Configuring Basic Leave Policies (Version 1)
Zoho People supports an advanced version of leave policy configuration(Version 2). Contact support@zohopeople.com to upgrade to the advanced version 2.
Advanced Settings
- Holiday and Weekend Settings
- Leave Restrictions
- Clubbing Policy
- Leave Balance Restrictions
- New Joinee Leave Entitlement
- Roll Over, Carry Forward Settings
- Expiry
Use cases
Initial Balance
New Leave Policy
New Leave types can be customized and created based on your organizational needs.
- From your home page, go to Leave > Settings.
- Click Leave Type and click Add to add a new leave type.
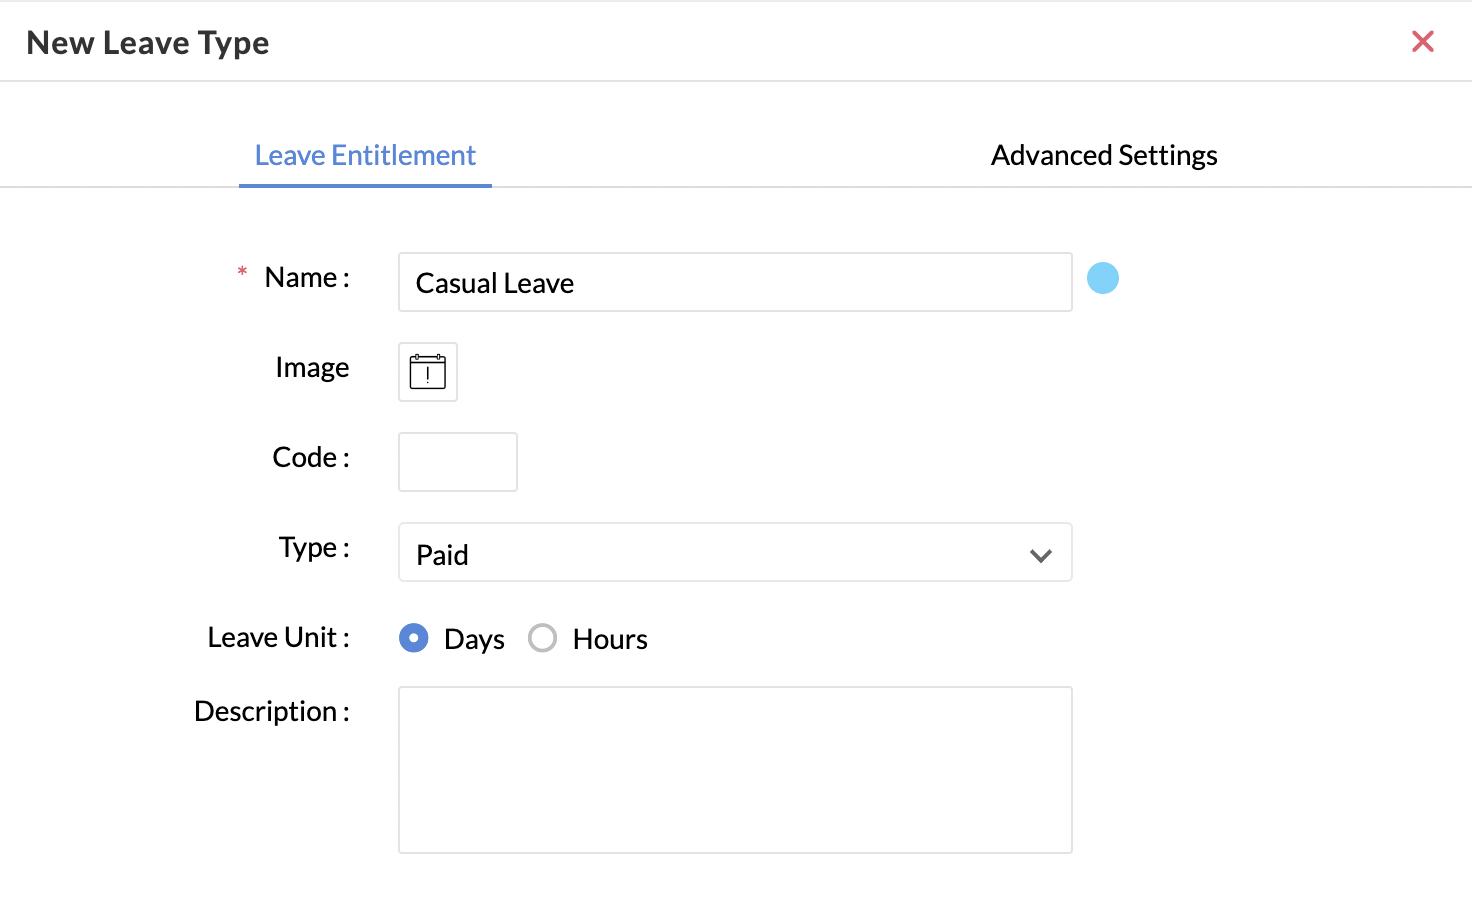
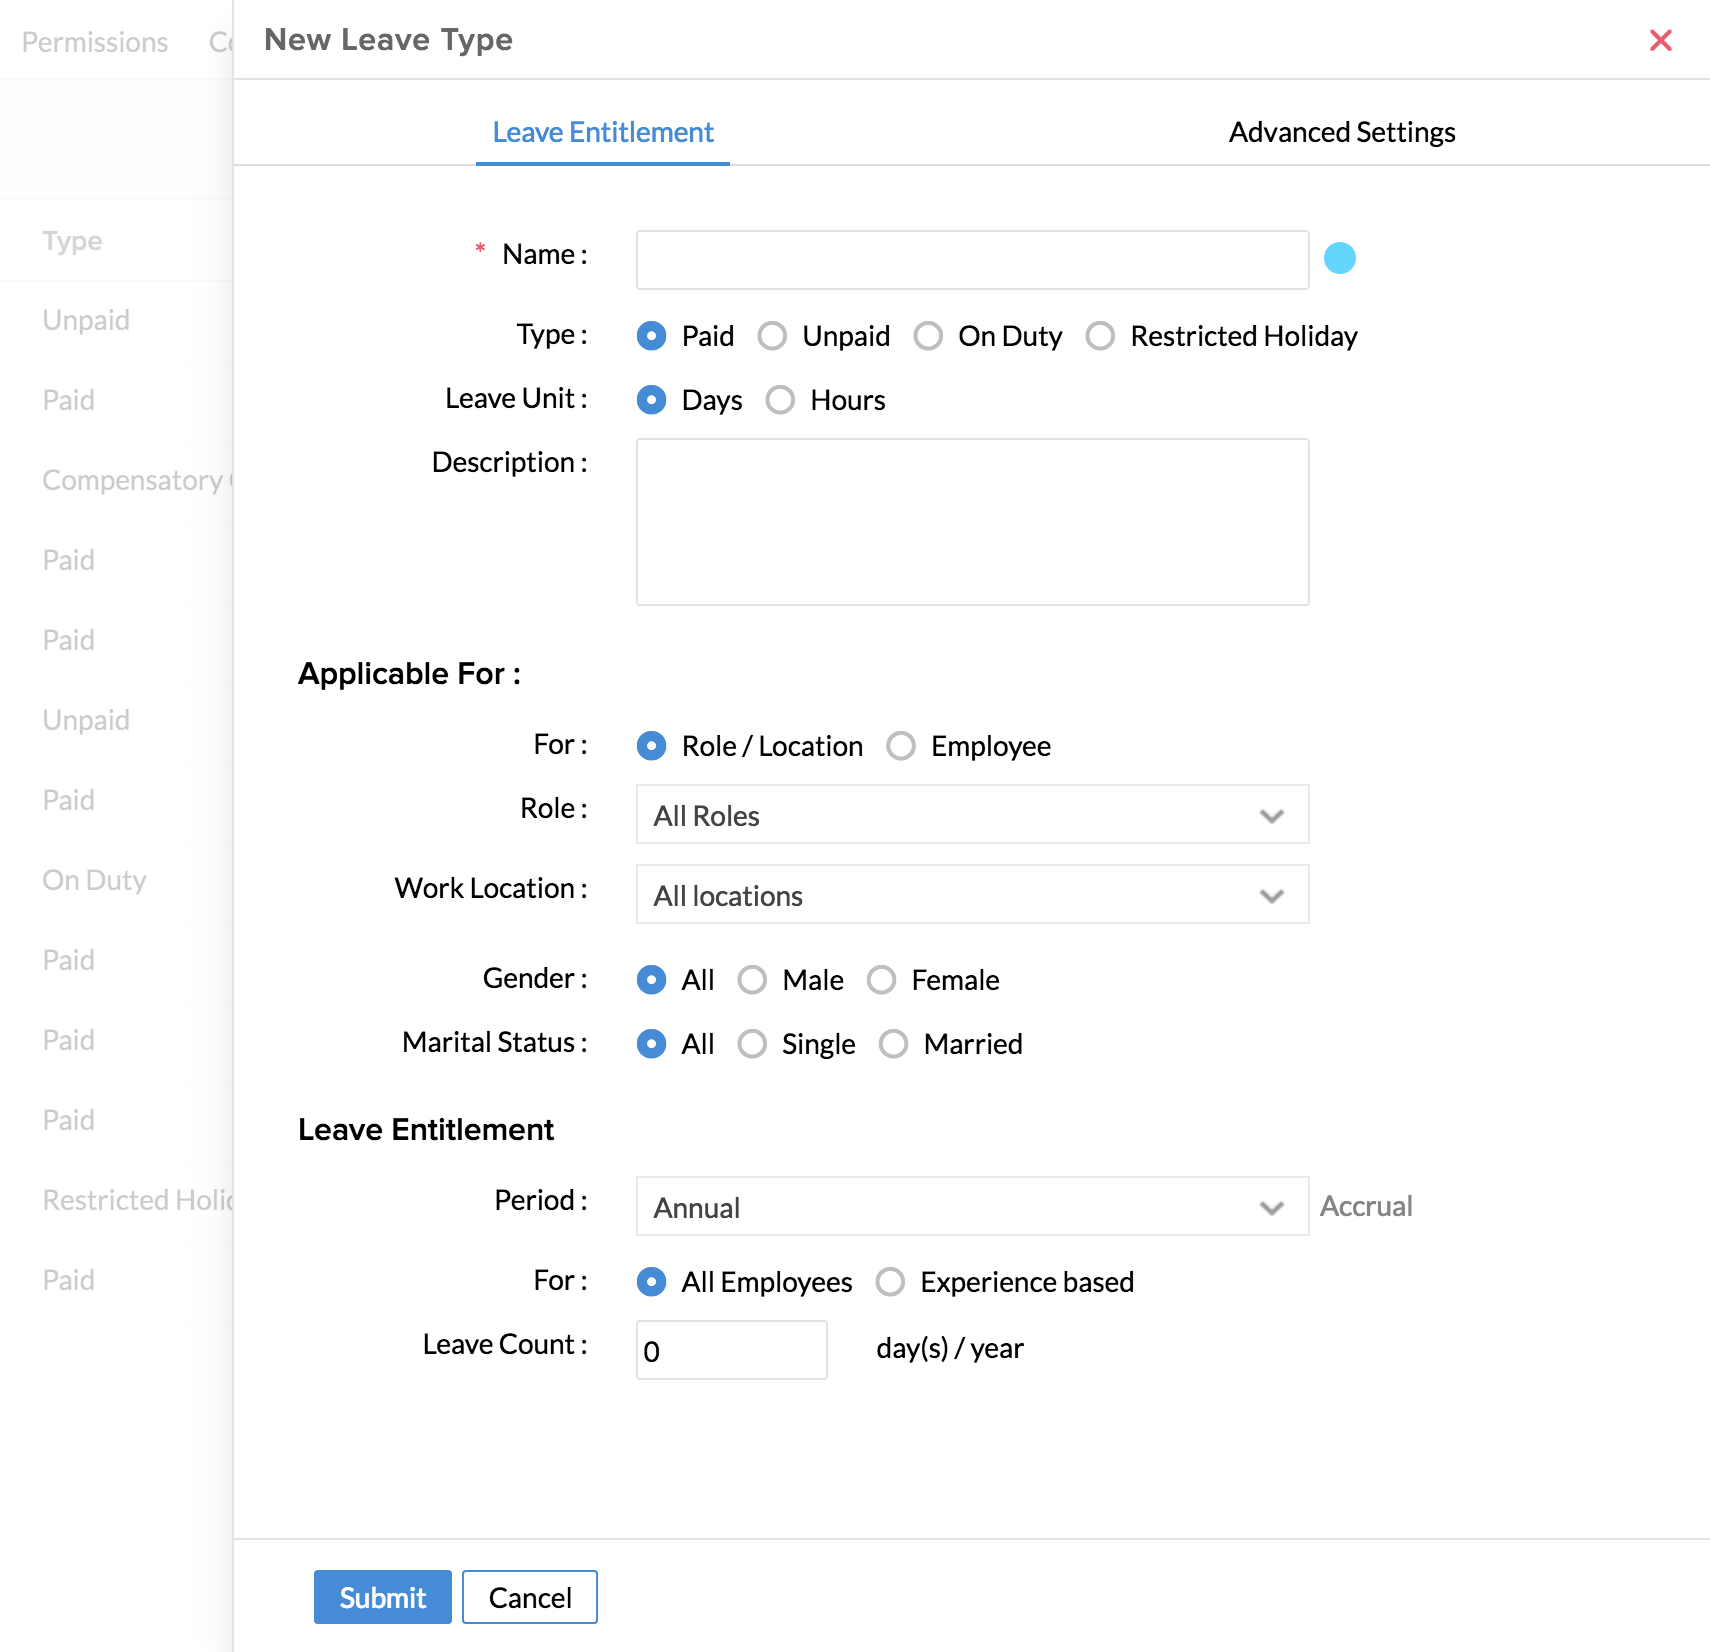
- Click Leave Entitlement.
- Under Type, you can define if the leave type is a paid or unpaid leave or if it falls under on-duty type.
- In Leave unit , you can define if the leave is based on the number of days or number of hours
Applicability
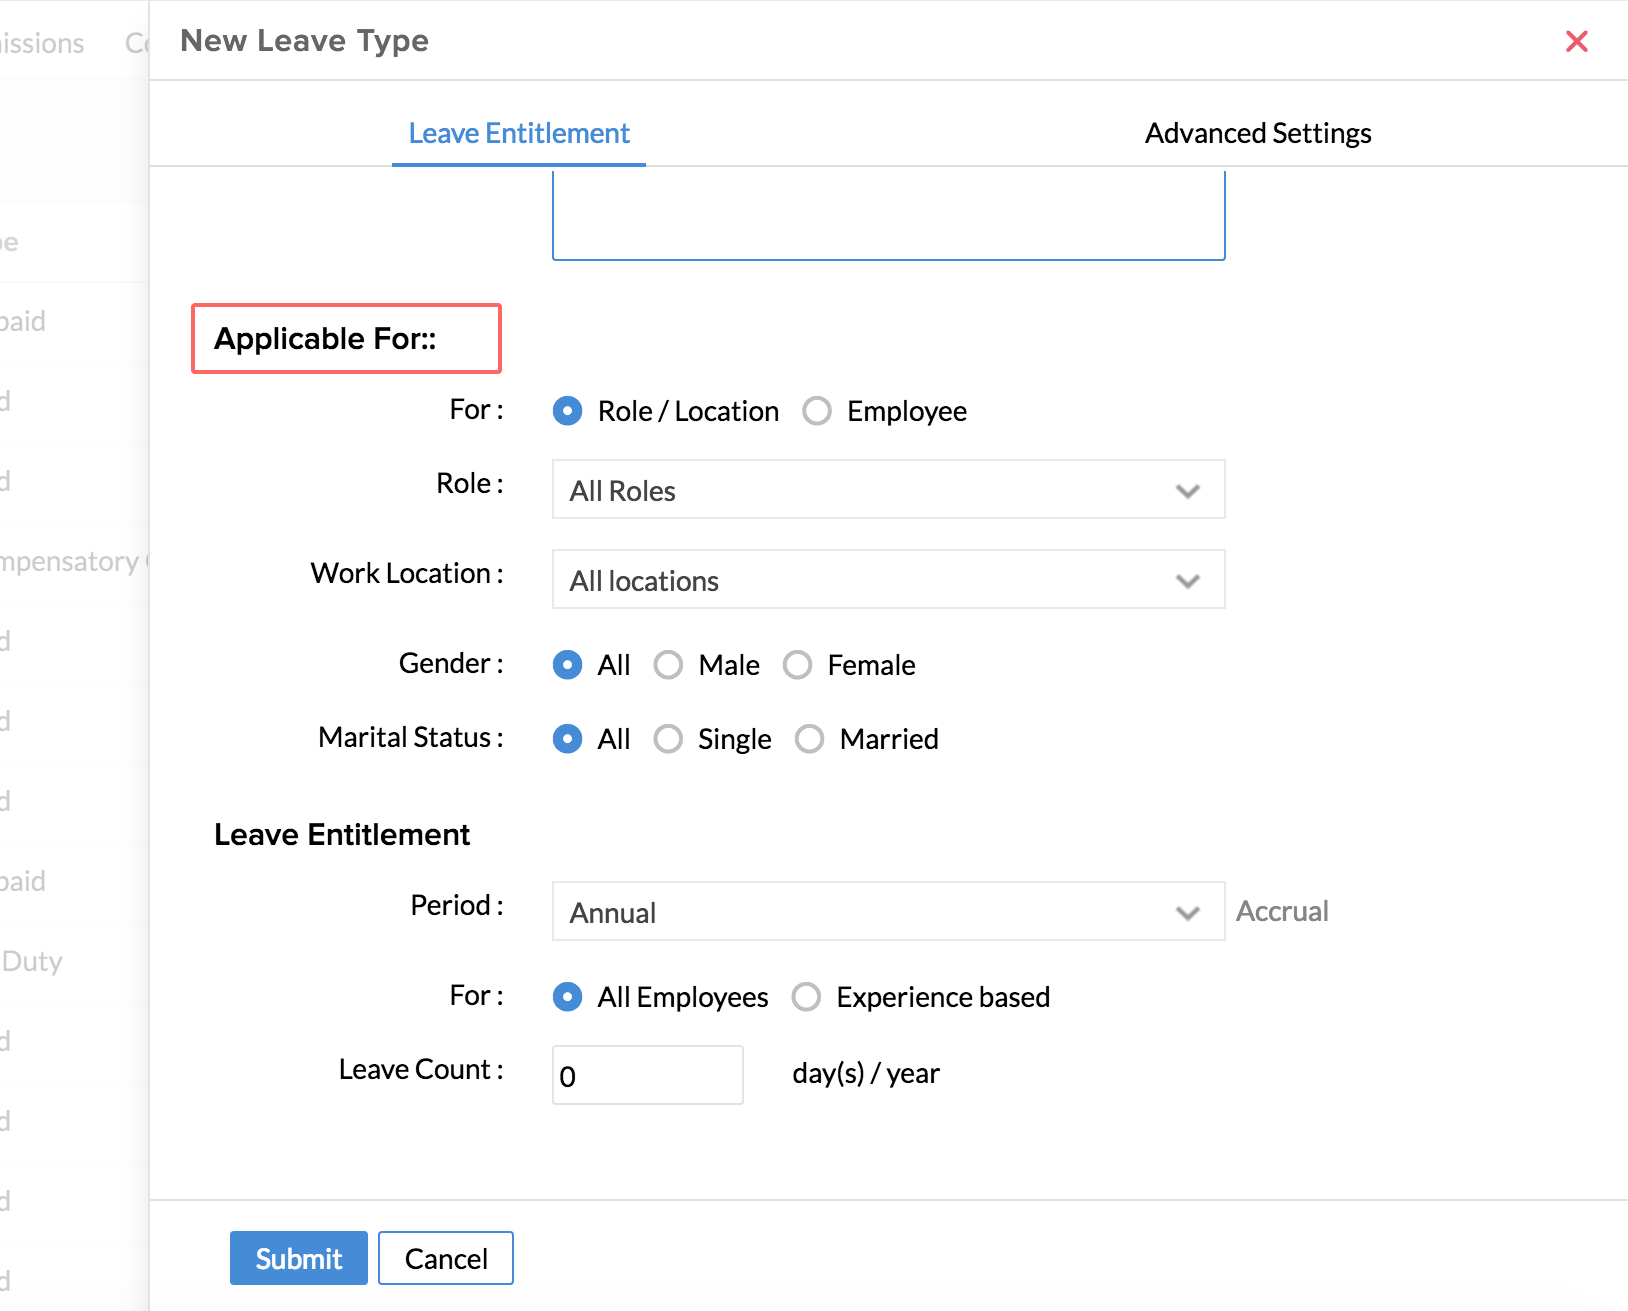
In this section, you have two divisions.
Using the first tab - 'Applicable For', you can decide on the list of employees who are eligible for this leave type. The list can be arrived at, by choosing from various options like Department, Designation, Location, Role, Gender etc. The second tab - 'Not applicable for' lets you list out the exceptions. If you would like to exclude a User or a Designation or Location etc, then you can define it here. This is useful in scenarios where you want to exclude a designation like 'Trainees' from being eligible for a particular leave type.

Leave Entitlement
Accrual configuration will entitle the leave balance to the employees in parts based on the selected period. Accrual refers to the number of days of leave you have in stock before it is being utilized within a time period. For eg, If your leave policy says that every employee is eligible to take one day leave at the end of every month, it means that the Accrual period is one month. You can define if the leave can be taken at the beginning or end of this accrual period and mention the number of days that can be taken.
![]() Tip: Click here to know more about Accruals.
Tip: Click here to know more about Accruals.
- Under For, you can choose if the leave is applicable for all employees and define the maximum number of days of leave that can be taken by all employees
- You can also define the number of days of leave for experienced employees alone. If you click on Experienced Employees, you will be able to see this screen
- Here, you can define the number of years of months that an employee must have completed being able to take a specific number of days as leave
- In Period, you can choose the period for which the leave is applicable for. You can set leave accruals also.
- Click Submit
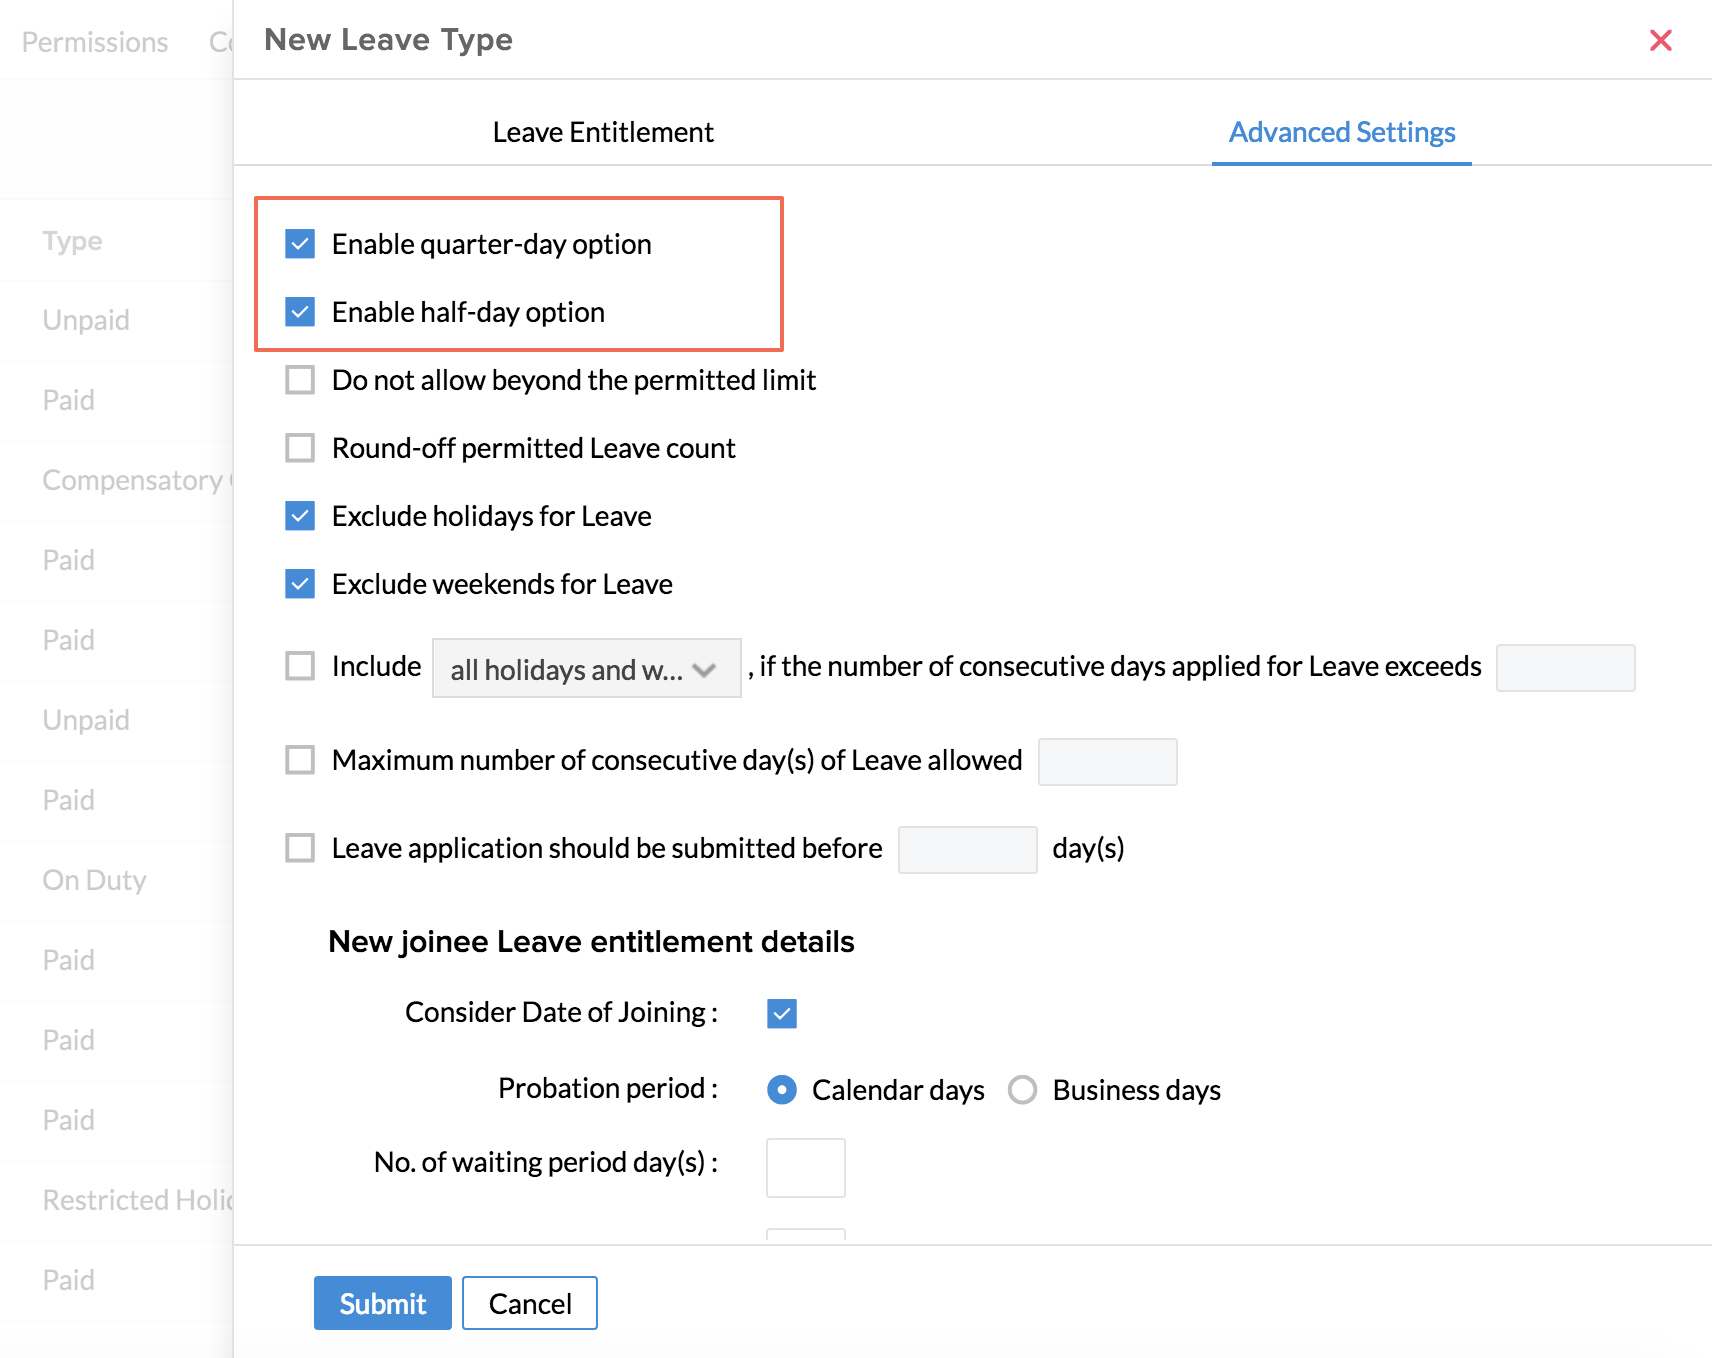
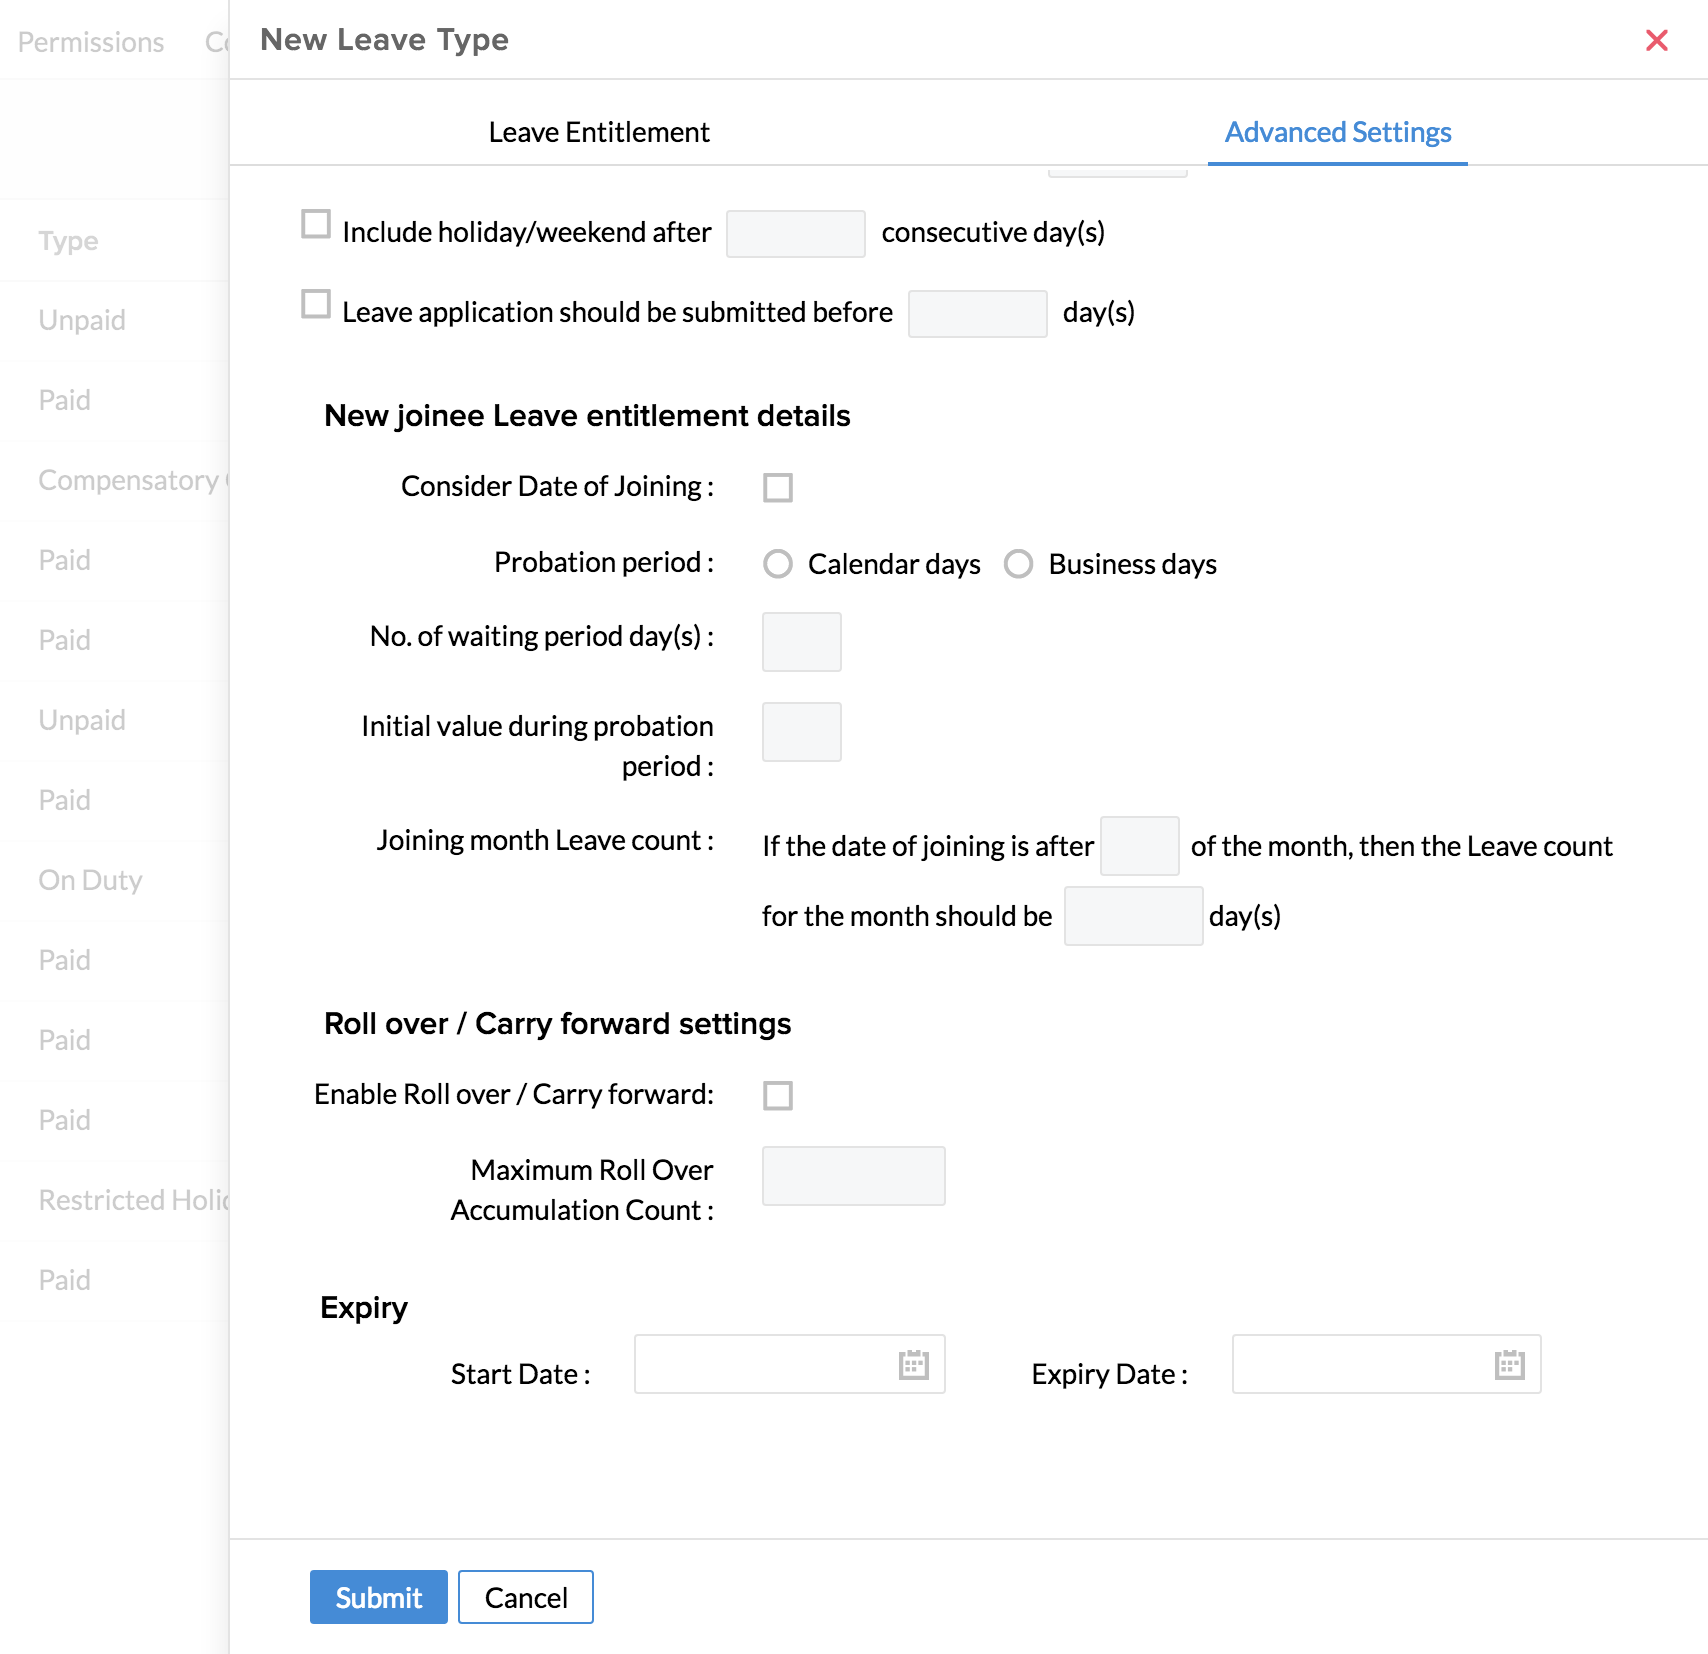
All the detailed settings for a new leave type are available under Advanced settings.
Leave Accruals
Accrual configuration will entitle the leave balance to the employees in parts based on the selected period. Accrual refers to the number of days of leave you have in stock before it is being utilized within a time period. For eg, If your leave policy says that every employee is eligible to take one day leave at the end of every month, it means that the Accrual period is one month. You can define if the leave can be taken at the beginning or end of this accrual period and mention the number of days that can be taken.
- From your home page, go to Leave
- Click Settings > Apply Leave type > Add
- Select other fields like For, Role, Work location etc based on your need
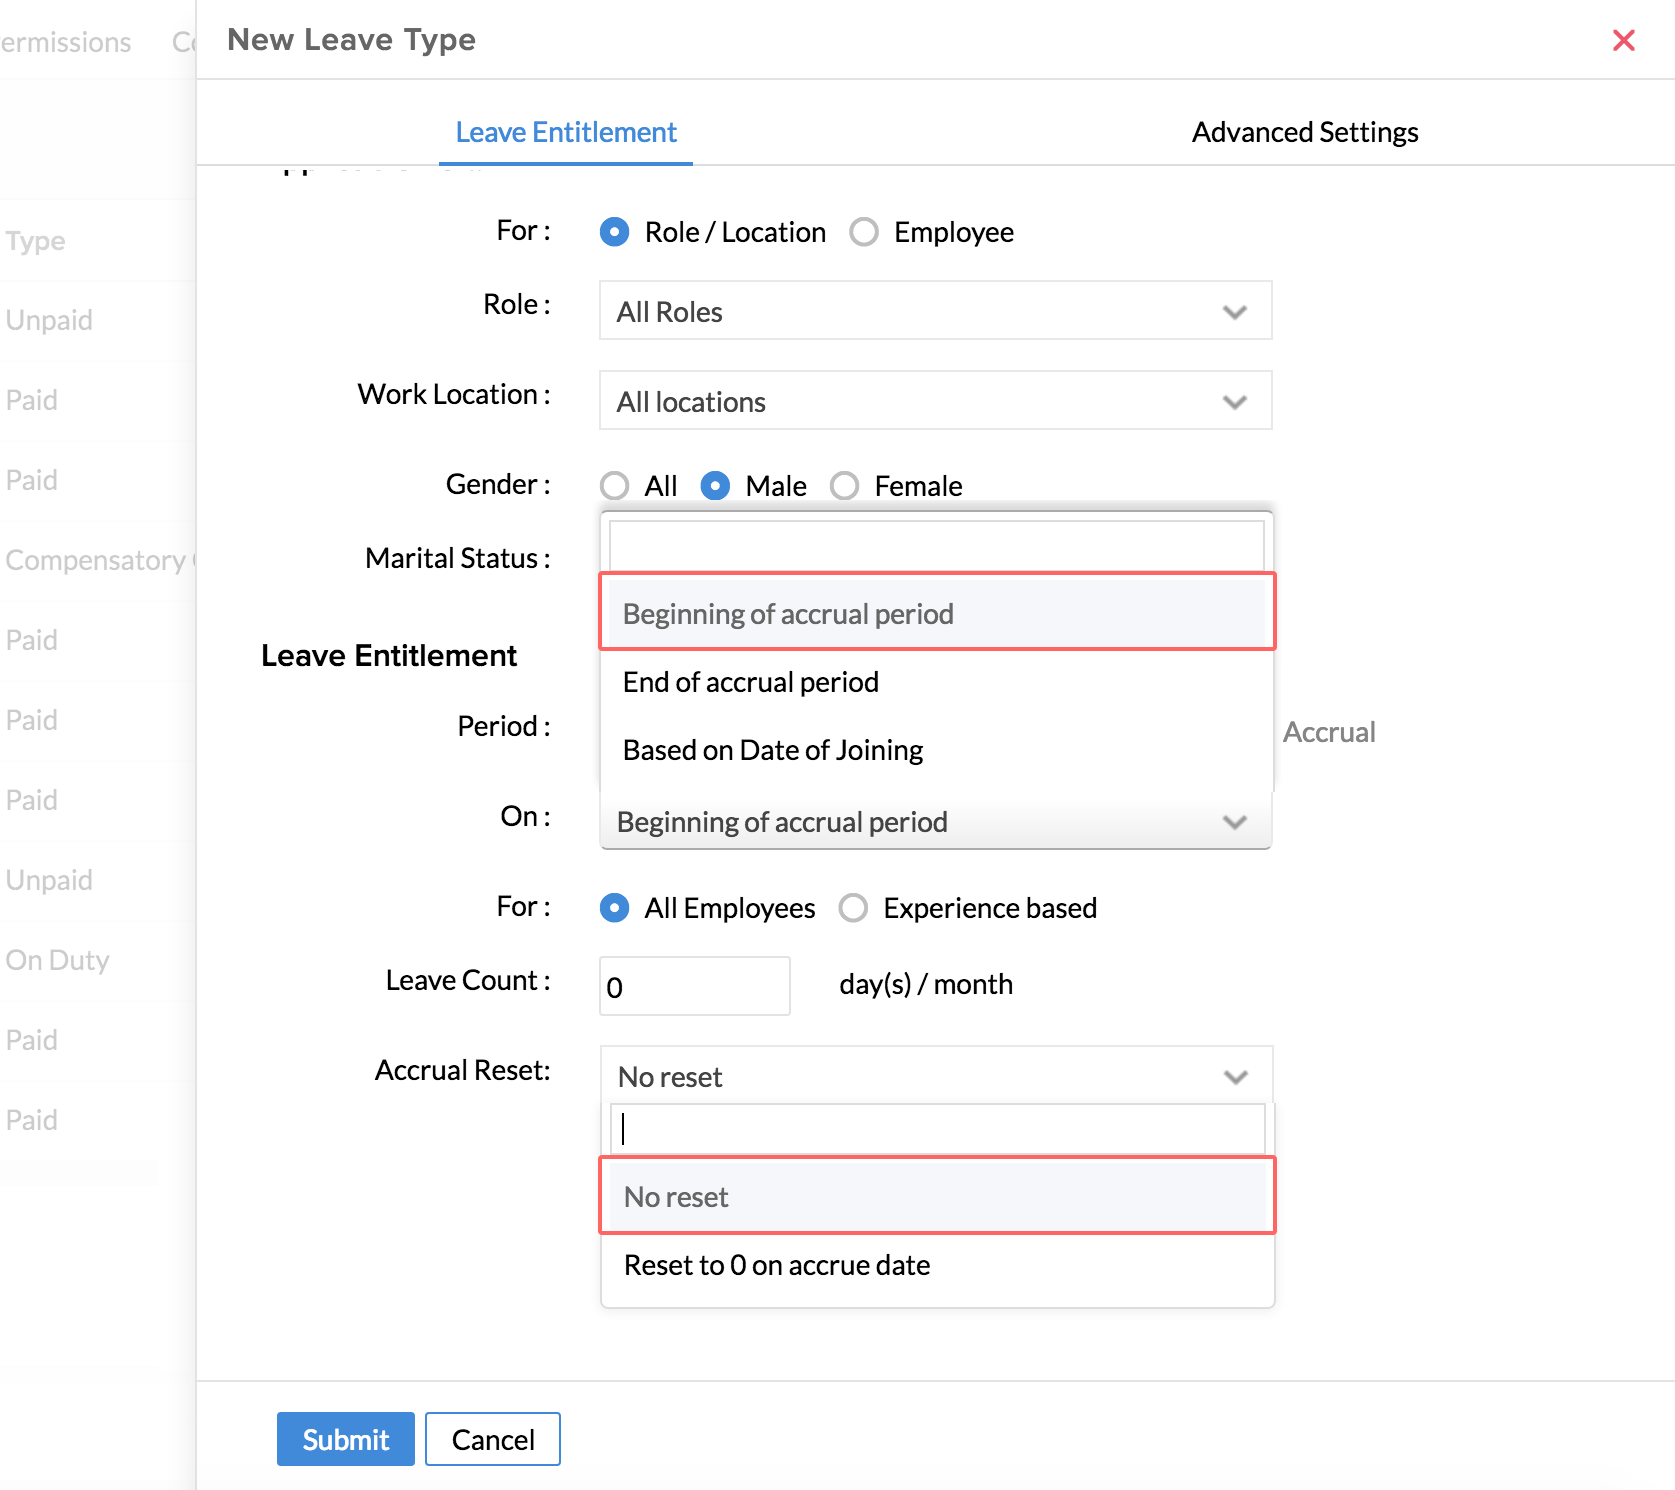
- Under Period, select the accrual period from the options that are listed - like Monthly, Quarterly etc. By choosing the accrual period, you are defining that the leave count that you will define is applicable only for this period
- Under 'On', select Beginning of accrual period or End of accrual period or Based on Date Of Joining
Note: If you select End of Accrual period, then employees will be able to take this leave only at the end of the month in this scenario. If you select the option, Based on Joining date, then the accrual period (monthly as chosen here) will be calculated based on that. I.e, one month will be from 5th of a month until the 5th of the next month.
- Select All employees or Experienced employees (Define various experience levels (years & months) and set maximum leave count for each experience level)
- Under Accrual reset, there are two options
1. No reset - which means that the number of days accrued will be carried forward to the next period.
2. Reset the Value - This option, lets you reset the accrual value to Zero, which means that the number of days accrued should be utilized within the accrual period. It cannot be carried forward beyond the accrual period
- Under Leave Count, enter Days or Hours in Apply Leave count (leave units)
You have now set leave accrual for your organization. You can go on to set other conditions by clicking Advanced Settings.
Leave accruals can be of many uses in instances as following.
Let us consider that an Organization A wants new joinees to be eligible for leave of 0.5 days per month. This applies to employees who have joined before the 15th of the month and this leave can be taken at any time of the month. For employees who have completed 6months of service, the organization wants to grant one day of leave per month to be taken in a month.
There is a condition that employees should not accumulate this leave to the next month.
Accrual settings can help you achieve this. Follow the steps given below.
- From your home page, go to Leave > Settings > Leave Type > Add
- Give a Name for the leave type
- Select the type and unit as per your need
- Give a description if needed
- Under Applicable for select the fields as per your need
- Under Period, select Monthly.
- Under On, select Beginning of accrual period.
Note: If you select End of Accrual period, then employees will be able to take this leave only at the end of the month in this scenario. If you select the option, Based on Joining date, then the accrual period (monthly as chosen here) will be calculated based on that. I.e, one month will be from 5th of a month until the 5th of the next month.
- Under Accrual reset, select Reset to Zero, because, as per our scenario, the organization does not want to roll over this leave beyond the accrual period
- Under For, select Experienced based and enter 0.5 for new joinees
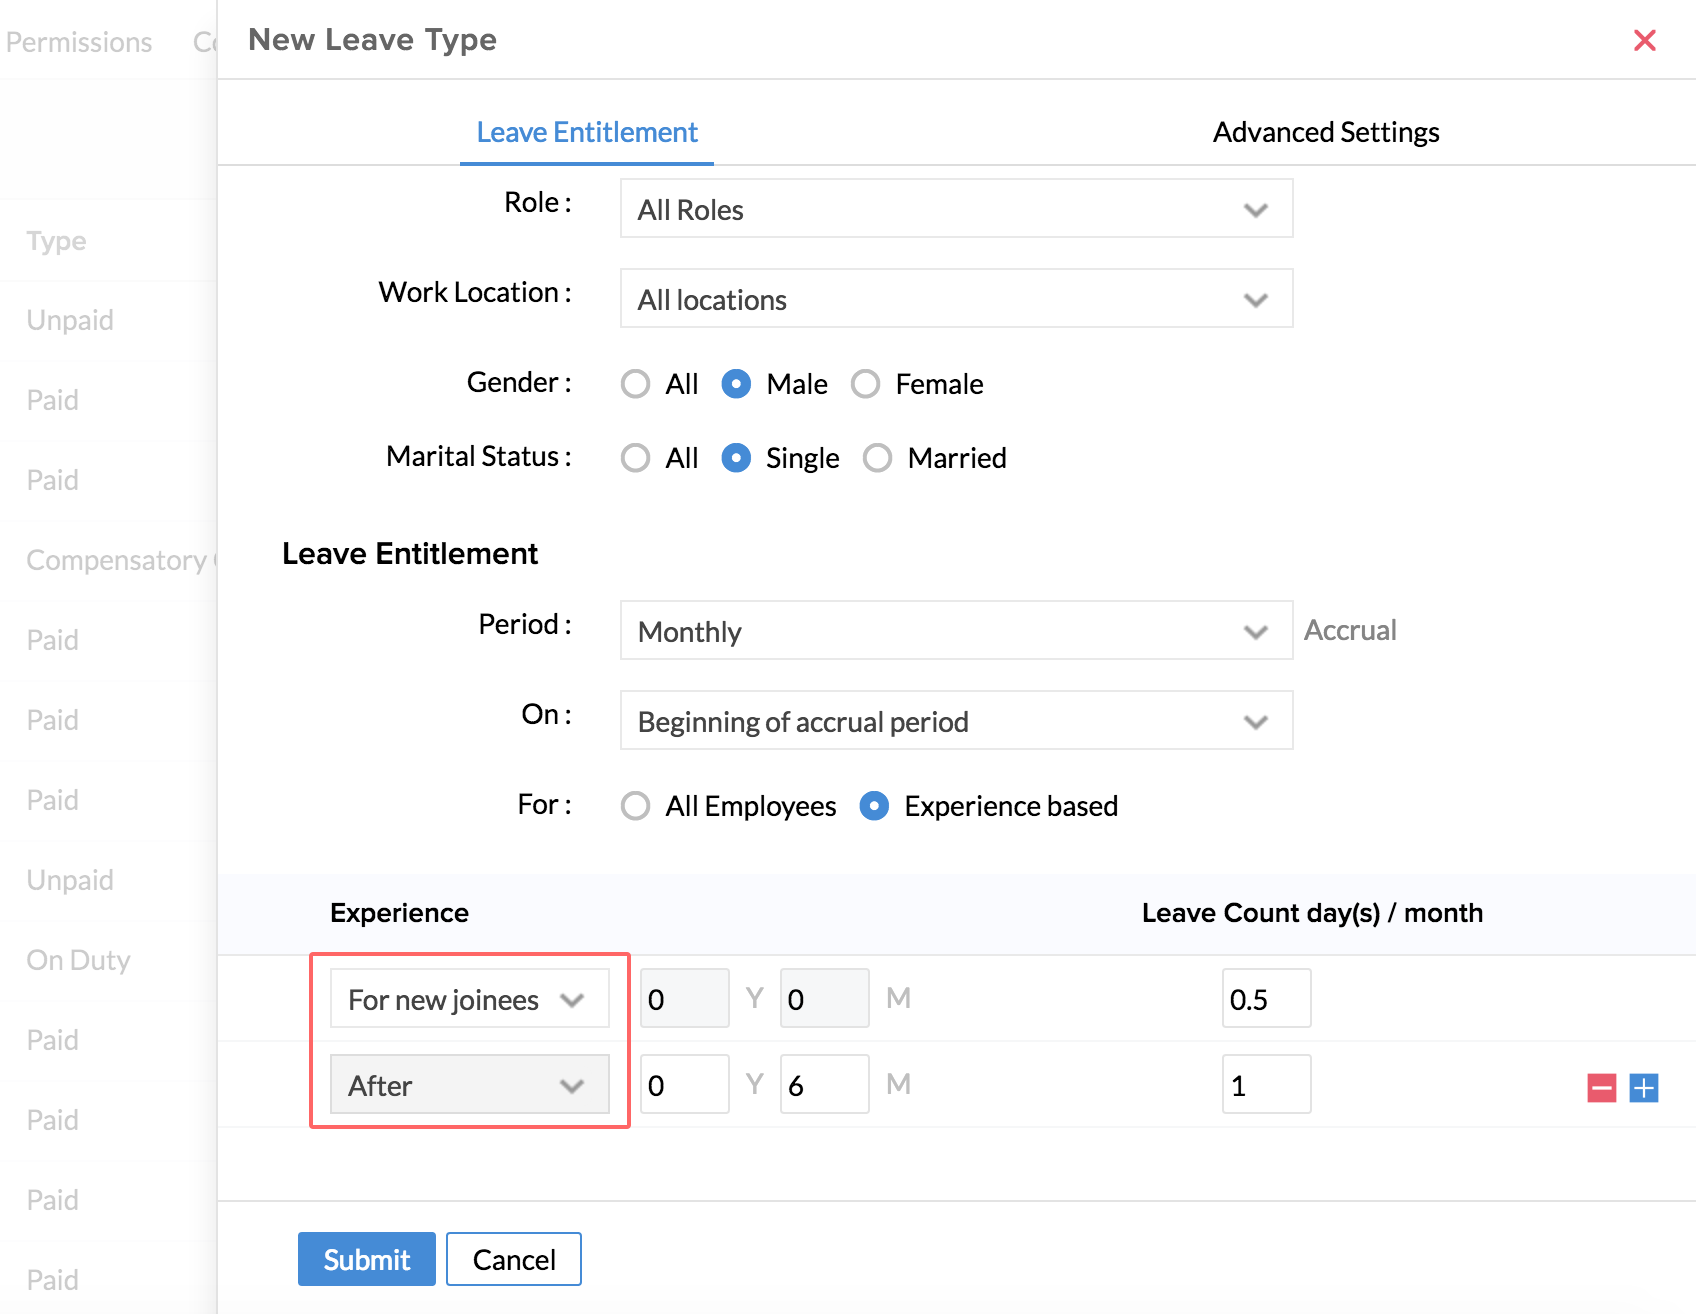
- Click the + icon to add another row
- Enter 'After' 6 months and give the value as 1
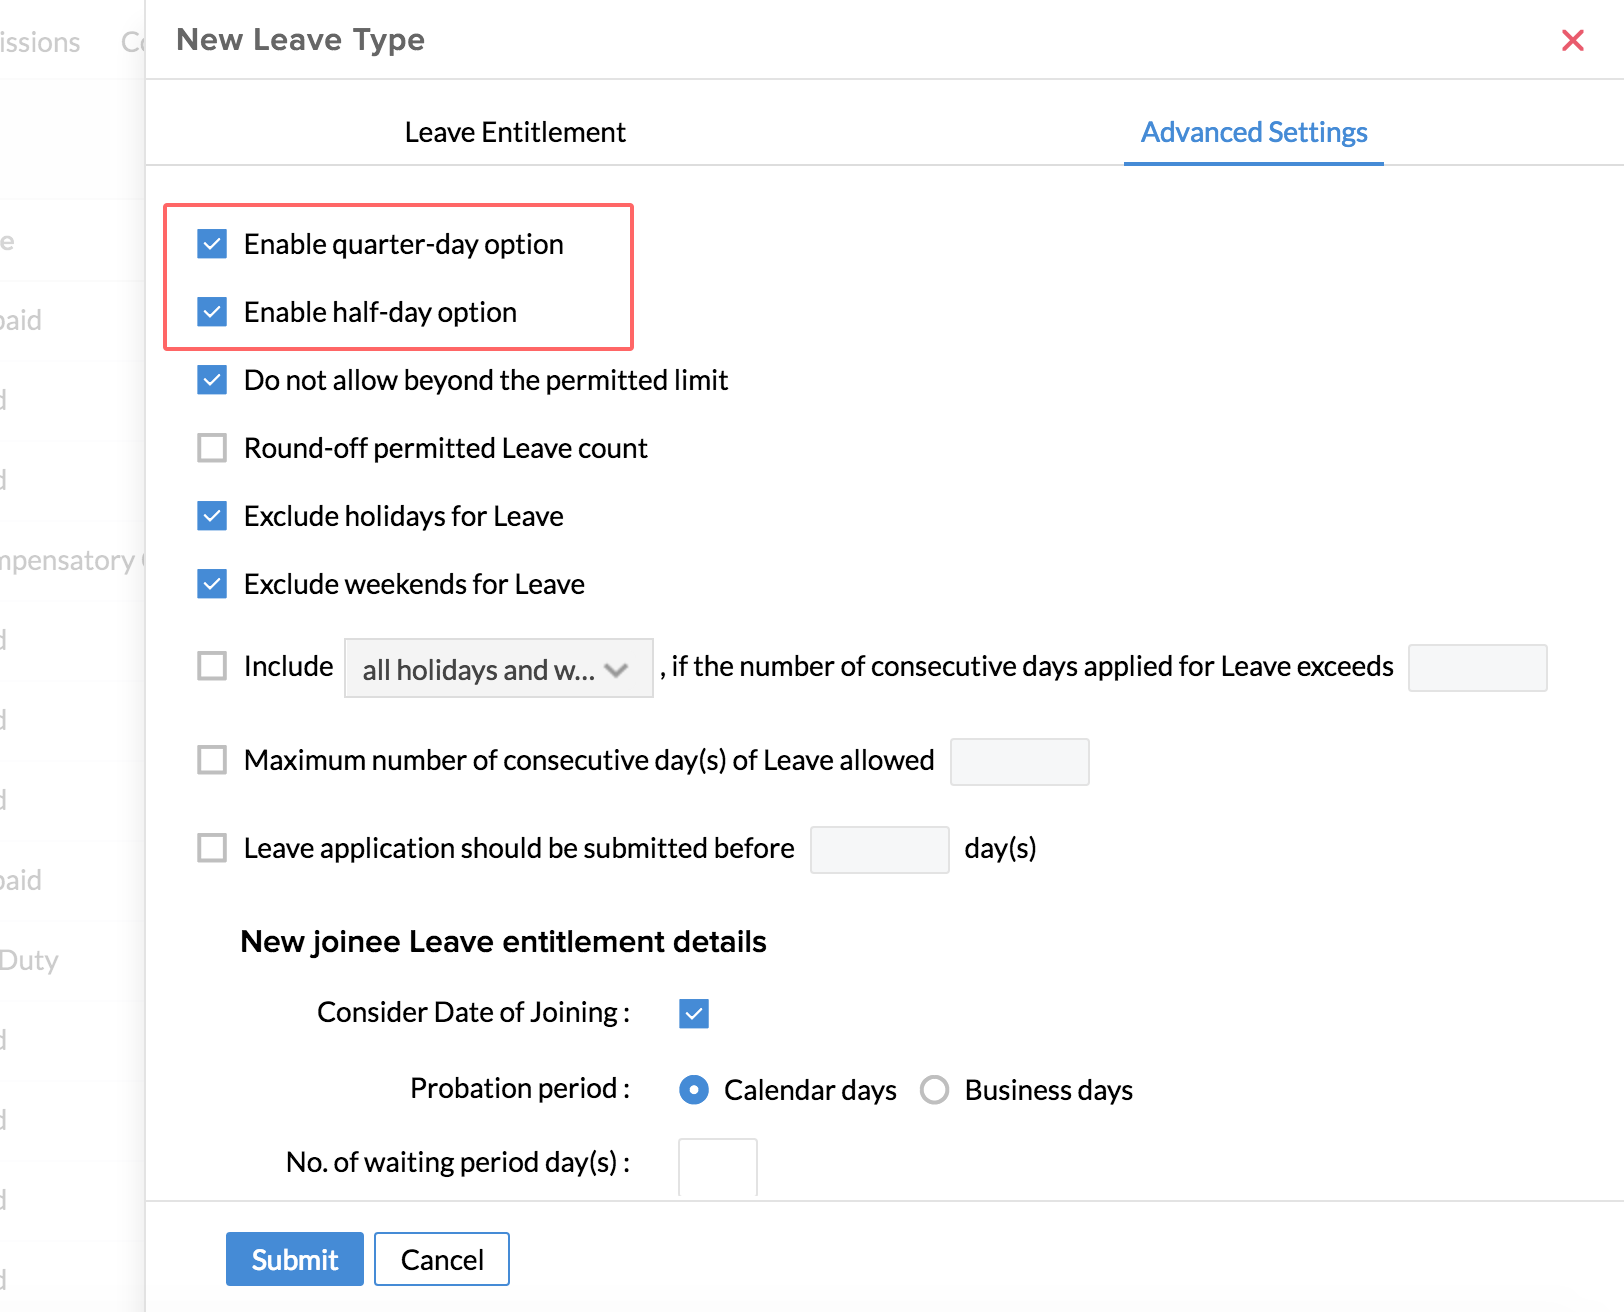
- Enable half-day or quarter-day option if needed.
- Under New Joinee Leave Entitlement Details, check Consider Date of Joining.
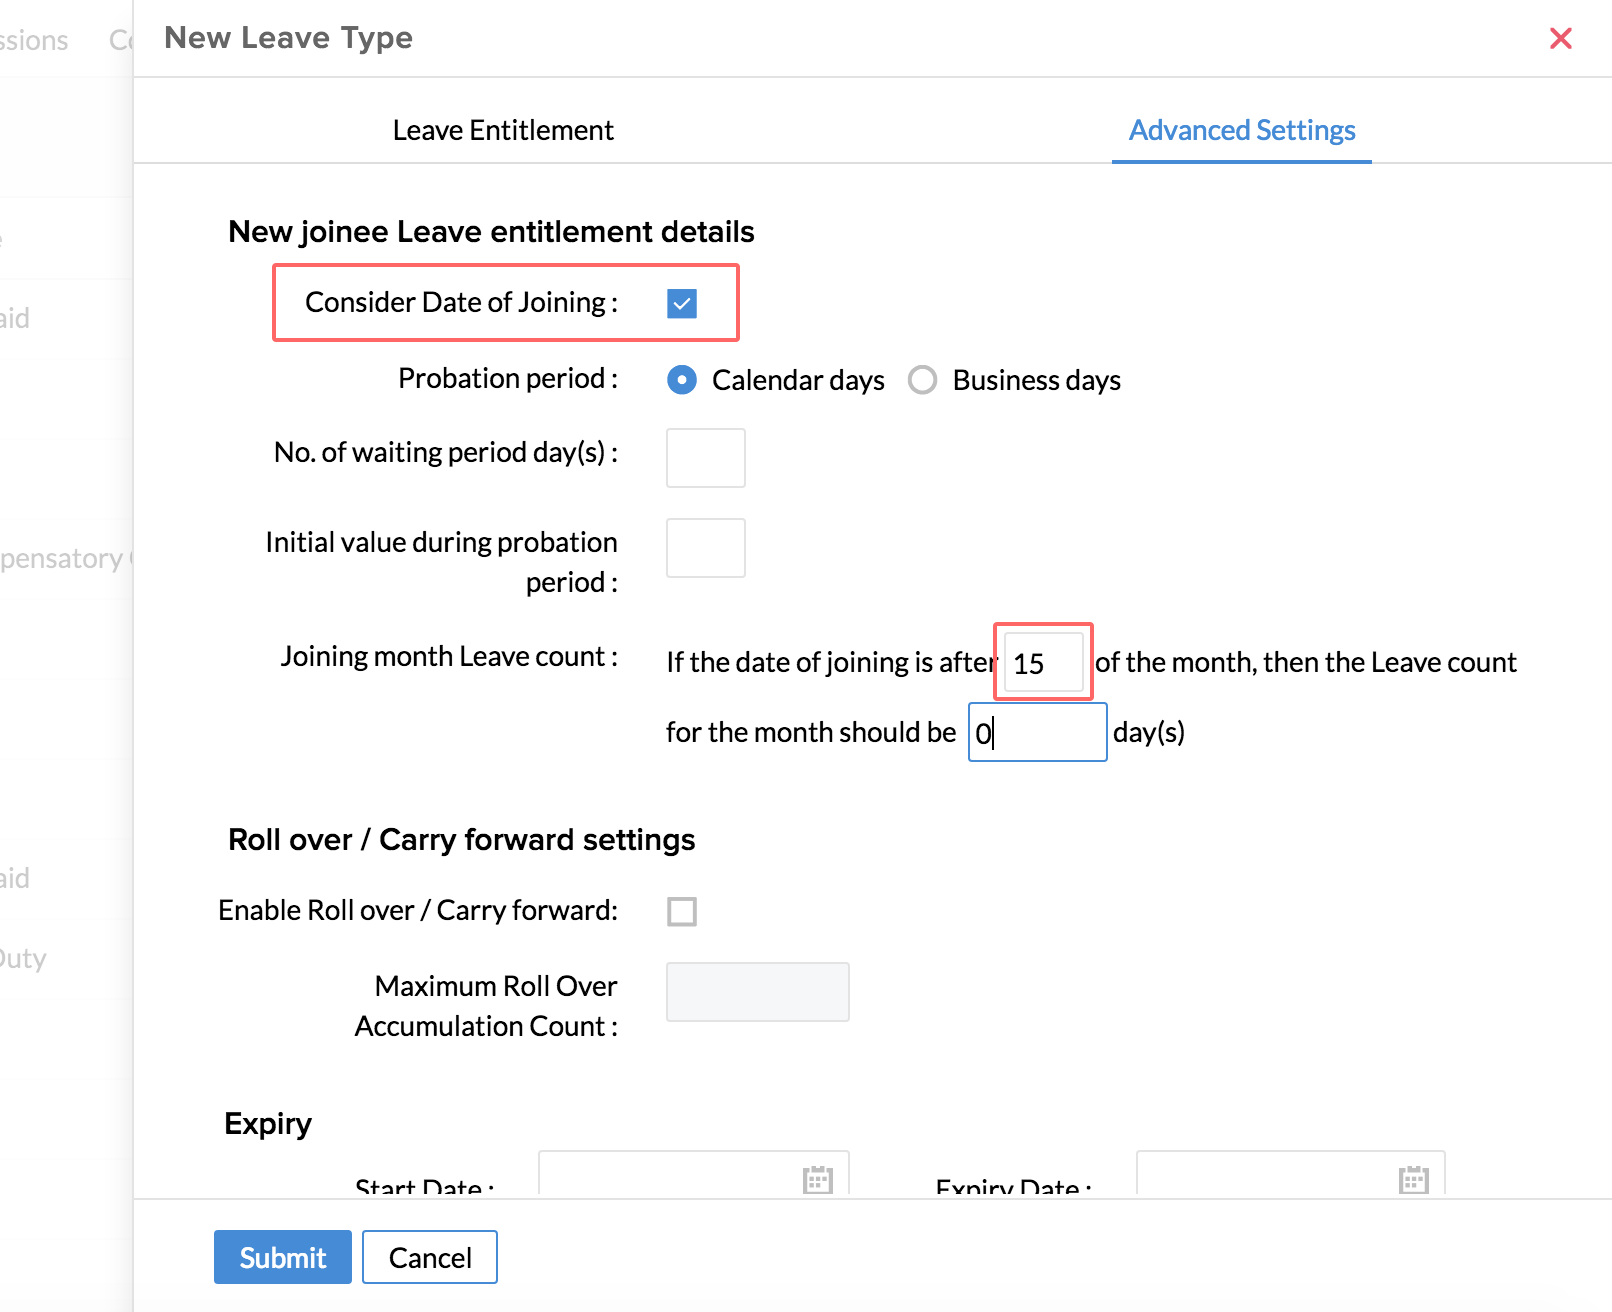
- Under joining month leave count, enter the value as 15 of the month, and give the value as 0 in days.
- Click Submit.
You have now configured leave accrual for new joinees and for experienced employees.
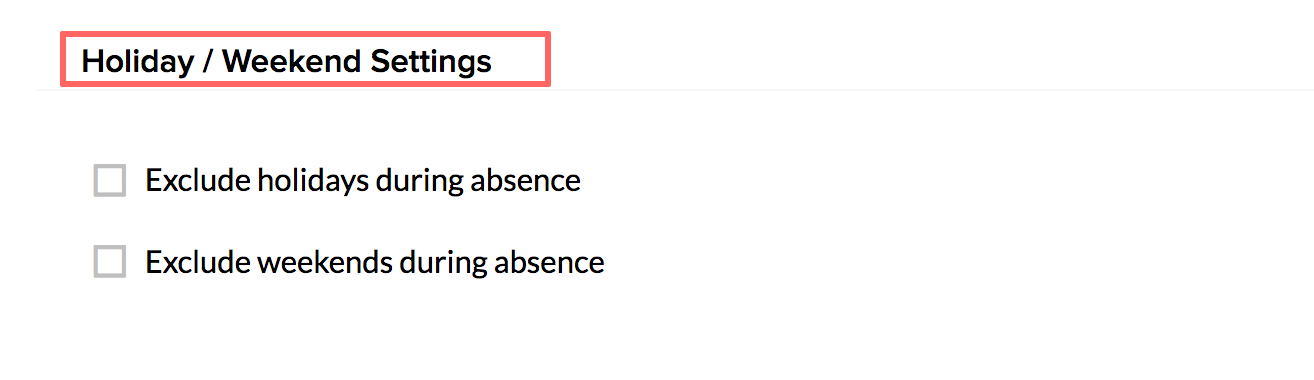
Holidays and Weekends settings
While creating a new leave type, you have three options with respect to weekends and holidays, as explained below.
- You can include all the weekends and holidays - In this case, you do not have to check the boxes 'Exclude holidays for leave' and 'Exclude weekends for Leave'. All the weekends and holidays will be included when an employee applies for leave.
- The next option is for you to Exclude the weekends and holidays - In this case, all the holidays and weekends will be excluded irrespective of the number of days of leave applied for. To enable this option, check the box 'Exclude holidays for leave' and 'Exclude weekends for leave'
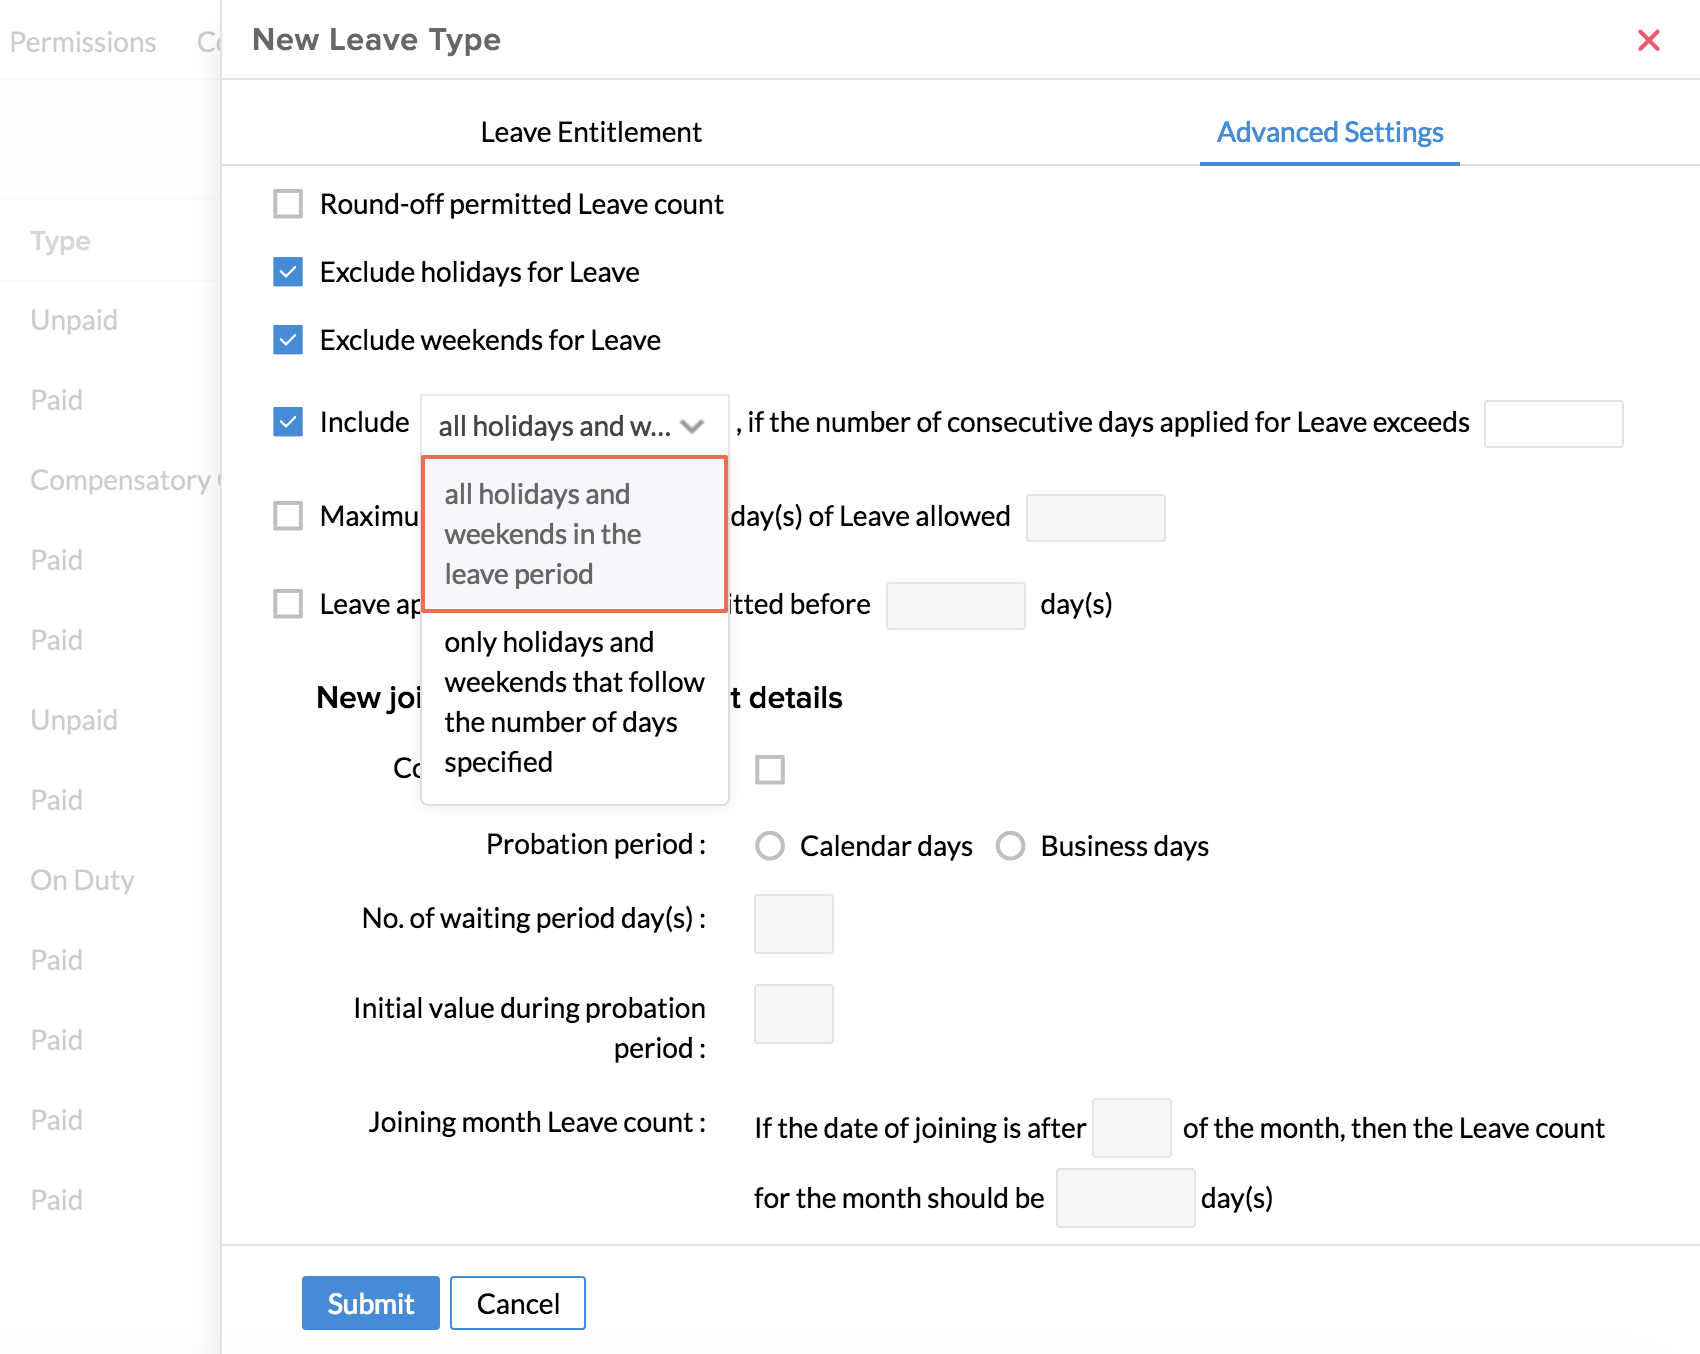
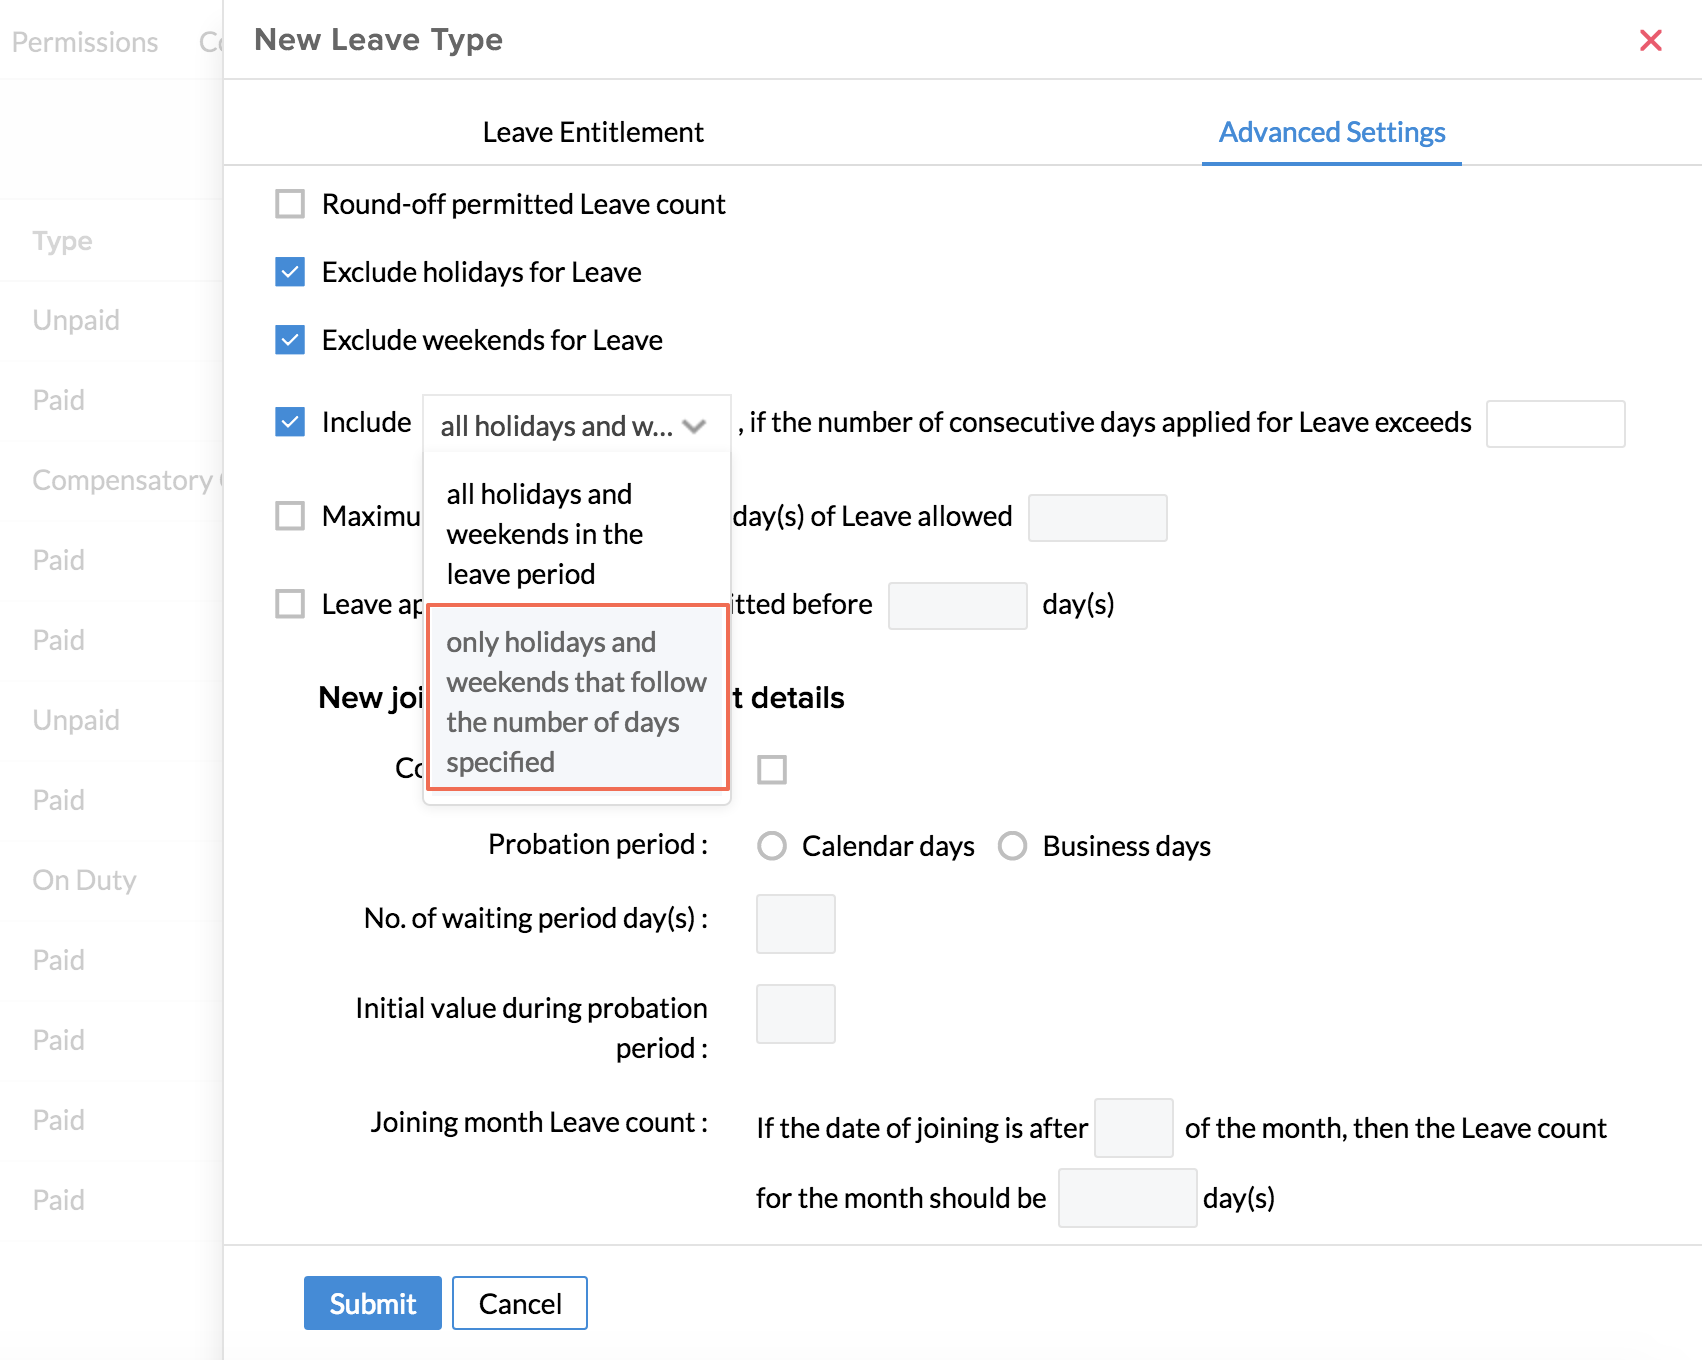
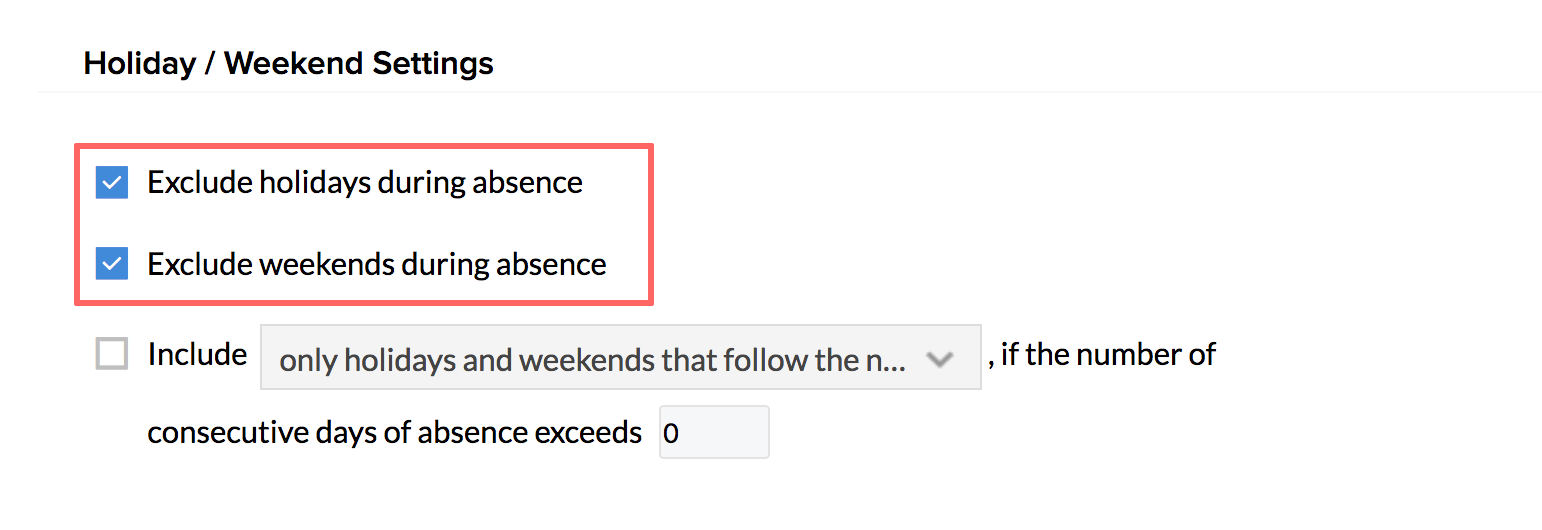
The last option is that you can choose to include weekends and holidays only when the number of days of consecutive days of leave exceeds the number of Calendar/Business days specified by you. If you choose to use this option, you can further drill down to define the following.
a. Include all the weekends and holidays in the leave period - Let us consider an example here.Let us assume that 25 of the month falls on a Monday and it is a holiday. You have defined (while adding the leave type), that, if the total number of days of leave applied exceeds 4 BUSINESS days, then all the weekends and holidays in this period should be included. In this scenario, the total number of days of leave taken by the employee will be calculated as follows:
- Number of consecutive days of leave after which all weekends/holidays should be included- 4 days
- Period for which leave is applied - 22 to 27
- Number of weekends in this period - 2 days (23, 24)
- Number of holidays in this period - 1 (25)
- No of days of leave that will be calculated - 3 days (22, 26 & 27) . We will not be including the weekends (23 and 24) and holiday (25) because the total no of days of leave applied is within four BUSINESS days
Consider the same scenario with one change. Assume that you have defined (while creating the leave type) that all weekends and holidays should be included if the total no of days of leave exceeds 4 CALENDAR days. In this scenario, the leave will be calculated as follows.
No of days of leave that will be calculated - 6 days (From 22 to 27). We will be including the weekends (23 & 24) and holiday (25) because the total no of days of leave exceeds 4 CALENDAR days
b. Only the holidays and weekends that follow the number of Business/Calendar days specified - Let us consider the same example to explain this option.
Let us assume that the 25th of the month falls on a Monday and it is a holiday. You have defined that the maximum number of consecutive days of leave after which weekends/holidays will be included is 4 BUSINESS days. In this scenario, the total number of days of leave taken by the employee will be calculated as follows:
- Number of consecutive days of leave after which weekends/holidays should be included - 5 business days
- Period for which leave is applied - 22 to 27
- Number of weekends in this period - 2 days (23 & 24)
- Number of holidays in this period - 1 (25)
- No of days of leave that will be calculated - 3 days (22, 26 & 27) because we are considering ONLY the holidays and weekends that follow the maximum no of days of consecutive business days of leave after which holidays/weekends will be included. We will not be considering the 3 days (23, 24 and 25) of weekends and holiday here because these three days are within the 4 business days of leave.
Consider the following example. Assume that, you have defined (while creating the leave type) that the holidays and weekends that follow a total of 4 Calendar days of leave should be included.
- Period for which leave is applied - 22 to 1
- Number of weekends in this period - 4 days (23, 24, 30 & 31)
- Number of holidays in this period - 1 (25)
- The number of days of leave that will be calculated - 8 days (22, 26, 27, 28, 29, 30, 31 and 1)
Here, we are not including the weekends 23, 24 and the holiday 25 because these days are within the first four Calendar days of leave applied. However, we will include the weekend 30 and 31, because these two days follow the four Calendar days as defined while creating the leave type.
Note: In case of shifts, shift based holidays and weekends will override the general holidays and weekends configured for the organization in all of the 3 options listed above.
Leave Restrictions
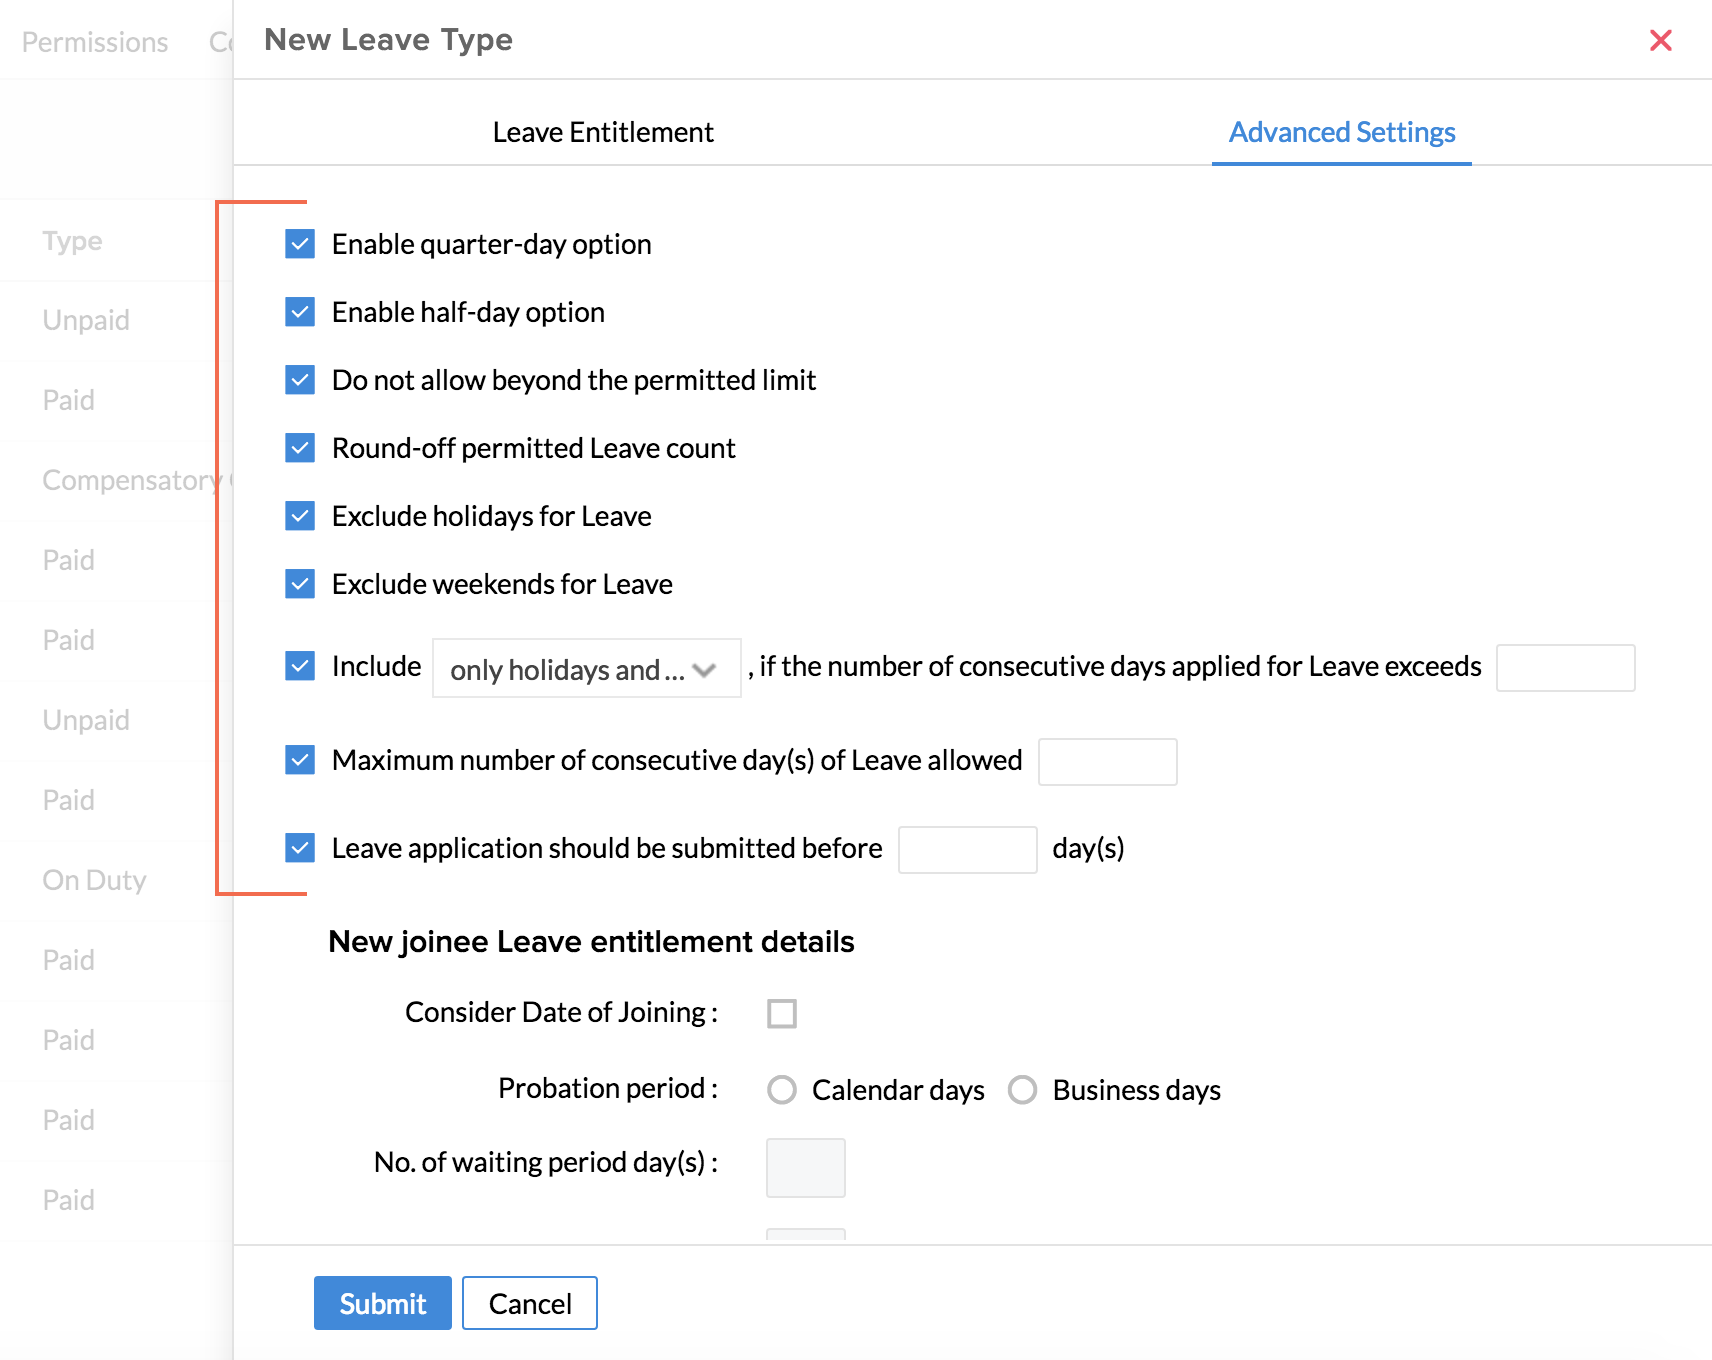
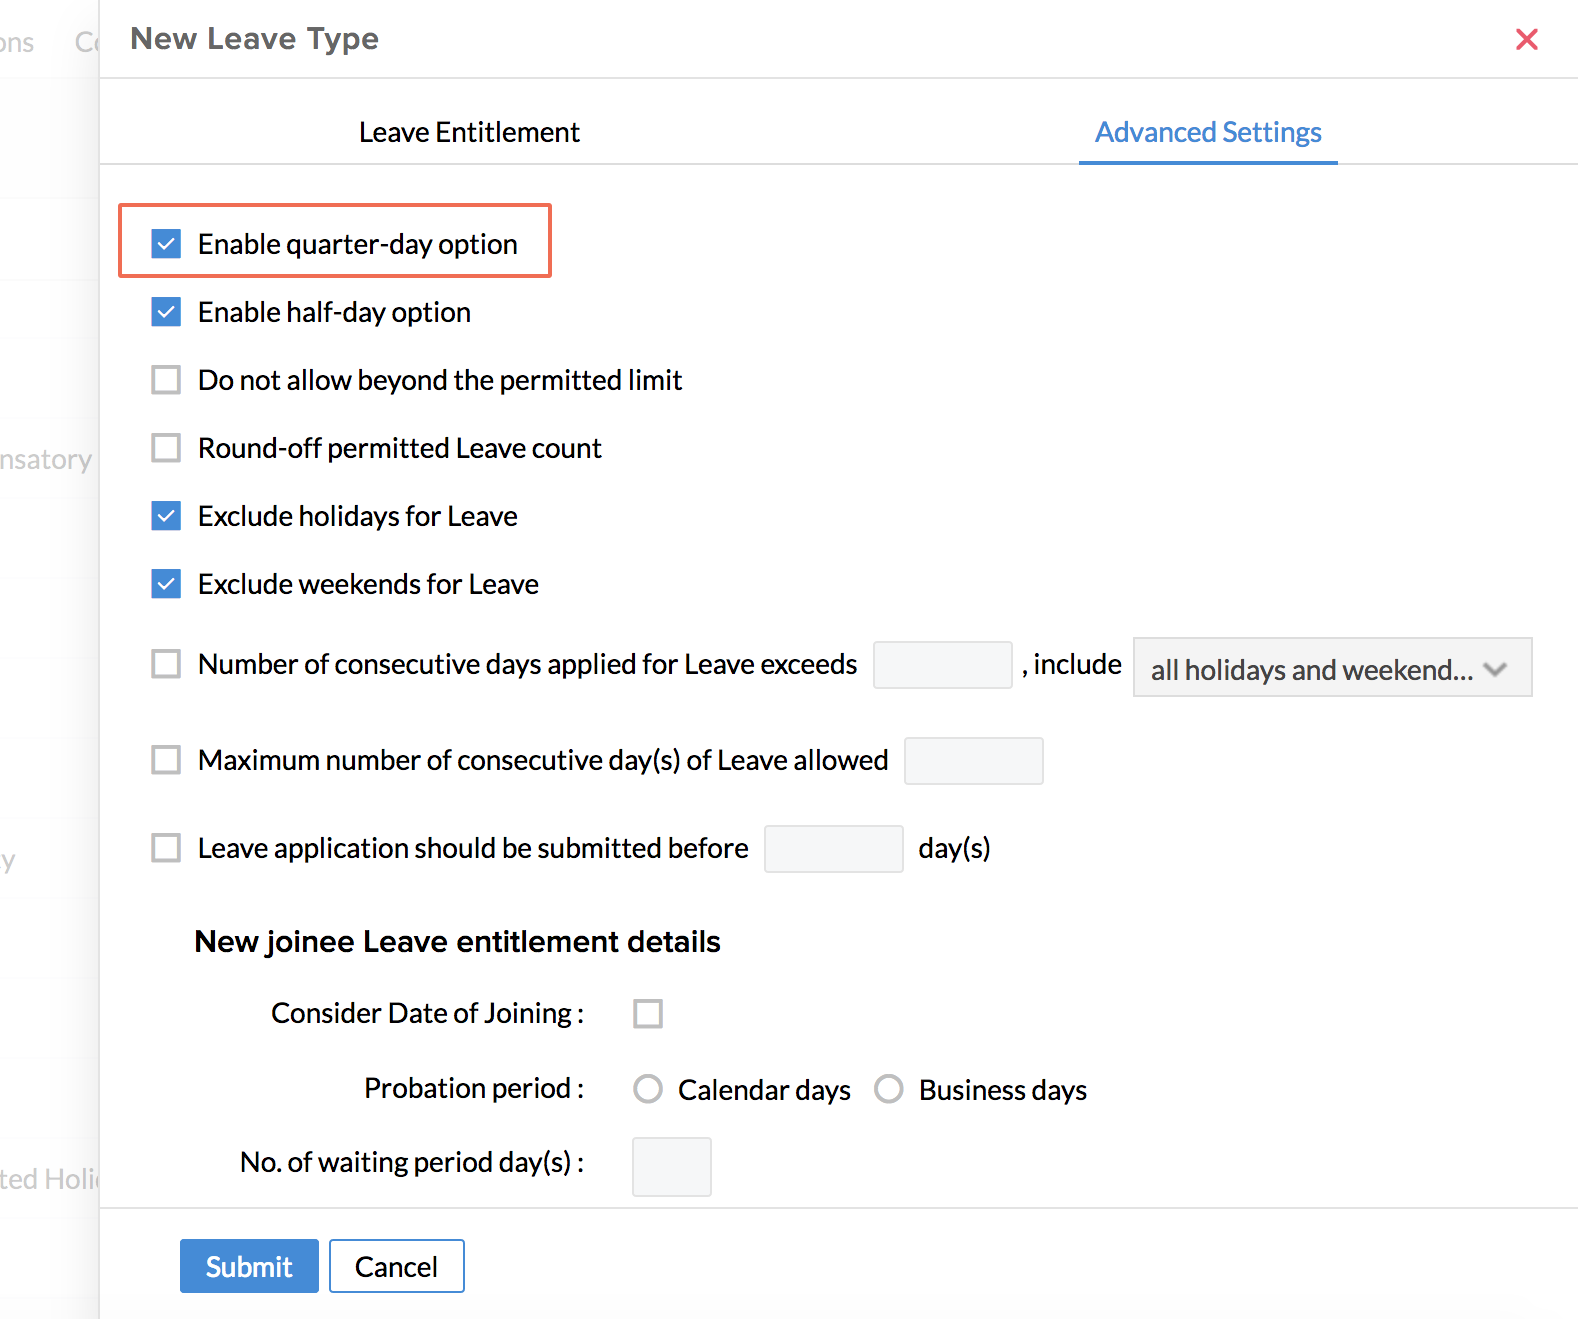
- Enable quarter-day option - If this is enabled, then the employee will be able to apply for leave for a quarter of the day
- Enable half-day Option - If this is enabled, then the employee will be able to take half day leave
- Maximum Number of Consecutive Day(s) of Leave Allowed - Here, you can define the number of consecutive days of leave allowed for this particular leave type
- Leave Application Should be Submitted Before - This option is most useful when employees go on planned leave. This option helps in better planning in case of absence of an employee
- Enable file upload option if applied leave period exceeds __ consecutive days - This option can be used in cases like Sick Leave, where you want the employee to upload a medical certificate if he/she applies for more than X no of days
- Round-off leave value to - There are three options here, Nearest, Maximum and Minimum. This lets you round-off the applied leave count to a value.Assume that there is an annual entitlement of 17 days for a leave type, with the organization's calendar year set as Jan - Dec. When an employee joins the organization in the month of November, he/she will have an eligibility of 1.4 days per month. This being the case, under Settings, if you have selected Nearest, then the eligibility value will be considered as 1. If you have chosen Maximum, then the eligibility value will be considered as 2 and if you have chosen Minimum, it will be considered as 1.In case you have enabled Half- day option, and you have selected Nearest, then in the same scenario, the value will be considered as 1.5. If you have chosen Maximum, it will be 1.5 and if you have selected Minimum, then the value will be 1.
To add restrictions to a leave type,
- From Home, go to Leave > Settings > Leave Type > Add
- Click Advanced settings
Under the first section, you can select the type of restrictions you need to set for the leave type.
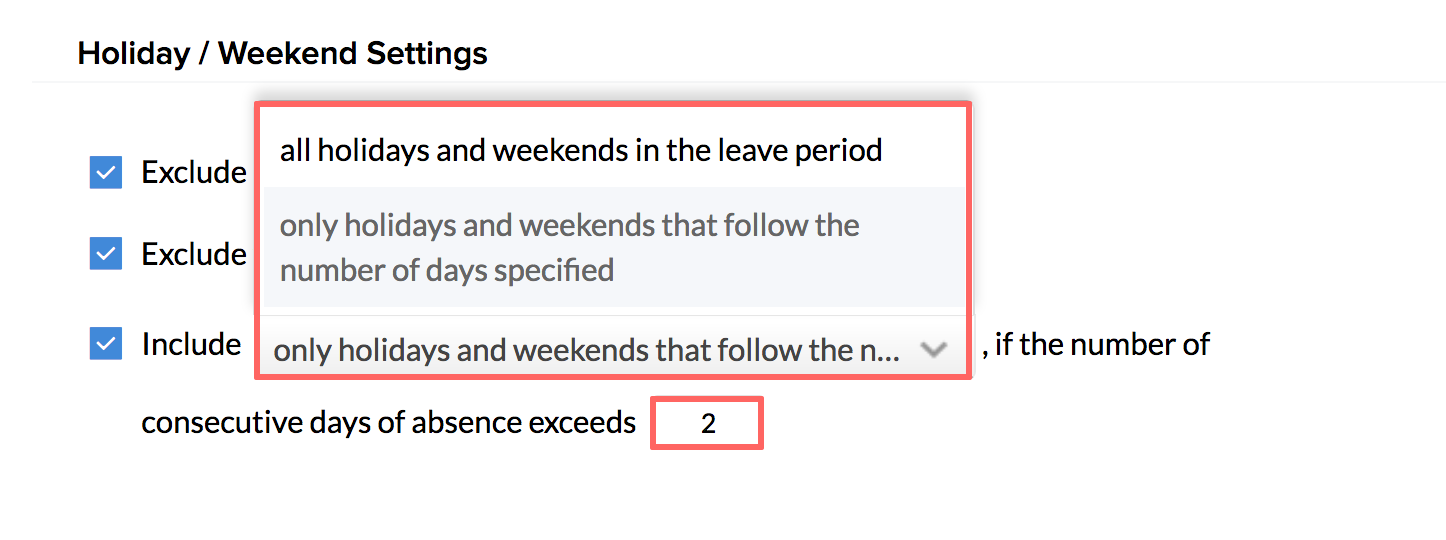
1. Include all holidays and weekends in the leave period - If you select this option, it means that you are including ALL the holidays and weekends that fall in the entire leave period, provided the leave period exceeds the specified no of days in the previous step.
2. Include Only the holidays and weekends that follow the no of days specified - If you select this option, it means that you are including only the holidays and weekends that come after the specified no of days in the previous step.
Note: It is good to know that though the Maximum number of consecutive day(s) allowed for a leave type is fixed at a particular count, it is possible for you to define that weekends/holidays can be included even before that fixed count is reached.
- Enable quarter-day option - If this is enabled, then the employee will be able to apply for leave for a quarter of the day
- Enable half-day Option - If this is enabled, then the employee will be able to take half day leave
- Round-off permitted leave count - This is to permit rounding off of leave
- Exclude holidays for Leave - This box needs to be checked if holidays (as per the holiday calendar) needs to be excluded while an employee applies for leave to a specific leave type. In case of shifts, location-based holidays will be replaced by shift-based holidays
- Exclude weekends for Leave - This box needs to be checked if weekends need to be excluded while an employee applies for leave under a specific leave type. In case of shifts, shift-based weekends will override the general organizational weekends defined
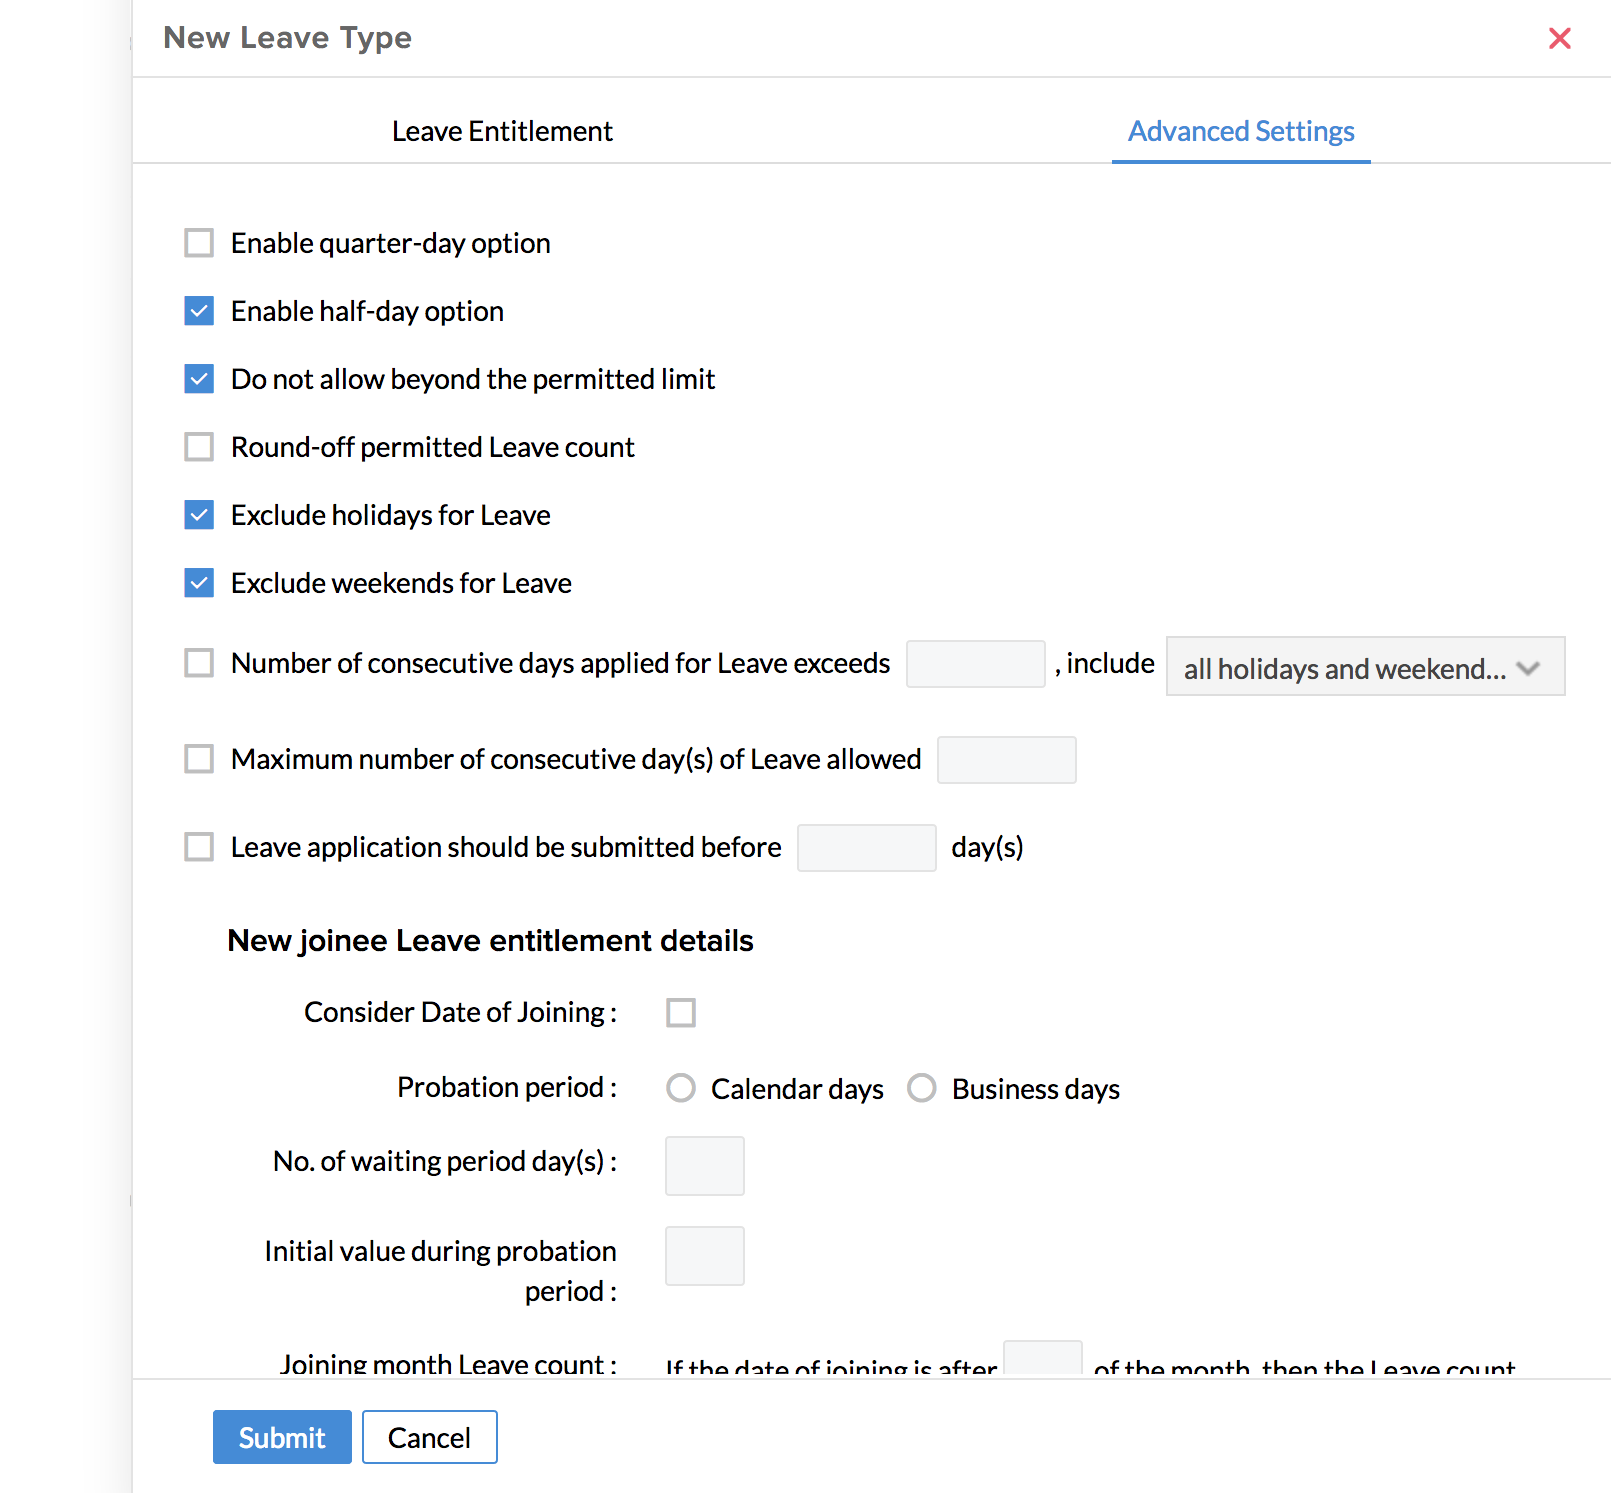
- If the number of days of consecutive days exceeds_____, then include (the dropdown with the options)- This option can be used when you want the holidays/weekends to be included after a specified number of days of consecutive days of leave applied. This option is sub-divided into two as explained below
- Maximum number of consecutive day(s)of Leave allowed - This option helps you define the maximum number of consecutive day(s)of leave that can be applied under this leave type.
- No. of days before which the leave application should be submitted - Here, you can define the number of days before which the leave application should be submitted for a leave type. This option helps in better planning in case of absence of an employee.
Clubbing Policy
- Do not allow club with - When you enable this option, it means that when an employee applies leave under this particular type, it cannot be followed by a leave application under the leave types that are selected here.
For instance - Consider a scenario where an employee applies a total of ten days. If there are no restrictions, then he/she can apply the first set of days under Casual leave and the next set of days under Sick Leave. In order to prevent this, you can make use of this restriction. If you enable this restriction, then the employee will not be able to combine these two leave types while applying for leave.
To create this restriction,
- From your home page, go to Leave > Settings > Leave Type
- Go to Sick Leave and click on Advanced Settings
- Under 'Clubbing Policy', enable the option 'Do not allow clubbing' and enter 'Sick Leave'

- Click Submit
With the help of this restriction, you can prevent employees from applying for leave under 'Casual Leave' soon after a 'Sick Leave' is applied.
Note: This is a one-way procedure. I.e - if you do not want employees to combine a sick leave with a casual leave, then the same restriction should be enabled under Sick Leave as well.
Leave Balance Restrictions
- Calculate Leave balance (While applying for leave) based on count: If you enable this, the leave balance (while applying for leave) will be shown based on what you select in the drop down here.
Case 1: If you select 'As on the date of request', then the leave balance count (while applying for leave) will be shown as it is on the date of which the leave request is raised.
Case 2: If you select 'As on the start date of the application', the leave balance count (While applying for leave) will be shown as it is on the date on which the leave starts.
Case 3: If you select 'As at the end of the calendar year', then the leave balance count (while applying for leave) will be shown as it will be at the end of that calendar year.
Consider a scenario, where the leave entitlement is 12 days per year, with a monthly accrual set. (leave accruing at the beginning of every month). Assume that the leave is applied on 30 June of the year and the leave application is raised on 3 July. Also, let's assume that there has been no leave taken by the employee until this date.
1. As per case 1, the leave balance while applying leave will be 7 days. (Leave of 1 day per month from Jan to July)
2. As per case 2, the leave balance while applying leave will be 6 days (leave of 1 day per month from Jan to June)
3. As per case 3, the leave balance while applying leave will be 12 days (leave of 1 day per month from Jan to December)
- Mark Leave beyond permitted limit as LOP: If you check this option, then all the leave taken beyond the entitlement will be marked as Loss of Pay. This will reflect under the LOP Report (Leave > Reports > LOP Report)
New Joinee leave entitlement details
This section is meant for defining rules for new joiners in an organization.
- Consider date of joining - Check this box if you want to take the date of joining into account.
- Probation period - Define if the probation period should include weekends or not
Note: Calendar days include weekends and holidays. Business days include only the days in a work week.
- No of waiting day(s)- Here, the number of days until which a new employee needs to wait to be able to apply a particular type of leave can be defined.
- Initial value during probation period - Number of days of leave a new joiner can take until confirmation of probation.
- Joining Month leave count - By using this option, you can define leave entitlement for employees who join after a specific date of the month.
To add a leave entitlement specific to new joinees,
- From your home page, go to Leave >Settings
- Click Leave Type > Add
- Click Add
- Under Advanced settings, go to New Joinee Leave entitlement details. If you want to add this option for an existing leave type, go to the intended leave type, click the edit button in the right corner and follow the same steps.
- Consider Date of Joining - Check this box, if the date of joining needs to be taken into account
- Probation period - Here, you can define if the probation period is in terms of calendar days or business days
Note: Calendar days include weekends and holidays. Business days include only the days in a work week
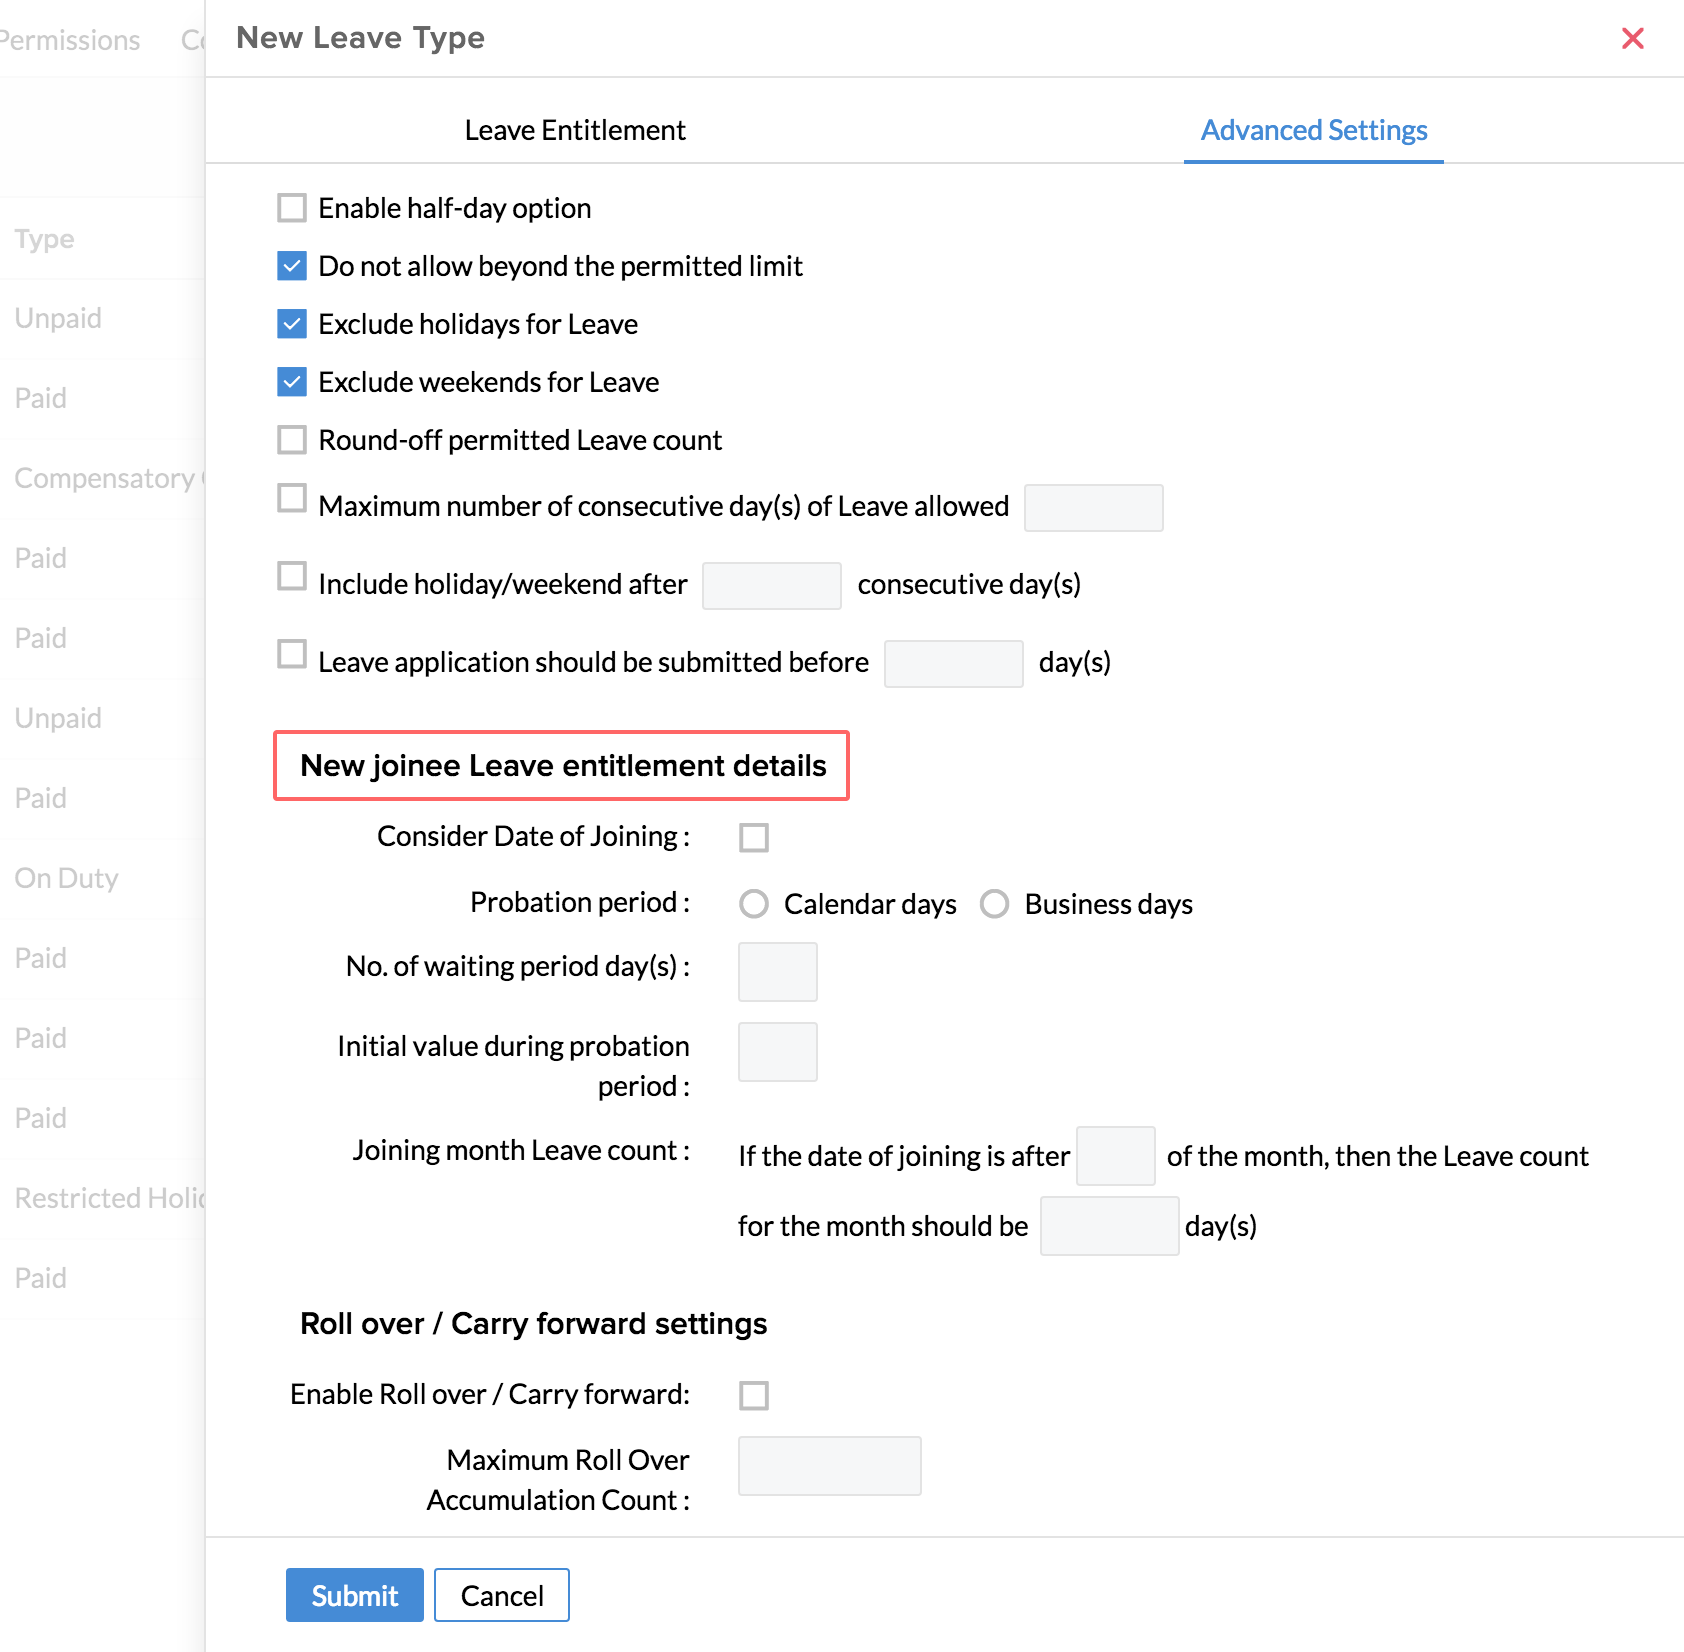
- No of waiting day(s) - Here, the number of days until which a new employee needs to wait to be able to apply a particular type of leave can be defined
- Initial value during probation period - Number of days of leave a new joinee can take until confirmation of probation
- Joining Month Leave count - By using this option, you can define leave entitlement for employees who join after a specific date of the month
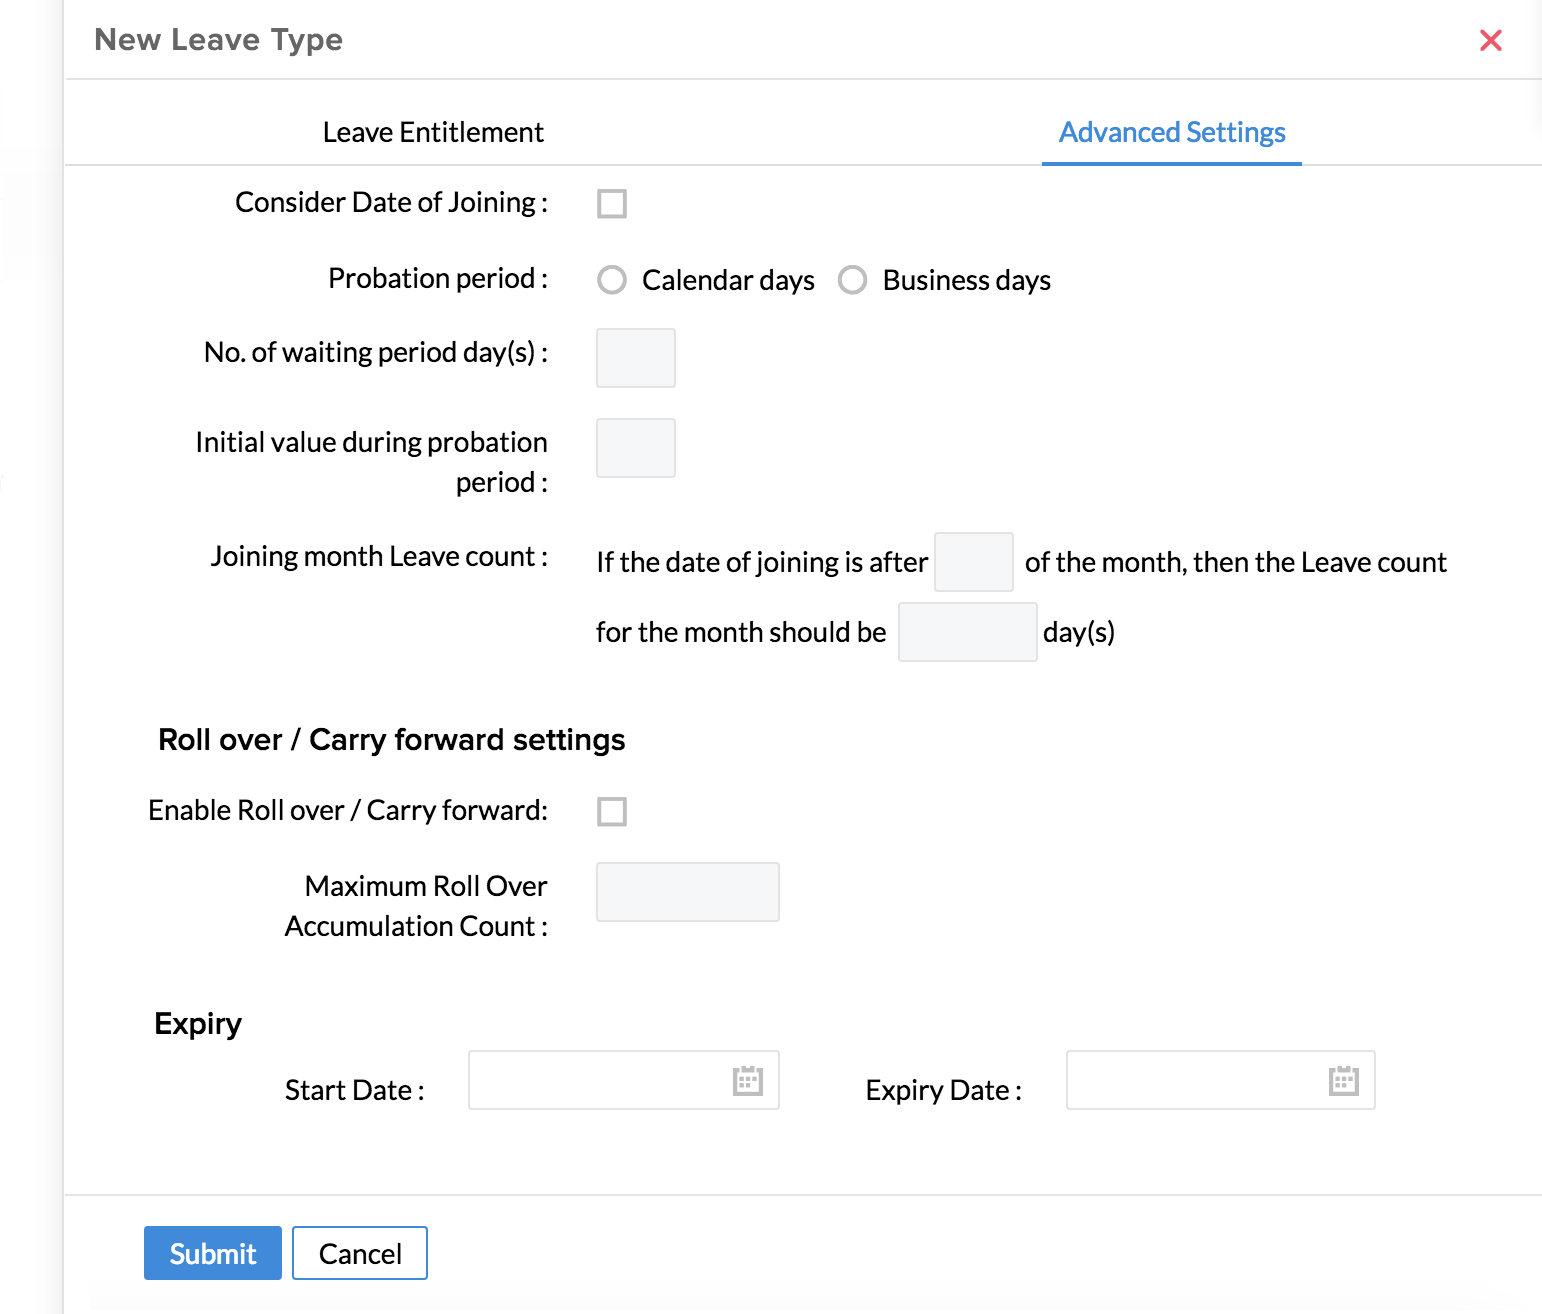
Roll over / Carry forward settings
Using roll over, you can generate the unused leave balances to the next year.
Leave that has not been utilized in the current year can be carried forward by the employee to be used in the following year. Follow the steps below to do this.
When you click Add, you will see this screen
By doing this, you enable your employees to carry forward or roll over their leave to the next year.
- Roll over / Carryforward settings - This option is to make roll over of leave possible for a particular leave type.
- Maximum Roll Over-Accumulation Count - Here, you can define the maximum number of days that can be accumulated.
- From your home page, go to Leave > Settings
- Click Leave Type
- Click Advanced settings
- Check the box Roll over/Carry forward settings under Leave restrictions
- Under Roll over/Carry forward settings, type the maximum number of days you want to be carried forward in 'Maximum Roll Over-Accumulation Count'
- Click Submit
Expiry
Under Expiry, you can define the start date and the end date for a leave type
You can define a leave type to be taken within a particular span of time by setting up an expiry date.
- From your home page, go to Leave > Settings
- Click Leave type
- When you click Add you will see this screen
- Click Advanced Settings
- Under Expiry, you can set a Start Date and Expiry Date for the leave type
- Click Submit
Use cases
Leave Type - Absent
When an employee does not mark attendance for a particular day, it is captured as Absence with the help of the 'Absent Schedule'. This will show under a leave type called 'Absent' for the employee in the leave - list view. The employee can then convert this to leave (under any of the leave types) by clicking on 'Convert to leave'.
![]() Tip : Click here to know more about the Absent Schedule.
Tip : Click here to know more about the Absent Schedule.
As an administrator, you can define some restrictions for this leave type 'Absent', as explained below. Please note that the restrictions that you define in this leave type will impact the Absent schedule.
- From your home page, go to Leave > Settings > Leave Type
You will be able to see the leave types listed here.
- Hover your mouse over the Absent leave type to click on the edit icon
- Go to Holiday/Weekend Settings
You have the following options here.
1. You can include all the weekends and holidays - In this case, you do not have to check the boxes 'Exclude holidays for leave' and 'Exclude weekends for Leave'. All the weekends and holidays will be included when an employee is absent.
As per the settings in Attendance module, let us assume that you have defined that the Absent Scheduler should push entries of the previous day. In the settings for 'Absent' leave type, you have defined that holidays and weekends during absence should be included.
In his scenario, when an employee is absent on Friday and Monday, initially, the scheduler will only push the entry for Friday and not for Saturday and Sunday since these two days are weekends as per the organization's weekend settings. However, on Tuesday, the entry pushed will include Saturday and Sunday as well because of two reasons as listed below.
a. There is a continuous absence from Friday until Monday
b. As per the Absent leave type settings, the weekends and holidays will have to be included
Hence, when the employee converts the absence of these four days to leave under any of the leave type, the number of days of leave will be only 4.
2. The next option is for you to Exclude the weekends and holidays - In this case, all the holidays and weekends will be excluded when the employee is absent. To enable this option, check the box 'Exclude holidays for leave' and 'Exclude weekends for leave'. Consider the same scenario as above.
When an employee is absent on Friday and Monday, the scheduler will only push the entry for Friday and not for Saturday and Sunday since these two days are weekends as per the organization's weekend settings. On Tuesday, the entry pushed will exclude Saturday and Sunday because, as per the Absent leave type settings, the weekends and holidays will have to be excluded. Hence, when the employee converts the absence of the two days - Friday and Monday, to leave under any of the leave type, the number of days of leave will be only 2.
3. The last option is you can choose to include weekends and holidays only when the number of days of consecutive days of absence exceeds the number of days specified by you. If you choose to use this option, you can further drill down to define the following.
a. Include all the weekends and holidays in the absence period - This means that if the number of days of consecutive absence exceeds the number of days specified, then all the weekends and holidays in the entire period will be taken into account. However, the number of days of leave will depend on whether you have chosen Business or Calendar days in the configuration.
Let us consider this scenario.
An employee is absent from 1 March to 11 March
You have defined that all the weekends and holidays should be included if the number of days of consecutive absence exceeds 3 business days. In this scenario, the total no of days will be calculated as follows.
- Days of Absence from 1 March - 5 March
- Weekends during this period - 2 days (3 & 4 March)
- Total no of days of absence that will be calculated is 3 days (1, 2 and 5 March). The weekends 3 and 4 March will not be included because the total leave period does not exceed the limit of 3 business days. In case, the leave is extended by one more day, then the weekends (3 and 4 March) will be included.
The Scheduler will push entries as per the settings defined in the Absent Leave type.
Instead of Business days, if you have defined as Calendar days while adding the leave type, then the
Total no of days of absence will be calculated is 5 days (1, 2, 3, 4 and 5th March). The weekends 3 and 4 March will also be included because you have defined that all the weekends/holidays should be included if the total no of CALENDAR days exceeds 3days.
b. Include only the holidays and weekends that follow the number of (Business/Calendar) days specified - This means that if the number of days of consecutive absence exceeds the number of days specified, then the weekends/holidays that follow the number of days should be taken into account.
An employee is absent from 1 March to 5 March
You have defined that the weekends and holidays should be included if the number of days of consecutive absence exceeds 3 BUSINESS days. In this scenario, the total no of days will be calculated as follows.
- Days of Absence - From 1 to 5 March
- Weekends during this period - 2 days (3 and 4 March)
- Total no of days that will be calculated as absence will be 3 days (1, 2 and 5 March). The weekends 3 and 4 March will not be included because they are within the 3 BUSINESS days limit.
Instead of Business days, if you have defined as Calendar days while adding the leave type, then the
Total no of days of absence will be calculated is 4 days (1, 2, 4 and 5th March). The weekends 3 March will not be included because it is within the first three CALENDAR days limit. However, the weekend 4 March will be included because you have defined that the weekends/holidays that follow the first 3 Calendar days of absence should be included.
Note: The functioning of the scheduler, as explained in the use cases above, is not applicable in case of leave applications that are submitted prior to the date of leave.
Leave Type - Quarter Day
Yes. This is possible. Employees can avail the option called Quarter day leave in order to make a request for permission. Follow the steps given below for configuring this option in the leave type.
- From your home page, go to Leave > Settings > Leave Type
- Go to the leave type for which you need to enable this option
- If you would like to enable this option for a new leave type, go to Leave > Settings > Leave Type > Add
- Go to Advanced Settings
- Tick the option 'Enable quarter-day option'
- Click Submit
Once the configuration is done, employees will be able to utilize this option by following the steps given below. Administrators who log for quarter-day leave on behalf of their employees can also follow this method.
- Click Apply leave from Leave > Views.
- Under Leave Type, select the respective leave type.
- Select the date.
- Tick the 'Quarter day' box if you would like to apply for a quarter day leave. In case both Quarter day and Half day leave are configured for the particular leave type, then you will be able to see both of these options as a drop-down list.
- Click Submit.
As for the reports, Quarter day leave will be calculated as 0.25 day when an employee applies for a quarter day leave.
Note: You can enable both quarter day and half day option for the same leave type. However, the employee will be able to apply leave either as quarter day or a half day on a particular date for that particular leave type.
Leave Type - Half day
You can configure leave types that include half-day, full day and quarter day based on your organizational requirements.
Follow the steps given below to do this.
- From your home page, go to Leave > Settings > Leave Type > Add
- Check the box 'Enable half-day option'
- Configure other options as per your need
- Click Submit
Now, half-day option is configured for this leave type.
Leave Type - Experience
You can create specific leave types for senior working members based on their work experience in your organization.
To create experience leave,
- From Home, go to Leave > Settings
- Click Leave type
- Click on Add to create a new leave type.
- Click Leave entitlement and enter the details
- Under 'Applicable', click on 'Applicable For' and select the User from the list of options given
If you want to add this option for an existing leave type, go to the intended leave type, click the edit button on the right corner and follow the same steps.
- Click Submit
Initial Balance
As per the leave policy, each employee will be eligible for a certain number of days of leave under each leave type. However, you may come across the need to add a few days extra for a particular employee on top of the entitlement. In this case, you can use the 'Initial Balance' to do this. The value entered under a leave type as Initial Balance will be apart from the leave entitlement. Follow the steps given below to add initial balance.
- From your home page, go to Leave > Settings > Initial Balance
- Click 'Add' and go to Initial Balance
- Enter values as required against the leave type
- Click Submit
Now, the employee's number of days of leave will be the initial balance plus his/her entitlement as per the leave policy.
To view the initial leave balance of all employee profiles,follow the steps given below to do this.
- From your home page, go to Leave > Settings > Initial Balance
- Click on the filter

- Under 'User/Employee Profile' drop-down, select 'Employee Profiles' and hit Search
Leave Roll Over
When there is a roll over involved, the leave balance should include the roll over too. Follow the steps given below to do this.
When there is a roll over of leave involved, you can override the general leave policy for employees.
- From your home page, go to Leave > Settings > Initial Balance
- Click the user whose leave balance should be edited
- Under Roll over, you will see the number of days that is carried forward
Note: Roll over should have been enabled already for this particular leave type.
- Under Initial Balance, go to the leave type for which you need to edit the entry, and add the number of days that you would like to be added apart from the actual entitlement
For eg, if as per the leave type, the entitlement is 15 days, and you would like to give a total of 20 days to the employee, then under Initial balance you need to enter the value as 5.
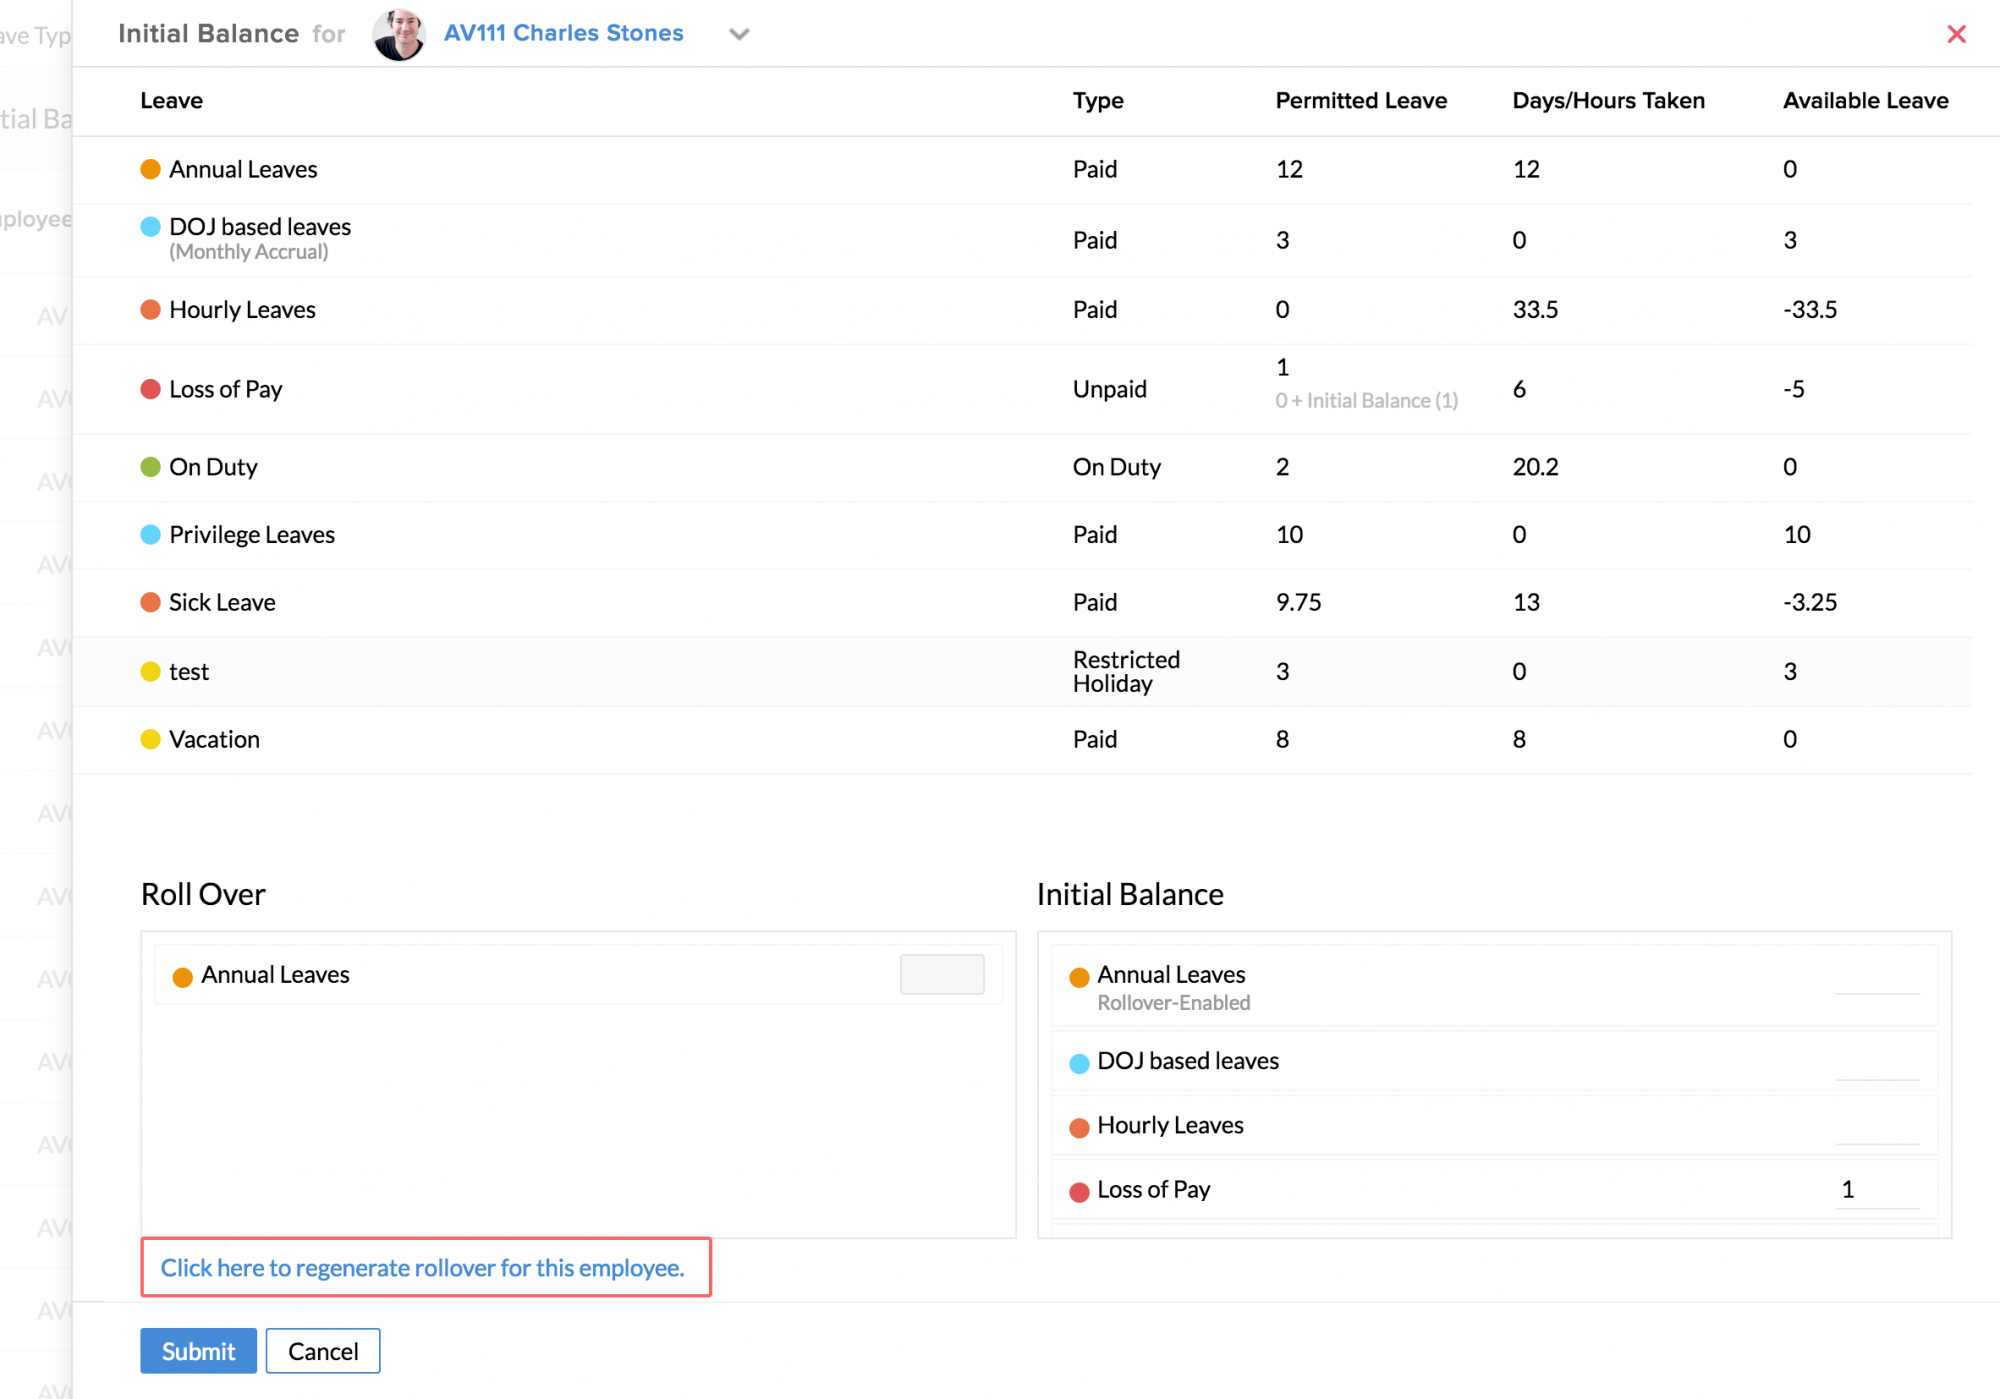
- Click Submit
Now if you go the leave type and check under permitted leave, the total number of days of leave will be the number of days rolled over + no of days as per entitlement + no of days added by you for the employee under initial balance.
You can also override the generic leave policy for a specific employee
Consider a scenario, where, you would like to have different leave count across leave types for a particular employee. This means that you have the need to override the count that you have set for all, as per the organizational policy. Using Zoho People, you can create such exemptions. Follow the steps below to know how to do this.
Under Leave Configurations, you will see the number of days of leave configured under each leave type as per the general leave policy
- From your home page, go to Leave > Settings
- Click on Customize Entitlement
- Click on Add
- Select the Employee from the drop-down
- Click on the leave type which you would like to edit
- Enter the days that should be added to the actual entitlement
- Click Submit
Customize Entitlement
To view the customized leave entitlement of a particular employee,
If you have customized leave entitlement for more than one employee, you can make use of the filter to view the entitlement of a specific employee/location etc. Follow the steps given below to do this.
- From your home page, go to Leave > Settings > Customize Entitlement
- Click on the filter and under 'Employee' drop down, use the search tab to select the employee

- Hit Search
You will be able to see the leave entitlement for the employee as required.
You can also export your customized leave entitlement details to an external source.
To export customized leave entitlement details,
- From your home page, go to Leave > Settings > Customize Entitlement
- Click on the ellipsis icon and select 'Export'

Note: Export can be done only in .xls/.csv/.tsv formats.
You can create leave types that are specific for Department, Designations, Locations etc and to view the active leave types that are created for a particular department,
![]() Tip: Click here to know how to create leave type specific to Departments, Designations etc.
Tip: Click here to know how to create leave type specific to Departments, Designations etc.
Once you have created the desired leave types, you can follow the steps given below to view the leave types that are active and are created for a particular Department.
- From your home page, go to Leave> Settings > Leave Type
- Click on the filter and click Advanced
- Select the required department under the 'Departments' drop-down, select 'Active' in the 'Status' drop down and hit Search
You will be able to see the leave type configured for the specific department.
Other Settings
If you would like to have the weekends and holidays included in the leave period even if the employee splits the leave under different leave types like Casual and Sick Leave.
While adding a leave type, you can define if the number of days calculated as leave for this leave type should be based on Calendar days or Business days (Leave > Settings > Add > Advanced Settings > Holidays/Weekend Settings).
![]() Tip : Click here to know how to add a new leave type
Tip : Click here to know how to add a new leave type
However, there are chances that weekends and holidays will get excluded when leave is applied under different leave types. You can create a restriction to prevent this. Follow the steps as given below.
- From your home page, go to Leave > Settings > General Settings
- Under Holiday/Weekend settings, enter the number of days of consecutive days of leave after which the weekends and holidays should also be included as leave
- Under 'Period', select Calendar or Business days
- Under Applicable for, select the leave types for which this is applicable
- Click Submit
Let us consider a scenario to understand this better. Assume that an employee has applied for sick leave from Monday to Friday and for Casual leave from the following Monday to Friday. In this case, if there are no restrictions, then the employee can skip including the weekends that fall in between. Instead, you can create a restriction using General Settings to have the weekends and holidays included in cases such as this. Follow the steps given below.
- From your home page, go to Leave > Settings > General Settings
- Enter the value as 5 under 'Number of consecutive days after which holidays/weekends in the leave period should be considered as leave'
- Under 'Period', select Calendar or Business days
- Under 'Applicable For', select both Sick Leave and Casual Leave (you can group the leave types that you wish.)
- Click Submit
Now, the total number of days of leave (across leave types that you have mentioned under 'Applicable For') after which holidays and weekends will be included is defined as 5. This means that, even if an employee applies for two weeks under these two leave types, the weekends will be included.
Note: The weekend that falls in between the two weeks of leave will be calculated as Casual Leave because the second part of leave has been applied under this leave type only. In case an employee applies for leave for the second week first and the first week later, then the weekend in between the two weeks will be logged as Sick leave since the second part of leave has been applied as Sick Leave.
Reports
- User Report
- User Availability Report
- Daily Report
- Leave Taken Report
- Leave Balance Report
- Loss of Pay(LOP) Report
- Payroll Report
- Importing and Exporting Reports
- Importing and Exporting - Password Protection
User Report
The User Report lets you view the complete leave details of your employees in a leave chart against days and leave types configured for your organization.
You can also view the leave report of previous years for a user, using the User Report
- From your home page, go to Leave > User Report

You will be able to see the report of the corresponding year.
- Click on the employee search tab to select the desired employee
- Use the left arrow to navigate to the previous years
The User import comes with assorted options to download the leave chart in required formats.
You can also download the leave chart of an employee with the 'Download PNG image' option available
Follow the steps given below to do this.
- From your home page, go to Leave > Reports > User Report
- Select the employee using the search tab
- Use the left arrow and right arrow to go to the desired year
- Click on the icon inside the report and select Download PNG image
User Availability Report
The User Availability Report shows the members of a particular team, who are available during a particular period of time.
Follow the steps given below to view this report.
- From your home page, go to Leave > Reports > User Availability Report
- Click on the Filter, and under Date, give the date range for which you would like to view the report

- Under Department drop-down, select the desired Department and hit Search
You would be able to see the leave details of the members of the selected department for the chosen period.
The main utility of this report is to view the availability of a team or departments' members and plan work accordingly. You can enable users to see leave data of his/her own department members with permissions configured for it.
In general, users will be able to see only their leave data. However, in cases where it is essential for users to see leave data of other members of their own department, permissions can be configured in the User Availability Report page.
Follow the steps given below.
- From your home page, go to Leave > Reports > User Availability Report
- Click on the ellipsis icon and select Permissions
You will be taken to the General Settings page, where you can define the permission under 'Permissions'. This can also be done from the 'Settings' page. Follow the steps given below.
- From your home page, go to Leave > Settings > General Settings > Permissions
You will be able to see that there is a field called User Availability Report Access.
- Select Department Data to Department Member
- Click Submit
By choosing this option, you can enable users to see the leave details of all the members of their own department.
Note: As a pre-requisite to use this option, you need to ensure that users are mapped to their department accurately in the Employee form.
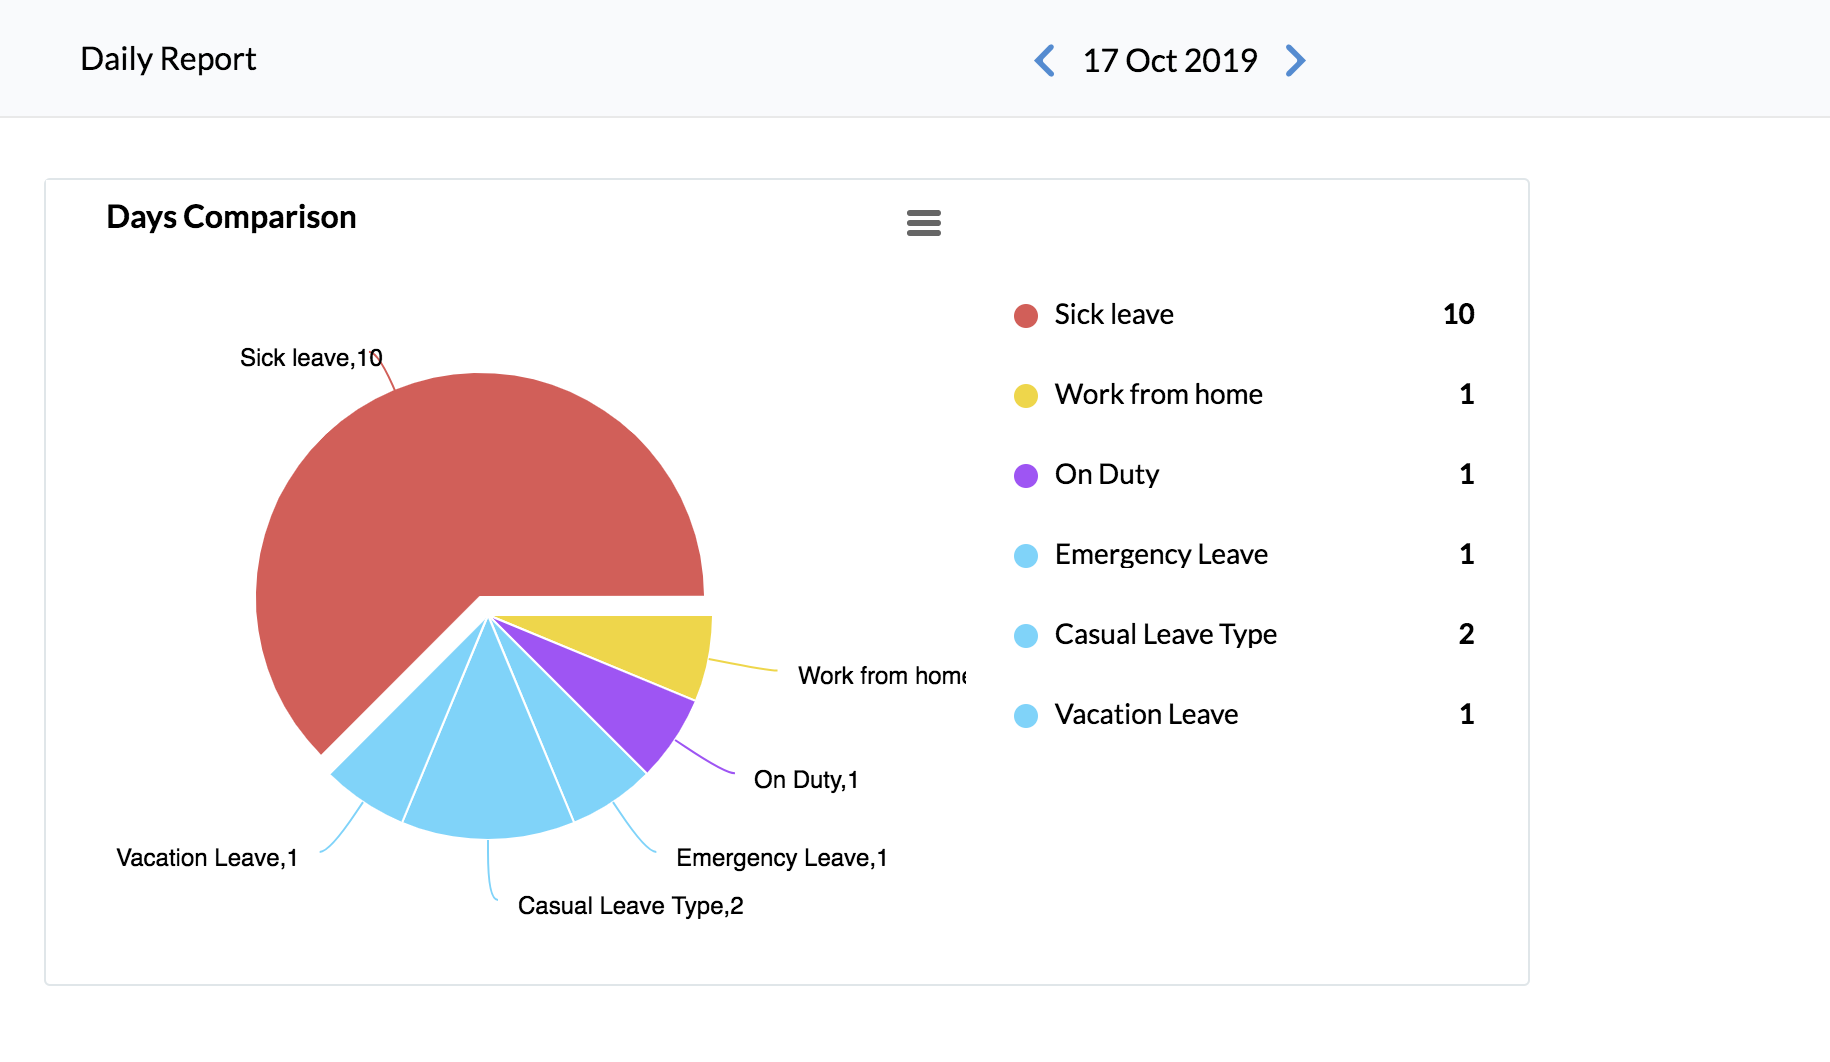
Daily Report
The Daily Report lists the leave details of the organization for a specific date. You can view the present and absent status of employees with the leave type and approval status listed.
Follow the steps given below to do view this report.
- From your home page, go to Leave > Reports > Daily Report
- Click the Filter to select a date
- Select the leave type, work location, department, status of the user from respective drop downs and hit Search
You will be able to see the leave details with the chosen criteria.
This report features two types of views- the graphical and the list view. To make use of the views, click on the toggle button near the filter icon.
Options like print, export, and download can be used by clicking on the ellipsis icon
To do this,
- From your home page, go to Leave > Reports > Daily report
- Use the filter at the corner of the page, to refine your search based on leave type, Department etc and hit Search
- Click the icon(ellipsis mark) to Export, Print or download this report
Leave Taken Report
This report is classified based on leave types. You can view the leave taken details of your employees listed according to the leave types created for your organization.

To view the leave taken by a particular employee for a particular period of time,
- From your home page, go to Leave > Reports > Leave Taken Report
- Click the filter
- Search for the employee in the Employee search tab
- Give the date range and hit Search
You can get the details of the number of days of leave taken by a particular employee or for a particular period of time.
Organizations face role swaps very often and for such cases, the newly appointed manager or any administrative head can view the complete historic leave data of the organization.
Follow the steps given below to view this.
- From your home page, go to Leave > Reports > Leave Taken Report
- Click on the filter and under Date, select the year for which you would like to see leave data
- Under the dropdown, select All and hit Search
You will be able to see the leave details of the organization for the year chosen.
Leave Taken Report comes with options to export, print and download the report as PDF.
For example, a report showing the details of unpaid leave availed by the members of a department for the past two months can be imported using the following the steps given below.
- From your home page, go to Leave > Reports > Leave Taken Report
- Click the filter and enter the date range
- Select Unpaid under Type
- Under Department select the required department and hit Search
You will be able to see the report as required.
Click the ellipsis icon and select 'Export'.You can print and download the report as pdf as well.
Note: Export should be done only in .xls/.csv formats.
Leave Balance Report
The Leave Balance Report lists the remnant leave balance details of your organization.
To view the complete leave balance details of the members of your organization,
- From your home page, go to Leave > Reports > Leave Balance Report
- Use the filter and select the To date
- Under Employee and Department, select All and hit Search.
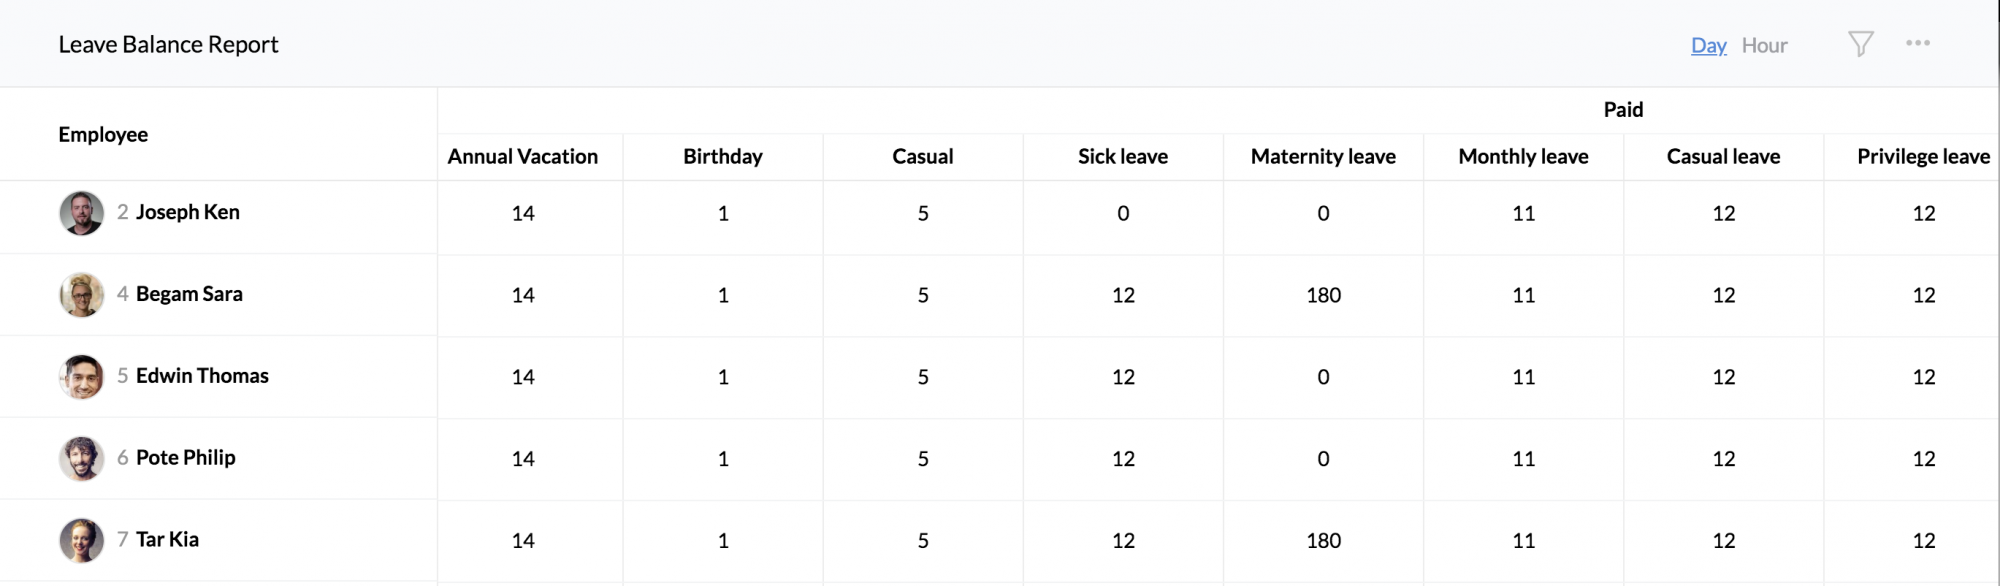
You will get the complete leave balance details of your organization.
Leave Balance Report also comes with assorted option to export, print and download the leave balance report.
Consider this case. To export the leave balance details of employee profiles(non-users) for a particular year, follow the steps below.
- From your home page, go to Leave > Reports > Leave Balance Report
- Click on the filter and select the year
- Under User/Employee Profile drop-down, select Employee Profiles
- Hit Search
- Click on the ellipsis icon and select Export
Note: Export can be done only in .xls/.csv formats.
Loss Of Pay (LOP) Report
The LOP report calculates and lists loss of pay for employees according to your organization's pay period settings. Click here to learn more about Pay Period settings.
Note: The LOP report is applicable only when leave is applied under a leave type which is 'Unpaid' and for leave that falls under the 'Absent' category. I.e - when a leave is applied under a leave type which falls under 'Unpaid' category, then the report will be generated on the processing day for the period chosen (under pay period) capturing the total number of days of LOP in the period.
When an employee has leave under 'Absent' category, then it will be considered as LOP and it will be captured for that period on the processing day for the period chosen in the pay period settings.
Once this setting is done, you will be able to see the LOP report as shown in the image below in which you see the following details.
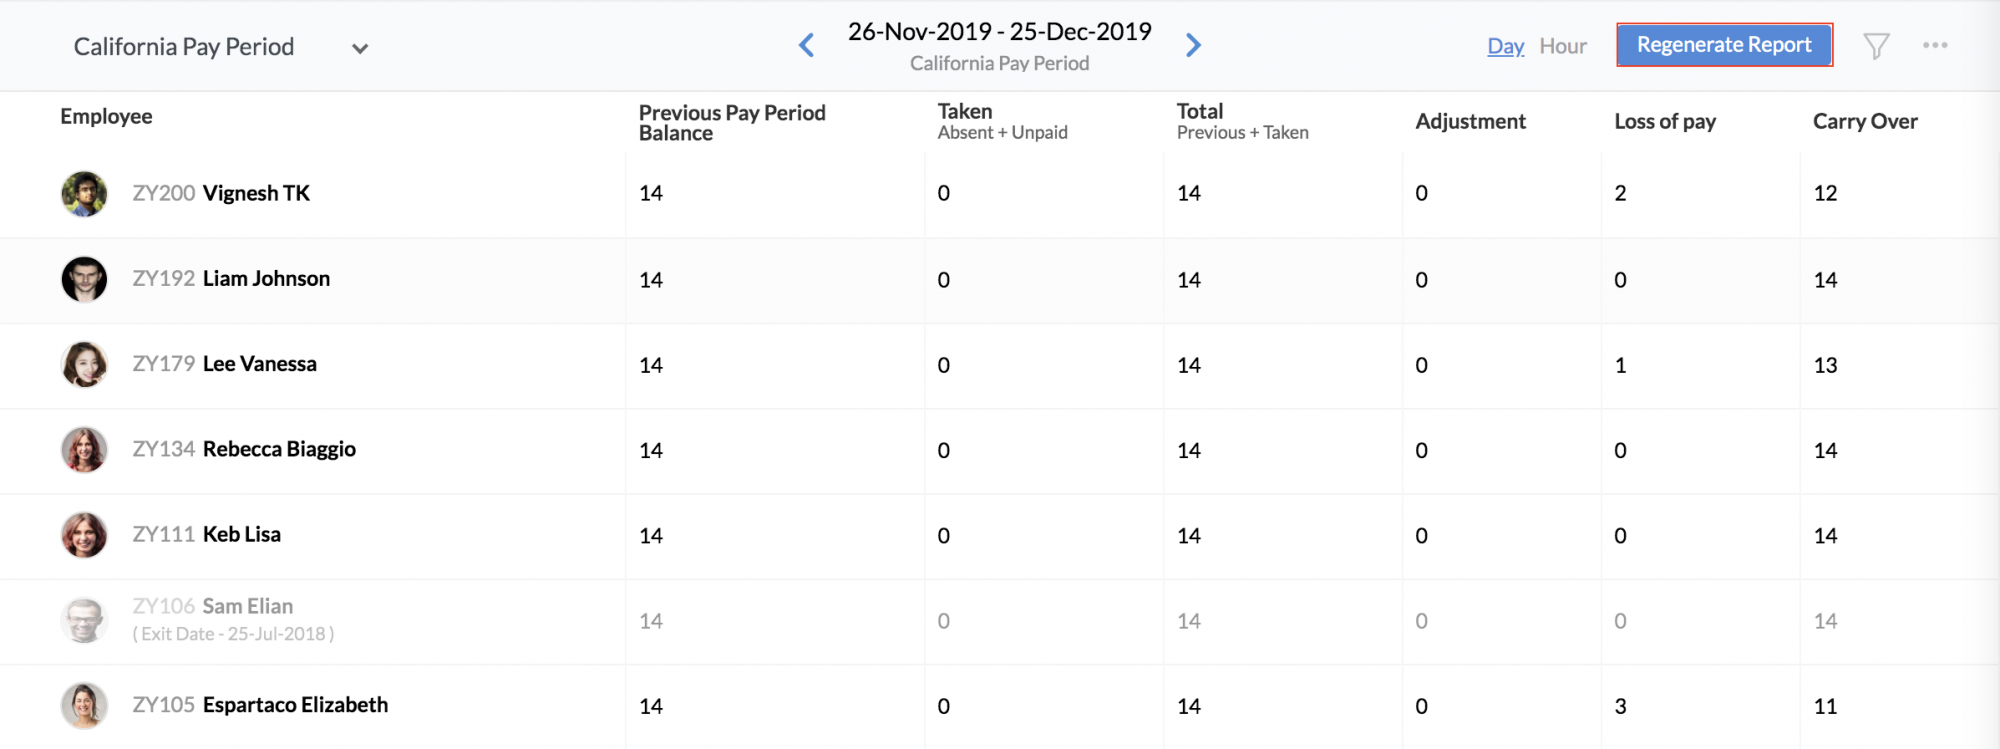
- Employee
- Previous pay period balance - this is the balance leave count from previous pay period for which loss of pay should be done
- Availed - this shows the leave count that falls under 'Unpaid' and 'Absent' leave types
- Total - this is the sum of the previous pay period's balance and the count of the current pay period
- Adjustment - This is for any manual adjustments that the admin wants to make. For eg., if the total LOP count is 22 days and you would like to cut pay only for 10 days in that pay period, then under adjustment, you can enter 11. Therefore, the balance 10 days will show under 'Loss of Pay for the period' and 11 will show under 'Carry Over'
- Loss of Pay - this is the number of days in that period for which payment will be cut
- Carry Over - this is the count that will be carried forward to the next pay period
- Regenerate Report - If any ad hoc changes are made, the regenerate report option can be used to reflect these changes. Once the LOP report is regenerated, all existing data will be deleted.
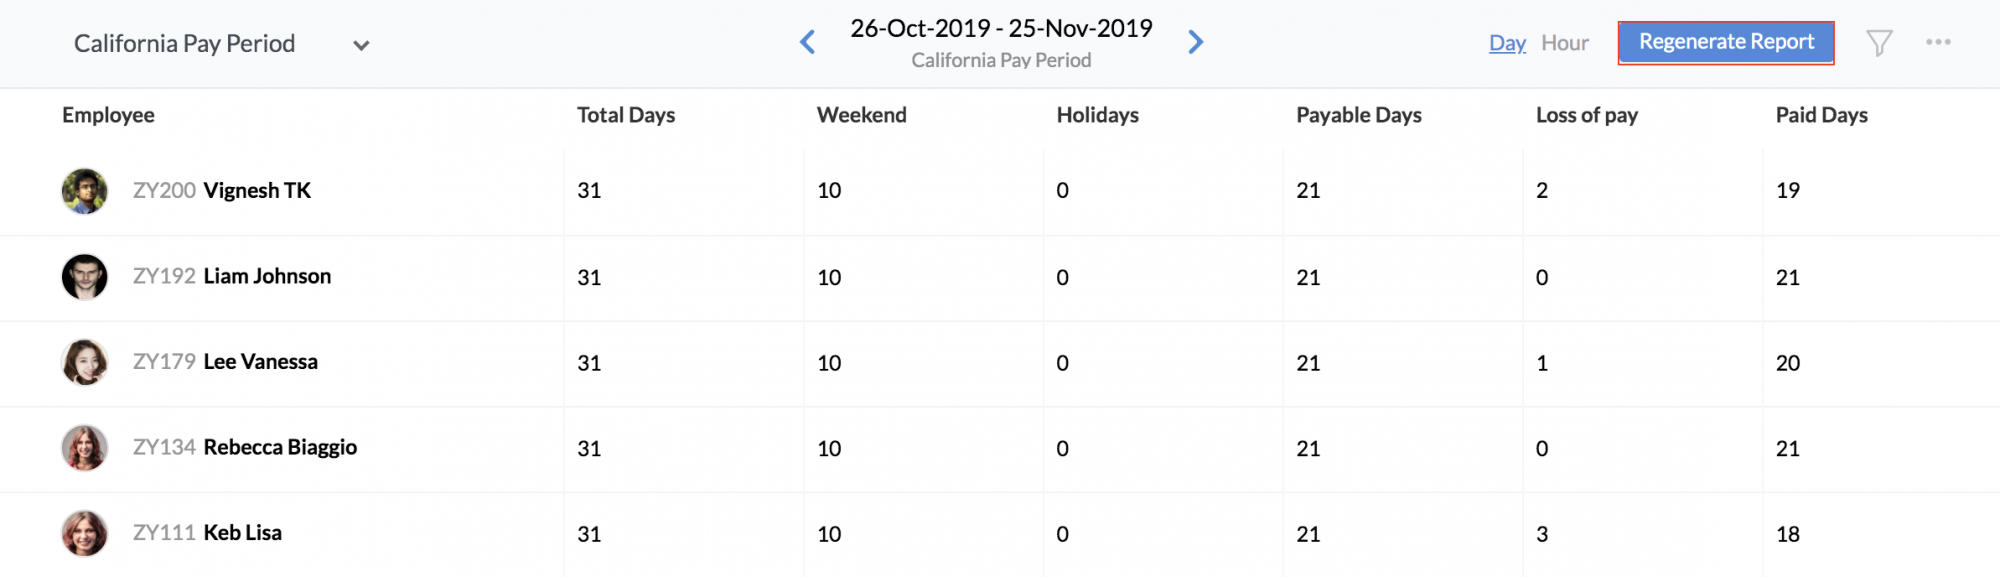
Payroll Report
The Payroll Report shows your total working days, payable days and loss of pay if any. The payroll report gives a count of the number of days to be paid to an employee.
- Total days - this is the total number of days in the pay period that is chosen
- Weekend - this is the total number of weekends in the pay period chosen (The weekend is calculated as per the settings defined for locations/shifts)
- Holidays - this is the total number of holidays in the pay period chosen. This is based on the holiday calendar based on locations and shifts if any.
- Loss of pay - the loss of pay count is derived from the LOP report
- Payable days - this is the total number of days for which the employee should be paid. This includes/excludes the weekends and holidays as per what you have defined under Attendance > Settings > General Settings > Pay Days/Hours Calculation
- Paid Days - this is the total number of days for which the employee is paid after deducting the loss of pay days.
- Regenerate Report - If any ad hoc changes are made, the regenerate report option can be used to reflect the changes. Once the Payroll report is regenerated, all existing data will be deleted.
If weekends/leave/holidays is disabled here, then the same will be excluded from payable days too.
Note: In case you have disabled the Attendance tab, you can define these settings under Leave > Settings > General Settings > Payroll Report Settings
The payroll data gives you the details of the total number of days, no of weekends/holidays etc in the pay period selected. However, you can also view the leave data in this report, although this data will not be utilized for payroll calculation. i.e - if you do not want to pay the employee for any leave, then ideally, leave should be applied under 'unpaid' leave type and this data will reflect under LOP days.
To see a comprehensive view of leave data, click on the filter and under Report Type, select Detailed and hit Search.
Importing and Exporting Reports
Zoho People's lets you print, export and import your various leave reports. Navigate to any leave report by clicking on Leave > Reports > Ellipsis icon to use these print, import and export options and more.
For example, if you would like to export the User Availability Report,
- Click on the ellipsis icon and select 'Export'
Other than the option to export, you can also print the report and download the report in formats like PDF and ICS.
Importing and Exporting - Password Protection
Certain files contain sensitive information that needs to stay private when they get exported. Such leave files can be encrypted with a password. The file will be accessible only with the password sent to your mail ID. Let us take the example of a User Availability Report. Follow the steps given below to do this.
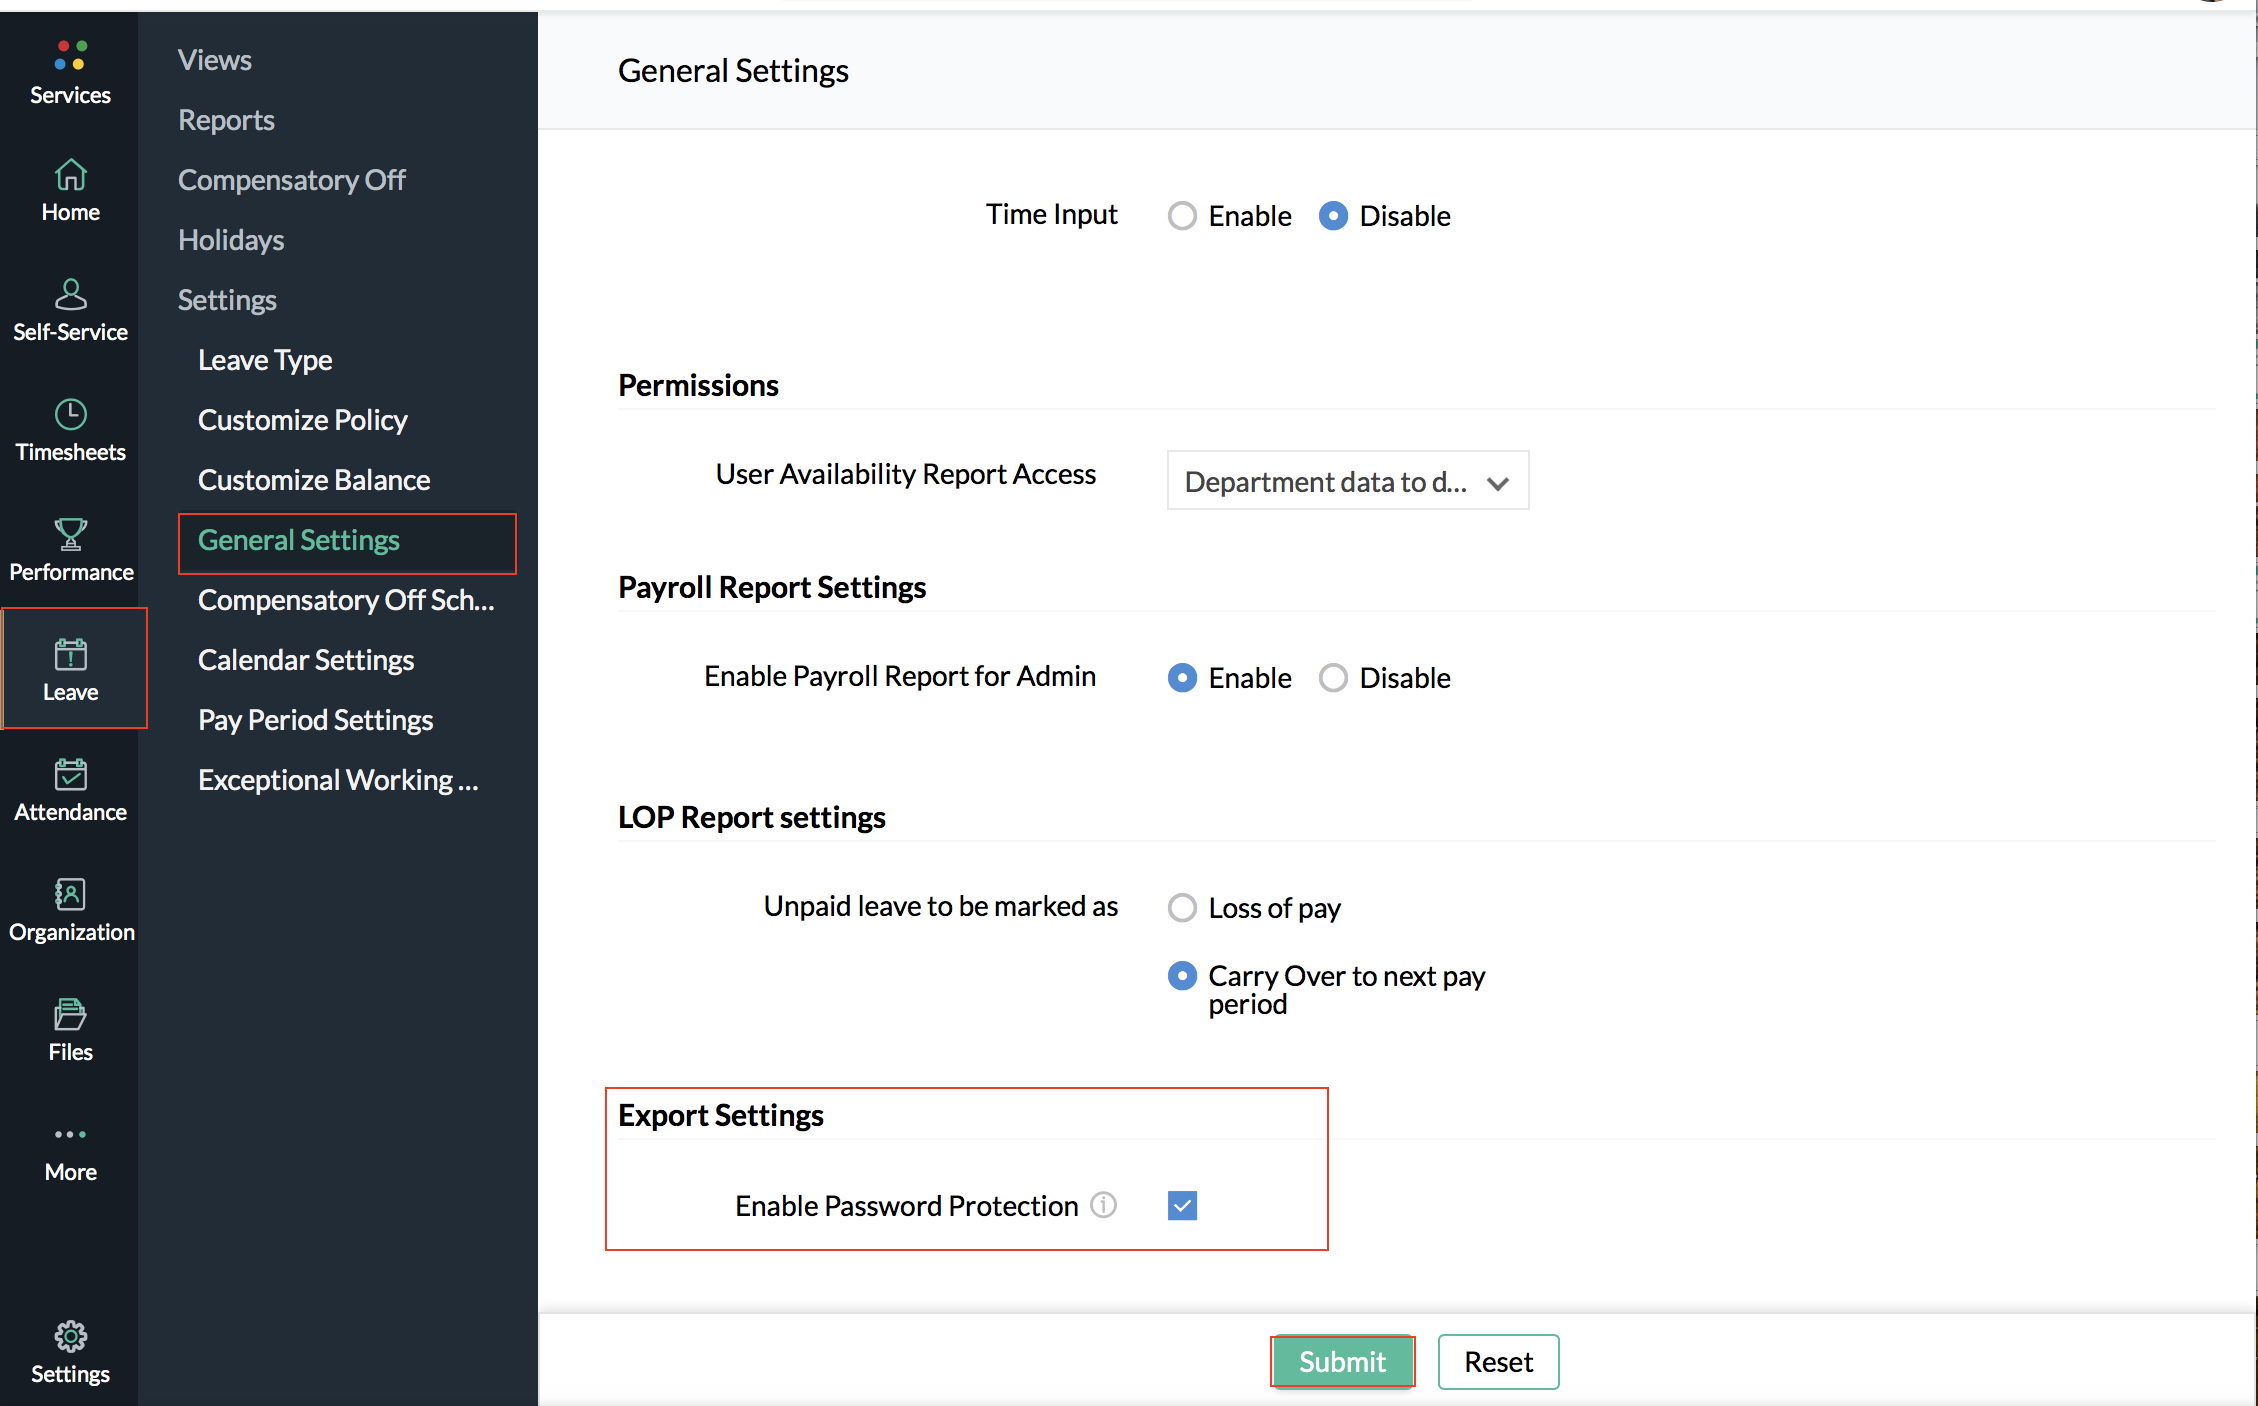
- From your Home page, go to Leave > Settings > General Settings
- Under Export Settings, click on 'Enable Password Protection'
- Click 'Submit'
Now go to the leave file that you would like to export. In this case, to export the User Availability Report,
- Go to Leave > Reports > User Availability Report
- Click on the ellipsis icon > Export
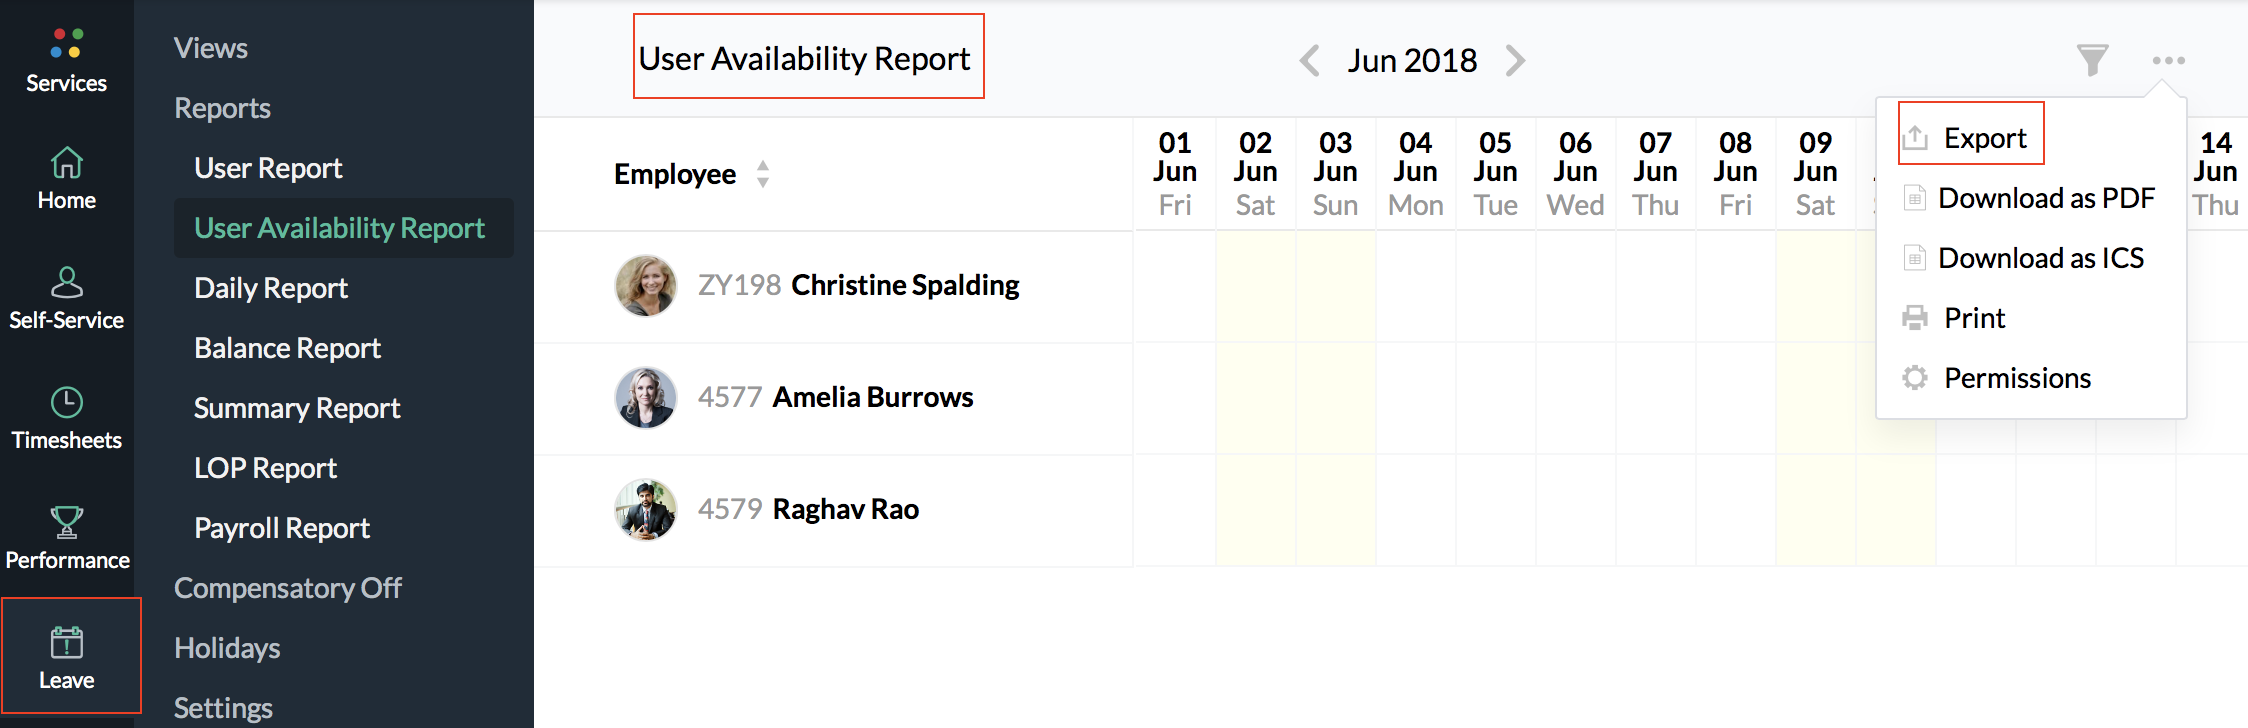
- Select the desired file format. You can choose from formats- xls, xlsx, csv and tsv.
- Click 'Export'
Note: Zoho People supports an advanced version of leave policy configuration (Version 2). Contact support@zohopeople.com to upgrade to the advanced version 2.