Configuring Advanced Leave Policies (Version 2)
If you are using the basic leave configuration (Version 1) and want to upgrade to this advanced leave policy configuration (Version 2), contact support@zohopeople.com.
Zoho People's new leave type gives you an extensive platform to configure and customize various leave types to suit every organization's need. This new leave type comes with various advanced options such as Prorate Accrual and Reset, that can make your leave dynamic and flexible. A leave policy can even be customized exclusively to a specific employee. Let us look at the important features in configuring a new leave type.
To configure leave types for special leave requests, you can use the Leave Grant feature.
- Leave policy configuration
- Entitlement
- Applicability
- Restrictions
- Use cases
- Customize Policy
- Customize Balance
Leave policy configuration
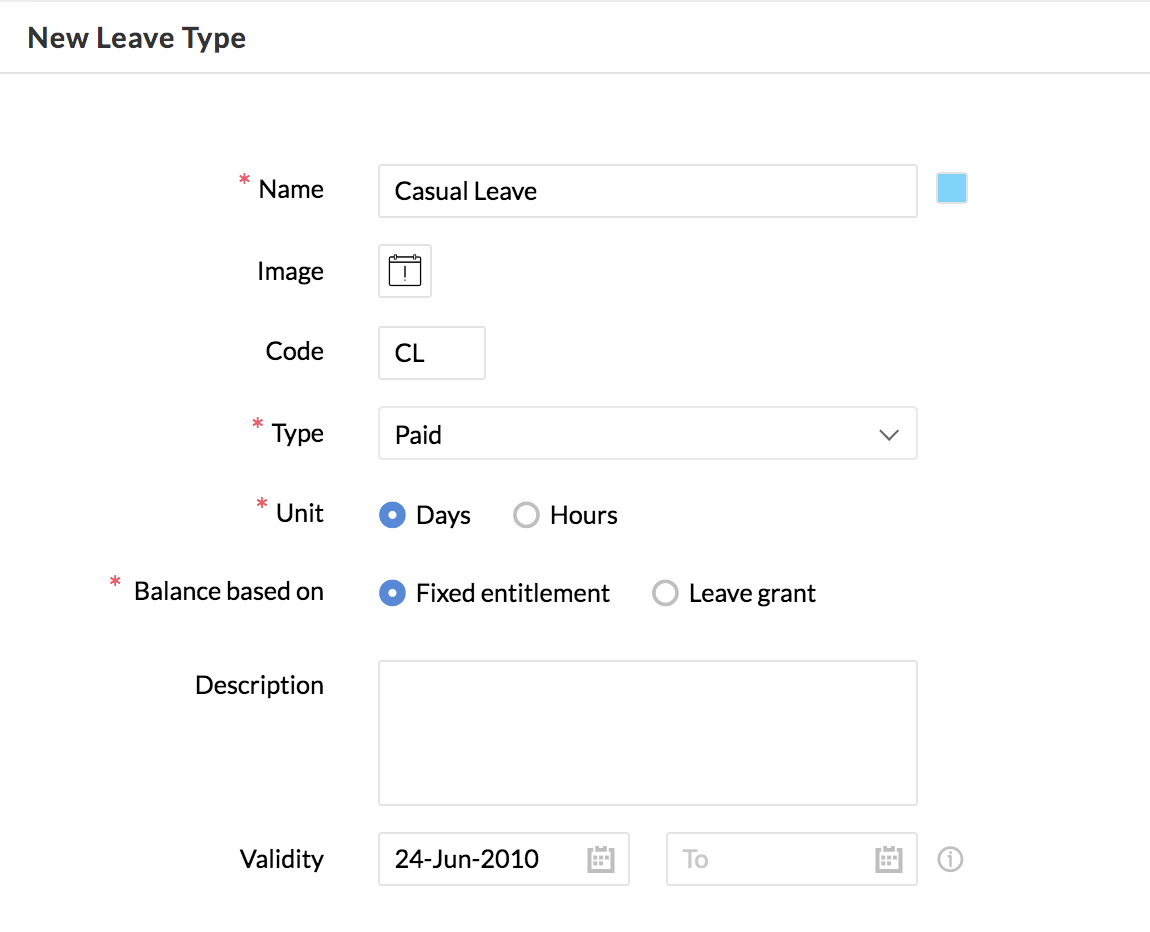
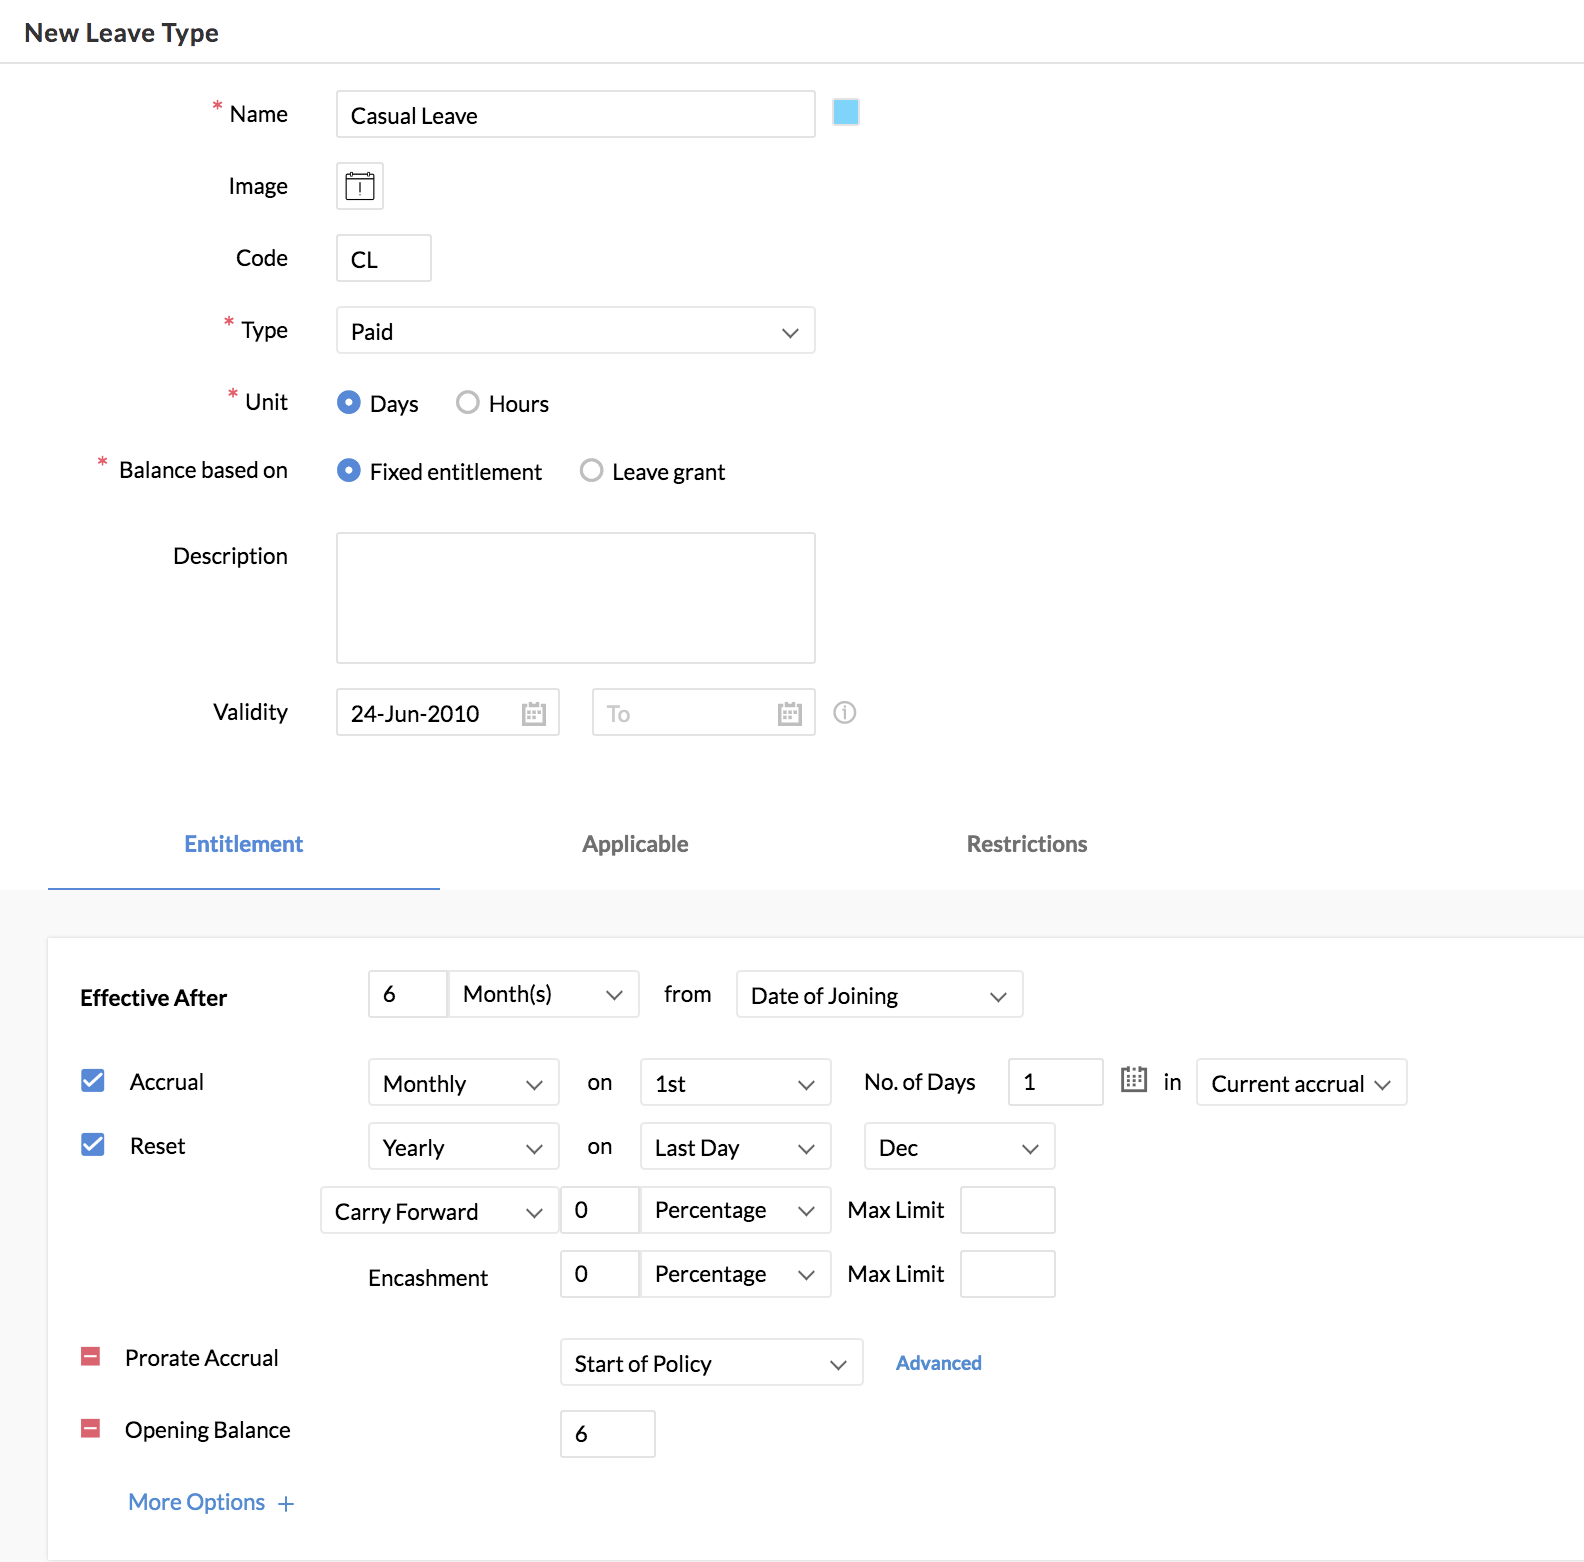
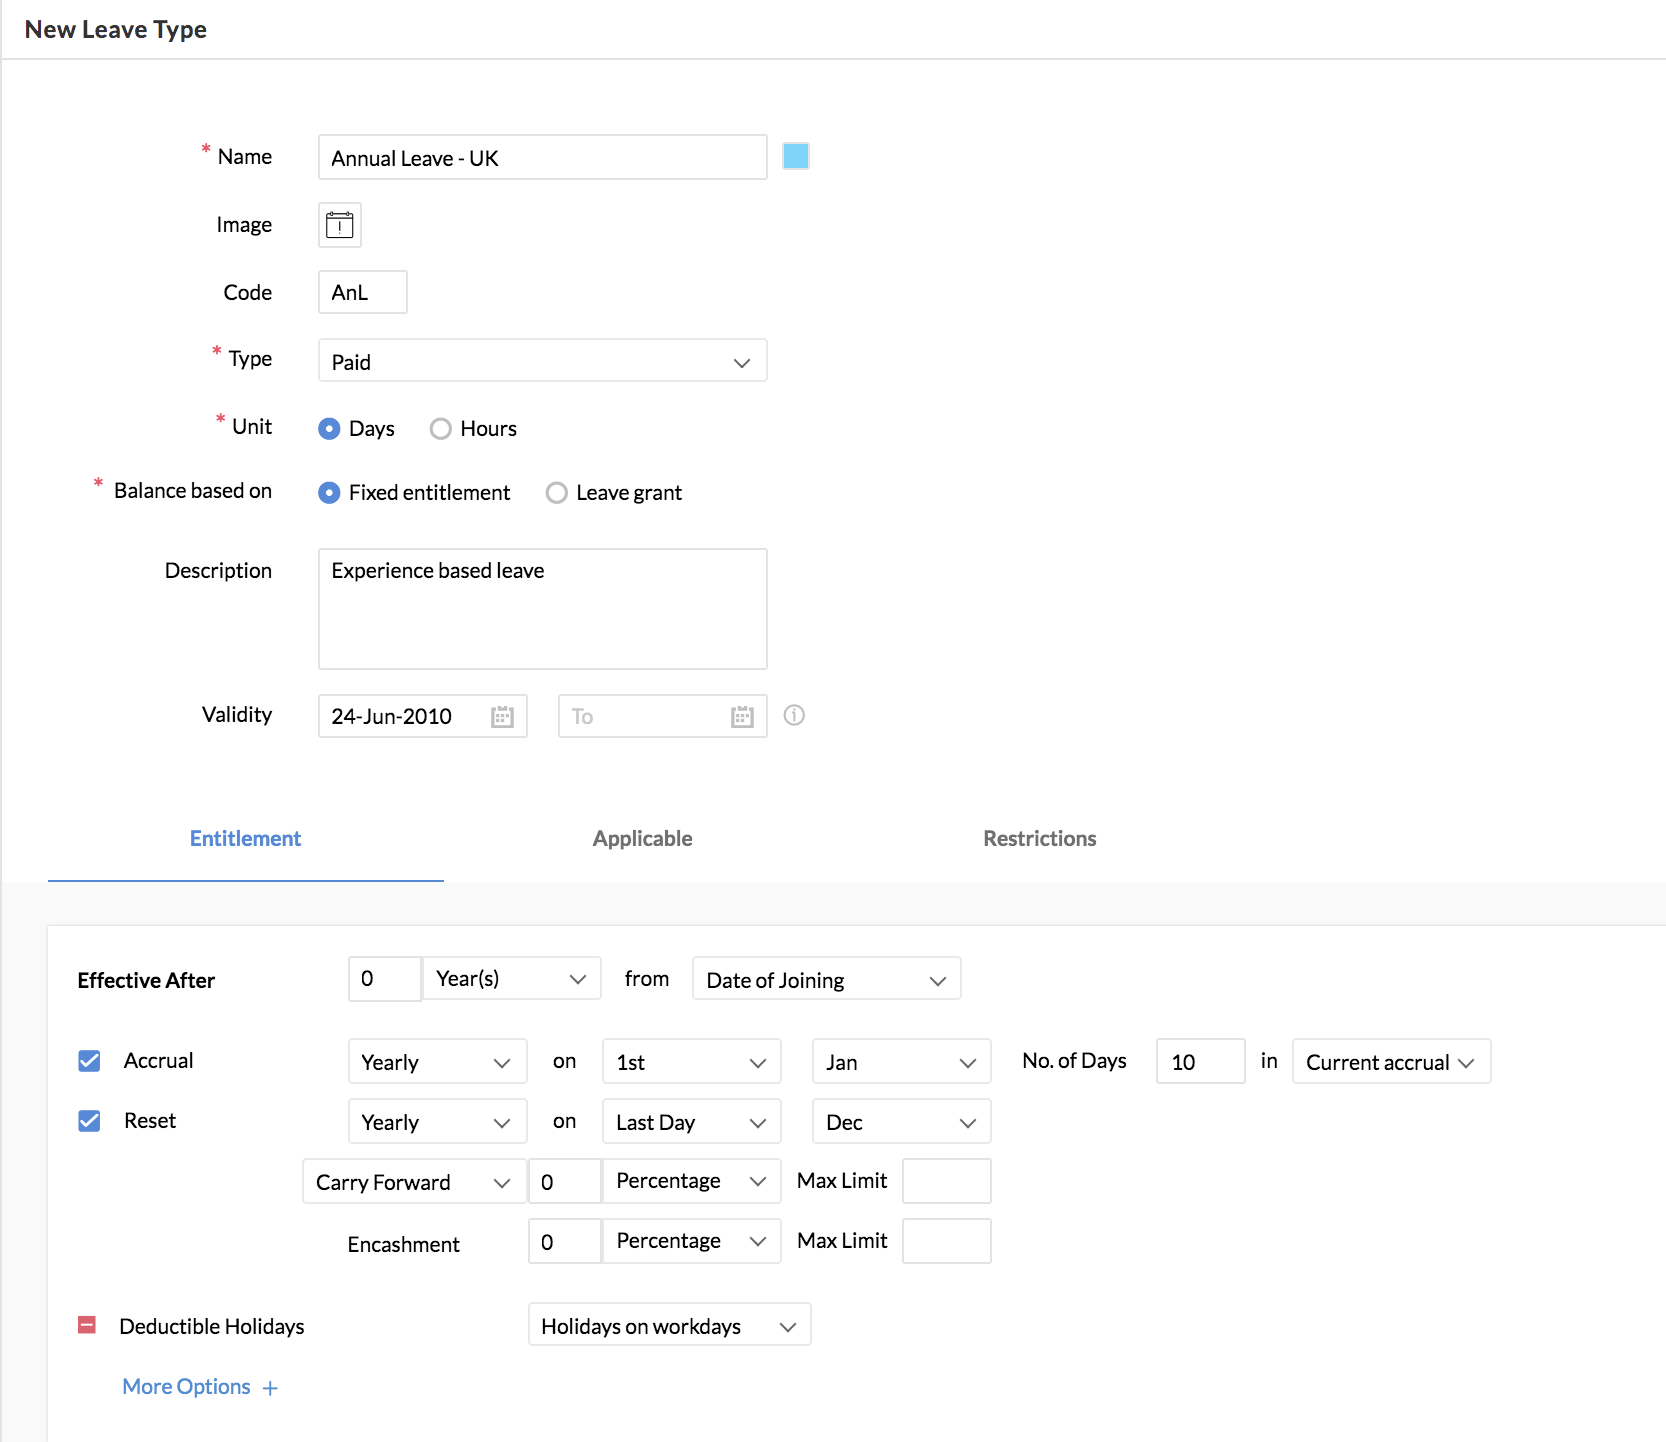
- Go to Leave > Settings > Leave Type > Add
- Give a Name, image and Code - Code is a unique reference for the leave type. For eg, the code for Casual Leave can be given for CL for easy identification
- Under Type, select whether the leave should be Paid or Unpaid, On Duty or a Restricted Holiday
- Under Unit, select Days or Hours and give a description. The unit given here will form the basis for all the leave calculations. For example, if Hours is chosen then all configurations and reports will be in Hours.
- Select Fixed entitlement under Balance based on.
- Validity refers to the period for which the leave type is valid. The From date is mandatory for any leave type. If you do not want the leave type to expire, the To date field can be left blank. Reports for the organization will be generated from this date.
Entitlement
In this section, we define how much leave gets credited to an employee using various options such as accrual and reset. You can also use entitlement when you would like to differentiate the amount of leave for each employee based on their years of experience.
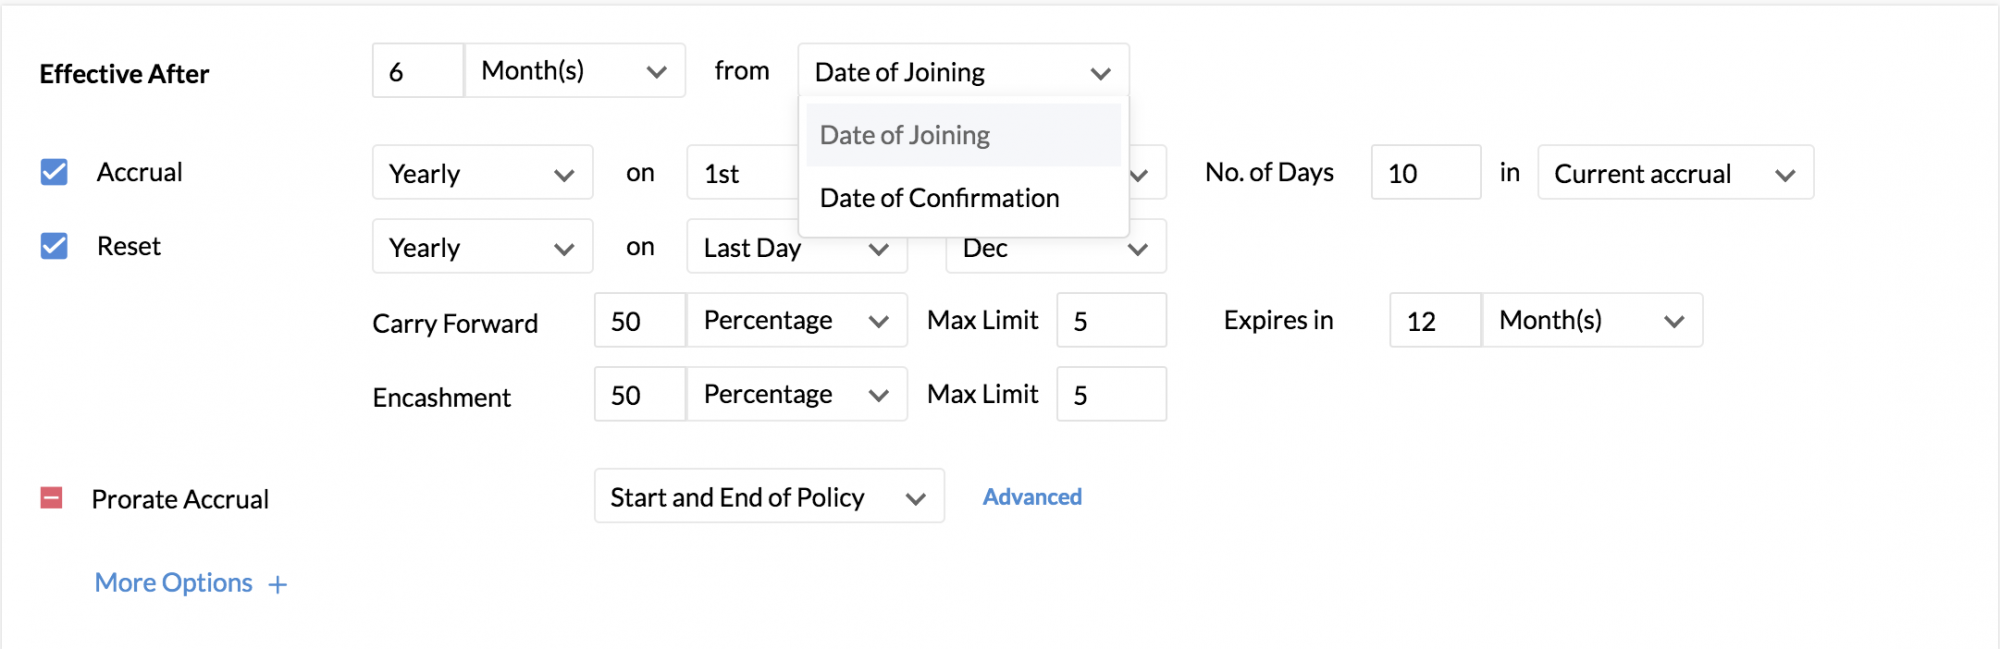
Effective After –The period after which the policy is applicable. The set period can be from either the Date of Joining or the Date of Confirmation.
Example 1: If your organization wanted to credit casual leaves to an employee after two months of joining, you'd select, 2 Months, and from Date of Joining.
Example 2: If your organization wants to credit privilege leave for employees only after six months of their employment confirmation, then you'd select, 6 Months and from Date of Confirmation.
Note: The Date of Confirmation and the Date of Joining fields must be filled in the employee form in order to be applicable in the leave policy.
Accrual helps you set the intervals within which the leave will be credited to the employee. For example, if you select Monthly as the accrual period and enter the entitlement as one, then it means that the employee will be credited one day of leave every month under this leave type.
Under Monthly, you can also define different entitlements for each month. Click the calendar symbol beside the number of days entered. You will see the entitlement calendar popup.
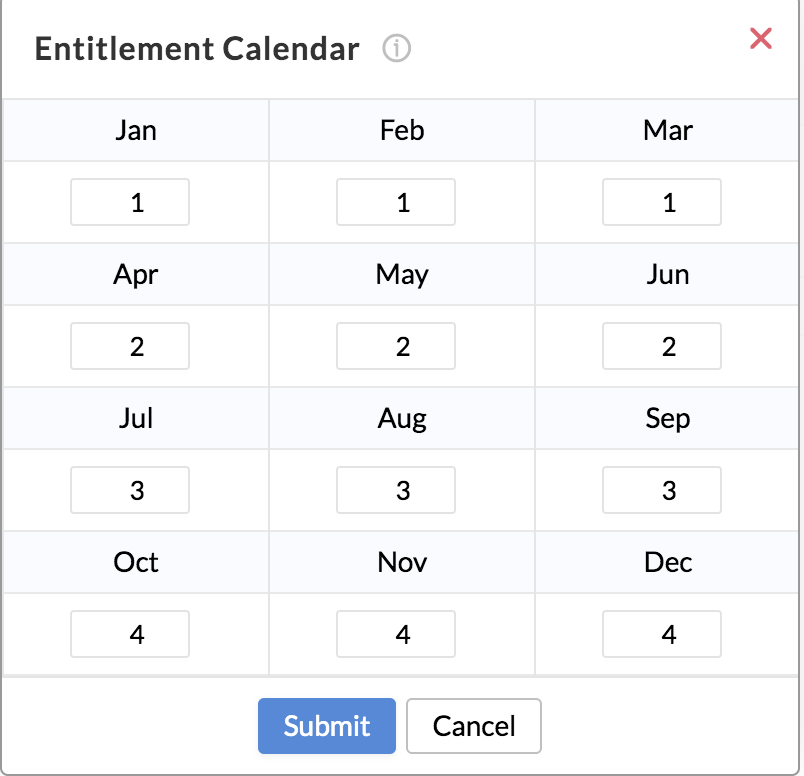
Enter the entitlement for each month. A similar popup will appear based on the accrual period selected - triannually, quarterly, half yearly. semi-monthly and bi-monthly.
If you select Yearly on the 1st of Jan and enter the entitlement as 5, this means that the employees will be credited 5 days on only the 1st of January. If an employee joins in the month of August, they will not receive any leave for that year. The leave will be credited in the following year on the 1st of Jan. However, if you want the leave to be credited within the same year, you can use Prorate Accrual.
Additionally, you can define when the accrual should happen. If Accrual is set as Yearly on 1st of January and Current Accrual is selected, it means that leave will be credited at the start of the accrual period. Based on the setting, the leave will be credited on the 1st of January in the year of joining. If Next Accrual is selected, it implies that leave will be credited on the 1st of January, next year.
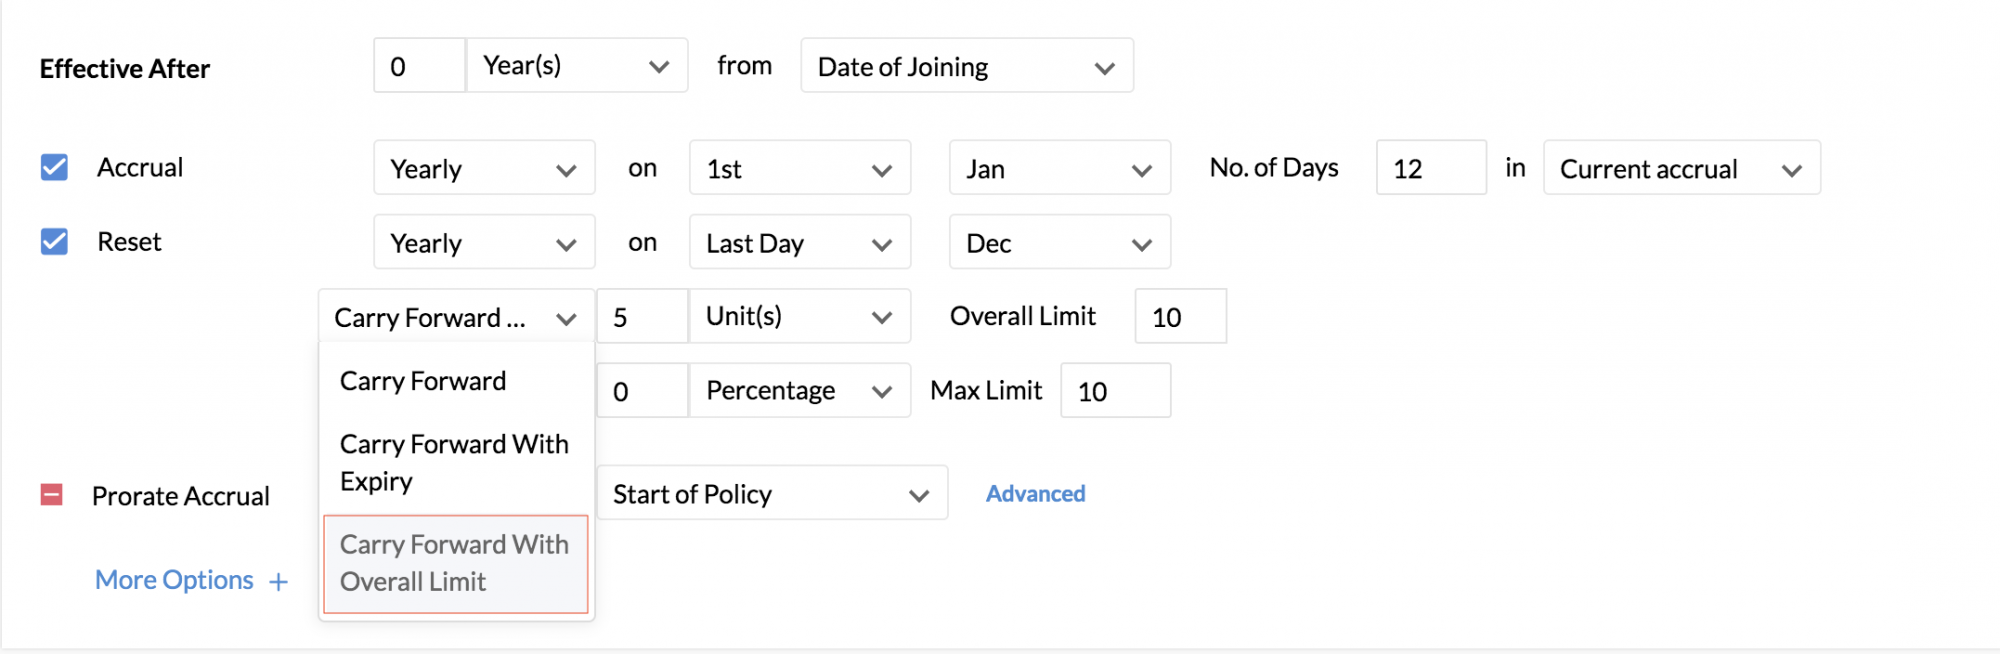
Reset can define whether the leave balance should be reset and also set the intervals for the reset to happen. If Reset is enabled, then it means that you would like the leave balance to lapse within the interval defined. If Reset is disabled, then the leave balance will accumulate and not lapse. When Reset is enabled, the unused balance can be carried forward and/or encashed.
Carry Forward can be used to move leave from one interval to the other. There are two ways leave can be carried forward: as units or as percentages. For example, if there is one day of leave available and one unit is given for carry forward, then the one day available will be carried forward.
In the same case if 50% is given for carry forward then 50% of one, (.5 days) will be carried forward.
Additionally, there are three types of carry forward that can be done.
- Carry Forward - this can be used for simple carry forward.
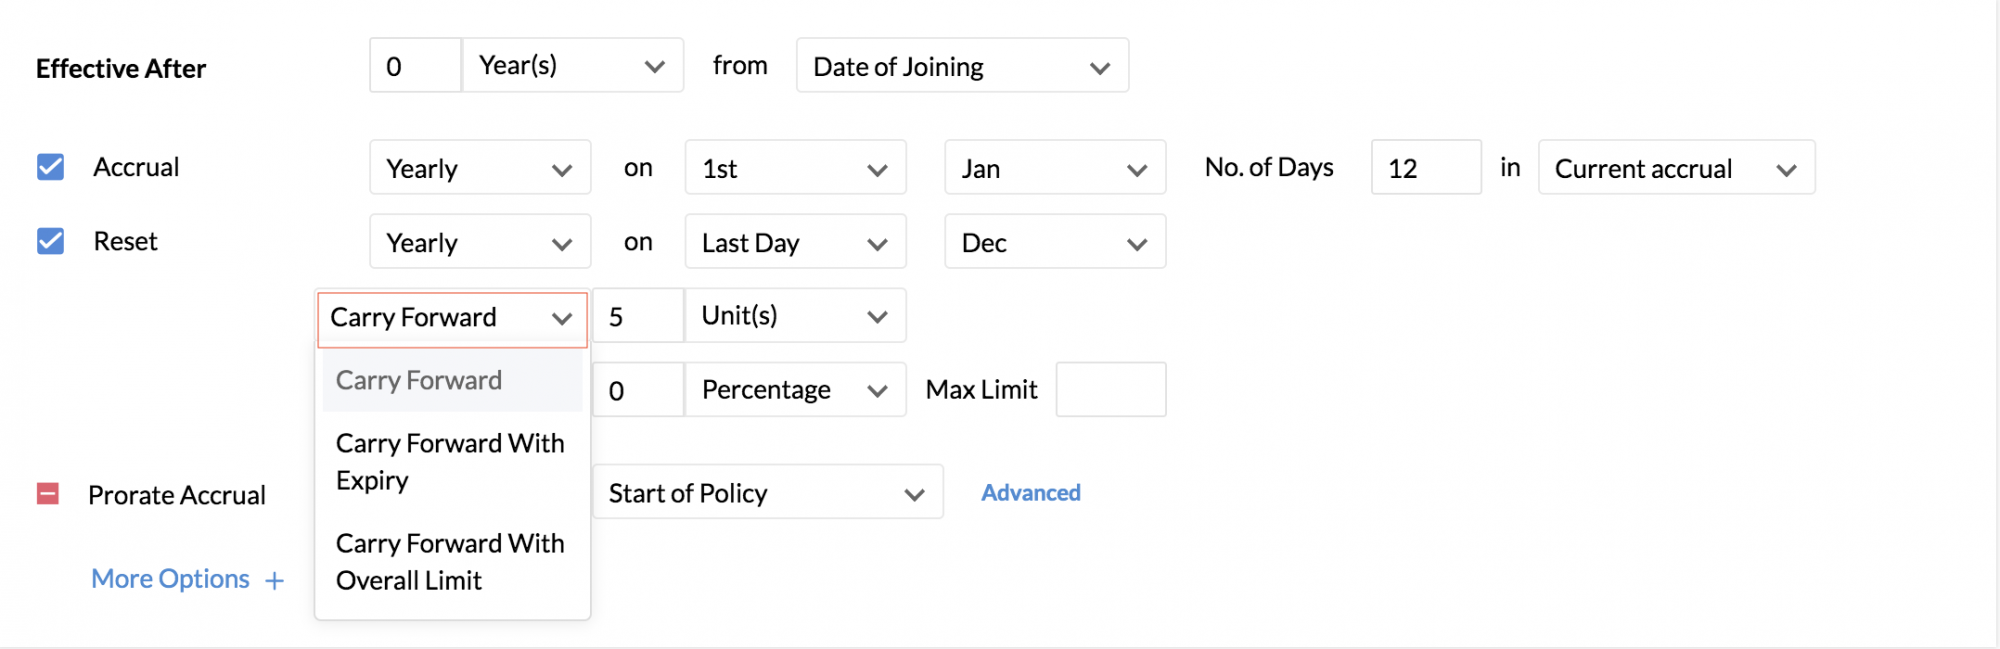
- Carry Forward with Expiry - this can be used to set carry forward along with an expiration date.
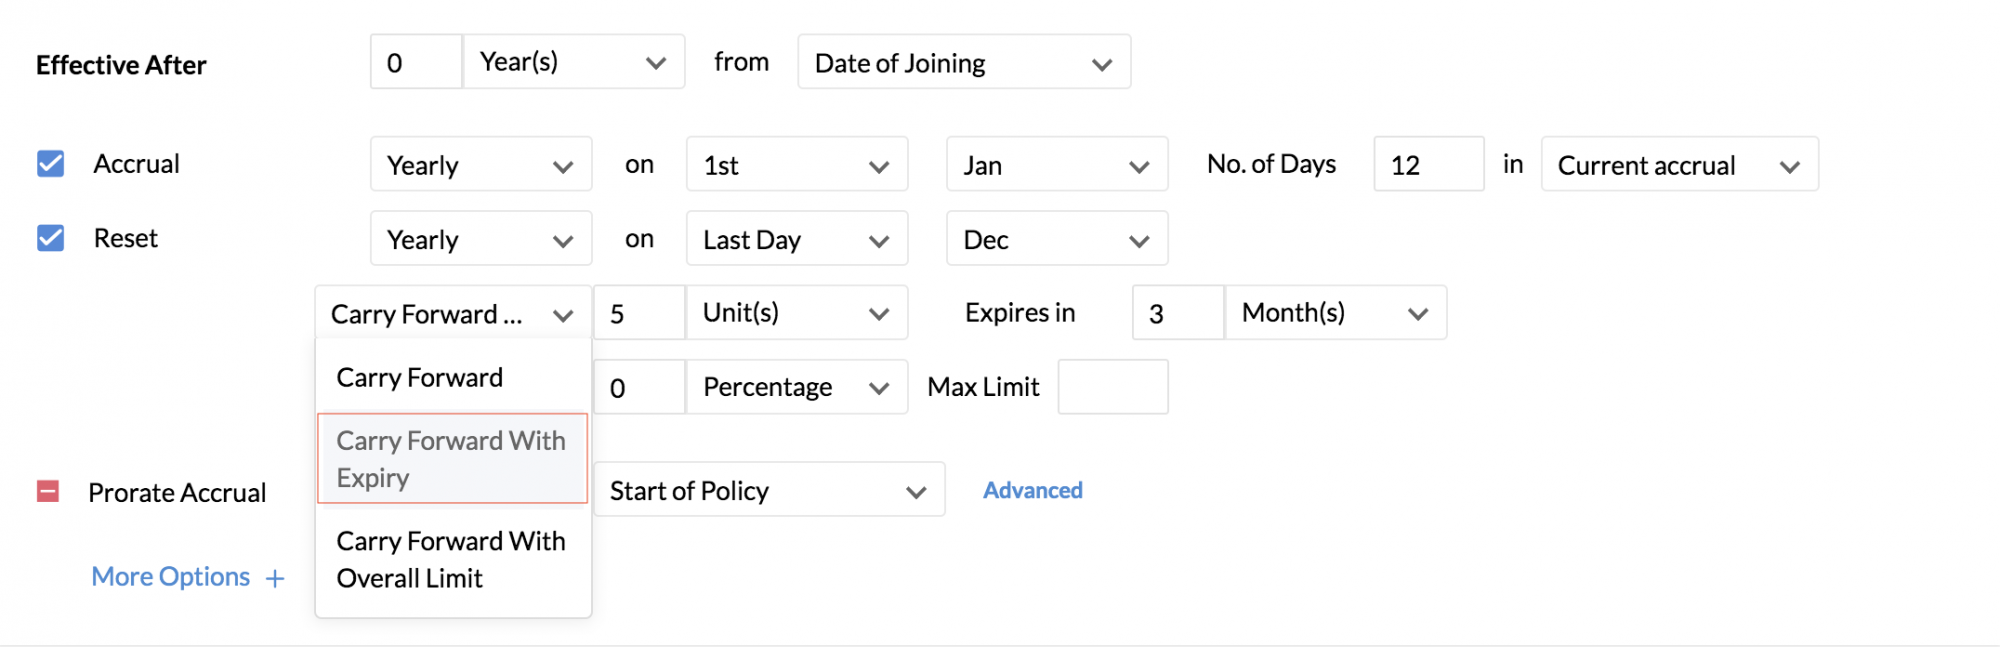
- Carry Forward with Overall Limit - this can be used to set carry forward with an overall limit beyond which the carry forward balance cannot accumulate.
The table below shows the differences between these types of carry forward based on the configurations shown above.
| Date of Accrual | Carry Forward | Carry Forward with Expiry | Carry Forward with Overall Limit |
| 1 January 2019 | 12 days | 12 days | 12 days |
| 1 January 2020 | 12 + 5 ( carried forward from 2019) | 12 + 5 ( will expire on March 2020) | 17: 12 + 5 (carried forward from 2019) |
| 1 January 2021 | 12 + 5 ( carried forward from 2020) | 12 + 5 ( will expire on March 2021) | 22: 12 + 5 (carried forward from 2019) + 5 ( carried forward from 2020) |
| 1 January 2022 | 12 + 5 ( carried forward from 2021) | 12 + 5 ( will expire on March 2022) | 22: 12 + 5 (carried forward from 2019) + 5 ( carried forward from 2020) - Cannot forward beyond 10 units from 2021 as Overall Limit is 10 |
Encashment can be used to define monetary compensation for a number of unused leaves. As in carry forward, you can define it as units or percentages.
You can further restrict both carry forward and encashment limit while using percentage. You can also set an upper limit to the maximum number of leaves that can be carried forward or encashed. This setting will take precedence in case the percentage exceeds this limit. For example, let's assume that you have set 50 % of leave to be carried forward and set four days as the maximum limit for the same. In a scenario where there are ten days of unused leave, 50% of that will be five days, but since we have set four days as the max limit, only four days will be carried forward. The same applies to encashment settings as well.
It is also important to note that overall, carry forward takes precedence over encashment. The spillover will be encashed when the maximum defined carry forward has exceeded. If you have defined five days for maximum carry forward and three days for maximum encashment and you have two days of unavailed leave, those two days will fall under carry forward and not encashment.
Moreover, if there is a leave remainder beyond the maximum carry forward and maximum encashment, that leave will lapse. For example, assume that the entitlement is twelve days. You have defined that the maximum carry forward should be five days and the maximum number of days to be encashed is three days. In this case, if the balance left is nine days, then five days will be carried forward, three days will be for encashment and one day will lapse.
Prorate Accrual
Using Prorate Accrual, you are allowing leave to be credited whenever the employee enters the policy. Under prorate accrual, you can further specify how the entitled leave gets prorated for the first and last accrual cycle using these options:
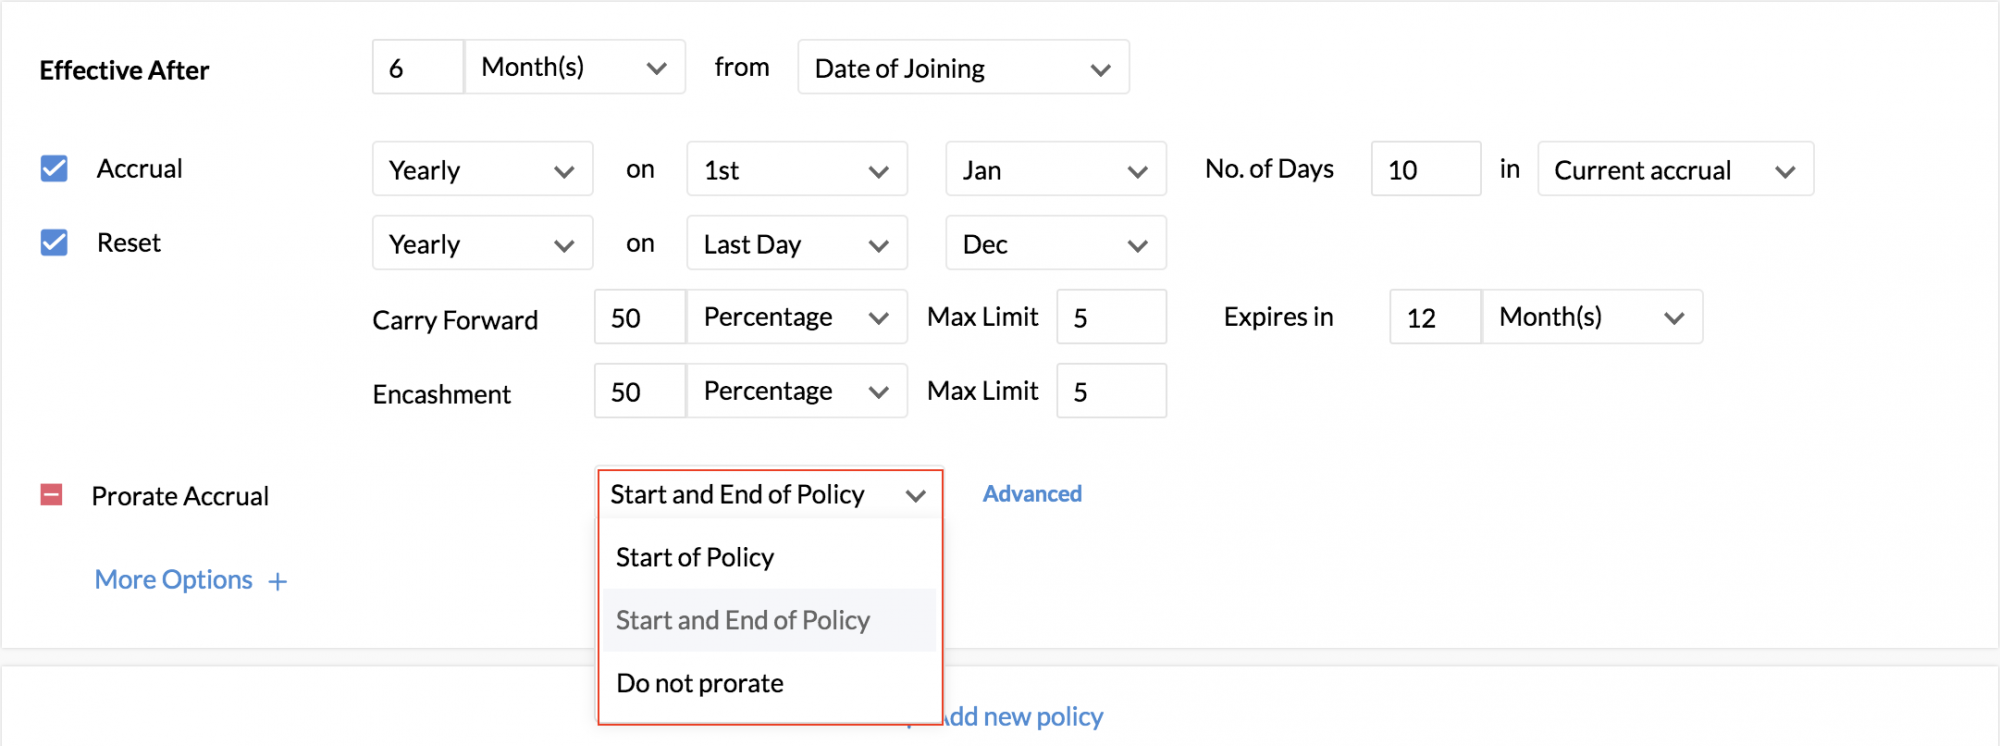
a. Start of policy - Employee will be receiving the entitled leave in a pro-rated basis from the start date of the policy. The period entered in Effective After will determine when the policy starts for each employee based on their date of joining and also the accrual amount.
b. Start and end of policy - This option is ideal when there are multiple policies within a leave type. Here, the first accrual and the last accrual of a policy will be pro-rated.This can be used for leaves based on employee's experience where the employee's leave is calculated in relation to their number of years in service.
c. Do not prorate - The full entitled leave will be given to the employee irrespective of the start date of the policy. The leaves will not be pro-rated.
Let us clearly distinguish between disabling Prorate Accrual and Do not Prorate option. While disabling Prorate Accrual implies that the leaves will be credited only on the accrual date, the Do not Prorate option in Prorate Accrual implies that the entire entitled leave will be given to the employee even if they join outside of the accrual date. Let us take an example here. Let us assume that for 5 days of casual leave an accrual date is set for Yearly 1st of January. An employee joins on the 5th of August. If Prorate Accrual is disabled, then this employee will not get any leave credited during their joining year. It will only be credited the following year on 1st of Jan. In the same scenario, if have enabled Prorate Accrual with Do not Prorate option, then the employee will get the entire 5 days even if they have joined outside of the set accrual date.
Let's now take a scenario to understand the difference between Start of Policy, Start and End of Policy and Do not Prorate calculation:
Start of policy calculation:
According to a leave policy, once the employee completes one year of service, the employee is credited six days of leave on the 1st of January every year.
The policy's validity date is: 1/3/2015 (1st March 2015)
Let us take an employee who has joined on 5/8/2015(5th August 2015). For this employee, the policy will start on 5/8/2016 (5th August 2016) - one year from the date of joining.
For the year 2016 the accrual will be calculated in this manner for this employee: *
No.of months to be considered for calculation - from August to December = five months
So the six days will be pro-rated for five months and given and 2.5 days will be credited for this employee.
From the following year, the employee will be credited 6 days of leave on 1st of January.
Start and End of Policy calculation:
As mentioned before, Start and End of Policy is useful in cases where there are multiple policies within a leave type.
Let us consider the same scenario as given above and add a second policy to it.
1st Policy - six days of leave will be credited to the employee who has completed one year of service. Accrual is pro-rated from Start and End of Policy
2nd Policy - 12 days of leave will be credited to an employee who has completed 2 years of service from Start and End of Policy.
Taking the example of the employee whose Date of Joining is 5/8/2015( 5th August 2015),
1st policy calculation for the year 2016 will be as given above*.
For the 2nd policy, the employee will be eligible on 5/8/2017 (5th Aug 2017) when the employee would have completed 2 years of service.
Let us see how the accrual will be calculated for the year 2017 (2nd year):
From 1st Jan 2017 to 4th Aug 2017 the employee is still part of the first policy. So the 6 days of leave will be calculated for 8 months (January - August) based on the first policy and the employee will be credited 4 days of leave.
From 5th Aug 2017, the 2nd policy will become applicable. The 12 days of leave from the 2nd policy will be pro-rated for 4 months ( September -December) and the employee will be credited 4 days of leave.
So in the year 2017, the employee would have been credited 4 + 4 = 8 days of leave.
Do Not Prorate
If do not prorate is applied to the above example, then the total entitled leave will be credited without being prorated, irrespective of when the employee comes into the policy. To elaborate, although the employee has entered the first policy only on 5th Aug 2016, they will receive the full six days entitled for that year without being prorated.
Under Advanced option, you can further define how the proration is to take place:

1.Prorate by
a.Number of effective months - Only the effective number of months will be considered. For example, if an employee has joined on 5th August 2015 - the 5 months will be taken for proration(Aug- Dec) although he has joined on the 5th and not the 1st of that month.
b.Number of effective days - when this option is applied, the exact number of effective days will be considered while calculating the prorated leave. Taking the same example as above, the number of days considered for proration will be 148 days (5th Aug - 31st Dec).
2. First month rule - this specifies the intervals within the first month of joining and the exact amount of leave to be given within each interval. For example, you can create a rule stating an employee who enters the policy from the 1st–15th of the month will be credited one day of leave while those entering from the 15th–31st will be credited .5 days of leave. When this rule is applied for multiple policies, the first month refers to the first month of each policy.
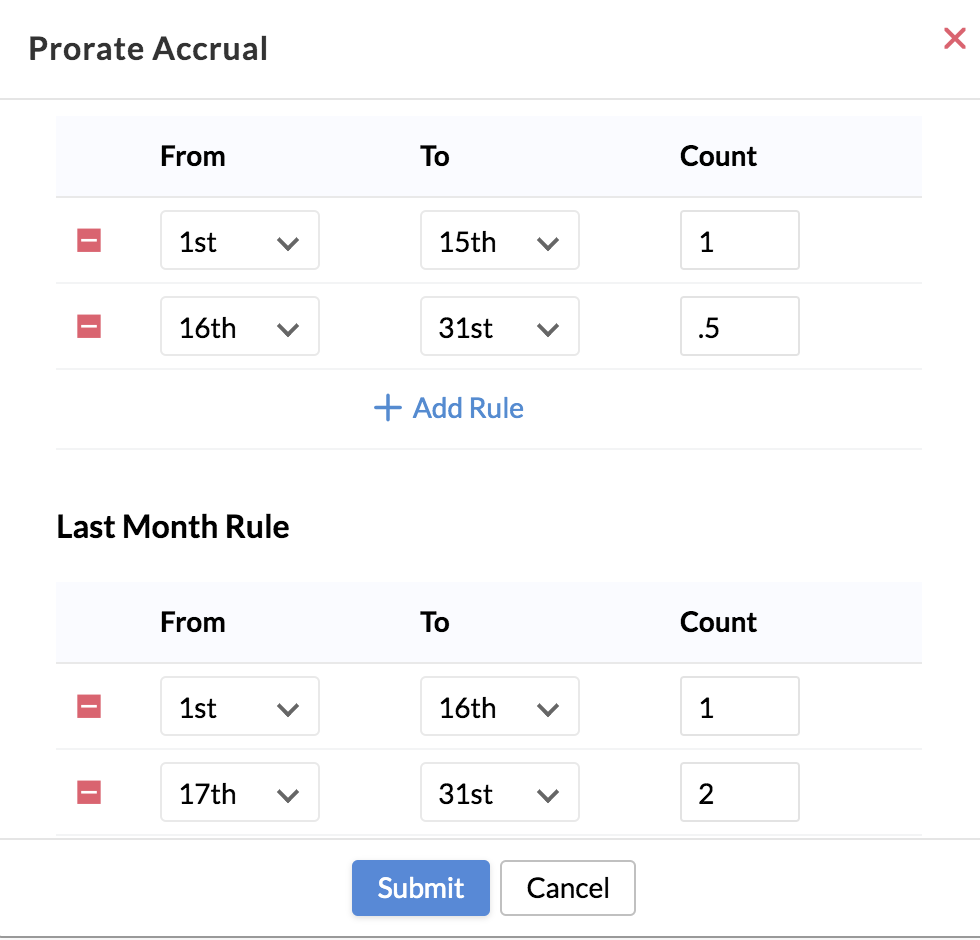
3. Last month rule - This specifies the intervals within the employee's final month and the exact amount of leave to be given within each interval. For example, you can create a rule stating that in their final month of relieving, if the employee exists from the 1st –15th of that month, 1 day will be credited and from the 17th–31st, 2 days will be credited. When this rule is applied for multiple policies, the last month refers to the last month of transition from one policy to the next.
4. Round off - Leave will be rounded-off using various options:
In the first dropdown there are 3 options - Nearest, Maximum and Minimum.
In the second dropdown there are 3 options - Day, Half Day and Quarter Day (for Days)and Hour, 30 min and 15 min (for Hours)
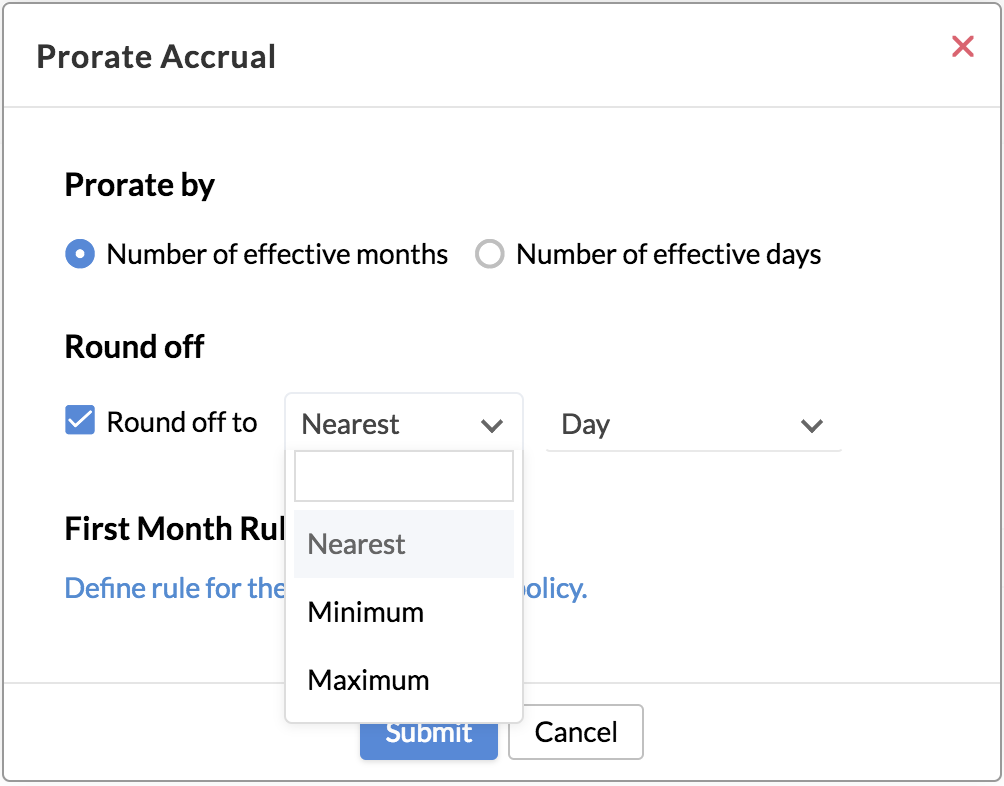
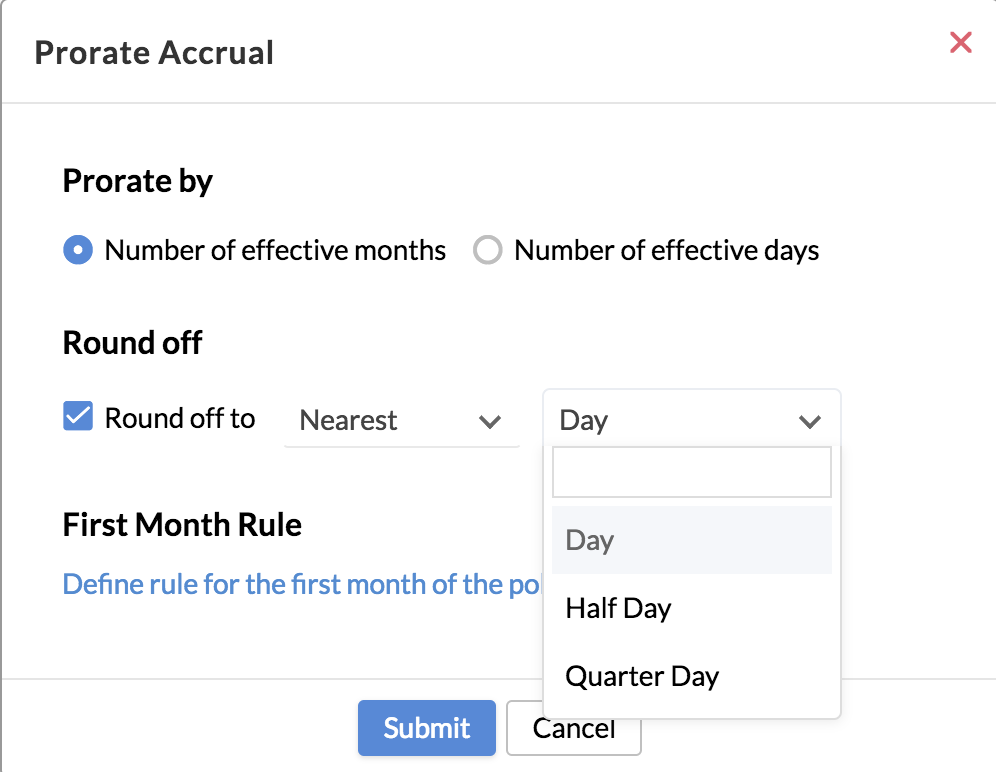
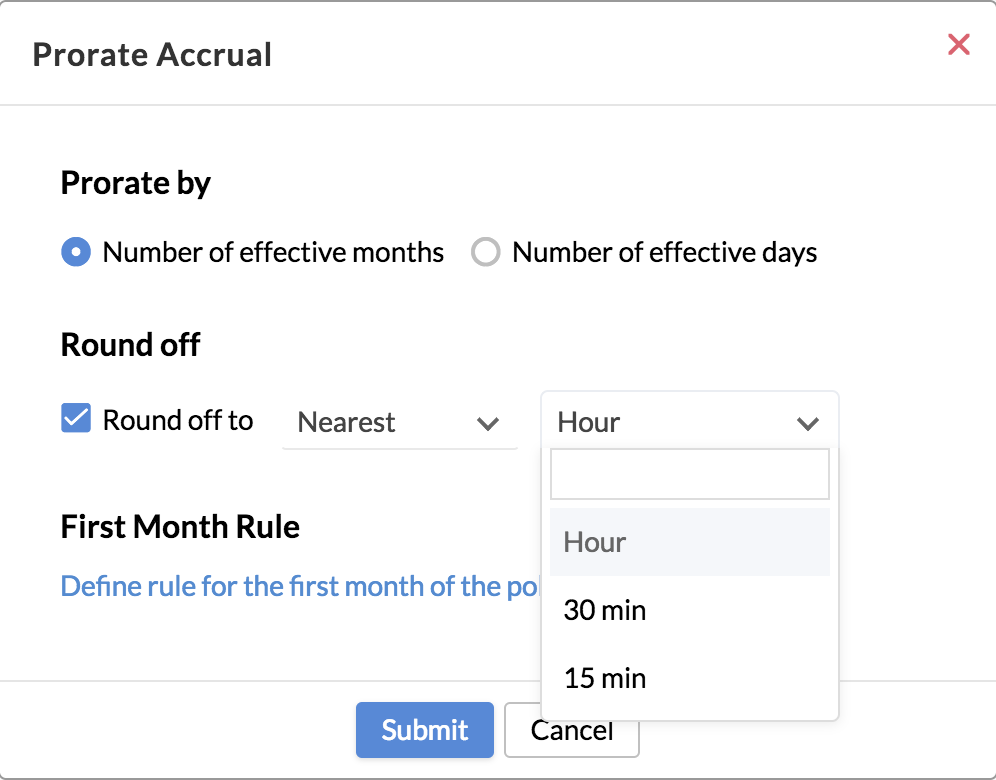
Let us take some examples to understand the round-off options.
Let us assume that an employee's prorated leave count is 3.43 days of leave. If round-off is disabled then he will be credited exactly 3.43 days of leave.
When enabled, let us see how each combination works:
1) Days calculation
Prorated Leave Count = 3.43 days
Nearest Day = 3 days (rounded-off to the nearest whole value)
Nearest Half Day =3.5 days ( rounded-off to the nearest .5 value)
Nearest Quarter Day = 3.5 days ( rounded-off to the nearest .25 value)
Maximum Day = 4 days
Maximum Half Day = 3.5 days
Maximum Quarter Day = 3.5 days
Minimum Day = 3 days
Minimum Half Day= 3 days
Minimum Quarter Day = 3.25 days
Let us assume that an employee's prorated leave count is 13.89 hours.
2) Hours calculation
Prorated Leave Count = 13.89 hours ( 13 hours 53 minutes)
Nearest Hour = 14 hours
Nearest 30 min = 14 hours
Nearest 15 min = 14 hours
Maximum Hour = 14 hours
Maximum 30 min = 14 hours
Maximum 15 min = 14 hours
Minimum Hour = 13 hours
Minimum 30 min = 13.5 hours ( 13 hours 30 minutes)
Minimum 15 min = 13.75 hours ( 13 hours 45 minutes)
Under More Options you can further define your leave type:
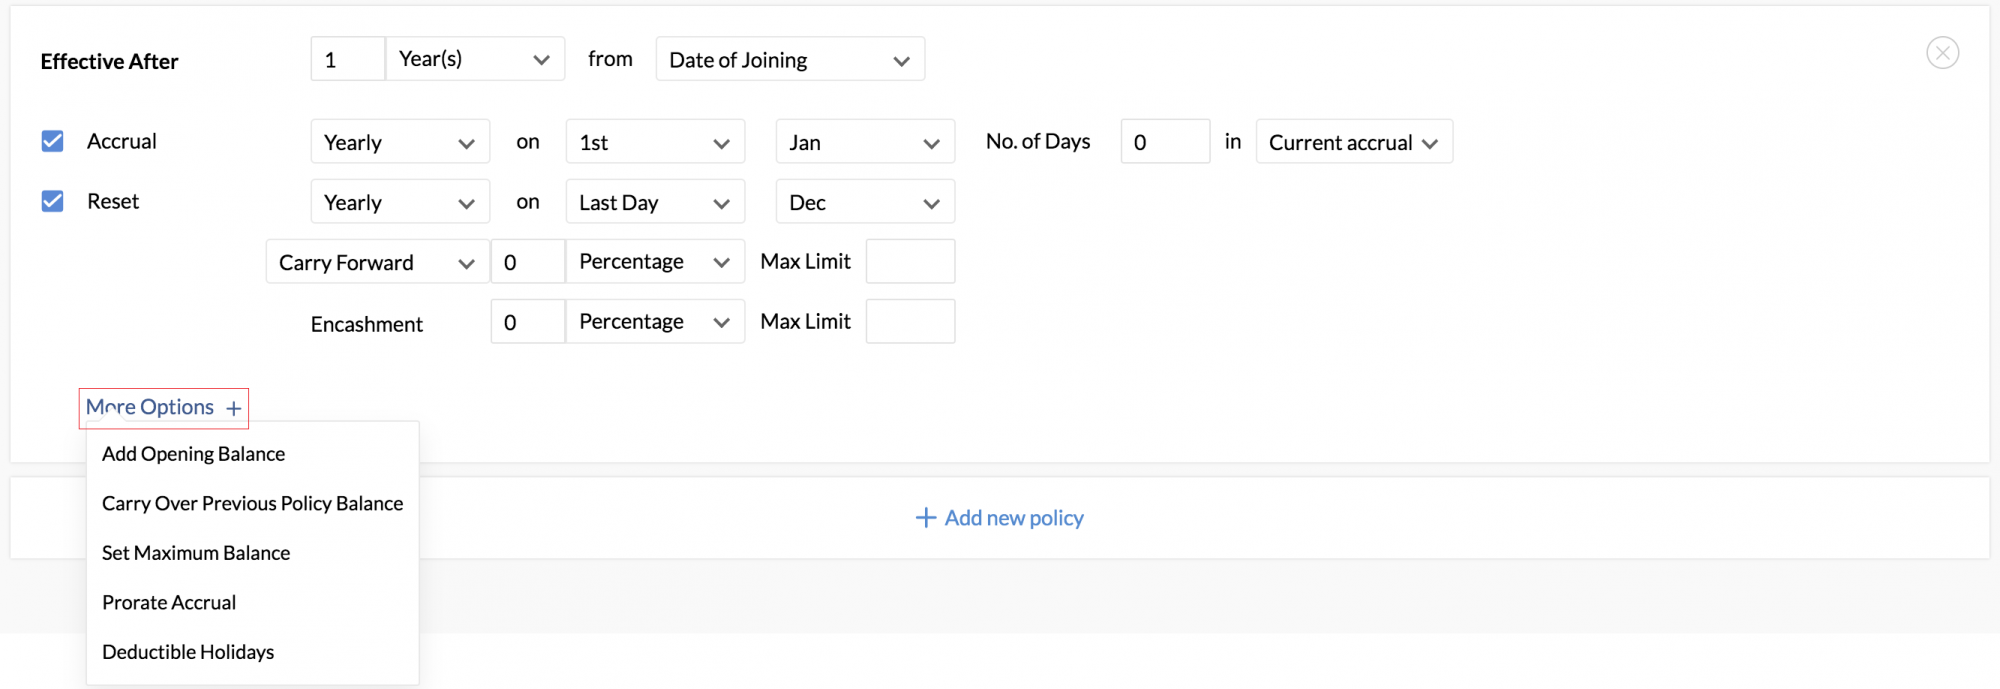
a. Opening Balance - Leave given in an ad hoc basis during certain circumstances. This leave is given as a one-time leave. This will be helpful during the period of probation for a new joinee when the employer would like to give the employee leave during the first six months of service but make it available to be used only after six months. In order to prevent the employee from using this leave before six months, you can give 6 months under Effective from and add 6 in Opening Balance.
b. Carryover Previous Policy Balance - Limit the carry over of the balance leave from the previous policy to the current policy. You can also define the amount of leave balance to be carried over in terms of Units or Percentages.
c. Set Maximum Balance - Indicates the maximum number of days/hours that can be accumulated.Once the maximum balance is reached, no more leaves will be credited. Use this option to encourage employees to take leave rather than accumulate it.
d. Prorate Accrual - Allow leave to be credited whenever the employee enters the policy. Under prorate accrual, you can further specify how the entitled leave gets prorated for the first and last accrual cycle using these options:
e. Deductible Holidays - Used when entitled leave is inclusive of Bank or Public Holidays. When enabled, the public or bank holidays will become a part of the entitled leave and will be deducted from the leave balance of the employee. You can further specify which of the holidays are to be deducted:
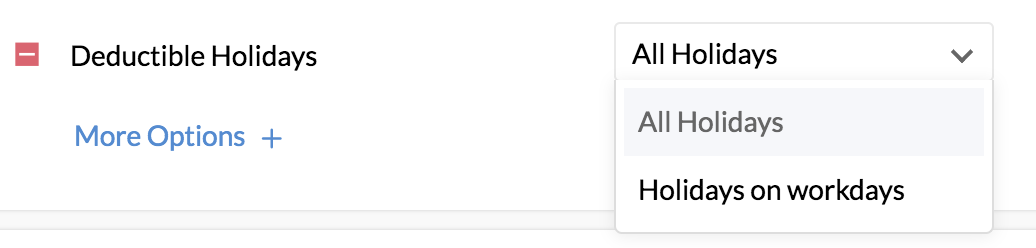
- If All Holidays is chosen, then all the bank or public holidays applicable to the employee, both workdays and days off, will be deducted from the employee's leave balance.
- If Holidays on workdays is chosen, then only the applicable public or bank holidays that fall on a workday ( based on the employee's shift), will be deducted from the employee's leave balance.
Applicability
In this section, you can define who the leave is 'Applicable' to. You have options like Gender, Marital Status, Department, Designation, Location, Role here. You also have an option to add specific employees to the leave type under Employee. This is useful in scenarios where you would like a specific employee from another region to be part of this leave type.
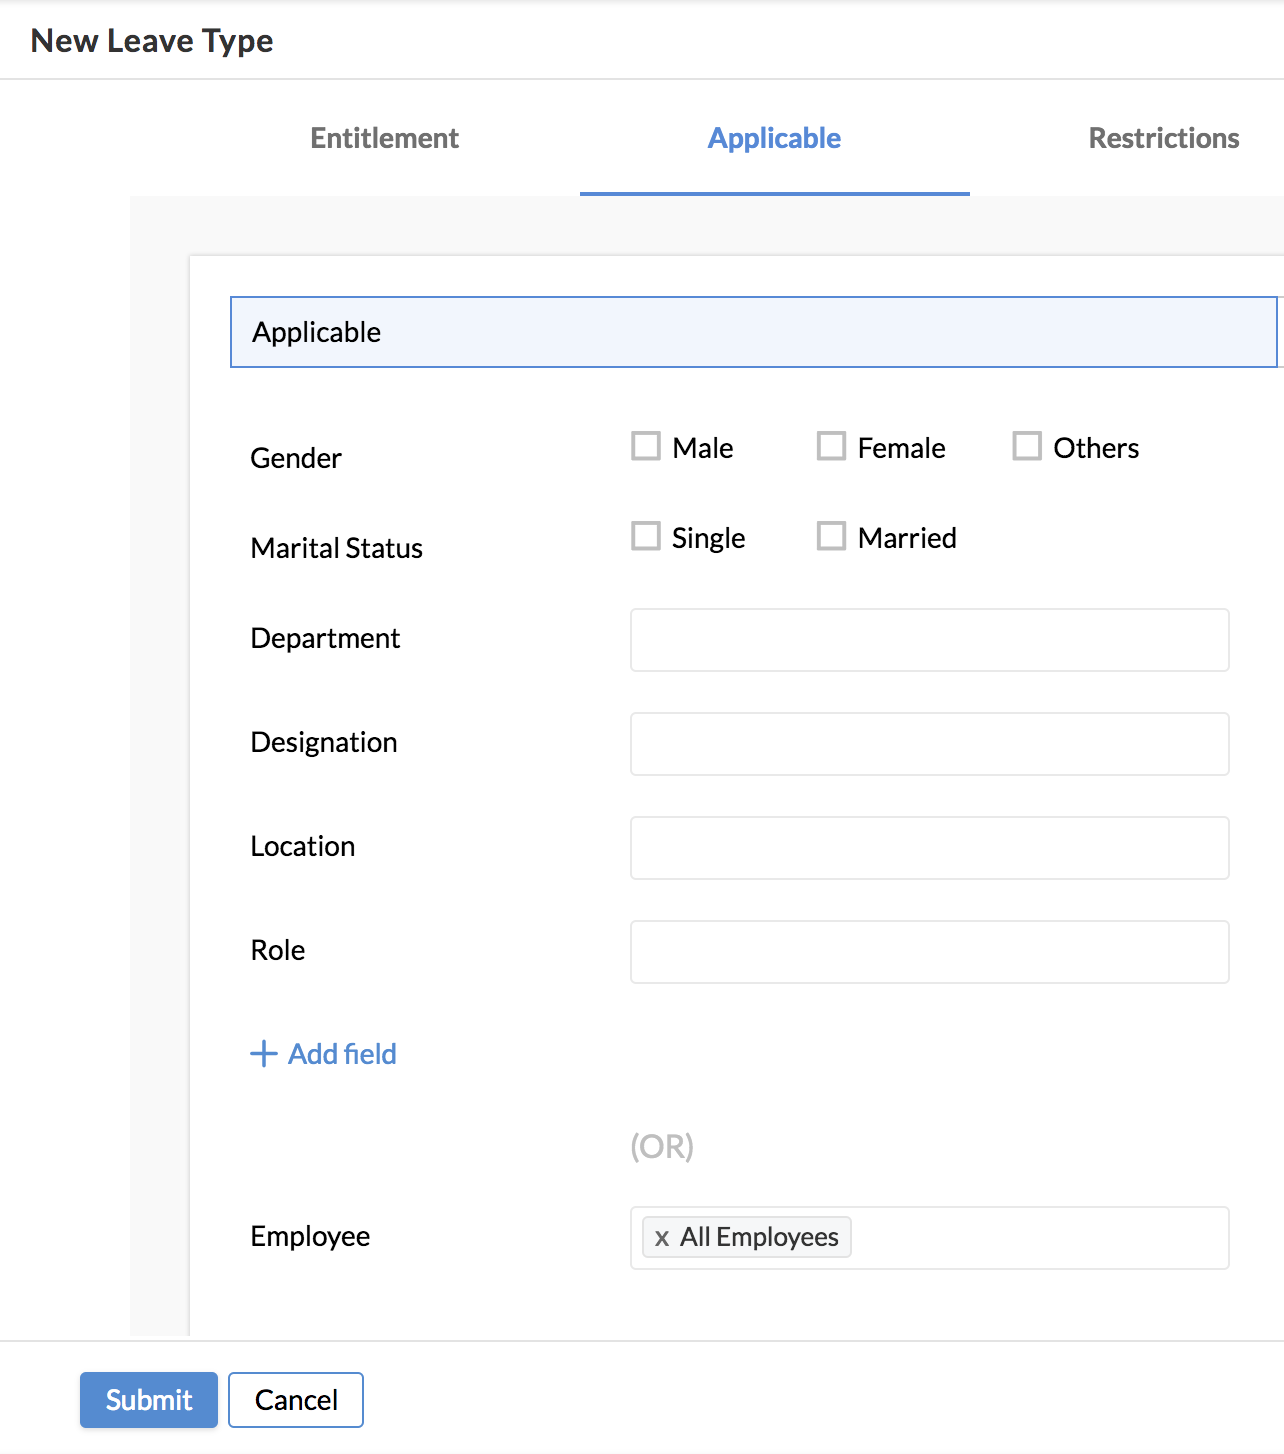
Exceptions - Set the exceptions based on options like Department, Designation, Location, and Role.
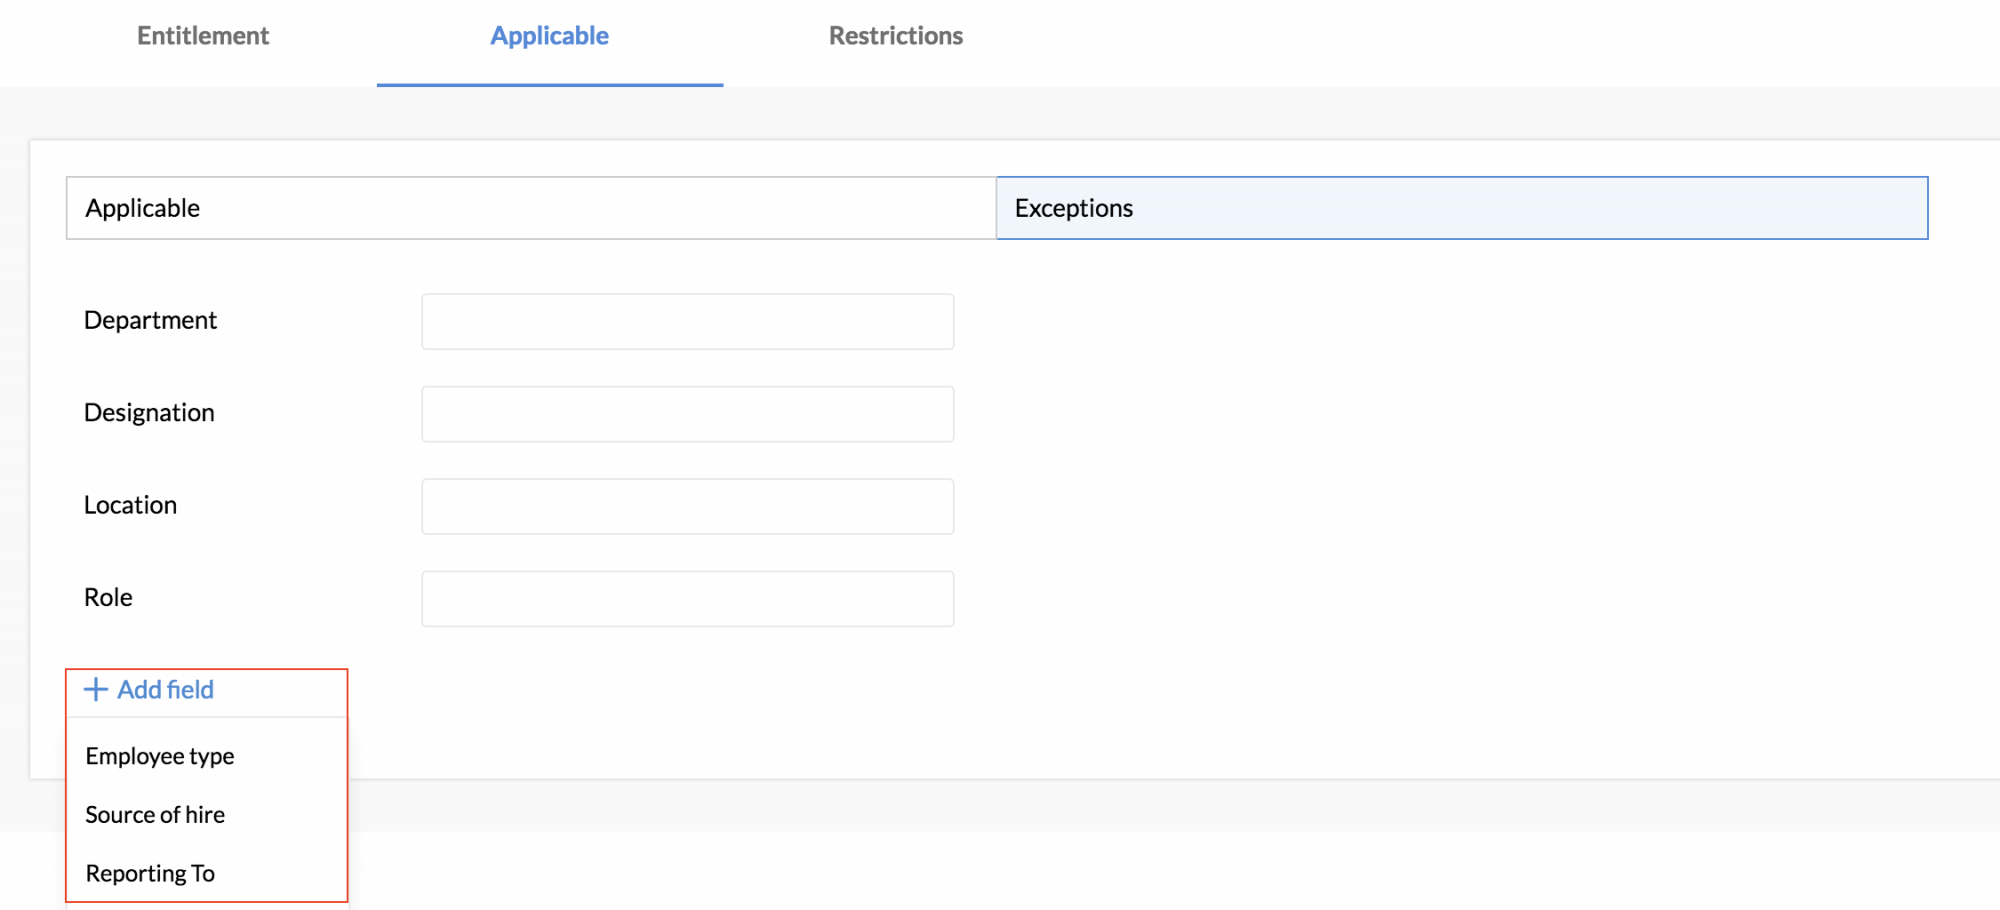
The Add field option is available in under Applicable and Exceptions where you can view drop-down and multi-select fields from the employee form. Choose the ones that you would like to include. This is useful in cases where you want to narrow down the leave type to a specific group of employees.
Restrictions
In this section, we can further refine the leave by imposing various restrictions.
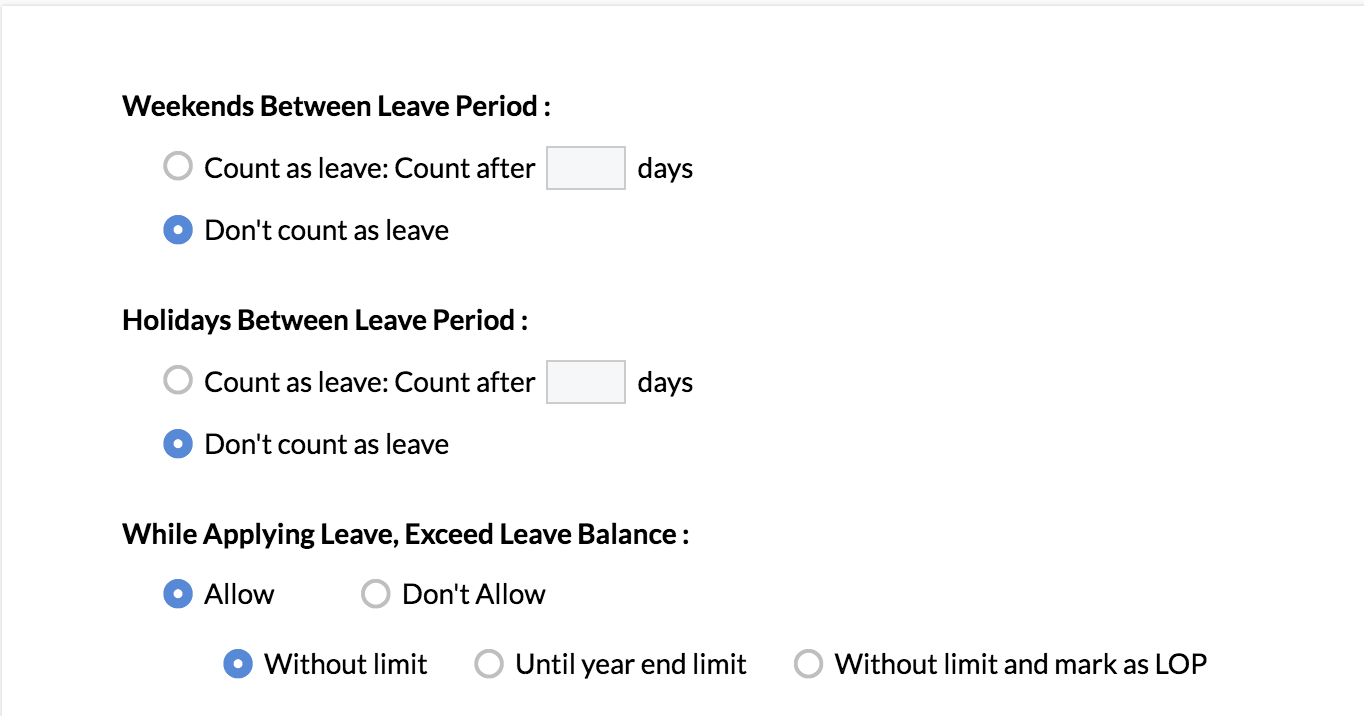
Weekends Between Leave Period - If this setting is disabled, then it implies that weekends will not be included while taking leave. If the setting is enabled, then it implies that weekends will be considered as part of the applied leave. Furthermore, when a value is given here it means that if the number of leave exceeds that value, then the weekends will be included as part of leave applied.
Holidays Between Leave Period - Similar to Weekends between Leave Period setting, you can enable/disable Holidays between the Leave Period as well and also give a value. If the leave period exceeds this value, then the holidays will be included.
While Applying Leave, Exceed Leave Balance - There are 2 main options under this setting. If Don't Allow is chosen it means that the system will show an error and not allow the employee to apply for the leave if it exceeds the leave balance.
If Allow is chosen , then there are 3 options to choose here:
If Without limit is chosen then the employee will be allowed to apply for leave even if the leave balance exceeds
If Until year end limit is chosen then the employee will be allowed to apply for leave even if it exceeds the current leave balance, until the year-end limit. This option is useful for monthly accrued leaves.
If Without limit and Mark as LOP is chosen it means that the employee will be allowed to apply leave even if the leave balance exceeds but will be marked excess requests as LOP (Loss of Pay).
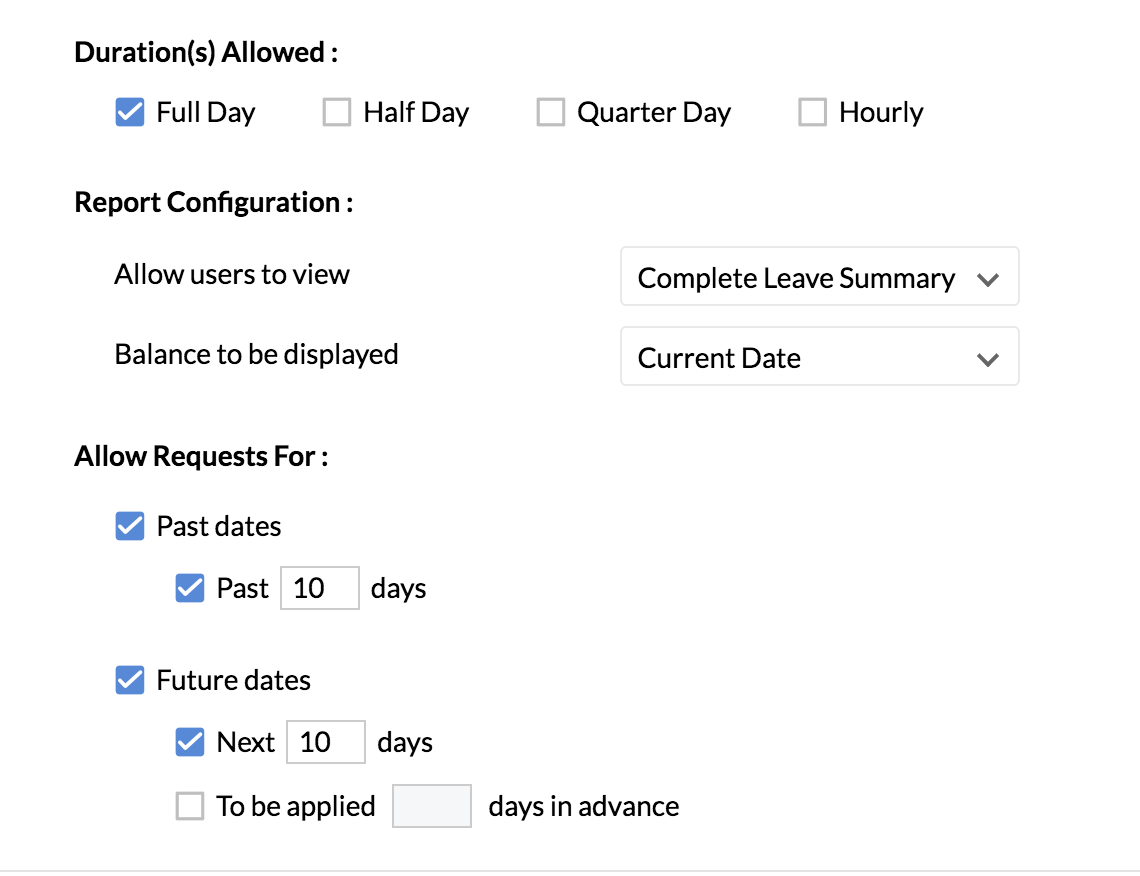
Durations Allowed:
Enable quarter-day option - Employees can apply for quarter-day leave under this leave type.
Enable half-day option - Employees can apply for half-day leave under this leave type.
Enable hourly option: Employees can apply for hour-based leave.
Report Configuration:
There are 2 options to differentiate the type of data displayed in the reports for the employee:
1. Allow users to view
a. Leave Taken Alone - Display only the leave taken.
b. Simple Leave Summary - Display the leave balance.
c. Complete Leave Summary - Display a detailed summary with details such as period, leave taken, balance and leave lapsed.
2. Balance to be displayed - Choose to display the leave balance in 4 ways:
a. Start date of leave request – The leave balance shown will exclude leave applied for future dates and leaves to be accrued in future.
b. Accrual Period Balance –The leave balance shown will include applied leaves for a future date if it falls within the accrual period.
c. Current Date –The leave balance shown will exclude leaves to be accrued in future and include leaves applied for future date.
d. Year end estimated balance –The leave balance shown will include applied leaves and leaves to be accrued in the future until the year end.
This setting allows you to define if you want to allow or restrict leave requests for past dates and future dates. If you want to allow leave requests for past dates but within a specified duration, the number of days can be entered. For instance, if you want to allow leave requests for only the past 10 days, then, enable for past days and enter 10 days.
Similarly, the same can be applied for future leave requests. In addition to setting a limit, you can also define how many days in advance the leave request must be submitted.
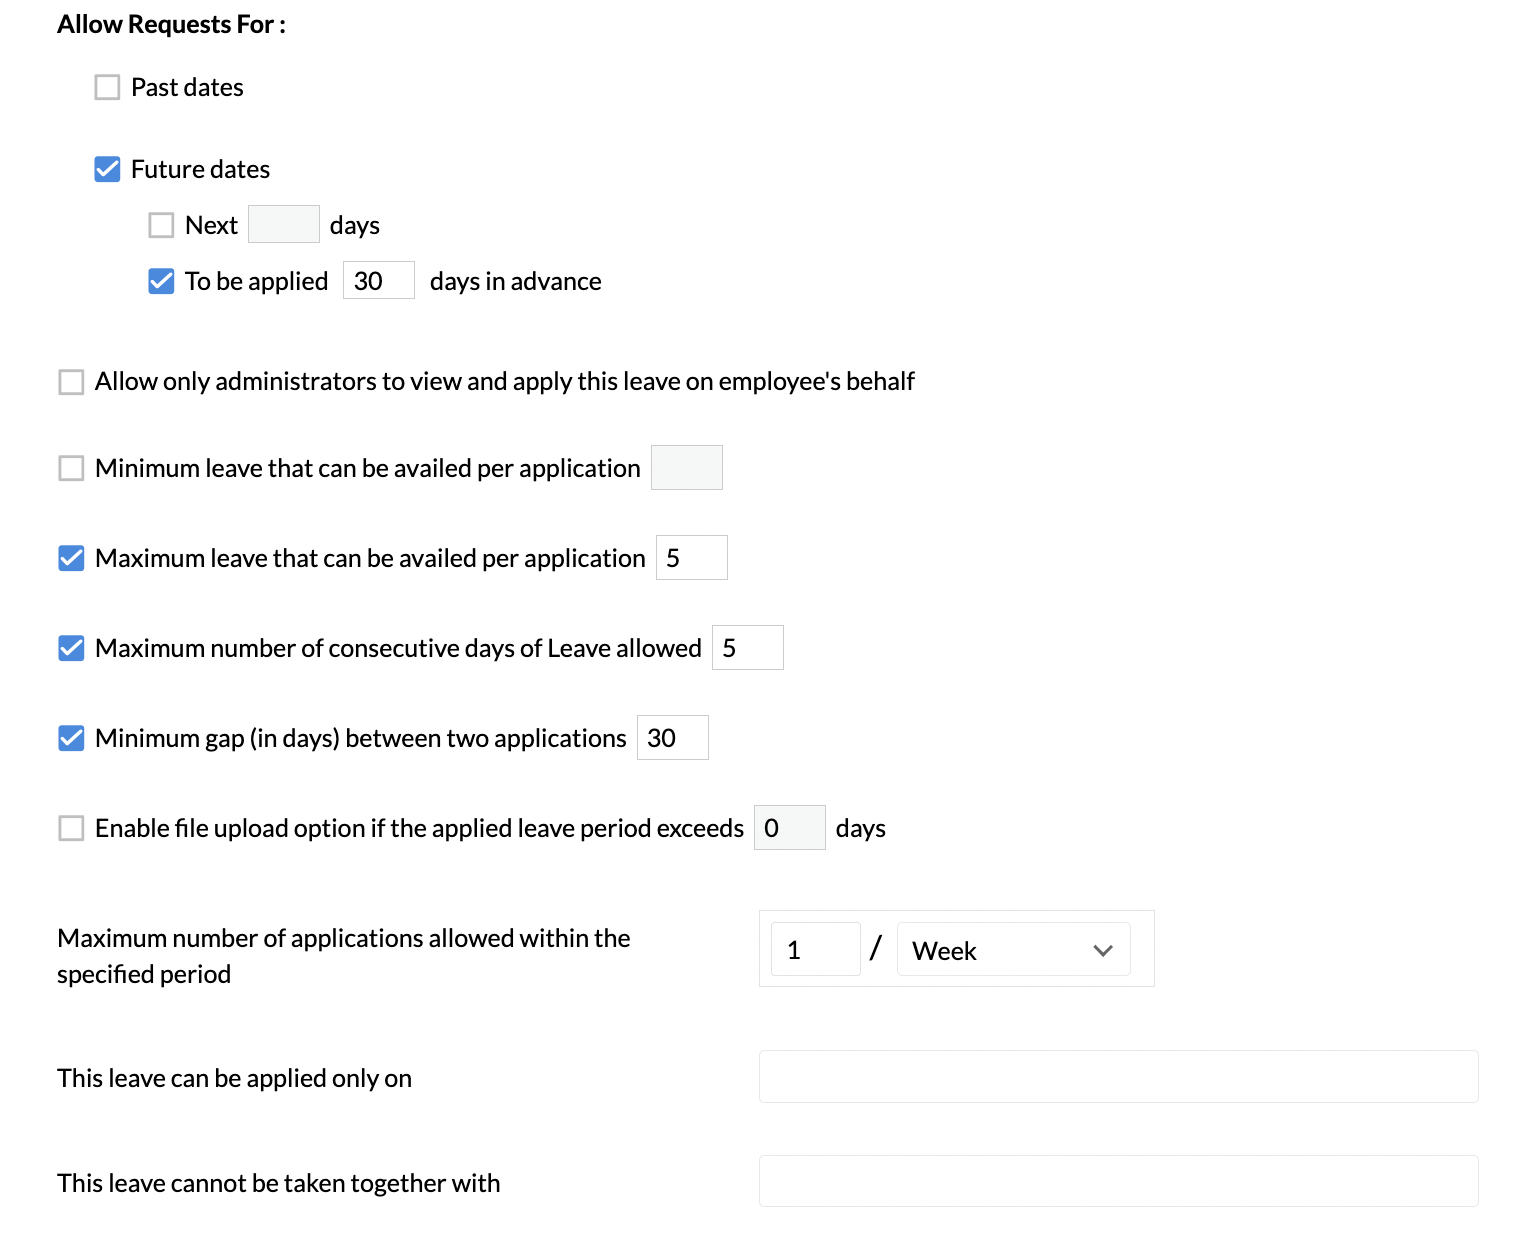
Allow only administrators to view and apply this leave on employee's behalf: When this option is enabled only administrators can manage this leave type, which includes applying, viewing records, and reports. The employee will be restricted (for themselves).
Minimum leave that can be availed per application: Sets a minimum limit to the number of leaves requested at a time.
Maximum leave that can be availed per application: Sets a maximum limit to the number of leaves requested at a time.
Maximum number of consecutive days of leave allowed: This option helps to restrict the number of consecutive days of leave that can be taken.
Minimum gap (in days) between two applications: Minimum interval to be given between two leave requests.
Enable file upload option if the applied leave period exceeds (x) days: This is useful for leave types like Sick Leave, where you would like employees to upload a file (like a Medical certificate) if the leave exceeds the number that you have given here.
Maximum number of applications allowed within the specified period: Maximum number of times the leave can be requested within a specified period. The period could be a week, month, year, accrual period, or job tenure. For example, we can set 2 as the maximum number of maternity leaves that can be requested during an employee's job tenure.
This leave can be applied only on: Leave can be applied only on the specified days. This option is useful for special leave types such as Birthday Leave, Anniversary Leave, Restricted holiday and so on. For example, if you are creating a Birthday leave, you can specify that this leave can be applied only on the Date of Birth of the employee. Birthday and Anniversary leaves will be recurring leaves that employees can apply for every year. However, if Restricted Holiday or other such fields from the employee form is chosen then it would apply only for the current year. For example, if Hannukkah is applied under Restricted Holiday, then it can be applied only on 30-Dec in the year 2019.
This leave cannot be taken together with (Leave types): If you do not want employees to club this leave type with another leave type while applying for leave, you can use this option.
Use cases
Casual leave
Assume you would like to configure casual leave for your employees. The condition is that you would like employees to be eligible for one day of leave every month and for the leaves entitled for the first six months, they will be credited only in the seventh month. This leave type can be configured in this manner:
To add some restriction to the first month of the policy, you can add an Advanced condition:

Leave transactions for the leave type will be calculated as follows(sample format for Date of joining:1st Aug 2015):
![]()
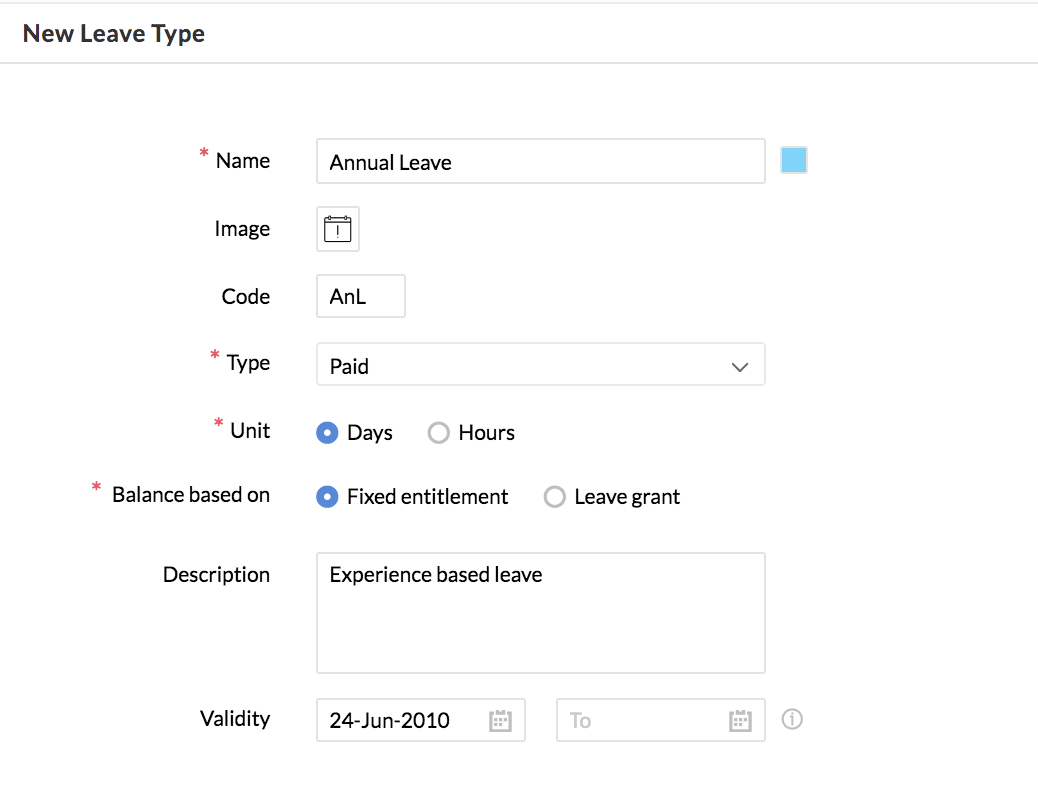
Annual Leave
Consider a scenario where you would like to define leave entitlements based on the years of experience of employees. Assume you want to set a policy with the requirement as given below.
- 1-2 years of experience - a total of six days per year, with a monthly accrual of 0.5 days, carry forward of a maximum of five days
- 3-4 years of experience - a total of 12 days per year, with a monthly accrual of one day, carry forward of a maximum of ten days
- Above 5 years of experience - a total of 24 days per year, with a monthly accrual of three days, carry forward of a maximum of 24 days and 100% encashment
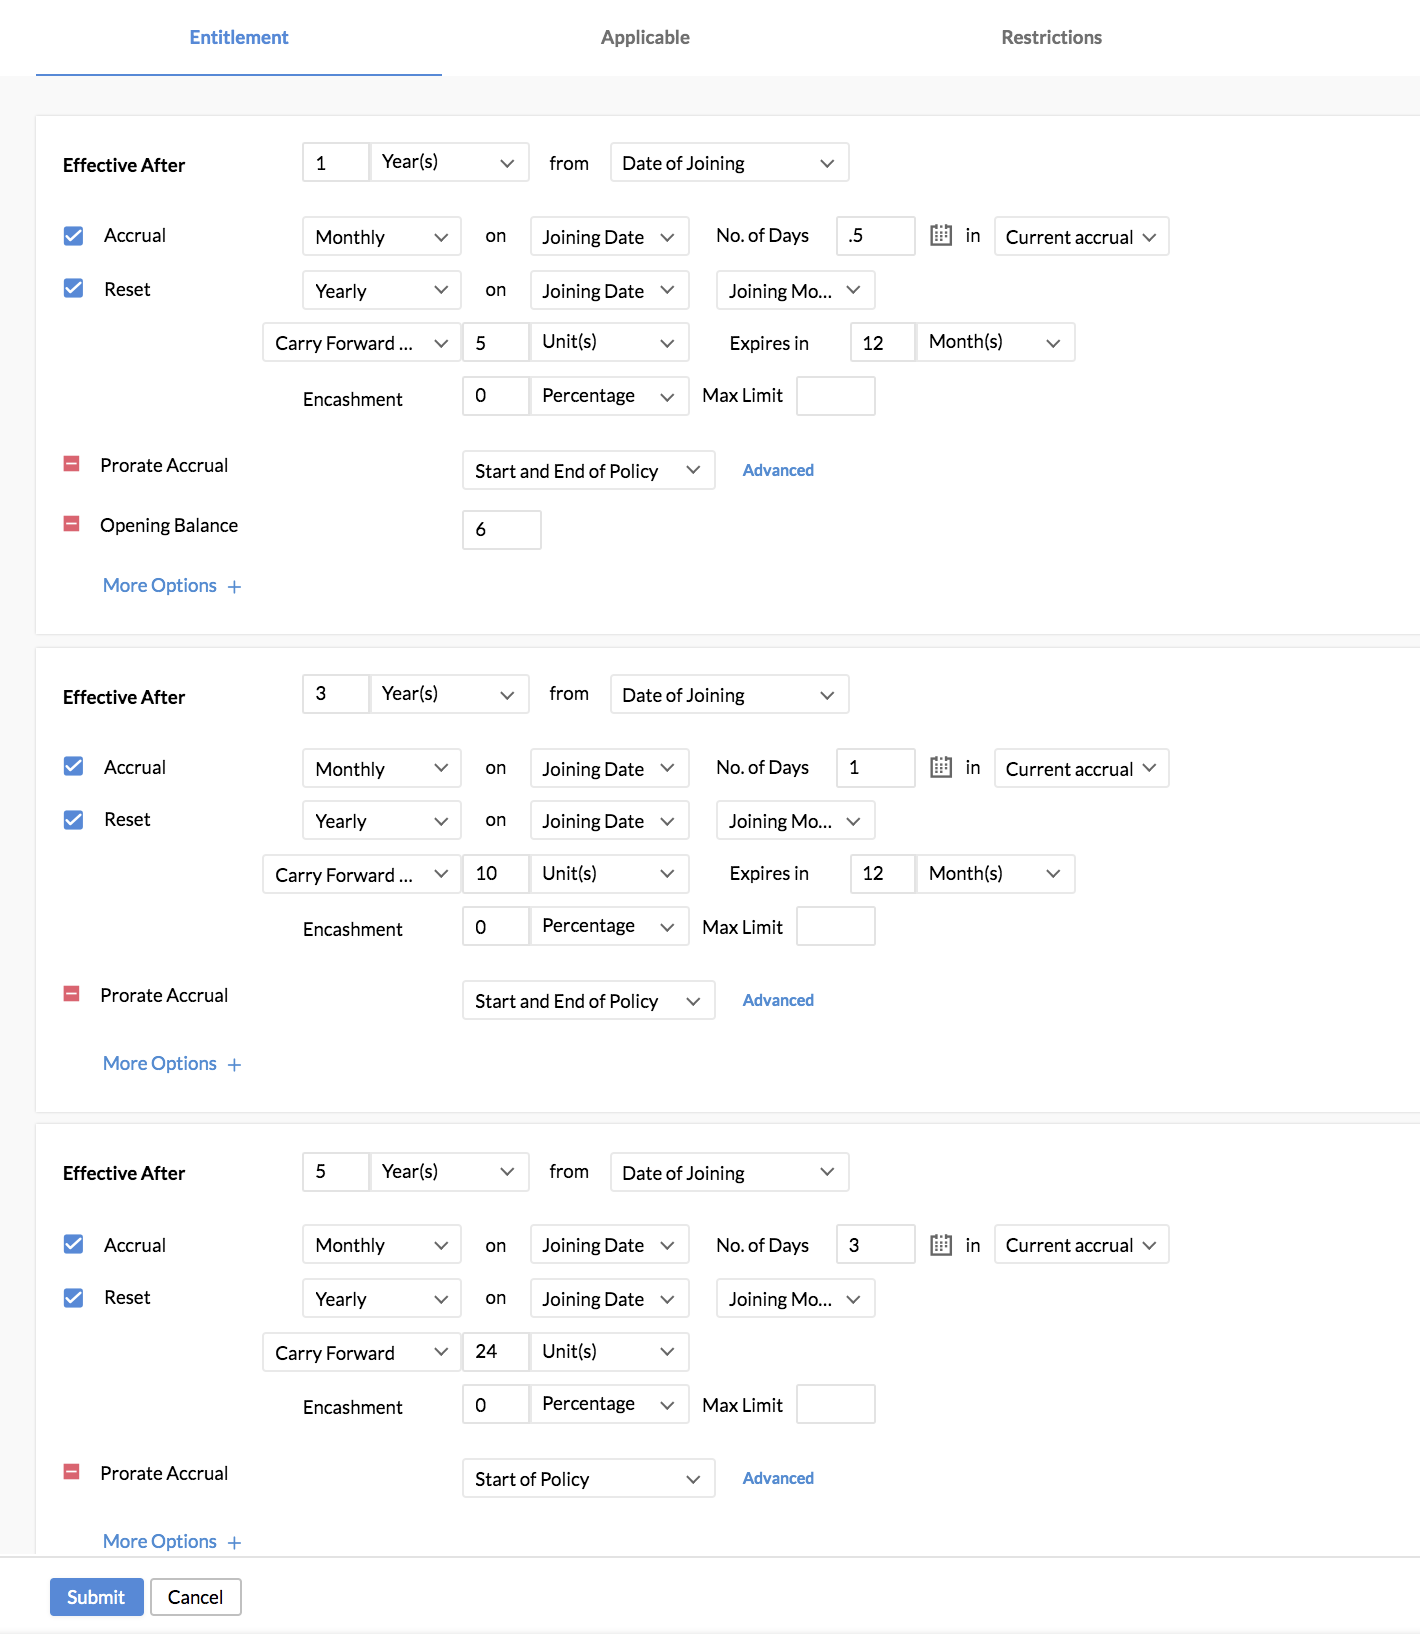
Leave transactions for this leave type will be calculated as follows (sample format for Date of Joining 5th Aug 2015):
![]()
Annual Leave with Deductible Holiday
When leave is credited yearly, but actual entitled leave is inclusive of bank holidays.
Leave will be calculated as shown below : (Sample DOJ: January 1st, 2020)
![]()
Here, 10 days of leave are credited to an employee. Out of 10 days, 8 days are deducted as they are part of bank holidays, which as per policy is part of entitled leave for all employees. So the user available leave remains at 2 (10-8) which they can apply as required.
For a list view of leave, Navigate to Leave > Views > List View

Customize Policy
Usually, when a leave type is created, that leave will apply to all applicable employees specified in the policy and leave will be calculated based on various options chosen in the leave type. However, in Zoho People, when a new leave type is created, we create a separate record for each employee. This is done so that the leave policy can be customized at any point for any specific employee. The Customize Policy tab is available for each and every employee for the admin to access. When you click on a leave type that applies to an employee, you will be able to see when the leave becomes effective and how exactly the leave will be calculated based on their date of joining and other options given in that leave type. Customize policy enables you to tailor any policy for a specific employee. So, if you would like to alter the leave policy for that specific employee, you can edit the leave policy and customize that leave policy. Under customize policy you can see all the leave policies applicable for an employee and click and edit any of the policies as and when required.
Additionally, there are three options available when you click the ellipsis icon on the left-hand side of a policy:
- View History: If you select a date range, you will be able to see all the policies that have been activated for the chosen employee and all the transactions that have happened under that policy in this manner:

As seen above, for a chosen date range, the entire leave history/ transactions will be shown. Use the export icon on the top right corner to export the leave history.
Terminologies in the report:
1. Report Initiated - The date from which the report is generated
2. Policy Attached - The date when the policy becomes applicable for this employee
3. Opening Balance - Any opening balance that has been given at the start of the policy
4. Accrual - the leave credited based on the accrual period or interval set in the policy
5. Reset (End of Day) - The carry forward balance under 'Balance' column
6. Carry Forward Expiration ( End of day) - unused carry forward balance that has expired
7. Leave Taken
8. Leave Rejected or Cancelled
9. LOP Adjustments - changes made in the LOP report
10. Manual Correction - Corrections to the leave balance ( when customized manually)
- Rerun Policy: Use this when a change has been made in the policy but is not reflecting in the report. The report will run again and show data accurately.
- Reset to default: You can use this option if you have customized the policy for an employee but later you would like to undo this customization and revert the employee back to the default configuration. This option is also useful if have wrongly customized the policy for an employee or customized the policy for the wrong employee.
There are a few more important actions that you can do under 'Customize Policy':
Refresh Policies: When a leave policy has undergone many changes there may be discrepancies reflecting in some cases. In such situations, to re-check and fix any eligibility mismatch of the employee with the current policy, you can click this option. So, this option may be used judiciously only in times of troubleshooting.
To view old policy details of the employee: Click on the Deleted option in the filter. All the policies that the employees were part of before moving to the current policy will be listed.
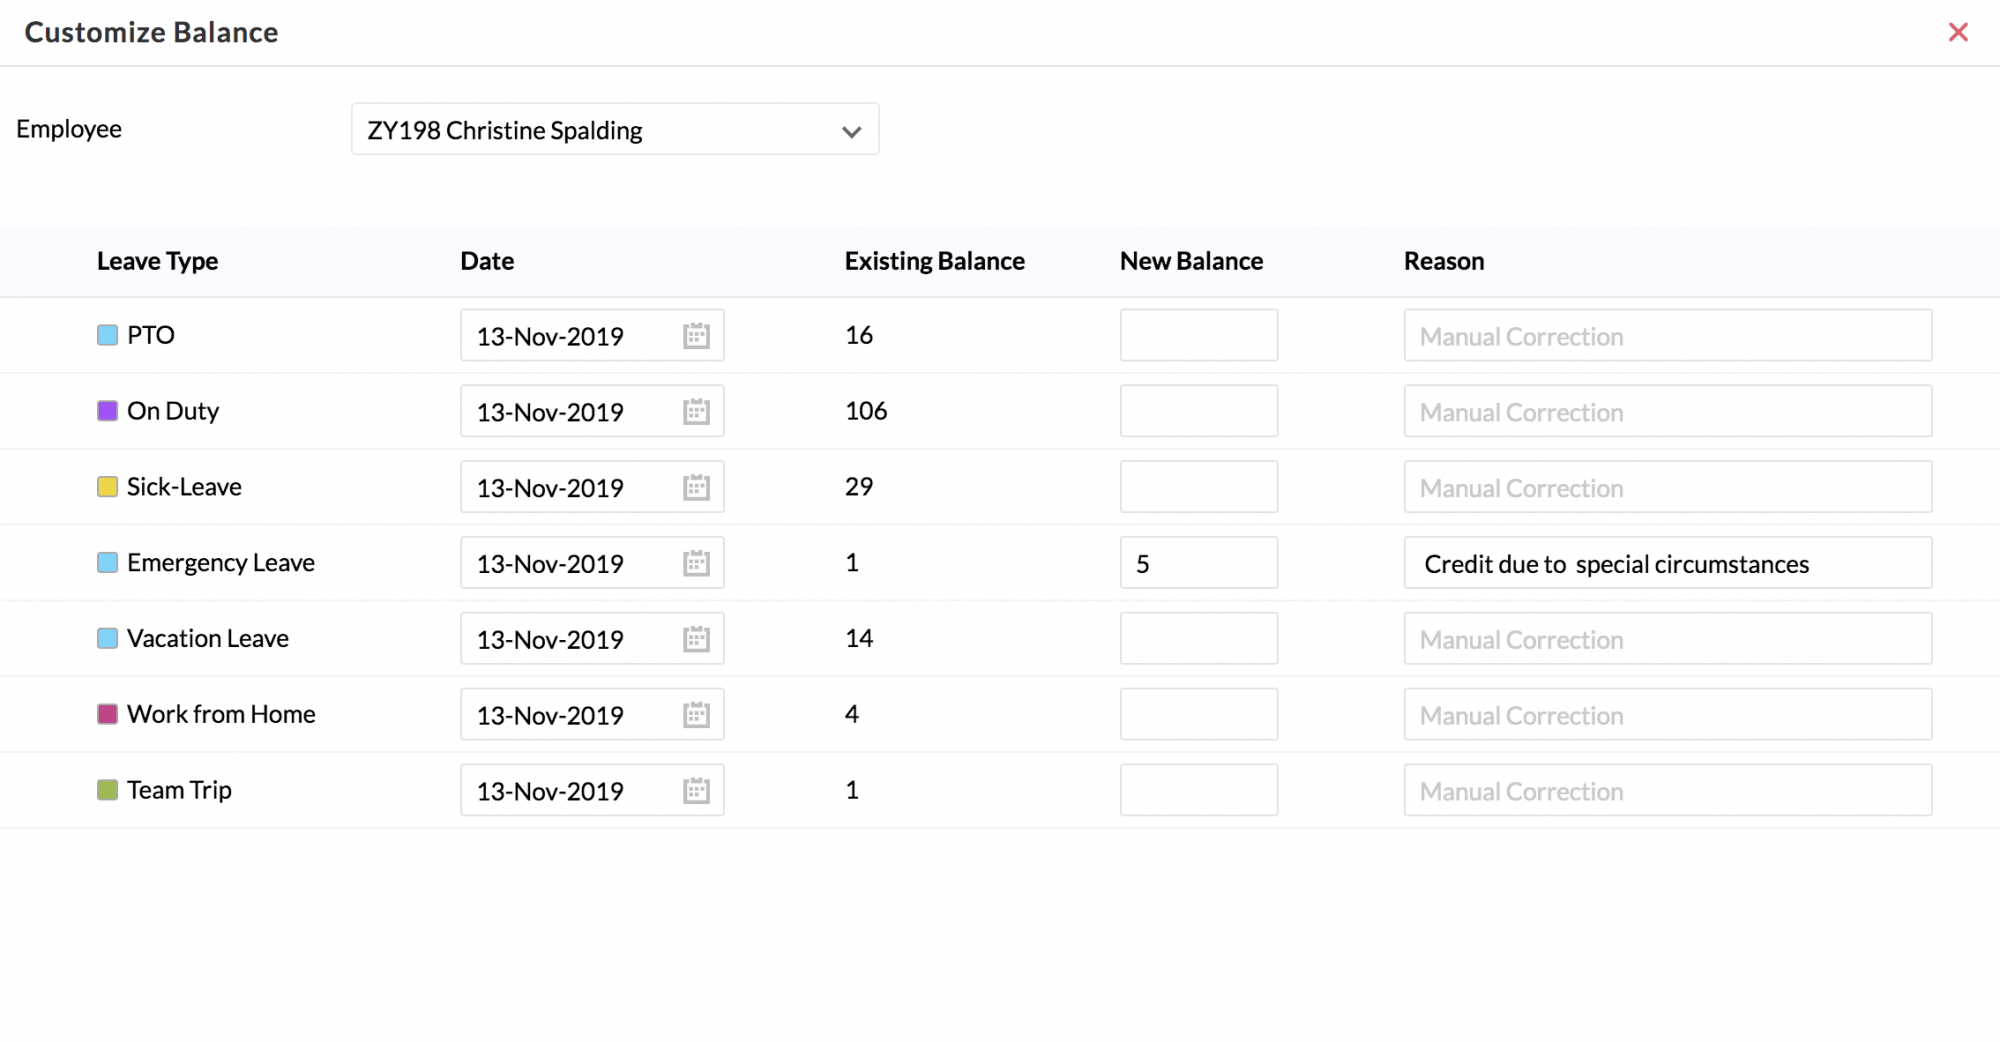
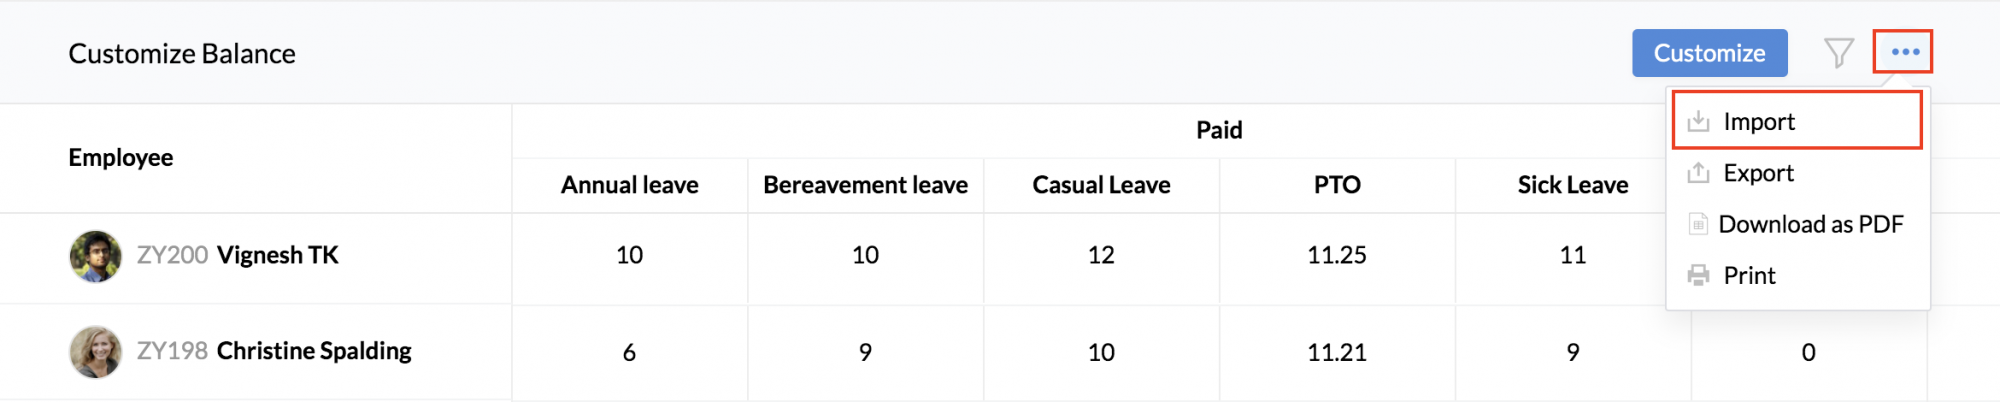
Customize Balance
Customize Balance is a further enhancement to customize policy. In Zoho People, not only is policy customization possible, you can even customize the leave balance for an employee on a specific date. Customize balance comes in handy in the following scenarios:
- When an organization migrates from one HRMS tool to another
- When employees migrate from an old policy to a new one
- When there are any corrections to be made apart from the system entitlements
In such situations, customize balance is the ideal solution. Here you can directly enter the new balance applicable to the selected employee. You need not calculate the difference in balance - the system will make the required corrections to bring it to the new balance entered.
To customize the leave balance,
- Go to Leave > Settings > Customize Balance
- Click on Customize button on the top right side
You can use the filter to view balance based on various criteria. You also have various options to import, export, download as PDF and print under the ellipsis icon.
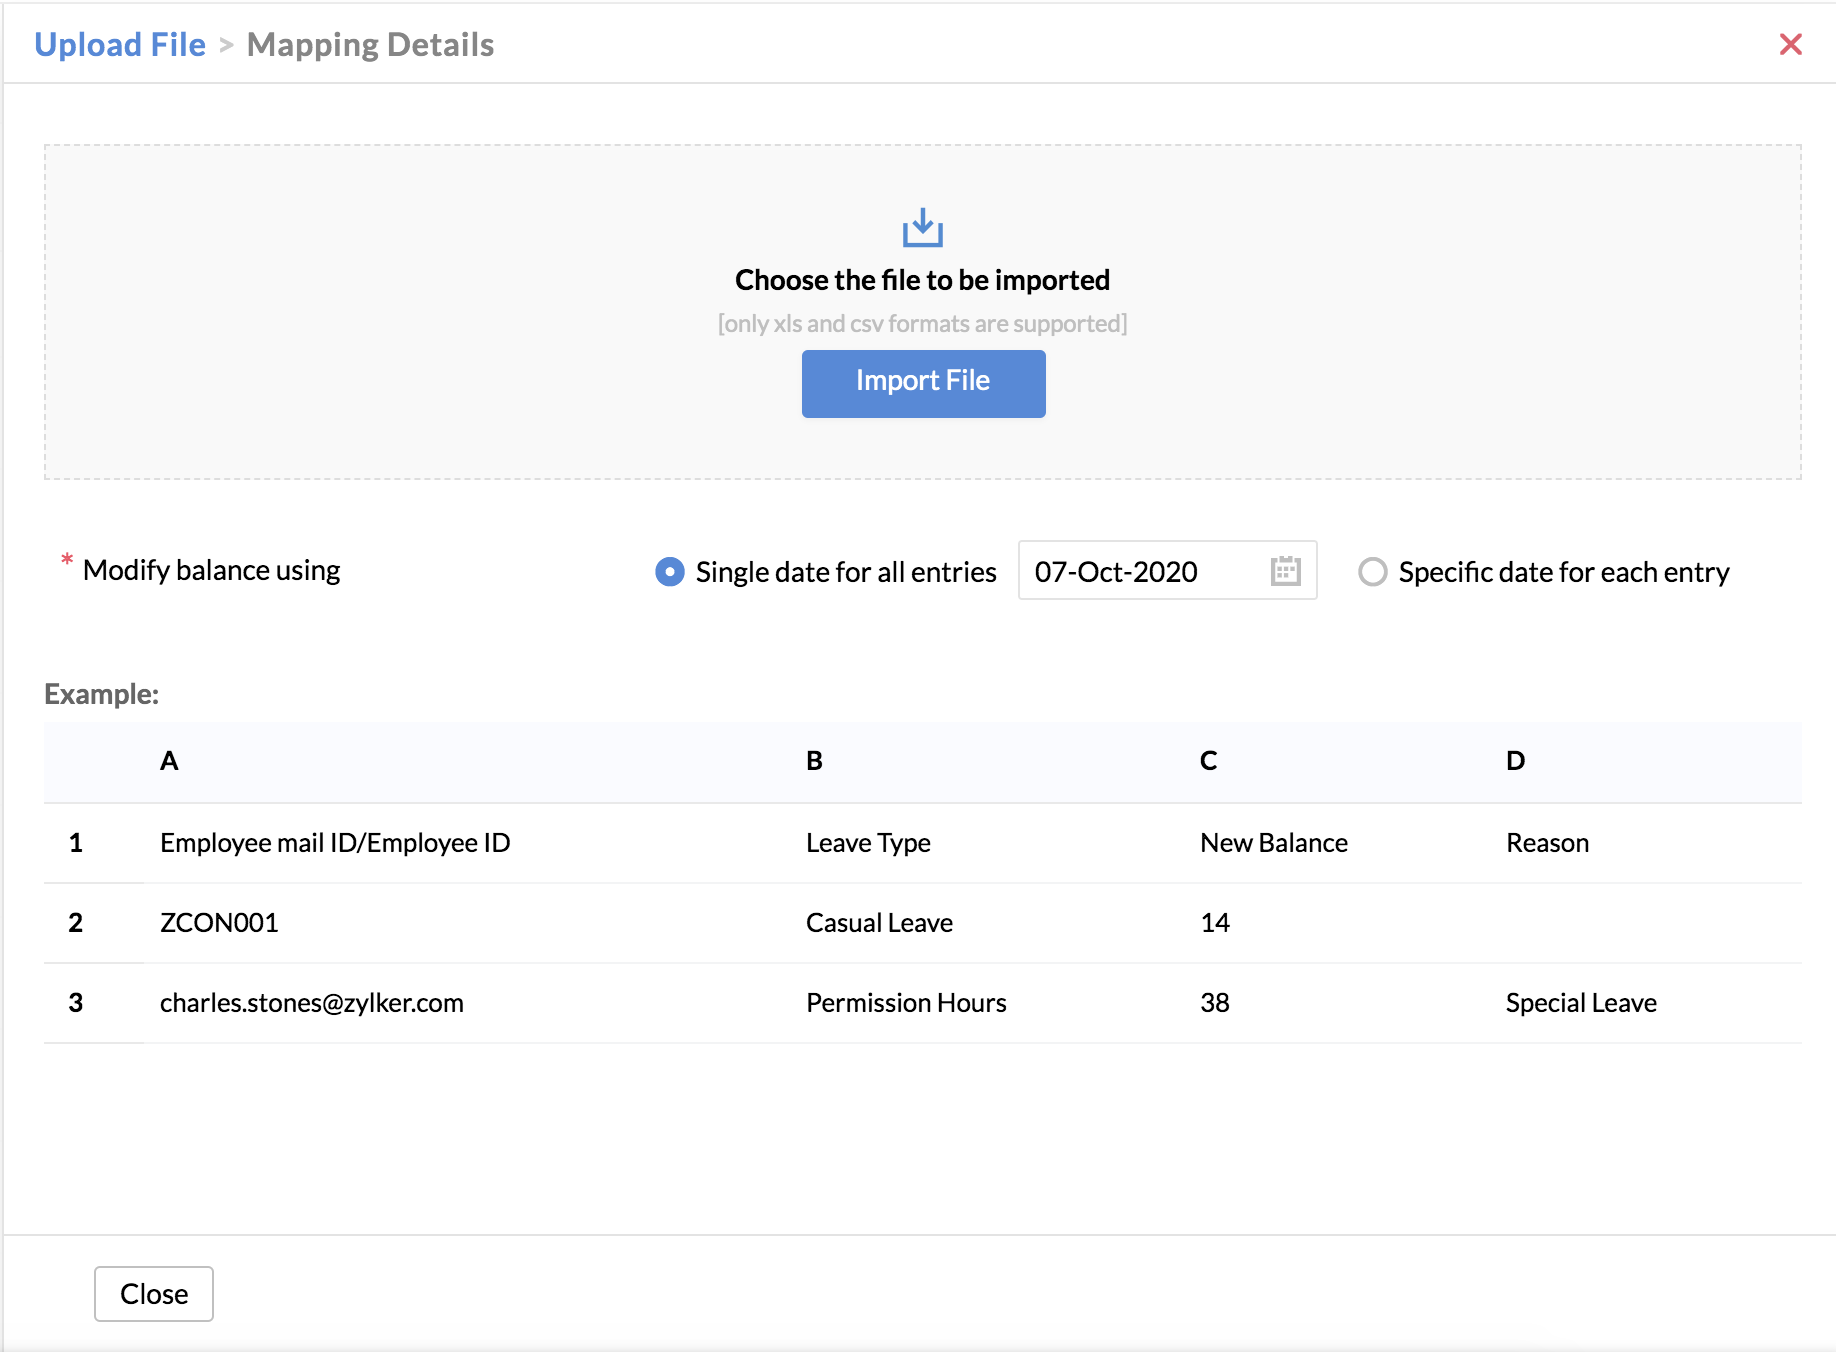
Customize Balance Import
You can import a bulk of entries to customize the balance of many employees in one go. To import for customized balance,
- Go to Leave > Settings > Customize Balance.
- Click the ellipsis icon on the top right corner.
- Select Import.
There are two ways you can import:
Modify balance using Single date for all entries
Select a single date for which you want to modify the balance for the entries you are importing. Follow the sample format as shown in the screenshot below.
Modify balance using Specific date for each entry
Enter specific dates for each entry in the file you are importing. This way you can enter different dates for each entry. Follow the sample format as shown in the screenshot below.
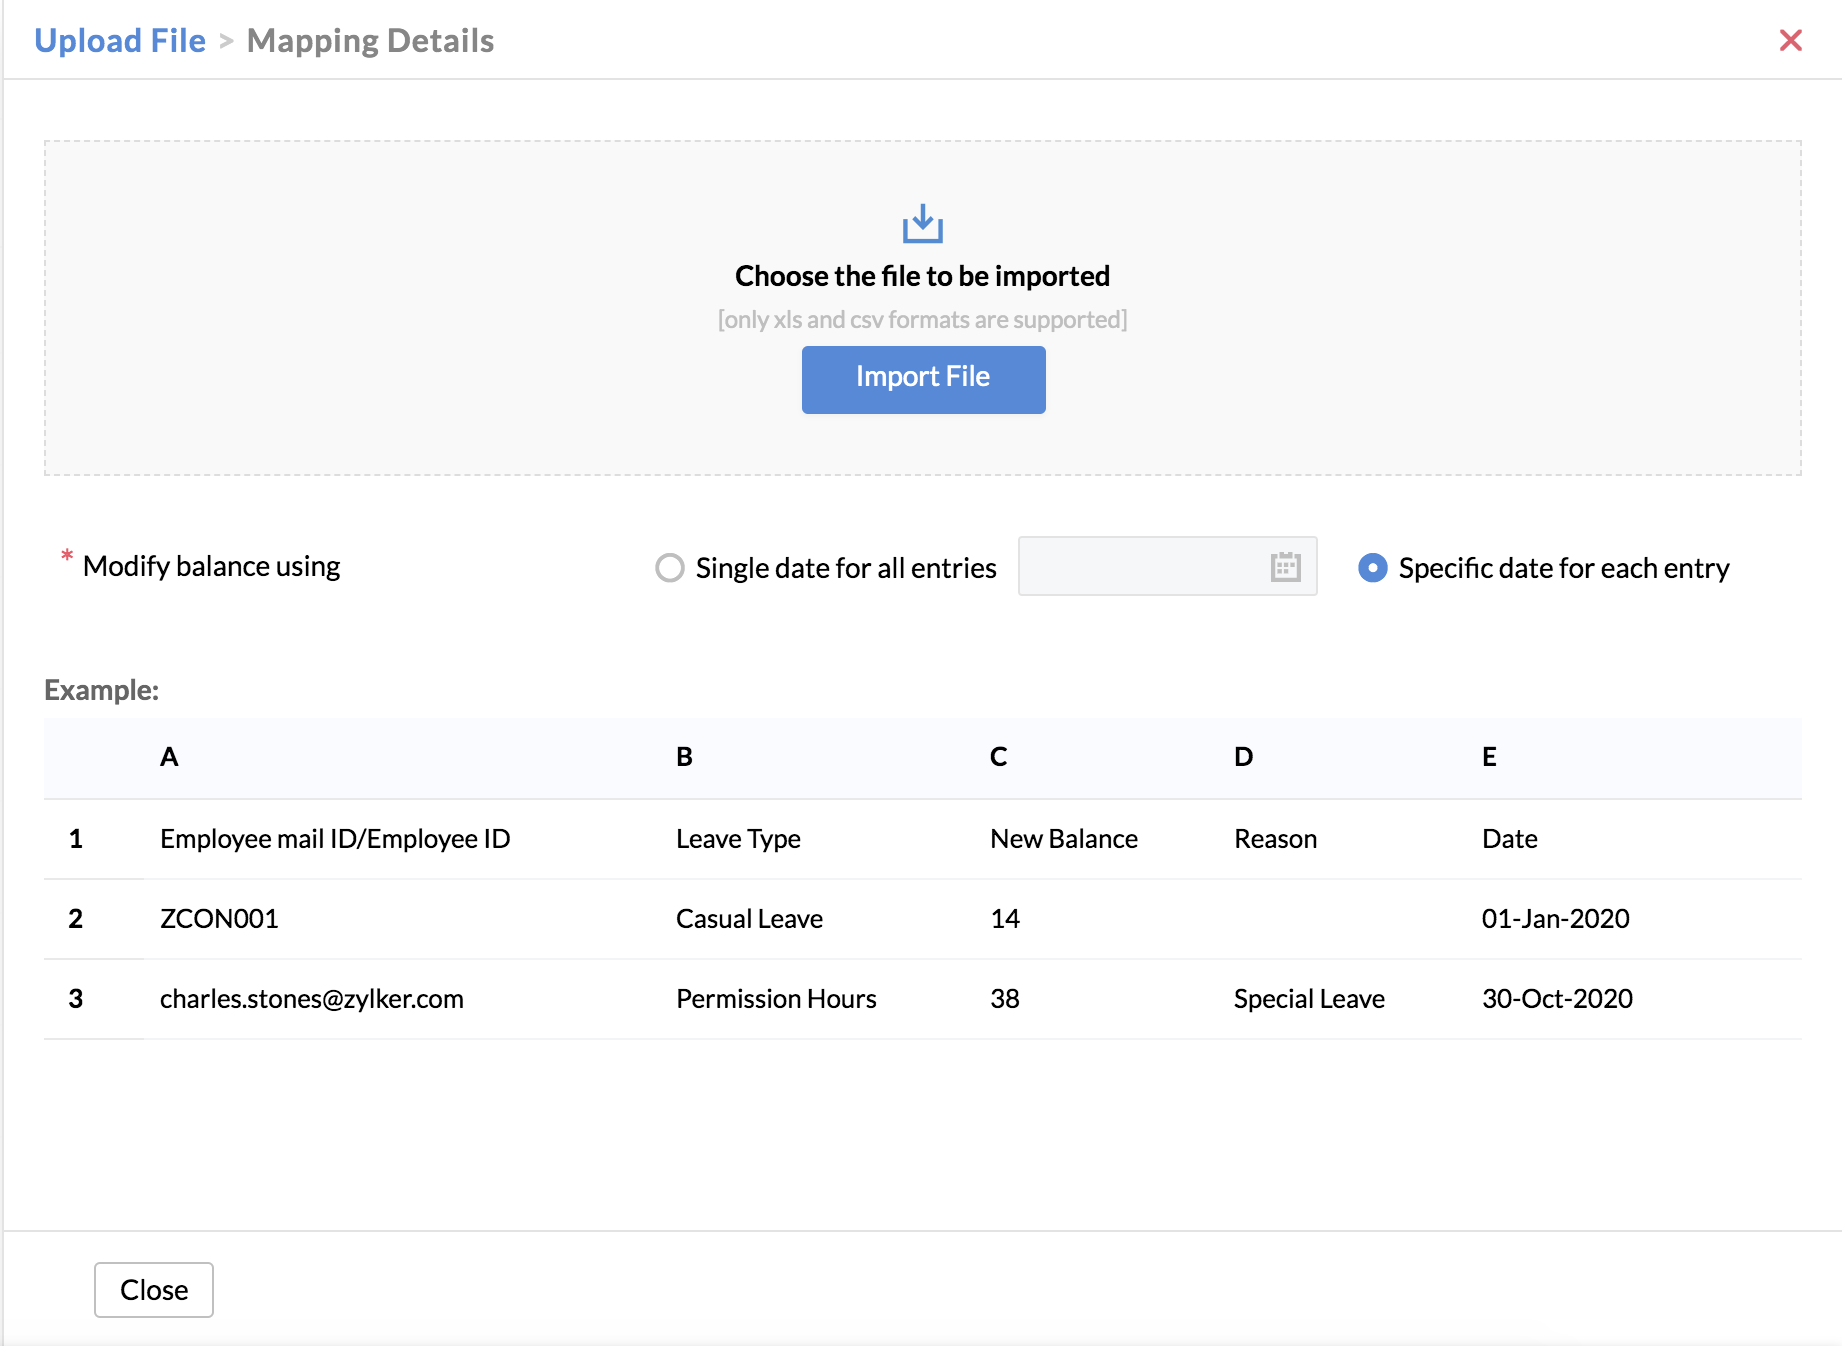
![]() Tip : It is best to customize balance in ascending order of dates.
Tip : It is best to customize balance in ascending order of dates.
Note: Contact support@zohopeople.com if you are using the basic leave configuration (Version 1) and want to upgrade to this advanced leave policy configuration (Version 2).