Incoming Filter
Incoming filters in Zoho Mail allow you to organize your incoming emails. It will also help you automatically perform certain actions on your incoming emails.
Learn more about Filters, by referring to the video below:
Create New Filter
- Login to Zoho Mail
- Click the Settings icon.
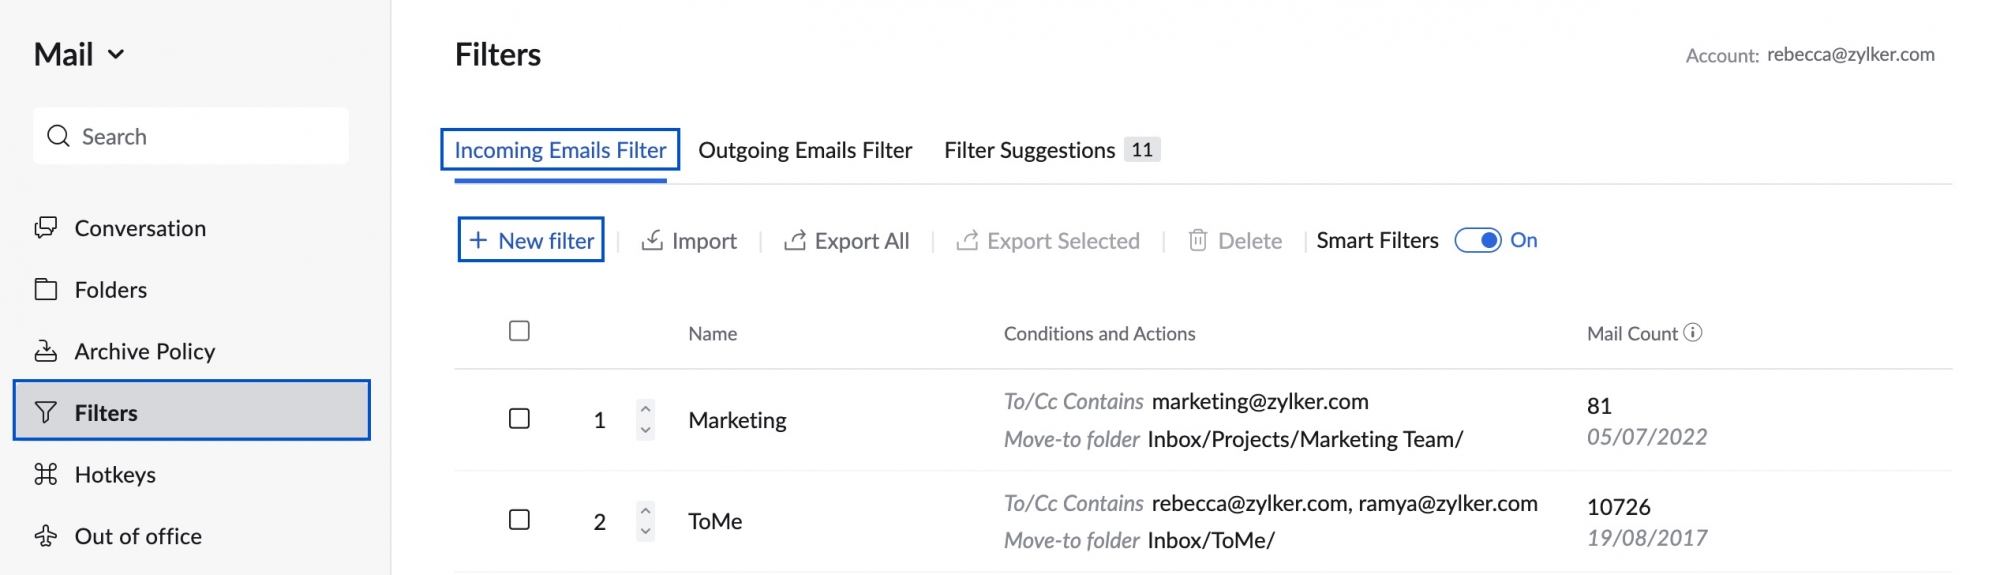
- Go to Filters
- If you have multiple mailboxes configured as POP/ IMAP accounts, select the required account using the account switcher on the left pane and then go to Settings > Filters > Incoming filters.
- Click the Incoming Emails Filter tab. Click on New Filter.
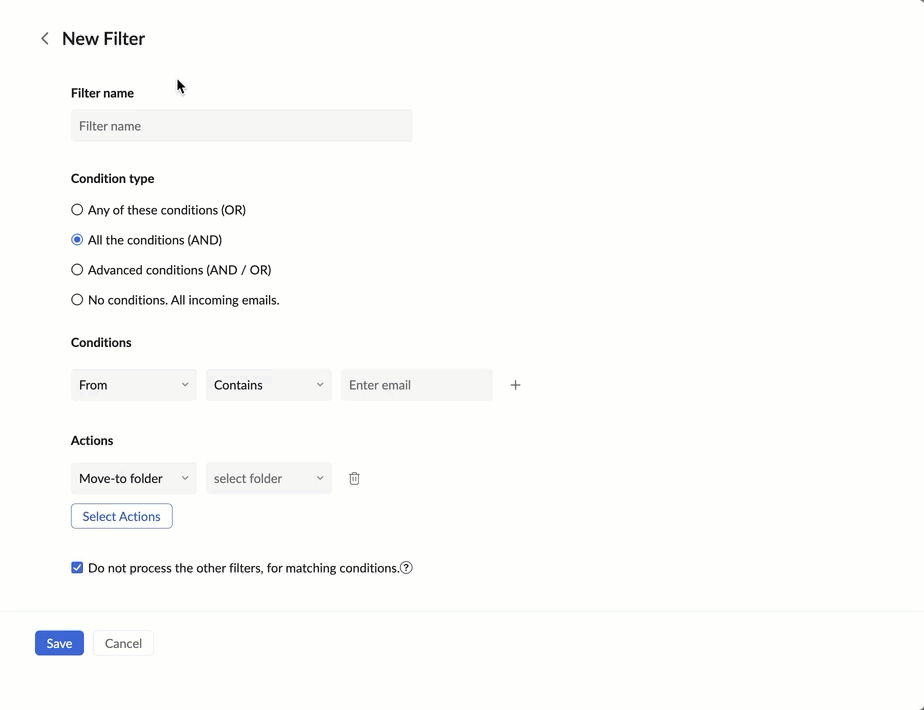
- Provide the Filter Name, Filter Conditions and Actions in the New filter tab
- Filter name - To identify the filter.
- Condition Type -
- Any of these conditions (OR) - The actions are processed even if one of the conditions matches.
- All the conditions (AND) - The actions are processed only if all of the specified conditions match.
- Advanced conditions (AND / OR) - The actions are processed based on the criteria provided for the conditions.
- No conditions. All incoming emails - The actions are processed for all the incoming messages, irrespective of whether or not the conditions match.
- Choose the required parameter for the Condition Type and provide the Condition for the particular parameter.
- Select the matching pattern, to connect the conditions you have provided. The available options vary according to the chosen parameter.
- Ex: For parameter "From", the pattern can be "Contains", "Begins with", "Ends with" etc.
- For the parameter "Priority", the matching pattern is "Is", "Higher than", and "Lower than"
- After adding the necessary conditions, choose the Actions that you want to set for your filter.

- For the ‘Move to Folder’, ‘Flag as’, and ‘Tag as’ actions select the suitable folder, tag, or flag from the drop-down menu across the actions field.
- Select the 'Do not process other filters, for matching conditions' checkbox to stop the execution of other filters.
- Select the 'Run existing emails through this filter' checkbox and choose the folder using the Select folder drop-down to apply the filter to the chosen folder.
- This option will be available only when you create a new filter. Refer here to apply an existing filter to process a folder.
- Click Save to save your filter preferences.


Note:
When you configure an incoming filter for an IMAP account, only the following actions will be available for the incoming email filters.
- Move to folder
- Flag as
- Tag as
- Mark as read
- Add Mail as Note
- Add Mail as Task
- Delete after N days
Only the actions such as Move to folder, Mark as read, and Delete after N days that are supported in IMAP will be reflected in the parent client.
Conditions and Actions
Any custom filter has two parts: Conditions and Actions. In simpler terms, you define the conditions in the first part and provide a rule or an action, which should be carried out when the part 1 condition is fulfilled.
Conditions
You can set up multiple conditions and multiple actions based on your requirements. The conditions that can be associated with any filter, the operating parameters and the data type that has to be used with each condition are listed below:
| Conditions | Operating Parameters |
| From | Contains, Does not contain, Begins with, Ends with |
Is, Is not | |
In, Not in | |
| Subject | Contains, Does not contain, Begins with, Ends with, Is, Is not, Is Empty |
| To | Contains, Does not contain, Begins with, Ends with |
Is, Is not, Only Me | |
| Delivered To | Contains, Does not contain, Begins with, Ends with, Is, Is not |
| Cc | Contains, Does not contain, Begins with, Ends with |
| Is, Is not, Only Me | |
| Bcc | Contains, Does not contain, Is |
| To/Cc | Contains, Does not contain, Begins with, Ends with |
Is, Is not, Only Me | |
| Content | Contains, Does not contain |
| Priority | Is, Is lower than, Is higher than |
| Has Attachment | True, False |
| Attachment Name | Contains, Does not contain, Begins with, Ends with, Is, Is not |
| Attachment Type | Contains, Does not contain, Begins with, Ends with, Is, Is not |
| Between | Date, Time |
| Domain Name | Is, Is not |
Actions:
Managing your mailbox:
- Move to Folder - You can select a folder and move the email to a specific folder. You can also create a new folder if you haven't already created one for a set of conditions.
- Apply a selected Tag/Flag - You can choose a tag that can be applied to the email.
- Mark as read/Unread - You can change the Read/ Unread state of the email. Ex: You can mark certain notifications as read, without adding them to the unread count.
- Archive email - You can archive emails that meet the conditions specified by this filter. You can then view all archived emails in the View archived section within your email listing.
- Set a reminder - You can set reminders for the email processed by this filter based on the conditions provided. You'll be reminded through notification based on the reminder preset configured by you.
- Snooze for - You can snooze emails processed by this filter based on the conditions provided. The emails you snooze will appear on top of the list of the folder at the set snooze time. You can also access the snoozed emails from the Snoozed folder in the left menu.
- Send an auto response - You can send an auto-response for the email processed by this filter based on the provided conditions. You can choose the preferred auto-responses from a list of predefined templates.
- Delete the email - You can move email directly to Trash based on some conditions. Ex: It will be useful when some newsletters keep coming, even after unsubscribing several times.
Delete after N days - This action deletes the emails that fall under the defined condition after the specified number of days. This action will be useful in cases where certain notifications are necessary at that point but are not meaningful after a few days. A tag with the number of days left for an email to be deleted (up to 10 days) will display at the end of the respective emails at the email listing.
 It is always advisable to use the 'Delete after N days' action with the 'Move to Folder' action because you will have an idea that emails in that particular folder will be deleted after the specified number of days. Also, make sure that this folder is named relevantly to convey that the folder content will be deleted after a few days.
- Forward the Mail (to a different email address) - Conditional Forwarding - Instead of forwarding all emails, you can define some conditions based on which only some emails can be forwarded.
- Don't add attachments to Attachment Viewer - Incoming attachments will not be added to the attachment viewer if this action is selected. If you decide that a record of certain attachments is enough in just emails, and doesn't have to be added to the attachment viewer, this action can be used.

Note:
If the Condition Type you have selected is Any of these conditions for any of the following actions, you will be prompted to re-check your Condition Type:
- Move to Spam
- Delete the email
Processing your emails:
- Add Mail as Notes - Add the entire email as a note, with the subject as Title and the email content as the Notes.
- Assign Mail as Task - Add the email as a Task, with the Subject as Title and email content as Description
- Post to Cliq Channel - You can choose to share an entire email as a link/ only the attachment(s) in the email to a chosen Zoho Cliq channel that you are a part of.
- Custom Functions - Customise the filter actions and conditions using the available parameters using Deluge scripting via Zoho Creator. Learn more.
Managing your attachments:
You can configure filters to upload the attachments from emails, that match your conditions, to certain file storage services or choose to not add attachments to Attachment Viewer using one of the following filter options.
- Add to Dropbox
- Add to Google Drive
- Add to OneDrive
- Add to Box
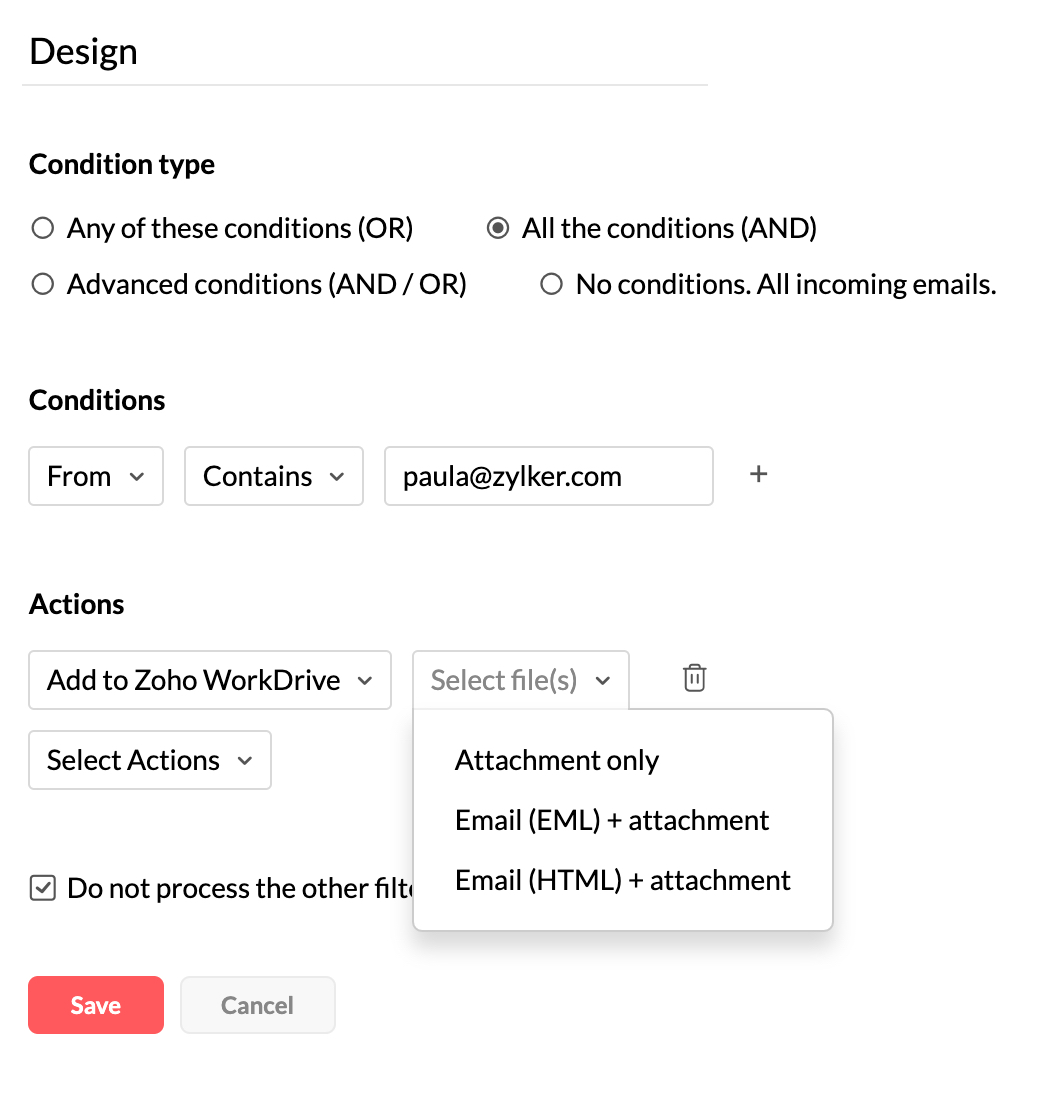
- Add to Zoho Workdrive
- Add attachment link to CRM - When you choose Zoho Workdrive, you'll also have the option to add the attachment from the email as a Workdrive link to your CRM module if the sender is a Lead in Zoho CRM.
- Don't add attachments to Attachment Viewer - Attachments that are part of your emails, will not be added to the Attachment Viewer if you select this action.
Once you have selected the storage service of your choice, you can also choose the file you wish to upload through the filter. You can upload only the attachments in the incoming email or also upload the email content as EML or HTML.
Authenticating the storage services
- Login to Zoho Mail
- Click the Settings icon.
- Go to Filters
- Click + New filter.
- Provide the necessary condition and click on Select Actions.
- Select the Add to <storage service> filter of your choice, the parameter (Attachment/ Email as EML or HTML), and click Choose Folder.
- Click the Authenticate button on the Authentication window that appears.

- If you are not already signed into the file storage service of your choice in your browser, you will be prompted to do so.
- Once signed in, a consent window to allow access to your files will appear. Click Allow.

- The list of your files and folders will be displayed. You can choose the folder you want to upload your attachments to. The attachment will be saved to the root folder if no folder is specified.


Note:
- The above Authentication steps are followed for Dropbox, One Drive, Google Drive, and Box filter options. Add Attachments to Zoho Workdrive filter option does not require the authentication process since you are already signed into your Zoho account.
- Attachment upload size constraints are subjective to the size limits of the User's file storage accounts.
Advanced Filters
You can create Advanced filters by using a combination of AND and OR condition types. Select the Advanced conditions (AND/ OR) condition type to create advanced filters. After adding multiple Conditions, you can change the AND or OR option between the conditions by clicking them.
Apart from selecting AND or OR between conditions, you can decide the sequence in which these conditions need to be run by editing the Criteria pattern. Click on Edit next to the Criteria pattern and enter the desired sequence of conditions and click Save.
Example:
Requirement - All emails from paula@zylker.com and charles@zylker.com with the subject 'Marketing' need to be processed.
Condition Type - Advanced conditions (AND/ OR)
Condition - From: paula@zylker.com (1), From: charles@zylker.com (2), Subject: Marketing (3)
Criteria Pattern - ((1 OR 2) AND 3). The emails with (1) & (3) and emails with (2) & (3) will be processed ie., emails can satisfy either 1 or 2 but need to satisfy 3.