Workflow Rules
Workflow Rules , are a set of actions (alerts, tasks and field updates) that are executed when certain specified conditions are met. These rules automate the process of sending email alerts, assigning tasks and updating certain fields of a record when a rule is triggered. A workflow rule consists of the following elements:
Basic Information - Specify details on the record for which the rule applies, rule name, description, and option to activate the rule.
Rule Trigger- Specify when the rule should be triggered for a record and based on what. There are two options:
- Execute based on a record's action - Rules can be triggered when records are created, edited, created/edited, deleted or a specific fields are updated.
- Execute based on a date field's value - For all the records matching the rule criteria, rule will be triggered either monthly or yearly based on the value of the date field that is selected.
Rule Criteria - List out the criteria to filter out records that meet the criteria. Workflow rule is triggered to these records.
Instant Actions - Add alerts, tasks, field updates, webhooks and custom functions that will be triggered immediately when the rule is executed. On Edit or Field Update actions, you can also convert Leads, Quotes or Sales Orders.
Time Based Actions - Add alerts, tasks, field updates, webhooks and custom functions that will be scheduled and triggered based on a specified time.
Create Workflow Rules
The steps to create a workflow rule are divided into 4 parts.
Part 1 - Specify the basic details of the rule
- Log in to Zoho Developer console and click Extensions for Zoho CRM.
- Select the extension you'd like to modify and click Edit.
- Click Automate in the left pane of the Extension Details page and click Workflow.
- Select the Rules tab at the top of the page and click Create Rule.
- In the New Rule page, do the following:
- Select the Module to which the rule applies from the drop-down list.
- Enter the Rule Name.
- Select the Status check box if you want the rule to be active.
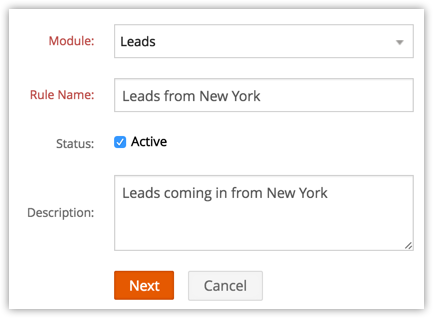
- Enter the Description for the workflow rule.
- Click Next.

Part 2 - Select rule trigger option
There are two options based on which the rule will be triggered for a record that matched the rule criteria. One of these options need to be selected when you create a workflow rule and you cannot change it later by editing the rule. The two options from the Execute based on drop-down list are:
- A Record Action - Rules can be triggered when records are created, edited, created/edited, deleted or a specific fields are updated.
- A Date Field's Value -For all the records matching the rule criteria, rule will be triggered either monthly or yearly based on the value of the date field that is selected. This option is available only in the Enterprise Edition.
Execute Based on Record Action
When new records are created in your CRM , it may be necessary to automatically send an email or a series of emails at set intervals. You may also want to create tasks for these new records. Also, sometimes when specific fields are updated, you may want to trigger a workflow. This execution option lets you specify an action (Create, Edit, Delete, etc.) based on which workflow rules will be triggered.
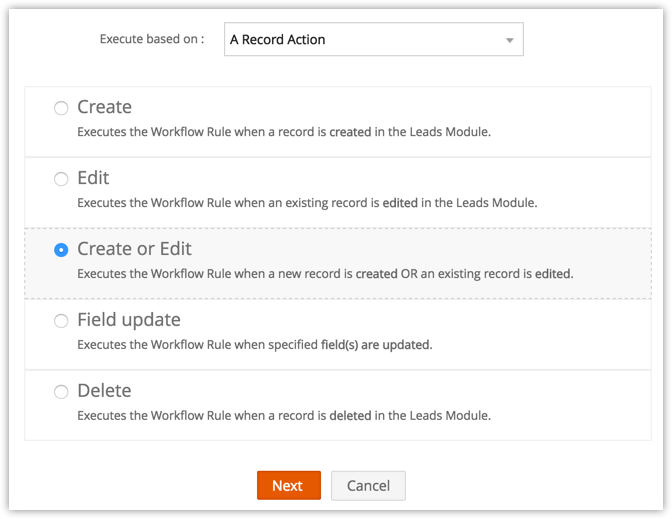
- Select one of the following:
- Create: Executes the rule when records are created.
- Edit: Executes the rule when existing record are modified.
- Create or Edit: Executes the rule when records are created or existing records are modified.
- Field Update: Executes the rule when the values of the specified fields are modified in a record.
- Delete: Executes the rule when certain records are deleted. Only Workflow Alerts and Webhooks be associated for such a rule. The action includes:
- Deleting a record from the Details Page.
- Deleting from the List View (One by one or in bulk).
- Using the Mass Delete feature.
- Deleting from a record's Related List. For example, deleting a contact under an Account.

- When you select the Field Update option, do the following:
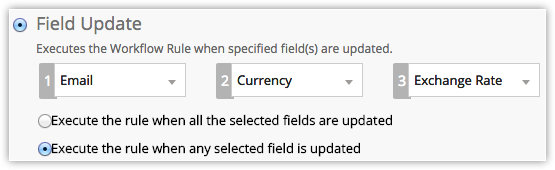
- Choose the field name from the drop-down lists.
- Choose one of the following:
- Execute the rule when all the selected fields are updated.
- Execute the rule when any selected field is updated.
- Click Next.

Execute Based on Date Field's Value
In your industry it may be necessary to send an email reminder to your customers ,a week before a deal's expected closing date, or to send an email to the customers reminding them of the monthly rentals or subscription renewals. In these cases, it is not necessary that the records should be created or edited for the rule to get triggered. It is plainly based on the value in the date fields. This execution option lets you pick a date field from a record and allows you to define the day for the rule to be triggered. Please note, with this option, a maximum of 3000 records will be triggered every hour. If there are more than 3000 records, the remaining records will be executed in the next hour.
- Choose a Date field from the drop-down list.
All the date fields in the module for which the rule is being created will be listed. - Choose On, Before or After from the drop-down list to set the Date of Execution.
The rule can be set to trigger a maximum of 90 days Before or After the Date field specified. - Specify the time of execution in hours and minutes.
In case of DateTime fields, there is an option to trigger the rule based on the time in the field value.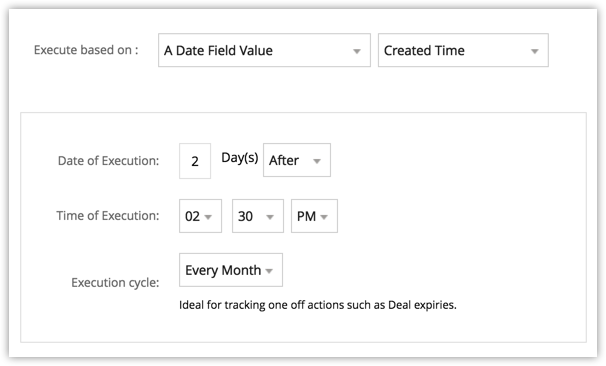
- Select the Execution cycle as Once, Every Month or Every Year.
- Click Next.

Note
- For a rule to be triggered using the Field Update option, both the rule criteria and the execution criteria must be true.
- When the Delete option is selected as the execution criteria, a workflow rule will not be triggered if records are deleted from the Recycle Bin.
- You can configure and associate only workflow alerts and webhooks to a workflow rule with the execution criteria as Delete.
- Workflow Rules will be triggered when records are modified using Mass Update, Macros and when ownership of records are changed. Rules are also triggered when tasks are created through Macro.
Part 3 - Set the rule criteria
- In the Rule Criteria section, specify the rule criteria details.
- Click Add Criteria to add multiple criteria.
- Click Next.
Edit Criteria Patterns
Criteria Pattern Editor in the custom list view helps you to develop the advanced filters using simple logical operators like and / or.
Note
- You can specify a maximum of 25 criteria for a list view.
- If you are associating a convert (instant) action to the rule, specifying the criteria is mandatory.
To edit criteria patterns
- Click Automate in the left pane of the Extensions Details page and click Workflow. Select the Rules tab at the top of the page.
- In the Workflow Rules page, select the workflow rule.
- In the Edit Rule page, review your existing criteria and click the Change Pattern link.
- In Pattern Editor box, modify filters and click the Save link.
- Save the modified custom view.
Example:
You would like to trigger a workflow rule for all the leads whose Lead owner is the current user, Status is contacted, Company name is not empty or phone number doesnt contain +91 and Lead source isnt trade show.
Lead Owner is Current User; Status is contacted; and company name is not empty or phone doesnt contain +91; and source isnt Trade show
You can create this criteria easily using the Criteria option given below:
The criteria pattern will be automatically set as:
Since the criteria pattern does not match the requirement, you can edit it as:
You can use the following characters in the Criteria Pattern Editor:
- Round brackets: ( )
- and / or operators
- Criteria Row Number
Important Notes
- When the Change Pattern box is being used to edit, you cannot add or delete a criteria row under the Specify Criteria section.
- The operator precedence will not be taken into account if you do not specify brackets. For example, if you specify the criteria as 1 or 2 and 3, it will be considered as ((1 or 2) and 3)
- You can change the and or or of the criteria rows and it will be updated in the Editor below.
- You can change the and or or condition in the pattern and it will be updated in the rows above.
- If you specify 1 and 2 and save it, on editing the view the pattern will be shown as (1 and 2). For (1 and 2) or 3 the pattern will be shown as ( (1 and 2) or 3 )
- If you add more rows in the editor and delete one by one there will be additional brackets displayed in the pattern. For example if there are 4 rows added and you delete the 3rd row, the criteria pattern will be as ( ( ( ( 1 and 2 ) ) ) or 3 ). If the first row is deleted then it will be shown as ( ( ( ( 1 ) ) ) or 2 ). However, on saving the criteria, it will change as ( 1 or 2 ).
- Make sure that you do not use the following as they are invalid: (), (and), (or).
- If the brackets do not match it will be treated as invalid.
- There will an error message, if the number of rows and the numbers given in the pattern do not match and also, if there are any numbers missed in the pattern.
- In case the final brackets are missing, there will be a difference in the Criteria Patterns Editor and its view mode.
Your Criteria Pattern in Editor Your Criteria Pattern in View Mode ( 1 and 2 ) or ( 3 and 4 ) (( 1 and 2 ) or ( 3 and 4 )) 1 and 2 and 3 and 4 (1 and 2 and 3 and 4 ) ( 1 or 2 ) and ( 3 or 4 ) ( ( 1 or 2 ) and ( 3 or 4 ) )
Part 4 - Associate instant and/or time based actions
Workflow rules are meaningful only if an alert, task, field update, webhook or custom function is associated to the rule. They are grouped under Actions that can either be Instant Actions or Time Based Actions. These actions once created, can be associated with many rules.
- In the Actions section, do the following:
Note that you cannot save a rule without creating either an instant or a time based action.- Create Instant Action by associating alerts, tasks, field updates, webhooks or custom functions. See Also Create Instant Actions
- Create Time Based Actions and associate alerts, tasks, field updates, webhooks or custom functions. See Also Create Time Based Actions
A maximum of 5 time based actions can be created.
- Click Save.
Note
- For each action, you can associate a maximum of 5 alerts, 5 tasks, and 3 field updates.
- You can associate up to 6 (1 Instant Action and 5 Time-Based Actions) custom functions per workflow rule. Similarly, you can associate up to 6 (1 Instant Action and 5 Time-Based Actions) webhooks per workflow rule.
- A maximum of 5 Time Based Actions (that includes alerts, tasks, field updates, webhooks and custom functions) can be created for a rule.
Associate Actions to Rules
Create Instant Actions
Instant action includes alerts, tasks, field updates, webhooks and custom functions that are triggered immediately when the rule is executed. There are two options to associate these actions.
- Create alerts, tasks, field updates, webhooks or custom functions and associate them to the rule. You can also create an action to convert leads, quotes or sales orders.
- Select existing alerts, tasks, field updates, webhooks or custom functions to associate to the rule.
To create an instant action
If you are creating a workflow rule, directly go to step 4
- Log in to Zoho Developer console and click Extensions for Zoho CRM.
- Select the extension you'd like to modify and click Edit.
- Click Automate in the left pane of the Extension Details page and click Workflow.
- Select the Rules tab at the top of the page.
- In the Workflow Rules page, click on the rule for which you want to create an action.
- Click Edit to modify the rule settings.
- Under Instant Actions section, do the following to associate alerts, tasks, field updates, webhooks or custom functions to the rule:
- In the corresponding section, click Add icon [
 ]and specify the details to create a record and associate it to the rule.
 - In the corresponding section, click Associate icon [
 ] and select an existing record and associate it to the rule.
- In the corresponding section, click Add icon [
- Click Save.
Note
- For a workflow rule, all the actions (alerts, tasks, field updates, webhooks and custom functions) will not be listed. If the rule is for Leads, only the actions created for Leads will be available for association.
- Only one set of instant action can be created with alerts, tasks, etc. associated to it.
- You can associate a maximum of 5 alerts, 5 tasks, 3 field updates, 1 custom function and 1 webhook to the instant action.
Create Time Based Actions
Time Based actions include alerts, tasks, field updates, webhooks and custom functions that are triggered on a specified time after the rule is executed. You can schedule the actions to be triggered based on the Rule Trigger Date, record Created Time, record Modified Time as well as other time or date fields in the module. You can see the list of scheduled actions for individual records under "Upcoming Actions".
There are two options to associate these actions.
- Create alerts, tasks, field updates, webhooks or custom functions and associate them to the rule.
- Select existing alerts, tasks, field updates, webhooks or custom functions to associate to the rule.
To create time based actions
If you are creating a workflow rule, directly go to step 4
- Log in to Zoho Developer console and click Extensions for Zoho CRM.
- Select the extension you'd like to modify and click Edit.
- Click Automate in the left pane of the Extension Details page and click Workflow.
- Select the Rules tab at the top of the page.
- In the Workflow Rules page, click on the rule for which you want to create an action.
- Click Edit to modify the rule settings.
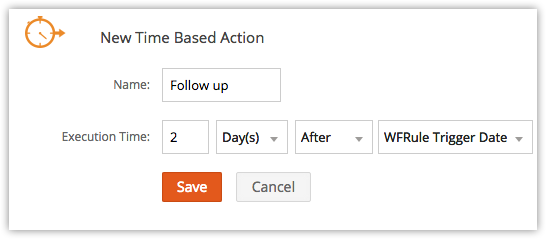
- Under the Actions section, click Add a Time Based Action.
- Enter a Name for the time based action.
- Specify the Execution Time, i.e. when the associated actions should be triggered.
- Click Save.
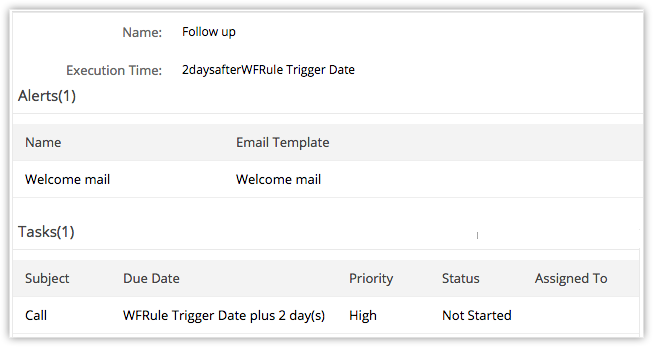
- Under Time Based Actions section, do the following to associate alerts, tasks, field updates, webhooks or custom functions to the rule:
- In the corresponding section, click Add icon [], specify the details to create a record and associate it to the rule.
- In the corresponding section, click Associate icon [], select an existing record and associate it to the rule.
- In the corresponding section, click Add icon [
- Click Save.


Note
- For a workflow rule, all the actions (alerts, tasks, field updates, webhooks and custom functions) will not be listed. If the rule is for Leads, only the actions created for Leads will be available for association.
- You can create a maximum of 5 time based actions for a workflow rule.
- Each Time Based Action can have a maximum of 5 alerts, 5 tasks, 3 field updates, 5 custom functions and 5 webhooks..
- If the Email Opt Out option is enabled, emails will not be sent to the customers.
- For the Workflow Management feature, the Organization's Time Zone will be considered for calculating a day. In the absence of the time zone being defined, the Super Administrator's Time Zone will be considered.
- Time Based Actions are not minute based. There can be a delay of few minutes for the time based actions to be triggered.
- When email alerts reach the limit for the day, any remaining emails to be sent the same day will not be sent.
- If the Execution Time that is calculated is a time in the past, then the action will be triggered immediately. There can be a delay of few minutes for the time based actions to be triggered.
- The scheduled actions for a records will be listed under Upcoming Actions in the Records Details Page.
Notes on Per Day Limits
- (No. of Users * 100) or 5000, whichever is lower, will be taken as the maximum limit per day for emails to be sent using workflow alerts.
- (No. of Users * 50) or 2500, whichever is lower will be taken as the maximum limit per day for the execution of time based actions (that includes alerts, tasks, and field updates).
- A maximum of 300 actions will be triggered every hour. If there are more than 300 actions per hour, the remaining actions will be executed in the next hour.
- The Super Administrator of your CRM account will be notified if the workflow email alerts limit is exceeded for the day.
- The per day limits (for e.g.: email limit) is calculated based on PST.
- Limits for Custom Functions:
- Calls per Day - 10000 calls/day or 200 calls per user license for the org. (whichever is lower)
- Integration Tasks - 5000 Zoho API calls /day using deluge.
- Get Data - 5000 calls/day
- Post Data - 5000 calls/day
- Send Email - 500 emails/day
Instances when the Time Based actions will be rescheduled:
- The Execution Criteria for the Rule is either Edit or Create or Edit. When the rule criteria is satisfied for a record, the instant actions are triggered and time based actions are scheduled for the record.
If a user edits the record and the rule criteria is not fulfilled, then the time based actions scheduled earlier will be deleted. If the record is edited again and the criteria is satisfied, then the time based actions will be rescheduled. - For Time Based Actions, the Execution Time can also be based on the custom Date & Time field. When a rule criteria is satisfied for a record, the instant actions are triggered and time based actions are scheduled for the record.
If a user edits the record to change the value of the date & time field, the time based actions will be rescheduled as per the new date & time value.
Instances when the Time Based actions will not be rescheduled or deleted:
- The Execution Criteria for the Rule is either Edit or Create or Edit. When the rule criteria is satisfied for a record, the instant actions are triggered and time based actions are scheduled for the record.
If a user edits the record but the rule criteria is not fulfilled, then the time based actions will not be scheduled again. - When a lead is converted, all the time based actions that are scheduled for the record will be deleted.
- When the Enterprise Edition is downgraded to the Free Edition, all the time based actions that are scheduled for the record will be deleted.
- When records are deleted, all the time based actions scheduled to the record will also be deleted. If the deleted records are restored, the time based actions will not be rescheduled.
Delete Workflow Rules
Workflow rules can be deactivated when not in use. You can also delete the unwanted workflow rules.
Note
- When you delete a workflow rule, all the time based actions scheduled for the records will also be deleted.
To delete workflow rules
- Log in to Zoho Developer console and click Extensions for Zoho CRM.
- Select the extension you'd like to modify and click Edit.
- Click Automate in the left pane of the Extension Details page and click Workflow.
- Select the Rules tab at the top of the page.
- In the Workflow Rules page, click the Delete icon [
 ] for the corresponding rule.
Related Topics
Workflow Alerts | Workflow Tasks | Workflow Field Updates | Custom Functions | Webhooks |