Webhooks
How Can I...up
Webhooks facilitates communication with third-party applications by sending instant web notifications every time an event occurs in your Zoho CRM (or Vertical CRM). With Webhooks, you can configure HTTP URLs and associate them in workflow rules to automate the entire notification process. For general information about Webhooks, please refer to webhooks.org .
Scenarios
- After closing a potential in your CRM, you can push the customer information to any third-party accounting software and automatically generate an Invoice for the Customer.
- You can add subscribers to the mailing list in Email Marketing software (e.g. MailChimp) based on leads or contacts collected from your Website using your CRM's Web forms.
- You can trigger SMS reminders to field sales reps about customer meetings, demos and other events.
- You can generate an estimate in your accounting software as soon as the opportunity stage is changed from Prospecting to Price Quote.
Target Audience
- CRM Users with Manage Workflow permissions
- Programmers with REST API skills
List of Fields in Webhook
| Field Name | Description | Data Type | Maximum Limit |
| Name | Specify name of the webhook. | Text | Alphanumeric(50) |
| Description | Add a description for the webhook. | Text | 200 characters |
| URL to Notify | Specify the REST API URL of the third-party application. | URL | 200 characters |
| Method | Select type of API method - POST or GET. By default, system selects POST method. | Radio Button | - |
| Module | Choose one of the Zoho CRM modules. Supported Modules:
Note: You can not set up webhooks for Call Logs and Notes modules. | Picklist | - |
| Append Entity Parameters | Specify the Parameter Name and corresponding Parameter Value. This is the request parameters sent while triggering the webhook notification to third-party application. Supported Modules:
| String | 3000 characters |
| Append Custom Parameters | Specify the CRM Parameter Name and corresponding Value for the webhook. This is also the request parameters sent while triggering the webhook. The name and the value are as configured. This key/value pair is mainly used to send the Auth tokens, security tokens, etc. | String | - |
| Preview URL | Preview the complete webhook URL to be notified to the third-party application. | Text | Read-only |
Set Up Webhooks
Setting up Webhooks includes the following three steps:
- Create a webhook.
- Associate webhook to a workflow rule.
- Test webhook integration.
To create a webhook
- Log in to Zoho Developer console and click Extensions for Zoho CRM.
- Select the extension you'd like to modify and click Edit.
- Click Automate in the left pane of the Extension Details page and click Workflow.
- Click Webhooks tab at the top of the page and click Configure Webhook.
- In the Configure Webhook page, specify all necessary parameters.
- Click Save.
To associate webhook to a workflow rule
- Log in to Zoho Developer console and click Extensions for Zoho CRM.
- Select the extension you'd like to modify and click Edit.
- Click Automate in the left pane of the Extension Details page and click Workflow.
- Click Rules tab at the top of the page.
- In the Workflow Rules page, click the Create Rule.
- In the New Rule page, specify workflow rule parameters.
- Under Instant Actions, select the webhooks to be triggered.
- Click Associate.
To test the webhook integration
- Add test data in your CRM according to your workflow rule criteria.
- In your application, check for the data received from your CRM via webhook notification.
- If there is an error or data mismatch, modify your webhook settings in your CRM.
- Continue this test until you obtain the required data from CRM to your Application.
Important Notes
- You can associate up to 6 (1 Instant Action and 5 Time-Based Actions) webhooks per workflow rule.
- You can transfer data for a maximum of 10 CRM fields from your CRM to third-party applications using webhook.
- You cannot retrieve data from other Apps to your CRM using webhooks.
- You must update the API ticket regularly according to limits in third-party applications.
- You will not receive any email notification, if the Webhook integration stopped functioning due to any issue in third-party API.
- If there is any failure in the process, Webhook will send a notification first, and your CRM system will send a second notification after 15 min. Thereafter, the system will not send any Webhook notifications for that particular workflow trigger.
- If you exceed the maximum count per day, the system will not send remaining Webhook notifications to third-party applications and will notify the failure to Administrator.
- In the URL to Notify field, if you want to specify a port number, please note that only 80 or 443 port numbers are supported.
- Data will be sent in the following standard format for Date and Date Time fields to third-party applications:
- Date: yyyy-MM-dd
- Date Time: yyyy-MM-dd hh:mm
Business Scenario 1
Calculate Sales Commission in Zoho Creator App upon closing an Opportunity in Zoho CRM.
Purpose
Sales Managers and the Payroll team can use the Sales Commission app to calculate the compensation for your Sales Reps according to a pre-defined formula set by your organization (for example, flat 2% of the closed contract or sales amount). This application helps you to reduce manual entries, minimize errors and save time while calculating commission for your Sales Reps. Additionally, Sales Reps can track their monthly commissions in a central location.
Pre-requisite
- Account in Zoho Creator Application
- Permission to access Zoho API
- Familiarity with Zoho Creator
Procedure
- Create the Sales Commission App in Zoho Creator (Refer Zoho Creator Tutorial on Creating Apps )
- Configure webhook in CRM
- Set up Workflow Rule
- Test your webhook integration
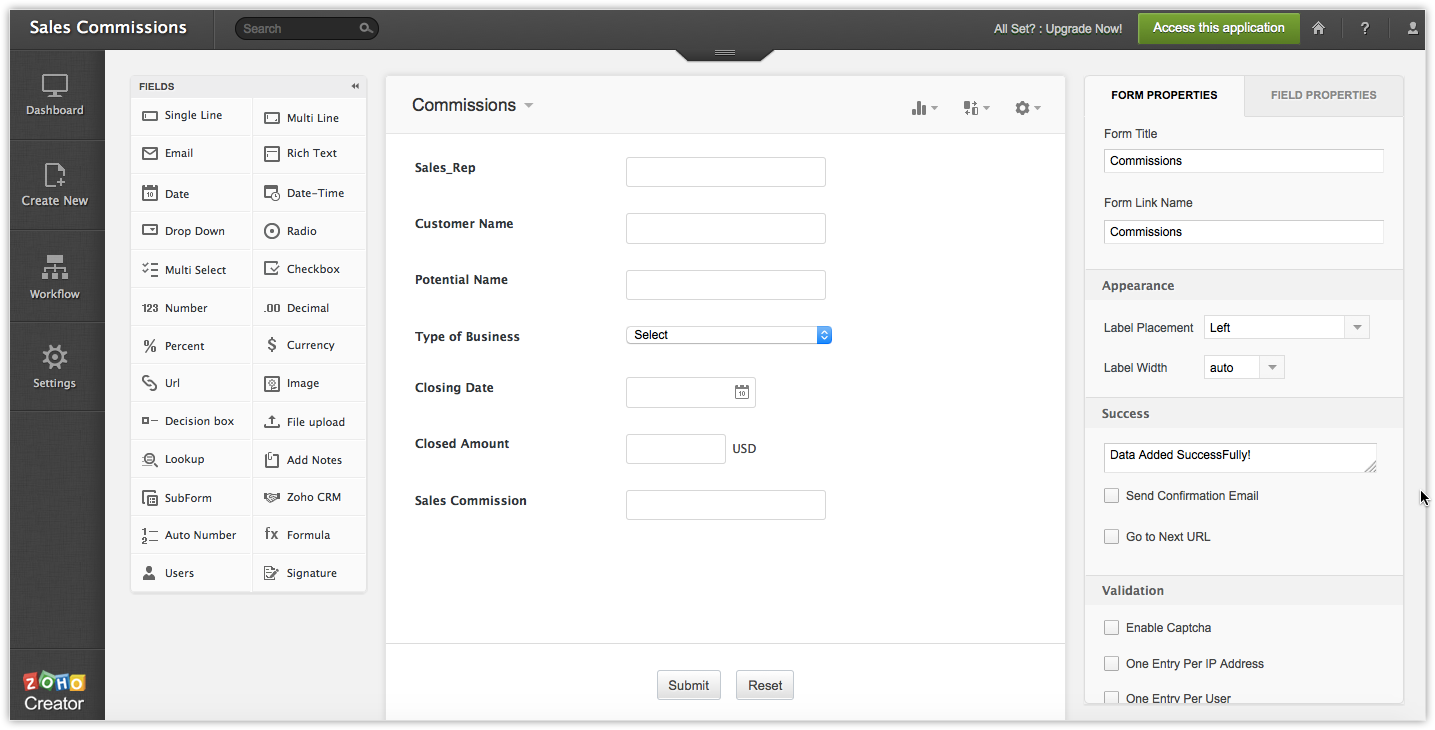
Step 1: Create Sales Commissions App in Zoho Creator
In Zoho Creator, create the Sales Commission App with following fields:
- Sales Rep
- Potential Name
- Customer Name
- Opportunity Amount
- Type of Business: New Business or Existing Business
- Closing Date
- Sales Commission
To create an Application in Zoho Creator refer to the online help
Step 2: Configure Webhook
Select the following Fields from the Potentials module while setting up user-defined parameters:
- Potential Name
- Closing Date
- Type
- Record Owner
- Amount
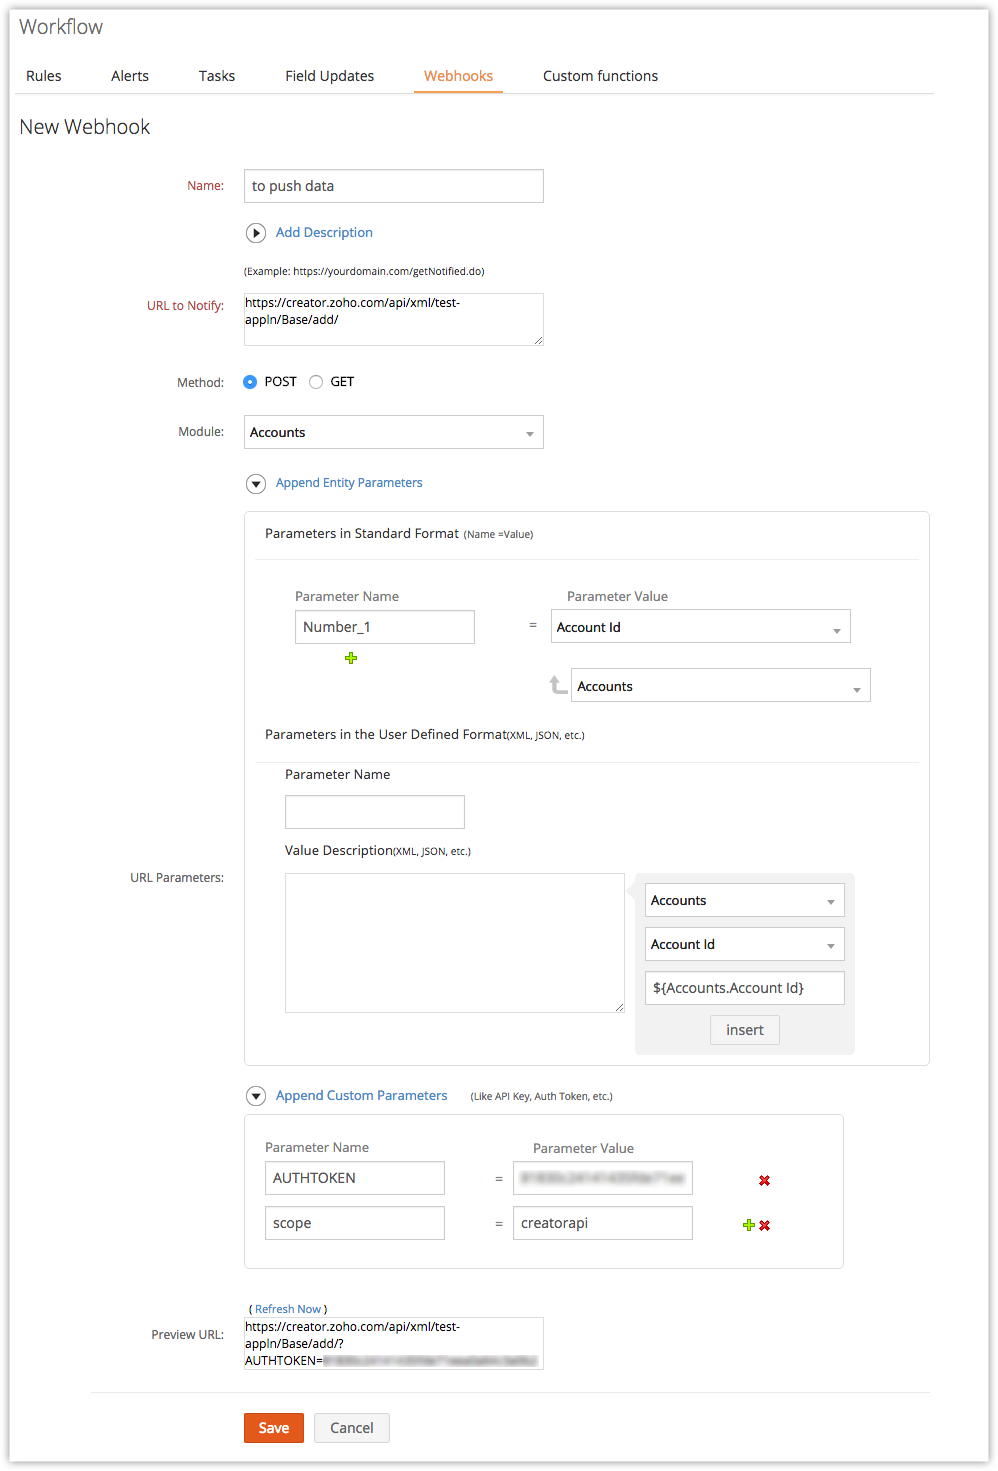
In Webhook, specify the following details:
URL to Notify:
- https://creator.zoho.com/api/xml/write - POST method
User-defined Parameters (XML or JSON)
- <ZohoCreator>
- <applicationlist>
- <application name='sales-commissions'>
- <formlist>
- <form name='Commissions'>
- <add>
- <field name='Name'>
- <value> ${Potentials.Potential Name} </value>
- </field>
- <field name='Closed_Amount'>
- <value> ${Potentials.Amount} </value>
- </field>
- <field name='Closing_Date'>
- <value> ${Potentials.Closing Date} </value>
- </field>
- <field name='Customer_Name'>
- <value> ${Accounts.Account Name} </value>
- </field>
- <field name='Type_of_Business'>
- <value> ${Potentials.Type} </value>
- </field>
- <field name='Sales_Rep'>
- <value> ${Potentials.Potential Owner} </value></field>
- </add>
- </form>
- </formlist>
- </application>
- </applicationlist>
- </ZohoCreator>
Note:
- In the above XML string, name represents the field in Zoho Creator App and the value for data is to be pushed from CRM.
- <applicaton name> is the name of the application that contains the form in Zoho Creator. Get your application name from the Application Settings tab of Zoho Creator.
- <form name> is the name of the form where you edit records in Zoho Creator. Get your form name from the Form Settings of your Zoho Creator account.
- Ensure that the date format in the Creator app is in yyyy-MM-dd format. You can change the date format from the Application Settings of your Zoho Creator account.
Custom Parameters:
| Parameter | Description |
| authtoken* | Specify authtoken from your creator account. Refer to the Creator Help for more details. |
| zc_ownername* | Specify the application owner's name of your creator account. |
Note
- To retrieve data from other apps to Zoho Creator, you must specify the username and authtoken of Zoho API. To generate Zoho API information, refer to the Online Help
Step 3: Set up Workflow Rule
Follow these steps in the Workflow Rule page:
- Set up workflow criteria as:
- Type is New Business
- Stage is Closed Won
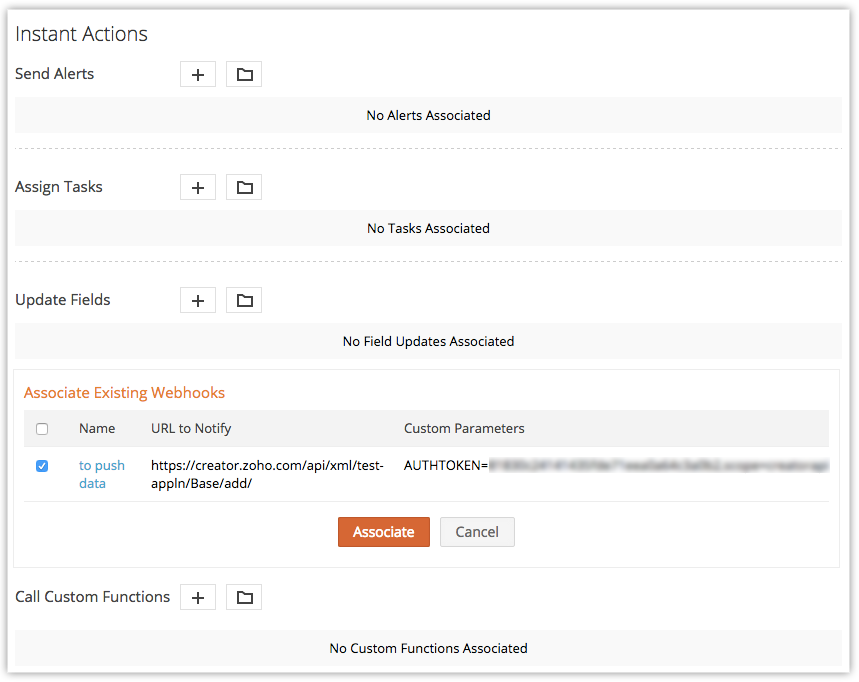
- Select the webhook as an instant action.
- Save workflow rule.
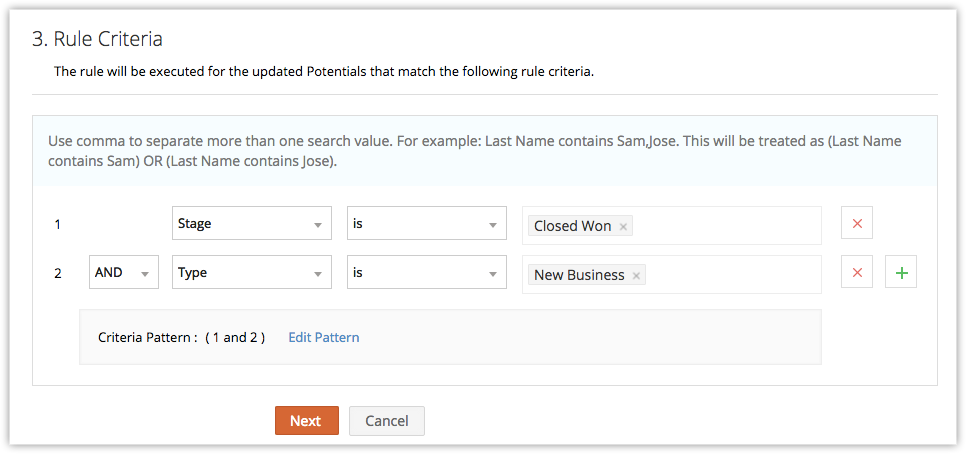
Workflow Rule Criteria
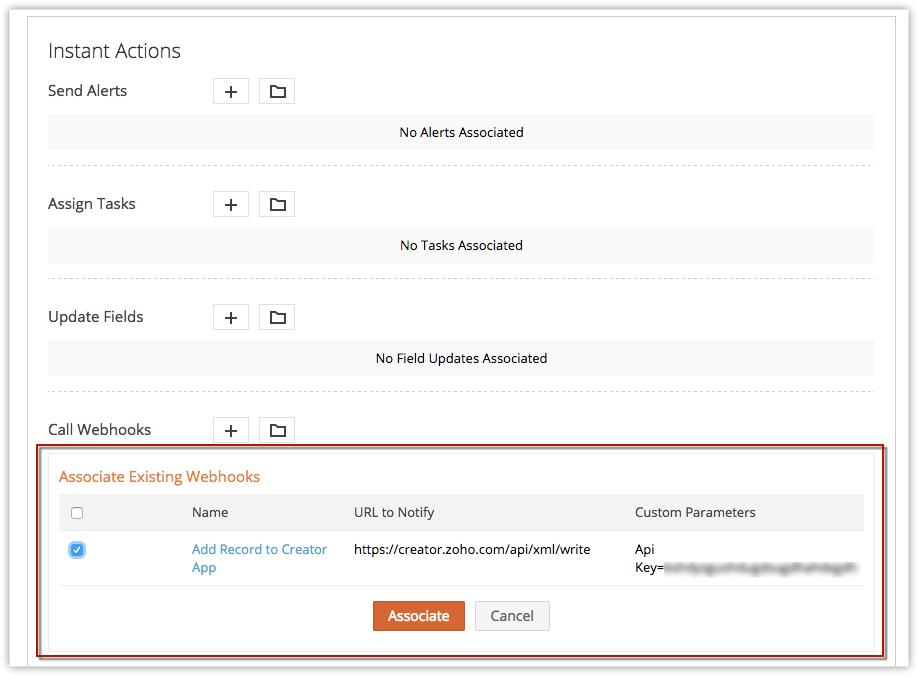
Associate Webhook to Workflow Rule
Step 4: Test your Integration
- Add a test potential in CRM with Type and Stage fields as a New Business and Closed Won respectively. While entering test data, ensure that Amount, Closing Data, Record Owner, Account Name and Potential Name are also entered.
- Open your Sales Commission App in Zoho Creator and check for the CRM data.
If you've not received any data, modify the webhook configuration and continue testing. After successful testing, remove test entries and roll-out this integration to your CRM users.
Refer Error Codes
When execution of webhook fails, one of the following error messages are displayed in Zoho CRM:
HTTP Status Codes
- 400 Bad Request - Often missing a required parameter.
- 401 Unauthorized - No valid Auth Token provided.
- 402 Request Failed - Parameters were valid but request failed.
- 404 Not Found - The requested item doesn't exist.
- 500, 502, 503, 504 Server errors - Something went wrong on third-party application.
- Error Code 1 - Temporarily not able to connect to the API server. You need to check API server logs, firewalls settings for our requests sent from CRM.
Custom Errors
- Internal process failure - When the webhook is not executed due to errors in processing the webhook.
- Day limit reached - When the company reached the maximum limit for the day.