- HOME
- Create Your Way
- Can you build a custom quotation management app without code? Yes, and here’s how.
Can you build a custom quotation management app without code? Yes, and here’s how.
- Last Updated : November 18, 2025
- 5.8K Views
- 7 Min Read

Quotation management is an essential part of your sales process that you can’t—and shouldn’t—compromise. But do you?
If you’ve been altering your data collection and processing methods to resonate more with the software you purchased off the shelf, then you aren’t doing yourself or your business justice. When you compromise on any part of your sales process, you’re requiring your sales representatives to adjust their pitches and the way they handle a situation. So what should ideally be a seamless procedure becomes inefficient and confusing for everyone.
There’s a simple way to get around this—build your own quotation management software and have it work exactly how you want it to.
Why create a custom quotation management application?
No learning curve
When you build your own app, you build it just the way you want it. Unlike store-bought software, a custom app follows every process you follow and blends in with your team’s workflow. You don’t have to spend hours in training or reading through documentation trying to figure out what each button and function does.
Flexibility to grow
Custom apps start small—just like your business did. They give you the freedom to deploy apps with only critical features and add more modules and functionality as you need them. That way, you don’t have to deal with unnecessary bells and whistles before you’re ready.
Essential features
When you build an app from scratch, you can be sure it has what you need. You don’t have to compromise and adjust your process to adapt to someone else’s design. Instead, you can choose exactly what your app should do, and how.
Custom data management and representation
The best part of having your own app to manage your sales and quotation processes is that you have complete control over your data. Not only can you access it at any time on any device, but you can also represent that data in any way you like. For example, you can have personalized dashboards for each of your sales representatives, as well as a completely different view for your managers.
There’s no denying it—building a custom app for your business is the best way to ensure you have what you want, how you want it.
However, app development can also be a tricky endeavor. When you take the traditional approach to app development, you run into many challenges, and some of them deal-breakers. For example,
Special know-how
Nowadays, when you develop a business app, you don’t just build a web app. You also build corresponding iOS and Android apps, so that your teams can continue working and access information even if they’re not at the office. And to build these mobile apps, you need developers who have expertise in iOS and Android programming languages, which can easily triple your budget.
Longer development cycles
The first step to developing your app is to explain your processes to your developers so they can accommodate your needs. Once you do that, they start making a prototype which you and your stakeholders need to offer feedback on. This is a back and forth process where you review every change made. And only when you’re fully satisfied does your developer build the actual app. Then comes bug testing and issue fixing, and it could take months—or even years—for your app to finally be functional.
Physical space
While developing an app is a challenge by itself, deployment isn’t easy either. To use your app, you need a proper space to store all your data. Often, this means you have to invest in large room-like servers, and constantly monitor and maintain them so they retain their integrity. If you’re a small-scale business operating on rented land, servers will be a considerable strain on your budget.
Inconsistent updates
Once you’ve got around all the other hurdles and successfully deployed your app, you’ll eventually want to make changes. Perhaps you’ve recruited another manager and you need to add them to a sales approval process. To achieve that, you’ll have to contact the developers of your web, iOS, and Android apps and have them update the change simultaneously. And in case one of the app stores rejects your update, you’ll run the risk of having different versions of your app live.
When you look at it that way, developing a custom app from scratch doesn’t look like such a good idea, does it?
It makes no sense to build a custom app from scratch—if you’re doing it the traditional way. But there’s a modern, much better way to build your app.
Low-code technology.
Zoho Creator is a custom application builder that uses low-code technology to help you create apps. Instead of traditional script-based development, you’ll have a more interactive interface to work with. For example, there’s a drag-and-drop builder to create forms, reports, and pages, as well as point-and-click configurations for workflows. All these features speed up your development time significantly and even enable non-programmers to build business apps.
Still unsure?
Here’s a five-step guide to building your own quotation management app from scratch.
But before you get started on your app, it’s important to identify what features and functionality you’ll need, which helps you build a proper skeleton for your app. A simple quotation management app should do the following:
Collect client information
Make a database of products and services
Let people request a quote
Approve, request, and prepare the quote
Reject requests and notify the client
Each of these capabilities will be a separate step in our app.
Step 1: Create a form to add and store client information
Zoho Creator comes with a drag-and-drop form builder. On your left in the builder, you’ll see ready-to-use fields—some basics like name, email address, phone number, and address, and some more complex like lookup, users, and formula. Click on the fields you need, and drag and drop them onto the canvas in the middle. When a field is selected, on the right side you’ll notice the properties and settings for that particular field.
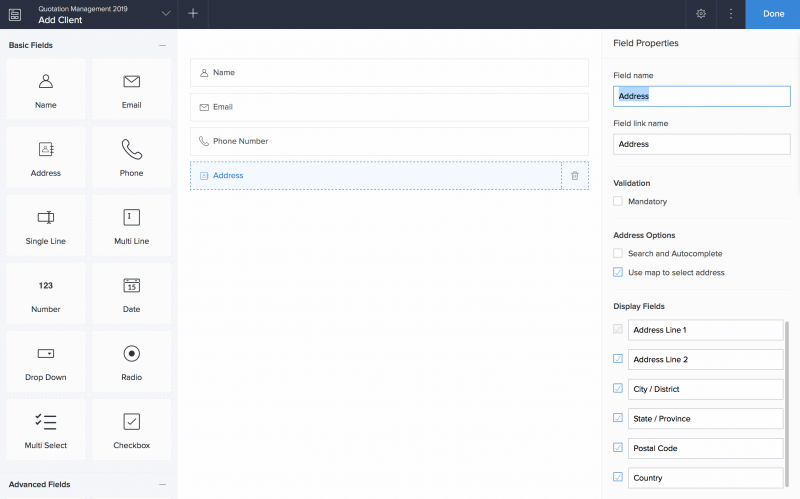
This form will be the data entry point for information about your clients. It’ll have contact fields like name and address, but also a few more, like the name and size of the business, social media profiles, requirements, and more details to help you understand the client better.
Step 2: Create forms to collect details about products or services
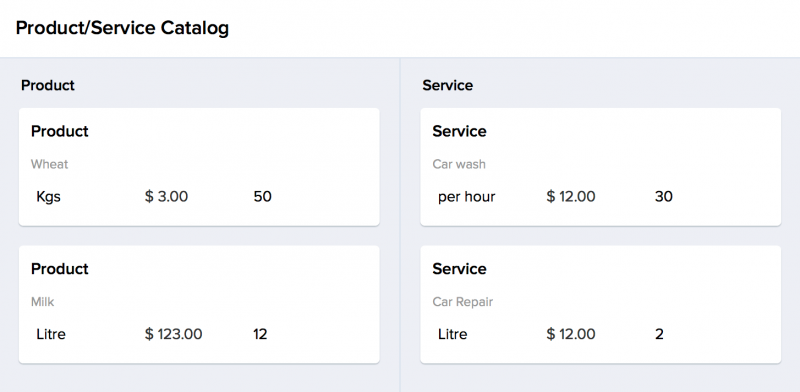
Just as in the previous step, we’ll use the drag-and-drop form builder to create another form, but with only one field. This will be the Units form. If you’re selling products by weight, when you create a new product, you need to select which unit you’ll sell it by. For instance, it could be kilos, grams, package, or liters. This form will collect all available units.
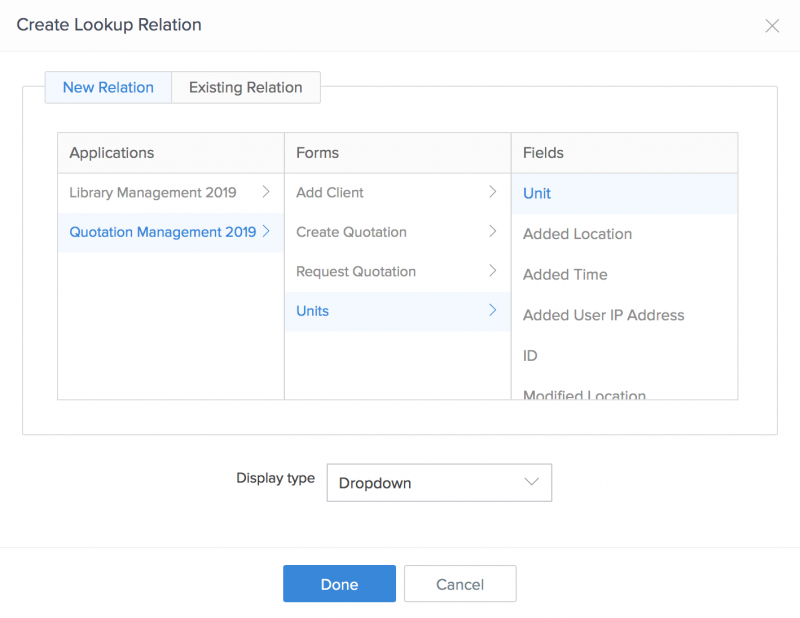
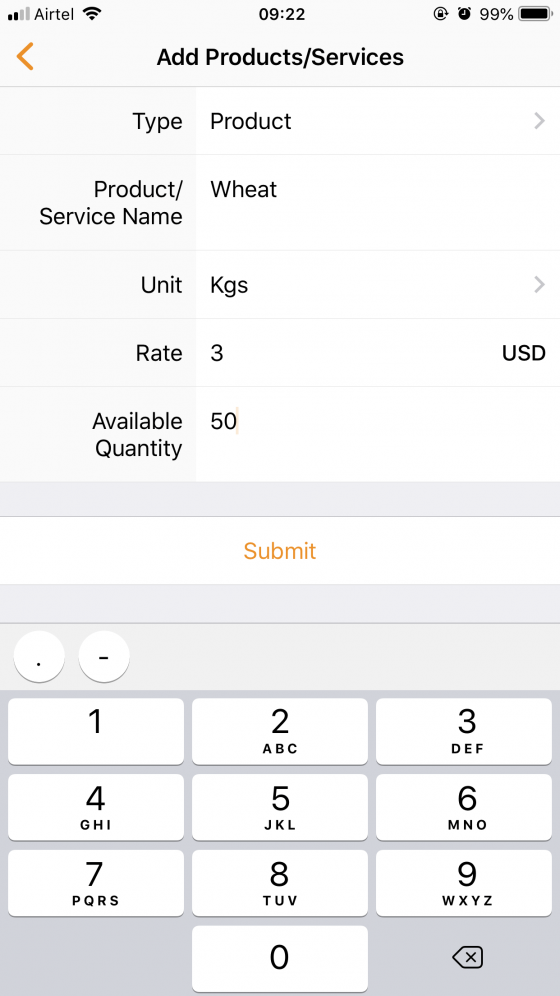
Once you create the Units form, you’ll create another form to add products or services to. This form will have fields like product name, quantity available, price by unit, bar code, and image. However, instead of adding a Sold by the Unit field, you’ll add a lookup field. This will connect to the Units form, and display a list of the units you’ve already saved there. Using a lookup field ensures that you don’t have any duplicate or erroneous data.
Every form you build, comes with a default report that lists out all the information collected through it. You can also create more custom reports like Kanban, bar charts, pie charts, pivot tables, and maps.
Step 3: Create a form for clients to request a quote
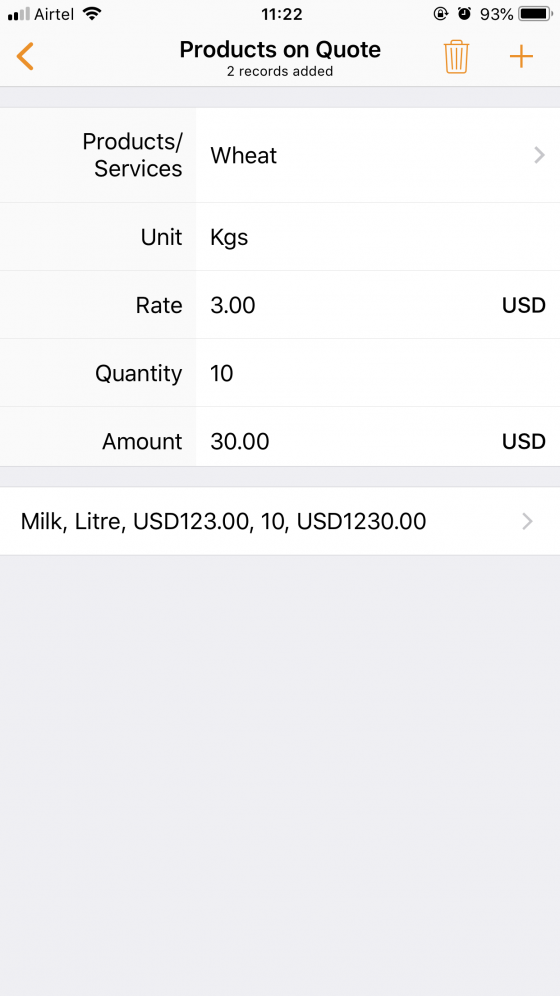
Now we’ll create another form for clients. Because we already have a list of clients and their information in another report—the form we created in the first step—we’ll use a lookup field to fetch the client’s name in this form. Other fields in the form could include a multi line field to collect requirements and additional contacts, and a subform field in case your clients would like to choose multiple products.
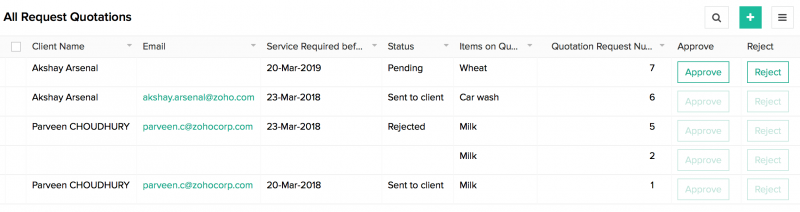
As soon as a client submits the form, it’ll be sent to the admin for approval. Setting that up is our next step.

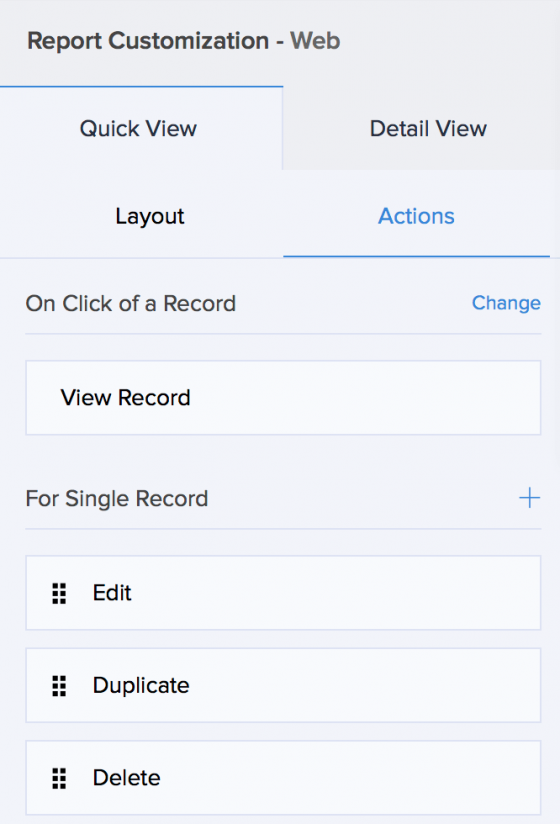
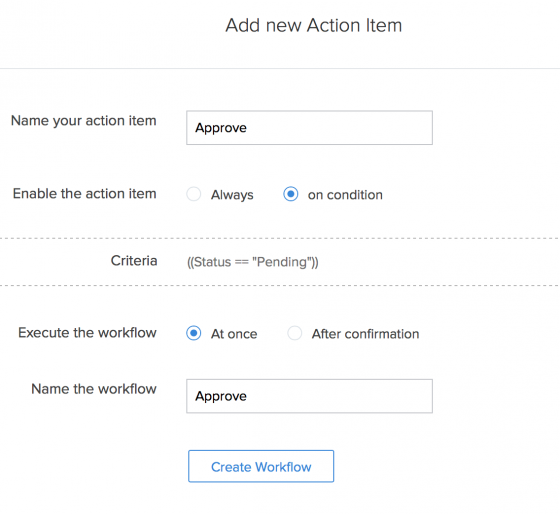
Step 4: Set up an approval workflow and build a form to create a quote
Approvals are one of the most common processes Zoho Creator customers make, so we designed a premade workflow to make our users’ jobs a little easier. You can now just select an approval type workflow, base it on the Request Quote form, and select a user to be the approver.
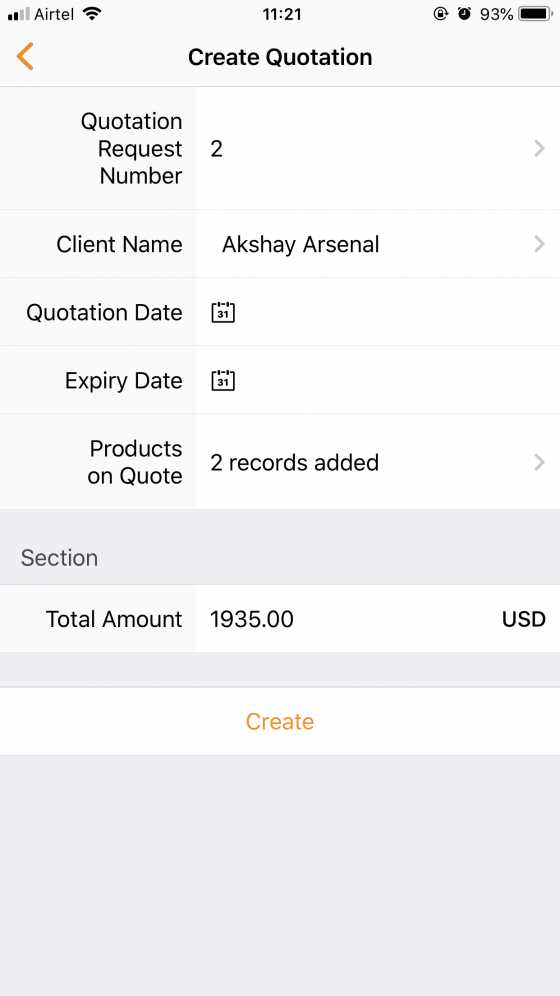
Then you create another form called Create Quotation. This one will have a lookup field to fetch the client’s name and another lookup to fetch the details of the quote requested. Apart from that, it’ll also have a number field to add the quote and a date field to denote the expiration of the quote.
The default (premade) approval workflow includes an email notification to the requester, telling them whether their request is approved or denied. In addition to that email, you’ll also need to create a condition so that the Create Quotation form is opened as soon as a request is approved.
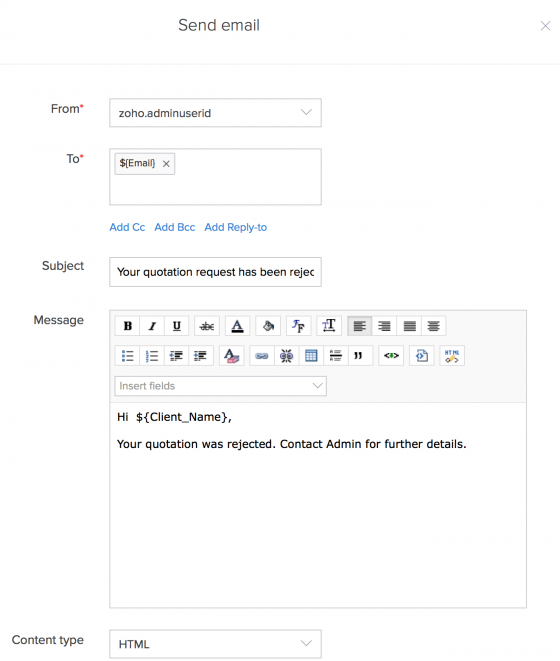
Step 5: Create an email to notify the client when their request is rejected
The approval workflow has default email notifications. When the approver denies a request, the submitter will receive an email, and you can customize this email message to include more information.
And that’s it—your custom quotation management app is ready!
 Bonus takeaway
One of the biggest problems with developing your own app from scratch is that you’ll have to develop it separately for the web and each mobile operating system. However, with Zoho Creator, you don’t have to worry about it at all. While you build your app on the web, the system automatically generates corresponding iOS and Android native apps for you. You can download and publish them right away in the app stores.
If you choose to, you can also further customize your mobile native apps. For example, you can hide certain reports and forms in the mobile version so it’s easier to navigate through. You can add mobile-specific features like barcodes, offline form submissions, and even gestures like swipe right to approve and left to reject. And the best part? You can do all this and more, on the web itself—without using a single line of code.
Impressive, right?
You can build a custom quotation management app without using code—and here’s a step-by-step video tutorial that explains the process for you.
A lot of Creator users have built apps by themselves, but many started out unsure. We understand—it can be a scary idea. However, we believe that time and effort spent on doing something you know will improve your business, is far better than altering your processes to fit store-bought software.
And if you run into any problems at all, we’re just an email away. So go ahead—decode your business problems today!
 Mathi Ganesh
Data-driven digital marketer experienced in handling multiple SAAS products across different platforms. Experienced in strategizing, campaign management-analytics & training.