Introduction to Hosted Pages
Hosted pages allow you to collect card and personal information from your customers. If you own a website or an online service, you can setup a hosted page to act as your checkout page/signup page. Your customers can choose the product or service of their choice and pay for them through the hosted page.
Related topics:
- Need for hosted page
- Checkout process
- Setting up a hosted page
- Linking hosted pages to your website
- Including add-on(s) in hosted page
- Collecting additional information from customers
- Thank You Page/Redirect URL
- Email notifications
- Customizing the hosted page
Need for a hosted page
You might ask “Why do I need a hosted page? Can’t I setup a page myself and collect payments?” The answer is, setting up your own page and collecting payments requires your website to be PCI-compliant and the process can sometimes be long and tedious.
But, deploying a hosted page for your website can be done within minutes and you don’t have to worry about PCI-compliance since the hosted pages are by default PCI compliant which means they are highly secure and complies with all security standards. Also, the hosted pages are mobile friendly which makes them easily accessible via mobile phones.
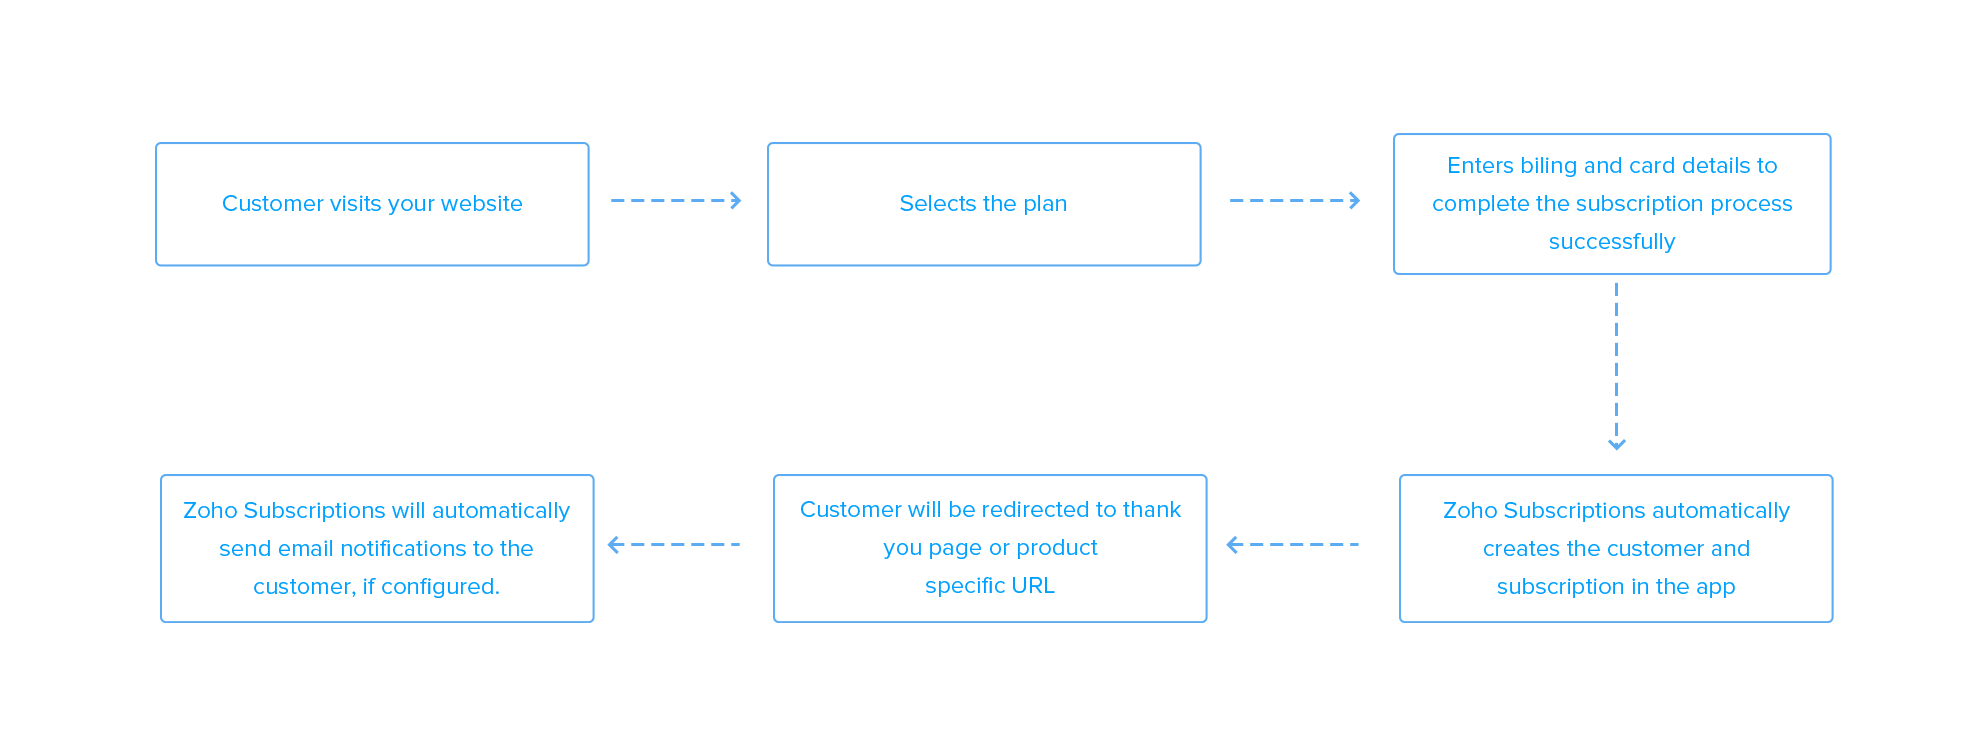
Checkout process
Setting up a hosted page
Hosted pages are specific to each plan and they’ll be generated automatically when you create a plan. You can view the hosted page link for each plan by clicking on View Plan URL link under each plan. Once you embed this link in your website, your customer can subscribe to your plan by giving their personal and card information.
Linking hosted page to your website
There are two ways to embed hosted page in your website.
- As an iframe
- As a hyperlink
As an iframe
This will embed the hosted page form directly on the page so that, customer can directly enter the details and complete the subscription process.
To embed the hosted page in an iframe, embed following code in your website where you want to embed the page.
Syntax:
<iframe src="view plan URL" width="xxx" height="xxx"></iframe>
Replace the view plan URL with the plan URL and enter the width and height of the form. Hosted page embedded in an iframe will look like this.

As a hyperlink
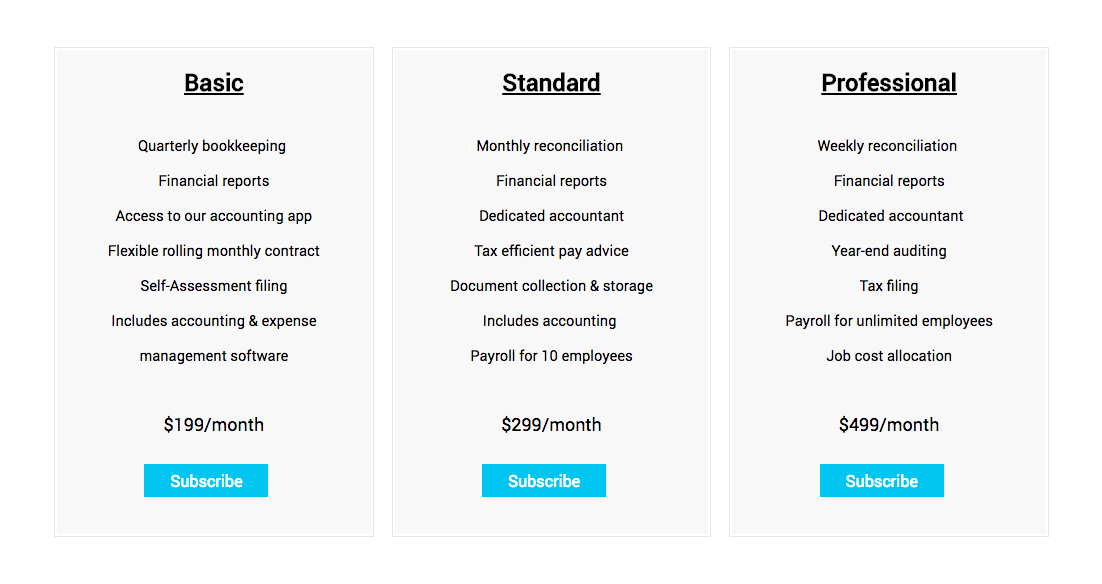
You can use the plan URL to hyperlink a button or text to include the hosted page. For example, refer the screenshot below where each Subscribe button is hyperlinked to respective plan URLs.
So, when your customers clicks on a Subscribe button, they’ll be taken to the hosted page to compete the subscription process.
Including add-ons in hosted pages
Zoho Subscriptions does not include addons in your hosted page by default. You have to manually embed them by passing parameters along with the plan URL and the section below is going to explain how to include addon to the plan url.
Let’s take the following plan URL(without addon embedded) for example,
https://subscriptions.zoho.com/subscribe/3b884751f87f05e584c3952b6388e7f96a2bba0f6b0532177e00f0ba8db832fc/monthly-essential
Now, to include the addon, you have to add the addon code and addon quantity at the end of the plan URL after “?” (question mark). Addon code and addon quantity should be separated by “&” (ampersand sign).
Addon code can be added using addon_code[0]=“the actual addon code” and addon quantity can be added using addon_quantity[0]=“the actual addon quantity”.
Here, “0” in addon_code and addon_quantity marks the addon number. So, if you’re including multiple addons, the numbers will increase.
https://subscriptions.zoho.com/subscribe/3b884751f87f05e584c3952b6388e7f96a2bba0f6b0532177e00f0ba8db832fc/monthly-essential?addon_code[0]=NUTMIX0943&addon_quantity[0]=1
If you were to include multiple addons, the same above URL will look like,
https://subscriptions.zoho.com/subscribe/3b884751f87f05e584c3952b6388e7f96a2bba0f6b0532177e00f0ba8db832fc/mnthly-essential?addon_code[0]=NUTMIX0943&addon_quantity[0]=1&addon_code[1]=GOODIEMIX&addon_quantity[1]=1
Here, 0 and 1 in the addon_code and addon_quantity which marks the addon numbers.
Collecting additional information from customers
By default, Zoho Subscriptions’ hosted page allows you to collects name, email, shipping and billing address from your customer. Sometimes you may have to collect additional information from your customers that your business may require. In these situations, you can use custom fields to collect the additional information.
As of now, Zoho Subscripitons hosted page supports the following custom field types.
- Dropdown
- Text
- Decimal
- Percentage
- Phone
- Number
- URL
- Amount
- Date
- Checkbox
To add any of these custom fields to the hosted pages, read here.
Thank You Page/Redirect URL
When your customer successfully signups to your plan, you can either take them to the default thank you page or to any page that you want to take them. For instance, your homepage.
- Default Thank You Page
Your customers will be taken to the Default Thank You page if the redirect URL is left empty. You can change the content and image of the thank you page by clicking Thank You page tab from the sidebar in the hosted page edit section.
- Redirect URL
Redirect URL can be used when you want to take your customers to a specific page or to your very own custom designed page. You can enter the URL to which you want to take your customers under Redirect URL field at the time of product creation or at the product edit screen.
Note: The Redirect URL is specific to each product and not to each plan. Also, if the redirect URL is left empty, customers will be taken to the default thank you page.
Email Notifications
After successfully creating a subscription, Zoho Subscriptions will automatically send an email notification to your customer about the new subscription and other notifications related to the subscription. You can learn how to configure customer email notifications here.
Also, you will receive in-app and mobile notifications for various subscription and payment related events. You can download the Zoho Subscriptions’ iOS application here.
Customizing the hosted page
Yes, you can customize the hosted page to suit you needs. You can customize the font color and size, set a background image, change the text fields’ width and height, change license agreement labels and many more.
To customize the hosted page,
- Click on Gear icon and select More Settings.
- Select Hosted Pages from the left pane.
- In the following page, you can customize almost every aspect of the hosted page.
- Once you’re done with editing, click on Save.
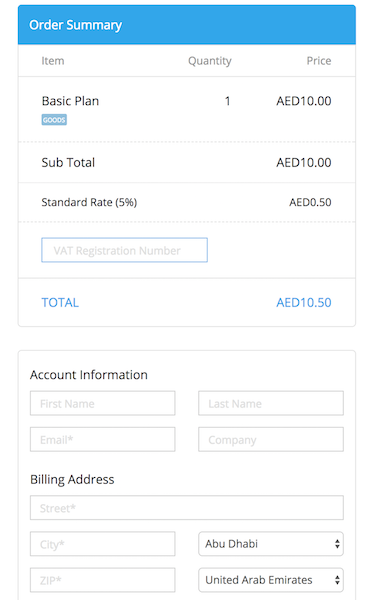
VAT handling in hosted pages
The hosted payment pages are tweaked to meet your needs of creating subscriptions with VAT rates. Do not disable the address sections unless your business isn’t VAT registered. The shipping address plays the key role here. Once your customer starts filling out the form to subscribe to your plans, we would be pre-filing the tax rates according to the details given here. The shipping country will be considered as the place of supply. If it is a GCC country we would be displaying a field to enter their TRN number as well. If the customer doesn’t enter their TRN number, he would be considered as unregistered for VAT.