Preferences
The preferences section under settings helps you handle certain functions of Zoho Payroll. You can read more about them below:
Employee Portal
From this page, you can manage portal access, payroll admin contact information, and send messages to all your employees who have portal access.
Enable or disable portal access for all employees
Toggle the Enable Portal Access option to enable or disable portal access for all employees at one go. This option will help manage overall access for employees but this does not affect the individual portal access preference you’ve configured in employees' profiles.
Manage Portal Contact Information
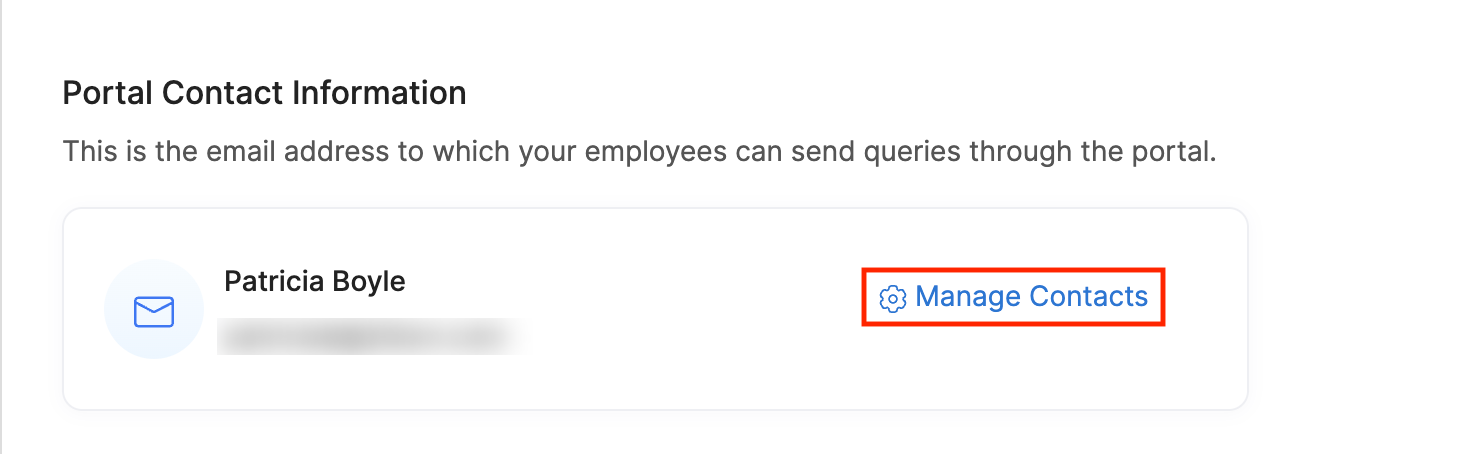
Displaying contact information in the employee self-service portal can be useful for employees to contact someone in case of payroll-related questions or issues.
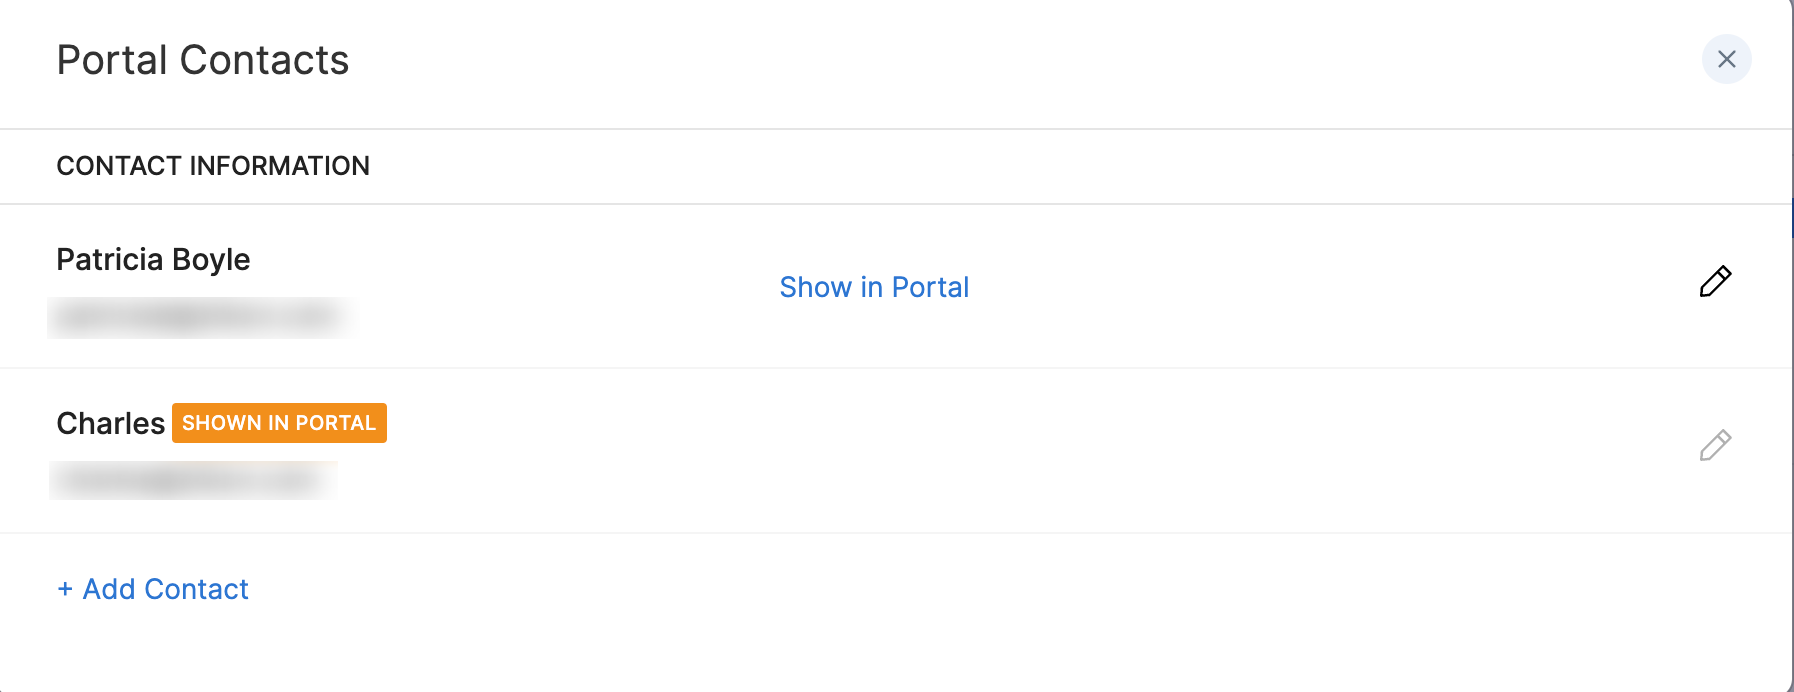
In Zoho Payroll, you can add multiple contacts. However, only one contact can displayed in the employee self-service portal.
Here’s how you can display the contact information in the Employee Self-Service portal:
- Click Settings in the top right corner and select Preferences.
- Click Employee Portal on the Preferences sidebar.
- Go to Portal Contact Information and click Manage Contacts.
- Click +Add Contact to add a new contact.
- Enter the name and email of the contact.
- Click Save.
- Hover over a contact and click Show in Portal to display the contact in the portal.
You can click the Edit or Delete icon next to the contact to make any changes or delete the contact.
Display Banner Message in Portal
It is important to ensure that all employees are informed about important updates and changes regarding payroll within the company. One way to effectively communicate these updates is by displaying banner messages in the employee portal.
Scenario: Zylker is planning to postpone the last date when employees can submit their Proof of Investments and wants to inform all employees about it. The HR department of Zylker creates a banner message in Zoho Payroll that includes information about the new deadline. The banner message is prominently displayed on the portal’s homepage, ensuring that all employees see it when they log in.
To display a banner message:
- Click Settings in the top right corner and select Preferences.
- Click Employee Portal on the Preferences sidebar.
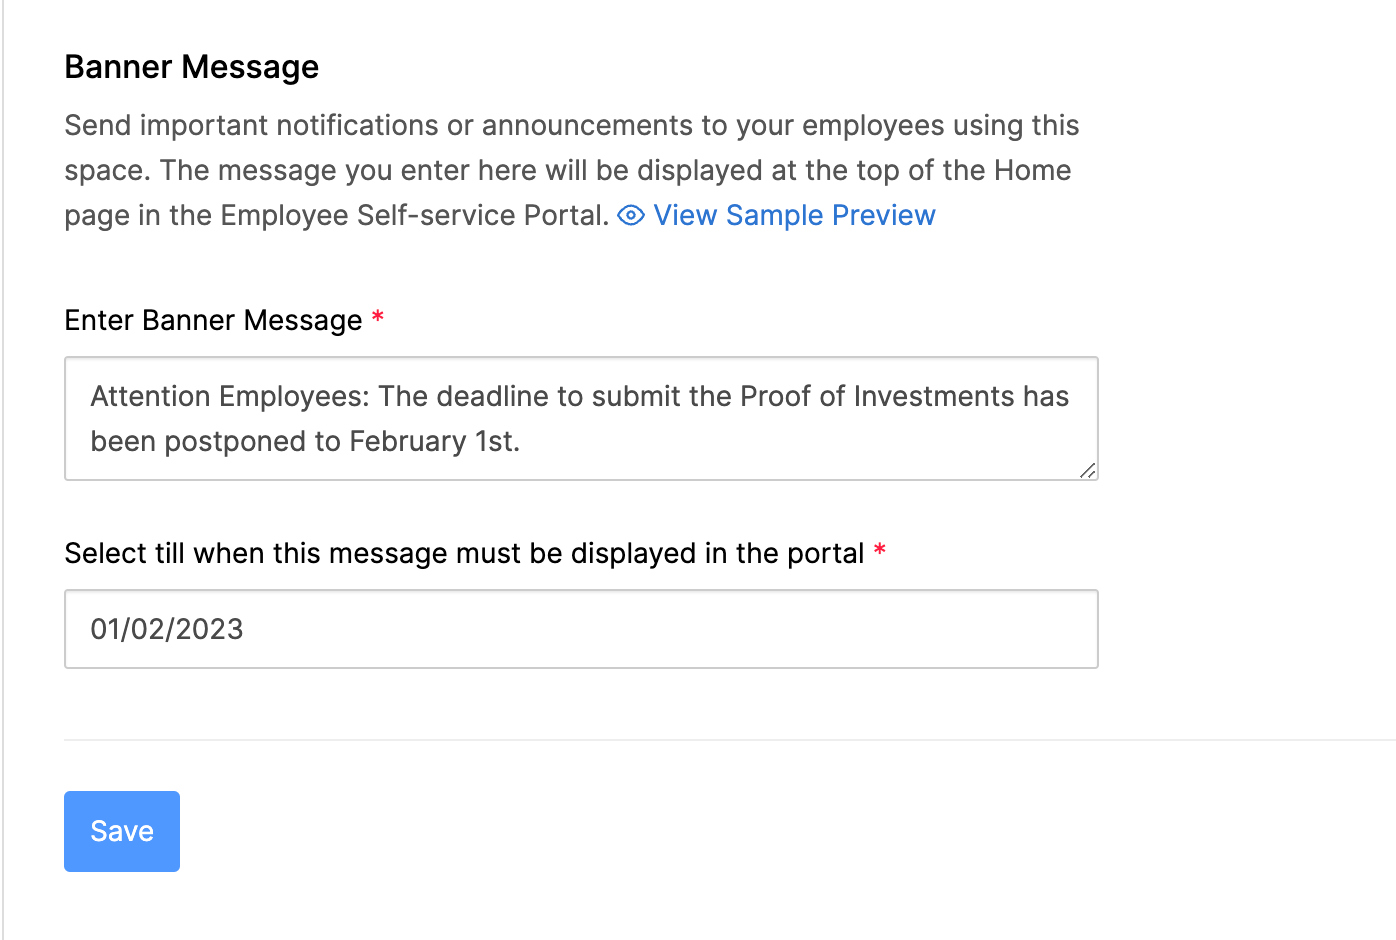
- Enter the message and select the date till when this message must be displayed in the portal.
Send important notifications or announcements to your employees using this space. The message you enter here will be displayed at the top of the Home page in the Employee Self-service Portal. You can also view the sample preview.
Your employees will be able to view the banner message in the portal until the date you’ve selected.
FBP & Reimbursement Claim
You can handle FBP and Reimbursement related preferences here.
Flexible Benefit Plan
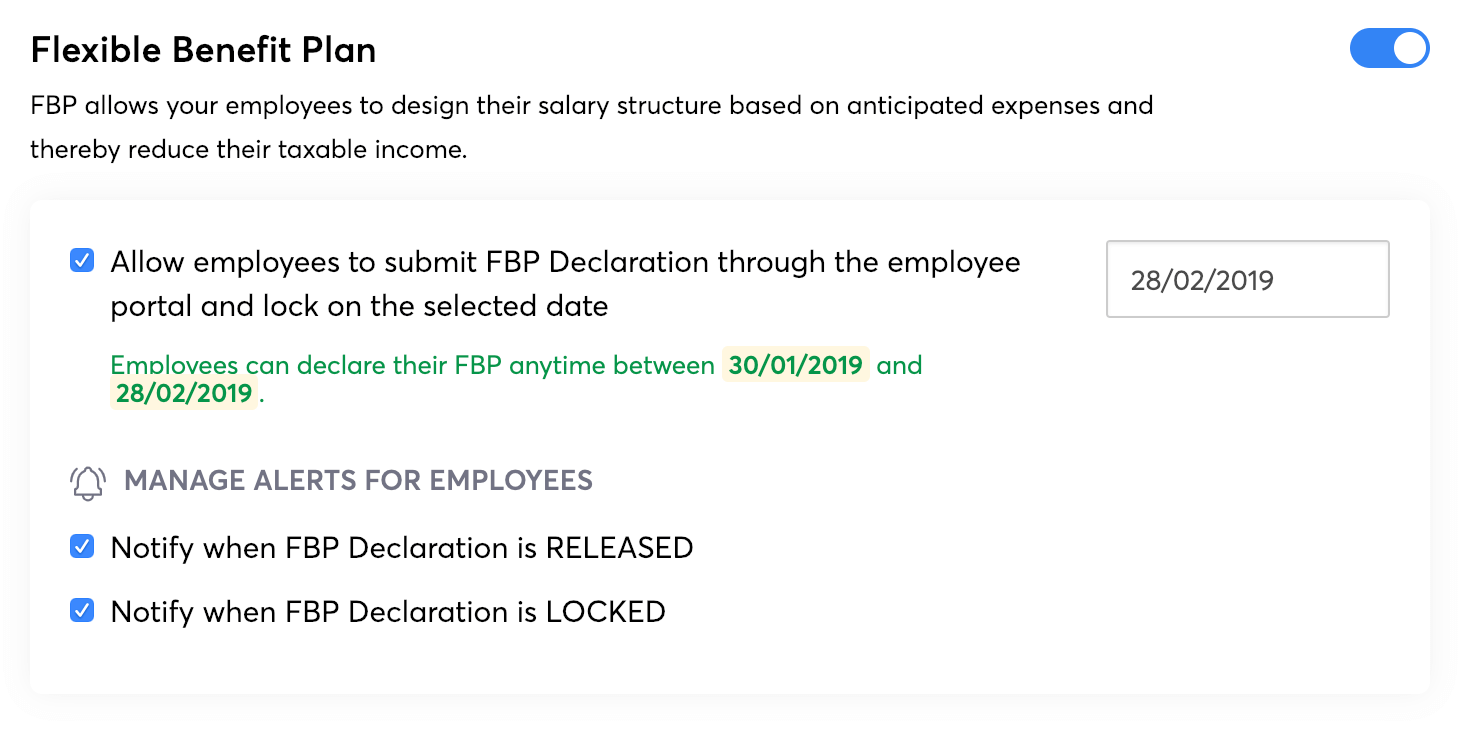
Flexible Benefit Plan (FBP) is a way in which your employees can structure their own salary. You can manage FBP related preferences here.
- Click the button to enable Flexible Benefit Plan for your organisation.
- Check the box when you want your employees to declare their FBP through the portal. You also have to provide the lock date, which is the last day to submit the declaration.
- You can configure FBP components under Settings > Salary Components.
- Select if you want to notify employees when FBP Declaration is RELEASED/LOCKED and when FBP lock date is changed.
Reimbursement Claim Submission
You can manage reimbursement related preferences here.
- Select the last day to submit reimbursement claims every month.
- Select if you want to notify employees when Reimbursement Claim submission is RELEASED/LOCKED and when the last day to submit claims is changed.
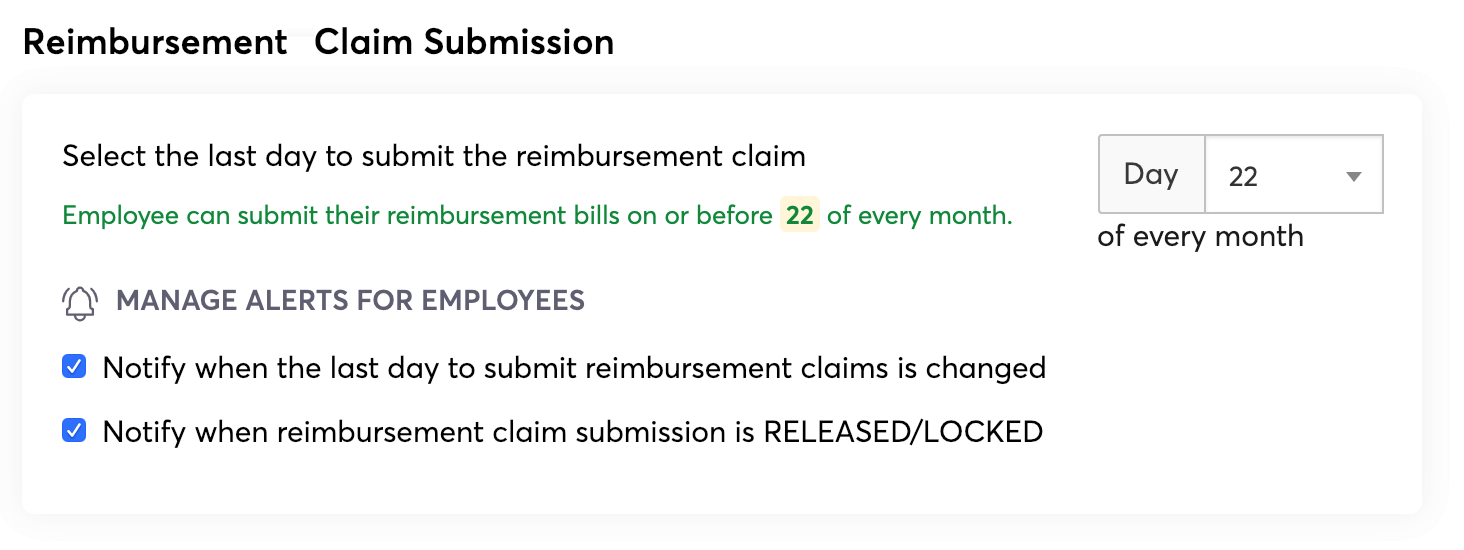
- Click Save.
IT Declaration & POI Submission
You can handle investment related preferences in this section.
Income Tax Declaration
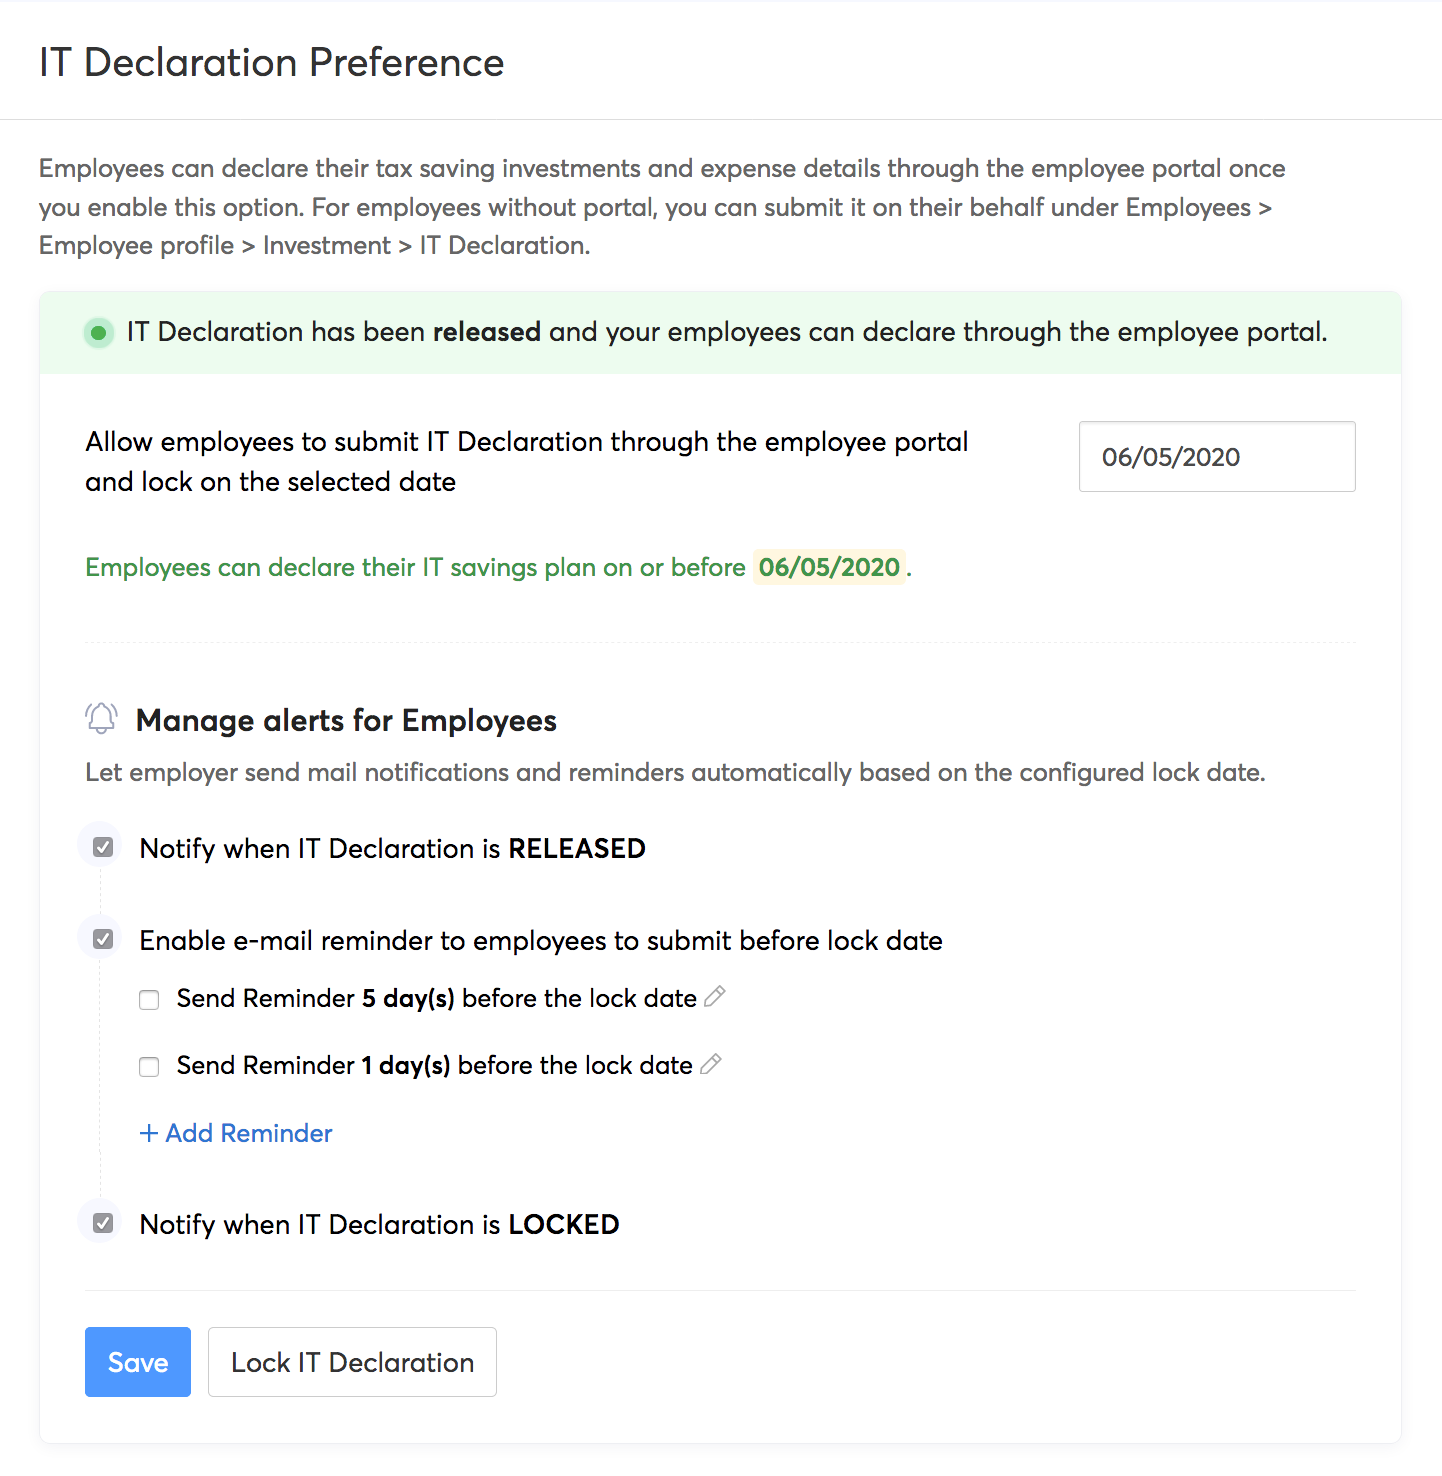
You can manage IT Declaration related preferences like releasing IT Declarations, setting a deadline, and configuring email reminders from this page.
- Click the Release IT Declaration button to enable IT Declaration for your organisation.
- Select the lock date, which is the last day to submit the declaration.
- Check the Enable e-mail reminder to employees to submit before lock date option.
- In the dropdown, depending on the desired frequency of email reminders for your employees, check the options. By default, this configuration is set for 2 reminders; one is to be sent 5 days prior to the lock date and the other 1 day prior the lock date.
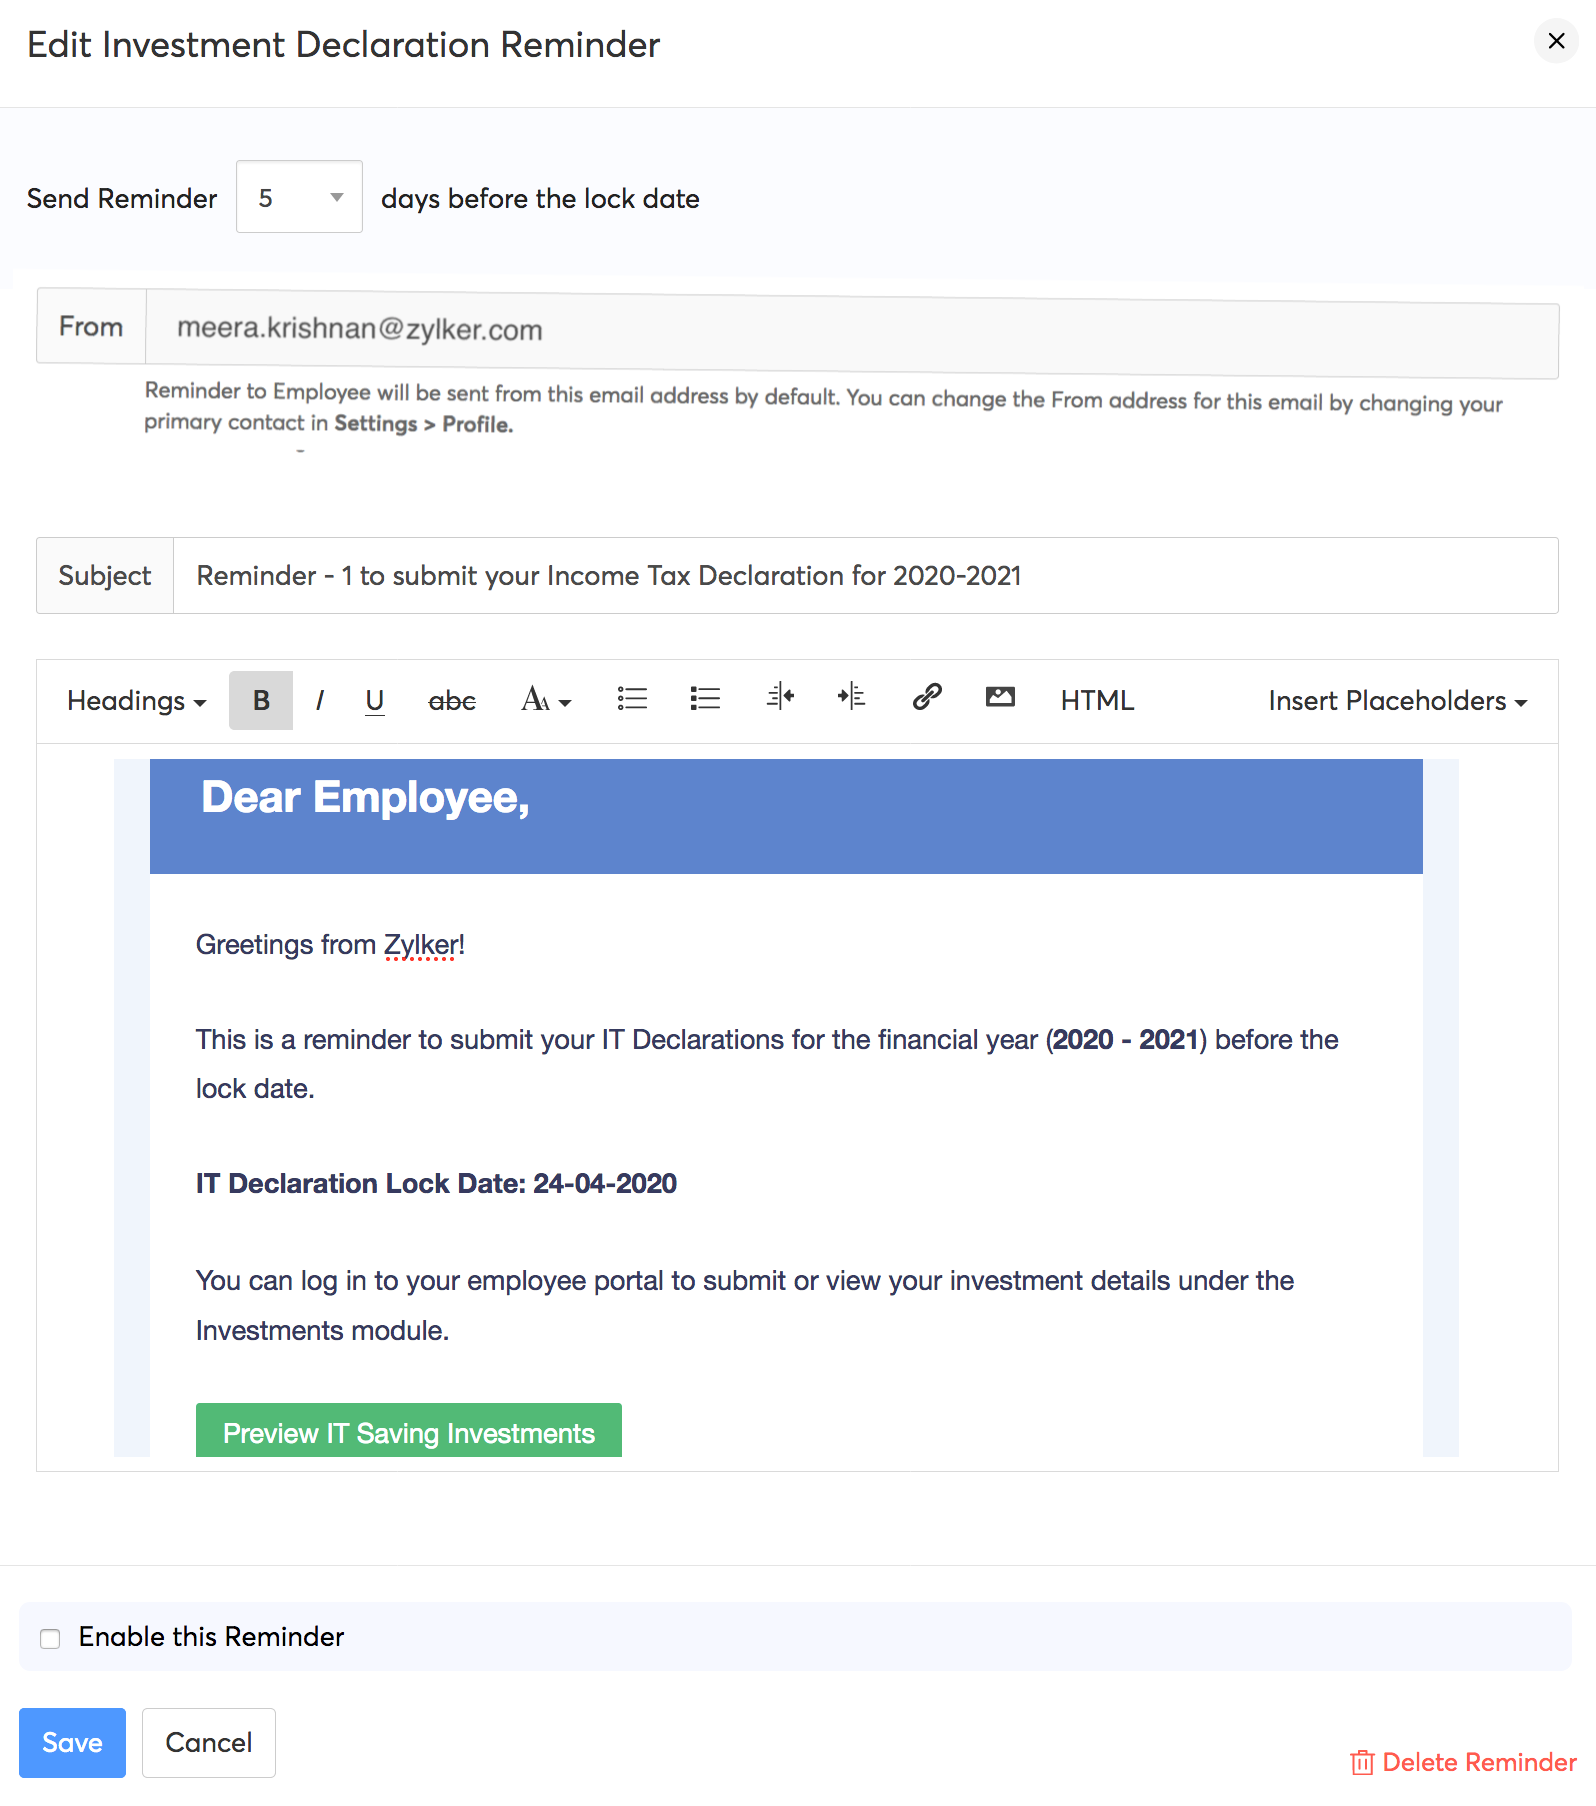
- To customise and send more reminders, click + Add Reminder. You can add up to two additional reminders.
- In the dialog box that opens, select the number of days ahead of which the email reminder should be sent and edit the contents of the email if needed. You can insert placeholders, images, and links wherever needed.
Insight: Placeholders are certain values that are used to hint the actual data that should be present in the mail. For example, when you use %CompanyName% in an email draft, it means the placeholder (%CompanyName%) needs to be replaced with the actual name of the organisation.
- Check the Enable this reminder option and click Save.
- Next, click Save in the IT Declarations settings page.
To disable a reminder:
- Go to Settings > Income Tax Declarations.
- Click the Edit icon next to the reminder.
- Uncheck the Enable this reminder option to disable the reminder.

To delete a reminder:
- Go to Settings > Income Tax Declarations.
- Click the Edit icon next to the reminder.
- Click Delete Reminder.

Besides helping you process your monthly pay runs, Zoho Payroll handles your employees' Income Tax saving investments. Employees can declare the investments that they’ve made and submit proofs for the same, and Zoho Payroll automatically calculates the Income Tax based on the type and amount of each investment. The main incentive for employees' to declare their investments is that it reduces their net taxable income, thereby decreasing the amount they need to pay as Income Tax.
How can employees declare their investments?
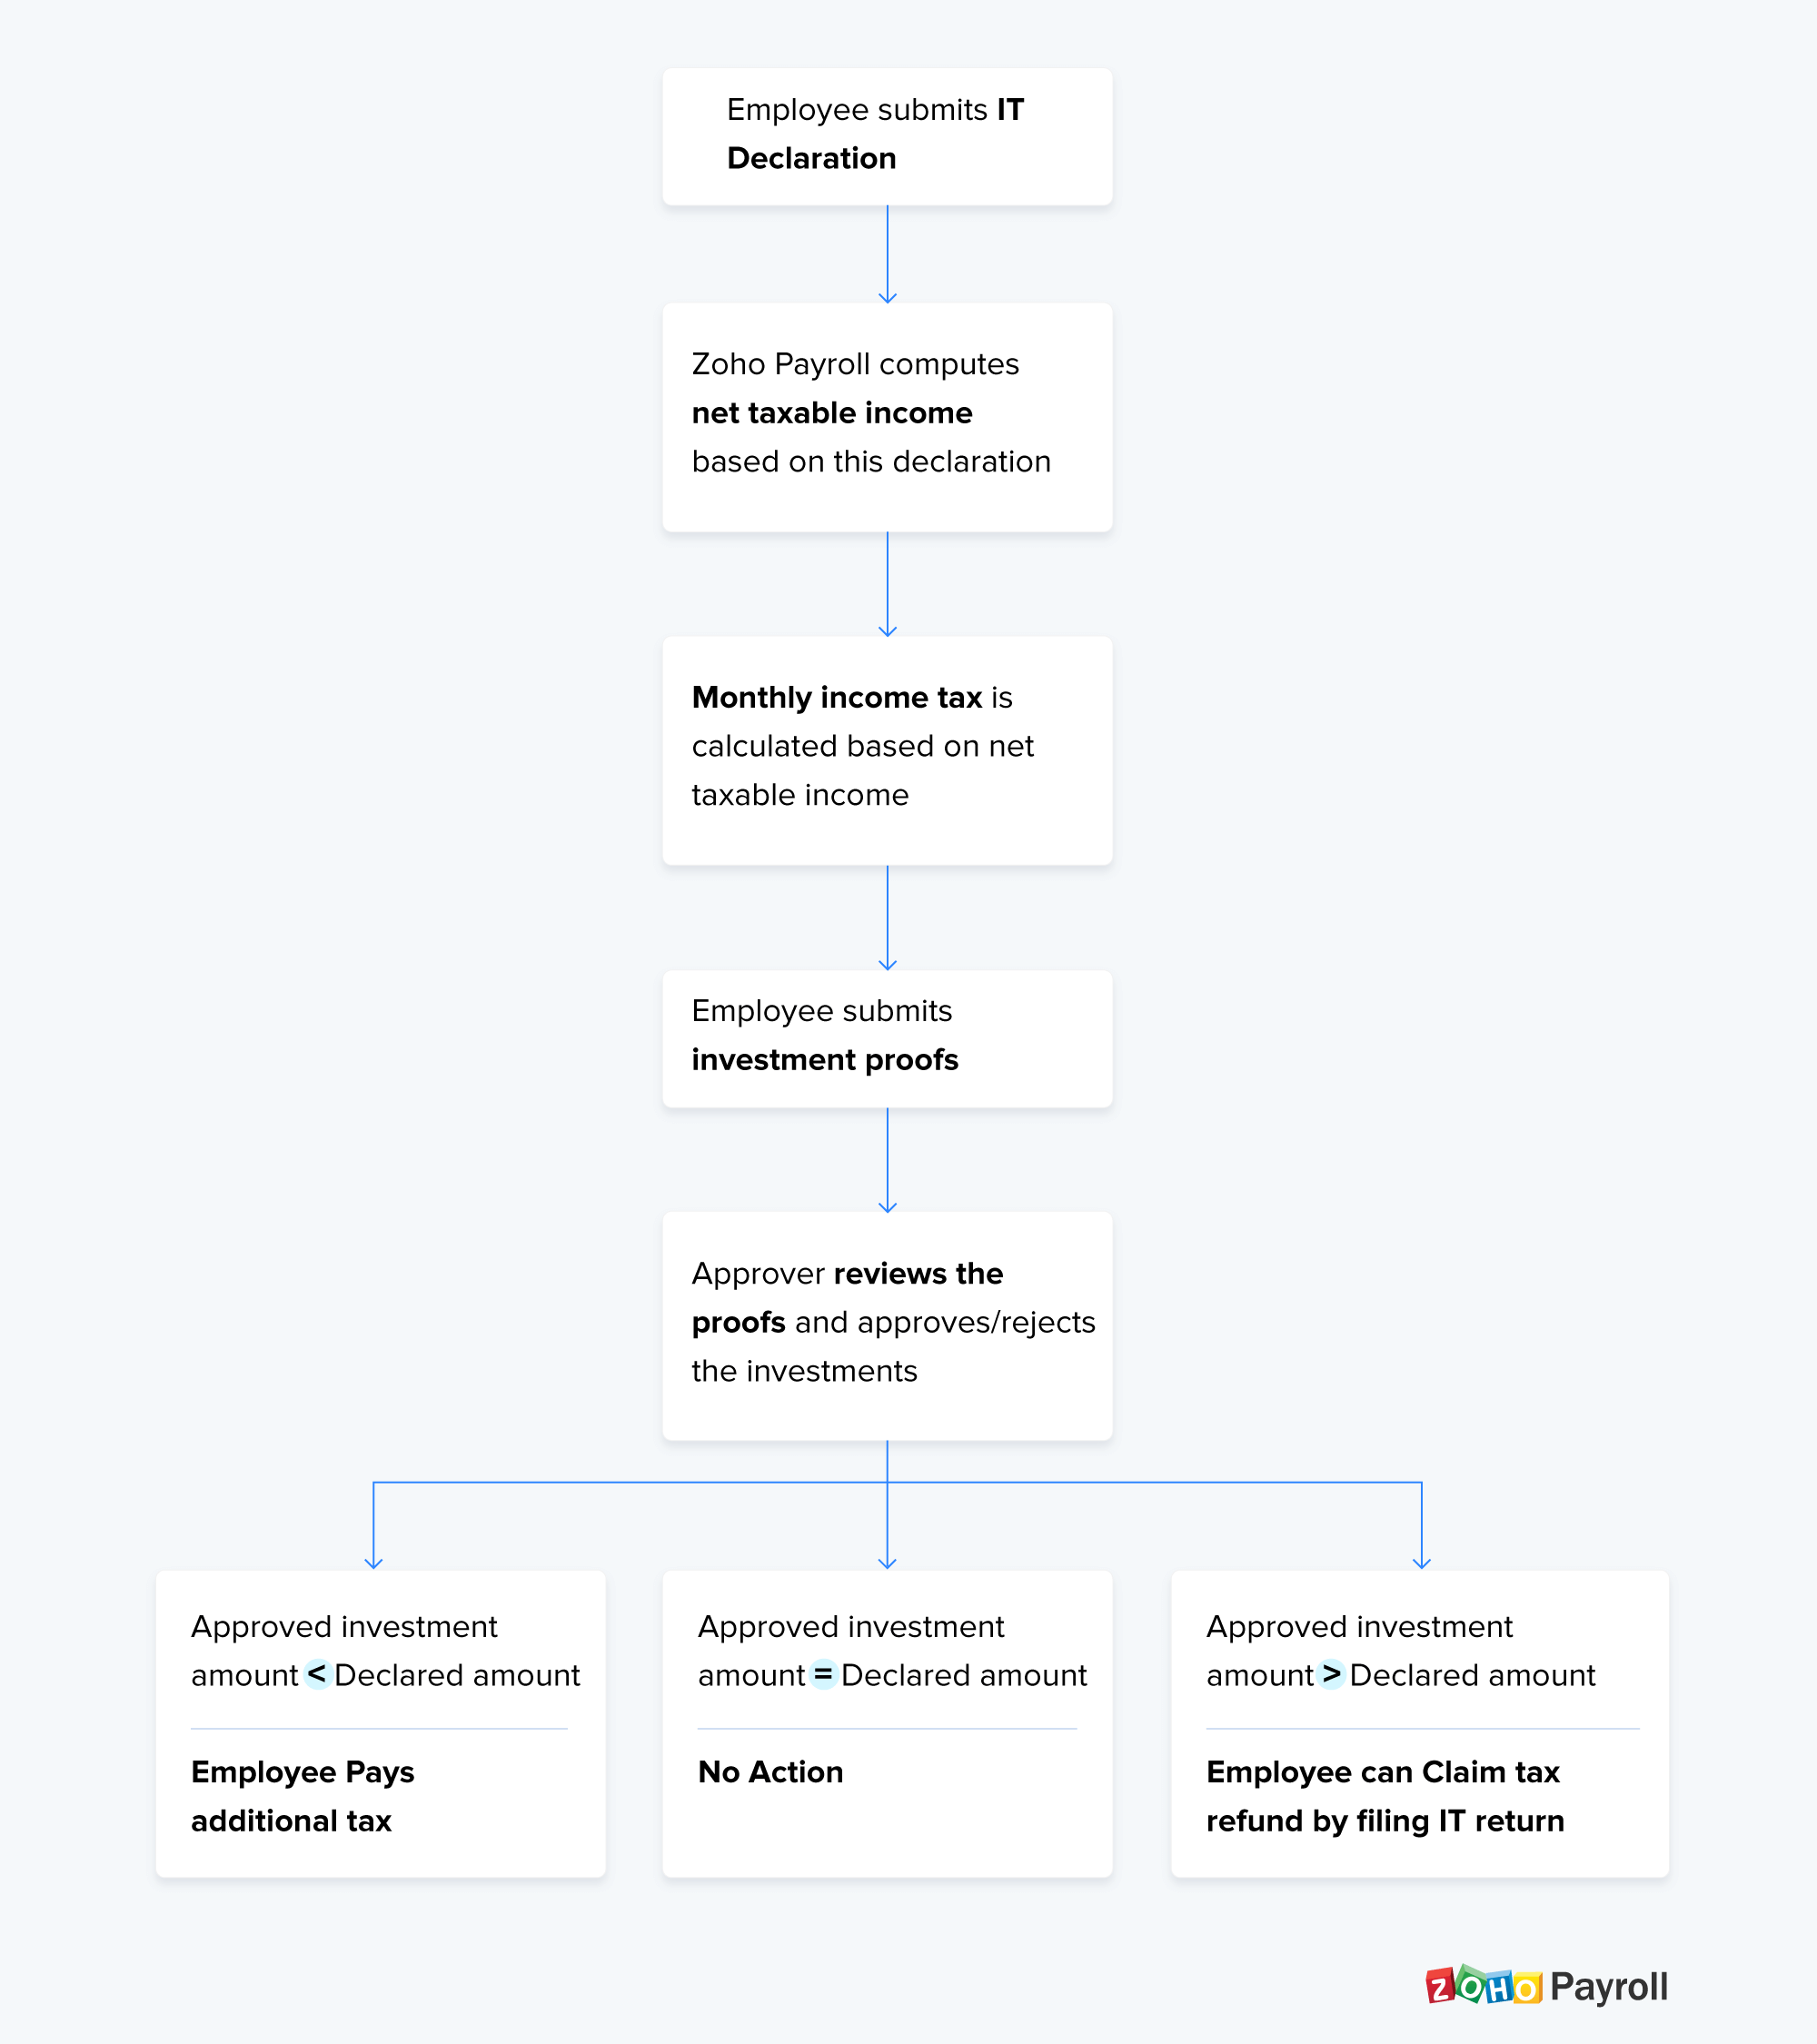
- Employees can declare their proposed investments and anticipated expenses through the IT declaration. This typically happens at the beginning of the financial year or when the employee joins the company.
- Zoho Payroll calculates the employees' net taxable income based on the investments declared and deducts the correct amount of taxes each month.
- When the end of the financial year nears, employees would need to submit proofs for each investment that they declared earlier that year.
- You can review the proofs through the Approvals module and enter an approved amount for each investment.
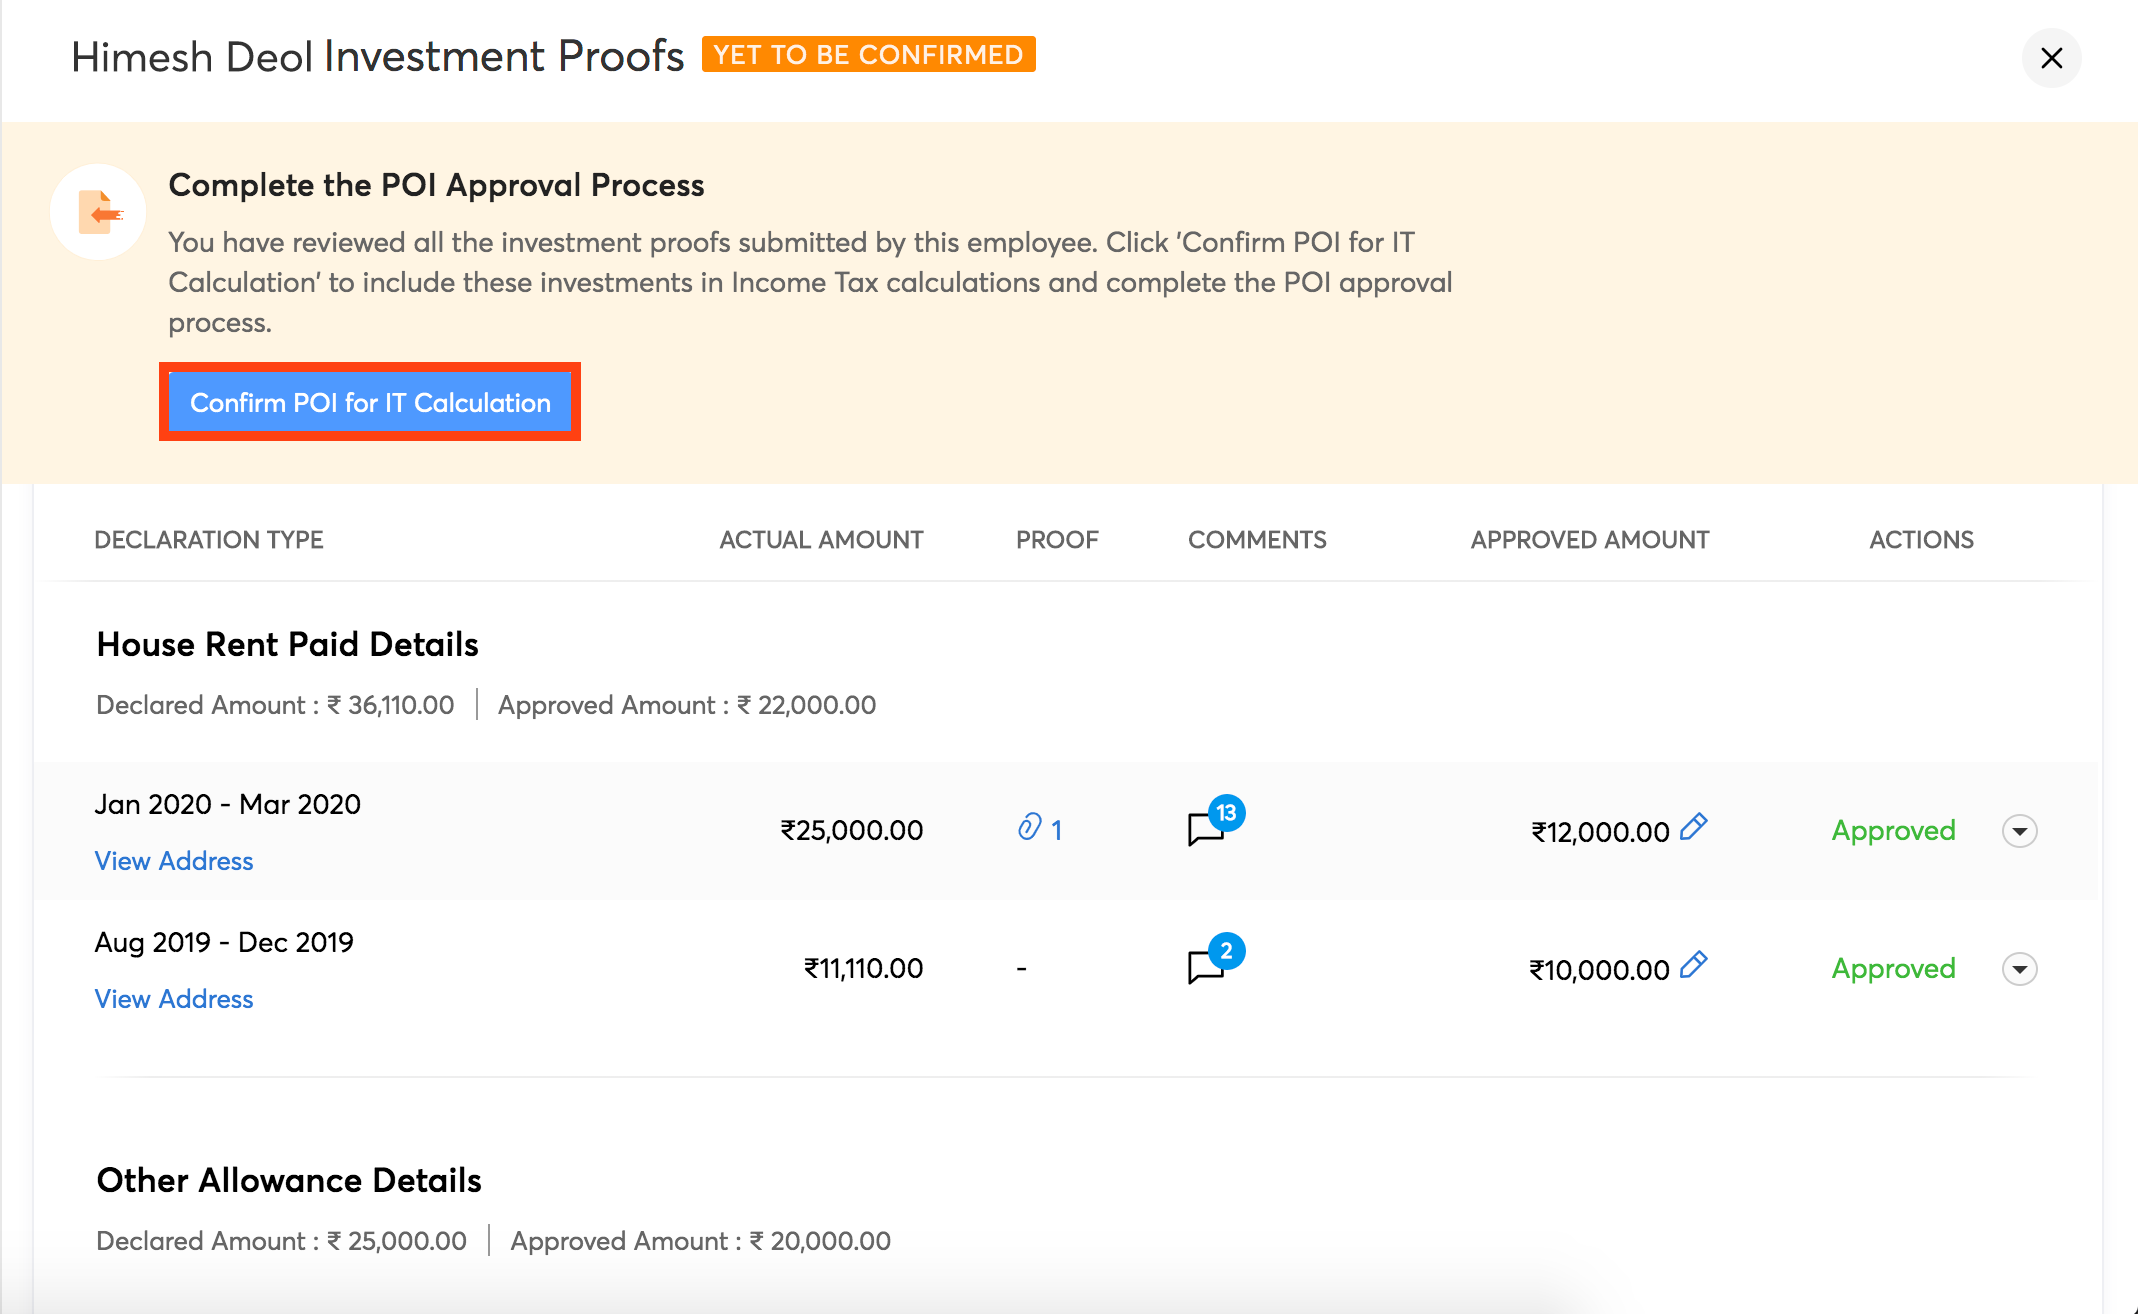
- Once you click the Confirm for IT Calculation button, the approved amounts will be applied to the income and a new net taxable income will be derived.
Keeping up with the changes proposed in the Union Budget for 2020, Zoho Payroll has introduced the option to choose between the new and the old tax regimes while submitting IT Declaration. Employees can submit their IT Declaration through the employee portal once you release it. However, for employees for whom you haven’t enabled employee portal, you can submit it by following these steps:
- Go to the Employees module.
- Select the employee for whom you want to submit the IT Declaration.
- Move to the Investments tab.
- Select Submit Declaration.
- Add the investments under IT Declaration tab.
- Click Submit and Compare once you’ve added all the investments.

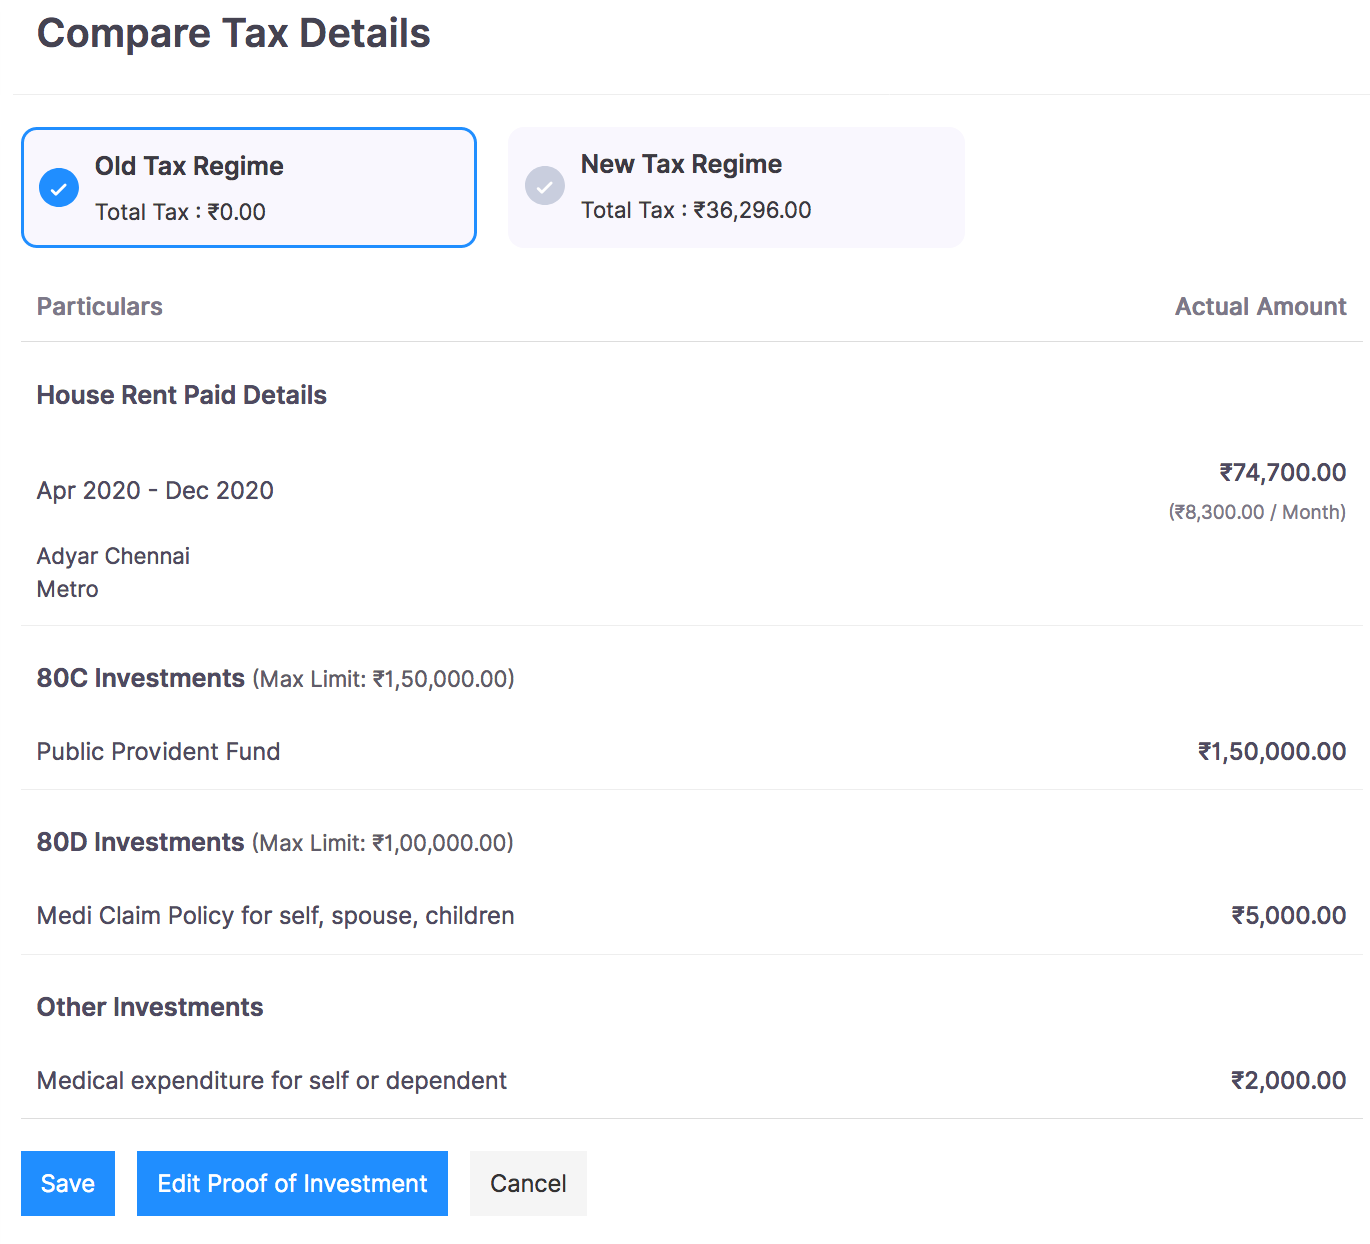
You will be redirected to the Tax Comparison page. Here, you can opt for either the new regime or the old regime.
Note: By default, the New Tax regime will be selected for all the employees.
If you want to opt for the new tax regime:
- Select the New Tax Regime option. The exemptions available for this regime will be listed below.
- You can click Submit; or
- Click Edit Declaration to make changes and click Save and Submit.
The IT Declaration consists of the following sections:
- House Rent Details
- Home Loan Details
- Let Out Property Details
- 80C Investments
- 80D Investments
- Other Investments
- Other Sources of Income
House Rent Details
If your employee lives in a rented accommodation, provide the following details.
- Rental Period for the current financial year.
- Monthly rent amount.
- Address of the employee’s rented house.
- Whether the accommodation is located in a Metro / Non-metro region.
- Landlord’s PAN if employee’s annual rent amount is in excess of ₹1,00,000.
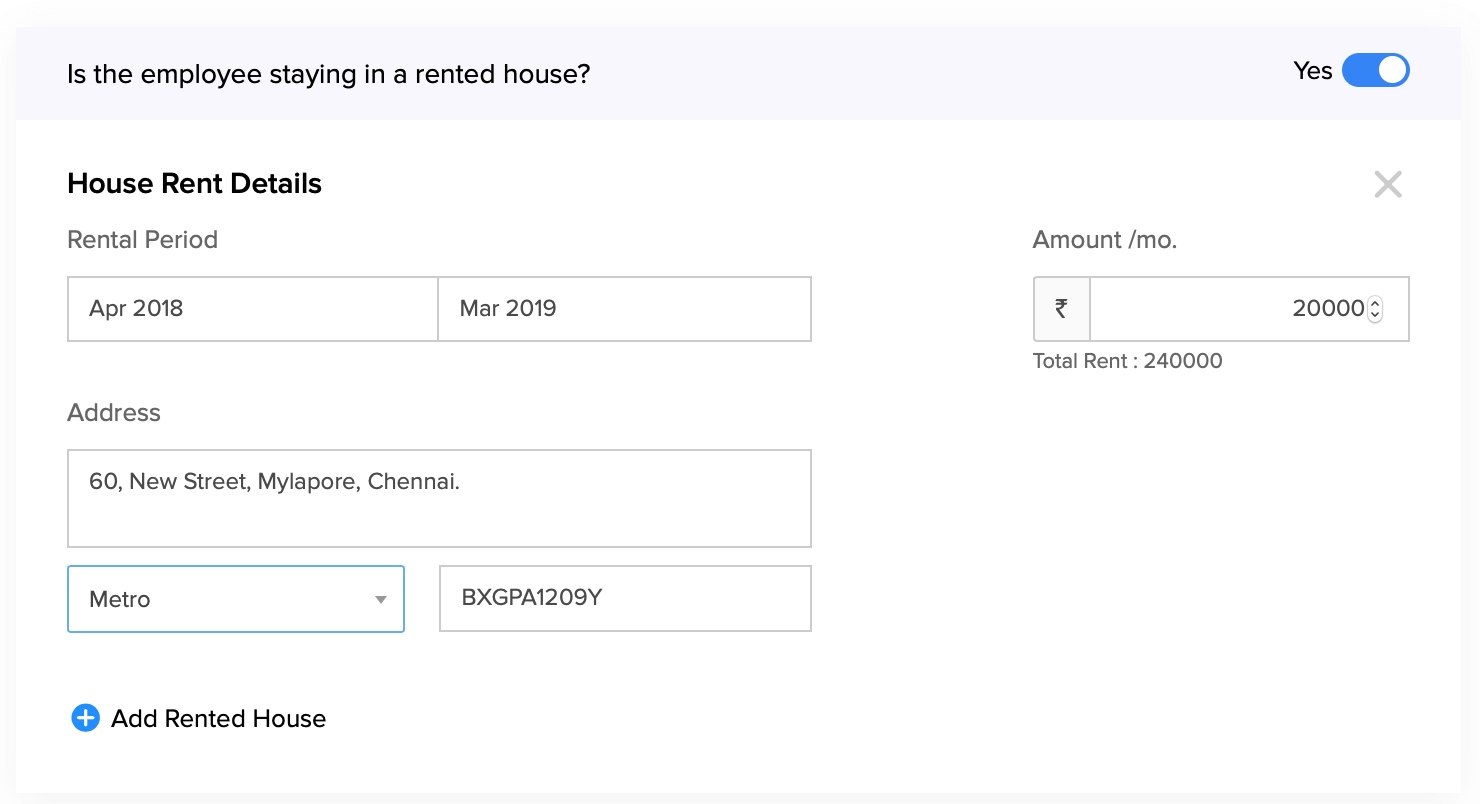
- Click + Add Rented House to enter the details for another rented house.
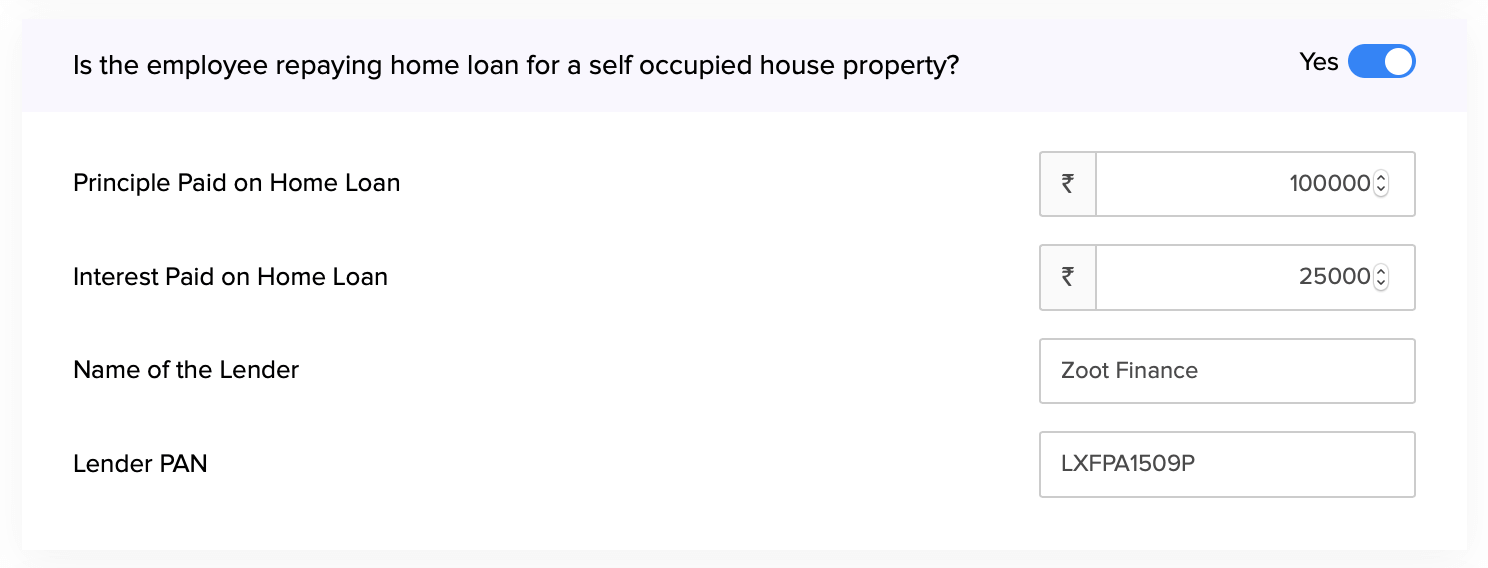
Home Loan
If your employee is repaying a home loan for their self-occupied property, provide the following details.
- Projected Principle amount and Interest amount of the loan for that financial year.
- Lender’s Name and PAN.
Let Out Property Details
If your employee is a landlord, provide the following details about their let out property.
- Annual Rent Amount
- Municipal Taxes Paid
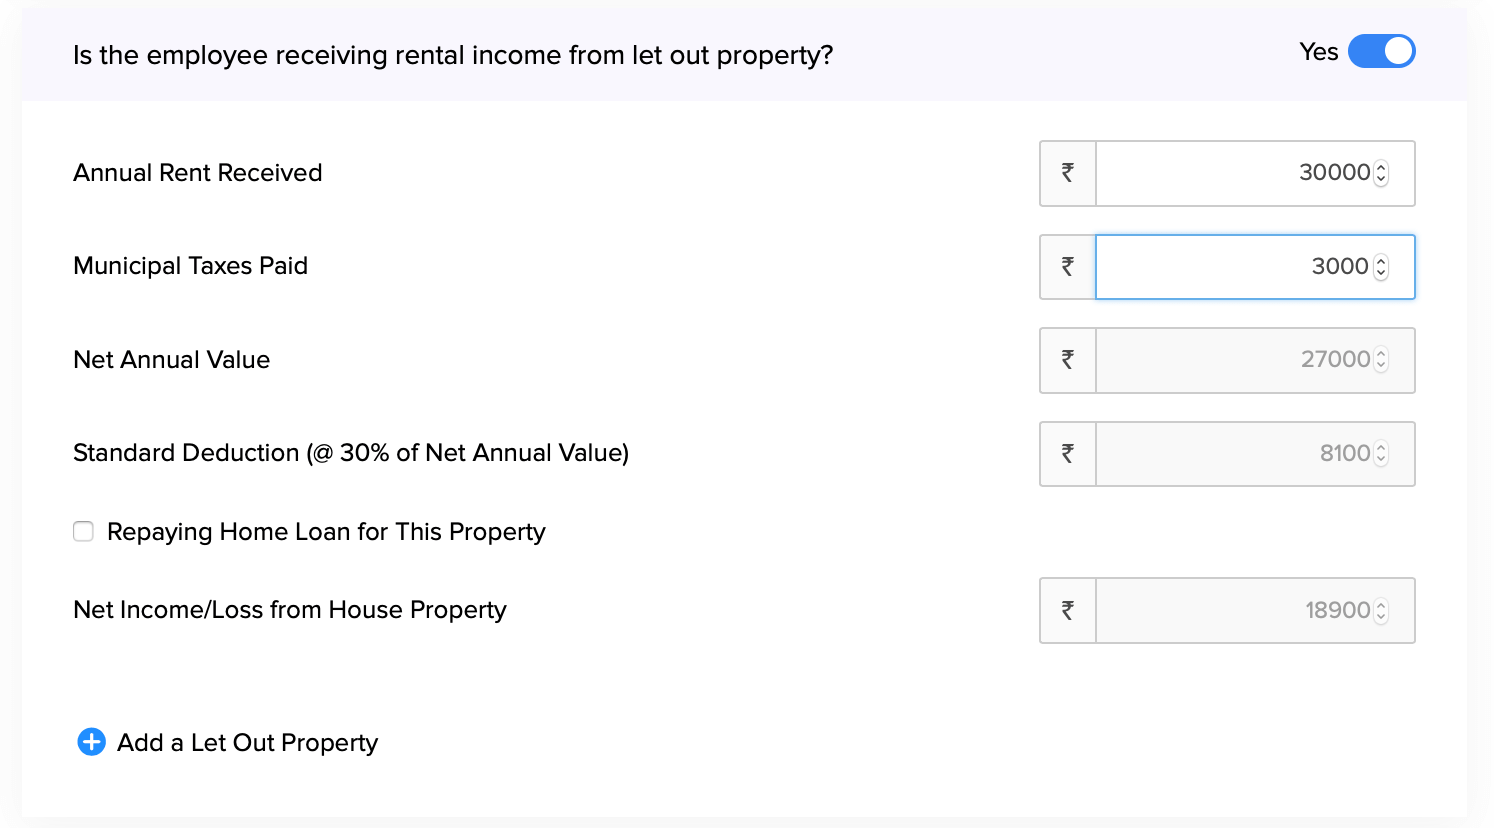
- If your employee is repaying a house loan for this let out property, you can enter the loan details too.
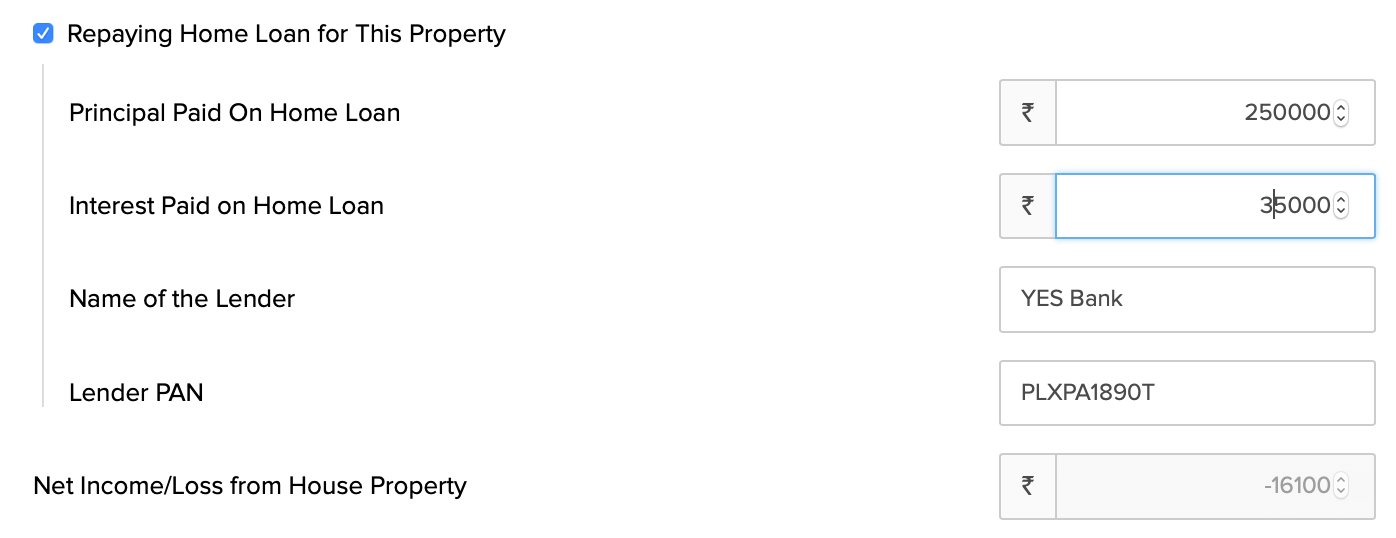
- The Net Annual Value, Standard Deduction and Net Income / Loss will be calculated based on the above inputs.
- Click + New Let Out Property to record details for another let out property.
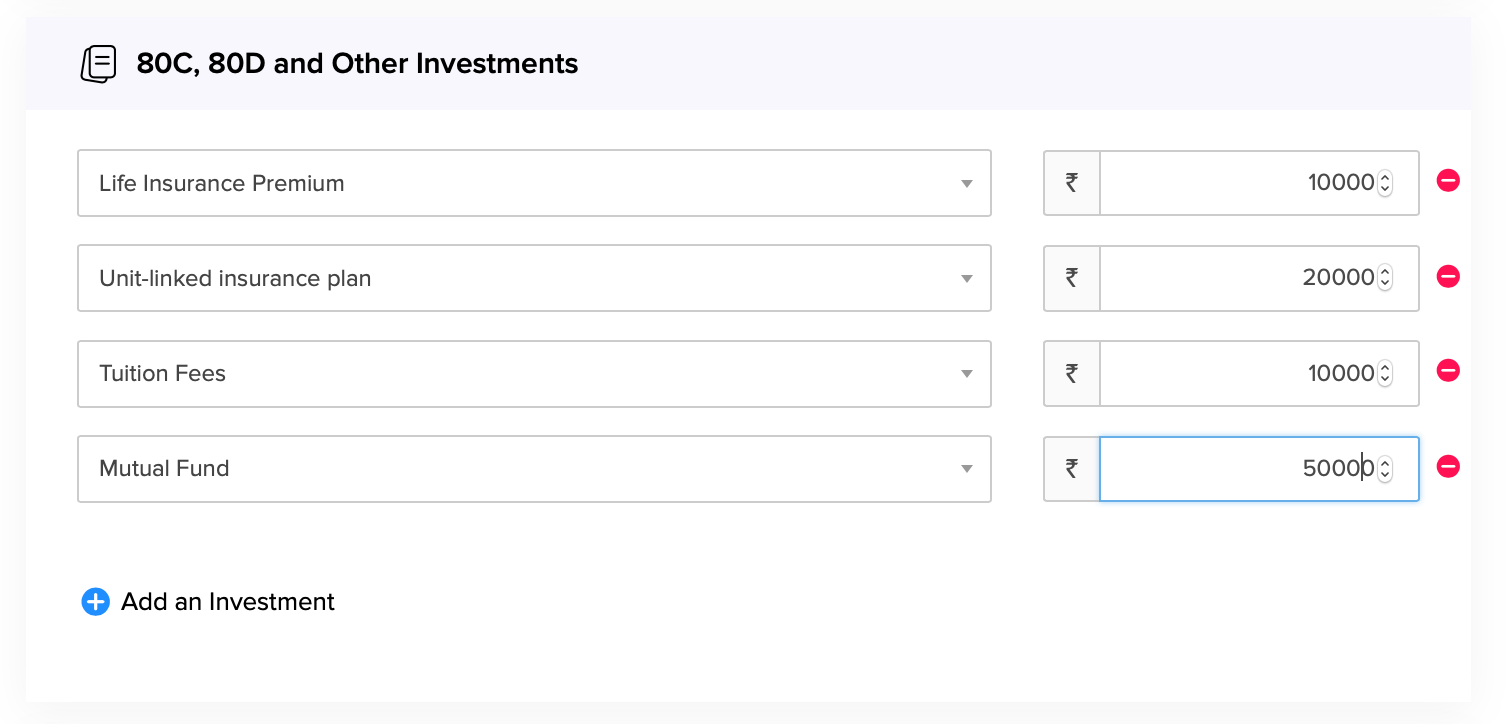
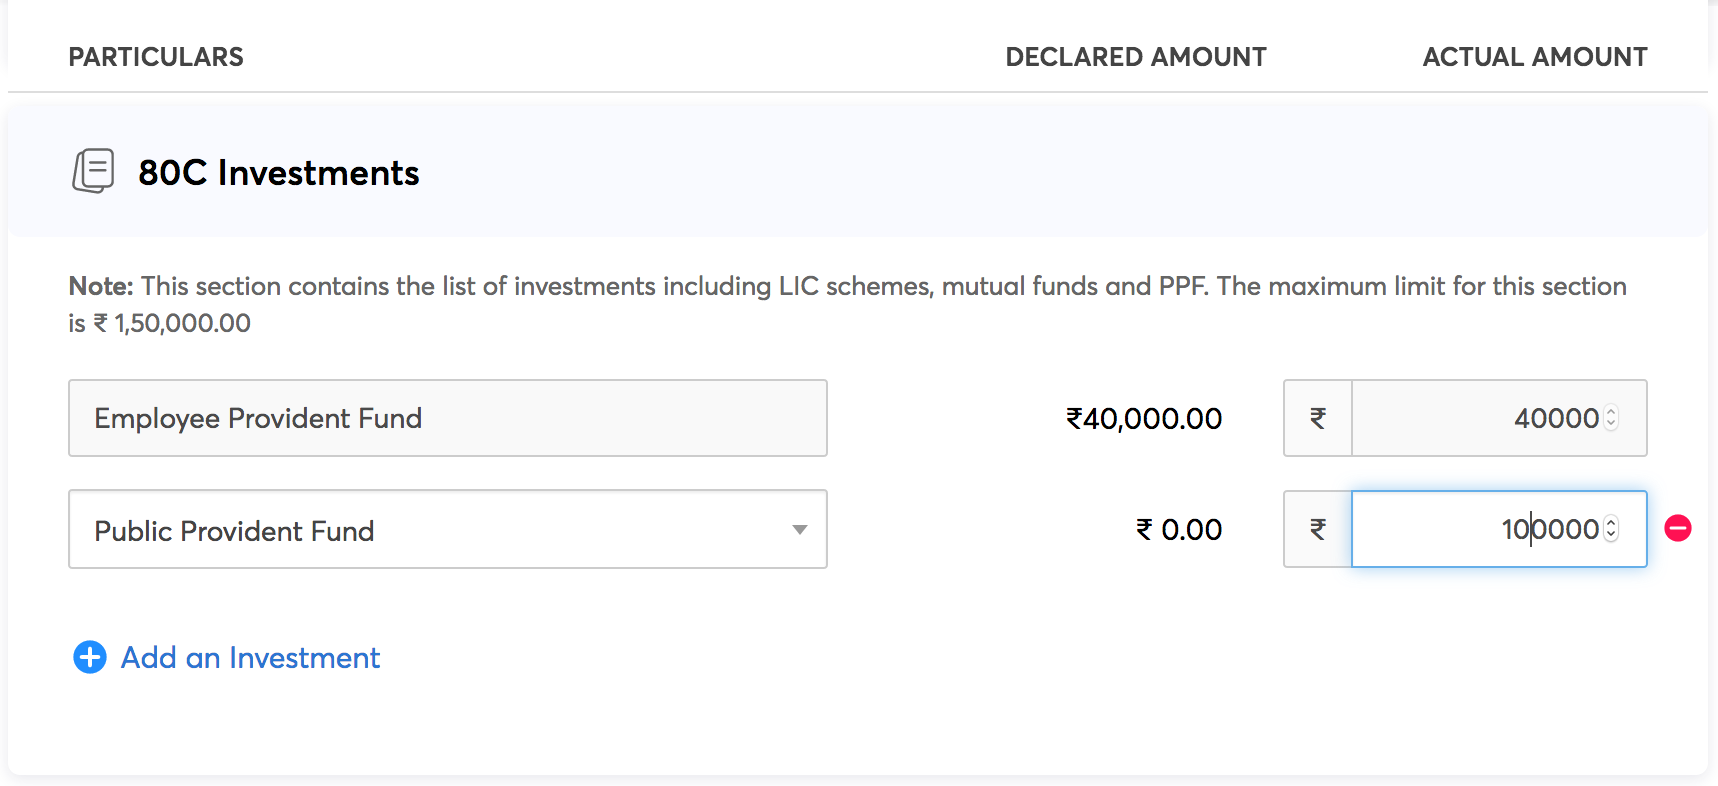
80C Investments
Section 80C contains a list of tax saving investments such as Life Insurance, Mutual Funds, NABARD Bonds and Unit-linked insurance plans. Select an investment and enter the invested amount to declare it. The maximum limit for investments under Section 80C is ₹1,50,000.
80D Investments
Section 80D contains Mediclaim policies for your spouse, children, parents and yourself. Select a policy and enter the invested amount to declare it. The maximum limit for investments under this section is ₹1,00,000.
Other Investments
All miscellaneous investments will be listed under this section. Select an investment and enter the invested amount to declare it.
Other Sources of Income
If your employee receives income from sources other than their current job, they have a legal obligation to declare it here.
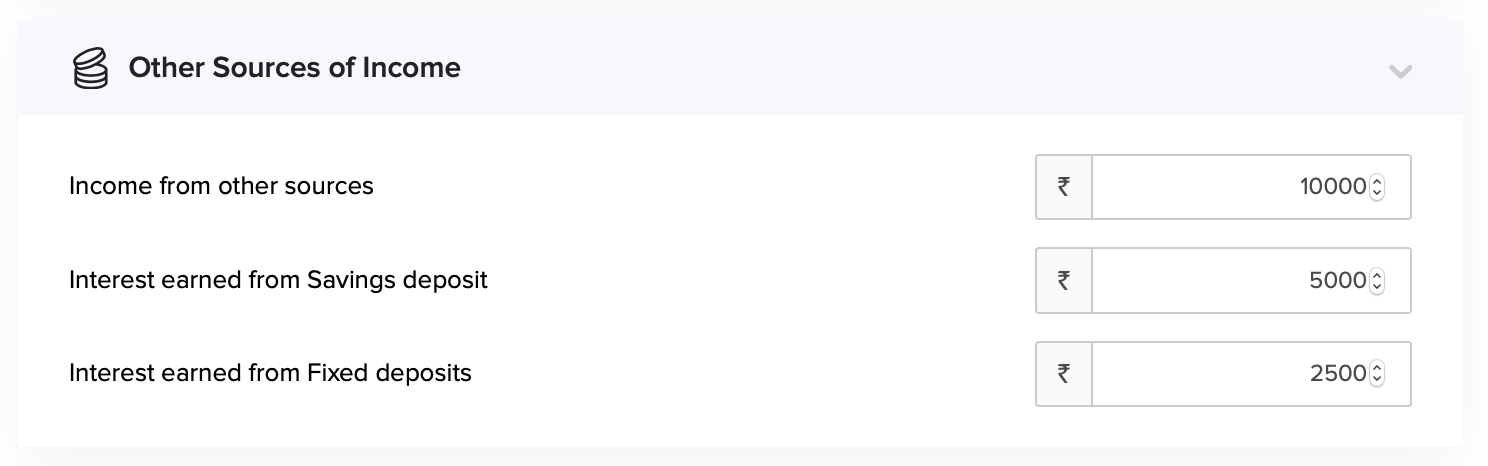
Click Save and Submit.
The declared amount will be subtracted from the employee’s net income. Income tax will be calculated on this deducted income, also known as the net taxable income.
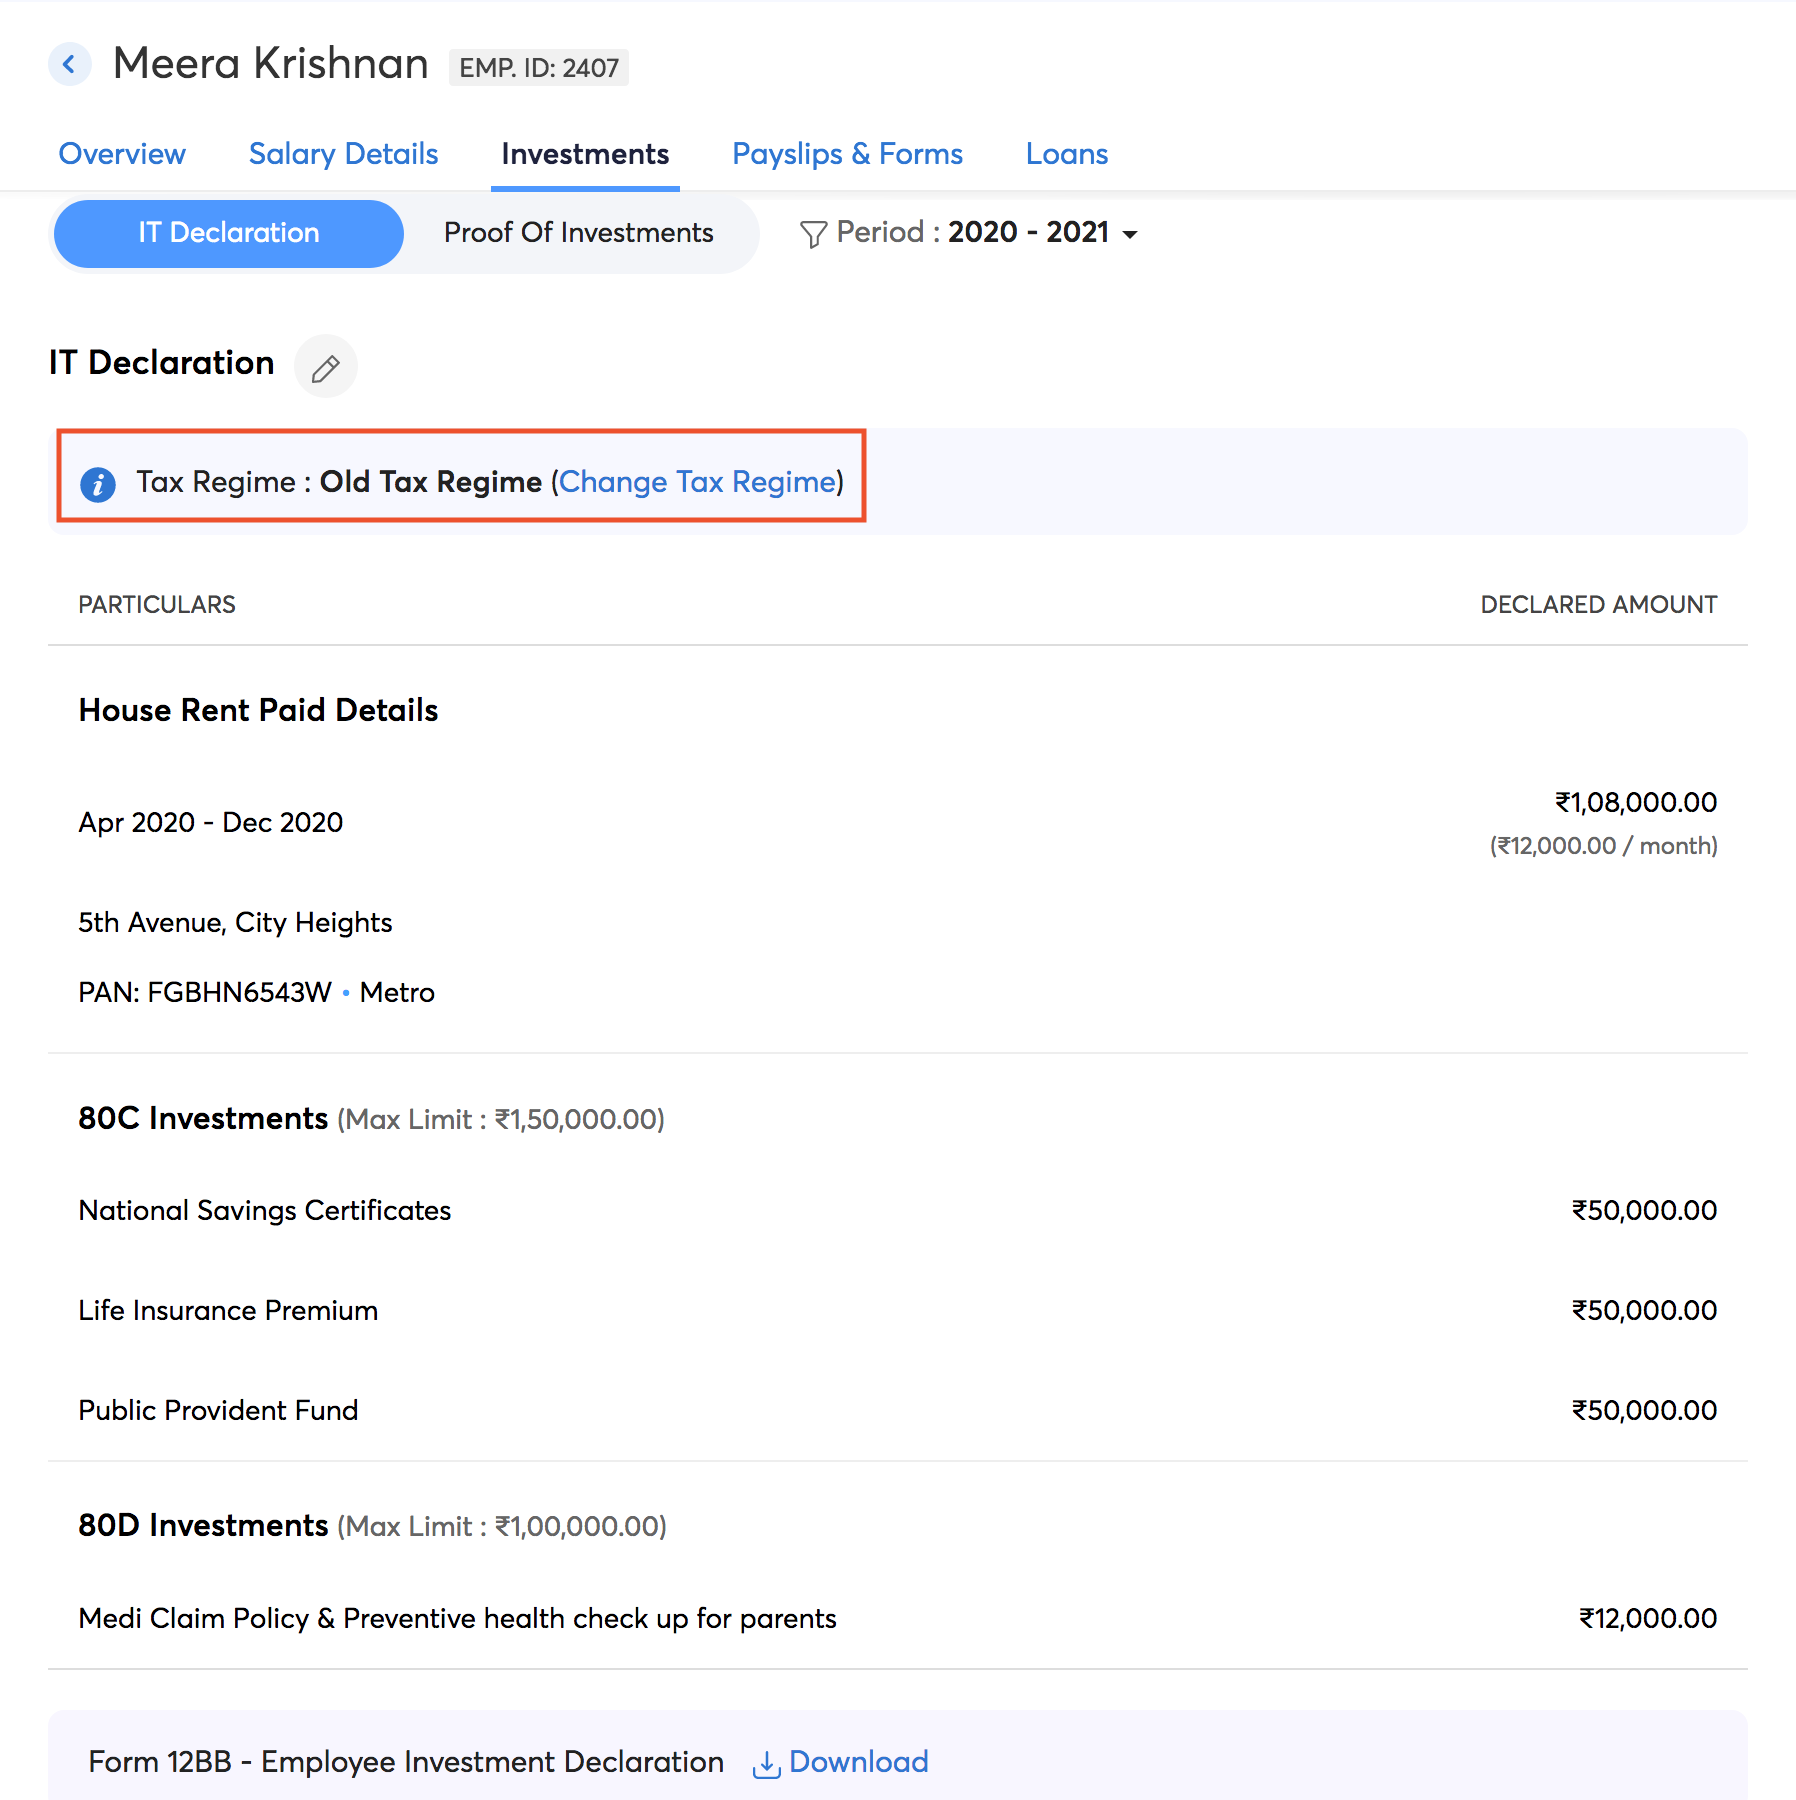
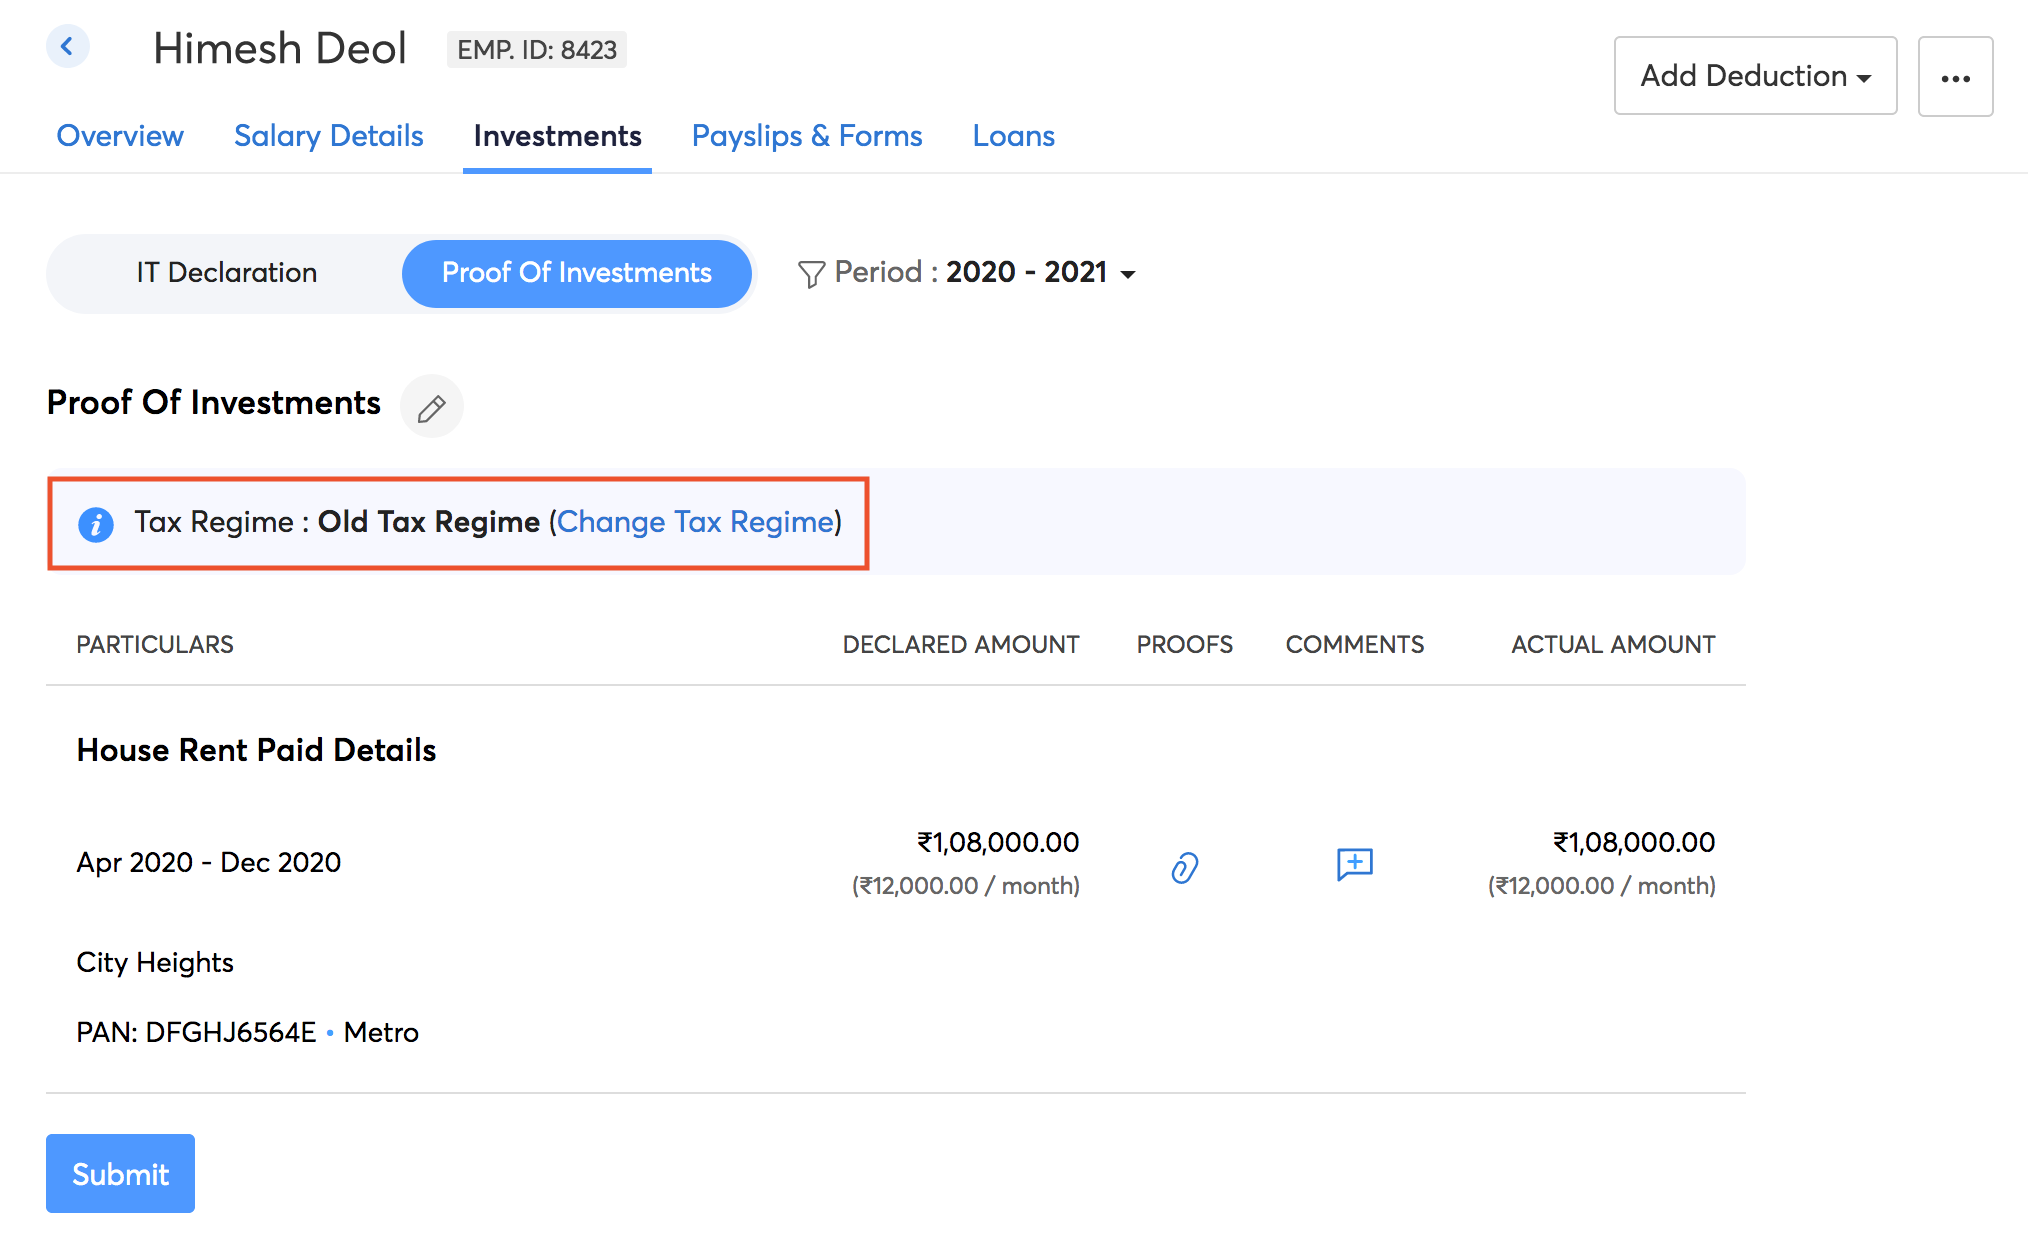
Switching Tax Regimes
You can switch tax regimes before the first payroll for the financial year is completed. To do this,
- Go to the Investments tab in the employee’s profile.
- Select IT Declarations.
- Click Change Tax Regime.
- Select the desired regime.
- Click Edit Declaration to make changes, if needed.
- Click Submit.
POI Submission
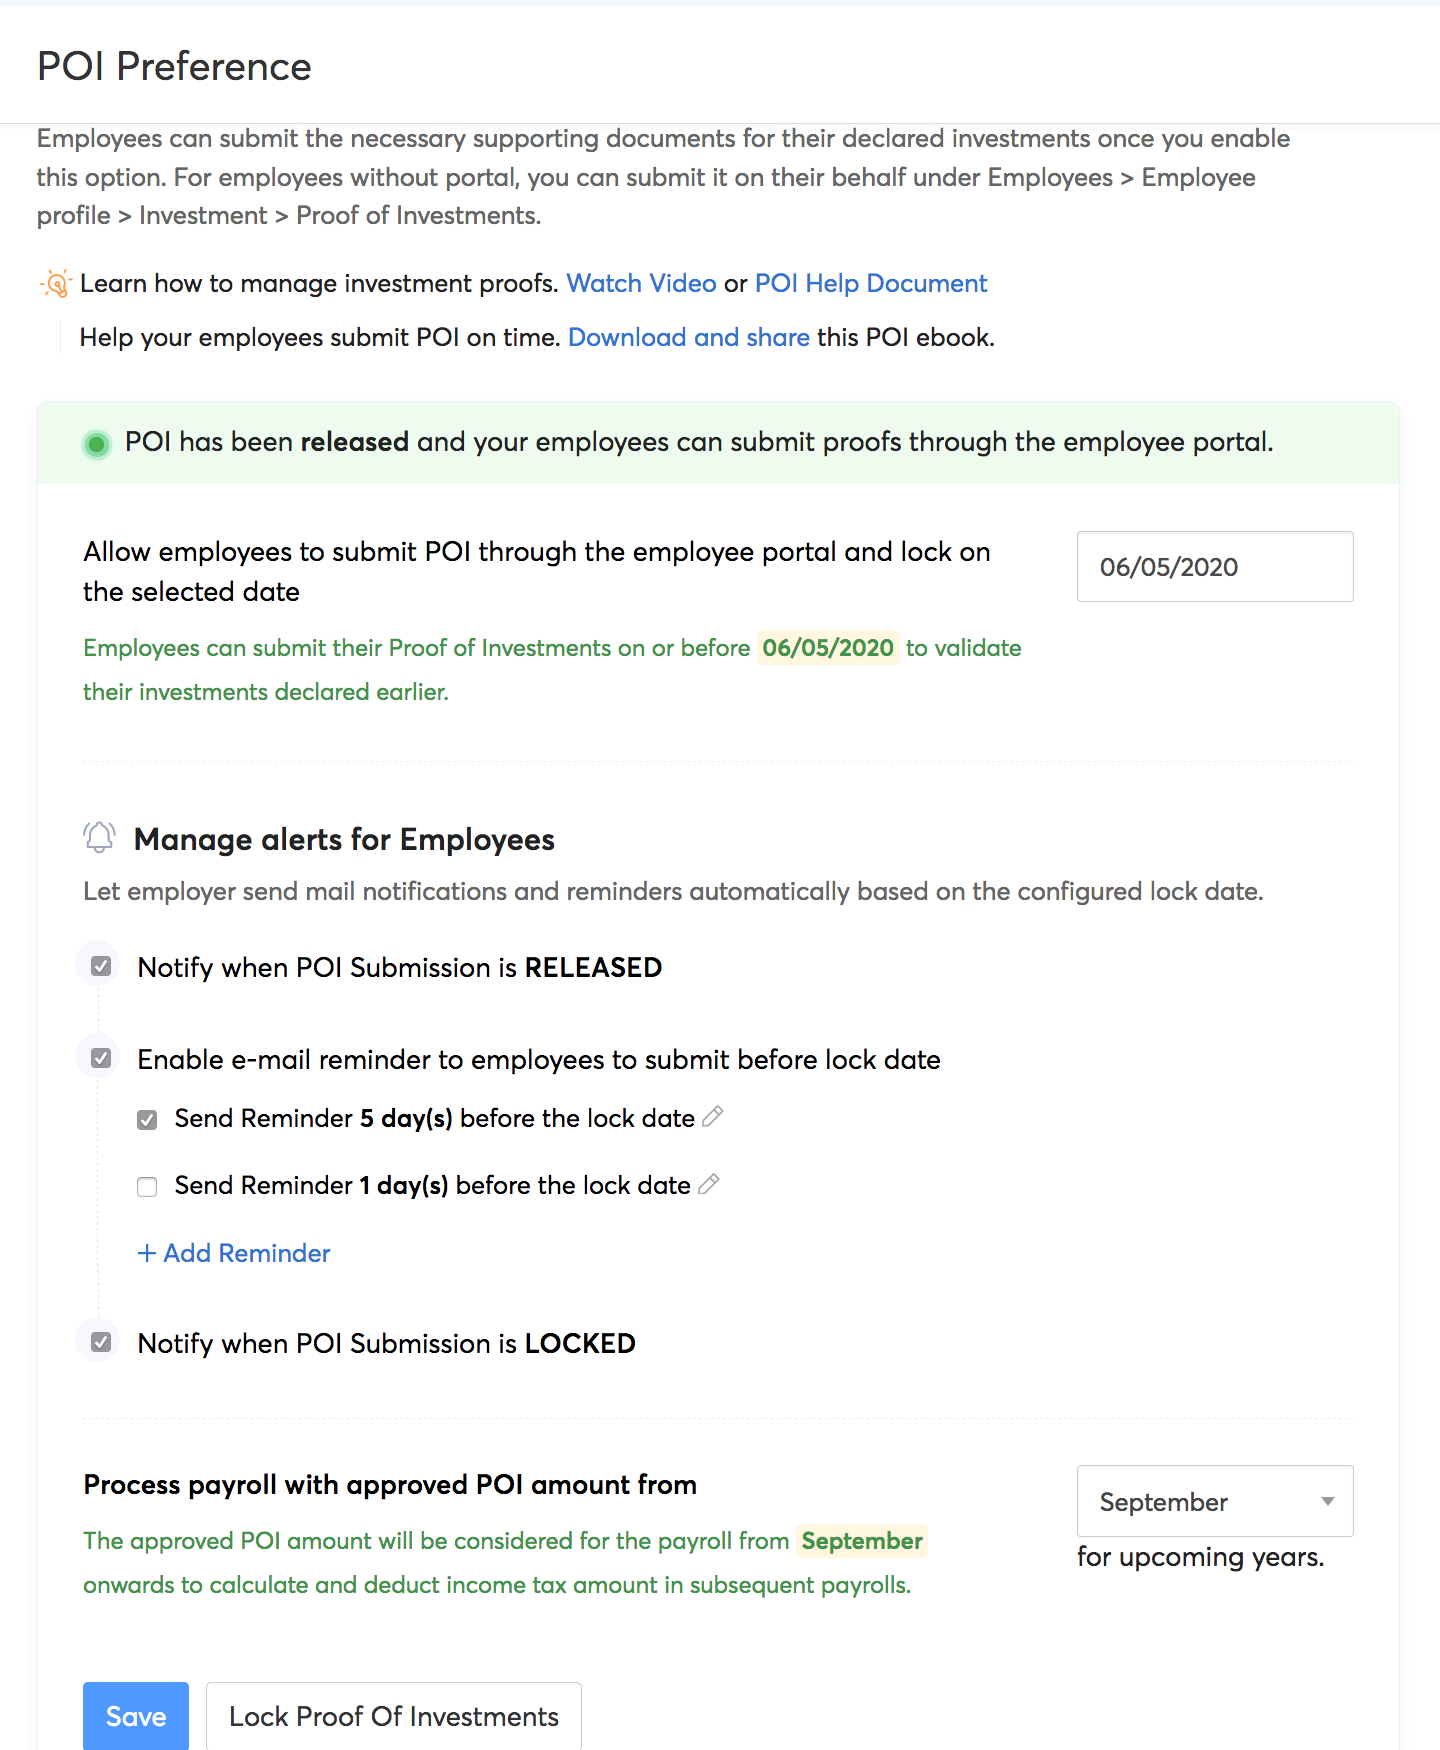
You can manage POI related preferences like releasing POI, setting a deadline, and configuring email reminders from this page.
- Click the Release Proof of Investments button to enable POI for your organisation.
- Select the lock date, which is the last day to submit the investment proofs.
- Check the Enable e-mail reminder to employees to submit before lock date option.
- In the dropdown, depending on the desired frequency of email reminders for your employees, check the options. By default, this configuration is set for 2 reminders; one is to be sent 5 days prior to the lock date and the other, 1 day prior to the lock date.
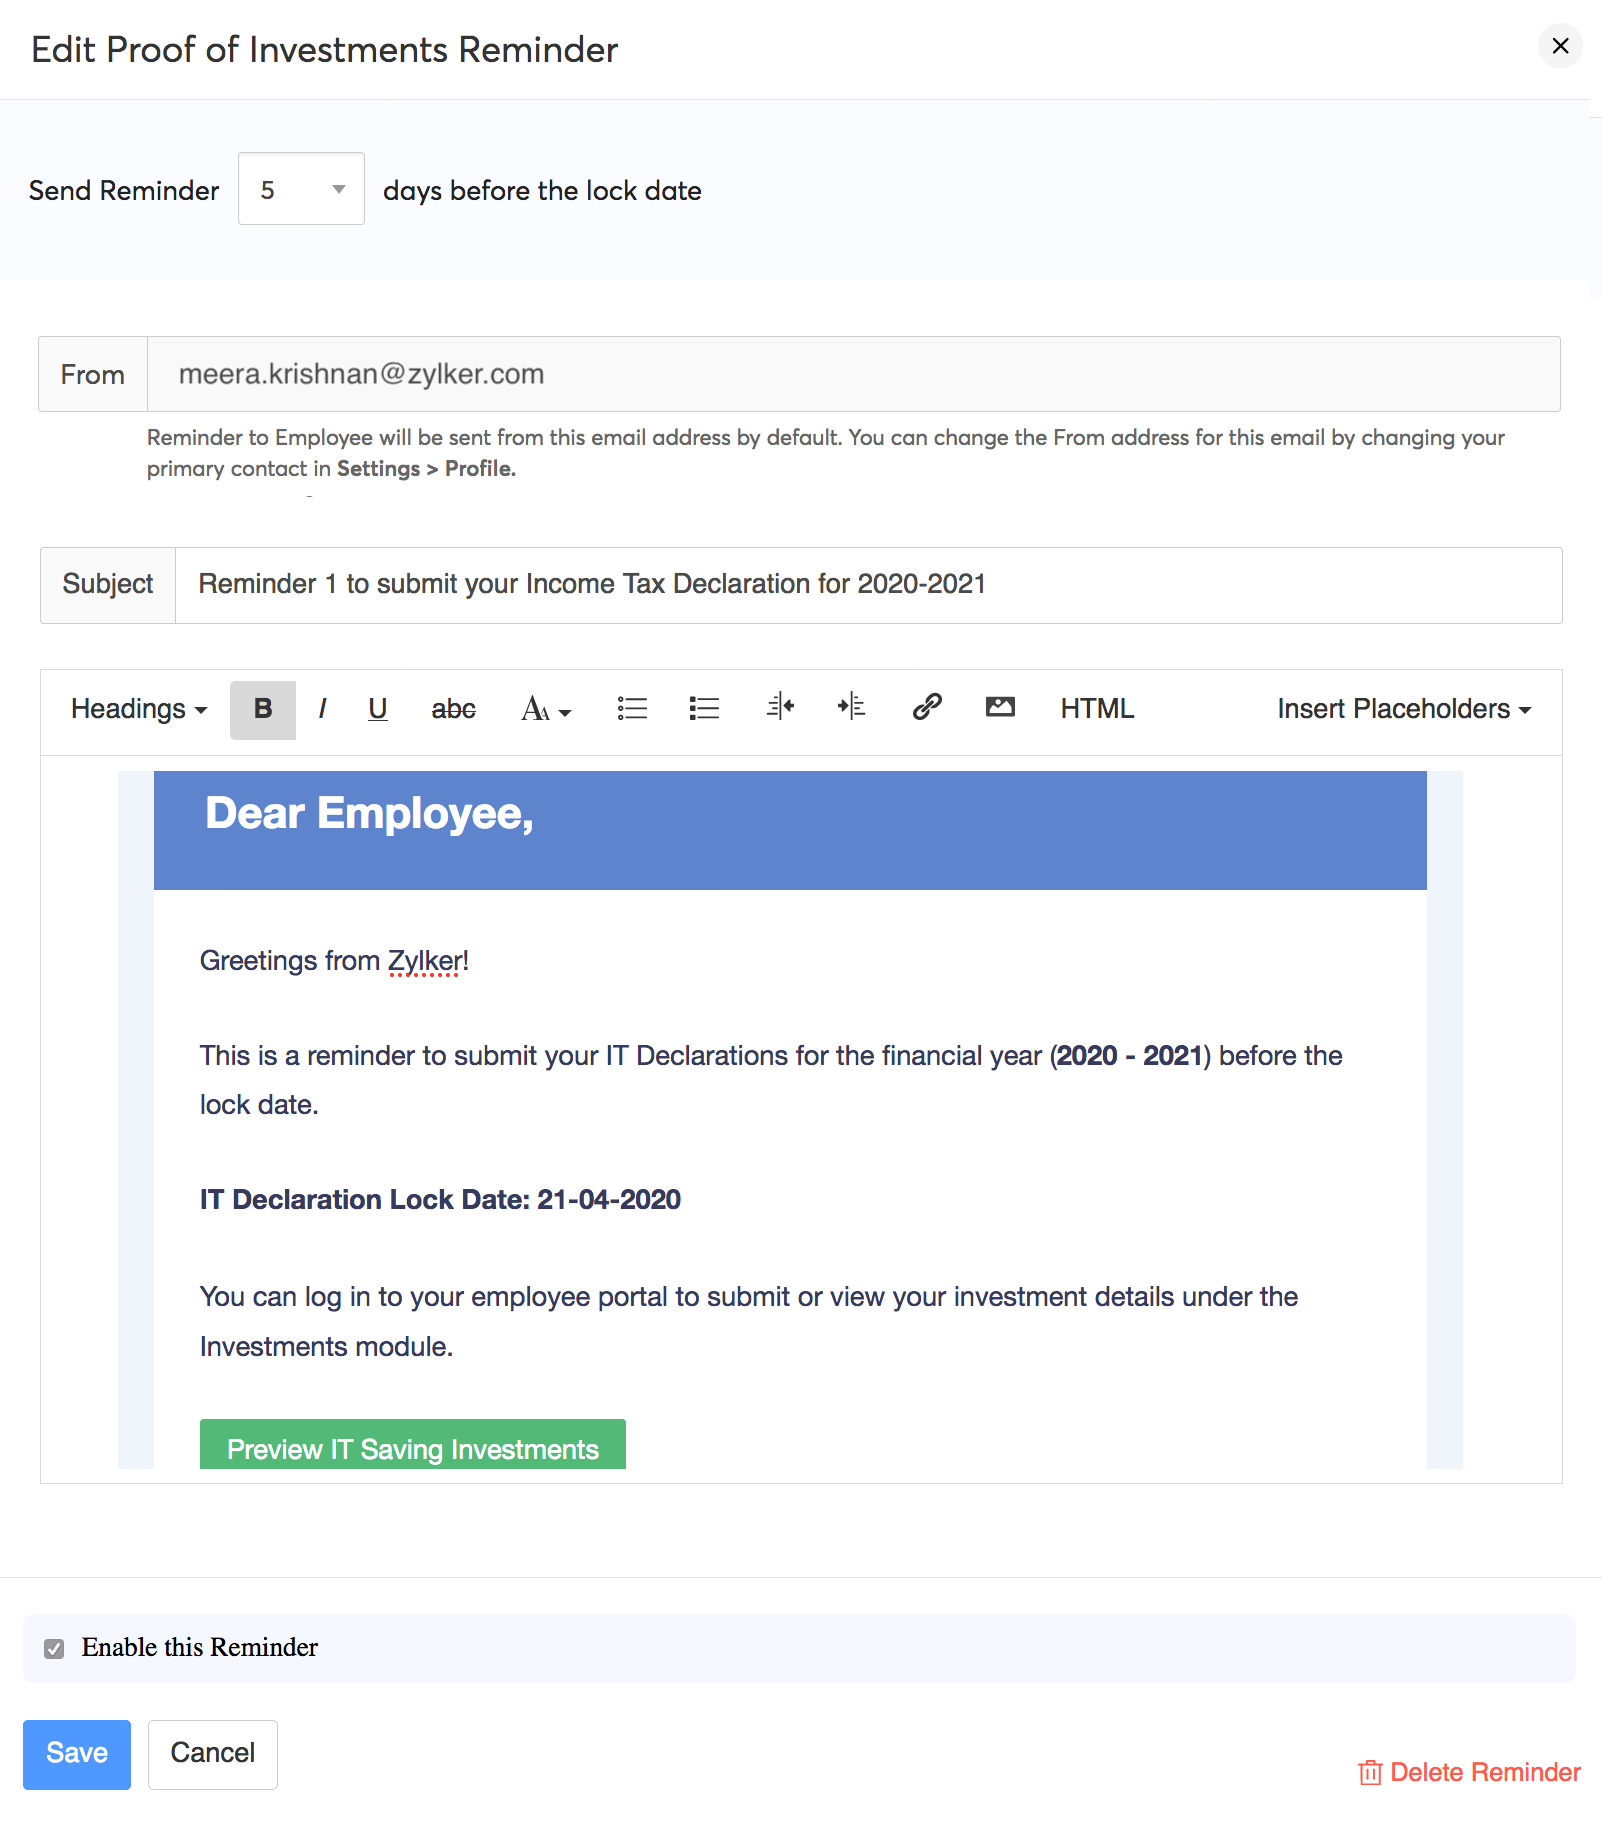
- To customise and send more reminders, select + Add Reminder. You can add up to two additional reminders.
- In the dialog box that opens, select the number of days ahead of which the email reminder should be sent and edit the contents of the email if needed. You can insert placeholders, images, and links wherever needed.
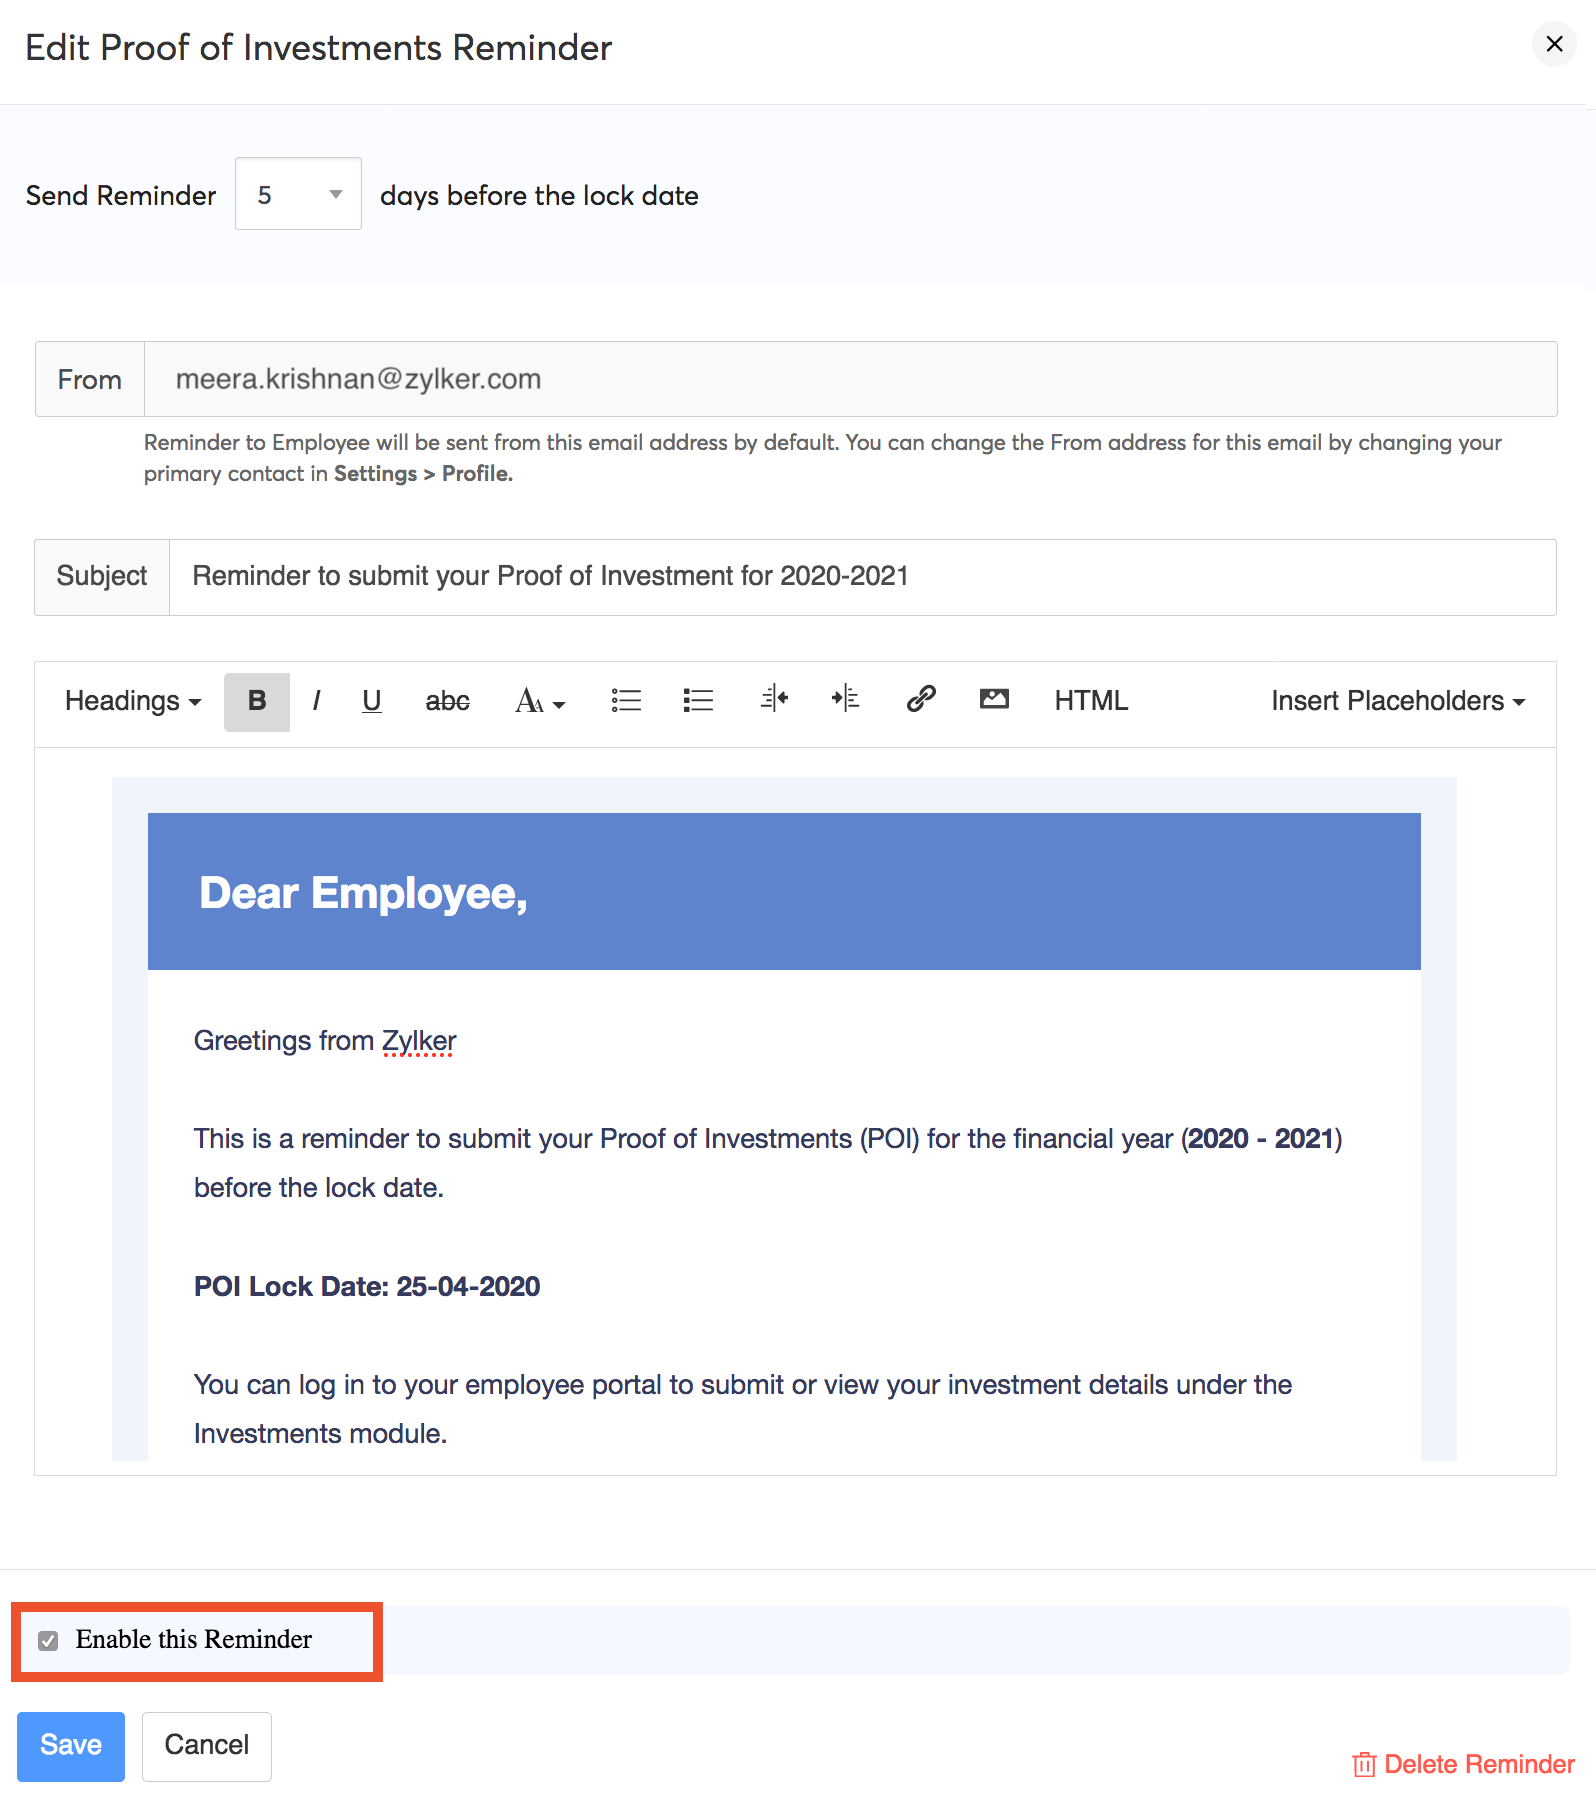
- Check the Enable this reminder option and click Save.
- In the POI settings page, select the month from which you want to apply the approved investment amount to pay runs.
- Click Save.
To disable a reminder:
- Go to Settings > Proof of Investments.
- Click the Edit icon next to the reminder.
- Uncheck the Enable this reminder option to disable the reminder.
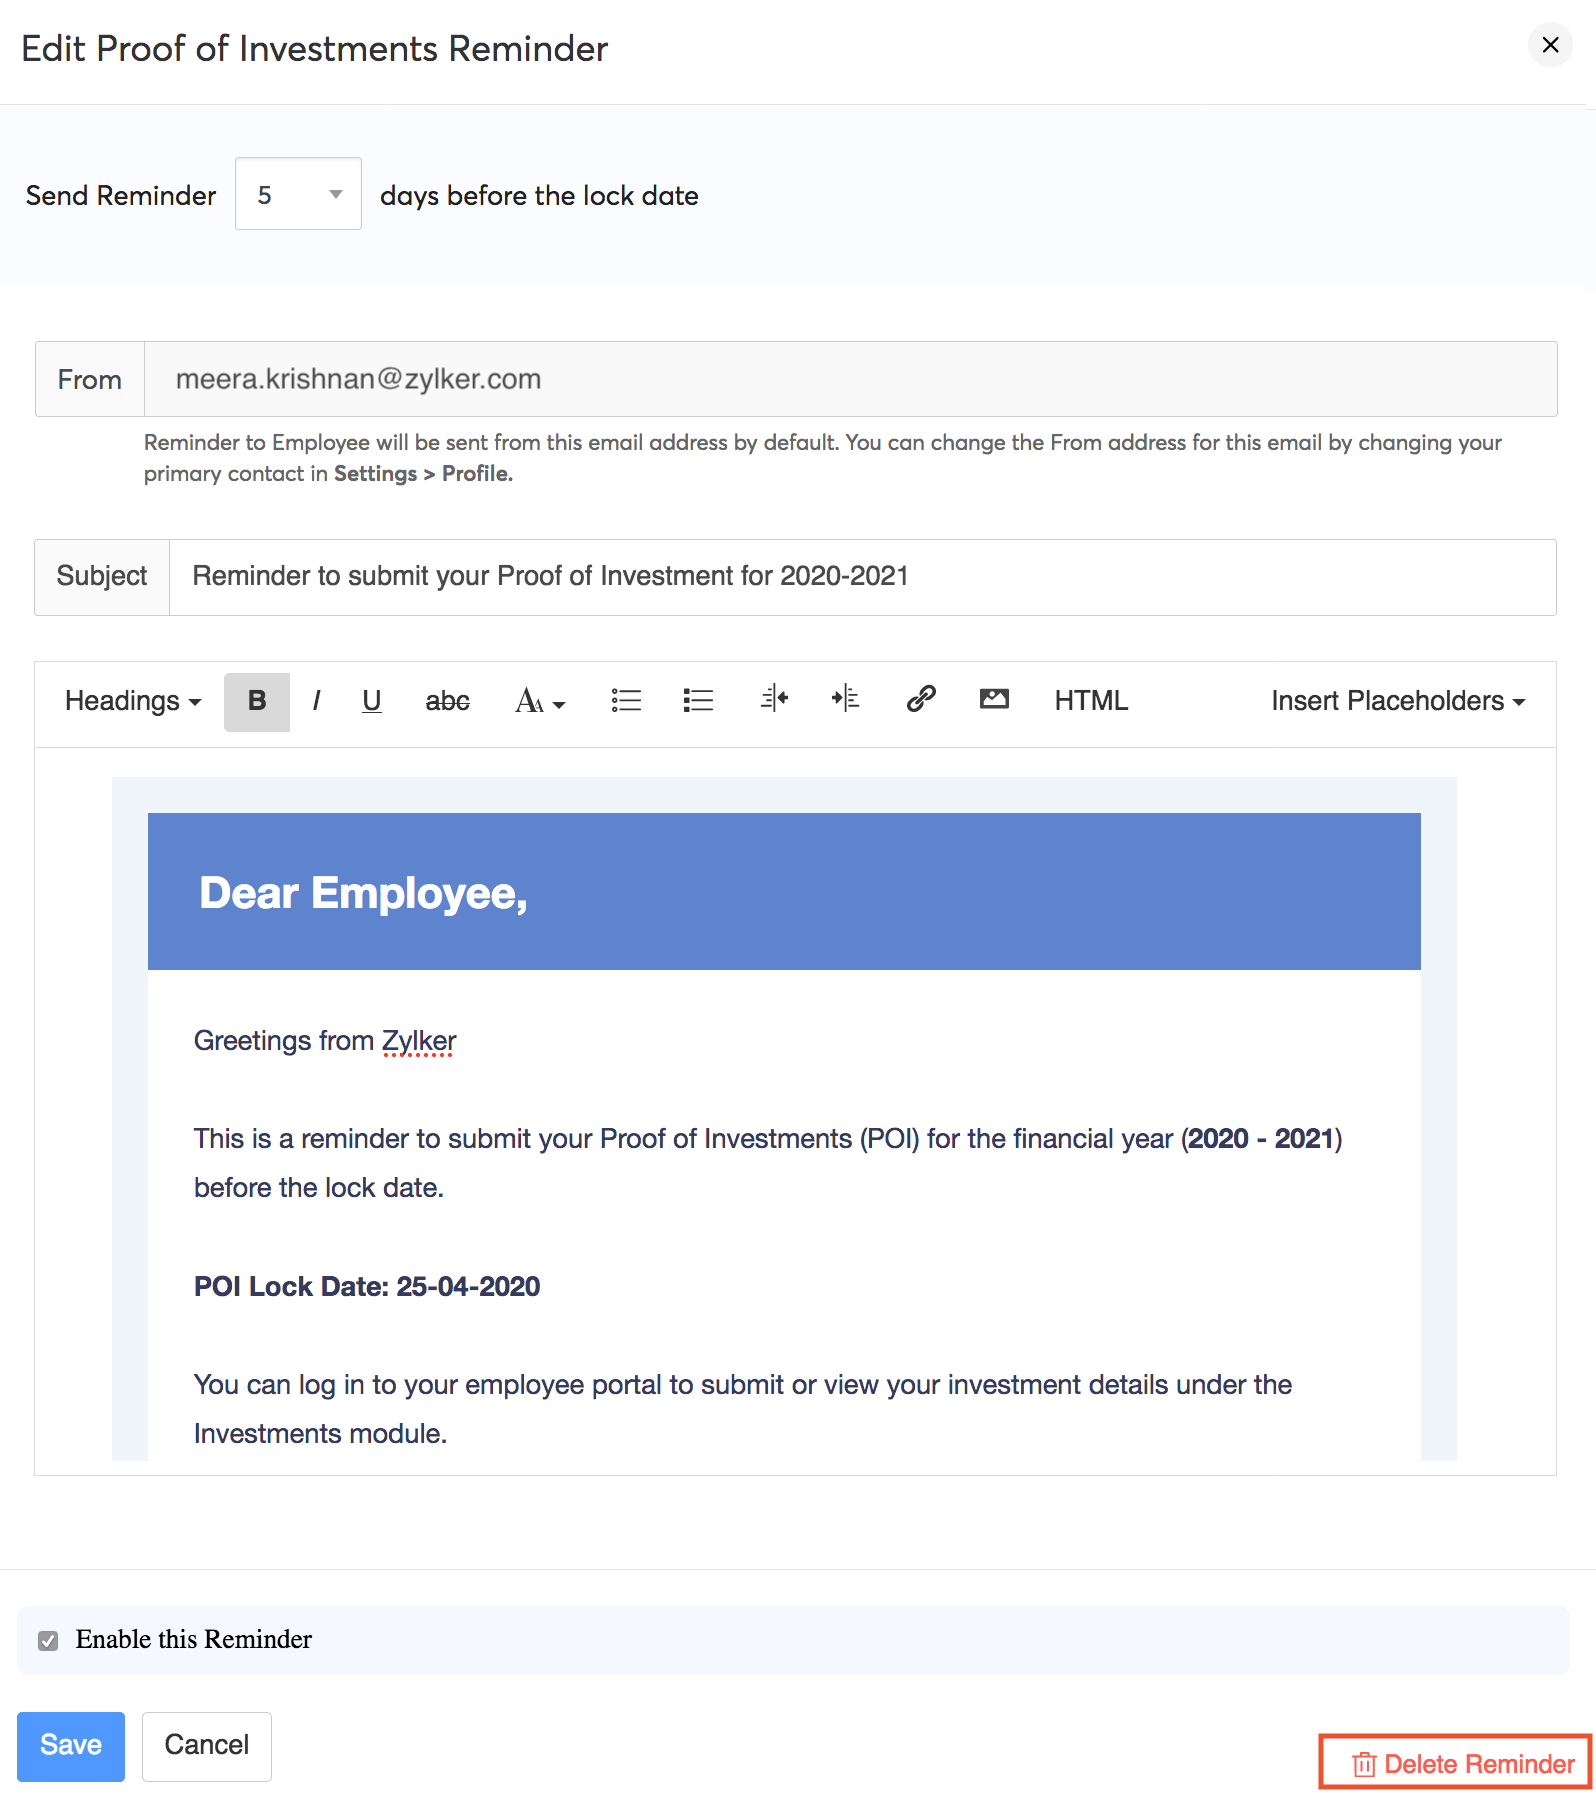
To delete a reminder:
- Go to Settings > Proof of Investments.
- Click the Edit icon next to the reminder
- Click Delete Reminder.
Employees can reduce their taxable income by investing in a few investment options provided by the Government. If employees have made such investments, they will declare it in their IT Declaration. At the end of the fiscal year, they will be required to submit proofs for their investments. The organisation will process these proofs of investments, calculate the employees' tax accordingly and submit the tax levied to the Government.
Pro-tip: It is recommended that employers process the proof of investments in multiple phases starting from December or January. Employers can start considering the investment sums for income tax from the month of January to distribute the tax burden on employees. This will also make processing investment proofs easier, especially when an organization has more than 50 employees.
When is the ideal time to enable the investment proof submission?
Ideally, employees should be allowed to submit their proof of investments from the month of December. This would reduce employers' workload and make it easier to process the investment proofs before the end of the fiscal year.
Enabling Proof of Investments submission in Zoho Payroll
You can enable Proof of Investments submission by following the below steps:
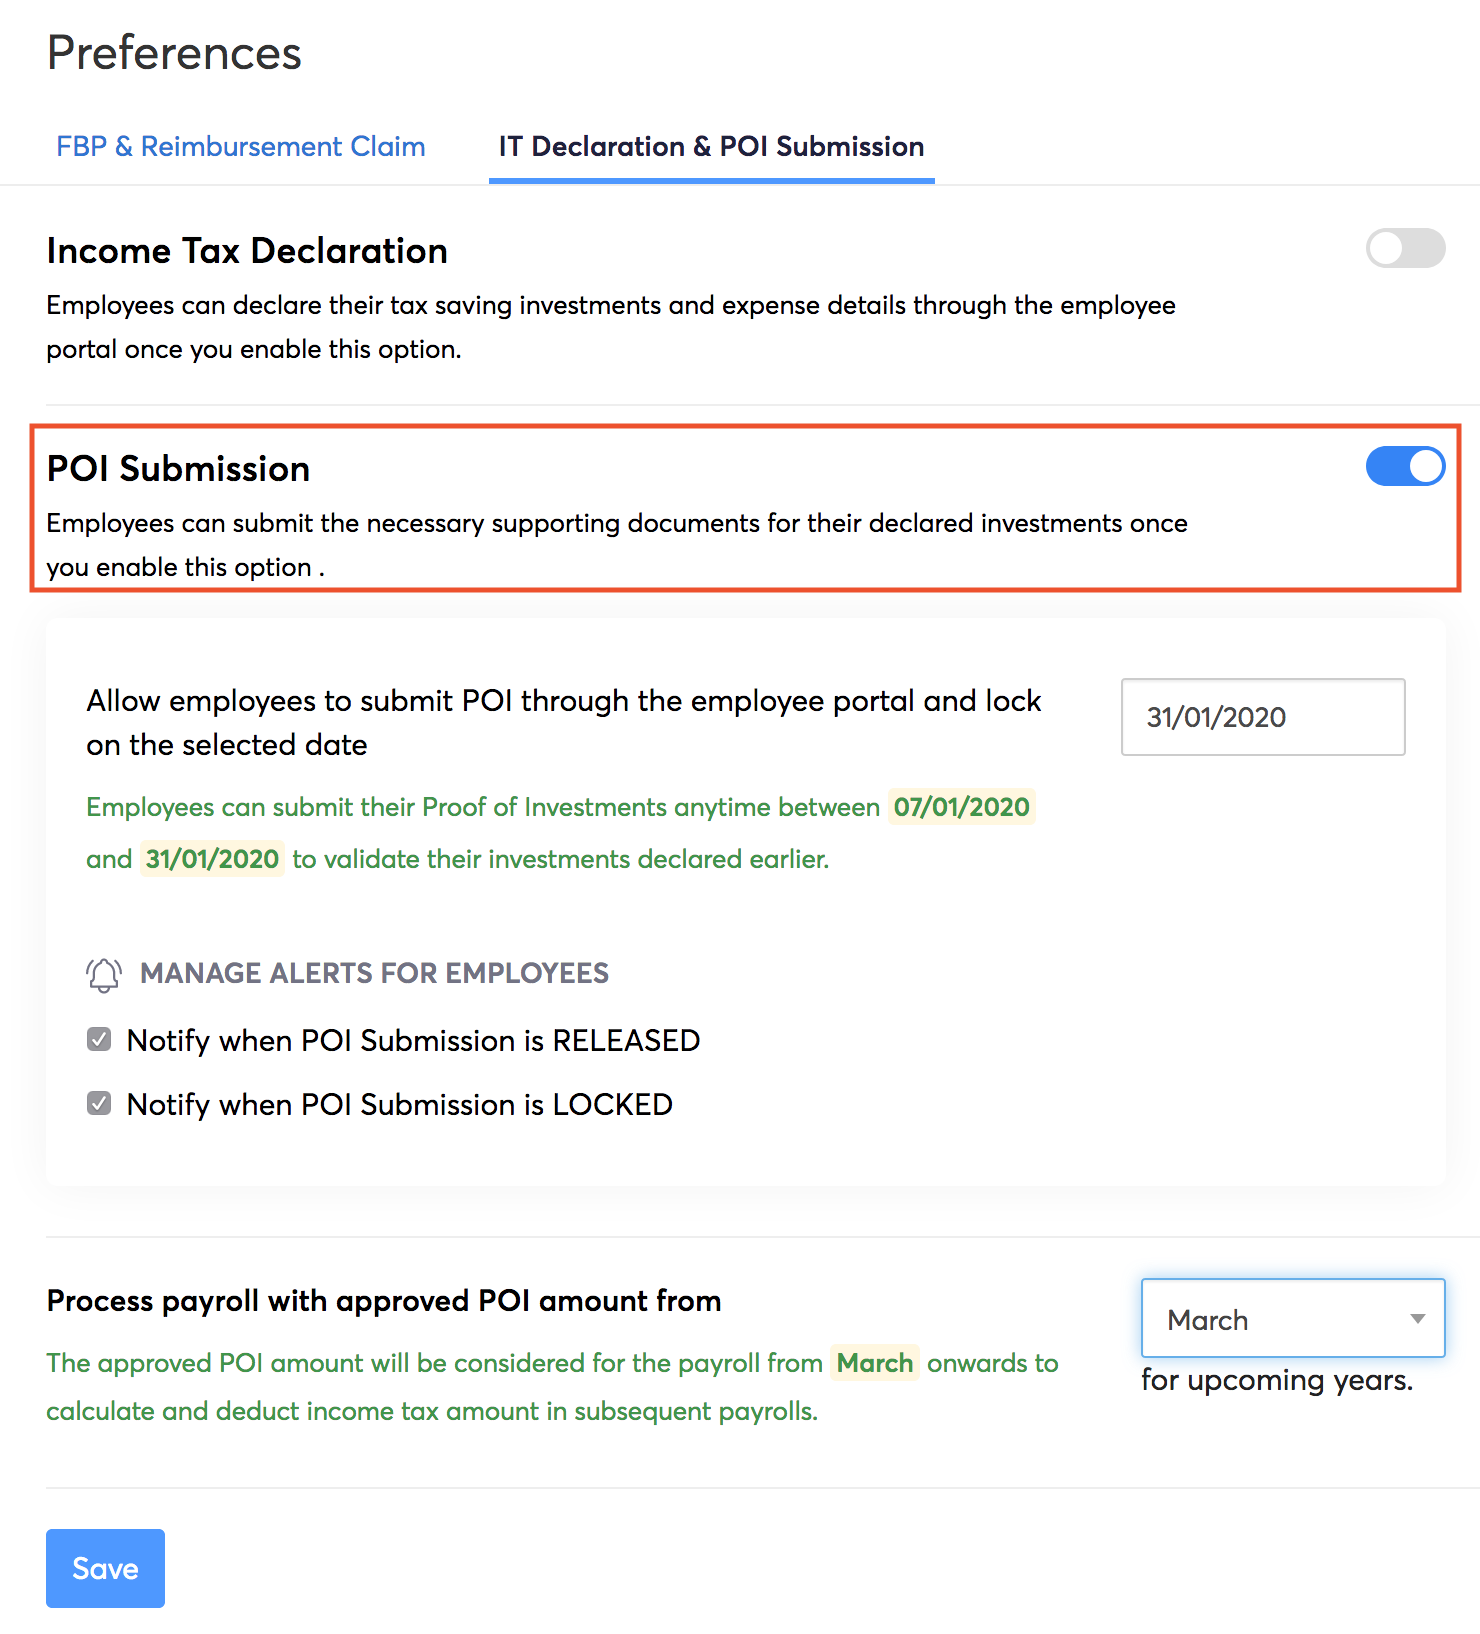
- Go to Settings > Preferences.
- Go to the IT Declaration & POI Submission tab.
- Enable the Proof of Investments submission option.
- Select the date on which the POI submission should be locked.
- Select the month from which the payroll should be processed with the approved amount.
Note: Income tax will be processed based on the investment amounts from the selected POI processing month.
- Click Save.
Once you click Save, the following automated mail will be sent to all the employees who have portal access.
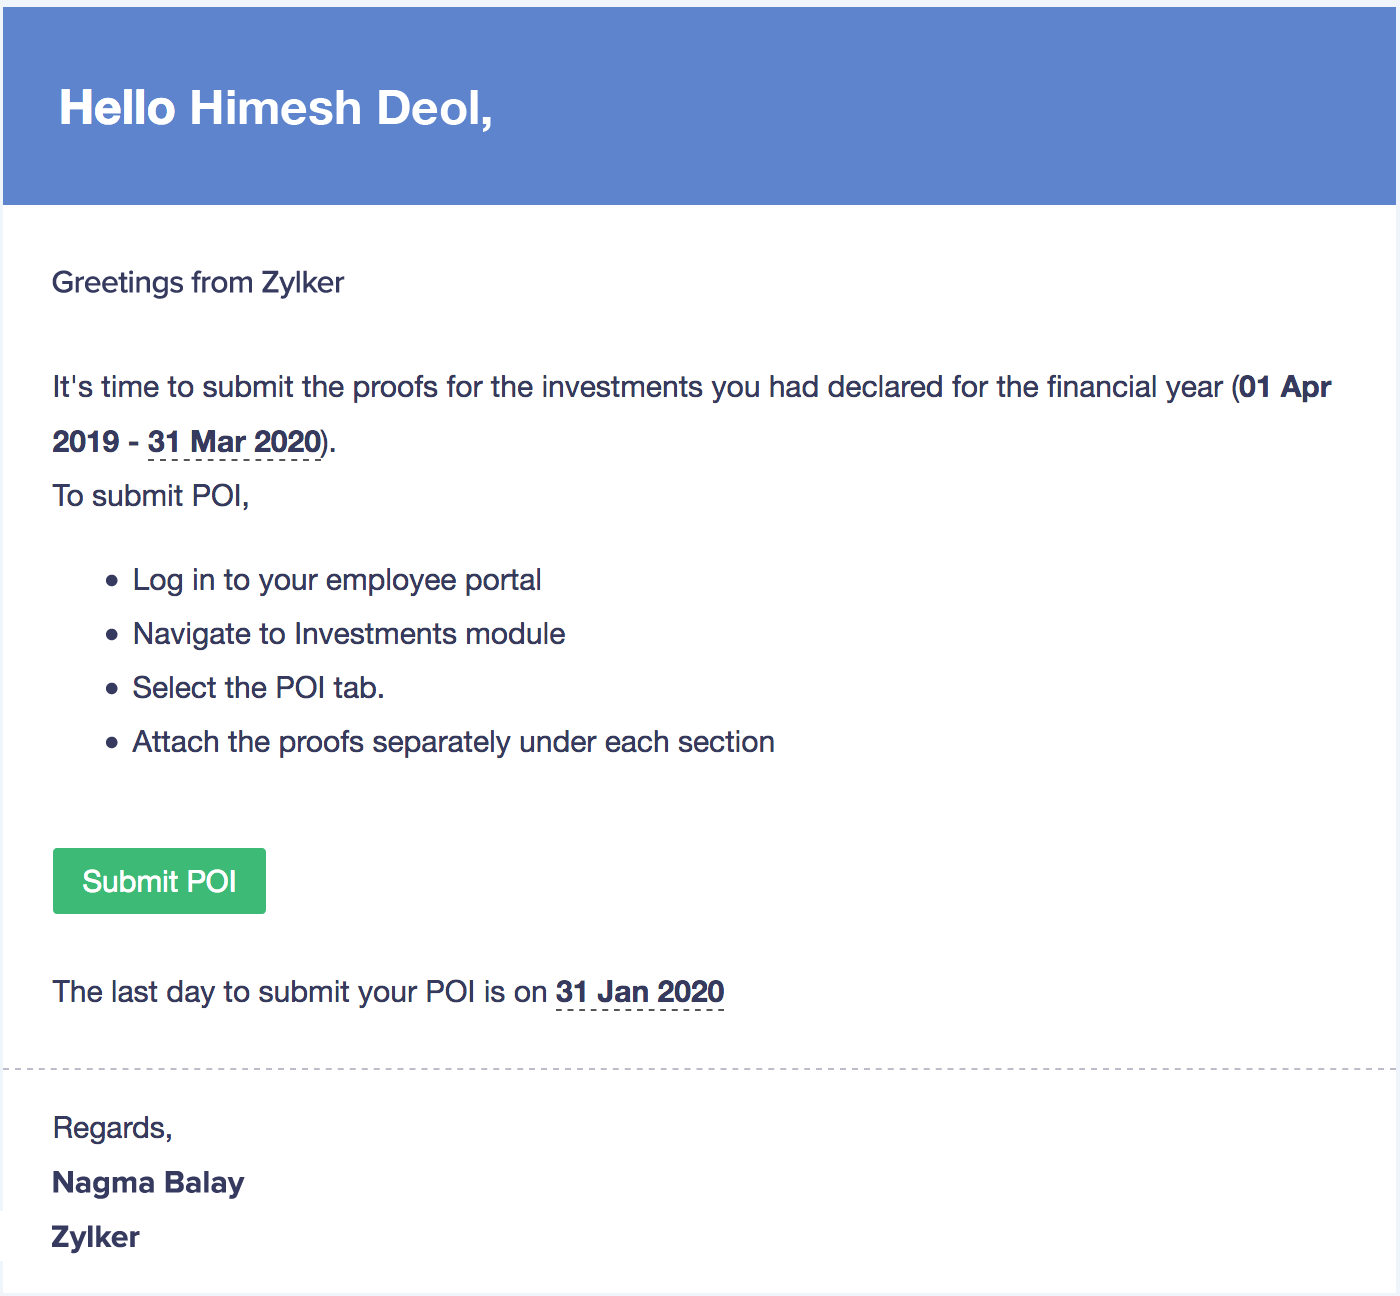
Note: This is an automated mailer and it cannot be edited.
Apart from this, you can selectively enable Proof of Investment for employees.
- Go to the Employees module.
- Select the employees for whom you want to enable proof submission.
- Click More.
- Select Release Proof of Investments.
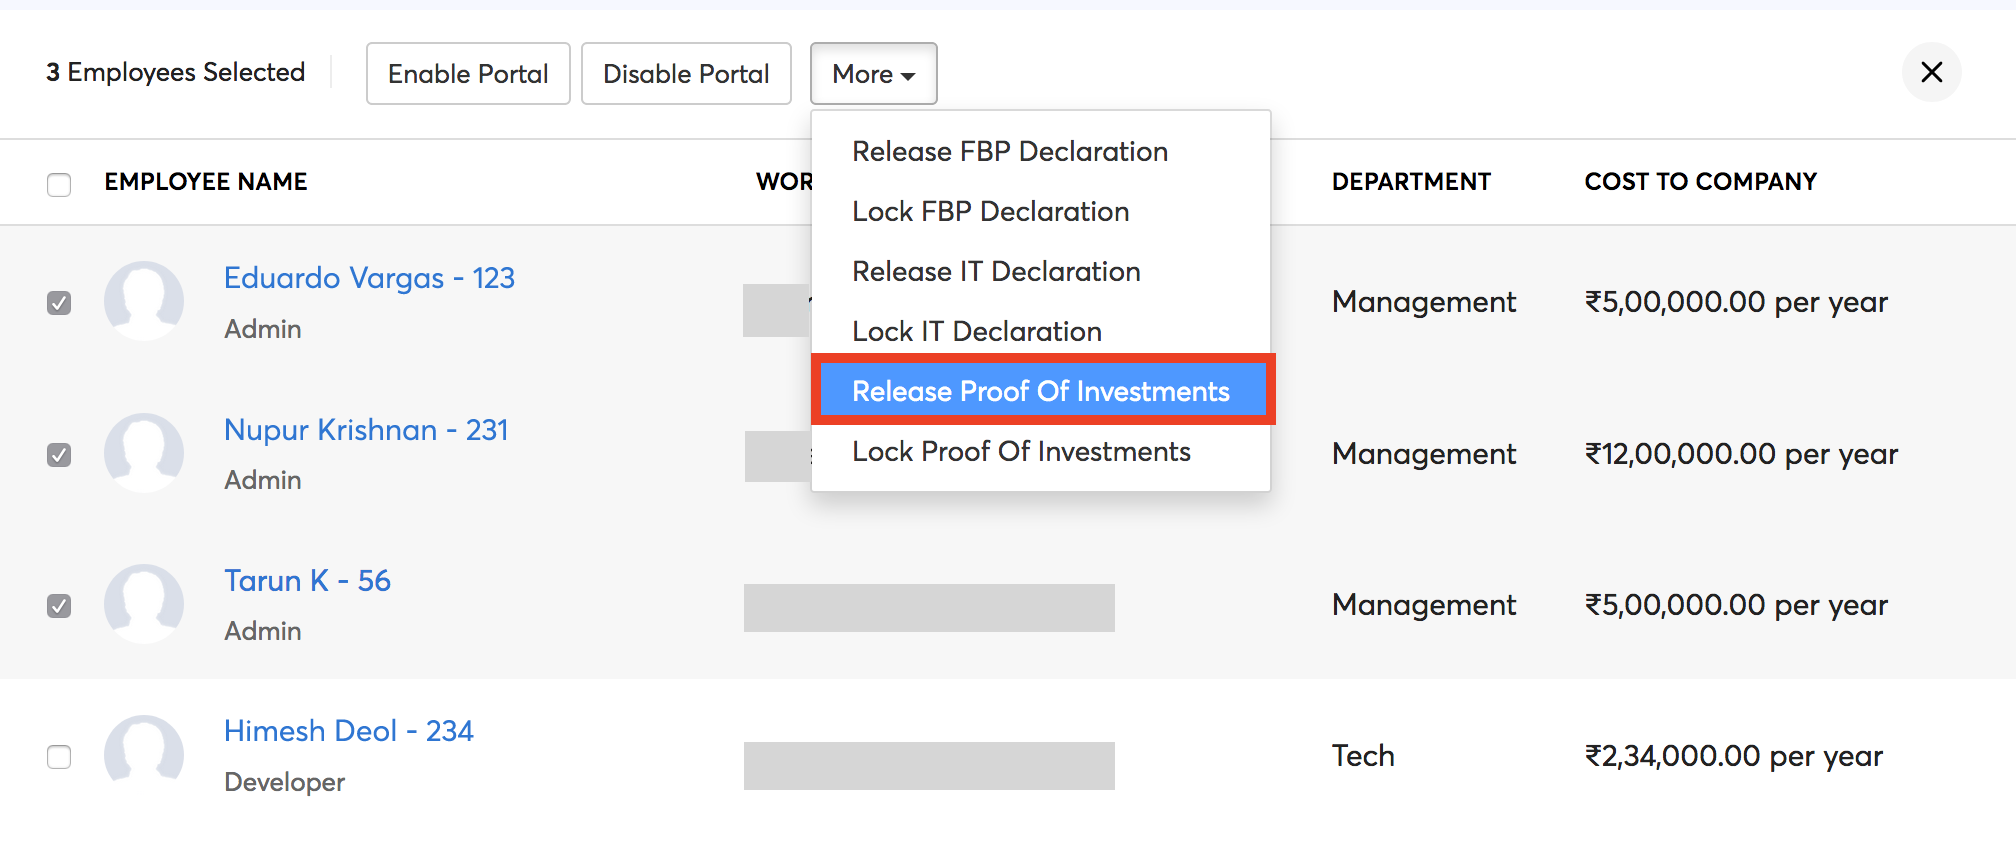
Employees will now be able to submit their proofs from their portals.
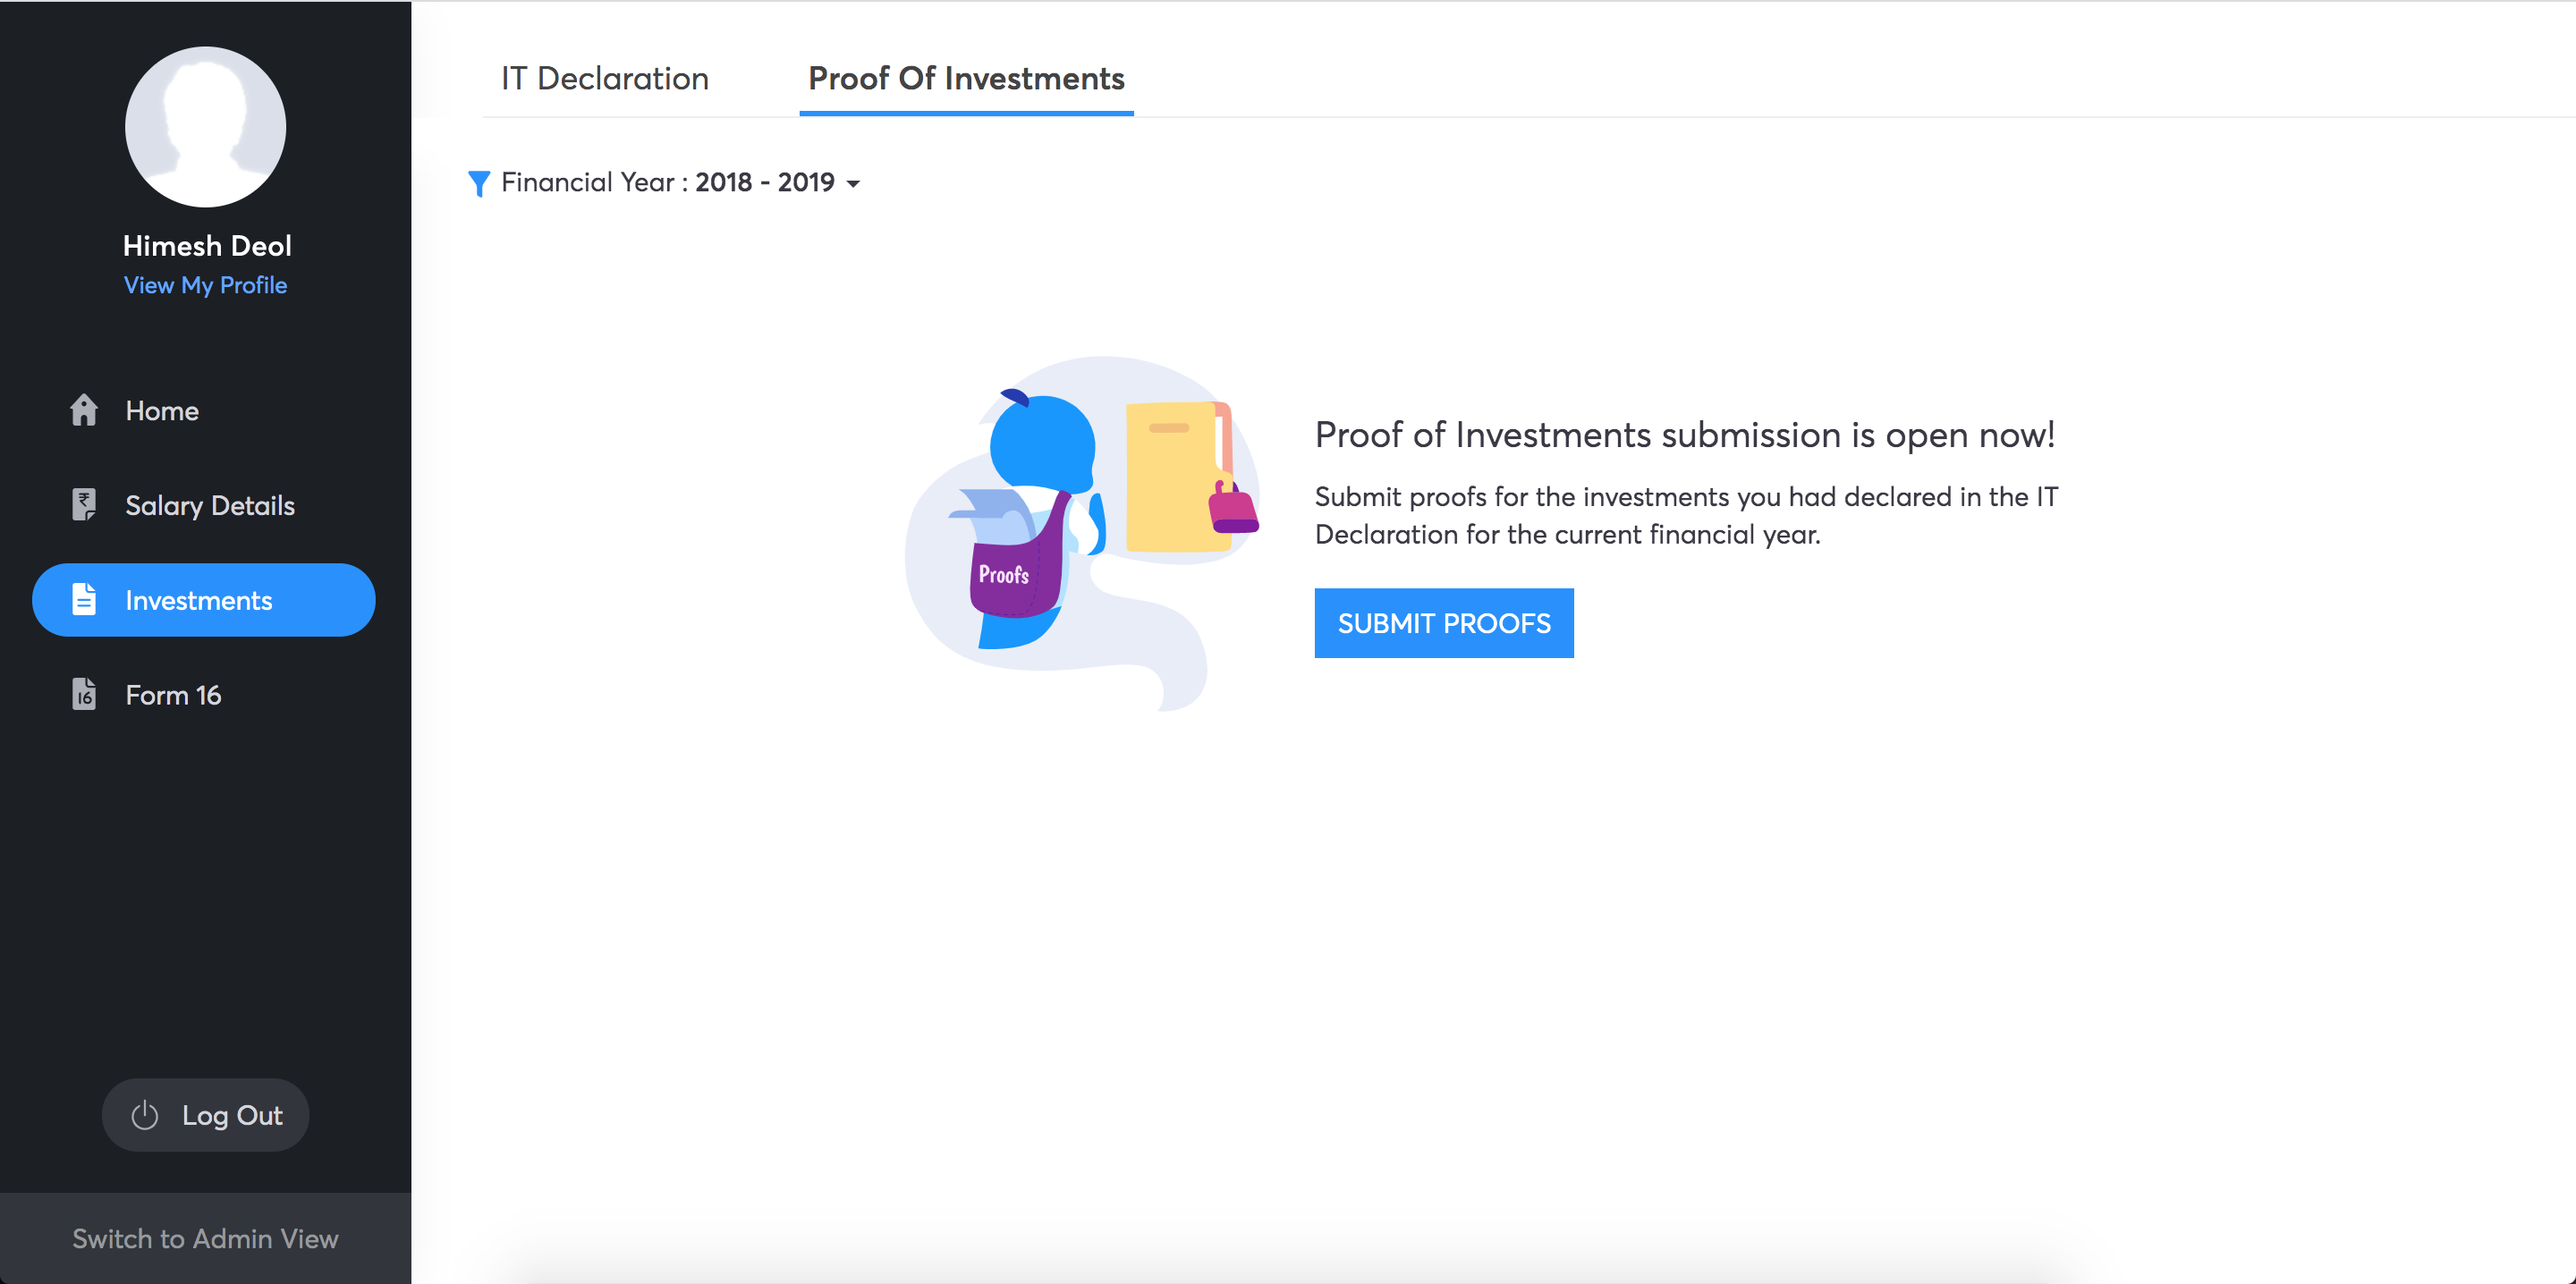
If the employees do not have access to their portals, employers can submit the proofs on behalf of the employee in the Employees module.
Insight: Pre-tax Deductions (VPF, NSC, etc.) will be considered for tax calculation automatically. No proof is be required for this.
Submitting proofs on behalf of the employees
You can submit the proof of investments on behalf of your employees. To do this,
- Navigate to the Employees module from the left sidebar.
- Select the employee for whom you want to submit the proof of investments.
- Navigate to the Investments tab.
- Under the Investments tab, move to the Proof of Investments section.
- Click Submit Proofs.
- Enter the actual amount invested in each investment that the employee had declared.
- You can add new investments, if needed.
- Click Save and Compare.

You will be redirected to the Tax Comparison page. Here, you can opt for either the new regime or the old regime.
- Once you’ve selected the desired regime, click Save.
- In the summary page, click the Attach icon to attach the proofs.
- Add comments, if needed.
- Review all the details and click Submit.

If you want to change the tax regime, you can do so before running the first payroll for the financial year. Select Change Tax Regime and click Save after choosing the desired regime. Once this is done, click Submit.
Note: You can view the tax liability in each tax regime using the Compute Tax option at the bottom of the page.
Reviewing and Approving the Proof of Investments
Once your employees submit the proofs, you need to either approve or reject them. To do this,
- Go to Approvals > Proof of Investments.
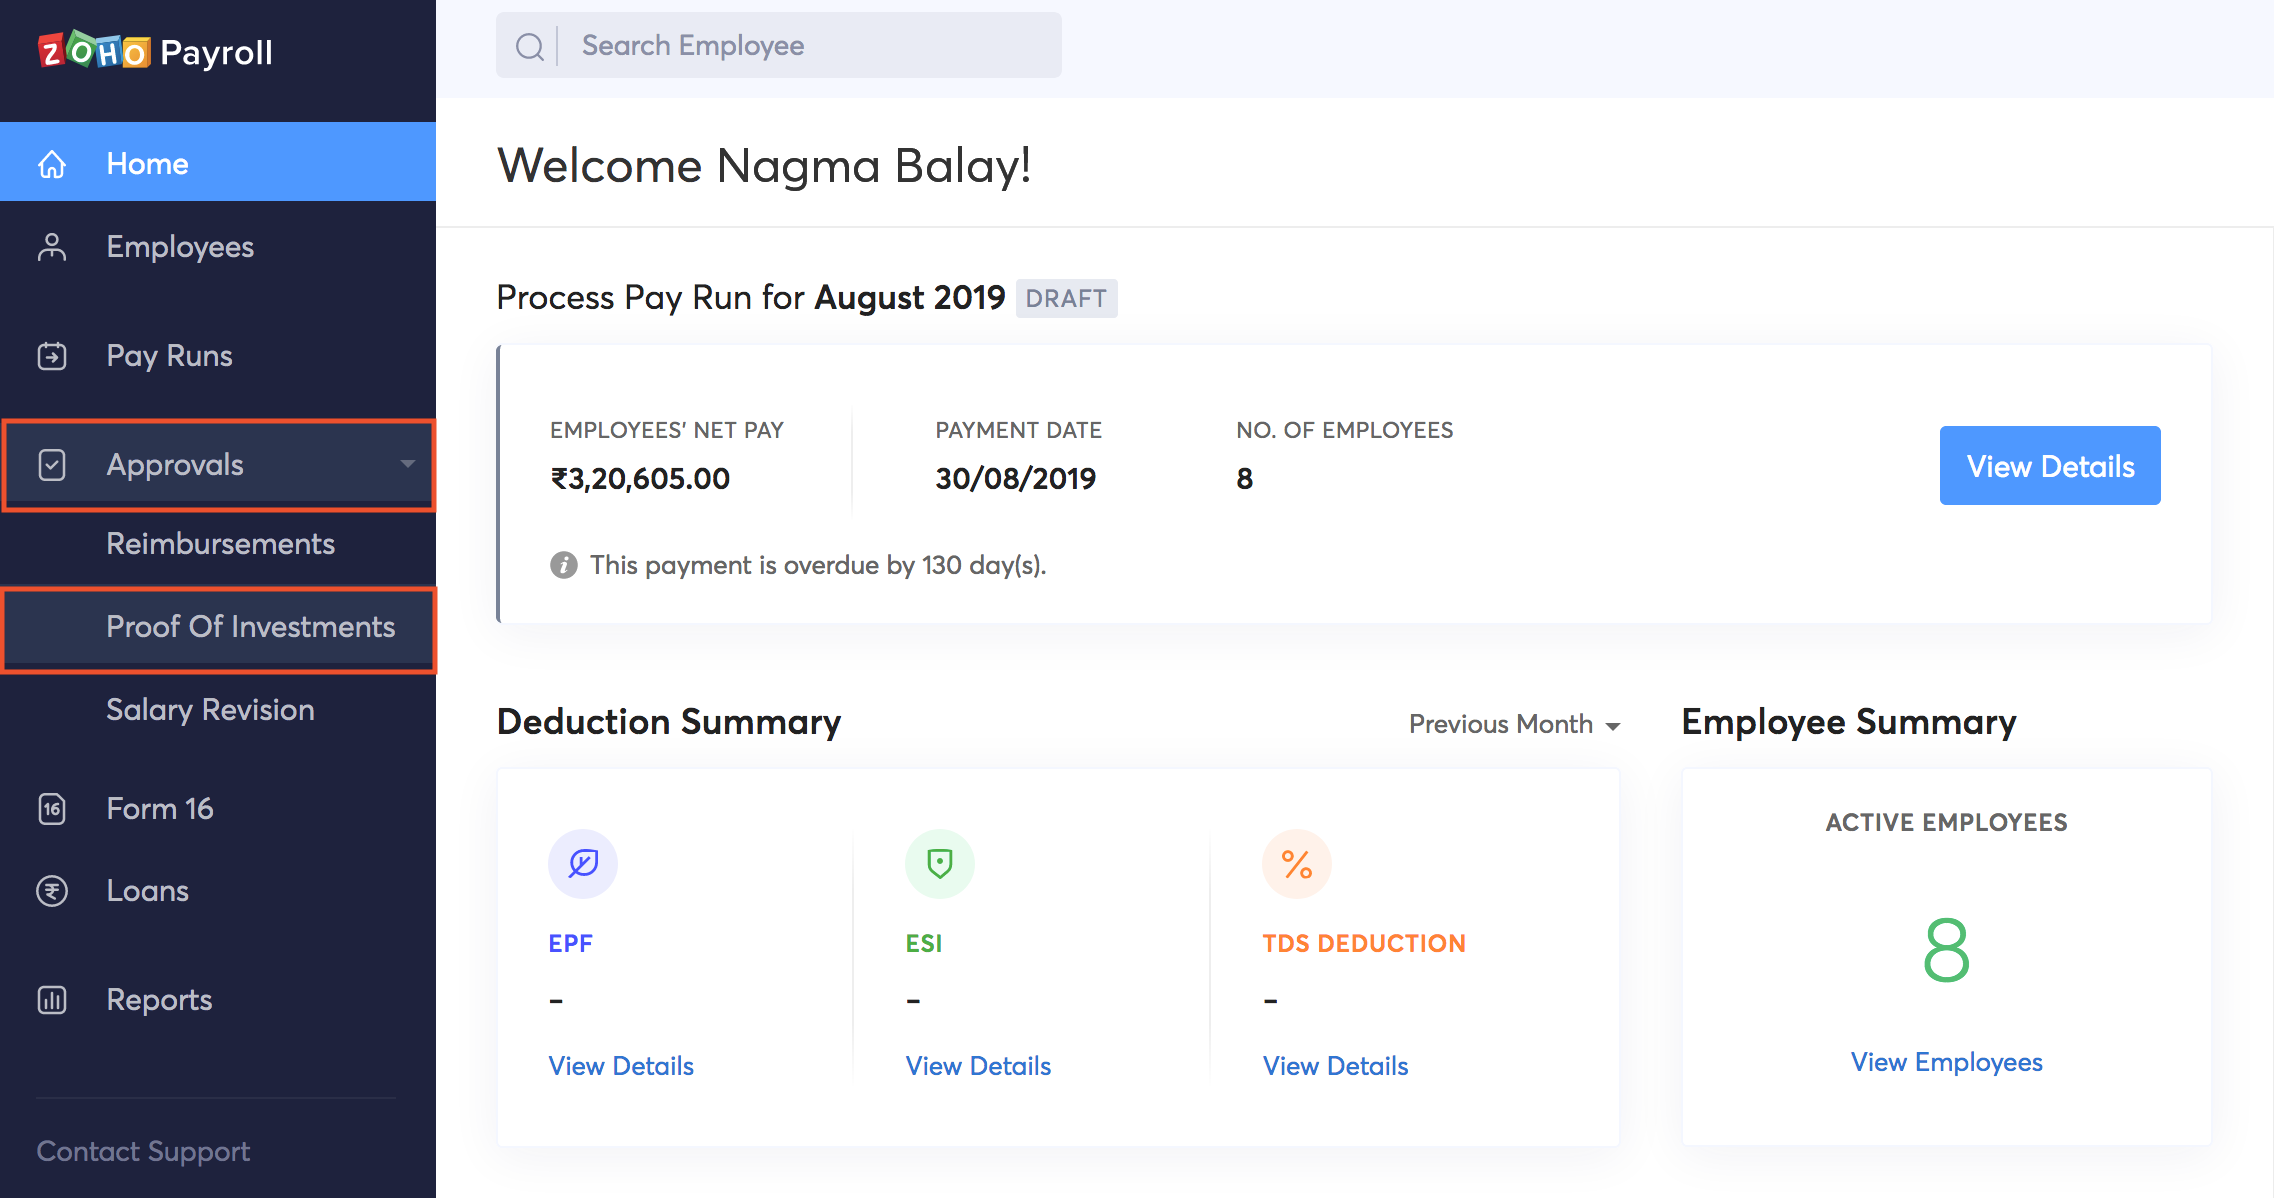
- Select the employee for whom you want to review the Proof of Investments.
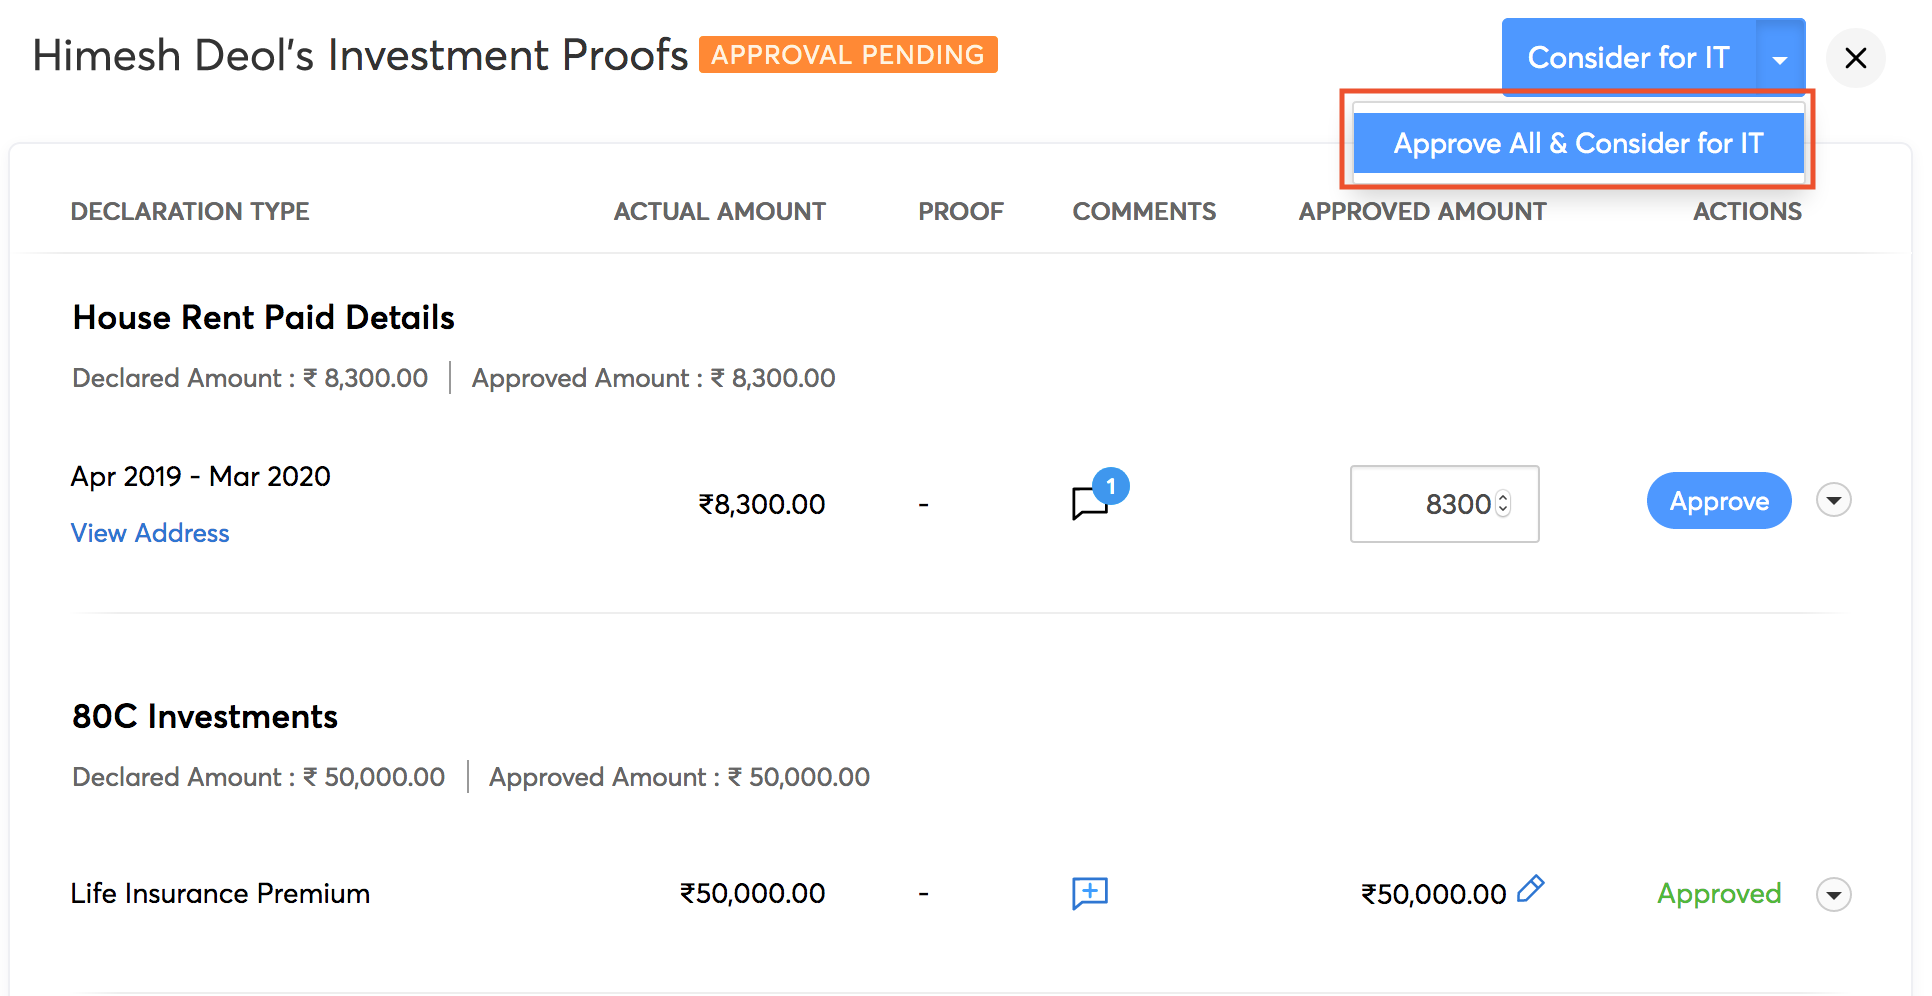
- Review the investment proofs and enter the actual approved amount and select Approve.
- If there is any discrepancy, select Reject from the drop down menu. Enter a reason as to why the proof has been rejected.
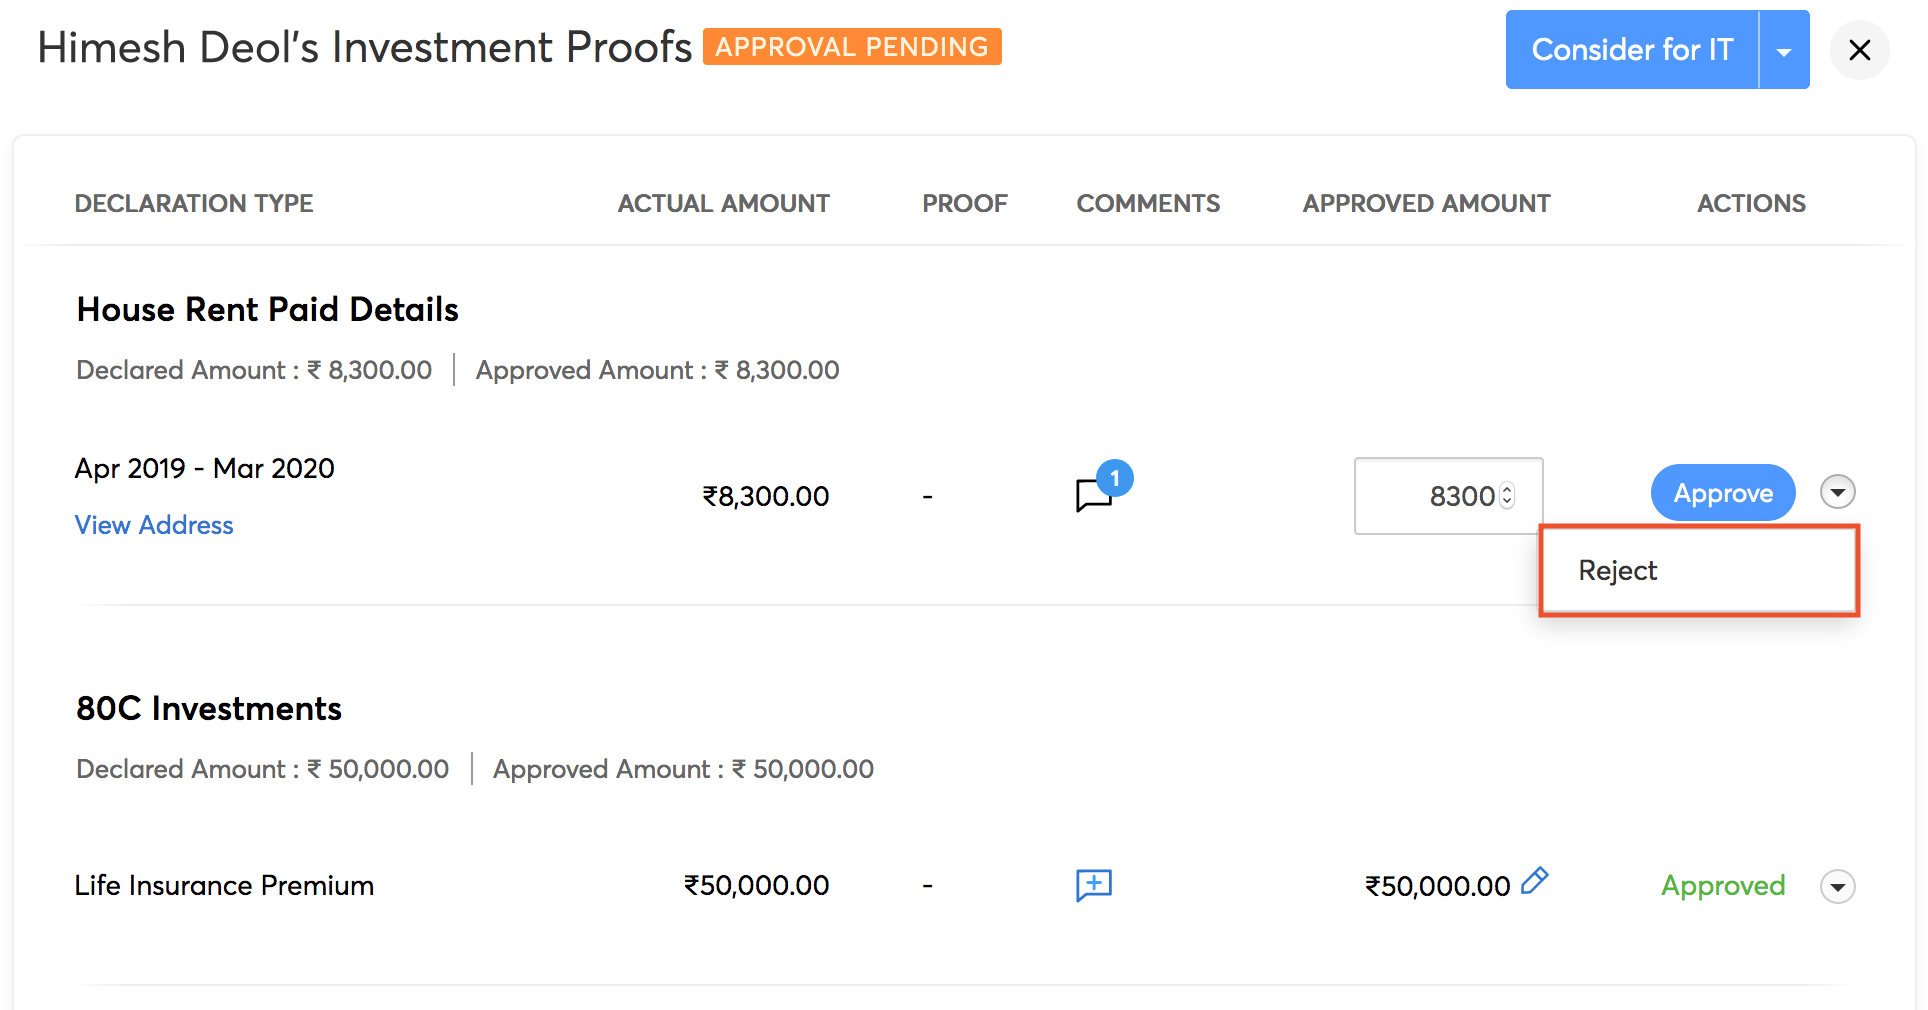
Once you have reviewed all the proofs, click Consider for IT. The approved amounts will be considered for income tax calculation for that financial year.
There is also an option to approve all the proofs in one go by clicking Approve All & Consider for IT in the dropdown menu.
Once the investment declarations are made in the Investments module (either in IT Declaration or in POI), the changes have to be applied in the pay runs module in case the pay run is in draft state. Alternatively, the pay run can be deleted and rerun.
Note: Changes made in the investment declaration after the amount is approved will not be taken into account for tax calculation.
Employee Custom Fields
Employee custom fields enable you to include additional information about the employee. Any detail that is not mandated in the payroll but you want to collect can be collected using custom fields. For example, details such as Aadhaar number, vehicle registration number, and marital status. These fields will be available under Personal Information > Other Details in the employee’s profile.
In this document you will learn how to:
- Create a custom field
- Edit a custom field configuration
- Mark a custom field as Inactive
- Delete a custom field
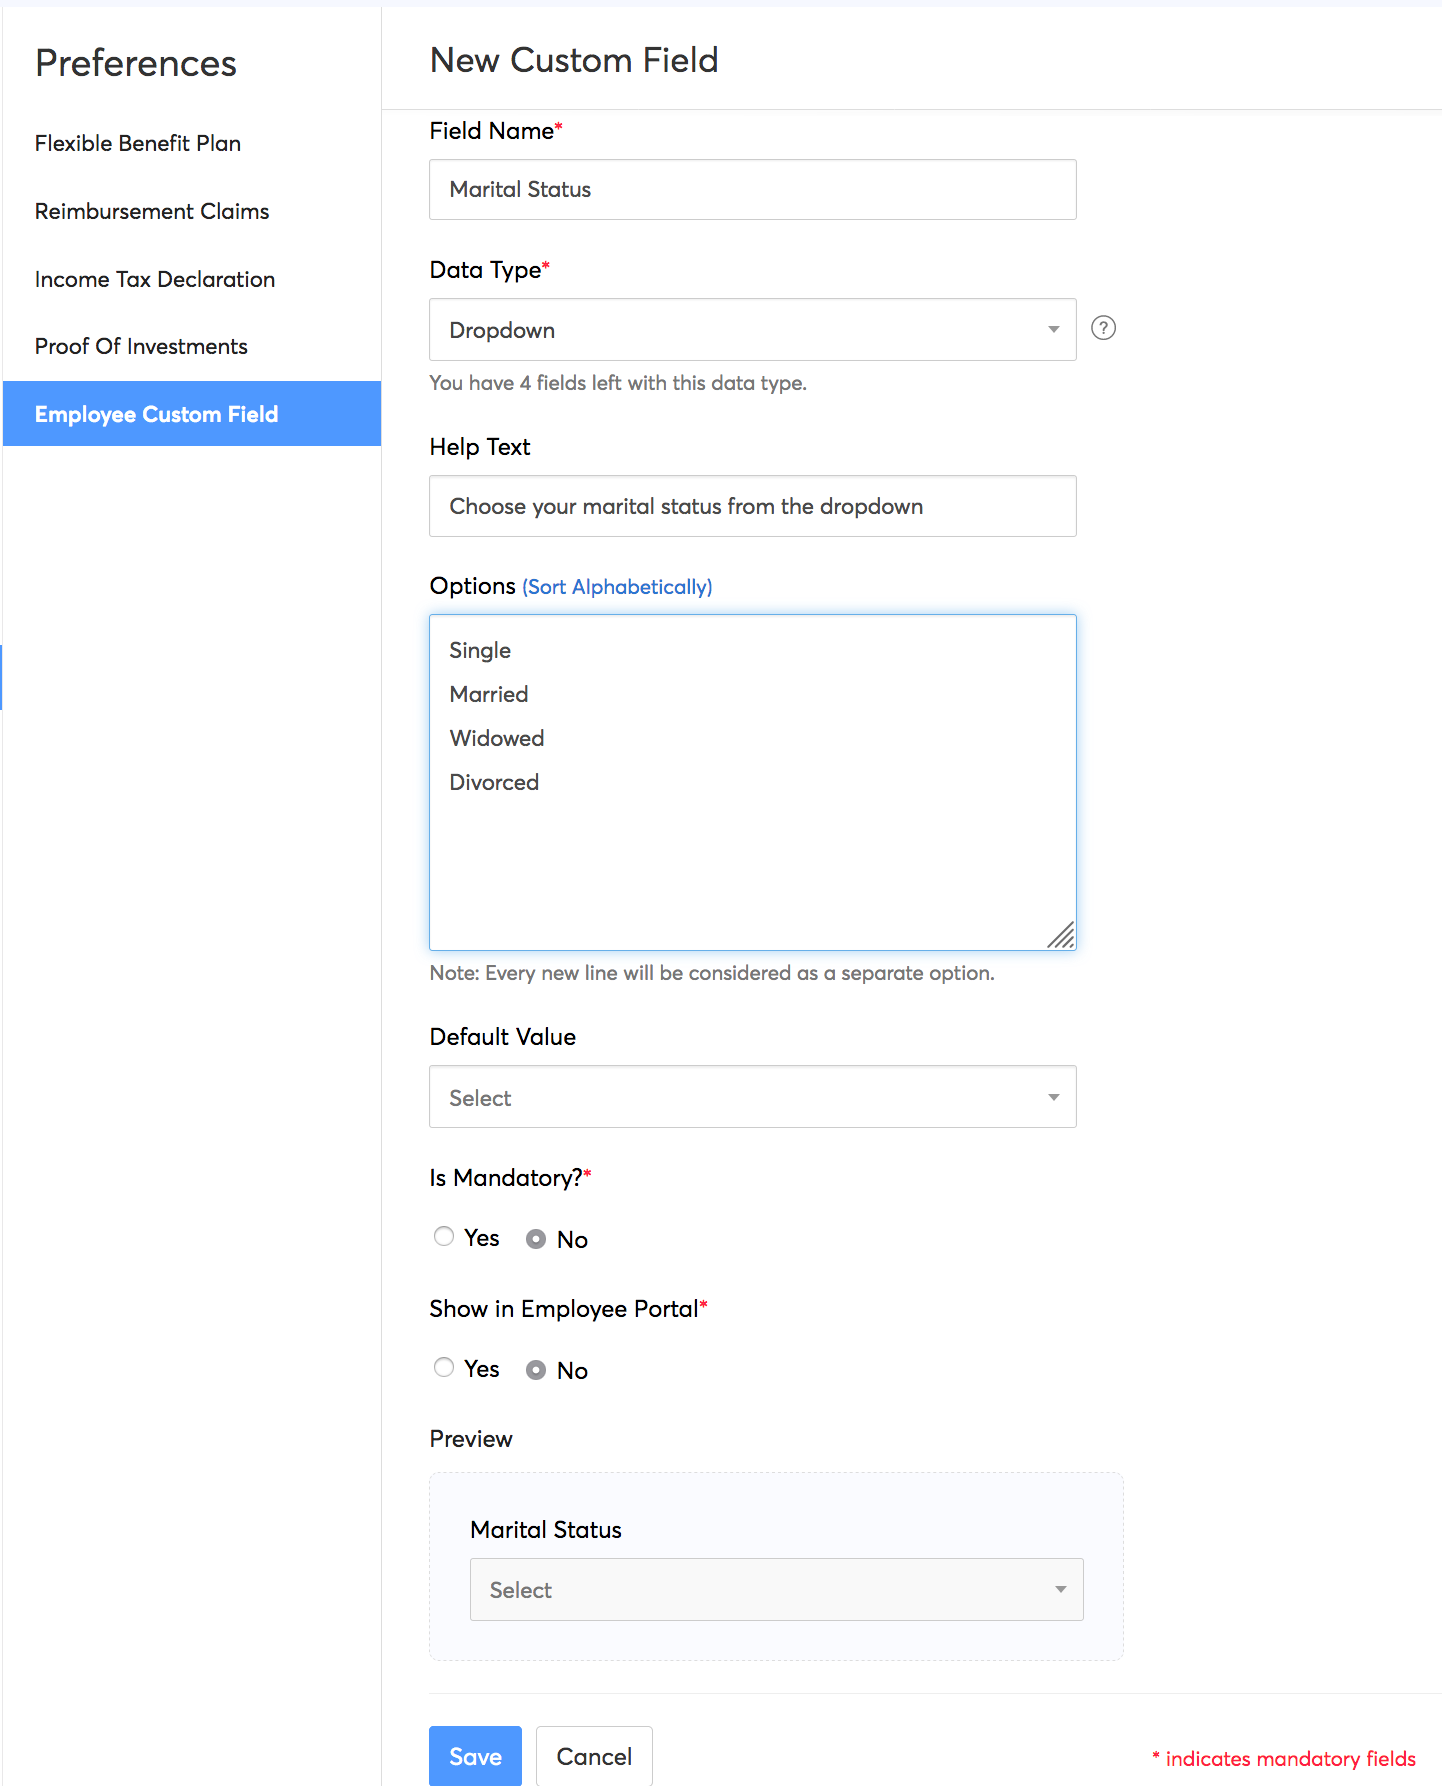
Create a Custom Field
- Go to Settings > Preferences > Employee Custom Field.
- Click the Create New button.
- Enter the Field Name and select the Data Type from the dropdown menu.
- Based on the data type, you will have to fill out the necessary information that will help with filling out the details. Given below are the data types available in Zoho Payroll:
| Data Type | Information Needed |
|---|---|
| Text Box (Single Line) | * Help Text * Is this PII? * Default Value |
| Text Box (Multi-line) | Help Text |
| * Help Text * Is this PII? * Default Value |
|
| URL | * Help Text * Is this PII? * Default Value |
| Phone | * Help Text * Is this PII? * Default Value |
| Number | * Help Text * Is this PII? * Default Value |
| Decimal | * Help Text * Default Value |
| Amount | * Help Text * Default Value |
| Percent | * Help Text * Default Value |
| Date | * Help Text * Is this PII? * Default Value |
| Check-box | * Help Text * Default Value (☐ Ticked by default) |
| Auto generate number | * Help Text * Prefix * Suffix * Starting Number |
| Drop-down | * Help Text * Options * Default Value |
| Multi select | * Help Text * Options * Default Value |
| Notes | * Help * Content |
- Check the option to make the field mandatory.
- Check the option to show the field in the Employee Portal.
- Click Save. Now, the field will be available in every employee’s profile.
Edit a Custom Field Configuration
To edit the custom field:
- Go to Settings > Preferences > Employee Custom Field.
- Click the More icon next to the field name and select Edit.
- Make the necessary changes and click Save.
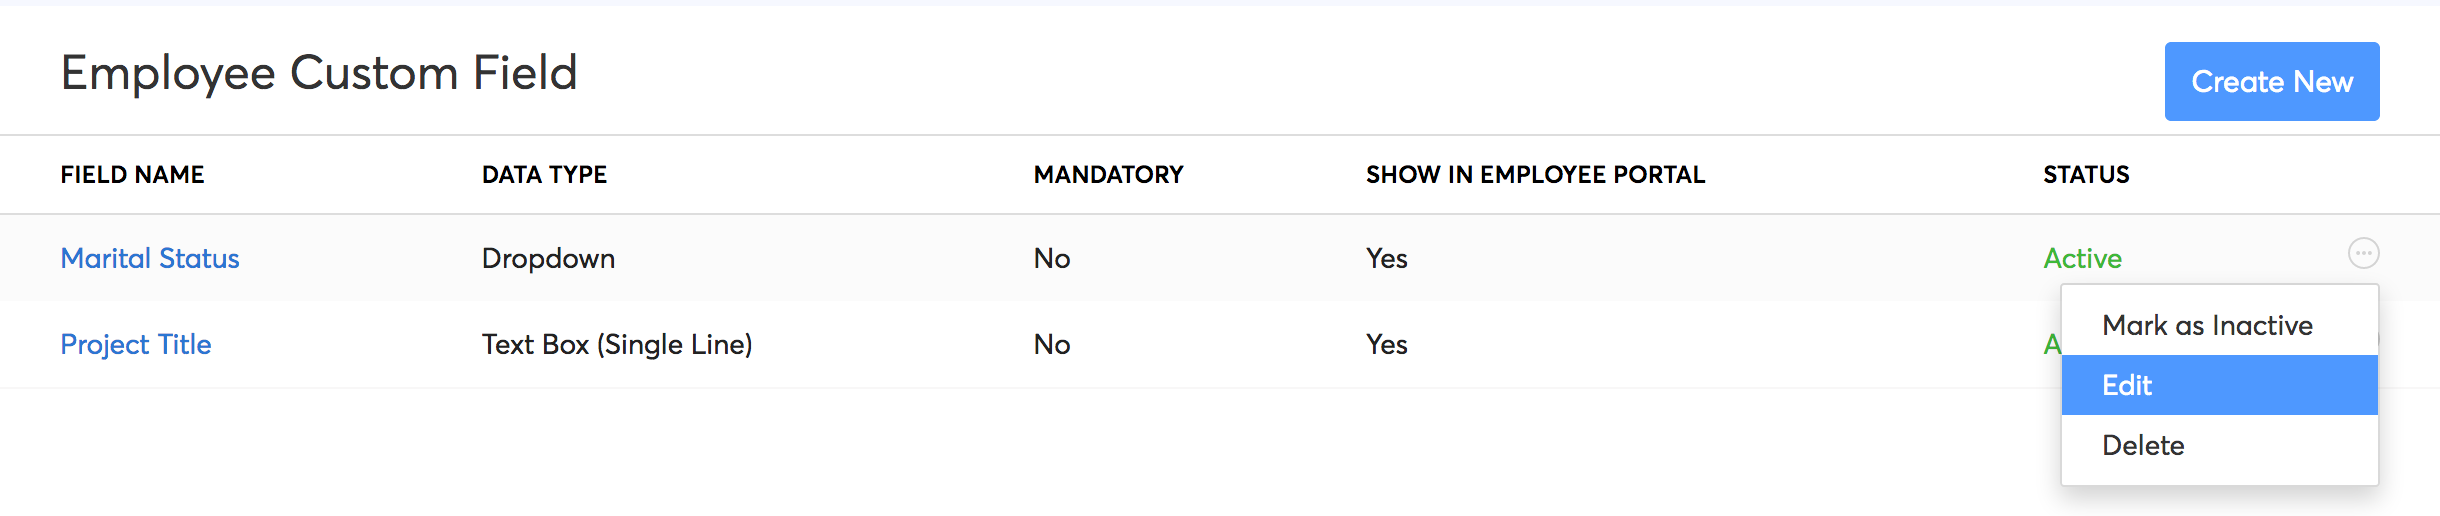
Make a Custom Field as Inactive
To temporarily mark a custom field as inactive:
- Go to Settings > Preferences > Employee Custom Field.
- Click the More icon next to the field name and select Mark as Inactive.
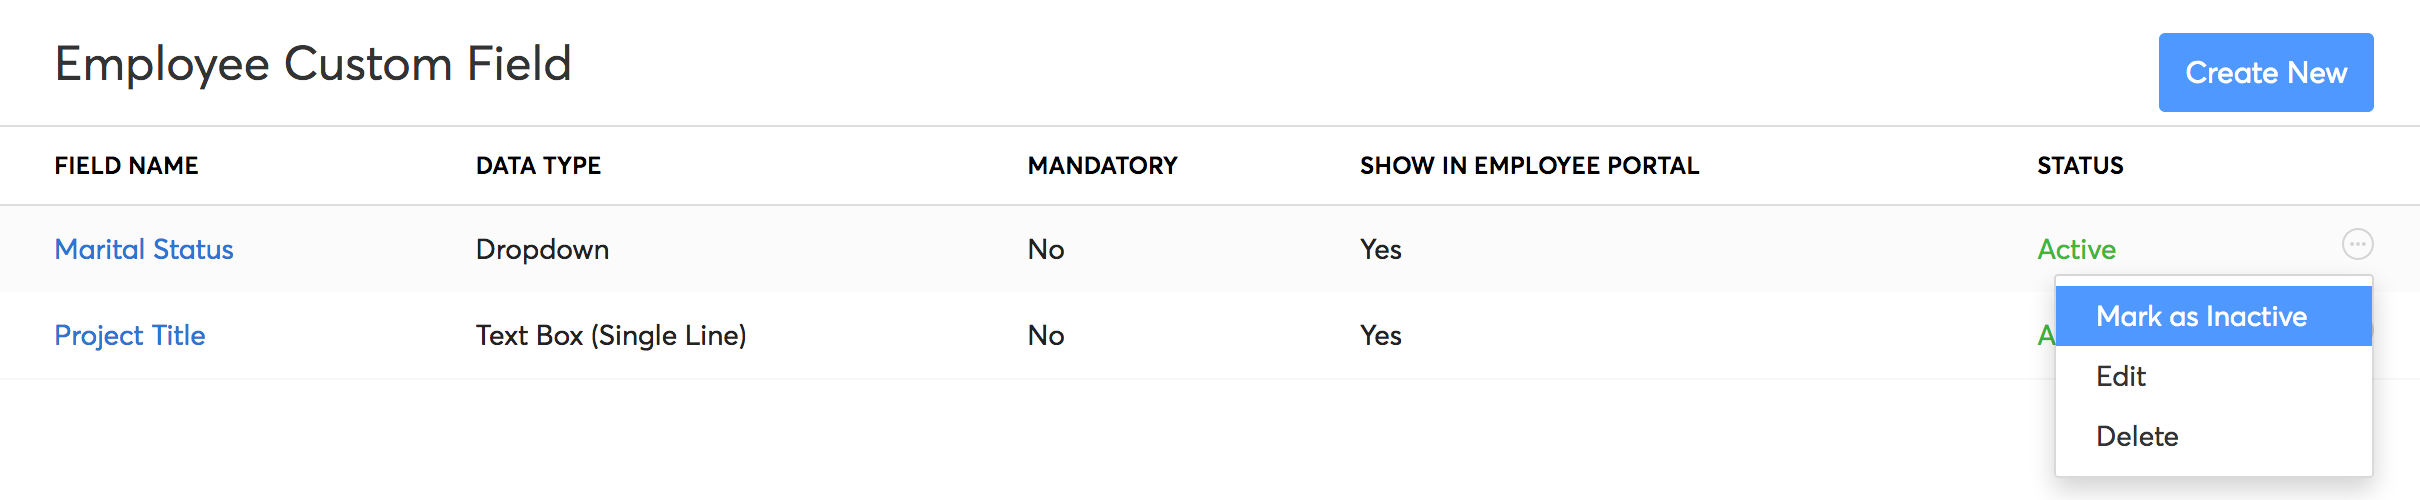
To enable it again, click the More icon and select Mark as Active.
Delete a Custom Field
You can delete a custom field if there is no employee data associated with that custom field. To delete a custom field:
- Go to Settings > Preferences > Employee Custom Field.
- Click the More icon next to the field name and select Delete.
- In the pop-up that opens, select Yes to confirm.
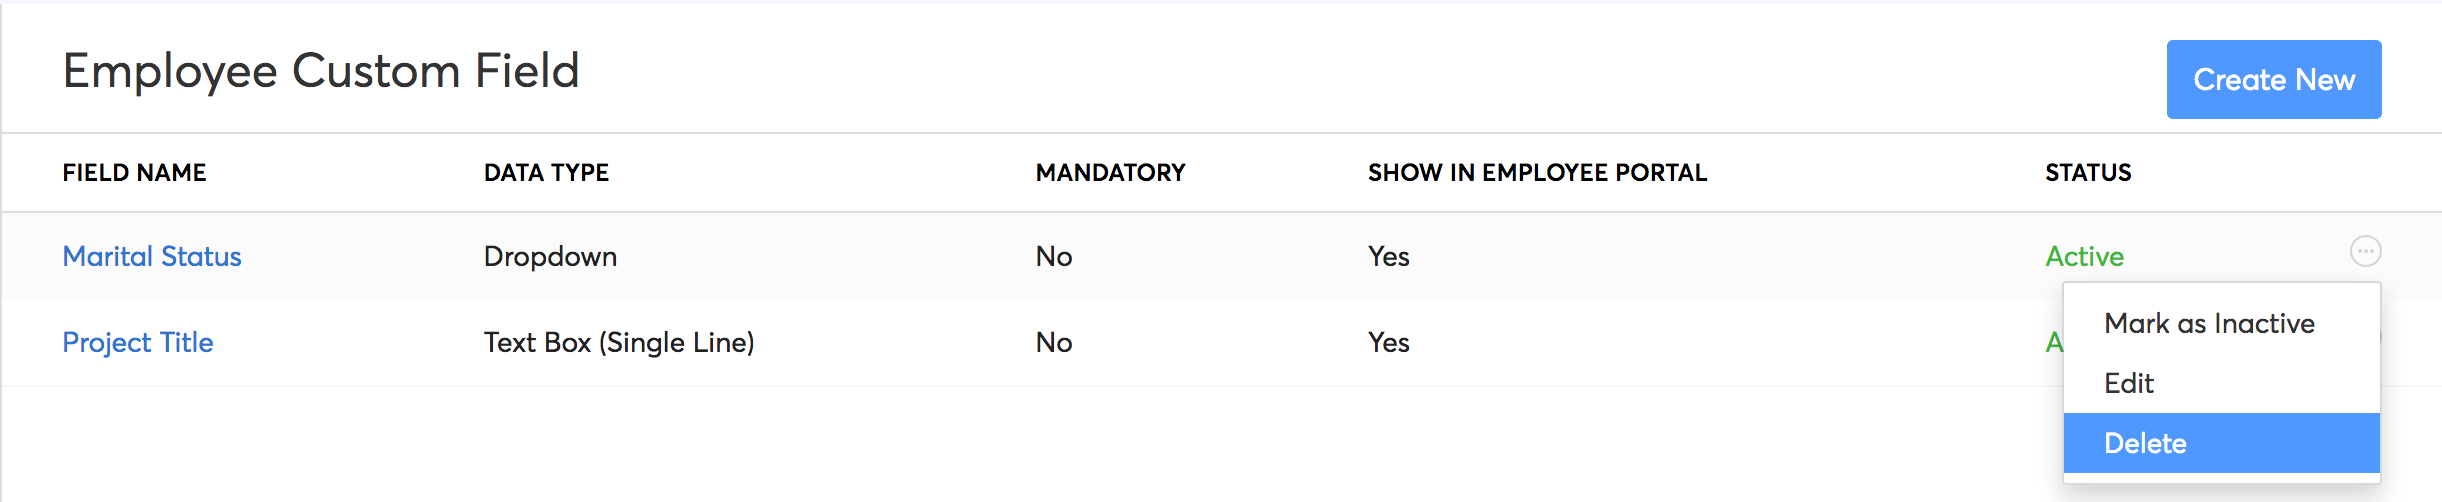
The custom field will be deleted.
Sender Email Preferences
You can configure the email addresses that are used in the From field of emails sent from Zoho Payroll. However, these emails can sometimes land in your recipient’s spam folder, causing them to go unnoticed. This happens when the email address in the From field of an email belongs to a domain that does not have SPF and DKIM records.
What are SPF and DKIM records?
By adding an SPF (Sender Policy Framework) record to your domain, your recipient’s mail server will be able to verify that Zoho Payroll is sending emails using your email address with your domain’s permission. Without the SPF record, the emails that Zoho Payroll sends on behalf of your domain will mostly end up in your recipient’s spam folder.
DKIM (Domain Keys Identified Mail) is also used for preventing spam and allows the recipient email server to verify whether an email was sent and authorized by the owner of that domain.
DKIM and SPF records are effective in preventing spam when used together. For this reason, Zoho Payroll will consider a domain as authenticated, only if it has both SPF and DKIM records.
In this section:
- Authenticate Domains
- Other Actions
- Mark Primary Contacts
- Add New Sender Email Addresses
- Resend Verification Emails
- Edit/Delete Email Addresses
Domain Classification
Zoho Payroll has classified domains into 3 categories to help you identify the email addresses, which if used in the From field of emails, could cause emails to go to the spam folder.
To find out which category your email addresses belong to, go to Settings > Preferences > Sender Email Preferences.
The 3 categories that you will find in this page are:
1. Unauthenticated Domains
Email addresses that belong to a domain without SPF and DKIM records will be listed here. If any of these email addresses are selected in the From field of an email sent from Zoho Payroll, the email address in the From field will be replaced automatically with message-service@sender.zohopayroll.com, which is Zoho Payroll’s own email address. This is done to prevent the email you send from landing in the Spam folder.
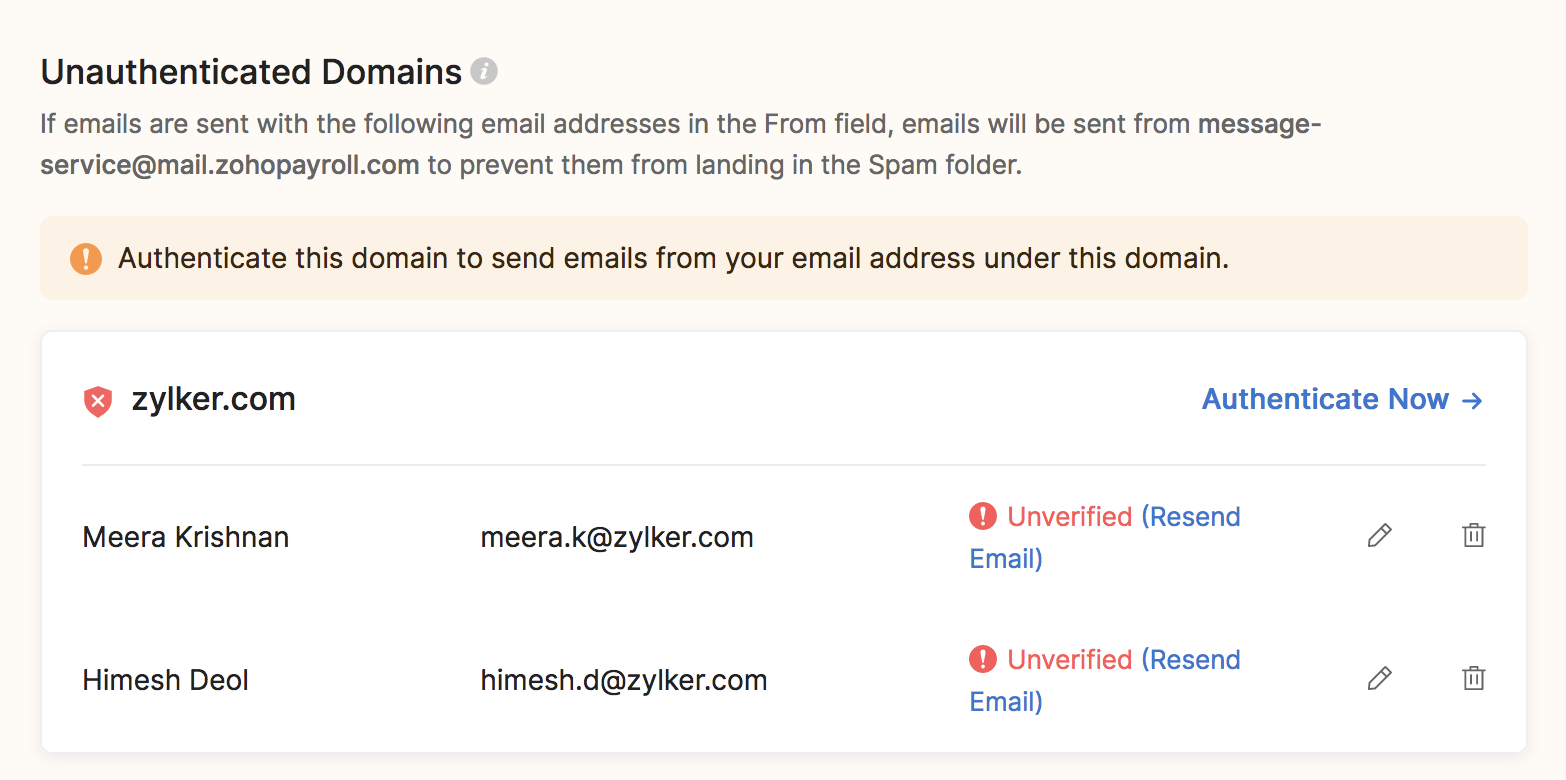
It’s important to note that the message-service@sender.zohopayroll.com address will only be used in the From address for emails and not the Reply-To address. i.e, your customers will still be able to see your name in their inbox and when they reply, their email will be delivered to your own email inbox.
To use the email addresses under this category in the From field, you must authenticate their domains.
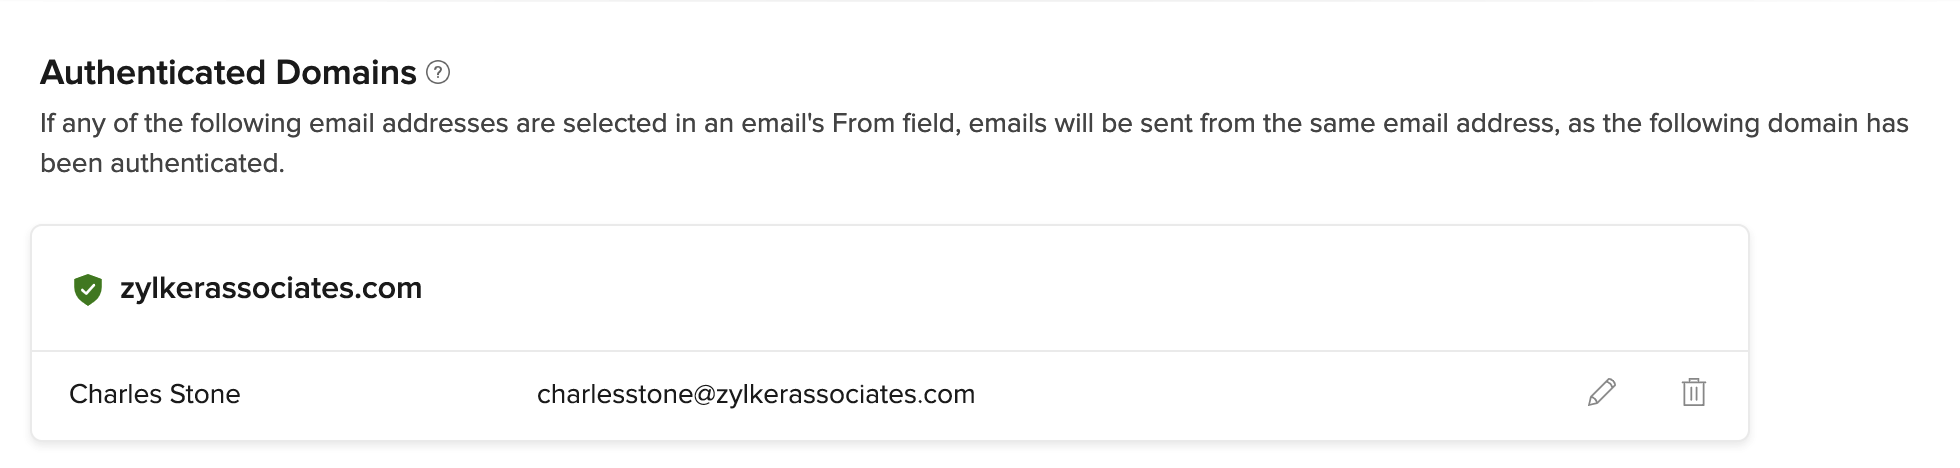
2. Authenticated Domains
Email addresses that belong to a domain with both SPF and DKIM records will be listed here. These email addresses can be used in the From field of emails sent from Zoho Payroll without having to worry about them ending up as spam.
3. Public Domains
If you use an email address that belongs to a public domain, such as Gmail or Yahoo Mail in the From address of emails sent from Zoho payroll, it will be replaced with message-service@sender.zohopayroll.com. This is because SPF and DKIM records cannot be added for public domains and can only be added for domains that you own.
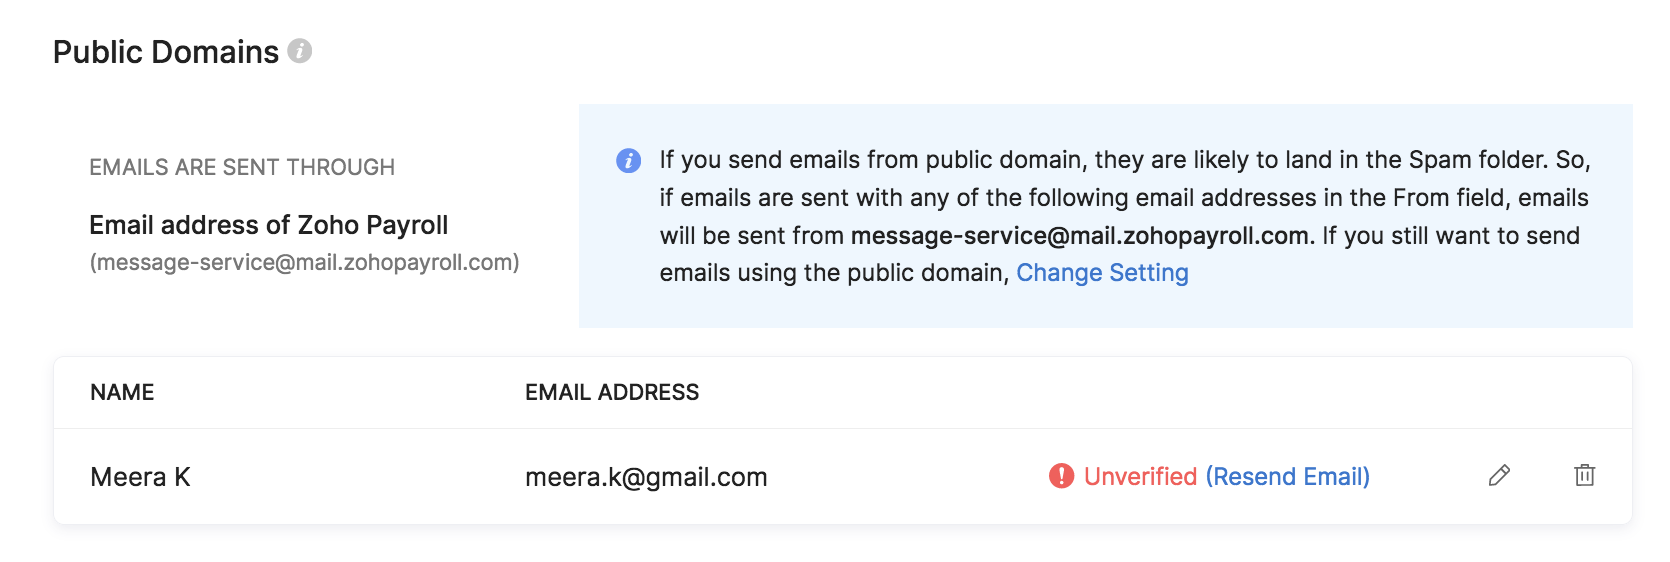
If you still wish to use emails listed in this category in the From address, you can do so by clicking Change Setting. Next, select Sender’s email address in the pop-up that follows and click Save.
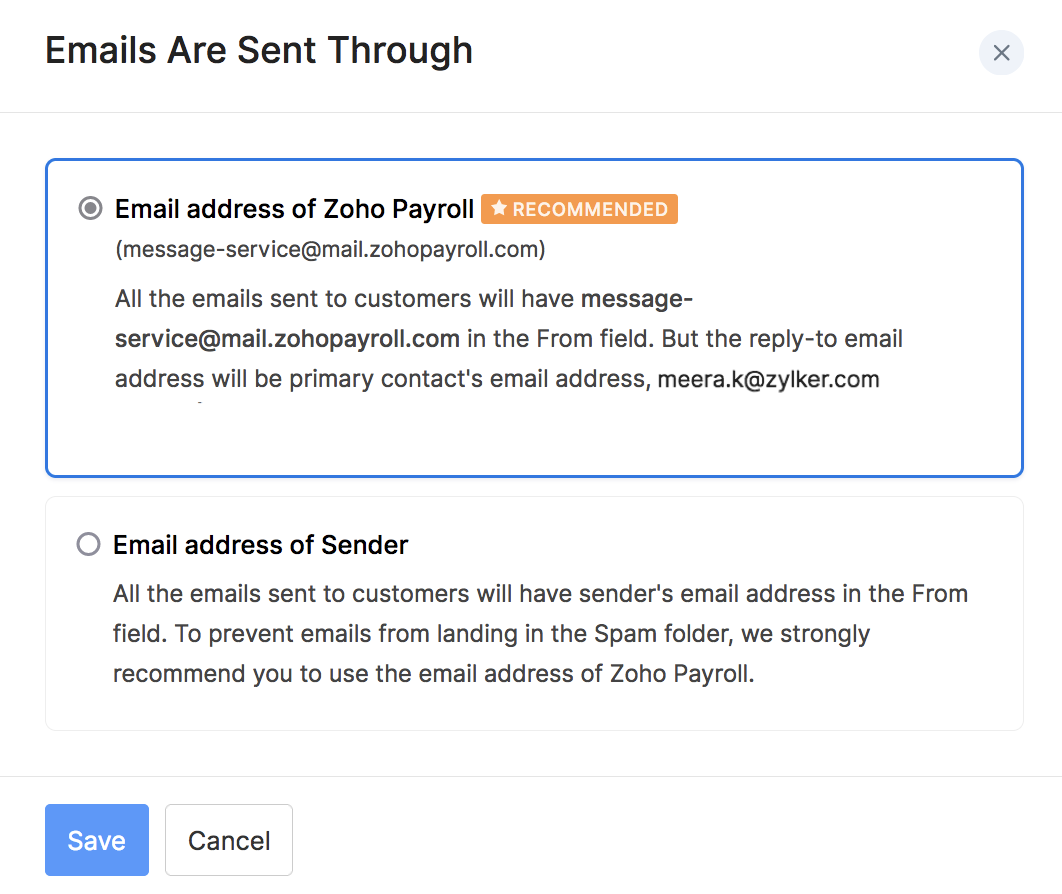
Now, email addresses from public domains will not be replaced with message-service@sender.zohopayroll.com.
Warning: We strongly recommend that you use message-service@sender.zohopayroll.com instead of email addresses from a public domain to prevent your emails from ending up in the Spam folder.
Authenticate Domains
Emails listed under the Unauthenticated Domains section can be authenticated by adding SPF and DKIM records for their domains.
To do this:
- Go to Settings > Preferences > Sender Email Preferences.

- Click Authenticate Now → next to the domain that you want to authenticate.
Now, copy the SPF record from the pop-up that follows, and add it to your domain name provider’s (e.g. Daddy) DNS settings.
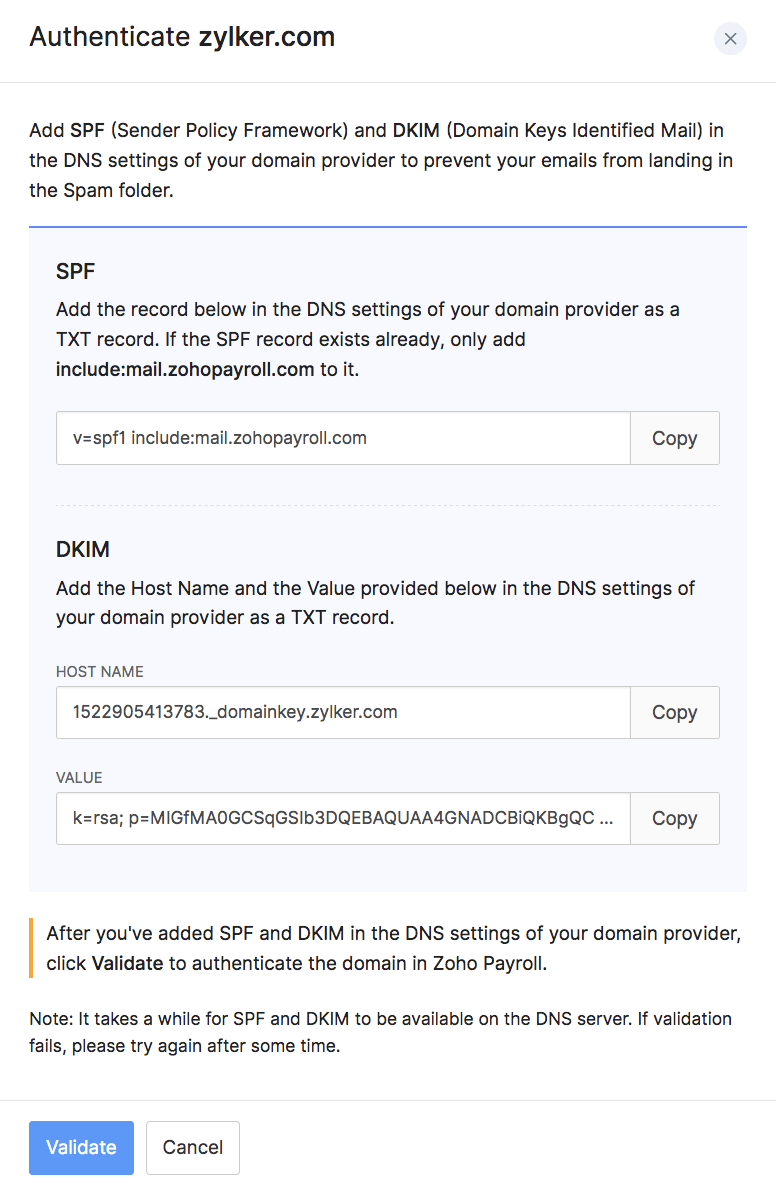
Next, copy the Host Name and Value for the DKIM record and add it to the DNS settings of your domain name provider.
Once you’ve added both the SPF and DKIM records, click Validate.
Insight: It will take a while for your newly added records to reflect on the DNS server. If your validation fails, wait for a while and try again. Also, you can continue to use Zoho Payroll while the records are being validated.
A few points to note about adding SPF and DKIM records:
- If an SPF record already exists for your domain, i.e, you’ve added an SPF record for a different service in the past, you must remove v=spf1 from the SPF record before adding it to your domain.
- If you use GoDaddy as your domain name provider, the Host Name for the DKIM record will have to be slightly modified. You will have to remove your domain name alone from the record, before adding it. For example, if the Host Name is 1522406527365._domainkey.patricia.com, you will have to remove your domain name from it and add 1522406527365._domainkey alone.
Now, your domain has been authenticated and it will be listed under the Authenticated Domains category. The emails from this domain can be used in the From address, without having it replaced or worrying about it landing in spam.
Other Actions
You can perform a few other actions from the Sender Email Preferences page.
Mark Primary Contacts
A primary contact is an email address that will be used as the point of contact between your Zoho Payroll’s organisation and Zoho. Updates regarding your Zoho Payroll’s organisation, such as subscription renewals and usage related emails will be sent to this email address.
Also, this email address will be used as default in the From address of emails sent from Zoho Payroll, unless you change it manually while sending an email.
To mark a contact as primary, hover over an email address and click Mark as Primary Contact.

Add New Sender Email Addresses
You will be able to add new sender email addresses and select them when you send emails from Zoho Payroll. To do this:
- Go to Settings > Preferences > Sender Email Preferences.
- Click Add Sender on the top right.

- Add a Name and Email Address.
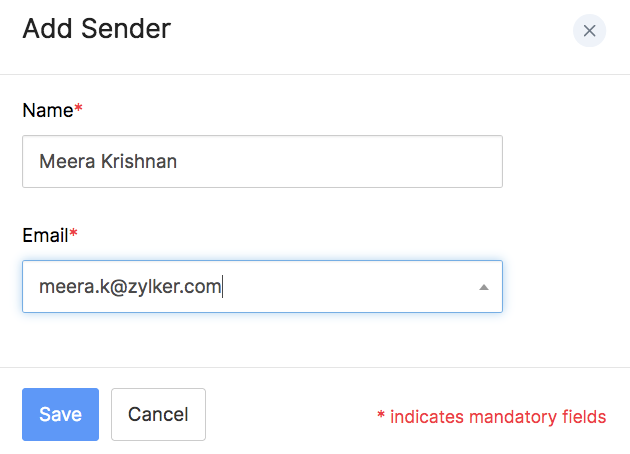
- Click Save.
Now, a verification email will be sent to the email address that you added. Once the email address has been verified, you will be able to use it in the From field of emails sent from Zoho Payroll.
Insight: Adding an email address this way will only enable the email address to be used for sending emails from Zoho Payroll and is not to be confused with adding users to your organisation.
Resend Verification Emails
As mentioned in the previous section, when you add a new sender email address, a verification email will be sent to that email address. However, if the email was not received, you can resend the verification email. Here’s how:
- Go to Settings > Preferences > Sender Email Preferences.
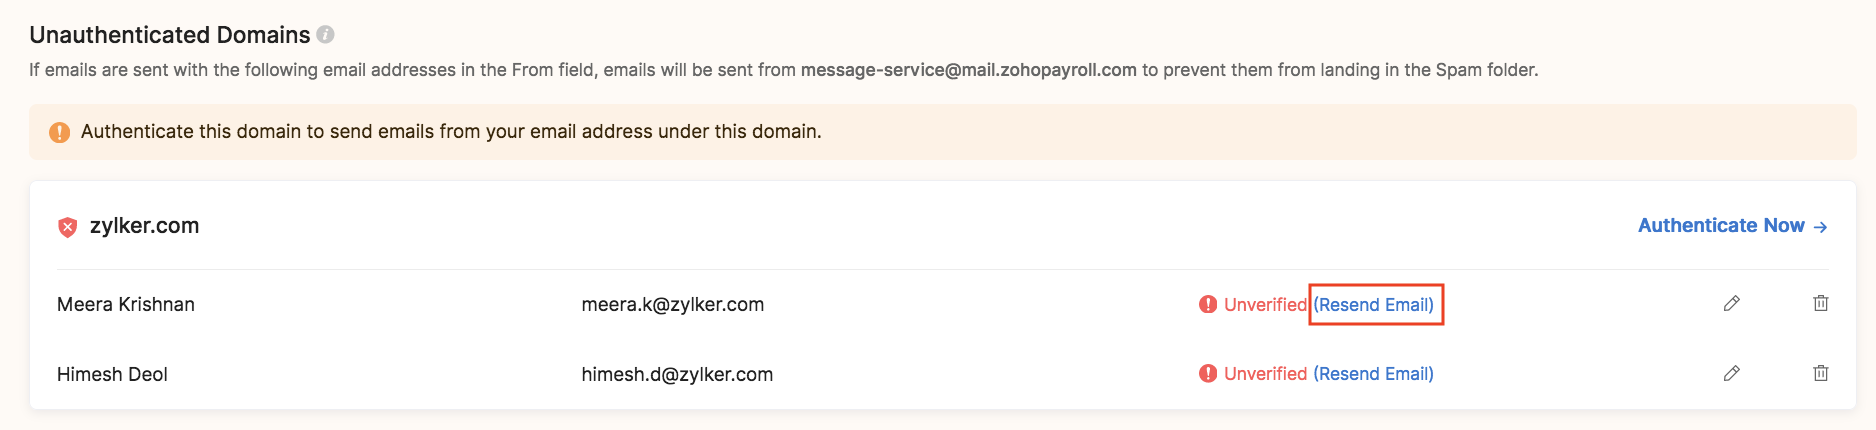
- Click Resend Email next to an email address that has not been verified yet.
The verification email will be sent again.
Edit/Delete Email Addresses
You can choose to edit or delete your users’ email addresses from Zoho Payroll by clicking the Pencil or Trash icon, respectively, which can be found on the right side of an email address.

Once you delete an email address,it will be removed from the organisation and emails will no longer be sent from that address. However, you can add it again, if necessary.