- HOME
- Create an inventory management tracker spreadsheet
Create an inventory management tracker spreadsheet
- Last Updated : June 12, 2026
- 1.1K Views
- 4 Min Read
As a business owner, whether it's in retail or ecommerce, you need to manage supplies, keep track of transactions, and organize your store. So, staying on top of your inventory is essential. While there are plenty of specialized inventory management tools out there, sometimes the simplest solution is also the most effective—a spreadsheet.
Spreadsheets offer a flexible, customizable, and cost-effective way to create an inventory tracker tailored to your specific needs. With just a bit of planning and some basic spreadsheet skills, you can build a powerful tool that keeps your stock levels accurate, your operations efficient, and your records up to date.
In this blog, we'll walk you through the steps to create an inventory tracker using Zoho Sheet—no advanced formulas or coding required. By the end, you'll have a functional system that can grow with your inventory and help you save time and money.
Download the inventory tracker spreadsheet, which includes all the formulas and formatting, for a hands-on experience.
Overview
This inventory tracker in Zoho Sheet is designed to streamline and manage stock effectively across four interconnected sheets. Each sheet plays a specific role—from recording transactions to summarizing stock levels and providing actionable insights. This ensures accurate, up-to-date inventory control and smarter decision-making.
- Product Master – This sheet provides a centralized list of all inventory items to ensure consistency and provide an easy point of reference.
- Input Sheet – Built to record daily purchase and sales transactions, this is the active data source that drives inventory updates.
- Summary – Designed to give a real-time holistic view of inventory status for the current date, the summary tab helps monitor stock levels and manage orders efficiently.
- Dashboard – Created for quick access to critical product information and alerts, the dashboard supports timely decision-making for stock management.
Step-by-step guide to create an inventory tracker in Zoho Sheet
Step 1: Set up your spreadsheet
Open a blank sheet and give it a clear name like Inventory Tracker.
Step 2: Create the master sheet
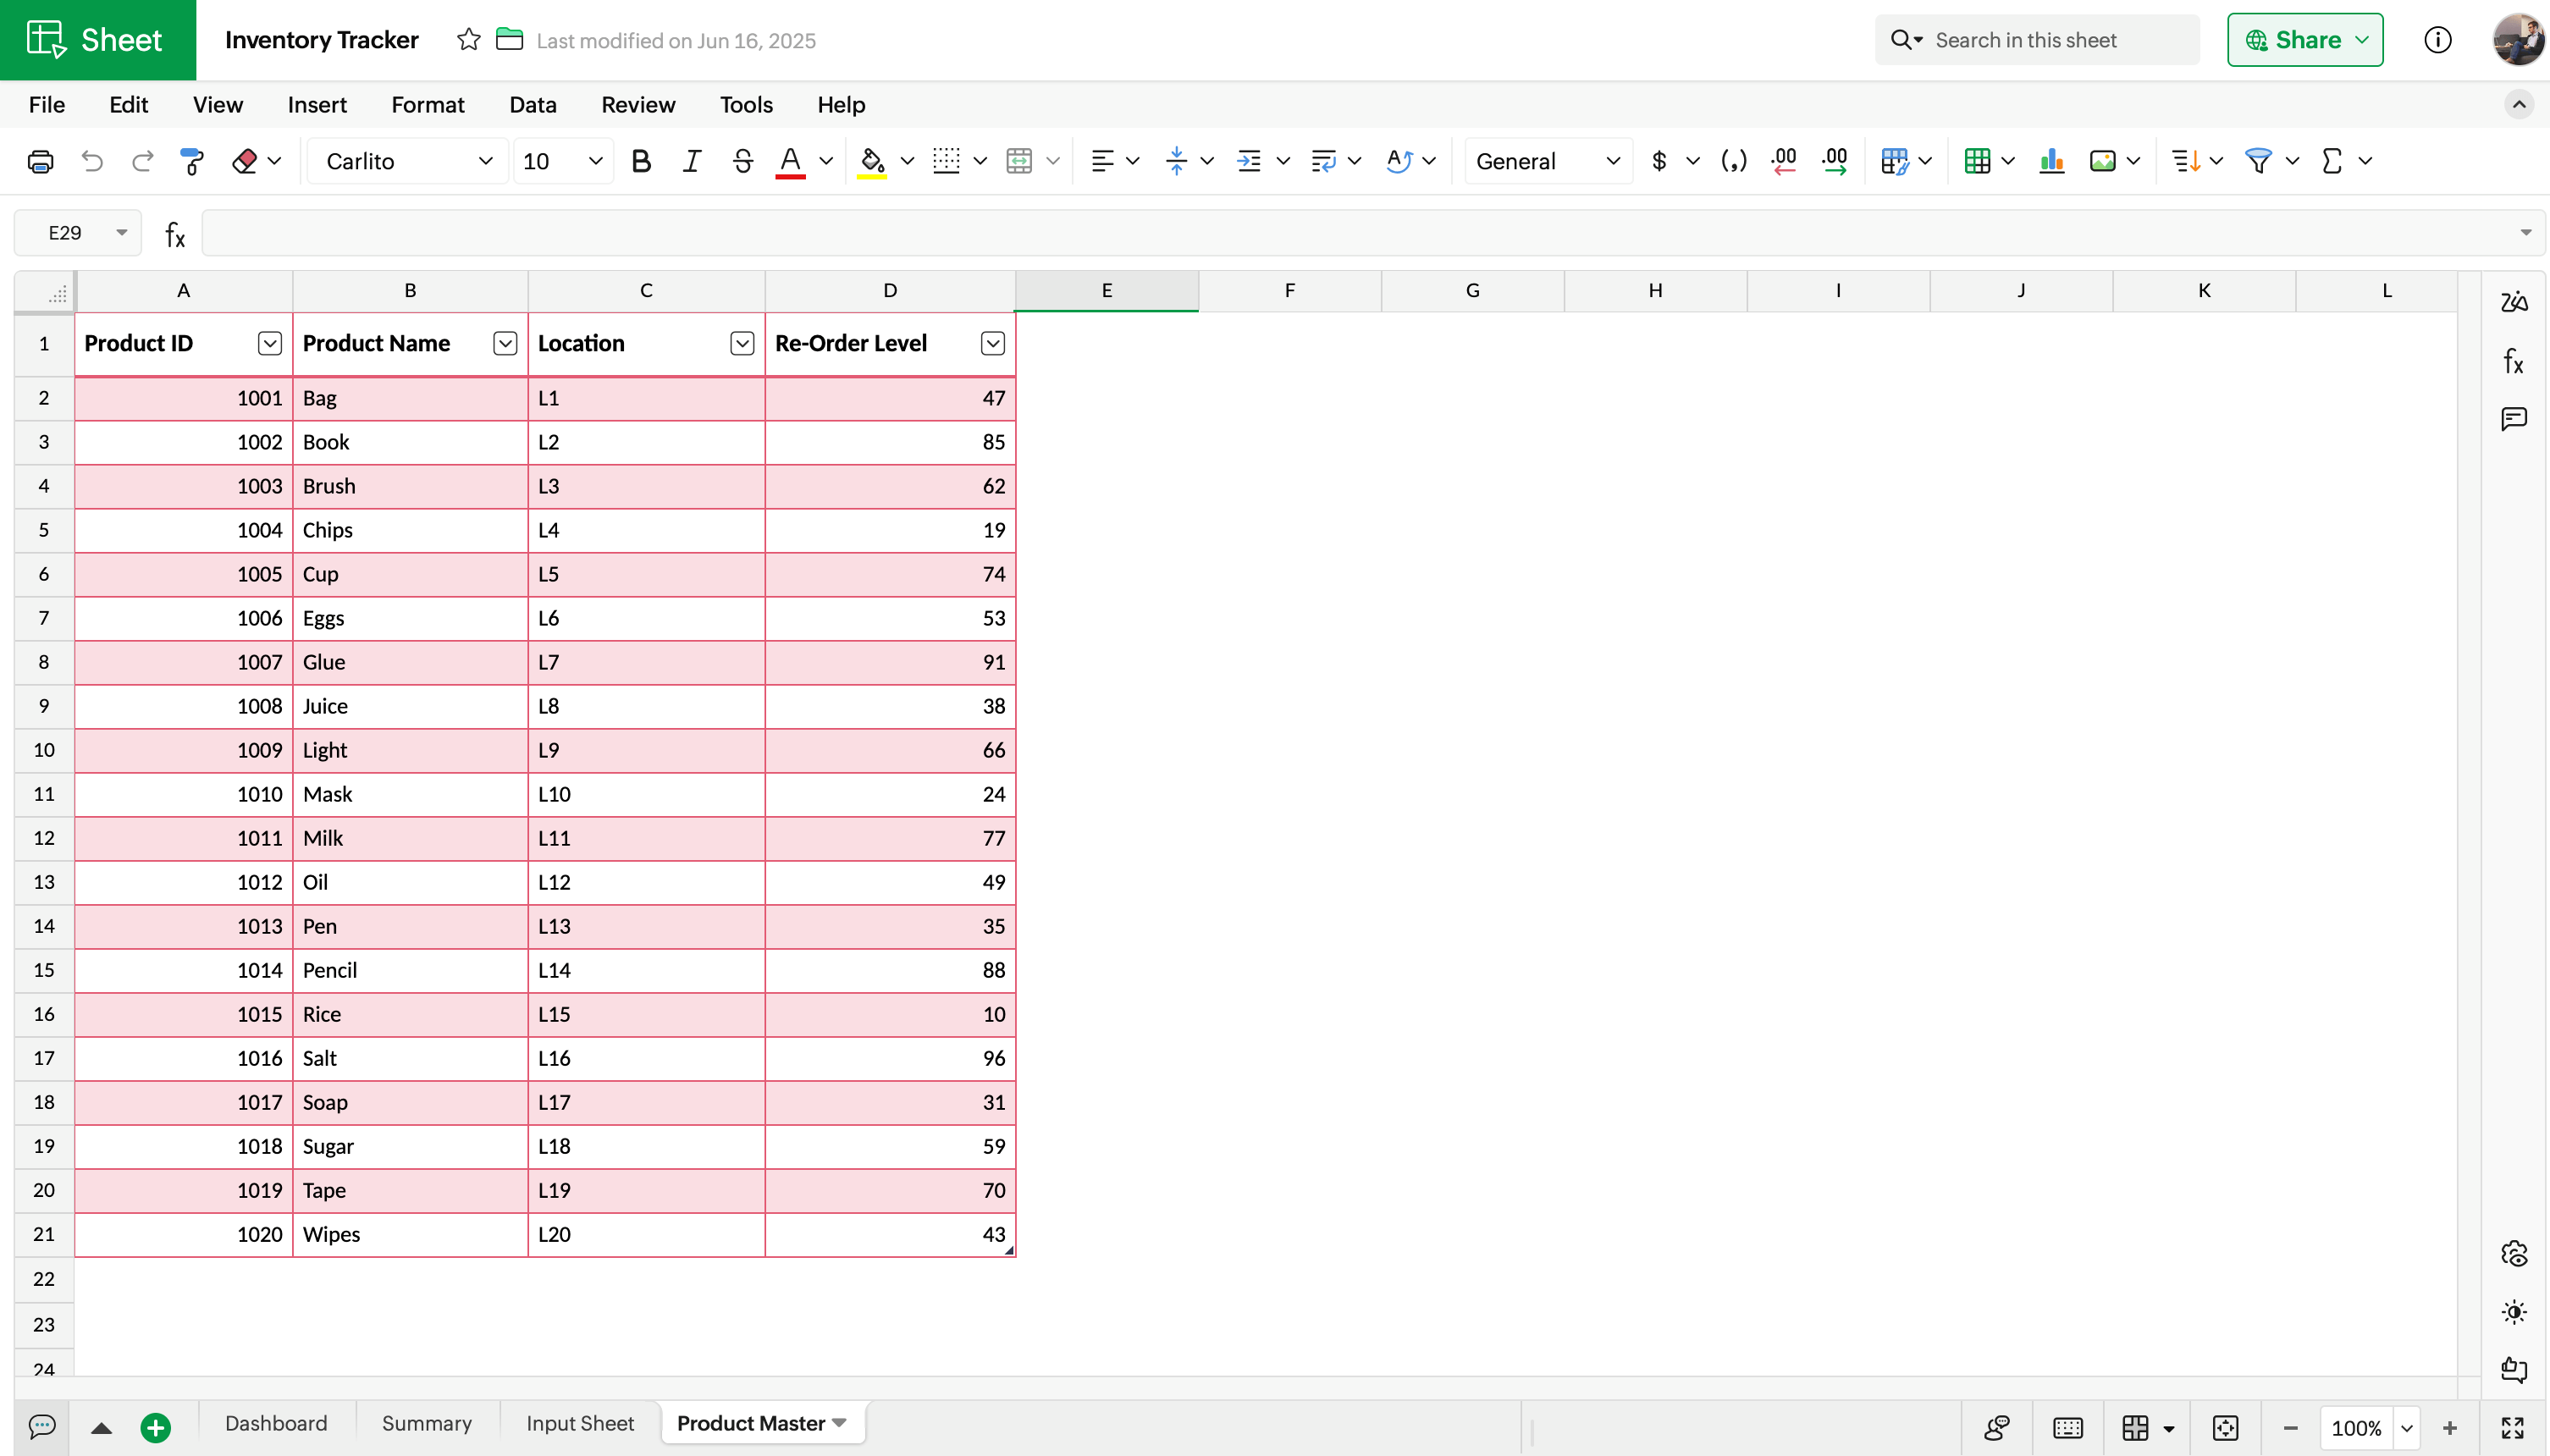
Create a Product Master sheet where you enter the details about all your inventory items manually.
Go to Format > Table, select a layout, and enter the following column headers:
Product ID: A unique numeric code for your products.
Product Name: The different products you sell.
Location: The place where the product is located in the warehouse.
Re-Order Level: The minimum quantity that needs to be available for every product.
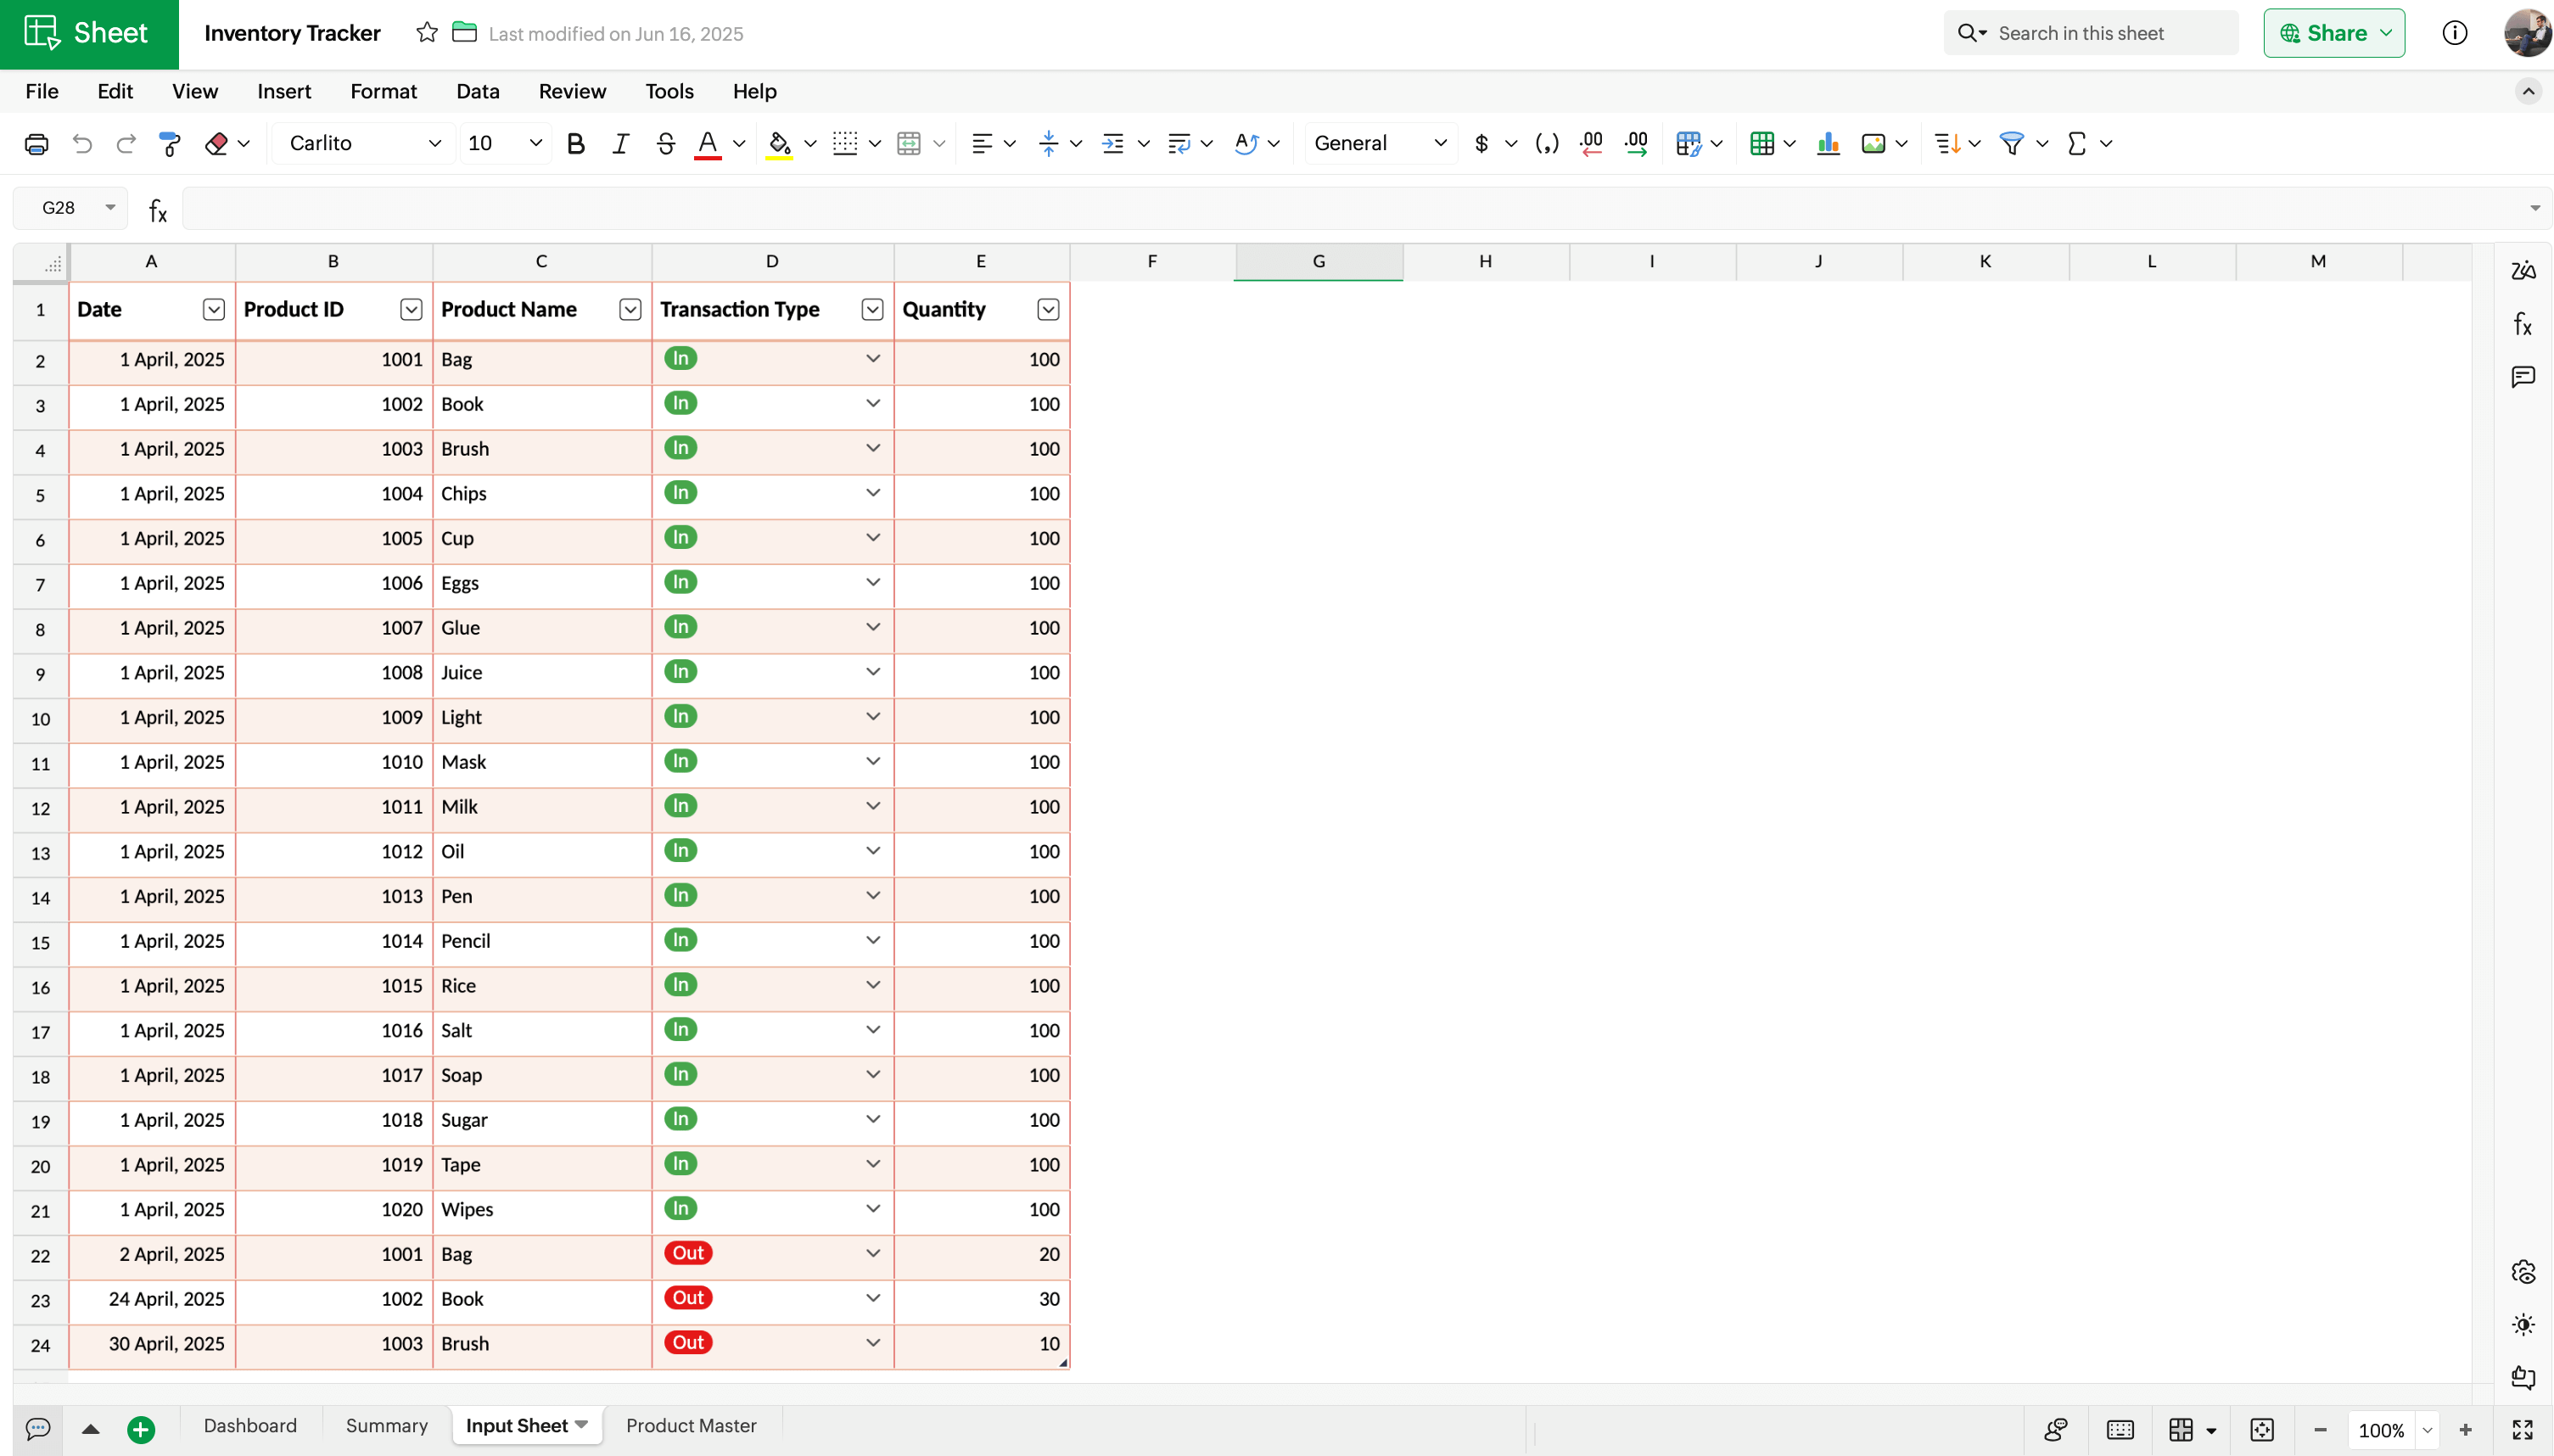
Step 3: Create the input sheet
This is where you keep track of the buying and selling of all your items on a day-to-day basis.
Go to Format > Table, select a layout, and enter the following column headers:
Date: The date of the transaction done for any product.
Product ID: The unique ID of your products, which can be entered manually.
Product Name: The different products you sell which can be populated from the Product Master sheet using this formula: =IFERROR(VLOOKUP([@Product ID];'Product Master'.A:B;2;0);"")
Transaction Type: Create a picklist by navigating to Insert > Picklist. Enter the values as "In" and "Out" and apply desired colours. The value "In" means you're purchasing the particular product, and "Out" means selling the product.
Quantity: The quantity of each product that was bought or sold.
So, at the beginning of the month, let's assume that you're purchasing 100 units of each product to stock up your inventory. When there is a transaction happening for any product, you can add them row-by-row on a daily basis.
Step 4: Create the summary sheet
This is where you get the complete picture of your stock for the current day.
Go to Format > Table and select a layout and enter the following column headers.
Product ID: Use the Unique function to autopopulate the product IDs =UNIQUE(Table1[Product ID])
Product Name: Use the formula =IFERROR(VLOOKUP(A4;'Product Master'.A:B;2;0);"")
Opening Balance: The number of units of each product you had on hand at the start of the period. Use the formula: =SUMIFS('Input Sheet'.$E:$E;'Input Sheet'.$D:$D;"In";'Input Sheet'.$B:$B;$A4;'Input Sheet'.$A:$A;"<"&$H$1)-SUMIFS('Input Sheet'.$E:$E;'Input Sheet'.$D:$D;"Out";'Input Sheet'.$B:$B;$A4;'Input Sheet'.$A:$A;"<"&$H$1)
In: The purchase made for a particular product on the current day.
Out: The sale made for a particular product on the current day.
Closing Balance: The stock available after the transactions made for the day. Use the formula: =C6+D6-E6
Re-Order Level: The minimum quantity that needs to be available for each product.
Re-Order Required: The value will be "Yes" if the closing balance is less than the re-order level. Use the formula: =IF(F4<=G4;"Yes";"No")
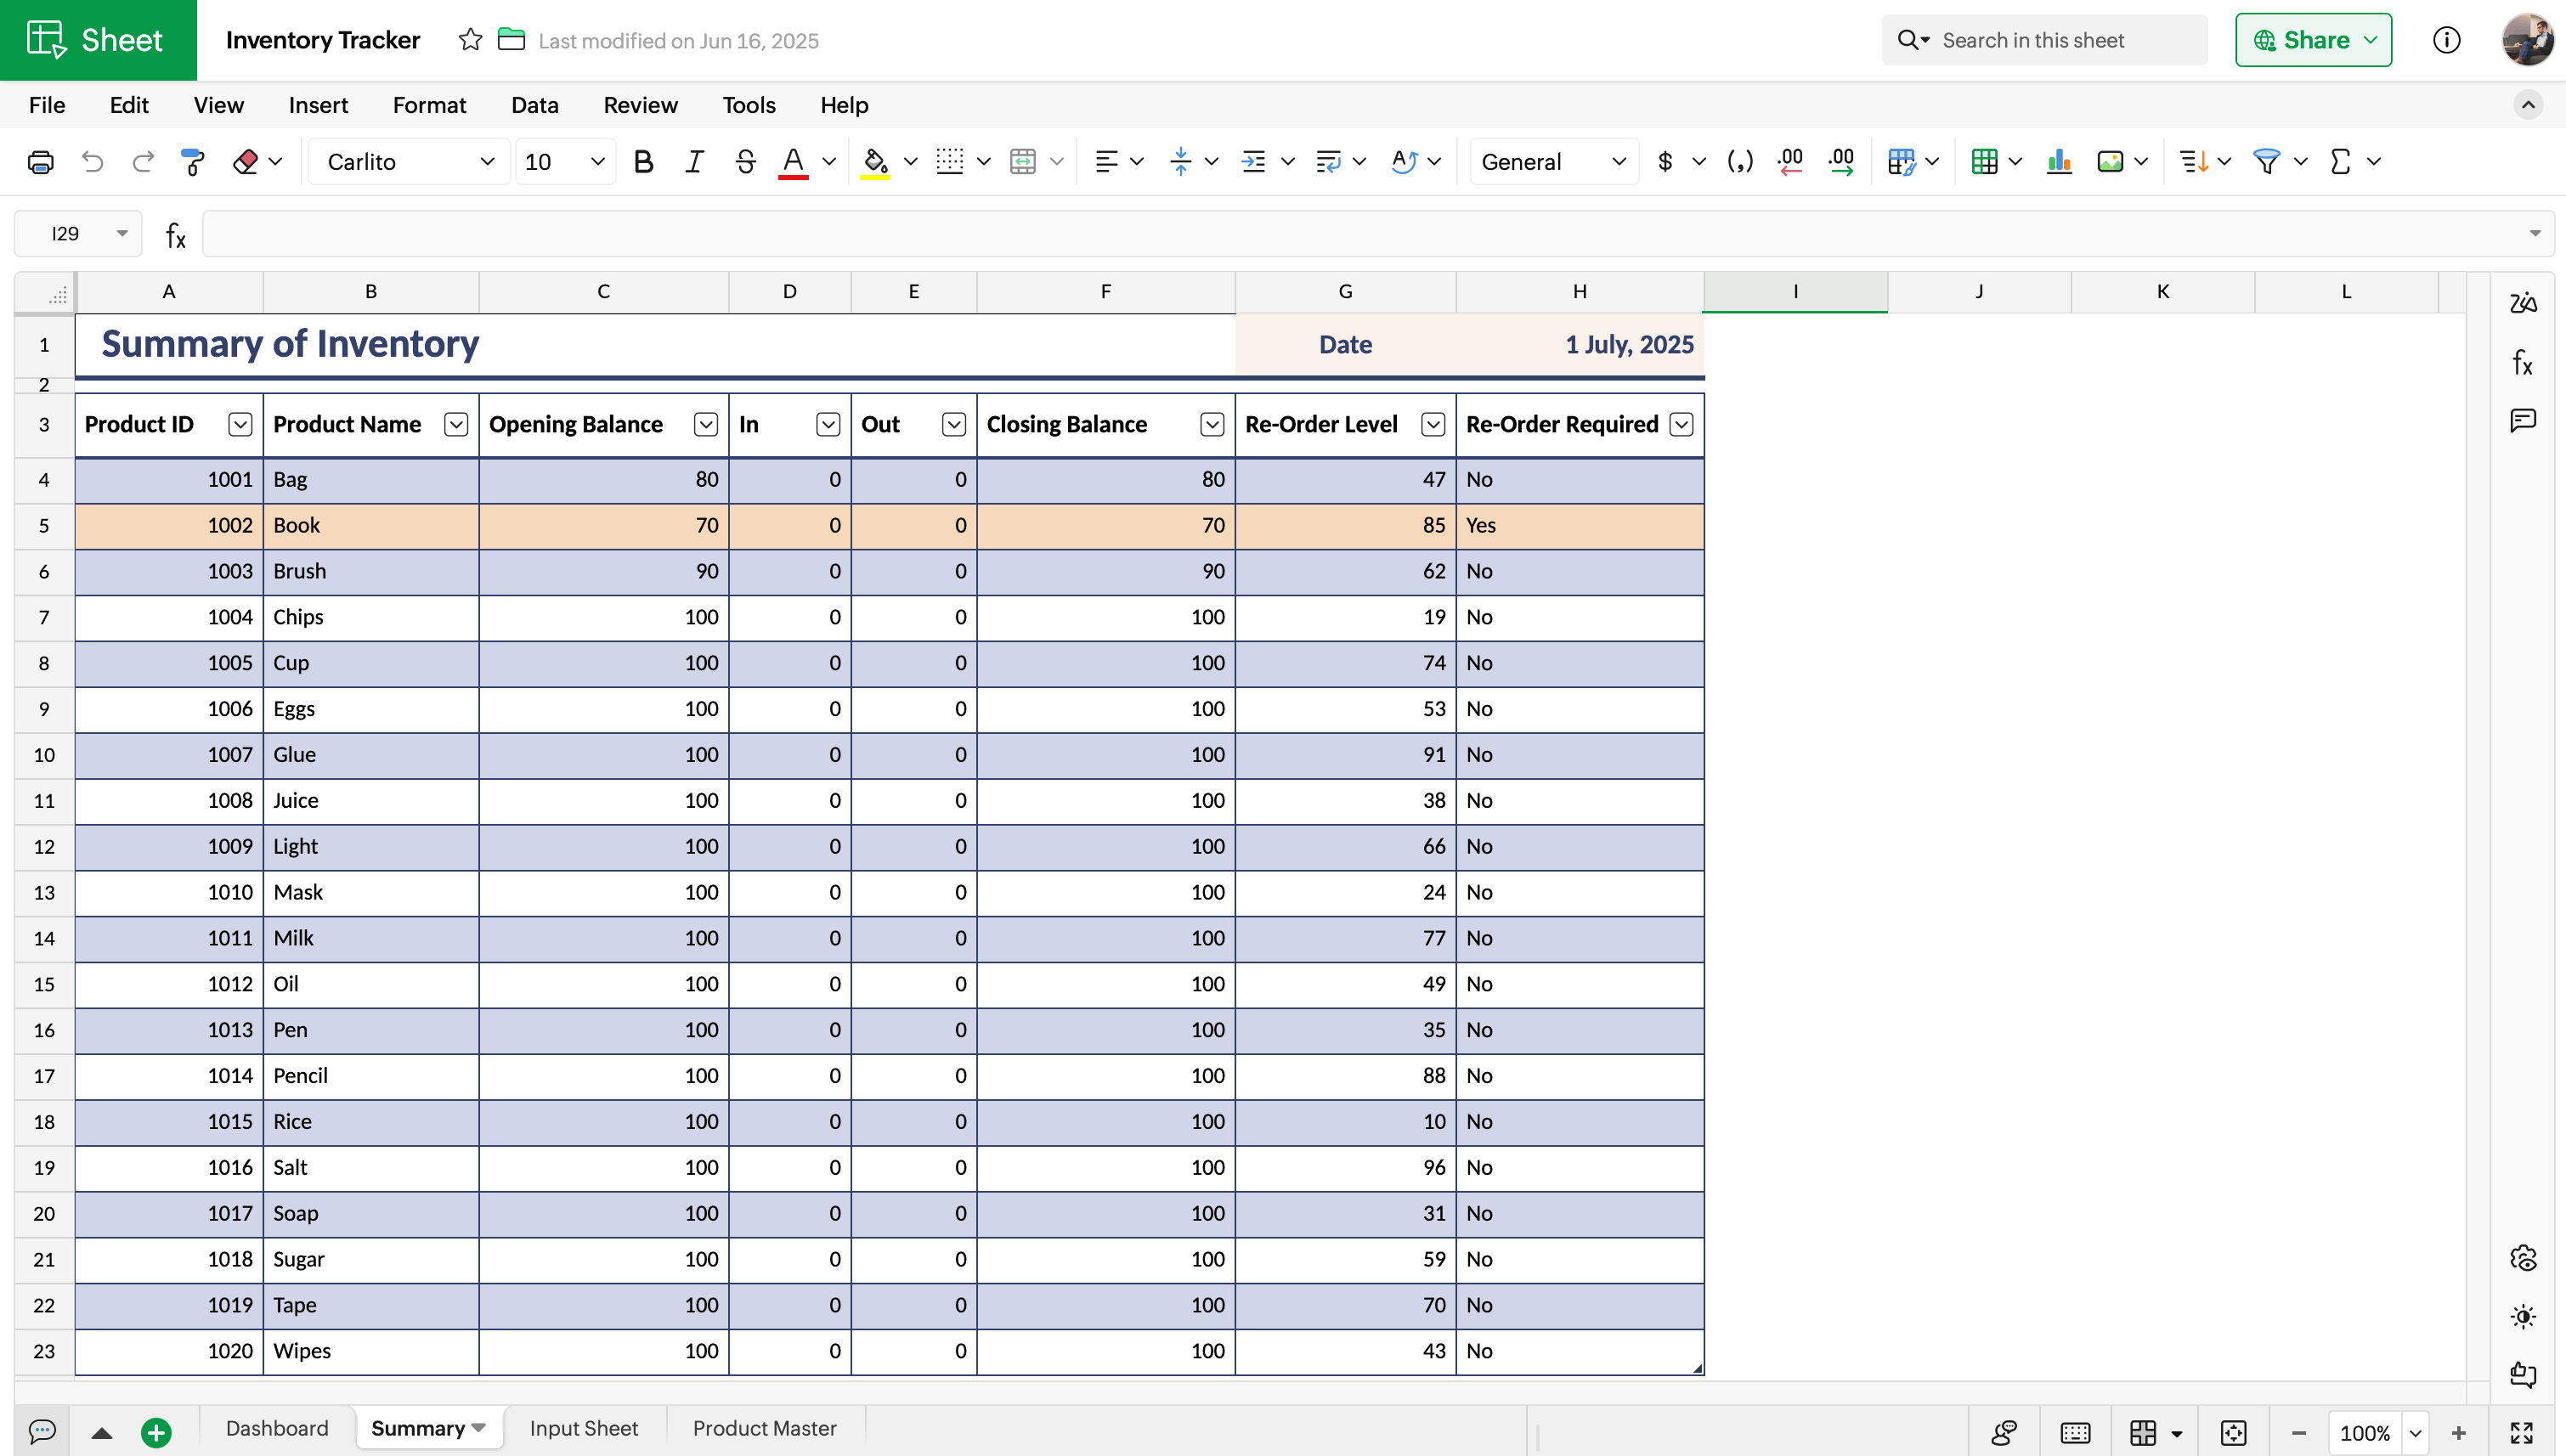
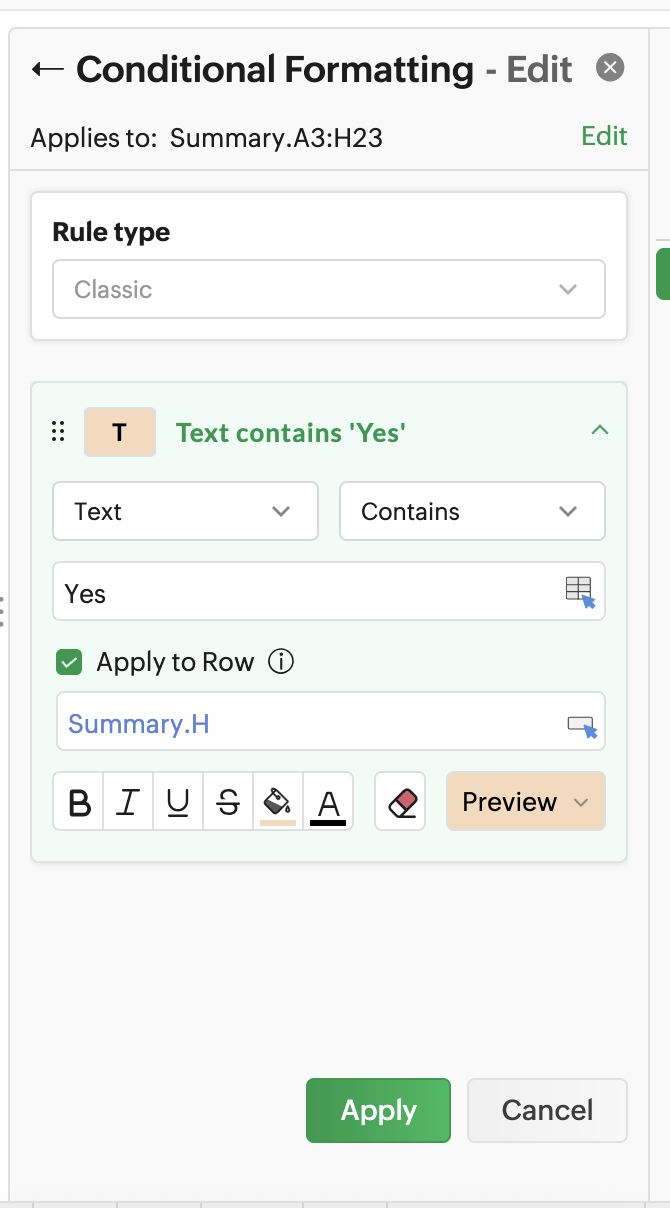
Use conditional formatting to highlight the products that require restocking. To apply conditional formatting, select the cell range and go to Format > Conditional Formatting > Classic > Contains.
In the dialog box that appears, choose Text and enter "Yes" as the value. Select the desired formatting style and check the "Apply to Row" option. This will highlight the entire row when the criteria is met.
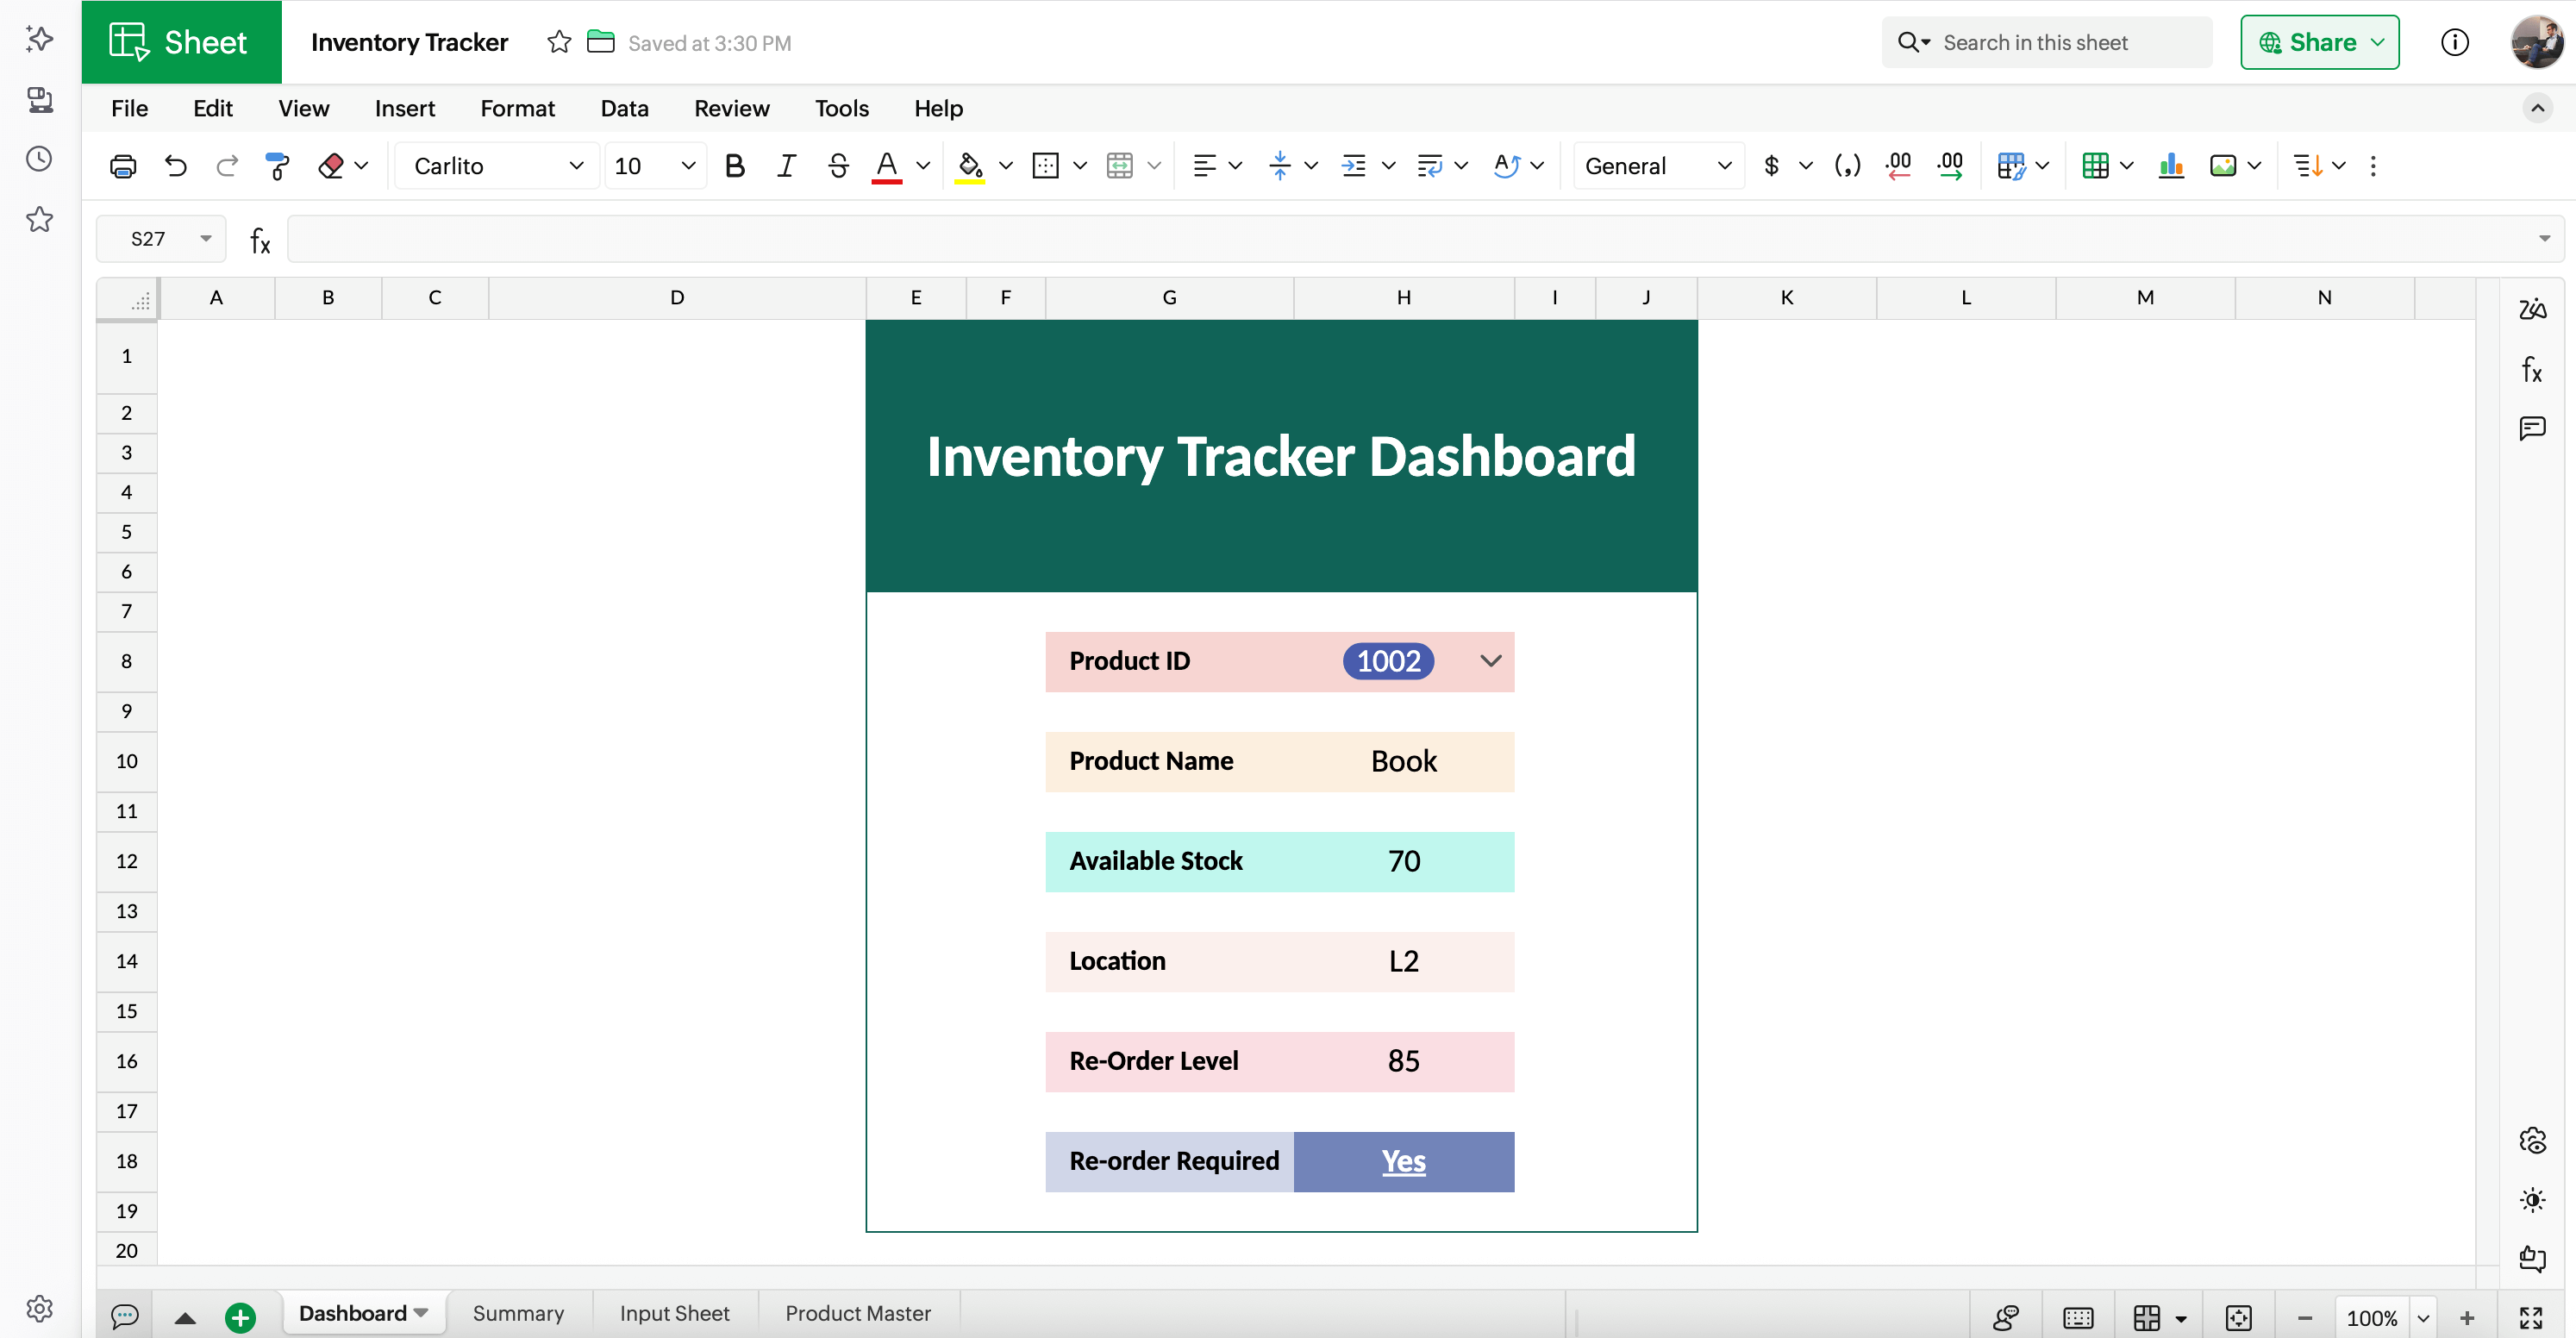
Step 5: Create the dashboard
Here, you’ll keep all the important information on your products, which includes the re-order level reminder. This dashboard is built mainly using the VLOOKUP formula.
Enter the following column headers:
Product ID: Go to Insert > Picklist and select Type as Cell Range and select the range of the product ID by navigating to Product Master Sheet. It will be 'Product Master'.A2:A21
Product Name: Use the formula =IFERROR(VLOOKUP(H8;'Product Master'.A:B;2;0);"")
Available stock: Use the formula =IFERROR(VLOOKUP(H8;Summary.A:H;6;0);"")
Location: Use the formula =IFERROR(VLOOKUP(H8;'Product Master'.A:D;3;0);"")
Re-Order Level: Use the formula =IFERROR(VLOOKUP(H8;Summary.A:H;7;0);"")
Re-Order Required: Use the formula =IFERROR(VLOOKUP(H8;Summary.A:H;8;0);"") . Apply conditional formatting to highlight the cell when the value is "Yes"
Conclusion
This inventory tracker built in Zoho Sheet offers a simple yet powerful solution for managing stock efficiently. With dedicated sheets for product data, daily transactions, real-time summaries, and a centralized dashboard, it provides a clear overview and actionable insights at a glance. This tracker helps you stay organized, avoid stockouts, and make informed inventory decisions with ease.
Download the template and try it now!
This template was built in collaboration with our in-house spreadsheet expert Ganesh Ramsakthi to ensure it’s accurate and easy for you to use.
 Srinalini M
Most businesses are one good spreadsheet away from getting clarity on their numbers. I craft stories and messages that help them get there. My approach combines technical research with a problem-solving narrative, ensuring the insights are understood and implemented.