Organization Settings
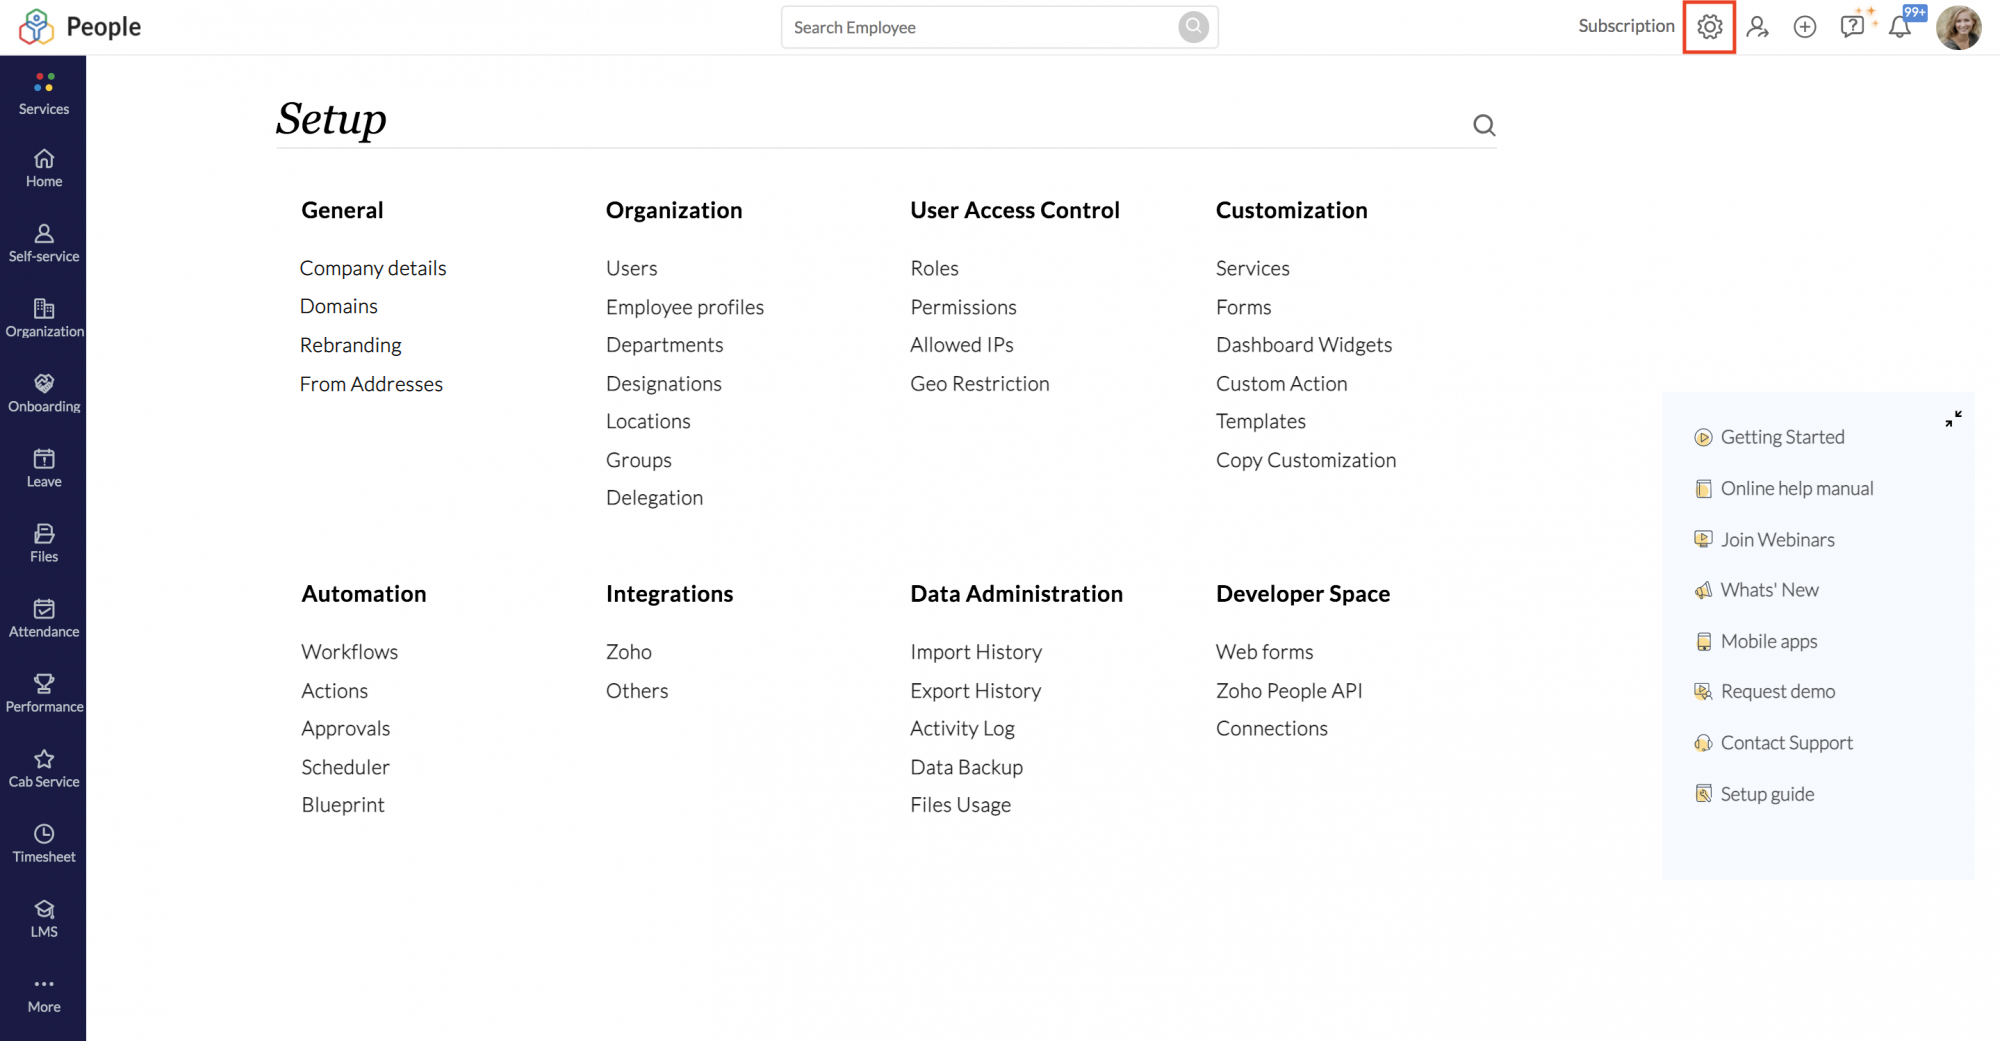
Many aspects of setting up your organization in Zoho People can be accessed by clicking the Settings (gear icon) on the top right corner of your screen:
- Setting up your Organization
- Confirming your account
- Supported Browsers
- Supported Languages
- Adding Users
- Departments
- Designations
- Streams
- Locations
- Groups
- Domain Addition and Verification
- Possible errors while verifying Domain
- Email Authentication
- Rebranding
- Delegation
Setting up your Organization
You can set up the basic details of your organization under Settings(gear icon) > Organization > Company Details.
- From home, go to Settings (gear icon) > Organization > Company Details > Modify Settings
- By default, Zoho People logo will be here. Click Change Logo. You can replace the Zoho People logo with your own custom logo. Your company logo will appear at the top of your Zoho People account. Your logo must be the same size as specified. Create your logo in the 80 * 55 size for the best resolution.
- Click Choose File and select your own custom logo from your computer
- Click Upload logo
- Enter your Organization's contact information such as name, address, contact number and email address.
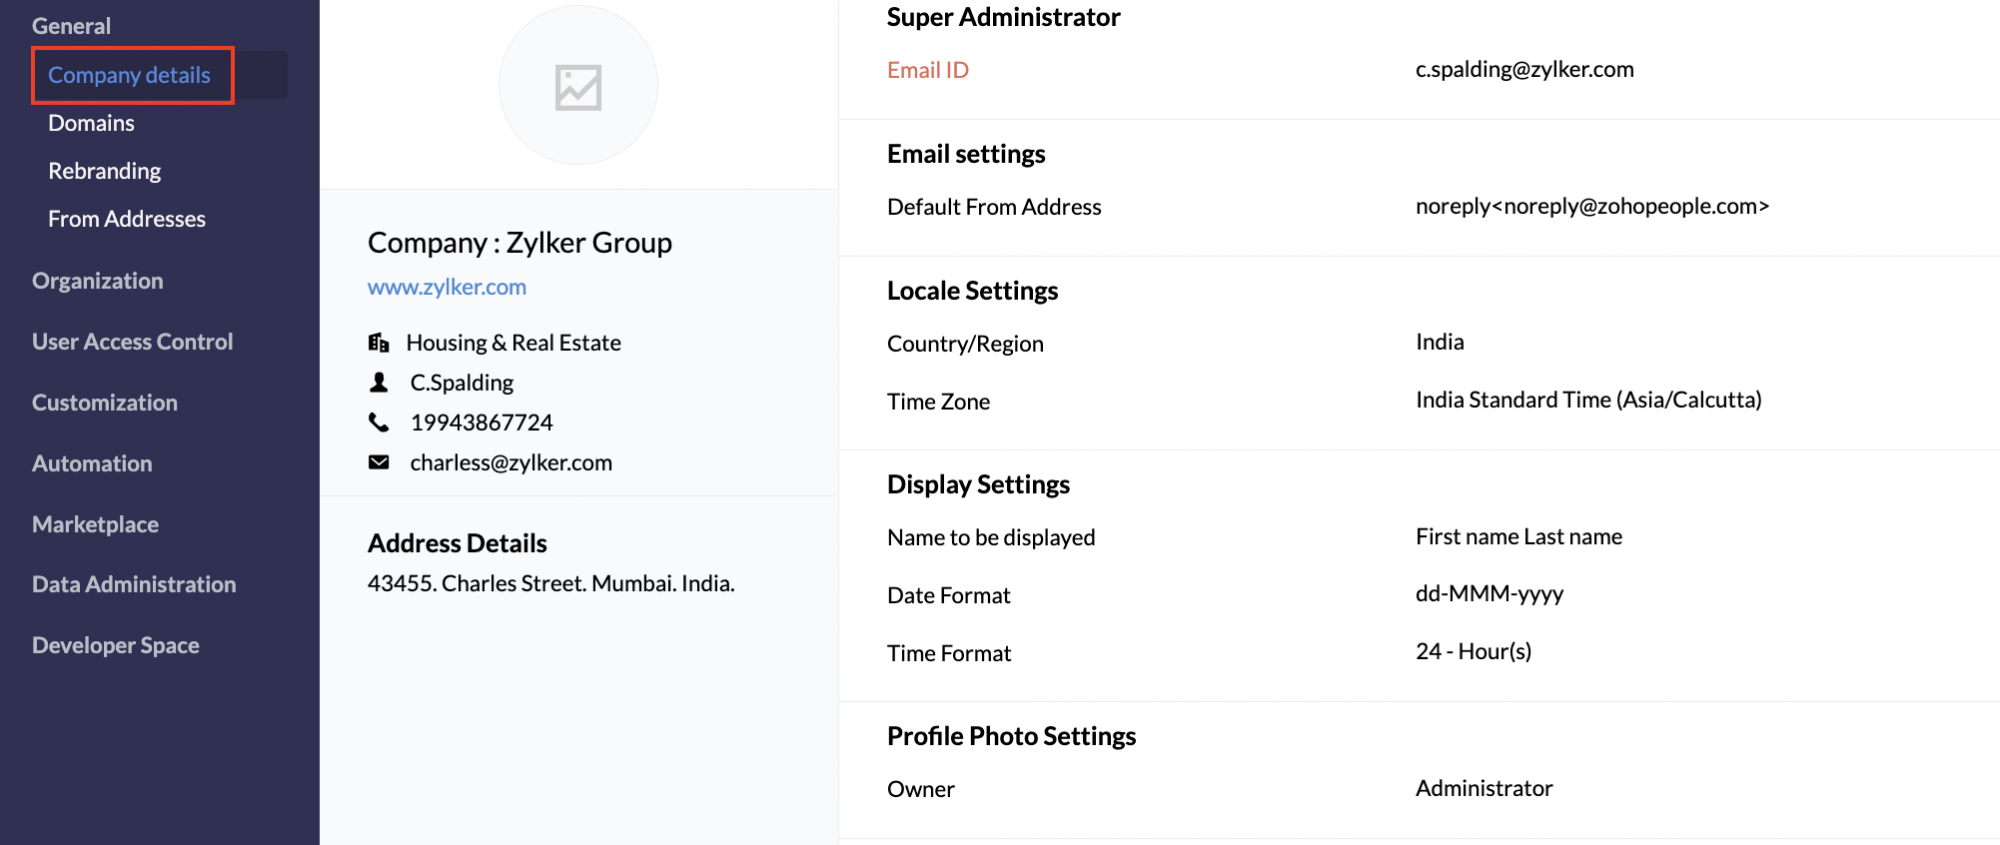
Super Administrator
The person who creates the account, by default is assigned as the Super Administrator. However, you can click Transfer admin rights and select another employee as the Super Administrator. All license related and other official correspondences will be sent to the selected email address here.
![]() Tip: In order to see all the admin users in the drop-down, you need to assign the 'Administrator' role to the respective users in the Employee form.
Tip: In order to see all the admin users in the drop-down, you need to assign the 'Administrator' role to the respective users in the Employee form.
From Addresses - Email Settings
Default From Address
Default From Address as the name suggests, serves as the default e-mail address (sender's e-mail address) for all your system e-mails triggered and sent from Zoho People to your employees.
The default from address will be "noreply@zohopeople.com". To add a new from address, click on Edit - pencil icon (click Modify Settings) and follow the steps shown below..
Click on the star icon to set the newly added from address as your default from address.
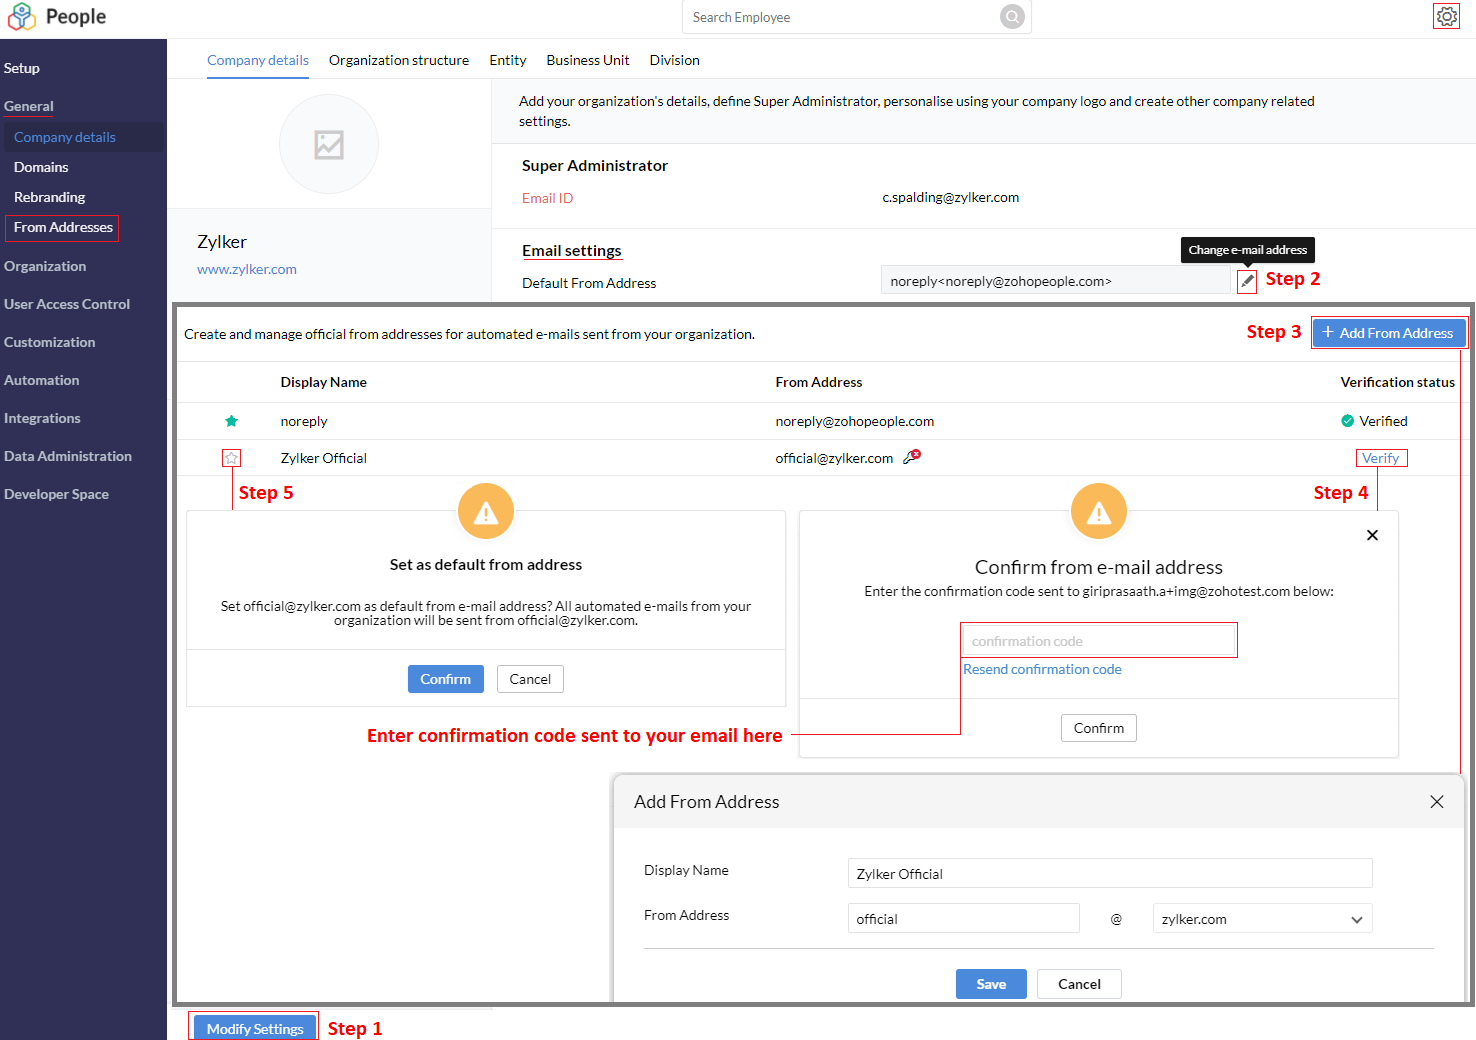
Adding Multiple From Addresses
From addresses can be used in Mail alerts, Approvals, and Schedulers. Using unique from address for emails of different intents can help employees easily observe the nature of the mail received and is handy for users who use mail filters. For example, leave alerts, official announcements, events etc.
Navigate to Settings > From Addresses > + Add From Address to add a new from address. Follow the steps shown above to add multiple from addresses.
Note 1: It is recommended that the from address you are adding is of a verified domain. Learn about domain verification.
Note 2: Key icon indicates that DKIM Authentication is not completed. DKIM authentications ensure that the recipients receive all emails in their inbox without any complications. Learn about DKIM Authentication.
Note 3: When adding a from address that uses a verified domain, verification is not required. (same goes for DKIM authenticated domains)
Locale Settings
Enter the operating location of your company under Country/Region. This will be displayed across the system, in all records and views.
Also select the default time zone you want to apply to your organization's account.
Display Settings
You can have the names of the employees displayed in the four different ways as mentioned below.
- First Name
- Last Name
- First Name Last Name
- Last Name First Name
Similarly, you can set your desired date and time format as well from the respective drop downs.
Profile Photo Settings
You can choose from the admin and employees and set permissions for them to change the profile photo the employees in the organization.
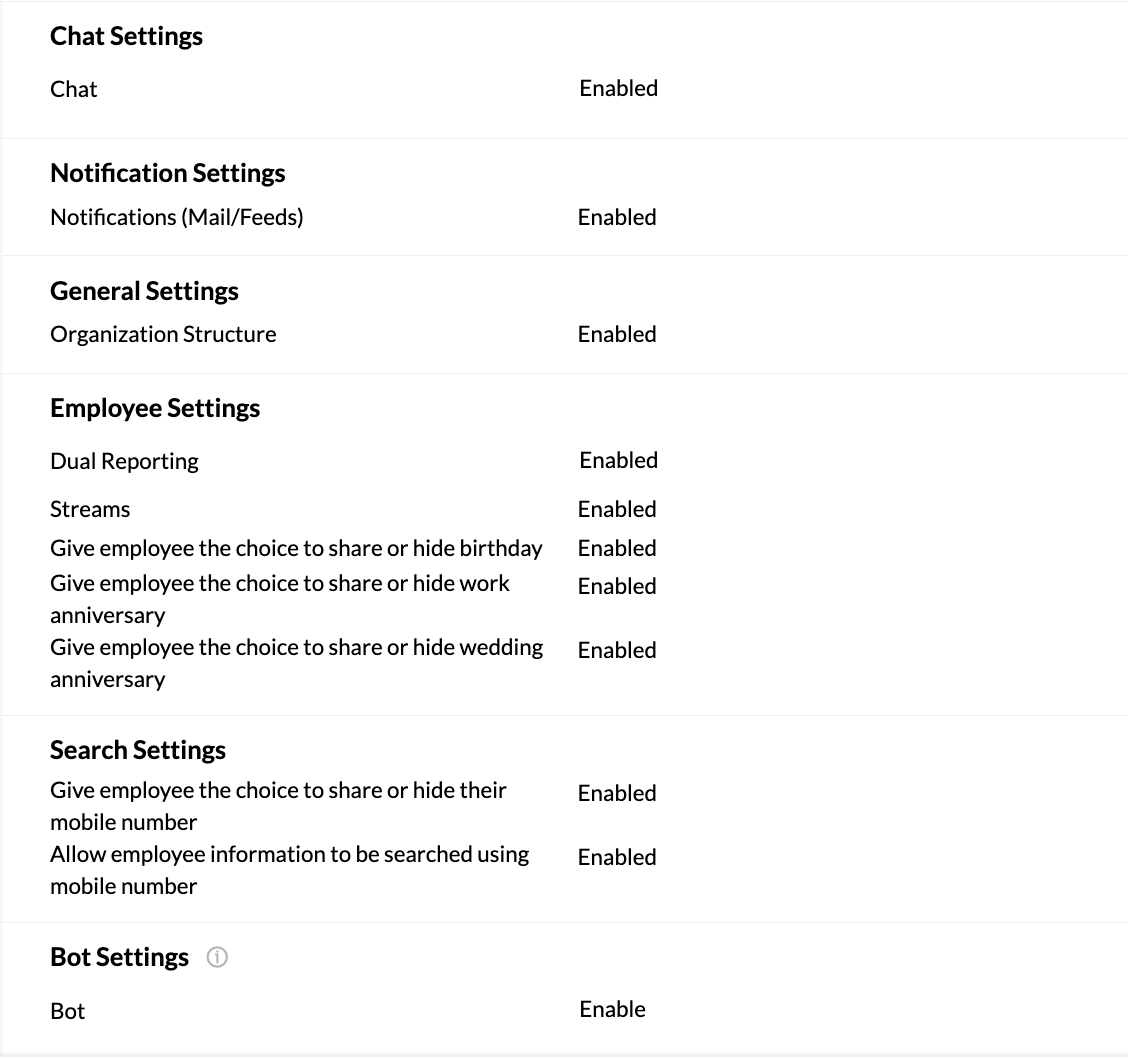
Chat Settings
Under Chat settings, you can either enable or disable chat options for your organization.
Notification Settings
You can enable or disable notification sent to you via mail from Zoho People. All emails and feed notifications from Zoho People will remain disabled or enabled as per your settings configured here.
General Settings
You can enable the organization structure feature for your organization here.
Enable dual reporting structure for your organization. Click here to learn more about Dual Reporting.
Learn how you can group related designations under one name. Click here to learn more about Streams.
Additionally, if you want to give employees the choice to hide or share personal information such as their birthday, work and wedding anniversary, these options can be used.
This will hide the corresponding options in the Self-Service > Personal Settings page.
The options in this section are related to searching of employee information using the search bar in Zoho People.
Give employee the option to share or hide mobile number - If this is enabled, and the employee chooses to hide their mobile number, then their mobile number will not be displayed in Zoho People. Alternatively, if either the setting is disabled or if the employee chooses to share, then their mobile number will be shown in Zoho People in their employee profile page.
Allow employee information to be searched using mobile number - If this is disabled, an employee's related information cannot be searched and retrieved using their mobile number.
Bot Settings
Define if you want to enable or disable the Zia- AI bot for your organization.
Confirming your account
A verified account ensures better security and reduces spam communications to your account. It is also imperative that you confirm your account to be able to send out any official communication from Zoho People and to carry out key operations like user addition and domain verification.
As soon as you sign-up a new account and provide your basic company details, you will see a popup banner prompting you to verify your account.
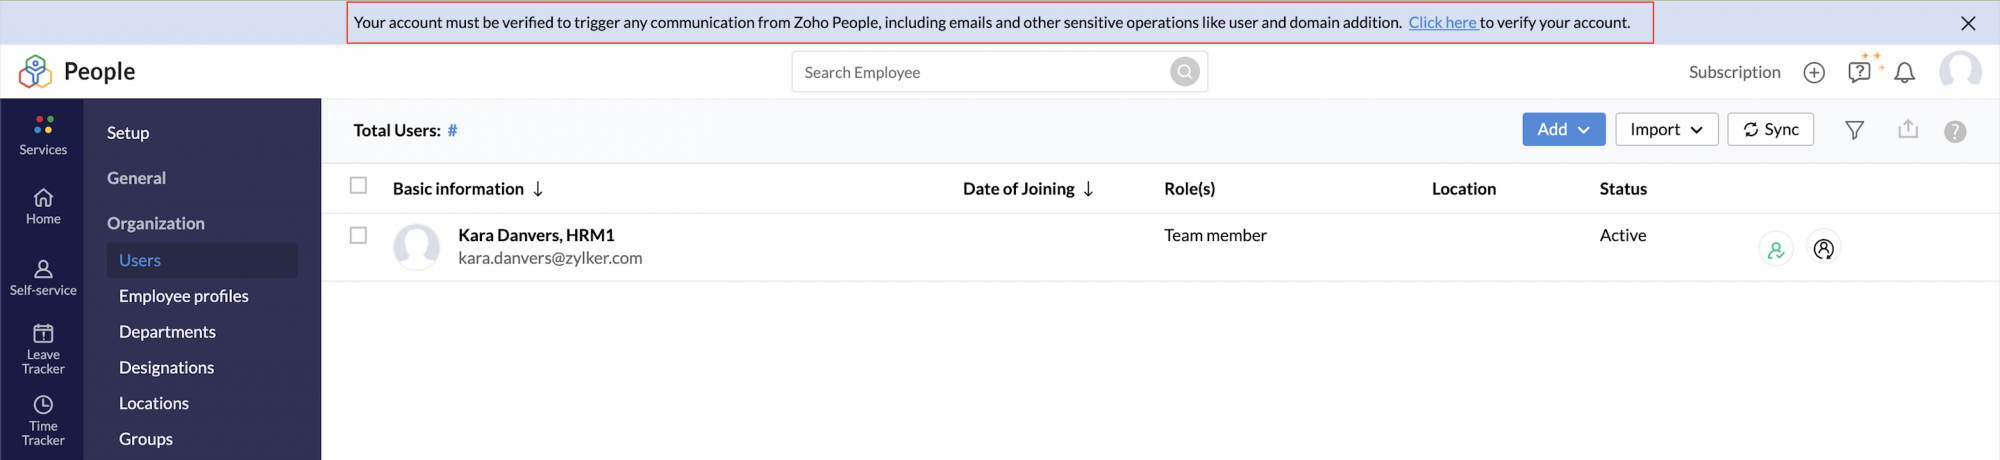
Click the banner to verify your account.
If you do not verify your account, many key functionalities may be hindered. Some of the services that need a verified Zoho People account include User Addition, Domain Addition, Onboarding, Approvals, Reminders, Shift Management, Custom Action, and Announcements.
Supported Browsers
ZOHO People is supportive of the following browser versions.
- Google Chrome 49 and above
- Mozilla Firefox 44 and above
- Safari 9 and above
- Microsoft Edge 16 and above
- Opera 45 and above
Supported Languages
Zoho People is offered in the following languages.
- English (US)
- English (UK)
- Arabic
- Chinese
- Dutch
- French
- German
- Hebrew
- Italian
- Korean
- Portuguese (Portugal)
- Russian
- Spanish
- Swedish
- Turkish
- Vietnamese
- Polish
- Serbian
- Danish
- Bulgarian
- Croatian
- Japanese
Note:
- For translation to be done effectively, select the corresponding country while selecting the language in the accounts.zoho.com page.
- Only the Tabs/Sub-tabs/Fields that are non-editable by the user will be changed to the respective language. The fields that are editable will remain the same.
Adding Users
Users can be added to your organization using the methods listed below:
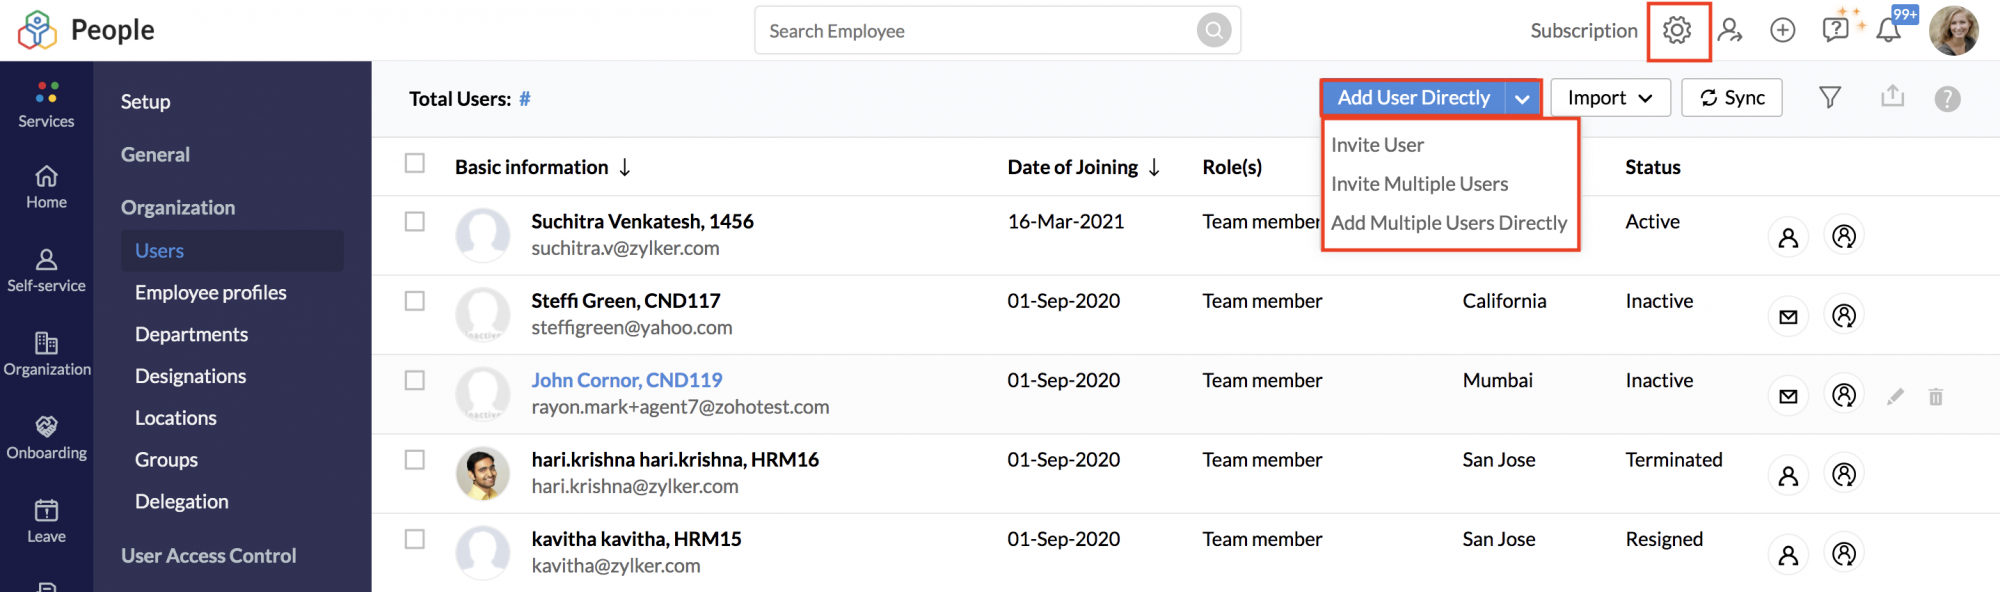
- Add Users directly - This option is useful if you have a verified domain. You can add users directly to your organization.
- Invite users - In this method, invitations are sent to users. Once they accept the invitation, they will become part of the organization.
- Sync users - This method is used for importing users directly from Zoho mail, Google apps etc.
- Import users - Using this method, you can import users from Zoho mail, google apps etc. This helps when your users are in large numbers.
Learn more in detail on adding users and employee profiles (non-users).
Departments
To create a department
- From home, go to Settings (gear icon) > Organization > Department.
- Click Add Department.
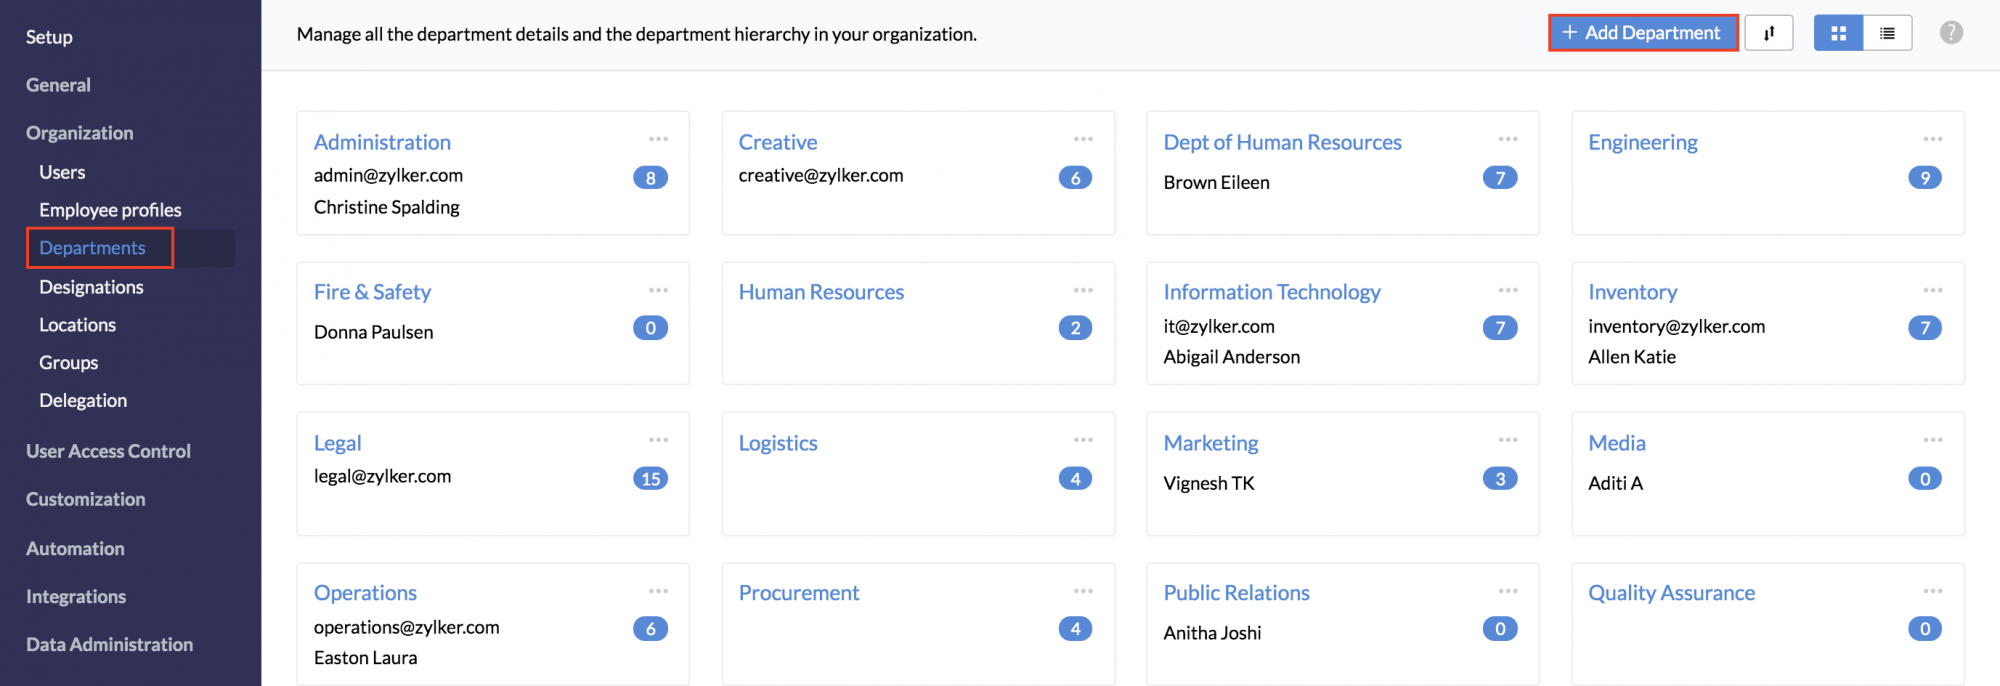
- Enter the department name.

- Enter the mail alias.
- Select the Department Lead from the drop down.
- Select the Parent Department, if required.
- Click Submit.
To edit details of a department, click the Edit icon at the end of the department name that you would want to edit and click Submit.
To delete department, click the delete icon at the end of the department you want to delete.
Designations
To add designation,
- From home, go to Setup (gear icon) > Organization > Designation.
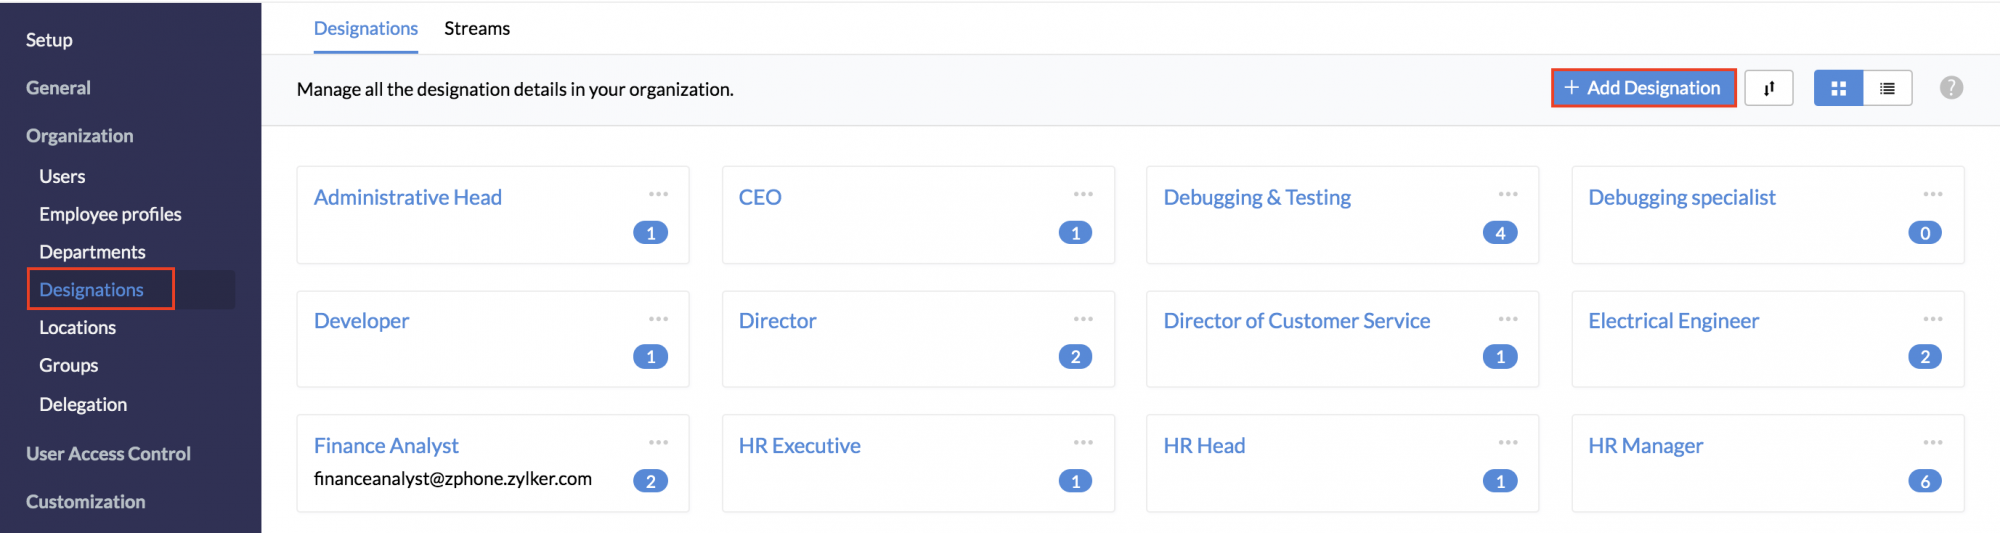
- Click Add Designation.

- Enter the designation name.
- Enter the mail alias.
- Enter the stream, if required.
- Click Submit.
To edit a designation,click the edit icon at the end of the designation name that you want to edit, and click Submit.
To delete a designation, click the Delete icon at the end of the designation name that you want to delete.
Streams
Streams in simple words, would be the grouping of related designations under one name. Streams can be configured to work independently or in association with a particular designation based on your organization's requirements.
Streams are helpful in two ways, it can either be used to group related designations in your organization, or it can be used to widely group employees who may have the same nature of jobs.
To add streams for your organization.
- Navigate to Settings > Designations under Organization
- Select Streams tab, click on + Add Stream to add a new stream.
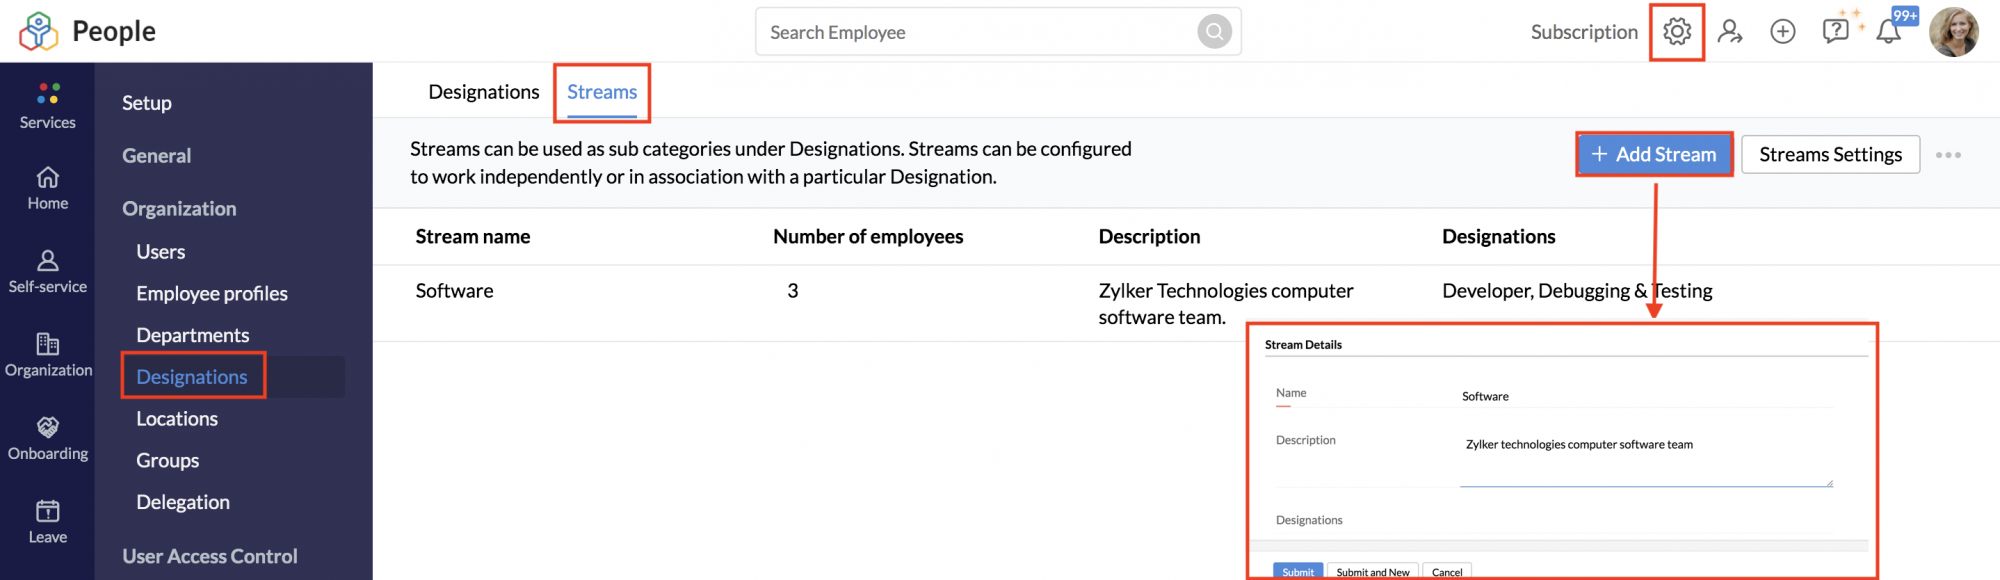
- Enter the Stream Name, Description, and click Submit.
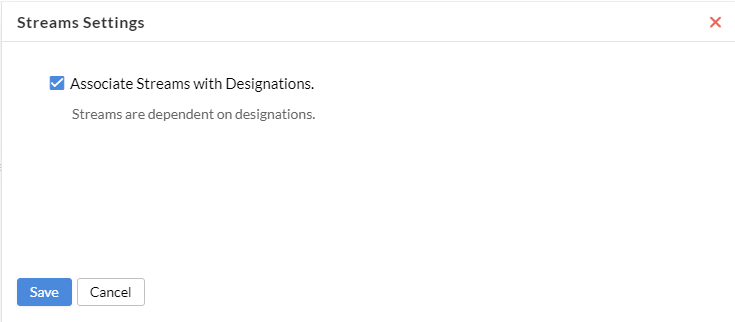
- Open Stream Settings option if you want to change streams and designations dependency.
In Stream Settings, Associate Streams with Designation checkbox is enabled by default, this would mean that only designations that belong to a particular stream can be tagged to employees. If unchecked, any designation can be tagged irrespective of which stream they belong to, thereby making streams independent of designations.
To associate particular designations to a stream, edit two or more designations and tag the corresponding stream as shown below.
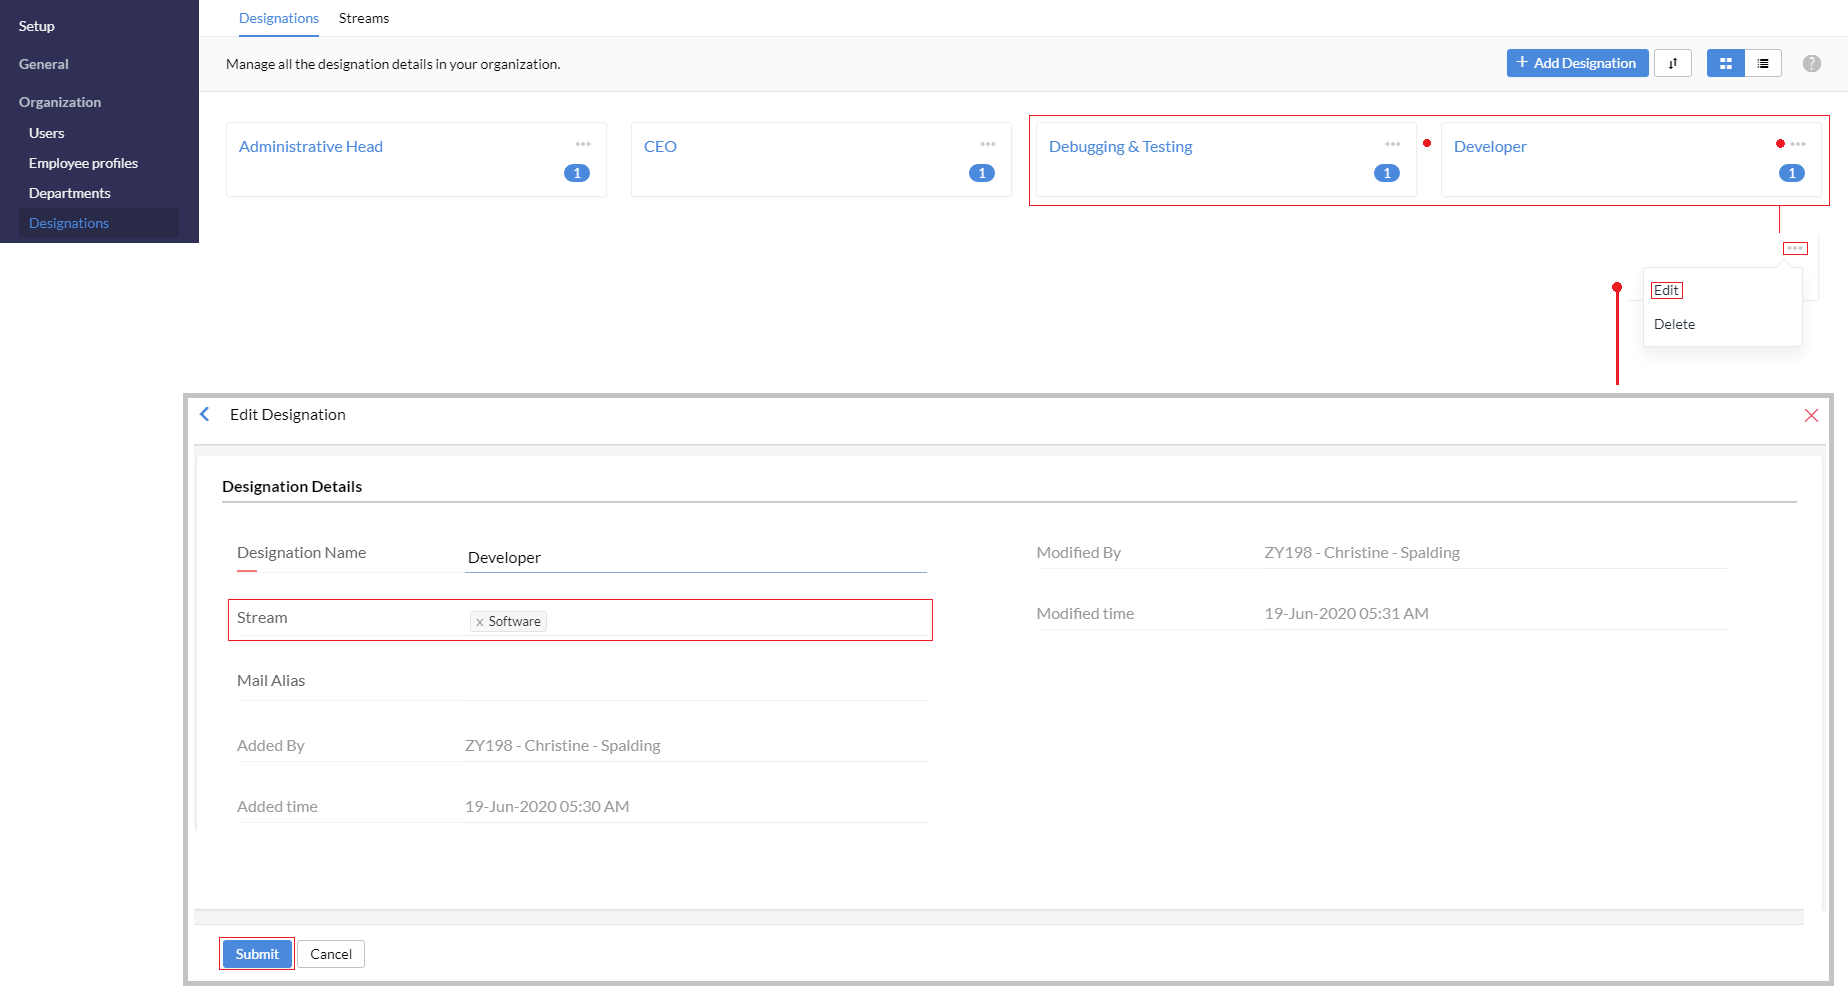
Now both Debugging & Testing, Developer designations come under the Software stream.
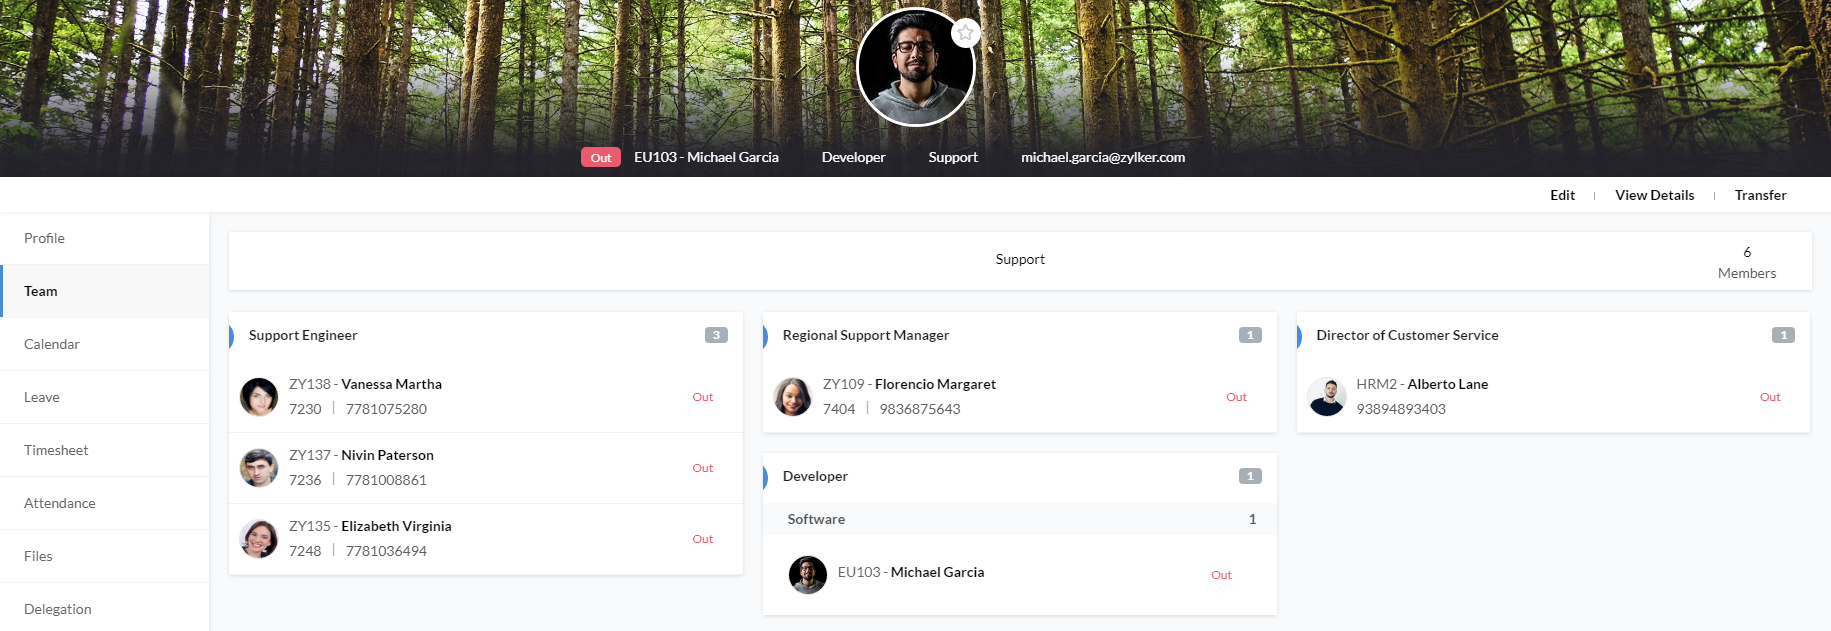
Once streams are configured, just like designation, location, department etc, Employee profiles can be edited to tag them to their respective streams.
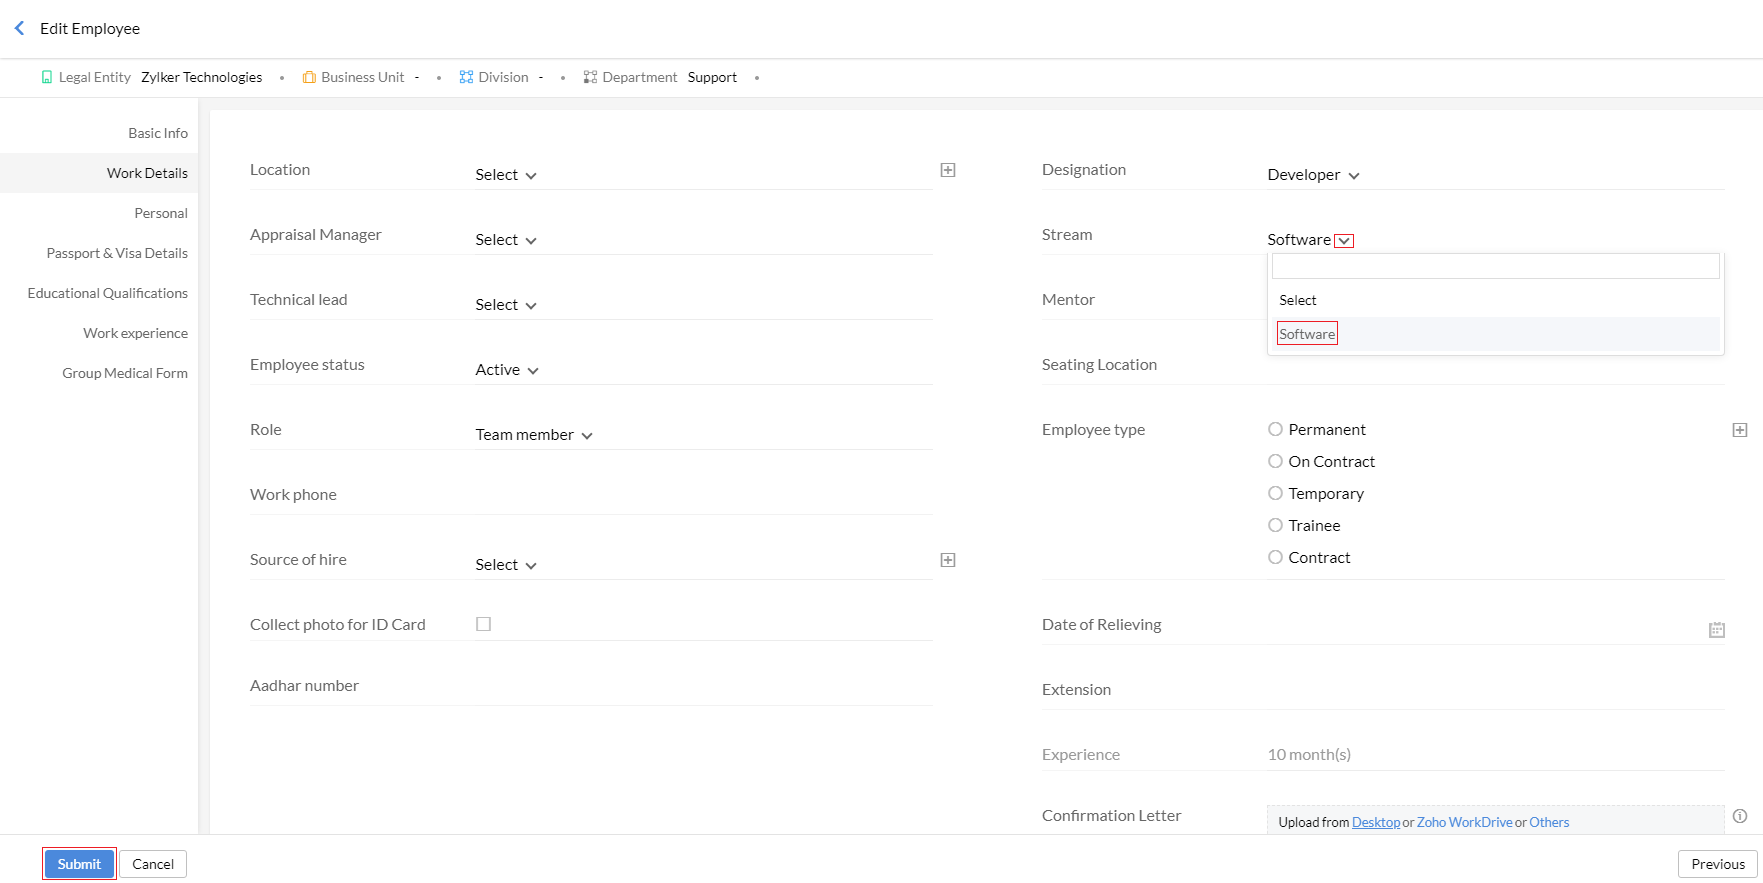
Employee stream will be displayed in the self-service page (employee profile > Team) as shown below.
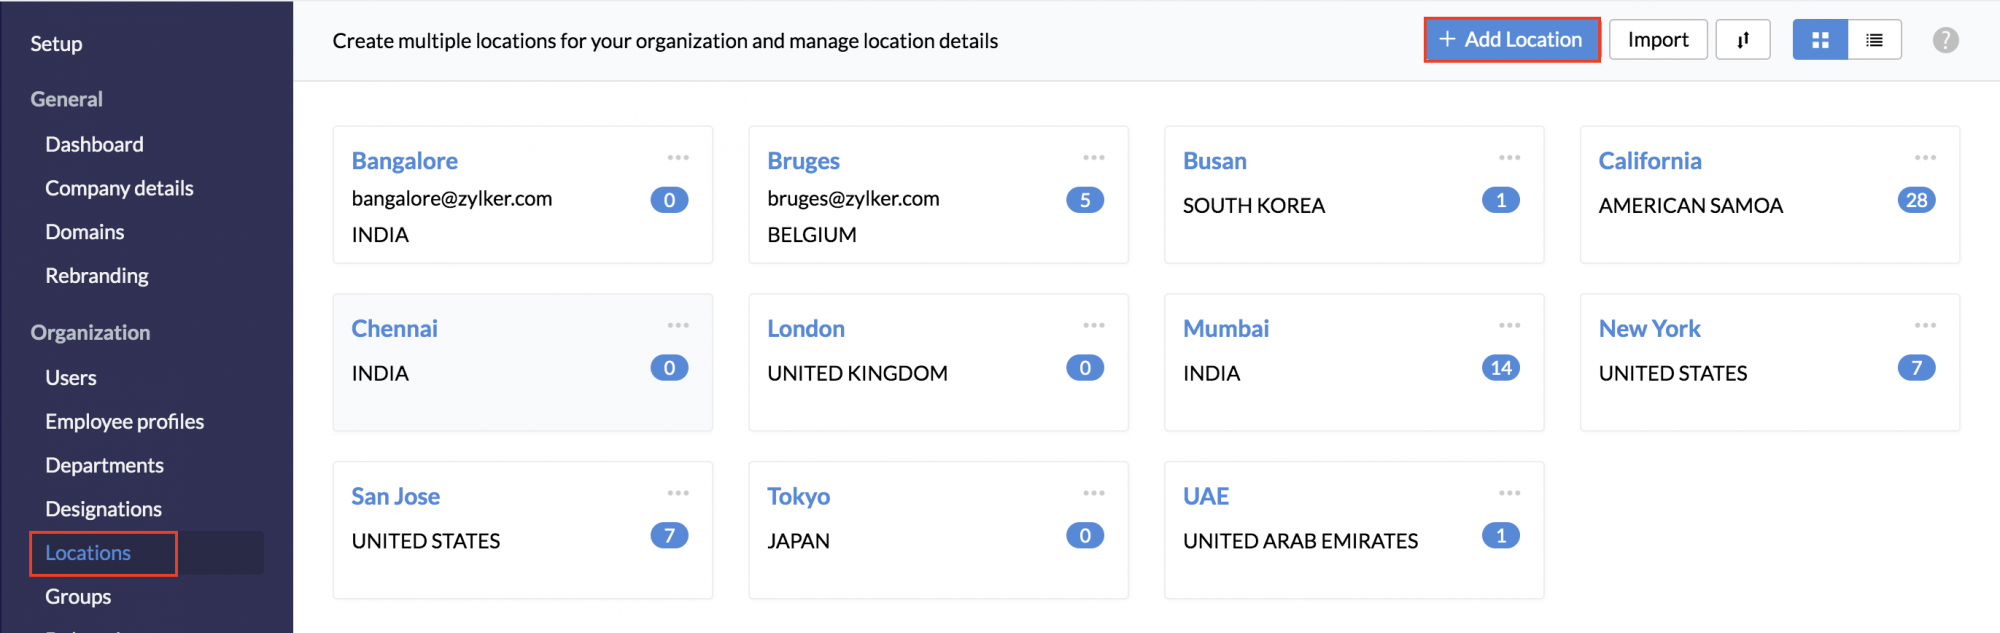
Locations
If your organization has set up a working office in more than one location, you will have to create multiple locations. Follow the steps given below for doing this:
- From home, go to Settings (gear icon) > Organization> Locations.
- Enter location name and select the country.
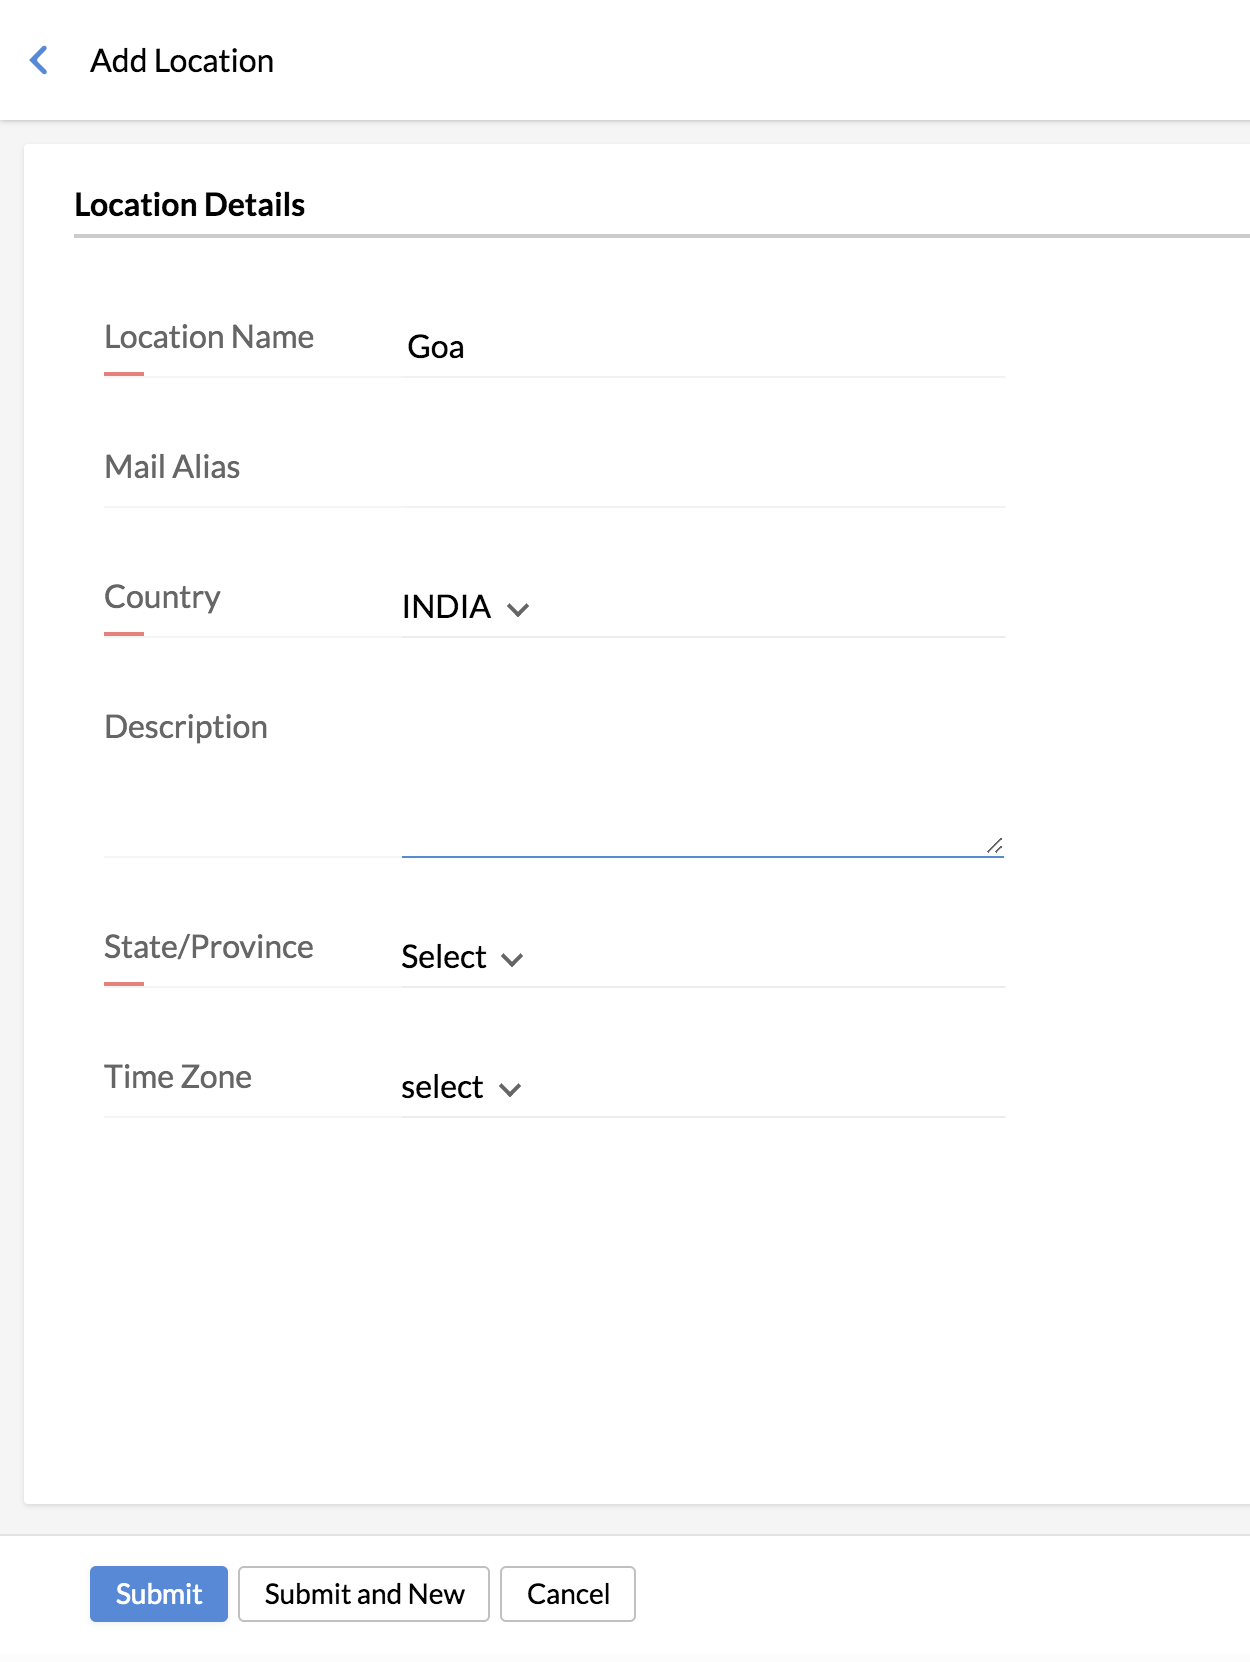
- Enter other details like Mail alias and description.
- Click Submit.
Groups
Groups are useful in the following scenarios
- When you want to post a message or announcement for a particular group, you can do so by navigating to Home > Groups. You will find the list of all groups that you are part of.
- Type in your message and use @user name to mention any user who is part of the group. Click 'Post'. In this case, the message can be seen just by the members of the group
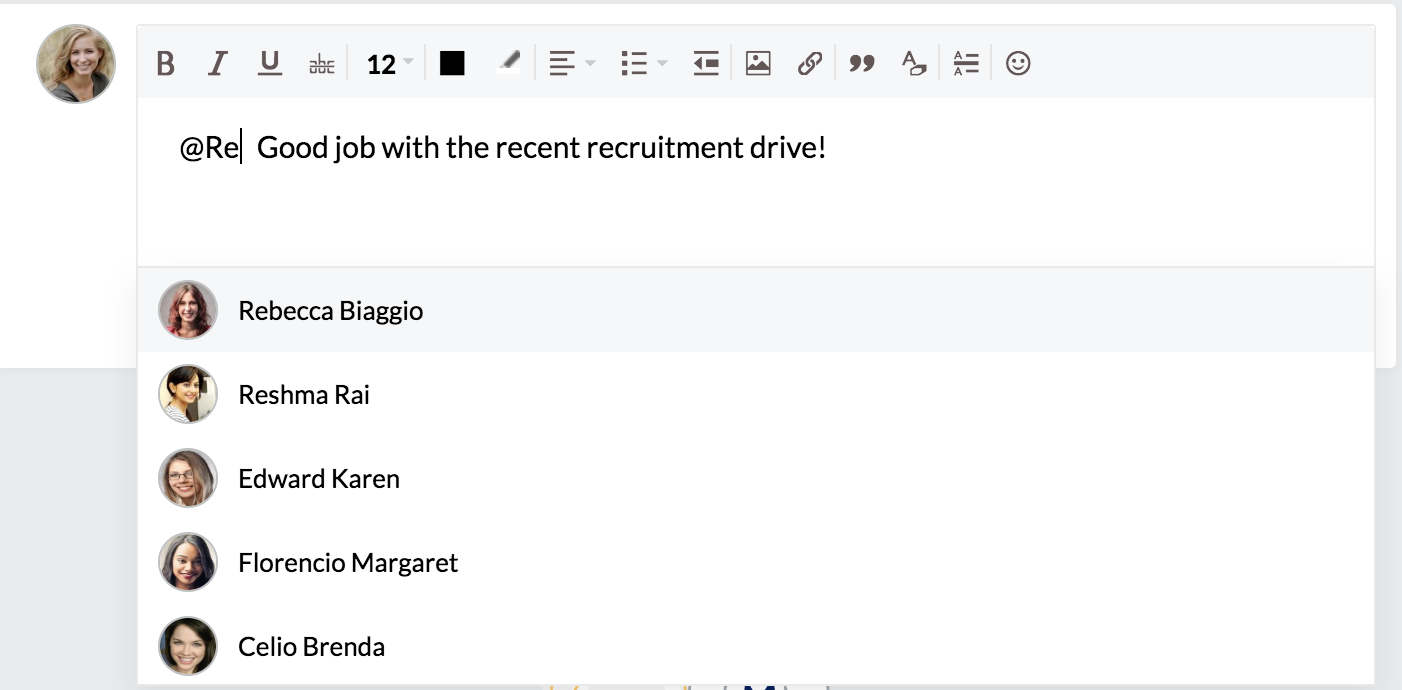
Note: You should be a part of the group that you are mentioning while posting the message. Even as an administrator, you will be able to post a message only to the group that you are a part of.
If a user posts a message tagging a group, then the posted message will be seen by the department members (of the user) and by the member of the group that is mentioned.
- When you have to get approvals from a group of people across different departments of an organization. In such cases, a group can be created and approvals can be sent to this group.
For a better understanding, consider this case. If you would like to have leave applications approved by a set of people in the HR team apart from the reporting manager,
Follow the steps given below to do this.
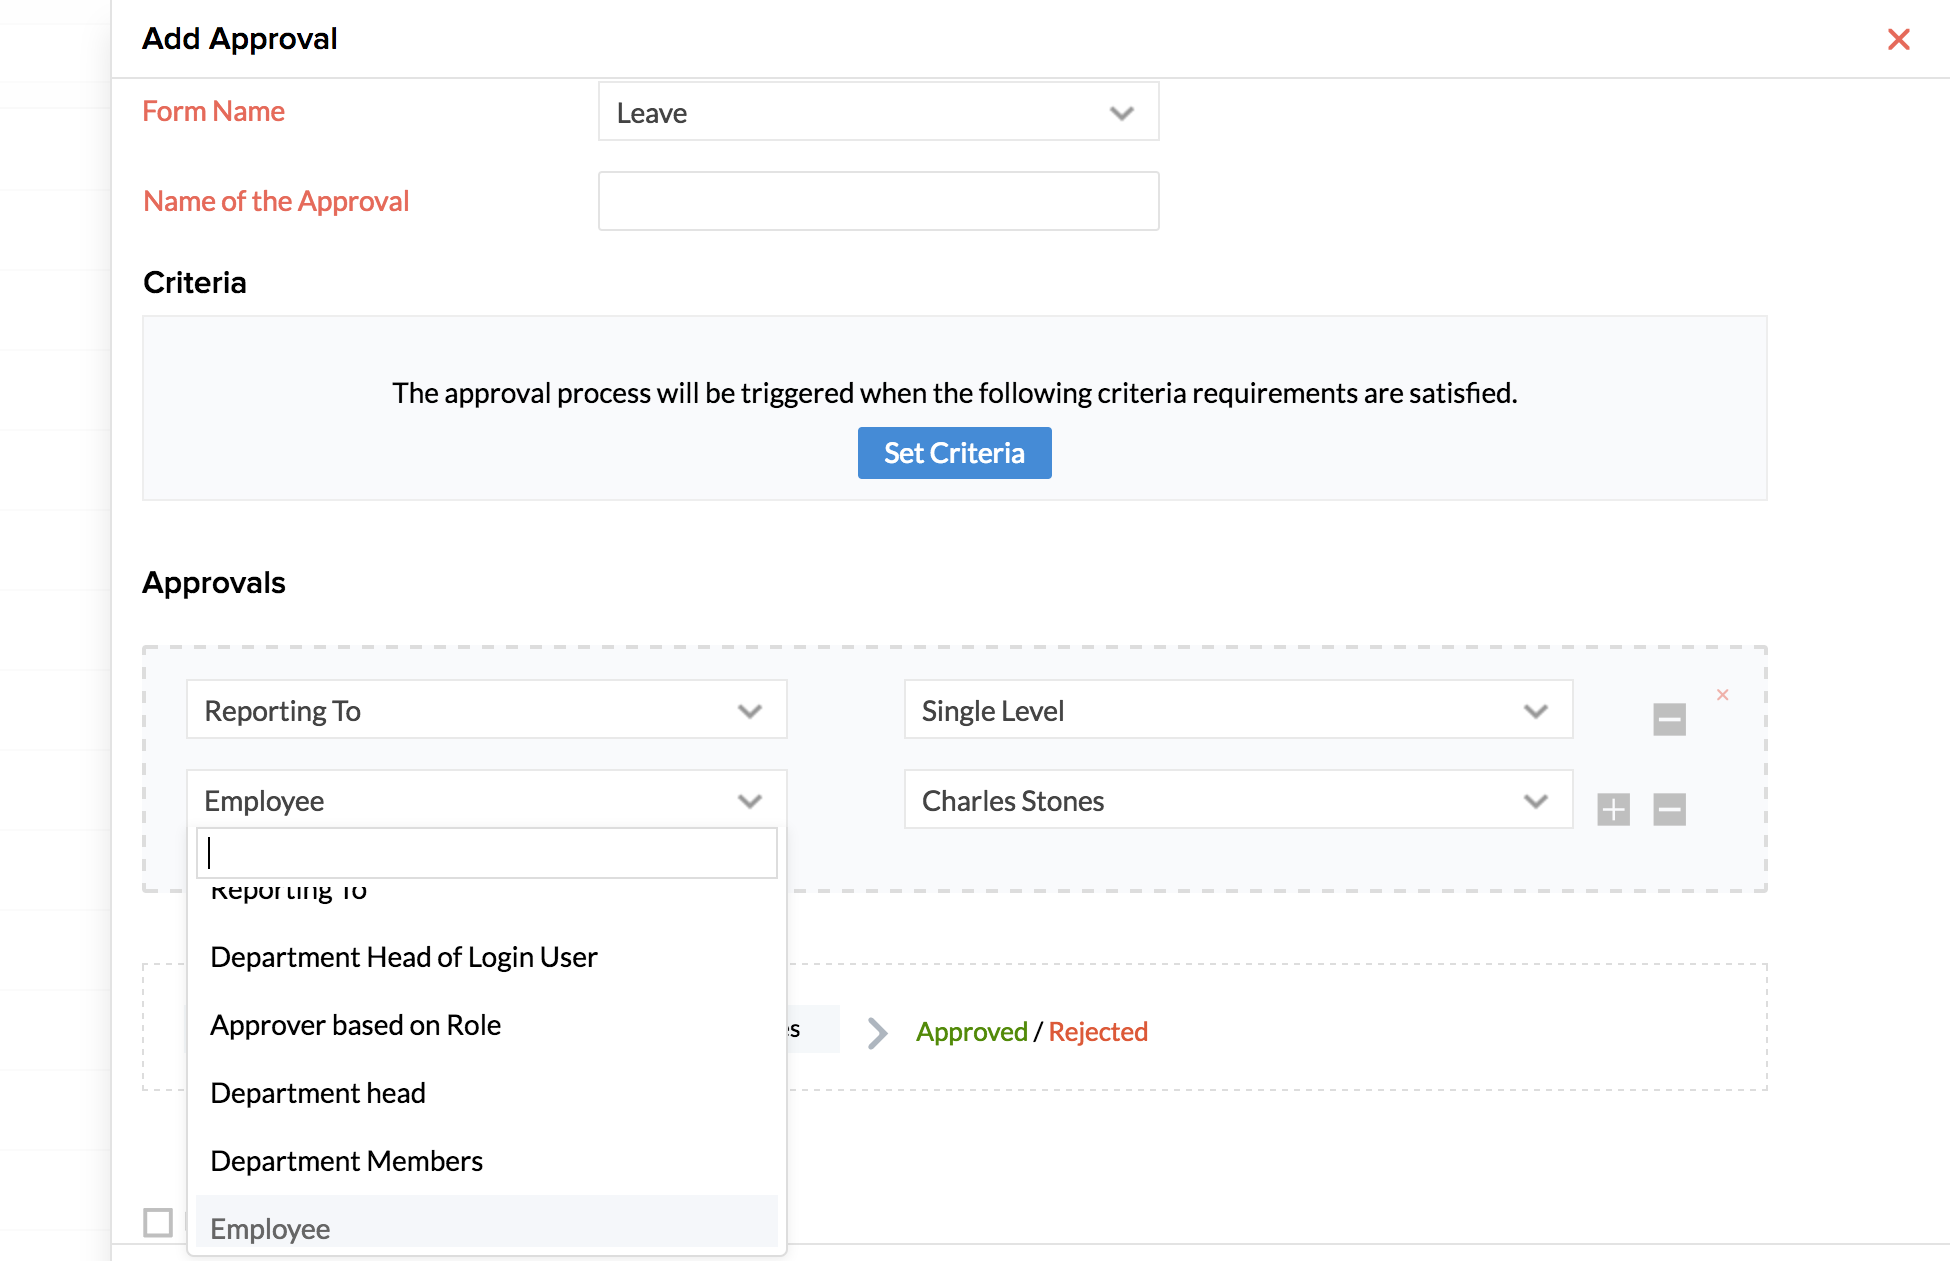
- From your home page, go to Approval > Add Approval
- Select the Leave form under 'Form Name' and give a name for the approval
- Click on 'Configure Approver' and select 'Reporting to' 'Single Level'
- Click the + icon to add another level of approver
- Under the first drop down, select 'Group' and under the second drop down select the desired group name
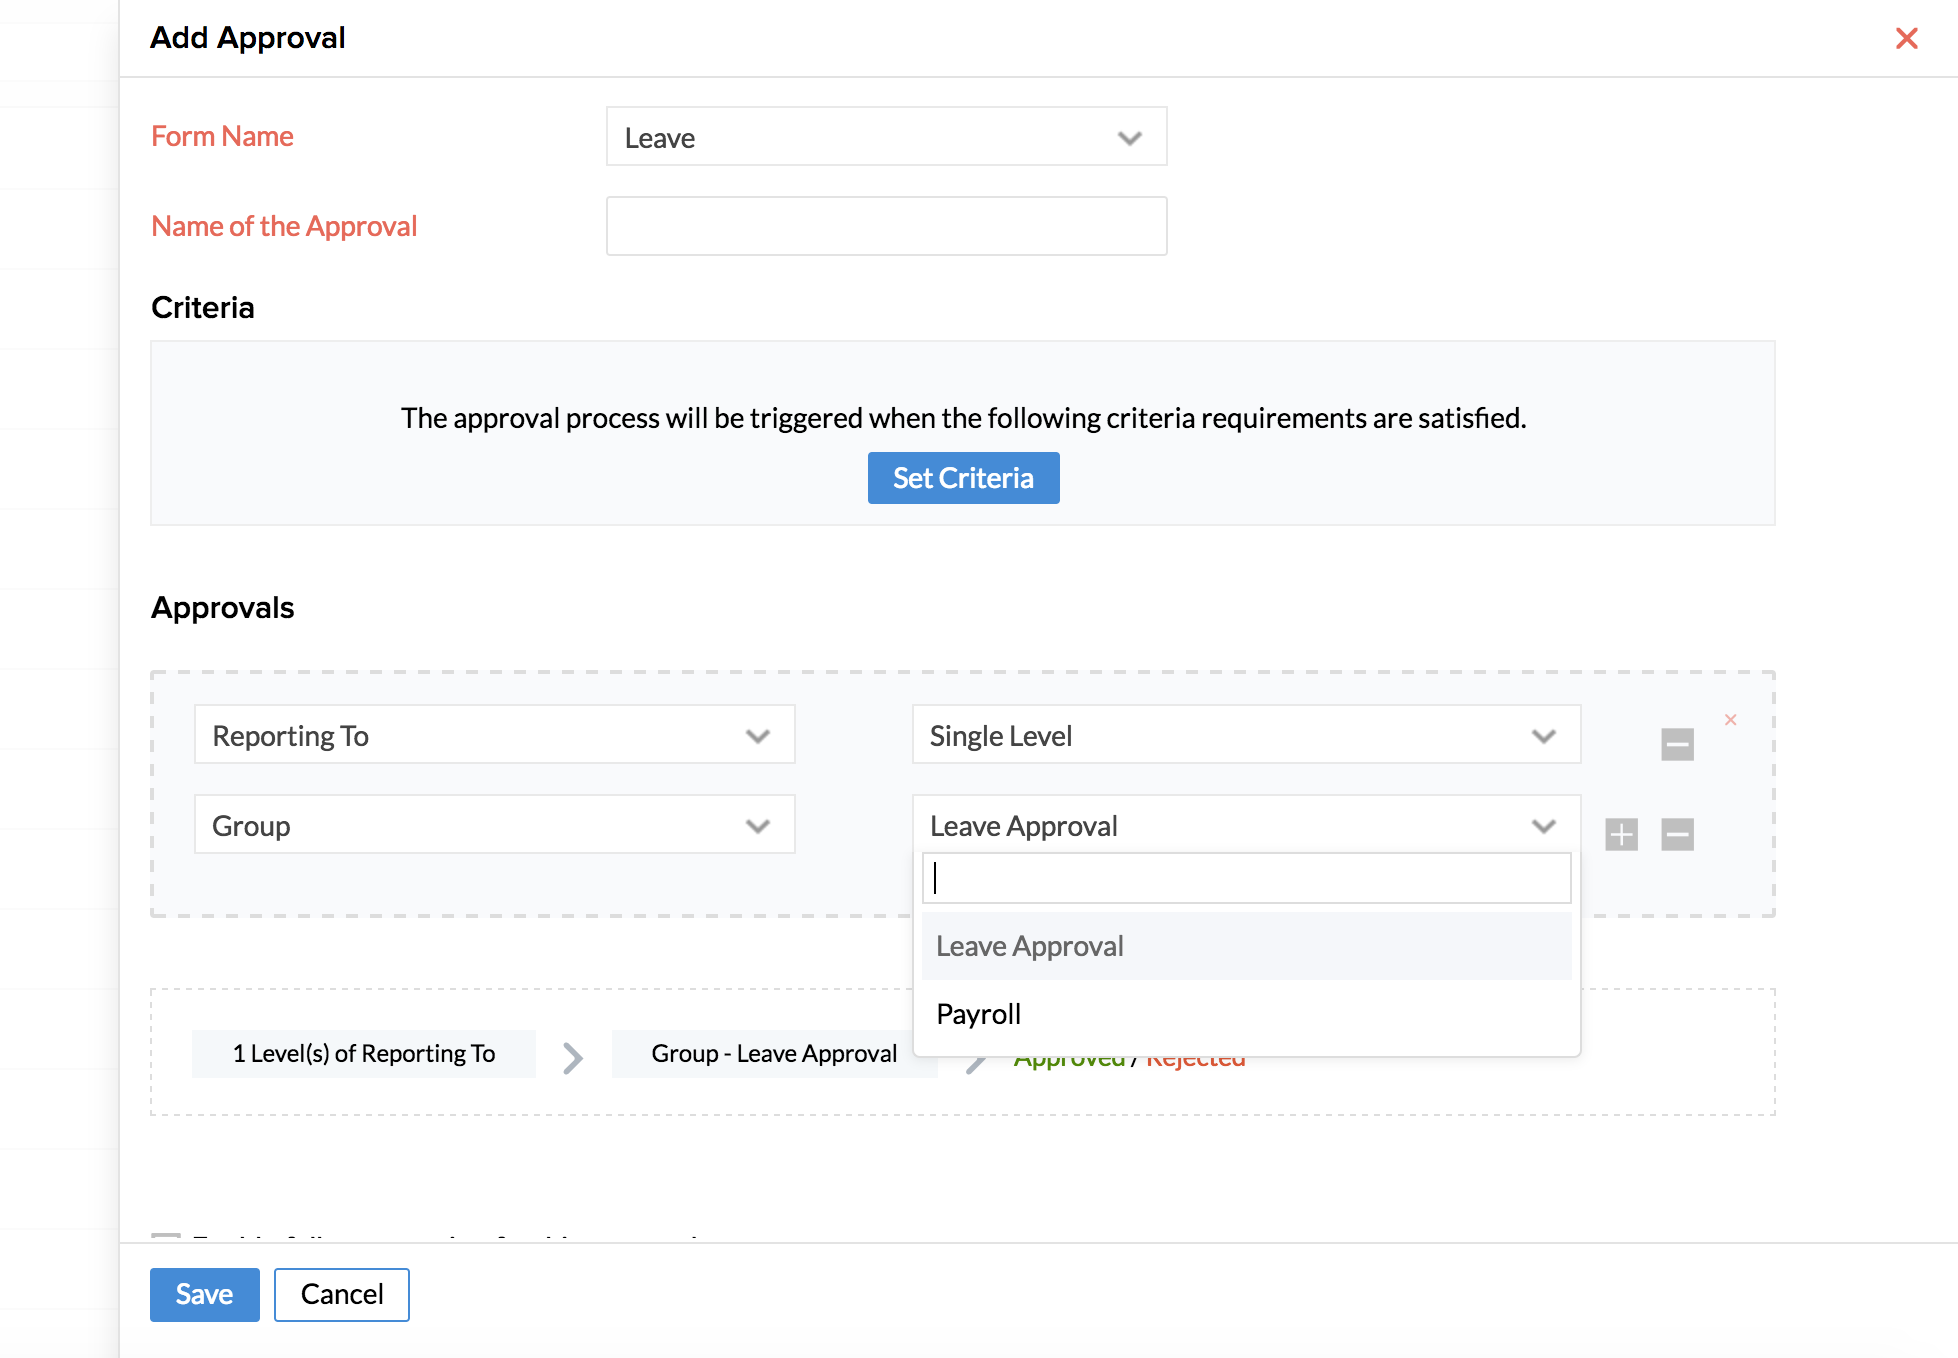
- Enable follow up if needed
- Configure a suitable message for approval
- Click Save
Now, based on the priority set under the Approval tab, leave requests will go to the reporting manager and to the group members for approval.
Editing and Deleting a group
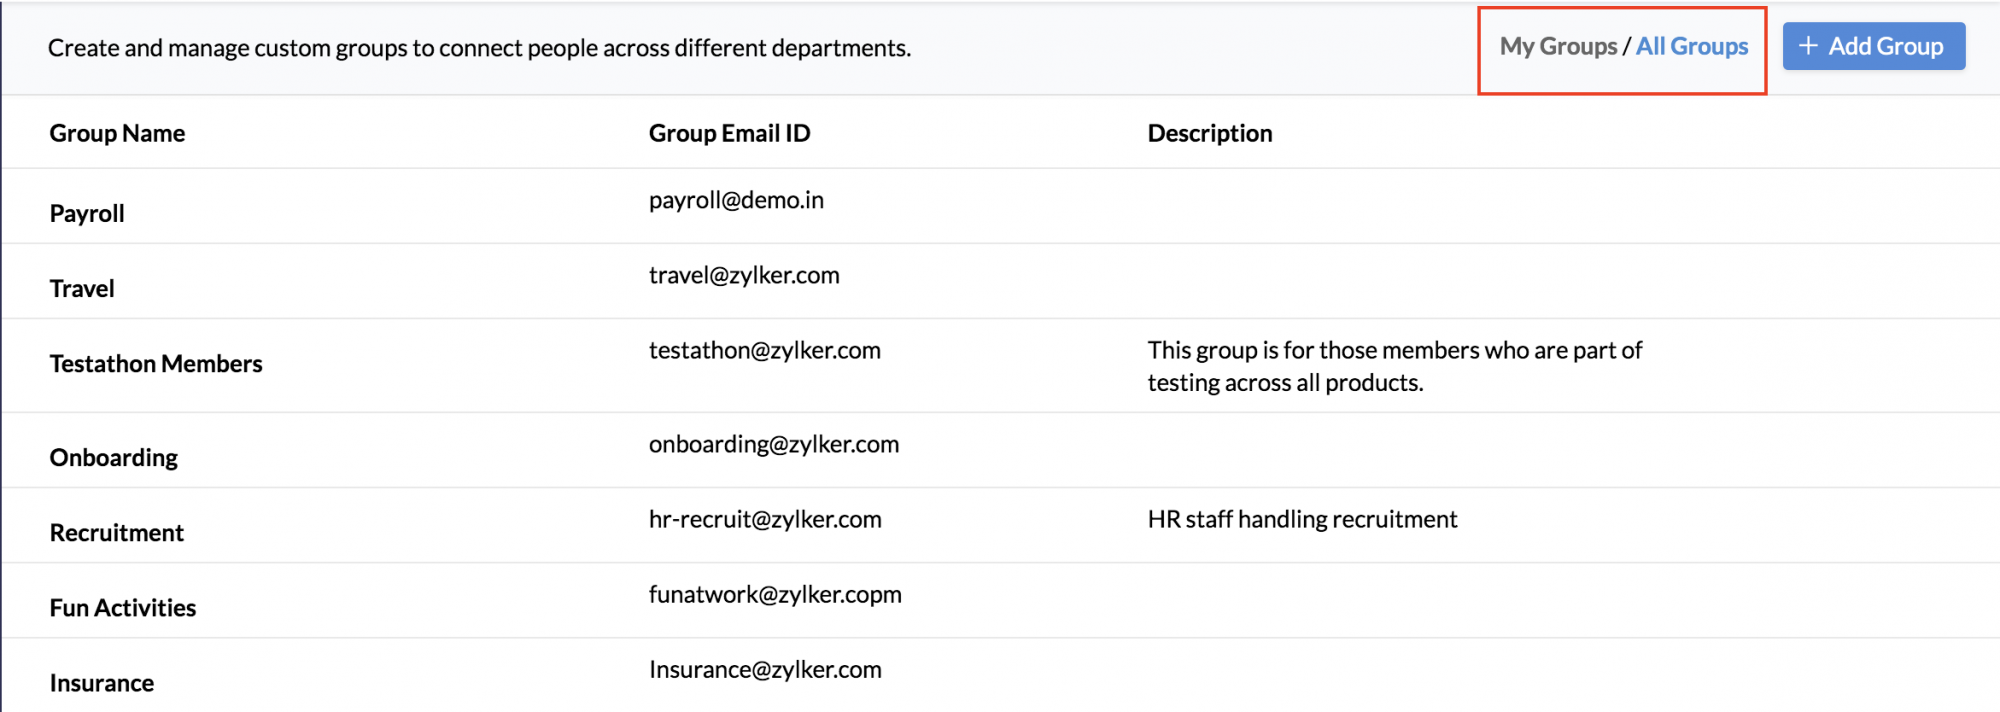
- From your home page, go to Settings (gear icon) > Organization > Groups > All Groups
You will be able to see the list of groups. You can also do this from Self Service > Organization > Groups > All Groups.
- Click on the edit/delete icon of the respective group
Note: The Admin of the group can also edit or delete the group.
Viewing Groups
To know the groups that you are part of,
- From your home page, go to Organization > Groups > My Groups
You will be able to see the list of your groups you are part of. You can also view this from Home > Groups
To view all the groups of the organization,
- From your home page, go to Settings (Gear Icon) > Organization > Groups > All Groups
You will be able to see all the groups that are created. You can also see this from Self Service > Organization > Groups > All Groups (right top corner).
Domain Addition and Verification
Domain Addition
You can have domains added to the system and verify them so as to add users directly into Zoho People and to have a rebranded login URL for your organization. Follow the steps given below to add your domain.
- From your home page, go to Settings (Gear icon) > Organization > Domains.

- Click Add Domain
- Enter your domain name.
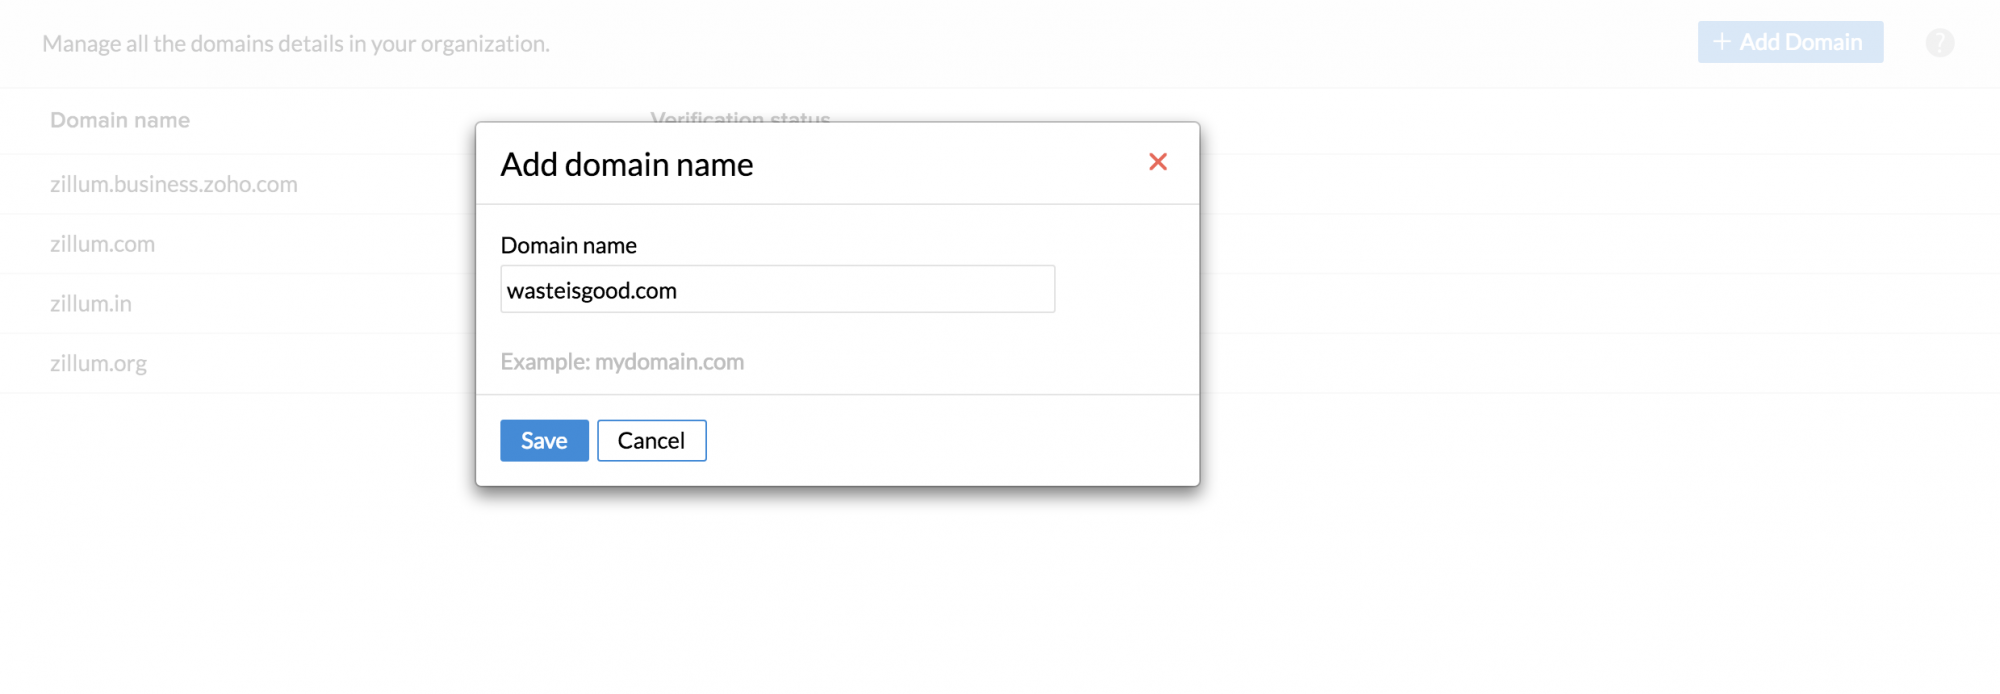
- Click Save.
You have successfully added your domain. Any domain added should be verified by Zoho to check its validity and authenticity. Verification is an integral step to prevent any misuse of domain names.
- Click 'Verify'.
Follow the steps given below to verify your added domain.
Domain Verification
Once a domain is added into Zoho People, it has to be verified. Domain verification in Zoho People can be done in two ways.
TXT Method:
In this method, you will create a TXT record in your DNS manager with the provided values.
- Login to your domain hosting site where your DNS is hosted.
- Open the DNS management page to add a record.
- Select the TXT Method as your type of domain verification in the DNS management page.
- Create a TXT record in your DNS with the name (alias/host/TXT) as '@' or leave a blank space.
- Enter the values (point to/destination) section of your DNS management page as shown in your screen.
- Click Save Record or Add Record.
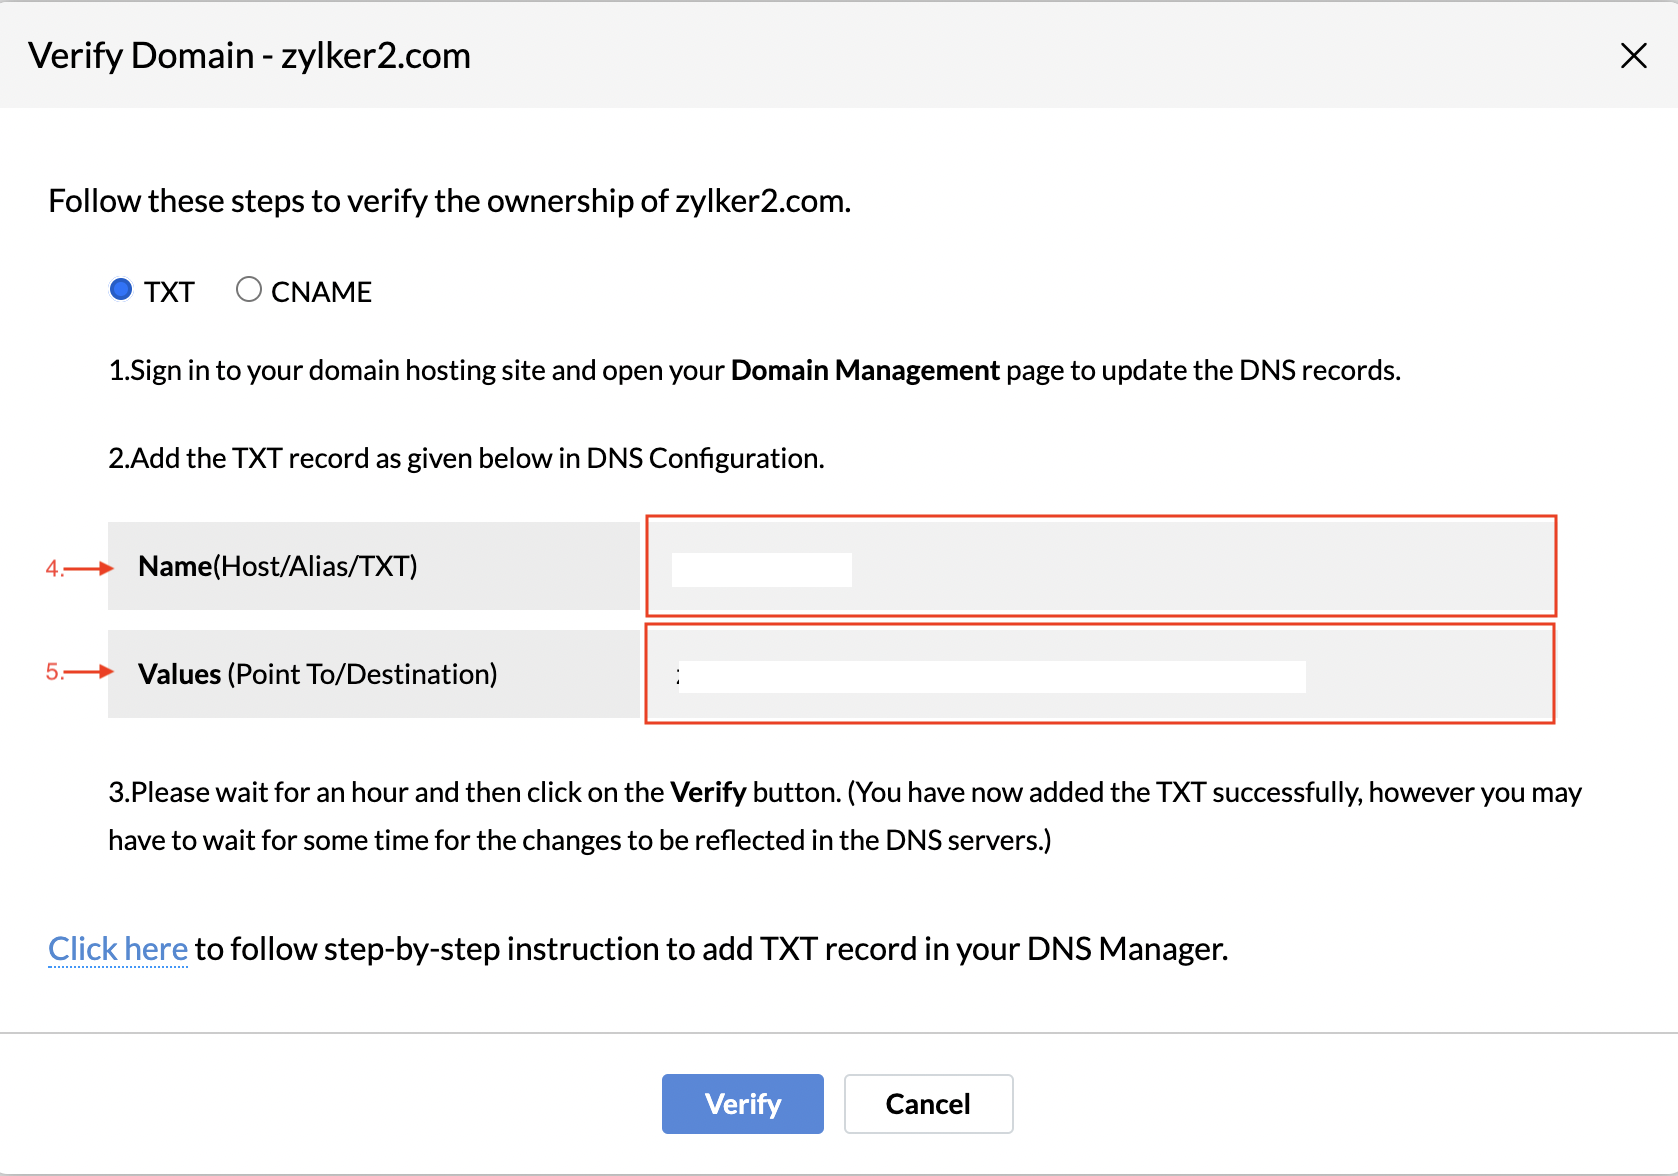
Note: Section names to add a record in your DNS hosting site may vary with different sites. Refer to the help documentation of your hosting site in case of doubts.
It may take a while for the record to be created. Wait for it.
- Now login to your Zoho People account.
- From your home page, go to Settings > Organization > Domains. Once the mentioned steps are completed, you can click Verify at the bottom of the popup.
Your domain has now been successfully verified in Zoho People using TXT method.
CNAME Method:
In this method, you will create a record in your DNS manager with a CNAME provided in Zoho People.
- Login to your domain hosting site where your DNS is hosted
- Open the DNS management page to add a record
- Select the CNAME Method as your type of domain verification in the DNS management page
- Create a record in your DNS with the name (alias/host/CNAME) as displayed on your screen.
- Enter the value (points to/destination) section of your DNS management page as displayed on your screen.This value differs with different domains.
- Click Save Record or Add Record.
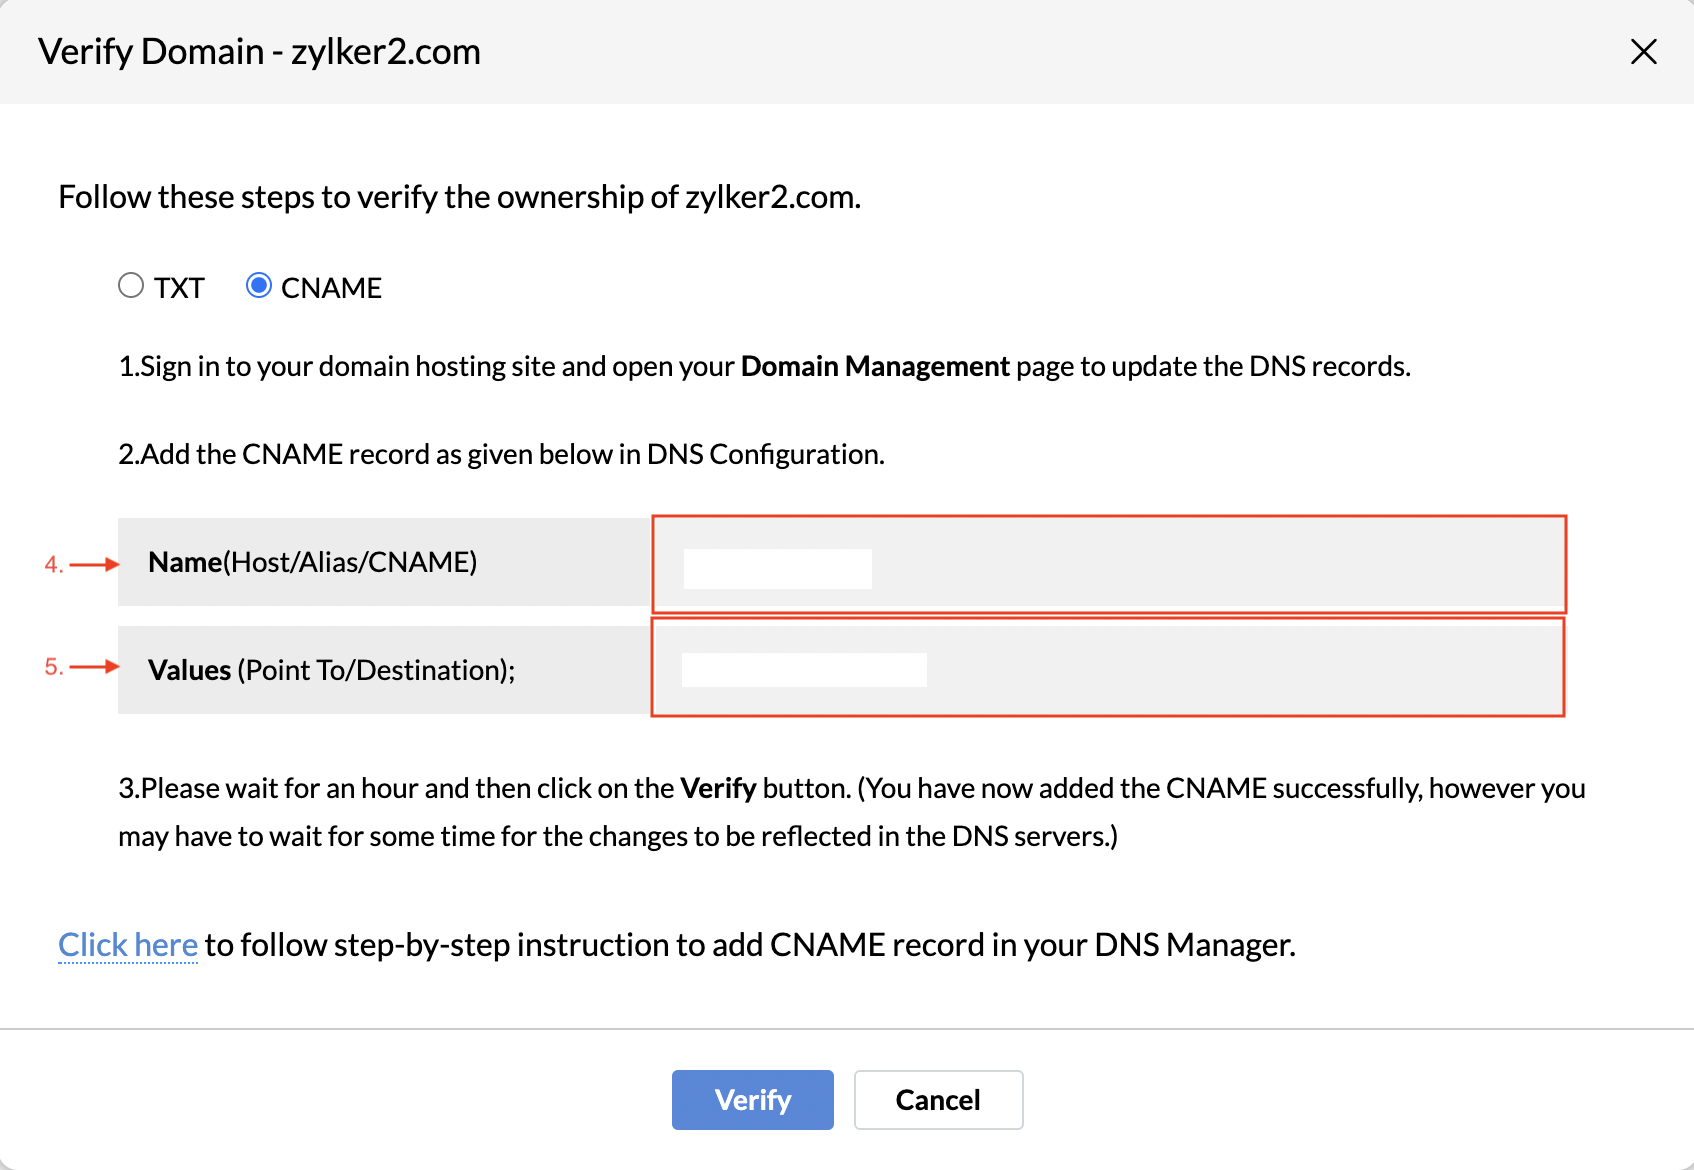
Note: Section names to add a record in your DNS hosting site may vary with different sites. Refer to the help documentation of your hosting site in case of doubts.
It may take a while for the record to be created. Wait for it. Now login to your Zoho People account.
- From your home page, go to Settings > Organization > Domains. Once the mentioned steps are completed, you can click Verify at the bottom of the popup.
Your domain has now been successfully verified in Zoho People using CNAME method.
Possible errors while verifying Domain
After completing the steps (adding CNAME/ TXT) of Domain Verification, if you still get an error while verifying, check the following:
If you have chosen the CNAME method, in the browser URL text area, type <zpeople>.<yourdomain name.com/eu/cn/in> based on your domain.
DNS Provider - Registrar conflict
When you register the domain with one provider, but change the Name Servers or host your DNS with another provider, the CNAME/ TXT records added in your Domain Registrar is not considered valid. The CNAME/ TXT records added in the DNS hosting provider will only be effective and valid. Hence do a 'NameServer' Lookup for your domain, to check where your DNS is hosted. You may also check with your Domain Registrar or the technical contact for your domain on where the name servers are pointed to if you are not sure.
Longer TTL
TTL (Time To Live) is the time specified in your DNS for each change in your DNS to be effective. If you have a huge TTL value (24 hrs/ 48 hrs), then the CNAME/ TXT/ MX Records might not be provided during the verification process. It might take up to 12 - 24 hours for DNS changes to take effect, based on the TTL setting. Please check the TTL value and try verifying after a while.
Incorrect Values
The way the CNAME/ MX needs to be added often varies with different DNS Providers. Some DNS Providers expect the domain name also to be added in the hostname (zpeople
Typos/ Spelling Mistakes
Check if you have added the correct domain name (without any typing errors) in Zoho.
DKIM Authentication
Once domains or subdomains have been verified, the next step is email authentication to validate the email source.
What is DKIM Authentication?
DKIM is an email authentication method that helps companies take responsibility of their message in transit, and mailbox providers to check the source of each message using cryptographic techniques. For each email, DKIM will attach a signature during the transmission to verify the authenticity of the message source. This way, companies can prevent spammers from sending out emails impersonating them, and enable third-party services to send emails on their behalf without them being marked as spam.
The DKIM (Domain Key Identified Mail) email authentication standard can be used for this purpose. This method is used to ensure that the message has not been altered in transmission. It uses public key encryption to authenticate email messages.
Steps to configure DKIM for a domain or from address
- Navigate to Settings > Domains under General
- Click Get under DKIM Details.
- Update the DKIM data in DNS as a TXT record.
- Once the TXT is added successfully, allow some time for the changes to be reflected in the DNS servers.
- Ensure DKIM data has been updated properly. This may take a while.
- Click Get under DKIM Details once more to confirm.
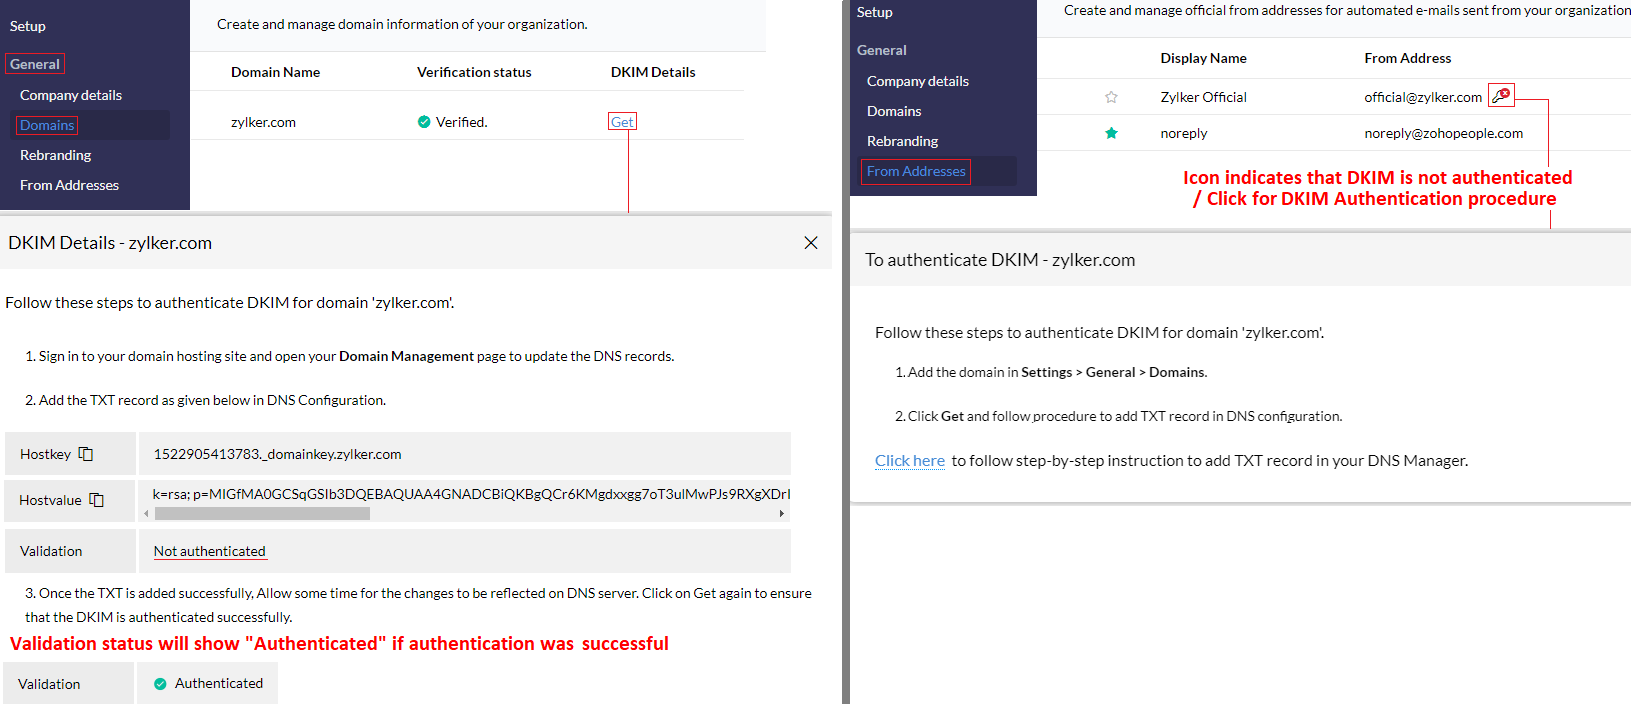
Note: For all the from addresses added, it is is recommended that a verified domain is used with DKIM authentication completed. This ensures an hassle free and secure experience. The above steps are used for domain verification and DKIM authentication
Rebranding
Rebranding is done by customizing the default URL. Generally, when you log in, you will be able to see that the default URL is people.zoho.com. However, when you opt for rebranding, you can customize your URL, provided your domain is verified by Zoho.
Follow the steps given below to Rebrand.
- From your home page, go to Settings (Gear icon) > Organization > Rebranding
- Under Login URL, give the URL (e.g: https://myhrms.mydomain.com) select the domain name from the drop down.
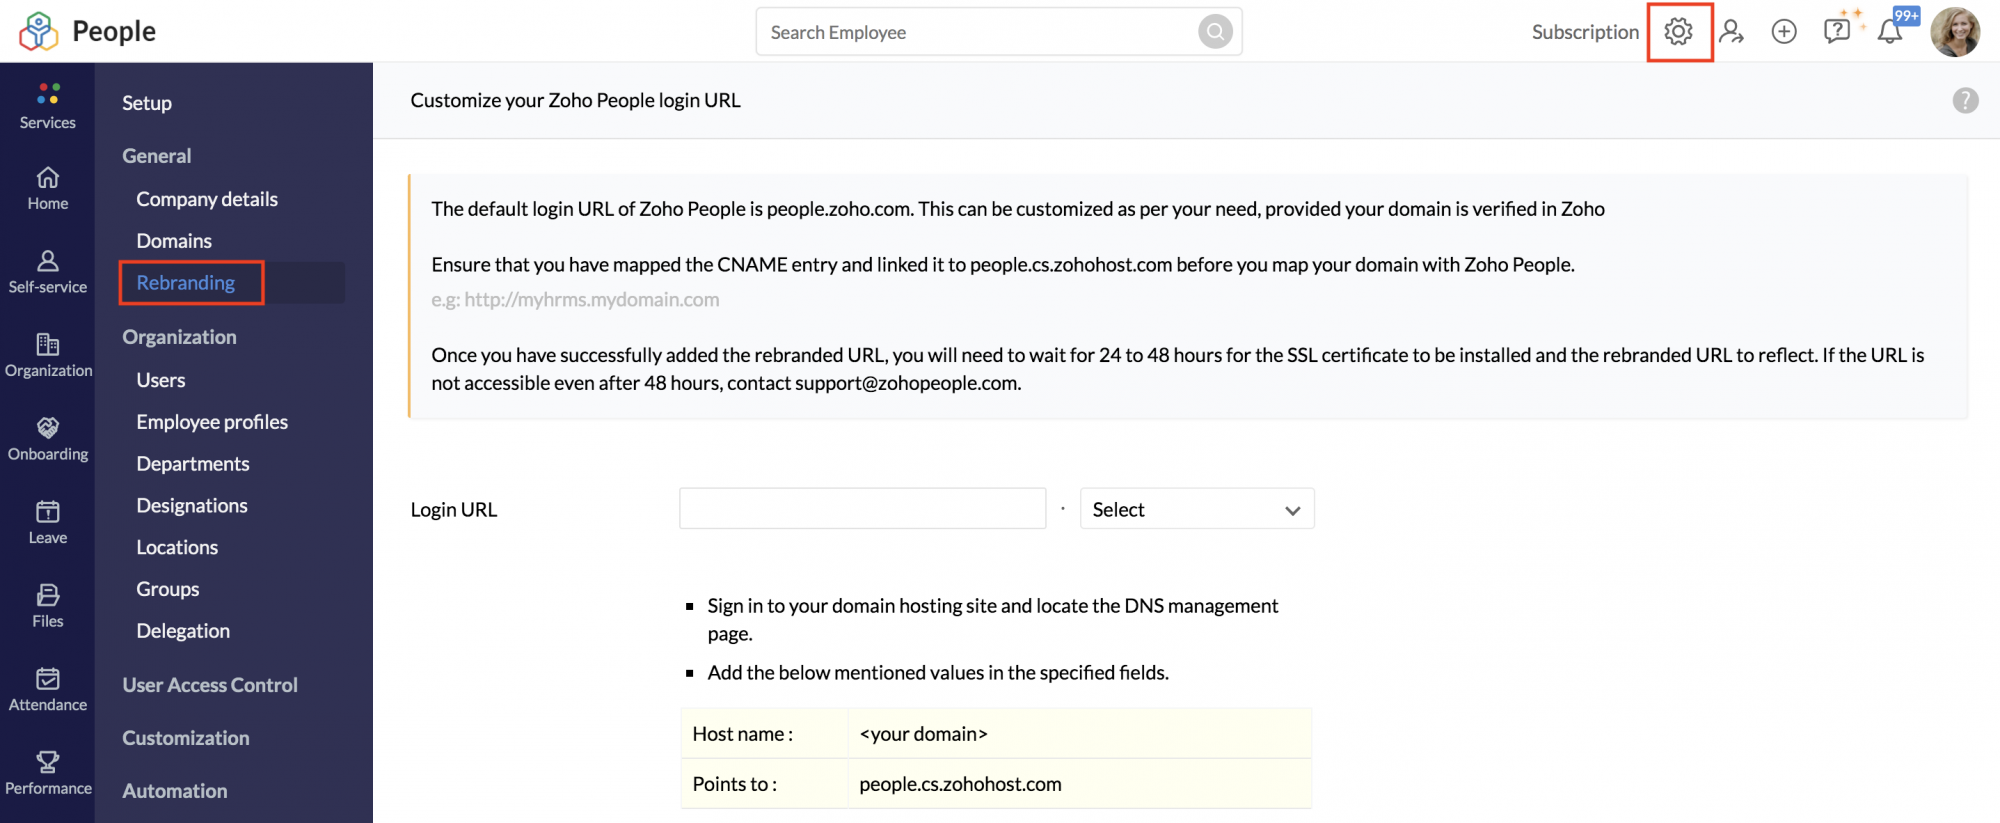
- Click Submit.
Note: Ensure that you have mapped the CNAME entry and linked it to people.cs.zohohost.com/people.cs.zohohost.eu /people.cs.zohohost.com.cn/people.cs.zohohost.in/people.cs.zohohost.com.au before you map your domain with Zoho People.
- Sign in to your domain hosting site and locate the DNS management page
- Add the below-mentioned values in the specified fields based on your domains (.com/.eu /.cn/.in/.au)
CName <yourdomain>
Hostname people.cs.zohohost.com/people.cs.zohohost.eu/people.cs.zohohost.com.cn /people.cs.zohohost.in/people.cs.zohohost.com.au
Delegation
When an employee wishes to delegate approvals to another employee during a specific duration or permanently, this can be done with the help of the Delegation feature.
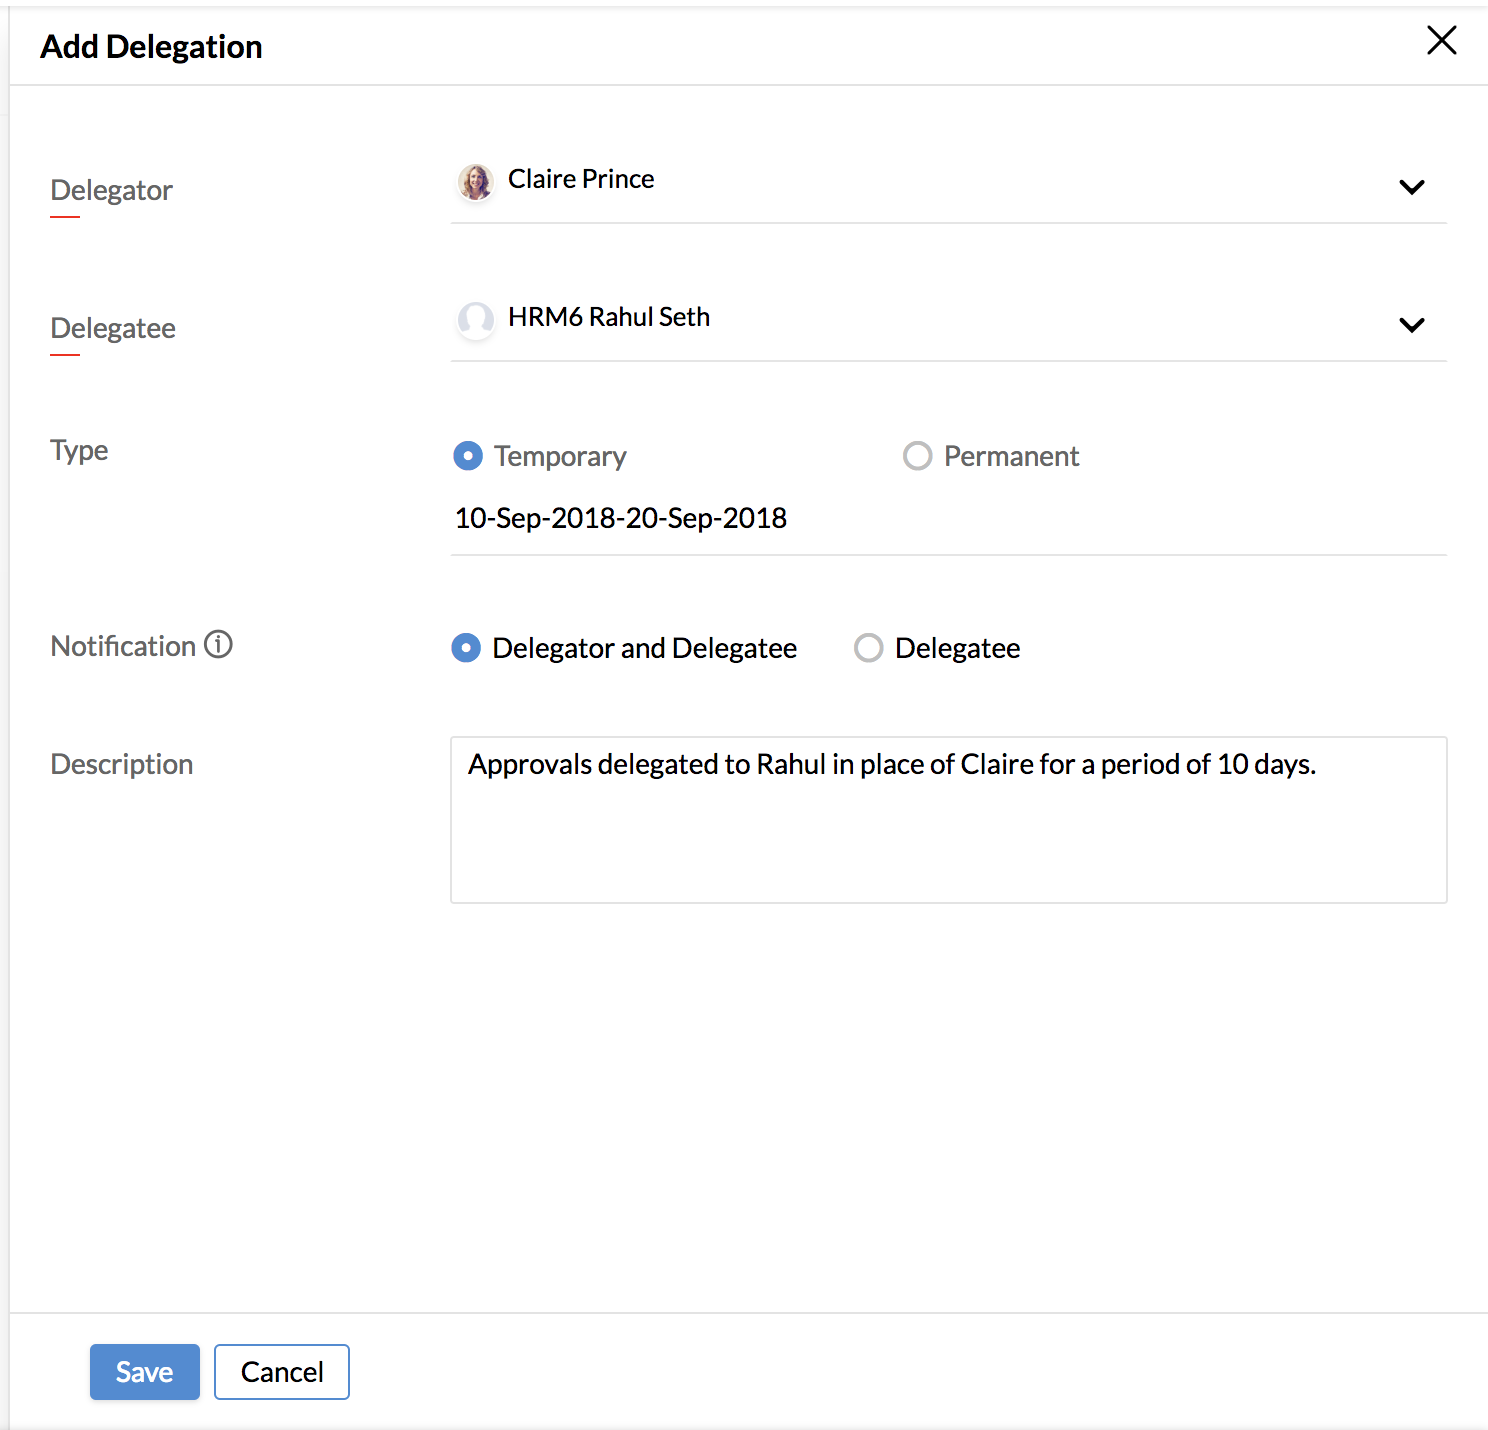
Adding a Delegation
To create a new delegation,
- Go to Settings > Organization > Delegation
- Click on Add Delegation.
- Under Delegator, select the person who is going to delegate the approvals.
- Under Delegatee, select the person to whom the approvals are going to be delegated.
- Under Type, select either Temporary or Permanent. If you select Temporary, select the Date Range applicable.
- Under Notification, choose either Delegator and Delegatee or Delegatee. If Delegator and Delegatee is chosen, all approval messages will be sent to both Delegator and Delegatee. If Delegatee is chosen, all approval messages will not be sent to the Delegator.
- Under Description, information regarding the approvals can be mentioned.
- Click Save.
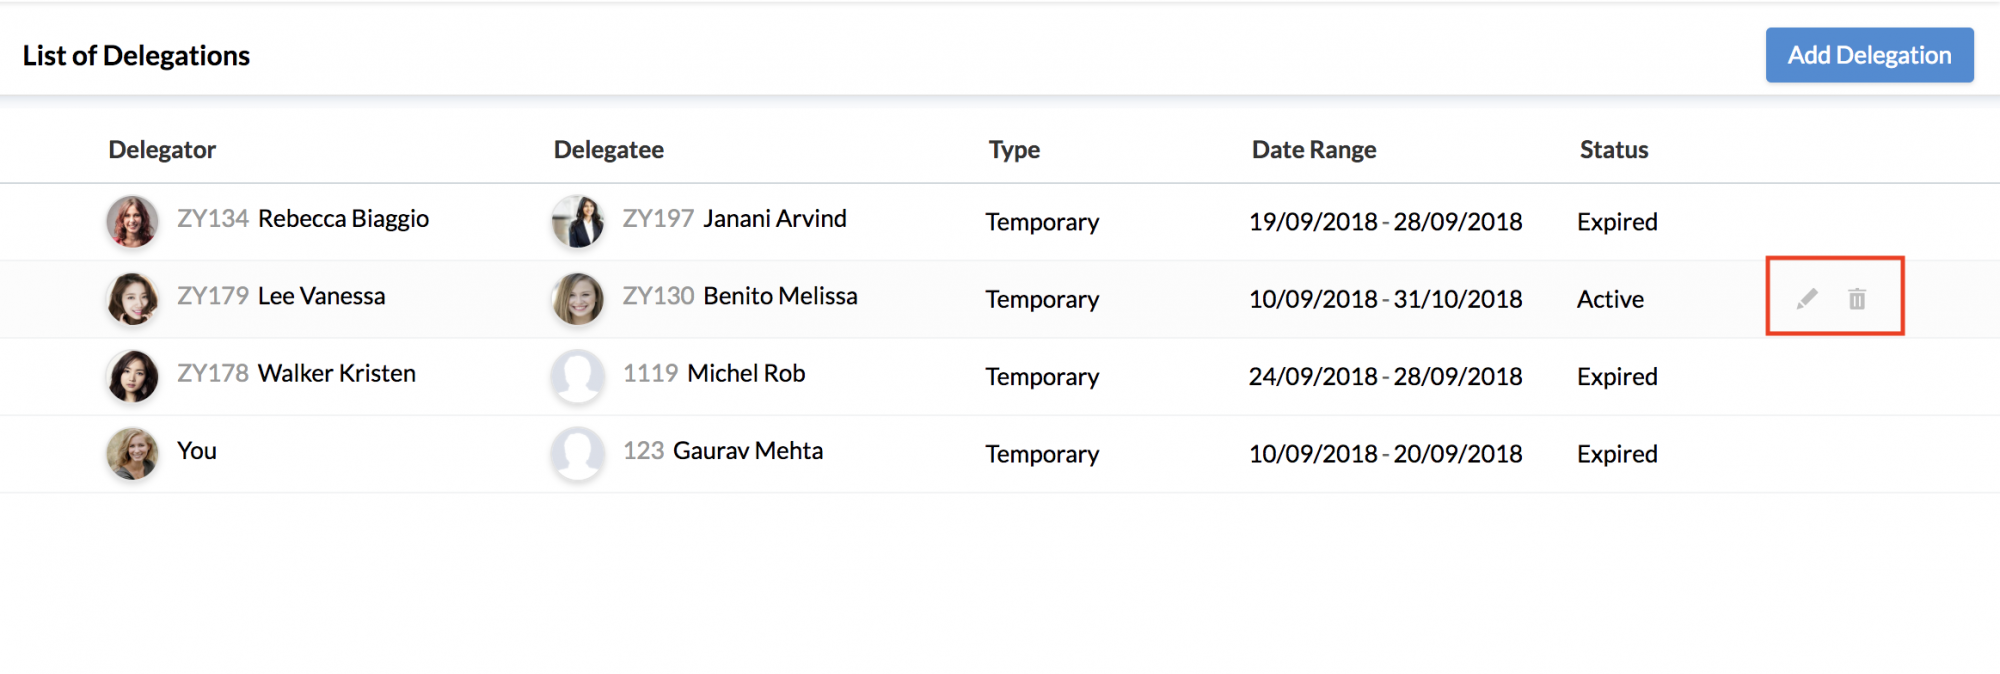
A new delegation is successfully created. Both the Delegator and Delegatee can view the details of the delegation as well its status on the under Self-Service > Delegation. Once a Delegation is created, all its details can be viewed under Self-Service > Delegation. Information about the Delegation's Delegator, Delegatee, Type, Date Range, and Status can be viewed.
Note: Delegation is only applicable to Approvals
Editing a Delegation
To edit a Delegation,
- Go to Settings > Organization > Delegation.
- Click on the Delegation that you want to edit and click on the edit icon.
- Make the necessary changes
- Click Save.
Now the Delegation has been successfully edited.
Deleting a Delegation
To delete a Delegation,
- Go to Settings > Organization > Delegation.
- Click on the delete icon beside the Delegation you want to delete.
- Click Confirm if you are sure you want to delete the Delegation. Now the Delegation has been successfully deleted.
Delegation can also be accessed from your Self-Service page.