Using Notes in Zoho Mail
Zoho Mail facilitates an easy way to add Notes. The Zoho Notes application within your mailbox makes it easy to jot down ideas instantly. These notes can be viewed or edited at a later time.
Add Note
Add Note from Left pane
- Log in to Zoho Mail
- Navigate to Notes on the application menu.
- Click the New Note button on the left menu.
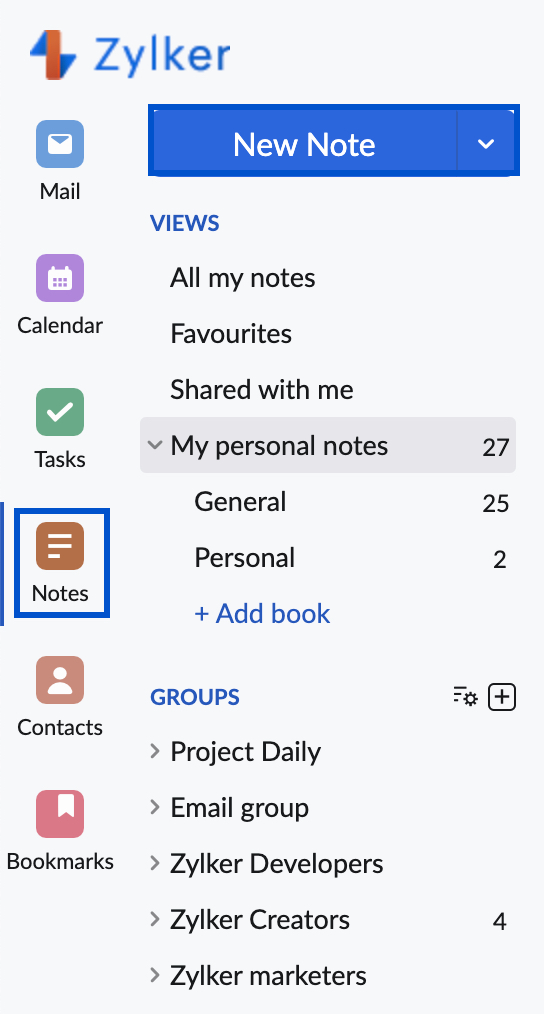
- Enter the desired title for your note and type in the description.
- You can change the note color, and insert tables, images, or other attachments to your note using the options provided.

- After adding the necessary customizations to the note, click Add.


You can also insert inline images into your notes and extract the content in these images into them. Select the Inline image and click More > Extract Content to do this.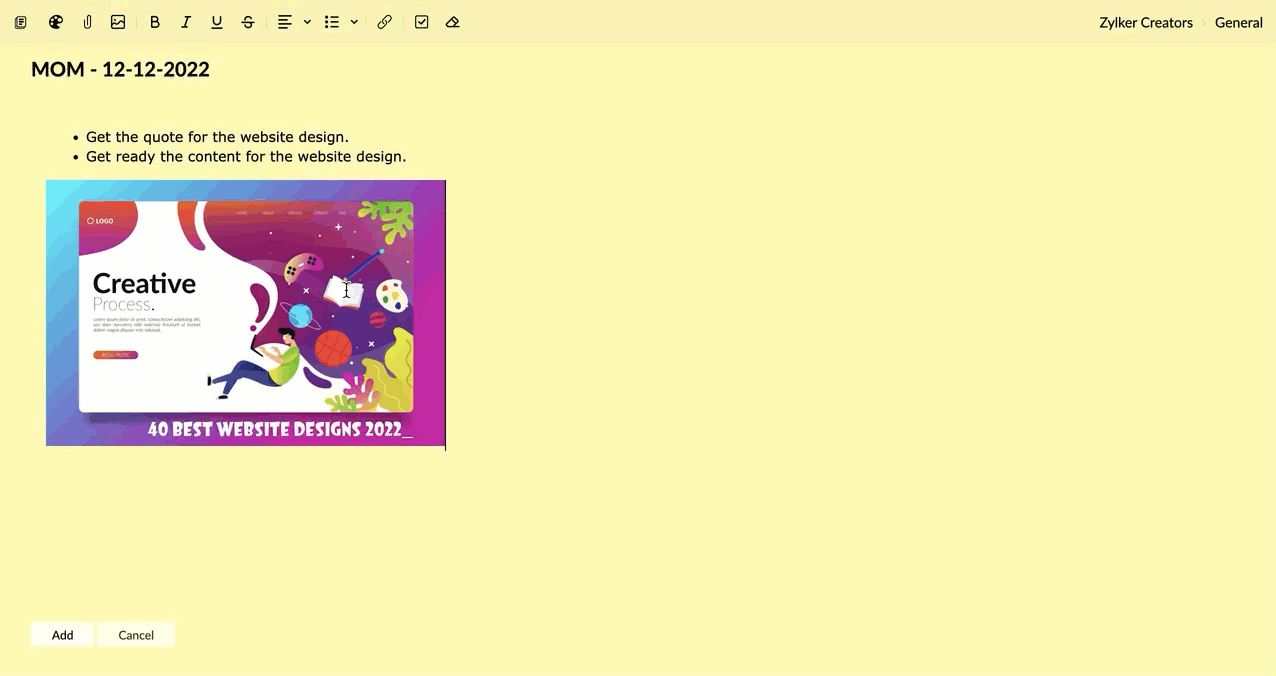
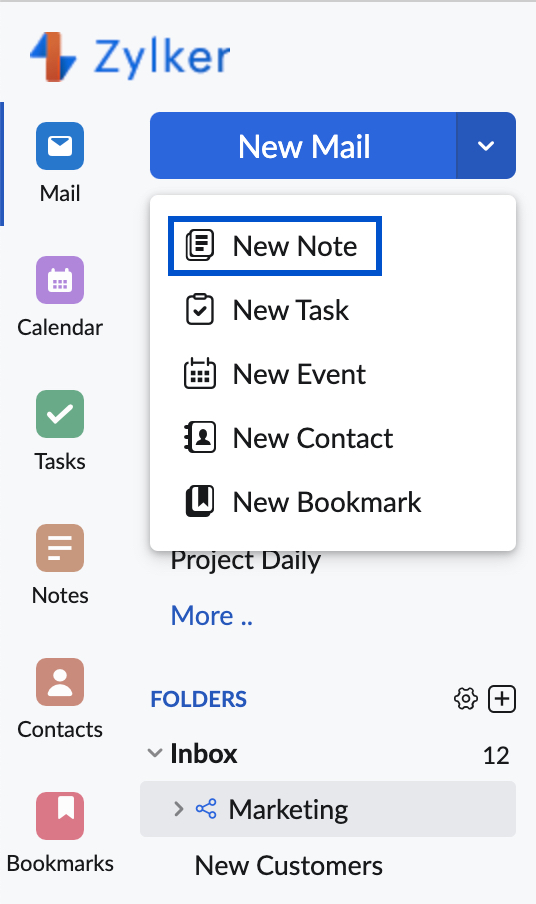
Alternatively, you can also click on the New Mail drop-down when you're in your inbox and choose New Note.
Add Note from Mail View
- Log in to Zoho Mail
- While viewing any email, click the More Actions icon in the top right corner of the window.
- From the drop-down, select, Add To and then choose Notes.
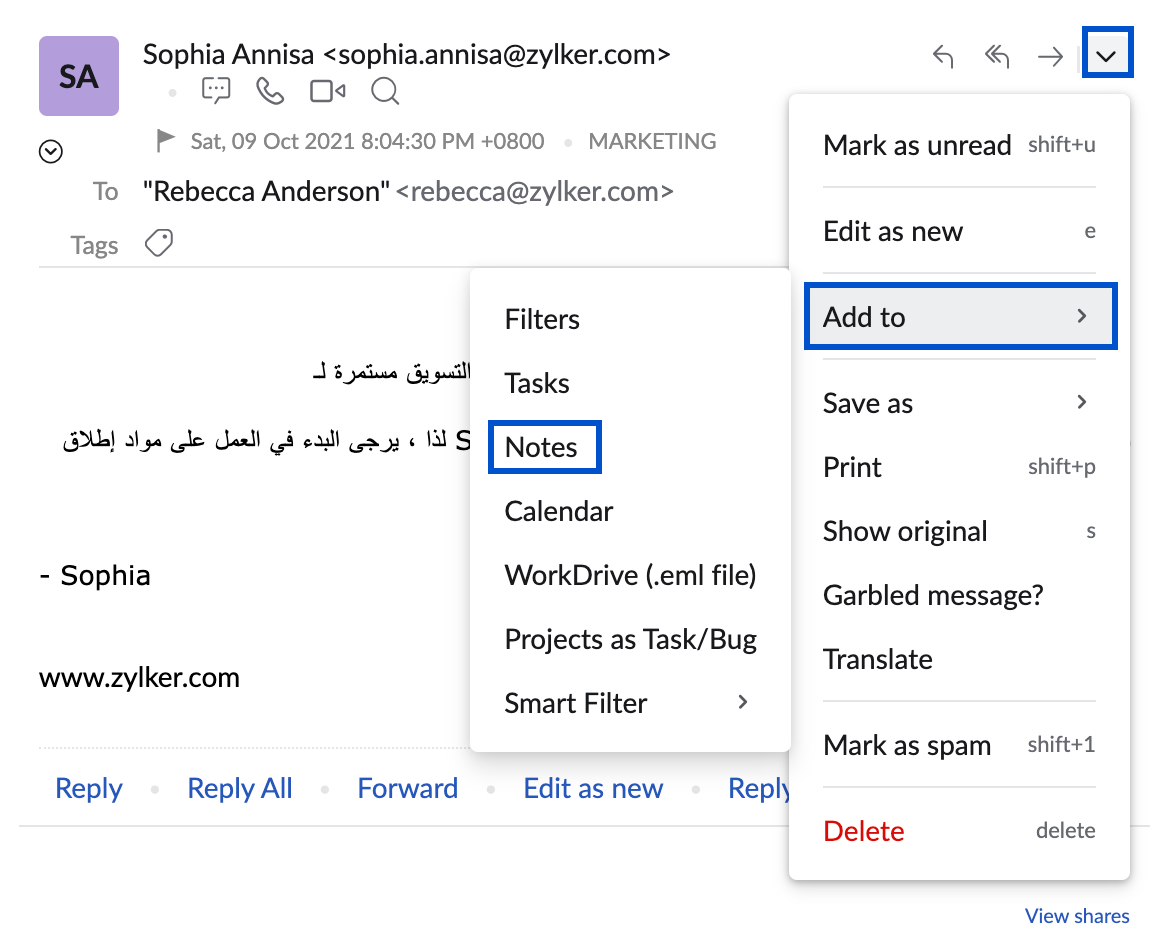
- The Create New Note window opens up.
- Provide a suitable title, enter the description, and click Add.

A new note can also be added from the listing of existing notes by clicking on the Notes Quick Add option.

You can also use the Smart Create menu to add a new note. Select the portion of the email you want to add as a note and Click on the Create Note icon in the Smart Create Pop-up that appears. The selected text gets added as the description of the note.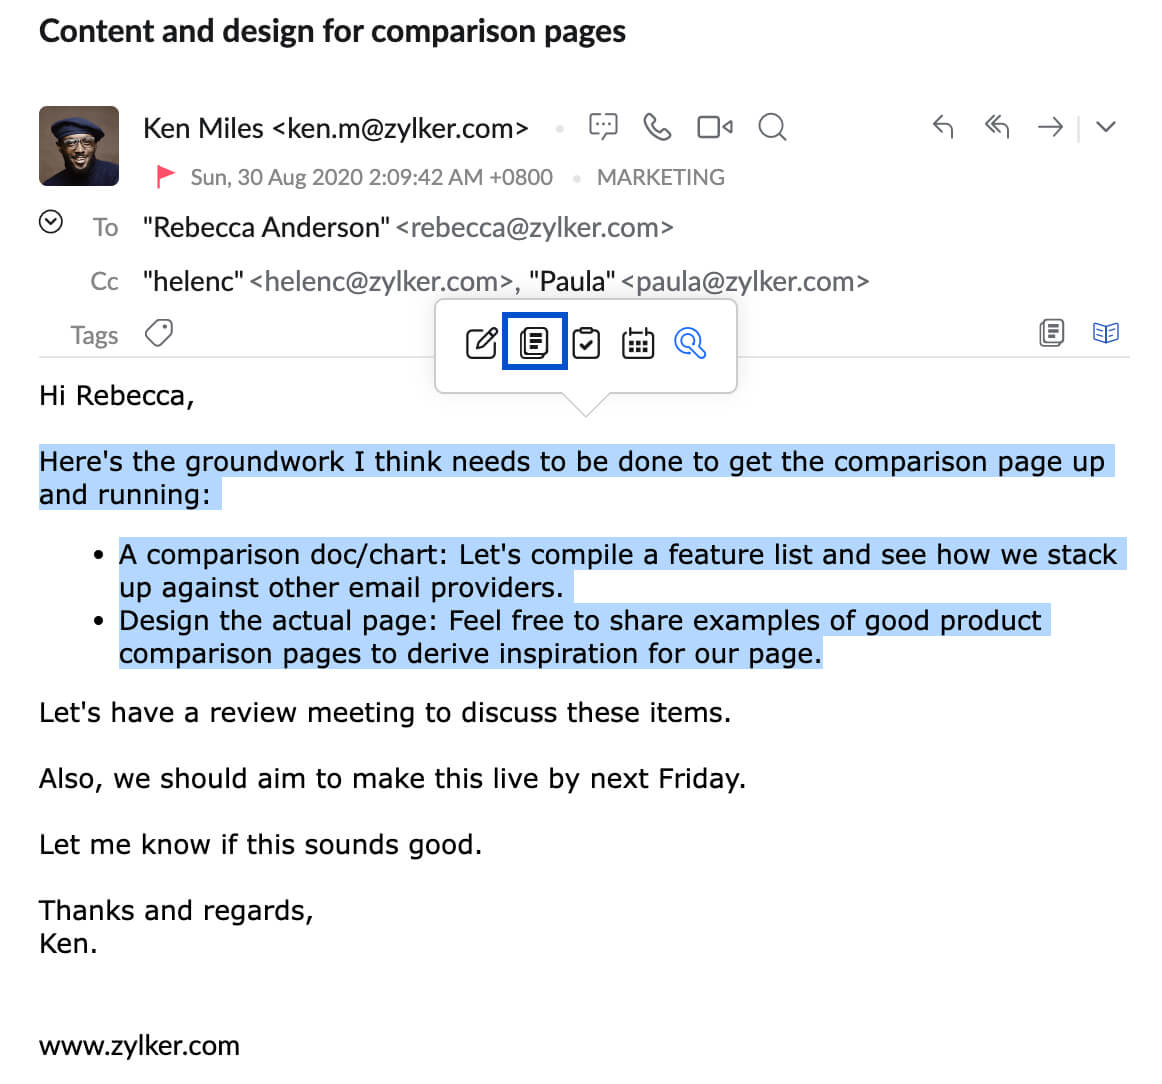
All these Notes get saved under the Notes application. You can view the email from which the Note was created using the Open Linked email option, in the Notes app.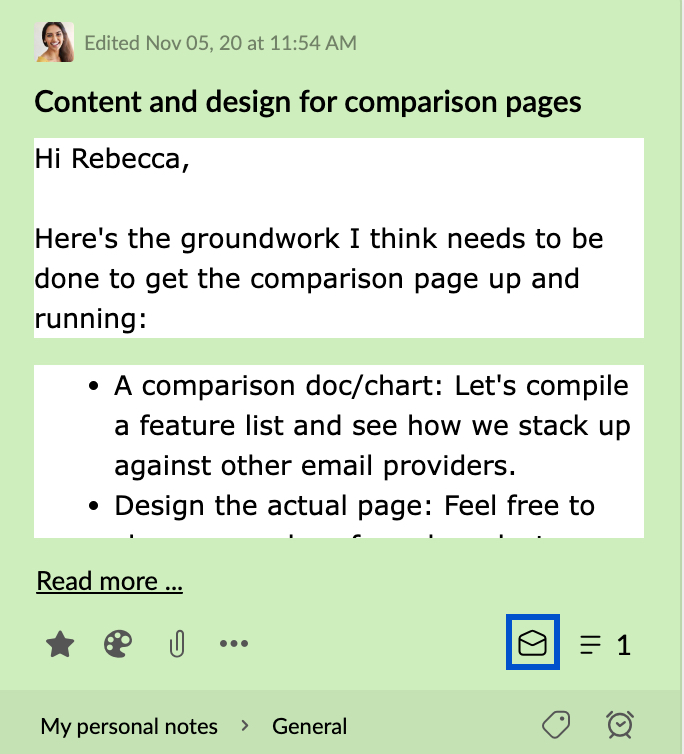
Zoho Mail notes support Rich text formatting. The formatting icons given at the bottom of the note are Bold, Italics, Underline, Strikethrough, Font indentation, and bullets. You can also convert the rich text format of the content to plain text by using the Remove formatting icon.

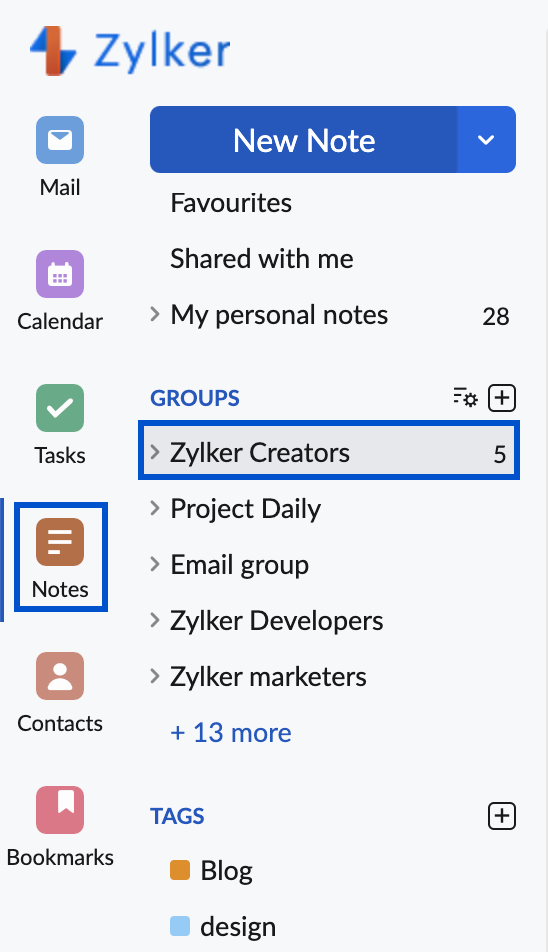
Add Group Notes
All the notes that you add get saved under the 'My Notes' section unless you select a specific group. To add Notes to groups, follow the steps below:
- Login to Zoho Mail
- Navigate to the Notes application in your mailbox.
- Click any group to which you want to add the note.
- Click the New Note button.
- The Add Note window pops up.
- Enter the title and description and click Add.
- The note gets saved under the specific group.

Alternatively, you can follow any of the methods to add a note and click My Notes in the top-right corner of the window. A listing of all the groups that you're a part of appears. Select the group to which you want to add the note.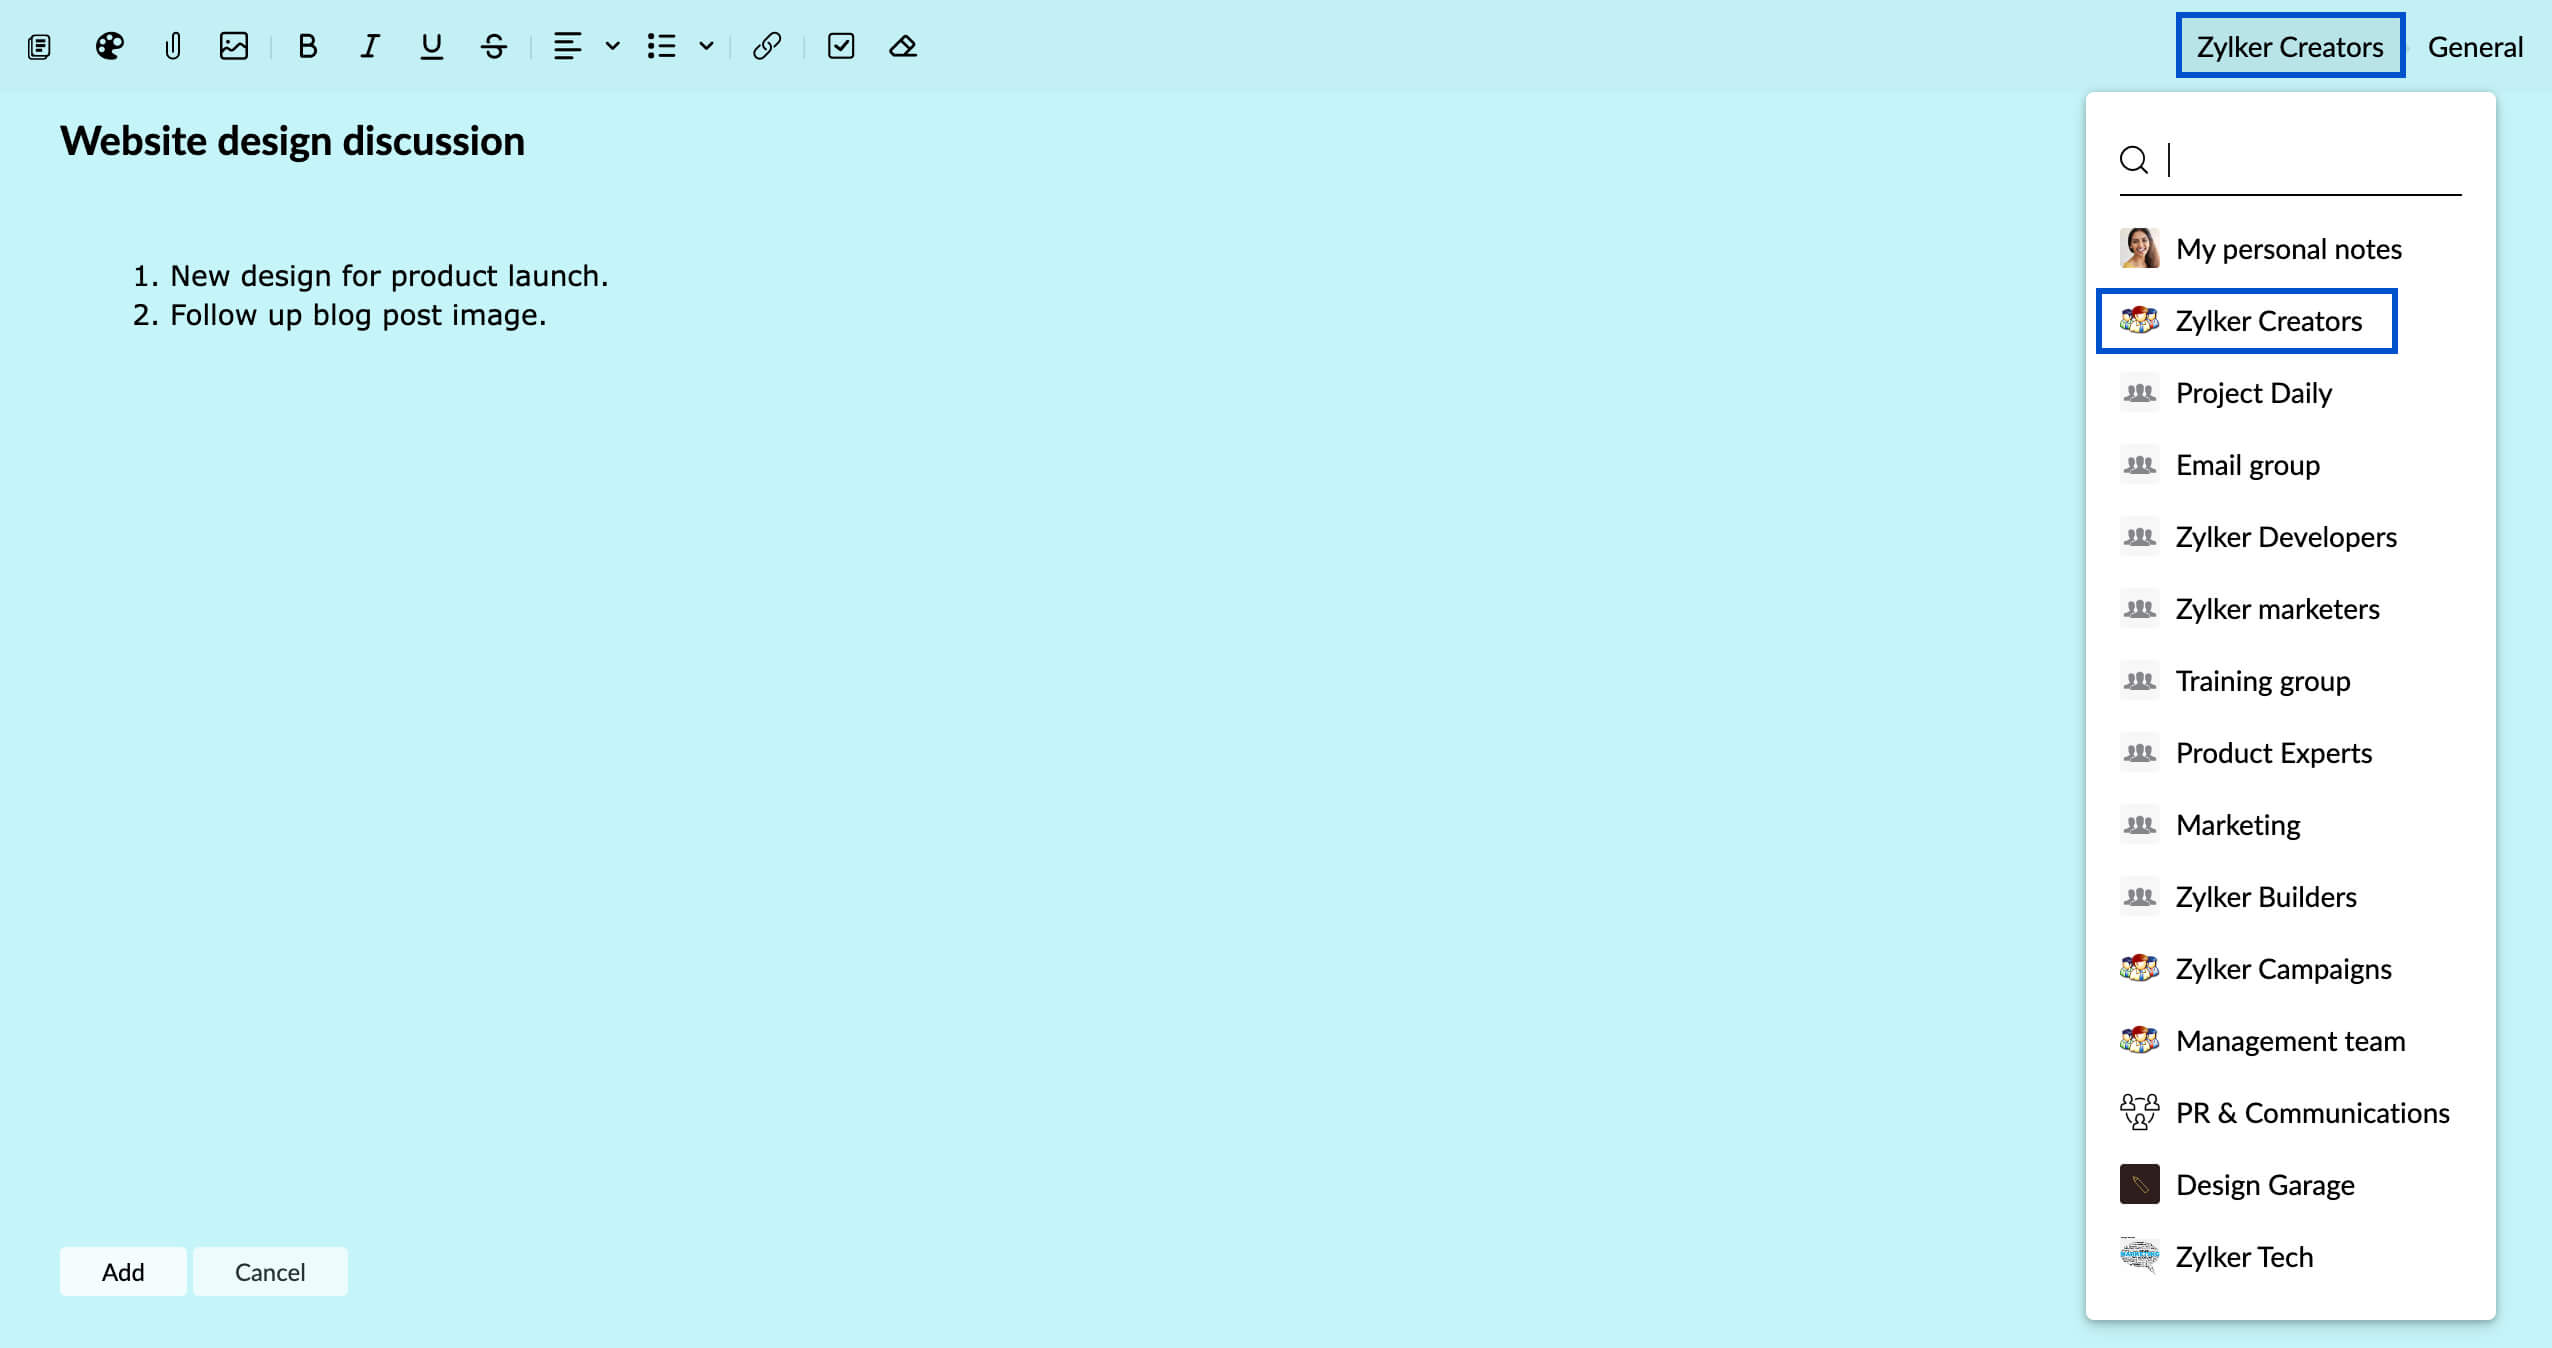
You can also copy or move the note to another stream group from the More options menu. Only the group's admin/moderator or the note owner can move the note from one group to another.
Sticky Note
Sticky notes are a great tool to take down your random thoughts and ideas that might get lost in the spur of the moment. Certain notes that you want to be reminded of when you open your mailbox, can also be made as sticky notes. These notes are affixed to your mailbox screen and can be minimized, popped out, resized, or closed depending on the requirement.
Steps to create a sticky note:
- Click on New Note in the left applications pane as you do to create a new note.
- Click on the Make it as sticky note icon on the top left corner of the new note.

- The Note will be affixed to your mailbox.
- The sticky note is actionable and all actions can be performed, similar to the usual notes.

You can convert an existing note into a sticky note by clicking on the same Make it as sticky note icon when the relevant note is in pop-out view.
Note:
Sticky notes can be placed in the preferred position on the mail interface using the drag option.
The minimized sticky notes can be accessed from the sticky notes icon in the bottom right corner of your mailbox. The number on the icon indicates the number the of sticky notes minimized and saved.

You can also make a note as a sticky note from the Notes app preview. Click on More Actions at the bottom of the note you want to make sticky and select the Make it as sticky note option. The respective Note will be affixed to your mailbox.

This can be done from both the Notes preview in the Notes application and in the email viewing pane (if the Note has been created from an email).
Note:
Sticky notes will be visible in your mail interface even on refreshing the page.
Print Notes
The Notes App allows you to print the Notes and Sticky Notes that require a hard copy. Notes in the box view can be printed by choosing Print from the More Actions option of the relevant note.

You can print the notes that are in the pop-out view by selecting the Print option from the More Options Drop down menu.
Copy Note
You can copy your notes to other groups in Zoho Mail by following these steps:
- Log in to Zoho Mail
- Navigate to the Notes application on the left pane and open the note which you want to copy to your streams group.
- Click the More options icon in the menu and select Copy Note.

- In the pop-up choose the group and book you want to copy the note to, from the respective sections and click ‘OK’.


You can also move the note to the other streams group by choosing Move Note in the more options menu.
Alternatively, if the Notes is in the box view, you can click My Notes in the lower part of the window. A listing of all the groups that you're a part of appears. Select the group that you want to move the note to.
Note: You can choose to exclude the comments in the original note by unchecking the 'Include comments' checkbox.
Notes View
You can change how you view your notes using the Notes View option. Notes can be displayed in Grid View or List View based on your preference.

Notes can be viewed in a separate tab by using the Open in tab option under More Actions in Notes preview.
Sort by
By default, your notes are arranged in order of when they were created. However, you also have the option to sort them based on the modification time. You can customize your sorting preferences by selecting either of the following methods:
- Oldest on top
- Newest on top


Sort by option for notes will not be available for Created by me view, favourites or Tags.
Comments and Collaboration
After adding a note, Zoho Mail provides options to collaborate and communicate about it without losing the context of the note. This can be done for both private notes and group notes.
Comments
In both cases, you can invite organization members to view the note or tag them in a comment to discuss ideas or keep them in the loop for projects involving various teams.
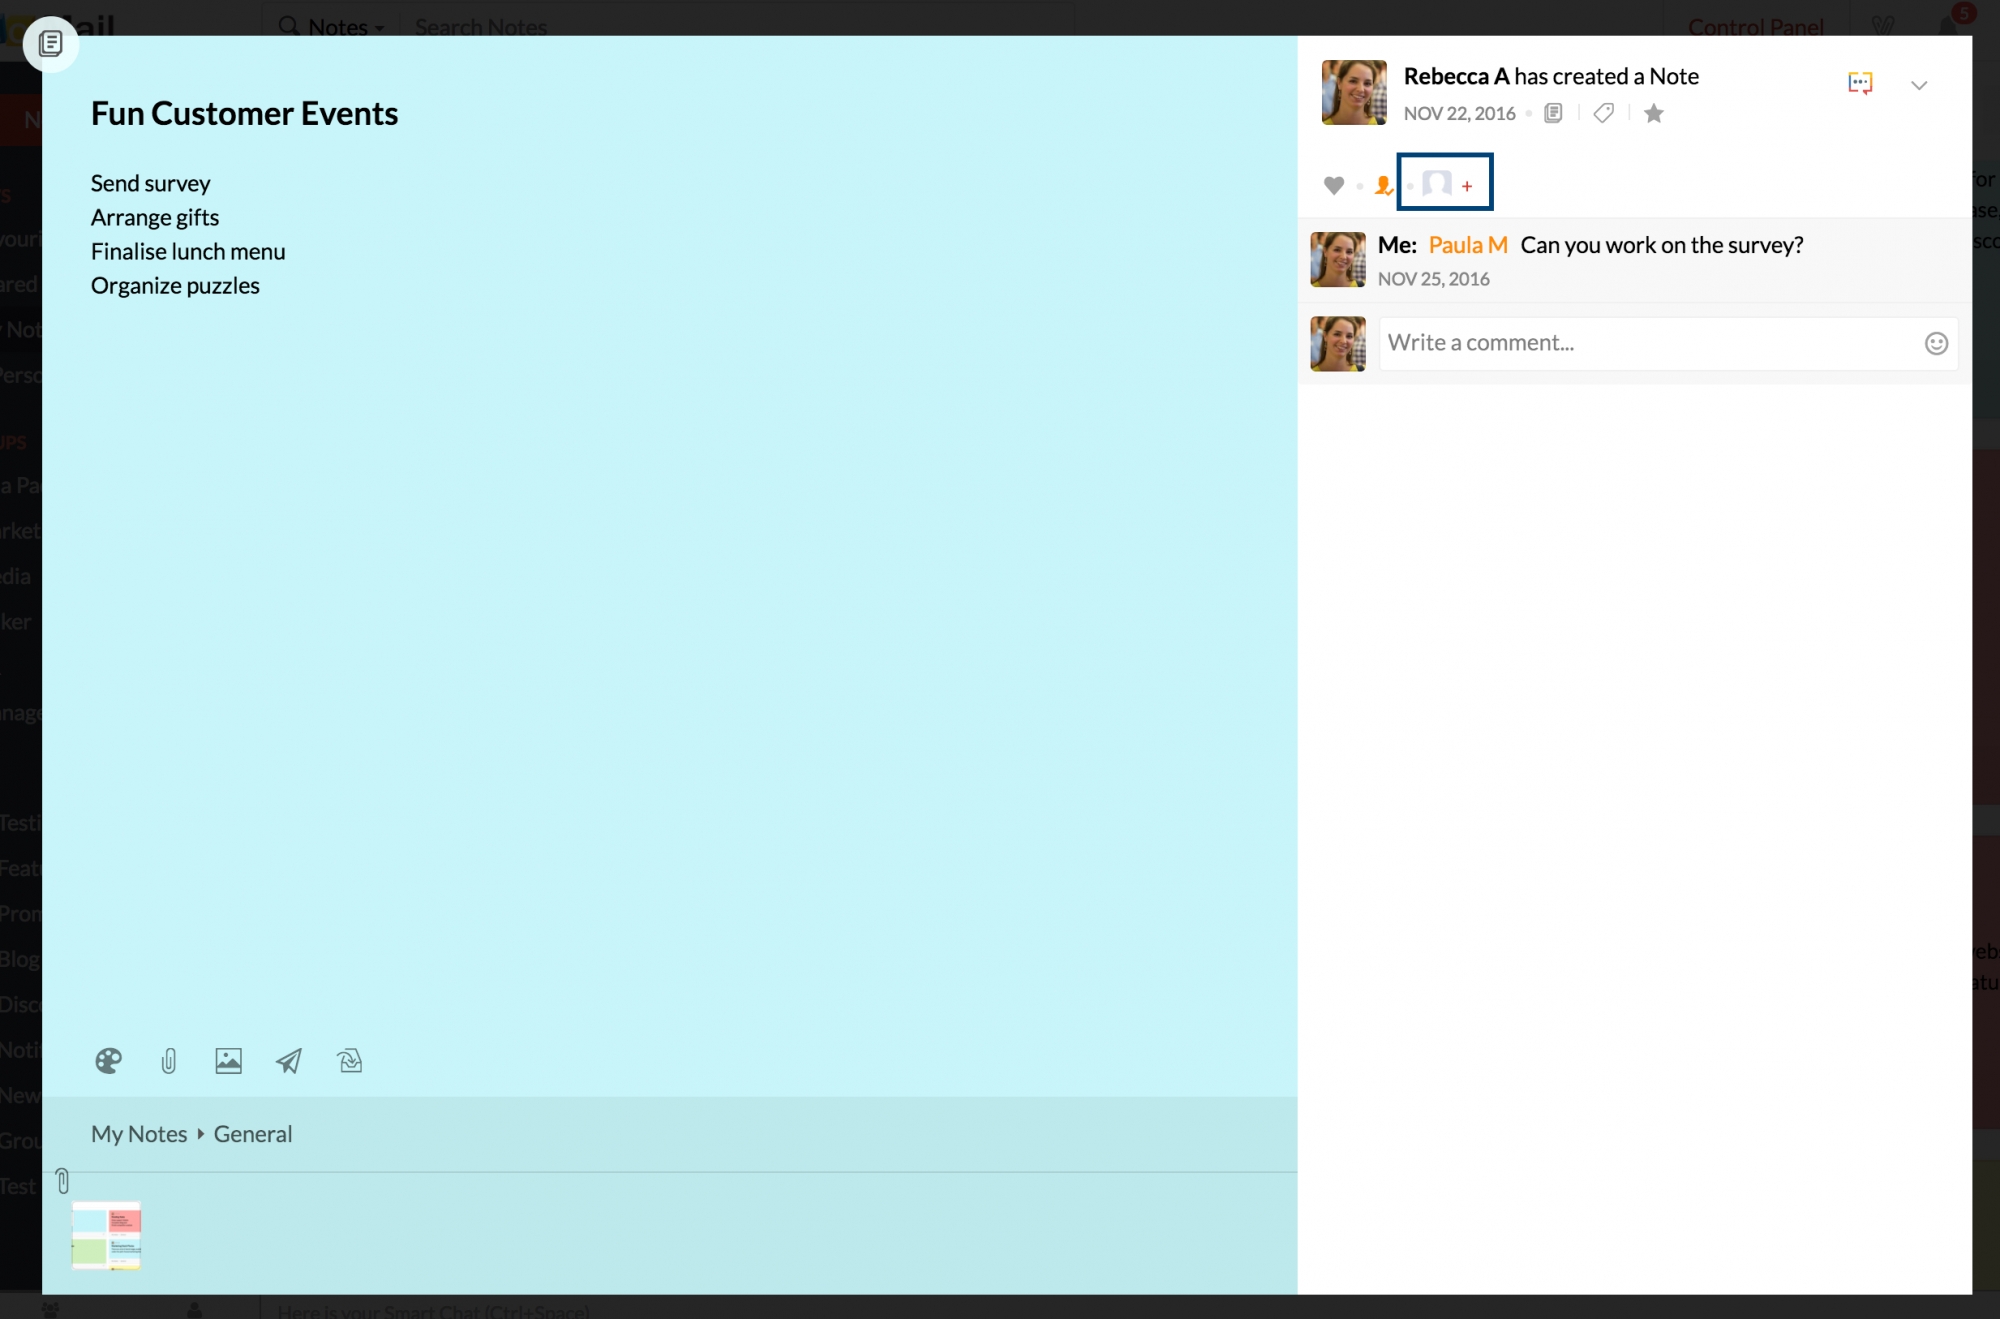
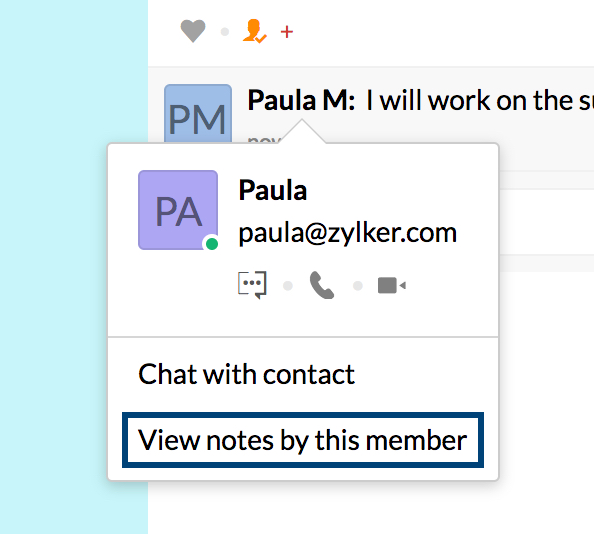
The notes that you add to a group directly get saved to the respective Streams page (if Streams is enabled for that group). You can click on the display name in the comments on any Group notes to view the contact card. You can choose the View notes by this member from the Contact Card to view all the notes by that member in that group.
Notes Collaboration
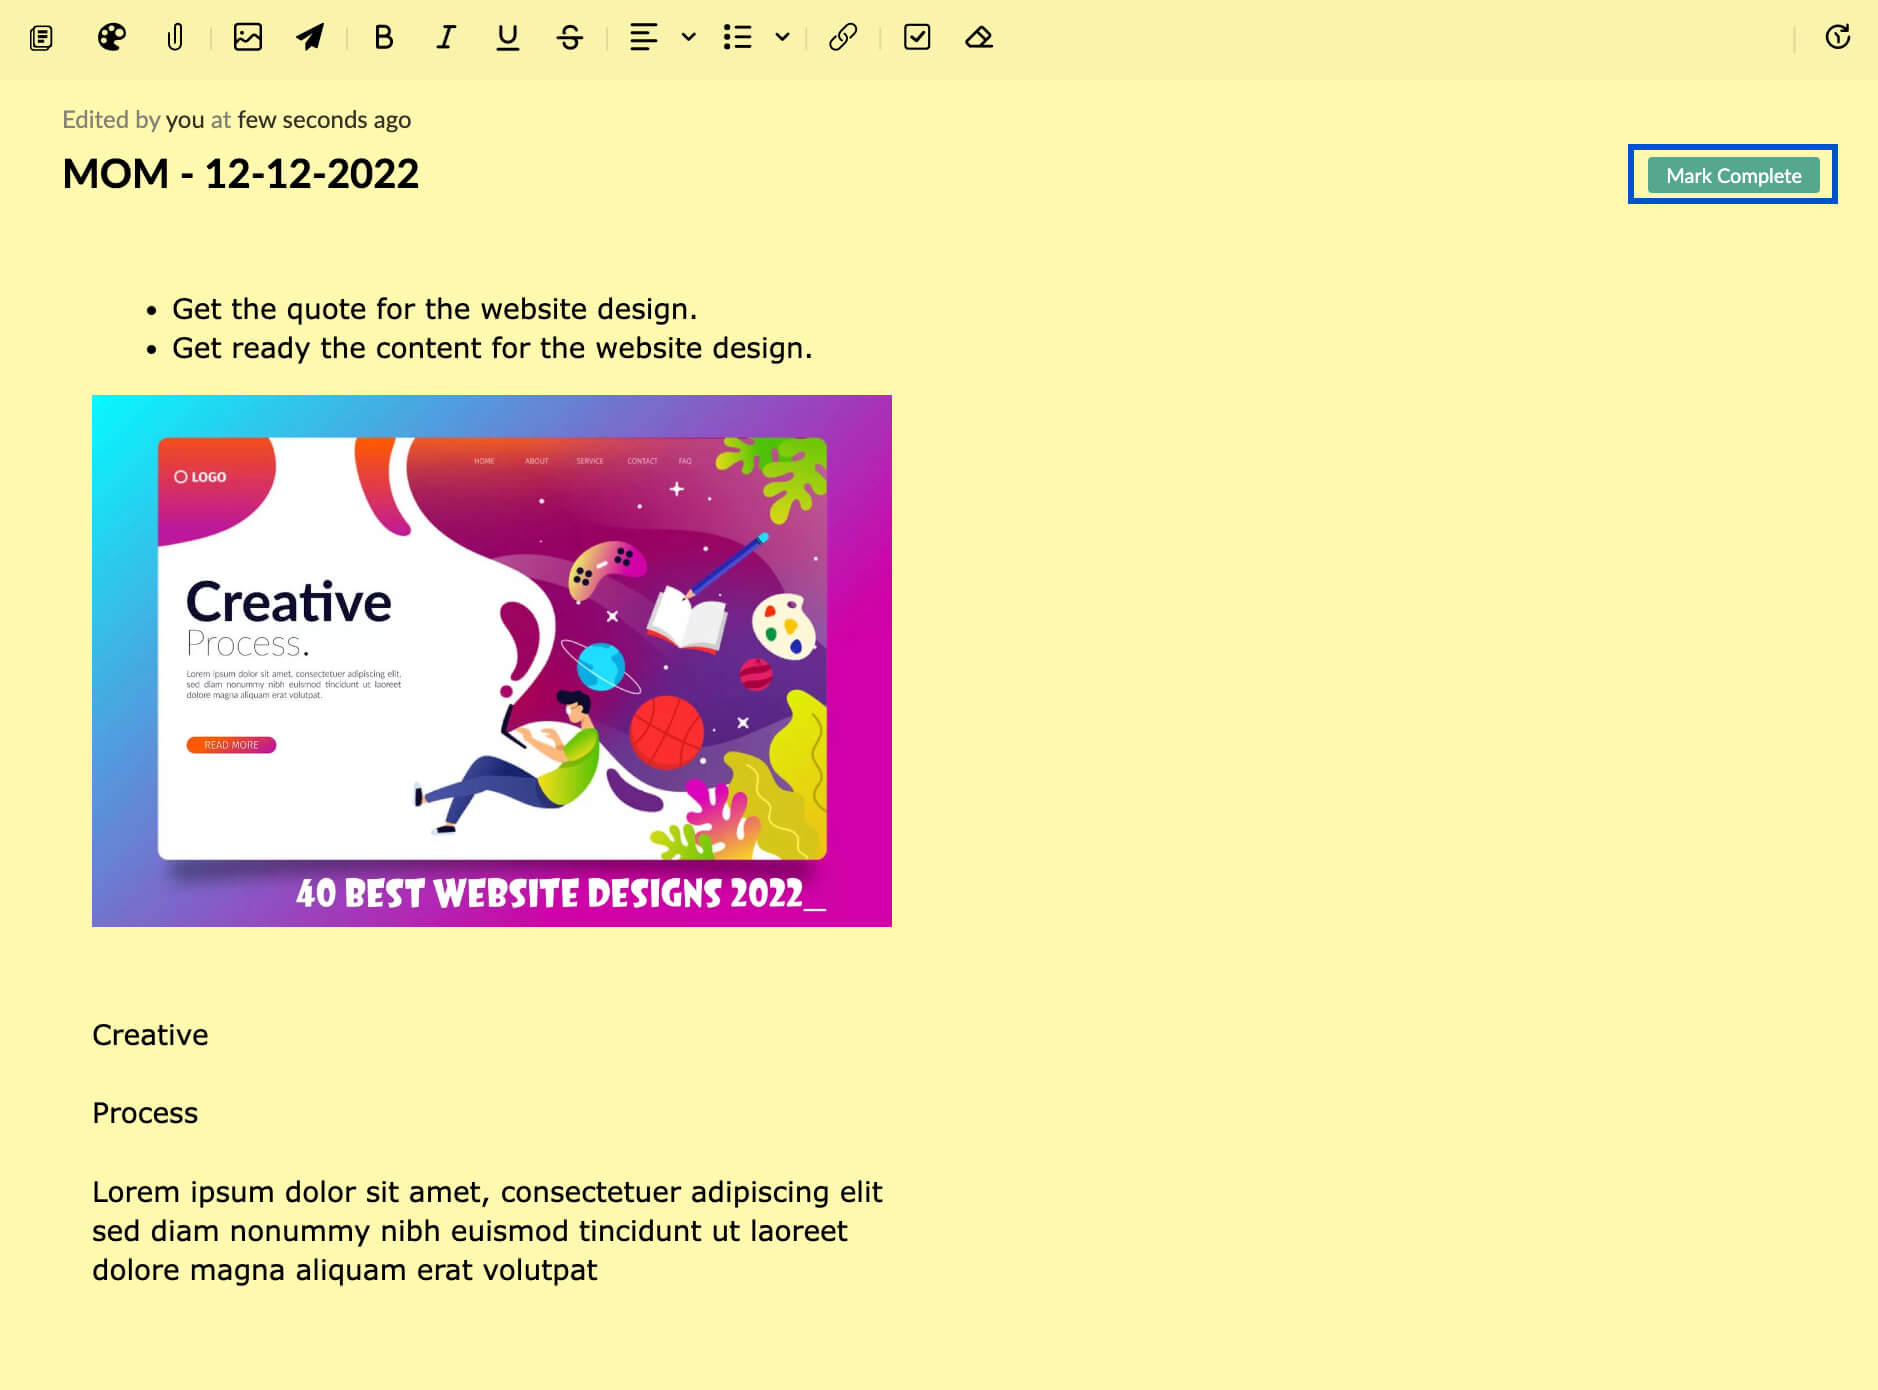
When you invite your org members to your note or create a note in any of your org groups, the members can edit the note and add their ideas or opinion to the note.
- The note can be edited only by one member at a time. To finish the edit the collaborator should click Mark Complete at the top. If any other group member/ invitee tries to edit the note simultaneously the changes done by them will not be saved.
- You can also view the version history of the note by clicking on the Version history icon in the top-right corner of the note. You can choose to Restore any version or Save as new version by using the More options icon.

- The collaborator's name along with the time of the edit will be mentioned on top of the note.


Tagging an organization member who's not part of the group, in a group note, adds them to the list of invitees.
Note:
The Notes Collaboration feature is available only to the organization users subscribed to one of our paid plans.
Organize Notes
Creating Books
In each individual group or your personal Notes section, you can create Books and categorize your Notes better under the relevant books.
Steps to create a Book:
- Navigate to the Notes application in your inbox.
- Right-click either My Notes or any of the groups that you're a part of.
- Select Create Book from the options listed.

- Enter a name for your Book and hit enter.
- The new Book gets saved under the parent Note category.
- You can navigate to a specific Book in the left listing pane to add notes under this category.

The books created under each category can be viewed by expanding the triangle to the left of the group name.
Create Collections under Books
Create collections under Books in Notes to better organize and view your notes, for both personal and group Notes. To create collections under Books, follow the steps below:
- Log into your Zoho Mail.
- Navigate to the Notes application in your inbox.
- Right-click either My Personal notes or any of the groups that you're a part of.
- Right click on the books created under a category - Group or Personal.
- Click on the +Add Collection.
- Enter the collection name and choose where to place the collection under from the drop-down.
The Collections created under each books can be viewed by expanding the triangle. Right click the collection to Rename collection, Place the collection under or Delete collection.
Mark as Favourite
You can mark the notes that you might need frequently as Favourites. They can be spotted easily under the 'Favourites' menu in the Notes application.
To mark a Note as a favourite, hover over the Note and click the Mark/ unmark Favourite icon. All the notes that are marked as Favourite can be viewed on a single screen under the Favourites menu.

Tag Notes
Tagging Notes is a great way to organize them into specific categories. Zoho Mail lets you create tags and assign them to Notes so that they're easily identifiable.
To tag a note, click the Tags icon on the right bottom corner of the note, and select the Tag that you want to apply to it.
You can view all the Notes under a specific Tag from your Streams page. Click the Tags icon in your group's Streams page and select the required tag. All the Notes under this tag get listed on the screen.

Color code Notes
You can also assign colors to each note based on the category for quicker identification. You can choose from 35 different colors to personalize and organize your notes. To assign a color to a note, click the Change color icon and choose the color that you would like to apply.
You will not be able to change the color of group notes that have been created by other group members.

Delete Notes
You can delete multiple notes at once from the Notes View to keep it organized. Select the Note(s) that needs to be deleted and click the Delete icon on the header menu.
