Outlook PST Migration
The administrators can migrate emails for multiple users from the Outlook PST files, to Zoho Mail, using the Outlook PST Migration option in the Zoho Migration Wizard.
Before proceeding with the migration, it is recommended to complete the following steps to ensure a hassle-free migration process:
Outlook PST Migration for Multiple Users with Multiple PST Files
The Administrator can migrate different PST files into the accounts of different users. The destination email accounts need to be created in Zoho under the same organization before the Migration process. When you have to migrate multiple PST files for multiple users, follow the preparatory steps specified below before migration.
Preparatory Steps - Text File
You need to create a text file with the details of the accounts to be migrated and also arrange the folders as mentioned in the steps below.
- Create a new migration folder in the system for multiple user migration.
- Create a new text file in the folder, with the list of accounts to be migrated, with each accounts email address in a new line (one below the other).
- The accounts should already be created in Zoho under the organization setup, and listed in the User Details section.
- Create subfolders under the migration folder in the format, user1@yourdomain.com, user2@yourdomain.com etc. with each account mentioned in the text file, being created as subfolder under the migration folder.
- Place the PST file(s) of each user, under the respective subfolders created.
- Cross verify the text file content with the subfolder details.
Folder names - Best Practices
Non English and Special Characters:
- We recommend folder names in English for better results during Migration. In case you have non English folder names, make sure that the local system in which you install and execute the Wizard supports the languages in use by the PST files.
- Special characters are not supported in the folder names. Any special characters will be removed from the folder name.
- In case you have trouble in non English folder names, you can temporarily have folder names in English only during the migration and then rename it back to the desired name in the web interface after migration in your preferred language.
Folders with System Folder names:
When you have folder names at the root level that match the system folders (Inbox/ Drafts/ Outbox/ Sent), the emails will be migrated to the respective folders. However, such system names are not supported for sub folders.
Similarly, except Inbox, other such folders should not have any subfolders. In case you have folders that have such reserved names, you may rename the folders for better results.
Incorrect Folder names | Suggested changes in Folder names |
|---|---|
Inbox/Drafts Drafts Templates $revenue$and%income% おはようございます Drafts/references | Inbox/myDrafts myDrafts myTemplates RevenueAndIncome GoodMorning myDrafts/References |
Password Protected PST files:
If some of the users have password protected PST files, create a text file 'pass.txt' under the respective users' folders. For each user, type in the PST file name followed by comma and the password to open the particular PST file. Add the details of each PST file for the same user in a new line, in the same format.
The pass.txt for a particular user will look as below:
my_email_backup1.pst,passw0rd1
my_email_backup3.pst,passw0rd3
Make sure you create the respective 'pass.txt' files under the corresponding folders for all users who have password protected PST files.
Steps to Migrate Multiple PST Files for Multiple Users:
- Launch the Wizard using the desktop shortcut or execute the file 'ZohoExchangeMigration.exe' from \Zoho\Zoho Exchange Migration\bin folder, under the installation path.
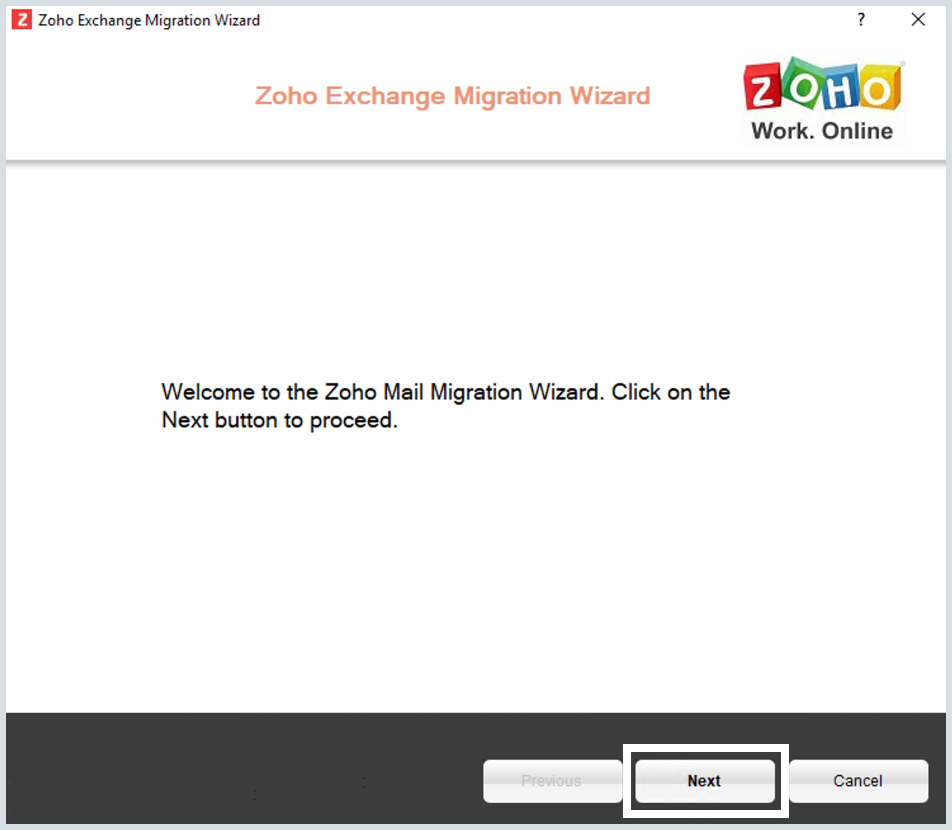
- In the Zoho Exchange Migration Wizard window, Click Next to proceed.
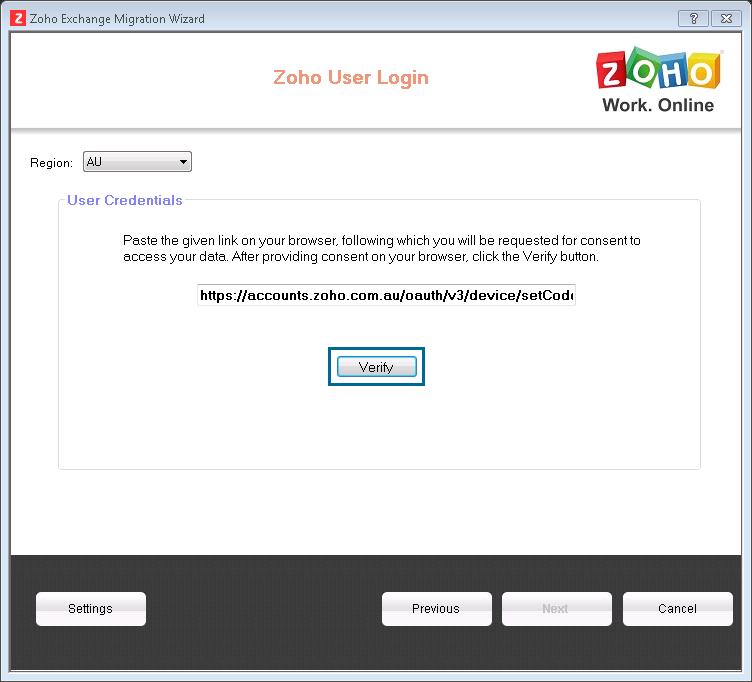
- Select your region from the drop-down menu. A verification link appears on the screen.
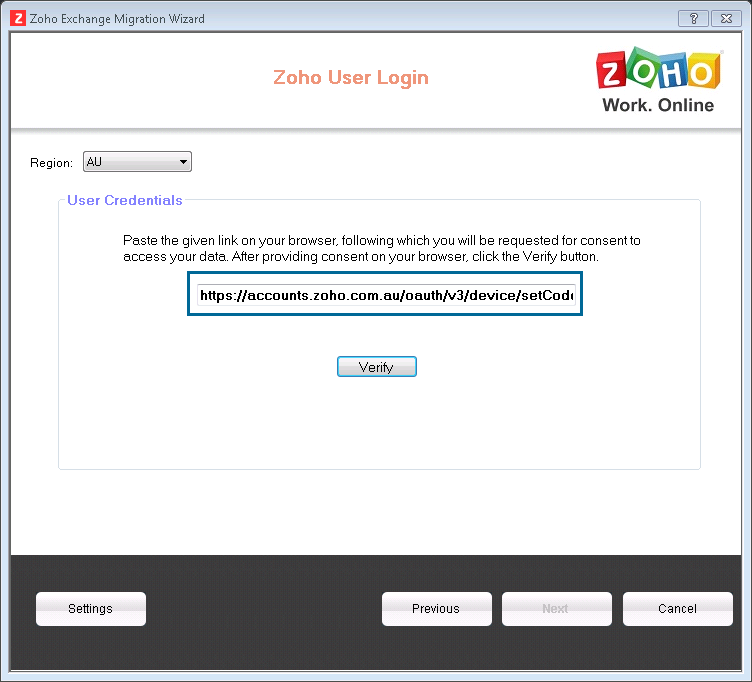
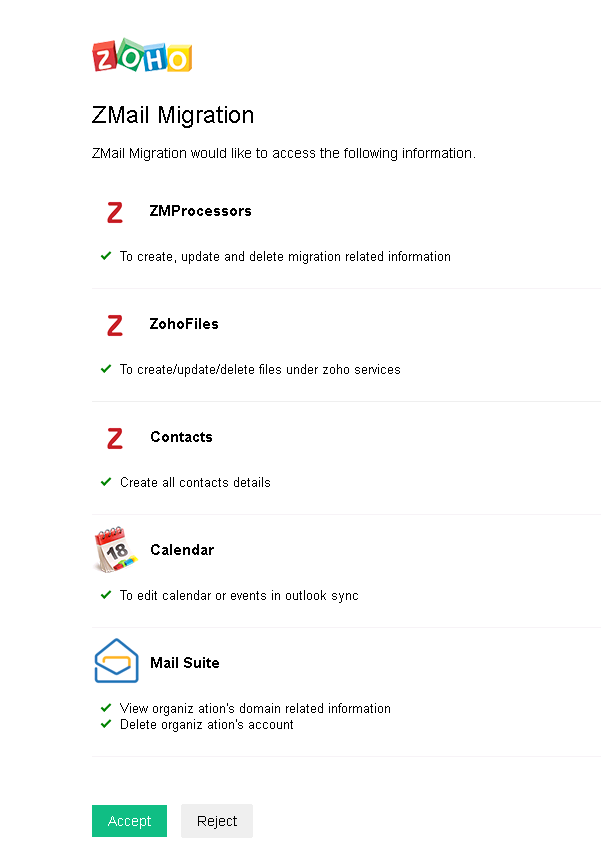
- Open the verification link on your web browser, log in to your account if not already logged in, and click Accept to let Zoho Mail access the mentioned data.
- Now, in the migration wizard window, click Verify, and then click Next.
- In the 'Migration For' dropdown, select 'Multiple Users' and click Next to proceed.
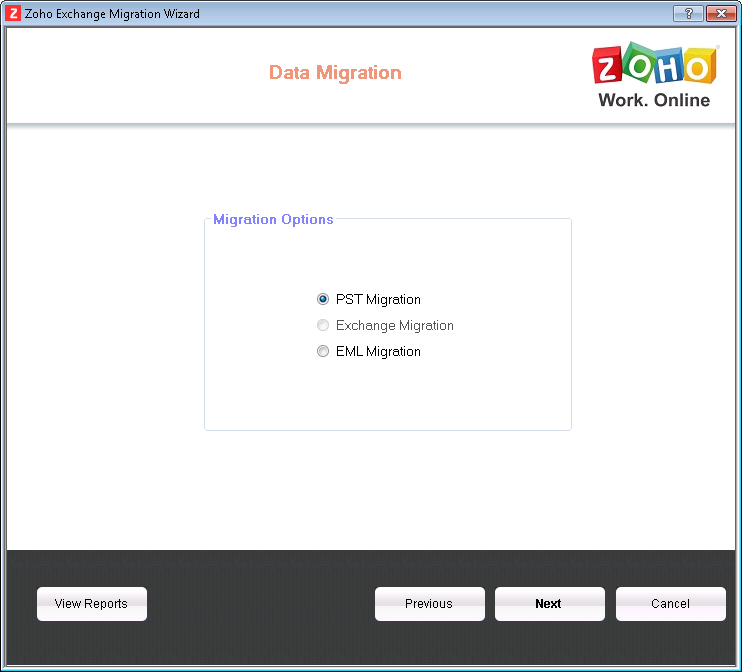
- In the Migration Options, select 'PST Migration' and click Next.
- In the Account verification dialog box, click on 'Browse' and upload the .txt file under the migration folder where you entered the user email addresses. Refer the preparatory steps for more details.
- The user account details from the text file get listed in a table.
- Click 'Verify Accounts'. The status column indicates the accounts that do not exist under Zoho Mail.
- If the account is listed as 'Does Not Exist', you have to create the user in case you have missed it. If the user has an account, but with a different email address you can create an alias email email for the user with the specific email address.
- After the account verification procedure, click Next.

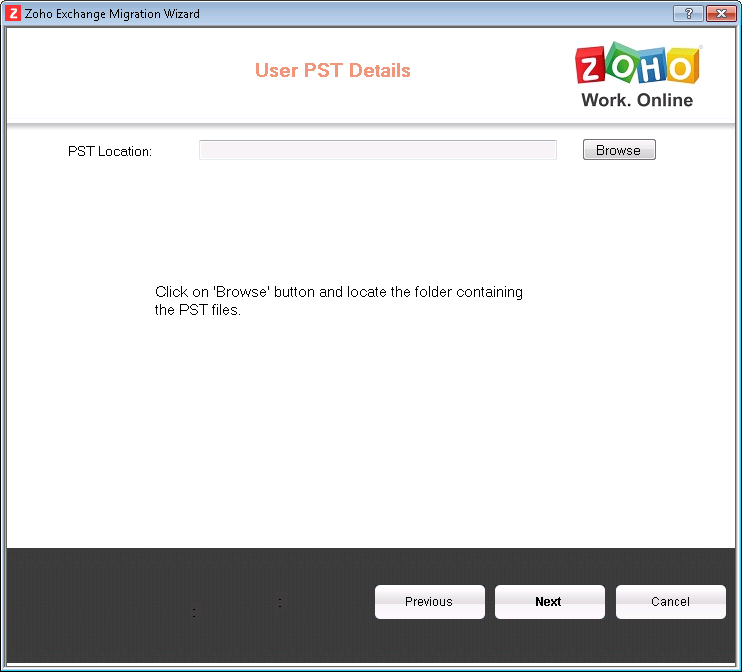
- In the User PST details dialog box, click 'Browse' and upload the folder containing the PST files. Refer the preparatory steps for more details.
- The list of PST files appear under each user. The PST files with which a problem was encountered during scanning will be indicated in red.
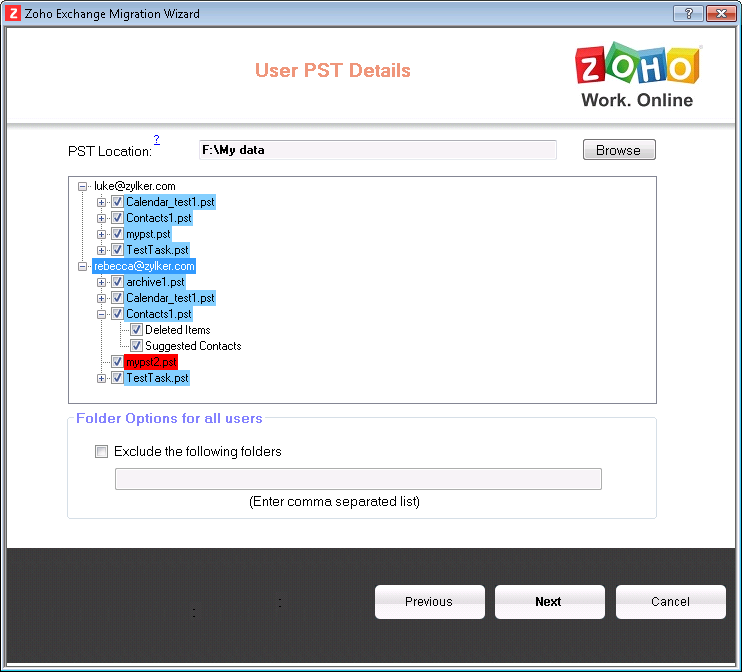
- If you want to leave out certain folders in the migration process, expand the user list and deselect the respective checkboxes.
- If you want to leave out a folder, universally for all users, type in the folder name in the 'Folder Options for all Users' text box, and click Next.
- The Error Info dialog box pops up, indicating the PST files that could not be migrated.
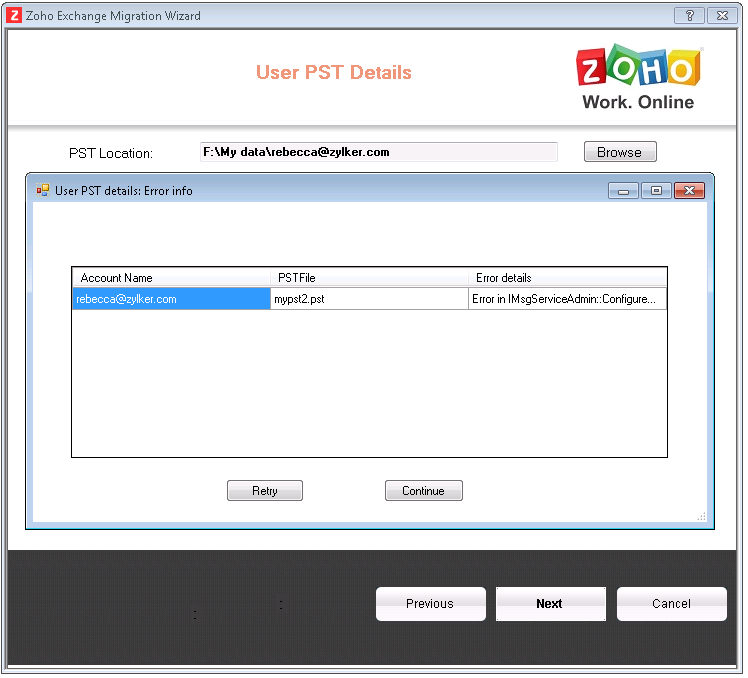
- If the password protected PST files have encountered an error, try removing the passwords and click 'Retry' to go back to Step 14.
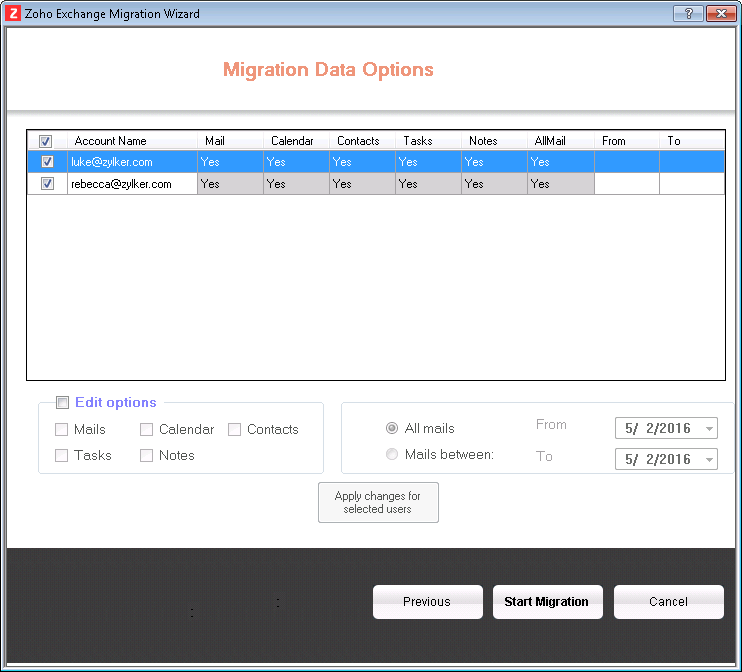
- In the Migration Data Options screen, select the data that you want to migrate to the respective Zoho accounts. By default, all the parameters are selected.
- You can select multiple accounts and edit your parameter preferences in the Edit Options menu.
- If you want to migrate mails that fall in a specific period, select 'Mails Between' and enter the 'From' and 'To' dates. Click on 'Apply Changes for Selected Users'.
- Make sure you have selected the right preferences for your accounts. You can't edit or access the previous screens once you've started the migration.
- Click 'Start Migration' to begin the migration process.
- Make sure you're connected to the internet throughout the entire duration of the migration.
- The status column provides the details for the account being migrated.
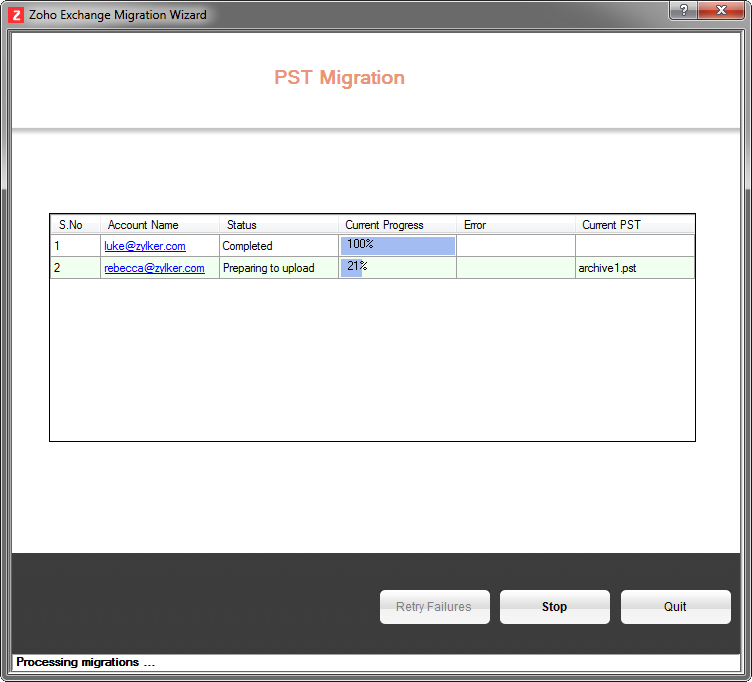
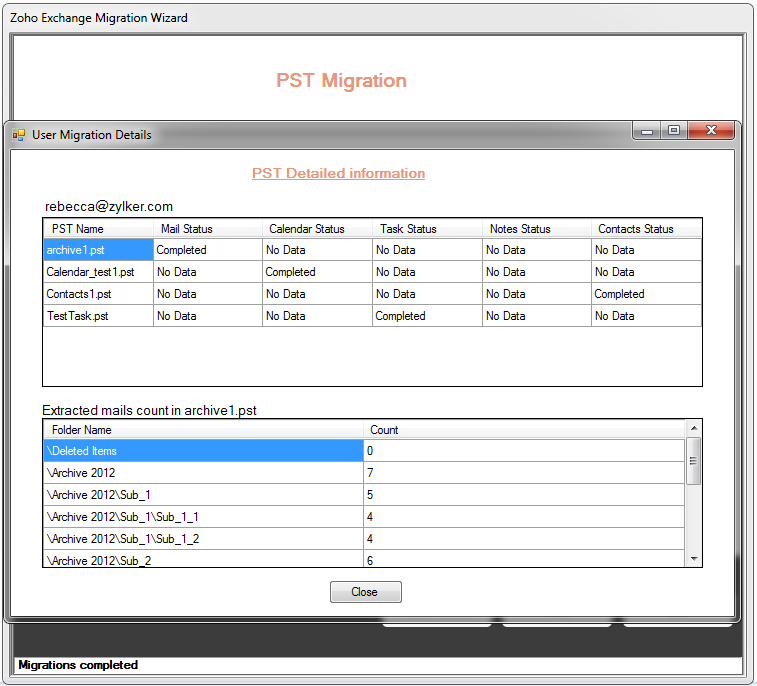
- You can click on any specific email address under the 'Account Name' column to view the detailed progress for that user.
- The migration speed depends on the network speed, size of data to be migrated and other such factors. You will be prompted after the migration process is completed. In case you encounter any connectivity issues, you may choose to check your internet connection, and click on 'Retry Failures'.


Outlook PST Migration for Single User:
Steps to Migrate PST Files for a Single User:
- Launch the Wizard using the desktop shortcut or execute the file 'ZohoMigrationWizard.exe' from \Zoho\Zoho Exchange Migration\bin folder, under the installation path.
- In the Zoho Exchange Migration Wizard window, Click Next to proceed.
- Enter your Zoho Mail credentials. The entered email account should be a part of your organisation first.
- In the 'Migration For' dropdown, 'Self' will be selected by default if you're not an admin. Otherwise, select Self.
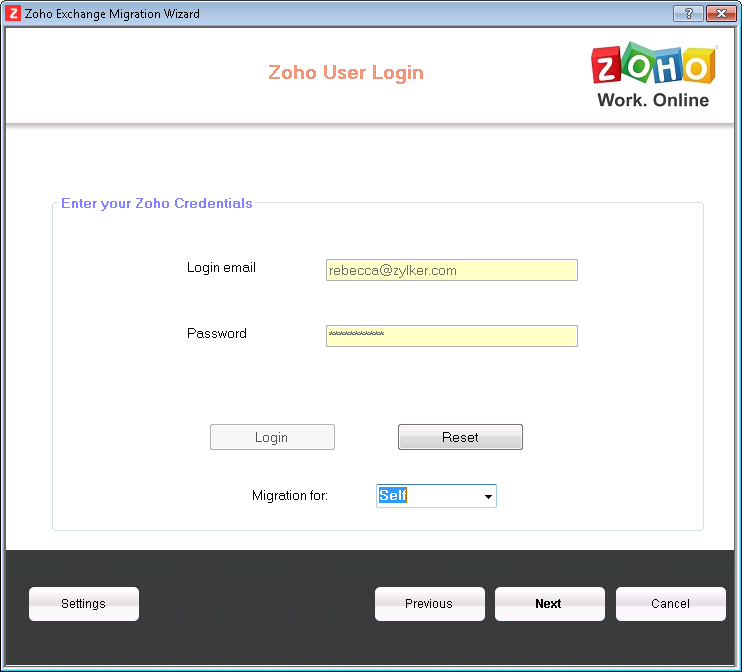
- In the Migration Options, select 'PST Migration' and click Next.
- Create a migration folder in your system and add all your PST files that need to be migrated.
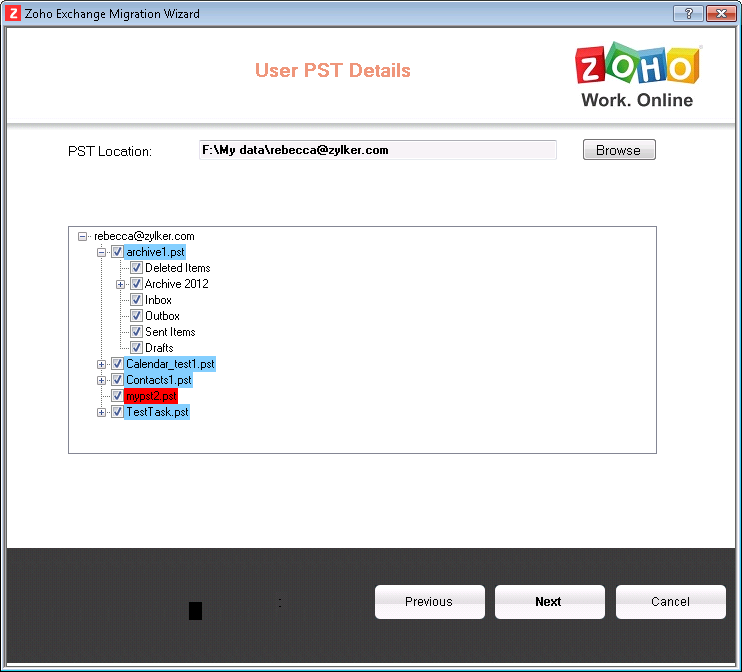
- In the User PST Details screen, click on 'Browse' and select the folder where you've stored the PST files.
- The list of PST files stored for this user get listed on the screen. The PST files with which a problem was encountered during scanning will be indicated in red.
- If you want to leave out certain folders in the migration process, expand the folder list and deselect the respective checkboxes. Click Next.
- The Error Info dialog box pops up, indicating the PST files that could not be migrated.
- If the password protected PST files have encountered an error, try removing the passwords and click 'Retry' to go back to Step 10.
- In the Migration Data Options screen, select the data that you want to migrate to the Zoho account. By default, all the parameters are selected.
- You can also edit your preferences directly in the Edit Options menu.
- If you want to migrate mails that fall in a specific period, select 'Mails Between' and enter the 'From' and 'To' dates. Click on 'Apply Changes for Selected Users'.
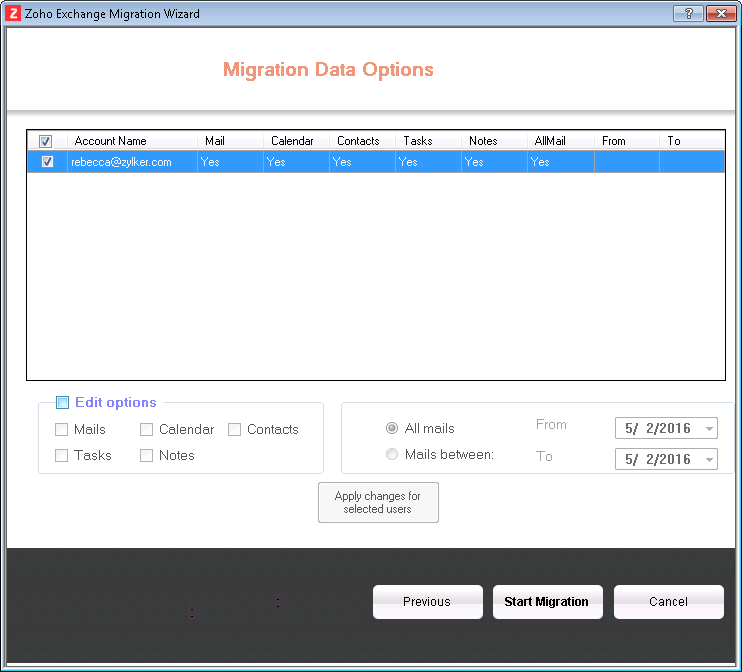
- Make sure you have selected the right preferences for your accounts. You can't edit or access the previous screens once you've started the migration.
- Click 'Start Migration' to begin the migration process.
- Make sure you're connected to the internet throughout the entire duration of the migration.
- The status column provides the details for the account being migrated.
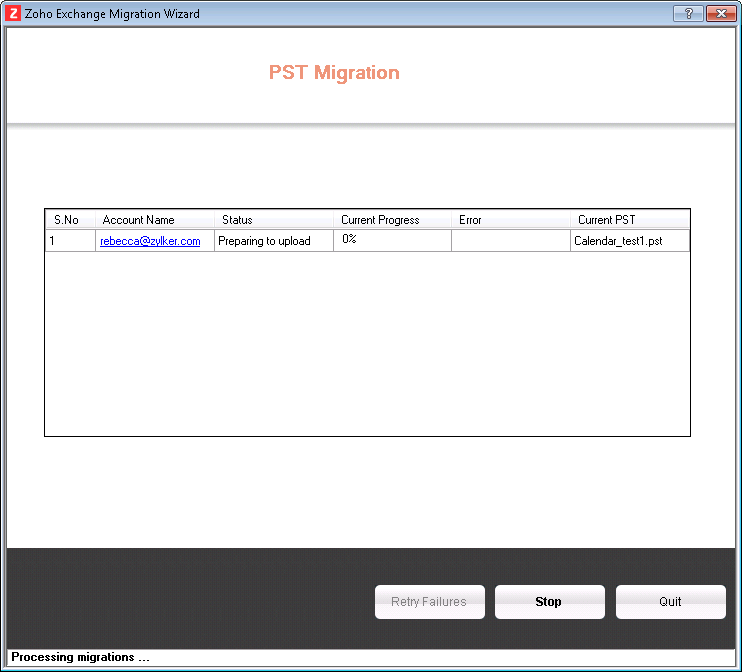
- You can click on the email address under the 'Account Name' column to view the detailed progress for that user.

- The migration speed depends on the network speed, size of data to be migrated and other such factors. You will be prompted after the migration process is completed. In case you encounter any connectivity issues, you may choose to check your internet connection, and click on 'Retry Failures'.


If your system crashes or some other such error occurs the migration will be paused. The next time you login, you will be prompted that the previous migration is not complete. You can resume your paused migration if you want to.
Migration Reports
Reports can be viewed for those accounts that have been migrated. They can be accessed by clicking on the 'View Reports' button after the login screen. Click here for more details on viewing migration reports.