Configure Zoho Mail Outlook Add-in
Zoho Mail users can now experience enhanced email security and have better control over their preferences with the new Outlook Add-in while using their favorite email client.
Pre-requisites
Before continuing with the provisioning and configuration of the Zoho Mail Outlook Add-in, it is recommended you have:
- Microsoft Outlook (2013, 2016 and above)
- Windows Vista / 7 / 8 / 10
- .NET Framework 4.6.2
- Configured Zoho Mail in Outlook for Windows - IMAP and ActiveSync (for desktop)
Note:
- To install or learn more about the .NET Framework 4.6.2, click here.
- In case, you haven’t configured the Zoho Mail account; you can do it either of the two ways as given below:
- IMAP Account
- To Configure Zoho Mail account as IMAP in Outlook for Windows, click here.
- ActiveSync for desktop
- To Configure Zoho Mail account as ActiveSync in Outlook for Windows:
- In the Add Account window, select Manual setup or additional server types and then click Next.
- Select Outlook.com or Exchange ActiveSync compatible service and then click Next.
- Enter the required information, specifying msync.zoho.com as your server name.
- Click Next, wait for the connection to complete, then click Finish.
- To Configure Zoho Mail account as ActiveSync in Outlook for Windows:
- POP Account
- IMAP Account
Now that you have configured your account via IMAP or ActiveSync, you are all set to enjoy what Zoho Mail Outlook Add-in has to offer.
Download and Installation
To install either the 32 or 64-bit version of the Zoho Mail Outlook Add-in, select one of the following:
Steps to download and install the Zoho Mail Outlook Add-In
- Click on the installation file (either 32 bit or 64 bit) to download the installer as per your machine configuration. Click Yes to allow the app to make changes to your desktop.
- Click Next on the InstallShield Wizard for Zoho Mail Outlook Add-in.
- In the Select Installation Folder select the location on your computer that you want to install Zoho Mail Outlook Add-In and click Next.
- Click Next to start the installation in the Confirm Installation window and allow the installation to run. Click on Close.
- Click Finish to exit the wizard.
Using the Zoho Mail Outlook Add-in
Once you have downloaded and installed Zoho Mail Outlook Add-In, open Microsoft Outlook (desktop version) to use it.
Authenticating the Add-in
Now, if you have already configured your Zoho Mail account in Outlook, a pop-up on the bottom right corner will appear showing Zoho Mail Outlook Add-in. Click on the pop-up to authenticate. In case, the pop-up does not appear, you will have to manually authenticate the account.
To authenticate the account manually, follow the steps below:
- Click on the ZohoMail tab in the Menu bar to view the ribbon menu with the functionalities.
- Click on the Authenticate button on the top left corner of the ribbon.

- Select your Data Centre from the listed i.e. United States, India, Australia, Europe, and China.
- A pop-up would appear asking to grant access and authenticate the account.
- Either copy the displayed link or click on Open link in default browser button.
- Sign-in your account to grant access. Click on Accept.
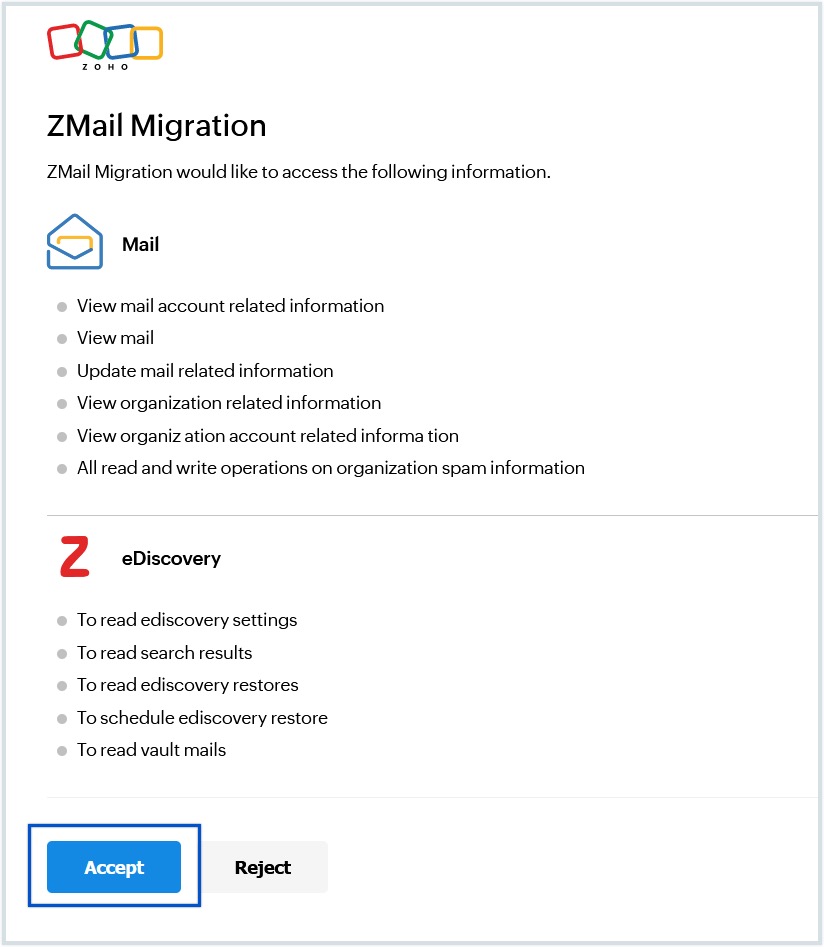
- Come back to the ZohoMail Authentication pop-up request and click on Authenticate.
- Once the account is authenticated, the ribbon section would display Anti-spam Controls, eDiscovery and Accounts under ZohoMail tab.


Note:
In case you are working behind a Proxy, check Settings.
Features
You can use the Zoho Mail Outlook Add-In to do the following:
Anti-spam control
- Report Spam
- Helps you move the current or selected set of emails to Spam folder.
- Report Phishing
- It reports the mail as Phishing and moves it to Spam folder.
- Block Sender
- Select and add the sender of the current mail to the Rejected list by clicking on Block Sender. It also moves the mail to the spam folder
- Manage Sender
- It opens the Manage Sender dialog box. This helps you to add and categorize senders under Trusted / Rejected and Allowed / Blocked Email List. You can also manually add new sender list or even shift a sender from Trusted to Rejected and vis-à-vis. Similar actions can be taken under the Allowed/Blocked Emails option as well. You can also delete or search emails here.
- Unblock Sender
- Select and remove a sender from the Rejected list, if any, by clicking on the Unblock Sender button. It also moves back the mail from the spam folder to the inbox
On-click Alerts
When you click on an email in your inbox, it is opened in the Reading pane. If the email is a suspected spam with a low spam score, an alert or warning message is displayed below the email to alert you about the nature of mail. This helps you to be careful while clicking any links or opening attachments in the email and it prompts you with context sensitive action buttons, like "Block sender" or "Trust the sender", allowing you to take immediate action. Some of the Time-of-click alerts are shown below.

eDiscovery/eArchive
eDiscovery is the process of discovering electronic data, processing, reviewing and producing retained emails which is potentially relevant to litigation.
The eDiscovery section in ZohoMail ribbon allows users to search and recover archived emails based on their role/privilege. If you don't see the eDiscovery section:
- Check with your administrator if eDiscovery is enabled for your organization.
- Request your administrator to enable eArchive access in Zoho Mail eDiscovery.
If you still face problems accessing eDiscovery, follow these steps:
- Uninstall the existing add-in and install the most current version.
- Follow the add-in authentication procedure.
- Upon successful authentication, the ZohoMail ribbon displays the eDiscovery (admins) or eArchive (users) section along with Anti-spam and Accounts.
Follow these instructions to search and recover archived emails:
- Navigate to the ZohoMail ribbon and click Search from the eDiscovery/eArchive section.
- The eDiscovery tab under ZohoMail ribbon has the below options:
- Search - Allows to search the archived emails and recover them based on the requirement.
- History - Click the History button on the ribbon to view the recovery history done by the user. The recovery history which is older than 90 days will get deleted automatically.
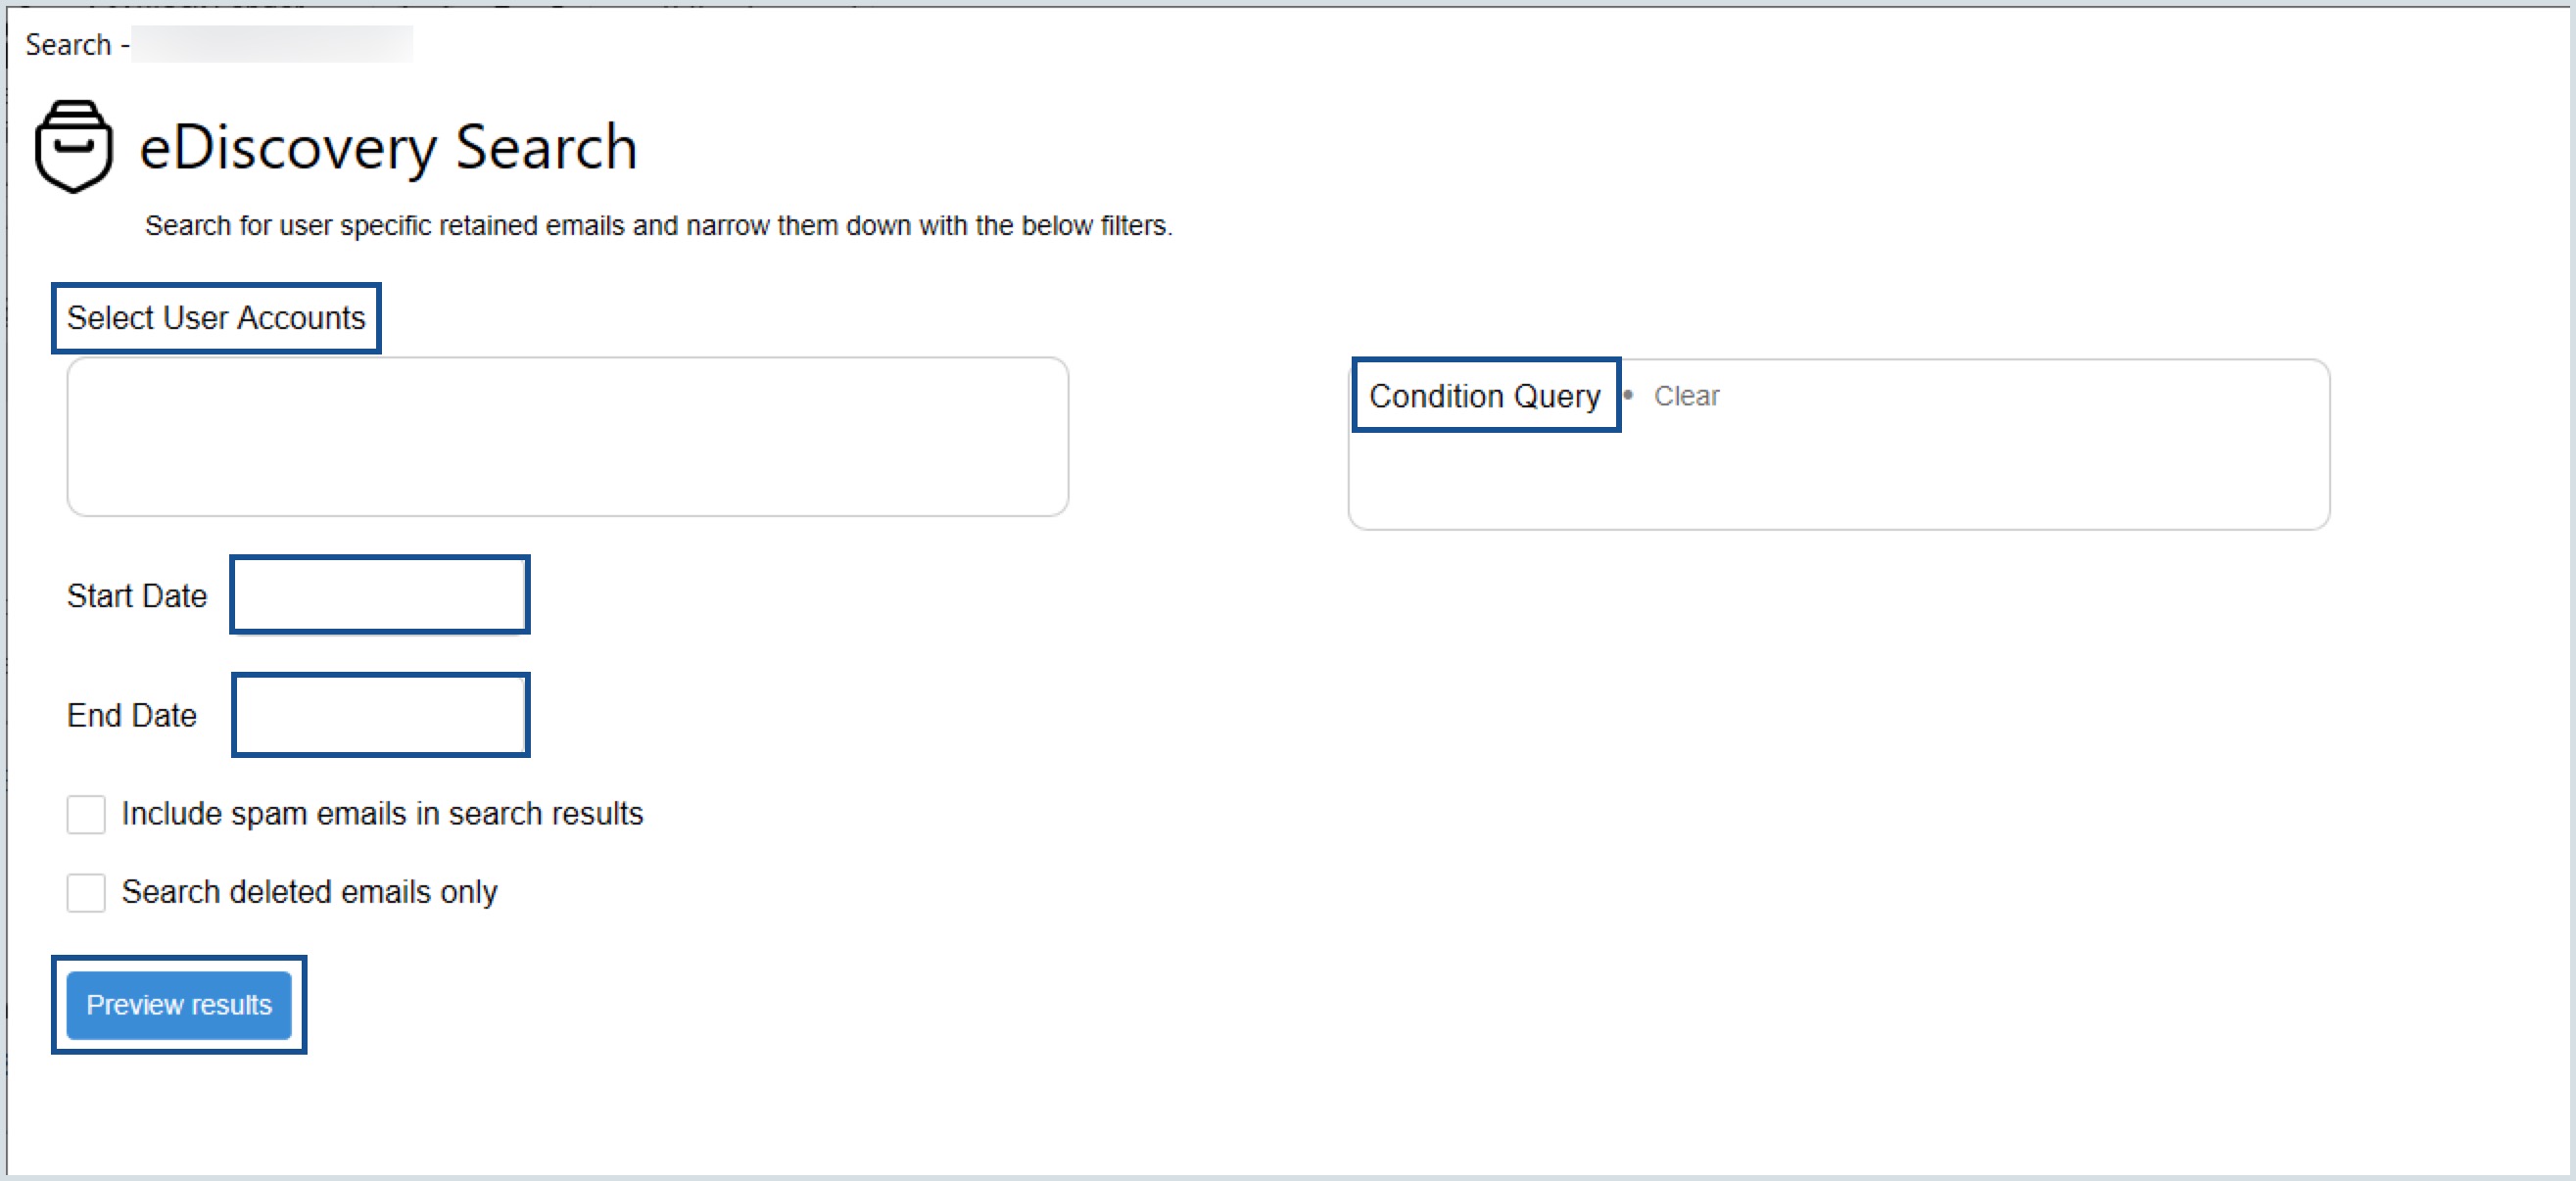
- Enter the search criteria and click Preview results:
- Select User Accounts (available only for admins).
- Enter the Condition Query for your search.
- Select the Start Date and End Date.
- Choose whether or not to include spam emails in the search.
- Select "Search deleted emails only" to retrieve only the emails deleted by the user.
- Select the desired action from the results page:
- Select one or more checkboxes adjacent to the emails and click Recover. The recover button will be available based on the user's role/privilege.
- Click Open to view the email.
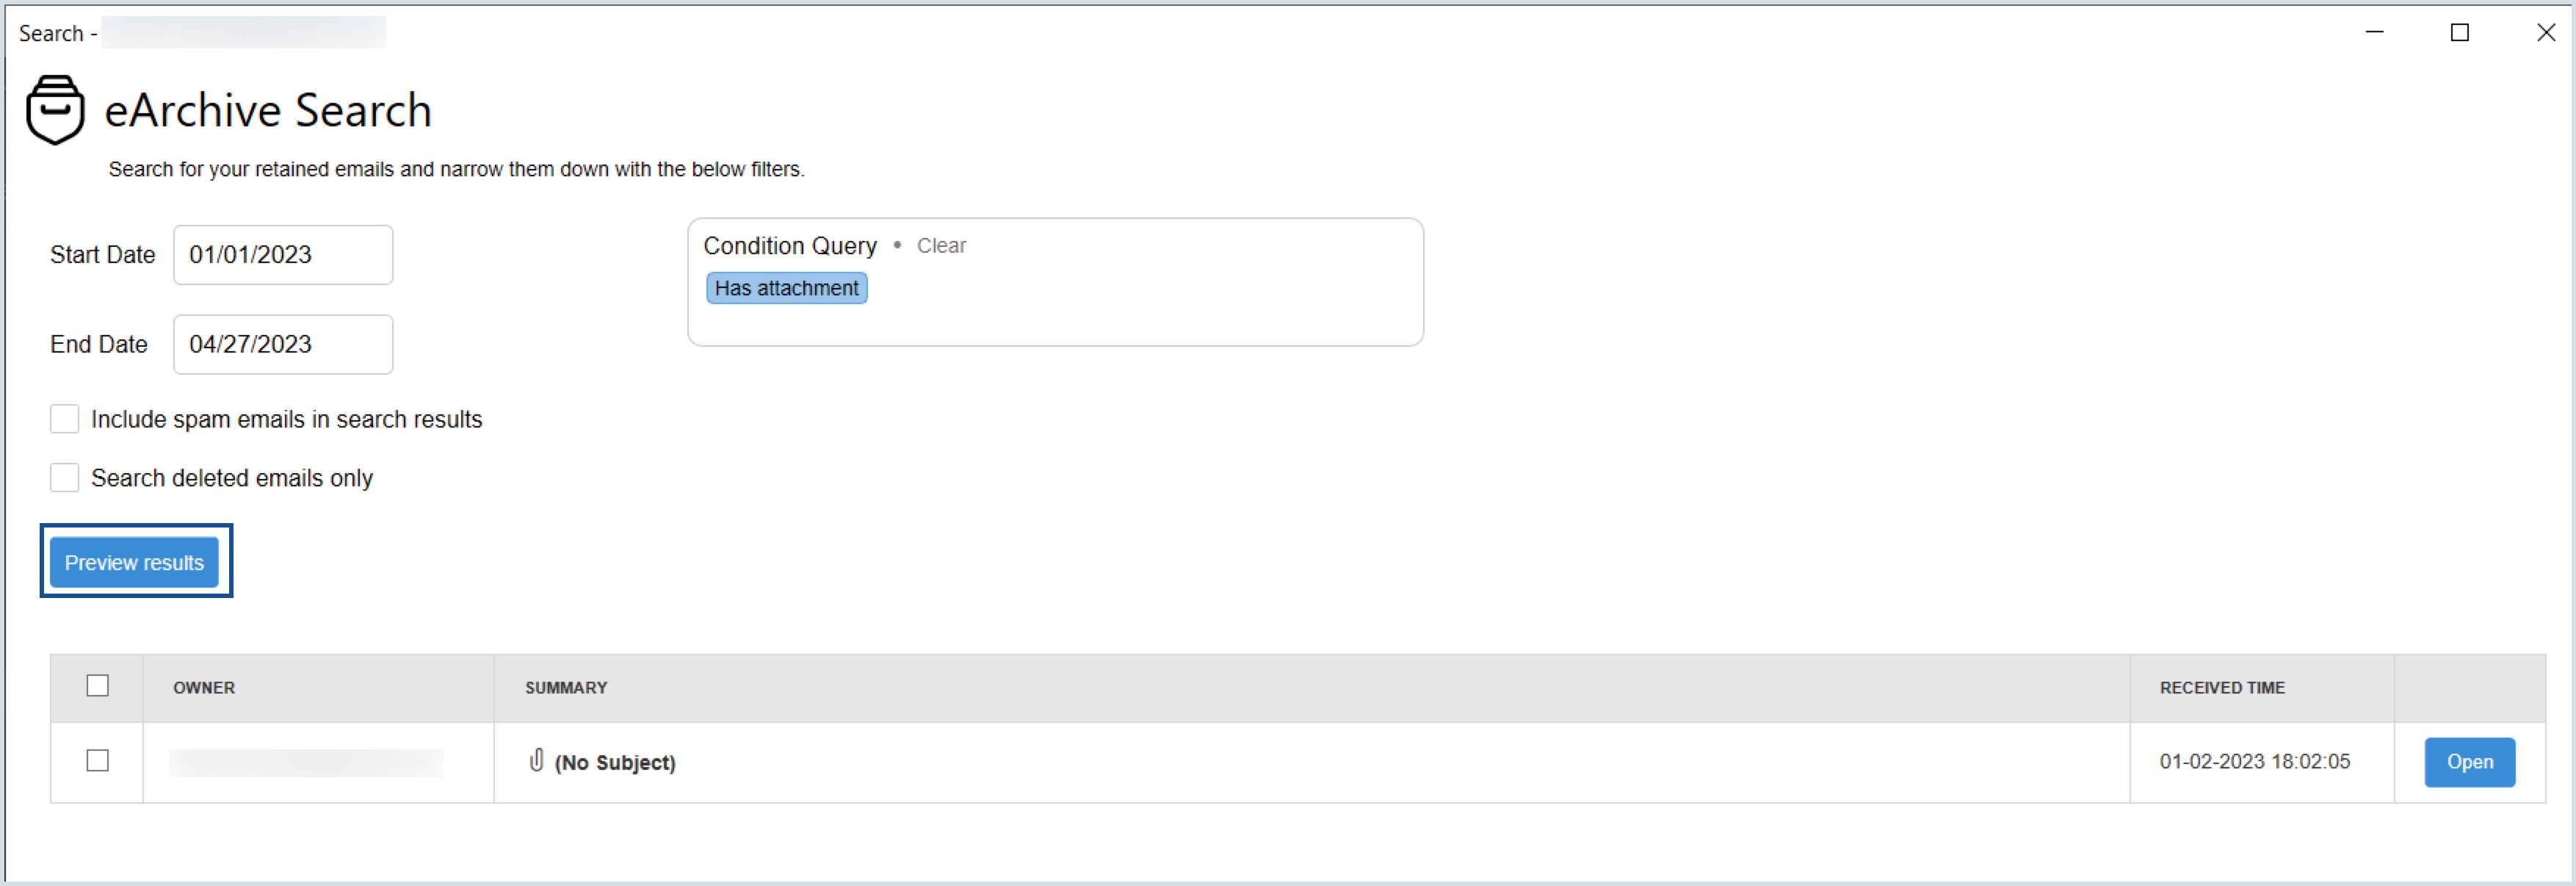
- If you select the Show Original option, you can Download full content/Copy to clipboard/Show full content based on the requirement.
- Administrators have the option to reply to an email.


Note:
- The Recover and History options will be available only when the Allow user to recover their retained emails privilege is enabled for a user in eDiscovery.
- Contact support@zohomail.com for more details.
Accounts
It is quite common that you might have configured multiple mailboxes in your outlook client. The Authenticated account(s) will be listed under Accounts. As there can be multiple accounts under a profile, the accounts group shows the account currently active mailbox or account.
For instance:
Assuming you have multiple accounts, say, rebecca@outlook.com & rebecca@zohocorp.com and you want to enable Anti-spam filters for both. In that case, you will have to first configure both the accounts with Outlook. As you configure, the accounts will be listed under the Accounts section of the ZohoMail ribbon. You can now individually choose from the listed accounts and customize the settings available including managing senders.
Let's say, if rebecca@zohocorp.com is the active account, then rebecca@zohocorp.com will be displayed in the ribbon and the ZohoMail anti-spam functions will work for rebecca@zohocorp.com account. And, if we switch to mail folders of rebecca@outlook.com, rebecca@outlook.com will be displayed in the ribbon and the ZohoMail anti-spam functions will work for rebecca@outlook.com account.
Note:
The add-in will work only for Zoho Mail accounts. For other accounts, the ZohoMail tab will not be visible.
Settings
Selecting Data Centre (DC) and enabling Proxy Setting are the options available under Settings.
In order to select the DC:
- Click on Settings in the Accounts section of the ribbon.
- By default, DC shows US. To set the DC, click on the drop-down option for the list to appear and select one of the following i.e. United States, India, Europe, China or Australia.
Note:
In order to know your DC, you can go to accounts.zoho.com and click the profile icon on the top right corner. Your Zoho Mail Data Centre will be mentioned there.
In some Outlook versions, users may find it difficult to remove the POP mailbox. For eg., there may be cases when the user does not want to continue using the Add-in for any of the mailboxes or when the user wants to temporarily disable the Add-in features instead of completely uninstalling the Add-in. In such situations, the users can opt for the Sign Out button in order to sign out of the add-in. You will have to re-authenticate in order to start using the add-in again.
Follow the steps to configure these settings if your organization uses a proxy server to connect to the Internet:
- Click on Setting.
- Select Use Proxy option available under DC.
- In the Proxy Setting, mention the Host, Port, Username and Password.
- Click Save to apply the setting.
Note:
Contact your sysadmin for proxy details.
Troubleshooting
Proxy is set up by the user's organization. So, the user needs to set the proxy settings only if he/she is working behind a proxy. If the proxy settings are not correct, upon clicking the add-in controls, error message box will show. Kindly contact your sysadmin to resolve such issues.