Migration from Microsoft Exchange server
The Exchange Migration Wizard can be used to migrate Emails directly from an In-house Exchange Server or from a Hosted Exchange environment. If you have already installed the Wizard, you can directly follow the instructions to migrate the data from the Exchange server and skip up to the Installation process.
Before proceeding with the migration, it is recommended to complete the following steps to ensure a hassle-free migration process:
Ensure that you have administrator rights on the client machine, to install and run the wizard. Also, check that the email accounts, to which the emails have to be migrated, have been created in Zoho Mail and are accessible by the users. In case you want to begin user provisioning from the Exchange Environment, choose the User Migration option in the Wizard and follow the instructions there.
Zoho Mail now supports migration from Exchange Server through the web. The migration options for Exchange servers are provided on the Zoho Mail UI. Migration through the web does not necessitate downloading the Migration Wizard. For more information, refer this help page.
If your Exchange server has online access, we highly recommend that you migrate using the web option, as it is much faster, and you will have better control over the migration.
Steps to execute the Exchange Migration Wizard
- Launch the wizard using the desktop shortcut or run the wizard using 'ZohoExchangeMigration.exe' file in the installation path under \Zoho\Zoho Exchange Migration\bin folder.
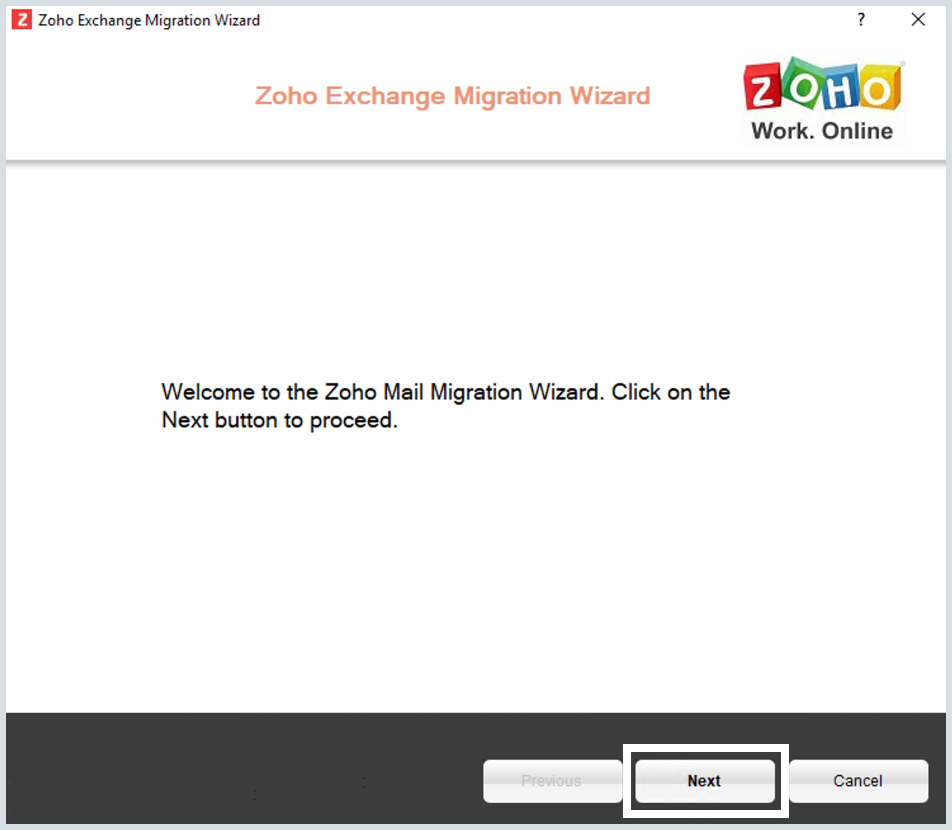
- In the Zoho Exchange Migration Wizard page, Click Next to proceed.
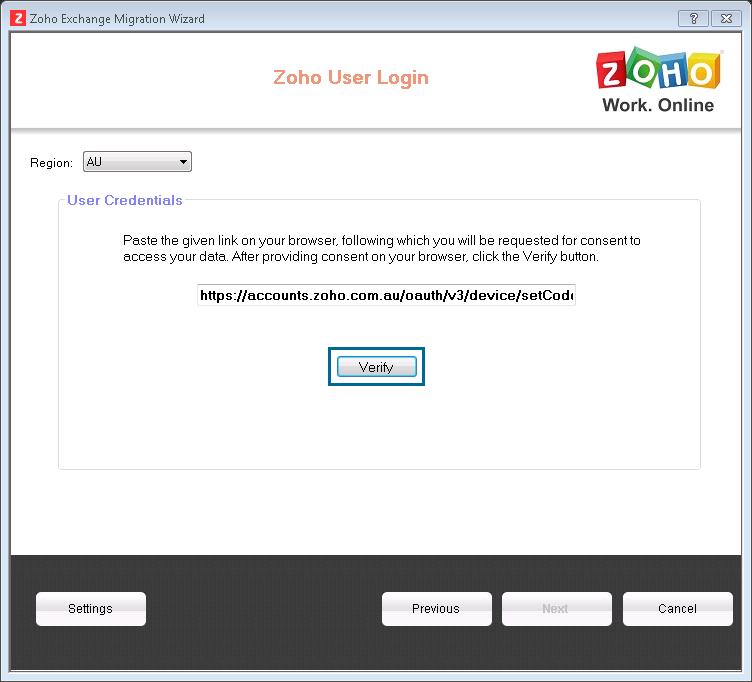
- Select your region from the drop-down menu. A verification link appears on the screen.
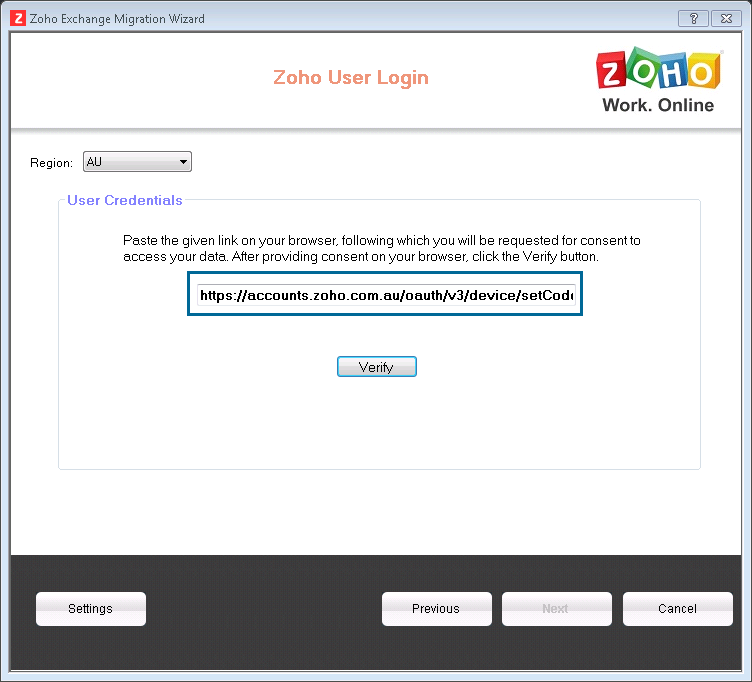
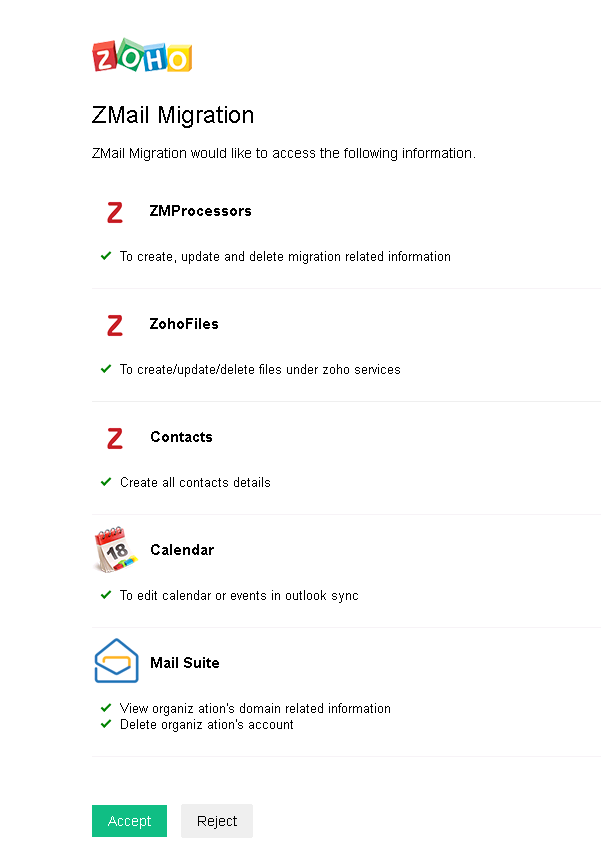
- Open the verification link on your web browser, log in to your Zoho account if not already logged in, and click Accept to let Zoho Mail access the mentioned data.
- Now in the migration wizard window, click Verify, and then click Next.
- To Migrate from Exchange server, select 'Exchange Migration' from the Data Migration options.
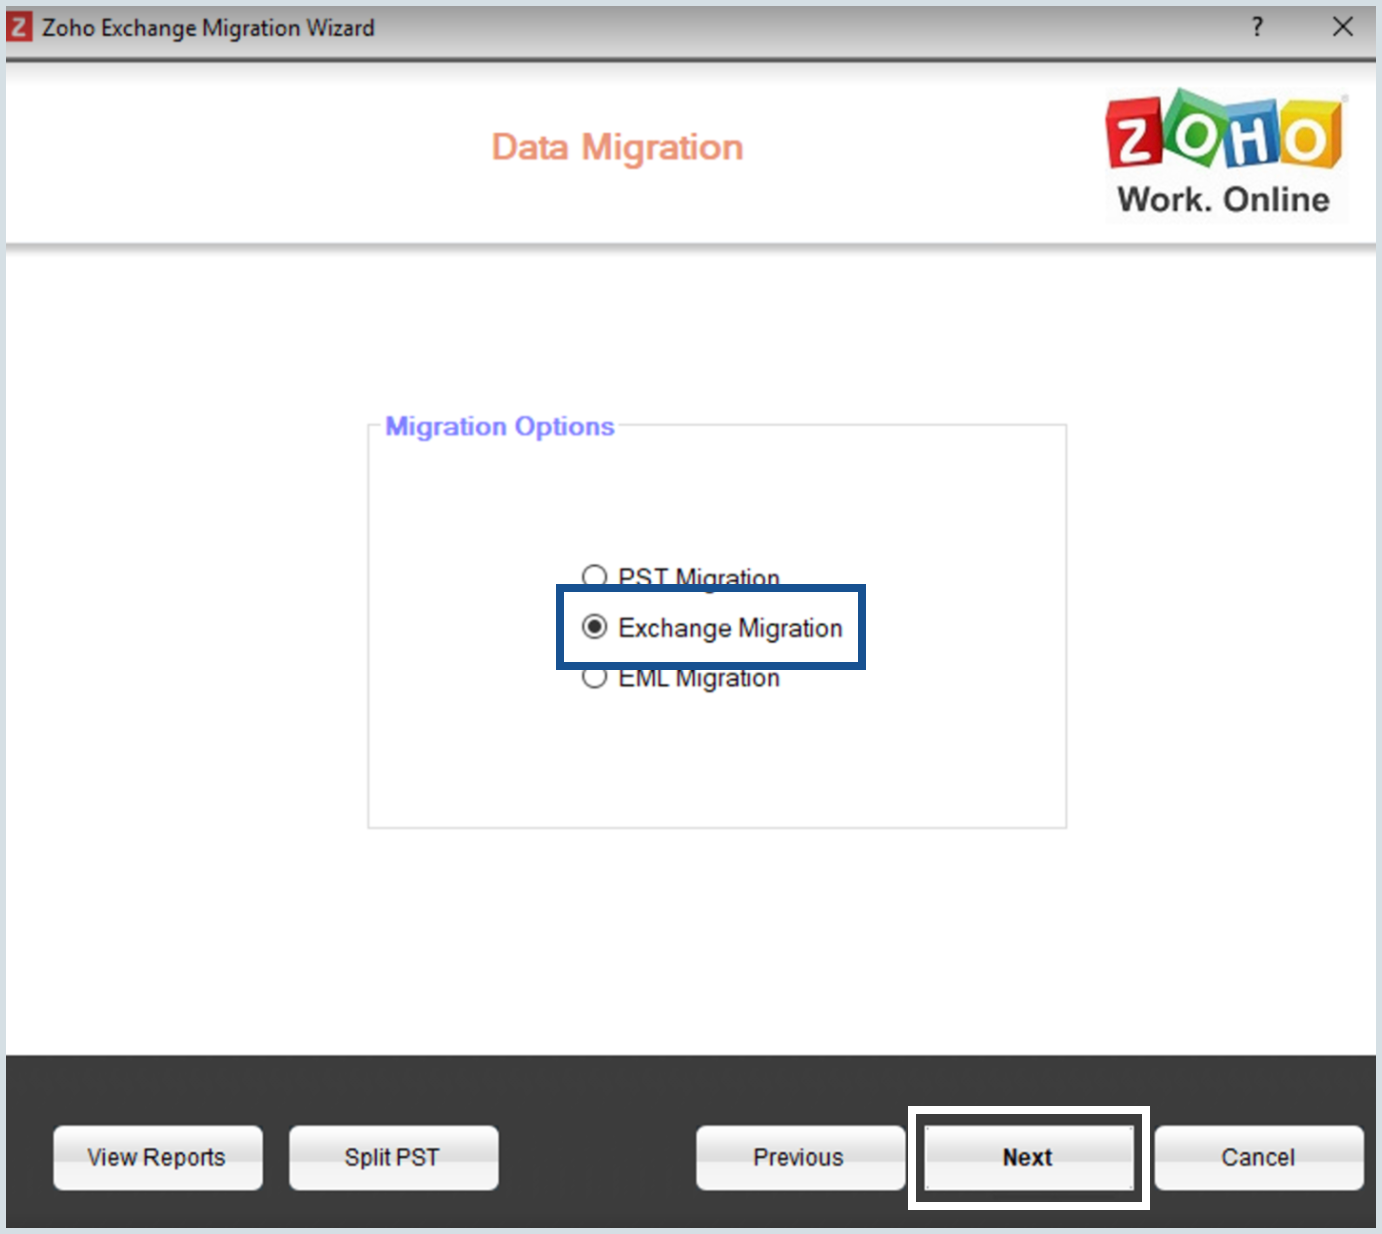
- The Exchange Migration can be done from and 'In-house Exchange Server' or even from a 'Hosted Exchange' service.
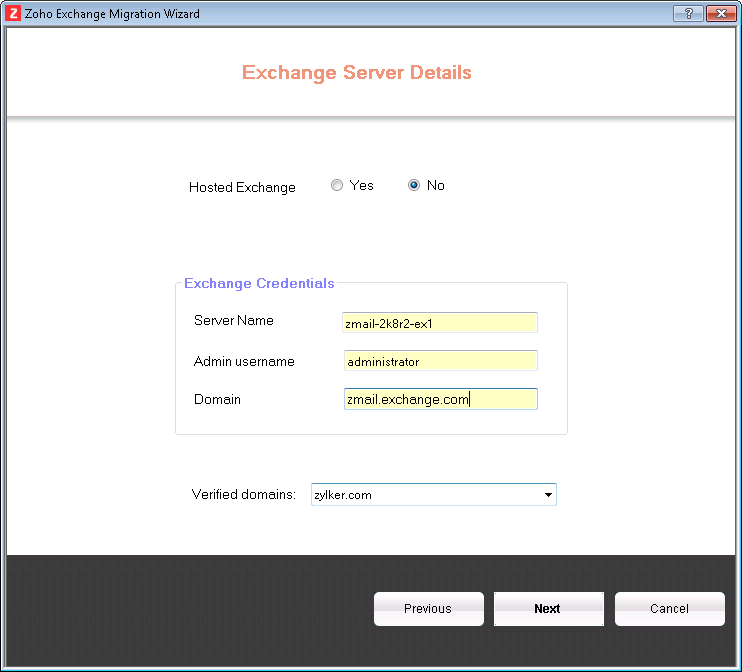
- Select 'No' to migrate from In-house Exchange server and provide the Exchange Server name, Exchange Admin username, Domain details on the Exchange Server.
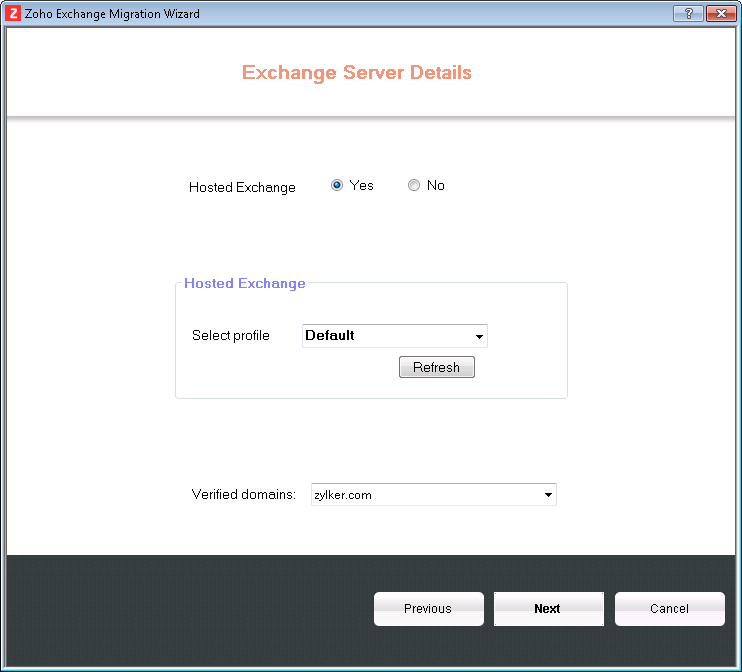
- To migrate from Hosted Exchange, select 'Yes' for Hosted Exchange. The details of the Outlook Profiles in the system where the Migration Wizard is running will be pulled and available in the drop-down.
- Select the particular profile, under which you have mapped the accounts to be migrated.
- Select 'No' to migrate from In-house Exchange server and provide the Exchange Server name, Exchange Admin username, Domain details on the Exchange Server.
- The verified domains drop down, lists the domains associated with the Zoho Account (provided in Step 3). Select the domain, to which you want to migrate the email and click Next.
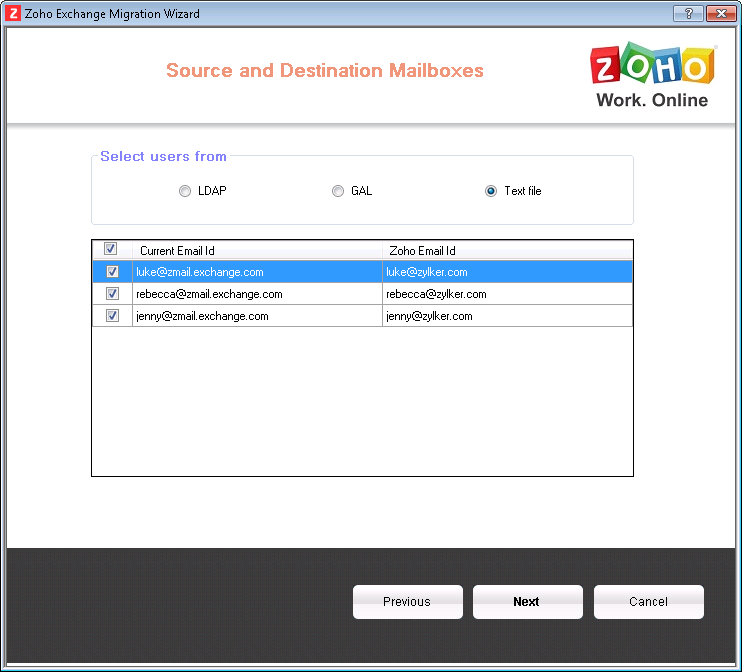
- Now you need to map the Source Email accounts with the Destination Email accounts, for email migration.
- The source details can be mapped using a Text File/ Global Address List (GAL) or directly from the LDAP Server.
- Source accounts from 'Text File'
- To use a Text file, with the details of source accounts, choose 'Text File' option.
- Browse and choose the text file from the file dialog.
- The list of source accounts should be listed in new lines, to import the details correctly.
- Based on the data in the text file, the list of users is retrieved.
- Source accounts from 'GAL'
- To list the source accounts from GAL, select GAL
- Choose the Type/ Domain and provide the filter criteria
- Based on the filter criteria, the list of users is retrieved.

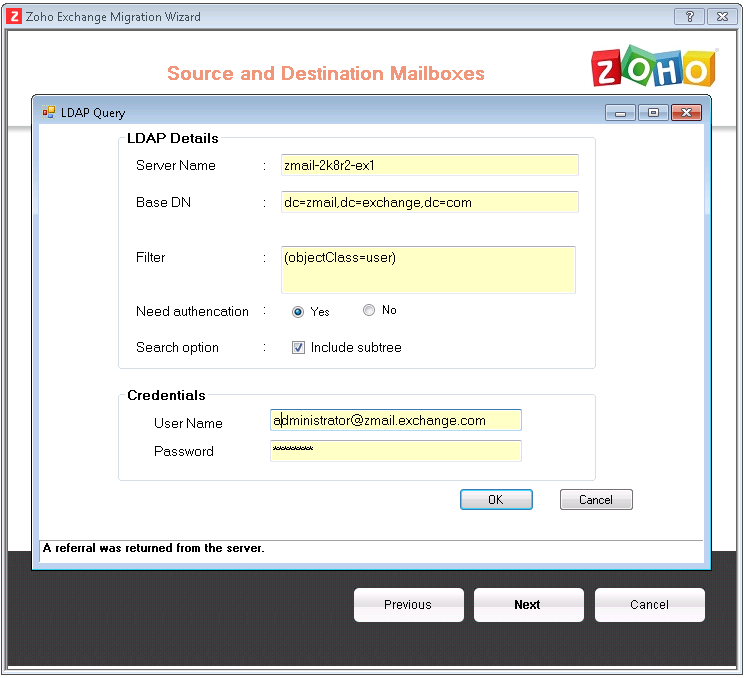
- Source accounts from 'LDAP' (The source accounts can be selected from LDAP only for In-House Exchange Migration, and not applicable for Hosted Exchange)
- To retrieve the source accounts from LDAP select LDAP.
- Provide the BASE DN and the corresponding LDAP Query
- Based on the LDAP query, the users are retrieved.
- Source accounts from 'Text File'
- You can map the list of imported source accounts using one of these methods with the user accounts set up in Zoho.
- The emails can be migrated only if the destination accounts are created with a valid email account and accessible by the user in Zoho.
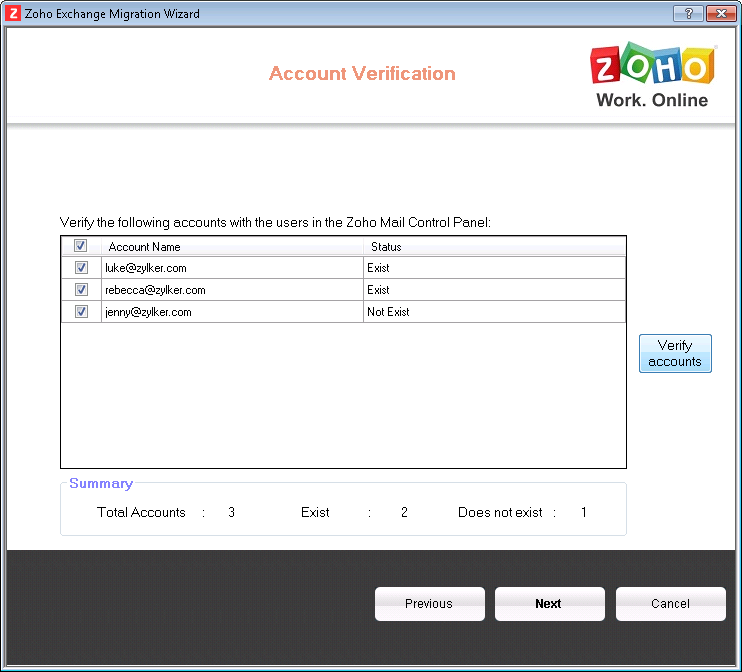
- Click 'Verify accounts' to verify the retrieved accounts. The Status indicates, the availability of the specific accounts, in the organization account created in Zoho Mail.
- In case any of the accounts are listed as 'Does Not Exist', you need to create the user, in case you have missed creating the user. If the user has an account, but with a different emails address, you may create an alias for the account with the specific email address.
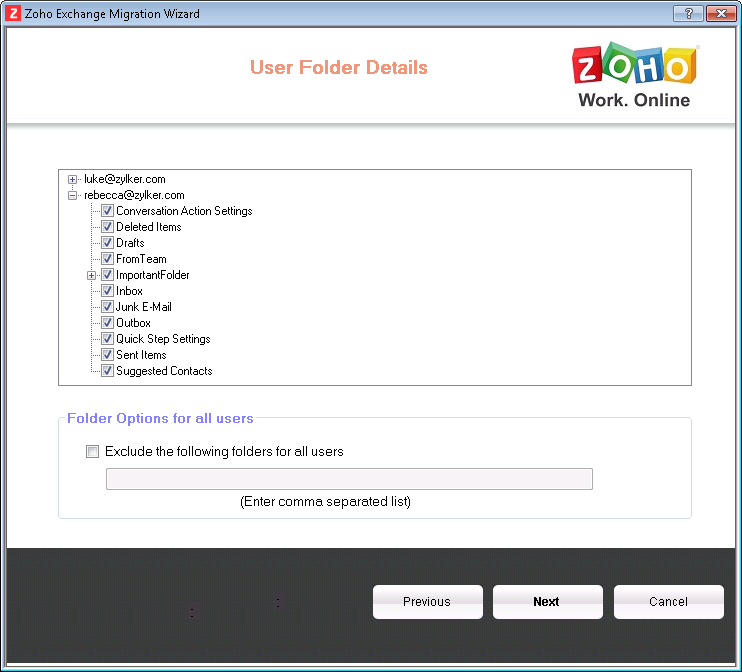
- After verification of the accounts, the wizard connects to the specified exchange server to the respective mail accounts to retrieve the folder lists.
- You can view the list of folders and include/ exclude the list of folders for migration using the select box next to the folder names.
- In Exchange, if for some reason, some accounts are not accessible, they are indicated in red along with an error message.
- For such accounts, check the permissions, configurations and access rights to ensure that it is accessible to the exchange administrator account used in the migration.
- In the Next screen, the list of source accounts with errors will be listed. Select 'Retry' in case, you have changed any permissions/ Settings for the account to go back to Step 15.
- Click Continue, to skip those accounts and proceed with the Migration process for the other accounts.
- In the next screen, Select the entities to perform the migration. By default, all data will be chosen for all the accounts.
- You can include or exclude Calendar, Contacts, Tasks, and Notes or even choose to migrate only Time-based Email Data for the accounts.

- You can also review and change the entities using the migration options in the lower part of the screen.
- Once you begin the migration, you will not be able to make changes to the selected options.
- Ensure that the source Servers are accessible and online during the entire migration process.
- Click 'Start Migration' to begin migration process for all the selected users.
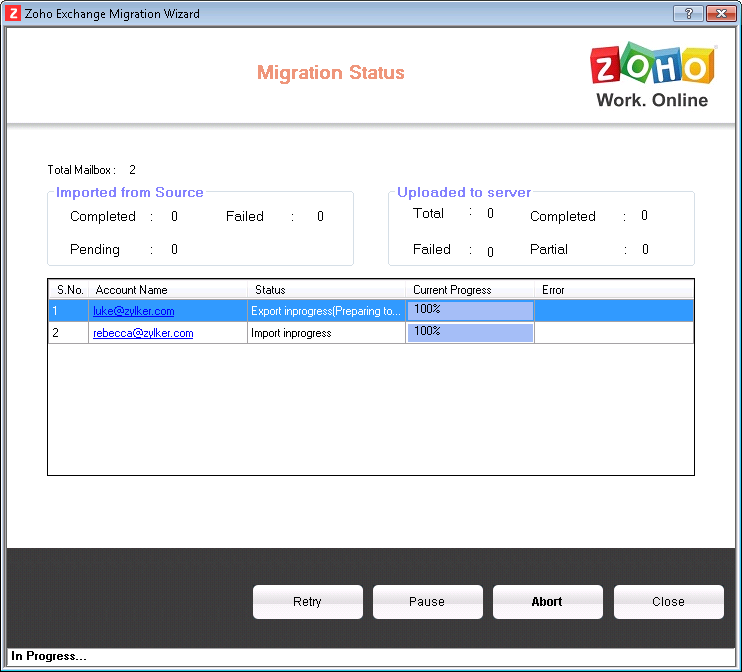
- The Migration Status page will give you the details of the current migration process.
- The Status Column provides the details of the account for which the data is extracted from the Exchange server and being processed.
- The Upload pane provides the details of the account that has been extracted and being uploaded to the Zoho Servers.
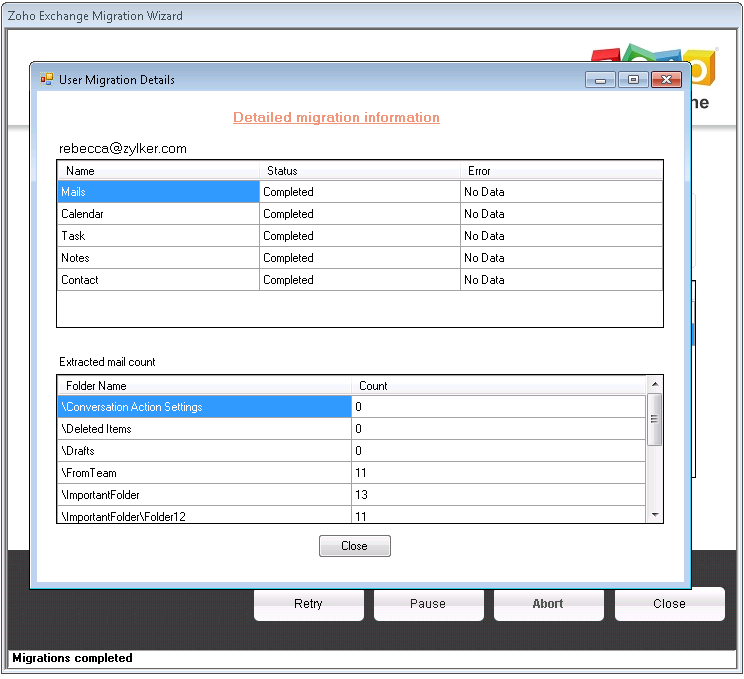
- You can click on any specific email address under the Account Name column to view the detailed progress for that user.
- Once the all the files are uploaded, you can exit the migration wizard, as the Migration process will be scheduled and run on the Zoho Servers.
- You need to make sure that the migration tool is processing and connected to the network until all files of all users are completely uploaded to the server.
- The details of the extraction and progress for each account can also be monitored from the table.
- You can exit the Migration Wizard after all the files are extracted and uploaded to the server.


Migration Reports
Reports can be viewed for those accounts that have been migrated. They can be accessed by clicking on the 'View Reports' button after the login screen. Click here for more details on viewing migration reports.