Creating New Modules & Fields
How Can I...
Modules and Fields are the building blocks on which all CRM activities are based. They allow you to collect, organize and analyse a wide range of customer information. Zoho CRM comes with a standard range of predefined modules and fields that are common to most industries and business. However, you may find that organizations in your industry have unique needs that aren't met by the standard Zoho CRM package. In such cases, you can create new modules and fields to offer users a CRM system tailored to their industry-specific needs.
Manage custom modules
Zoho CRM comes with standard modules for Sales, Marketing, Customer Support and Inventory management. However, module requirements can vary widely from business to business. Custom modules give developers with the flexibility to create the niche solutions that maximize operational efficiency, sales acquisitions, and customer retention. Extension for Zoho CRM open up a range of possiblities- for example, matching database structure with industry practices, storing data from a third-party service in its own dedicated module, or enhancing information synthesis by linking data from multiple standard modules. Extensions allow you to build custom modules and then distribute them to other Zoho CRM users, either directly or through the Zoho Marketplace .
Add a module
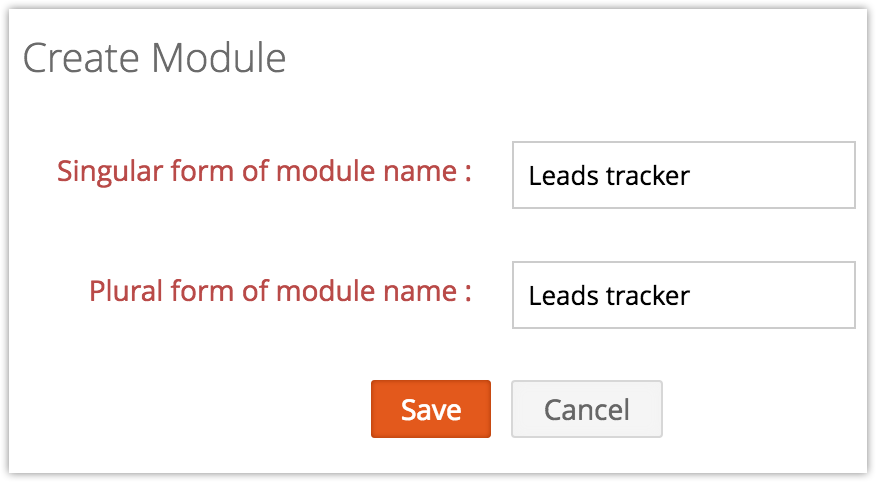
To add new modules
- Click Extensions for Zoho CRM in the Zoho Developer console homepage.
- Select the extension in which the new module has to be created and click Edit.
- Click Modules in the left pane and then click Create New Module .
- Enter the singular and plural form of the module name in the respective text boxes.
- Click Save.

Note
By default, all custom modules come with four standard fields: Record Name, Record Owner, Email and Secondary Email. To further customize your module and create new fields, see Adding a New Field for more information.
Edit a module
As you get feedback from users, edit or update your modules to ensure you deliver the best product possible.
To edit a custom module
- Click Extensions for Zoho CRM in the Zoho Developer console homepage.
- Click Edit next to the extension you'd like to modify.
- Click the Modules option in the left pane.
- Click Edit icon [
 ] next to the module you'd like to modify.
 - Make the necessary changes and click Save.
Delete a module
You can also delete the modules you have created, if they are no longer necessary.
To delete the existing modules
- Click Extensions for Zoho CRM in the Zoho Developer console homepage.
- Click Edit next to the extension you'd like to modify.
- Click Modules in the left pane of the Extension Details page.
- Click Delete icon [
 ] next to the module you want to delete.
 - Click Ok.
Note
- Any changes will only take effect after you re-publish your extension. ( See Publishing your extension for more information.) Once you've republished it, new users who install your extension will automatically have the most recent version. Existing users will have to update the extension.
Manage custom fields
Fields can vary dramatically across different industries, businesses and workflow styles, so customization is crucial when building an effective CRM system. Native Extensions allow you to add new fields both to Zoho's standard modules as well as to custom modules you've created specifically for the industry. When a user installs your extension, these new fields will be added to their Zoho CRM account.
Note
Although you can change the name of your custom fields, you cannot change field type(eg. Text, Integer, Date, etc.). For instance, if you create a text field, you cannot later convert it to an integer field.
When creating a new field, you will be required to fill in the Field Details, depending on the type of field you are adding. Consult the following table to see which information you'll need for each Field Type:
| Field Data Type | Field Details | Notes |
Text | Label: Field Name | Maximum Length: 255 characters. |
Integer | Label: Field Name | Maximum Length: 9 digits. |
Decimal | Label: Field Name | Maximum Length: 16 digits (including decimal places). |
Percent | Label: Field Name | - |
Currency | Label: Field Name | - |
Date | Label: Field Name | Format: YYYY/MM/DD |
Date & Time | Label: Field Name | Format: YYYY/MM/DD HH:MM |
Label: Field Name | - | |
Phone | Label: Field Name | - |
Pick list | Label: Field Name | - |
Multi-select Pick list | Label: Field Name | - |
URL | Label: Field Name | - |
Text Area(Small) | Label: Field Name | Maximum Length: 2000 characters. |
Text Area(Large) | Label: Field Name | Maximum Length: 32000 characters. |
Checkbox | Label: Field Name | - |
Auto Number | Label: Field Name | To apply an auto-number sequence to existing records, select the checkbox. |
Lookup* | Label: Field Name | Available in Paid Editions of your Zoho CRM. |
Long Integer* | Label: Field Name | Maximum Length:18 characters. |
*Only available for Paid Editions of Zoho CRM. If you create one of these fields, your extension will only function for users running a Paid Edition.
Add a custom field
You can add custom fields to any module. This will allow you to capture important data specific to your business model.
To add a new field
- Click Extensions for Zoho CRM in the Zoho Developer console homepage.
- Select the extension in which the new field has to be created and click Edit.
- Click Customize in the left pane select the Fields tab.
- Select the module from the drop-downlist box and click New Custom Field.
- In the Create Custom Field page, select the Field Type and fill in any necessary Field Details. (See Overview of Field Types above for more information).

- Click Save.

Note
- When creating a new field in either the Leads or Quotes modules an option will appear asking if you'd like to create the same field in related modules (related modules for Leads: Accounts, Contacts, and Potentials; related modules for Quotes: Sales orders, and Invoices). Choose this option if you would like the new field data to be available at later stages of the sales process.
Edit a custom field
As you refine how your CRM system works, you may need to make changes to your custom fields. Once a field has been created, you are able to edit certain Field Details, but not the data type. For example: an Integer field cannot be changed into a Currency field. In order change the data type, you must create a new custom field.
To edit custom fields
- Click Extensions for Zoho CRM in the Zoho Developer console homepage.
- Select the extension containing the field you wish to change and click Edit.
- Click Customize in the left pane and then select the Fields tab in the Customizations page.
- Select which module the custom field is in from the dropdown list.
- Click Edit icon [ ] next to the custom field.
- Make any necessary changes and click Save.
Note
- You can change the character length for Currency fields, Text fields, Integer fields, Decimal fields, Phone fields, Long Integer fields and URL fields. (See Overview of Field Types above for more information on Field Details.)
Delete a custom field
If you no longer need a custom field, you can delete it anytime. When you delete a custom field, the associated data will also be deleted. If you wish to keep the data, you can choose to hide it instead.
To delete custom fields
- Click Extensions for Zoho CRM in the Zoho Developer console homepage.
- Select the extension that contains the fields to delete and click Edit.
- Click Customize in the left pane, then click Fields tab in the Customization page.
- Select the module containing the custom field to be deleted from the drop-down list box.
- Click Delete icon [] corresponding to the custom field you would like to remove.
A confirmation pop-up will appear. - Read the instructions and then click OK to delete the field.
Create a currency field
You can define the number of decimals and the precision for currency fields based on your selected currency locale. There are four rounding options available for a currency field in Zoho CRM:

To create currency custom fields
- Click Extensions for Zoho CRM in the Zoho Developer console homepage.
- Select the extension to receive the custom currency field and click Edit.
- Click Customize in the left pane and select click Fields tab in the Customization page.
- Select the module from the drop-downlist box and click New Custom Field.
- Select Currency from the Field Type list.
- Fill in these details in the Field Details section:
- Label: Choose a name for your custom field.
- Section Name: Define where the field will be displayed.
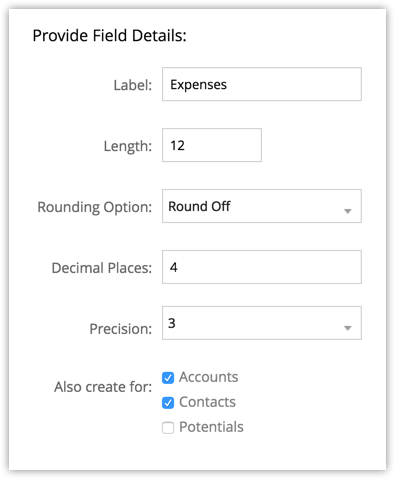
- Length: Specify the maximum number of digits.
- Rounding option: Choose the rounding technique you prefer.
- Precision: Choose the number of digits to which the output should be rounded off. ( This option appears for all rounding options except Normal).
- Decimal Places: Set the number of decimal places you require.

- Click Save.
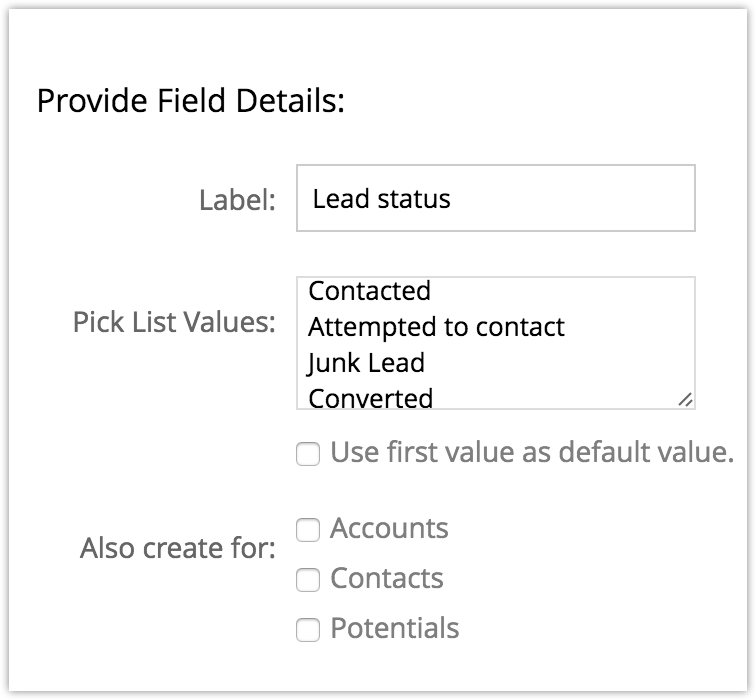
Add pick list values
Pick lists allow users to select a single value from a range of options. For example, the Lead Status pick list can be set to Converted, Open, Closed, etc. By default, each module comes with a collection of standard pick list values. You can use extensions to add new pick list fields to meet the needs of the industry you serve.
To add new pick list fields
- Click Extensions for Zoho CRM in the Zoho Developer console homepage.
- Select the extension to receive the custom currency field and click Edit.
- Click Customize in the left pane and select click Fields tab in the Customization page.
- Select the module from the drop-downlist box and click New Custom Field.
- Select Pick list from the Field Type list.
- Fill in the Field Details that are associated with picklists. (See Overview of Field Types above for more information on Field Details.).
- Click Save.

Add multi-select pick list values
This field type allows you to create a set of options from which the end user can select multiple values. For example, a sales person at an insurance company may need a multi-select pick list to indicate if a potential is interested in more than one insurance product, e.g., health insurance, life insurance, and renter's insurance.
To add multi-select pick list values
- Click Extensions for Zoho CRM in the Zoho Developer console homepage.
- Select the extension to receive the custom currency field and click Edit.
- Click Customize in the left pane and select click Fields tab in the Customization page.
- Select the module from the drop-downlist box and click New Custom Field.
- Select Multi-select Pick List from the Field Type list.
- Fill in the Field Details that are associated with multi-select pick lists. (See Overview of Field Types above for more information on Field Details.).
- Click Save.
Create lookup field
The lookup field establishes a parent-child relationship between different modules.
Examples of Parent-Child Relationship:
- Parent Account - Member Accounts (Doing business with Head Quarter Company and multiple divisions within the company)
- Contact - Member Contacts
- Case - Sub Case
- Potential - Part Payment
- Product - Part Products
- Solution - Related Solutions
Note
Lookup fields cannot be created for the Tasks or Events modules.
To create lookup field
- Click Extensions for Zoho CRM in the Zoho Developer console homepage.
- Select the extension to receive the custom currency field and click Edit.
- Click Customize in the left pane and select click Fields tab in the Customization page.
- Select the module from the drop-downlist box and click New Custom Field.
- Select Lookup from the Field Type list.
- In the Field Details section, fill in the following details:
- Label: Enter a name for the lookup field. (Eg. Interested Products.)
- Lookup Type: Select a module from the Lookup Type drop-down. This is the module with which the relationship will be established.(Eg. Products. The lookup field will list all the products)
- Related List Label: This is the name of the related list that will be available in the Record Details page of the Look up module.(Eg. Interested Leads. A related list will be created for the records in the Products module.)
- Click Save.
Example:
Module: Leads
Label: Products
Lookup: Products
Related List Label: Interested Products
A field will be created in the Leads module, where you can add the list of products from the Products module. These products will be displayed in the Leads Details page under Interested Products related list.
Create auto number field
Auto number custom fields help classify the records by unique numbers (e.g., invoice numbers, quote numbers, sales order numbers). Once the auto number field is added to the CRM module, the number is added sequentially to the new records. This can be used to update the existing records as well.
To create auto number fields
- Click Extensions for Zoho CRM in the Zoho Developer console homepage.
- Select the extension to receive the custom currency field and click Edit.
- Click Customize in the left pane and select click Fields tab in the Customization page.
- Select the module from the drop-downlist box and click New Custom Field.
- Select Auto Number from the Field Type list.
- In the Field Details section, do the following:
- Label: Enter a name for the field.
- Section Name: Select the section from the drop-down list where the field will be displayed.
- Enter the Prefix, Starting Number and the Suffix for the auto number value.
- Click Save.