Introduction
The Zoho Desk Software Development Kit (SDK) for iOS is aimed at helping you build a custom iPhone/iPad app containing the features and functionalities of Zoho Desk. When you build an app using this SDK, you get to choose which help desk module you want to retain and which one you want to exclude. Besides, you can design the app UI according to your requirements and style guidelines, while powering the back-end of the app using the SDK.
Getting Started
There are a few requirements that must be met before you can start creating an app using the Zoho Desk SDK for iOS. These requirements are as follows.
Zoho Account
Having a Zoho account is an absolute must to be able to use the Zoho Desk SDK for iOS. If you do not have an account yet, sign up for one by visiting this link.
Client ID and Client Secret
Next, you require the client ID and client secret for your app. To receive these credentials, you must first register your app by performing the following steps.
- Visit Zoho's Developer Console.
- On the API Credentials page, click the Add Client ID button.
The Create Zoho Client ID form appears. - In this form, enter the following details:
- Client Name: Name of your app
- Client Domain: Website of your app
- Authorized redirect URIs: Redirect URI for authentication. The URI must be entered in the <your_app_URL_scheme>:// format; for example, zohodesksdk://
- In the Client Type drop-down list, choose Mobile.
- Click the Create button.
The Client ID and Client Secret are displayed.
For more information on client ID and client secret, refer to this document.
Building Your App
The first step towards building your app is installing the Zoho Desk SDK for iOS. Keep in mind that the minimum iOS version required is iOS 9.
Installing the Zoho Desk SDK for iOS
You can either automatically install the SDK using the CocoaPods dependency manager tool or manually install it in the project directory of your app.
Automatic Installation Using CocoaPods
target 'Demo' do
  use_frameworks!
  pod 'ZohoAuth'
  pod 'ZohoDeskSDK'
end
To add the Zoho Desk SDK to your iOS app, just add the ZohoAuth and ZohoDeskSDK pods to the podfile.
target 'Demo' do
  use_frameworks!
  pod 'ZohoAuth'
  pod 'ZohoDeskUIKit'
  pod 'ZohoDeskSDK'
end
To include Zoho Desk UI components too in your app, add the ZohoDeskUIKit pod to the podfile.
After adding the required pods, run the pod install command in the project directory.
Note: If you have not set up CocoaPods for your app, run the pod init command from the root of your project directory. This command creates the podfile required.
Manual Installation
- Download the framework from one of the links below:
- Drag the .project file into the project directory of your app.
- Add the ZohoDeskSDK framework in the Embedded Binaries and Linked Frameworks and Libraries sections of the Xcode project settings.
Note: Make sure that the Copy items if needed option is selected in the settings related to Embedded Binaries.
Initializing and Authenticating the Zoho Desk SDK for iOS
import ZohoDeskSDK
Make sure to add the ZohoDeskSDK header to the app delegate object.
func application(_ application: UIApplication, didFinishLaunchingWithOptions launchOptions: [UIApplicationLaunchOptionsKey: Any]?) -> Bool {
        let configuration = SDKConfiguration(baseURL: "https://desk.zoho.com")
        ZohoDeskSDK(configuration: configuration)
        ZohoDeskSDK.delegete = self
        let scope = ["Desk.tickets.ALL","Desk.tickets.READ","Desk.tickets.WRITE","Desk.tickets.UPDATE","Desk.tickets.CREATE","Desk.tickets.DELETE","Desk.contacts.READ","Desk.contacts.WRITE","Desk.contacts.UPDATE","Desk.contacts.CREATE","Desk.tasks.ALL","Desk.tasks.WRITE","Desk.tasks.READ","Desk.tasks.CREATE","Desk.tasks.UPDATE","Desk.tasks.DELETE","Desk.basic.READ","Desk.basic.CREATE","Desk.settings.ALL","Desk.settings.WRITE","Desk.settings.READ","Desk.settings.CREATE","Desk.settings.UPDATE","Desk.settings.DELETE","Desk.search.READ","Zohosearch.securesearch.READ","aaaserver.profile.READ","zohocontacts.userphoto.READ","ZohoSupport.feeds.ALL","ZohoSupport.basic.ALL","VirtualOffice.messages.CREATE","profile.userphoto.UPDATE","profile.userinfo.READ","profile.orguserphoto.READ"]
  ZohoAuth.initWithClientID(, clientSecret: , scope: scope, urlScheme: , mainWindow: (UIApplication.shared.delegate?.window)!, accountsURL: "https://accounts.zoho.com")
  ZohoAuth.getOauth2Token { (token, error) in
    if token == nil{
      ZohoAuth.presentZohoSign(in: { (token, error) in
        if token != nil{
//Success Login
        }
      })
    }
else{
        //Success Login
  }
}
//Your code
return true
}
If you use Swift for app development, make sure to include #import <ZohoAuthKit/ZohoAuth.h> in the Objective-C bridging header.
For more information, refer to the Connect Your App Delegate section in this link.
Then, add the code on the right panel in the app delegate.
Note: The Zoho Accounts URL varies according to your domain.
Add URLScheme to the Info.plist File
URLScheme refers to the redirect URI entered while generating the client ID and secret of your app. This URI must be included in the Info.plist file of your app for authentication.
Add:
  <key>CFBundleURLTypes</key>
  <array>
    <dict>
      <key>CFBundleURLName</key>
      <string><#URLScheme#></string>
      <key>CFBundleURLSchemes</key>
      <array>
        <string><#URLScheme#></string>
      </array>
    </dict>
</array>
In the code on the right panel, replace #URLScheme with the actual redirect URI. Then, paste the code in the Info.plist file.
Add Custom Login
ZohoAuth.presentZohoSign(inHavingCustomParams: ) { (token, Error) in
  if token != nil{
  	//Login Success
  }
}
To add the Zoho Accounts login to your app and customize the login page, add the code snippet on the right panel to the login button action in the ViewController object of your app.
Add the OpenURL Method to the App Delegate Object
This method enables the ZohoAuth library to handle user login for the app.
To include this method, copy-paste the code on the right panel into the app delegate object.
Note: Code Snippet 1 is applicable only for iOS versions 10 and later. Code Snippet 2 is applicable for iOS versions older than iOS 10.
func application(_ app: UIApplication, open url: URL, options: [UIApplicationOpenURLOptionsKey : Any] = [:]) -> Bool {
  let sourceapplication = options[UIApplicationOpenURLOptionsKey.sourceApplication] as! String
  let annotation = options[UIApplicationOpenURLOptionsKey.annotation]
  ZohoAuth.handleURL(url, sourceApplication: sourceapplication, annotation: annotation)
  return true
}
Code Snippet 1:
func application(_ application: UIApplication, open url: URL, sourceApplication: String?, annotation: Any) -> Bool {
  return ZohoAuth.handleURL(url, sourceApplication: sourceApplication, annotation: annotation)
}
Code Snippet 2:
Including Custom Params
The SDK supports inclusion of custom params on the login page. The following table lists the different custom params and their purposes.
| Custom Param Name | Values Supported | Purpose |
|---|---|---|
| hide_signup | true or false | Show or hide Sign Up option |
| portal_domain | Registered domain name of the organization | Display organization logo on the login page |
| hide_fs | true or false | Show or hide Federated Sign In option |
@"hide\_signup=false\&hide\_fs=true"
Note: You can include more than one custom param in the URL query param format. To view an example, refer to the right panel.
Handling User Logout
ZohoAuth.revokeAccessToken { (error) in
  if error != nil{
  }
}
Add the code snippet on the right panel to the Logout/Sign Out button action in the ViewController object.
ZohoDeskUIKit.flushUserData()
Also, make sure to clear user data when a user logs out. To perform this activity, use the code snippet on the right panel.
Note: Clearing of user data is possible only in the Zoho Desk UI Kit.
Enabling Authentication for API Calls
The ZDAuthenticationDelegate method handles authentication related to API calls for the Zoho Desk SDK for iOS. This method fetches the OAuthToken that the SDK requires for making API calls.
func getToken(completion: @escaping ((String) -> ())) {
  ZohoAuth.getOauth2Token { (token, error) in
    let token = "Zoho-oauthtoken \(token ?? "")"
    completion(token)
  }
}
Make sure to include this method in the app delegate object. Otherwise, API requests cannot be made from the SDK.
Zoho Desk APIs
Below are a few examples of the APIs provided by Zoho Desk.
Get organization
ZDOrganizationAPIHandler.getOrganization() { (organization, error, statusCode) in
  if error != nil{
  //Show UI operation
  }
  else{
  //show Error
  }
}
This API returns details of an organization from the help desk portal.
Get ticket details
ZDTicketAPIHandler.getTicketDetails(, ticketId: ) { (ticketDetail, error, statusCode) in
  if error != nil{
    //Show UI operation
  }
  else{
    //show Error
  }
}
This API returns the details of a ticket from the help desk portal.
Help desk modules are referred to in the ZD<Module Name>APIHandler format in API requests and ZD<Module Name> format in API responses.
To download a sample app to check how the APIs work, click here.
To view the complete list of Zoho Desk APIs, click here.
Zoho Desk UI Kit for iOS
The Zoho Desk UI Kit for iOS is a plug-and-play feature that helps build an app using standard UI elements created by Zoho. All that you need to do is add a view to the app and call an init method with the params required.
Currently, the UI kit supports the Ticket List and Ticket Detail components.
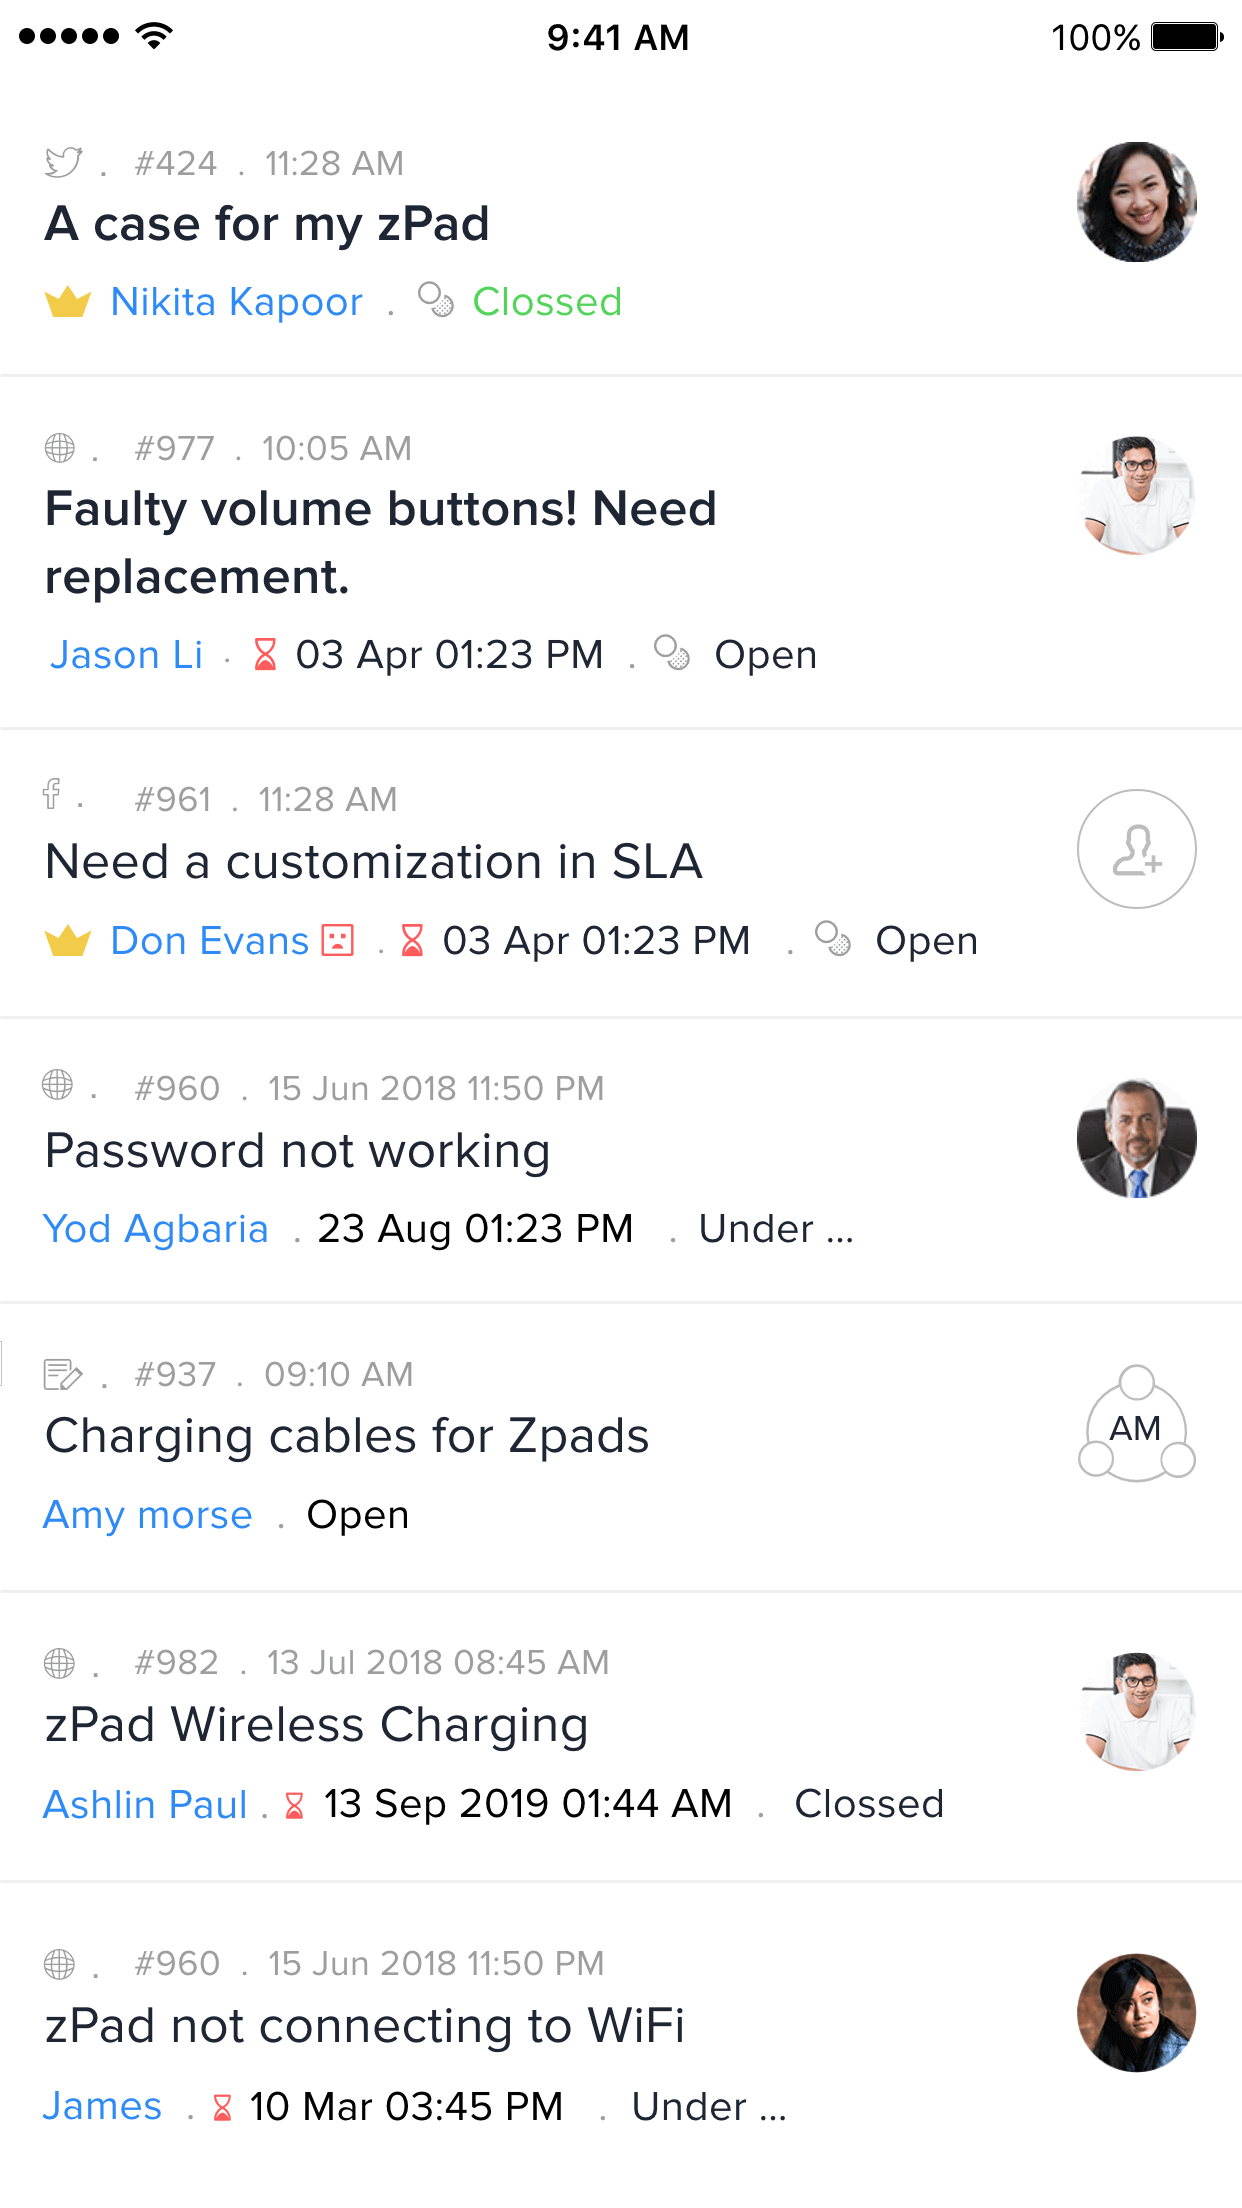
Ticket List Component
let configuration = ZDTicketListConfiguration(orgId: )
configuration.from = 0
configuration.limit = 50
configuration.sortBy = "recentThread"
ticketView = ZDTicketListView(frame: , configuration: )
ticketView?.delegate = self
view.addSubview(ticketView!)
To display the ticket list in your app, add the code snippet on the right panel to the ViewController object.
ZDTicketListConfiguration
You can customize the ticket list by altering the different attributes in the ZDTicketListConfiguration method.
let configuration = ZDTicketListConfiguration(orgId: )
configuration.from = 0
configuration.limit = 50
configuration.sortBy = "recentThread"
To view the complete list of attributes supported, click here.
TicketList Delegate
The TicketList delegate enables callbacks to the ViewController when certain events occur in the view. The different callbacks supported are: BeginLoading, EndLoading, DidSelectTicket, and ShouldLoadMoreData.
BeginLoading
Sends a callback to the ViewController when the ticket list is populated with content from the server.
func didBeginLoadingData(ticketList:ZDTicketListView,from:Int) -> Void{
}
Note: You can display a loading indicator, if required. The delegate sends a callback everytime a set of tickets is loaded. You can configure the loading indicator to appear when the from index value is 0.
from refers to the index number starting from which the tickets must be listed.
EndLoading
func didEndLoadingData(ticketList:ZDTicketListView,error:Error?,statusCode:Int) -> Void{
}
Sends a callback to the ViewController when the ticket list finishes loading. You can choose to hide the loading indicator for this callback.
DidSelectTicket
func didSelectTicket(ticketList:ZDTicketListView,orgId:String,ticketId:String,index:Int) -> Void{
}
Sends a callback to the ViewController when the user selects a ticket in the list.
ShouldLoadMoreData
func shouldLoadMoreData(ticketList:ZDTicketListView) -> Bool{
  return true
}
Sends a callback to the ViewController if the ticket list tries to load more content.
UpdateConfig
This method helps update configuration details, such as the orgId.
updateConfig(configuration:)
When this method is executed, all data is reset and the ticket list is refreshed with the new configuration settings.
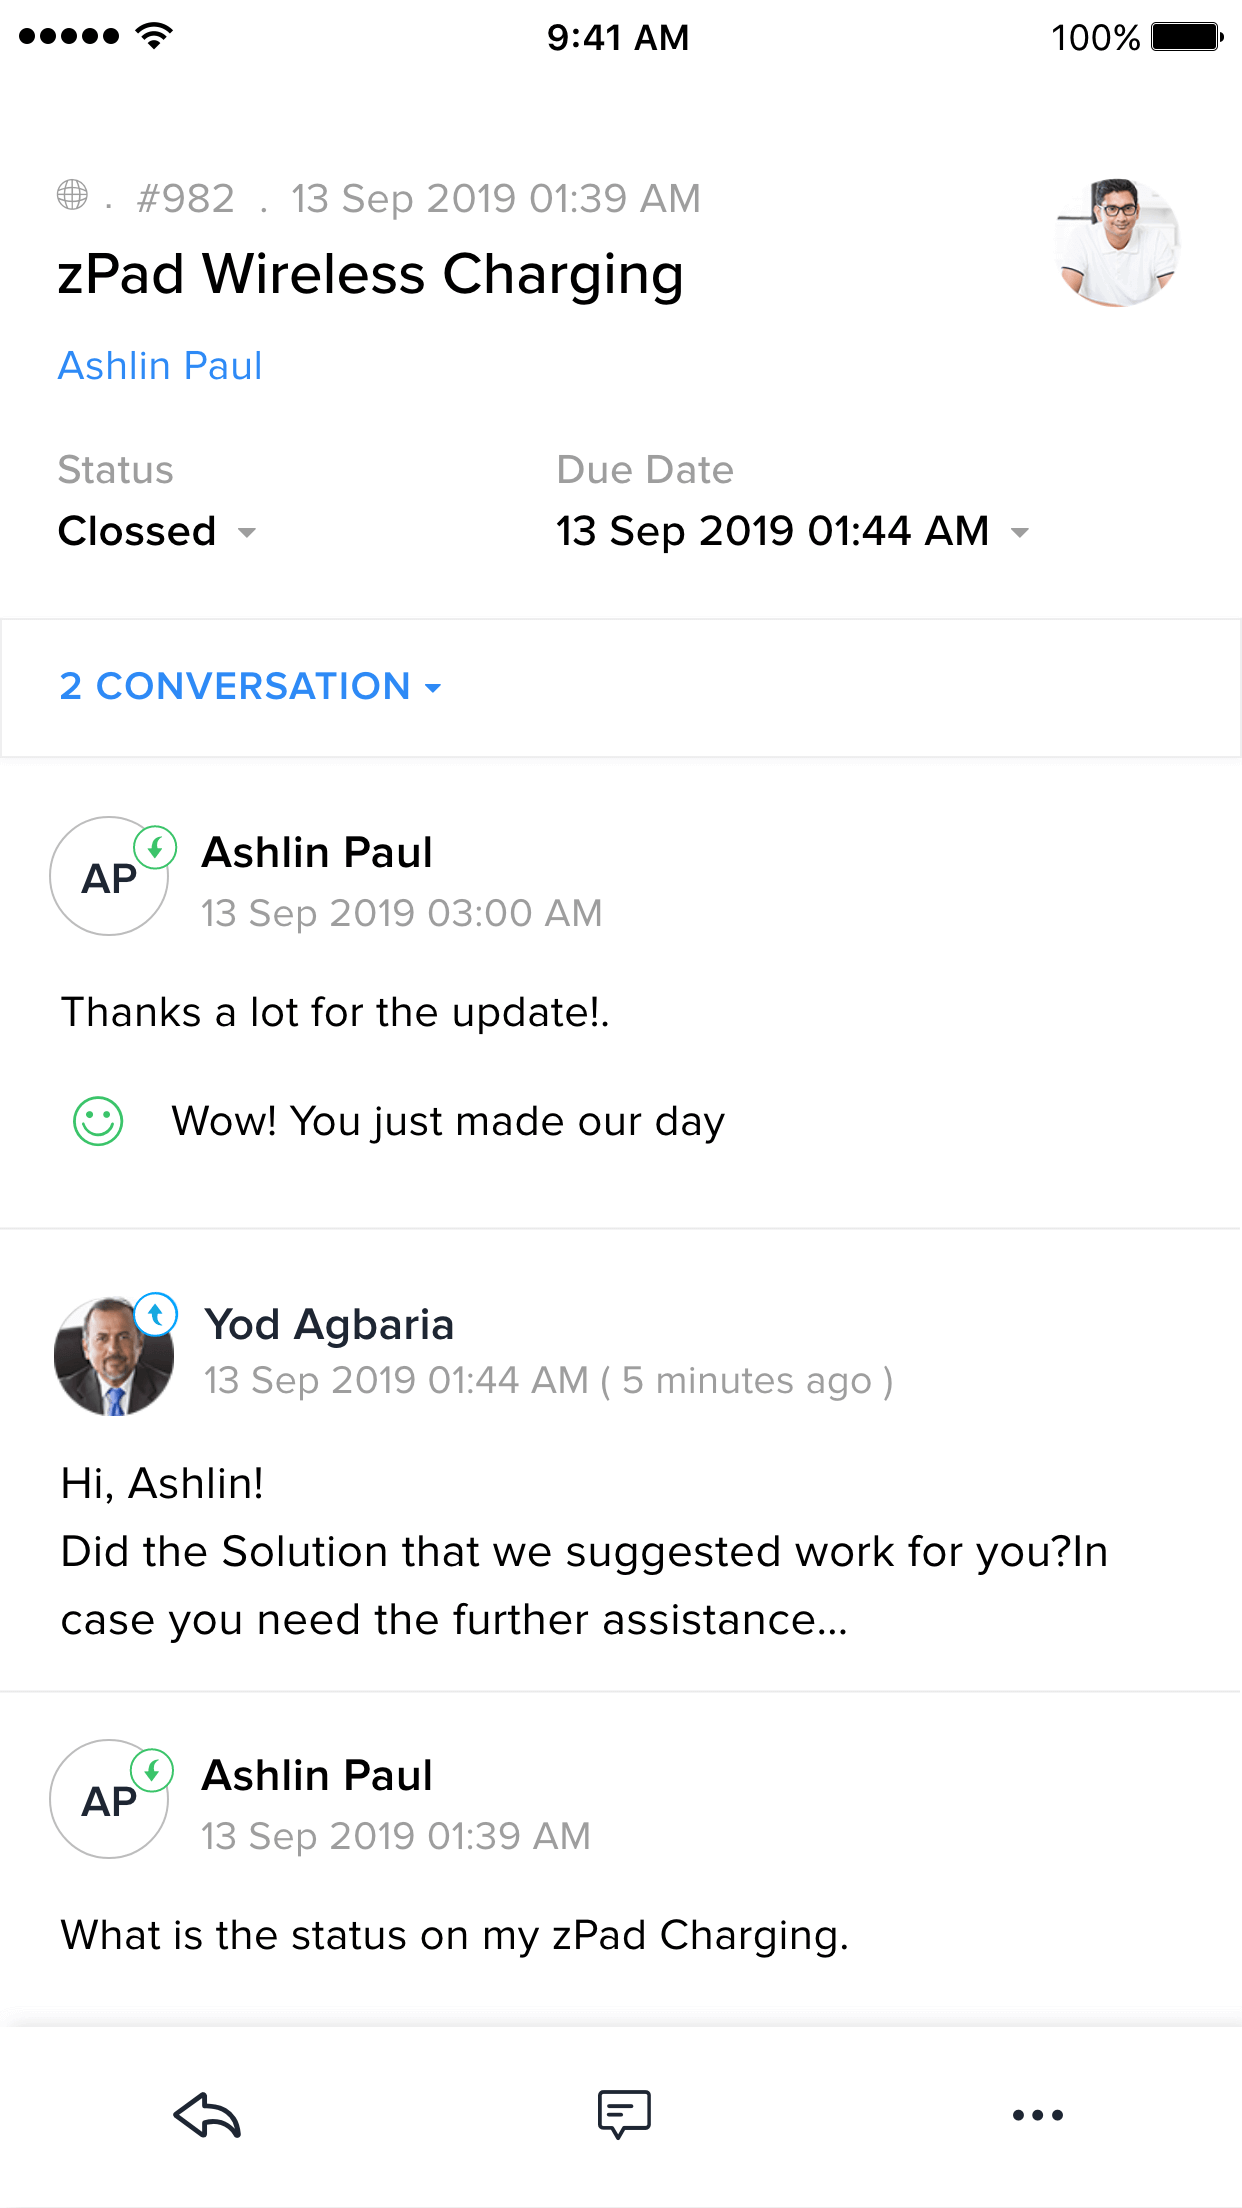
Ticket Detail Component
let configuration = ZDTicketDetailViewConfiguration(orgId: , ticketId: )
let ticketdetails = ZDTicketDetailView(frame: , configuration: configuration)
view.addSubview(ticketdetails)
To display the ticket detail view in your app, add the code snippet on the right panel to the ViewController object.
ZDTicketDetailViewConfiguration
let configuration = ZDTicketDetailViewConfiguration(orgId: , ticketId: )
OrgID - Unique ID of the organization
TicketId - Unique ID of the ticket
The ticket detail view displays ticket information, based on the configuration set in this method. The code for a sample configuration is displayed on the right panel.
TicketDetail Delegate
The TicketDetail delegate enables callbacks to the ViewController when certain events occur in the view. The different callbacks supported are: BeginLoading, EndLoading, and ShouldLoadMoreData.
BeginLoading
func didBeginLoadingData(ticketdetail:ZDTicketDetailView,) -> Void{
}
Sends a callback to the ViewController when the ticket detail view receives content from the server.
Note: You can display a loading indicator, if required.
EndLoading
func didEndLoadingData(ticketdetail:ZDTicketDetailView,error:Error?,statusCode:Int) -> Void{
}
Sends a callback to the ViewController when the ticket detail view finishes loading.
ShouldLoadMoreData
func shouldLoadMoreData(ticketList:ZDTicketListView,listingType:String) -> Bool{
  return true
}
Sends a callback to the ViewController if the ticket detail view tries to load more conversation/thread/comment data.
UpdateConfig
This method helps update configuration details, such as the orgId.
updateConfig(configuration:)
When this method is executed, all data is reset and the ticket detail view is refreshed with the new configuration settings.
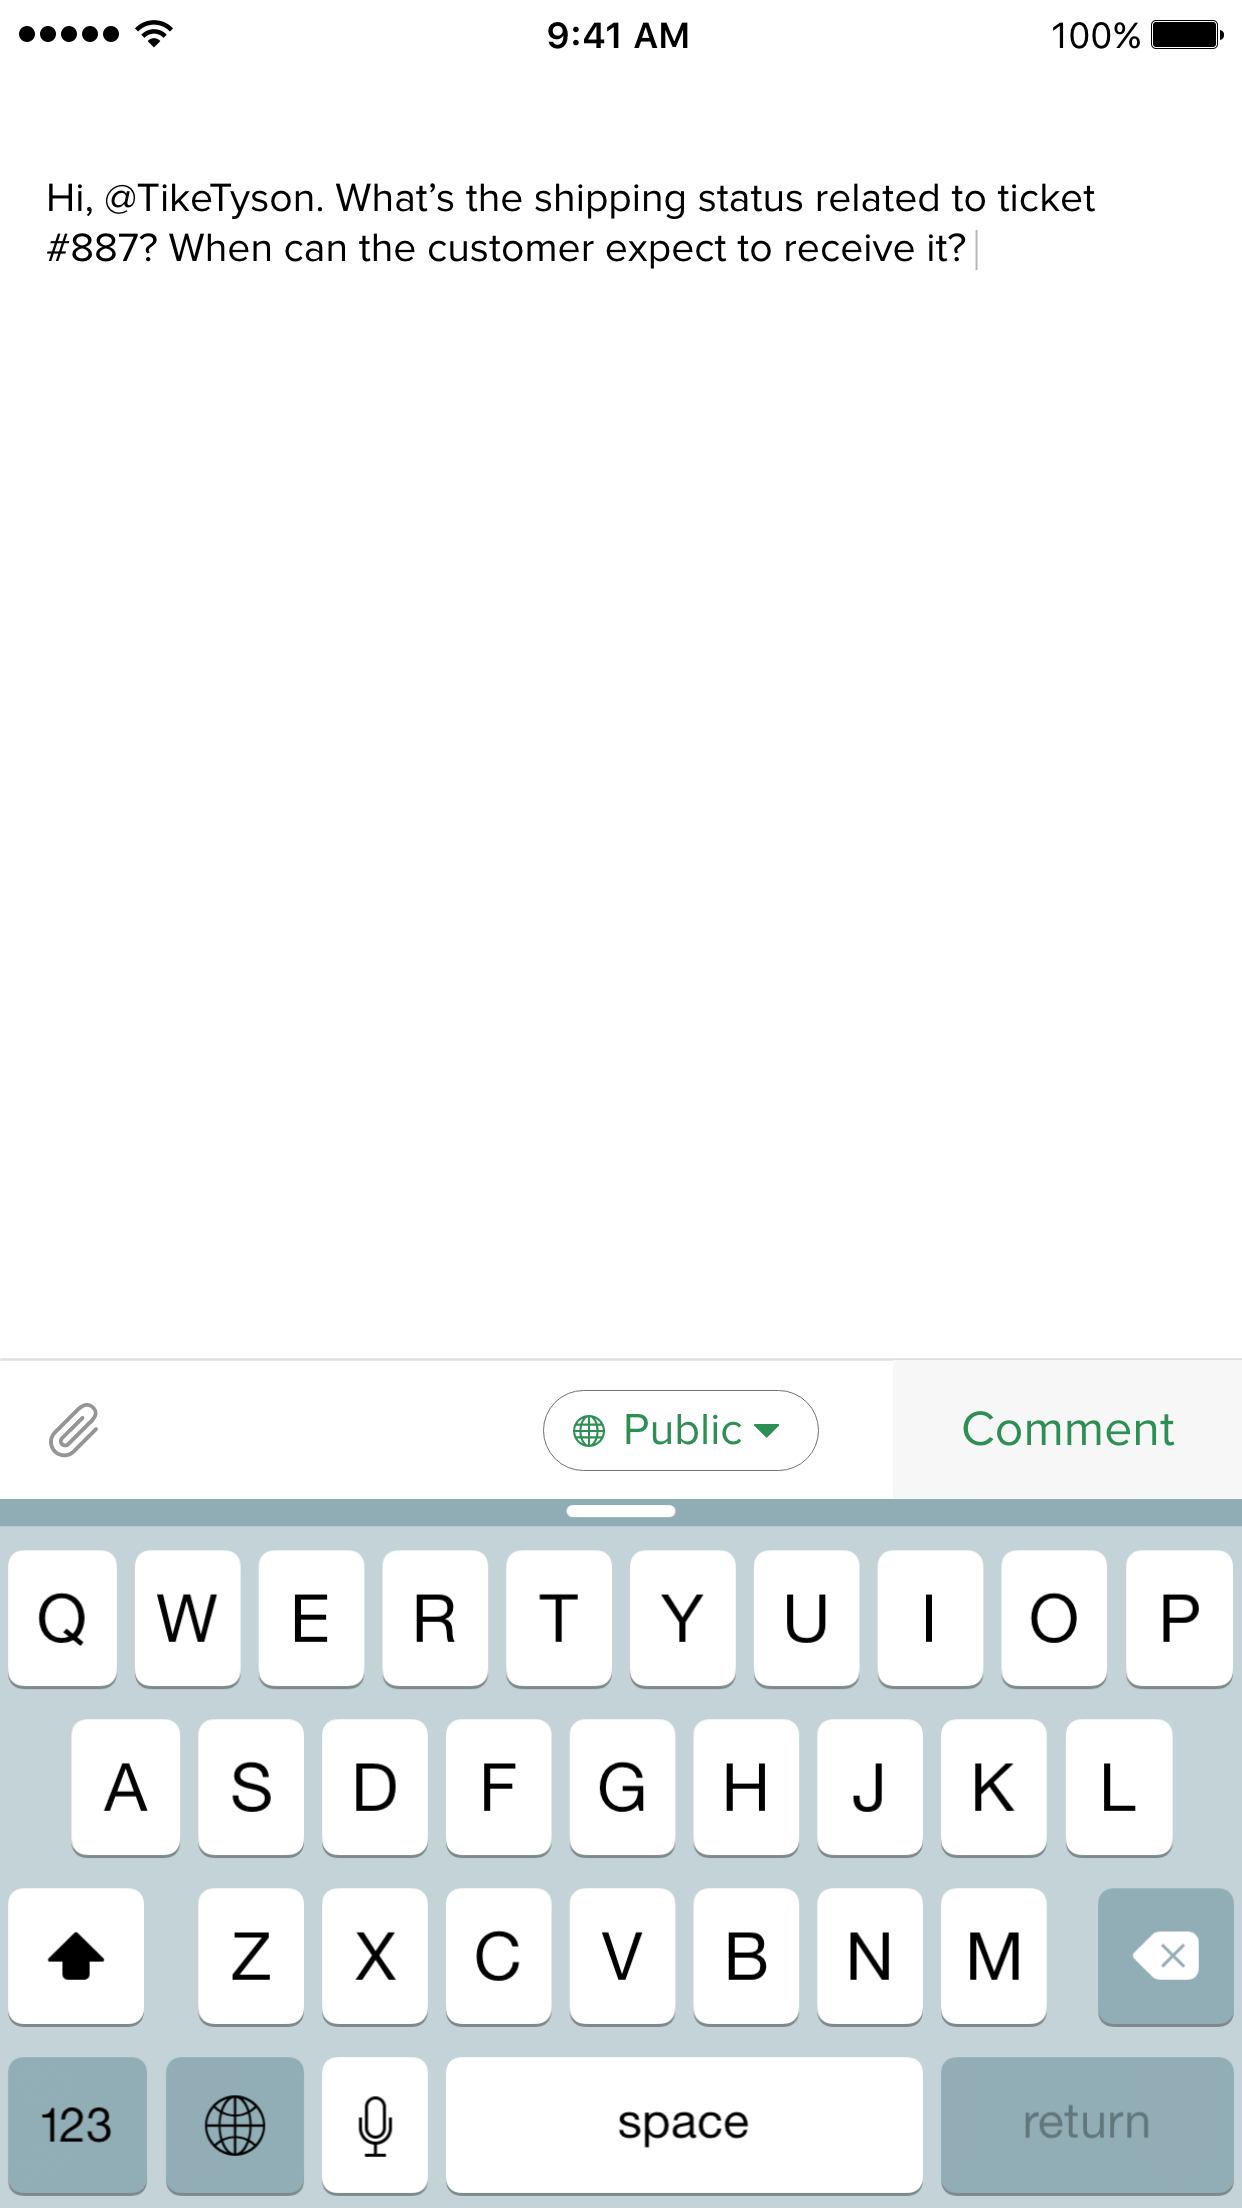
Comment Editor Component
let commentEditorView = ZDCommentEditor.initialize(frame: )
commentEditorView?.setCommentConfiguration(configuration: commentConfig)
commentEditorView?.delegate = self
commentEditorView?.autoresizingMask = [.flexibleWidth,.flexibleHeight]
view.addSubview(commentEditorView)
To display the comment editor in your app, add the code snippet on the right panel to the ViewController object.
ZDCommentConfiguration
let commentConfig = ZDCommentConfiguration(orgId: , ticketId: , type: ,comment: )
This method helps pass basic details, such as org ID, ticket ID, and comment type.
CommentEditor Delegate
The CommentEditor delegate enables callbacks to the ViewController when certain events occur in the view. The different callbacks supported are: didBeginComment, didEndComment, onAccessoryViewSelection, generatedCommentContent and shouldMakeComment.
didBeginComment
func didBeginLoading(editor:ZDCommentEditor){
}
Sends a callback to the ViewController when a user starts typing a comment. You can use a custom loader for this method.
didEndComment
func didEndLoading(editor:ZDCommentEditor,error:Error?,statusCode:Int){
}
Sends a callback to the ViewController when a comment is sent to the server. You can use a custom loader for this method.
onAccessoryViewSelection
func onAccessoryViewSelection(editor:ZDCommentEditor,type:ReplyAccessoryType) -> Void{
}
Sends a callback to the ViewController when the user selects a tool in the toolbar of the comment editor.
generatedCommentContent
func generatedCommentContent(editor:ZDCommentEditor,content:[String:AnyObject]?, error:Error?) -> Void{
}
Sends a callback containing the user's input in the Comment editor, to the ViewController.
shouldMakeComment
func shouldMakeComment(editor:ZDCommentEditor, configuration:ZDCommentConfiguration) -> Bool{
    return true
}
Validates user comments before they can be sent to the server for publishing.
Reply Editor Component
let config = ZDReplyConfiguration(orgId: , departmentId: , ticketId: , replyType: );

let dataSource = ZDReplyDataSource(ticketDetail:,thread: , fromMailAddress: , agentSignature: , mailConfiguration: , customerHappiness:,agentName: )

let replyContainerView = ZDReplyEditor.initialize(frame: , configuration: config, dataSource: dataSource);
replyContainerView.delegate = self
self.view.addSubview(replyContainerView)
To display the Reply editor in your app, add the code snippet on the right panel to the ViewController object.

ZDReplyConfiguration
let config = ZDReplyConfiguration(orgId: , departmentId: , ticketId: , replyType: )
This method helps pass basic details, such as org ID, department ID, and ticket ID.
ZDReplyDataSource
let dataSource = ZDReplyDataSource(ticketDetail:,thread: , fromMailAddress: , agentSignature: , mailConfiguration: , customerHappiness: , agentName: )
This optional data source helps present the reply controller faster. If you do not specify this data source, the Reply component fetches the necessary data from the server.
ZDReplyDelegate
The Reply delegate enables callbacks to the ViewController when certain events occur in the view. The different callbacks supported are: didBeginLoadingData, didEndLoadingData, onAccessoryViewSelection, generatedReplyingContent, shouldMakeReply, didBeginSendingReply, didEndReply, didBeginSendingDraft and didEndDraft.
didBeginLoadingData
func didBeginLoadingData(replyView:ZDReplyEditor) -> Void{
}
Sends a callback to the ViewController when users start entering data in the Reply editor. You can use a custom loader for this method.
didEndLoadingData
func didEndLoadingData(replyView:ZDReplyEditor,error:Error?,statusCode:Int) -> Void{
}
Sends a callback to the ViewController when users complete entering data in the Reply editor. You can use a custom loader for this method.
onAccessoryViewSelection
func onAccessoryViewSelection(replyView:ZDReplyEditor, type:ReplyAccessoryType) -> Void {
}
Sends a callback to the ViewController when the user selects a tool in the toolbar of the Reply editor.
generatedReplyContent
func generatedReplyingContent(content:[String:AnyObject]?,error:Error?) -> Void{
}
Sends a callback containing the user's input in the Reply editor, to the ViewController.
shouldMakeReply
func shouldMakeReply(configuration:ZDReplyConfiguration) -> Bool{
    return true
}
Validates user replies before they can be sent to the server for publishing.
didBeginSendingReply
func didBeginSendingReply(configuration:ZDReplyConfiguration) -> Void{
}
Sends a callback to the ViewController when the send reply action begins. You can use a custom loader for this method.
didEndReply
func didEndReply(configuration:ZDReplyConfiguration,thread:ZDThreadDetail?, error:Error?,statusCode:Int) -> Void{
}
Sends a callback to the ViewController when the reply is successfully sent to the server. You can use a custom loader for this method.
didBeginSavingDraft
func didBeginSendingDraft(configuration:ZDReplyConfiguration) -> Void{
}
Sends a callback to the ViewController when the save draft action begins. You can use a custom loader for this method.
didEndDraft
func didEndDraft(configuration:ZDReplyConfiguration,  thread:ZDThreadDetail?,error:Error?,statusCode:Int) -> Void{
}
Sends a callback to the ViewController when the save draft action ends. You can use a custom loader for this method.