Introduction
The Zoho Desk Software Development Kit (SDK) for Android is aimed at helping you build a custom app containing the features and functionalities of Zoho Desk. When you build an app using this SDK, you get to choose which help desk module you want to retain and which one you want to exclude. Besides, you can design the app UI according to your requirements and style guidelines, while powering the back-end of the app using the SDK.
Getting Started
There are a few requirements that must be met before you can start creating an app using the Zoho Desk SDK for Android. These requirements are as follows.
Zoho Account
Having a Zoho account is an absolute must to be able to use the Zoho Desk SDK for Android. If you do not have an account yet, sign up for one by visiting this link.
Client ID and Client Secret
Next, you require the client ID and client secret for your app. To receive these credentials, you must first register your app by performing the following steps.
- Visit Zoho's Developer Console.
- On the API Credentials page, click the Add Client ID button.
The Create Zoho Client ID form appears. - In this form, enter the following details:
- Client Name: Name of your app
- Client Domain: Website of your app
- Authorized redirect URIs: Redirect URI for authentication. The URI must be entered in the <your_app_URL_scheme>:// format; for example, zohodesksdk:// (The URL scheme is case-sensitive. Therefore, make sure to enter it in lowercase.)
- In the Client Type drop-down list, choose Mobile.
- Click the Create button.
The Client ID and Client Secret are displayed.
Build Configuration - Versions Required
compileSdkVersion - 28
buildToolsVersion - 28.0.3
supportLibVersion - 28.1.1
minSdkVersion - 19
targetSdkVersion - 28
Building Your App
As the first step towards building your app using this SDK, add the code snippets on the right panel to the build.gradle file of your app.
implementation 'com.zoho.accounts.android:zaccountssdk:V0_2
To enable IAM login flow
implementation 'com.zoho.desk:provider:1.0’
To add the Zoho Desk SDK to your Android app, include the desksdk library.
implementation 'com.zoho.desk:ui:1.0’
To include Zoho Desk UI components too in your app, add the deskui library.
dependencies {
      classpath "org.jetbrains.kotlin:kotlin-gradle-plugin:1.3.50”
      }
Since the ZohoDeskSDK library was built using Kotlin, you must also add the Kotlin gradle plugin in the project level build.gradle file.
allprojects {
      repositories {
      maven { url 'https://maven.zohodl.com/' }
      }
      }
Additionally, include the code in the right panel too in the project level build.gradle file.
Authenticating Users
To enable user authentication, perform the following steps.
public final static String SCOPES = "Desk.tickets.ALL," +
      "Desk.tickets.READ," +
      "Desk.tickets.WRITE," +
      "Desk.tickets.UPDATE," +
      "Desk.tickets.CREATE," +
      "Desk.tickets.DELETE," +
      "Desk.contacts.READ," +
      "Desk.contacts.WRITE," +
      "Desk.contacts.UPDATE," +
      "Desk.contacts.CREATE," +
      "Desk.tasks.ALL," +
      "Desk.tasks.WRITE," +
      "Desk.tasks.READ," +
      "Desk.tasks.CREATE," +
      "Desk.tasks.UPDATE," +
      "Desk.tasks.DELETE," +
      "Desk.basic.READ," +
      "Desk.basic.CREATE," +
      "Desk.settings.ALL," +
      "Desk.settings.WRITE," +
      "Desk.settings.READ," +
      "Desk.settings.CREATE," +
      "Desk.settings.UPDATE," +
      "Desk.settings.DELETE," +
      "Desk.search.READ," +
      "Zohosearch.securesearch.READ," +
      "aaaserver.profile.READ," +
      "zohocontacts.userphoto.READ," +
      "ZohoSupport.feeds.ALL," +
      "ZohoSupport.basic.ALL," +
      "VirtualOffice.messages.CREATE," +
      "profile.userphoto.UPDATE," +
      "profile.userinfo.READ," +
      "Desk.articles.READ," +
      "ZohoDiscussions.basic.ALL," +
      "profile.orguserphoto.READ";
1. Add the various scopes to be supported.
ZohoSDK.getInstance(this).init(scopes, true)
      where
      init
      param 1 - Scopes mentioned above,
      param 2 - toShow Log or not
2. In the onCreate method in the Application class, include the code snippet on the right panel.
Strings:
      <string name="c_id"> YOUR CLIENT ID </string>
      <string name="c_secret"> YOUR CLIENT SECRET ID </string>
      <string name="redir_url">schemeName://</string>
      <string name="accounts_url">https://accounts.zoho.com</string>
      <string name="enable.logs">true</string>
      <string name="is.debug">true</string>
3. In the strings.xml file in the project directory of your app, include the strings on the right panel.
Activity:
      <activity android:name=".RedirectActivity">
      <intent-filter>
      <action android:name="android.intent.action.VIEW" />
      <category android:name="android.intent.category.DEFAULT" />
      <category android:name="android.intent.category.BROWSABLE" />
      <data android:scheme="schemeName" />
      </intent-filter>
      </activity>
4. Create a subclass called RedirectActivity from the Activity() class, and add it to the AndroidManifest.xml file in the project directory.
This redirection activity is called if user login is successful.
ZohoSDK.getInstance(this).handleRedirection(this)
Then, in the onCreate() method in RedirectActivity, add this single line.
ZohoSDK sdk = ZohoSDK.getInstance(getApplicationContext());
      if(sdk.isUserSignedIn()){
      sdk.presentLoginScreen(this, new ZohoTokenCallback() {
      @Override
      public void onTokenFetchInitiated() {

      }

      @Override
      public void onTokenFetchComplete(ZohoToken zohoToken) {

      }

      @Override
      public void onTokenFetchFailed(ZohoErrorCodes zohoErrorCodes) {

      }
      },null);
      }
      else{
      // start intent to your first activity
      }
Finally, in the first activity of your app, include the code on the right panel.
Handling User Logout
sdk.revoke(new ZohoSDK.OnLogoutListener() {
      @Override
      public void onLogoutSuccess() {
      }
      @Override
      public void onLogoutFailed() {
      }
      });
To log users out from the SDK, use the code snippet on the right panel.
ZohoDeskUIKitKt.flushUserData(context);
Also, make sure to clear app data saved by the SDK components when the user logs out. To perform this activity, use the code snippet on the right panel.
Note: Clearing of data is possible only in the Zoho Desk UI Kit.
Integrating Your App with the Zoho Desk SDK
ZDeskSdk.Companion.getInstance().init(this,this)
      where,
      param 1 - callback
      param 2 - context

      ZDeskSdk.Companion.getInstance().setBaseUrl("https://desk.zoho.com");
To integrate the Zoho Desk SDK with your app, add the code snippet on the right panel to the onCreate method in the application class.
ZDeskSdk.Companion.getInstance().setZdEnableLogs(true);
To enable the Developer Log, use the code snippet on the right panel.
Similarly, implement ZDAuthenticationInterface in the Application class.
@Override
      public void getAuthToken(final @NotNull ZDSdkInterface callback) {
      ZohoSDK.getInstance(this).getToken(new ZohoTokenCallback() {
      @Override
      public void onTokenFetchInitiated() {
      }
      @Override
      public void onTokenFetchComplete(ZohoToken zohoToken) {
      callback.setOAuthToken(zohoToken.getToken()); /* On success of the Token Fetch this method will get called */
      }

      @Override
      public void onTokenFetchFailed(ZohoErrorCodes zohoErrorCodes) {
      /* On Failure of the Token Fetch this method will get called */
      callback.onOAuthTokenFetchFailed(zohoErrorCodes.getDescription(), /* Error Code*/);
      }
      })
      }
The getAuthToken method handles authentication related to API calls for the Zoho Desk SDK for Android. This method fetches the OAuthToken that the SDK requires for making API calls. Configure the method as shown in the right panel.
Zoho Desk APIs
Below are a few examples of the APIs provided by Zoho Desk.
Get organization
ZDOrganizationAPIHandler.INSTANCE.getOrganisation(new ZDCallback() {
      @Override
      public void onFailure(@org.jetbrains.annotations.Nullable Call call,
      @NotNull ZDBaseException exception) {
      // ToDo on Failure call
      }
      @Override
      public void onSuccess(@NotNull ZDResult result) {
      // ToDo on Success call
      }
      },mOrgId);
This API returns details of an organization from the help desk portal.
Get ticket
ZDTicketAPIHandler.INSTANCE.getTicketDetail(new ZDCallback() {
      @Override
      public void onFailure(@org.jetbrains.annotations.Nullable Call call,
      @NotNull ZDBaseException exception) {
      // ToDo on Failure call
      }
      @Override
      public void onSuccess(@NotNull ZDResult result) {
      // ToDo on Success call
      }
      },mOrgId,mTicketId,optionalParams);
This API fetches a ticket from the help desk portal.
Help desk modules are referred to in the ZD<Module Name>APIHandler format in API requests and ZD<Module Name> format in API responses.
To download a sample app to check how the APIs work, click here.
To view the complete list of Zoho Desk APIs, click here.
Zoho Desk UI Kit for Android
The Zoho Desk UI Kit for Android is a plug-and-play feature that helps build an app using standard UI elements created by Zoho. All that you need to do is add a view to the app and call an init method with the params required.
Currently, the UI kit supports the Ticket List and Ticket Detail components.
Ticket List Component
ZDTicketListFragment ticketList = ZDTicketListFragment.Companion.create(mOrgId);

      ArrayList deptList = new ArrayList();
      deptList.add(departmentId);

      ZDTicketListConfig config = new ZDTicketListConfig.ZDBuilder()
      .setViewId(viewId)
      .sortBy("-recentThread")
      .setDepartmentIds(deptList)
      .setPageSize(99)
      .build();

      ticketList.setConfig(config);
To display the ticket list in your app, add ZDTicketListFragment in the required activity or fragment.
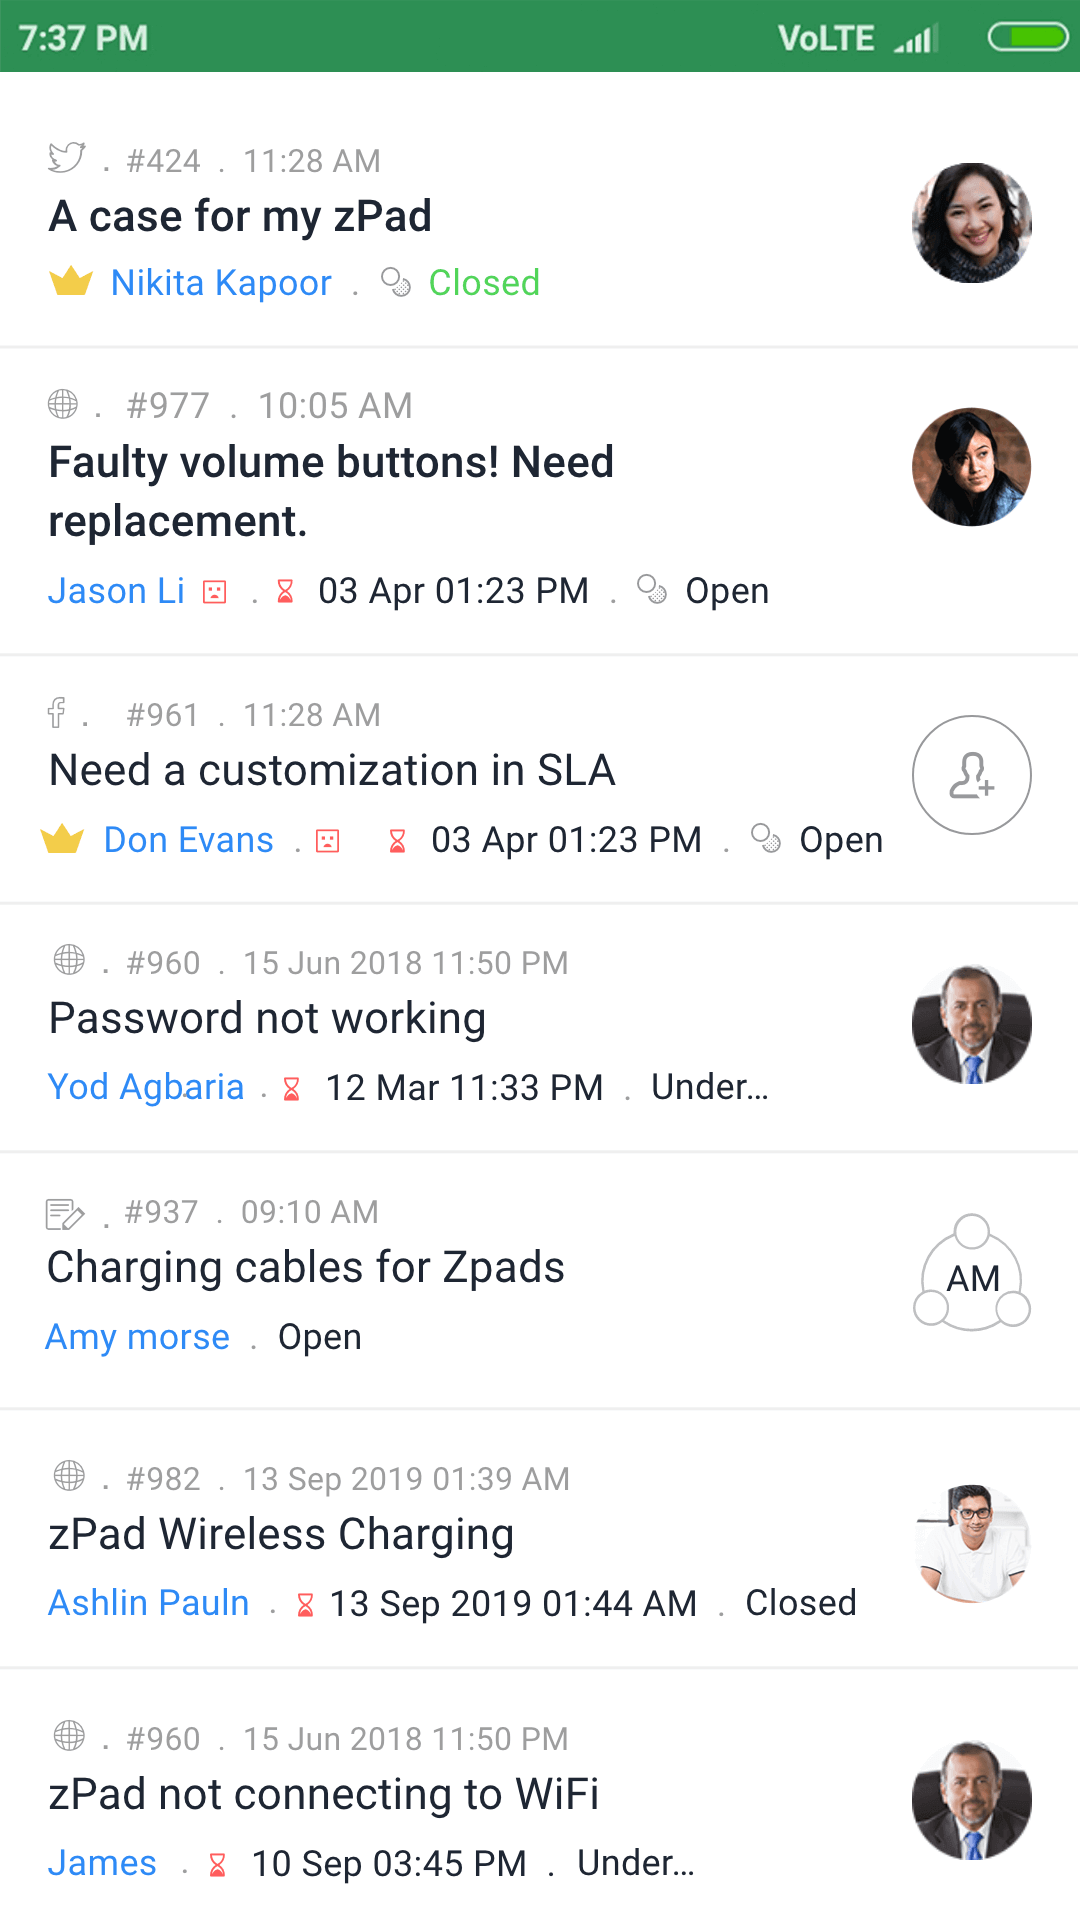
Note: setConfig is an optional method. If you do not set any values in this method, the default values will be considered.
Listeners
void onAction(@NotNull String status)
      void onClick(@NotNull ZDTicket ticket)
      void onListItemUpdated(@NotNull ZDTicket ticket)
      void onListItemDeleted(@NotNull ZDTicket ticket)
Any fragment or activity that uses ZDTicketListFragment must implement ZDTicketListInterface because this interface supports the necessary callback methods:
Ticket Detail Component
ZDTicketDetailFragment zdTicketDetailFragment = ZDTicketDetailFragment.Companion.create(mOrgId, mDepartmentId, mTicketId);

      ZDTicketDetailConfig config = new ZDTicketDetailConfig.ZDBuilder()
      .setConversationPageSize(40)
      .setTicket(ticket)
      .build();

      zdTicketDetailFragment.setConfig(config);
To display the ticket detail screen in your app, add ZDTicketDetailFragment in the required activity or fragment.
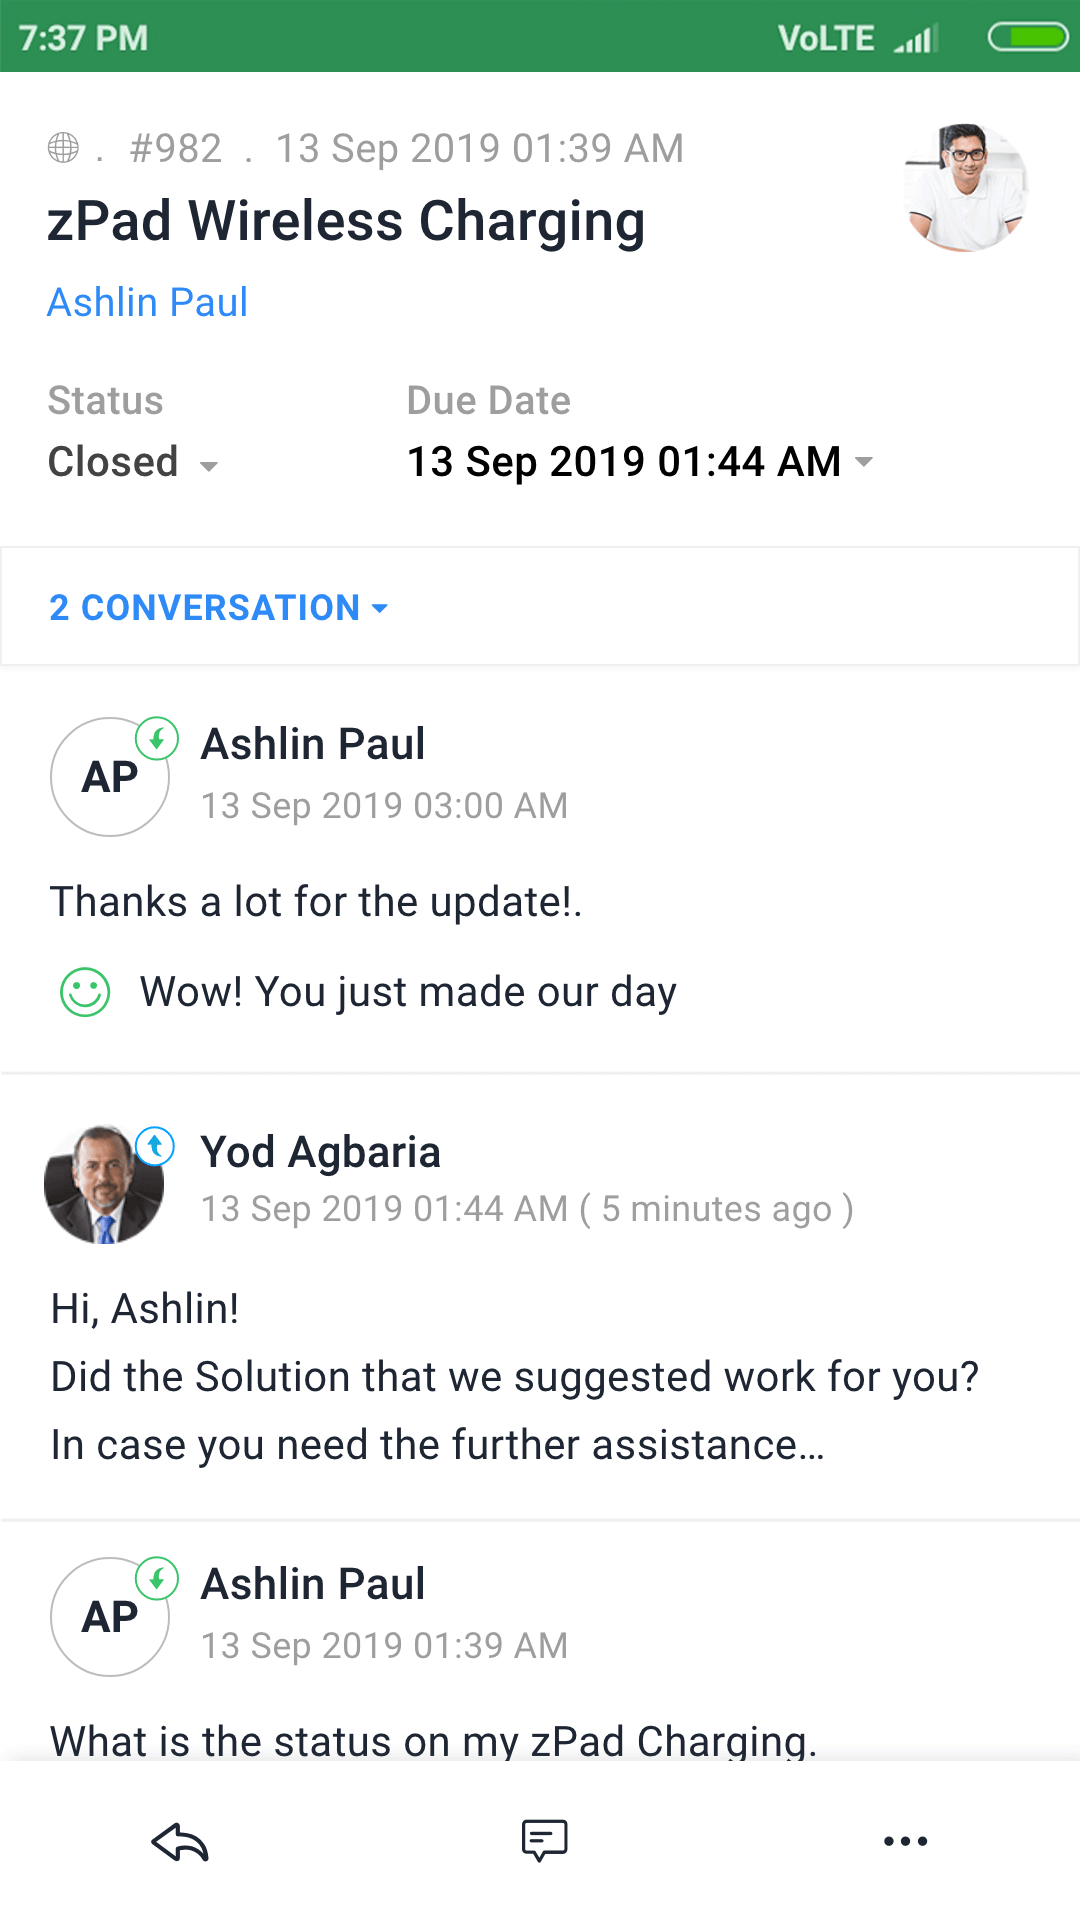
Note: setConfig is an optional method. If you do not set any values in this method, the default values will be considered.
Listeners
void onAction(@NonNull String action, @NonNull ZDTicketDetail ticket, @Nullable ZDConversation conversation, @Nullable ZDAgentDetail currentAgentDetail)
Any fragment or activity that uses ZDTicketDetailFragment must implement ZDTicketDetailInterface because this interface supports the necessary callback methods:
Reply Editor Component
ZDReplyFragment replyView = ZDReplyFragment.Companion.create(mOrgId, mDepartmentId, mTicketId, actionType,currentAgentName);

      ZDReplyConfig config = new ZDReplyConfig.ZDBuilder()
      .setTicket(ticketDetail)
      .setThread(threadDetail)
      .setThreadId(threadId)
      .build()

      replyView.setConfig(config);
To include the reply editor in your app, add ZDReplyFragment in the required activity or fragment.
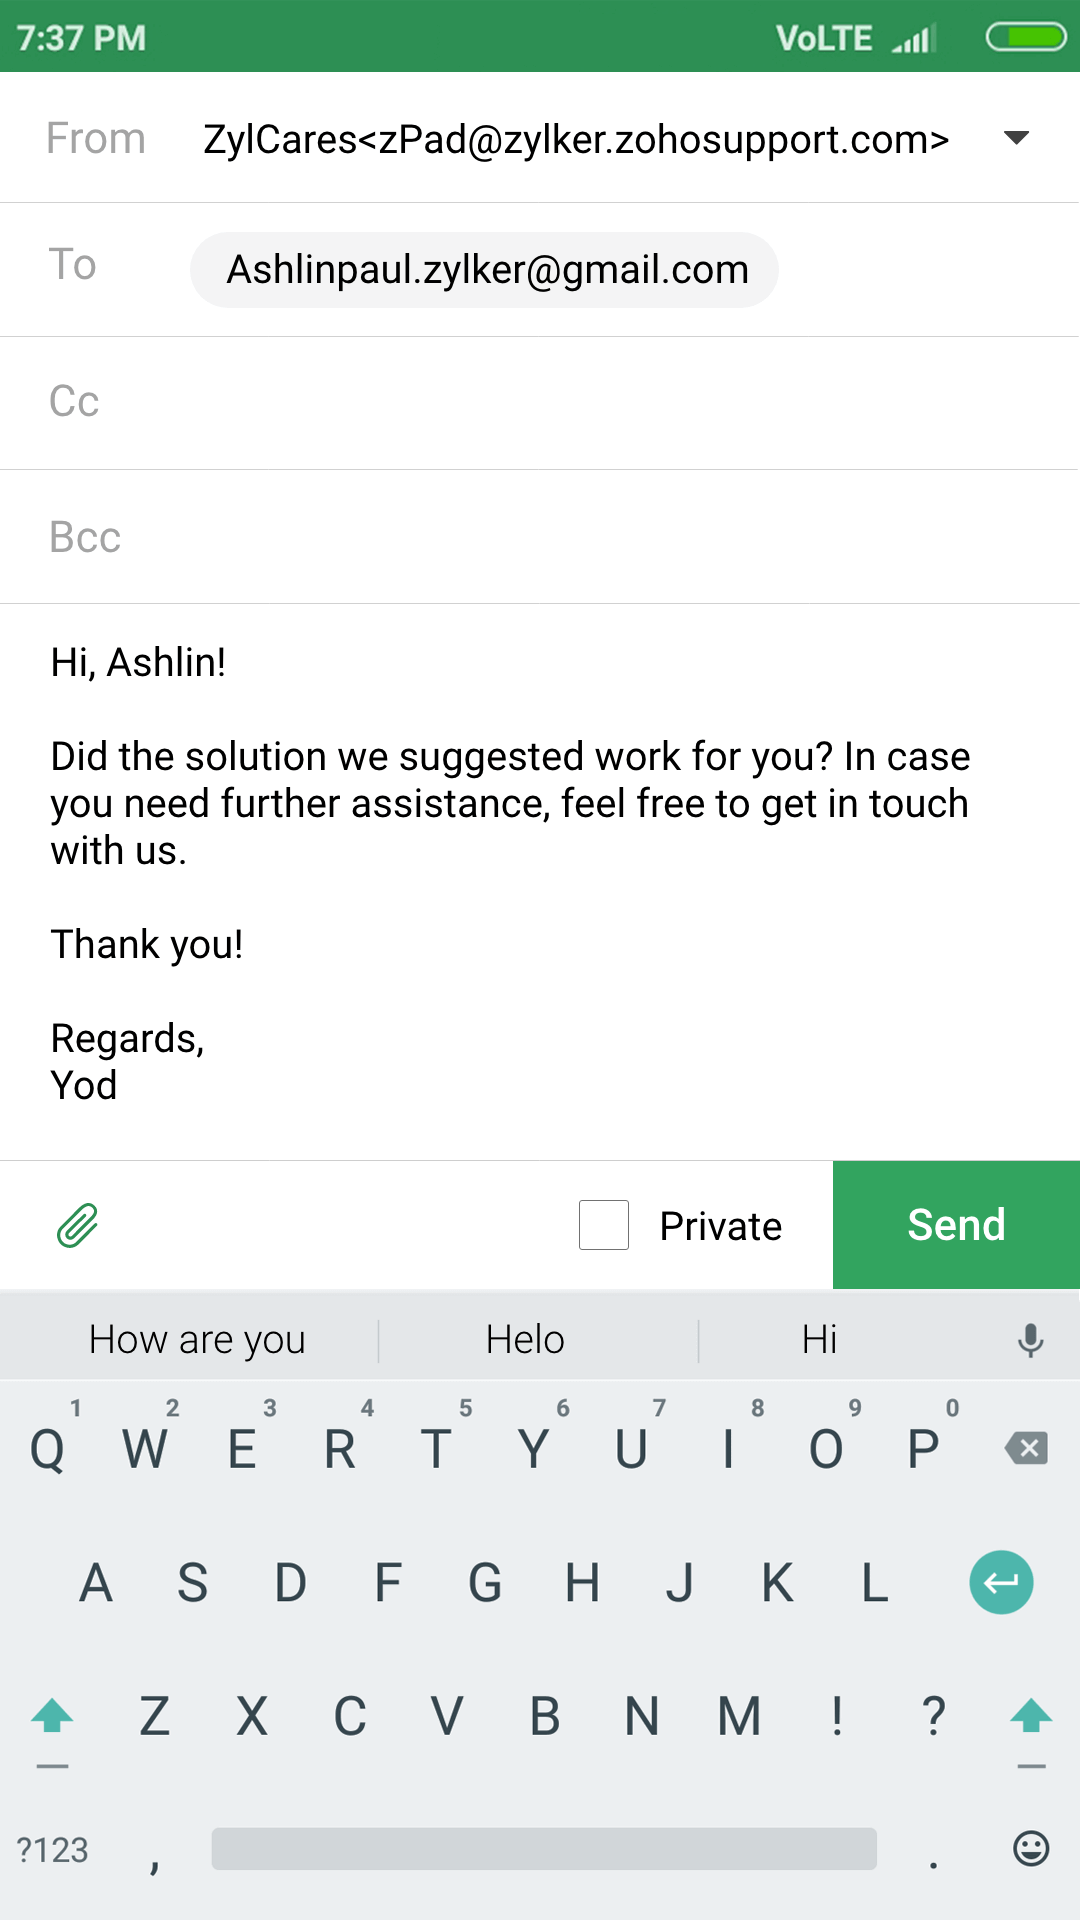
Note: setConfig is an optional method. If you do not set any values in this method, the default values will be considered.
Listeners
public void openAttachment(@NonNull ArrayListattachmentList) public void setResultBack(@NonNull ZDThreadDetail thread) public void onError(@NonNull ZDBaseException exception) public void onDismiss()
Any fragment or activity that uses ZDReplyFragment must implement ZDReplyInterface because this interface supports the necessary callback methods:
The openAttachment method is called with the lxist of files selected, if any file attachments exist already. After this method is called, you can either use our ZDAttachmentEditorFragment or a different fragment of your choice.
replyView.setAttachmentList(attachmentList);
After the user selects or removes attachments in the fragment, attachmentList can be set to this method:
The setResultBack method is called if a thread is sent or saved successfully.
The onError method is called if the reply editor encounters an error.
The onDismiss method is called if users discard the changes made in the reply editor.
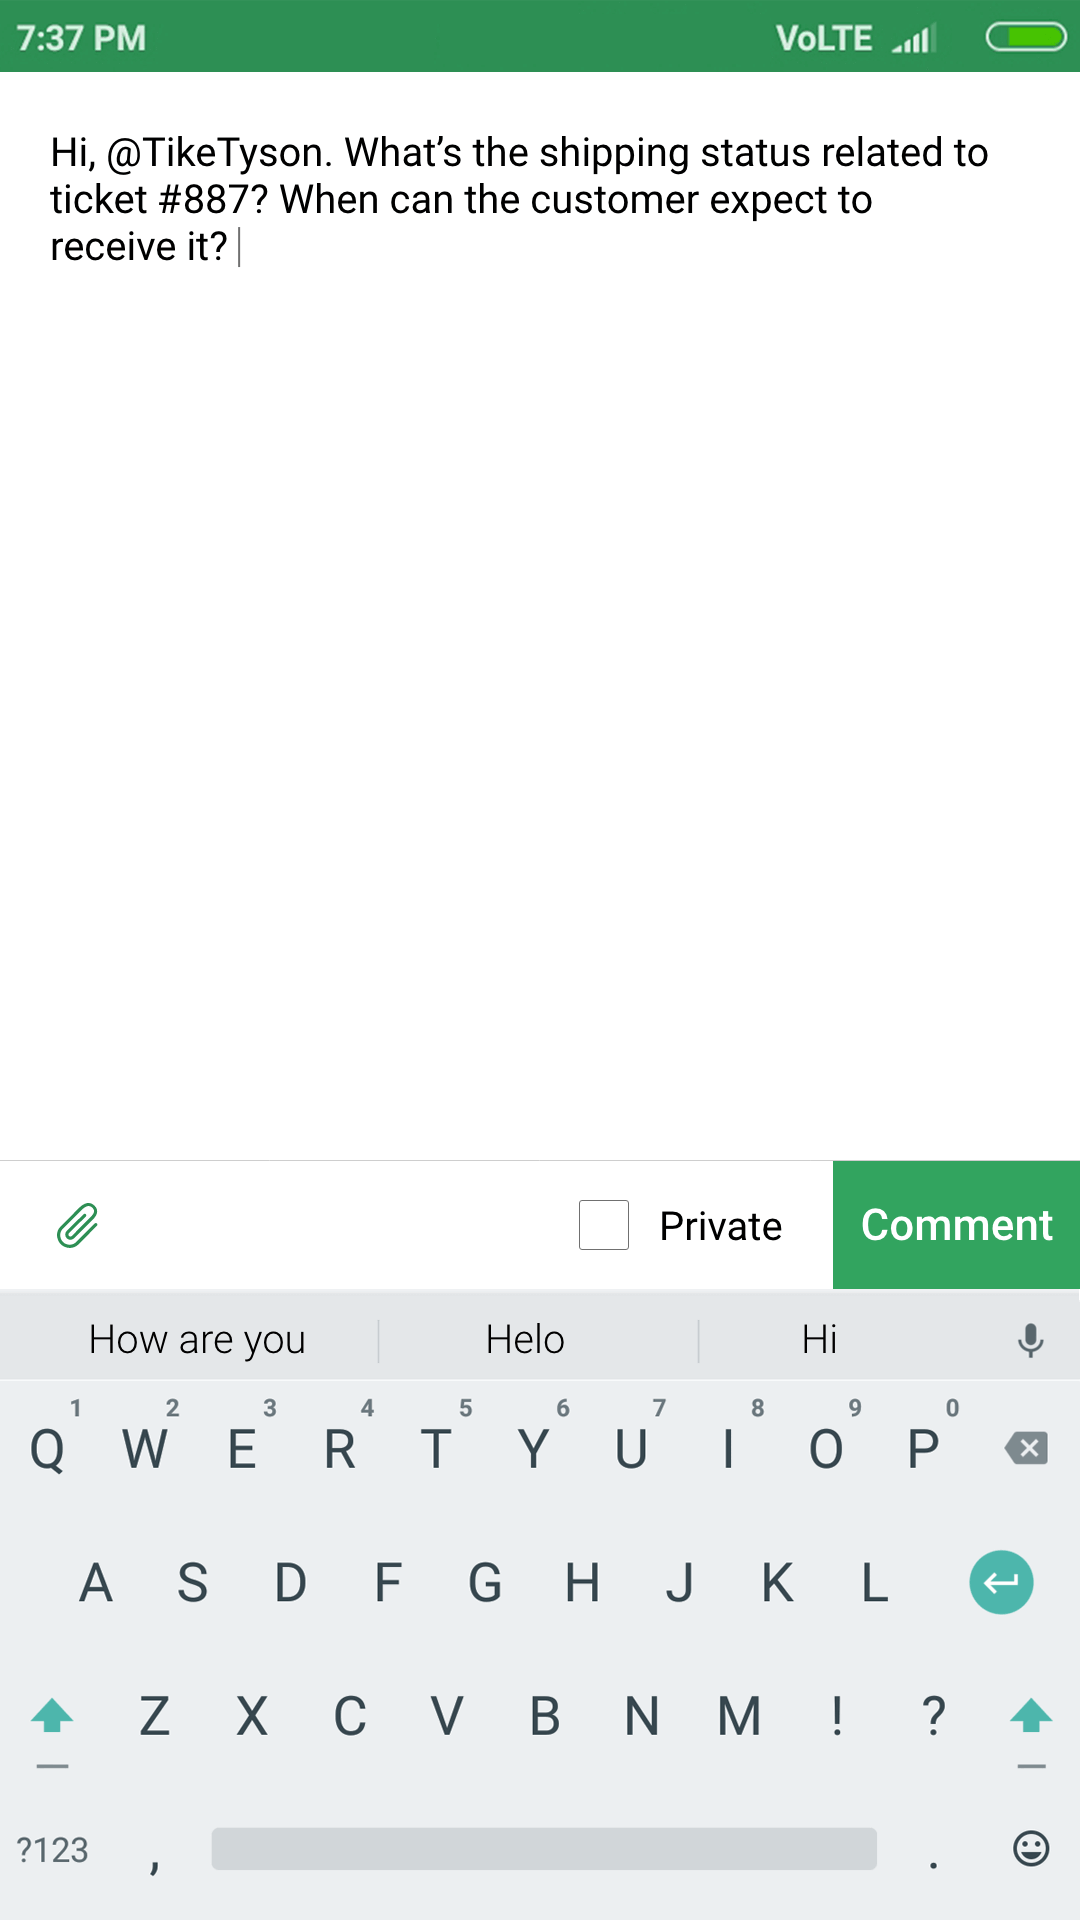
Comment Editor Component
ZDCommentFragment commentView = ZDCommentFragment.Companion.create(mOrgId, mDepartmentId, mTicketId);
To include the comment editor in your app, add ZDCommentFragment in the required activity or fragment.
commentView.editComment(comment);
To enable editing of existing comments, include this method:
Listeners
public void openAttachment(@NonNull ArrayListattachmentList) public void setResultBack(@NonNull ZDTicketConversationComment comment) public void onError(@NonNull ZDBaseException exception)
Any fragment or activity that uses ZDCommentFragment must implement ZDCommentInterface because this interface supports the necessary callback methods:
The openAttachment method is called with the list of files selected, if any file attachments exist already. After this method is called, you can either use our ZDAttachmentEditorFragment or a different fragment of your choice.
commentView.setAttachmentList(attachmentList);
After the user selects or removes attachments in the fragment, attachmentList can be set to this method:
The setResultBack method is called if the comment is sent or saved successfully.
The onError method is called if the comment editor encounters an error.
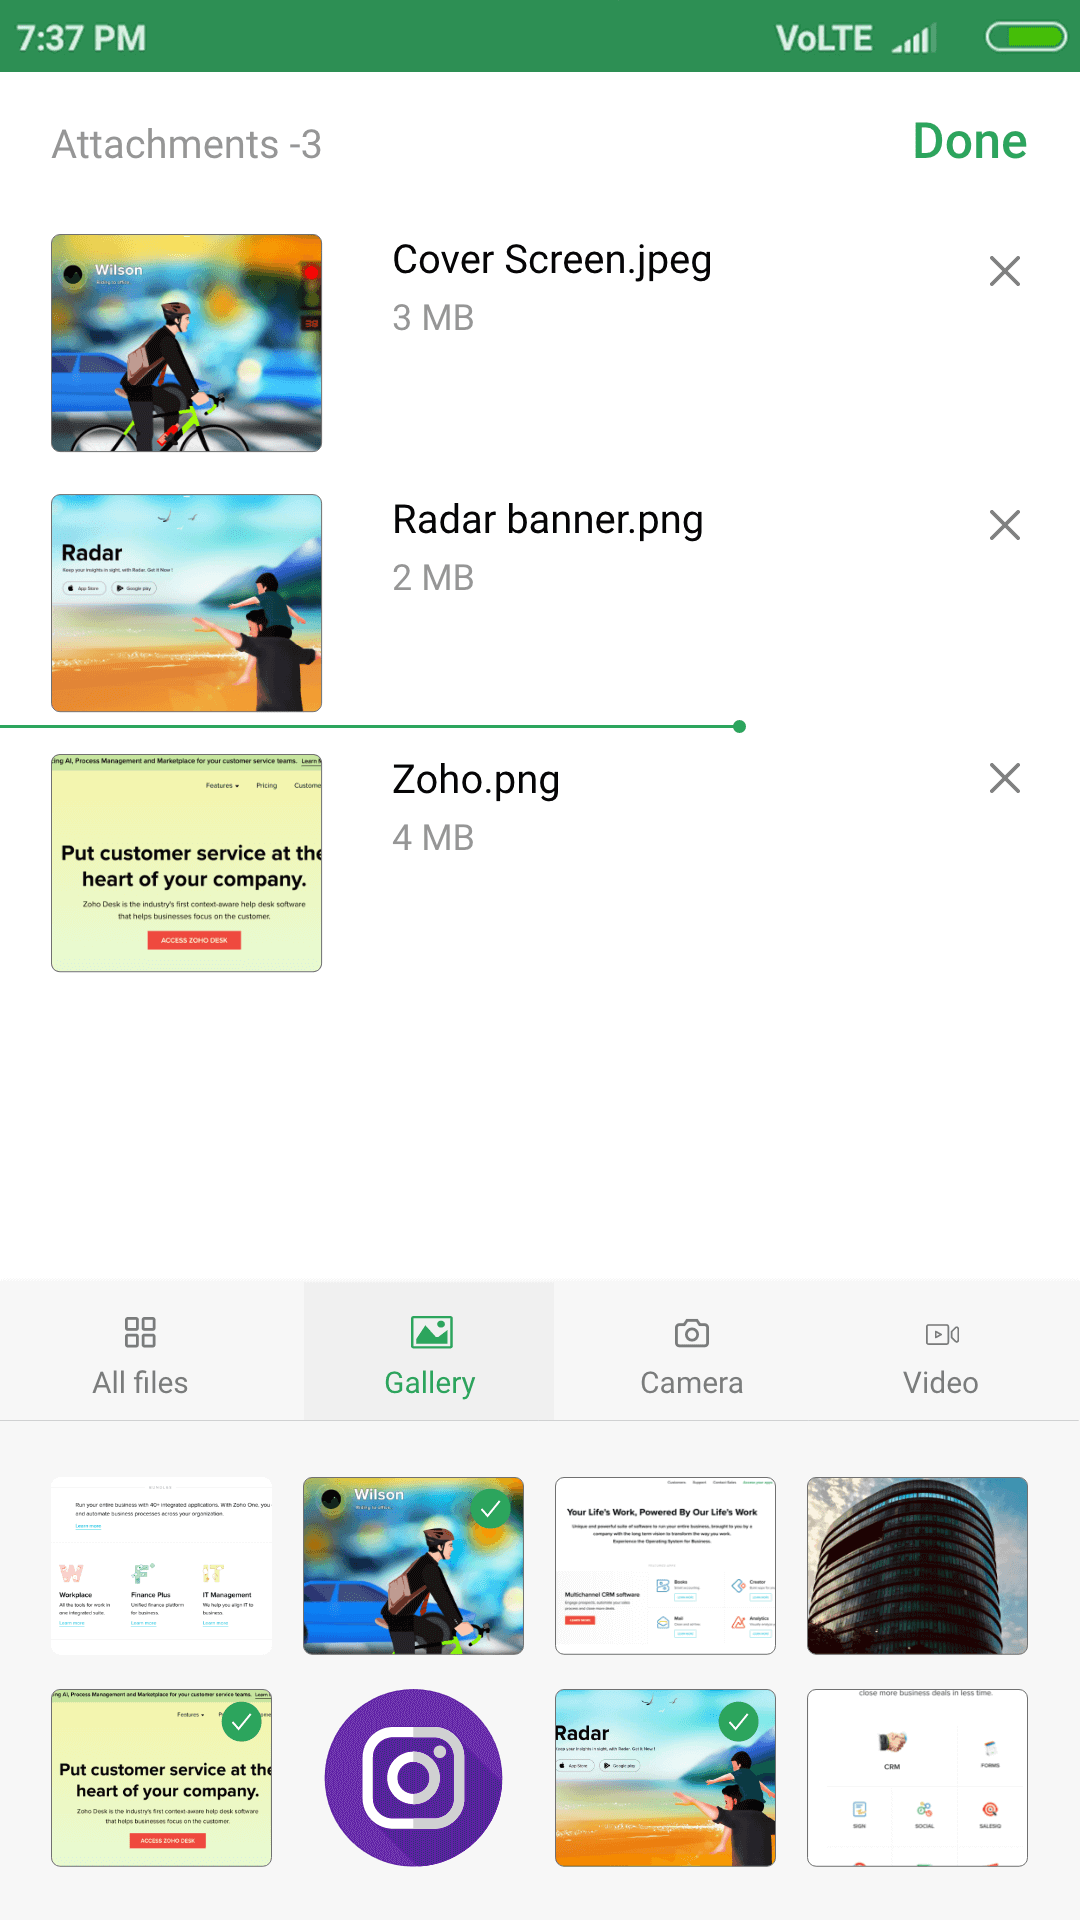
Attachment Editor Component
ZDAttachmentEditorFragment attachmentView = ZDAttachmentEditorFragment.Companion.create(mOrgId);

      ZDAttachmentConfig config = new ZDAttachmentConfig.ZDBuilder()
      .setFileCount(25)
      .setSizeIn(SIZE.MB)
      .setSingleFileSize(10)
      .setDoneVisibility(true)
      .setTotalFileSize(200)
      .build();

      attachmentView.setConfig(config);
To include the attachment editor in your app, add ZDAttachmentEditorFragment in the required activity or fragment. This fragment helps users select or deselect attachments and also provides your app with the ArrayList of currently selected attachments.
attachmentView.setAttachmentList(attachmentList);
This method need not be executed the first time the attachment editor is loaded in a thread. It must, however, be executed on subsequent instances of loading the attachment editor.
Listeners
public void setAttachmentLists(@NonNull ArrayListattachmentList)
Any fragment or activity that uses ZDAttachmentEditorFragment must implement ZDAttachmentInterface because this interface supports the necessary callback methods: