Deluge in Zoho People
Zoho People features that support Deluge
Zoho People supports Deluge in the following four areas:
- Validation: Execute a Deluge custom function on click of a form's submit button.
- Workflow: Execute a Deluge custom function on the specified workflow.
- Scheduler: Execute a Deluge custom function based on a schedule.
- Custom Button: Execute a Deluge custom function on a click of a custom button.
Validation
Zoho People allows you to create validation based on one or more fields of a form. With Deluge, you can write custom logic that will be triggered on click of the submit button of a form.
- Click the Settings icon at the top-right corner.
- Under Customization, select Forms.
- Select the form for which you want to create validation.
- Click the Custom validation checkbox.
Let's assume an organization has a policy that employees who are serving their notice period can't apply for leave. Custom validation can be used to customize the Leave form to restrict entry from the employees who are serving their notice period.
Details of all the employees serving their notice period are maintained in Exit Details form. The Leave form is used by all employees to apply for leave. Let's configure a custom validation for the Leave form.
- Click the Settings icon at the top-right corner.
- Under Customization, select Forms.
- Select the Leave form.
- Click the Custom validation checkbox.
Next, let's script using Deluge to restrict submission of the form if the employee's record is found on the Exit Details form.
- Under Automate, click Edit in the Sign template card.
- Click the Configure Sign Collection button.
- In the pop-up that appears, go to the Advance settings tab, check the Execute a custom function checkbox and click Configure.
// Construct a map to supply as criteria to Zoho People - Get Records integration task. This checks if an entry with the current employee ID is available in the Exit Details form. search_map = Map(); search_map.put("searchField", "EmployeeID"); search_map.put("searchOperator", "Is"); search_map.put("searchTextByID", employee_record_id); // Fetch record with the current employee ID from the Exit Details form using Zoho People - Get Records integration task. The link name for the Exit Details form in Zoho People is P_Separation. employee_exit_details = zoho.people.getRecords("P_Separation", 0, 1, search_map); // If no record with current employee ID is found in the Exit Details form, the value of 'employee_record_id' param will not be available in the response. Hence, perform a null check on the returned key. record_unavailable = employee_exit_details.get(0).getKey(employee_record_id).isNull(); // Create a collection to store error message to be displayed for employees serving notice period custom_message = Collection(); // Insert custom error message into the 'custom_message' map only if 'employee_record_id' value is not available in the response if(record_unavailable == false) { custom_message.insert("EmployeeID":"Employees on their notice period cannot apply for leave"); } // Insert the error message into a collection with key 'errors'. error = Collection(); error.insert("errors":custom_message); //Return the 'error' collection. This restrict the form from being submitted if value is available against 'errors' key. return error;
Workflow
Zoho People offers you a workflow automation tool that automates all your HR processes. You can associate Deluge functions on the configured workflow.
- Click the Settings icon at the top-right corner.
- Under Automation, select Workflows.
- Click the Add Workflow button.
- Provide the function name and select the required trigger process.
- Click on the plus icon next to Custom Functions under Action.

Let's assume an organization allows its employees to request to resign using Exit Request form. An entry will be automatically added in Exit Details form if the request is approved by their manager. This automation can be achieved using Zoho People workflows and Deluge.
Create a form with the following details. This form is used by the employees to raise exit request.
| Form Name | Form Link Name | Field Type | Field Name | Field Link Name |
| Exit Request | Exit_Request | Lookup (Employee) | Employee ID | Employee_ID |
| Date | Separation date | Separation_date |
Note:
- Mark both the fields as mandatory
- Select the primary lookup checkbox to set Employee ID field as primary lookup.
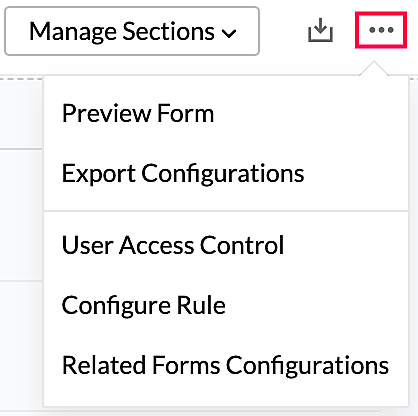
Set permission for the team members to access the Exit Request form. Click on the ellipsis (three dots) icon at the top-right corner of the form's edit page and set permission as shown below:

- Click the Settings icon at the top-right corner.
- Under Automation, select Workflows.
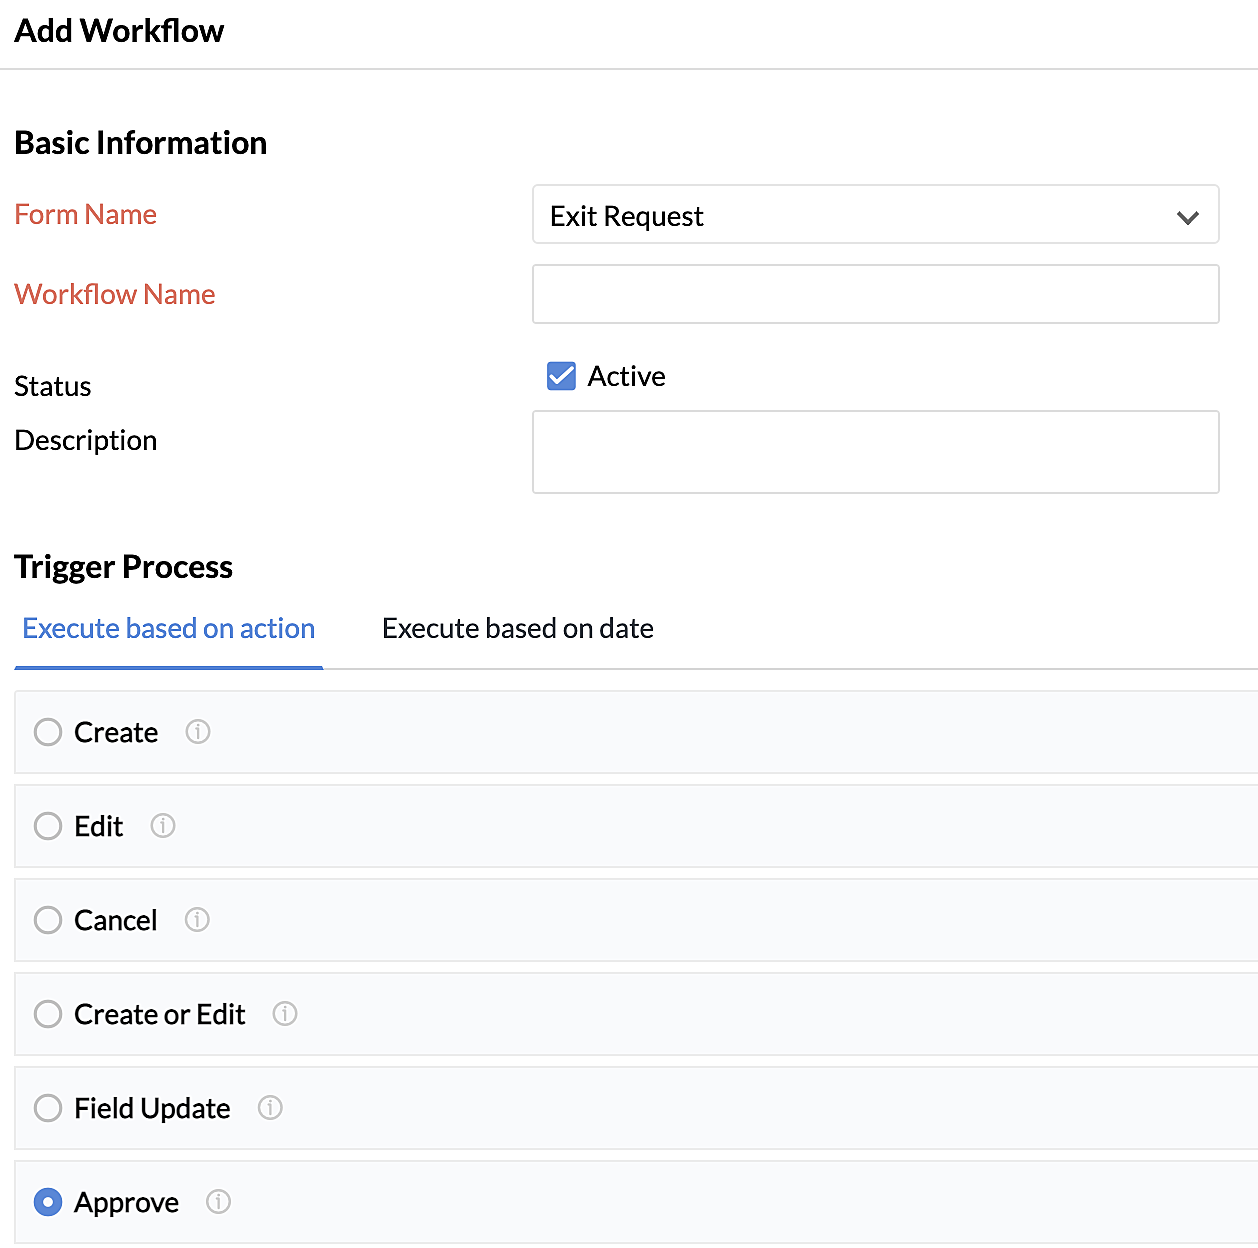
- Click on the Add Workflow button.
- Provide the following details in the Add Workflow window.
- Click the plus icon next to Custom Functions under Action.


- In the top pane of the Deluge editor that appears, enter a function name and click Edit Params.

- Provide the following details in the Edit Params window. In the following step, we will use these arguments like variables in Deluge script.
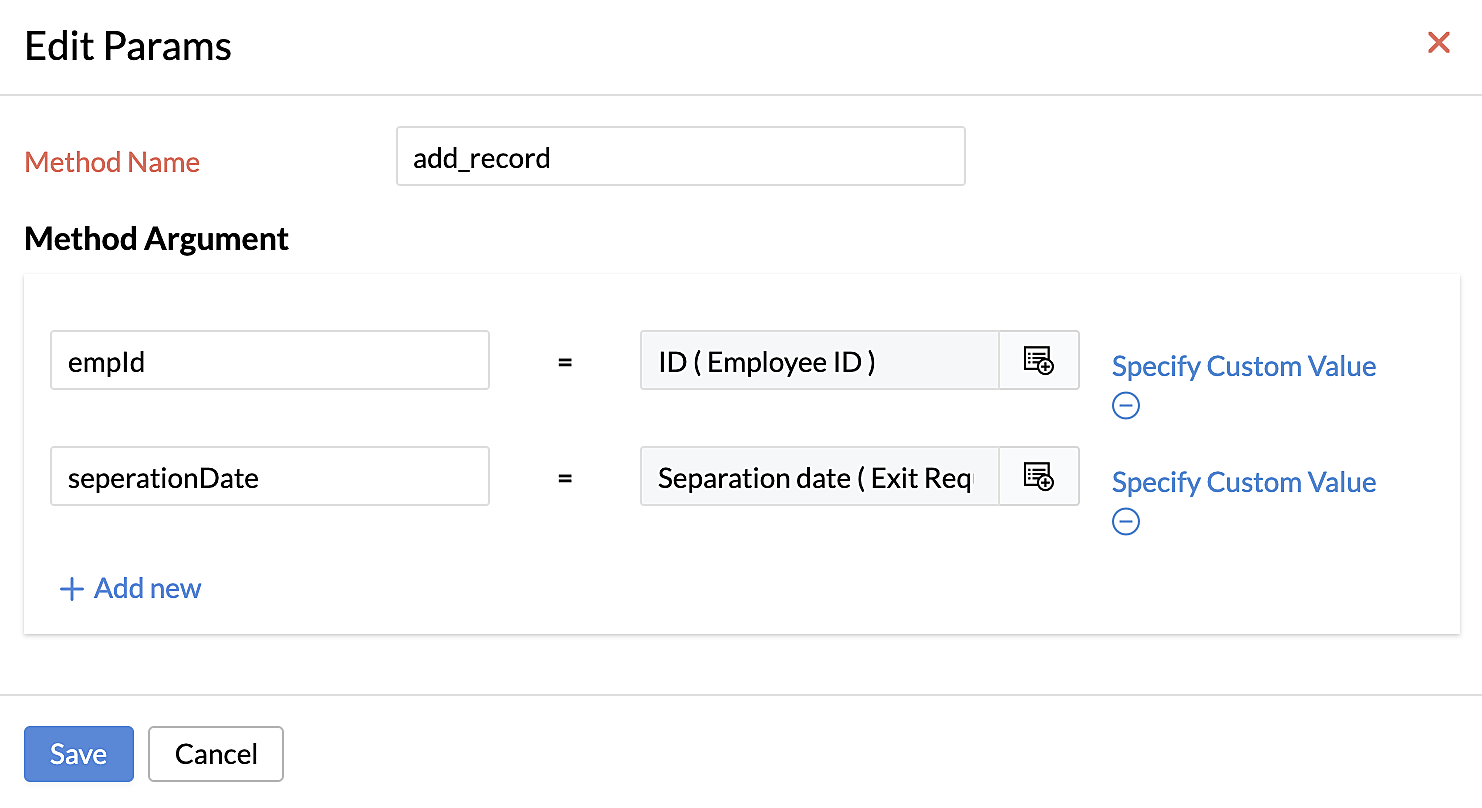
Next, let's script using Deluge to create a new record in the Exit Details form with the employee's details and assign the approver/manager as the interviewer.


// Construct a map to hold the criteria to search the record of the logged-in user in Employee form. search_map = Map(); search_map.put("searchField","EmailID"); search_map.put("searchOperator","Is"); search_map.put("searchText",zoho.loginuserid); // Use Zoho People - Get Records task to fetch the details of the logged-in user. The link name for the Employee form in Zoho People is P_Employee. interviewer_id = zoho.people.getRecords("P_Employee",0,1,search_map).get(0).get("Zoho_ID"); // The logged in user (approver) will be assigned as interviewer of the employee who raised exit request. Construct a map to store employee details of the interviewer. values_map = Map(); values_map.put("EmployeeID",empId); values_map.put("SeparationDate",seperationDate); values_map.put("Interviewer",interviewer_id); // Use Zoho People - Create task to create a record in the Exit Details form. The link name of the Exit Details form in Zoho People is P_Separation. response = zoho.people.create("P_Separation",values_map);
Configure who can approve the exit request submitted by employee.
- Click Approvals under Automation.
- Click the Add Approval button.
- Provide the following details and click Save.
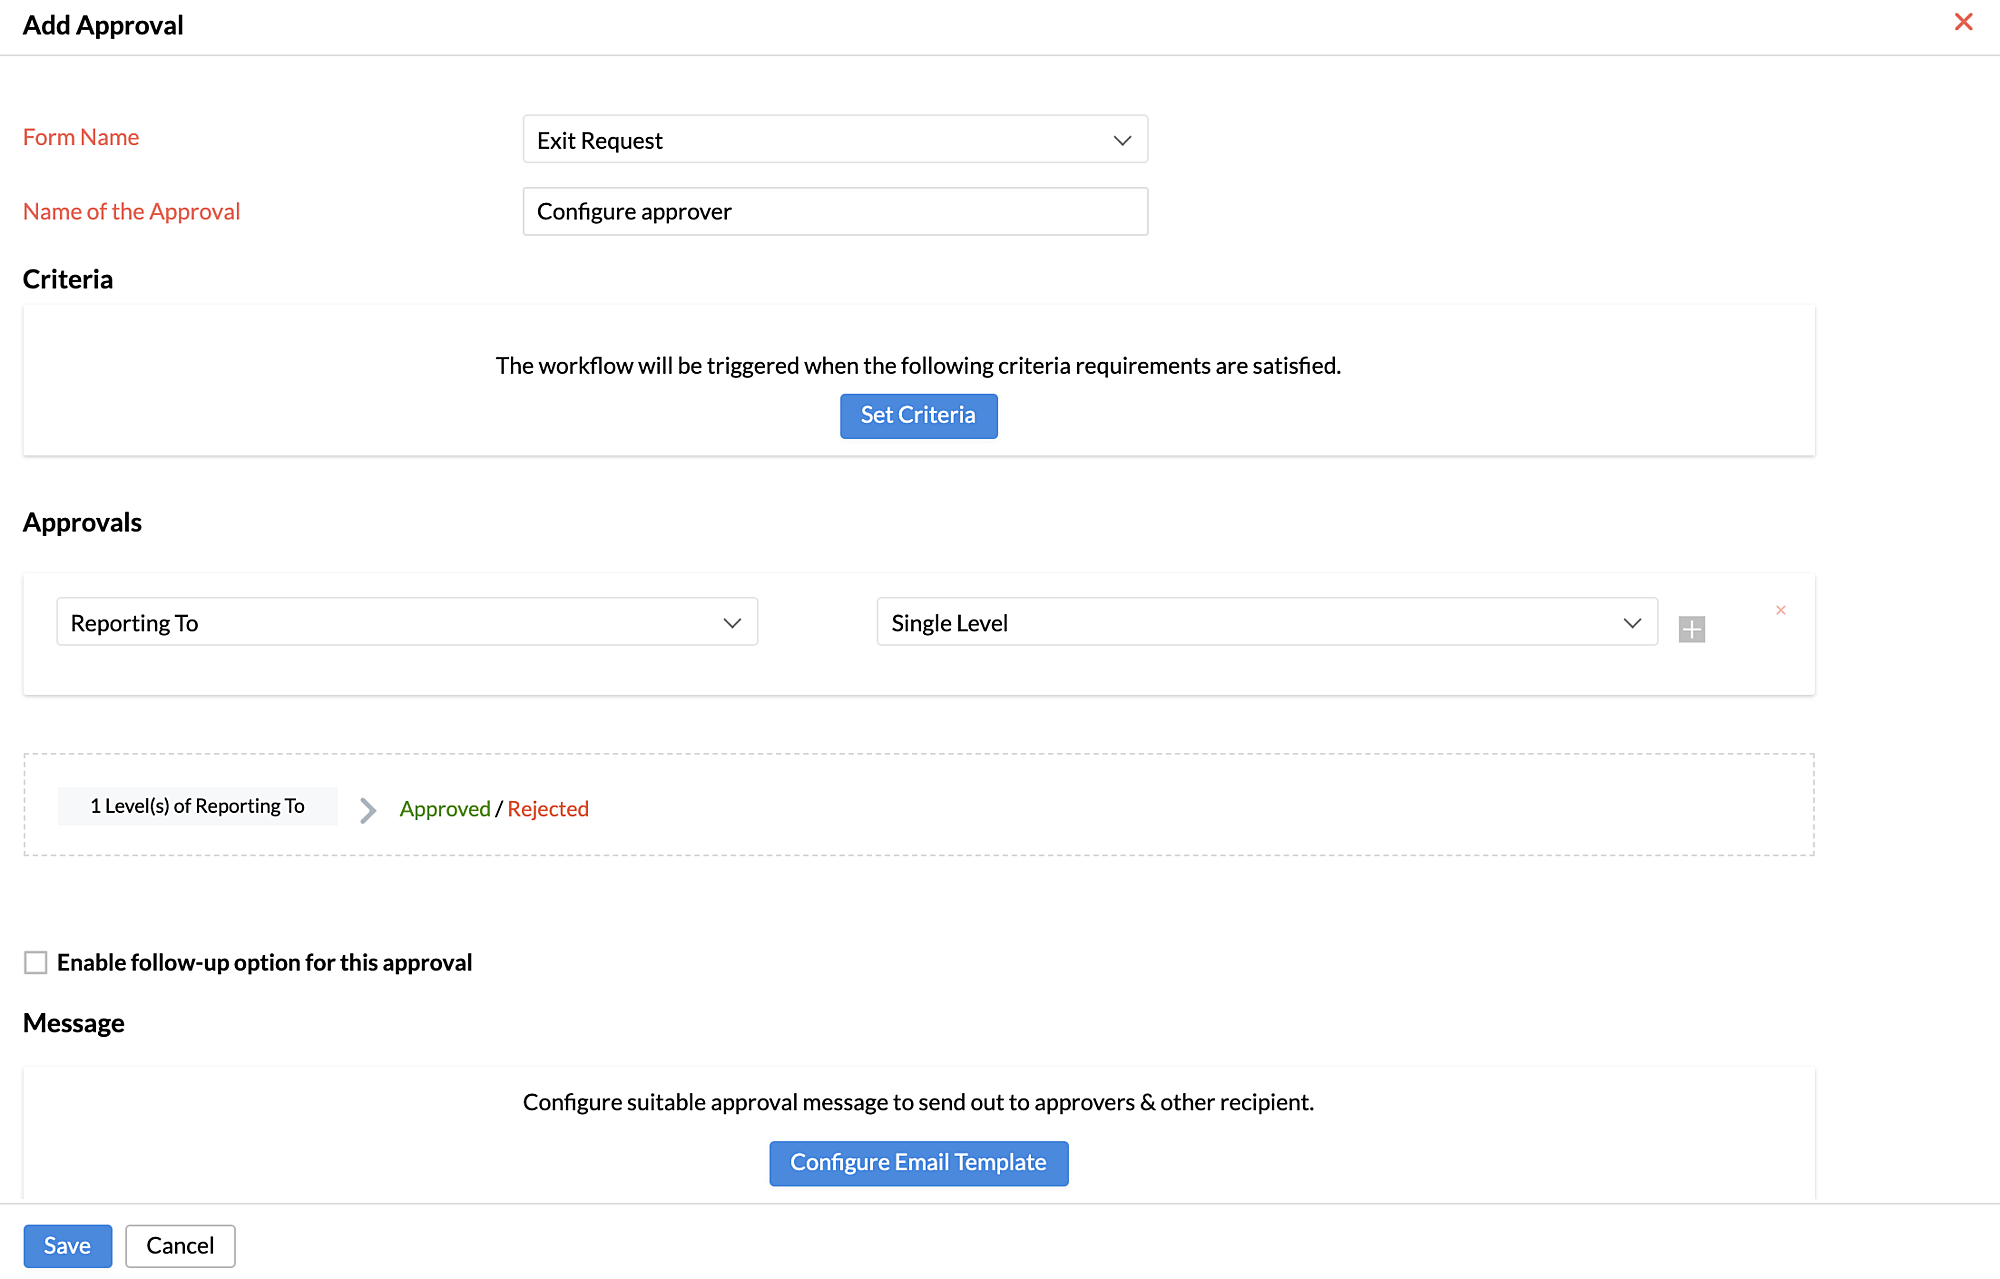
A button for approve and reject will be displayed in the record. The custom function configured in step 4 will be executed when the approve button is triggered.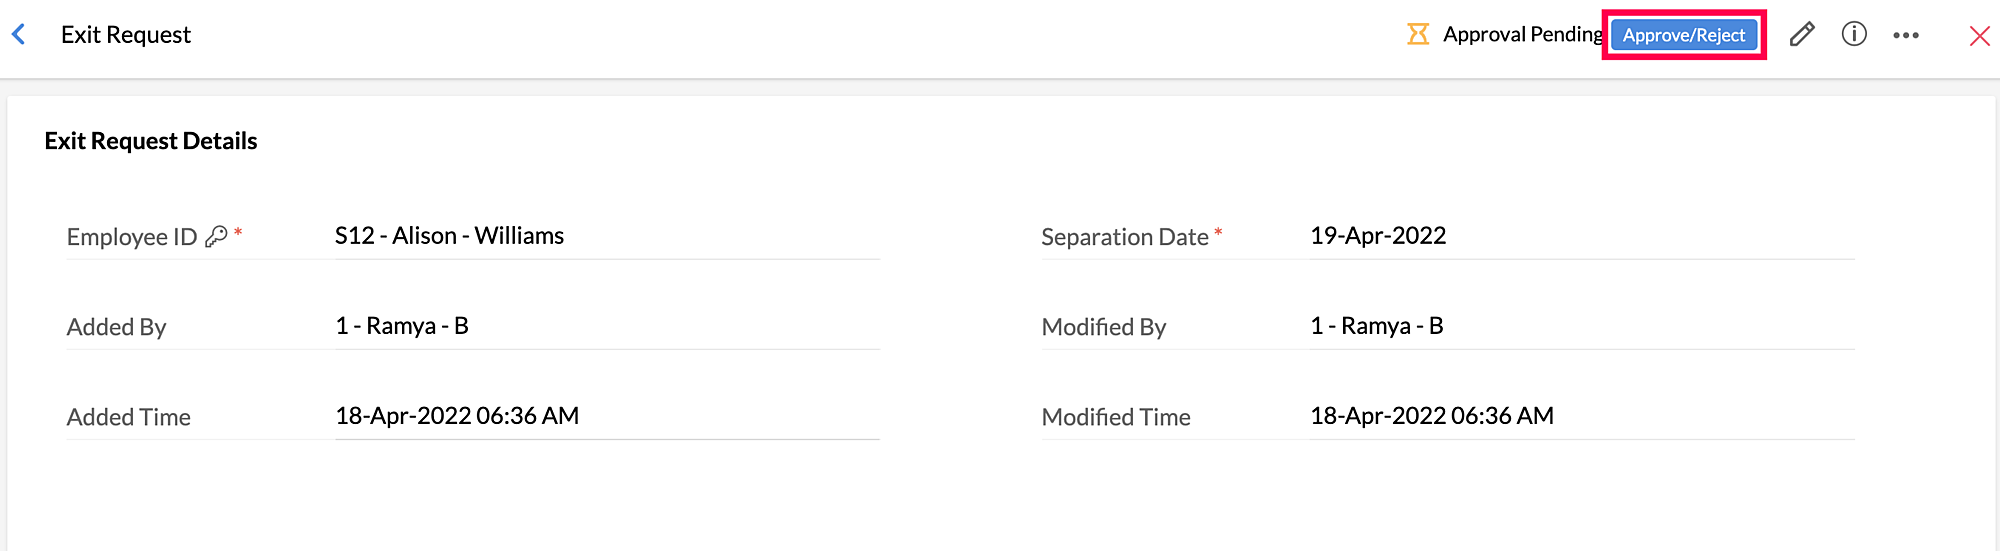


Scheduler
Zoho People offers to create schedulers which will automatically perform the actions of a particular Deluge custom function, at the time specified by you.
- Click the Settings icon at the top-right corner.
- Under Automation, select Scheduler.
- Click on the Add Scheduler button.
Let's assume an organization expects its employees to be considerate of their work hours. Therefore, employees' attendance will be analyzed every Sunday and intimation emails will be sent to the employees whose previous week's work hours dropped less than 48hrs. This process can be automated using Scheduler and Deluge.
Create a Zoho People connection with the following details. This will be used later in the Deluge script to invoke an API.

- Click the Settings icon at the top-right corner.
- Under Automation, select Scheduler.
- Click on the Add Scheduler button.
- Provide the following information:


// Construct a map to supply as parameter to the Zoho People API
query_map = Collection();
query_map.insert("startDate":zoho.currenttime.subDay(7));
query_map.insert("endDate":zoho.currenttime);
query_map.insert("dateFormat":"dd-MMM-yyyy");
query_map.insert("sIndex":"0");
query_map.insert("limit":"200");

// Invoke the Zoho People API to fetch attendance record of all employees
get_rec = invokeurl
[
url: "https://people.zoho.com/people/api/attendance/getSummaryReport"
type: POST
parameters: query_map.toMap()
connection: "people_oauth_connection"
];
summary_Reports = get_rec.get("summaryReport");

// Go over each record to check the number of hours worked by each employee
for each summary in summary_Reports
{
totalWorkedDays = summary.get("totalHours");
totalWorkedDays = totalWorkedDays.getPrefix(":").toNumber();

// Send an intimation email if total working hours is less than 45
if(totalWorkedDays < 45)
{
    emailId = summary.get("emailId");
    sendmail
    [
        from: zoho.adminuserid
        to: emailId
        subject: "Hello"+summary.get("name")
        message: "You have worked less than 45 hrs last week"
    ]
}
}
- This API can only fetch upto 200 records. To fetch more than 200 records, you'll need to make multiple API calls.
- Please make sure the number of API calls required would fall within your API limit.
Custom Button
Zoho People supports custom buttons for different actions making the system more flexible and forms more customizable. You can achieve custom automations by associating a Deluge custom function to these buttons.
- Click the Settings icon at the top-right corner.
- Under Customization, select Custom Action.
- Click the Add Custom Action button.
- Provide the required details as configure where the button has to be displayed.
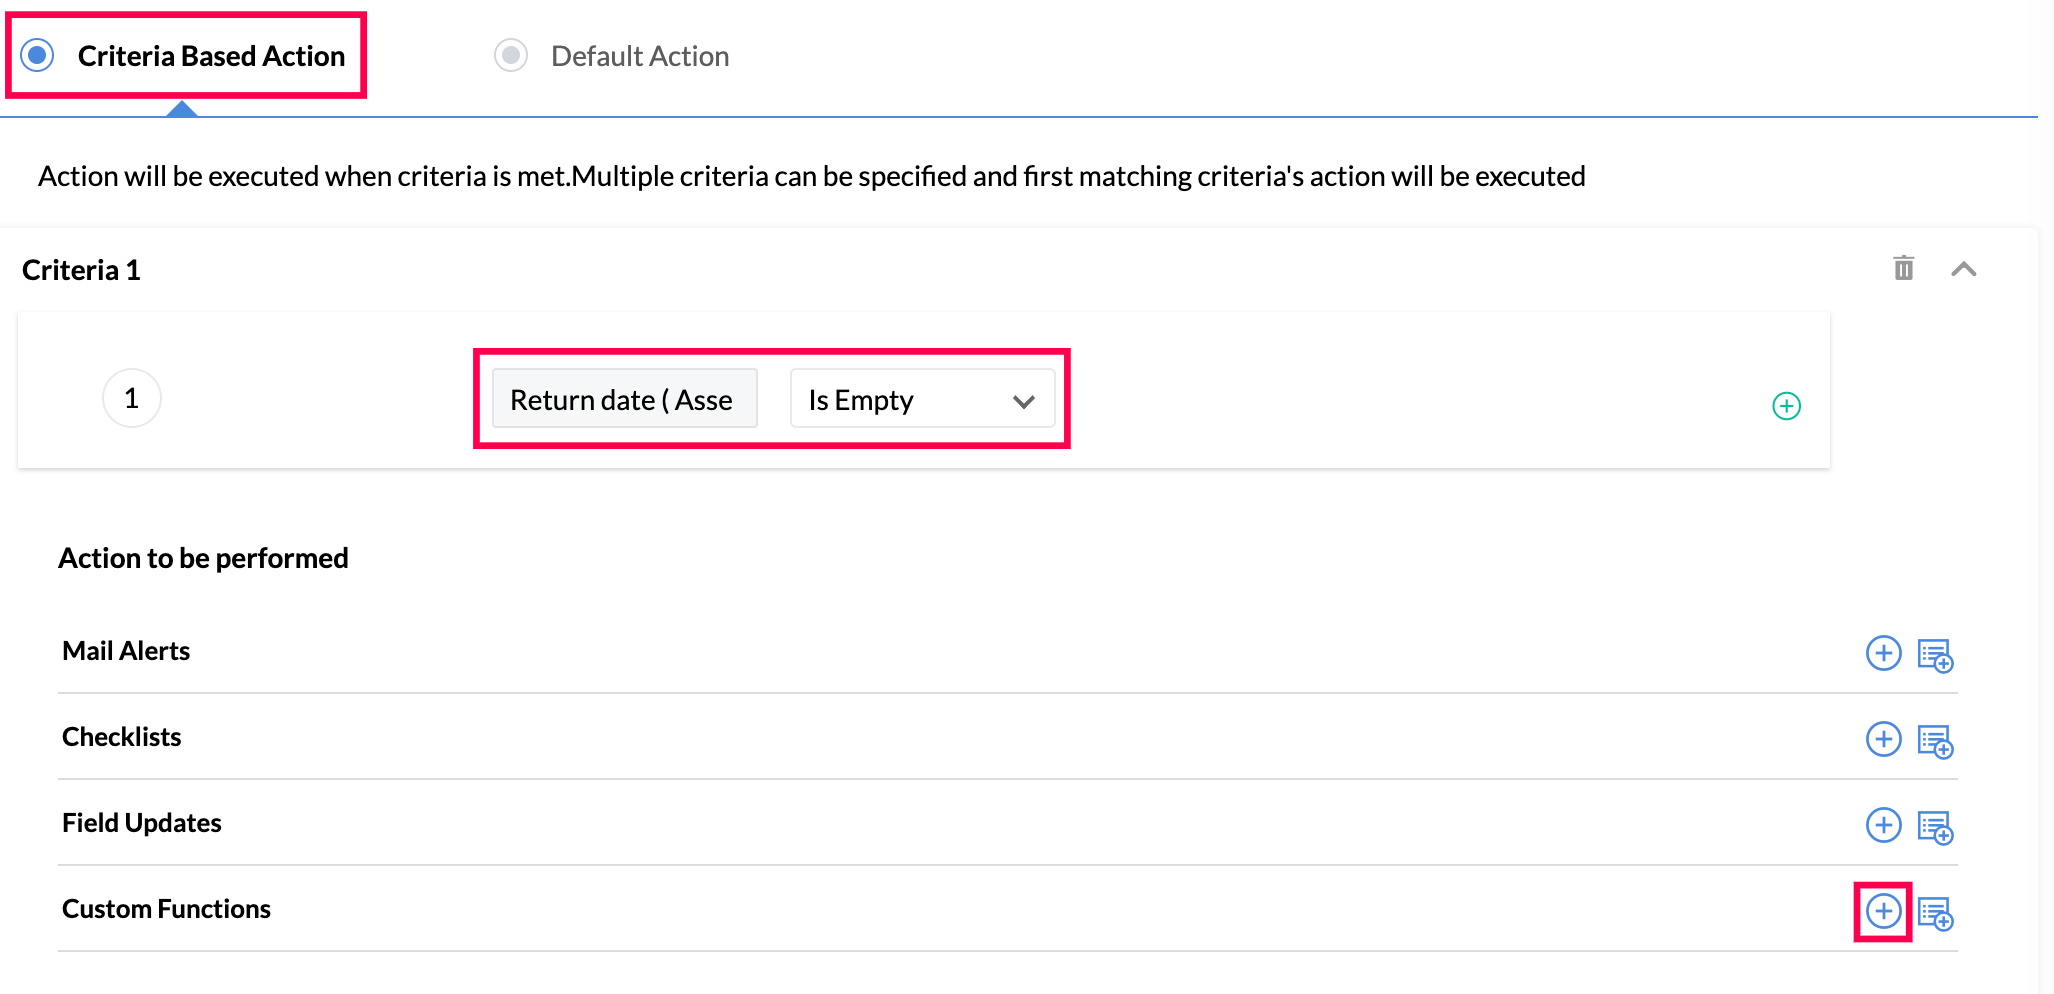
- Under Criteria Based Action (or) Default Action, click the plus icon next to Custom Functions.
Let's assume when a company's assets are given to the employees, an entry will be added in the Add Asset form. Upon returning the asset, the administrator updates the return date field and sends a confirmation email to the employee. This process can be automated using Zoho People's custom button and Deluge.
- Click the Settings icon at the top-right corner.
- Under Customization, select Custom Action.
- Click the Add Custom Action button.
- Provide the following details:

- Under Criteria Based Action, provide the following criteria to make the custom button work only if the return date field is empty and click the plus icon next to Custom Functions.


- In the top pane of the Deluge editor that appears, enter a function name and click Edit Params.

- Provide the following details in the Edit Params window. In the following step, we will use these arguments like variables in the Deluge script.
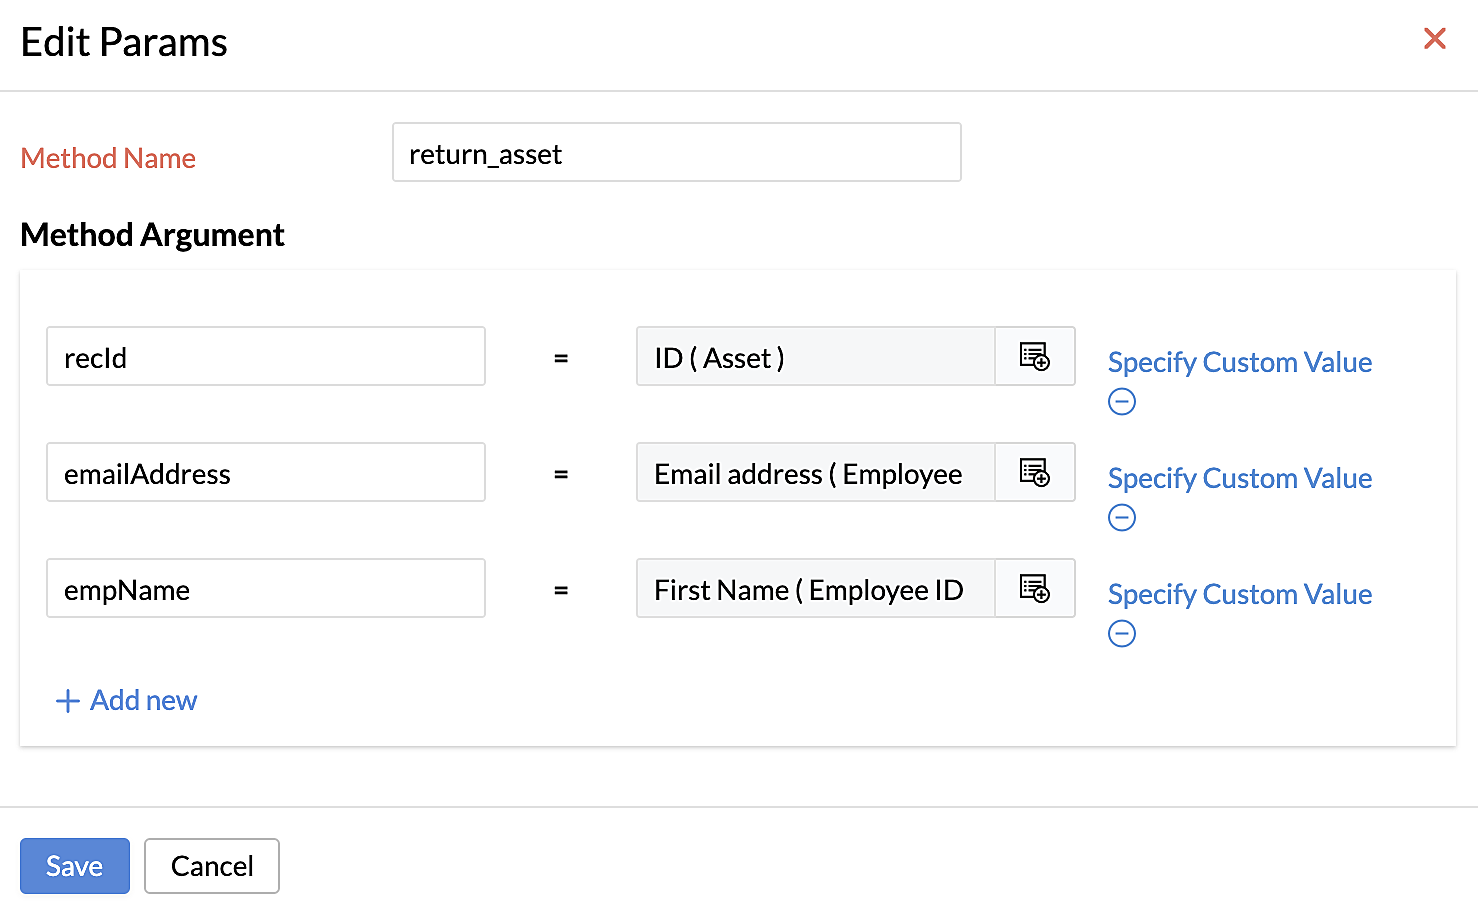


// Construct a map to store the values that need to be updated param_map = Map(); param_map.put("ReturnDate", zoho.currentdate); param_map.put("recordid", recId); // Use zoho.people.update integration task to update the Return Date field. response = zoho.people.update("Asset", param_map); // Send confirmation email to the employee sendmail [ from:zoho.adminuserid to:emailAddress subject:"Asset Returned" message:"Hello"+empName+",<br>We have received your asset. Please reply to this mail to confirm that we can format this machine.<br>Thank you,<br>Zylker System Admin." ]