
Now that you've got a great app, it's time to make sure that it gets downloaded. That's where App Store Optimization, or ASO, comes into play. ASO is a bit like SEO in that a big part of it is keyword research, a/b testing, and, of course, always optimizing, optimizing, optimizing.
However, where SEO is focused on traffic, app store optimization takes a slightly broader view. Yes, good ASO can maximize the flow of traffic (thanks to keyword optimization), but it can also increase the number of people who convert as a result of your listing. In that way, it's a combination of SEO (search engine optimization) and website CRO (conversion rate optimization). To accomplish this, you have to balance the technical elements of search engine optimization against the more abstract needs of persuasively communicating the value of your app.
While it may seem a little complicated, especially if you aren't a marketer by trade, app store optimization is tremendously important. With more than 5.5 million apps available in the marketplace, you need to do everything you can to stand out from the crowd. Nearly 2/3rds of people find new apps by browsing through app marketplaces, so having a good listing that ranks well is essential. In fact, good App Store Optimization has been able to increase downloads for some apps by over 1500%.
Conducting keyword research for app store optimization
As you built out your other marketing assets—like your website and content marketing strategy—you may have begun collecting a list of SEO keywords that you want to rank for organically on search engine results pages. If so, great! Those terms will act at the starting point for your ASO keywords. If not, start by asking yourself a few questions:
- What are the key features of your app?
- What synonyms describe those features?
- If there are similar apps on the market, what are their titles/subtitles?
- What category does your app best fit in?
- What are terms people commonly search for in this category?
- What are the top apps for your keywords?
Picking your ASO tools
For the simplest approach to keyword research, you can plug words into Google Trends to see which phrasing is more common, at least when it comes to general search engine queries. If you'd like to dive deeper—without having to shell out for a paid ASO tool—Google Keyword Planner can tell you a lot about the popularity of different keywords and how hard it will be to rank for them. It's also a great option if you want suggestions for long-tail keywords that may be relevant for your app.
While both Google Trends and Keyword Planner can tell you a lot about what people are searching for, just remember: this data is pulled from general search inquiries and Google ad buying behavior, not specific search patterns for different app stores. You can use that information to triangulate in on the right keywords for your app marketplace of choice, but if you want a more definitive answer, we suggest using a tool that's built for App Store Optimization. Products like App Radar, App Figures, or MobileAction provide a host of research tools that can help you discover opportunities in the market and optimize your listings.
Coming up with the right ASO keyword strategy
Just remember: really popular terms, like "fitness tracker" or "calendar", may not be very easy to rank in, so find the ones you can realistically compete for.
While simple, single word search terms will have larger search volumes, medium- to long-tail keywords will also be worth including. Long-tail keywords are longer and more specific phrases that users are searching for. Not only will they usually be easier to rank for, but they generally tell you much more about the search intent of the user. If you sell a homework tracking calendar, it's probably more important to rank for phrases like "calendar for students" or "high school homework tracker," rather than simply "calendar." After all, a lot of the people searching for the word "calendar" are probably looking for something general-purpose, not something for school work specifically. Also, be sure to check whether a singular or plural version of your potential keyword is more popular, and choose that one.
Note: While it may be tempting to increase your traffic by any means, make sure you use accurate and relevant keywords. Not only will this help you get discovered by genuine leads, it will also help keep your listing out of the rejection pile. Marketplaces—not to mention consumers—penalize apps that engage in false advertising.
Creating a great app store listing
The first place you'll start with App Store Optimization is within your listing itself. The words you use in your title, the description of your product, and the images you upload: all of it will have a huge impact on the success of your app. Even though each app store has its own strict format and guidelines, there are a lot of opportunities to foster brand recognition and make your listing unique.
Just make sure you give yourself enough time to get your listing right. Don't leave this to the day before launch. Not only will you end up rushing something that shouldn't be rushed, but you also need to leave time for the content moderators at the different app stores to approve your listing. It usually takes 2–3 days to get approved, then an additional 24 hours before the listing goes live.
Optimize your title and subtitle
Once you've identified the top 5–10 keywords for your app, you're ready to start creating your listing. Make sure the #1 keyword appears in your title, then use the other keywords in your subtitle and description. The most popular apps in the marketplace include keywords in their title, e.g. "App Name: Keyword." Including the keyword in the title gives it more weight in the algorithm, in turn helping you rank higher.
The Apple App Store limits titles to 30 characters, but also gives you a 30 character subtitle, which is a great place to succinctly summarize what your app does and highlight some of its features. The App Store also lets you include up to 100 characters worth of keywords for each listing. To make the most of this limited space, make sure not to use duplicate words, names of app categories, or plural forms of singular words that have already been included. You can also squeeze out a few more characters by separating your keywords with commas rather than spaces.
Google Play gives you 50 characters for your title as well as up to 80 characters for a "short description". This text will also be the first thing people see when they open the details page, so it is a great place to more thoroughly explain what your app does.
Pick the right app category
Picking the right categories will also go a long way to getting your app in front of the right users. The primary category determines which tab your app will appear under in the marketplace, so choosing correctly is incredibly important for discoverability. If the category is also one of your keywords (which it likely will be), you don't need to use it in your list of targeted keywords; it will appear already.
The primary category is also where your listing will show up in filtered results. Be sure to pick the right category; if your listing proves non-relevant it will be rejected.
Provide a clear description of your app
As you can probably guess, the description is your opportunity to get into the nitty-gritty of what your app does. While it may be tempting to list off every last bell and whistle, you don't want to squander the limited attention that a potential user is willing to give. Knowing this, both marketplaces limit you to 4000 characters so even if you wanted to go on at length, you won't be able to.
We recommend creating a succinct paragraph that explains the big-picture value of your app followed by a bulleted list of the most important features. This is your chance to detail the problems and pain points you are solving, how it will help the buyer, and why it is worth your asking price.
Pro tip: Make sure your copy looks good on every platform. For example, on the mobile version of the Apple App Store, only the first 150 to 180 characters of your description will be immediately visible. Everything else will be hidden behind a "more" link. On the desktop version, they display the first four lines with any extra paragraph breaks stripped out. Again, anything beyond that will be hidden. If you were listing your app on the App Store, you'd want to make sure the previews both on mobile and desktop contain enough impactful information to cause the reader to click on to your expanded description.
As you compose your description, you'll want to use keywords strategically and judiciously so you don't end up over-stuffing your listing with them; it's likely to get rejected as a result. Instead, try to communicate in a genuine way that matches your brand, industry, and ideal user base. If you're selling a party planning app for new parents, let your personality shine through. If you're selling an asset management app for the medical industry, keep things a little more professional. Not every listing should be super formal or technical, but they shouldn't be overly casual either. Seek to strike the right balance that will appeal to your users.
Along those same lines, make sure that the terminology you're using in your description will be familiar to your entire audience. What seems self-evident to an expert like you might be alienating or confusing to other people within your target demographic.
Note: In Google Play, the app description will be indexed in search results; this is not the case with the Apple App Store.
Use compelling screenshots
In terms of app store optimization, looks matter, especially when you only have seconds to catch someone's attention. Screenshots and videos of your app in action can be a powerful marketing tool, especially if they can represent the experience the user will have with your app in a compelling way. Your screenshots can make or break your listing; after the number of downloads, screenshots are the number one thing people look at when deciding to try an app.
The goal for your screenshots is to tell an interesting visual story, to capture your app's UI, and to highlight its most popular features. Both the App Store and Google Play have a (minimum) 2 image requirement for the listing, but you can have a total of 10 and 8 images, respectively.
Sizing and requirements
Of course, the first step to great screenshots is making sure you fit within the parameters set by the marketplace.
The Apple App Store has different requirements depending on the device. Three screenshots appear in search results, so you want to keep them eye-catching yet simple and readable. And since only 3% of users enlarge screenshots, and almost nobody scrolls through all of them, you need to make your point and make it fast.
The Google Play Store has the following requirements for screenshots:
- JPEG or 24-bit PNG (no alpha)
- Minimum dimension: 320px
- Maximum dimension: 3840px
- The maximum dimension can’t be more than twice as long as the minimum dimension
Style and design for screenshots
So what are the best ways to grab someone's attention with your screenshot?
Use a big font and simple words; the image should be able to tell its own story without the user having to enter the listing. Uber has done a fantastic job of encapsulating the app's benefits in a single screen, and one that can be read from search. The next two images further elaborate on the main benefit while also showing the user what they will experience inside the app.

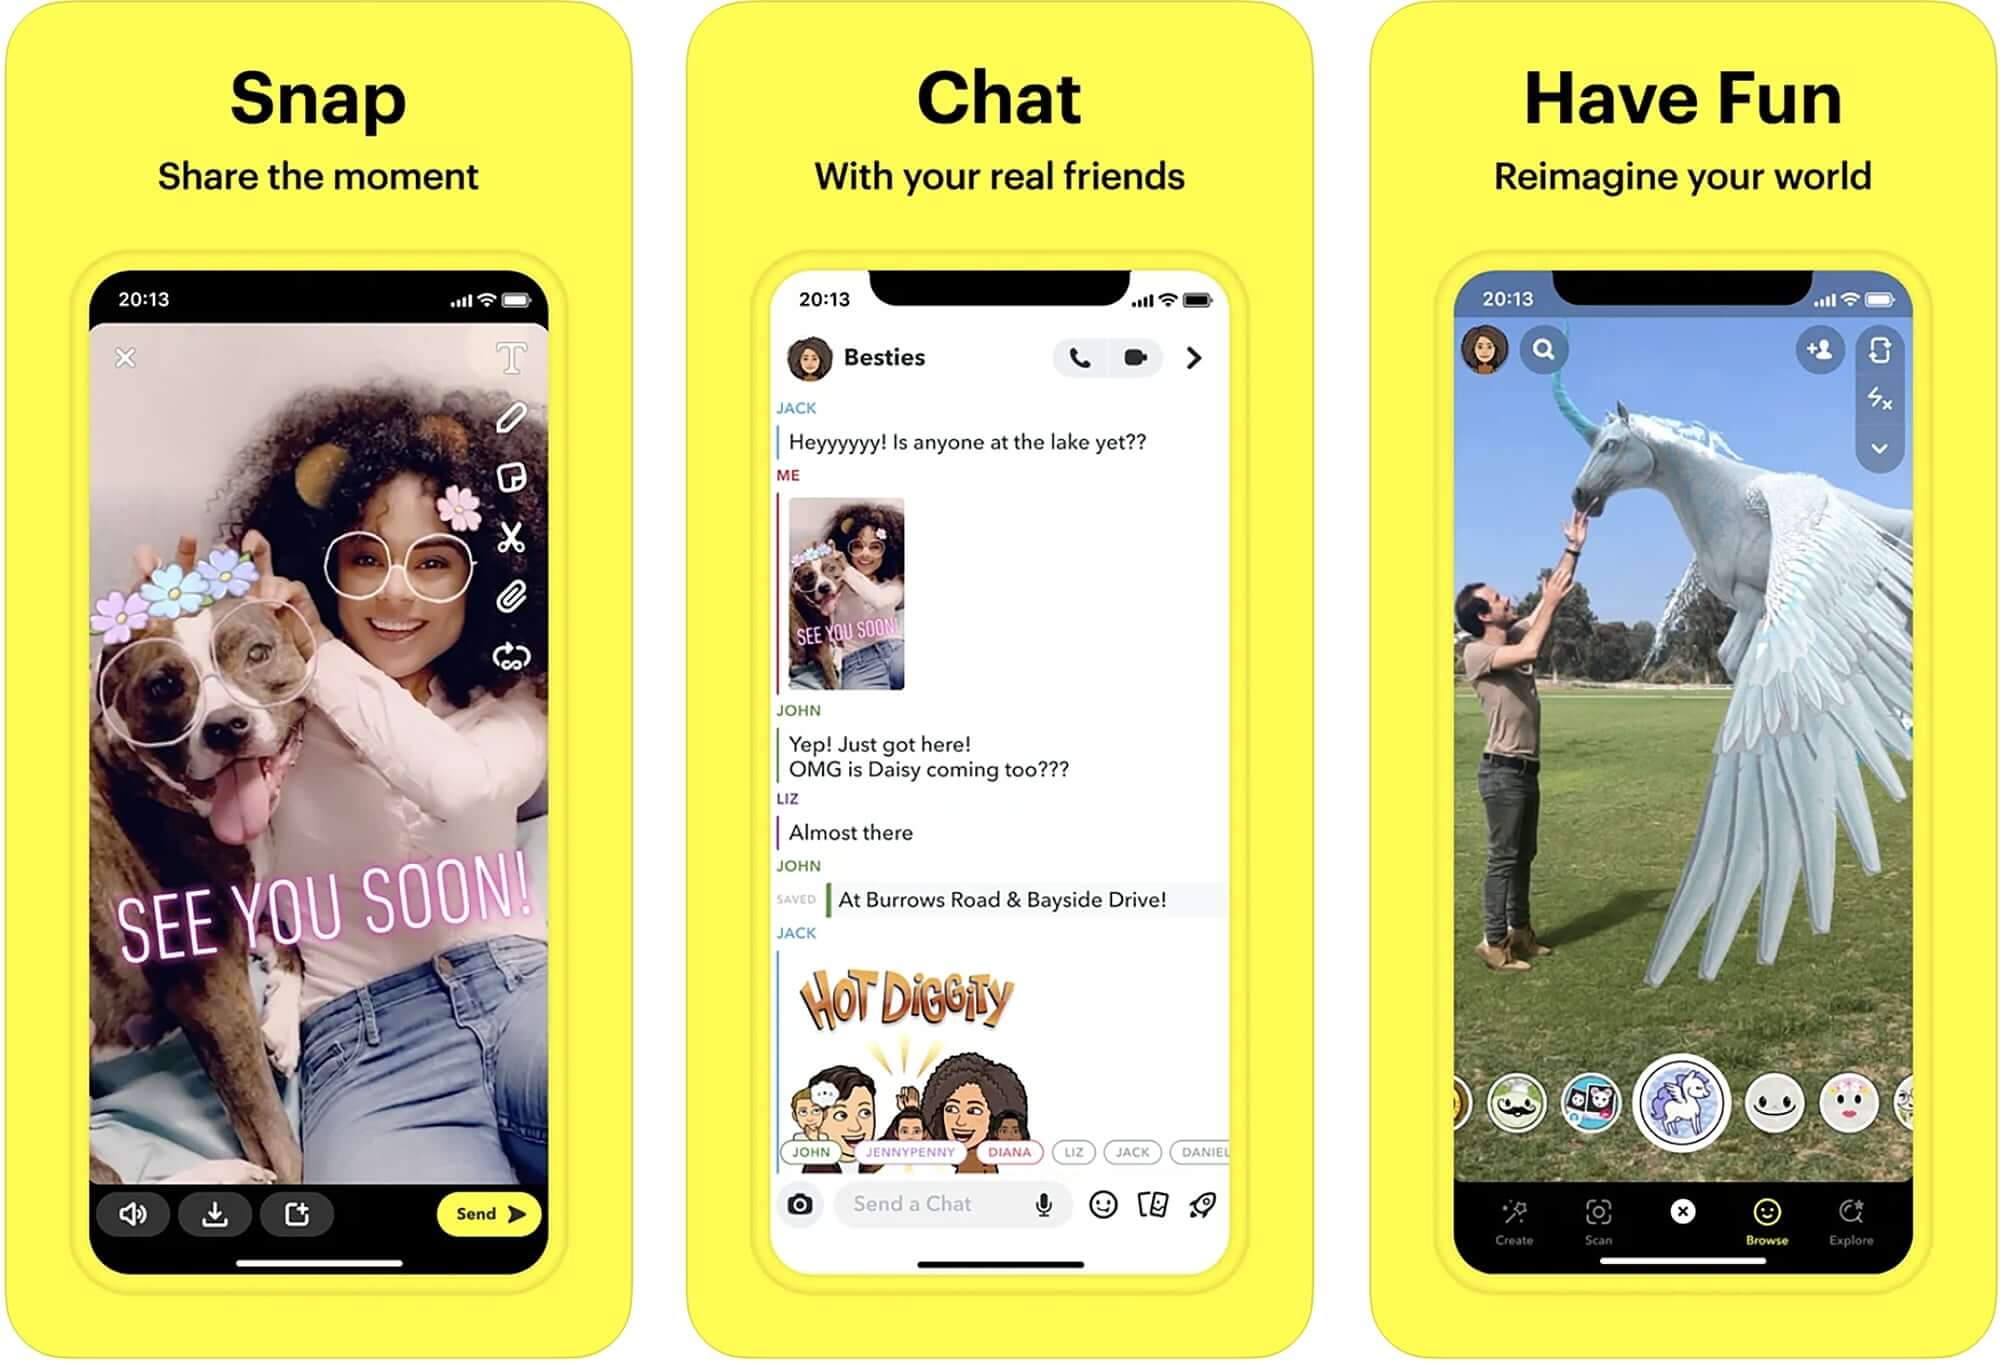
Stick to one feature per screenshot, and highlight the most popular ones. Snapchat has done exactly that while managing to convey a bunch of the apps features.The first image not only tells you the major function of the app, it also highlights some of the editing and filter possibilities you'll find. The second image shows the UI for chat while also demonstrating a number of features (particularly of note is the way they've subtly highlighted the "Saved" function). Combined with the third image, we're being given a tour of Snapchat's major features.
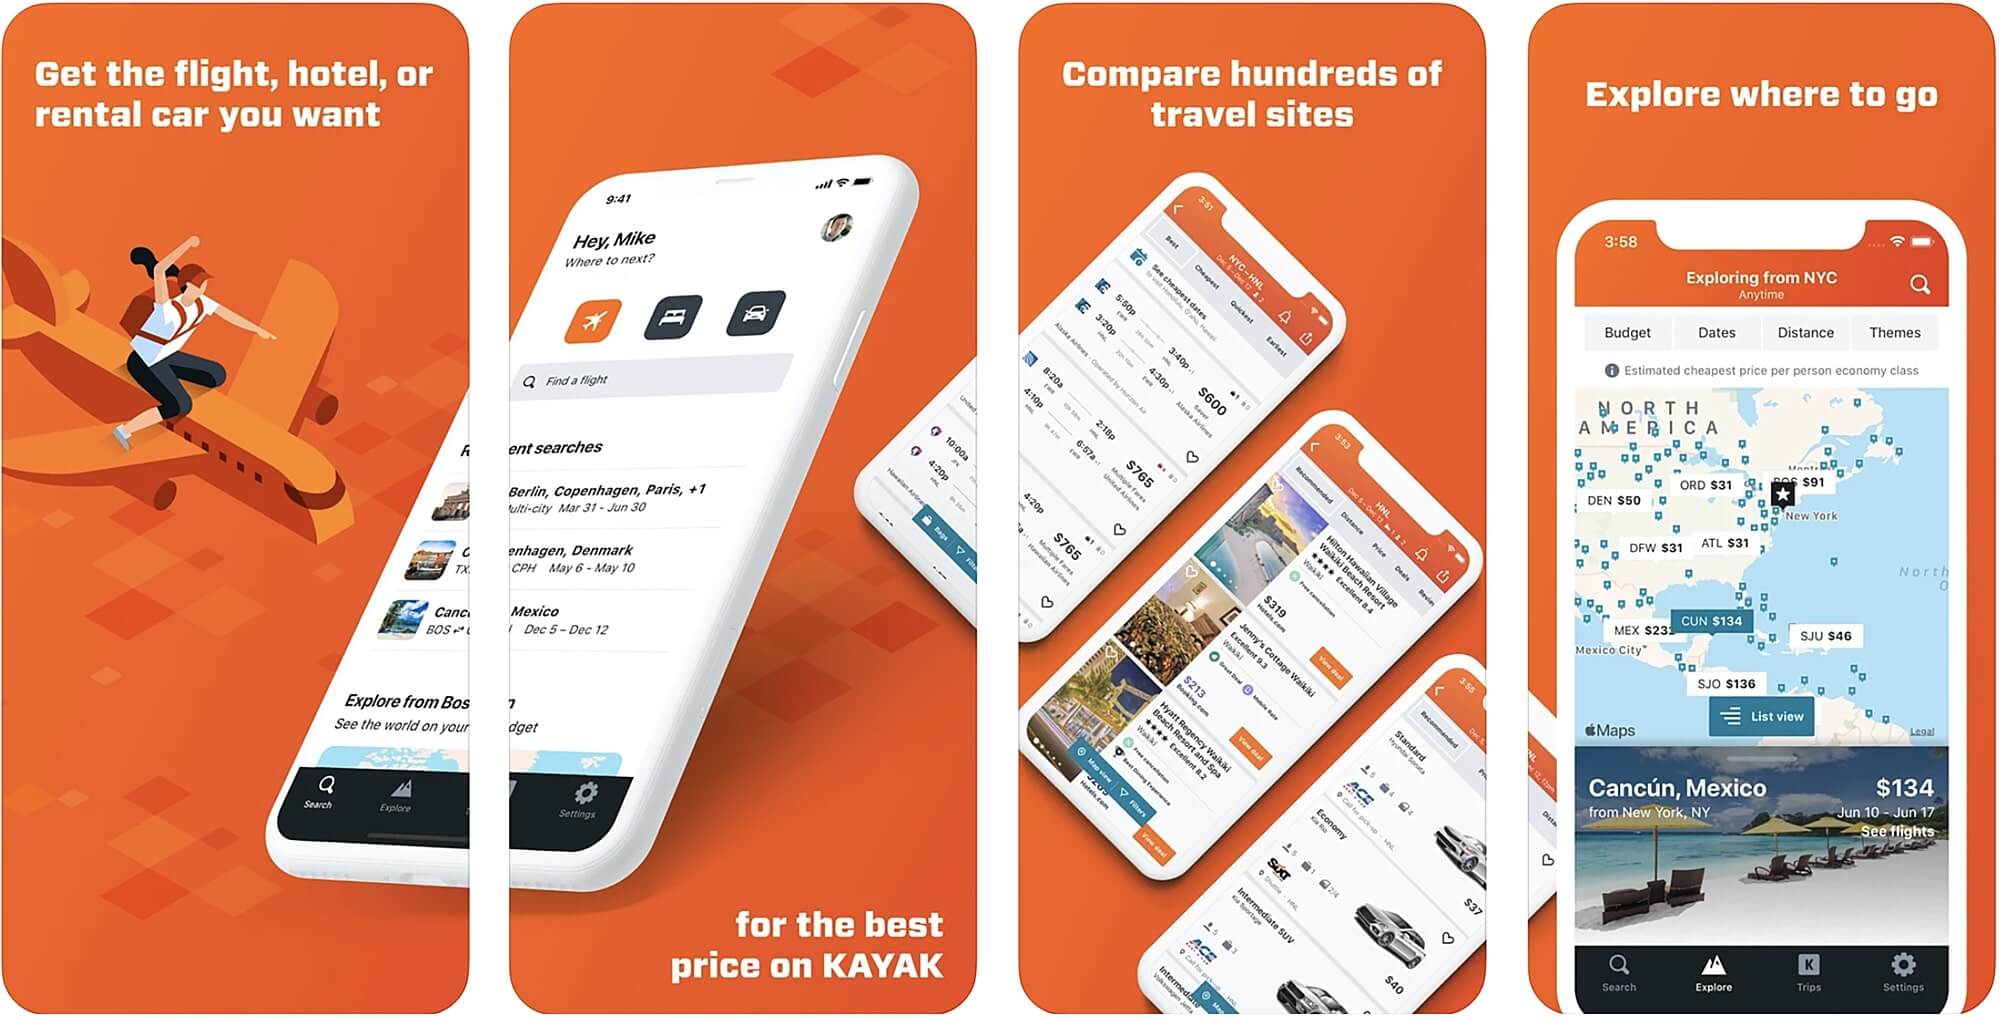
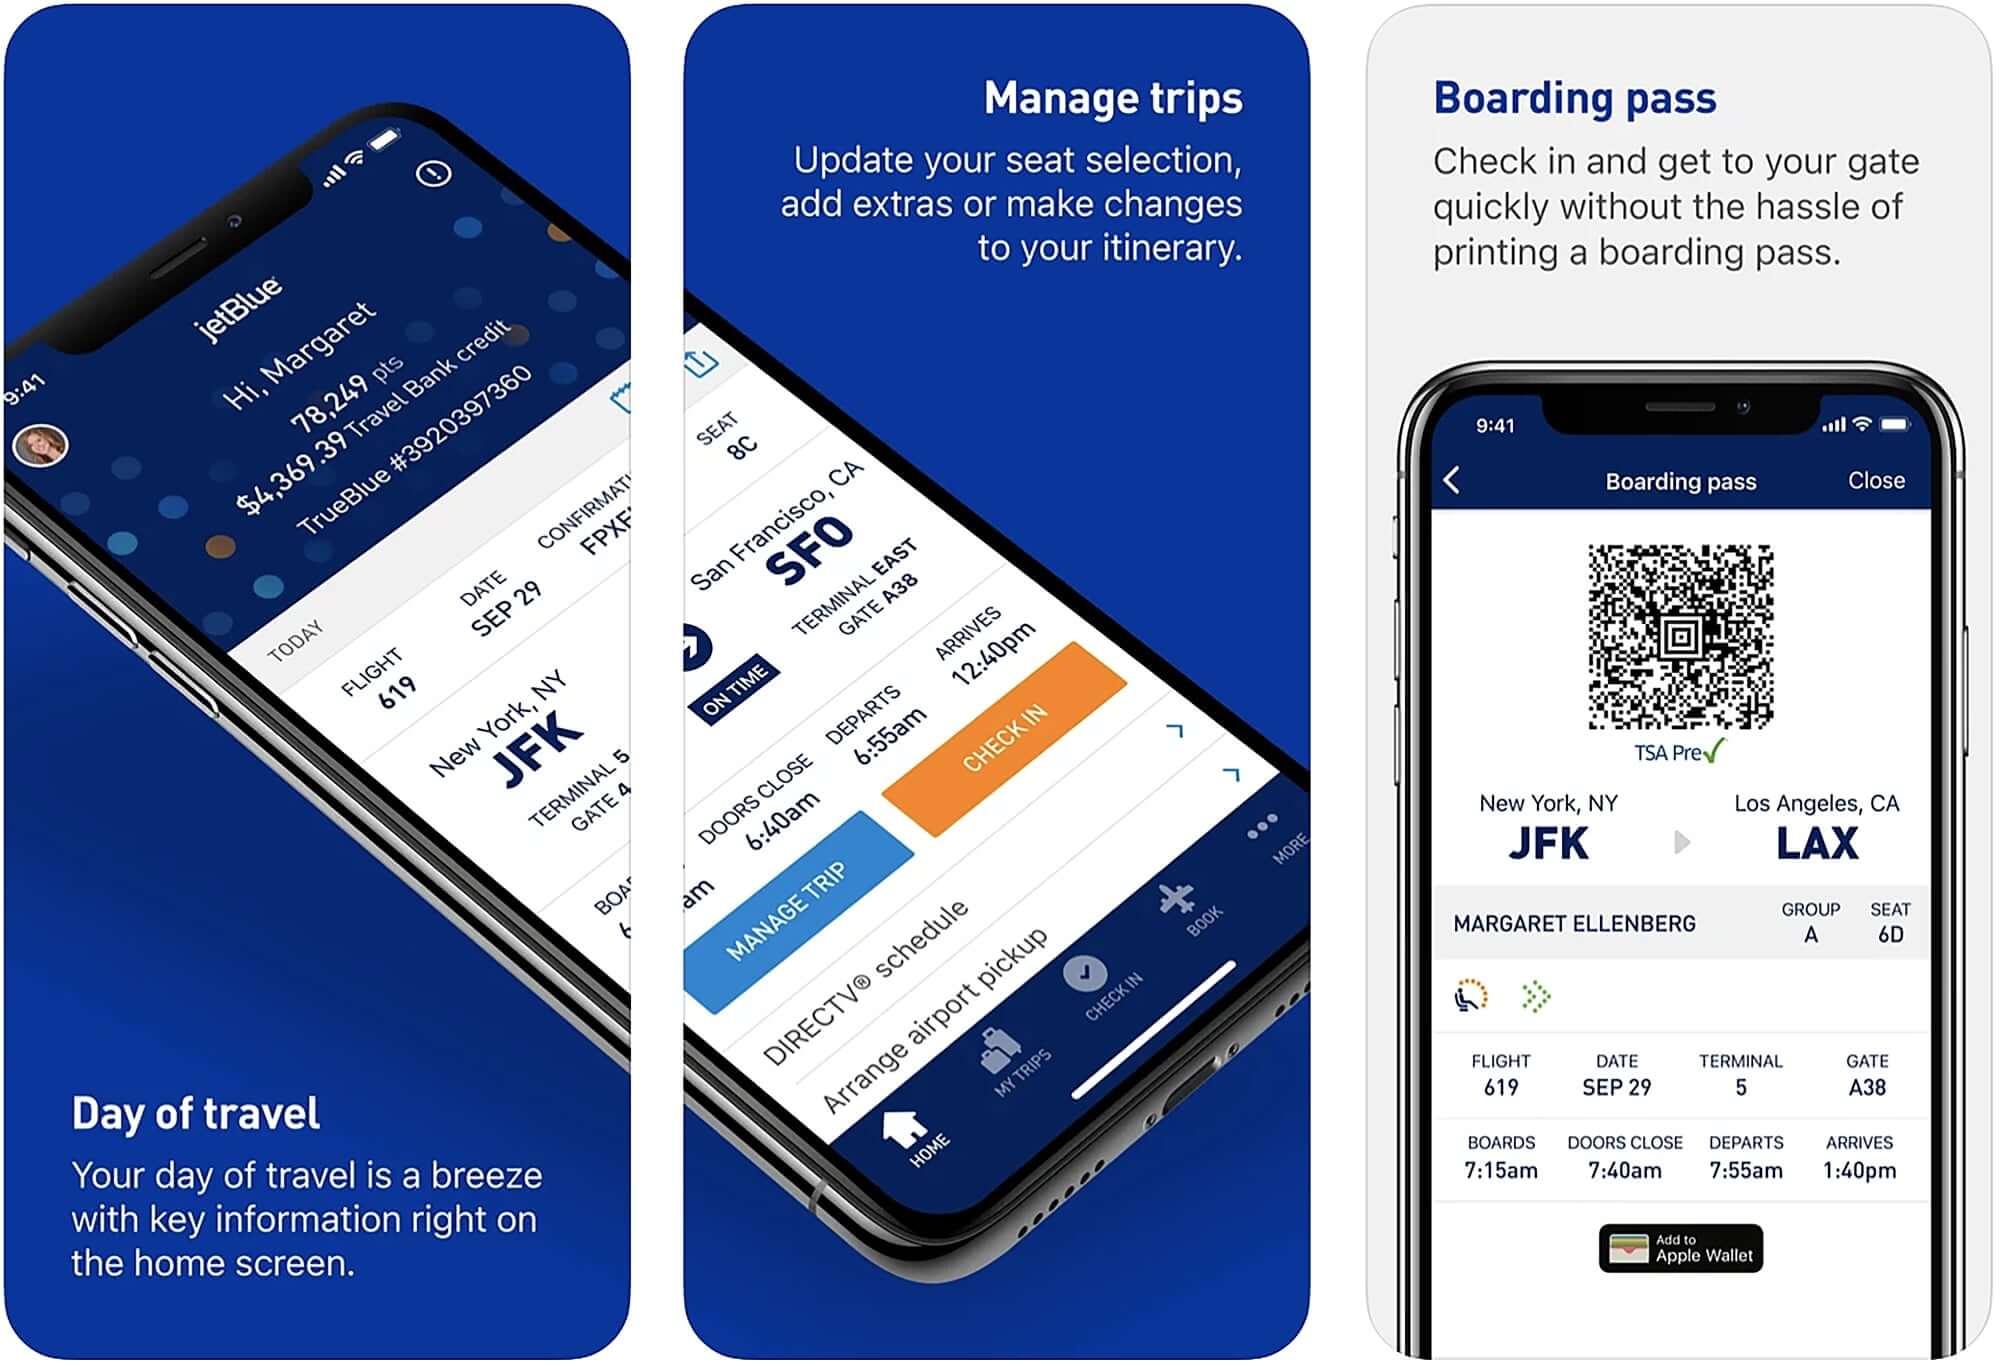
Bold and contrasting colors can really help your app stand out in search. Check out Kayak's bright orange screenshots, or JetBlue's vibrant blue images. Both also create a story-line by "splitting" images of the app across multiple screenshots. By splitting the image, they are able to show the app in up-close detail while also creating a coherent narrative about what the app does.
Be sure to use high resolution images and never use stock photos. If your app has a dark mode, an image of that is also worth including. Take your images with the latest devices or mock them up (for iOS) accordingly. You might need some help from a designer to figure out the finer details of your color palette and graphics, and you'll definitely want to run A/B testing to see what resonates most with your audience.
Video content for app store optimization
While pretty much ALL of the top apps have some sort of video collateral, they usually don't get watched: most apps average about a 2-4% video view rate, with less than 50% of people watching them to completion. So then is it worth it? In some cases yes, in others no. If you've built a mobile game or other highly visual app, then it's definitely worth the effort. However, if you're selling a more business-oriented or professional app, the ROI isn't as clear. Even if you aren't banking on your users watching the video itself, you can still take advantage of the video's cover image/frame to highlight a key feature of your app.
In the Google Play store, you can add one preview video per listing. In the App Store, you can include up to three 30-second preview videos of your app. Depending on the platform and device the video may be on muted autoplay when the listing is opened, so it's key the first seconds are visually compelling.
Note: The App Store requires videos to be device specific, so you will have to create different videos for each device your app works on.
Post-launch App Store Optimization strategies
Once you've launched your app in the marketplace—and started implementing your marketing plan—the downloads should start rolling in. But what if you're still not showing up where you want in search results? The best thing you can do, now that everything's live, is to increase the activity and engagement on your listing. This can take two forms: downloads and reviews.
Run targeted download campaigns
One of the most important ranking factors on any app store is how many times your app has been downloaded. While that may be helpful for established apps, what do you do when your app is new and relatively unknown? Although you aren't able to directly control how many people download your app, you can time your promotional campaigns so that the downloads you do get will give you the best possible chance to rank.
In brief, while app store search engines do consider the total number of downloads, they also watch the rate at which those downloads are occurring. That means that an app that has been downloaded 1000 times in the last month will tend to rank lower than an app that got 1000 downloads in the last week.
When you're first starting out, if you can make a big splash with some carefully planned marketing campaigns, you may be able to rack up enough downloads in a short enough period of time that your app starts to trend in the category of your choice. The visibility you gain can be a huge boon to a fledgling product.
Note: Download consistency is also a big part of your ranking. If you get a ton of downloads in the first week, but get very few for the rest of the month, don't expect to stay on top. Targeted campaigns are a good way to get temporary exposure, but they aren't a sustainable solution long-term.
What a targeted campaign could look like
But what does that look like? Let's say a popular influencer has decided to include your app in a roundup of the best apps for your industry. Knowing you'll likely see a spike in downloads as a result, there are a few things you should plan on doing before and after the post goes live.
First, make sure you leverage your personal network to spread the word. Send an email to your product's subscriber list and post about the article on social media. Not only will this drive more traffic to the article and thus more traffic to your listing, but it will also increase the chances that your app will get mentioned again in a future article. After all, the more you promote the piece, the more benefit the writer will get from including you, so they'll have incentive to mention you again.
Once you've got the word out on all your organic marketing channels, you might also consider promoting your app with a paid social media ad, Google ad, or retargeting ad (which can follow prospects from site to site). If you have a marketing budget, it might be worth condensing your monthly ad spend to a 24-48 hour period after the roundup goes live. That way the traffic from the article, your social media activity, your email subscribers, and your ad campaigns all overlap. While that won't necessarily help with download consistency, it may get you trending on the app stores, which is basically free exposure.
Not every campaign can be timed like this, but looking for opportunities like this can help you make a mark early on.
Encourage users to leave reviews
Reviews are some of the most valuable assets for any new app. And for the most part, you'll just have to wait for reviews to flow in id and when your users want to post them. However, when you're first starting out, getting even a dozen more positive reviews can have a big impact.
So what can you do to increase your chances? Here are a couple ideas simple ideas:
Solicit in-app reviews
The easiest way to get reviews is to ask your users through prompts within the app, but these requests have to be timed right; if you ask too soon, people aren't likely to leave a review, while if you ask too late, people might have gotten over the initial excitement and also fail to act. Most users pick up or abandon an app within the first 72 hours of download, so the request should definitely come in that window.
Note: In the App Store, you will be penalized if you request reviews more than 3 times a year.
Ask for a review through an email campaign
You can also send out email campaigns to anyone who has recently downloaded your app, asking them to post a review. Keep your request simple and to the point, and be sure to include a link to the appropriate marketplace. Here's an example:
Dear [USER NAME],
Thanks so much for downloading [APP NAME]! I hope you're finding it useful.
A big part of how people find us is through reviews from current users like you. I'm writing today to ask if you'd be willing to take a few minutes to detail your experience with the app.
Of course, if you are having questions or are facing any problems, please respond to this email; we would love to help.
Thanks!
It's a simple request and you shouldn't expect a huge response. But even if you only get a handful of responses, it will be well worth the time it takes to set up an automated email.
Respond promptly to negative feedback
While it may seem counter-intuitive, negative reviews can actually be your friend. Only 1/25 people will actually bother to complain to support or post a review about a problem; the other 96% will just abandon the product, and are likely to tell their friends to avoid it. By listening to the feedback, learning from it, and responding to the complaint, you add credibility for your app and your brand.
Plus, if you address the issue the user is facing in a timely and respectful way, they are likely to update their negative review to reflect your great customer service. That can turn a disappointed 2-star review into a happy 4-star review.
A/B testing your App Store Optimization strategy
App Store Optimization is an ongoing process, and there are always tiny tweaks you can make to your listing to improve your rank in search results. Outside of your app's name and icon, everything else on your listing is ripe for A/B testing.
While the sky's the limit, just make sure that you only test one item at a time (i.e. the screenshots that appear in search), and that you run the test for at least a week. You probably want to avoid running your test during times of unusual traffic, like holidays or big sporting events. What you are looking for is statistically significant differences, so a change of 1% or less is not that important. Once you get above 5%, you have left the realm of chance and are likely seeing meaningful results.
Note: Google offers their own tool for this, but the App Store does not.
So what should you test? For your screenshots, you might see if split images preform better than stand alone ones, or if horizontal ones engage people more than the vertical. You might try using different colors in your screenshots to see if it results in more downloads, or if including a video meaningfully changes conversion rates.
Another area of focus is your description and your keywords. Placing keywords in a different order in the subtitle can change their algorithmic weight, and you might find entirely different keywords that you want to be targeting.
The main thing is to keep experimenting and improving. Details matter, and your app listing is (for many users) the first impression people will get. And with ever-changing algorithms and new apps always entering the market, you want to keep actively refining your listing to get the best results possible. Great App Store Optimization doesn't take a bunch of money, it just takes some time, some attention and a willingness to try out new things. You have an awesome app; let's make sure your listing lets people know.