Configure Sign-in Method
Next, let's configure Google and Zoho sign-in providers for the application.
Click the Sign-in Method tab in Authentication.

Catalyst provides a ready-to-use script to enable user authentication in a sign-in form, which you can incorporate in your application's login page. You can learn about this code in detail from the Sign-in Method help page.
Perform the following actions to enable Zoho and Google sign-in providers in the Authentication app:
Zoho:
To enable Zoho sign-in, you must provide a client name for your application's OAuth client ID. Since the application will be hosted in Catalyst, you need not setup OAuth with Zoho.
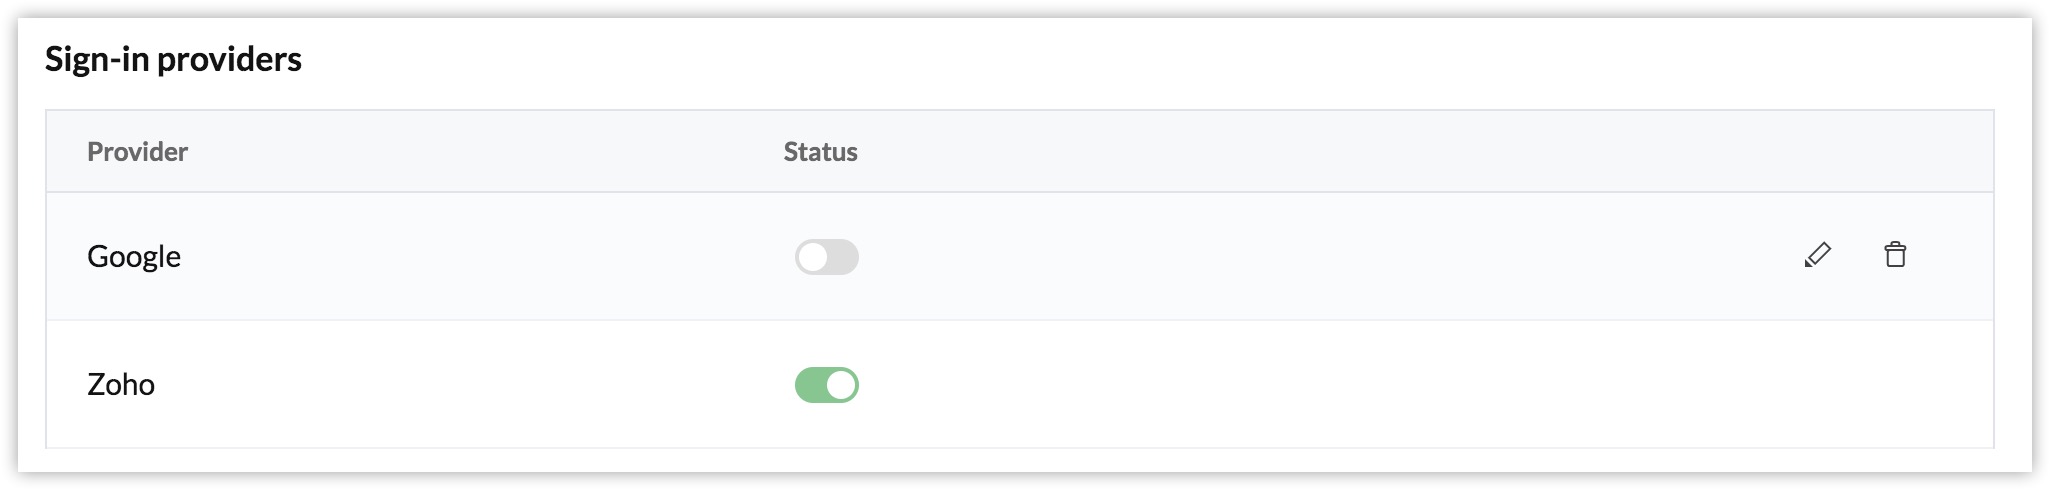
- Click the toggle switch for Zoho.
- Enter 'userApp' as the client name for your application and click Save.
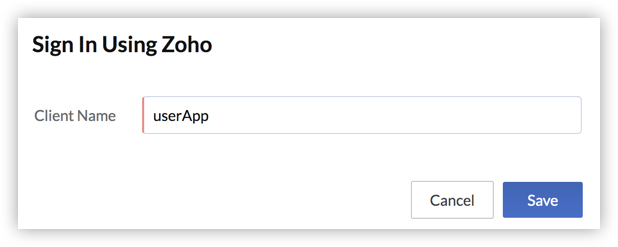 Note: We will be using the same name for the client component when we initialize it from the CLI. Therefore, provide the same name as instructed.

Zoho sign-in is now enabled for Authentication app.
Google:
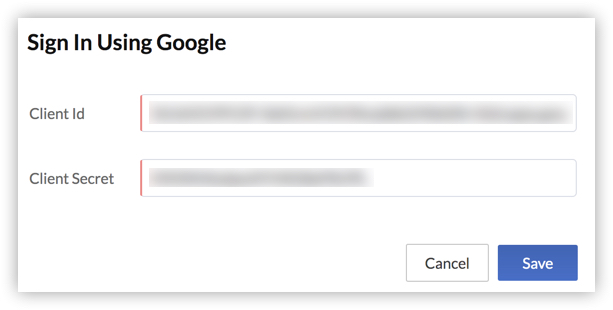
To enable Google sign-in in your application, you must provide the client ID and client secret of your Oauth credentials with Google. Therefore, before you enable Google sign-in, you must obtain OAuth credentials for your application with Google in the following manner:
- Open the Google API Console Credentials page.
- Click the project drop-down in the console, and then click NEW PROJECT.
If you had already created a project in Google developer console for your application, select your existing project. Skip the next step for an existing project. - Enter a name for the project in the New Project section. If required, edit the provided project ID. Select a parent folder, if relevant. Click Create.
- After the project has been created, navigate to the Credentials page.
Note: Ensure that you have selected the right project from the drop-down list.
- You will be asked to configure the OAuth consent screen with your application details, if it is a new project. Click Configure consent screen.
Note: If this is not a new project, you must still modify some information about your application. Navigate to the OAuth consent screen page. Click Edit App, then follow the steps below.
- Choose a user type for your app and click Create.
- Provide 'userApp' as the application name, and other application information you require in the OAuth Consent Screen.
- Under Authorized Domains, enter this value: zohoportal.com and press Enter to add it.
- Under Application Homepage Link, enter this value: https://accounts.zohoportal.com/accounts/extoauth/ZAID/clientcallback
Obtain the ZAID of your project from the Environments settings and substitute it here in the URL in place of ZAID. - Provide other relevant information, if required. Click Save.
- Navigate back to the Credentials page and click Create Credentials. Select OAuth client ID from the drop-down list.
- Select Web application as the Application type in the Create OAuth client ID page.
- Enter 'userApp' as the name for your application's web client.
- Enter this value as an Authorized Redirect URI: https://accounts.zohoportal.com/accounts/extoauth/ZAID/clientcallback.
Replace the value of ZAID with the ZAID of your project. - Click Create.
The API console will open a pop-up window with the Google client ID and client secret for your application. Copy these values.
You can now enable Google sign-in provider in the console in the following way:
- Click the toggle switch for Google.
- Enter the client ID and client secret that you copied, and click Save.


Google sign-in is also now enabled for Authentication app.
