Connections
Table of Contents
Note:
- Following are Zoho services that support connections
- Backstage
- Bigin
- Billing
- Books
- BugTracker
- Circuit
- Cliq
- CommandCenter
- Connect
- CRM
- CRM SandBox
- Desk
- Expense
- Forms
- FSM
- GC
- Inventory
- Invoice
- IOT
- Orchestly
- Payroll
- People
- Projects
- QEngine
- Qntrl
- Recruit
- SalesIQ
- SDPOnDemand
- Sheet
- Sites
- Solution
- Sprints
- Survey
- Voice
- Writer
- ZApps
- Zia
- Zoho Creator supports a different version of connections page. Click here to learn more.
- Know important updates on connection.
Overview
Connection is used to establish authentication with other Zoho or third-party services to perform integration with them. You can consider connection as a way to login to any Zoho or third-party service. So, if you're already logged in (connected) to a particular service, you can always access your data stored in those services.
Once a connection is created and connected, you can use it in Deluge integration tasks or invoke URL scripts to perform REST operations on the target service from the required Zoho service. For example, to access your Dropbox account using their REST APIs from your Zoho CRM, you can create a Dropbox connection, connect to it, and use the connection link name in invoke URL Deluge task. The invoke URL task will perform the specified API call to your connected Dropbox account.
Services
Services are the connectors using which you can create your connections. The following are the types of services:
- Default services: These are pre-configured services. You can easily create a connection using default services and authenticate it using your credentials. Learn more.
- To view the available default services, click on Default services under Services in the left pane.
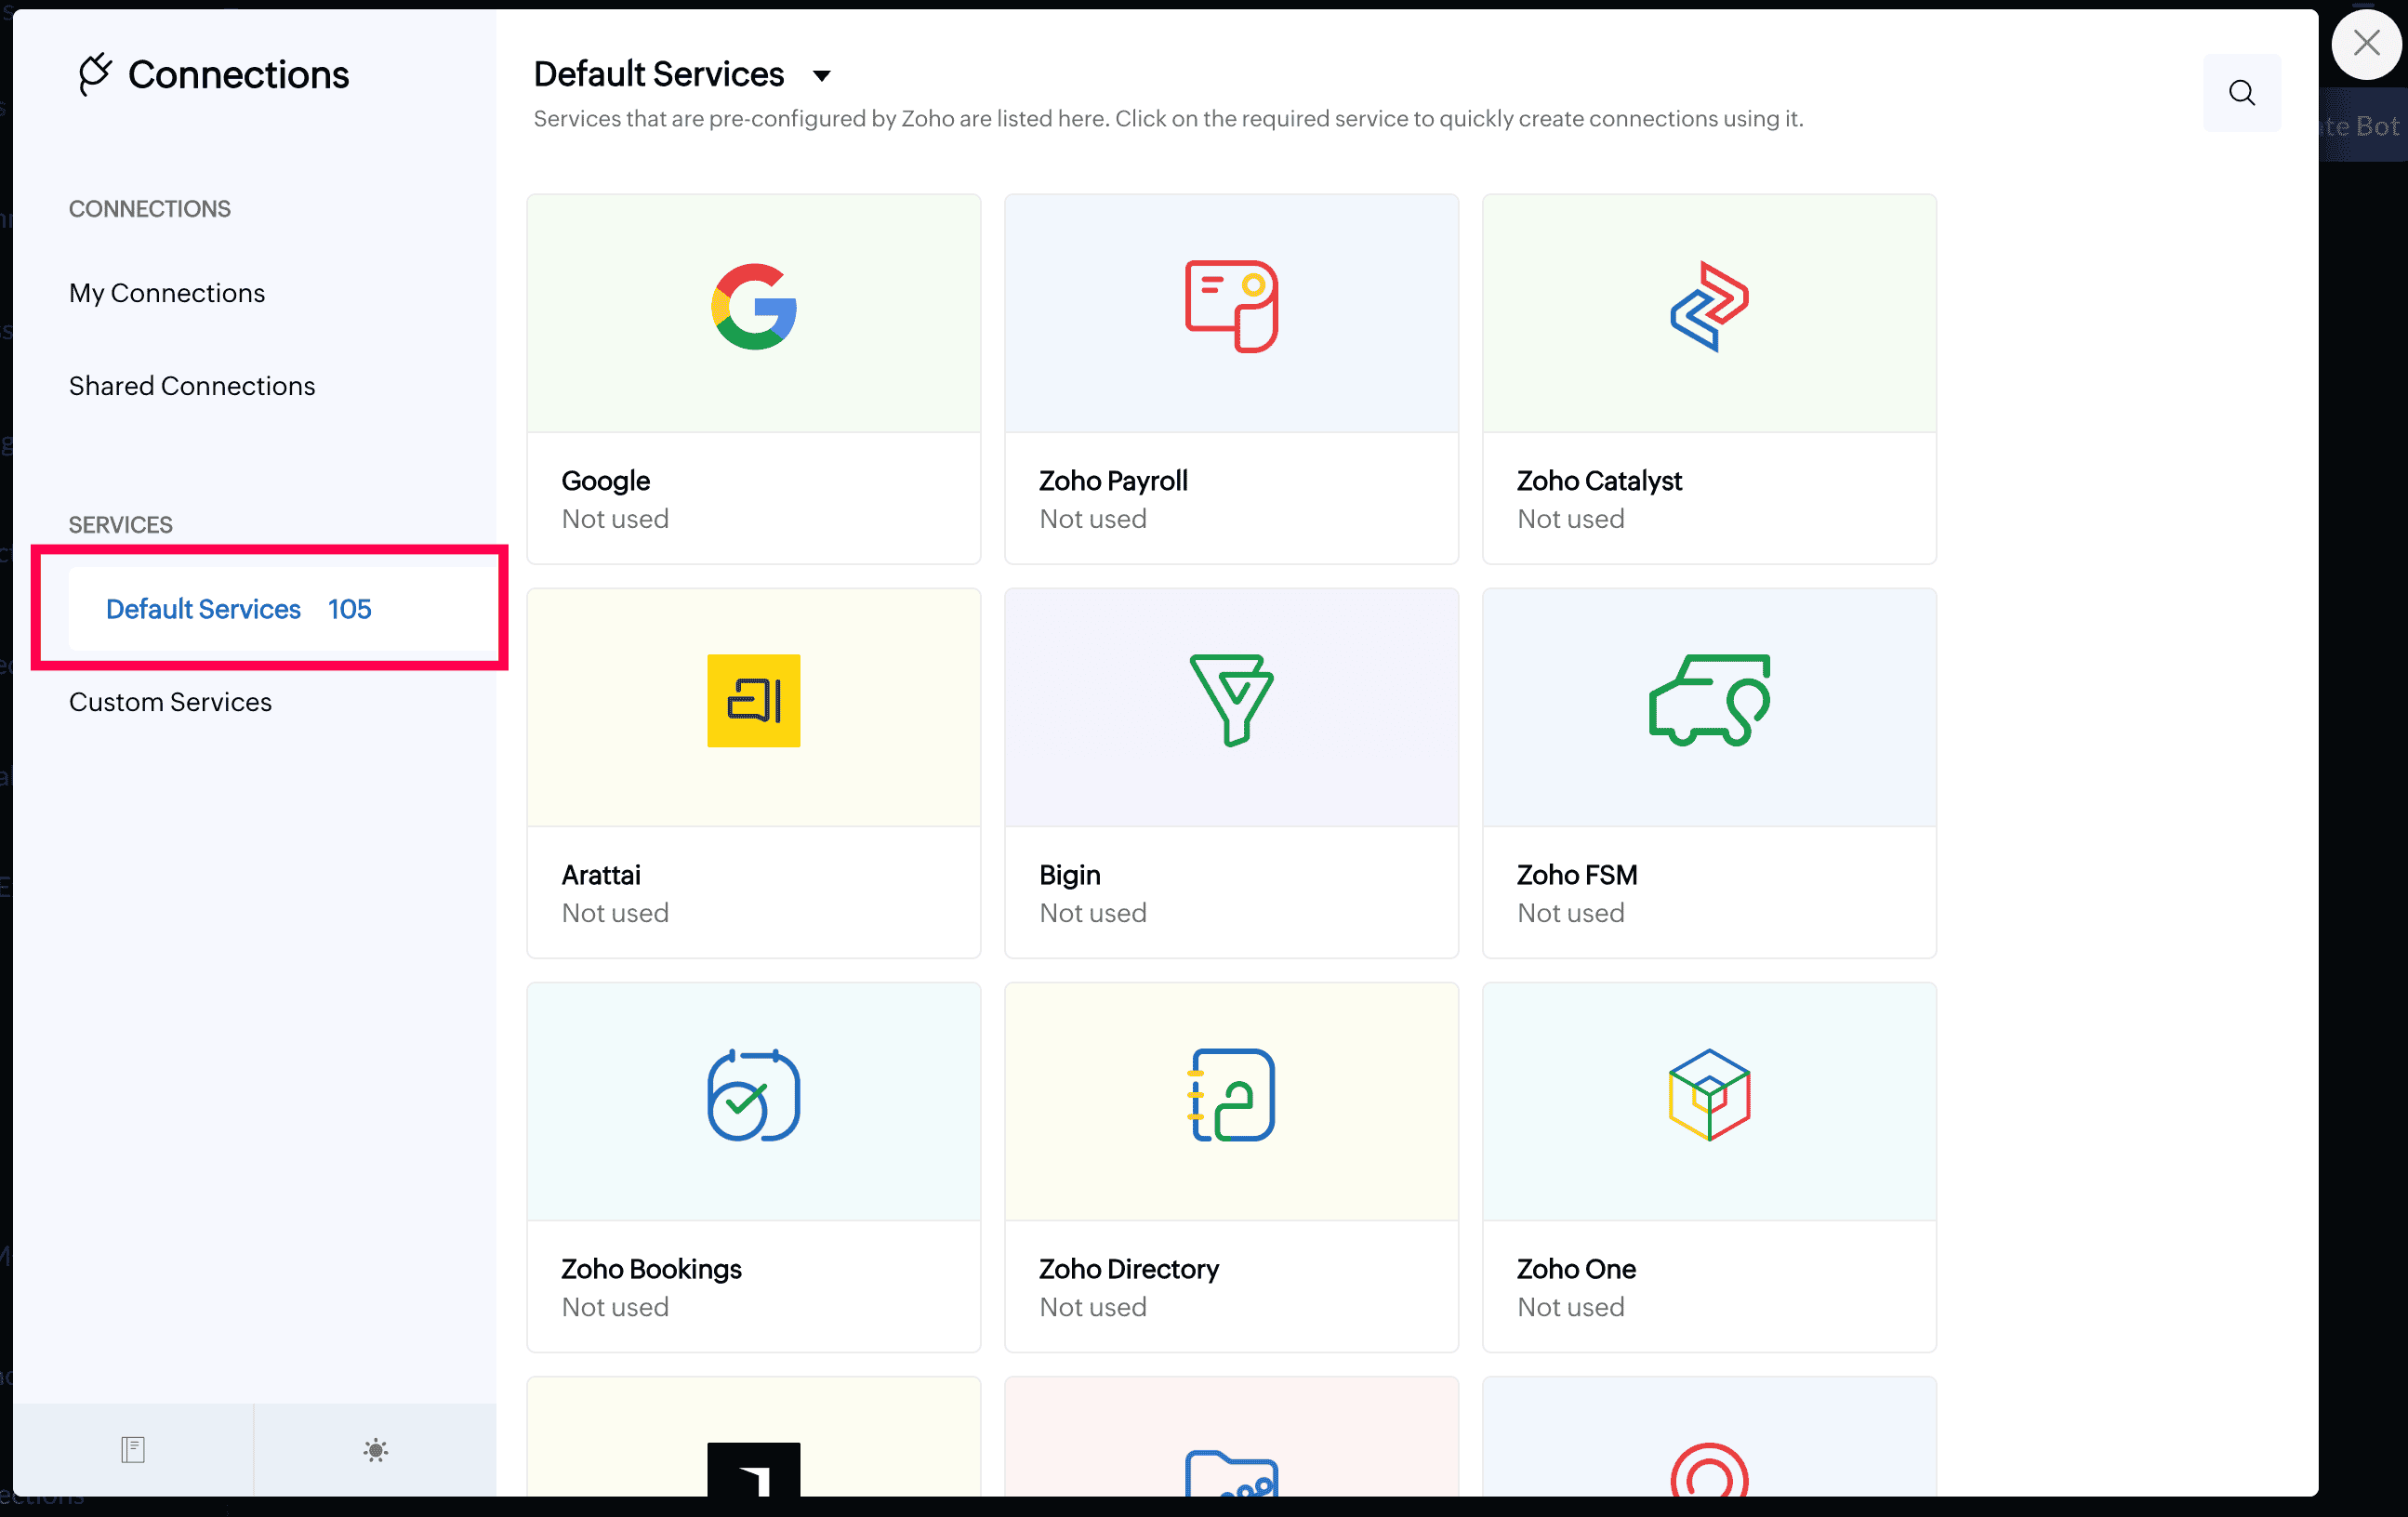
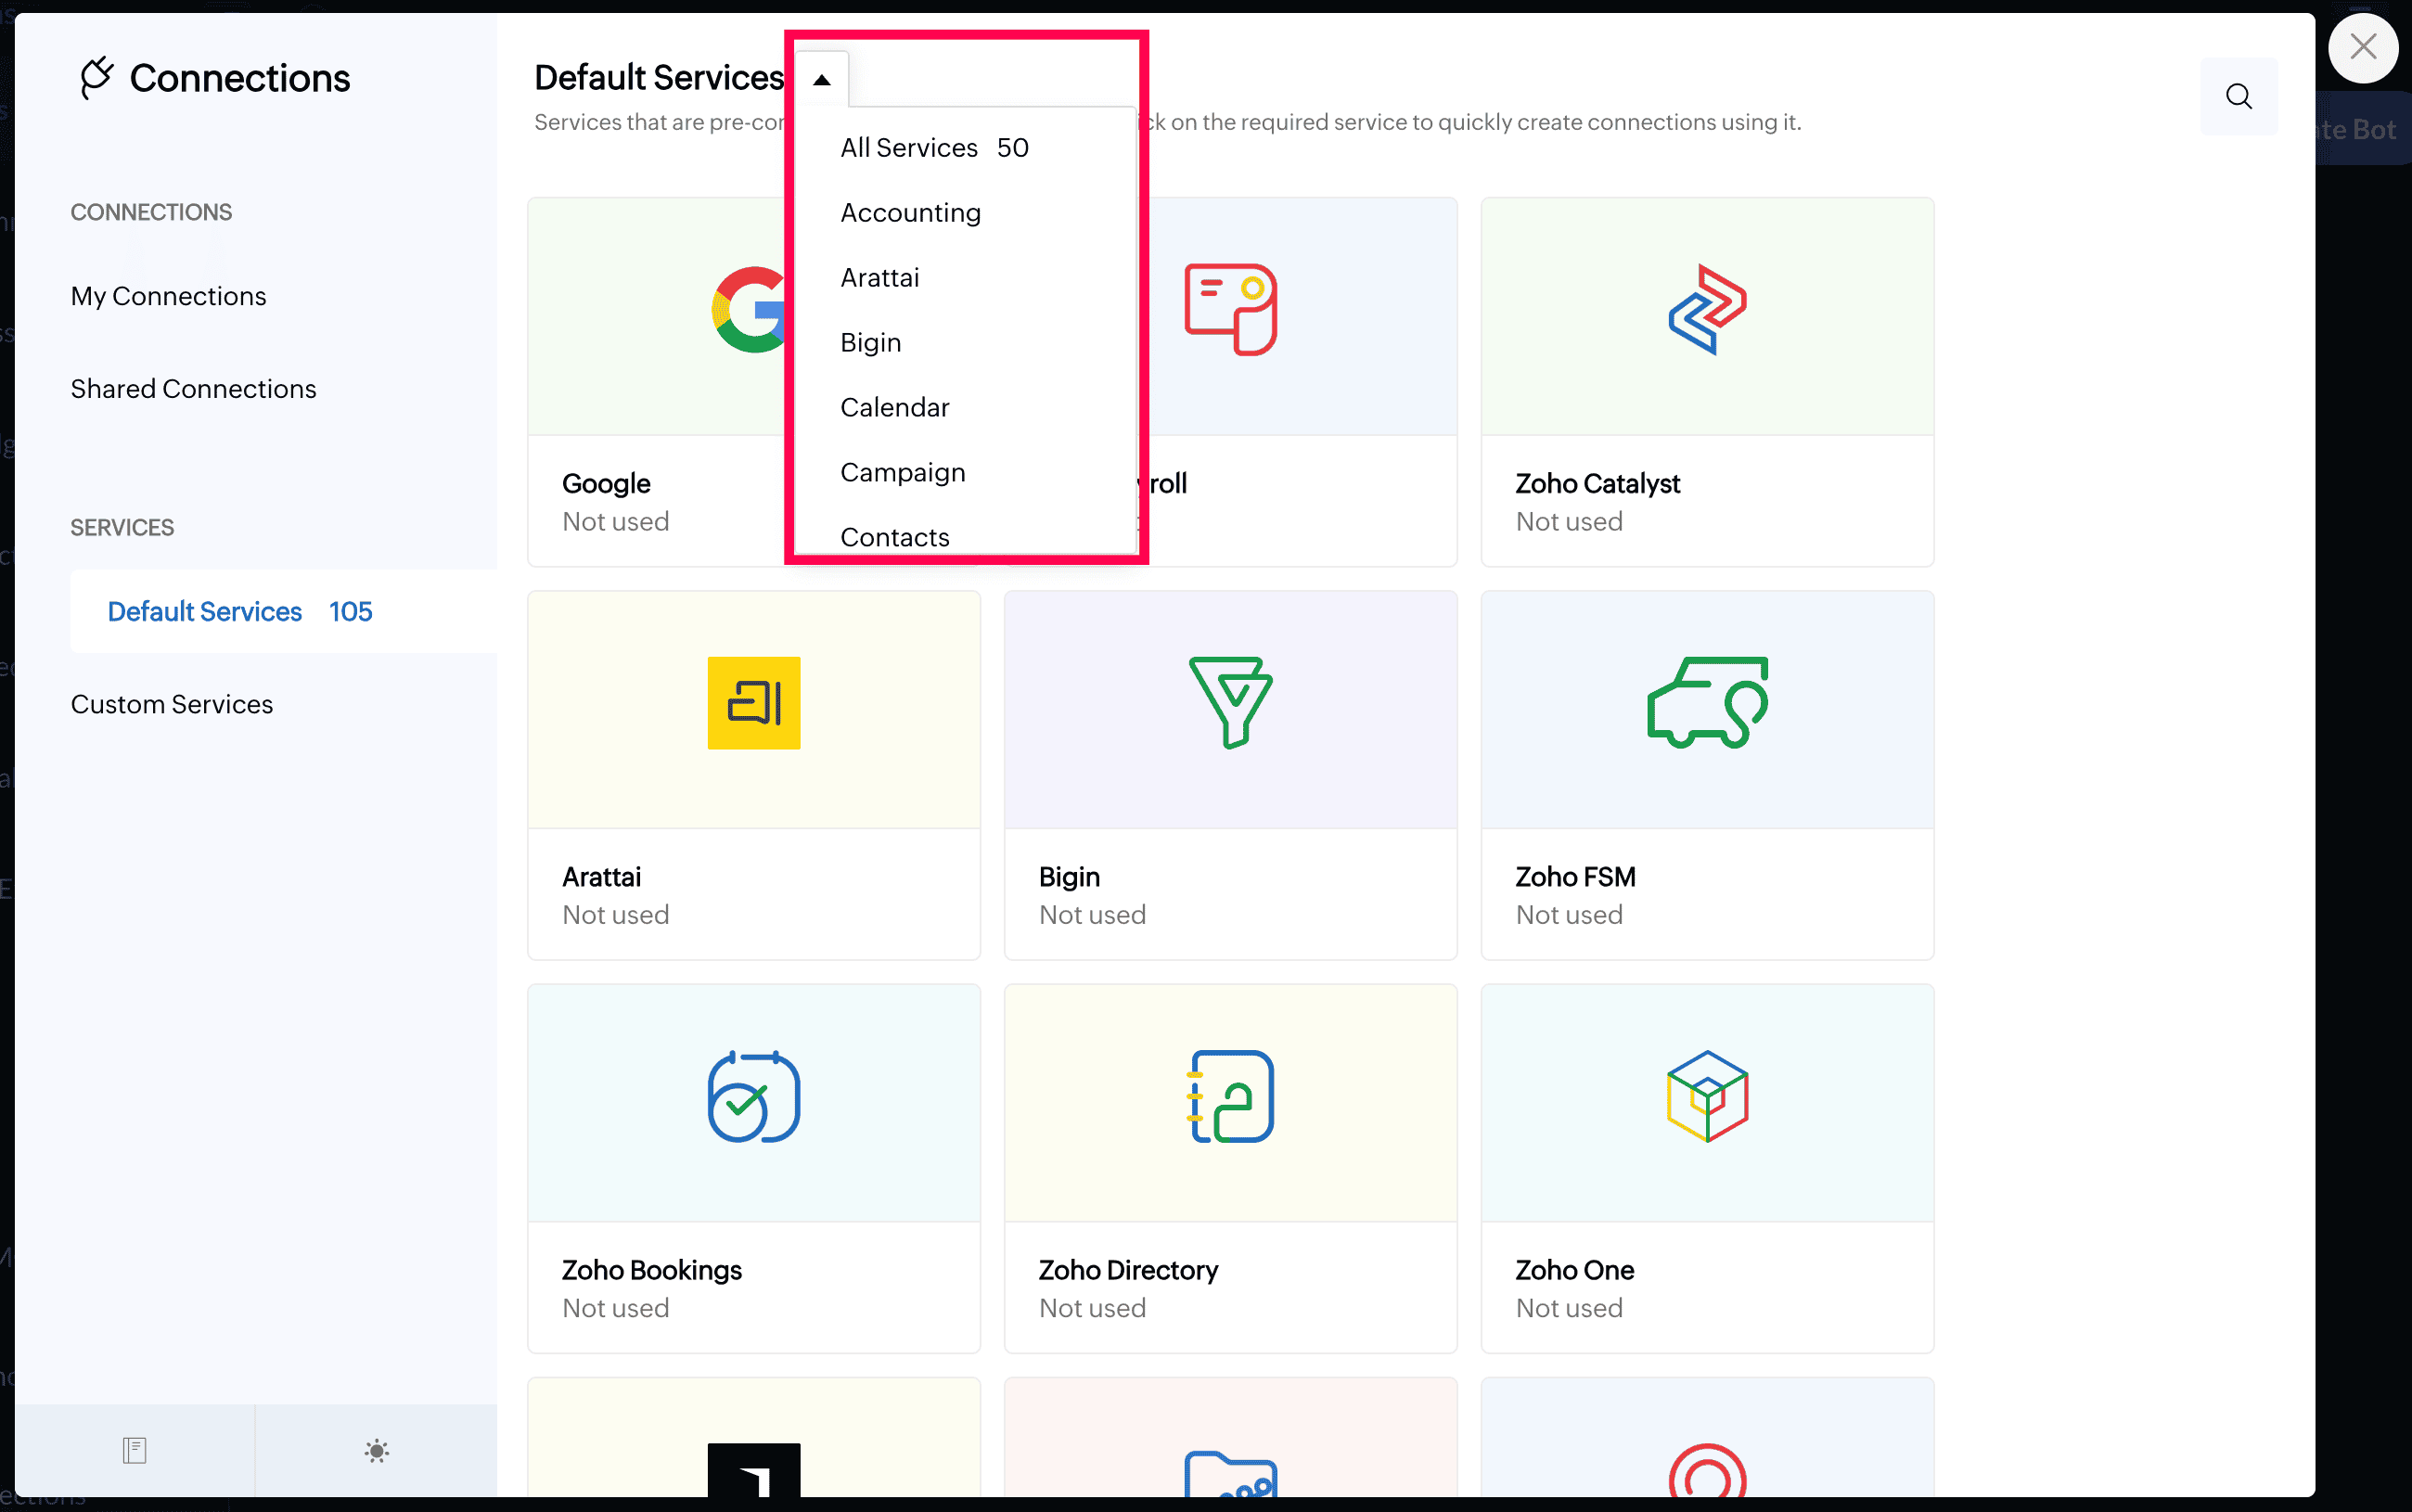
- The default services are categorized based on the type of the service. To narrow down your choices, click on the dropdown on top of the page and choose your required category.
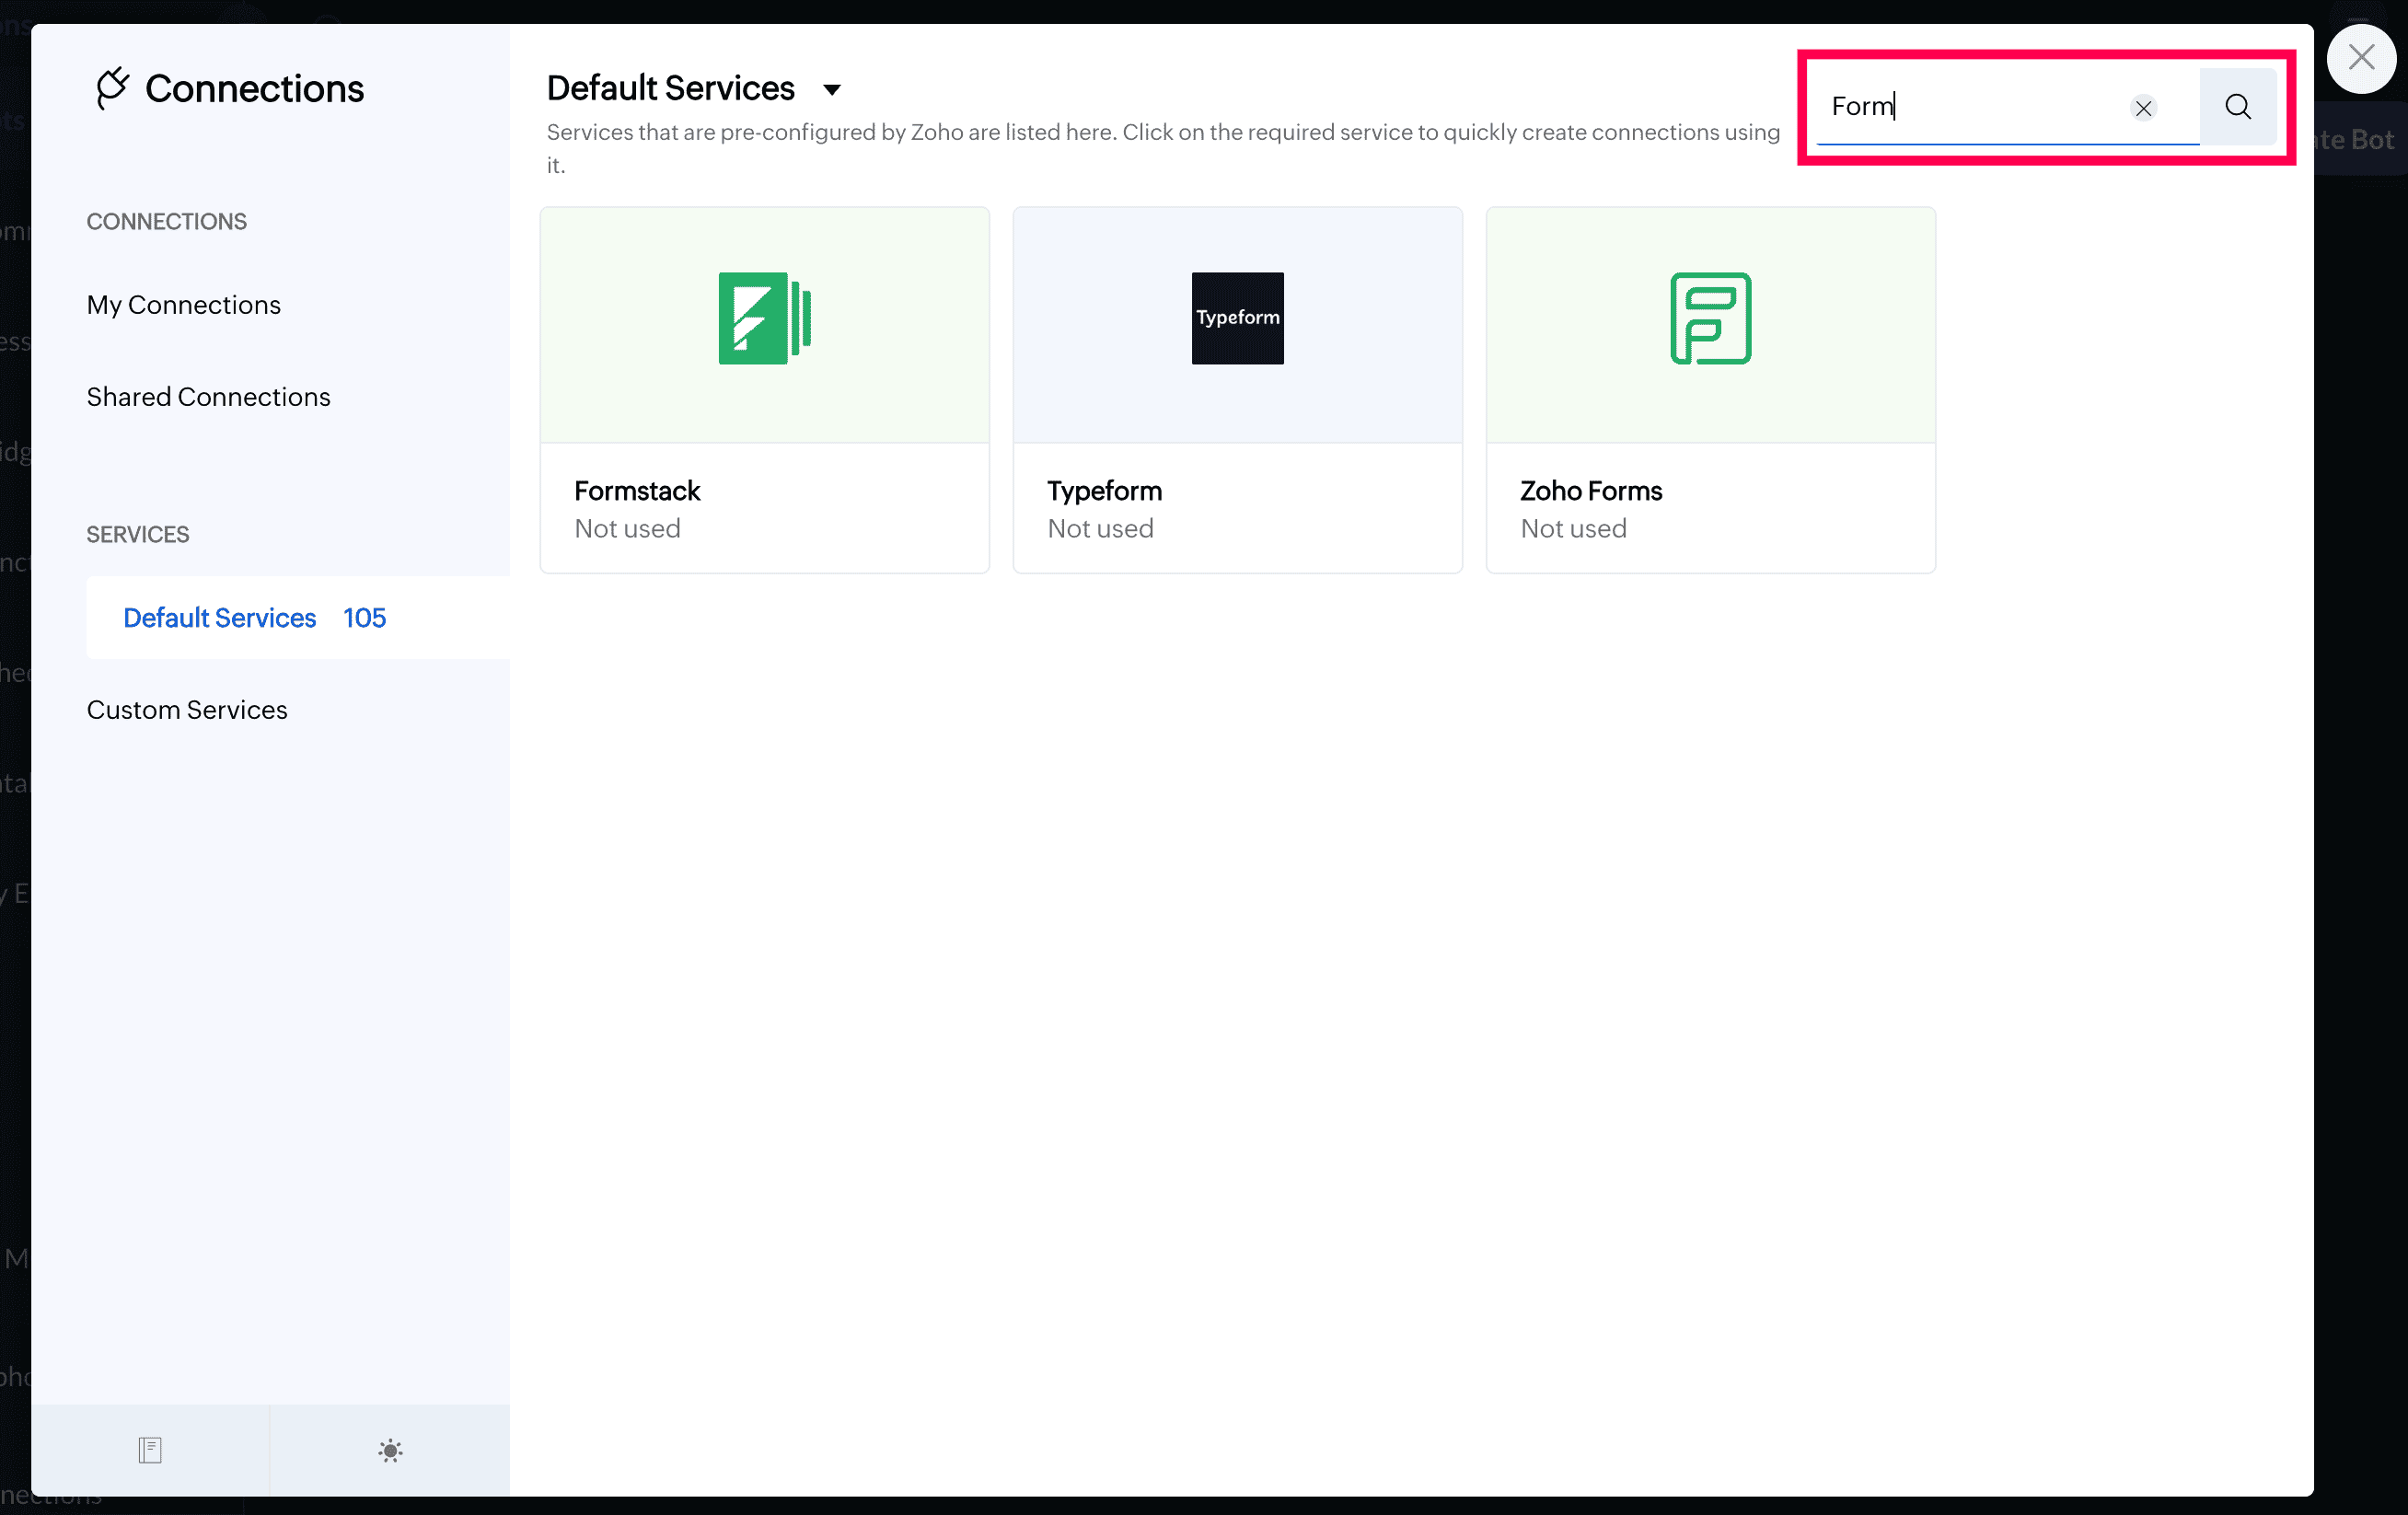
- To search for a specific service, type the service name in the search bar at the top right corner.
- To view the available default services, click on Default services under Services in the left pane.
- Custom services: If your required service is not available in the default services list, you can configure it on your own. Once the service is configured, you or any member of your organization can create as many connections as required using it by providing credentials.


Configure custom services
To create a custom service:
- Navigate to the Custom Services under Services. All the custom services created by you and other members of your organization will be listed here.
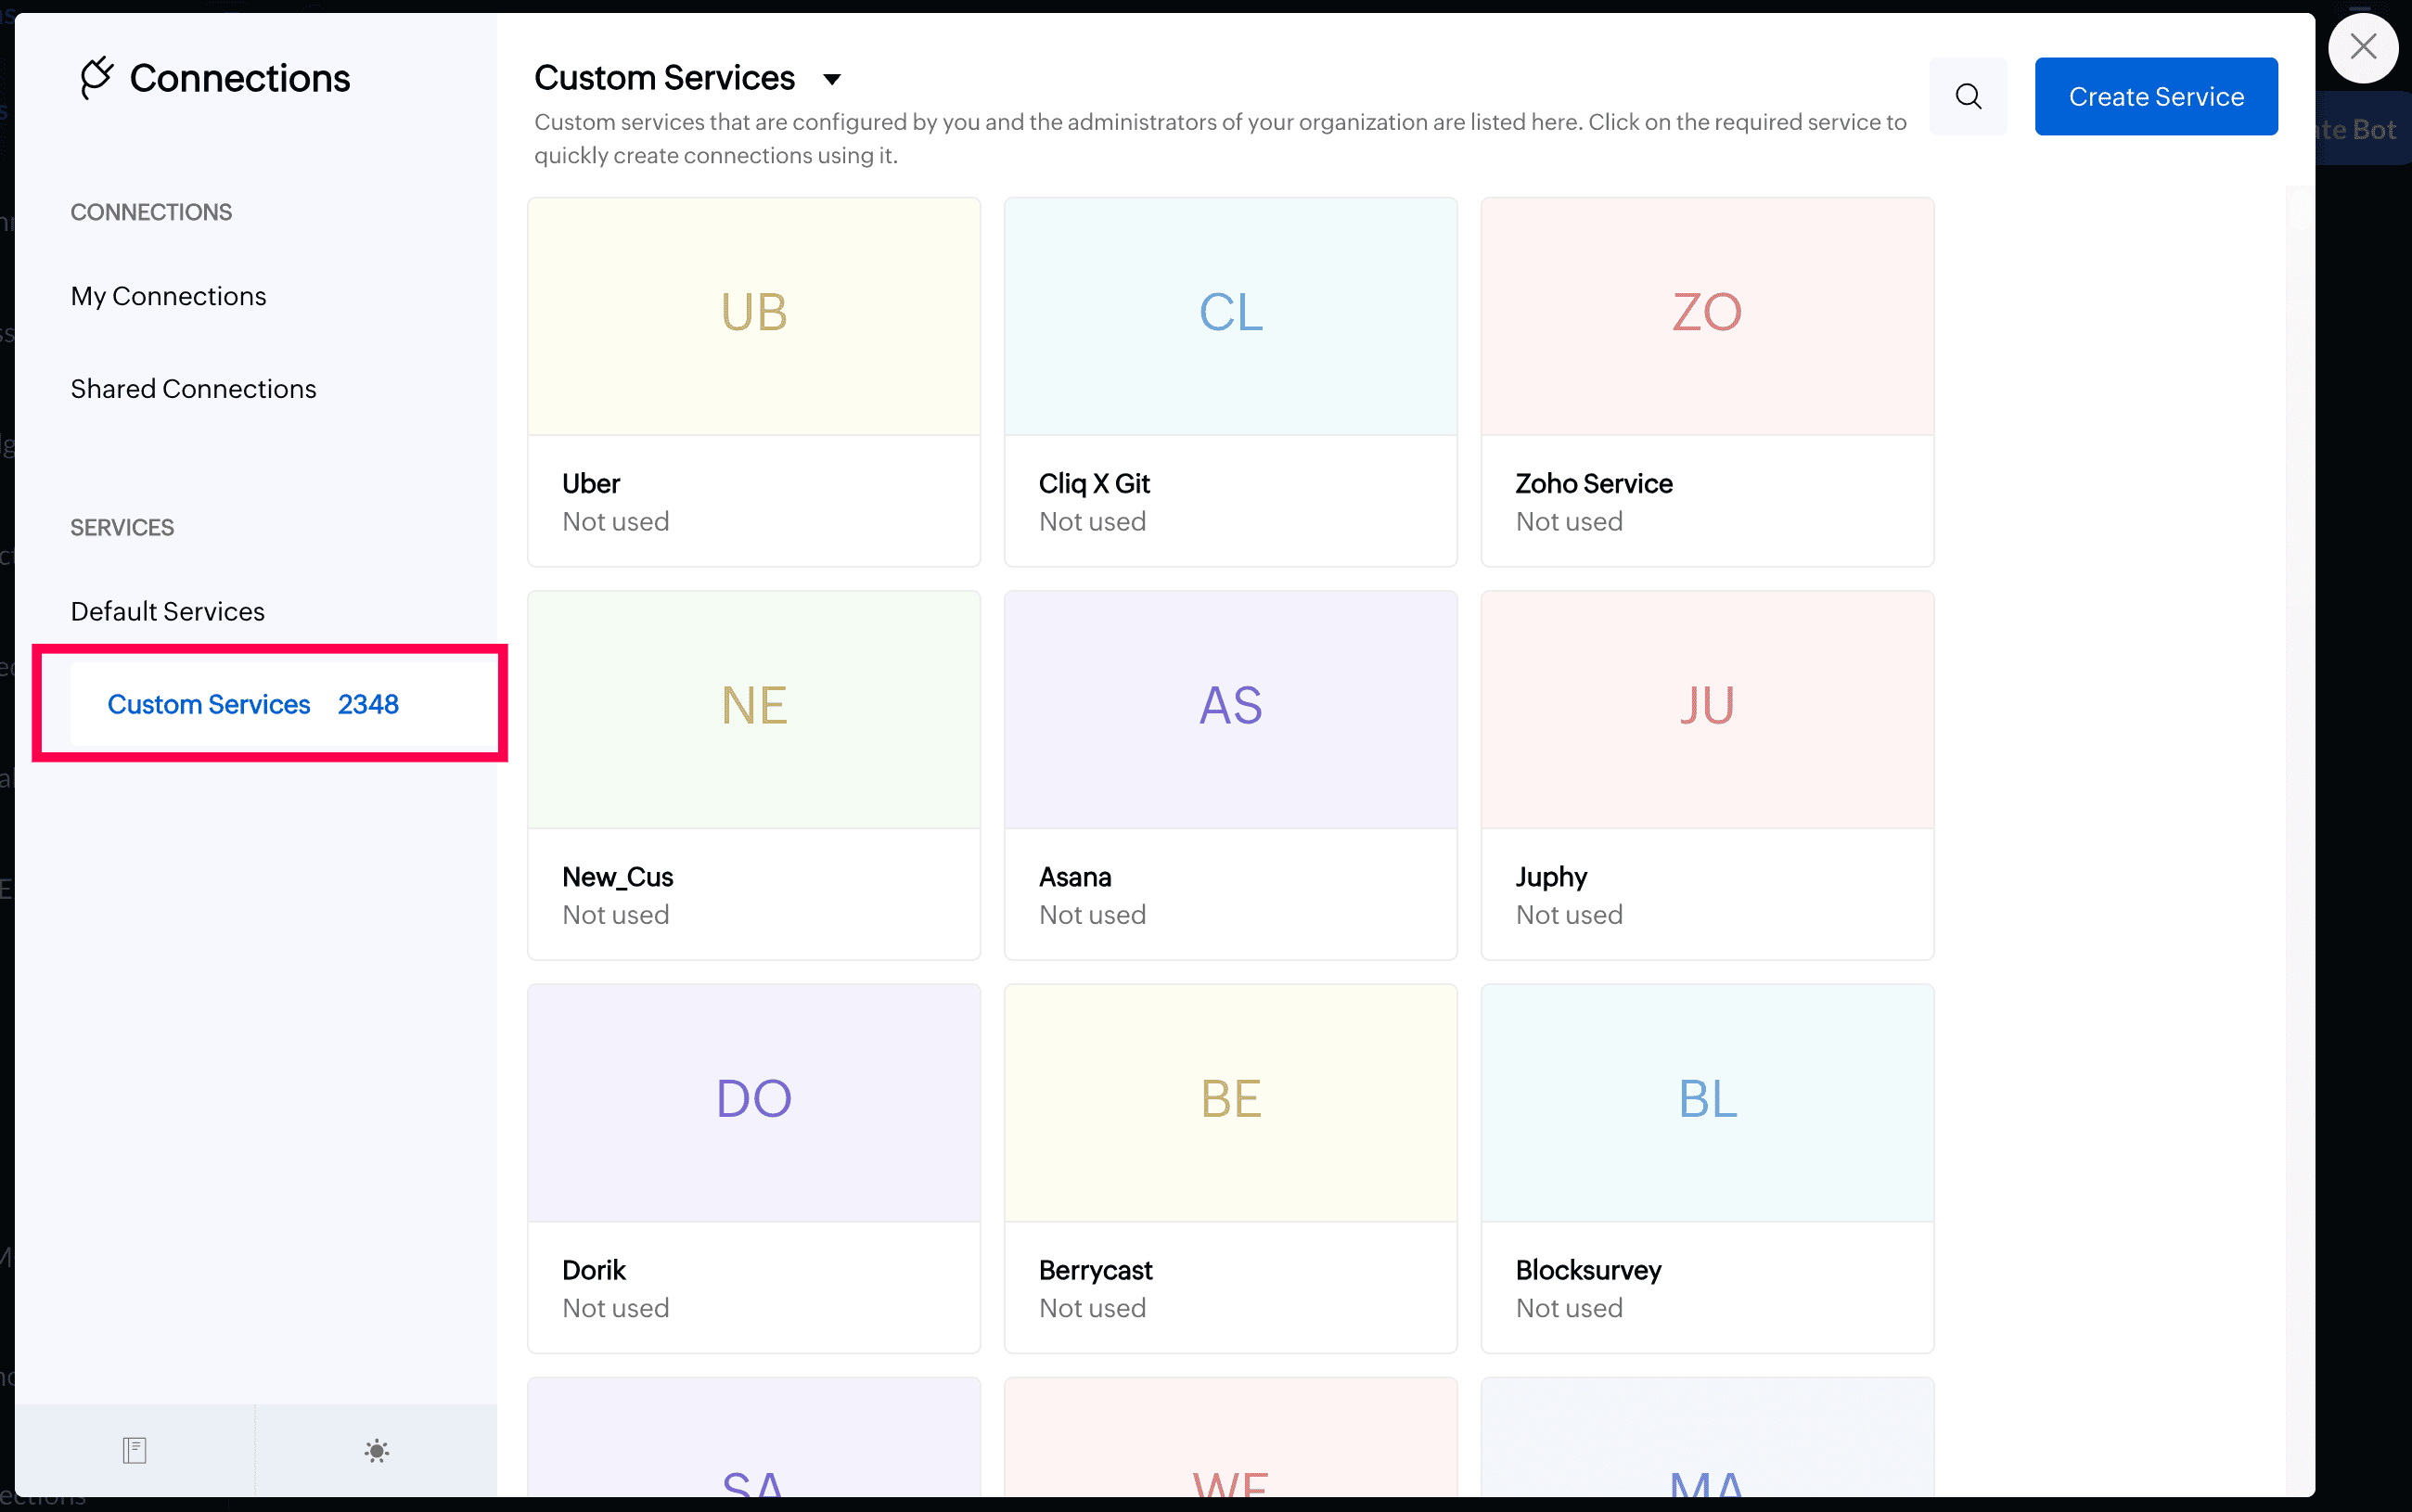
- Click on Create Service button
- In service details window, provide the following information:
- Service Name: This is the display name of the service that you want to create. Display name can contain up to 50 characters.
Service LinkName: Link name of the service to help you to uniquely identify your custom service.
Note: The link name that you provide must satisfy the following conditions:
- It must begin with a lower case letter.
- It can contain lower case letters, numbers, and underscores (_).
- It can contain up to 50 characters.
Authentication Type: Choose from the following authentication types based on the desired service's API documentation
Type Description Fields API Key This auth type requires you to specify the params for establishing a connection with the desired service. In the next step, you will have to supply values for these params to perform the integration. For example, if you specify authtoken as param, the next step would be to provide your account's auth token to establish a successful connection. On choosing API Key as authentication type, you need to provide values to the following fields:
- Param Type: This decides how the authentication parameters will be sent along with the URLs specified in the invoke URL scripts. Supported param types: Query string, Form Data, and Header
- Actual Parameter: Name of the key (as specified in the API documentation of the desired service) against which the parameter needs to be sent
- Parameter Display Name: Display name for the parameter.
Note:
- You can add as many parameters as required.
- Parameter could be any type of key that is required for authentication. Example: api-key, user-key, authtoken, apitoken, etc.
Basic This auth type requires you to specify the username and password in the next step. The provided username and password will be automatically encrypted with base64 algorithm and passed as header in the format: basic <encrypted_username>:<encrypted_password>. N/A OAuth 1 This auth type requires you to specify the required parameters to perform an OAuth 1 authentication. On choosing OAuth 1 as authentication Type, you need to provide values to the following fields:
- Consumer Key: Consumer key that is issued by the service provider
- Consumer Secret: Your consumer secret to authorize your application
- Request Token Url: URL to fetch the request token as specified in the API documentation of the desired service
- Authorize Url: Authorize URL as specified in the API documentation of the desired service
- Access Token Url: URL to fetch the access token as specified in the API documentation of the desired service
- Param Type: This decides how the authentication parameters will be sent along with the URLs specified in the invoke URL scripts. Supported param types: Query string, Form Data, and Header
OAuth 2 This auth type requires you to specify the required parameters to perform an OAuth 2 authentication. On choosing OAuth 2 as authentication Type, you need to provide values to the following fields:
- Grant type: Grant type that the desired service uses to perform authorization. You can choose from the supported grant types: Authorization code, Authorization code with PKCE and client credentials
- Client Id: Client ID that is issued by the service provider
- Client Secret: Your client secret to authorize your application
- Authorize Url: Authorize URL as specified in the API documentation of the desired service
- Access Token Url: URL to fetch the access token as specified in the API documentation of the desired service
- Refresh Token Url: URL to fetch the request token as specified in the API documentation of the desired service
- Revoke Token URL: URL to remove the refresh token as specified in the API documentation of the desired service
- Param Type: This decides how the authentication parameters will be sent along with the URLs specified in the invoke URL scripts. Supported param types: Query string, and Header.
- Scope: Scopes required to perform integration as specified in the desired service's API documentation.
Scope Delimiter: Delimiter with which the desired service API expects the scopes to be separated.
Note:
- You can select from the supported delimiters: comma, space, and plus. If not specified, comma is assumed as default delimiter.
- While registering your application in your desired service to generate client ID& client secret, you will have to provide the callback URL as:
- US domain: https://deluge.zoho.com/delugeauth/callback
- EU domain: https://dre.zoho.eu/delugeauth/callback
- CN domain: https://dre.zoho.com.cn/delugeauth/callback
- IN domain: https://deluge.zoho.in/delugeauth/callback
- AU domain: https://dre.zoho.com.au/delugeauth/callback
- JP domain: https://dre.zoho.jp/delugeauth/callback
- CA domain
https://dre.zohocloud.ca/delugeauth/callback - SA domain
https://dre.zoho.sa/delugeauth/callback
AWS Signature Version 4 This auth type requires you to specify the required parameters to perform AWS Signature Version 4 Authentication. On choosing AWS Signature as authentication type, you need to provide values to the following fields
- AWS Service (Editable)
The name of the service you want to connect to.
ex : sqs, s3, dynamodb - AWS Region (Editable)
The name of the region receiving the request.
ex : us-east-1, eu-west-1
This auth type requires to specify the access key and secret key provided by AWS in next step.
Note: Deluge supports appending AWS auth details only via headers.In headers we will add authorization, X-Amz-Date, X-Amz-Content-Sha256 fields.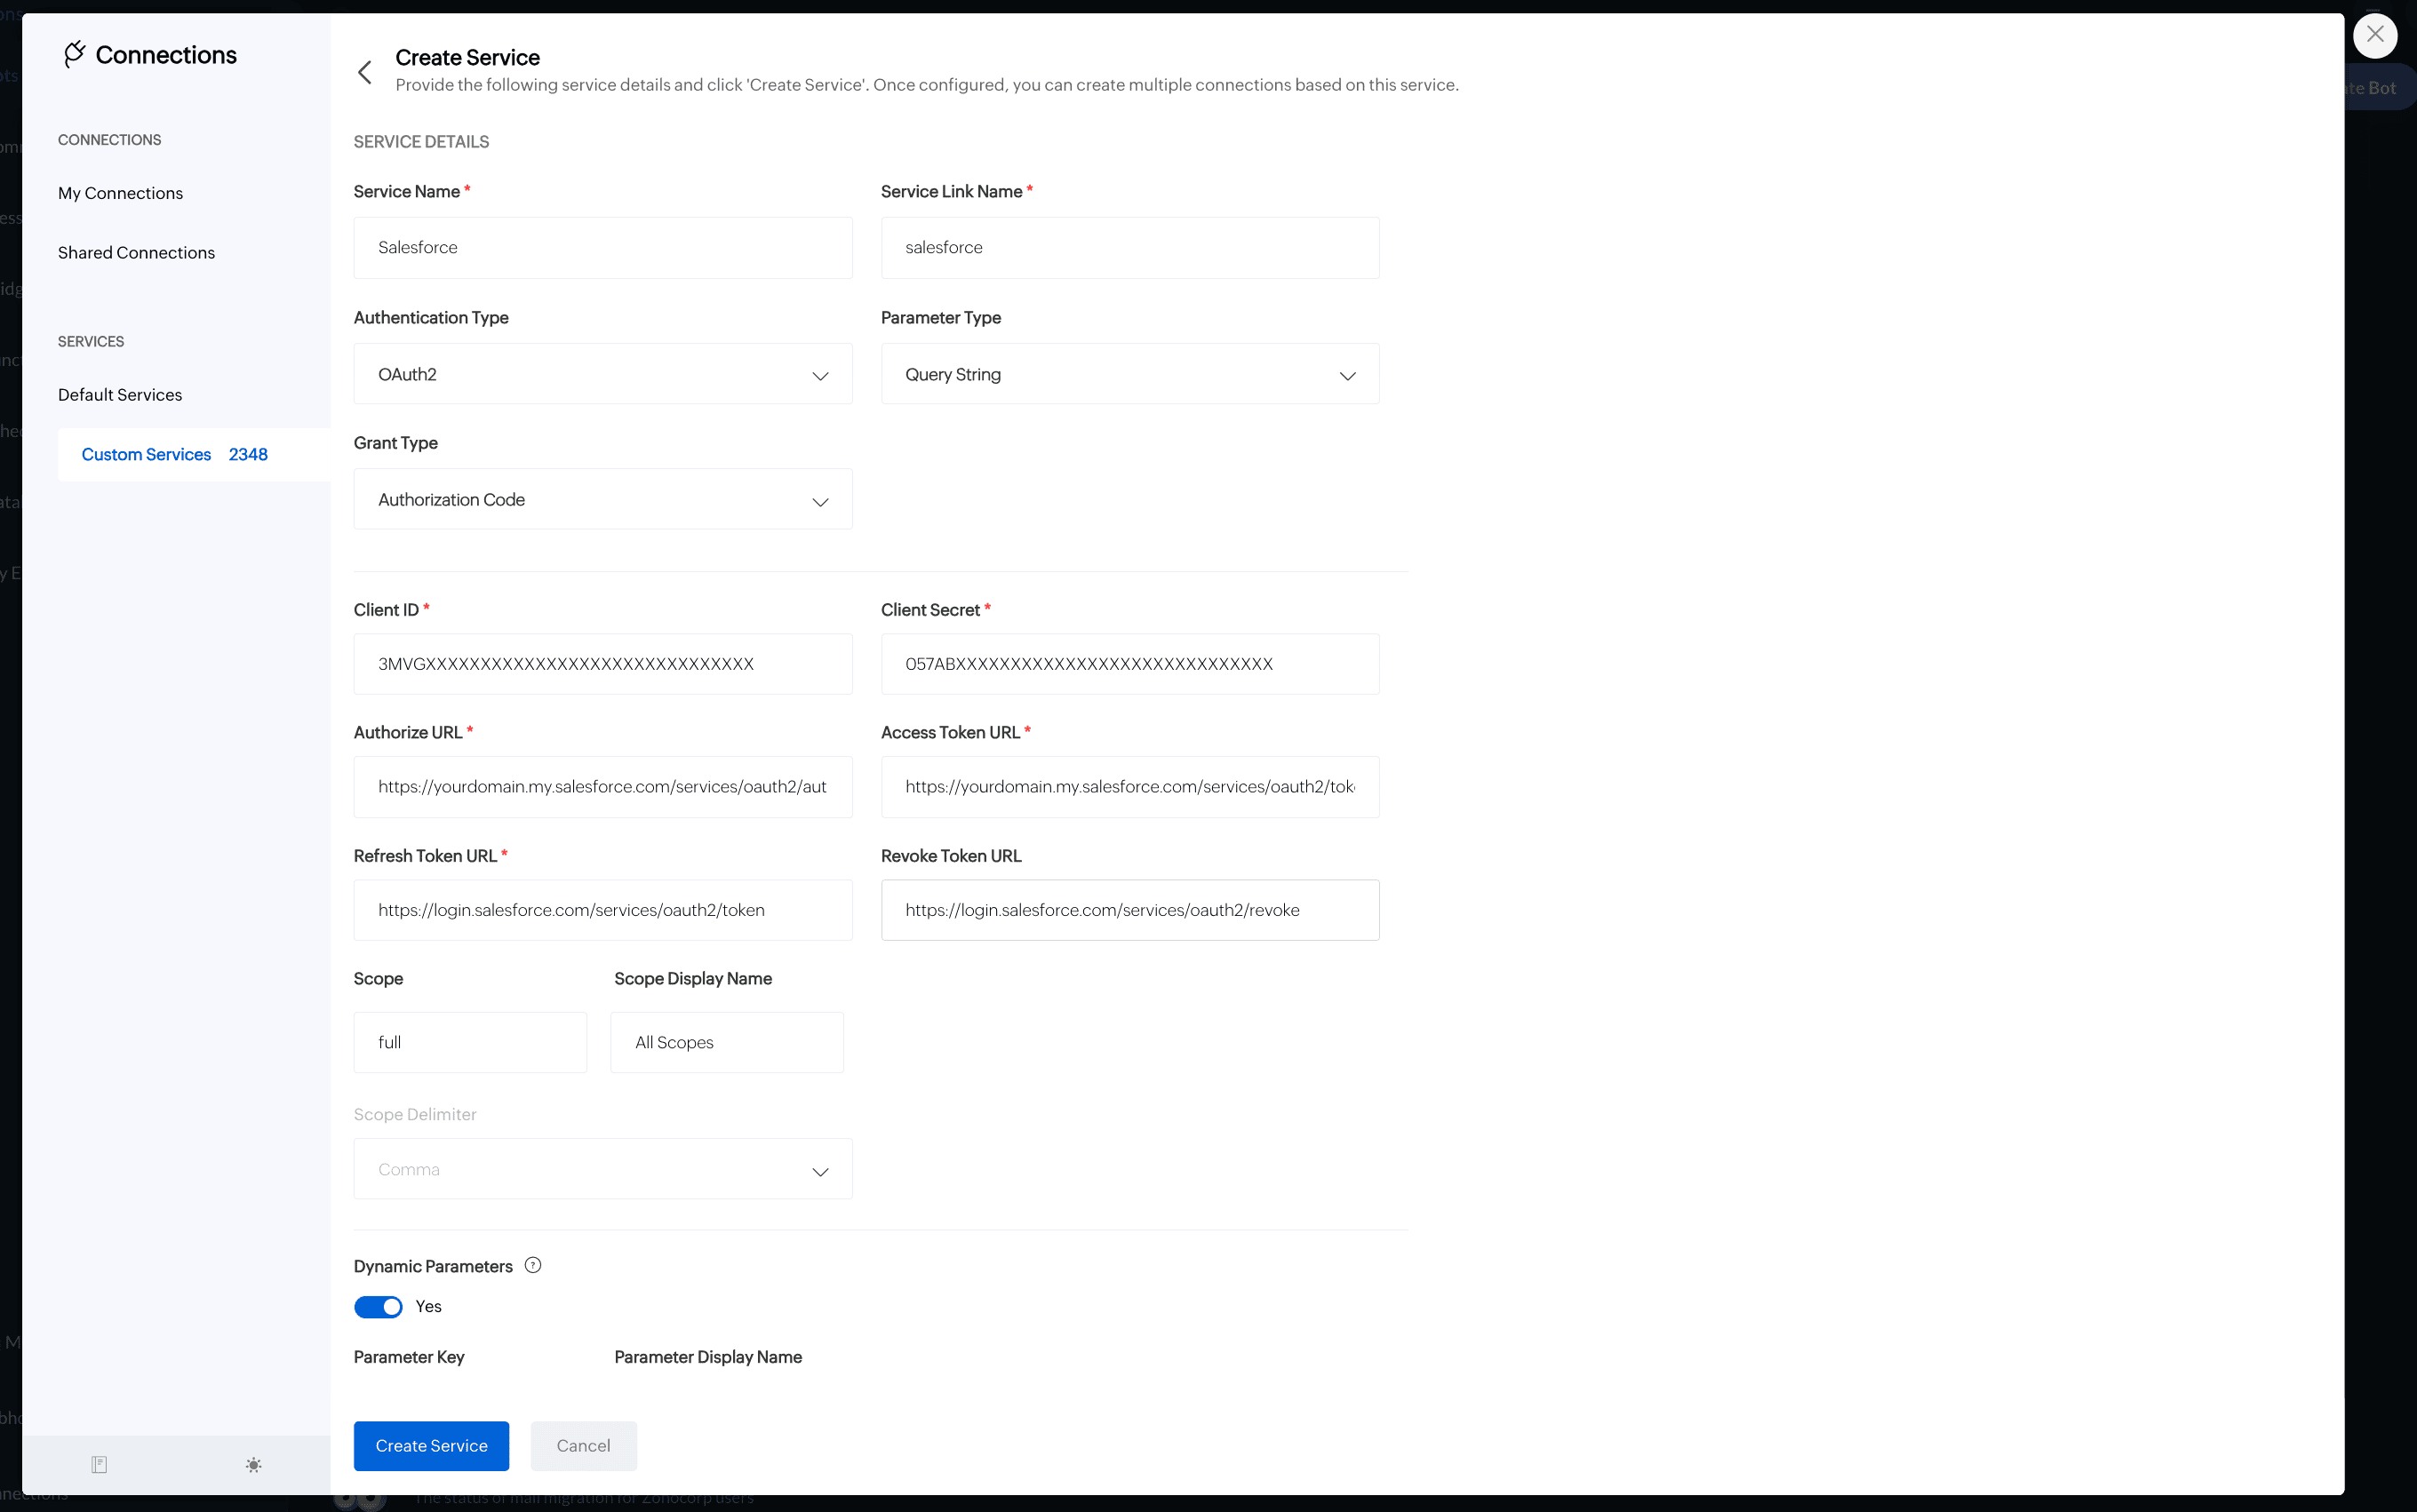
Dynamic Parameters: These are variables for which you can get values from the users while they create connections using this service. Use these parameters as placeholders using the format {Parameter Key} in the Deluge invokeUrl task, Authorize URL, Access Token URL, and Refresh Token URL. During execution, the dynamic parameter placeholders will be replaced with the values supplied by the user.
Let's say, we have created a dynamic parameter domain and the user has supplied zylker as the value to the parameter while creating the connection. During the execution of the following Deluge script, the dynamic parameter {domain} in the URL will be replaced with zylker.response = invokeurl [ url: "https://{domain}.my.salesforce.com/services/data/v56.0/sobjects/Merchandise__c/updated/v2/read" type: GET connection: "salesforce_connection" ];
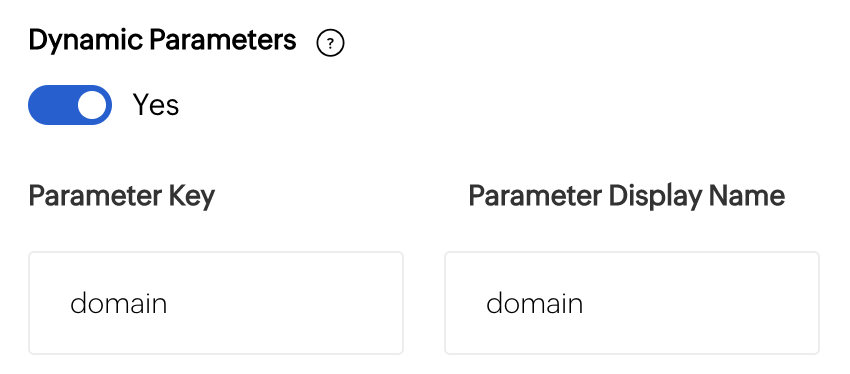
Similarly, the {domain} mentioned in the Authorize URL, Access Token URL, and Refresh Token URL while creating a custom service will be replaced with the value specified by the user during execution.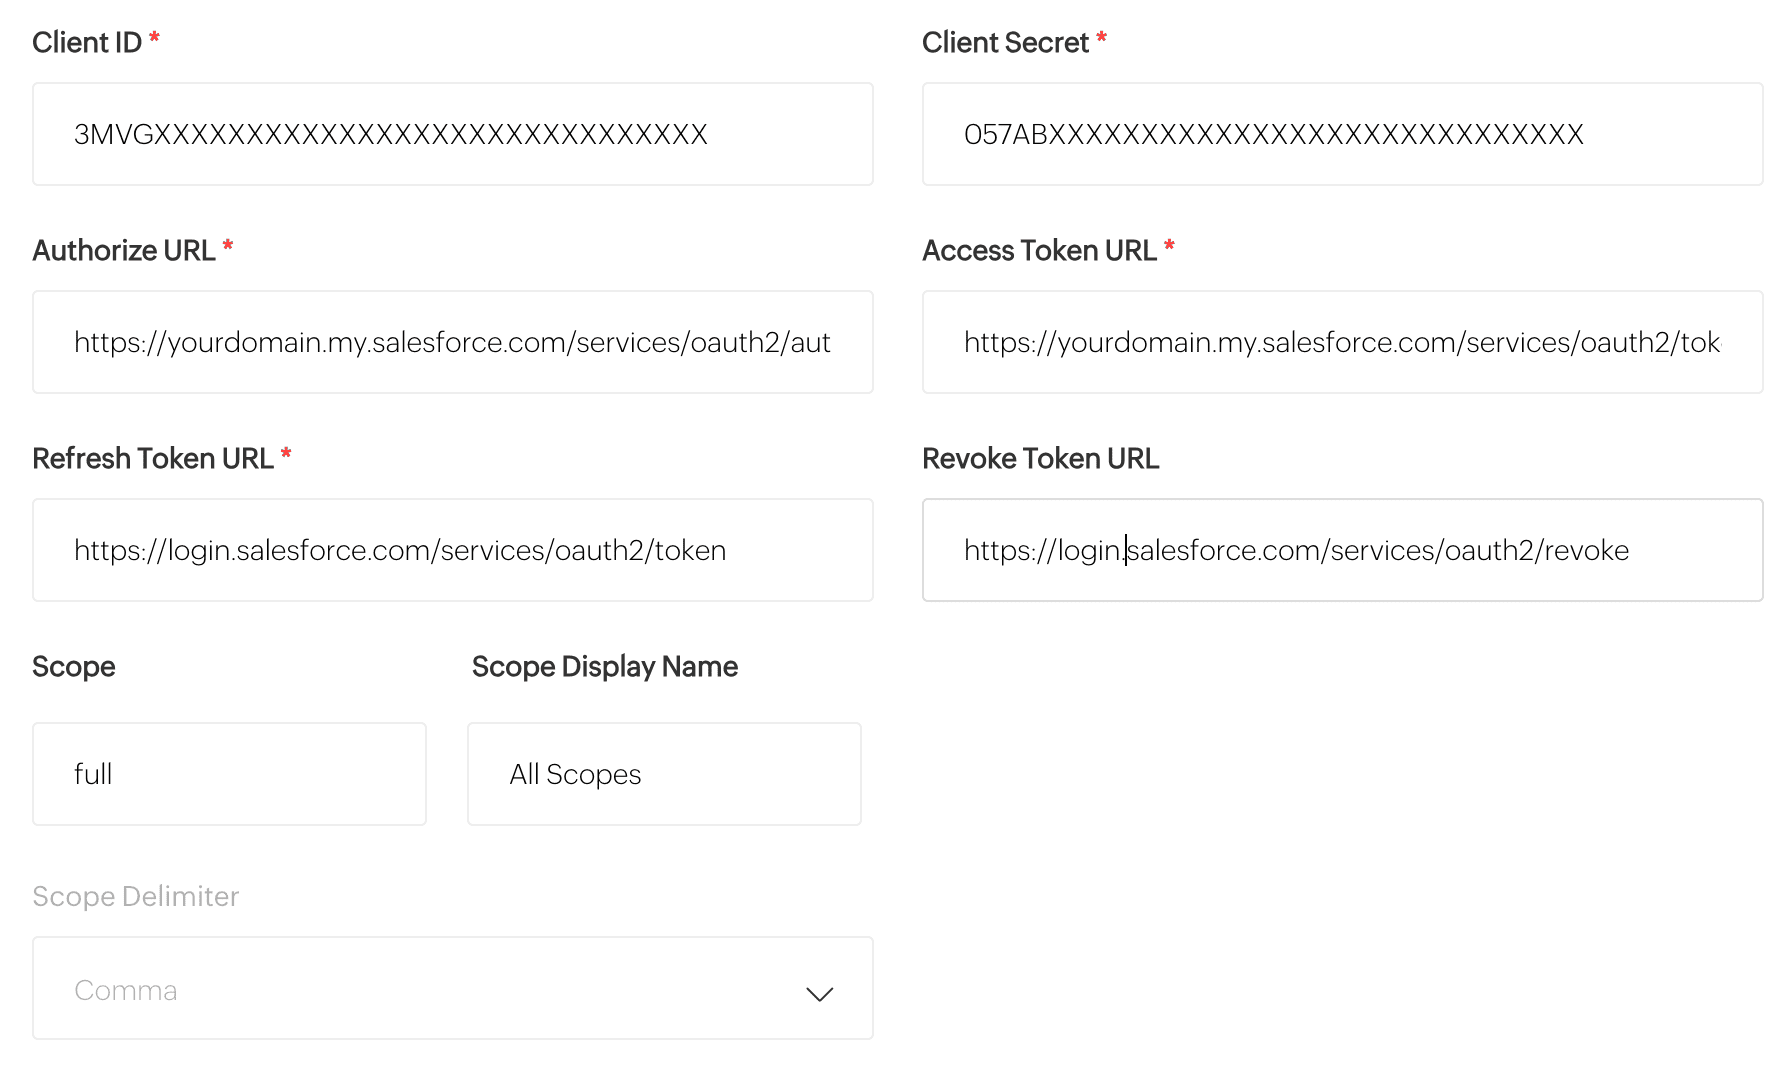
Edit and Delete your custom service
Hover over the custom service to edit or delete it.
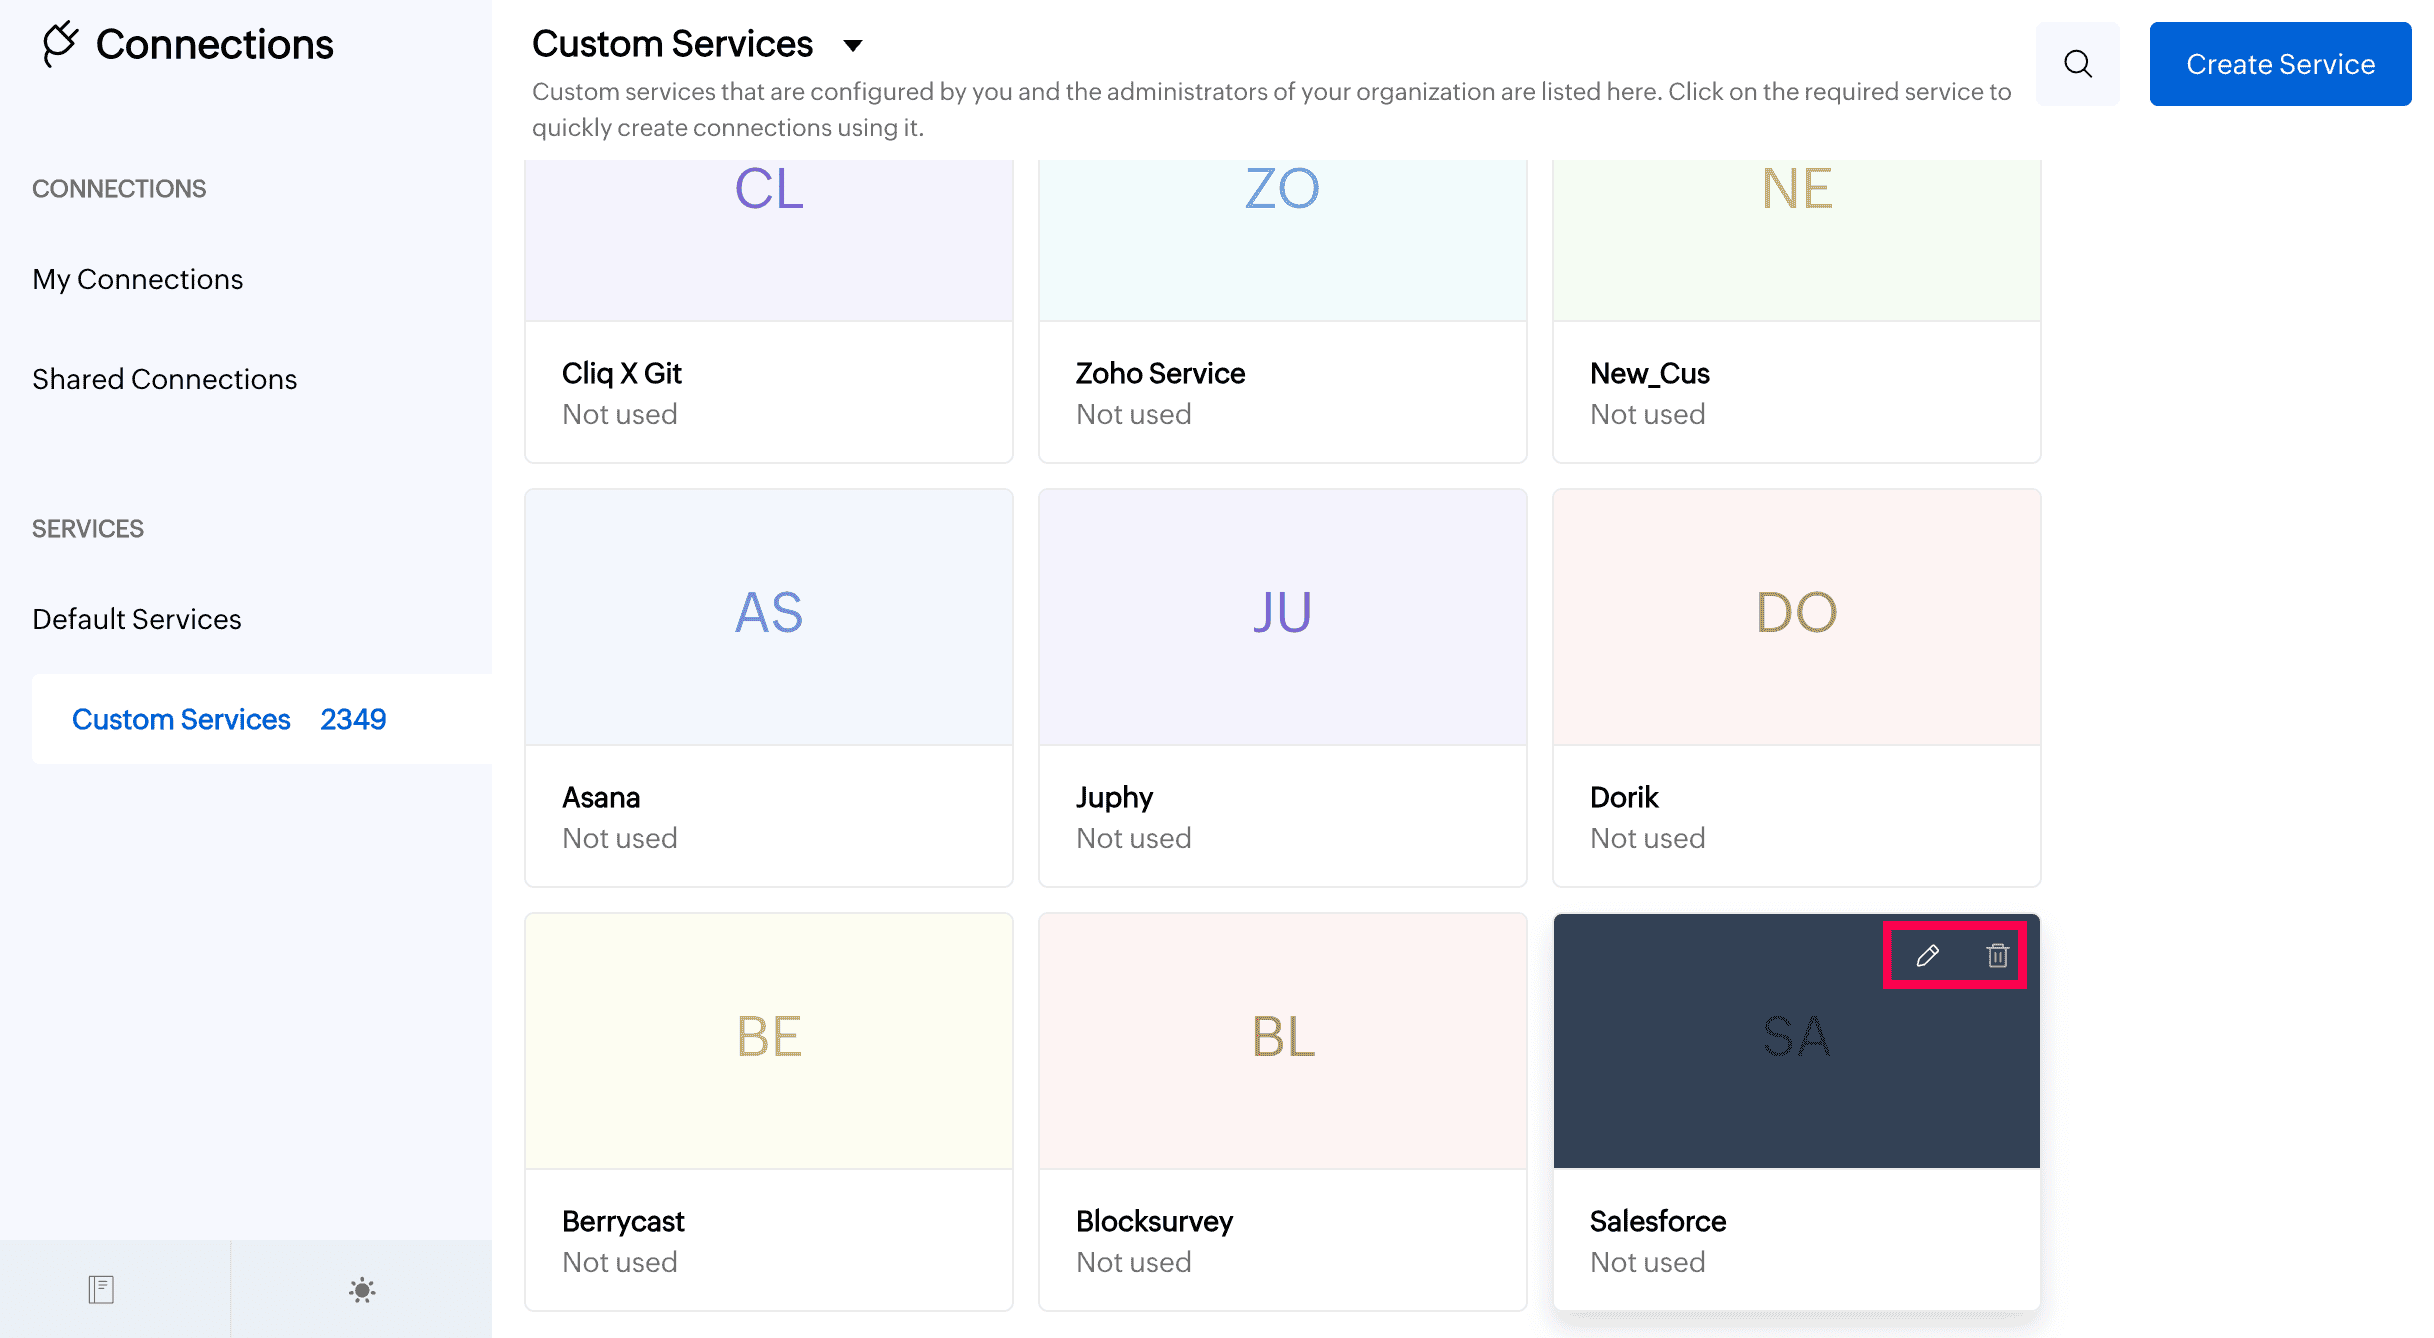
(or)
In the custom service details page, click on the 3 horizontal dots icon to edit or delete the custom service.
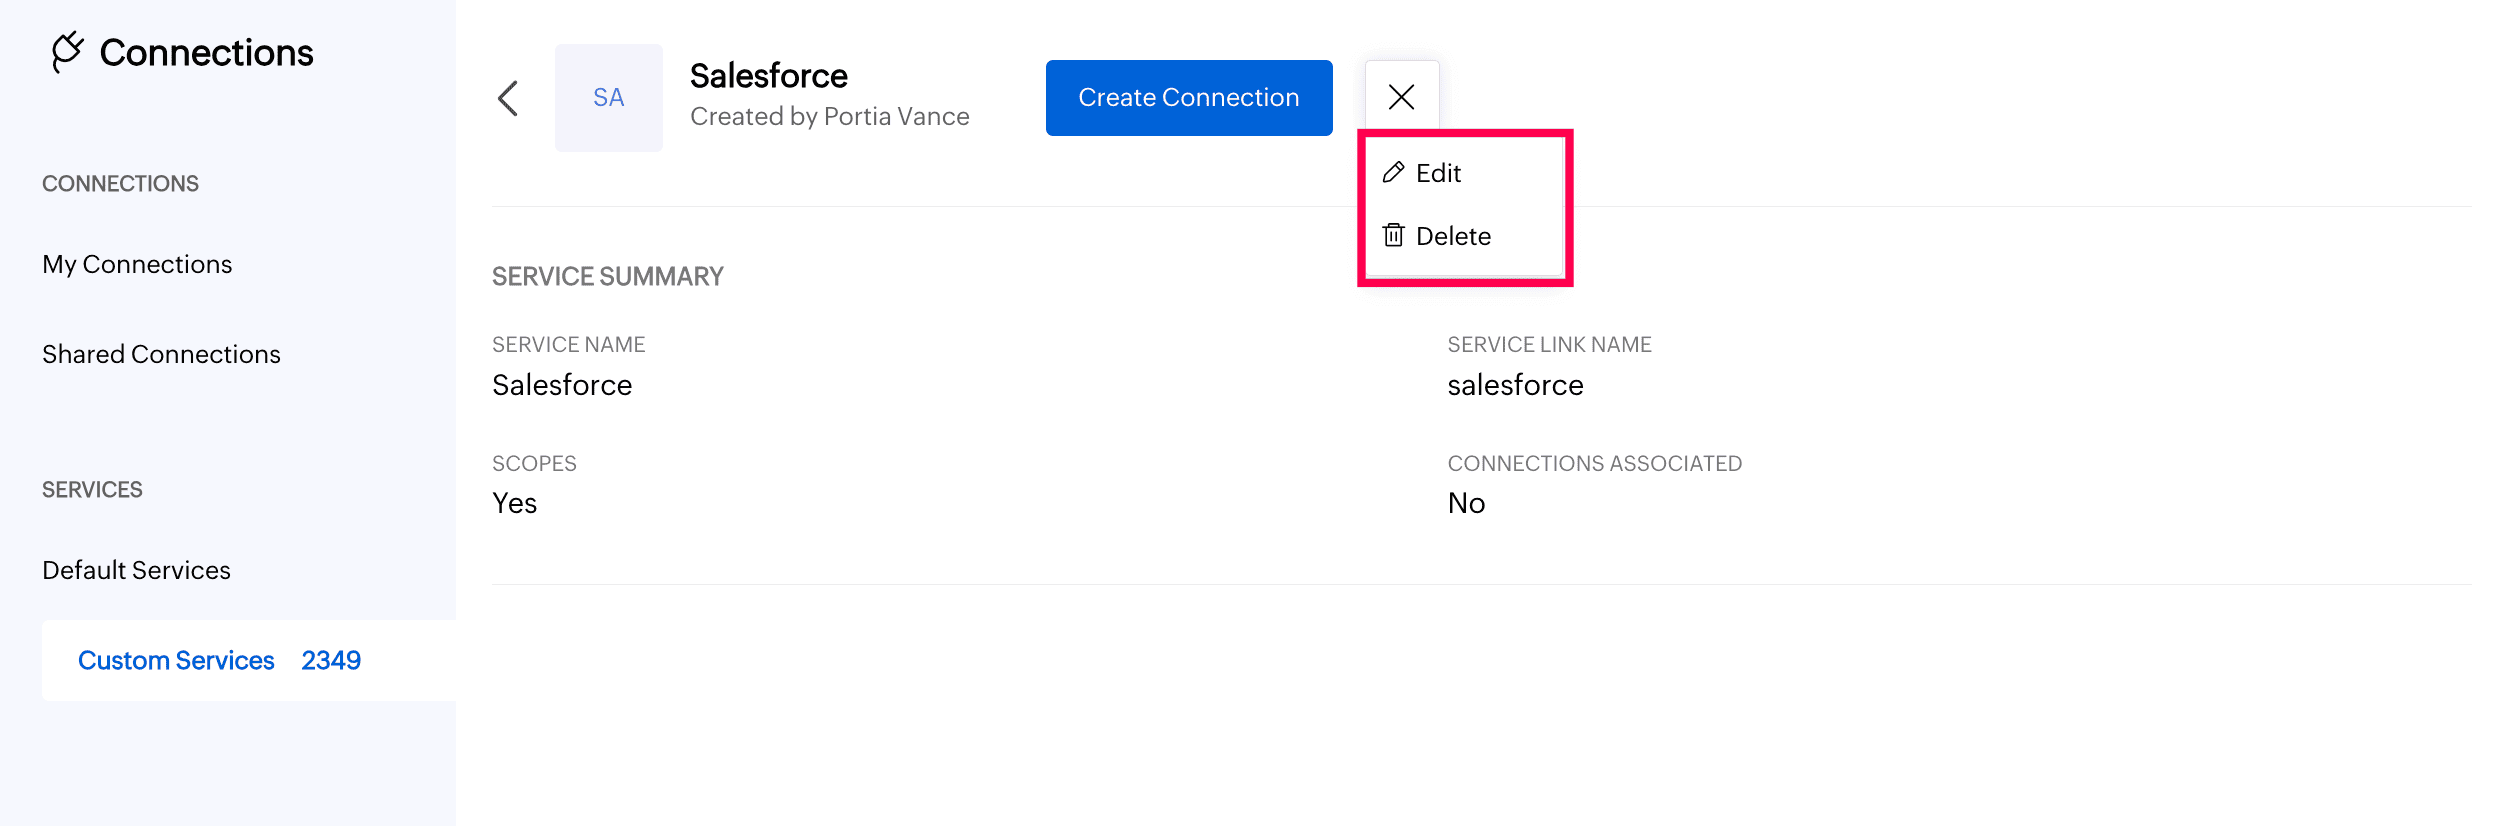
Note:
- You can only edit or delete the custom services that you have configured.
- If a custom service is edited or deleted, all the existing connections created using the service will be revoked.
The following table lists the editable and non-editable custom service fields:
Authentication type Editable fields Non-editable fields Basic - Service name
- Authentication type
- Service link name
API Key - Service name
- Param type
- New parameters can be added
- Existing parameters can be edited but cannot be deleted
- Authentication type
- Service link name
OAuth 1 - Service name
- Param type
- Consumer ID
- Consumer secret
- Authorize URL
- Access token URL
- Refresh token URL
- Authentication type
- Service link name
OAuth 2 - Service name
- Param type
- Client ID
- Client secret
- Authorize URL
- Access token URL
- Refresh token URL
- Revoke token URL
- Scopes can be added but cannot be edited or deleted
- Authentication type
- Grant type
- Service link name
AWS Signature - Service name
- AWS region
- Service link name
- Parameter type
- authentication type
Types of Connections
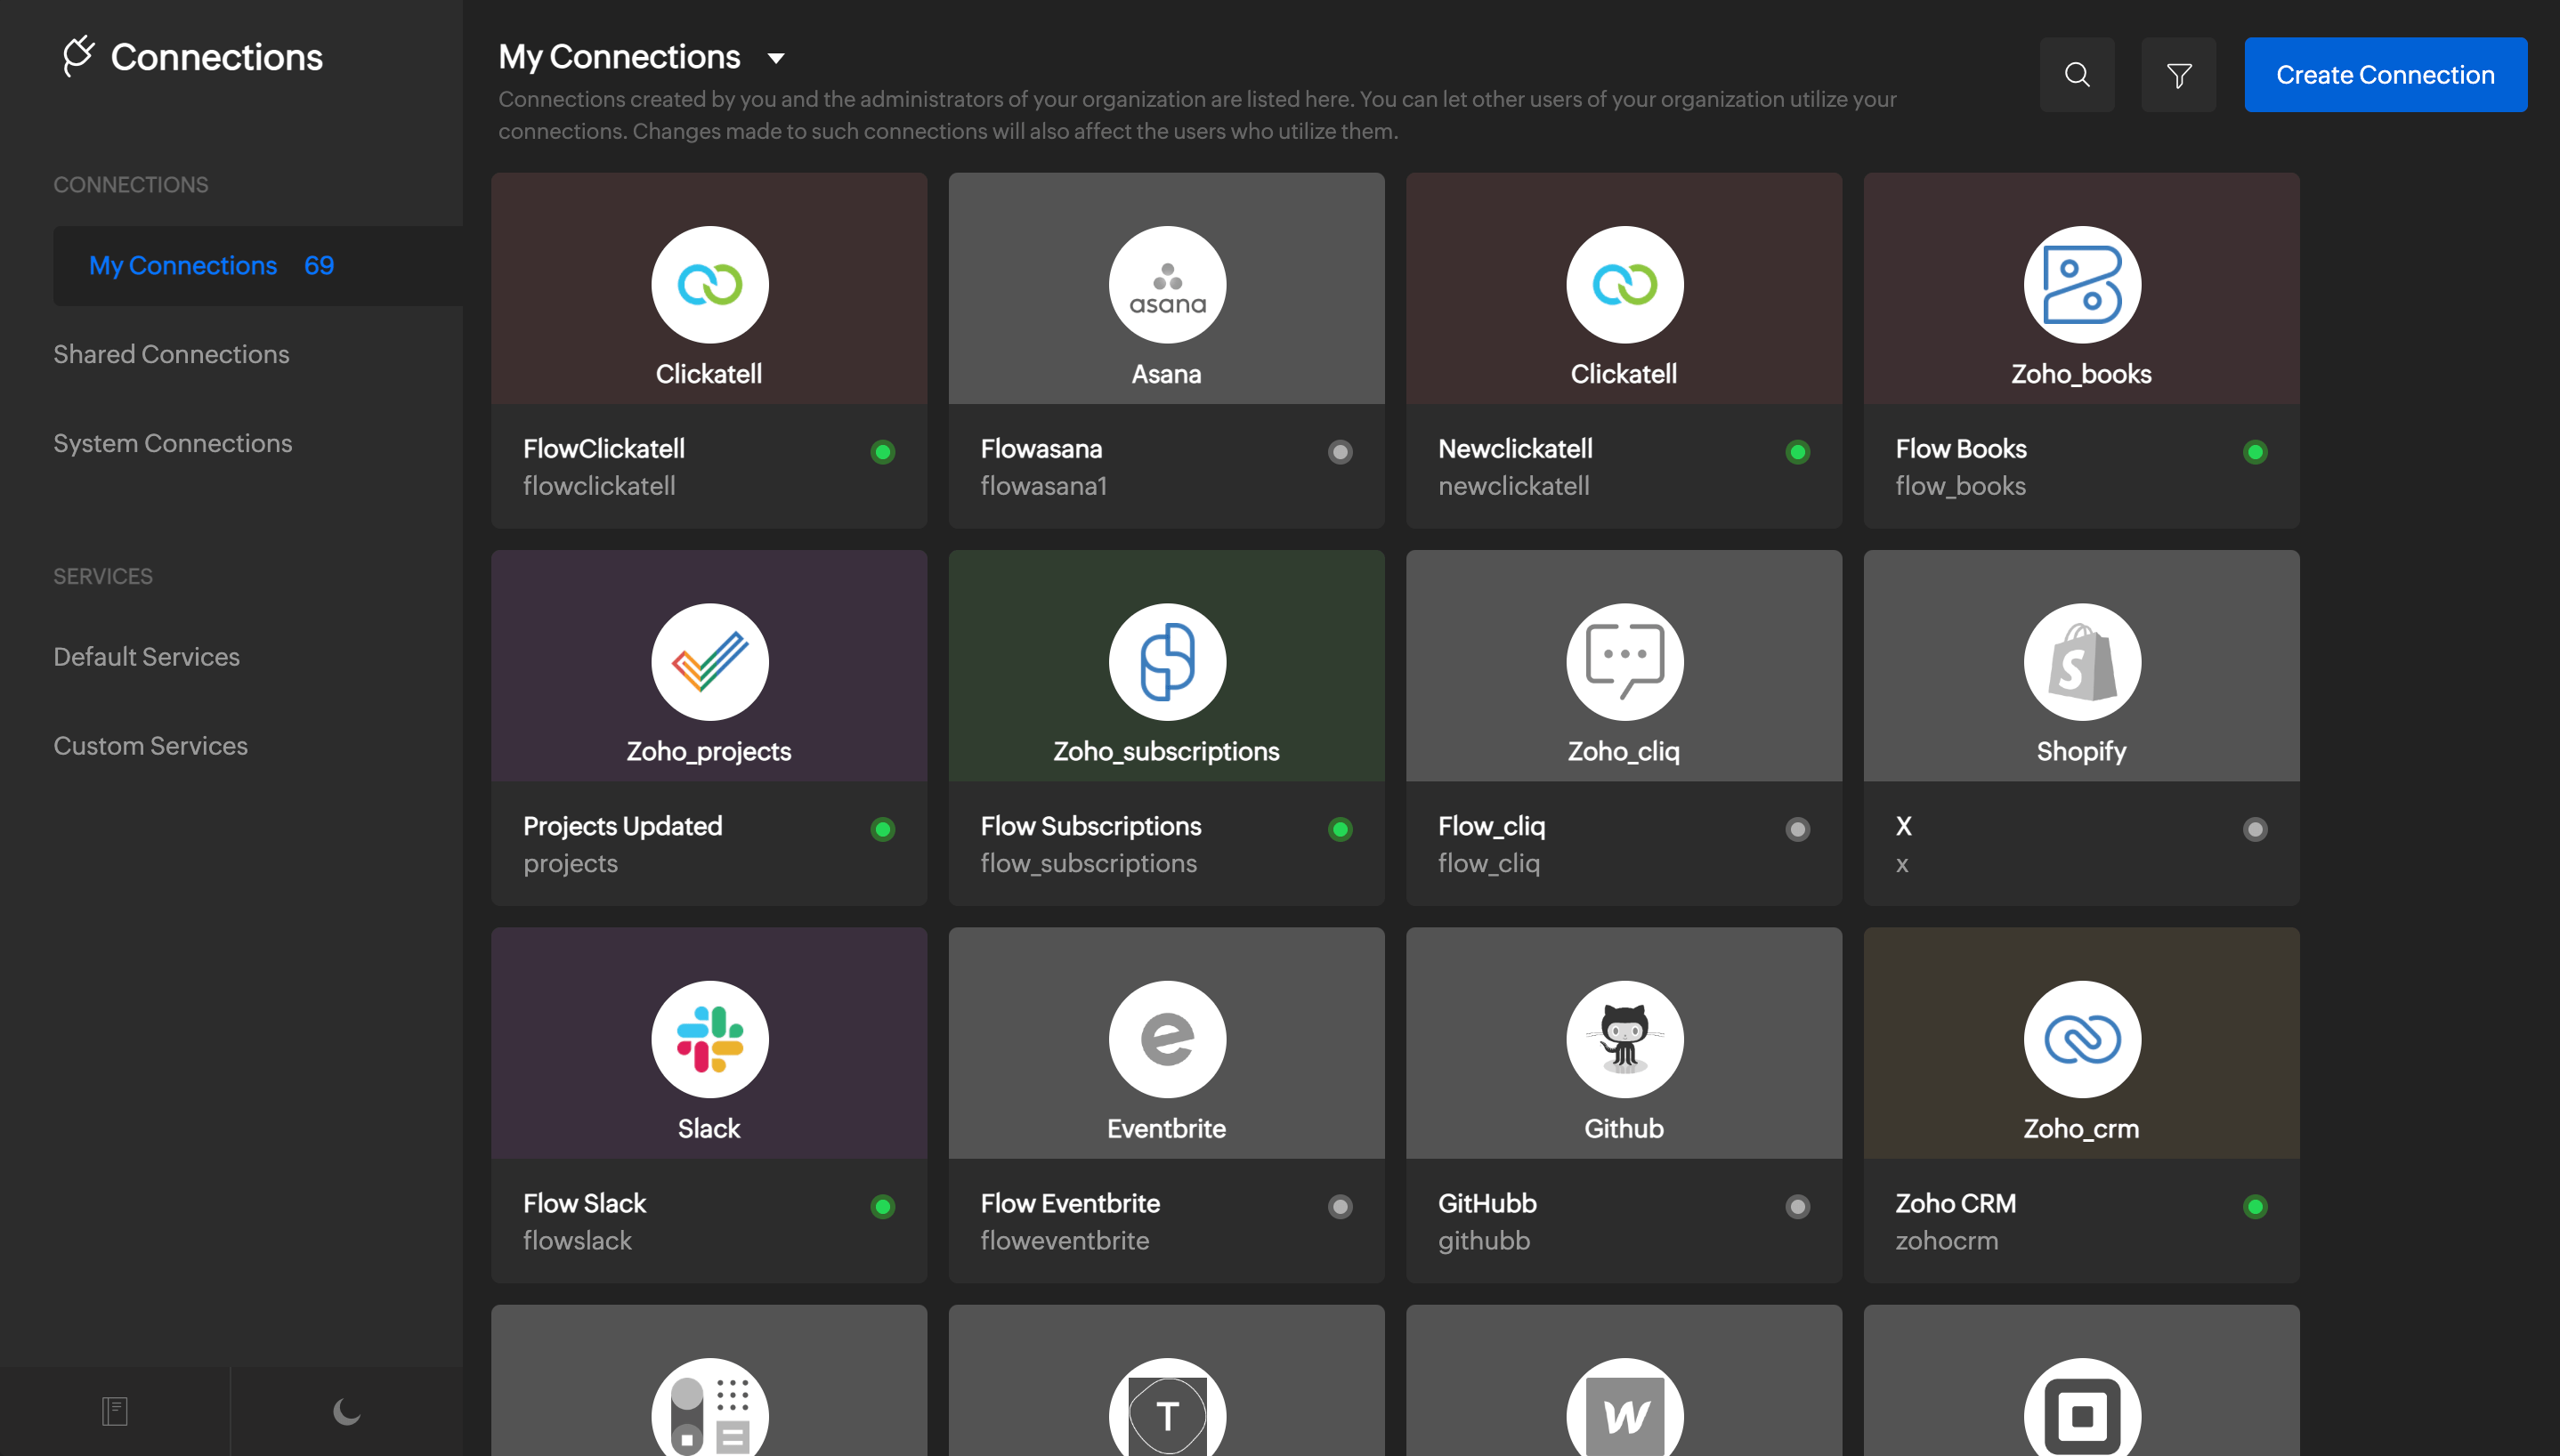
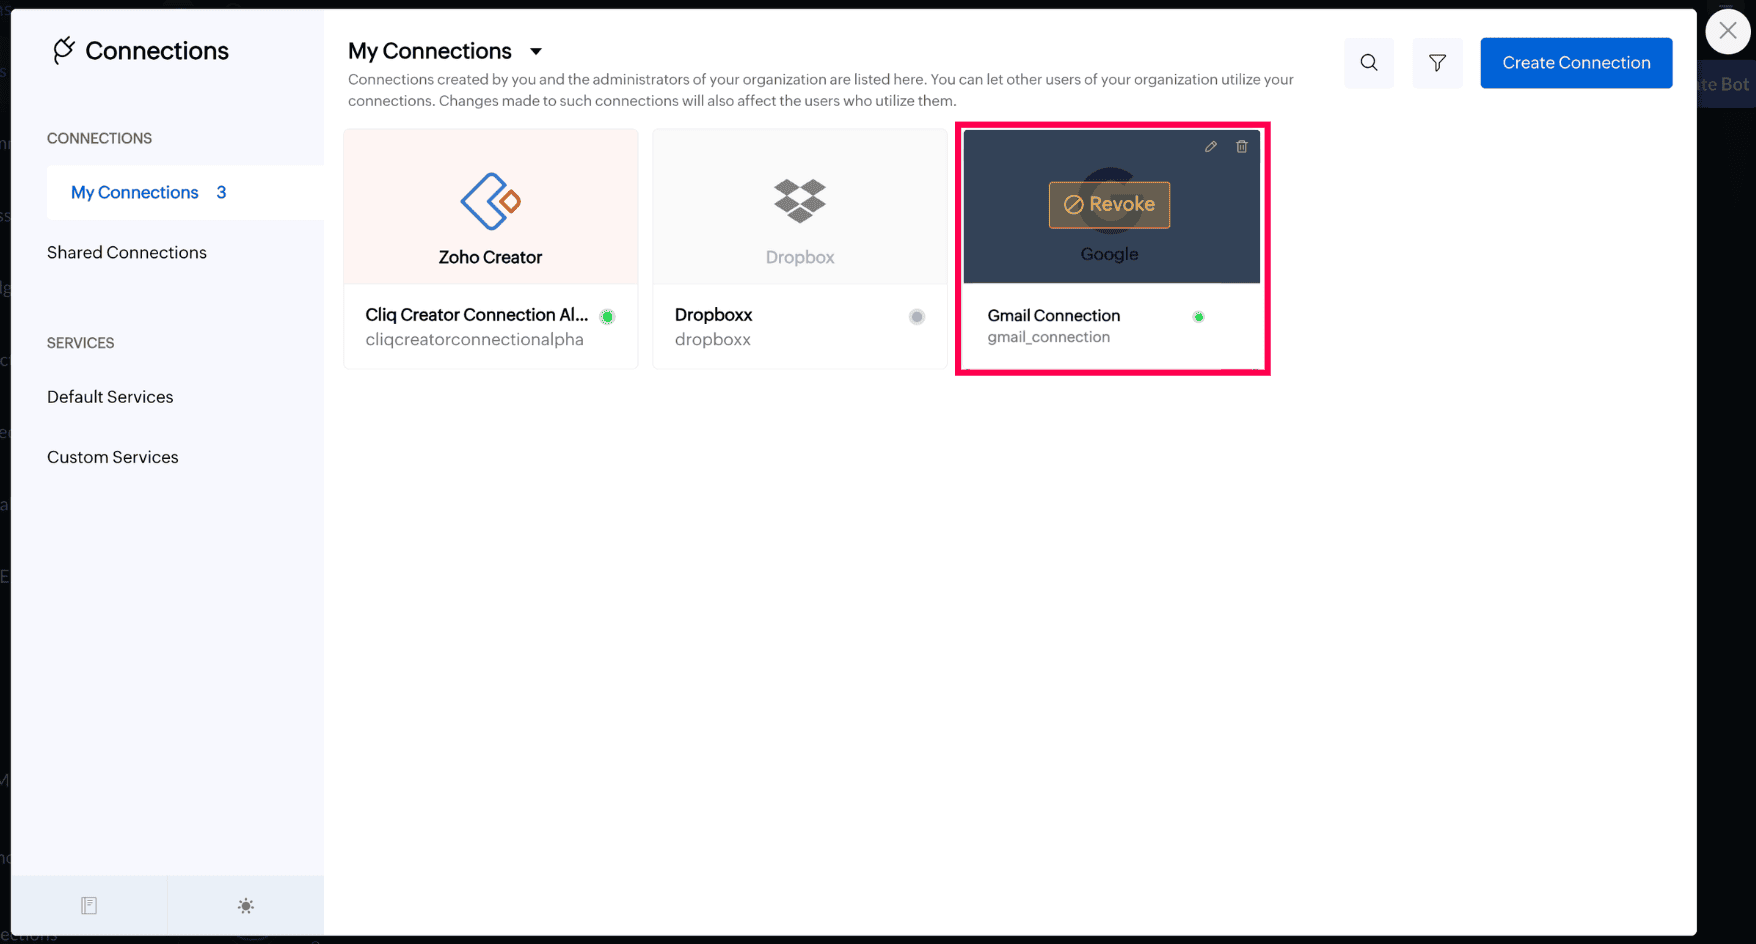
- My Connections: All the connections created by you will be listed under "My Connections".
- Connections from extensions: When you install an extension that uses connections, you will have to authenticate them using your credentials in order to utilize them. Those connections that are created by the extension developers and authenticated by you are listed here. To view the connections created from extensions, go to "My Connections", click on the dropdown at the top of the page and choose "Extensions".
- Shared Connections: The connections that are not created by you but only authenticated using your credentials will be listed under "Shared Connections". These connections will be listed under "My connections" for the user who created the connection.
- Internal Connections: The connections that are created internally while you execute integration tasks without connections parameter will be listed under "Internal Connections".
Creating a connection from My Connections page
- Navigate to My Connections and click on the Create Connection button.

- Under "Pick Your Service" choose your required default or custom service with which you want to create the connection.
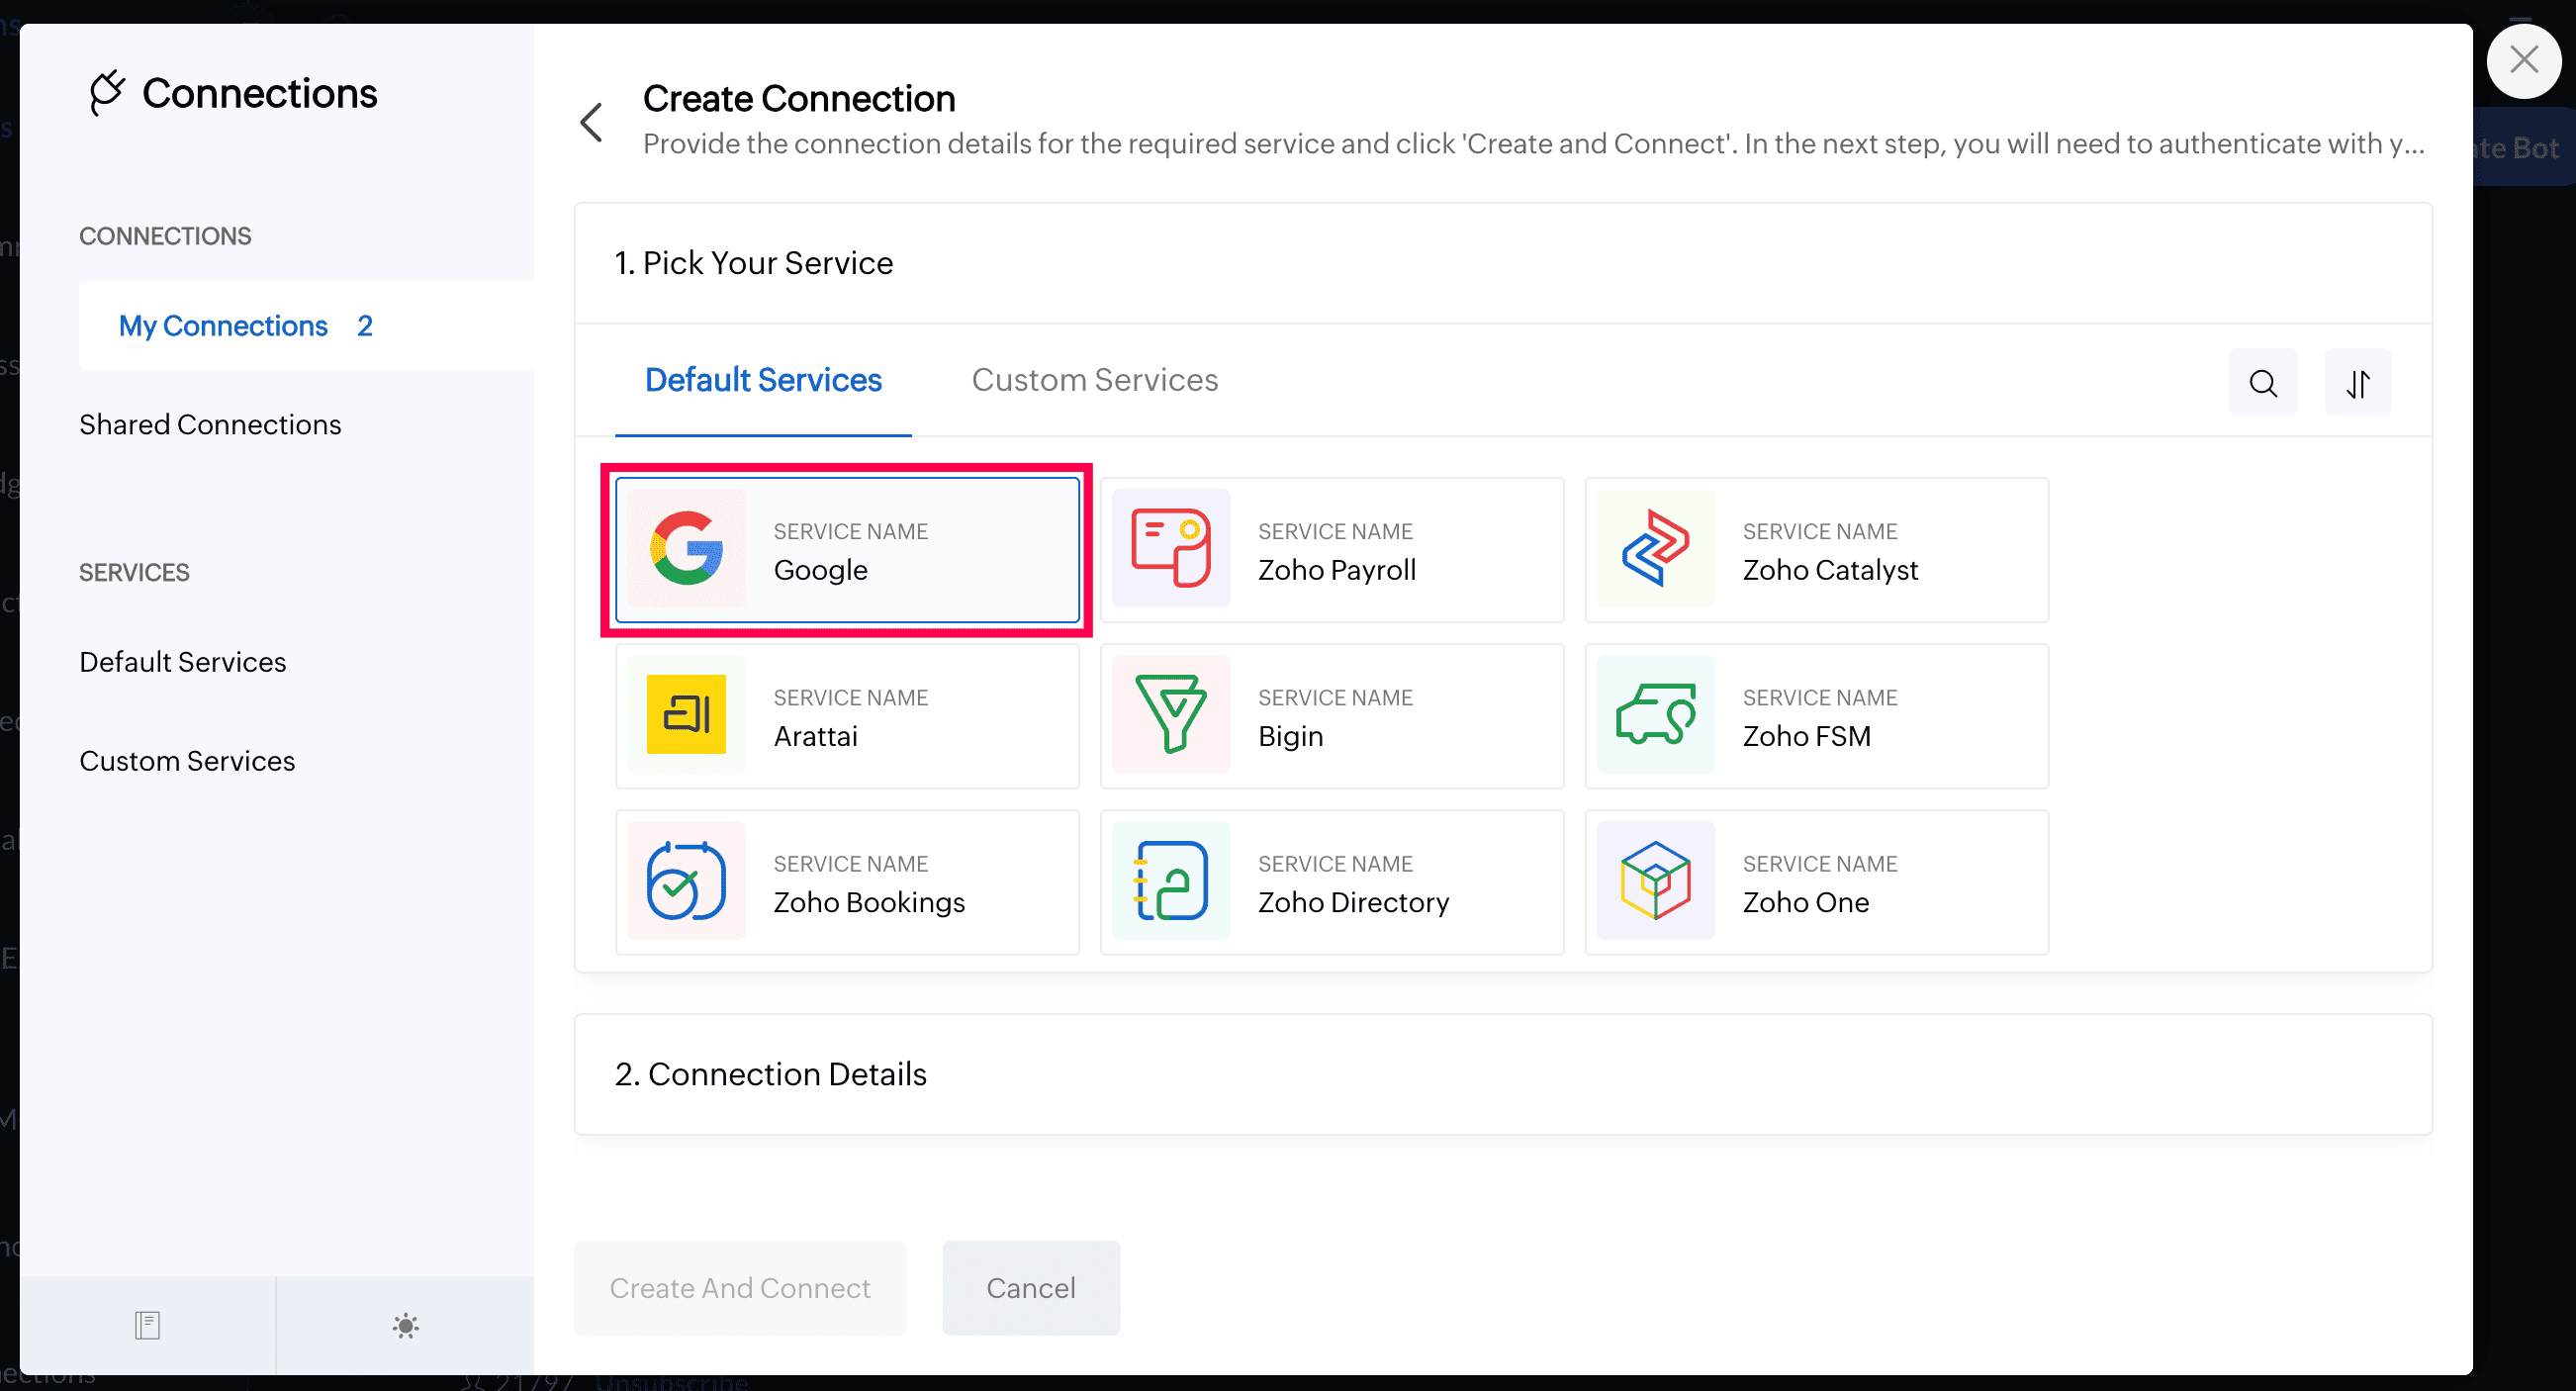
- In Connection Details window, perform the following actions:
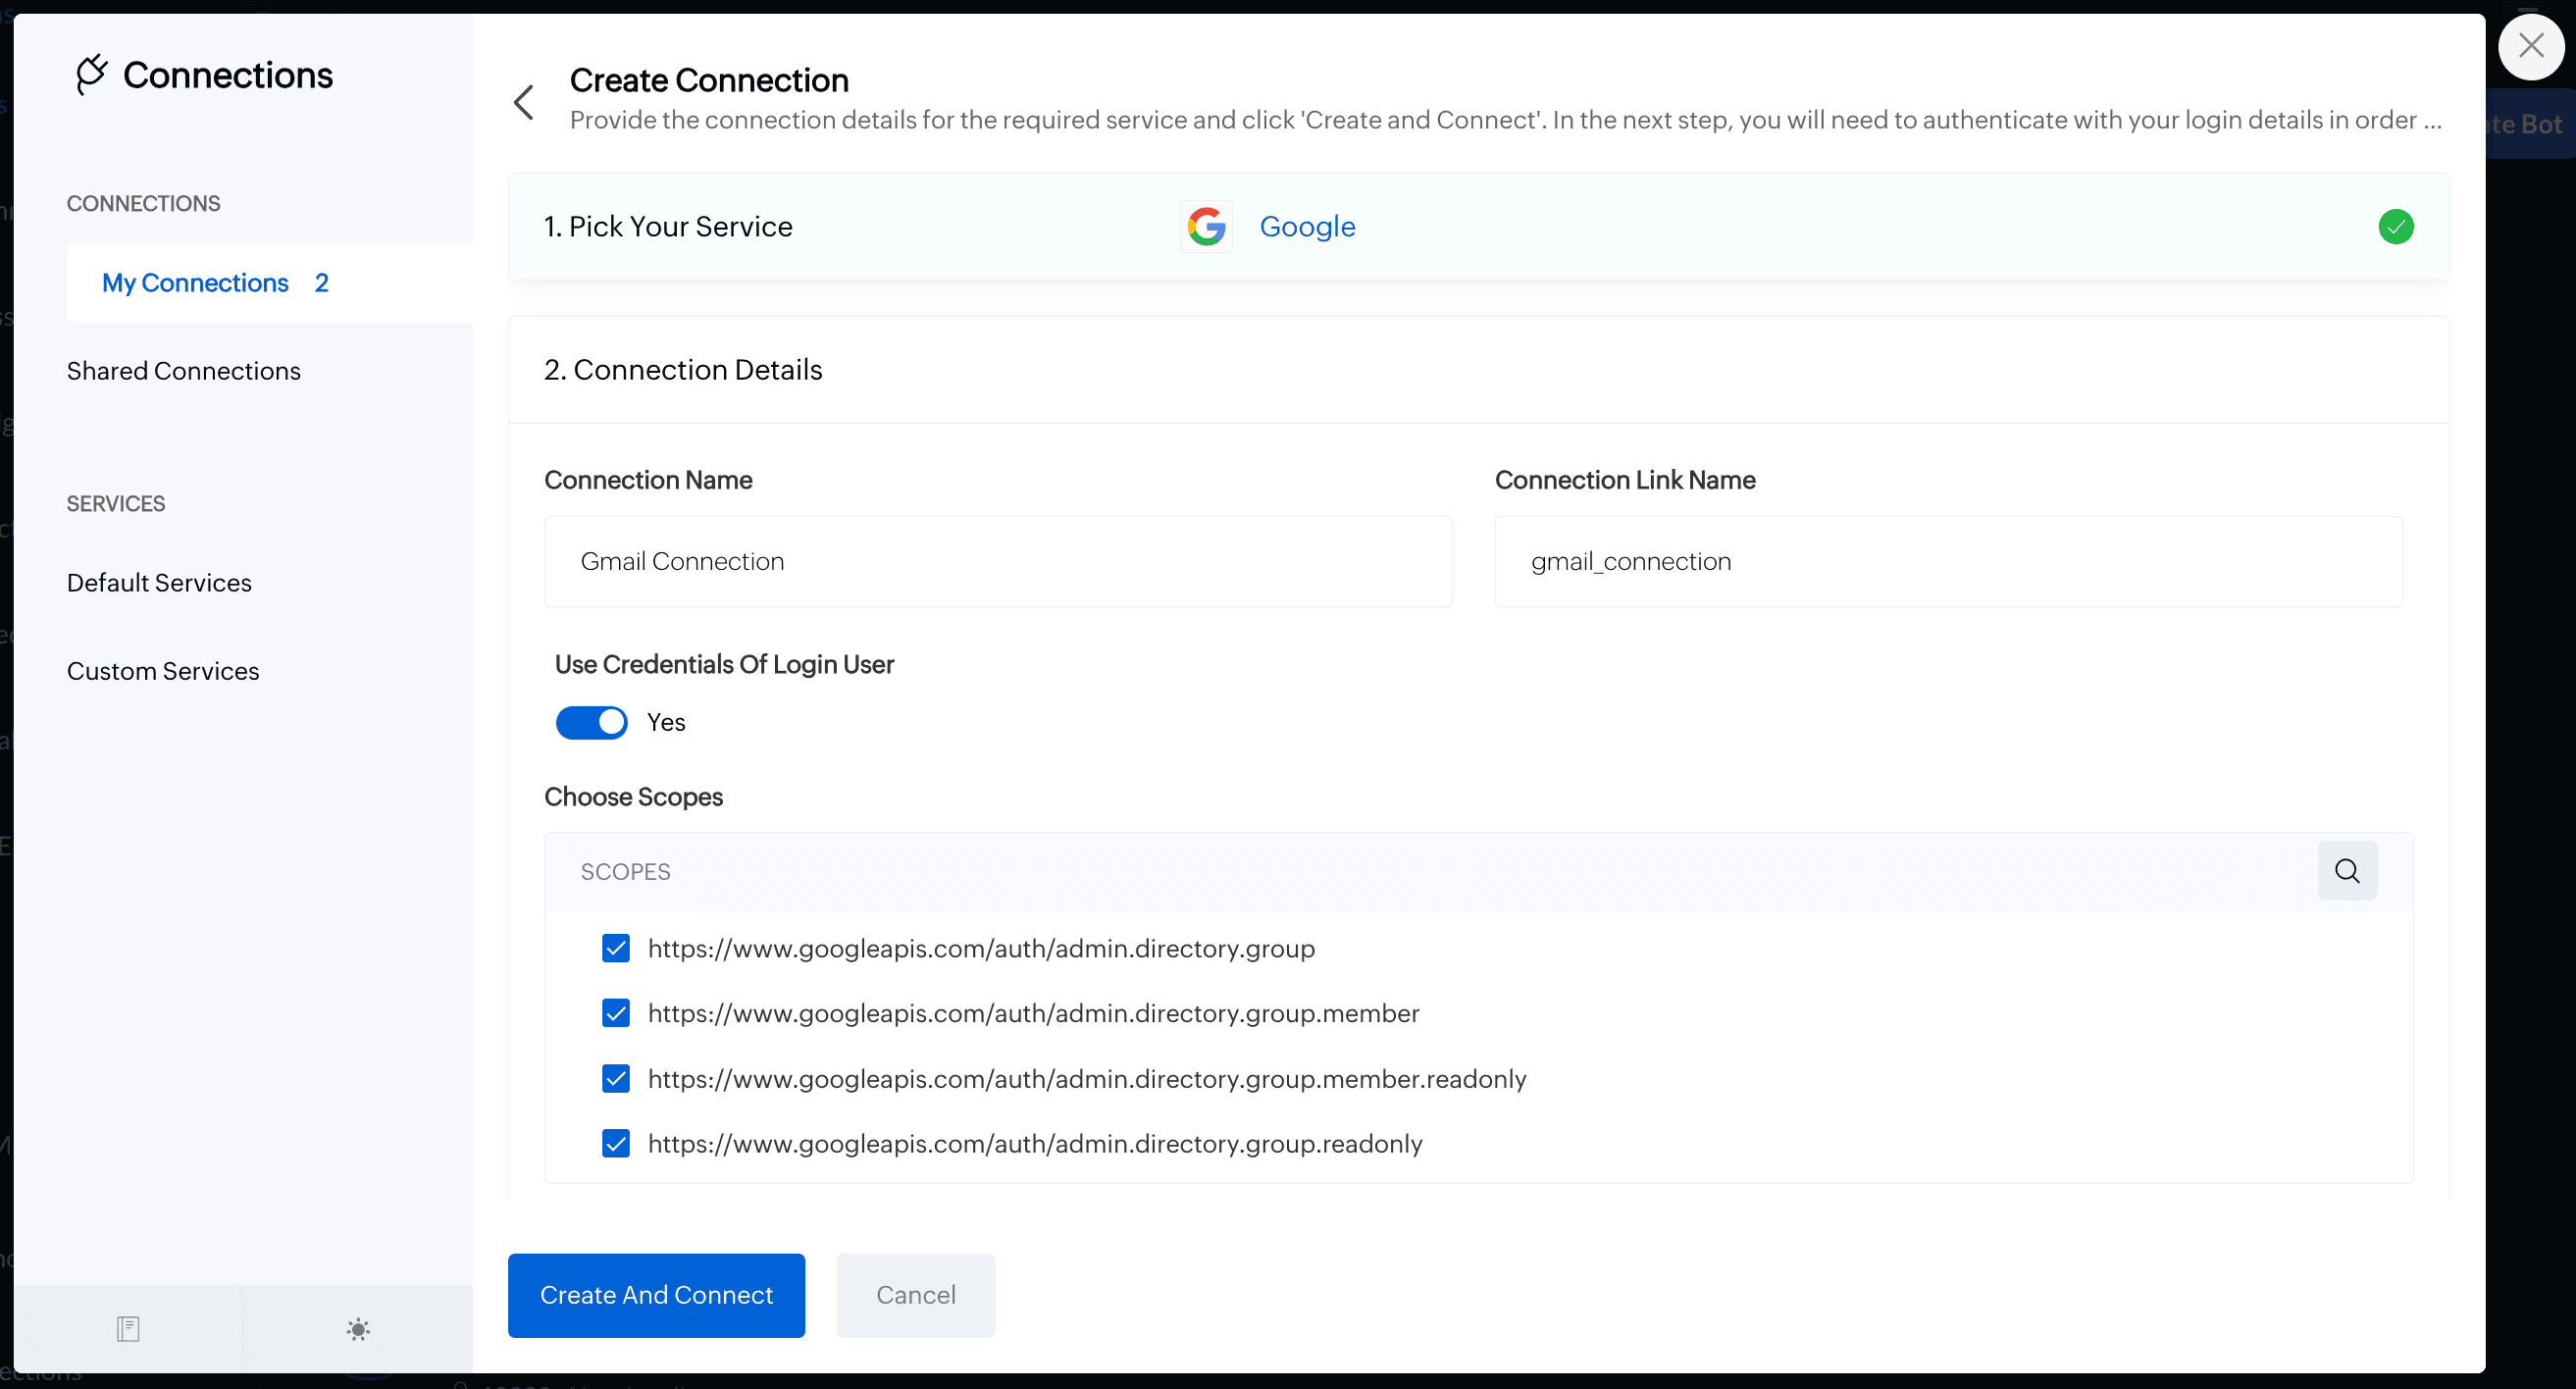
- Provide connection name. This will be the display name for your connection. Display name can contain up to 50 characters.
- Provide connection link name. Link names must be unique and can be used in Deluge integration tasks and invoke URL scripts to establish authentication.
Note: The link name that you provide must satisfy the following conditions:- It must begin with a lower case letter.
- It can contain lower case letters, numbers, and underscores (_).
- It can contain up to 50 characters.
Choose appropriate scopes, if required.
Note: The scopes and their availability vary depending upon the service that you pick. You can find the applicable scopes in the desired service's API documentation.- Click on Create and Connect.
Use credentials of login user: This allows other users to utilize the connection that you've created. If this switch is turned on, other users can authenticate your connection using their credentials and a copy of it will be listed under “Shared connections” in their connections page.
Consider the following scenarios to understand the "Use credential of login user" switch and shared connections:
- Let's assume you want to create and publish a Zoho Cliq bot for everyone in the organization that will upload the files forwarded to it into the user’s Dropbox account. To achieve this integration, you must create a connection to Dropbox and use it in the invoke URL Deluge task. And while creating the connection, you must turn on the "user credential of login user" switch so that the users can authenticate your connection using their credentials. Hence, the files will be uploaded to the user’s Dropbox account. If the switch was not turned on, the connection will run using the credentials of the connection owner, and the files sent by all the users will be uploaded to your (connection owner’s) Dropbox account.
In this example, the "Use credential of login user" switch should be turned on, and all the bot users will authenticate your Dropbox connection using their credentials. Therefore, a copy of your connection will be listed under "Shared Connections" in their connections page while it will be listed under “My Connections” in your connections page.
- Imagine you want to create and publish a Zoho Cliq slash command for everyone in the team that will fetch the team's task list from Zoho Projects. Unlike the previous example, you need not turn on the "Use credentials of login user" switch while creating the connection because every user wants to access the same data. So, rather than encouraging every single user to authenticate your connection in order to access your team's common data, you can use allow them to use your connection to communicate with Zoho Projects.
In this example, the users will not authenticate your connection using their credentials, instead, they make use of your connection as such. So, this connection will not be listed in the user’s connections page.
- Let's assume you want to create and publish a Zoho Cliq bot for everyone in the organization that will upload the files forwarded to it into the user’s Dropbox account. To achieve this integration, you must create a connection to Dropbox and use it in the invoke URL Deluge task. And while creating the connection, you must turn on the "user credential of login user" switch so that the users can authenticate your connection using their credentials. Hence, the files will be uploaded to the user’s Dropbox account. If the switch was not turned on, the connection will run using the credentials of the connection owner, and the files sent by all the users will be uploaded to your (connection owner’s) Dropbox account.
- You will be redirected to an authentication page. Click the Connect button to connect to the service using your account.
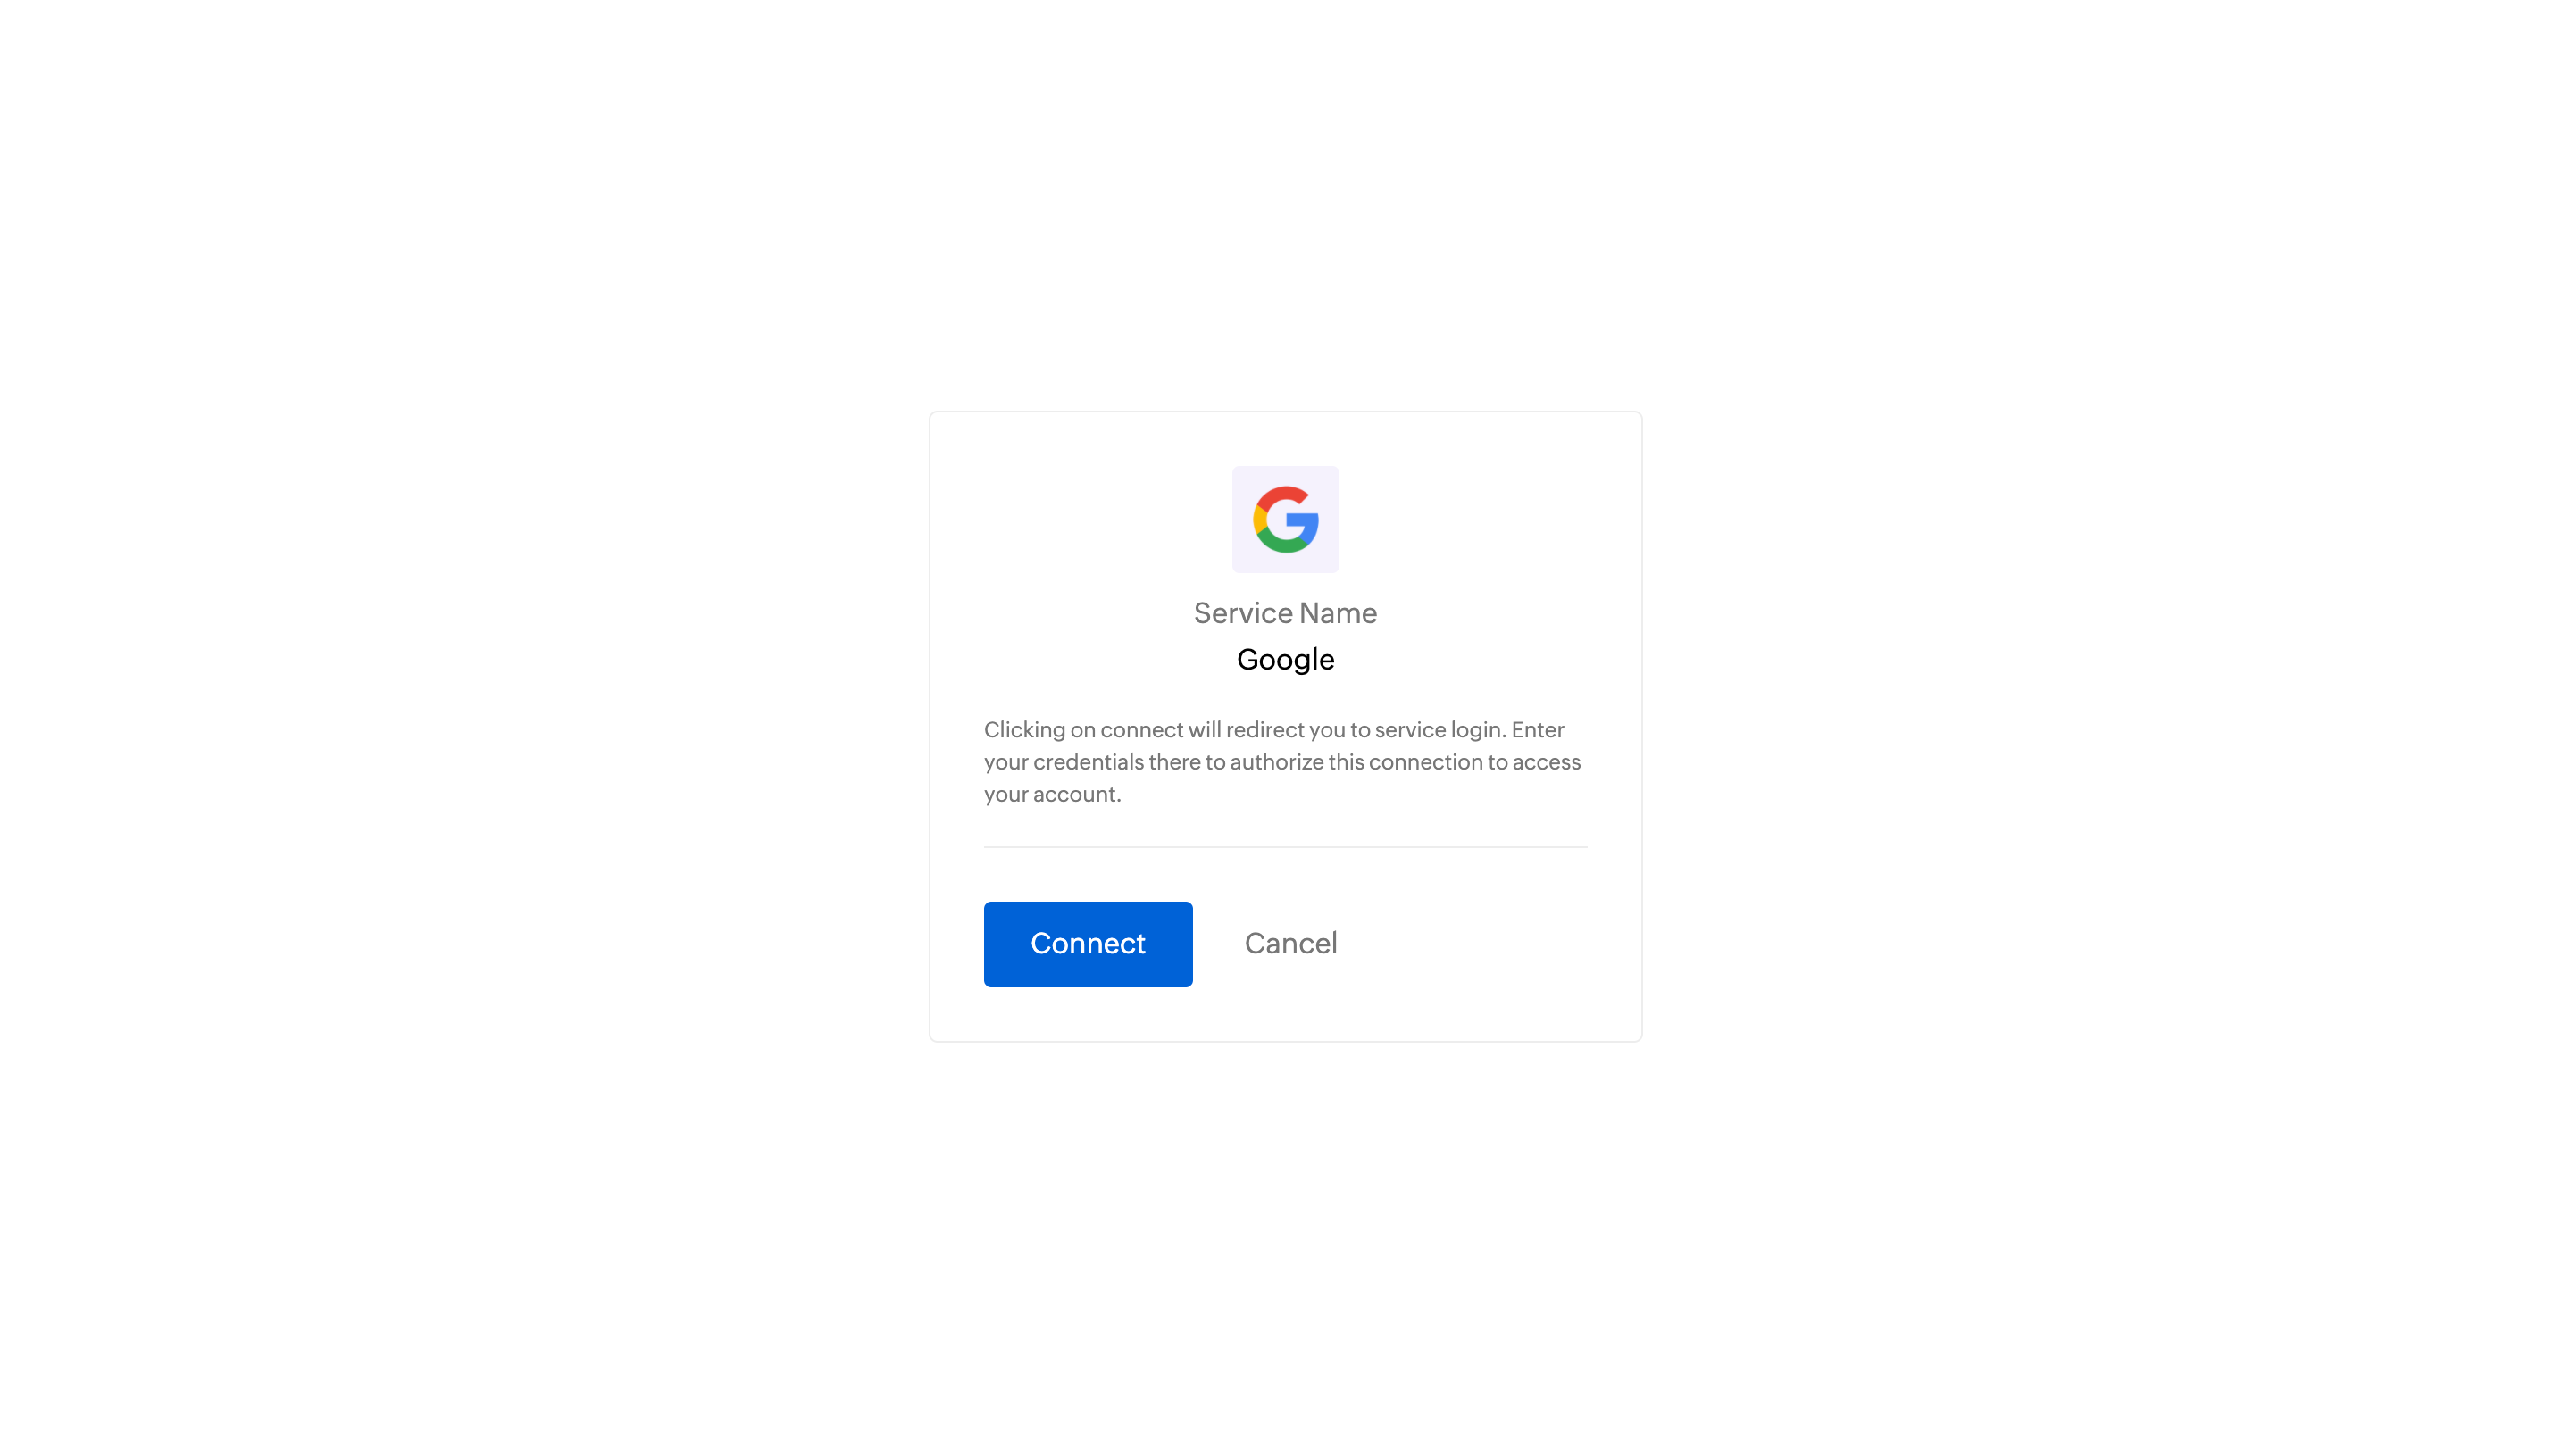
- Provide credentials to log in to your account.
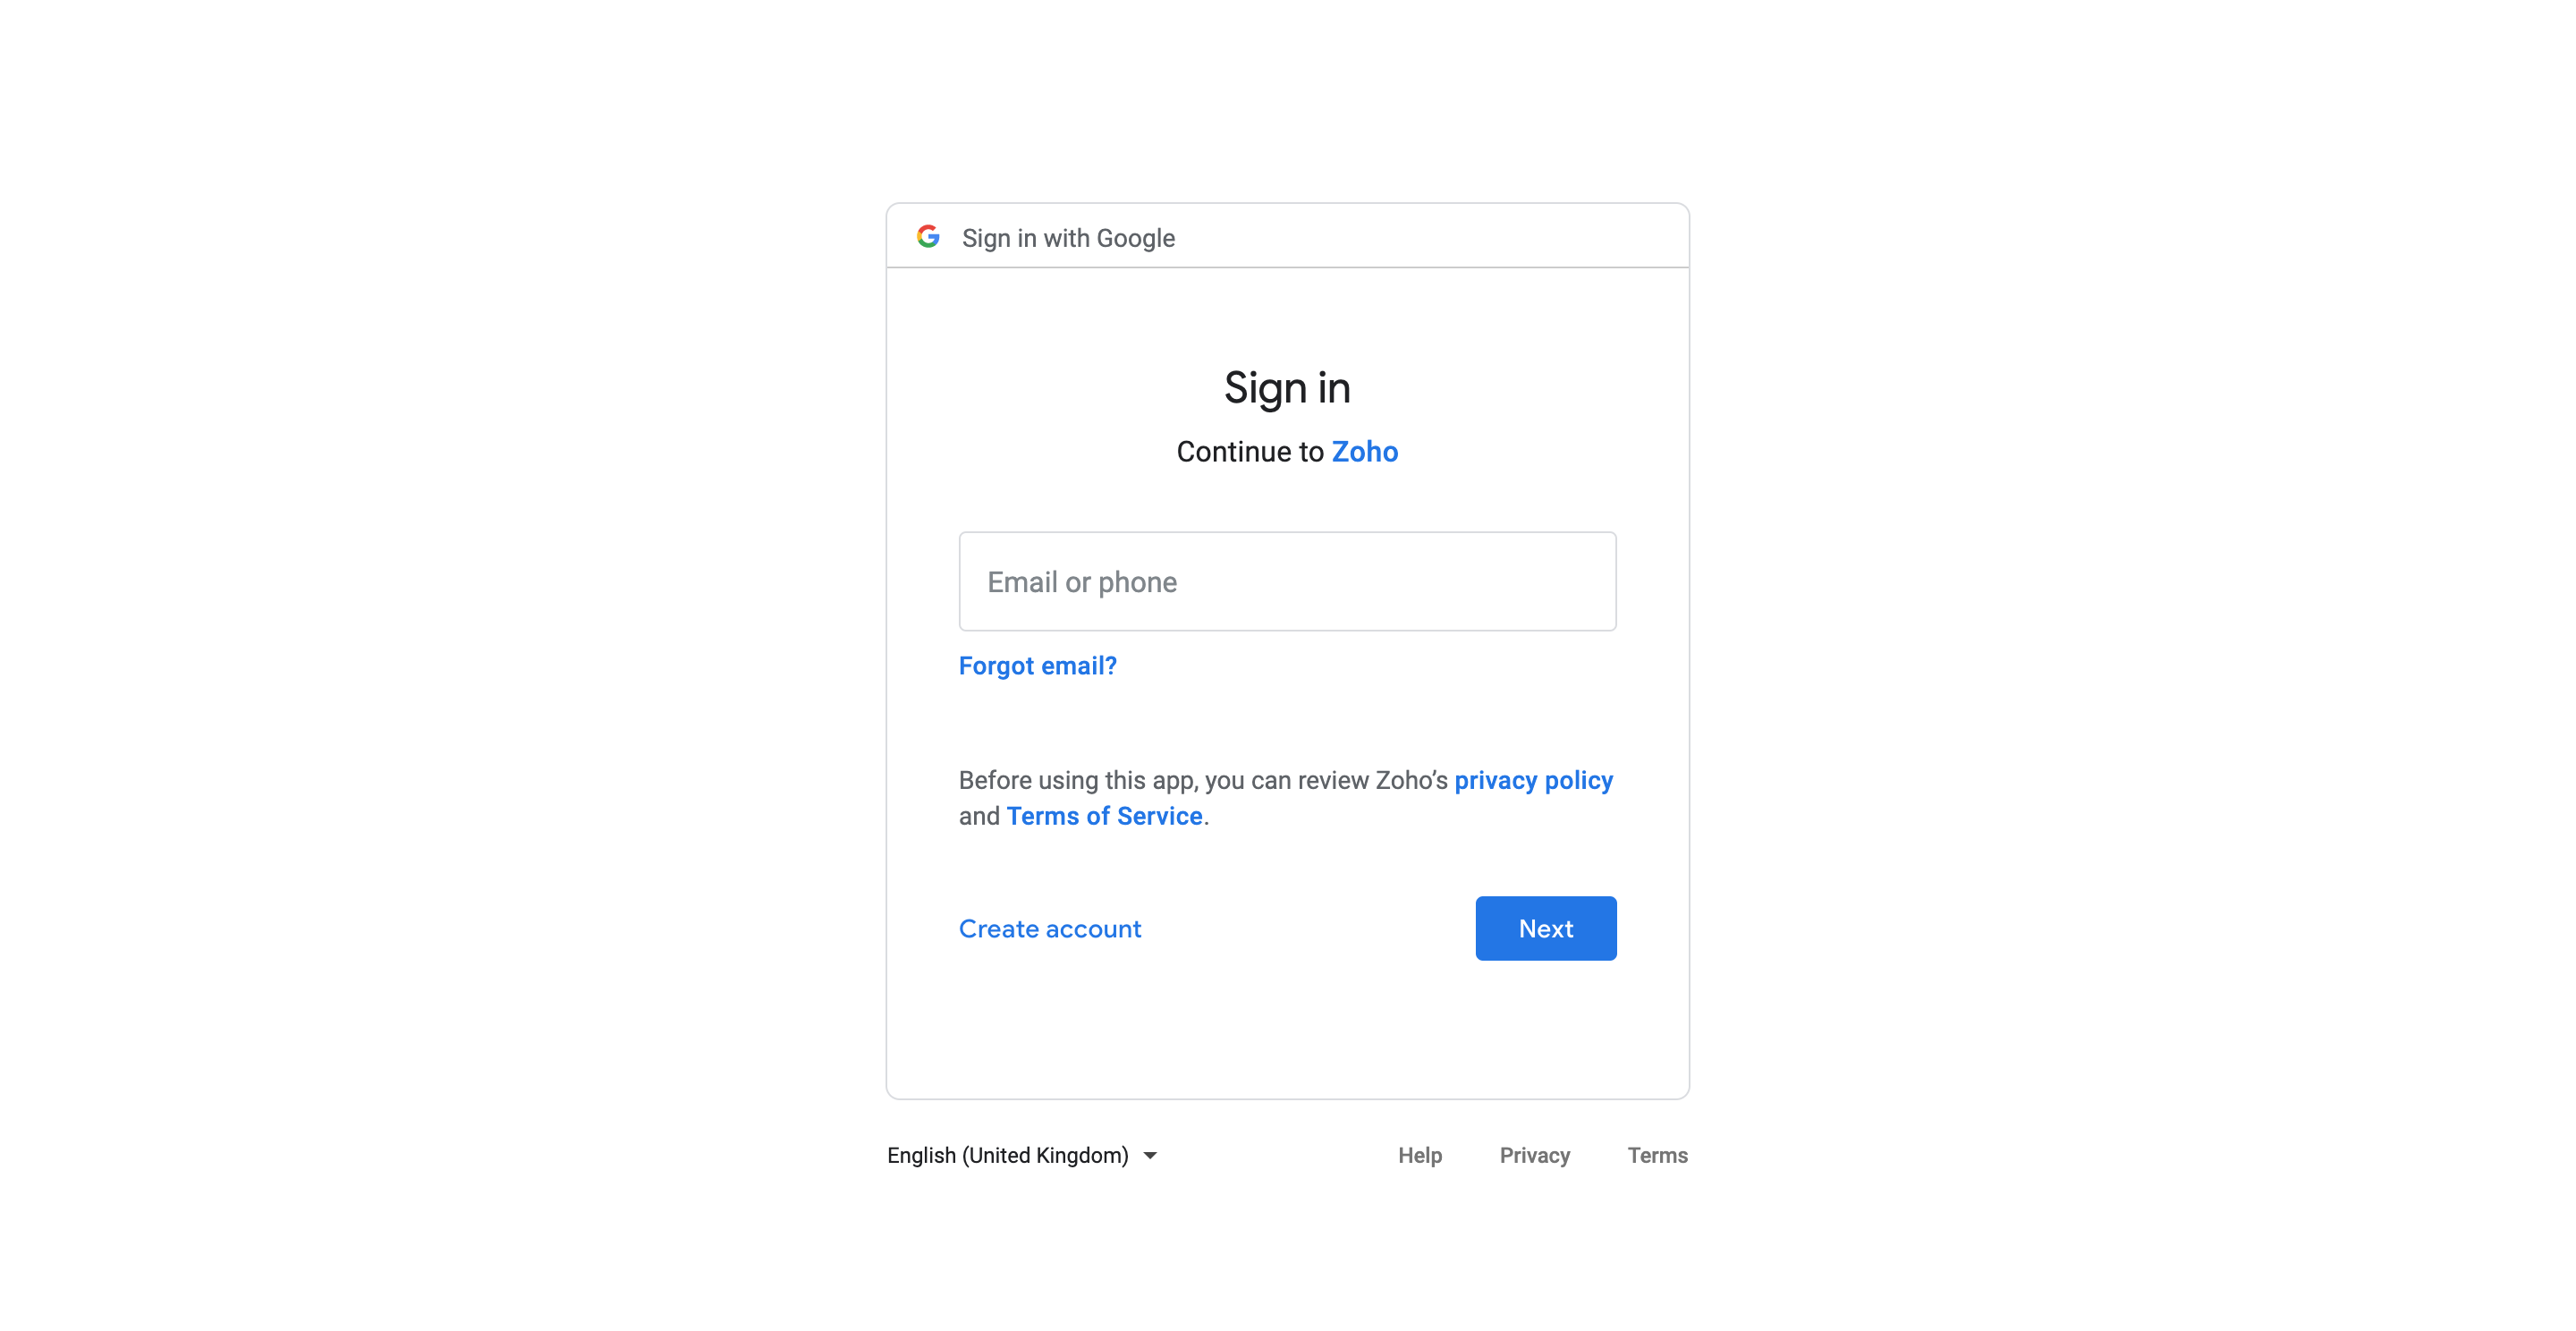
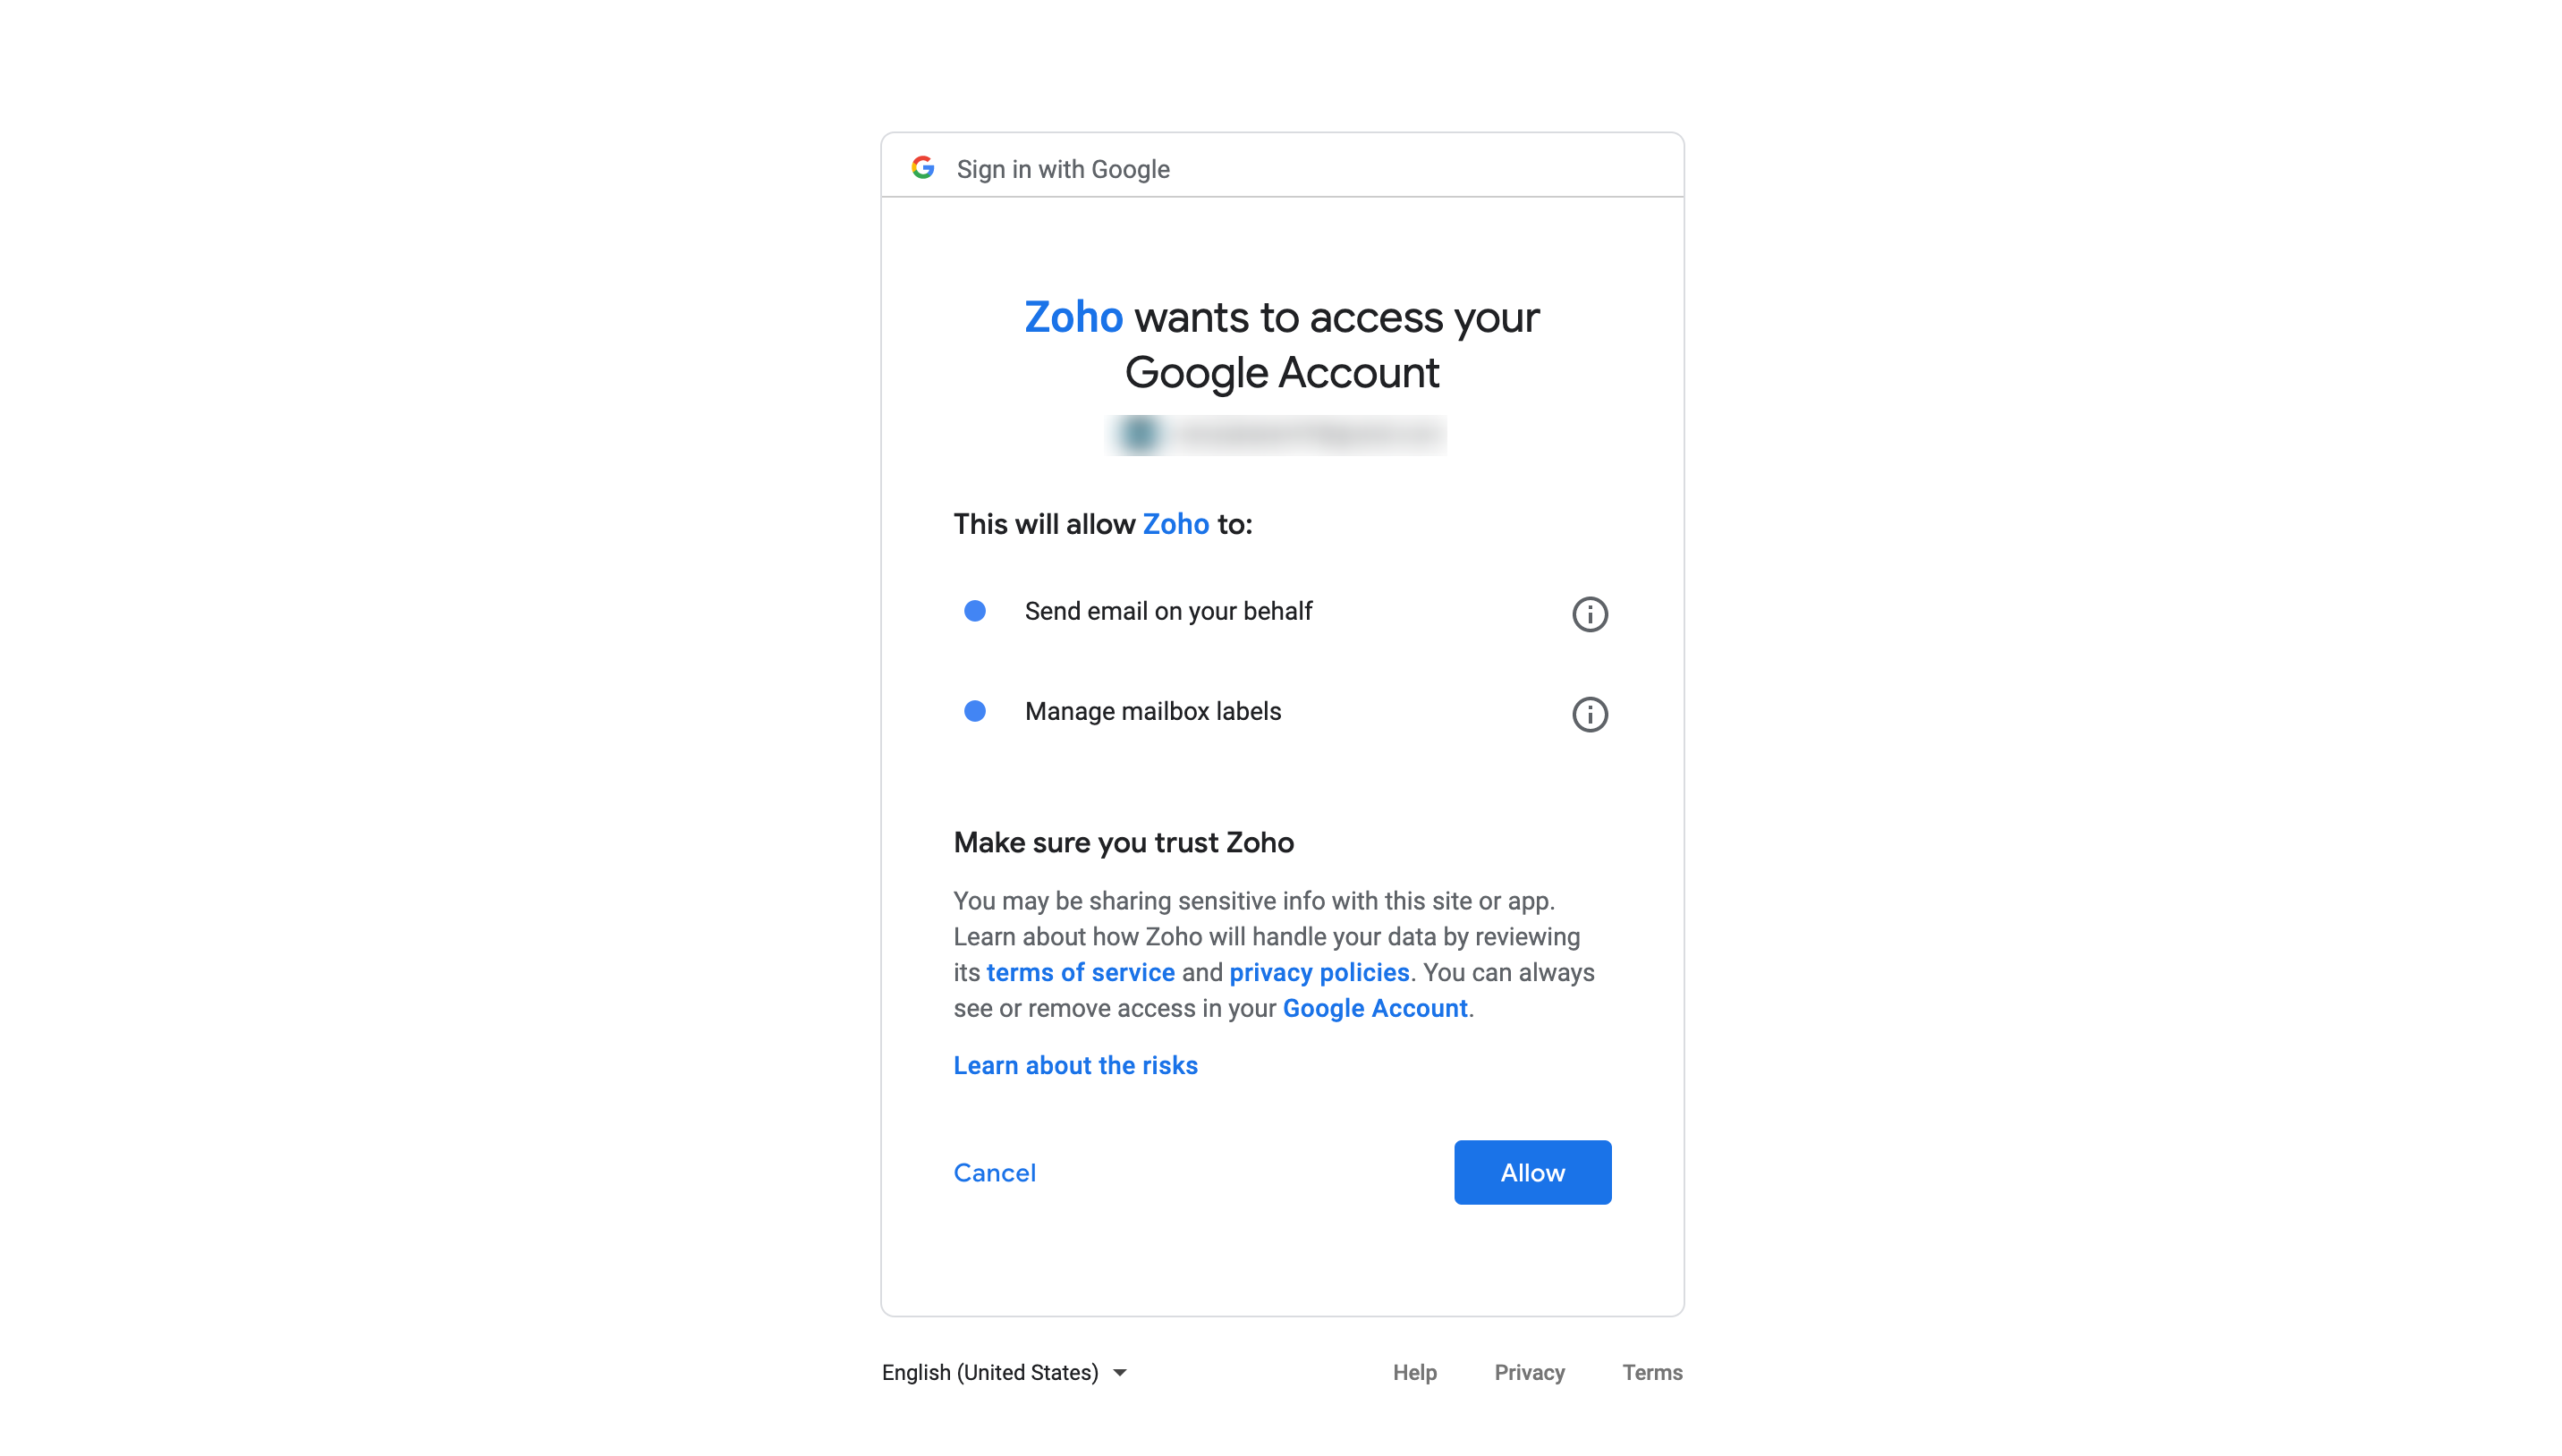
- A user permission dialog box will be displayed. Provide your login credentials and proceed or allow access if you are already logged in.
Creating a connection from Default services/ Custom services page
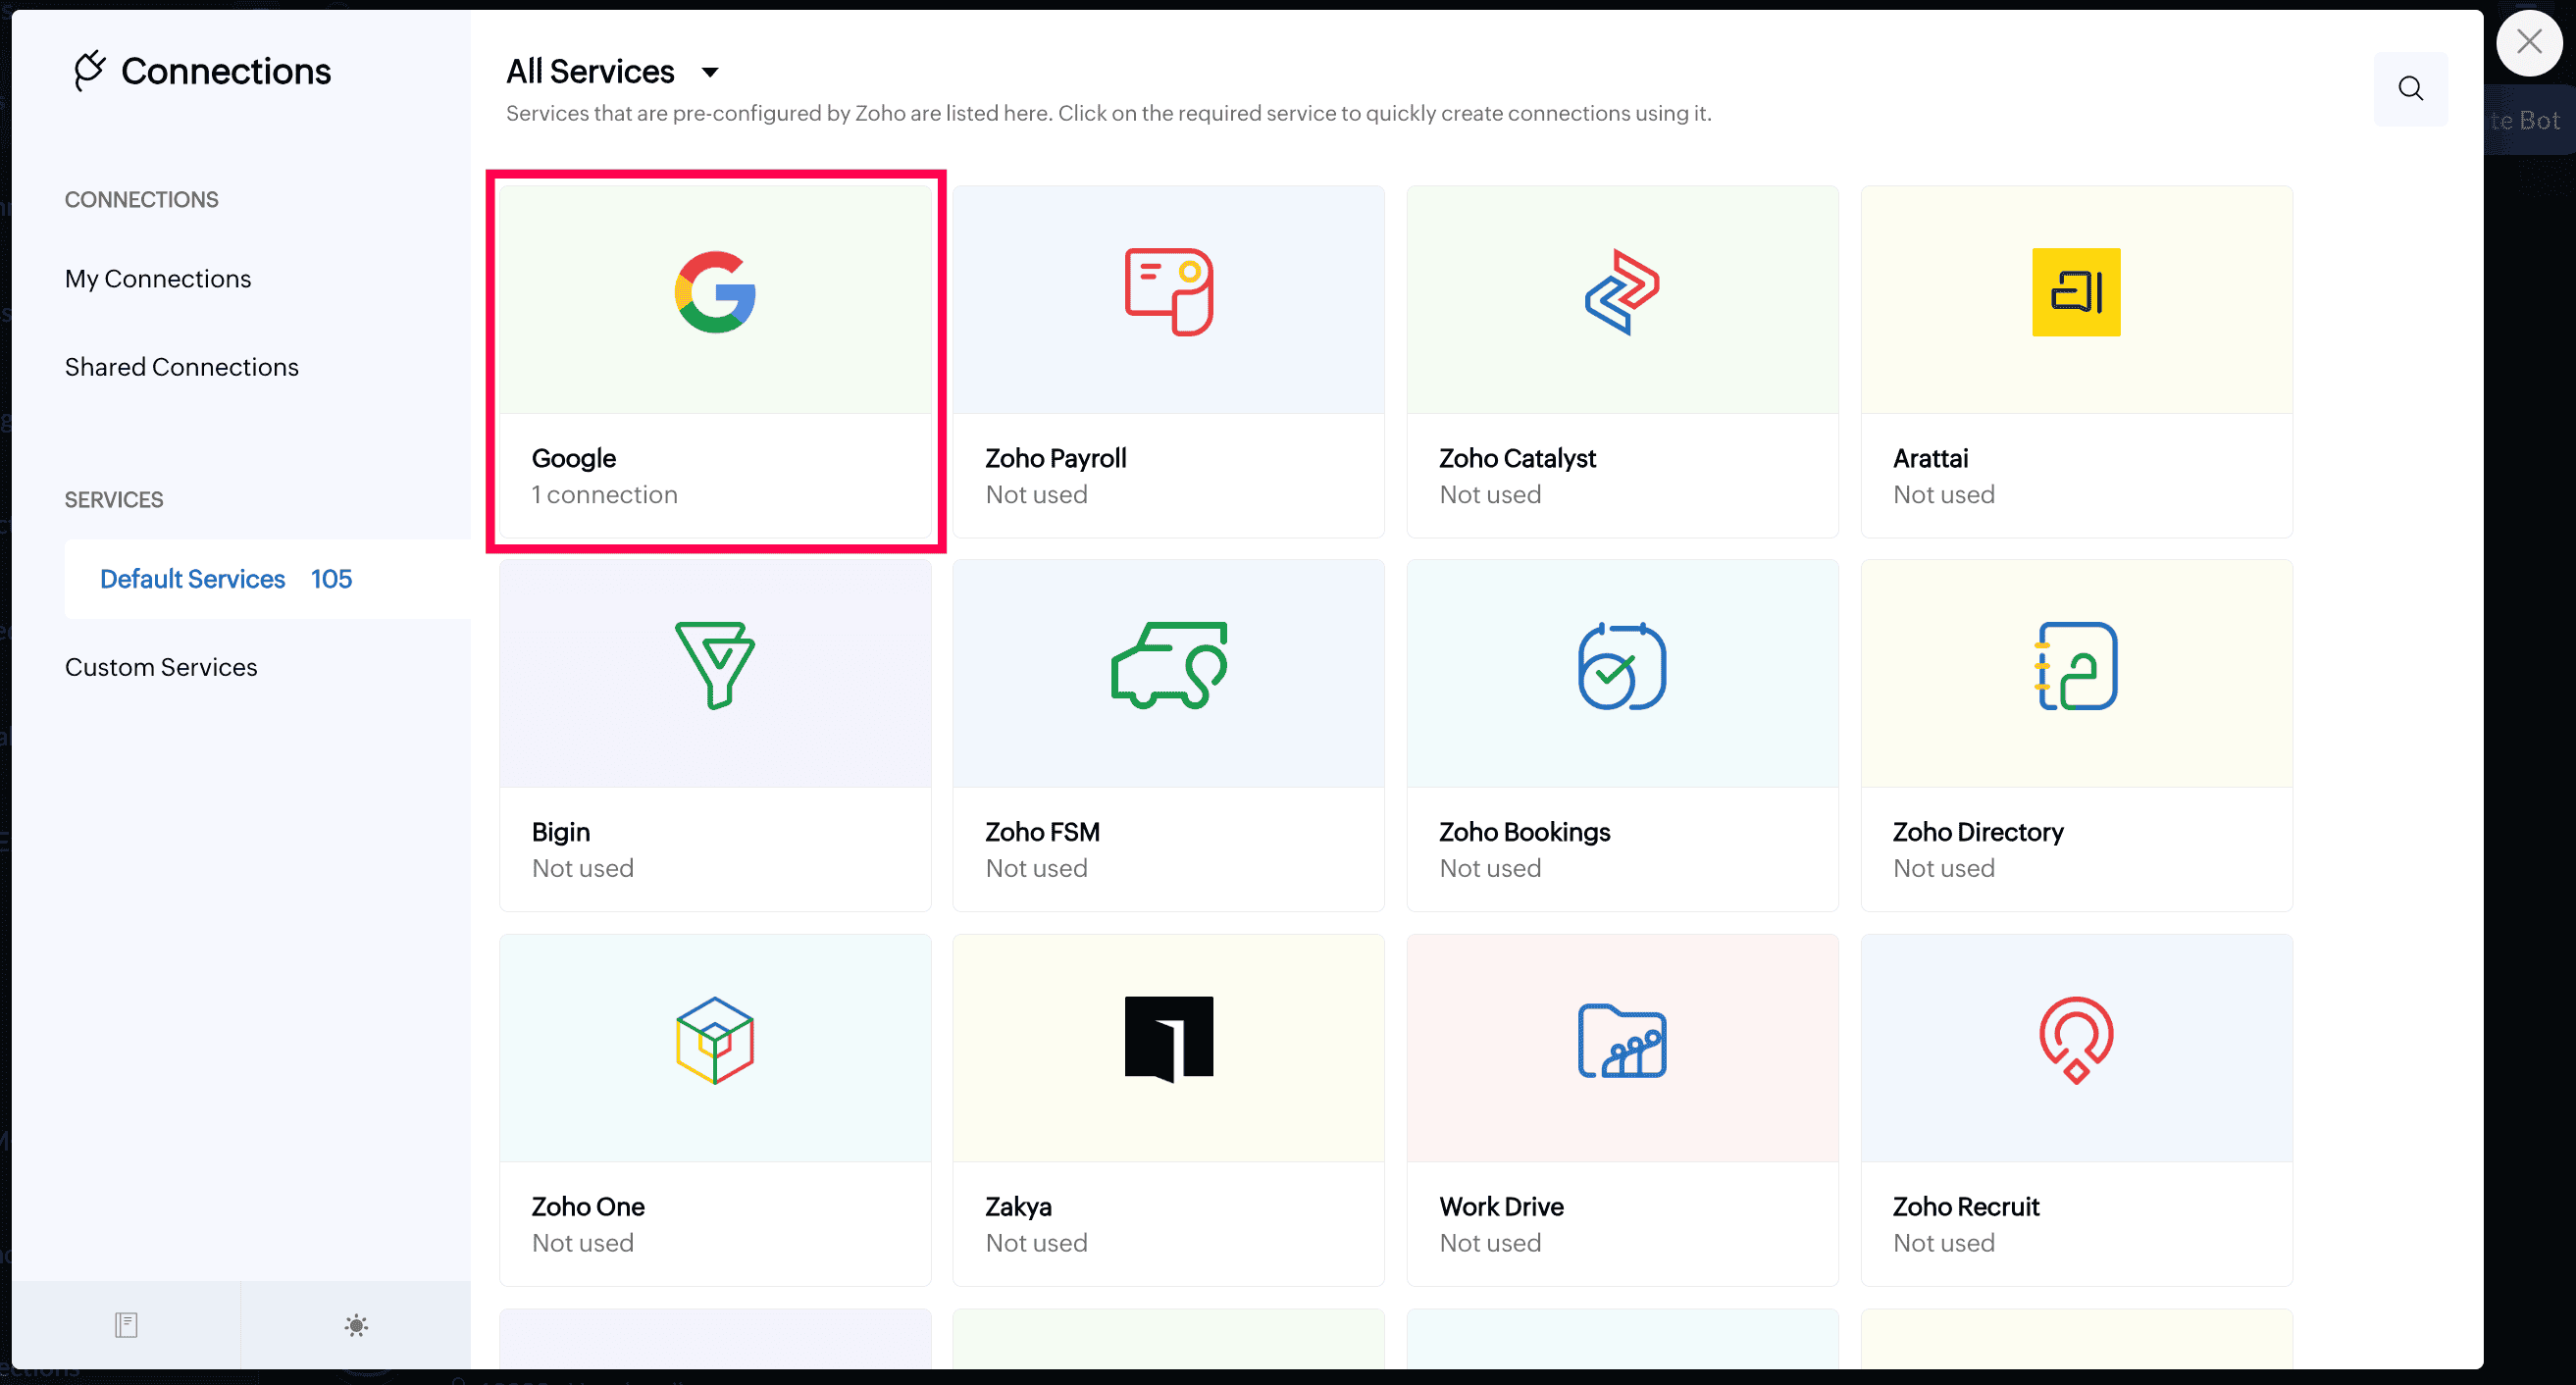
As an alternative to the previous method for creating connections, you can also create a connection from Default services or Custom services page. To do so, navigate to the Default/ Custom services page and click on the required service.
Edit, delete, and revoke connection
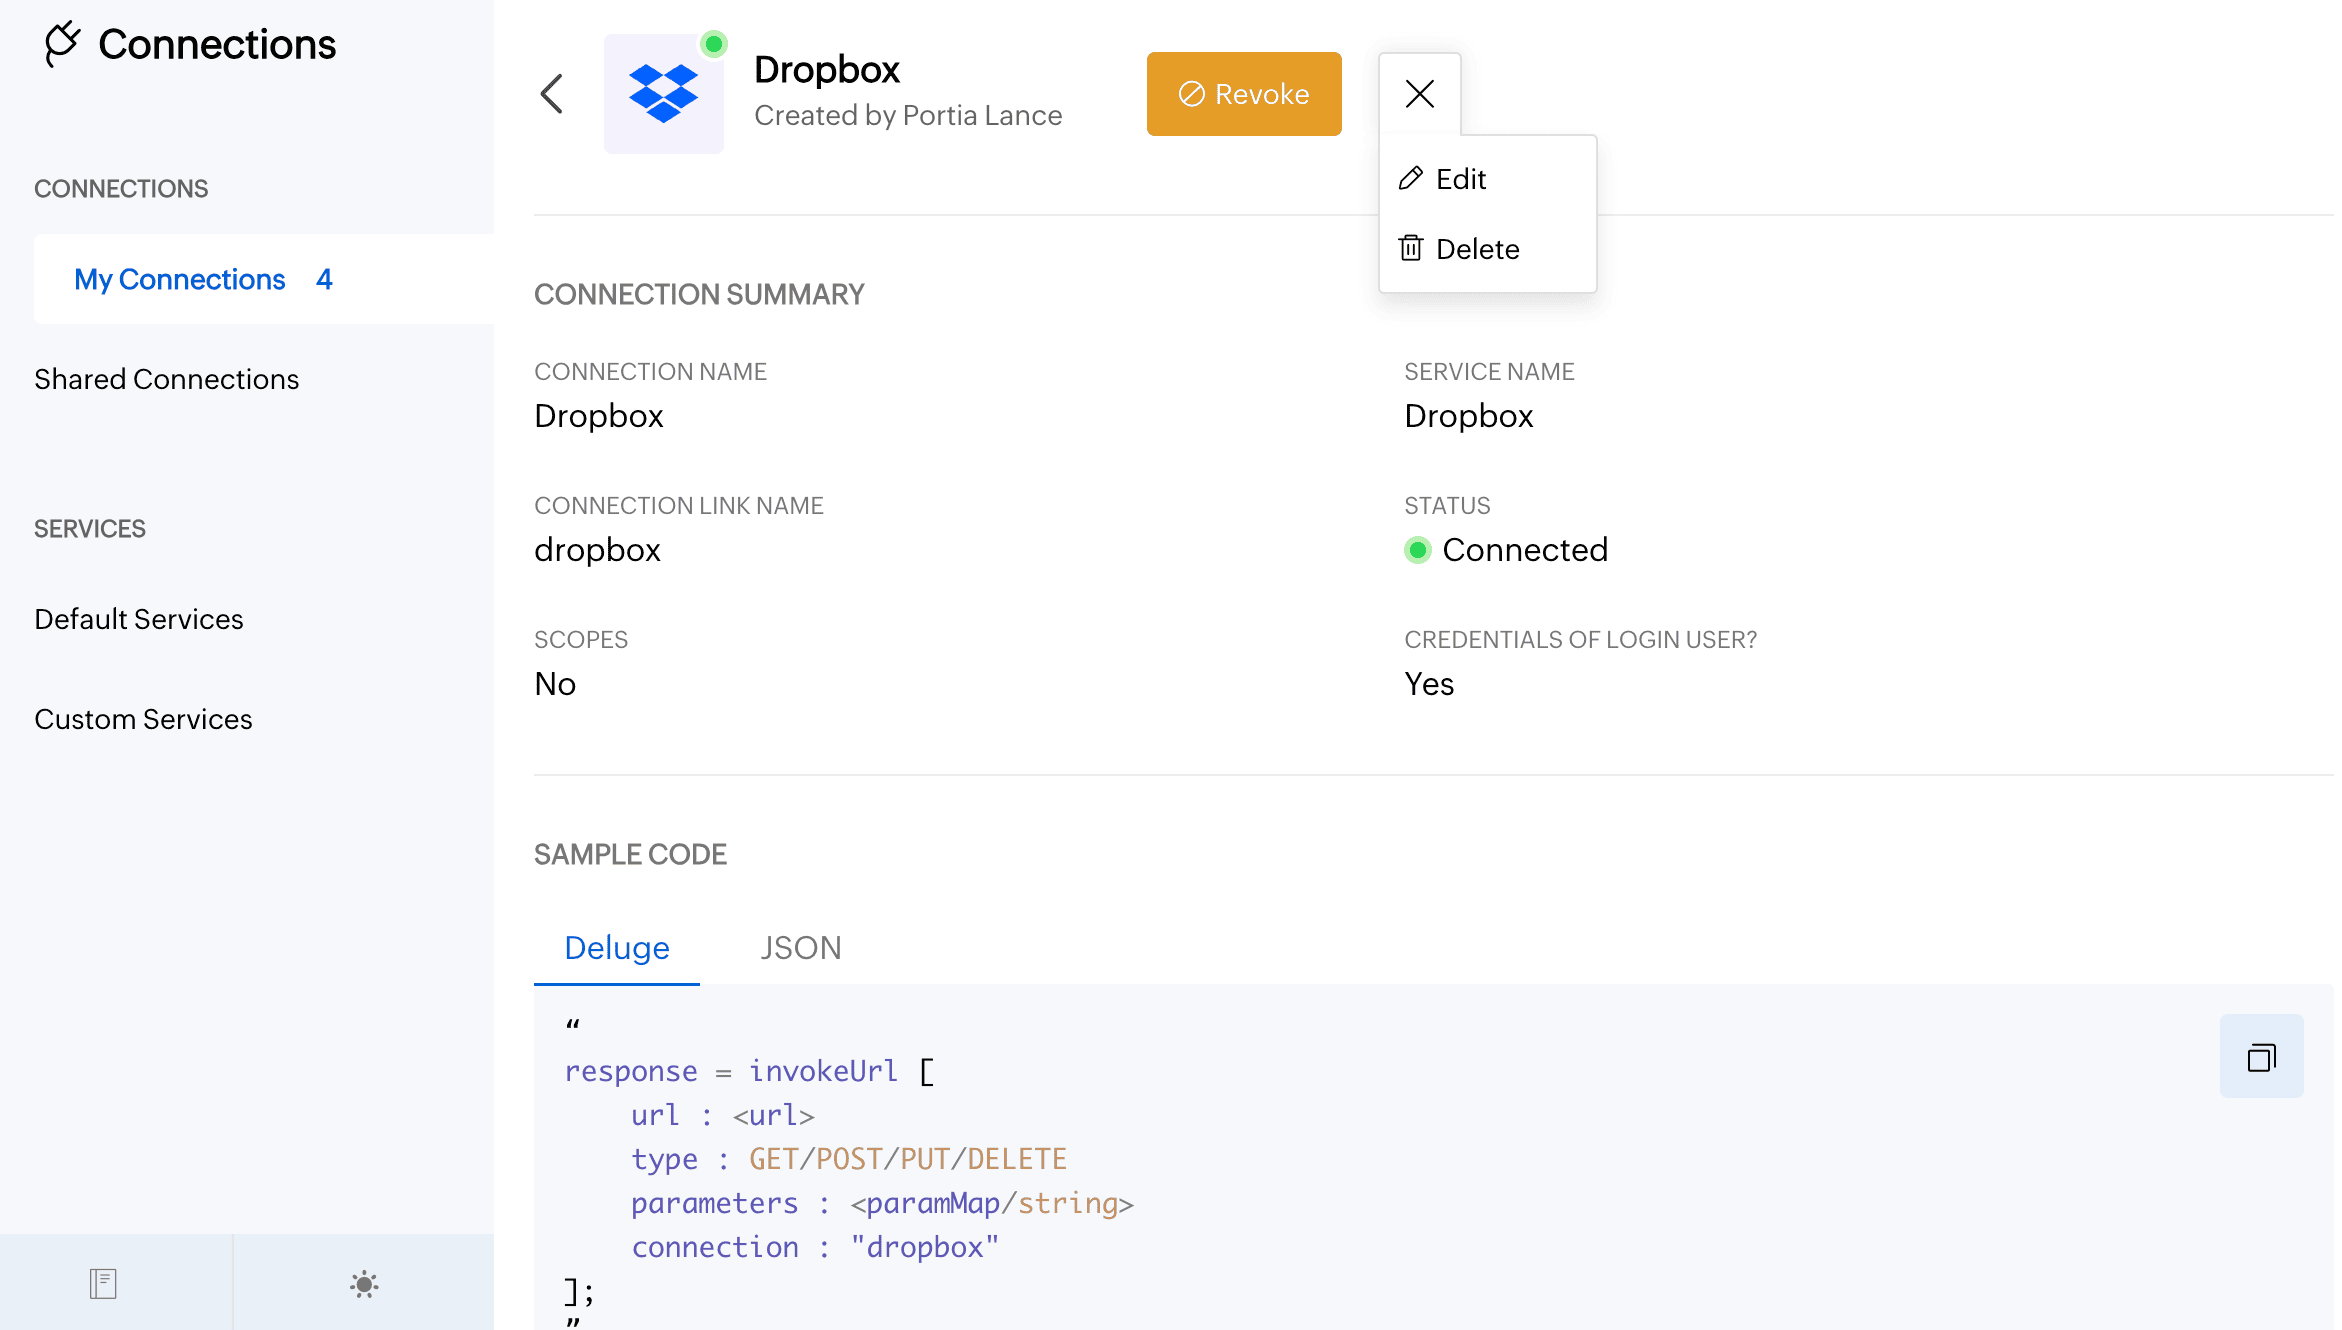
Hover over the connection to edit, revoke, or delete it.
(or)
In the connection details page, click on the 3 horizontal dots icon to edit or delete the connection.
Note:
- You can edit, revoke, or delete any connection created by you (the connections that are listed under "My Connections").
- You can revoke your shared connections, internal connections, and connections from extensions, but cannot edit or delete them.
- If you choose Revoke access granted to all connected apps option while resetting the Zoho account password, you will need to reconnect the connections when you execute them for the first time after the password updation.
- Connections that are unused for more than 6 months will be automatically revoked. Such revoked connections can be reauthorized to resume usage. Further, they can also be edited or deleted.
Dark Mode
To enable dark mode to your connections page, click on the icon at the bottom left corner.

Dark mode in connections page looks like the following: