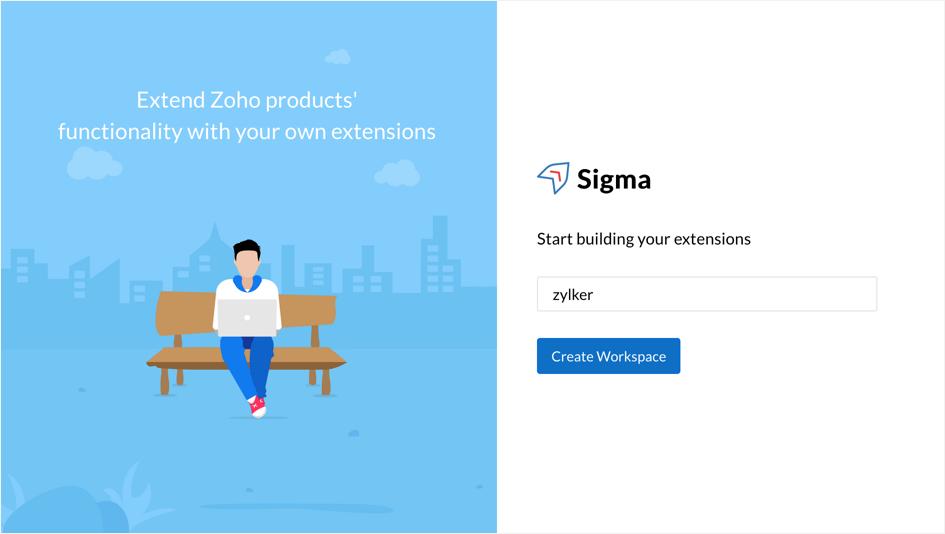
Create a Workspace
Summary
A Sigma workspace is your development environment for creating Zoho Writer extensions. Every developer gets a designated workspace where they can build, test, and manage their extensions.
Prerequisites
- Zoho account with developer access
- Internet connection
- Modern web browser
- Basic HTML/CSS/JavaScript knowledge
Step-by-Step Guide
Step 1: Navigate to Sigma
Visit the Zoho Sigma home page:
https://sigma.zoho.com/createworkspaceThis is the main Sigma IDE platform where developers can create and manage their extensions.
Step 2: Enter Workspace Name
Choose a clear and descriptive name for your workspace. Some examples:
MyWriter ExtensionsZohoWriter-DevWriter-IntegrationTeamExtensions
Tips for naming:
- Use descriptive names
- Avoid special characters
- Make it easy to identify the purpose
- Keep it concise
Step 3: Click Create Workspace
Once you submit, the system will:
- Validate the workspace name
- Create the directory structure
- Initialize default settings
- Assign you as owner
Step 4: Workspace Created
Your workspace is now ready. You have access to:
- Development environment
- Extension management tools
- Version control support
- Testing capabilities
Workspace Features
Project Management
- Organize extensions
- Track versions
- Manage collaborators
- Control access
Development Tools
- Code editor
- File manager
- Preview environment
- Console / Debugging
Multiple Workspaces
| Role | Capabilities |
|---|---|
| Owner | Create extensions, manage team, delete workspace, configure settings |
| User | Develop extensions, test extensions, view workspace, limited management |
Workspace Settings
| Setting | Description |
|---|---|
| Name | Display name of the workspace |
| Description | Workspace purpose and context |
| Team Members | Add or remove users |
| Access Levels | Permission management per member |
| Notifications | Alert preferences |
File Organization
MyWorkspace/ ├── Extension1/ │ ├── app/ │ │ ├── plugin-manifest.json │ │ ├── writer-widget.html │ │ └── img/ │ └── config/ ├── Extension2/ │ └── [similar structure] └── Shared Resources/ └── common files
Complete Workflow
Step 1: Navigate to Sigma ↓ Visit: https://sigma.zoho.com/createworkspace
Step 2: Create Workspace ↓ Name: "Document Enhancement Extensions" Description: "Tools to enhance document creation workflow"
Step 3: Configure ↓ Add Team: - john@company.com (Owner) - sarah@company.com (Developer) - team@company.com (Viewer)
Step 4: Ready to Develop ↓ Click "Create New Extension" Select "Zoho Writer" Start building extension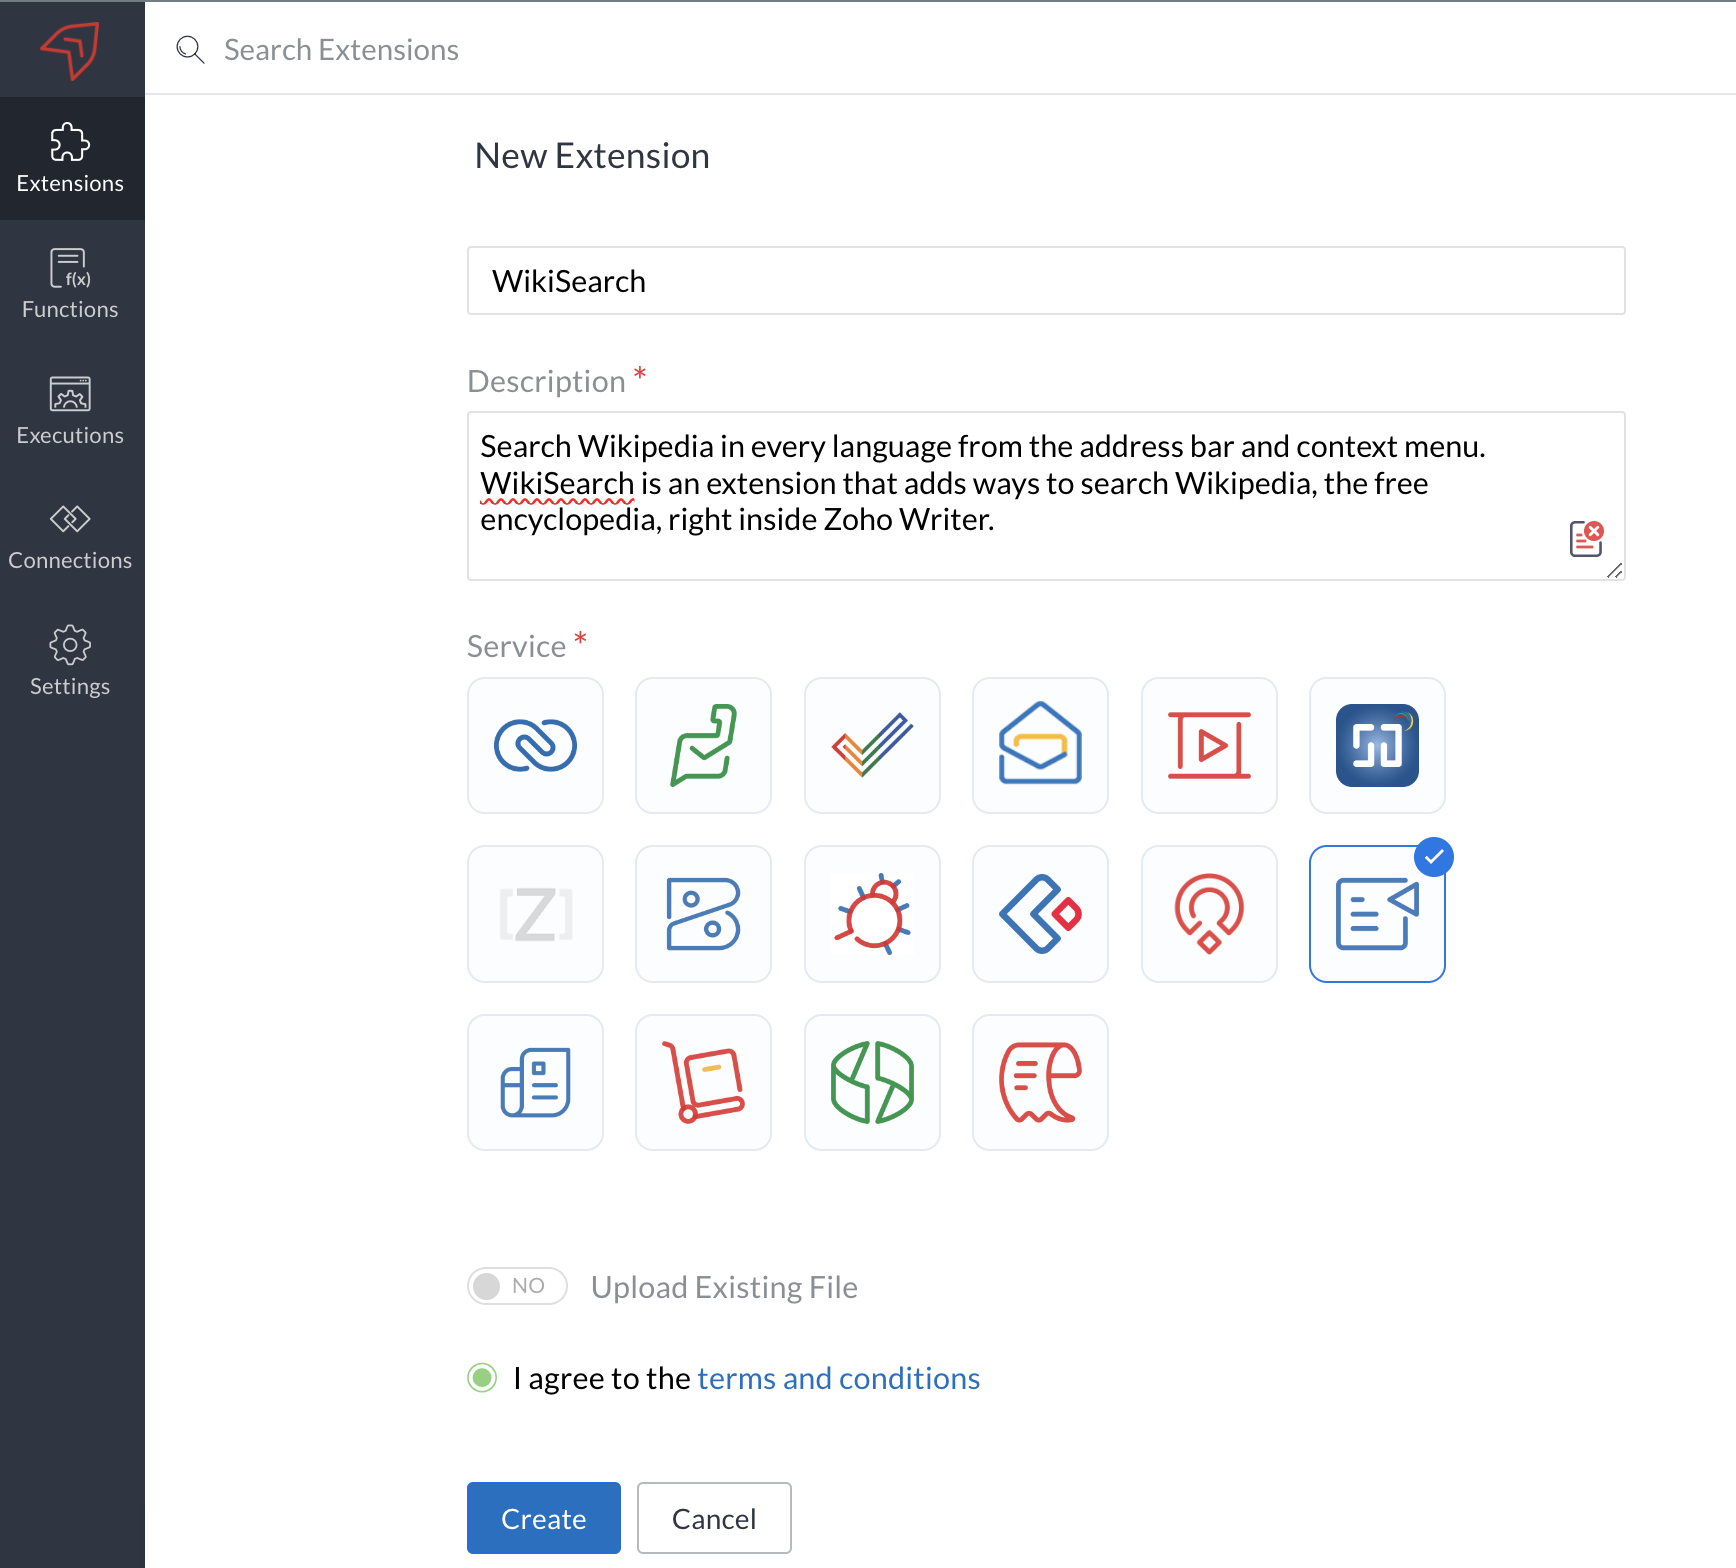
Best Practices
1. Naming Convention
✓ Do: Use clear, descriptive names with consistent formatting.
✗ Avoid: Special characters, generic names like "workspace1", or names that don't indicate purpose.
2. Organization
✓ Do: Group related extensions and separate test workspaces from production.
✗ Avoid: Mixing experimental and live extensions in the same workspace.
3. Team Management
✓ Do: Add appropriate team members with the correct role and review access periodically.
✗ Avoid: Granting Owner access to everyone.
4. Version Control
✓ Do: Track changes, use descriptive version messages, and maintain a changelog.
✗ Avoid: Publishing extensions without documenting version changes.
Troubleshooting
Problem: Workspace name is already taken
Solution: Workspace names must be unique. Try appending a team name, year, or project code (e.g., Writer-Dev-2026).
Problem: Unable to access Sigma
Solution: Verify that your Zoho account has developer access enabled. Contact your Zoho account administrator or sign up at sigma.zoho.com.
Problem: Workspace not loading after creation
Solution: Clear your browser cache and reload. Ensure you are using a supported modern browser (Chrome, Firefox, Safari, or Edge).
Problem: Team member cannot access the workspace
Solution: Confirm the invited member has accepted the invitation email and that the correct role has been assigned.
Build Extension
Summary
Building your extension involves writing code, configuring the plugin manifest, and creating the necessary files. This section covers the complete development process in Sigma IDE.
Prerequisites
- Sigma workspace created
- Zoho account with developer access
- Basic HTML/CSS/JavaScript knowledge
Step-by-Step Guide
Step 1: Click New Extension
In your Sigma workspace, navigate to Dashboard → New Extension or Extensions → Create New.
Step 2: Enter Extension Name
Choose a clear, descriptive name for your extension. Examples:
Task ManagerDocument FormatterTable GeneratorContent Assistant
Tips: Be descriptive and concise. Avoid special characters. Use a professional, user-friendly name.
Step 3: Select Zoho Writer
From the list of available applications, select Zoho Writer.
Step 4: Create Extension
Click the Create button. Sigma opens the app editor pre-loaded with a sample extension that is ready to customize.
Extension Workspace
The editor opens with:
- Plugin-Manifest Editor
- HTML/CSS/JS Code Editor
- File Manager
- Preview / Testing Area
- Save / Deploy Controls
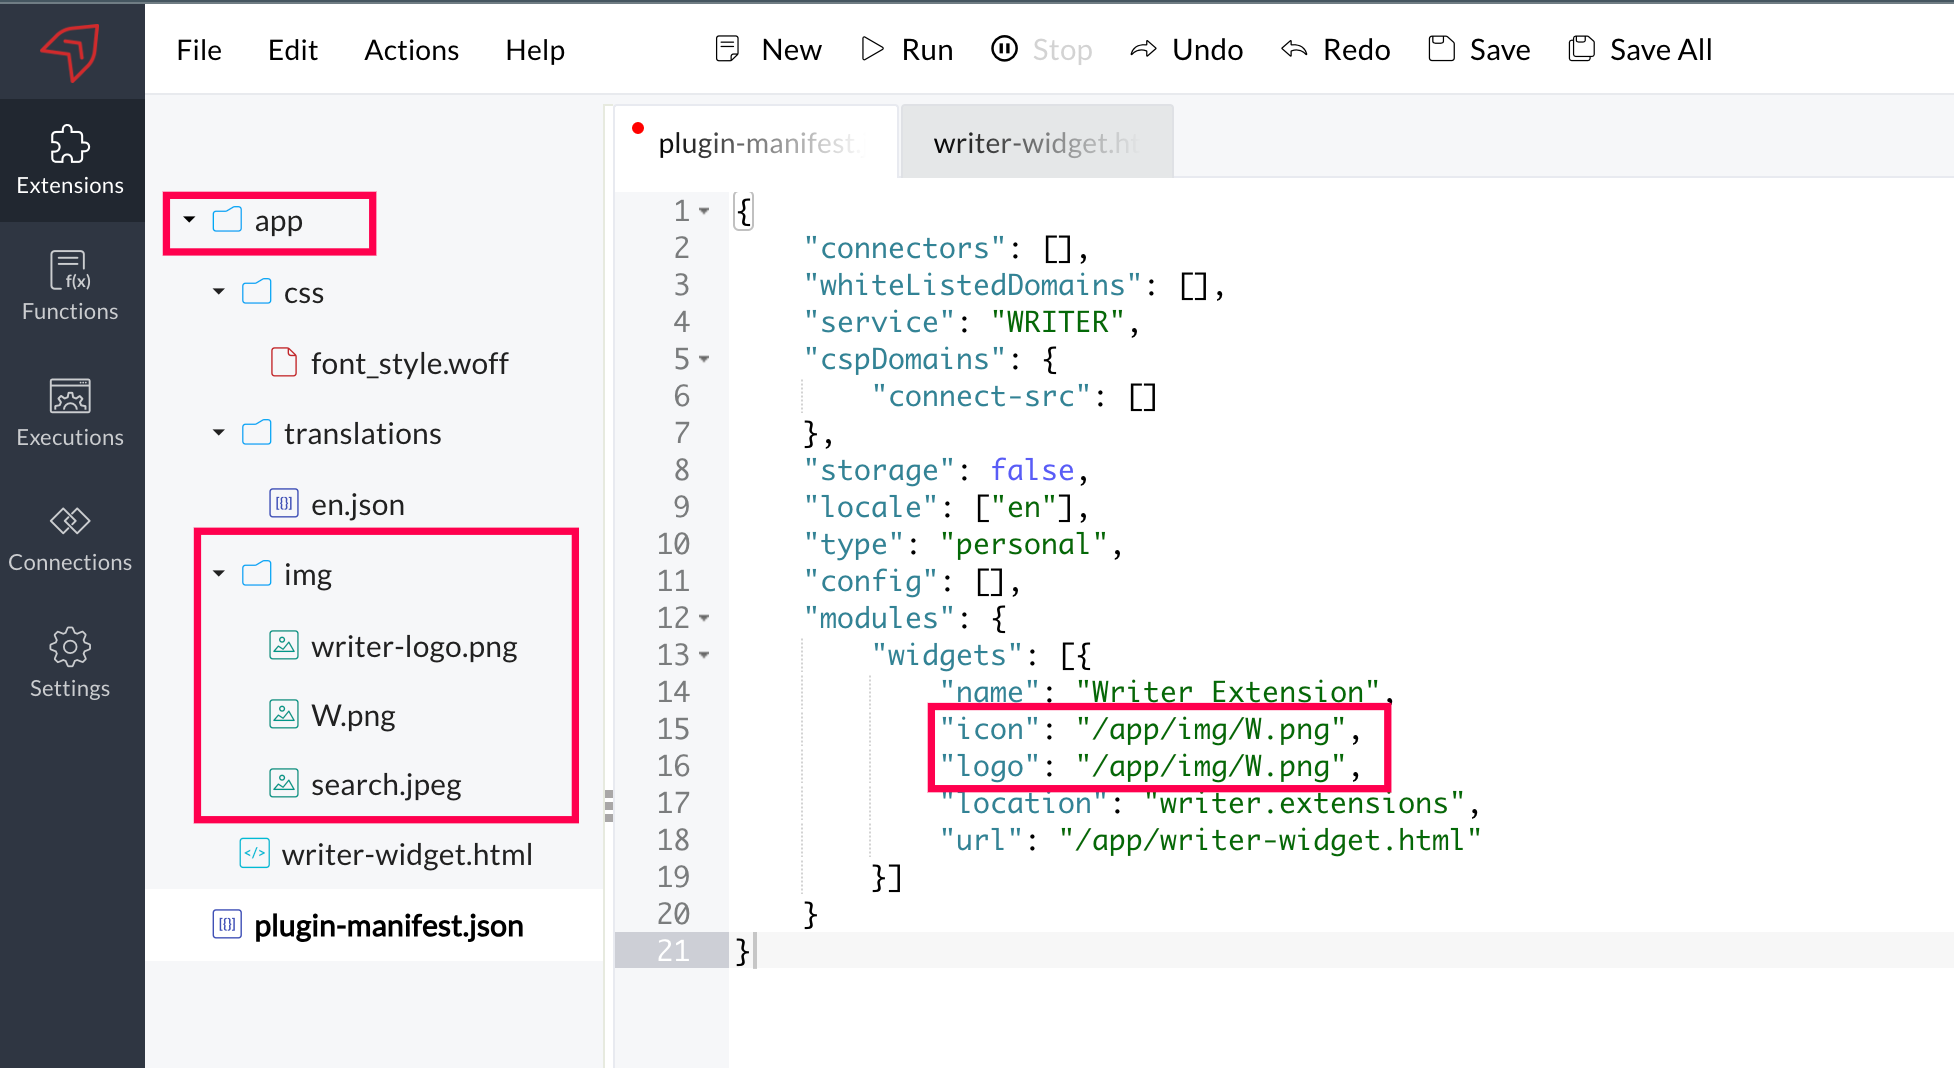
Configure plugin-manifest.json
Define extension properties in the manifest:
{
  "name": "Task Manager",
  "description": "Manage tasks in Writer",
  "version": "1.0.0",
  "modules": {
    "widget": [
      {
        "name": "taskwidget",
        "url": "app/writer-widget.html",
        "title": "Task Manager",
        "type": "panel"
      }
    ]
  }
}
See Full Configuration Guide for all available properties.
Create Extension Code
Option 1: Use Default Sample
Sigma provides a sample extension with a pre-configured widget and basic functionality — ready to build upon.
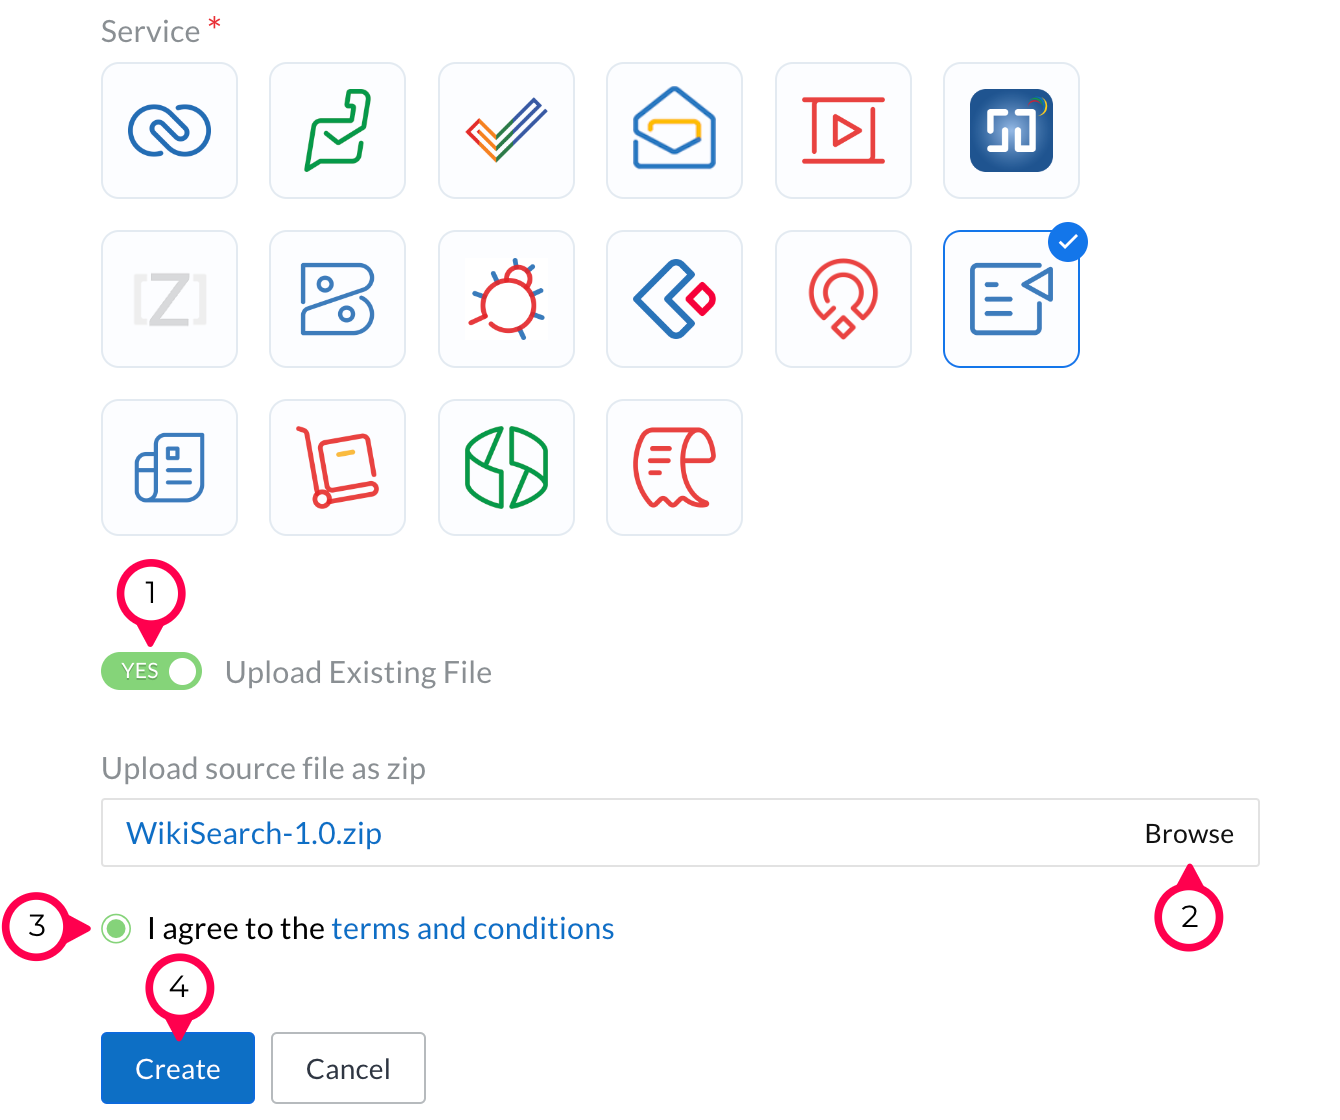
Option 2: Upload Existing Extension
- Click Upload Existing File
- Select your
extension.zip - Sigma unpacks and loads it
- Edit as needed
Option 3: Build from Scratch
- Create a blank extension
- Add your HTML file
- Configure the manifest
- Write your code
- Save and run
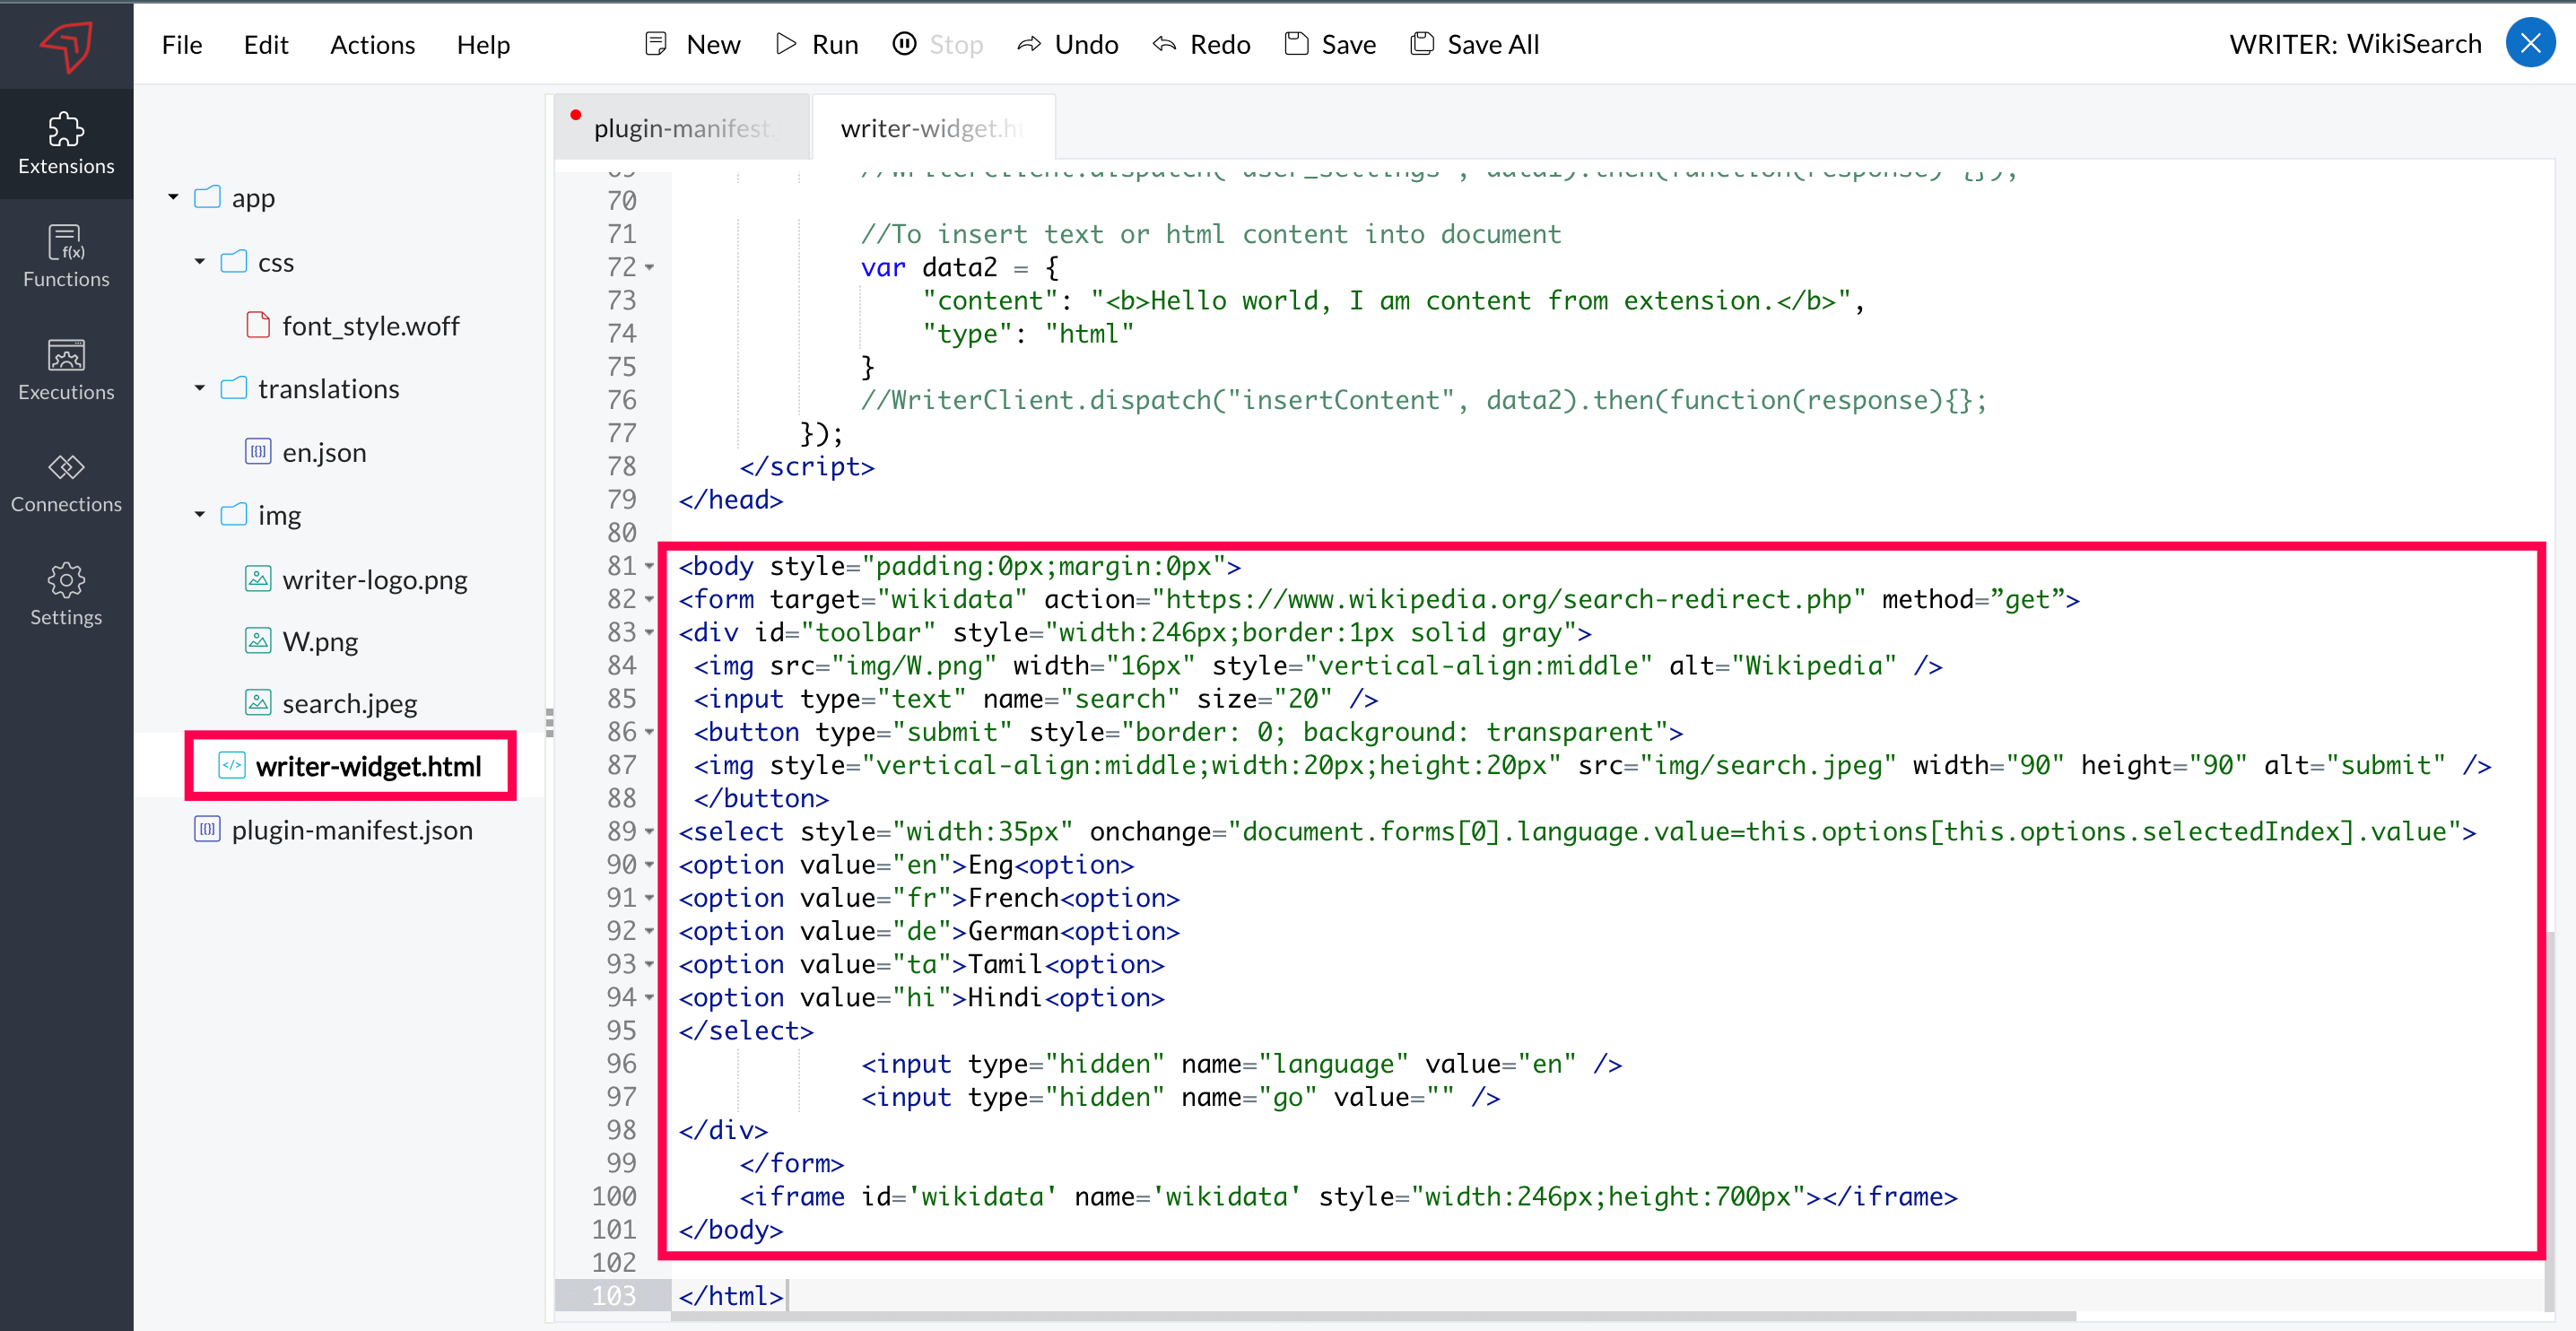
File Structure
writer-extension/
├── app/
│   ├── plugin-manifest.json
│   ├── writer-widget.html
│   └── img/
│       ├── icon.png
│       └── logo.png
└── config/
    └── [other config files]
HTML File Template
<!DOCTYPE html>
<html>
<head>
    <title>My Extension</title>
    <script src="https://static.zohocdn.com/sigma/client/sdk/v3/sigma-sdk.min.js"></script>
</head>
<body>
    <div id="app">
        <!-- Your extension UI -->
    </div>
    <script>
        // Initialize extension
        SigmaSDK.WRITER.init();
        console.log("Extension loaded");
    </script>
</body>
</html>
Image Management
| Image | Size | Format | Purpose |
|---|---|---|---|
| Logo | 128×128 px | PNG | Marketplace listing |
| Icon | 64×64 px | PNG | Toolbar / UI display |
Store all images in the app/img/ folder and use relative paths in the manifest.
Best Practices
1. Code Organization
✓ Do: Separate concerns into different files (HTML, CSS, JS).
✗ Avoid: Writing all code in a single file without comments or structure.
2. SDK Initialization
✓ Do: Always call SigmaSDK.WRITER.init() before using any SDK methods.
✗ Avoid: Calling SDK methods before initialization completes.
3. Error Handling
✓ Do: Wrap async operations in try-catch blocks.
✗ Avoid: Letting errors fail silently.
Troubleshooting
Problem: Extension does not appear after save
Solution: Ensure you clicked Save in the editor and no syntax errors are highlighted in the code editor.
Problem: Manifest validation error
Solution: Check that all required properties (name, url, location) are present and properly formatted in the manifest.
Test Extension
Summary
Testing your extension in Zoho Writer ensures all features work correctly before publishing or sharing. This section covers the complete testing process and best practices.
Prerequisites
- Extension built in Sigma
- Zoho Writer account
- Access to a test document
- Latest browser version
Step-by-Step Guide
Step 1: Save Extension
Before testing, ensure your extension is saved:
- Complete your code changes
- Click the Save button in Sigma
- Wait for Sigma to process and confirm no errors
Step 2: Click Run
In the Sigma editor, locate the Run button in the top bar and click it.
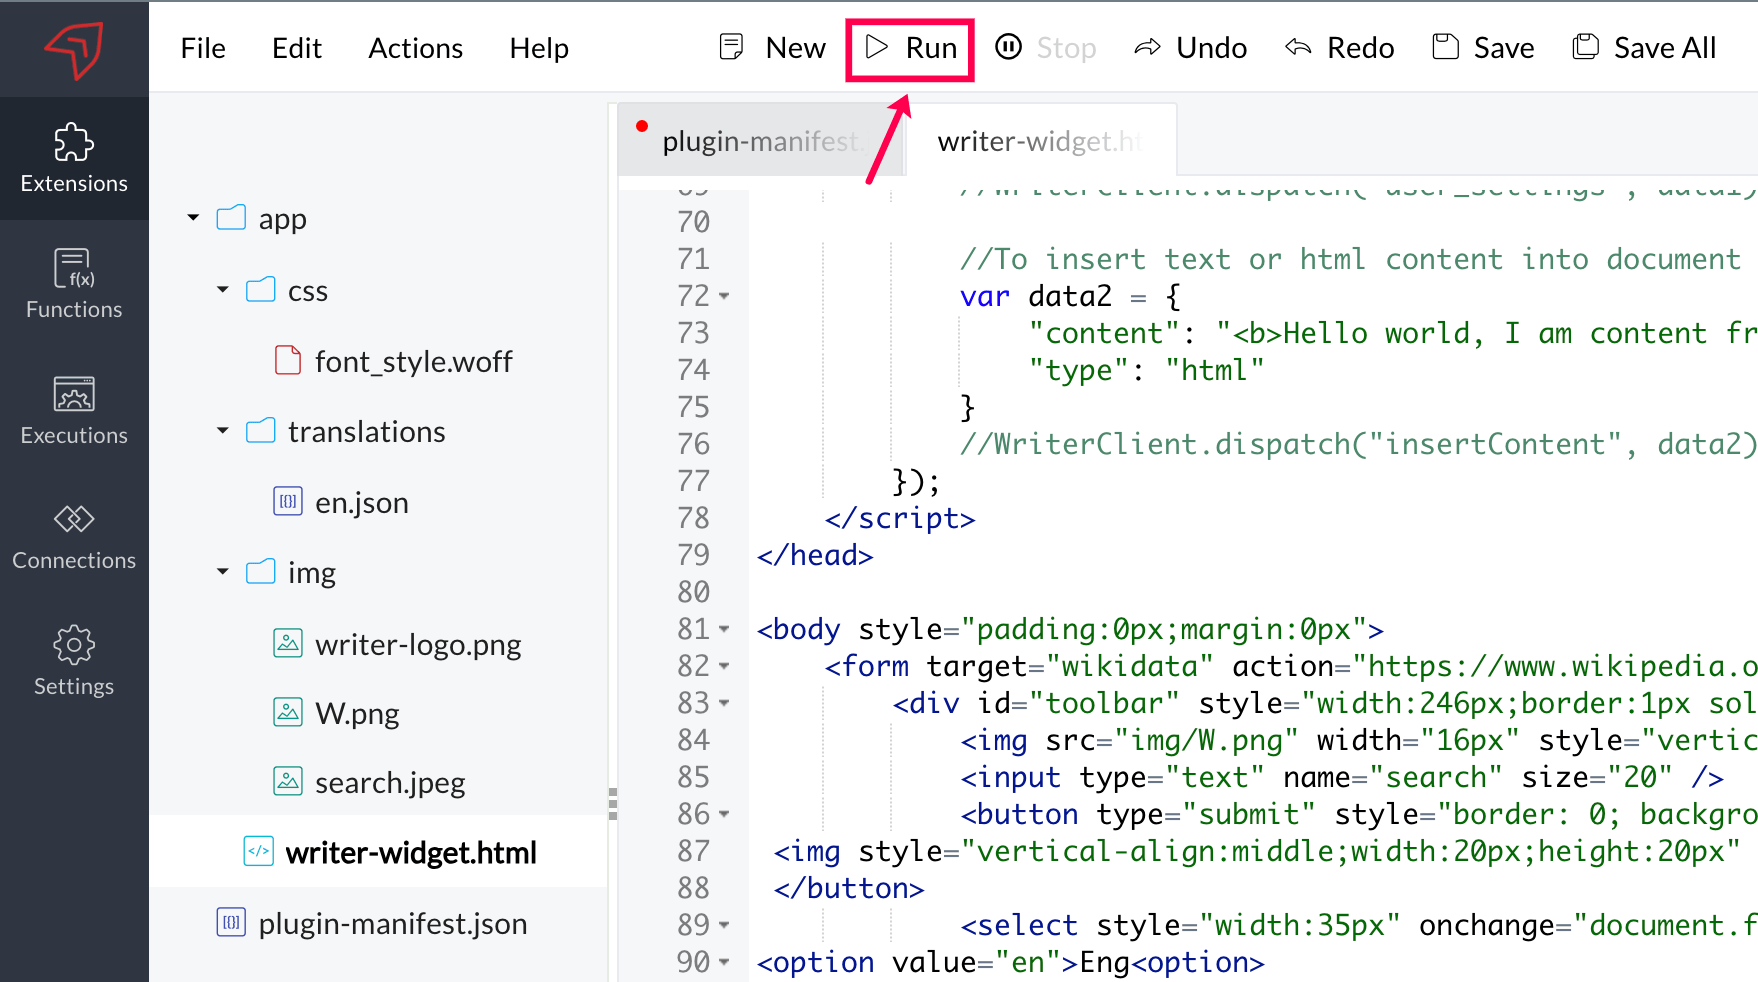
Step 3: Select Zoho Writer Document
A dialog appears prompting you to select an application and a document to test in. Choose Zoho Writer and then select or create a test document.
Step 4: Choose Test Document
- Select Existing: Click "Select Document" and choose from your documents
- Create New: Enter a document name and click "Create New"
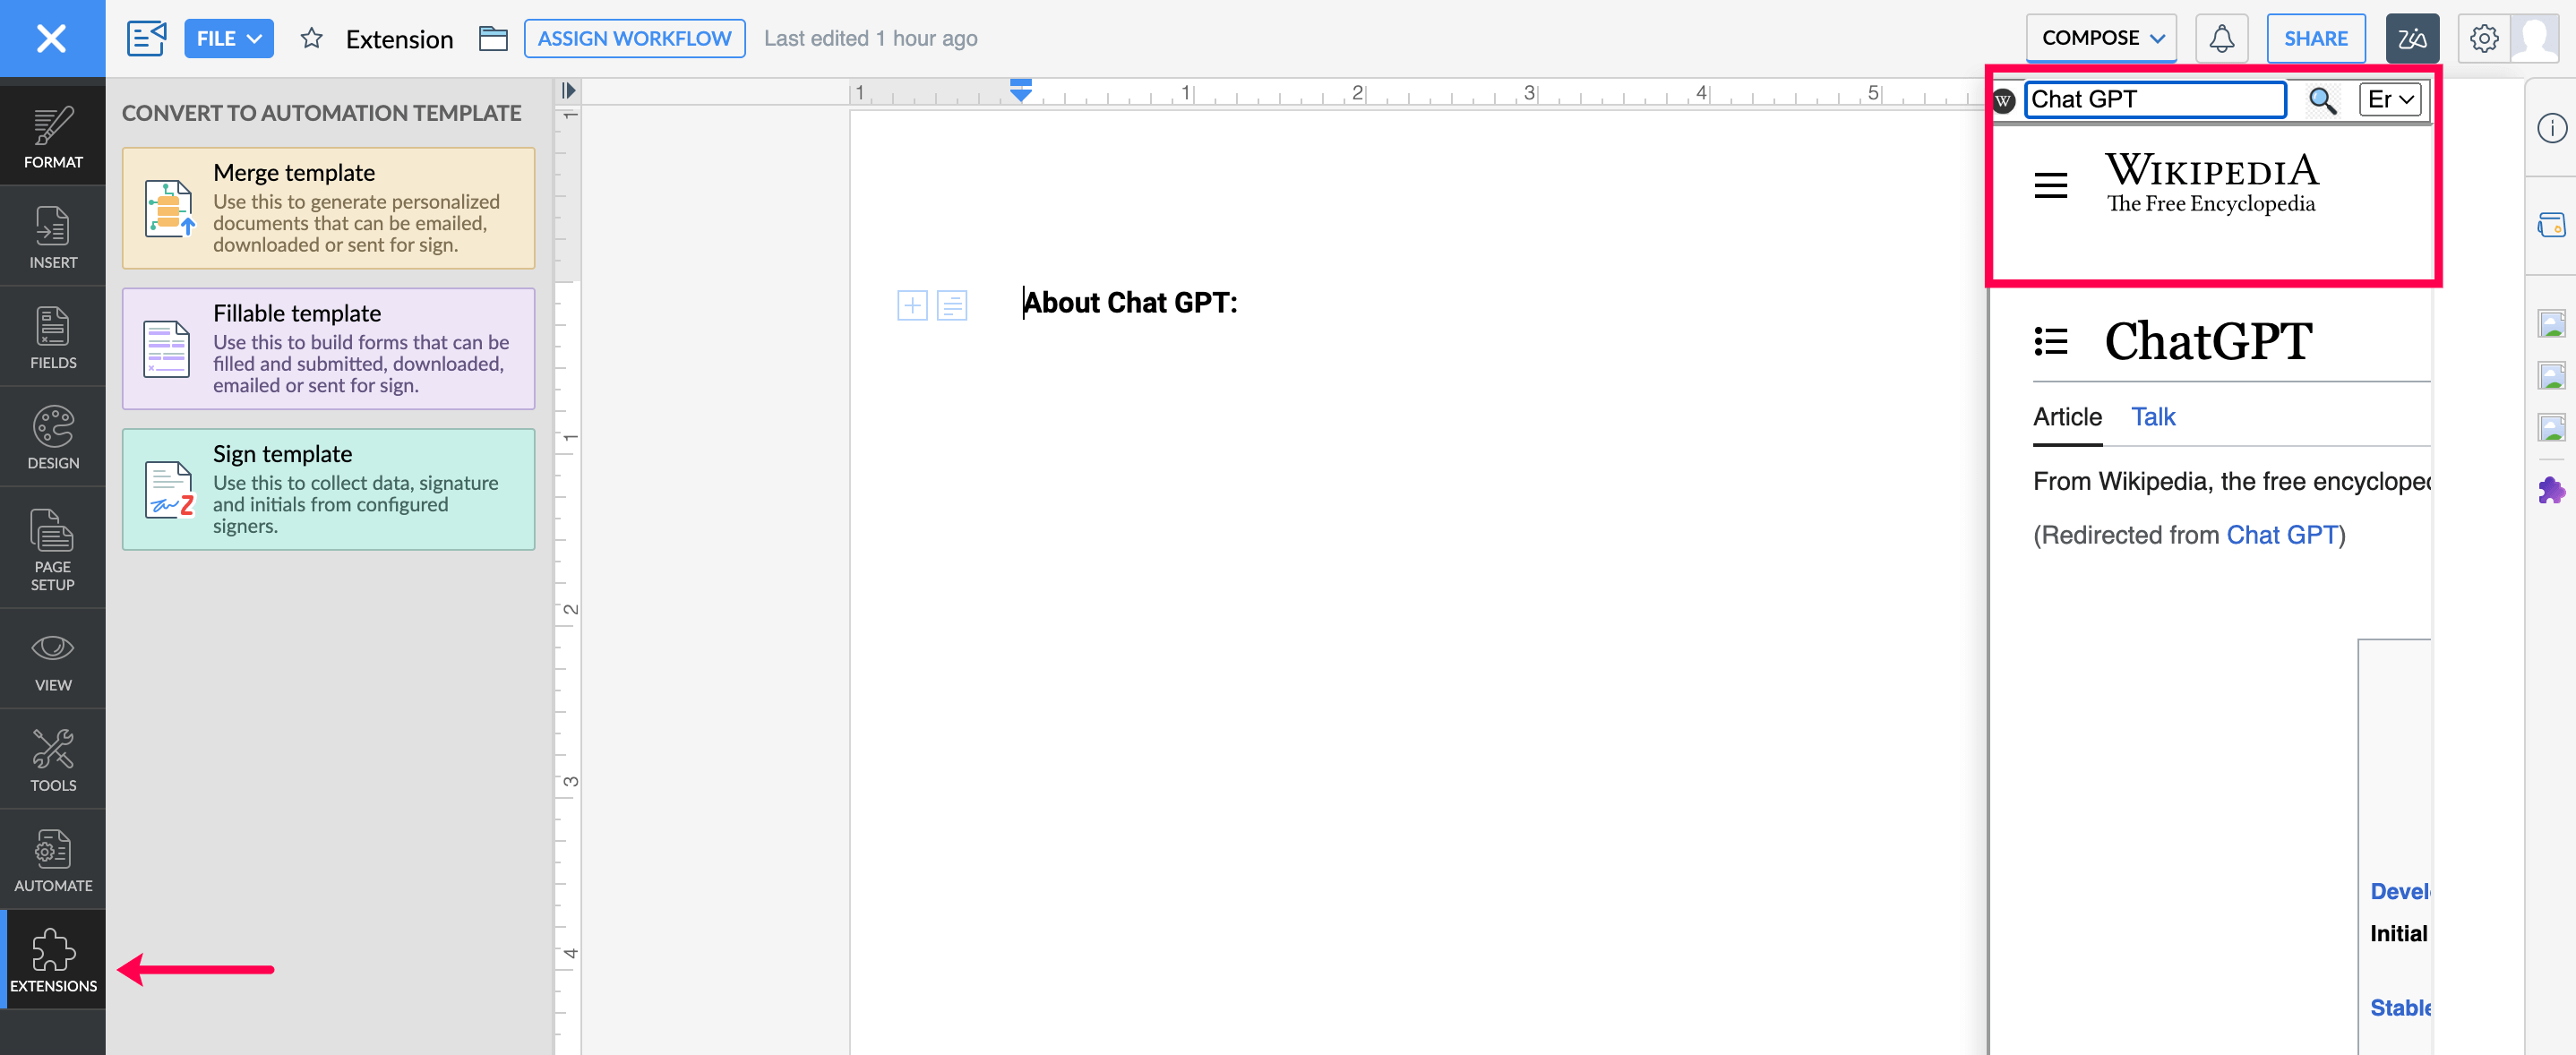
Step 5: Extension Loads
Writer opens with your extension. The extension appears in the left sidebar under "Extensions". Test your functionality and interact with features.
Testing Checklist
Functionality Testing
- Extension loads without errors
- All buttons work
- Forms accept input
- Data saves correctly
- Features perform as expected
- No console errors
UI/UX Testing
- Layout looks correct
- Colors and styling are proper
- Text is readable
- Icons display correctly
- No overflow issues
Error Handling
- Invalid input is handled gracefully
- Network errors are caught
- Error messages are clear
- Recovery is possible after errors
Integration Testing
- Storage operations work
- Connections function correctly
- Message display works
- Banner notifications show
- Writer methods are accessible
- SDK initializes properly
Performance Testing
- Load time is acceptable
- No lag in interactions
- Memory usage is reasonable
- Network calls are efficient
Best Practices
1. Test in Multiple Documents
Test your extension in different document types (new document, existing document) to catch edge cases.
2. Test All User Flows
Cover every button, form, and interaction in your extension — not just the "happy path".
3. Check Browser Console
Open the browser developer tools (F12) and check the Console tab for JavaScript errors during testing.
4. Test Error Scenarios
Deliberately trigger error conditions (empty inputs, network disconnection) to verify your error handling works correctly.
Troubleshooting
Problem: Extension not appearing in Writer sidebar
Solution: Verify the widget location is correctly specified in the manifest as writer.extensions and that the extension is running (click Run in Sigma).
Problem: Console shows "SigmaSDK is not defined"
Solution: Ensure the SDK script tag is included in your HTML <head> and loads before your JavaScript code runs.
Problem: Extension loads but features don't work
Solution: Open the browser console and look for error messages. Check that SigmaSDK.WRITER.init() is called before any SDK methods.
Share Private Extensions
Summary
After publishing your extension as private, you can share it with specific team members. This section covers the sharing process and best practices for distributing private extensions.
Prerequisites
- Extension fully tested
- All features working correctly
- Error handling complete
- Icons and images prepared
Step-by-Step Guide
Step 1: Publish as Private
- Complete extension development in Sigma
- Click the Publish button
- Select Private as the distribution type
- Configure the settings (name, version, description, access control)
- Click Publish
Step 2: Generate Share Link
After publishing, Sigma displays an installation link:
https://writer.zoho.com/extensioninstall?ExtensionId={EXTENSION_ID}Copy this link to share with your team.
Step 3: Distribute the Link
Share the installation link using any of the methods below.
Step 4: Users Install
- User receives the share link
- User clicks the link
- A permission review dialog appears
- User clicks Install
- Extension appears in Writer sidebar immediately
Distribution Methods
Method 1: Email
Subject: [New Tool] Task Manager Extension
Hi Team,
We've released a new extension to help manage tasks directly in your documents.
Installation: https://writer.zoho.com/extensioninstall?ExtensionId=...
Features:
- Create and track tasks
- Set deadlines
- Assign to team members
Questions? Contact: support@company.com
Method 2: Slack / Teams
New Extension Available!
Task Manager is now available.
Installation: https://writer.zoho.com/extensioninstall?ExtensionId=...
Features:
• Task creation
• Deadline tracking
• Team assignment
Method 3: Internal Wiki / Knowledge Base
Document the installation on your internal wiki with:
- Extension overview
- Installation link
- Usage instructions
- Support contact
Access Control Options
| Option | Who Can Access |
|---|---|
| All users in organization | Everyone in your Zoho account |
| Selected roles | Users with specific Zoho roles (Admin, Manager, etc.) |
| Specific users | Individual users by email address |
Best Practices
1. Prepare Before Sharing
Ensure the extension is fully tested with all features working. Prepare documentation (installation instructions, feature overview, support contact) before sharing.
2. Clear Communication
When sharing the link, include a brief description of what the extension does and how to get started.
3. Monitor Feedback
After sharing, collect feedback from users and plan iterative improvements. Gather reports of bugs or missing features early.
Troubleshooting
Problem: User sees "Extension not found" error when clicking link
Solution: Verify the extension was published successfully in Sigma. Confirm the link contains the correct ExtensionId.
Problem: Extension installed but not visible in Writer
Solution: Ask the user to refresh their Zoho Writer page. Confirm their account has the required role/profile for the extension.