Import & Customize Campaign for Contacts via Integrated Apps
Zoho Voice's Power Dialer helps you to choose contacts from multiple sources for your campaign:
Existing contacts in your Zoho Voice account
New contacts imported from a CSV file
Contacts from integrated apps
In this guide, you will understand the steps involved in importing and selecting contacts from a integrated app and customizing them for your campaign.
Import & Select Contacts via Integrated Apps
You can import leads, contacts, or deals saved under specific portals of the Zoho app integrated with Zoho Voice. To import and select contacts via integrated apps:
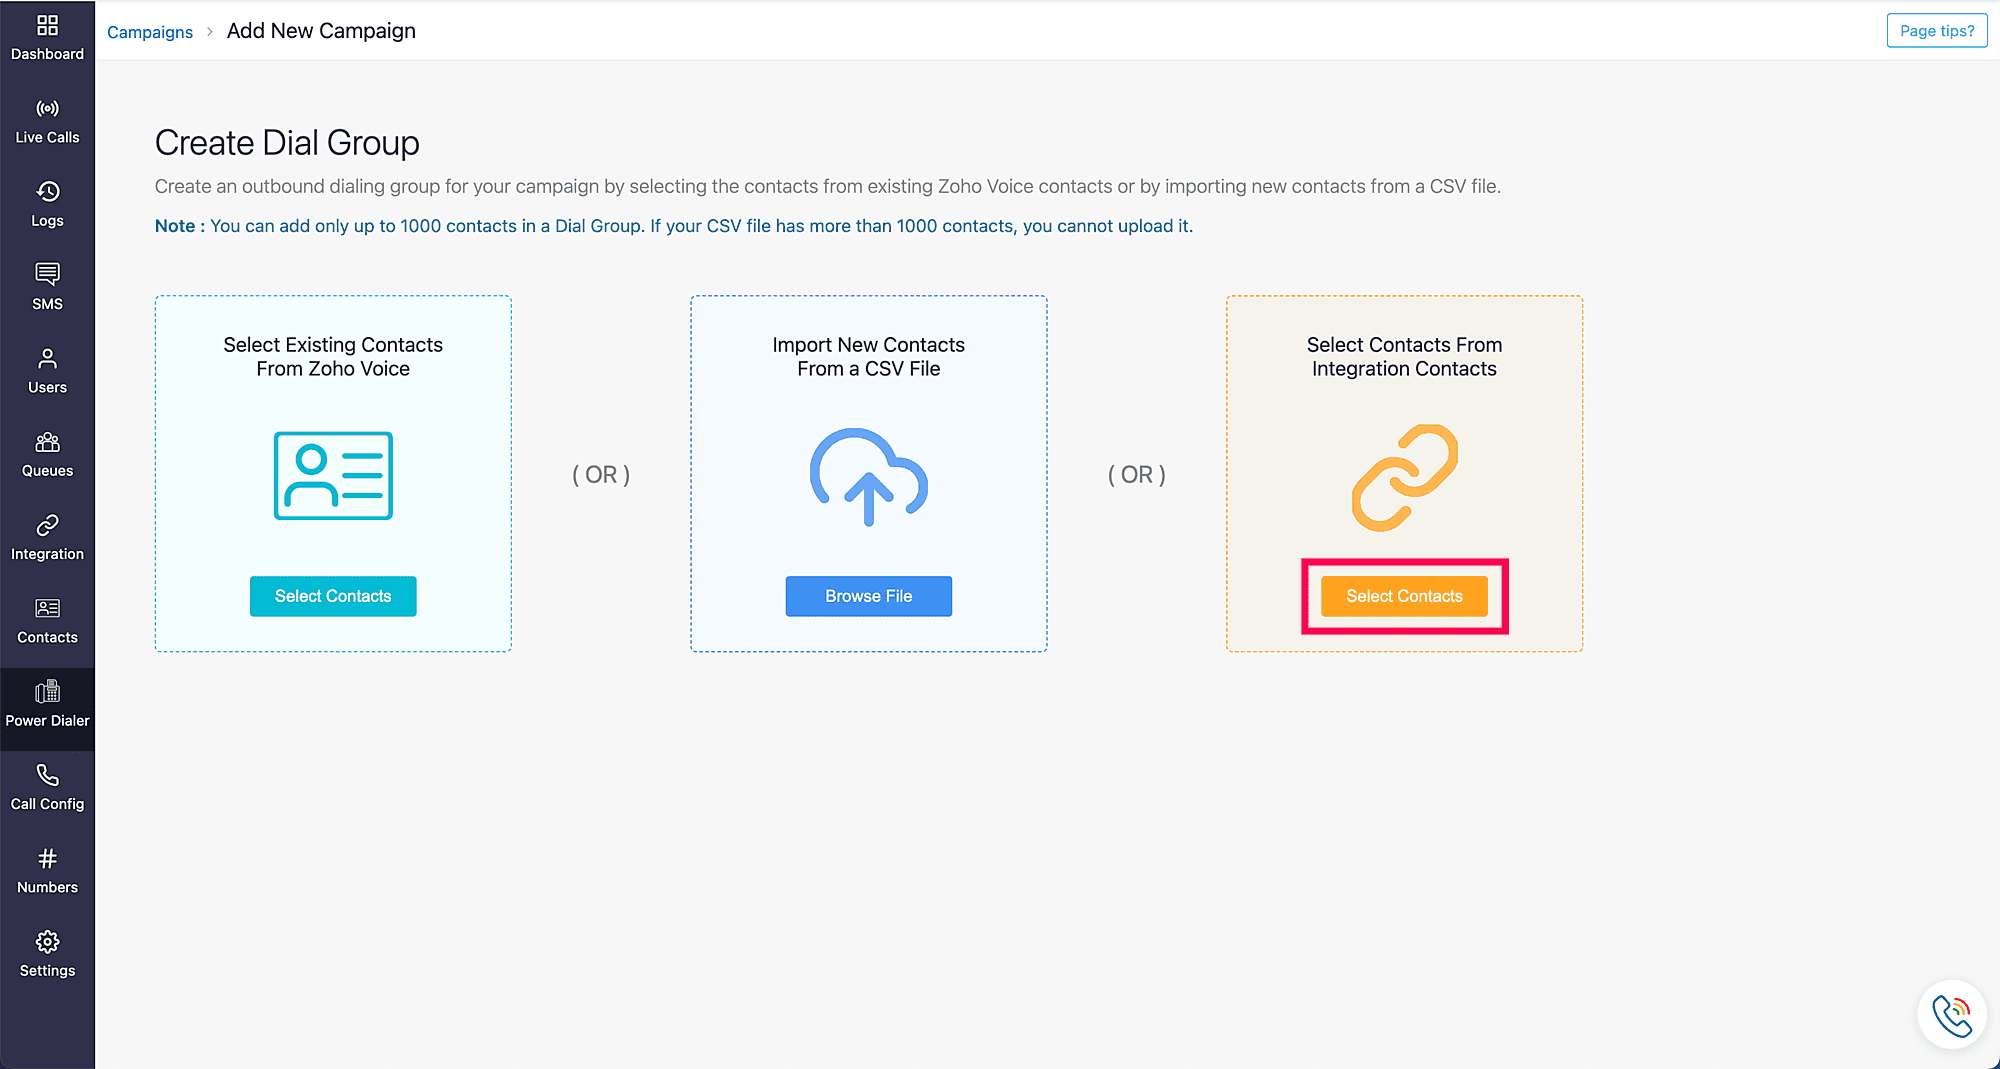
On the Power Dialer homepage, click Add New Campaign.
On the Create Dial Group page, click Select Contacts under Select Contacts From Integration Contacts.
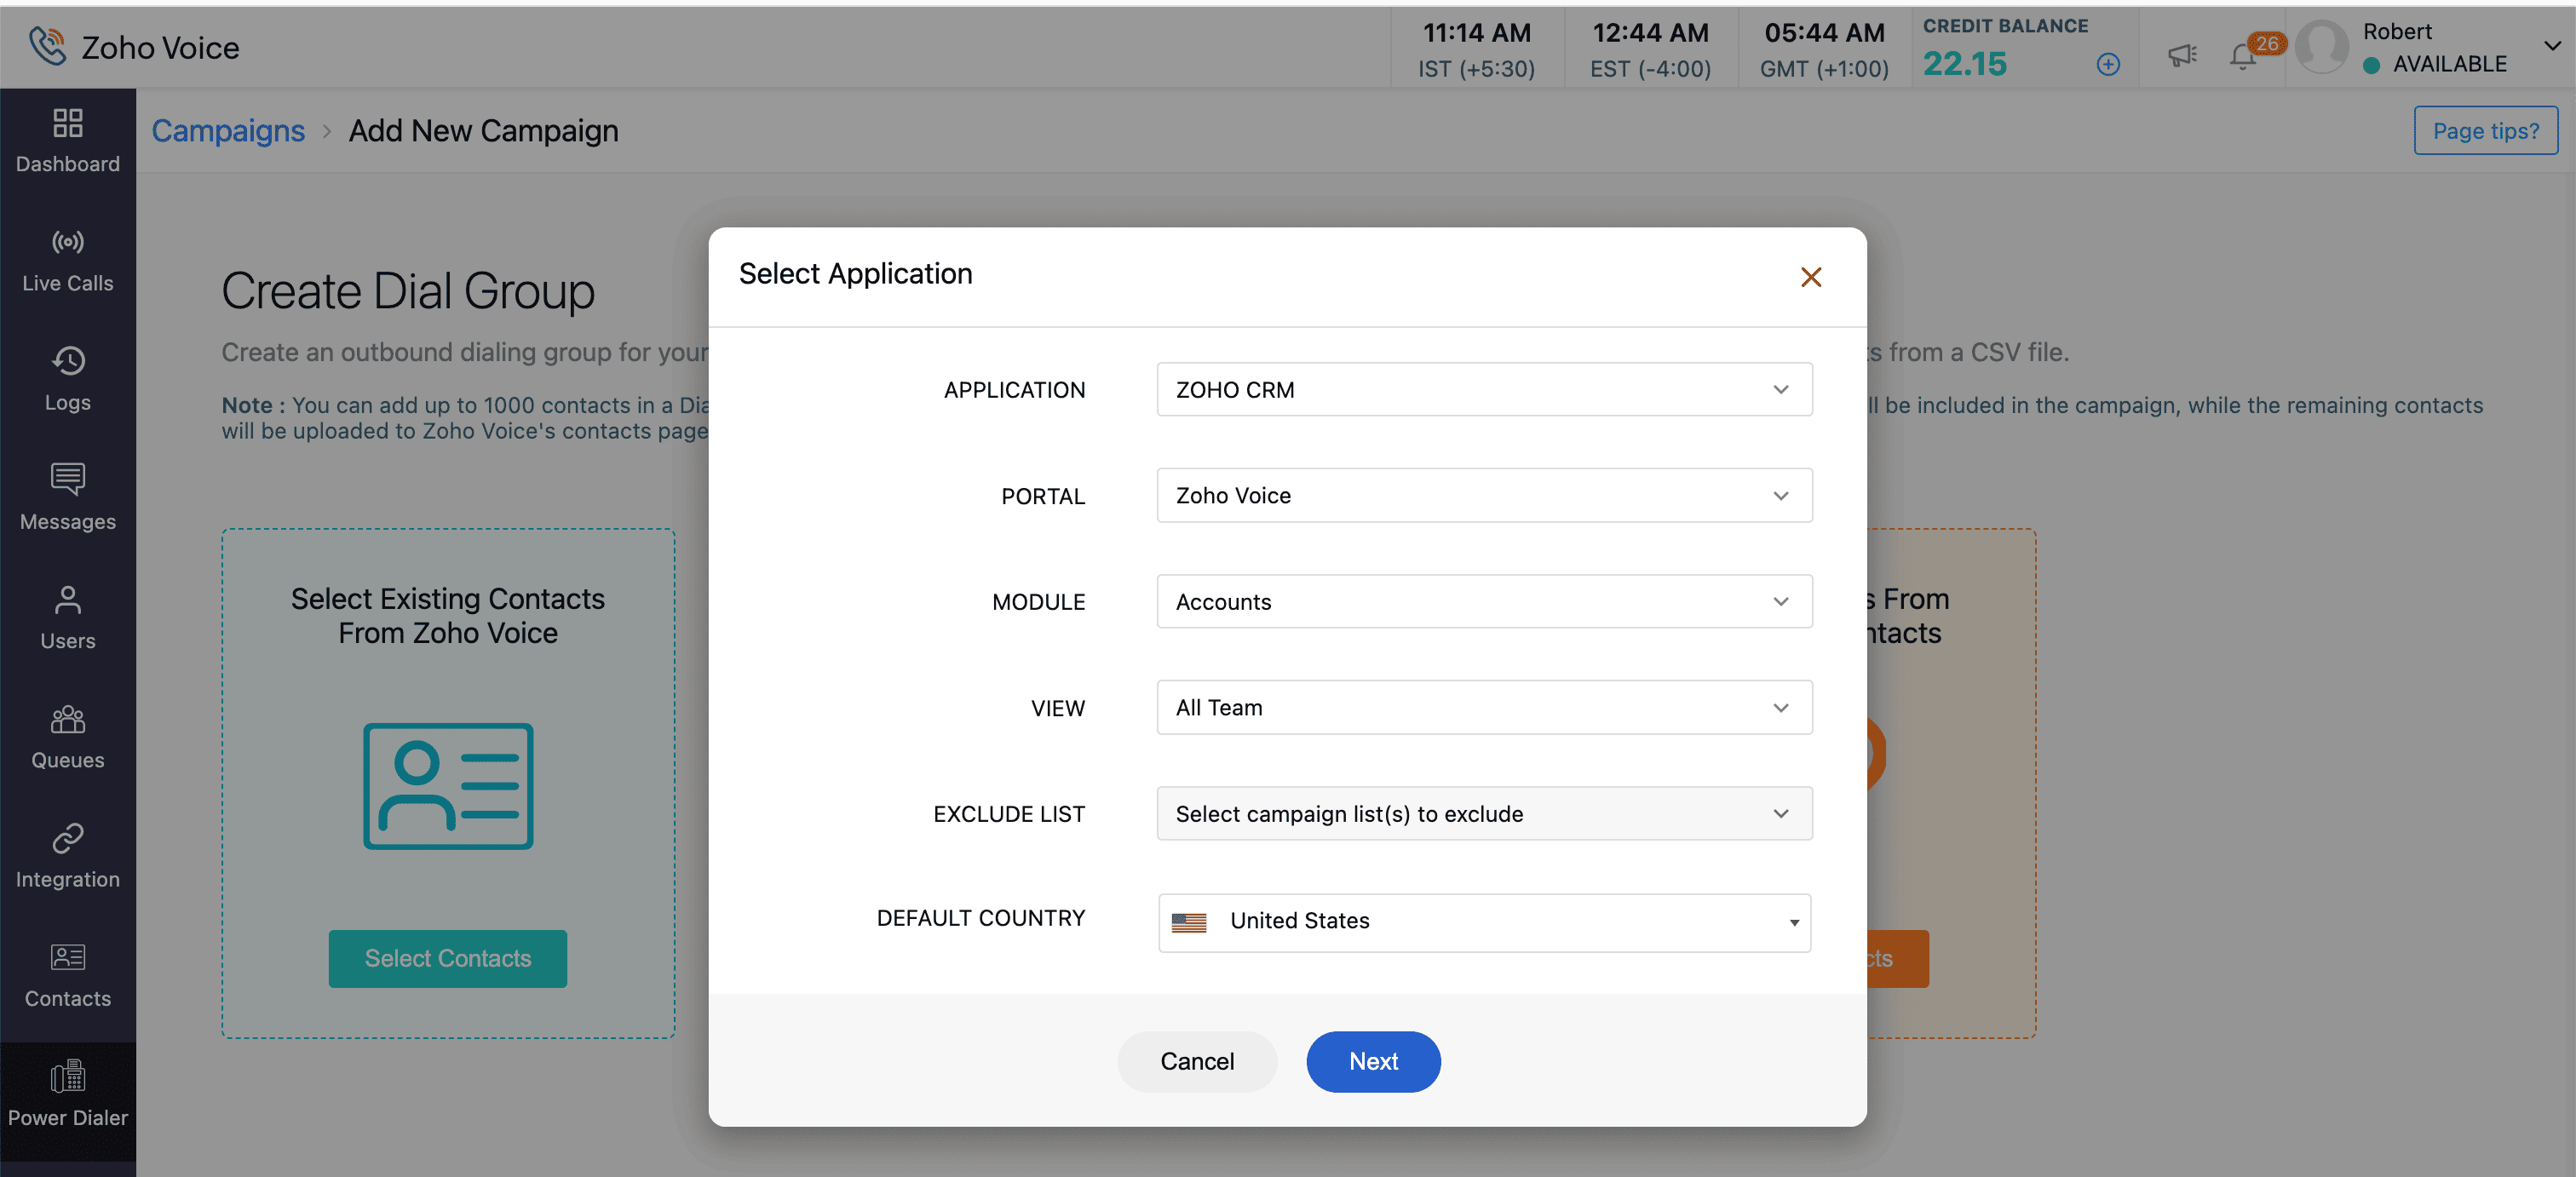
In the Select Application prompt, specify the following fields:


Fields:
Application: Select the designated application integrated with Zoho Voice from which you want the contacts to be imported. Zoho Voice integrates with Zoho CRM, Zoho Desk, Zoho Bigin, and ManageEngine ServiceDesk Plus Cloud.
Portal: From the list of available portals of the selected application, select the specific access portal by its unique name. Portals act as the gateway for contacts imported from the designated Zoho app.
Module: Modules are categories of data imported from the integrated Zoho app. Select the module of your interest. This imports the complete data stored under the respective module of the integrated Zoho app. Modules can be Contacts, Leads, and more, and may vary depending on the integrated Zoho app.
View: Views are module-specific groups of contacts curated based on a defined set of criteria. When a module is selected, the custom list of views that have been applied to that module are also listed. Select the contacts you want to import into your dial group from the contacts curated under that view.
Exclude List: Choose campaigns to exclude from your new campaign. Contacts from the chosen campaigns will not be included in your new campaign.
Default Country: Choose the default country. The corresponding country code will be automatically applied to contacts without a specified country code.
Once the required fields are chosen, click Next.
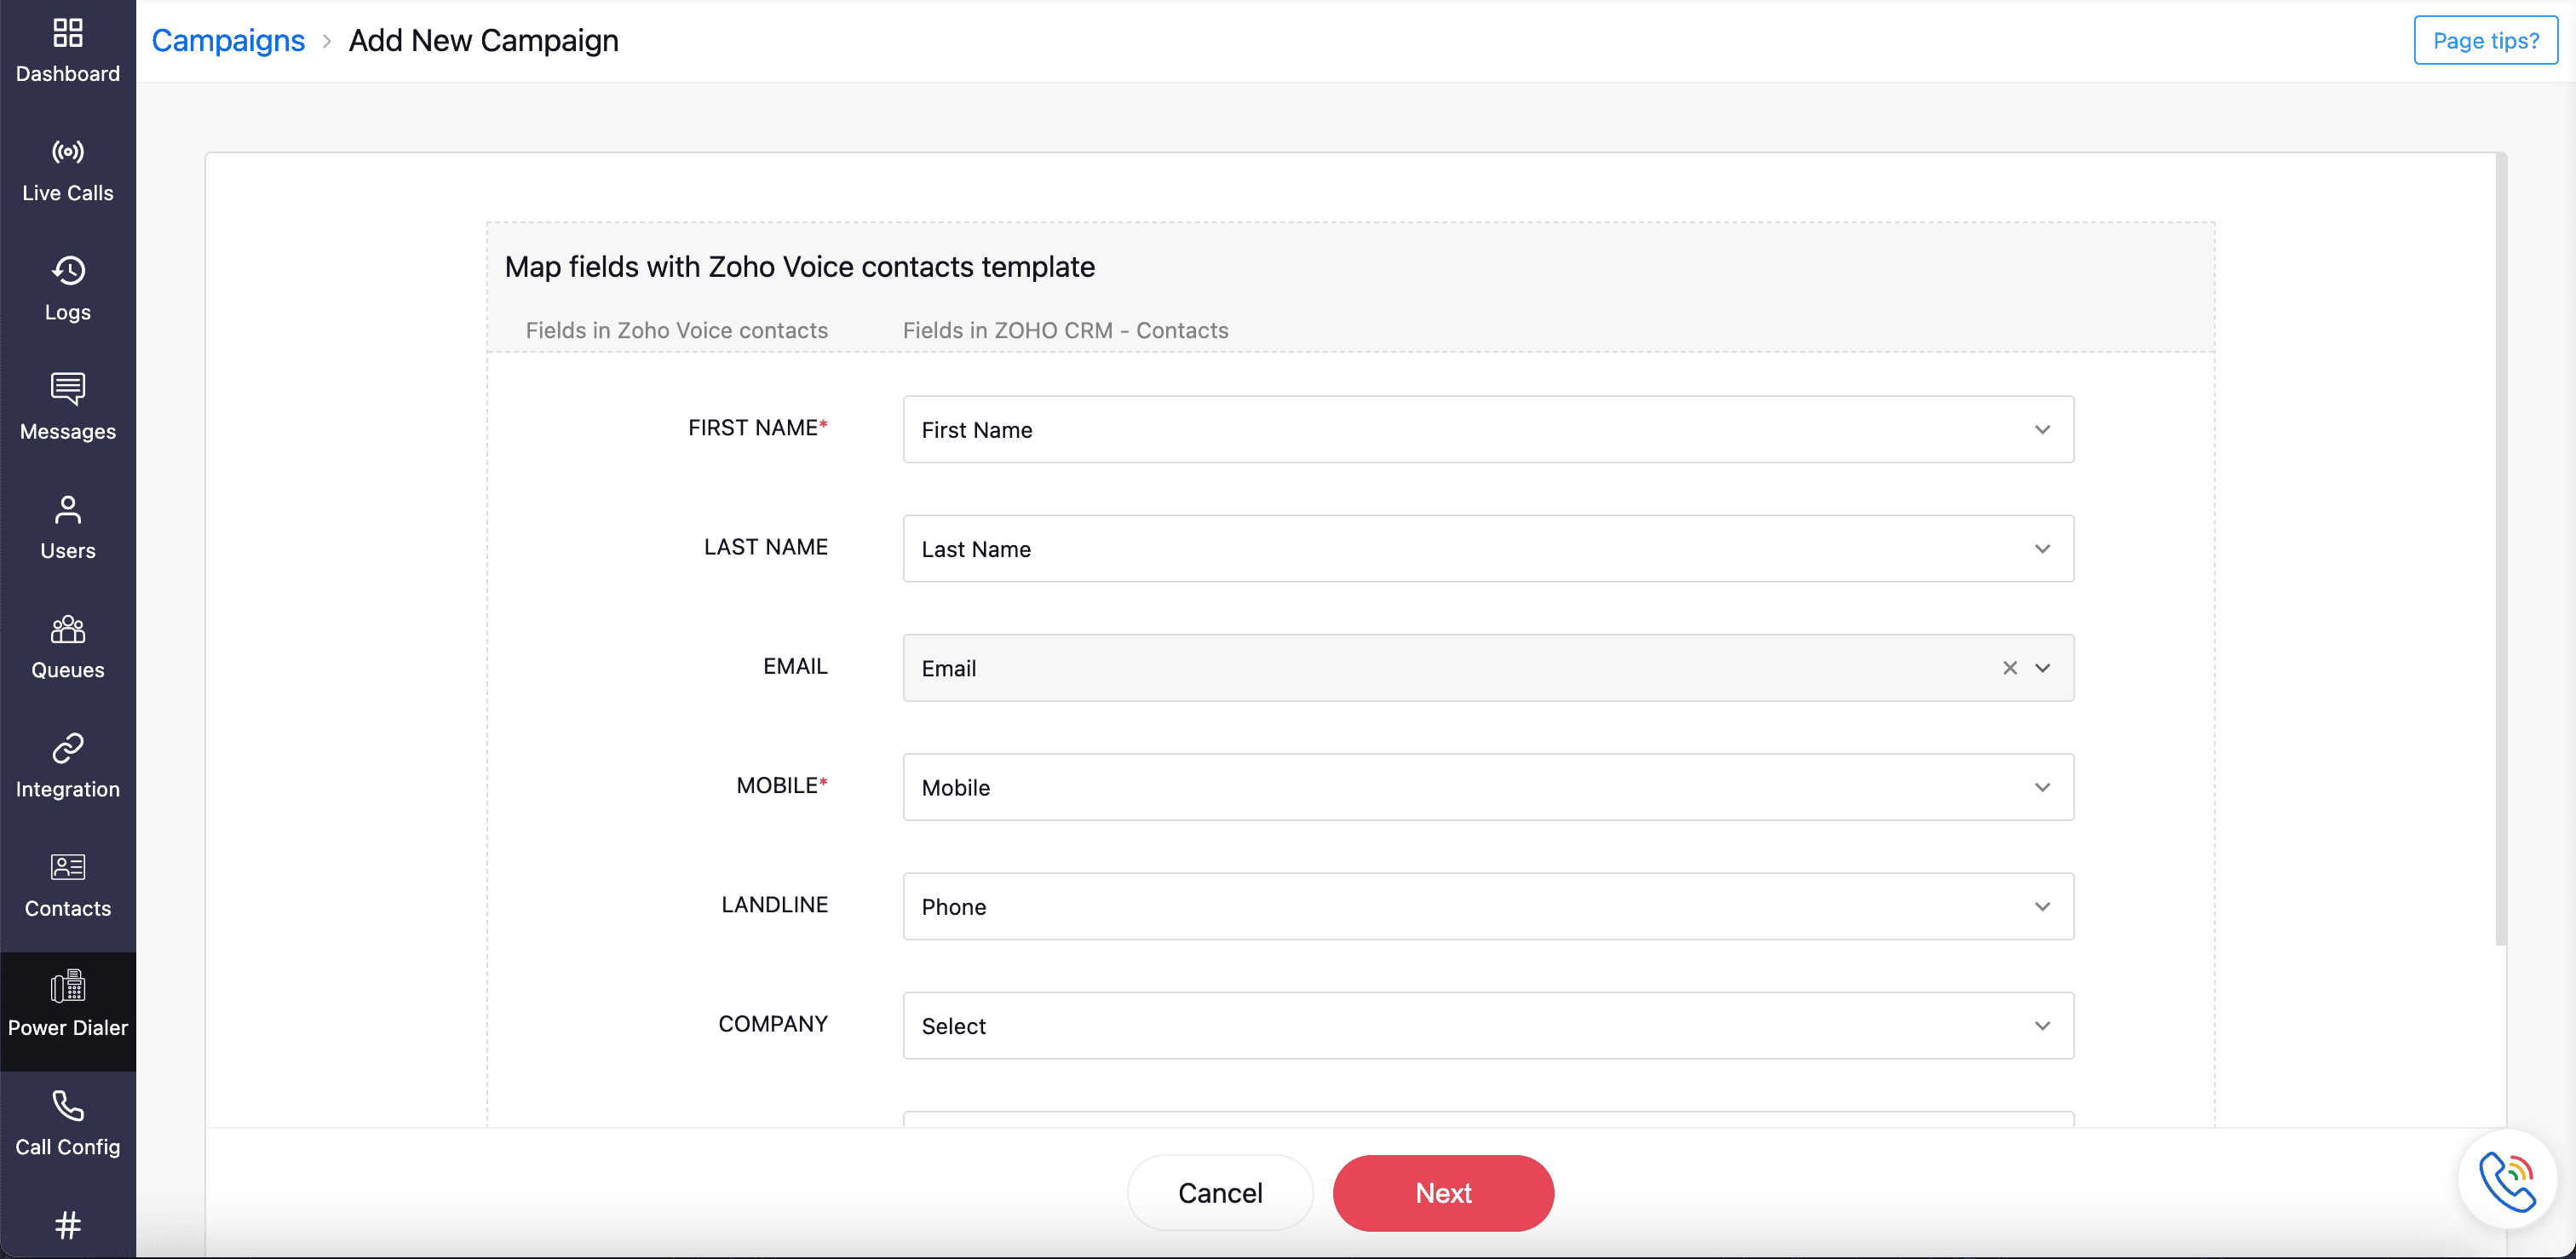
Map the contacts from the selected integrated app to the Zoho Voice contacts template, as mentioned in the fields.
Fields:
First Name: Map the corresponding field in the integrated app to the First Name field.
Last Name: Map the corresponding field in the integrated app to the Last Name field.
Email: Map the corresponding field in the integrated app to the Email field.
Mobile: Map the corresponding field in the integrated app to the Mobile field.
Landline: Map the corresponding field in the integrated app to the Landline field.
Company: Map the corresponding field in the integrated app to the Company field.
Country: Map the corresponding field in the integrated app to the Country field. The mapped country code will be applied to contacts without an existing country code.
State: Map the corresponding field in the integrated app to the State field.
Note
The First Name and Mobile fields are mandatory and must be mapped to Zoho Voice Contacts fields.
Address: Map the corresponding field in the integrated app to the Address field.
Once you're done mapping, click Next.
Select the required number of contacts.
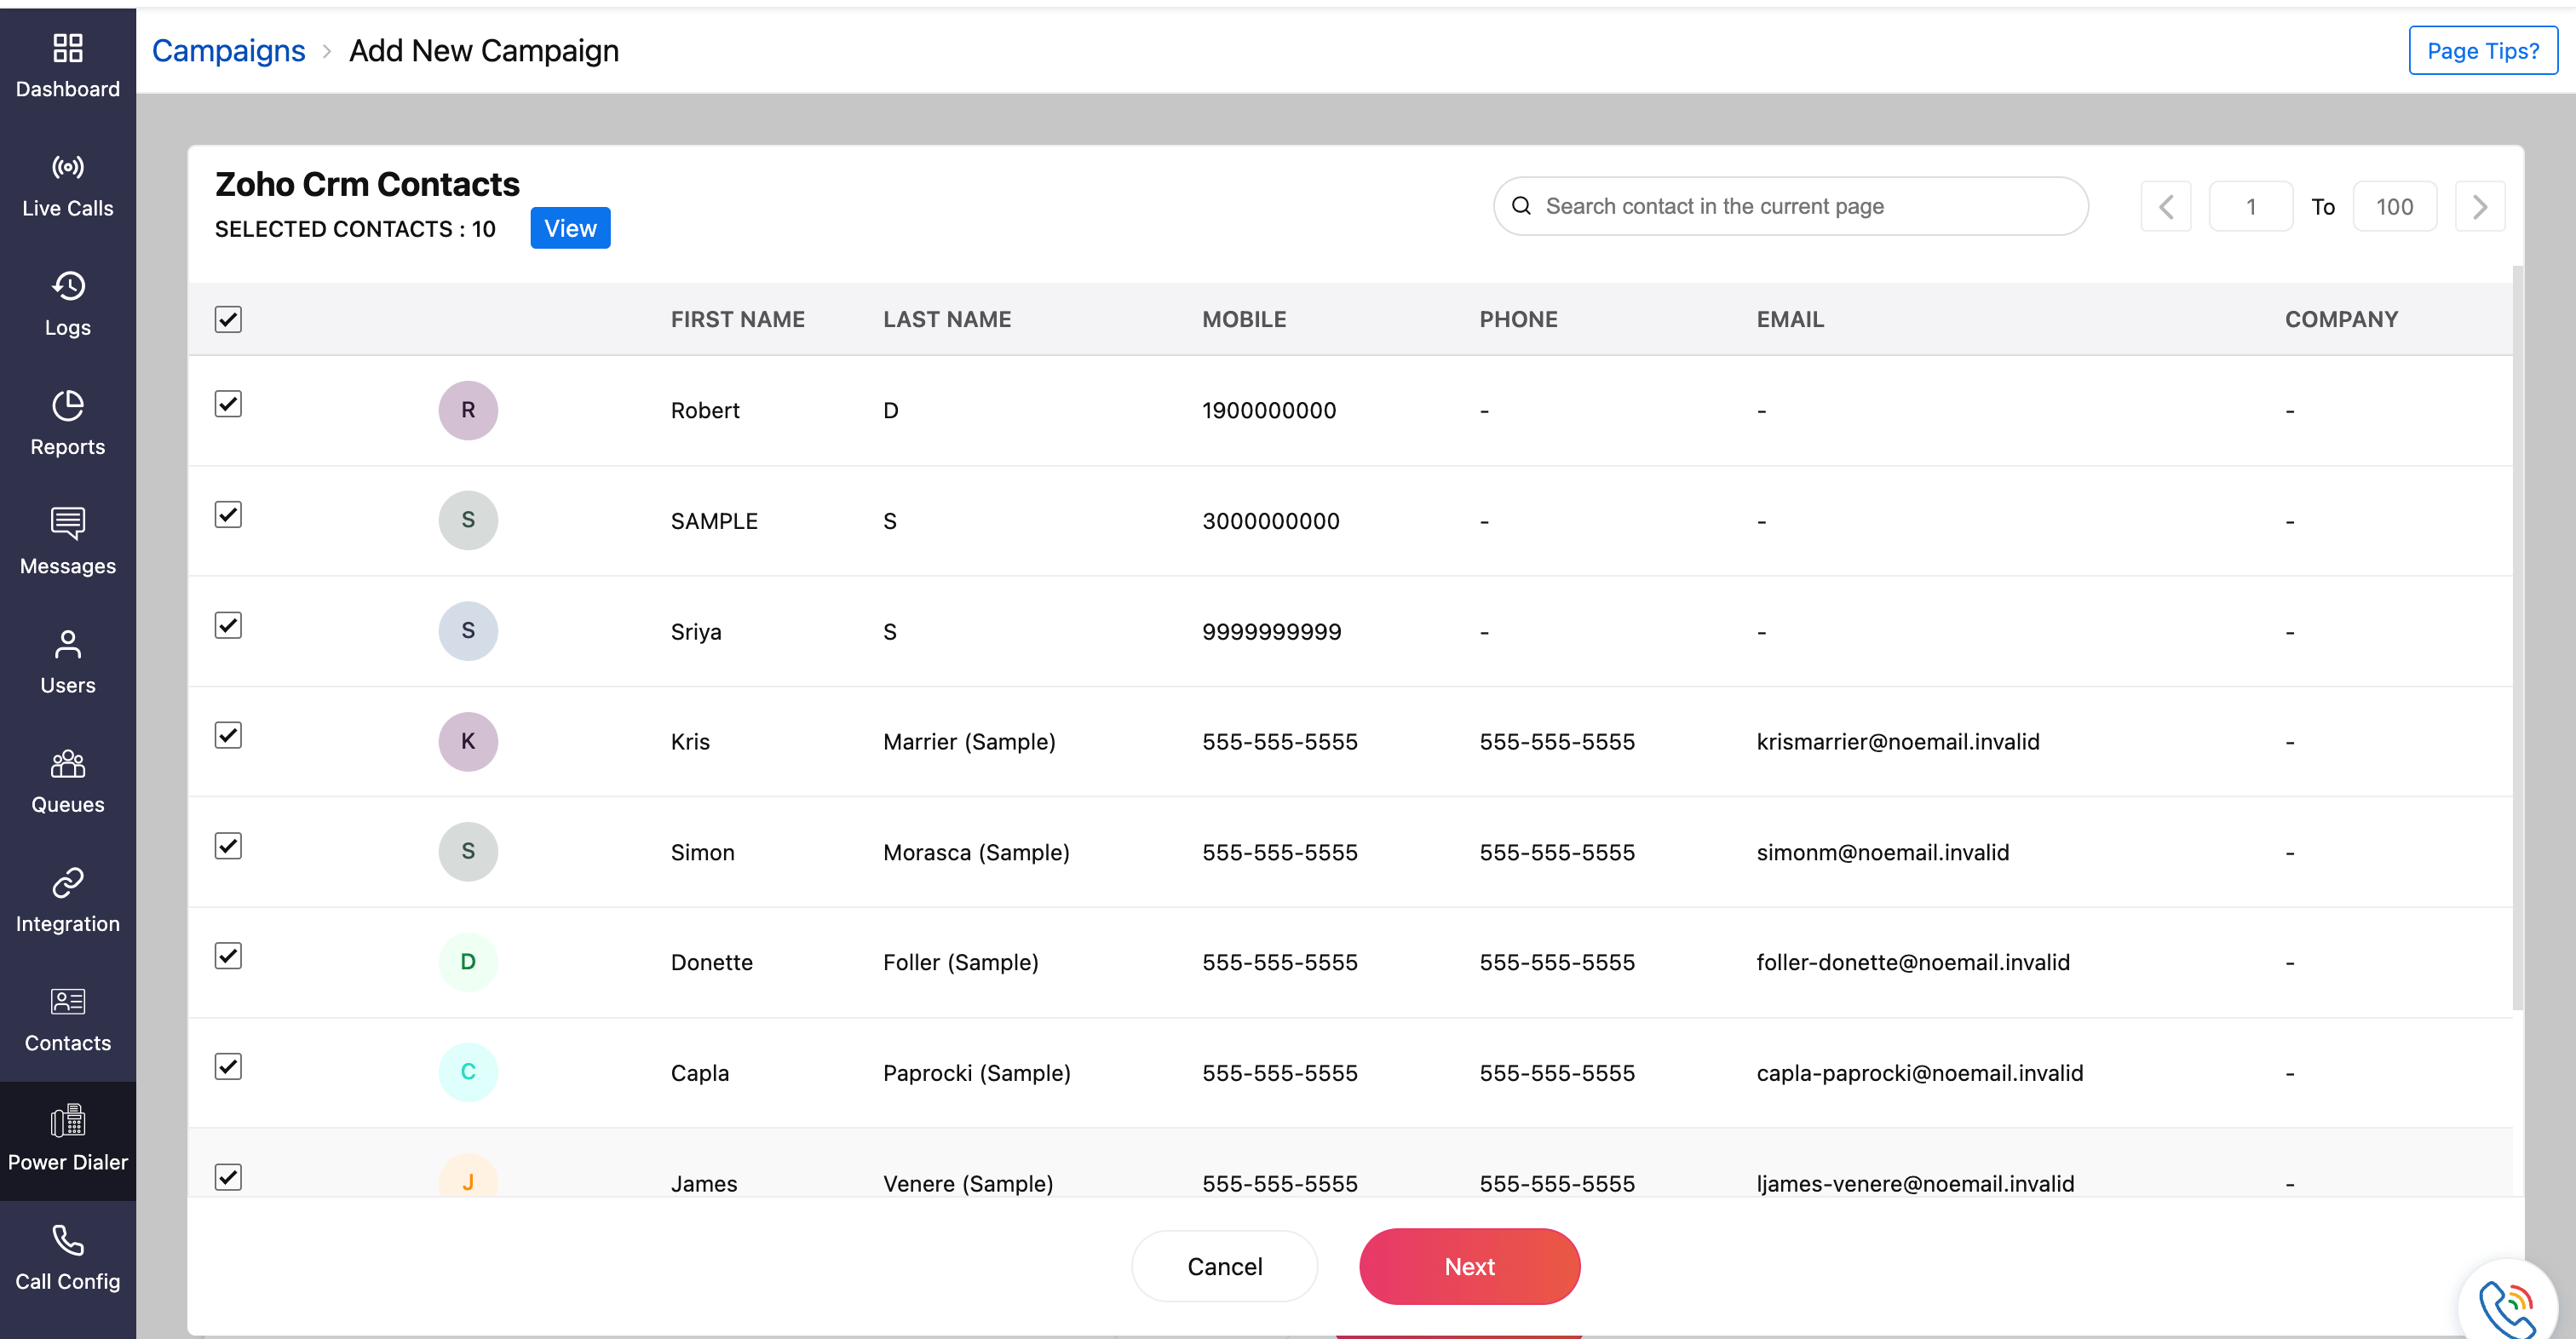
Click View to see the selected contacts. Here, you can also remove any contact by clicking the Delete icon next to it.
Click Next. You will be directed to the next step where campaign customization can be performed.


All the contacts imported via the integrated Zoho apps are saved in Zoho Voice's Contacts module. If the contacts already exist in Zoho Voice, the contact details are updated.
Customize the Campaign
For contacts imported and selected from other Zoho integrated apps, the fields for your campaign customization will be as follow:
Campaign Name: Identifies the new campaign with a unique name.
Note
This field is mandatory.
- Snooze Interval: Determines the short supplementary interval period between consecutive campaign calls. Acceptable values range from 10 seconds to 300 seconds.
Assign To: Designate the agents responsible for handling campaign calls. Multiple agents can be assigned to a single campaign by selecting by their names.
Note
Up to 40 agents can be selected.
- Dial Order: Specify the sequence in which contacts will be dialled for the campaign. You can drag and drop to rearrange the sequence if needed.
Add More Contacts: Additional contacts can be included from the contacts of the integrated app.
Once all the required fields are chosen, click Save. The created campaign will be listed in the power dialer home page with the Campaign Status as Yet To Start.