Basics of Dialogflow
If you are new to Dialogflow, you can learn the basics here and implement your bot agents with Dialogflow and integrate them with Zobot.
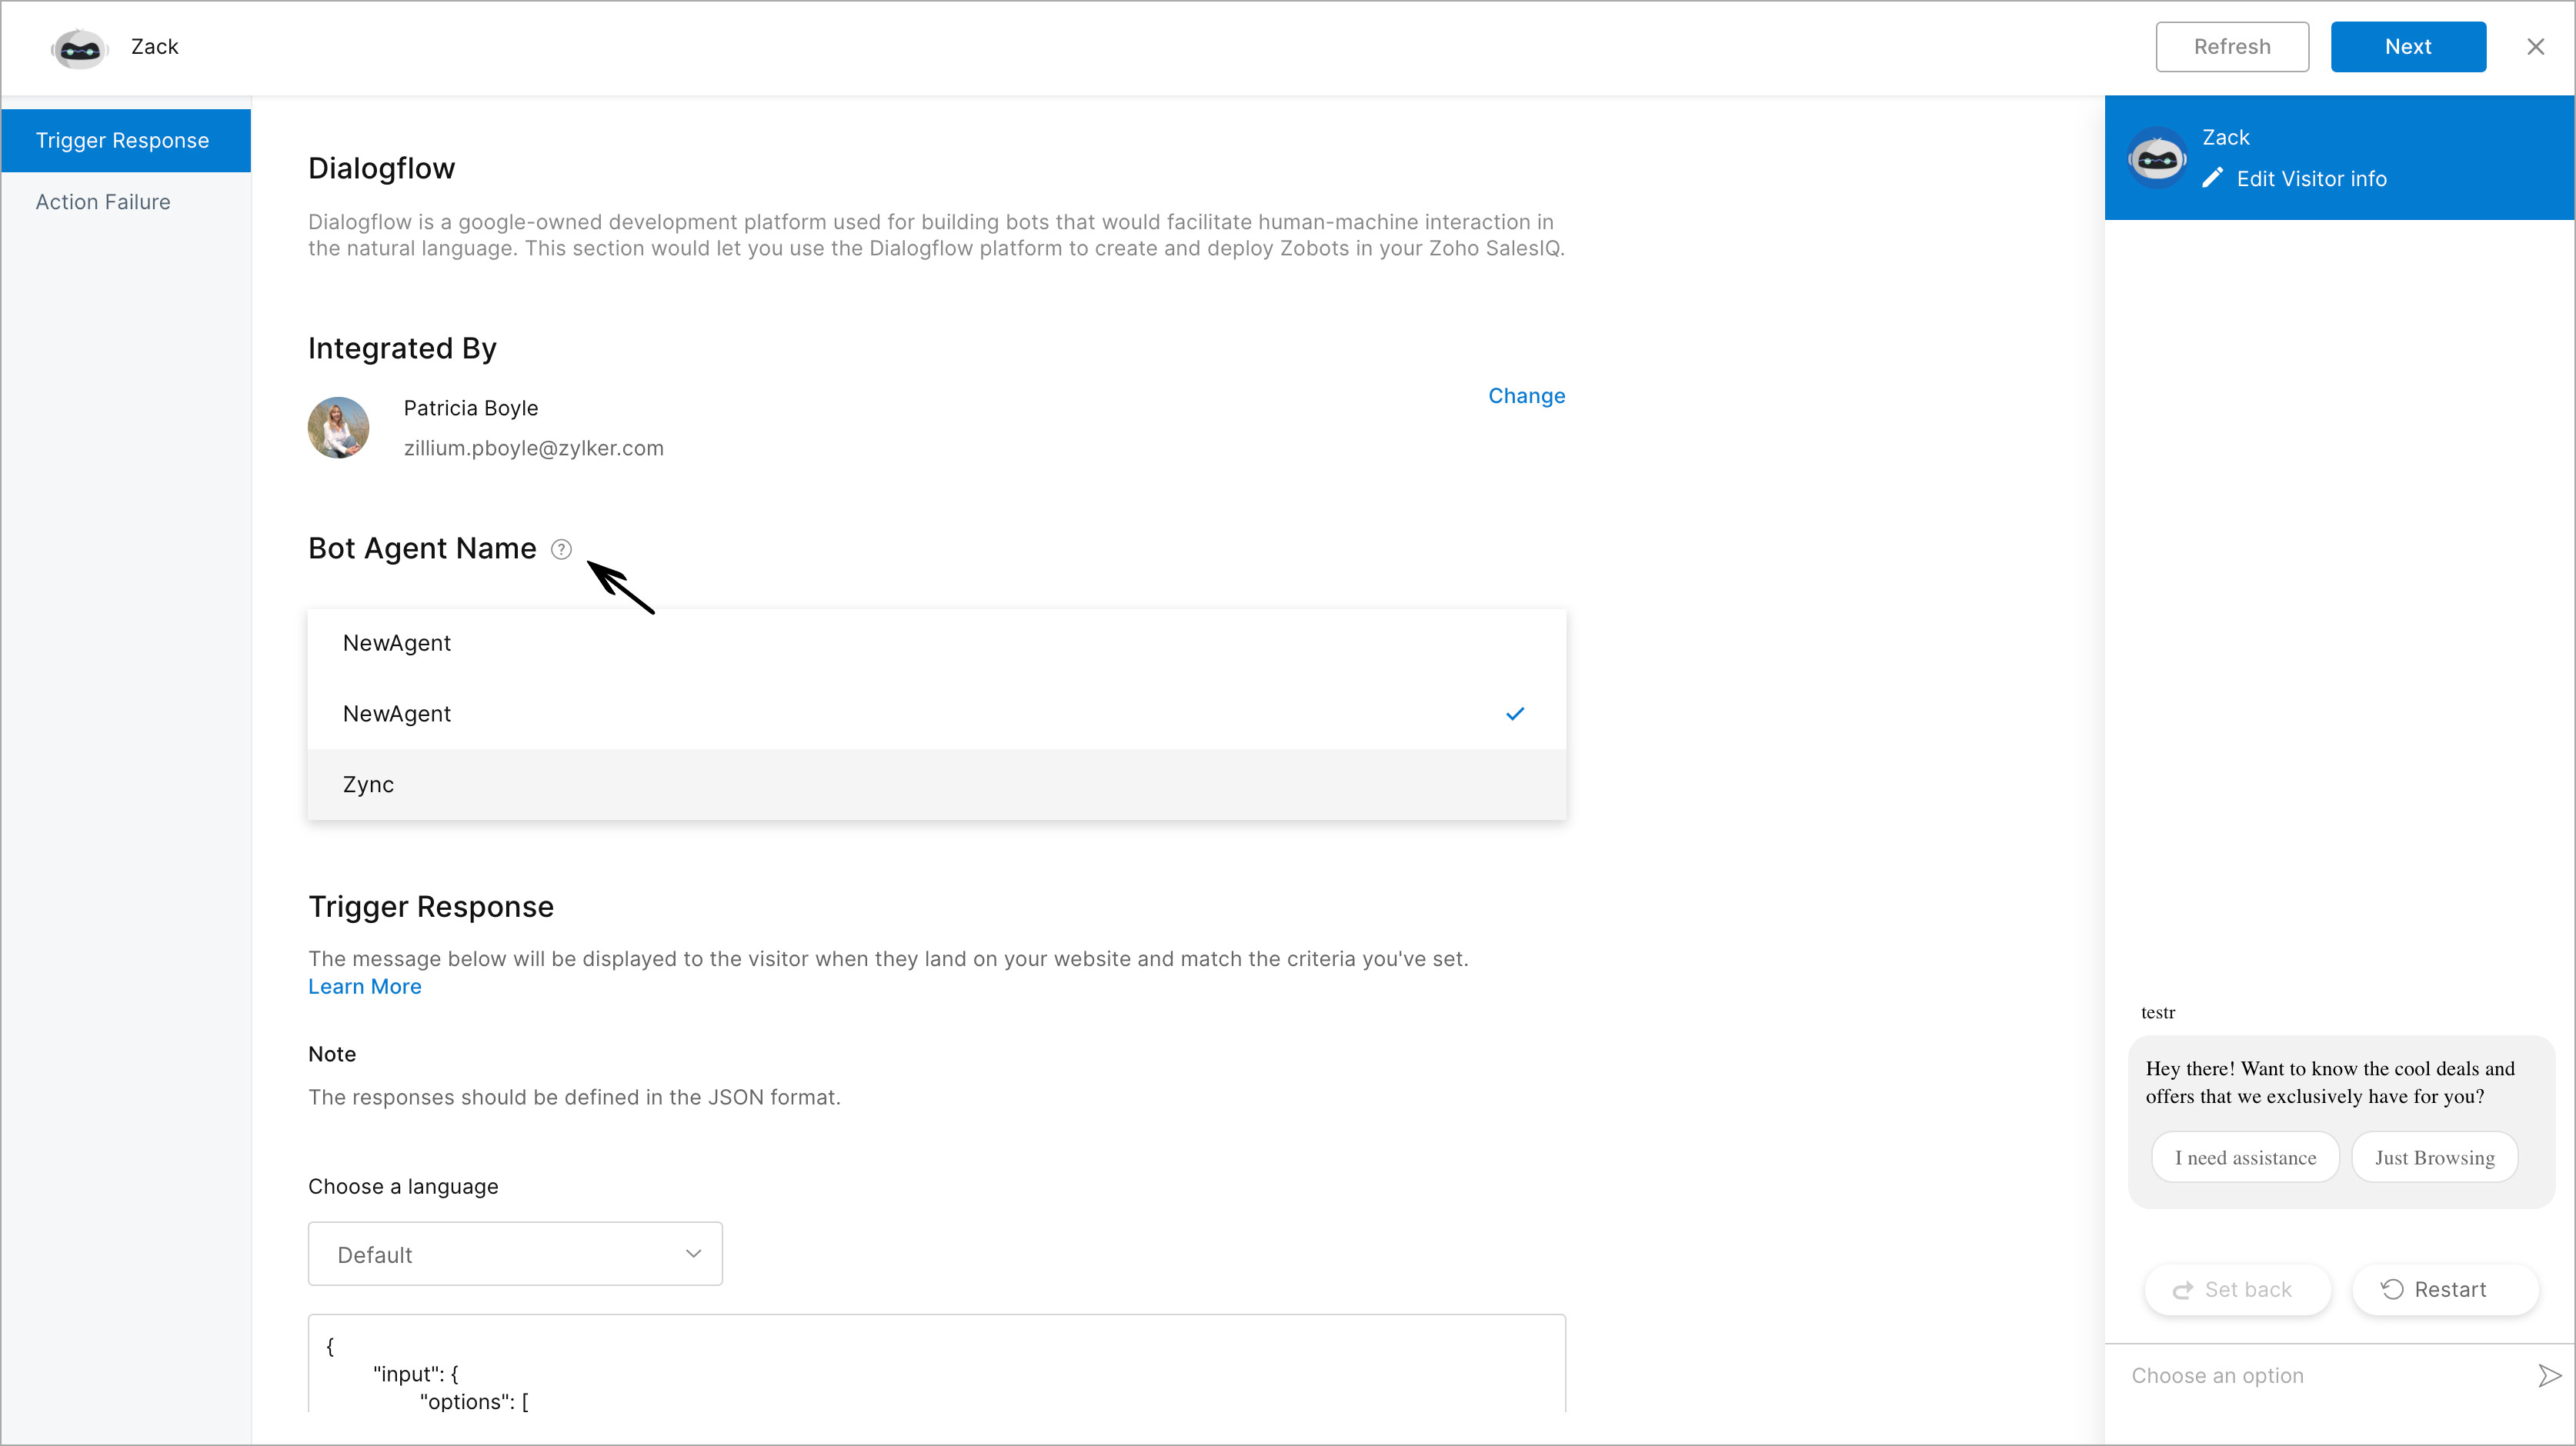
Creating a Bot Agent Dialogflow and Integrating it with the Zobot
To create a Dialogflow agent:
- In the Dialogflow console, click Create Agent on the left of the screen.
- Enter a name for your agent, choose the language (you can add more languages to your agent right after creating one) and time zone, then click Create button.

Note: SalesIQ does not support some languages that are supported by Dialogflow. If the Dialogflow bot agent language is not supported, then SalesIQ will pick the default language.
The Languages we support are listed in the table below:
| Languages | Code | Languages | Code | Languages | Code | Languages | Code |
| Arabic | ar | Japanese | ja | Greek | el | Irish | ga |
| Chinese | zh | Hungarian | hu | Spanish | es | Romanian | ro |
| Danish | da | Norwegian | nb | Abrit | iw | Italian | it |
| Dutch | nl | Polish | pl | Swedish | sv | German | de |
| English | en | Portugese | pt | Thai | th | Russian | ru |
| French | fr | Portugese-Brazilian | pt-BR | Indonesian | id | Turkish | tr |
Also Remember that, Chinese does not have a default locale in Dialogflow. So the locale for Chinese and the locale for all the other languages supported by dialogflow will be based on the visitor IP address.
The dialogflow bot language to respond to the visitor is chosen based on the following condition. The Dialogflow bot checks in the given order, and chooses the bot language to converse with the visitors:
- The language preference JSAPI script added to your website.
- The SalesIQ Chat window language chosen in the Modify the Chat Window Language section.
- The language attribute added to the website's HTML.
If you wish your dialogflow bot to interact with the visitors based on the visitor's language/browser settings, then do the following:
- If you've added the language preference JSAPI script, remove them from the website.
- If you have chosen a specific language for your chat window in the Modify the Chat Window Language section, then change the option to Website Language.
- If you've added any language attribute to the website HTML, remove them.
Integrating Dialogflow bot agent with SalesIQ bot:
- Once the bot agent is created in Dialogflow, it will be reflected in the Zobot dashboard. If you have more than one bot agent, they will appear in the drop-down and you can choose one among them.
Creating Intents
Intents are used to categorize the user's intentions. You can also use training phases to define what the user might ask your bot agents.
To create an intent:
- In the Dialogflow console, click (+) plus next to Intents in the left menu.
- Click above the Intent Name to add a name.
- In the Training Phrases section, enter the questions your users might ask the Agents.
- In the Responses section, click on the text field and enter the responses you would like to provide for the questions the users ask.
- Finally, click Save.

Fulfillment
Fulfillment is the code that's deployed as a webhook and lets your Dialogflow agent call business logic on an intent-by-intent basis. During a conversation, fulfillment allows you to use the information extracted by Dialogflow's natural language processing to generate dynamic responses or trigger actions on your back-end. Learn more.
There are two ways of creating a fulfillment:
1. Webhooks
In Webhooks, there will be a personal server URL to which all queries will be redirected. After receiving a request, the webhook can perform any required tasks. For example, the webhook might use information from the request to look up a product in a database or place an order.Finally, your webhook should respond back with instructions for what Dialogflow should do next. Learn more.
Note: They use Dialogflow formats to draft and send out responses
2. Inline Editor
The Inline editor is similar to DRE scripts. We define responses in the editor for each intent separately as functions inside which we can set the following responses for an agent
- Text
- Cards
- Suggestions
- Custom payload
The following is an example of how responses have to be structured:
const functions = require('firebase-functions');
const {WebhookClient} = require('dialogflow-fulfillment');
const TextResponse = require('dialogflow-fulfillment/src/rich-responses/text-response');
const CardResponse = require('dialogflow-fulfillment/src/rich-responses/card-response');
const SuggestionsResponse = require('dialogflow-fulfillment/src/rich-responses/suggestions-response');
const PayloadResponse = require('dialogflow-fulfillment/src/rich-responses/payload-response');
const PLATFORMS = require('dialogflow-fulfillment/src/rich-responses/rich-response');
process.env.DEBUG = 'dialogflow:debug'; // enables lib debugging statements
exports.dialogflowFirebaseFulfillment = functions.https.onRequest((request, response) => {
  const agent = new WebhookClient({ request, response });

  function welcome(agent) {
    agent.add(`Welcome to my agent!`);
    agent.add(new TextResponse('Hey there! Looking out for the best courses for your educational qualification? I can help! '));
    //card
    agent.add(new Card({
             title: `Title: this is a card title`,
             imageUrl: 'https://developers.google.com/actions/images/badges/XPM_BADGING_GoogleAssistant_VER.png',
             text: `This is the body text of a card.  You can even use line\n  breaks and emoji!`,
             buttonText: 'This is a button',
             buttonUrl: 'https://assistant.google.com/'
           })
         );
    //suggestion
    let suggestion = new Suggestion('you want assistances?');
    suggestion.setReply('I need assistance');
    agent.add(suggestion);
    agent.add(new SuggestionsResponse(`No, Thanks!`));
  }

  function fallback(agent) {
      const siqpayload = {"platform": "ZOHOSALESIQ","action": "forward","replies": ["Thanks for contacting us today, You will be connected to our operator shortly"]};
      //new PayloadResponse(PLATFORMS.PLATFORMS.UNSPECIFIED, siqpayload);
      agent.add(new PayloadResponse('PLATFORM_UNSPECIFIED', siqpayload));
  }

  let intentMap = new Map();
  intentMap.set('Default Welcome Intent', welcome);
  intentMap.set('Default Fallback Intent', fallback);
  agent.handleRequest(intentMap);
});
Note:
- SalesIQ does not support images because the text is mandatory on our end.
- The custom payload is an integration specific response. Since Zoho SalesIQ integration is not directly supported, we need to use platform_unspecified for the integration.
function fallback(agent) {
      const siqpayload = {"platform": "ZOHOSALESIQ","action": "forward","replies": ["Thanks for contacting us today, You will be connected to our operator shortly"]};
      //new PayloadResponse(PLATFORMS.PLATFORMS.UNSPECIFIED, siqpayload);
      agent.add(new PayloadResponse('PLATFORM_UNSPECIFIED', siqpayload));
  }
- In Inline, in case both Payload Response and text/images/cards are used, only the response from PayloadResponse will be sent.
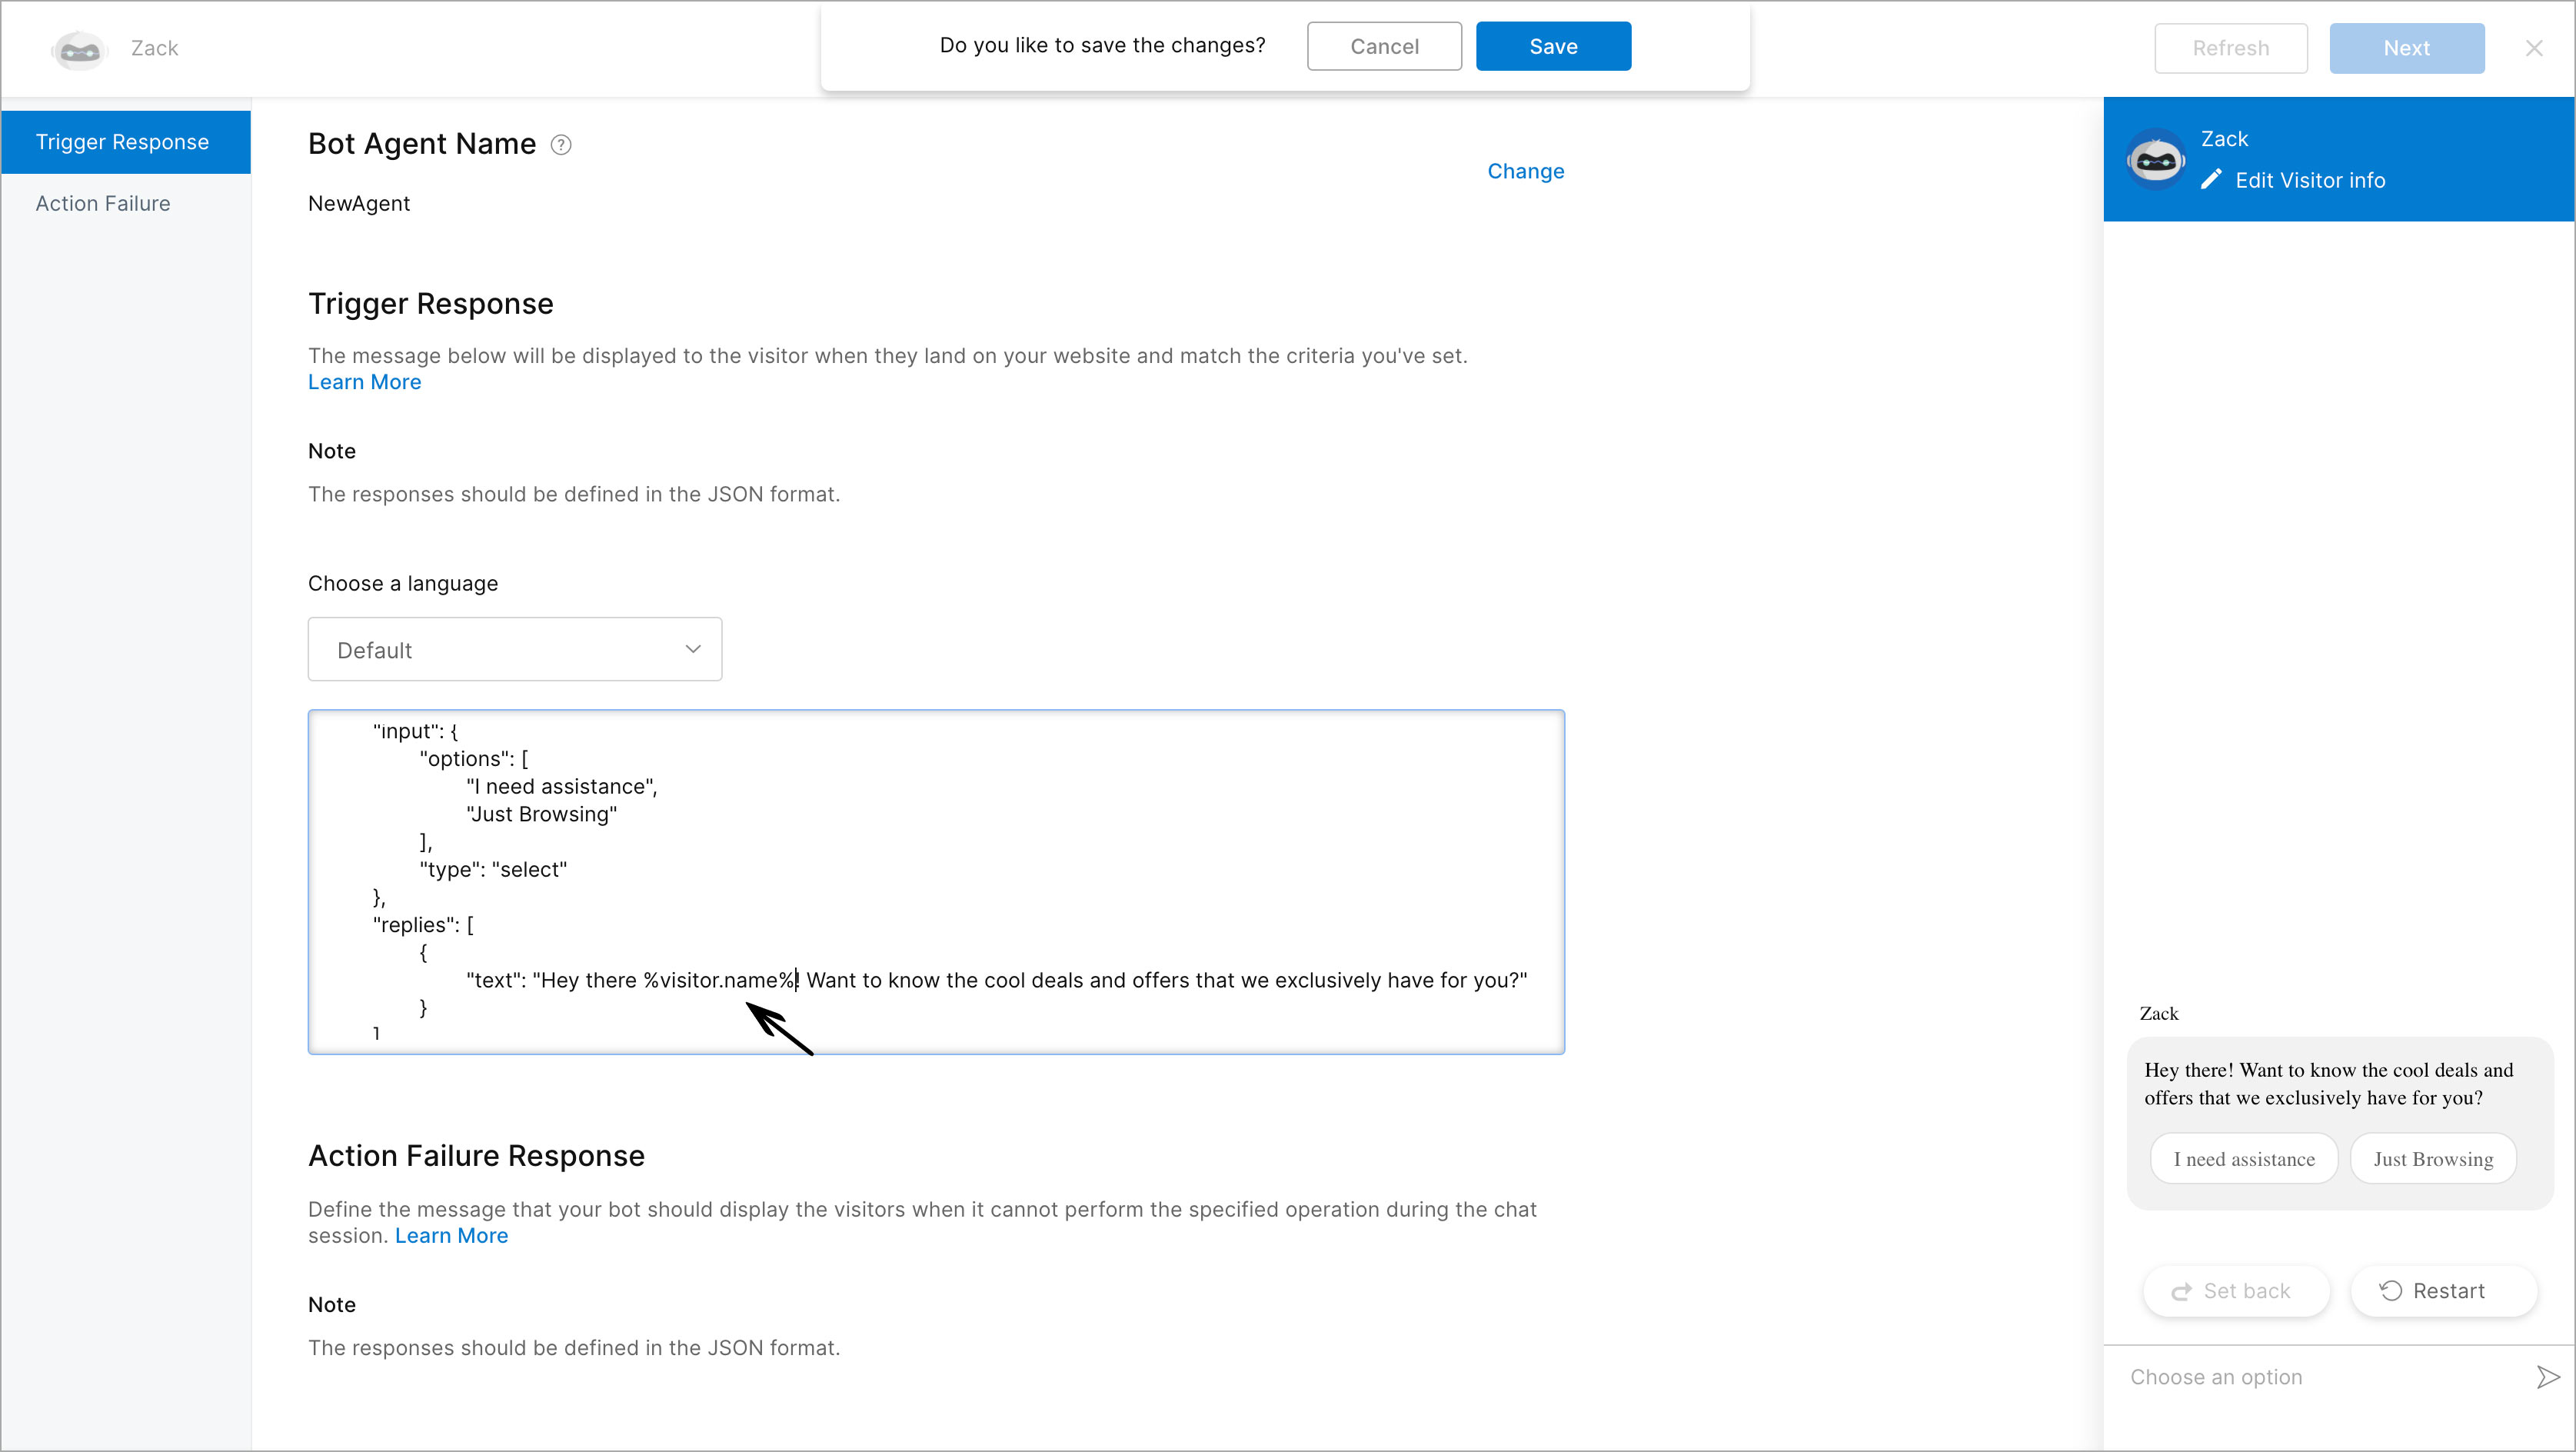
Using Dynamic Text in Response
The text that can change is termed as "Dynamic Text". Messages will be conveyed dynamically from one visitor to the other as mentioned in the defined rule. The dynamic text will be auto-populated when the "%" symbol is typed along with the message. Zoho SalesIQ supports Dynamic text in Dialogflow responses and so you can use the dynamic text in trigger messages and chat responses.
How to use dynamic text?
Using dynamic text in trigger messages:
- In Zobot dashboard > Trigger Message text box, type % followed by the format along with the message.
- Messages will be triggered dynamically to each visitor.
Using dynamic text in Dialogflow Responses:
- In the Dialogflow responses > Text Response section, type % followed by the format along with the message.
- Responses will be sent dynamically to each visitor.

List of dynamic text you can use in your triggers messages and Dialogflow responses:
| Dynamic Text Format | What it represents | Use in Trigger Message | Use in Dialogflow Responses |
| %visitor.name% | Name of the visitor on the website. | ✔ | ✔ |
| %visitor.id% | Reference ID for the visitor on the website. | ✔ | |
| %visitor.email% | Email Address of the visitor on the website. | ✔ | ✔ |
| %visitor.phone% | The contact number of the visitor. | ✔ | ✔ |
| %visitor.department% | Name of the department to which the visitor has initiated the chat. | ✔ | ✔ |
| %visitor.question% | The question raised by the visitor while initiating the chat. | ✔ | |
| %visitor.ip% | The IP address of the visitor visiting the website. | ✔ | ✔ |
| %attender.name% | Name of the operator attending the chat. | ✔ | ✔ |
| %visitor.pagetitle% | Title of the page, from where the visitor has initiated the chat. | ✔ | ✔ |
| %visitor.pageurl% | URL of the page, from where the visitor has initiated the chat. | ✔ | ✔ |
| %visitor.referrer% | Source from where the visitor is referred from. | ✔ | ✔ |
| %visitor.state% | State/Province of the visitor. | ✔ | ✔ |
| %visitor.city% | City of the visitor. | ✔ | ✔ |
| %visitor.country% | Country of the visitor accessing the website. | ✔ | ✔ |
| %visitor.timezone% | Time zone of the visitor accessing the website. | ✔ | ✔ |
| %visitor.latitude% | Latitude of the visitor. | ✔ | |
| %visitor.longitude% | Longitude of the visitor. | ✔ | |
| %visitor.operating.system% | The operating system used by the visitor. | ✔ | ✔ |
| %visitor.browser% | The browser used by the visitor. | ✔ | ✔ |
| %visitor.browser.version% | The version of the browser used by the visitor. | ✔ | |
| %web.embed.name% | The web embed where the visitor has initiated the chat. | ✔ | ✔ |
| %platform% | The platform used by the visitors in their system. | ✔ | |
| %screen.resolution% | Screen resolution of the visitor's system. | ✔ | |
| %search.engine% | Search engine used by the visitor to reach the website. | ✔ | |
| %search.query% | Search Query (Keyword)used by the visitor to reach the website. | ✔ | |
| %attender.email% | The email address of the attender who attends the chat. | ✔ | ✔ |
| %smart.timenow% | Time period in the sequence of the day (Eg. Morning, Evening). | ✔ | ✔ |
| %company.name% | Company name mentioned in Clearbit. | ✔ | ✔ |
| %company.type% | Company type mentioned in Clearbit. | ✔ | ✔ |
| %company.sector% | Company sector mentioned in Clearbit. | ✔ | ✔ |
| %company.location% | Company location mentioned in Clearbit. | ✔ | ✔ |
| %company.website% | Company website mentioned in Clearbit. | ✔ | ✔ |
| %company.employeecount% | Company's employee count mentioned in Clearbit. | ✔ | ✔ |
| %company.annualrevenue% | Company's annual revenue mentioned in Clearbit. | ✔ | ✔ |
| %company.marketcapital% | Company's market capital mentioned in Clearbit. | ✔ | ✔ |
| %company.fundraised% | Company fund details present in Clearbit. | ✔ | ✔ |
| %company.twitterfollowers% | Your company's Twitter followers from Clearbit. | ✔ | ✔ |
| %company.facebooklikes% | The likes you got in Facebook registered in Clearbit. | ✔ | ✔ |
| %company.industrytype% | The industry type your company belongs to. | ✔ | ✔ |
Note: Some of the dynamic text might not work in the Zobot preview window.
File Upload
While uploading a file to the Dialogflow bot, a text message that says File Uploaded Successfully will be sent to Dialogflow. No text will be displayed in the chat window and the text will not be sent based on the language. The user needs to handle the file upload intent based on the text response.
Passing visitor info and attachments
Visitor info will be passed on to Dialogflow for framing a response based on the visitor information like name, visitor region, etc. While processing the intent response inside Fulfillment, the values will be available inside the parameters object. Here, two objects will be received:
- visitor - you can retrieve the visitor info mentioned here
- attachments - if the visitor attaches a file during a bot conversation, it will be available inside this object. Otherwise, an empty array will be passed.
{
      "attachments": [
        {
          "name": "Screenshot.png",
          "url": "https://salesiq.zoho.com/api/v2/vicky123/attachments/330340647f6b1386d7373d2b2933b0fde58837d874086b95b2909d87f663272f5aba596670294baa?file_name=Screenshot.png&chat_id=LD_2242276011928302370_1664693403&purpose=chat_attachment",
          "contenttype": "image/png"
        }
      ],
      "visitor": {
        "current_page_url": "http://htmledit.squarefree.com/",
        "uvid": "fbe9a8d9-d1be-4799-b2ff-f64573f4eb92",
        "landing_page_url": "http://htmledit.squarefree.com/",
        "last_call_attender": "318242000000556023",
        "in_time": "1561026289397",
        "uts_session_id": "-8438009772243006363",
        "browser": "Google Chrome",
        "country": "",
        "ip": "125.19.26.35",
        "country_code": "IN",
        "language": "en",
        "question": "hi",
        "phone": "",
        "number_of_past_chats": "1",
        "lead_score": "1",
        "number_of_past_visits": "1",
        "visitid": 252,
        "visitor_id": 318242000001314000,
        "os": "Apple Macintosh",
        "email": "",
        "name": "Visitor 974826",
        "uuid": "e6c49e0c-fbf0-4b1d-86b2-b7db6cf6f13b_a0",
        "department_id": 318242000000002000
      }
    }