Timesheets
- Creating a Timesheet
- Permissions to create a Timesheet
- Timesheet Settings
- Viewing Timesheets
- Audit History for Timesheets
- DCAA Compliance for Timesheets
- Editing Timesheets
- Deleting Timesheets
- Exporting Timesheets
Creating a Timesheet
A timesheet is a collection of one or more time logs. As a first step to create a timesheet, you need to have time logs created.
The image given below shows the steps involved in having a timesheet created.
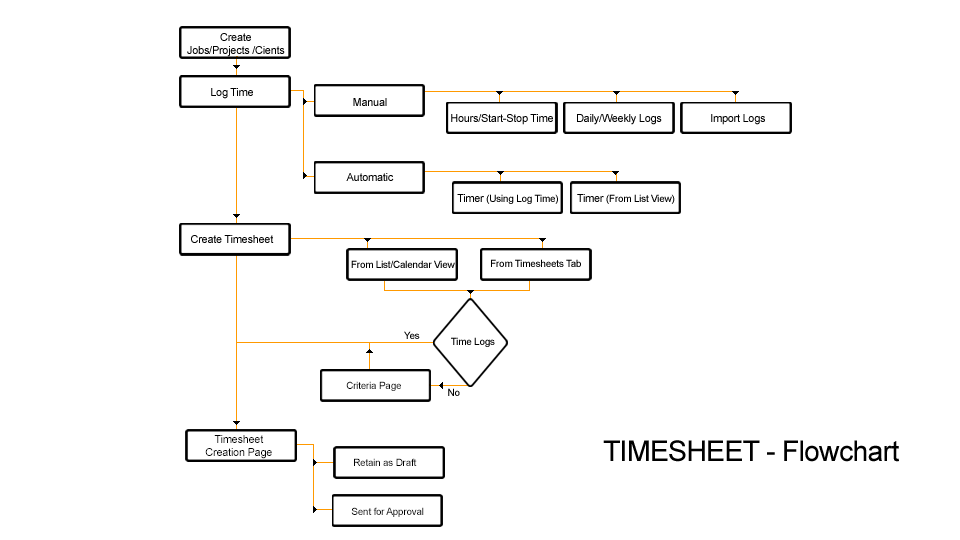
There are two ways in which you can create a timesheet. Given below are the steps to submit a timesheet.
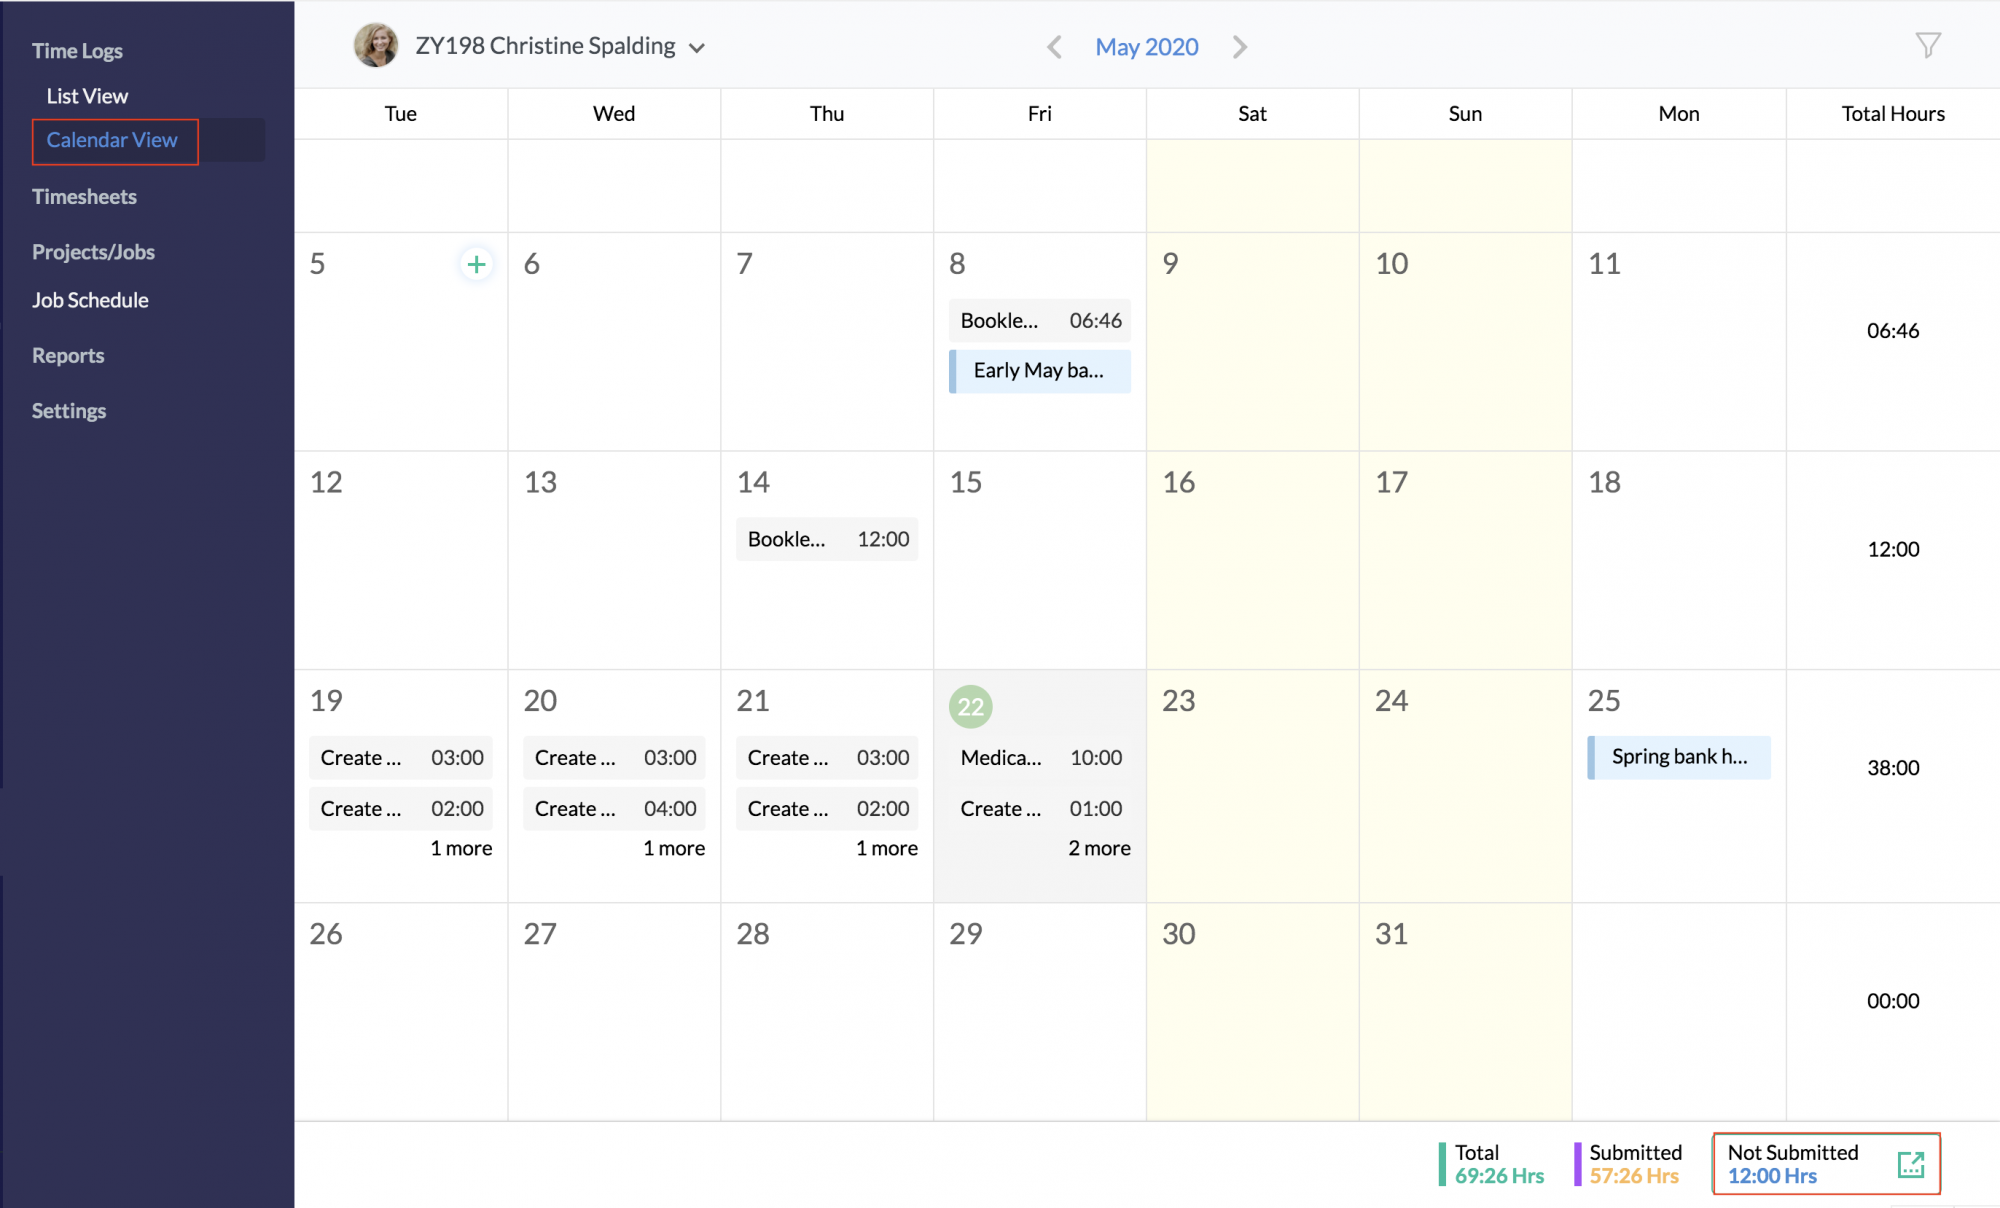
- In the List View and Calendar View of your Timesheet, at the right bottom corner, click Not Submitted.
![]()
- This has the list of time logs that are not submitted for approval. When you click on this, you will be able to see the timesheet creation page.
- If you go from the list view page, your timesheet creation page will display the logs of the current day or current week as per what you have defined in the Settings page (Timesheet > Settings > General Settings > Time Log Settings > Time Log view).
- If you go from the Calendar View page, your timesheet will display the logs of the entire month.
You can also choose to create timesheet by clicking on Timesheet > Timesheets > Create Timesheet
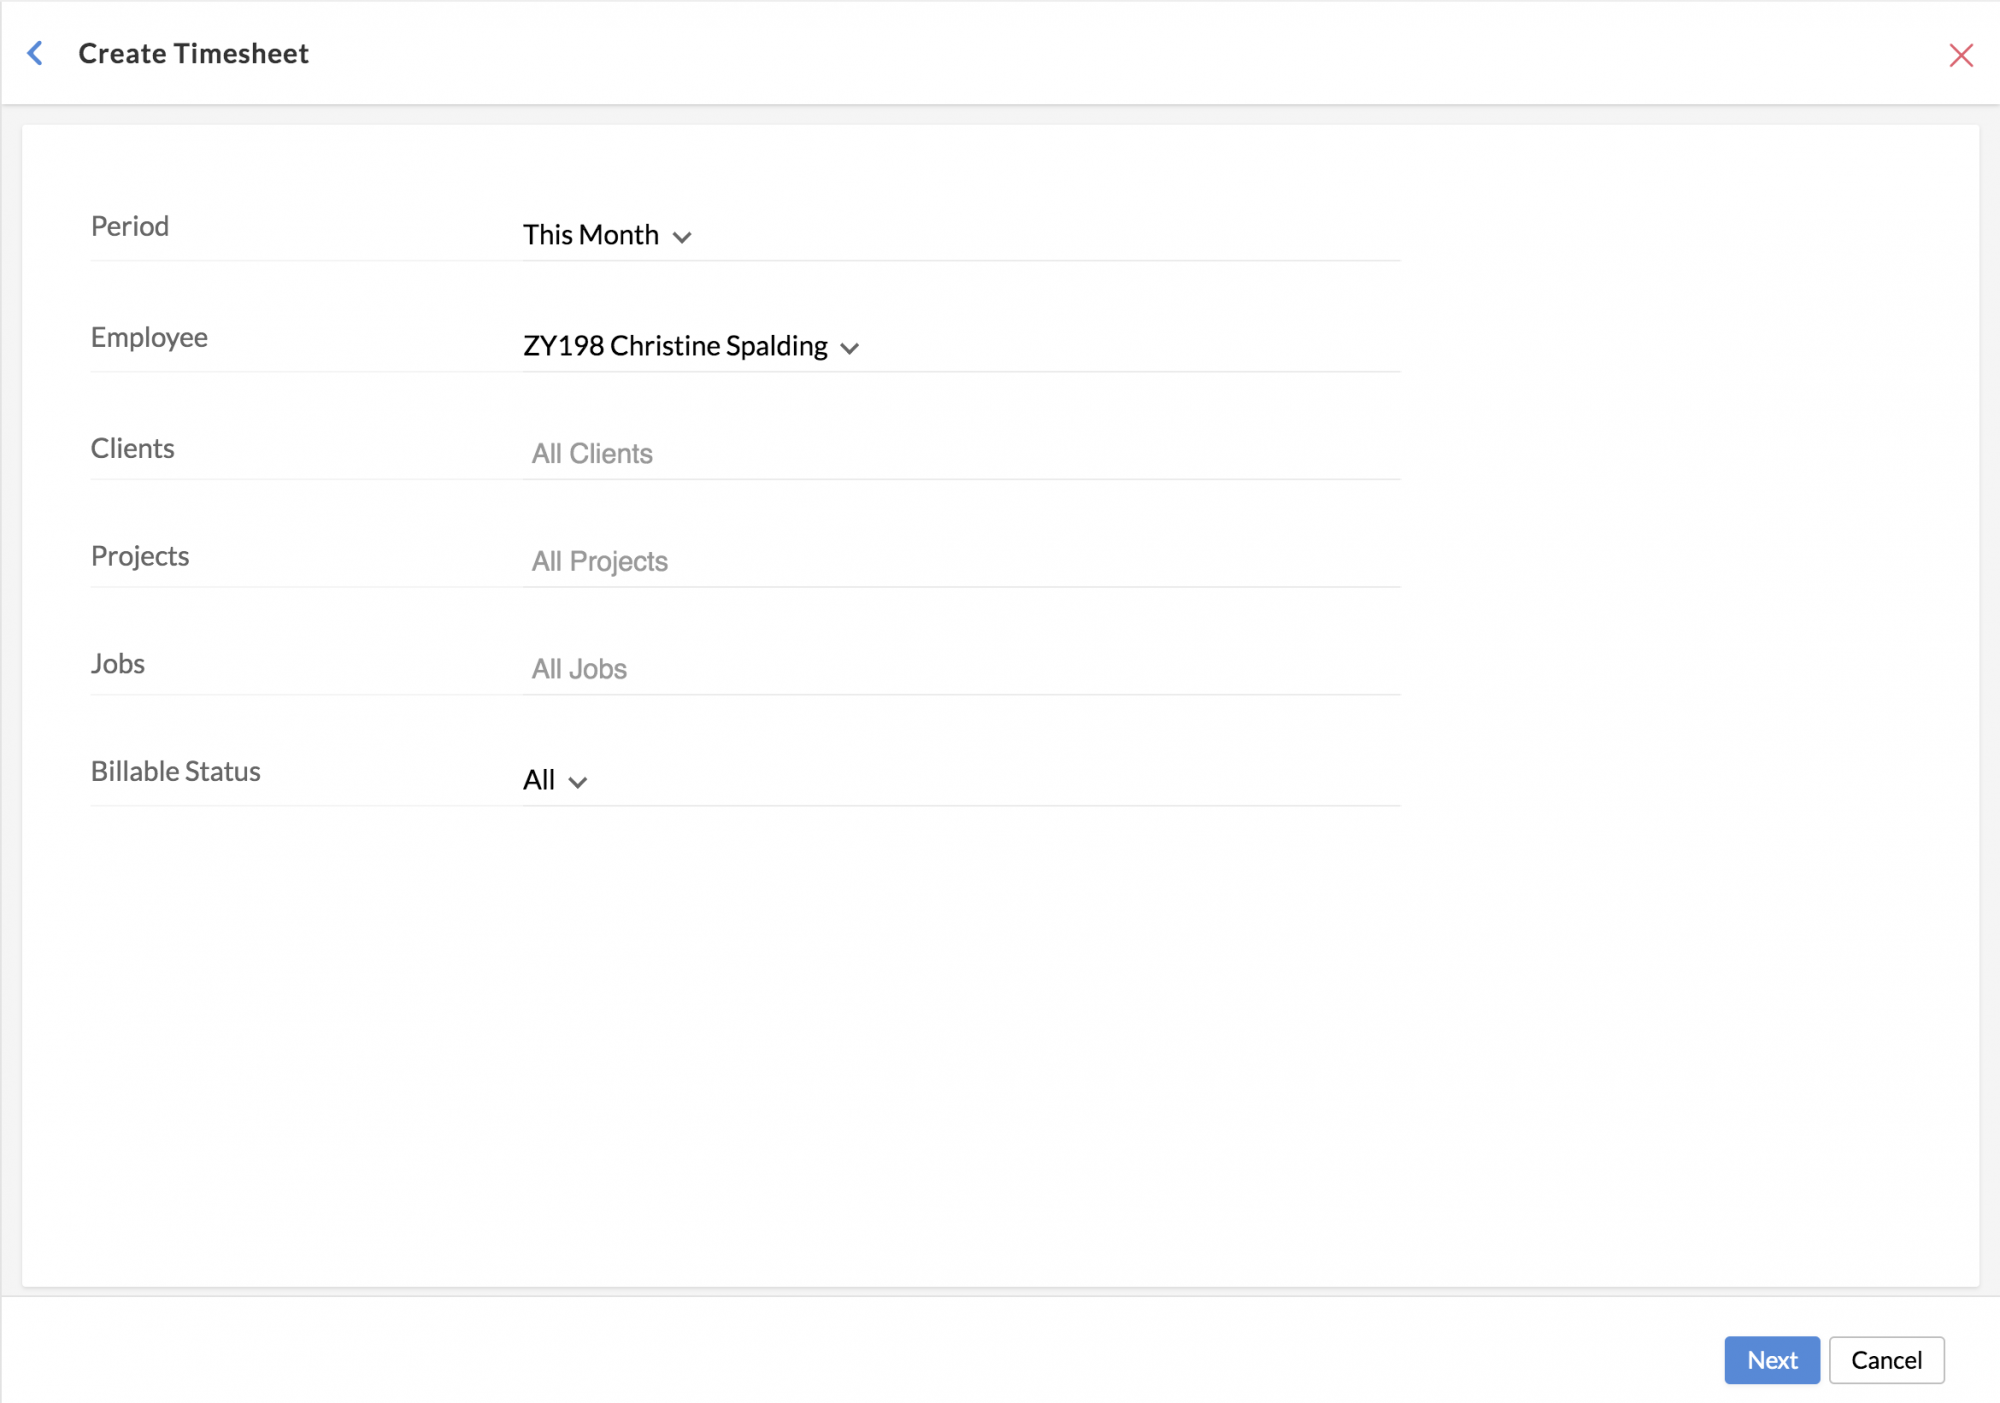
- Select the Period from the drop-down.
- Select the Employee.
- Select the specific Clients, Jobs and Projects if needed.
- Select the Billable Status.
- Click Next.
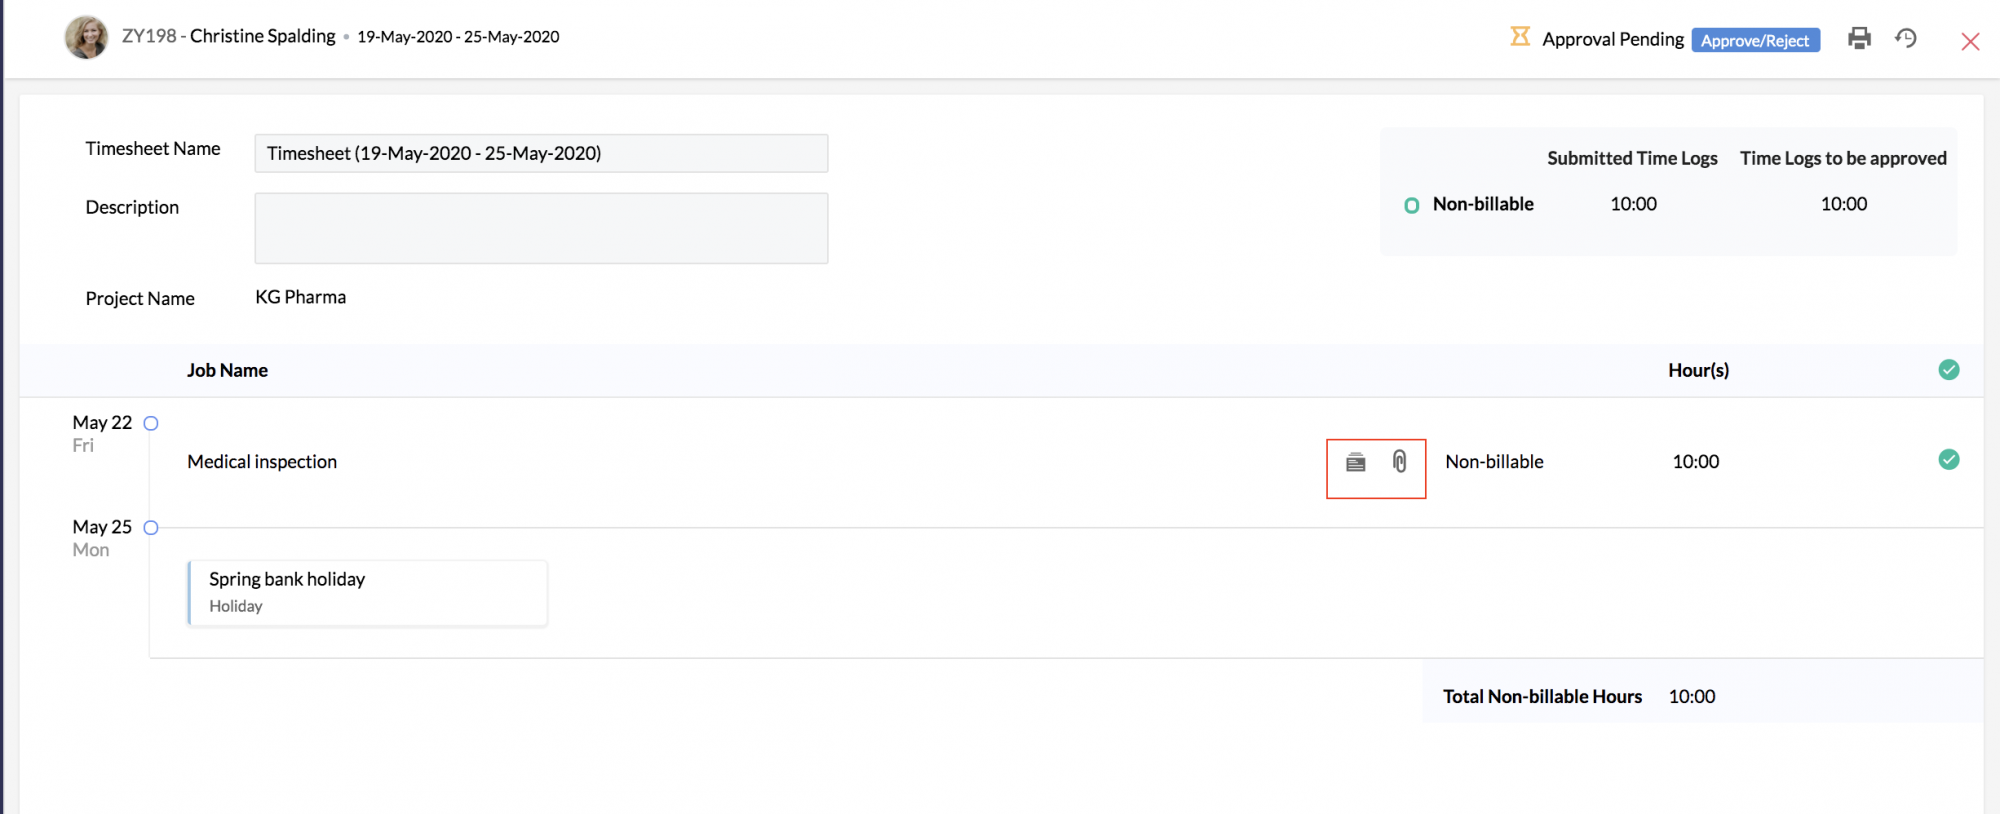
You will be able to see all the time logs collated as per the criteria you have selected above.

Once you have collated all the time logs, click Send for Approval.
Your timesheet will be displayed under Timesheet > Timesheets > My Timesheets.
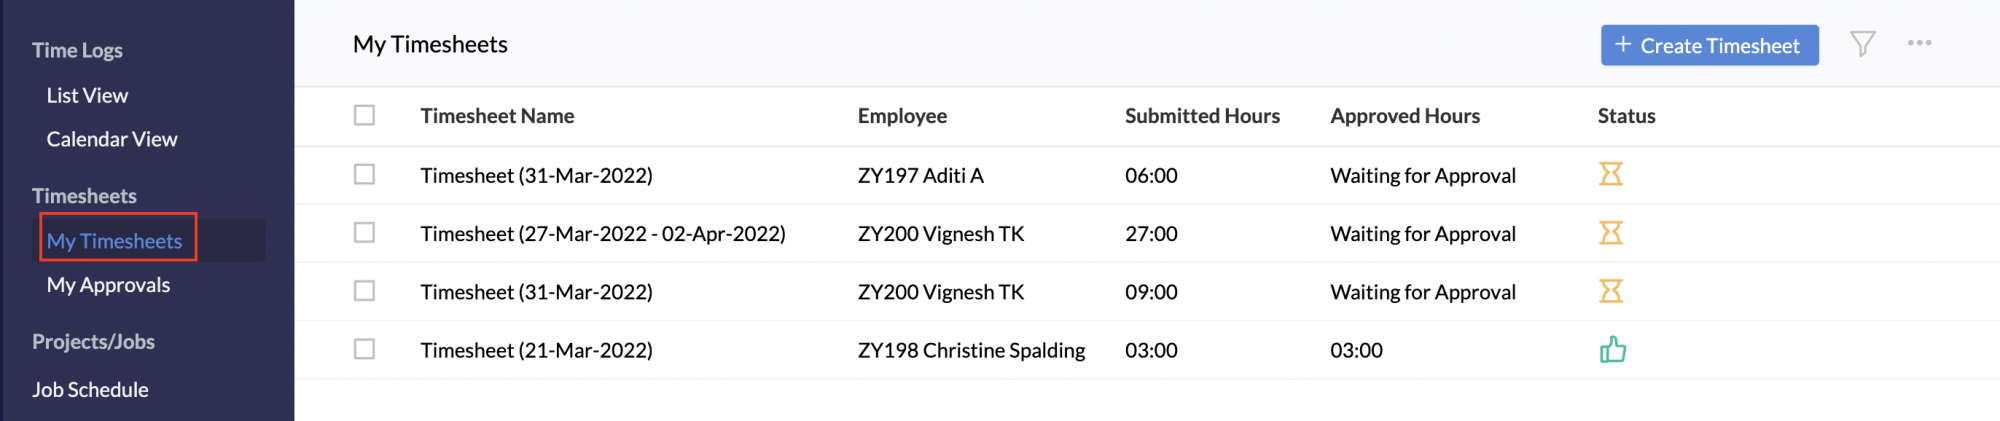
- If approvals are configured, then the timesheets will go to the approver. a green thumbs-up icon will be displayed as status when a timesheet is approved.
- If approvals are not configured then timesheets will be indicated with a draft status icon.
- When creating a timesheet, if you feel that the timesheet is incomplete, you can use the Save as Draft button.
- In My Timesheets page, if a timesheet was rejected then a red thumbs-down icon will be displayed.
Note: The rate that is used in the timesheet is based on the rate per hour defined for a particular user under payroll settings.
![]() Tip: Click here to know how to define the rate per hour for a user.
Tip: Click here to know how to define the rate per hour for a user.
You also have another option where you can schedule timesheets to go for approvals automatically.
- From your home page, go to Timesheet > Settings > Scheduler settings
- Enter the details
- Under Applicable for, make the selection as required from the drop-down options available
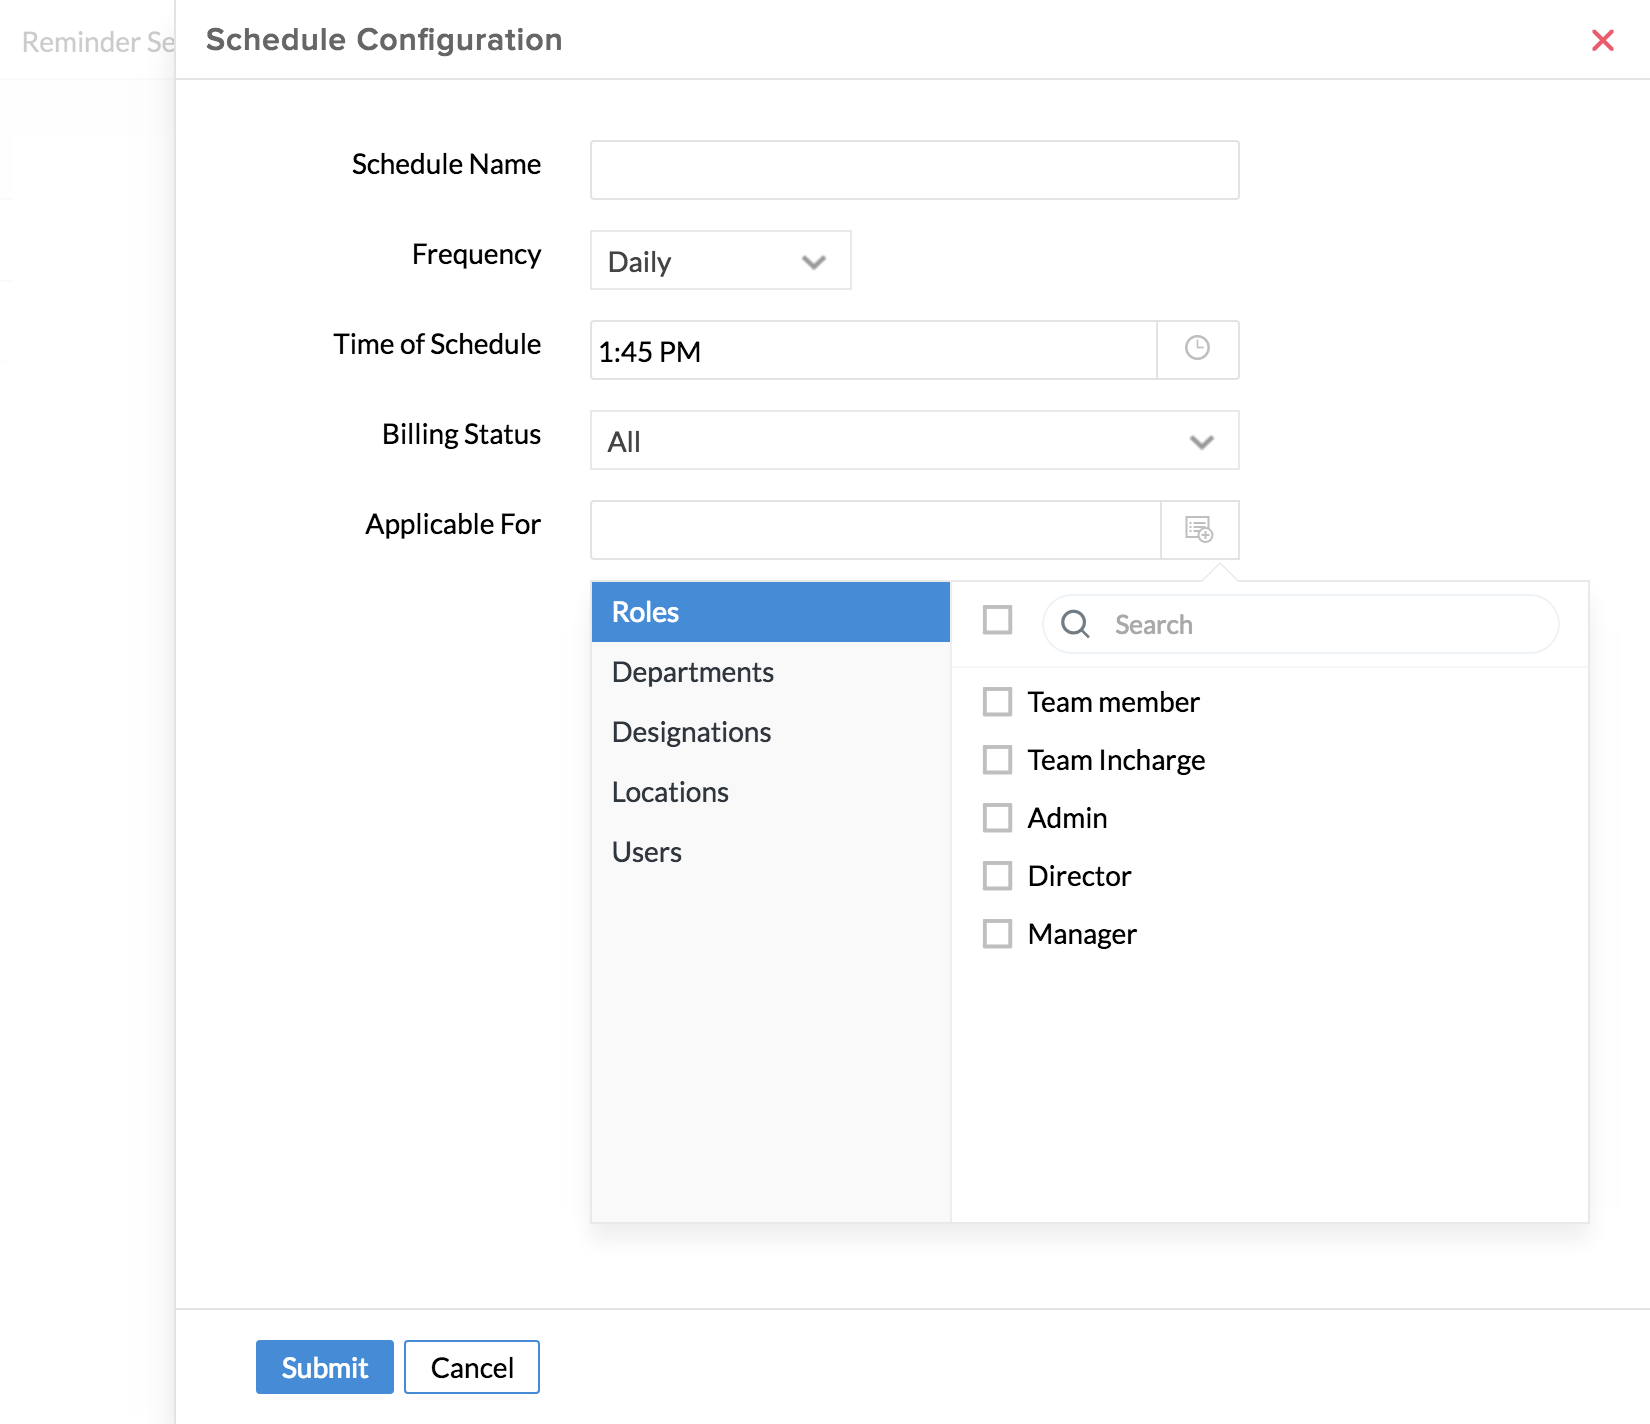
- Click Submit
The timesheets will go for approval automatically at the time chosen in the scheduler. If Approvals are not configured, the Timesheets will remain in Draft.
Permissions to create a Timesheet
Depending on the nature of your business and your organizational policy, as an administrator, you can either retain the timesheet creation permission to yourself or enable users and Reporting Managers to create Timesheet. Follow the steps given below to grant permission to users or Reporting Managers to create timesheets.
- From your home page, go to Timesheet > Timesheet Settings.
- Under Timesheet settings, go to Creator.
- Select the desired role from the drop-down.
- Click Submit.
Timesheet Settings
The number of time logs displayed while creating timesheets is dependant on two factors as listed below.
1. In the configurations page, (Timesheet > Settings > General Settings > Timesheet Settings), if you chose to Exclude jobs without clients, then the time logs which you have created for jobs that are not associated with clients will not get listed.
2. In the configurations page (Timesheet > Settings > General Settings > Timesheet Settings > Billable Status), if you have chosen the billable status as Billable, then, the time logs that are created for jobs with Billable status will only get listed.
For all your time logs to get listed, the option of including time logs without clients and including time logs with both Billable and Non-Billable status should be enabled.
Viewing Timesheets
You can see your timesheets and your reportees, by following the steps given below.
- From your home page, go to Timesheet > Timesheets.
- Click on My Timesheets to see the timesheets that are created by you and your reportees.
- Select the Timesheet you would like to view.
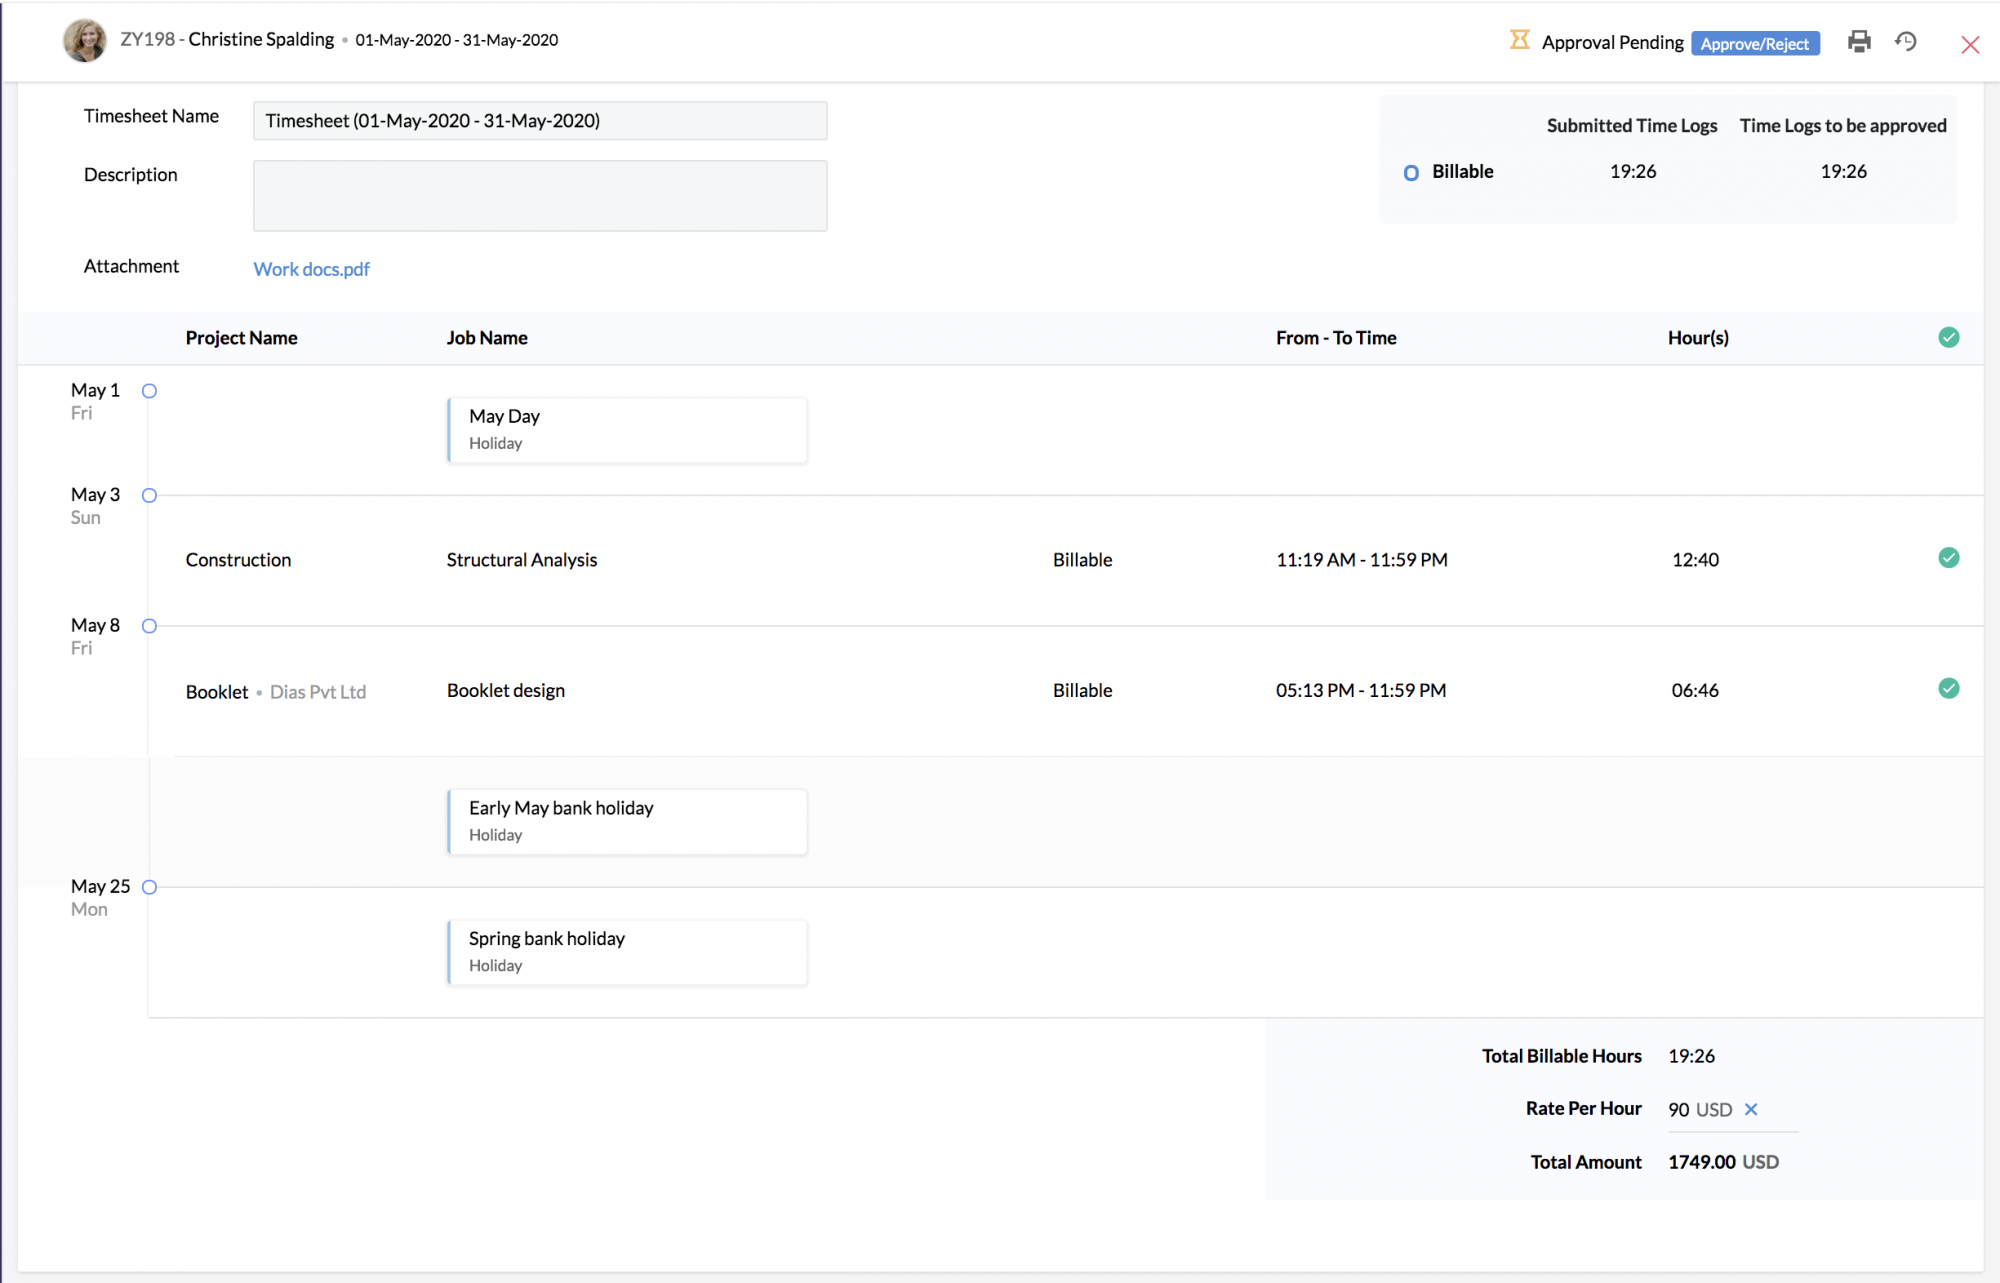
Employee leave or applicable holiday information also will be displayed in the timesheet.

Using Filters
The filter option can be used to create custom views to see Timesheets.
For instance, You can view the pending timesheets of all users.
Follow the steps given below to do this.
- From your home page, go to Timesheet > Timesheets > My Timesheets
- Click on the filter and under Employee Profile, select All Users, under User/Employee Profile, select All Users & Employee Profiles
- Under Approval Status, select Pending and hit Search
You will be able to see the timesheets of all users that are pending for approval within the selected period.
Some points to note:
- The default period filter is set to This Month. You can change the filter criteria as per your need.
- All timesheets that overlap with the From or To date of the selected period will be listed. For example, even if weekly filter is applied, any other timesheets that overlap with any of that week's days will be displayed.
- A maximum of 31 day's timesheets can only be filtered and displayed.
Audit History for Timesheets
Using the Audit history option, you will be able to see the history of a timesheet including edits, right from the time of creation until the time of approval of the timesheet. Follow the steps given below to view the audit history.
- Go to Timesheet > Timesheets > My Timesheets
- Select the respective timesheet.
- Click on the Audit History icon on the right top corner
You will be able to see the history of the timesheet. You can also print this history by clicking on the print icon.
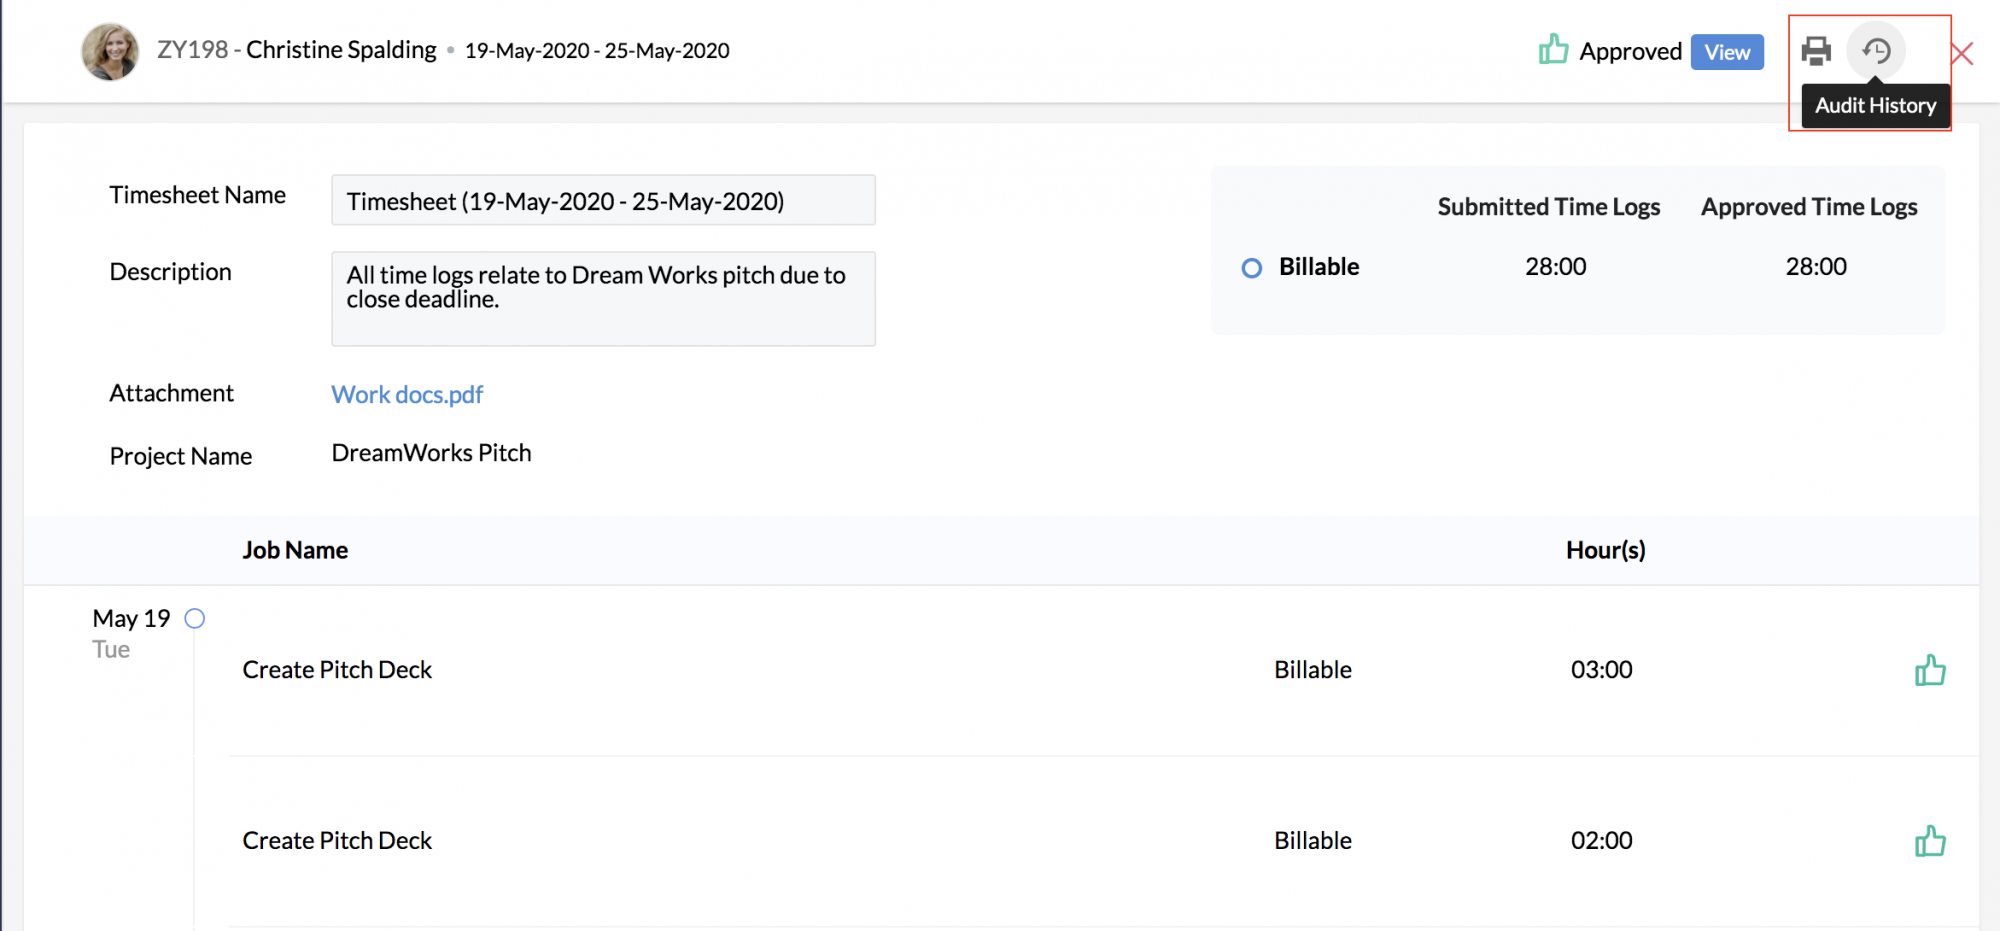

Note:You can print a timesheet by clicking on the print icon. Only one timesheet can be printed at a time.
DCAA Compliance for Timesheets
Yes. The timesheets that you create using Zoho People are compliant with the standards that are defined by the DCAA. Click here to know more.
Editing Timesheets
- From your home page, go to Timesheet > My Timesheets
- Select a particular timesheet to edit Name or Description. To edit billable status and hours click on the edit icon(pencil icon) which appears when you hover the mouse over the time log.
- Click Submit
Note: A timesheet can be edited by the users only when it is in a draft state.
Deleting Timesheets
- From your home page, go to Timesheet > Timesheets
- Select the Timesheets that should be deleted
- Click Delete
Note:Employees can only delete timesheets that are currently in draft state. Admins, however, can delete any timesheet.
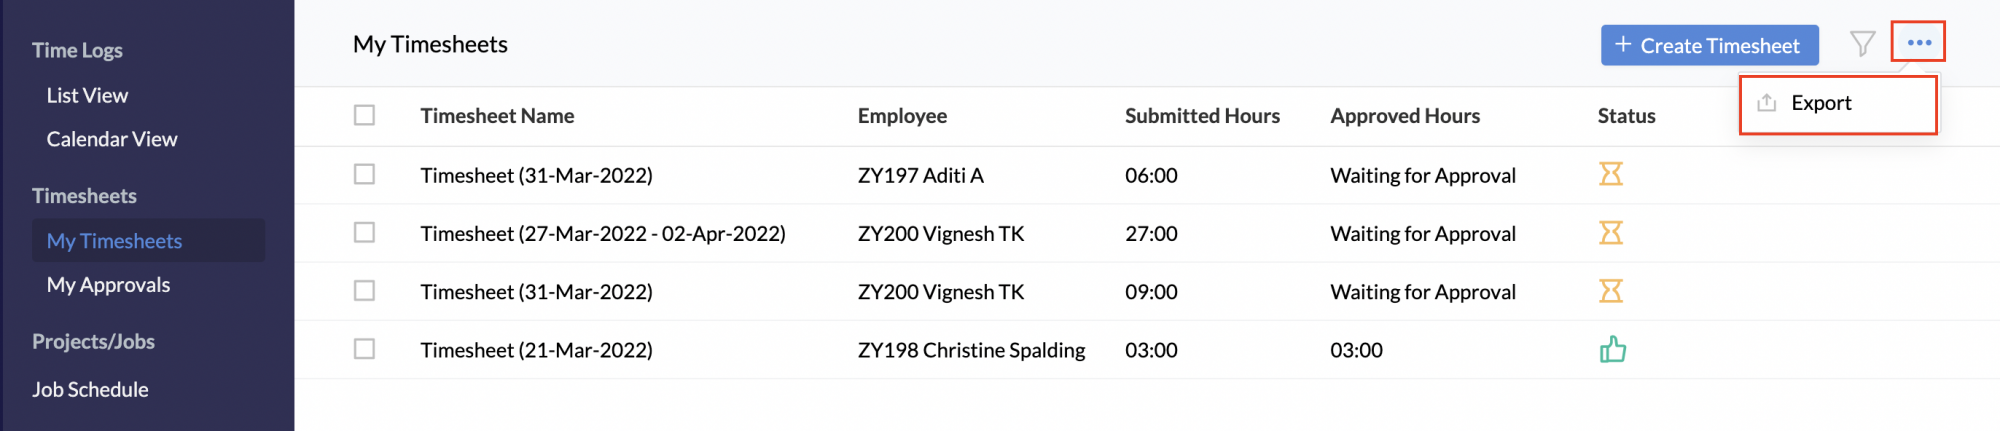
Exporting Timesheets
To export timesheets, go to Timesheets > My Timesheets, click the ellipsis icon beside the filter icon and click Export.
Some points to note:
- The exported data will be same as what you see in your screen.
- Only the Admin (configured under User Access Control > Roles), Specific Role Data Admin ( configured under Roles > Specific Role Assignment > Data Admin), Timesheet Module Admins and Location Admin for all locations ( configured under User Access Control > Permissions > Admin Operations) will be able to view and use this export option.
- A maximum of 31 day's timesheets can only be exported.
- All timesheets that overlap with the From or To date of the selected period will be listed and exported. For example, even if weekly filter is applied, any other timesheets that overlap with any of that week's days will be displayed and exported too.
- Exported file link will be sent in an email.
- Data can be exported only in xls or xlsx formats.