Incoming Rules
Incoming Rules are a set of conditions based on which administrators can decide which emails get to reach a user's mailbox. The rules can be associated with a specific user, a set of users or for the entire organization. Once a rule is enabled, emails get validated against the conditions specified in the rule before getting delivered to the intended recipient's mailbox.
Note:
- It is mandatory to enable Organization Rules from the Spam Processing section in the Admin Console.
- The Incoming Rules feature will be rolled out in a phased manner and be available only for organizations that use one of our paid plans.
- If you want the option enabled for your organization, please reach out to us at support@zohomail.com.
Note:
- The Incoming Rules feature is currently available under Mail Settings in the Admin Console for organizations hosted in the IN Data Center. These changes will be rolled out to other regions in a phased manner.
- For now, organizations hosted in other Data Centers can continue to access Incoming Rules from Zoho Mail Admin Console > Security & Compliance > Rules > Incoming Rules and follow the steps below to configure them.
Create Incoming Rule
Follow these steps to create an Incoming Rule:
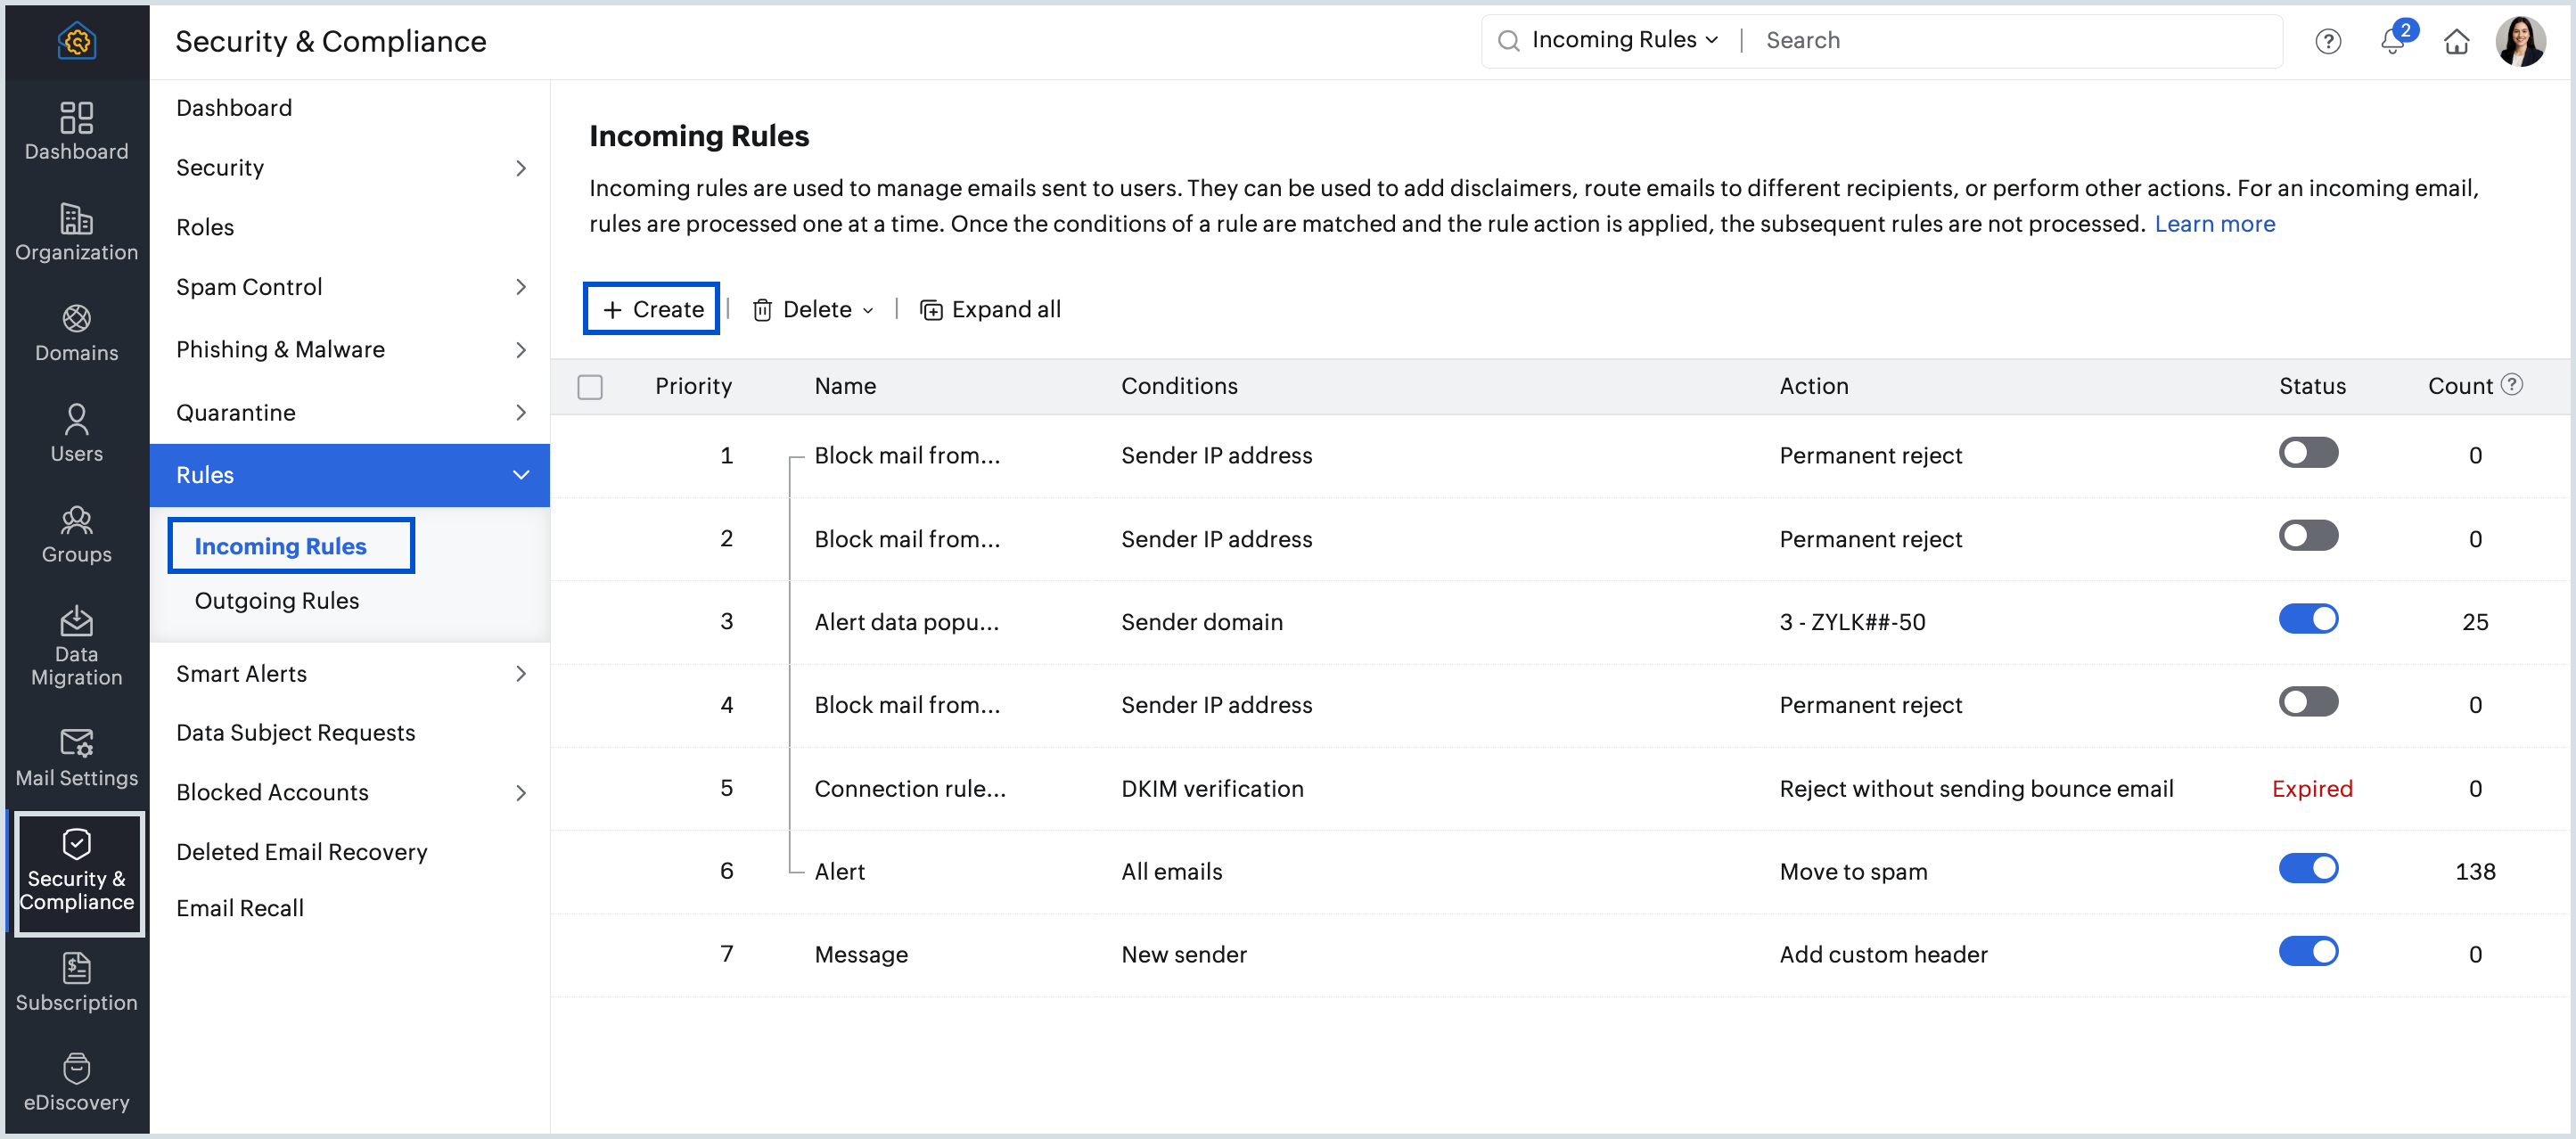
- Log in to Zoho Mail Admin Console and select Mail Settings on the left pane.
- Navigate to Rules and select Incoming Rules.
Click the Create now button to add the first rule or click +Create button to add a new incoming rule.
Note:
If Organization Rules setting is not enabled, the below note will be displayed while creating a rule. Click Enable now to enable it and proceed with the configuration.

- Provide a rule name and a description for the rule. If the entered rule name is already in use, "Name already exists" warning is shown.
- If required, set an Expiry Date by selecting the Set expiry date checkbox.
- Select either of the Condition Type from the below options:
- Apply for matching conditions - When chosen, all the emails will be checked for the conditions mentioned.
- No Conditions. Apply to all emails. - When chosen, all the emails you receive will go through the preferred action.
- Select one or more Conditions, the Operating parameter and the corresponding Action.
- Click +Add values under Conditions to enter multiple values separated by a delimiter which you can choose from Choose delimiter drop-down. Select Custom from the drop-down, to add your own custom delimiter for the values and select Update.
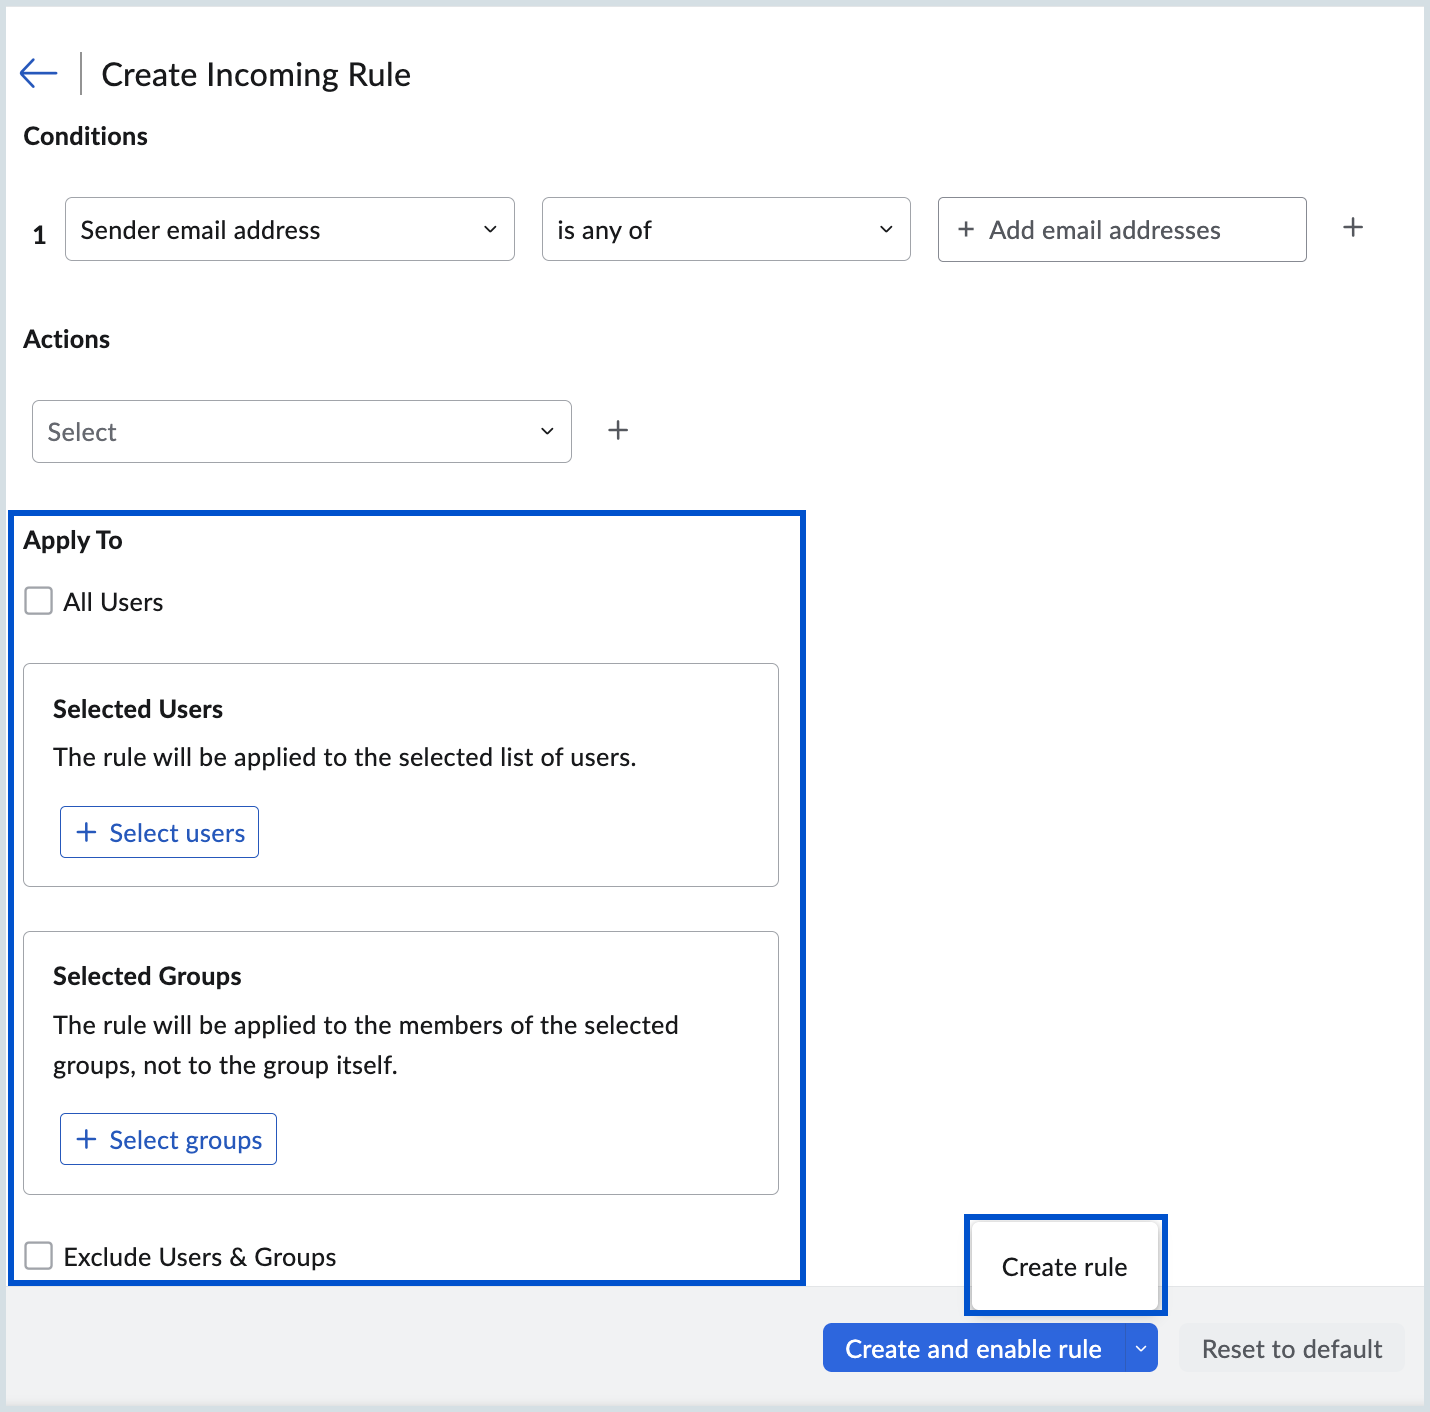
- Choose the users whom you want to select or exclude from the rule under the Apply To section:
- All users - The rule will be applied to all the users in your organization.
- Selected Users - The rule will be applied to the specific set of users you add.
- Selected Groups/Shared Mailbox - The rule will be applied only to the users who are members of the specified groups/Shared Mailbox.
- Excluded Users - The rule will not be applied to the selected list of users.
- Excluded Groups/Shared Mailbox - The rule will not be applied to the users who are members of the selected groups/Shared Mailbox.
- Skip to this step if you chose All users.
- Select the users you want to add to the list and click Submit. You can also remove a user from the list by clicking the Delete icon next to the user.
- Select the Reset to default button when you have to clear all the selected conditions and provide a different criteria.
Review your rule and do one of the following:
- Create and enable rule - Your rule will not only be created but also be enabled automatically to start processing emails with respect to its conditions and actions.
- Create rule - Your rule will only be created and not enabled. That means if you want the rule to be applied to the emails you receive, you will have to manually activate it.
- Click Yes in the Confirm Action! dialog box.
Select either Done or Go to created rule or Add more rules depending on your requirement once the rule is created successfully.
Note:
The new rule created will be highlighted in the list of rules section under Incoming Rules page.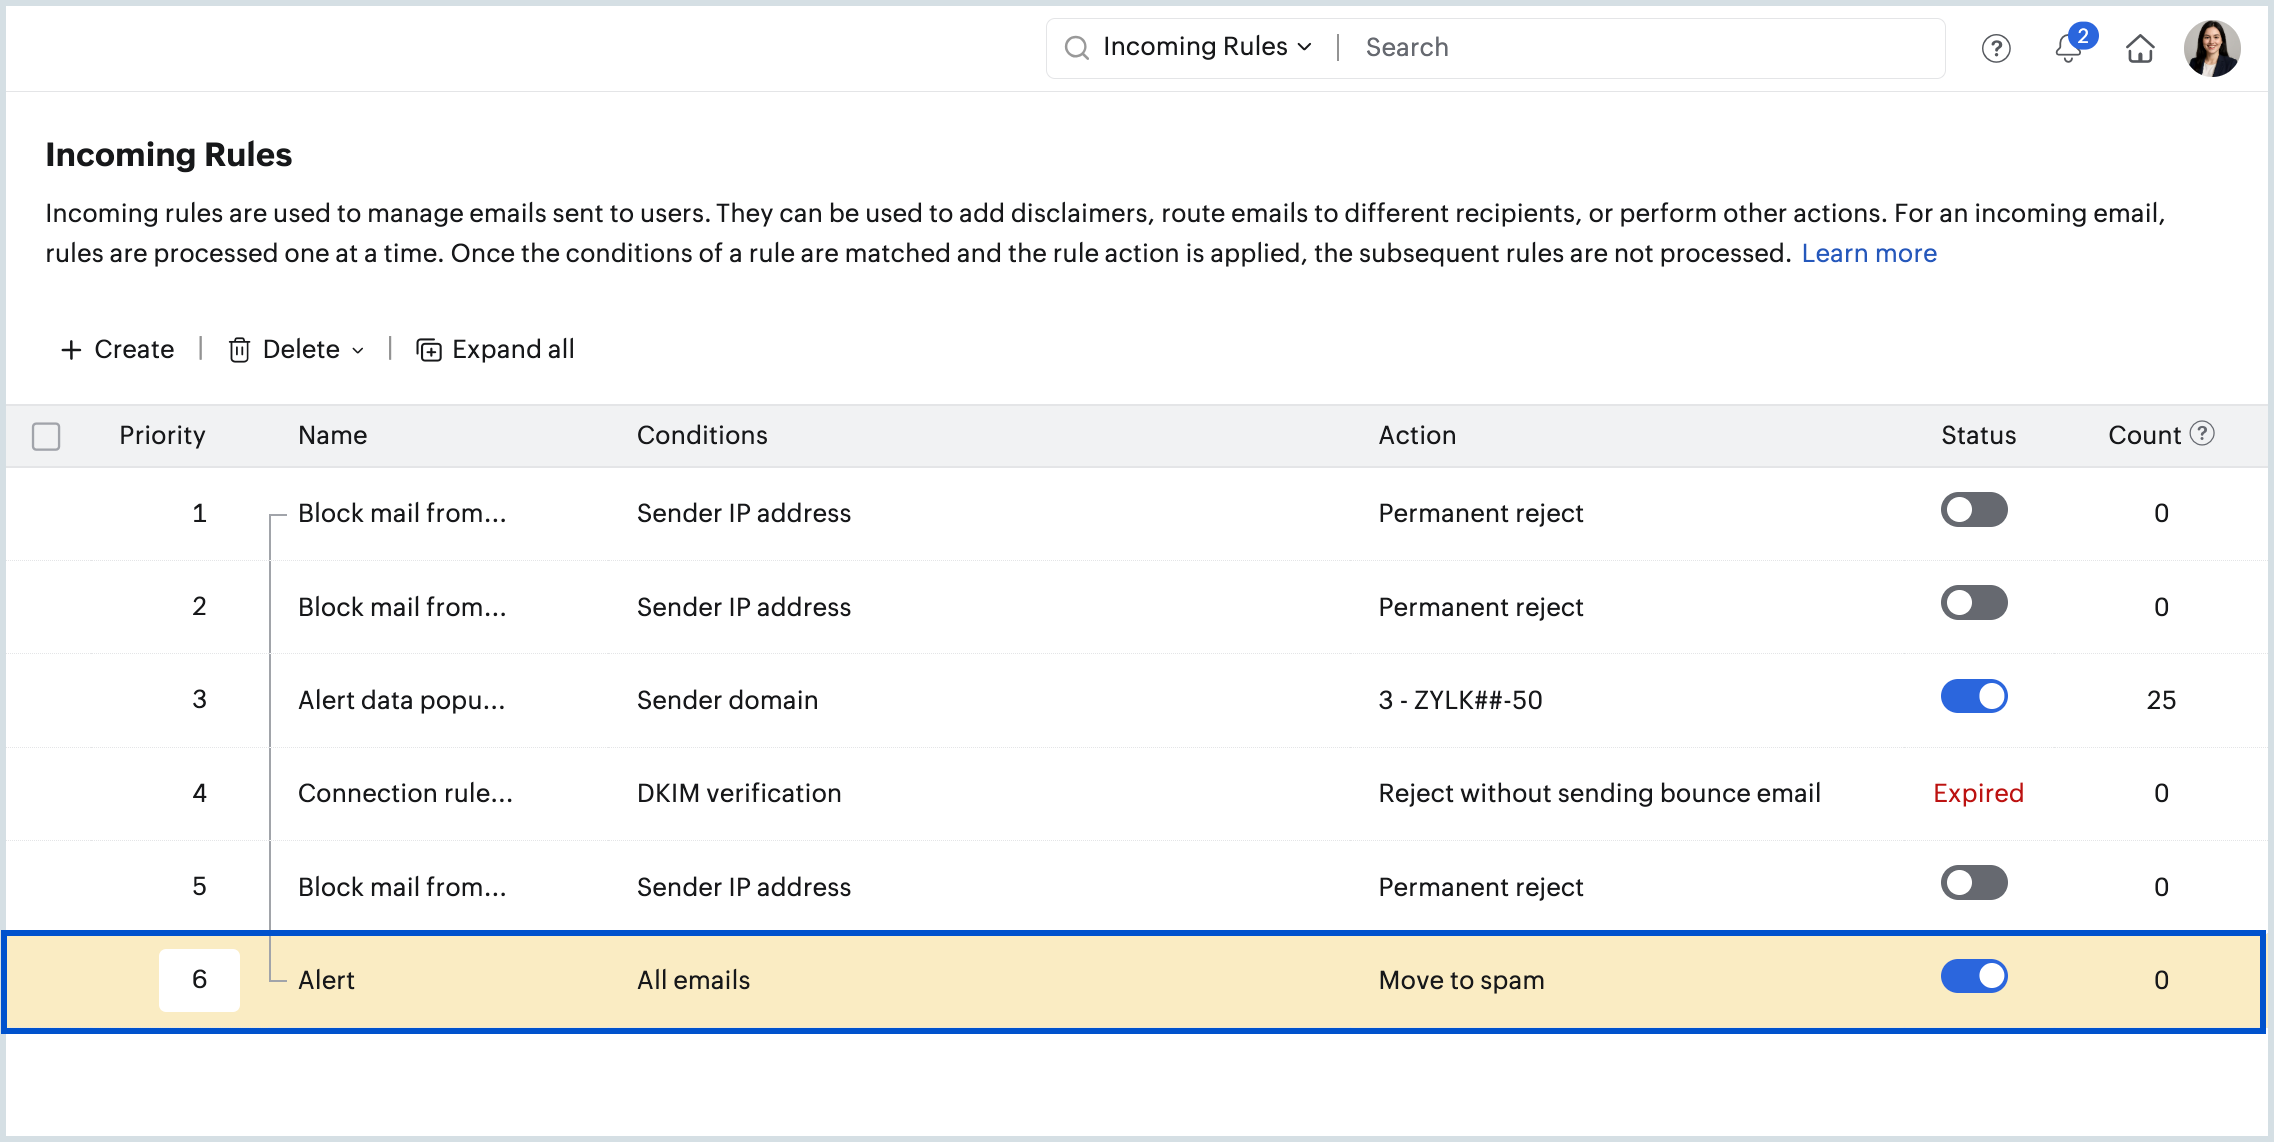
- Hover over a rule in the list to rearrange it using the drag and drop icon. You can only drag and drop rules created within the same rule type indicated by your theme colored bar towards the left pane.
.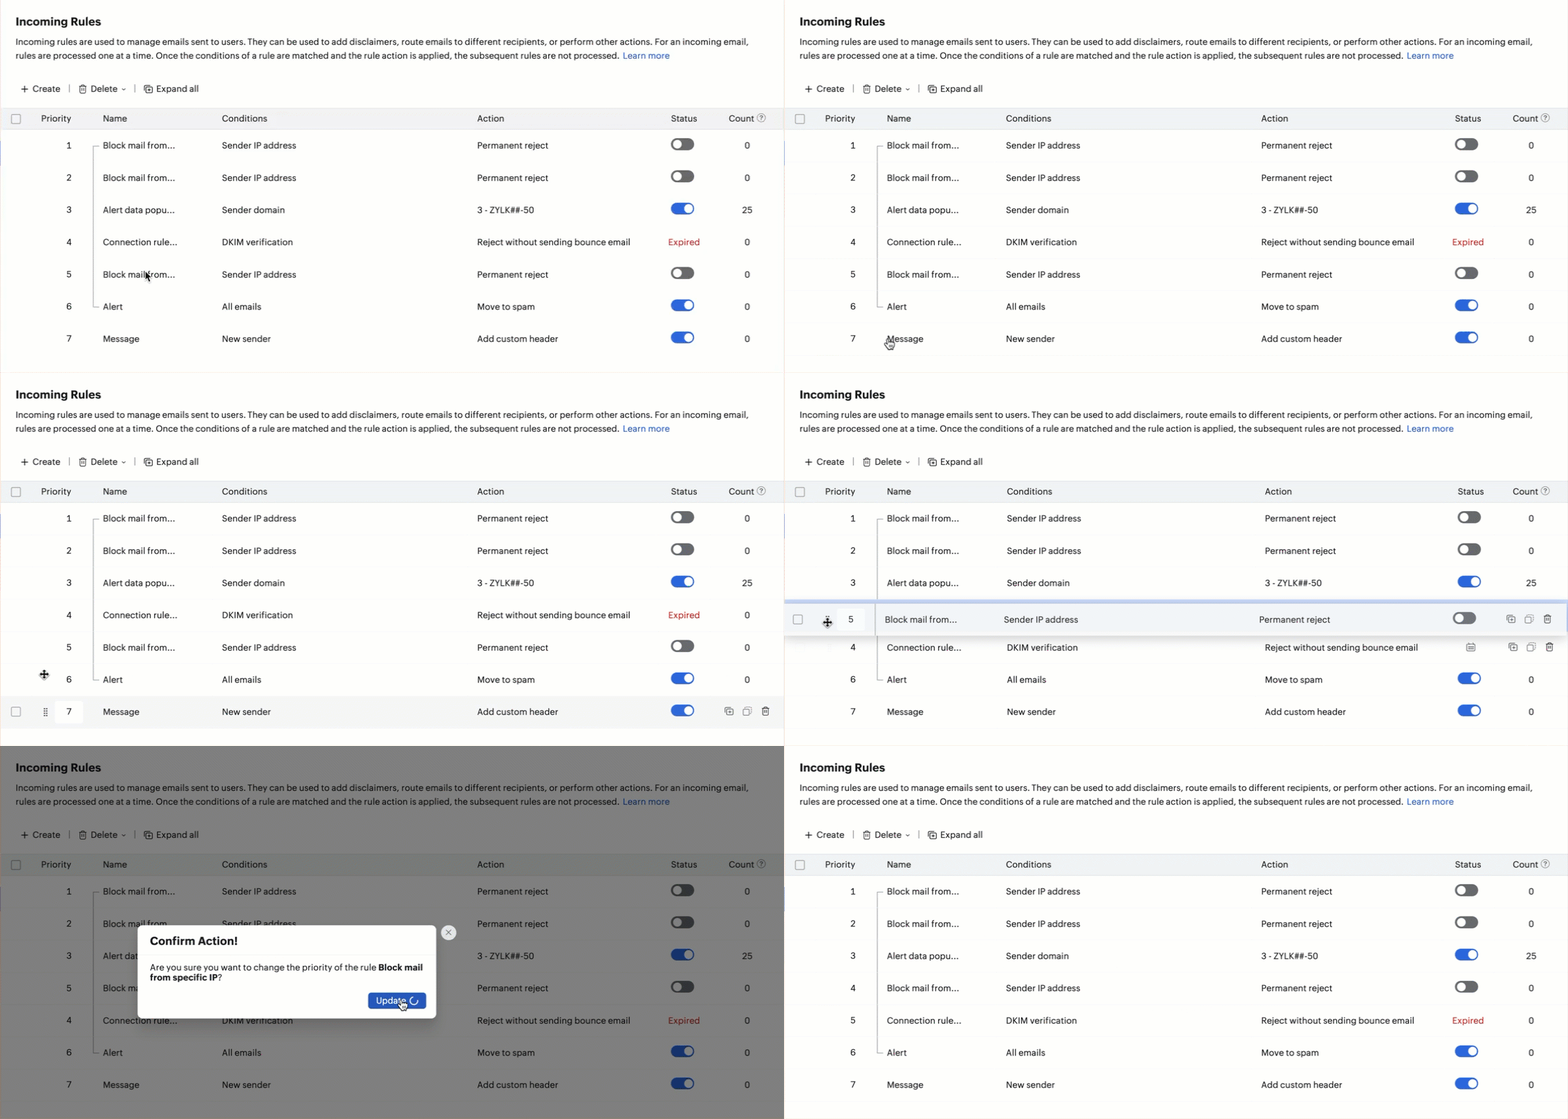
- Alternatively, you can select the rule to be rearranged, and click the Reorder button on the top pane. Now select Move up or Move down from the list.
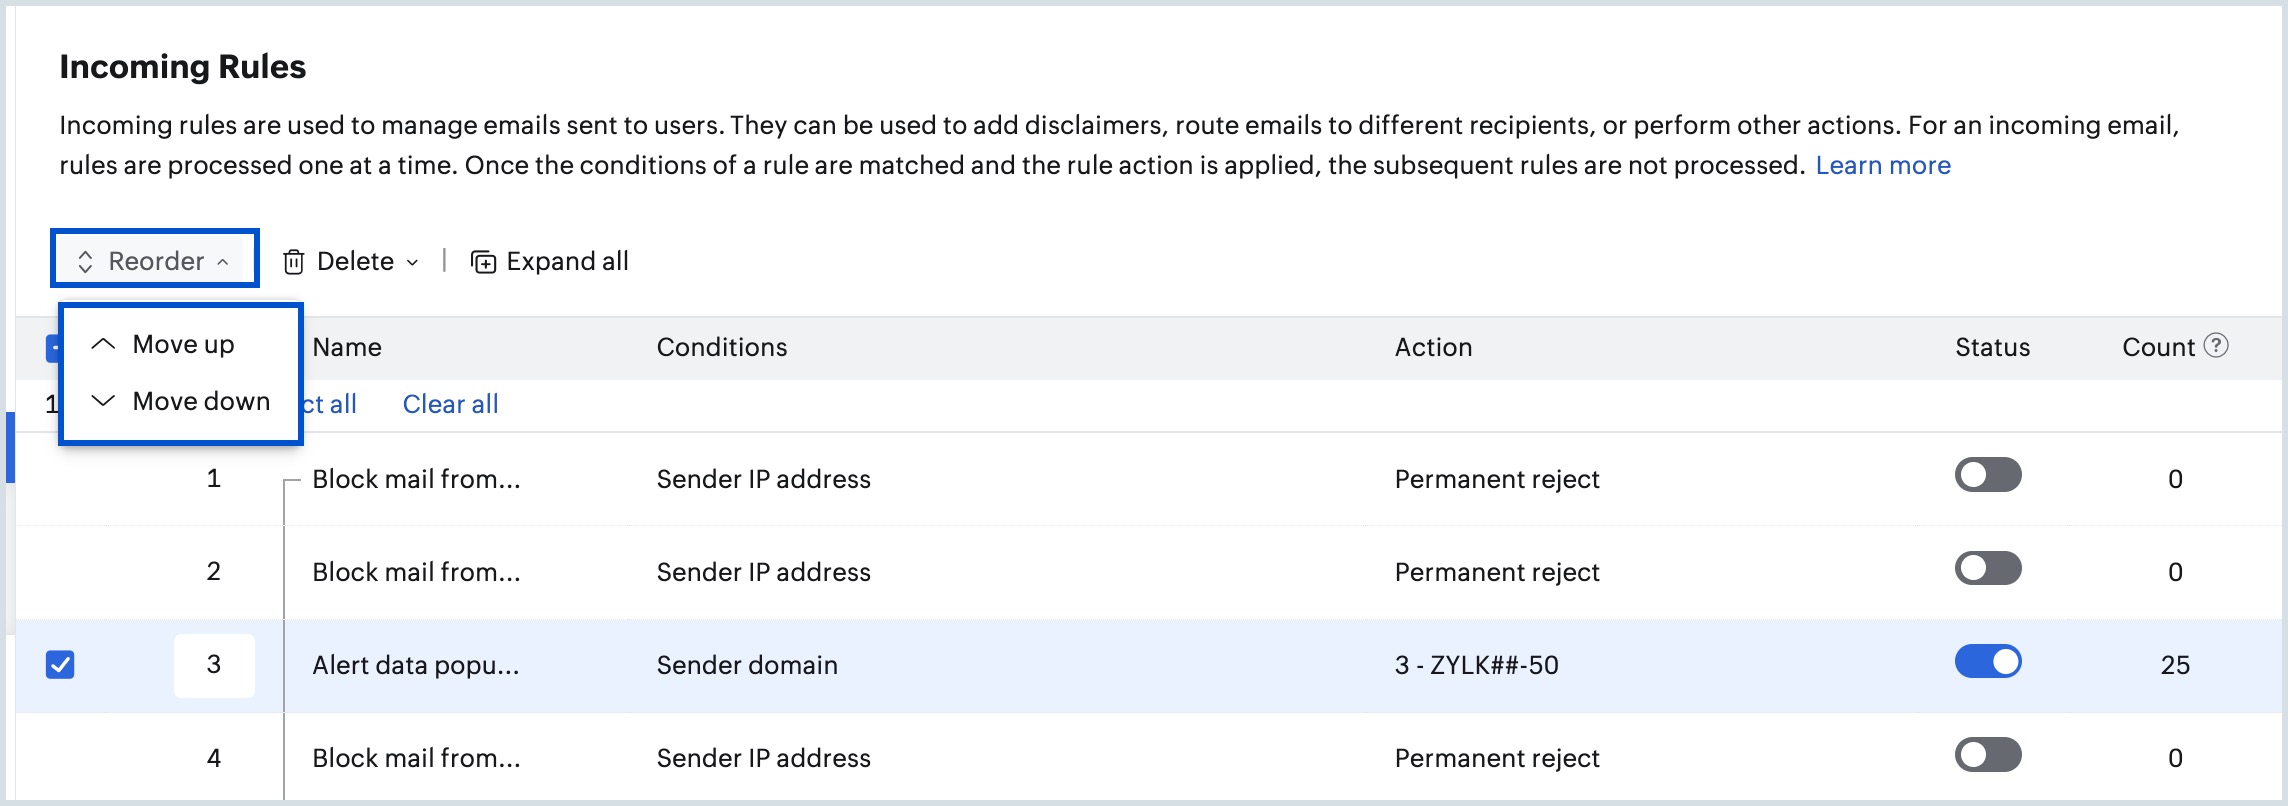
- Rearranging them automatically changes the rule processing priority based on the order they are currently listed.
Note:
The maximum number of Incoming Rules that can be configured for an organization is 500.
Available Conditions
Zoho Mail provides multiple conditions based on which you can filter incoming emails. There can be more than one condition for a single rule depending on your organization's requirement. The various conditions are listed in the tables that follow:
| Parameter | Description | Value |
| Is external sender | Checks if the sender is not part of the organization | Select Yes or No from the drop-down. |
| Is authenticated sender | Validates whether the sender's identity is authenticated | Select Yes or No from the drop-down. |
| New sender | Checks if the email is received for the first time from the sender | Select Yes or No from the drop-down. |
| Reply-to email address | The reply-to address of an incoming email | Click Add email addresses, enter the desired email address and click Add. |
| Return path domain | The reverse-path/ bounce address's domain | Click Add domains, enter one or more domain names and click Add. |
| Return path email address | The reverse-path/ bounce address of an incoming email | Click Add email addresses, enter the desired email address and click Add. |
| Sender display name | The display name of the sender | Click Add values, enter the user's display name and click Add. |
| Sender DNS | The DNS address of the sender | Click Add values, provide the sender DNS and click Add. |
| Sender domain | The domain address of the email sender | Click Add domains, enter the sender domain name and click Add. |
| Sender email address | The 'from' address of the email sender | Click Add email addresses, enter the desired email address and click Add. |
| Sender IP address | The IP address of the email sender | Enter the sender's IP address that you wish to validate. |
| Parameter | Description | Value |
| Recipient count | Validates the number of recipients in the email | Provide a value between 1 to 100. |
| Recipient domain | Validates the domain address of the recipient | Click Add domains, enter one or more domain names and click Add. |
| To/CC email address | The email address in the To/CC field | Click Add email addresses, enter the desired email address and click Add. |
| Parameter | Description | Value |
| MIME Message ID* | The ID that can be gathered from a MIME email's header | Click Add values, enter the desired MIME value and click Add. |
| MIME size (in MB) | The size of the non-text attachment specified in MB | Enter a value between 1 to 40. |
| Subject | The subject of the email | Click Add values, enter the desired subject and click Add. |
| X-Mailer* | The desktop client from which the email was sent | Click Add values, enter the X-Mailer you wish to validate and click Add. |
| Header | The email header that needs to be verified for the provided values | Enter the Header Name and Header Value. |
Note:
- MIME message* - Multipurpose Internet Mail Extensions supports non-text email attachments. A MIME header is added to the original email header from where you can gather the unique content ID/message ID used to identify the message.
- X-Mailer* - Specifies which desktop client (For example, Apple client, Thunderbird, etc) was used to draft or send the email. Can be found in the email header.
| Parameter | Description | Value |
| Content | The content of the email | Click Add values, enter the content to be validated and click Add. |
| Email language | The language in which the email was composed | Click Select languages, add the desired languages and click Add. |
| Originating country | The country from which the email was sent | Click Select countries, add the desired countries and click Add. |
| URL domain in content | The domain names of the URLs available in email content | Click Add domains, enter one or more domain names and click Add. |
| URL in content | The existence of specified URLs in the email content | Click Add values, provide the URL content to be validated and click Add. |
| Parameter | Description | Value |
| Attachments | To check the malware content in the email attachment. | Select any one of the values given below:
|
| Has attachment | Checks if any file is attached | Select Yes or No from the drop-down. |
| Attachment size (in MB) | The size of the attached file in MB | Enter a value between 1 to 40. |
| Attachment type | The type of attached file | Click Select attachments, add the attachment types and click Add. You can also enable the Show add & import options toggle button ON to add any custom attachment type or import from CSV file. |
| Parameter | Description | Value |
| SPF verification | The result of SPF verification | Select the desired authentication result from the available list:
|
| DKIM verification | The result of DKIM verification | Select the desired authentication result from the available list:
|
| DMARC verification | The result of DMARC verification | Select the desired authentication result from the available list:
|
| Parameter | Description | Value |
| Has web bugs | The existence of web bugs in incoming email content | Select Yes or No from the drop-down. |
| Has JavaScript content | The existence of javascript content in the email content | Select Yes or No from the drop-down. |
| Has macros | The existence of macros in the email content | Select Yes or No from the drop-down. |
| Is bulk email | Validates if the email received is a bulk email | Select Yes or No from the drop-down. |
| Has frame tags | The existence of iframe tags in the email content | Select Yes or No from the drop-down. |
| Has object tags | The existence of object tags in the email content | Select Yes or No from the drop-down. |
| Has embed tags | The existence of embed tags in the email content | Select Yes or No from the drop-down. |
| Has form tags | The existence of form tags in the email content | Select Yes or No from the drop-down. |
| Has shortened URL | The existence of shortened URLs in the email content | Select Yes or No from the drop-down. |
| Has suspicious macros | The existence of suspicious macros in the email content | Select Yes or No from the drop-down. |
Once you select the desired conditions, proceed to this step to complete setting up the rule.
After selecting the Conditions and the Operating parameters, provide the values with respect to the chosen conditions that need to be verified against. Once done, proceed to select the Actions that needs to be performed for the emails with the chosen conditions by selecting the +icon. This will list the corresponding actions pertaining to the primary one selected.

The emails that match the specified conditions will be processed as per the actions defined in the rule. Select the necessary action and, if required, provide a value as given in the table that follows:
Available Actions
| Action | Description | Value |
| Move to spam | All the emails that satisfy the given condition/s will be moved to the spam folder of the recipient's inbox. | N/A |
| Action | Description | Value |
| Allow email to Mailbox | No action will be taken for the emails that satisfy the given condition/s. | N/A |
| Action | Description | Value |
| Permanent Reject | All the emails that satisfy the given condition/s will not be accepted by our servers and will be rejected permanently removing the chances of delivery retries | Click Add message (optional), enter the custom error message you want to include and click Add. |
| Reject without sending bounce email | Email gets rejected, but no bounce email will be sent to the sender | N/A |
| Action | Description | Value |
| Move to quarantine | Moves the email to Quarantine | N/A |
| Action | Description | Value |
| Show warning message | Shows the configured warning message in the email preview | Click + Add warning message, enter the warning message you wish to add and select Add. |
| Append custom X-Header | Adds a custom value in the header | Click + Add header details, provide the header name and value and click Add. |
| Append text to subject | Appends a text in the subject | Click + Append text, enter the text which you want to be appended to the subject and click Add. |
Note:
You can select the subsequent action after adding the Email modifiers as Move to spam under Spam marking.
| Action | Description | Value |
| Add BCC and deliver to recipient | Adds the BCC email address and delivers the email | Click Add BCC addresses, select the desired users to whom you wish to send a copy and click Add. |
| Forward the email | Forwards a copy of the email to the specified email address | Click Add forward addresses, select the desired users to whom you wish to forward the email and click Add. |
Filter
Once the rules are created, they are listed under Incoming Rules home page. You can view and filter the rules based on their status/action. Follow the below steps to perform the filter operation:
- Select Filter button on the Incoming Rules home page.
- Click the desired status/action from the drop-down. The types of rules based on the status are:
- Active Rules - Lists all the rules where the status is marked active.
- Inactive Rules - Lists all the rules where the status is marked inactive.
Expired Rules - Lists all the rules where the set expiry date of the specific rule has been lapsed. However, you can modify the expiry date of a rule by hovering over the status and selecting a different date.
Note: The expired rules are also included in the filtered list when Inactive Rules is selected from the Filter drop-down.
- Select Action from the Filter drop-down to filter rules based on the available actions.
Rule Processing and Priority
Incoming Rules allow administrators to automatically handle incoming emails based on specific rules and conditions. When multiple rules are created, the order in which they are evaluated becomes crucial to ensure that each email is processed correctly. Zoho Mail uses two types of priority to determine how rules are applied:
Every incoming rule belongs to one of the three predefined filter levels. These levels determine the sequence in which rules are executed. The order of these levels is fixed and cannot be modified:
- Reception Level are set to filter all the emails at the authentication level, thereby avoiding incoming volume of traffic.
- Content Level are set to filter all the emails based on the content such as email language, or attachment type.
- Forwarding Level are based on the email forwarding options that are set as the action for the condition given.
You can add any number of Incoming Rules to process different types of incoming emails. But the filter with the highest level/priority (1) will take precedence over the filters with lower level/priority (2). While the overall level order is fixed, i.e, any rules applied specific to Forwarding Level (Priority 3) cannot be swapped with Reception Level (Priority 1) or Content Level (Priority2), you can reorder the multiple rules created under the same filter level by dragging them within the rule list. This allows you to fine-tune the processing sequence for rules serving similar purposes.
Once an email matches the conditions of a particular rule, the actions specified in the rule will be applied to the email. The same email will not be scrutinized against the subsequent rules in the list.
When you create an incoming rule, you can choose who the rule applies to or excludes using the Apply To section. Each selection type has its own priority, and the rule is evaluated based on these priorities:
- All Users
- Selected users (priority 2)
- Selected groups/Shared Mailbox (priority 4)
- Exclude users or groups
- Exclude users (priority 1)
- Exclude groups/Shared Mailbox (priority 3)
When a rule is evaluated, the system checks the selected and excluded entities in the order of their priority. This ensures that higher-priority exclusions or inclusions override lower-priority selections.
Below are detailed examples to illustrate this:
Case 1: If a user is added under Exclude users, the rule will not be applied to that user, even if the group they belong to is included under Selected groups/Shared Mailbox. This happens because Exclude users has the highest priority and is processed first.
Case 2: If a user’s group is added under Exclude groups/Shared Mailbox, but the individual user is added under Selected users, the rule will apply to that user. This is because Selected users has a higher priority than Exclude groups/Shared Mailbox.
Case 3: When a user is added under Exclude users, and no other selections are made under the All Users category, the rule will still be applicable to all users by default, except for the users listed under Exclude users. This happens because All Users is considered the default scope for every rule.
Modify Incoming Rule
You can modify the existing incoming rules based on your requirements. Follow these steps to edit a rule:
- Log in to Zoho Mail Admin Console and select Mail Settings on the left pane.
- Navigate to Rules and select Incoming Rules.
- Select the desired rule and click Edit from the top right corner.
- Make the desired changes and click Update.
Additionally, you can search and edit the incoming rules based on the rule name, or associated users. Navigate to the search bar on the top right corner and select the contains or applicable to parameters from the listing as per your requirements. Type in a rule name, or select a specific user from the list and press enter. All the incoming rules satisfying the search will be displayed. You can then select the rules from the list and make the required changes.
User-specific incoming rules can be viewed by selecting Users on the left pane of Admin Console. Under Anti-Spam Settings, select Incoming Rules to view the list of incoming rules applicable for that user.

Enable or Disable a Rule
To enable or disable a rule, follow these instructions:
- Log in to Zoho Mail Admin Console and select Mail Settings on the left pane.
- Navigate to Rules and select Incoming Rules.
- Toggle the status button to ON or OFF in order to enable or disable a rule.

Remove Rules
There can be situations where you no longer require a rule or a rule might have expired. In such scenarios, you can remove them using the delete option. Follow these steps to delete a rule:
- Log in to Zoho Mail Admin Console and select Mail Settings on the left pane.
- Navigate to Rules and select Incoming Rules.
- To remove a rule:
- Hover over an existing or expired rule and click the delete icon.
- Alternatively, you can select the desired rules, click Delete on the top menu and choose the required option from the drop-down:
- Delete selected rules
- Delete all expired rules
- Delete all rules

Note:
When a filter is applied, the Delete drop-down includes additional value of Delete filtered rules for quick deletion of rules that satisfies a specific filter.
- Click Delete in the confirmation dialog that appears.


