Data Migration in Zoho eProtect
Zoho eProtect enables organizations to seamlessly migrate emails from Microsoft 365 and Google Workspace. This ensures historical email data is preserved, fully searchable, and archived according to your configured retention policies.
Prerequisites
To facilitate smooth migration of emails, ensure that required access and configurations are completed:
- Administrator access to the source platform (Microsoft 365 or Google Workspace).
- Administrator access to Zoho eProtect.
- Verified domains in Zoho eProtect.
- Email provider configuration for authentication between platforms.
- Every user selected for migration is added, licensed, and active in Zoho eProtect.
- eDiscovery must be enabled with retention policies configured for each user.
- Migration source email accounts are valid, active, and not deleted.
- Zoho eProtect subscription is sufficient for the entire mailbox archival.
- Before starting the migration, make sure the respective user accounts are created in Zoho eProtect. (Refer to the User Management help page for detailed steps for adding users.)
Migration flow
- Step 1: Create Migration
- Step 2: Configure Migration
- Step 3: Add Users for Migration
- Step 4: Start Migration
- Post-Migration: Manage Migration
Step 1: Create Migration
To create a new migration, follow the below steps:
- Log in to Zoho eProtect.
- From the left menu, navigate to eDiscovery and go to Data Migration.
- Click + Create.

Step 2: Configure Migration
Once you have created a new migration, you need to configure its settings.
To configure the migration settings, follow the below steps:
- Name of this migration: Enter a descriptive name for the migration.
- Select email provider configuration: Use the dropdown to choose an existing configuration or click + Add New (See Add a new email provider configuration for details).
- Under Folders to migrate, you can choose either the All folders or Specific folders option.
- If you choose the All folders option, you can exclude specific folders from the migration by entering their names, separated by commas, in the dialog box. Refer folder convention.
- If you choose the Specific folders option, you can specify the folders to be included in the migration by entering their names, separated by commas, in the dialog box.Refer folder convention.
- Under Folders to migrate, you can choose either All emails to migrate every message, or Emails in a specific date range to restrict migration by date.
- Maximum Connection Limit*: Specify the Maximum Connection Limit.This refers to the maximum number of connections accepted by the server at a given time. For example, if you provide 5 as the maximum connection limit when the migration is started, the migration process will be started simultaneously for 5 users. The migration process will be faster when there are parallel migrations happening between the servers.
- Pause migration when storage reaches: Choose the storage threshold (80% or 95%) at which migration should pause automatically.
After verifying all inputs, click Save to finalize your migration configuration. You can now proceed to Add Users for Migration section.
- In case you want to mention a specific parent folder (E.g. Reports), enter it as Reports.
- In case there are multiple subfolders under Reports and you want to mention all the subfolders, enter it as Reports/*.
- In case there exists a subfolder under Reports named 2016, and you want to mention this particular subfolder, enter it like this - Reports/2016.
- If you want all the subfolders under Inbox, only the Marketing folder without the subfolders, and a specific subfolder, 2012, alone under the Sales Reports folder to be mentioned, you will have to type the Folder List like this - Inbox/, Marketing, Sales Reports/2012.
Add a new email provider configuration
You can add an email provider configuration from the Organization section. Alternatively, you can add a new email provider configuration by clicking +Add New in the Select email provider configuration drop-down in the Data Migration section.
Choose your preferred email provider:
Follow these steps to add Microsoft 365 as your email provider:
- Enter a unique configuration name.
- Authenticate with Microsoft 365 admin credentials.
- Consent for the required permissions.
- Click Authorize.
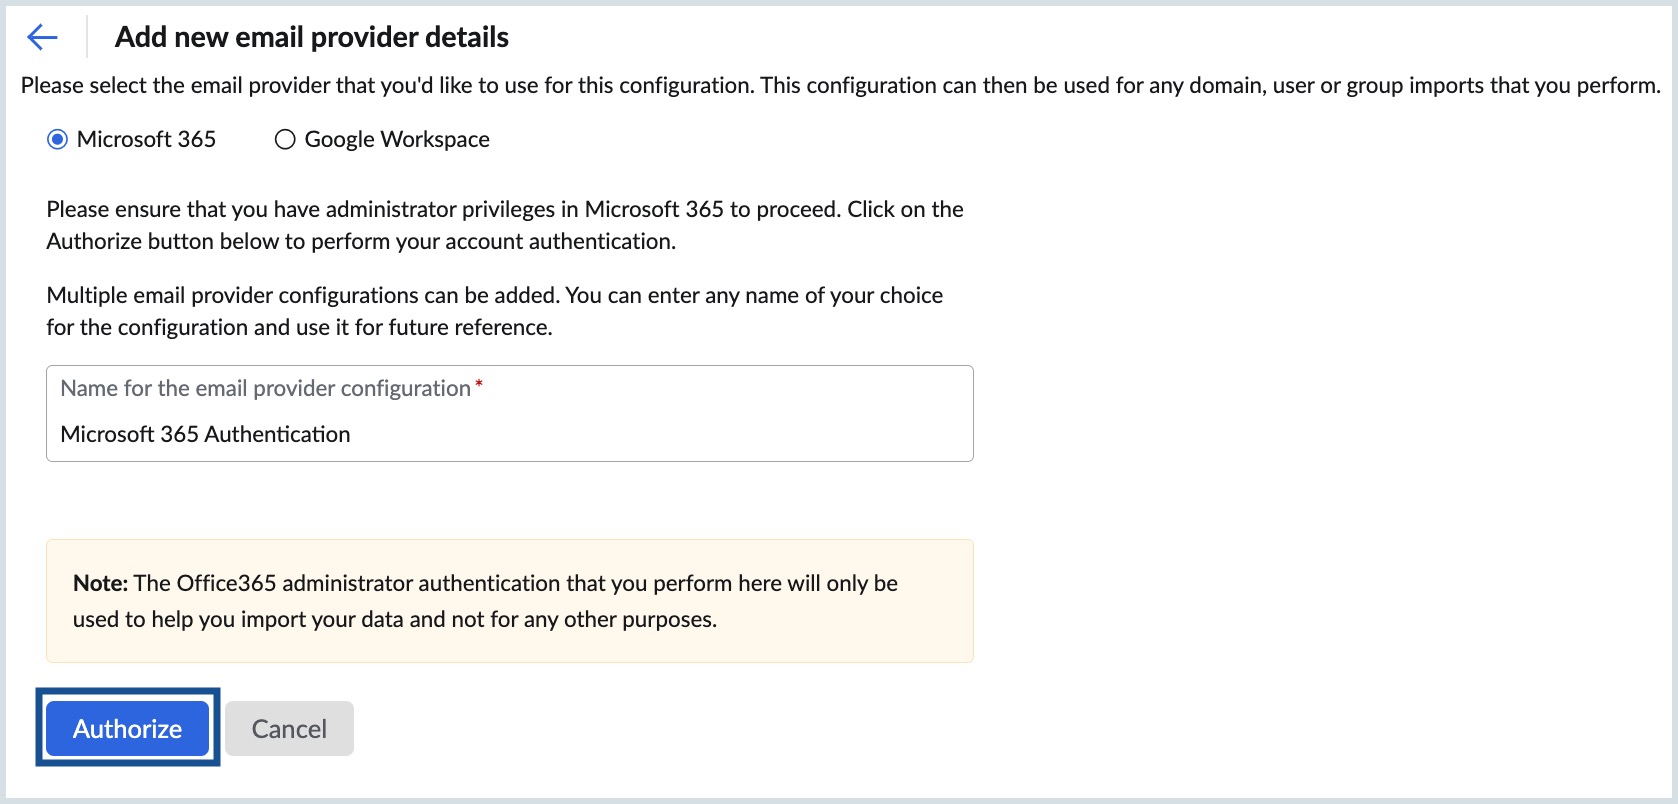

You have now successfully configured your Microsoft 365 account in Zoho eProtect to migrate emails. Navigate to the Configure Migration section of our help page to proceed with Data Migration.
Follow these steps to add Google Workspace as your email provider:
- Enter a unique configuration name.
- Enter administrator email address.
- Enter the service account email address from Google Cloud.
- Upload the JSON/key file (Learn how to obtain the JSON/key file here).
- Click Proceed.


You have now successfully configured your Google Workspace account in Zoho eProtect to migrate emails. Navigate to the Configure Migration section of our help page to proceed with Data Migration.
Step 3: Add Users for Migration
Once configuration is complete, add the user accounts to migrate. This ensures each source account maps correctly to the Zoho eProtect destination.
To add users for the migration, follow the below steps:
- Log in to Zoho eProtect.
- From the left menu, navigate to eDiscovery and go to Data Migration.
- Select the migration and go to the Users tab.
Option 1: Add users manually
- Select source email address from the drop-down .
- Select the destination Zoho eProtect account (search supported).
- Click Add. You have now successfully added the user for migration.


Option 2: Import users in bulk
- Click Import.
- Upload a CSV with source and destination accounts (use sample format).
- Click Import. Accounts are listed in the Users tab.


Step 4: Start Migration
Once users are added, start the migration. To start the migration, follow the below steps:
- Log in to Zoho eProtect.
- From the left menu, navigate to eDiscovery and go to Data Migration.
- Select the migration.
- Review the summary.
- Click Start migration.
- In the confirmation pop-up, click Proceed.
Zoho eProtect begins migrating data based on your configuration.
Post-Migration: Manage Migration
After migration starts, you can monitor and manage its progress. You can:
- Monitor Migration
- Abort the Migration
- Resume a Paused Migration
- View Migration Details for Individual Users
Monitor Migration
To monitor the migration, follow the below steps:
- Log in to Zoho eProtect.
- From the left menu, navigate to eDiscovery and go to Data Migration.
- Select the migration.
- Go to Configurations tab.
Here, you can view:
- Migration Statistics: Displays the overall migration status (CREATED, IN PROGRESS, PAUSED, COMPLETED, FAILED, ABORTED) along with user counts for Total Users, Yet to Start, Completed, In Progress, Failed, and Paused.
- Migration Configuration: Displays the creation date, connection limits, and pause threshold.
- Applied Server Details: Displays the email provider configuration, protocol/application type.

Note: Click Refresh to update the latest migration status.
Abort the Migration
You can only abort a migration that is in progress. To abort a particular migration, follow the steps below:
- Log in to Zoho eProtect.
- From the left menu, navigate to eDiscovery and go to Data Migration.
- Select the migration, you want to manage.
- Go to Configurations tab.
- Click Abort migration.
- In the confirmation pop-up, click Abort.
Resume a Paused Migration
A migration may be paused for several reasons:
- Storage limit reached – Available storage exceeded.
- Maximum threshold storage reached – Defined threshold usage crossed.
- Migration paused by admin – Paused manually by the administrator.
- Migration aborted – Aborted before completion.
- Server configuration not found – Required server details missing/invalid.
- eDiscovery disabled – Migration cannot continue.
- User mailbox not found – The specified mailbox does not exist.
- Invalid source email – Incorrect or invalid source address.
To resume a paused migration, follow the below steps:
- Log in to Zoho eProtect.
- From the left menu, navigate to eDiscovery and go to Data Migration.
- Select the migration.
- Go to Users tab.

- Locate the account with Paused status.
- Individual accounts:
- Hover over Paused status of the individual account.
- Click Resume.
- In bulk: Click Resume All at the top of the Users tab, then choose:
- Resume – Resume when migration is paused for reasons other than storage and the reason caused is fixed.
- Force Resume – Resume even if storage usage has crossed pause threshold.
- Individual accounts:

Note:
- Use the Filter option to quickly locate specific accounts based on the migration status of each account.
- Click Refresh to update the latest migration status.
- Hover over the warning icon (⚠️) next to a paused status to see the reason.
- Completed accounts do not need further action.
View Migration Details for Individual Users
You can view the migration status and detailed logs for each user.
Access User Migration Details
- Log in to Zoho eProtect.
- From the left menu, navigate to eDiscovery and go to Data Migration.
- Select the migration.
- Go to the Users tab.
- Click the user account to view details.
User Details Overview
- User mapping: Source → Destination addresses.
- Status: Aggregate migration status for the selected user (e.g., Completed, In Progress, Suspended).
Tabs available:
Lists all successfully migrated emails, grouped by folder.
| Field | Description |
| Folder Name | Email folder (e.g., Inbox, Sent) |
| Status | Current state of the folder (e.g., Completed) |
| Completed | Number of emails migrated successfully |
| Failed | Number of failed emails (hover to view error details) |
| Total | Total emails attempted |
Lists all emails that failed to migrate.
| Field | Description |
| Folder Name | Folder where the email was located |
| Sender | Original sender of the email |
| Subject | Email subject line |
| Date | Date and timestamp |
| Reason | Error message (e.g., Mail already exists) |
Common Error Reasons
- Mail already exists – The email is already present in the destination mailbox, so migration was skipped to avoid duplication.
- Unable to process - The email could not be processed due to an unsupported format or other technical issues.
Note: Click Refresh to update the latest migration status.