Using Visitor Tracking
How Can I...
Set up Visitor Tracking
To enable Visitor Tracking, your customers should do the following in their Vertical CRM account.
- Click Setup > Apps & Add-ons > Zoho Apps > Visitor Tracking.
- Click Enable.
Once the customer clicks Enable, the subsequent steps vary depending on whether your customer is a new user of Zoho SalesIQ or an existing user.
New to Zoho SalesIQ
If your customer is new to Zoho SalesIQ, they should follow the steps below after clicking Enable.
- In the Create SalesIQ Portal pop-up, the customer should Enter a Portal Name.
A portal in Zoho SalesIQ will be created, on enabling this integration.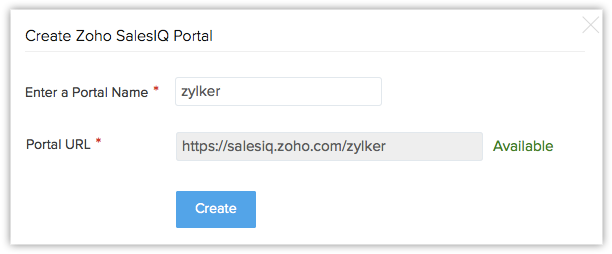
- In the Choose Chat Team Members pop-up, the customer has to select the Vertical CRM users who has to be added in Zoho SalesIQ as well.
- In the Configuration pop-up, the customer must specify the following details:

- Push your visitors to CRM as - Customers can select Leads or Contacts. The new visitors to their web page will be added as a lead or contact based on the selection.
- Assign these Lead– Customer can choose one of the options below to assign the new visitor to a sales rep in their CRM account.
- To a chat attendee - This denotes the users in Zoho SalesIQ. The email address of the user, who attends to the visitor via chat, will be populated for the Attended By field.
- To a user - Users in Vertical CRM will be listed. The customer can select any one user. The selected user's email address will be populated for the Attended By field.
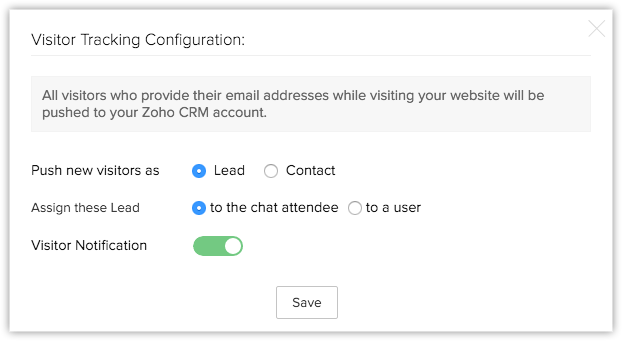
- The customers should select the Visitor Notification option if they want to get pop up notifications when they have visitors to their website.
- Click Save.
The settings will be saved.

Existing User in Zoho SalesIQ
If your customer is an existing user of Zoho SalesIQ, they should follow the steps below after you click Enable.
- Specify the following details in the pop-up:
- Push your visitors to CRM as - Customers can select Leads or Contacts. The new visitors to their web page will be added as a lead or contact based on the selection.
- Assign these Lead– Customer can choose one of the options below to assign the new visitor to a sales rep in their CRM account.
- To a chat attendee - This denotes the users in Zoho SalesIQ. The email address of the user, who attends to the visitor via chat, will be populated for the Attended By field.
- To a user - Users in Vertical CRM will be listed. The customer can select any one user. The selected user's email address will be populated for the Attended By field.
- The customers should select the Visitor Notification option if they want to get pop up notifications when they have visitors to their website.
- Click Save.
The settings will be saved and code will be generated for their reference. The customer should Publish this code in the website where they want to track visitors.
Once the customers enable the integration, the following elements will be added to their Vertical CRM account. All the visit details will be captured in the Visits tab.
- New fields in Leads/Contacts module.
- Related list (Visits – Zoho SalesIQ).
- Notifications in your Vertical CRM for the visits in your customer's website.
Embed Code in your website
To track the leads, the customers have to embed the code in their in their website.
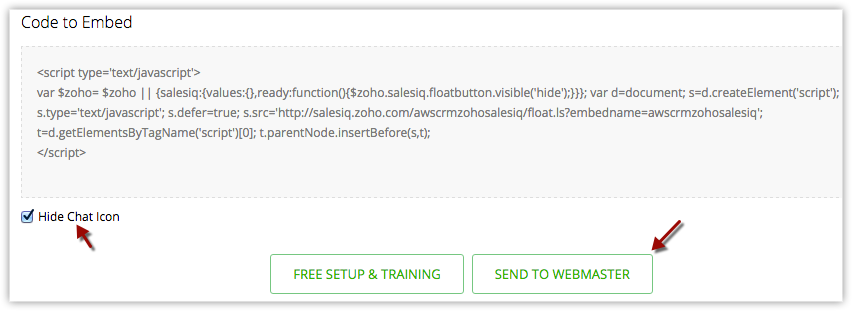
- The code will be automatically generated when the integration is done. This code can be copied and pasted in your customer's website.
- Select the Hide chat icon check-box if you do not want the chat icon to be displayed and then copy the code. Customers can also send the code to the Webmaster by clicking on the Send to Webmaster link. See Also: How to add the embed code to your website

Use Visits Tab
The Visits tab should be selected as one of the modules at the time of creation of your application. As soon as your customers enable the integration, before any visits are captured, the Visits tab will have links to "Free Setup & Training" and "Send to Webmaster". They can click on the desired option.

These links disappear once the visits starts coming in. Each record in the Visits tab will provide you details on the IP Address of the visitor, the page that was visited, referrer, time spent on the page, etc. These details are captured from the website with the help of Zoho SalesIQ integration and cannot be modified by the users.
Just like other modules, the Visits tab can be hidden for certain user profiles. The administrator can hide the tab and additionally restrict permissions for Viewing, Creating and Deleting records. See Also Managing Profiles
The following details will tell you more about the Visits tab.
Records in the Visits Tab
When a visitor visits your customer's website and chats with the sales representative by providing name and email address, the visitor's details are captured as an entry in the Visits tab. The various fields capture the information such as time spent in the web pages, visited pages, IP address, visitor’s name, etc.
The Actions Performed related list will provide more details on the pages that were visited, the actions performed in them, time spent in them, etc. Additionally, chat transcript will be attached to the record and the customers can create notes for the visits.
Standard Fields
Following is a list of Zoho defined fields available in the Visits module. The data in these fields will be automatically populated via the Zoho SalesIQ Integration. Customers cannot edit the values in these fields.
| Field Name | Description |
| IP Address | IP address of the user who visited the web page. |
| VisitedBy | Name of the Lead or Contact who visited the page. Based on the integration settings in Zoho SalesIQ, new visitors will be added as Leads or Contacts. |
| Visited Page | The web page that was visited by the prospects. |
| Time Spent (Minutes) | Number of minutes spent by the visitor on the web page(s) in a single visit. |
| Referrer | It is the URL of the page that directs visitors to your customer's web page. This field gives the URL of the page that the person was on before visiting your customer's page. |
| User Agents | Details on the browser, operating system, etc. used by the visitor |
| Attended By | Name of the user who contacted the visitor via chat option in your customer's web page. |
| Visited Page URL | The URL of the web page that was visited. |
| Browser | The browser in which the web page was accessed. |
| Visitor Type | The visitors are categorized into these types: Customer, Potential, Leads, Contact, and Unknown. |
| Revenue | Revenue till date, from the customer. |
| Visited Time | Date and time of the visit. |
| Search Keyword | The search keyword that listed your customer's web page as one of the search results and brought the visitor to the page. |
| Search Engine | Name of the search engine where the keyword was used to search. |
| Operating System | Operating system of the visitor's computer/laptop. |
Custom Fields
For the visits, if your customers need additional information that are captured in Zoho SalesIQ, it can be done by creating custom fields in their Vertical CRM. These custom fields should have the same label as in Zoho SalesIQ. Only then values will be automatically populated in these fields. Just like the other fields, the custom fields created for the Visits tab also cannot be edited. See Also Create Custom Fields
To check fields in Zoho SalesIQ
- Log in to Zoho SalesIQ with Administrator privileges.
- Click History.
- In the History page, from the list of chat transcripts, click on a name.
- Click the Information icon.
All the fields used to capture visitors’ details will be listed. Your customers can create similar fields in Vertical CRM for the Visits tab too.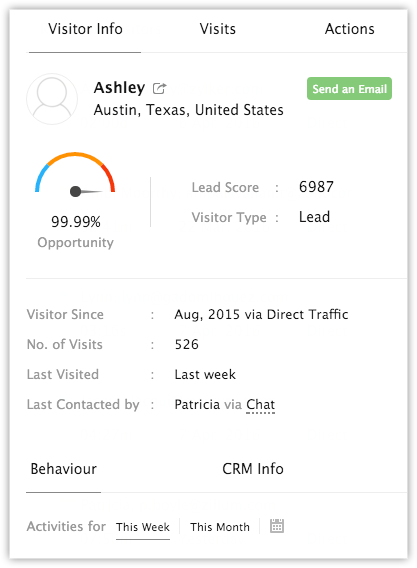
List Views
Some predefined list views are provided for the Visits tab. They are:
- All Visits
- Today's Visits
- Top Visits
- Today's Top Visits
- Visits by Leads
- Visits by Contacts
CRM View for Visits Tab
Along with the normal List Views, the Visits tab has a CRM view that groups your customer's website visitors' details based on the data available in their CRM account. They are grouped under three categories:
- Customers - Lists the visitor tracking details related to the contacts with at least one potential that is won and closed.
- Potential Customers - Lists the visitor tracking details related to the contacts with at least one potential in pipeline.
- Leads/Contacts - Lists the visitor tracking details related to the leads and also the contacts that do not fall under the other two categories.

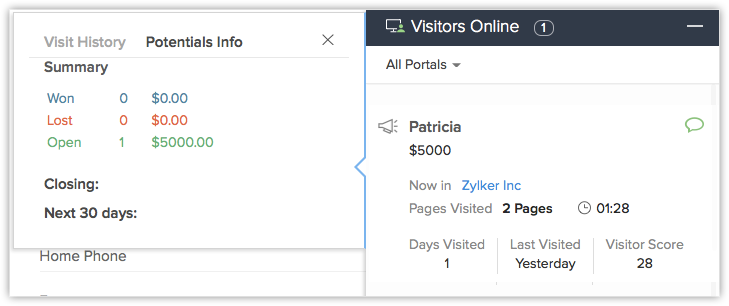
The CRM View gives you holistic view of all the details related to the visitor. You can check the visitor's details that is already available in CRM, view the chat histories, visit details, mail conversations, potential summary, activities, notes, etc.
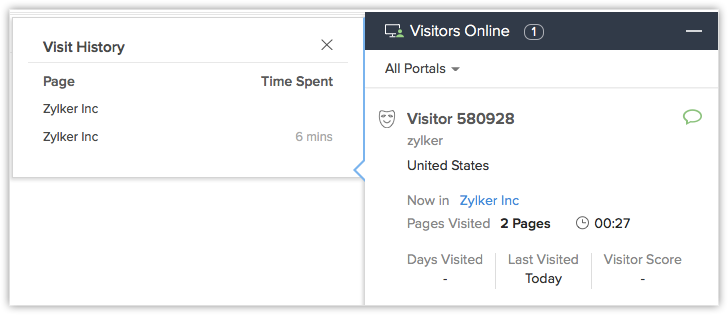
Page Visits, Chat History and Visits History

Info, Conversations and Timeline

Related Lists
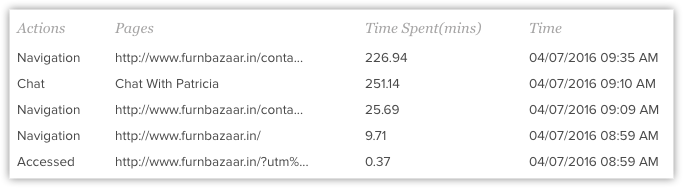
Your customers can associate notes and upload documents, as attachments to each record under the Visits tab. Chat transcript will be attached to a visit. There is another related list, namely Actions Performed. In a single visit, the pages that the visitor navigated to and the actions performed in them will be listed here. Following are the details:
- Action Type - Either one of these three values - Accessed, Navigation, Chatted.
- Actions - Title of the web page or the page’s URL.
- Time Spent - Number of minutes spent by the visitor on the web page(s) in a particular visit.
- Action Performed Time - Date and time when the action was performed in the web page.

Identify New Fields in Leads or Contacts
Once your customers enable the integration, a few new fields will be added in the Leads or Contacts modules (based on the integrations settings in Zoho SalesIQ). Following are the additional fields in Leads/Contacts module:
- Days Visited - Number of days the lead/contact visited your customer's website.
- Number Of Chats - The total number of chat sessions with the lead/contact.
- Average Time Spent (Minutes) - Total time spent on your customer's website (including all the visits) by Number of days the lead/contact visited.
- Last Visited Time - The last time the lead/contact visited your customer's website. Date and time will be available.
- First Visited Time - The first time the lead/contact visited your customer's website. Date and time will be available.
- First Visited URL – URL of the web page that the lead/contacts first visited in your customer's website.
- Referrer - URL of the page that directed the visitor to your customer's web page. This field gives the URL of the page that the person was on, before visiting the page.
- Visitor Score - The Lead Score pulled from Zoho SalesIQ.

View Related List for Leads/Contacts
For leads/contacts, a new related list, Visits – Zoho SalesIQ is added where the details on the each visit's IP Address, Visited Page, Time Spent (Minutes), Referrer, and Search Engine will be recorded.
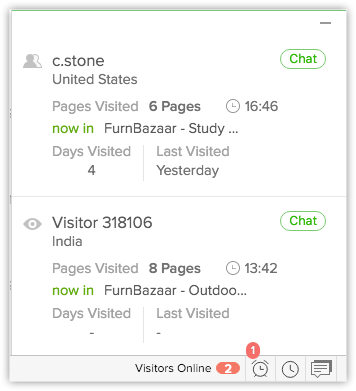
Check Visitor Tracking Notifications
During the setup, the administrator can enable the Visitor Notification option so that users can receive pop-up notification whenever there is a visitor to your customer's web page. This can also be defined in Zoho SalesIQ from Settings > Integrations > Vertical CRM > CRM Configuration.
When the visitor tracking code is added in your customer's website, all the visitors will be tracked and your customers will start getting notifications within your Vertical CRM, for the visits. Ideally, it is not feasible to manage the overwhelming visits and the notifications but to help you with that we have Routing Rules.
With Routing Rules, you can manage which visitor details needs to be tracked and route it to sales reps. These sales reps would then be automatically notified whenever a visitor visits your customer's website and their details meet the criteria in the routing rule.
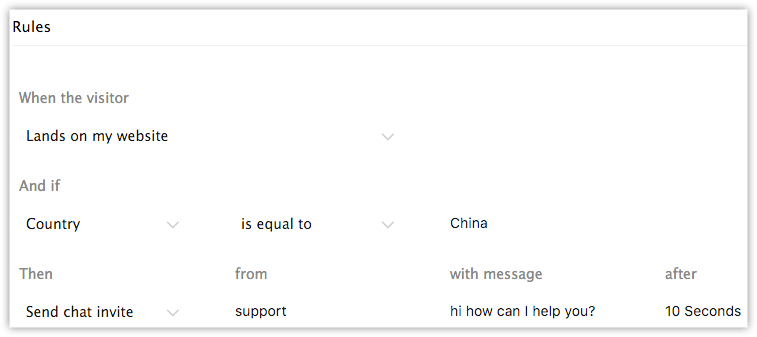
To add routing rules
- In your Vertical CRM, click Setup > Zoho Apps > Visitor Tracking.
- In the Visitor Tracking page, click Settings > Routing Rules.
A new tab with the settings for routing rules in Zoho SalesIQ will be available.
- Under Rules, do the following:
- Specify the criteria based on which you want the visitors to be tracked.
- Select an option to route the notifications about the visits to the sales reps.
- Select an Action to be performed.
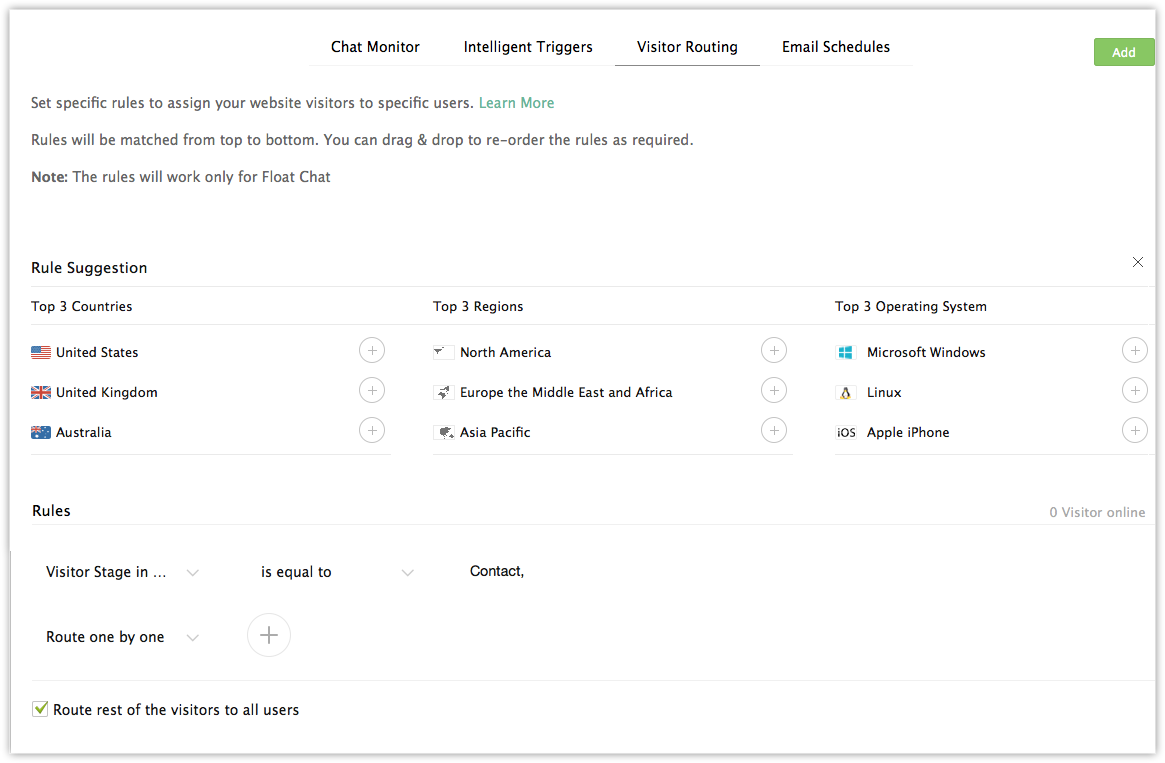
- Select the Route rest of the visitors to all agents check box, if required.
- Click Add for more rules.


Different Notifications
- Customer Online Notification
- Lead/Contact Online Notification
- Potential Online Notification
- Unknown Visitor Online Notification
- Multiple Notifications


Besides Routing Rules your customers can create their own automated chat triggers based on your business needs. Your customers can increase visitors' conversation by configuring triggers based on specific actions performed by the visitor on their website.
To add Intelligent Triggers
- In your Vertical CRM, click Setup > Zoho Apps > Visitor Tracking.
- In the Visitor Tracking page, click Settings > Triggers.
A new tab with the settings for adding chat triggers in Zoho SalesIQ will be available. - Under Rules, do the following:
- Specify the criteria for the chat trigger.
- Specify the action to be performed when the criteria is met and the rule is triggered.

- Click Add for more rules.
View Google AdWords Information
A user who has enabled Google AdWords Integration as well as Zoho SalesIQ integration will have the benefit of viewing Google AdWords information in the corresponding Visits tab as well. If a new visitor enters a site by clicking on a Google AdWords campaign and fills up a form, the following actions occur in CRM:
- A lead is created in the Leads module. The Leads Details page presents the Google AdWords information as well as Visitor Tracking information.
- In addition to this, the lead appears in the Lead/Contact stream of the Visits module. The same Google AdWords information is included in the Marketing Information section of a Visit's Details page as well.
This tracking information is obtained with the help of the GCLID that is appended to every URL on your customer's site upon Google AdWords integration. See also: Understanding the GCLID Mapping in Zoho CRM
To view the Google AdWords information in the Visits Details page
- Click on the Visits Module
- Click on the desired Visit
- In the Visits Details page, scroll down to the Marketing Information section.
The relevant Google AdWords info is displayed.

Disable Zoho SalesIQ Integration
On disabling the Zoho SalesIQ Integration the Visits tab will not be functional. Also, the following will not be available:
- Custom fields and related lists created for this integration in the Leads or Contacts modules.
- Reports on Visits tab.
To disable Zoho SalesIQ integration
- Log in to Zoho SalesIQ with Administrator privileges.
- Click Setup > Apps & Add-ons > Zoho Apps > Visitor Tracking.
- Click Disable.