Using Vertical CRM Plug-in for Microsoft Outlook
How Can I...up
Using the CRM Plug-in for Microsoft Outlook, your customers can do the following:
- Add records to CRM Category
- Remove records from CRM Category
- Automatically synchronize (one-way) Contacts, Tasks and Calendar Events from MS Outlook to Vertical CRM
- Export Contacts, Tasks and Calendar (Events) from MS Outlook to Vertical CRM
- Add Emails to Leads, Contacts or Potentials in Vertical CRM
- Add emails as Cases in Vertical CRM
Categorize Records as CRM
In Microsoft Outlook, the contacts, tasks and calendar event can be grouped into categories. Assigning records to categories helps you to sort and then view the records by category. With the CRM Plug-in, your customers get an additional category namely, CRM. They can make use of this category while synchronizing records to Vertical CRM.
To mark records under CRM Category, your customers should follow the steps below
- Select the Contacts, Tasks, or Calendar events.
Note that the records should be selected from the corresponding folder that your customer had specified under Folder Settings. - Click Home > Categorize.
- Select the CRM checkbox from the list of categories.
The record will be marked under Zoho category.
Similarly, they can remove the category by clearing the checkbox.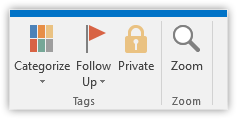

Synchronize Contacts, Tasks and Calendar
The one way synchronize option pushes Contacts, Tasks, Calendar events from MS Outlook to Vertical CRM. It helps to keep your customer's data updated in both Vertical CRM and MS Outlook and they can avoid duplication of data. Data synchronization can be done either manually or automatically.
Contact Synchronization - Field Mapping
| MS Outlook | Vertical CRM | Field Length in Vertical CRM |
| First Name | First Name | 40 |
| Last Name | Last Name | 80 |
| Email 1 | Email Address | |
| Job Title | Title | 100 |
| Company Name | Account Name | 200 |
| Department | Department | 50 |
| Business Telephone Number | Phone | 50 |
| Home Telephone Number | Home Phone | 30 |
| Other Telephone Number | Other Phone | 30 |
| Business Fax Number | Fax | 30 |
| Mobile Telephone Number | Mobile | 30 |
| Assistant Name | Assistant | 50 |
| Assistant Telephone Number | Asst Phone | 30 |
| Manager Name | Report To | 50 |
| Business Address Street | Mailing Street | 250 |
| Business Address City | Mailing City | 30 |
| Business Address State | Mailing State | 30 |
| Business Address Postal Code | Mailing zip | 30 |
| Business Address Country | Mailing Country | 30 |
| Other Address Street | Other Street | 250 |
| Other Address City | Other city | 30 |
| 21. Other Address State | Other state | 30 |
| Other Address Postal Code | Other zip | 30 |
| Other Address Country | Other Country | 30 |
| Description | Description | 32000 |
| Birthday | Birthday | - |
Note
- Duplicate check for Contacts is primarily based on the Email ID of the contacts. In the absence of an email address, the duplicates are identified on the basis of the First Name and the Last Name.
Tasks Synchronization - Field Mapping
| MS Outlook | Vertical CRM | Length in Vertical CRM |
| Subject | Subject | 255 |
| Due date | Due Date | - |
| Start date | - | - |
| Priority | Priority | - |
| Status | Status | - |
| Description | Description | 32000 |
Note
- Duplicate check for Tasks is based on the Subject and End Date.
Calendar Synchronization - Field Mapping
| MS Outlook | Vertical CRM | Length in Vertical CRM |
| Subject | Subject | 255 |
| Start Time | Start Date and Time | - |
| End Time | End Date and Time | - |
| Location | Venue | 255 |
| Description | Description | 32000 |
| Attendees | Participants | - |
Note
- Duplicate check for Events is based on the Subject, Start Date and Time and End Date and Time as well as the Email ID of the attendees/participants.
Synchronization of Event Participants
When your customers synchronize events from Microsoft Outlook to Vertical CRM, the event attendees from Outlook are synchronized as event participants in CRM automatically. The participants thus synchronized are associated to the event as contacts, leads or Vertical CRM users, as the case may be. If the participants are not any of these, then just the email address of the attendee is displayed in the Participants section.
Similarly, when they synchronize events from vertical CRM to Microsoft Outlook, the event participants are included as event attendees in Outlook automatically upon synchronization.
In case there are duplicates in the email addresses synchronized from Microsoft Outlook to Vertical CRM, the issue is addressed based on the following order of priority:
- Contacts
- Leads
- CRM user
If the Email ID of an attendee exists in Vertical CRM as a contact as well as a lead, then your Vertical CRM associates the contact to the event as a participant and ignores the lead. This is because a Contact is given the highest priority.
If two contacts in CRM are found to have the same email address as that of an attendee, the contact that was created first in CRM is associated to the event as a participant.
Note
- Event invitation emails are not automatically sent to participants in Vertical CRM when an event is created upon synchronization from Microsoft Outlook. This is because the decision regarding invitation emails would already have been taken at the time of event creation in Microsoft Outlook. Therefore the user is not prompted to send an invitation email for events that are created as a result of synchronization in Vertical CRM. The same applies to events synchronized from vertical CRM to Microsoft Outlook as well.
- If required, invitation emails can be sent to event participants by manually editing an event and sending the mail, like it is done for any regular event in both Vertical CRM and Microsoft Outlook.
To enable automatic synchronization, your customers should follow the steps below
- In Microsoft Outlook, click CRM > Settings.
- In Settings dialog box, click Contacts/Tasks/Calendars tab.
- Select the Automatically sync the changes made in Outlook contacts/tasks/appointments to [Vertical CRM] checkbox.
- Click Save.
The changes made to the records before your customer enables the option to automatically synchronize, needs to be manually synchronized.

To manually synchronize contacts, tasks and calendar events
- Log in to Vertical CRM from within Microsoft Outlook.
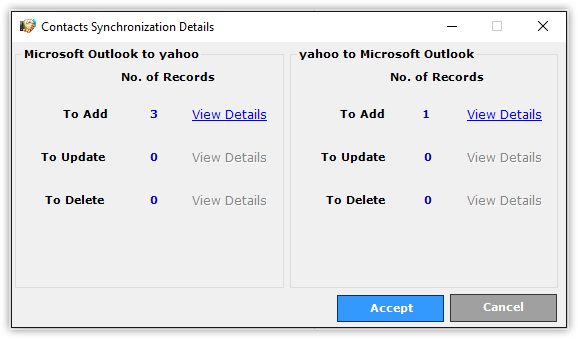
- From the CRM Plug-in, click Sync Contact /Task/Calendar.
The synchronization will automatically start. Based on the Synchronize Settings , the records will be updated.

Note
- Your customer can click the View Details link to get the detailed list of changes.
- The Contacts/Tasks/Calendar Synchronization details are displayed in three categories - To Add, To Update and To Delete.
- During the synchronization of contacts, tasks or events, records that were not synchronized during a previous sync are automatically unchecked and marked as Ignored during previous sync under the Information column.
This way your customers can easily see which records were not synced previously. Also they decide to include them in the current synchronization, all they have to do is select the records and synchronize them. - A user's ability to edit records synced with Outlook depends on their profile permission and data sharing rules.
- In the case of restricted profile permission, a user will receive a Permission Denied warning when he/she attempts to modify the record.
- In case a user attempts to modify a record shared to him/her on the basis of data sharing rules, the record changes will be reflected in Vertical CRM based on the Access Type set in the data sharing rule. This will be the case even if the user has the required profile permission to access the record. For example, if the Access Type of a record is set to Read Only, the user cannot make record changes effective even if he/she has profile the required permissions to edit the record.
Add Emails as Cases to Vertical CRM
Your customers can add customer-specific email messages from Microsoft Outlook to Vertical CRM as a Case. Before adding the email messages make sure the corresponding contact to the email exists in Vertical CRM.
To add email messages as Cases in Vertical CRM, your customers should follow the steps below
- Select Inbox from the sidebar or the Folder that contains the emails that needs to be added to Vertical CRM.
- Select the customer-specific Email from the Inbox or custom email folder.
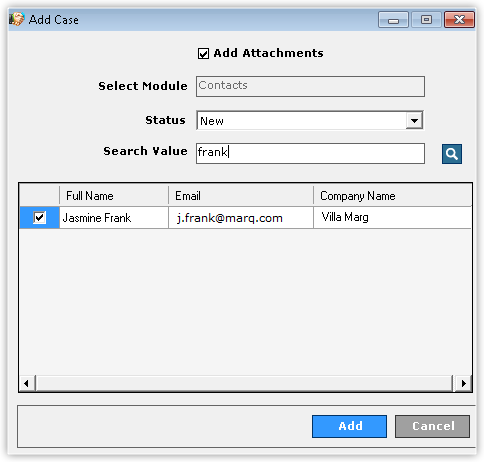
- From the CRM Plug-in, click Add Case.
- In the Add Case dialog box, select a Status from the drop-down list.
- Select the Attachments checkbox, if they want the attachments also to be added along with the email.
- Search records based on a given criteria and then add the email as case to the selected records.
- Search records based on a given criteria and then add the email as case to the selected records.
- Click Add.
The email will be added as a case in Vertical CRM.

Note
- Your customers can search and add the email as a case, only to the selected contacts, if required.
- While adding it to Contacts, if your customers select the status and just click Add, then a new record will be created and the following values will be taken in Vertical CRM:
In MS Outlook In Vertical CRM Email Address Email Address Contact Name Contact Name Subject of the Email Subject of the Case Email Content Case Description
Adding Email to Vertical CRM
Your customers can associate the email messages that they receive in Microsoft Outlook to the Leads, Contacts or Potential records in Vertical CRM. Before adding the email messages they must make sure the corresponding contact to the email exists in Vertical CRM. If not, based on the Mail Settings , emails will be associated to the records in CRM. There are four ways in which they can add emails to CRM:
Add Email option
- On clicking this option the selected email (received or sent) will be added to the lead/contact based on the Mail Settings that is specified.
Search and Add Email option
- Your customers can search records by criteria and add the email (received or sent) to the matching records.
- Thisoption can be used to associate emails to potentials.
- Emails are not associated based on the Mail Settings. They have the option here to select the module.
Automatically add outgoing emails
- On sending an email from MS Outlook, it will be automatically added to the matching contact in Vertical CRM.
- The email sent will be added in Vertical CRM, only if it is available in the sent folder specified in the Mail Settings. See Also Configure Mail Settings
- The contact to whom the email is sent should be listed in the Folder and Category specified in the Contact Settings. See Also Set up Category and Folder Settings
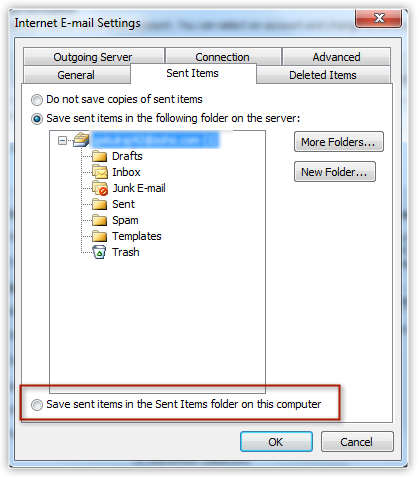
- For IMAP account users, email may not automatically get associated to the records in Vertical CRM, if the "Save sent items in the Sent Item folder on this computer" is not selected in the MS Outlook settings. To enable:
- Open MS Outlook's account settings.
- Click More Settings > Sent Items.
- Select "Save sent items in the Sent Item folder on this computer".
- Click OK.

Send and Add option in the Compose window
- Your customers can draft an email to their customer and add it to Vertical CRM whenever they send it.
- This option can be used to associate emails to potentials.
To add emails to Vertical CRM (Add Email Option)
- Select the Folder that contains the emails that needs to be added to Vertical CRM.
- Select the customer-specific Email from the folder.
- From the CRM Plug-in, click Add Email.
Based on the Mail settings the selected email will be added to the lead/contact in Vertical CRM.
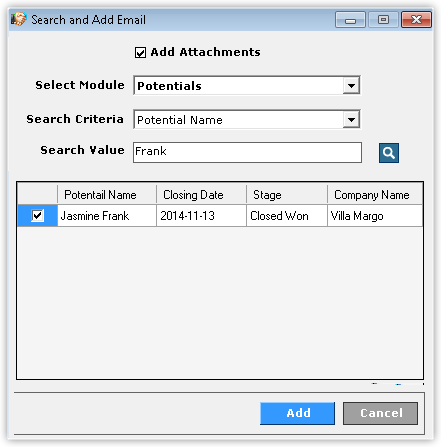
To add emails to Vertical CRM (Search and Add Email Option), your customer should follow the steps below
- Select the Folder that contains the emails that needs to be added to Vertical CRM.
- Select the customer-specific Email from the folder.
- From the CRM Plug-in, click Search and Add Email.
- In the Add Email dialog box, select a Module (Leads, Contacts, or Potentials) from the drop-down list.
When theyselect Potentials, another field will be available namely, Criteria (to search records).
You need to select either Email Address or Potential Name to search the records. On selecting Email Address, the Contacts with the matching email address will be searched in Vertical CRM and the Potential records associated to the matching contacts will be listed. - Select the Attachments checkbox, if they want the attachments also to be added along with the email. They can also do the following:
- Search records based on a given criteria. The matching records will be listed.
- Search records based on a given criteria. The matching records will be listed.
- Click Add.
The email will be added to the selected leads/contacts/potentials.

Note
- While adding it to Leads or Contacts, if your customers select the module and just click Add, then a new record will be created and the following values will be taken in Vertical CRM:
- Email address in MS Outlook will be the email address in Vertical CRM
- Contact name in the mail will be the Contact or Lead name in Vertical CRM.
Related Topics
Installing Vertical CRM Plug-in | Configuring Plug-in Settings