Configuring CRM Plug-in in Windows
How Can I...up
There are some basic settings that your customers need to do, before they start synchronizing the contact, task and calendar events.
Sign In to CRM Plug-in
Sign In Using Vertical CRM Login Credentials
To get started, first your customers need to sign in to the CRM Plug-in using their Vertical CRM login credentials. They can also sign in using their Google Apps, Google, Yahoo or Facebook login credentials but with a different password. See Also Sign in using other login credentials
Note
If your customers are not able to sign in to the CRM Plug-in, one of the reasons could be that they exceeded the Authtoken's limit (10 tokens). Log in to www.accounts.zoho.com and following the steps given below to close the active authtokens and log in to CRM Plug-in for MS Outlook.
- In the Home tab, click ActiveAuthtokens.
- In the Active Authtokens page, click Remove for the appropriate authtokens.
To sign in to CRM Plug-in, your customers should follow the steps below
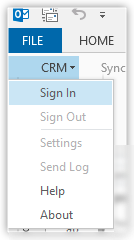
- In Microsoft Outlook, click CRM > Sign In.
- In the Sign In dialog box, enter Product's (Vertical CRM) URL,Vertical CRM account's Email/Username and Password.

- Select the Stay signed in check box if they want to automatically log in to Vertical CRM for the next session.
- Click Sign In. After they sign in, the CRM Plug-in options will be enabled.


Set Up Categories and Folders for Contacts, Tasks and Calendar
When your customers set up a synchronization of contacts, tasks or calendar (events), they can specify the category and folder from which the records should be synchronized.
To set up category and folder for Contacts, your customers should follow the steps below
- In Microsoft Outlook, click CRM > Settings.
- In Settings dialog box, click Contacts tab.
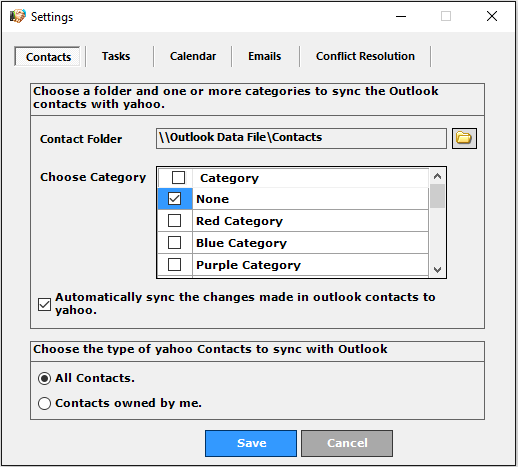
- Choose a folder from Contacts Folder.
The records will be synchronized from the selected folder only. - For Choose Category option, they can select the categories of their choice to sync only the records under this category.
By default, the [Vertical CRM] Category will be selected to sync only the records belonging to the Vertical CRM category. You cannot clear the [Vertical] check box. - Select the Automatically sync the changes made in Outlook Contacts to [Vertical CRM] check box.
On selecting this option, contacts from MS Outlook will be automatically synchronized in Vertical CRM. - In the Choose the type of Vertical CRM Contacts to sync with Outlook section, select one of the following options as per your requirement:
- All Contacts - refers to contacts owned by you and your subordinates in your Role hierarchy as well as contacts shared with you via data sharing rules and territories. (i.e, contacts in the All Contacts view in Vertical CRM).
- Contacts owned by me - refers to contacts owned by you (i.e, contacts in the My Contacts view in Vertical CRM)
- Click Save.

Note
- To set up categories for Tasks and Calendar, select the Tasks or Calendars tab in the Settings dialog box. Use the procedure mentioned above for Contacts as reference and select appropriate options for Tasks and Calendars.
Configure Mail Settings
From the Emails tab, your customers can configure the settings for outgoing emails and also for the Add Email option in the Plug-in.
Outgoing Emails settings - Your customers can specify whether the outgoing emails should be automatically added to the contact in Vertical CRM.
Add Email Settings - Based on the email address of the recipient, the right contact or lead is searched in Vertical CRM and the email is associated to the matching record. If the recipient's email address does not match a record in CRM, they have the option to automatically create a record and associate the email to it. Your customers can define whether the email should be associated to a contact or a lead in Vertical CRM.
To configure mail settings, your customers should follow the steps below
- In Microsoft Outlook, click CRM > Settings.
- In the Settings dialog box, click the Emails tab.
- For outgoing emails, do the following:
- Choose a Sent Item Folder where outgoing emails are stored.
- Select the Automatically add outgoing emails to [Vertical CRM] check box, if required.
- For mail setting, select the following check boxes, if required:
- Search the recipient's email address in contacts and associate the sent email to the matching contact(s).
- Search the recipient's email address in leads and associate the sent email to the matching lead(s).
If there are no matching leads/contacts, then select Contacts or Leads from the drop-down list to create a new record.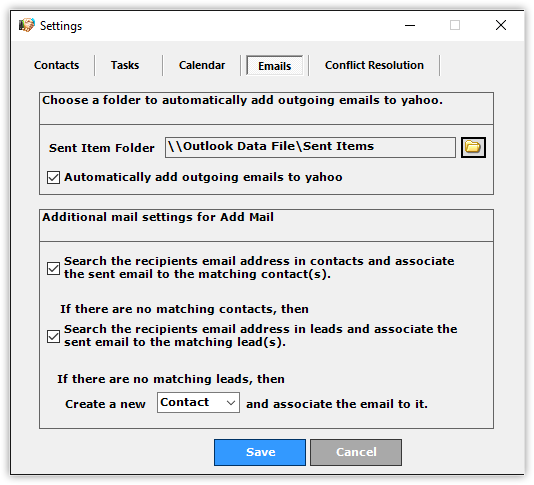
- Click Save.

Configure Conflict Resolution Settings
The conflict resolution settings are used when there are duplicate records with a conflict in the field values during a sync. With such conflicting records, the option selected will be applied provided the records are being updated. Note that these options are not applied when new records are added.
To configure conflict resolution settings
- In Microsoft Outlook, click CRM > Settings.
- In the Settings dialog box, click the Conflict Resolution tab.
- Choose the Conflict Resolution from the following:
- A pop-up alert will help me decide - Your customers can manually select, which information needs to be added
- Let MS Outlook Win - The values from MS Outlook will overwrite the CRM values.
- Let Vertical CRM Win - The values from Vertical CRM will overwrite the MS Outlook values.
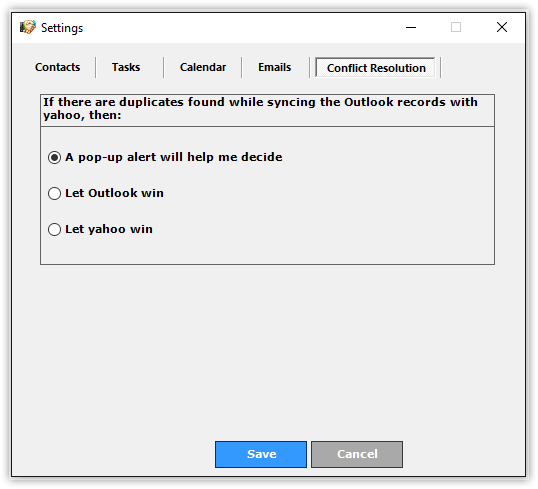
- Click Apply > Save.

Note
- Duplicate check for Contacts is primarily based on the Email ID of the contacts. In the absence of an email address, the duplicates are identified on the basis of the First Name and the Last Name.
- Duplicate check for Tasks is based on the Subject and End Date.
- Duplicate check for Events is based on the Subject, Start Date and Time and End Date and Time.