Blueprint for Order Management
Objective: To guide Zylker's sales reps at every stage of their order management process - such as inventory check, shipping and delivery. Here, sales reps are prompted to enter CRM information contextually.
- For example, a user is prompted to enter customer's address right before an order can be shipped. This can help avoid inadvertent delays in product delivery.
- Also, custom actions can be associated with this Blueprint so that invoices and purchase orders are generated automatically at the appropriate stages in the order management process.
- Basic Details and Process Flow
- Transition Settings and Execution
Pre-requisites
Under Setup > Customization > Modules > create a custom module called Orders.
- 1.SECTION: ORDER INFORMATION
- Order Name - Single Line field
- Order Number - Number field
- Order Quantity - Number field
- Order Status - Picklist field (with the following values) These values form the States in this Blueprint.
- 2.SECTION: CONTACT INFORMATION
- Delivery Address - Single Line field
- Phone - Number field
- Alternate Contact - Number field
- City - Single Line field
- State - Single Line field
- Country - Single Line field
- Courier Details - Multi-Line field
| Order Confirmed | Inventory Check | Product in Stock | Product out of stock | Not Delivered to warehouse | Order Fulfilled | PO Created | Product in warehouse | Product Not in warehouse | Delivered to warehouse | Shipped to customer | Invoice created |
|---|
Enter Basic Details
- 1.Click Setup > Process Management > Blueprint.
- 2.Click +Create Blueprint. In the ensuing popup window, specify the following details:
- Blueprint name: Zylker Order Management
- Module: Orders
- Layout: Standard
- Choose field: Order status
- Criteria: Order Status is Order Confirmed
- 3.Click Next

Design Process Flow
- 1.In the Blueprint Editor, drag and drop all the States (stages) that form a part of the process.
- 2.Establish the process flow between the States by connecting the nodes in the State buttons.
- 3.Create Transitions by clicking on the + button between two States. (To delete a transition, simply Right Click on the transition line and click Remove Transition )

Configure Transition Settings
Following are the instructions to configure each Transition included in the Leads Qualification Blueprint for Zylker. Click on each Transition header to reveal the Before, During and After Transition settings.
| Before Transition | During Transition | After Transition |
|---|---|---|
Criteria: None | None | None |
- Creation of invoice and purchase order can be automated using Blueprint in the After Transition section using custom functions. Learn about custom functions here.
- If you do not require the creation of invoice to be automated, you can skip the After Transition settings, and associate them manually.
Once you have configured the Transition settings, save the Blueprint. Now we are ready to execute this Blueprint.
Execute Blueprint
- 1.Create a new order with the Order Status as Confirmed. You will see that the record matches the Blueprint entry criteria and so it enters the process.
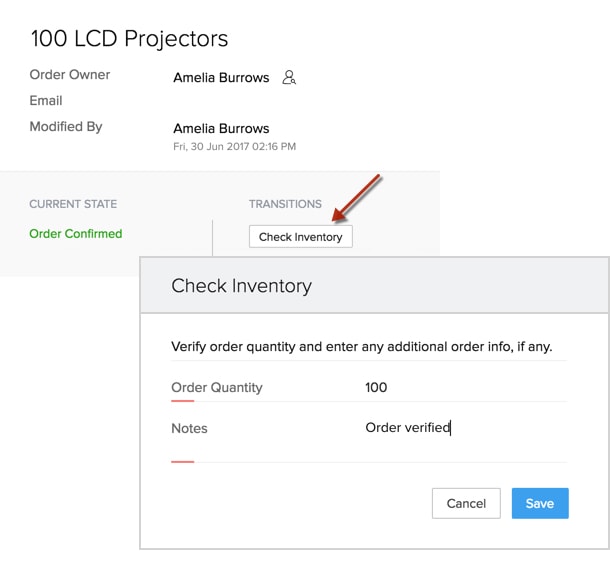
- 2.Go to the new record's detail page. A Blueprint strip displays the "Current State" of the record and the Transitions available at that State.
- 3.Click Check Inventory. enter the Order Quantity and enter notes about the order summary in the popup window. This way, CRM prompts important information from the users, contextually. Once you have entered the required details, click Save.
- 4.Click Save after entering the required details. The next set of Transition Buttons are visible to you. Let's say the product is available.
- 5. Click the In Stock Transition and enter notes as prompted.
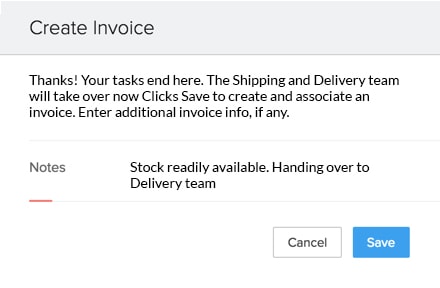
- 6.Click Create Invoice. A message is displayed asking the user to click Save to create an invoice. On execution of this Transition, an invoice is automatically created, as per the custom action associated.
- 7.Proceed to Ship to Customer.
- 8.Enter the Shipping Info such as Address, contact info and other details. This lets you avoid any delivery delays due to wrong contact info.
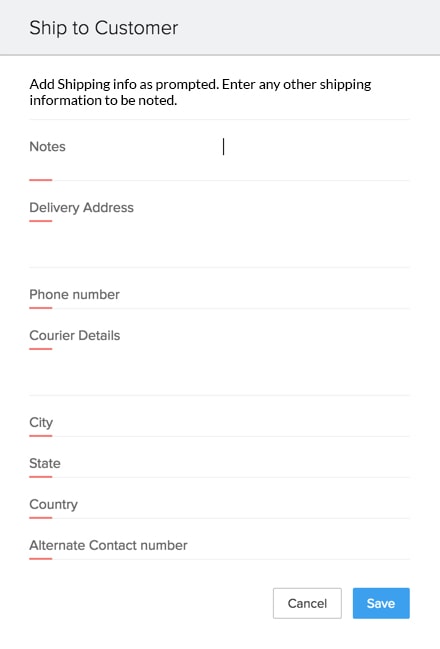
- 9.Enter values for the fields prompted and then click Save.
- 10.Click Deliver to Customer and then enter the delivery details as prompted. Now the Order Status has been systematically changed to Order Fulfilled.


If you do not want the invoice to be created automatically, you can skip the custom action setting in the After Transition settings and create it manually.

You have successfully executed the Order Management Blueprint for Zylker. This marks the end of the Blueprint Tutorial.