Canvas for Zoho CRM
Implementation for Zylker Realtors
Zylker Realtors is a full service commercial brokerage company based in New York.
- Requirement
- Solution
- Instructions
The Context
Zylker Realtors is a full service commercial brokerage company based in New York. They manage their property management needs in Zoho CRM. They have a database of their property enquiries, clients, property listings, builders and so on in their CRM under different modules.
While they can carry out their day-to-day activities in CRM and engage with customers perfectly well, there are a few hassles when it specifically comes to the detail page of each record.
Multiple teams referring to a single standard layout
Zylker Realtors has three major teams working on every deal.
- The primary agents
- The marketing team
- The legal team
While all of them have access to a customer record, each team is focused on a different aspect of the customer record.
While the real estate agent needs to know primary deal details, property details and upcoming activities, the marketing specialist is more interested in social media conversations and campaign details. Similarly the legal team's focus is more on the documentation aspects of the deal such as contracts and terms.
However, all three teams have access to a single database where every detail is present, which could clutter the page and make each team run around the system for details that they specifically need for their processes.
Create profile-based custom layouts using Canvas
Canvas offers the flexibility to not only organize data components according to the needs of an organization, it goes an additional step further to let an admin customize the layout for each department in the organization. This profile-based customization is a key feature of Canvas that will solve the challenges of Zylker Realtors.
So with the Canvas layout, Zylker could have an Agent View and a Marketing Specialist view and a Legal team view for the same customer record.
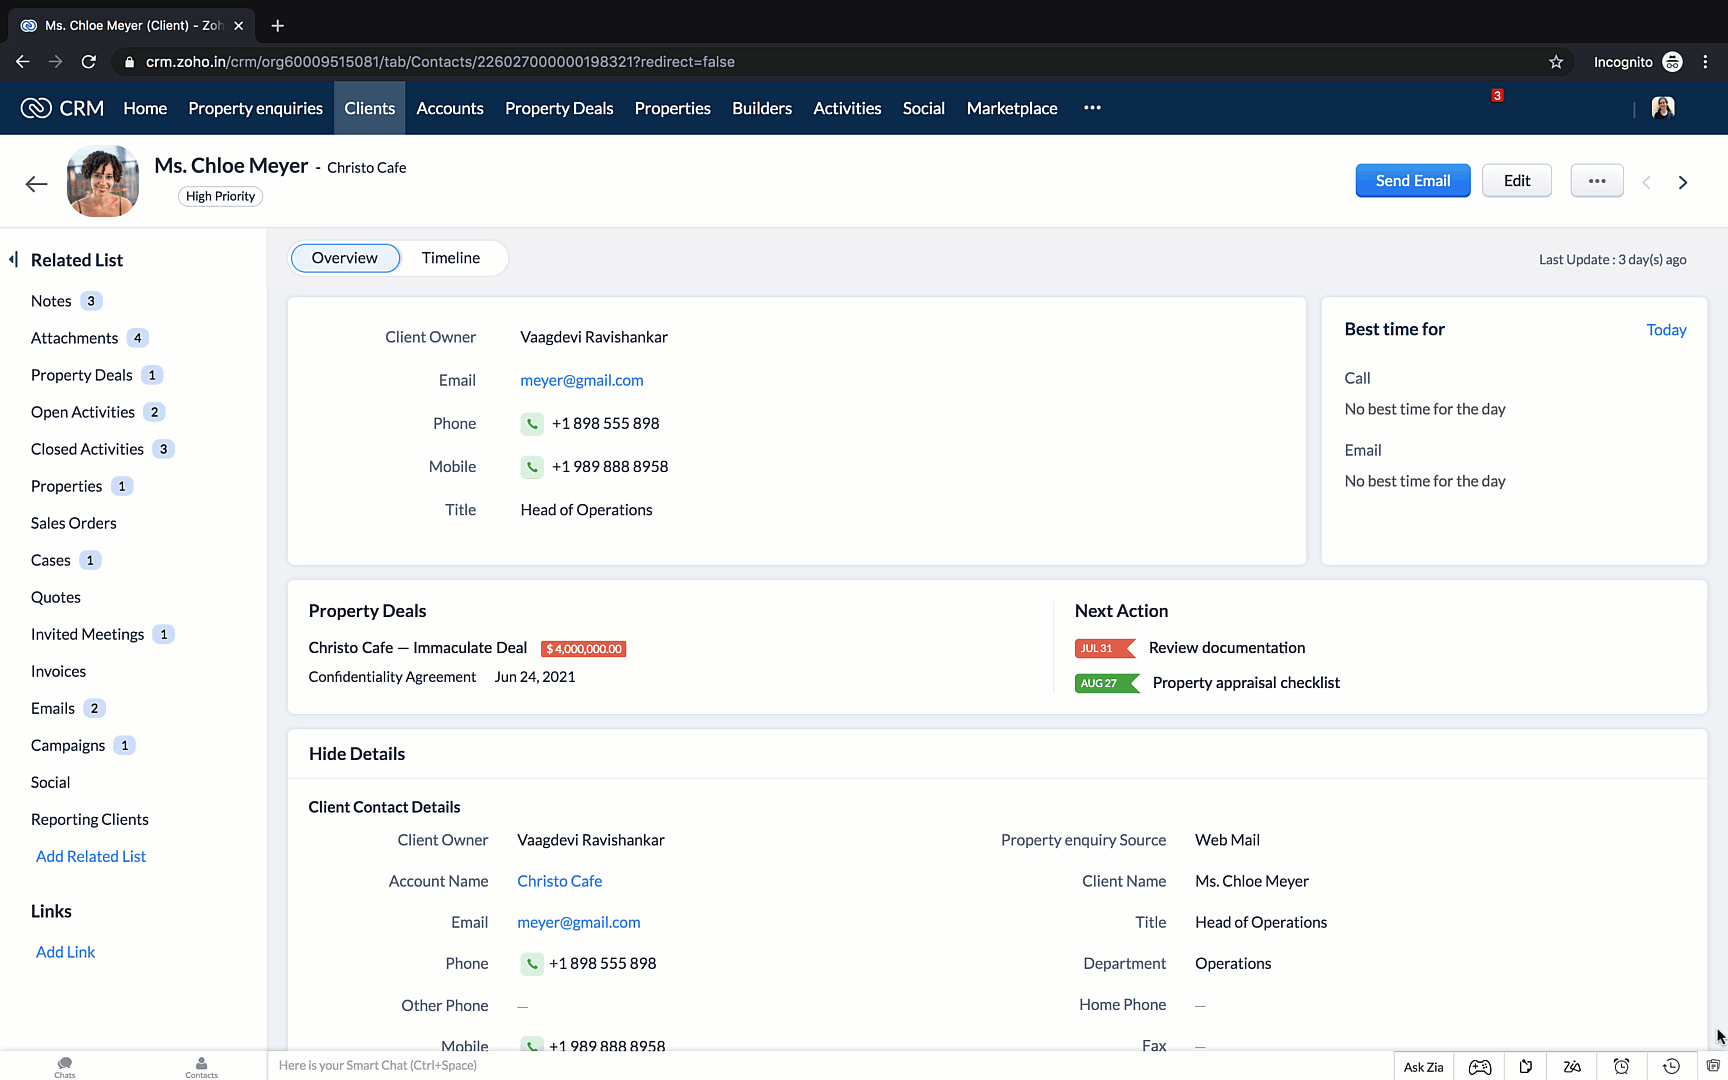
You can create multiple detail-page views for different profiles using Canvas. So essentially the same set of details on a record detail page can be reorganized differently for different profiles based on their responsibilities and functions. For instance, following are two views for the same customer "Chloe Meyer"— one is ideal for the real estate agent and the other for the marketing team.
- The real estate agent view has key components such as "Properties", "Property Deals", "Upcoming activities" and "Client Preferences" available to them right when they land on the page.

- Whereas, when you switch to the Marketing Canvas view, the key components here are the social media section, enquiry source, campaign details and then these are followed by other property-related details.


In both pages, what is relevant for a particular team has been made available to them immediately when they access the page. Other details have been organized in the form of multiple switchable tabs.
Therefore Canvas addresses the challenges of Zylker Realtors by offering the flexibility to design different views of the same record based on the functions of different teams. This profile-based customization goes a long way in making the detail page more relevant and contextual for the user. Zylker users now no longer have to rely on a single standard view for multiple teams.
How to create profile-based custom layouts using Canvas
To create a Canvas layout,
- Go to Setup > Customization > Canvas Builder.
- Click Create Record Detail Page.
- Select the desired module and layout.
In this case, the Clients module and Standard layout, respectively. - Click Create.
- In the Select a template from the gallery popup, choose Blank Template. The empty Canvas Builder opens up where you can create your page from scratch.
For this Canvas Layout called the Agent View, the design plan is for the page to be separated into three major parts:
Canvas Page Design Plan
Part 1
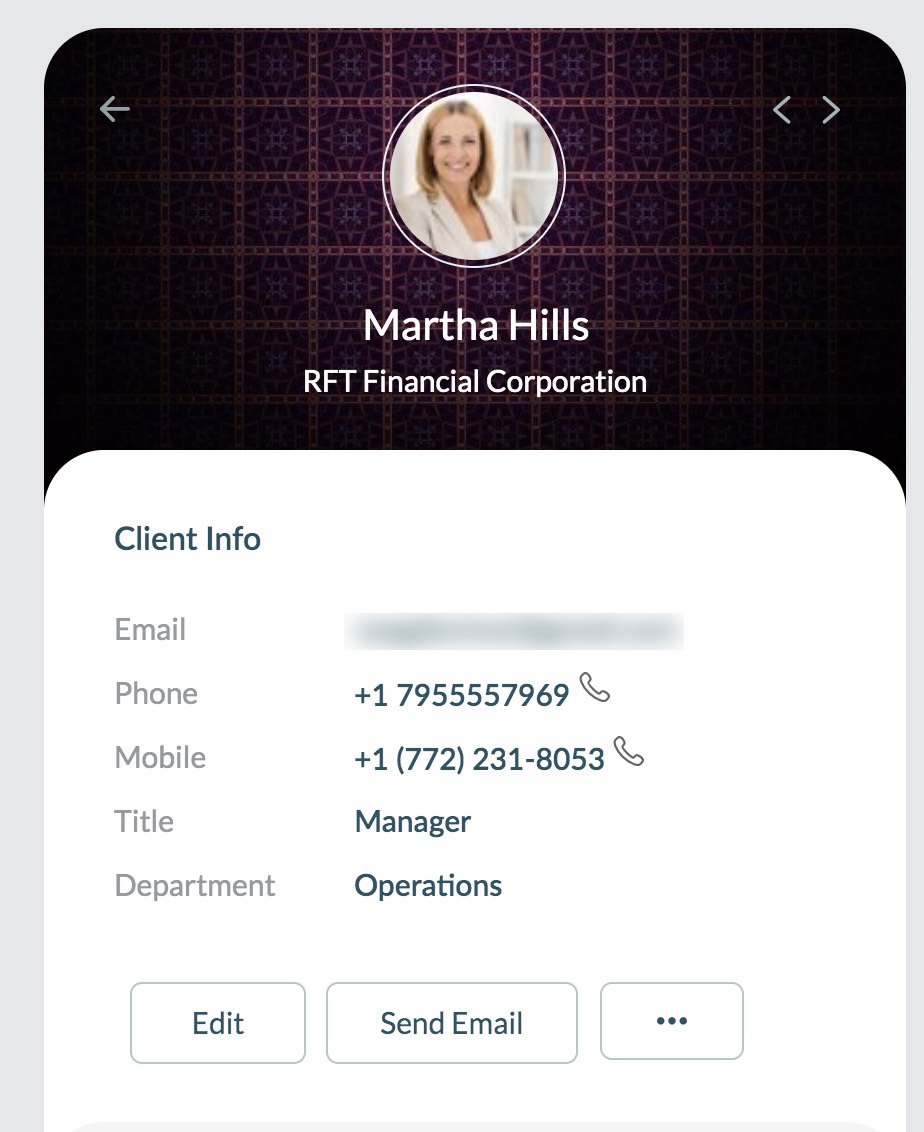
The first part of the page will have Client details column on the left . This will contain four sections:
- Introduction Section
- Basic Client Info
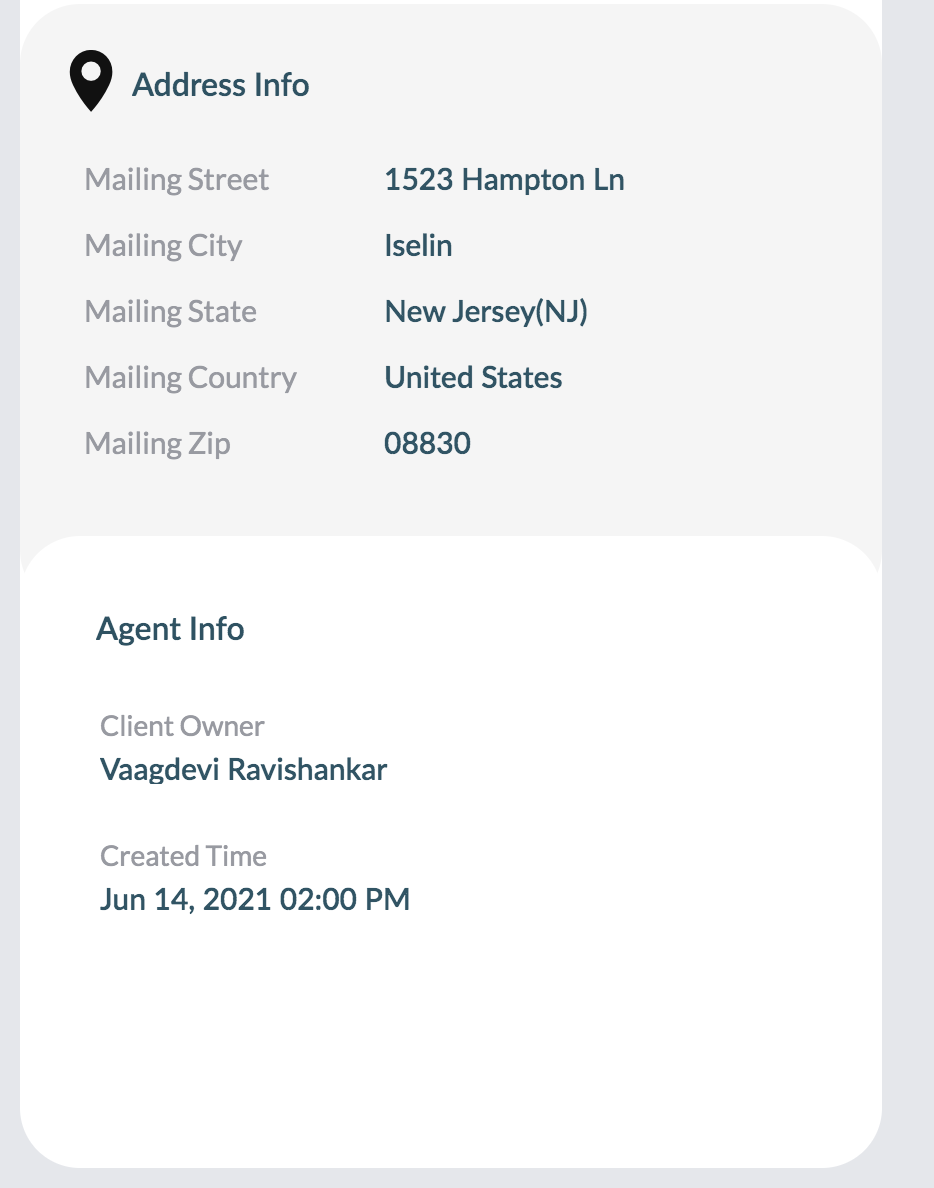
- Address Info
- Agent Info
Part 2
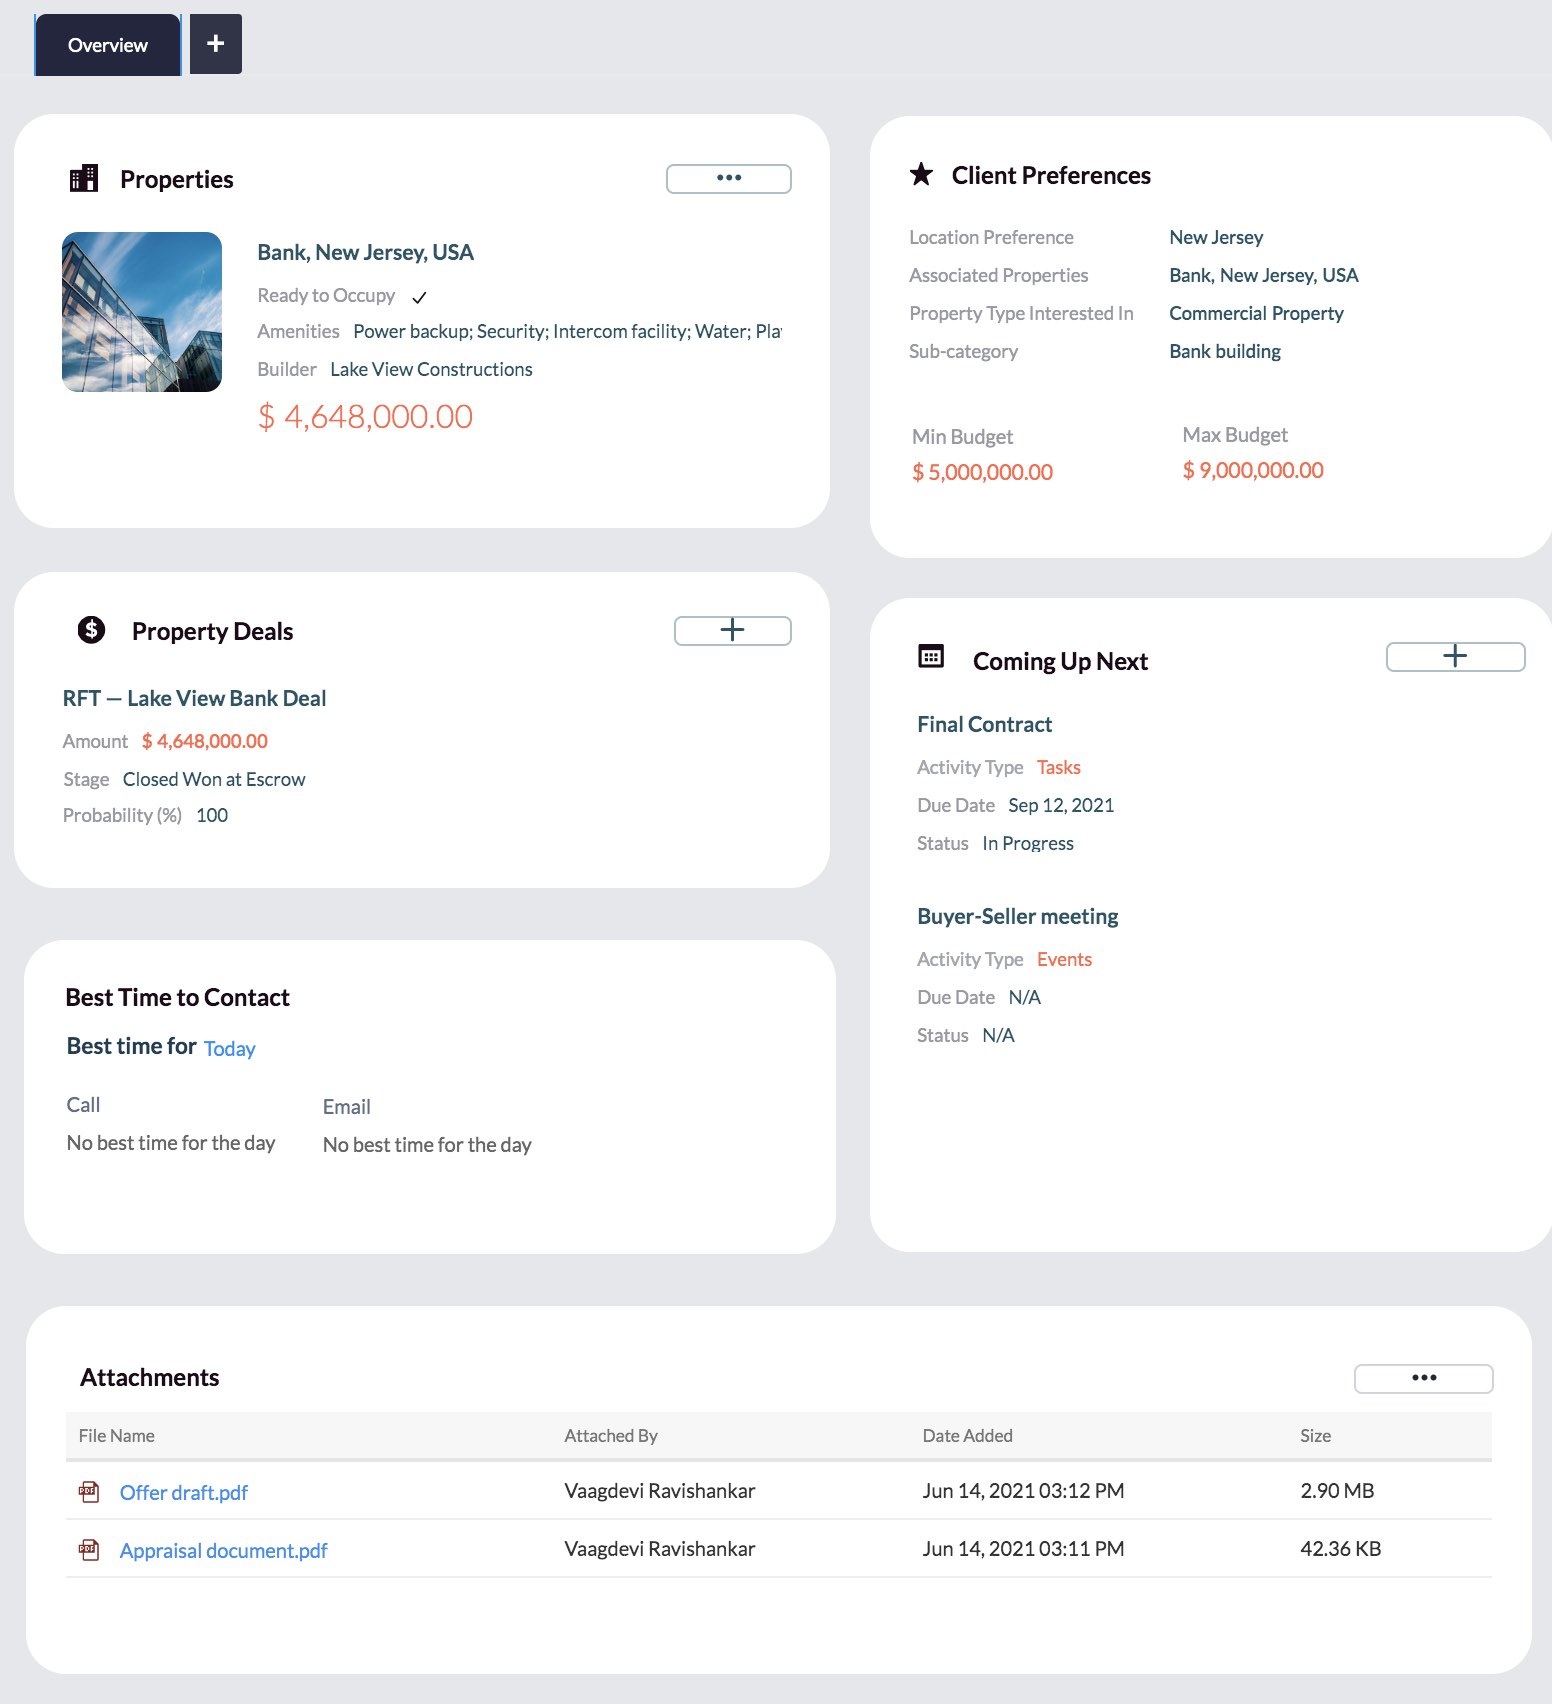
The second major part of the Canvas view will be the Overview tab taking up most of the page to represent the following data components:
- Properties (Related List)
- Client Preferences (Primary module)
- Property Deals (Related List)
- Best Time to Contact (Primary module)
- Coming Up Next (Activities Related List)
- Attachments (Related List)
Part 3
The second major part of the Canvas view will be the Overview tab taking up most of the page to represent the following data components:
- Notes, Emails, All Fields, Timeline, Social, Invited Meetings and Cases.
- Other applicable related lists will be available upon clicking the Plus icon.
To execute the design for this plan, do the following actions as mentioned below in the Canvas Builder.
Part 1 — Client Details column on the left
Follow the steps below to build the Client Details column on the left.
- From the Elements panel, drag and drop a Section element to the top left corner of the page.
- Drag and drop the following items into the section:
- Client Image
- Navigator buttons and Back arrow.
- Client Name
- Account Name For the Client Name and Account Name, right click and select Hide label.
- Style the components the way you desire. Use different formatting options, shadow, color and background settings.
- Drag and drop a second section right below the first one. In this section, add the following fields one after the other:
- Email, Phone, Mobile, Title, Department.
- Add Buttons: Edit, Send Mail, More icon.
- Add a Text element and give this section a title: Client Info.
- Style the components the way you desire. Use different formatting options, shadow, color and background settings

- Drag and drop a third section right below the second one. In this section, add the following fields one after the other:
- Mailing Street, City, State, Country, Zip.
- Add a Text element and give this section a title: Address Info.
- Drag and drop an Icon element, browse for the Location Icon and place it near the title to complement it with an illustration.
- Drag and drop a fourth section right below the second one. In this section, add the following fields one after the other:
- Client Owner and Created Time.
- Add a Text element and give this section a title: Agent Info.

Part 2 — The Overview Tab
Follow the instructions below to build the Overview tab on the Agents View Canvas
- From the Elements panel, drag and drop a Tab element adjacent to the Intro section.
- Rename the "Untitled" tab as Overview. This is a tab that you can customize.
- Drag and drop the Properties Related List and place it right below the Overview tab.
- Add the Icon element and browse for a Building illustration and place it next to the heading.
- Make sure to click inside the Properties related list to bring up Property-based data set on the left. Now add the following details into the Properties section.
- Property Name and Image
- Ready to occupy (checkbox field)
- Amenities
- Builder
- List Price (Label hidden) (Color used: HEX #FF6848)
- Drag and drop the Property Deals Related List and place it right below the Properties section.
- Add the Icon element and browse for a Dollar illustration and place it next to the heading.
- Make sure to click inside the Properties related list to bring up Property-based data set on the left. Now add the following details into the Properties section.
- Deal Name
- Amount (Color used: HEX #FF6848)
- Stage
- Probability
- Drag and drop the Best Time to Contact component from under Related Lists and place it right below the Property Deals section. Resize it to fit the page.
- Drag and drop the Section element and place it adjacent to the Properties section to its right. Resize it to appear as a section parallel to Properties.
- Add the Text element and give this section a title: Client Preferences
- Add the Icon element and browse for a Star illustration and place it next to the heading.
- Add the following details into the Client Preferences section.
- Location Preference
- Associated Properties
- Property Type Interested In
- Sub-category
- Min Budget and Max Budget
- Drag and drop the Activities Related List and place it right below the Properties section.
- Rename the title as "Coming Up Next". Perhaps this will connect better with the agents than the standard title "Activities".
- Add the Icon element and browse for a Calendar illustration and place it next to the heading.
- Add the following details into the Coming Up Next section.
- Subject
- Activity Type
- Due Date
- Status
- Drag and drop the Attachments Related List and place it right below all these sections across the width of the overview section of the page.

Part 3 — Other Tabs
Click the Plus icon right next to the Overview Tab and add the following related lists in the form of tabs:
- Notes
- Emails
- All Fields
- Timeline
- Social
- Invited Meetings
- Cases
Resize each of these related lists (under each tab) to cover the top fold of the page.
That's a wrap! You now have a good draft of the Agents View. Save the layout. Under Canvas Assignment, make sure to enable the Agent View Canvas as the default layout for the Real Estate Agents Profile.
Note: These are the suggested steps. Feel free to resize components, style them differently and place them where you see fit for your context.
While the Agents View is ready, it may not be ideal for other teams in the organization. For instance, the marketing team is more interested in social media conversations, emails and campaign details. So the Zylker could simply clone the Agents View and alter the following details alone, to create the Marketing Canvas view.
Change #1 — Background

Change #2 — Enquiry Source highlighted:
- To do this, this drag and drop a small section right below Address Info.
- Add the following fields: (Label Hidden, replaced with custom titles, to customize the font size and placement of the fields)
- Enquiry Source
- Tag

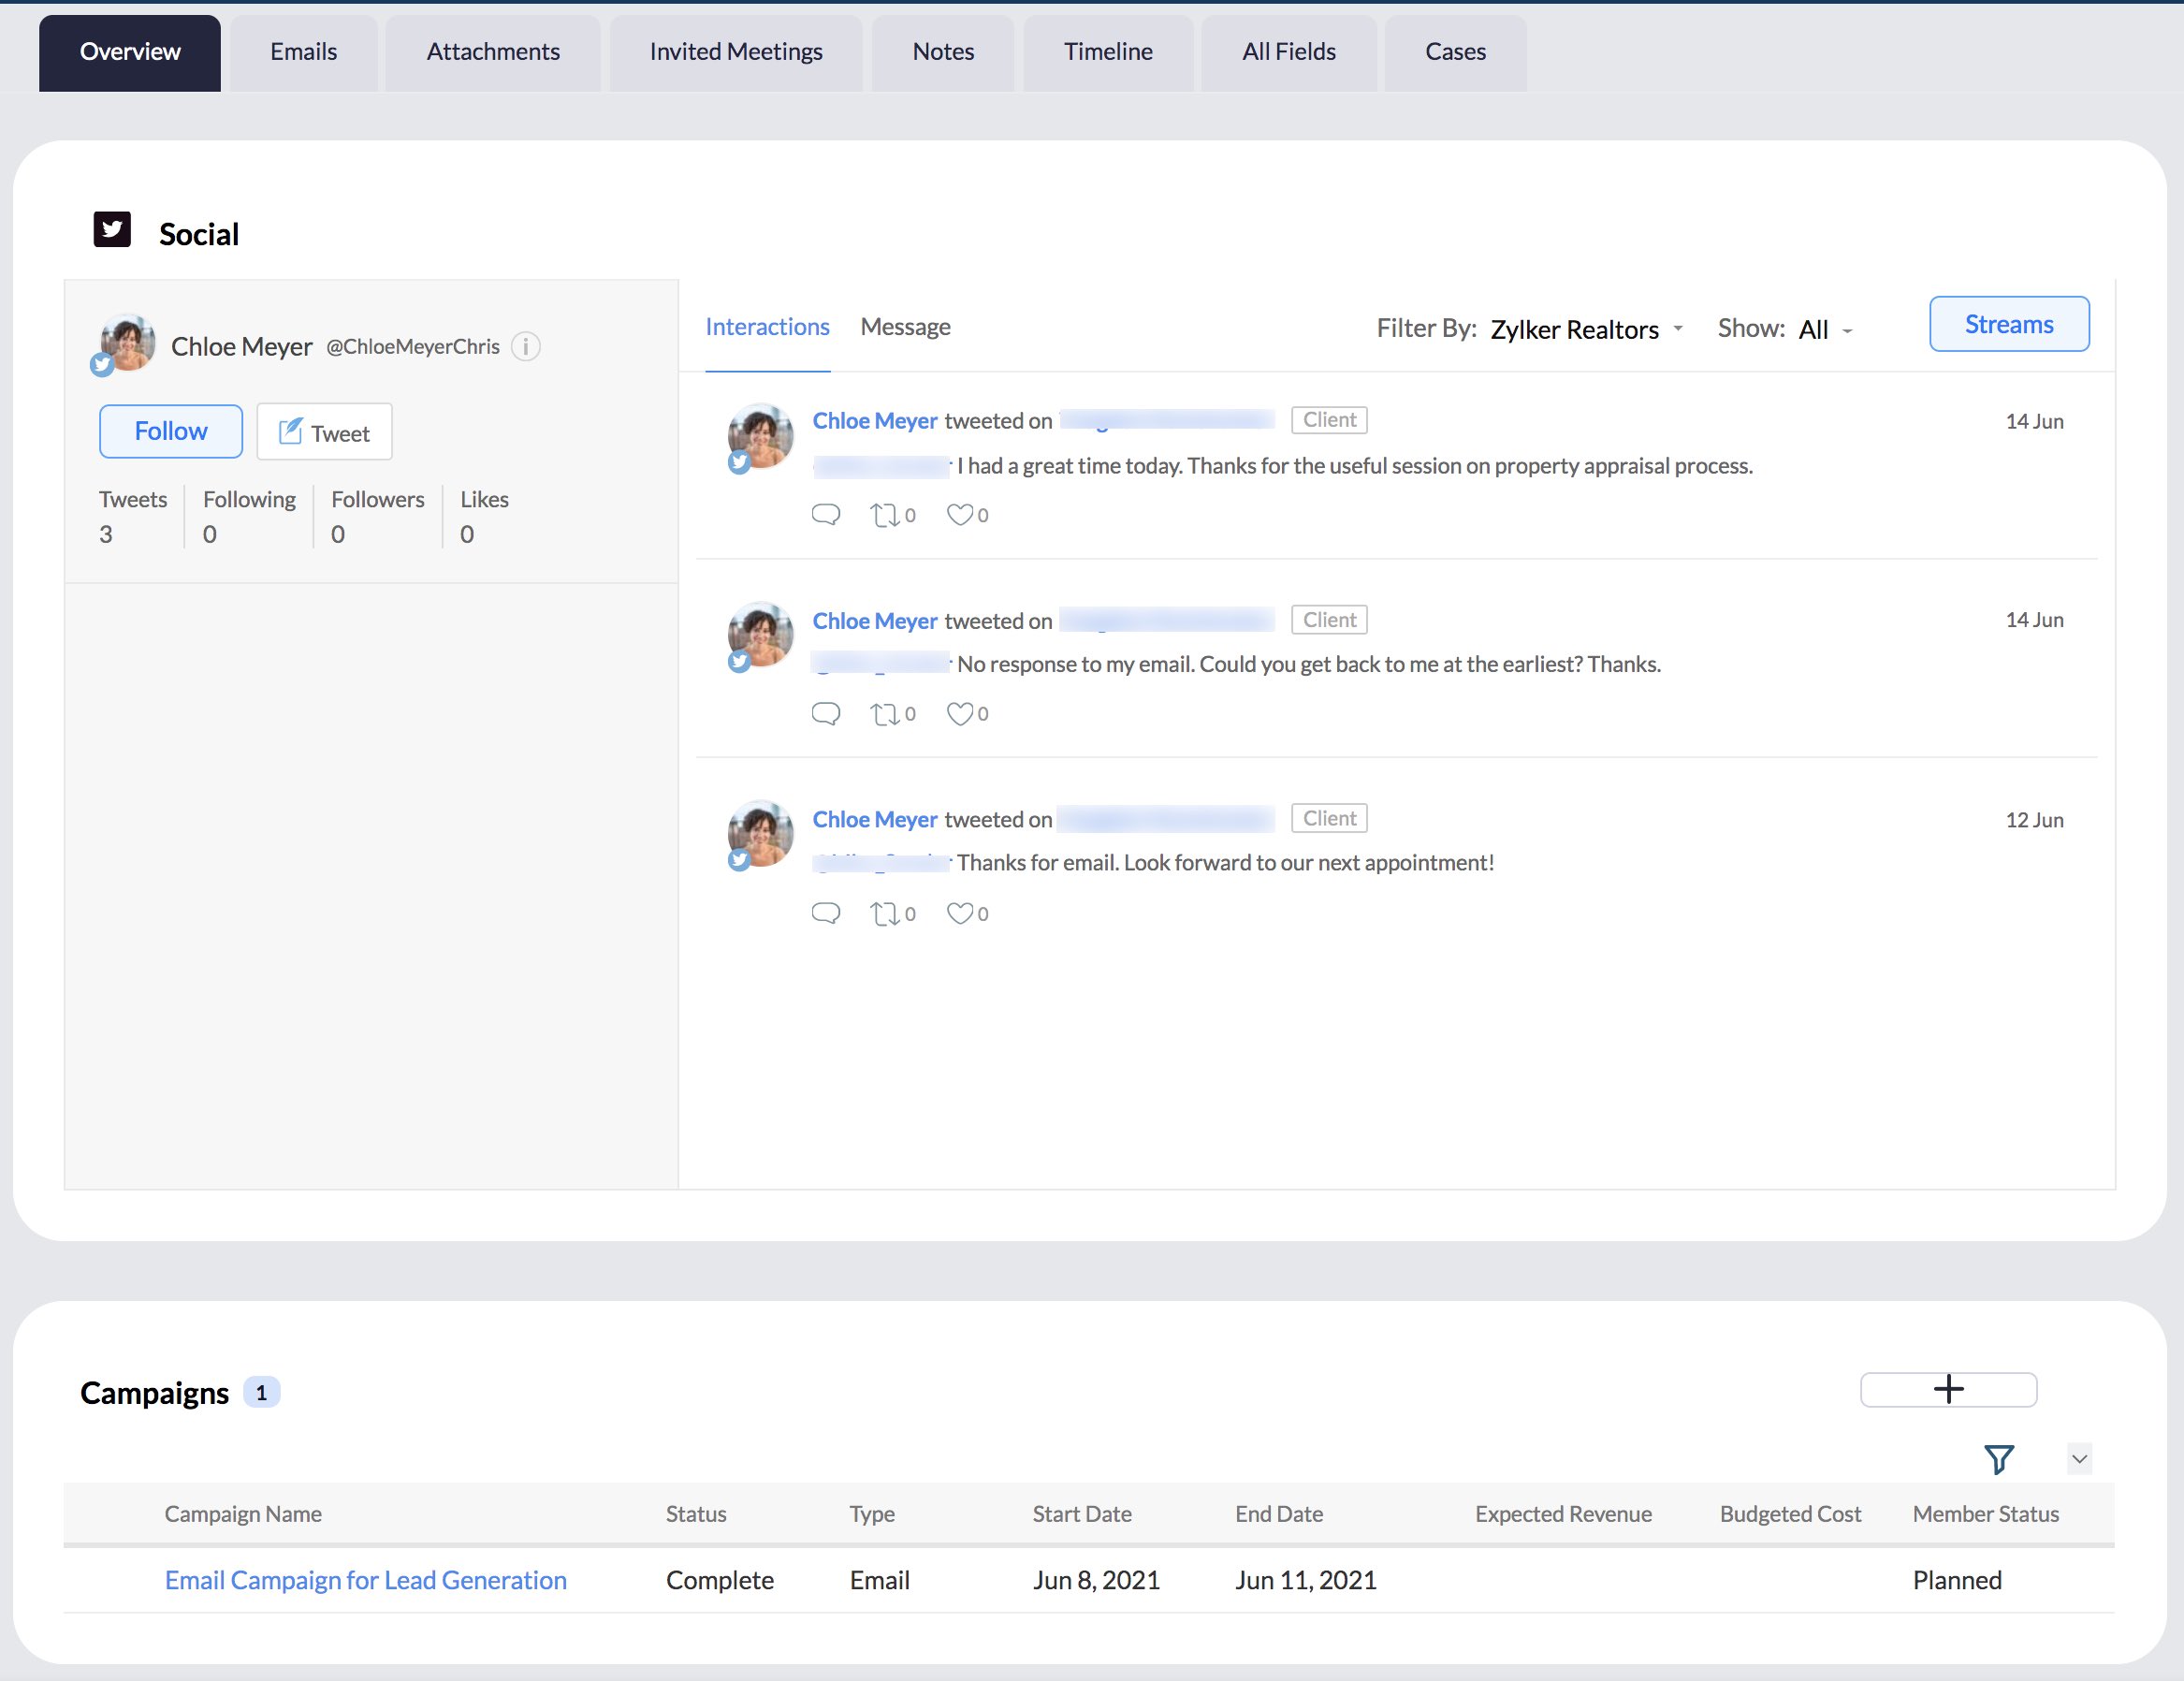
Change #3 — The Social and Campaigns related lists are given focus under the Overview tab.
- To achieve this, first drag and drop the Social related list under the Overview tab. Resize it to form a huge section covering the width of the page on the top fold.
- Below this, drag and drop the Campaigns related list.

- Below these two sections, retain the components below from the Agents View.
- Properties
- Property Deals
- Client Preferences
- Coming Up Next
- Best Time to Contact
- The following Related Lists are added as the multiple switchable tabs in the Marketing Canvas:
- Emails
- Attachments
- Invited Meetings
- Notes
- Timeline
- All Fields
- Cases
Note: These are the suggested steps. Feel free to resize components, style them differently and place them where you see fit for your context.
You now have a good draft of the Marketing Canvas View. Save the layout. Under Canvas Assignment, make sure to enable the Marketing Canvas View as the default layout for the Marketing specialists Profile.
That's a wrap! You now have not only created a tailor-made design for your page, you have created profile-based canvas layouts that are customized for different functions of two different teams.
This addresses Zylker's solution of profile-based customization for the problem of multiple teams dealing with the same database for their various activities.