Settings
The Settings page is where you shape how Zia Agents works for your organization. It brings your profile, users, roles, teams, billing, credits, keys, and integrations into one place, so you can manage everything without hopping across tabs. Whether you're adding people, adjusting permissions, configuring credits and BYOK, or setting up connections, this is the control center that keeps your Zia Agents setup running smoothly.
Your Profile
This section contains all the basic details about your profile, including your personal information on the Zia Agents org.

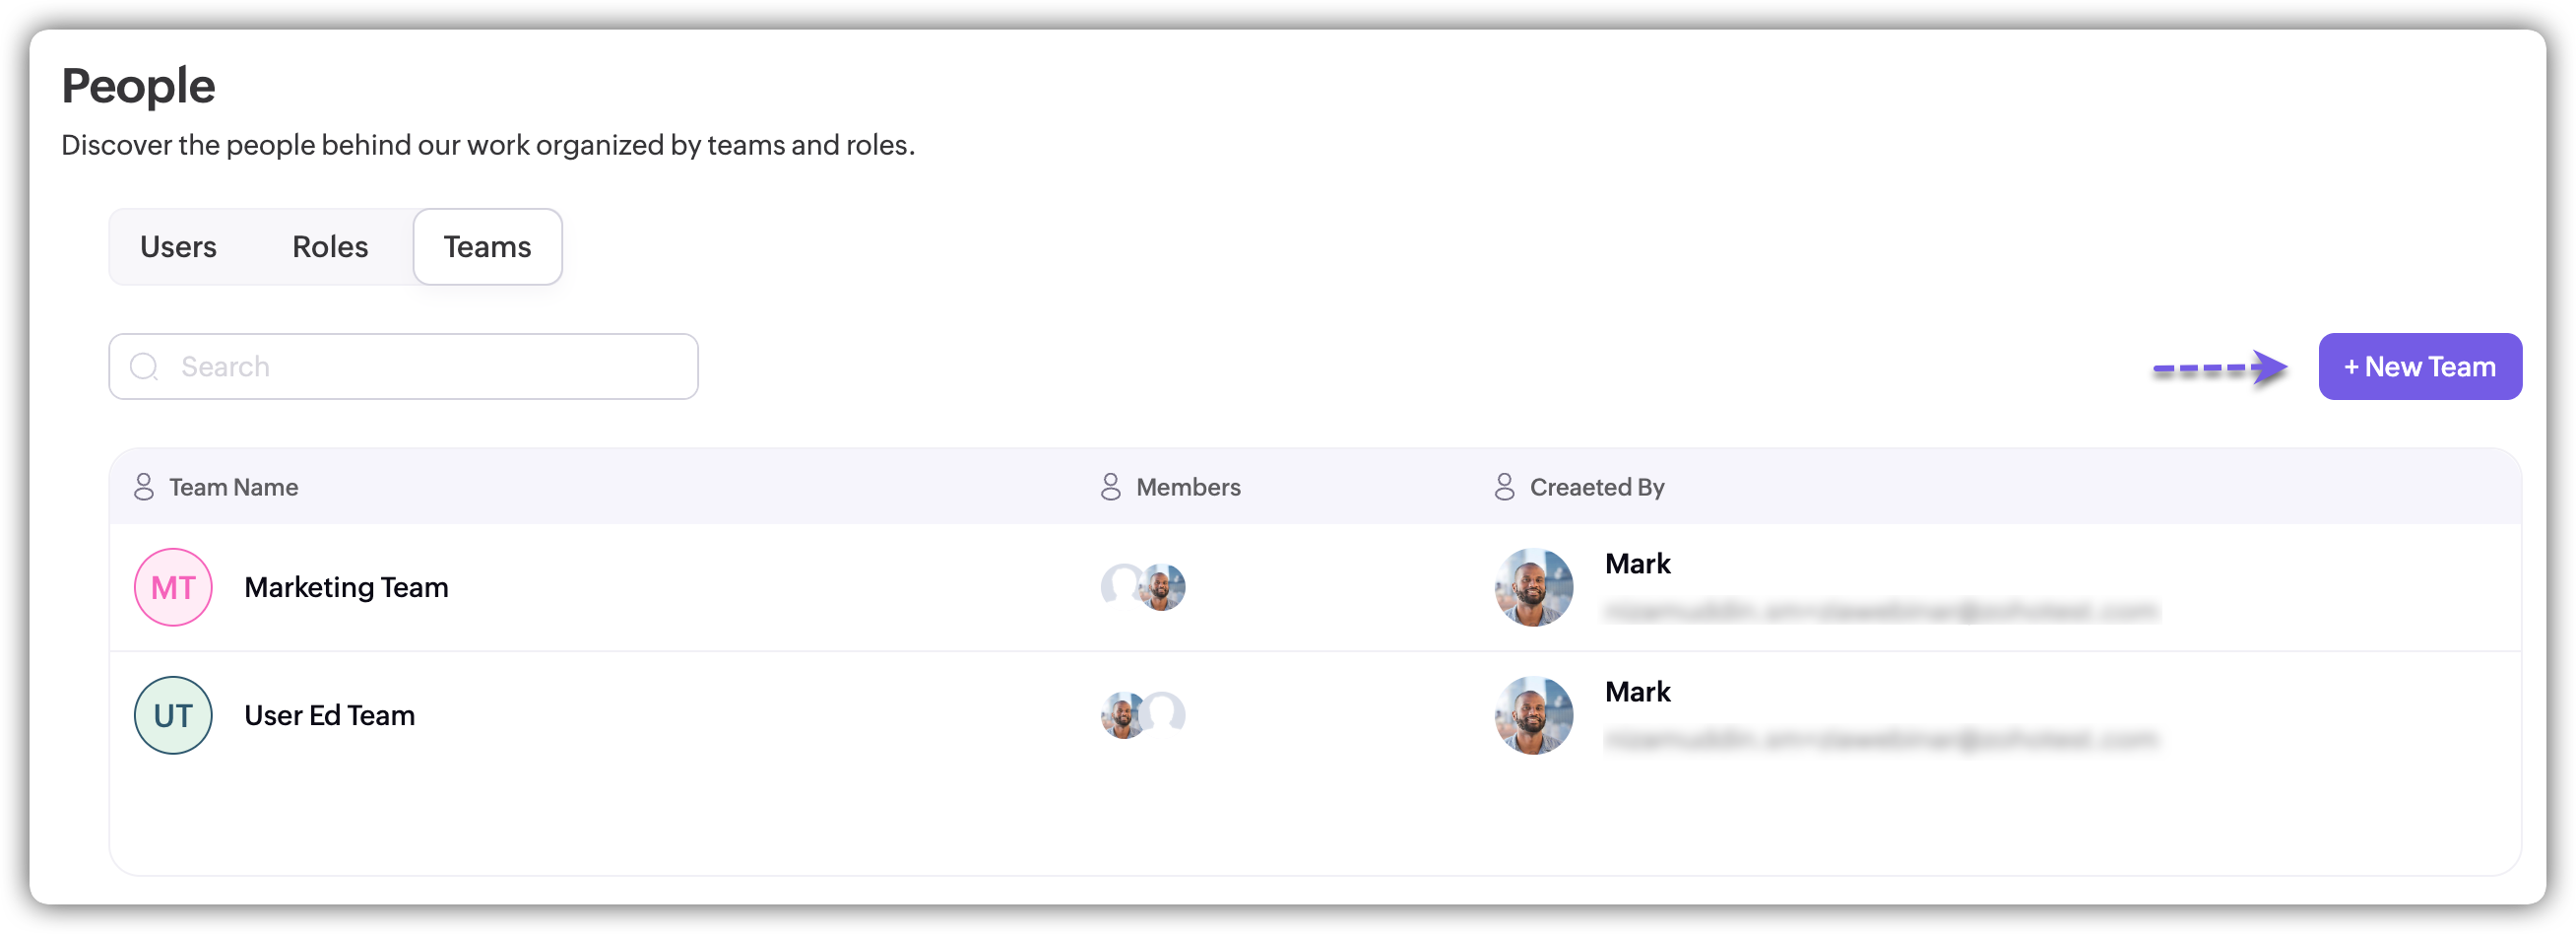
People
Under the People tab, you get Users, Roles, and Teams.
In the Users section, you can see a list of all users within your organization.
As a Super Admin, you will have the options to invite new users, change the role of existing users, mark a user as active or inactive, and delete a user.
Switching to the Roles tab you can view the pre-defined roles available in Zia Agents.
Custom roles or profiles aren't available yet.
On the Teams tab, you can view the teams or groups created in your organization, as well as create new teams with the users.
Adding users
To create a new user,
- Navigate to the Users tab in the People section in the Settings.
- Click Invite Users.
- Provide the email address, and specify the role.
- Click Invite Users again to send the invitation email.
Creating teams
To create a new team,
- Navigate to the Teams tab in the People section in the Settings.
- Click + New Team.
- Provide the required details for the team, like the name, description and select the members.
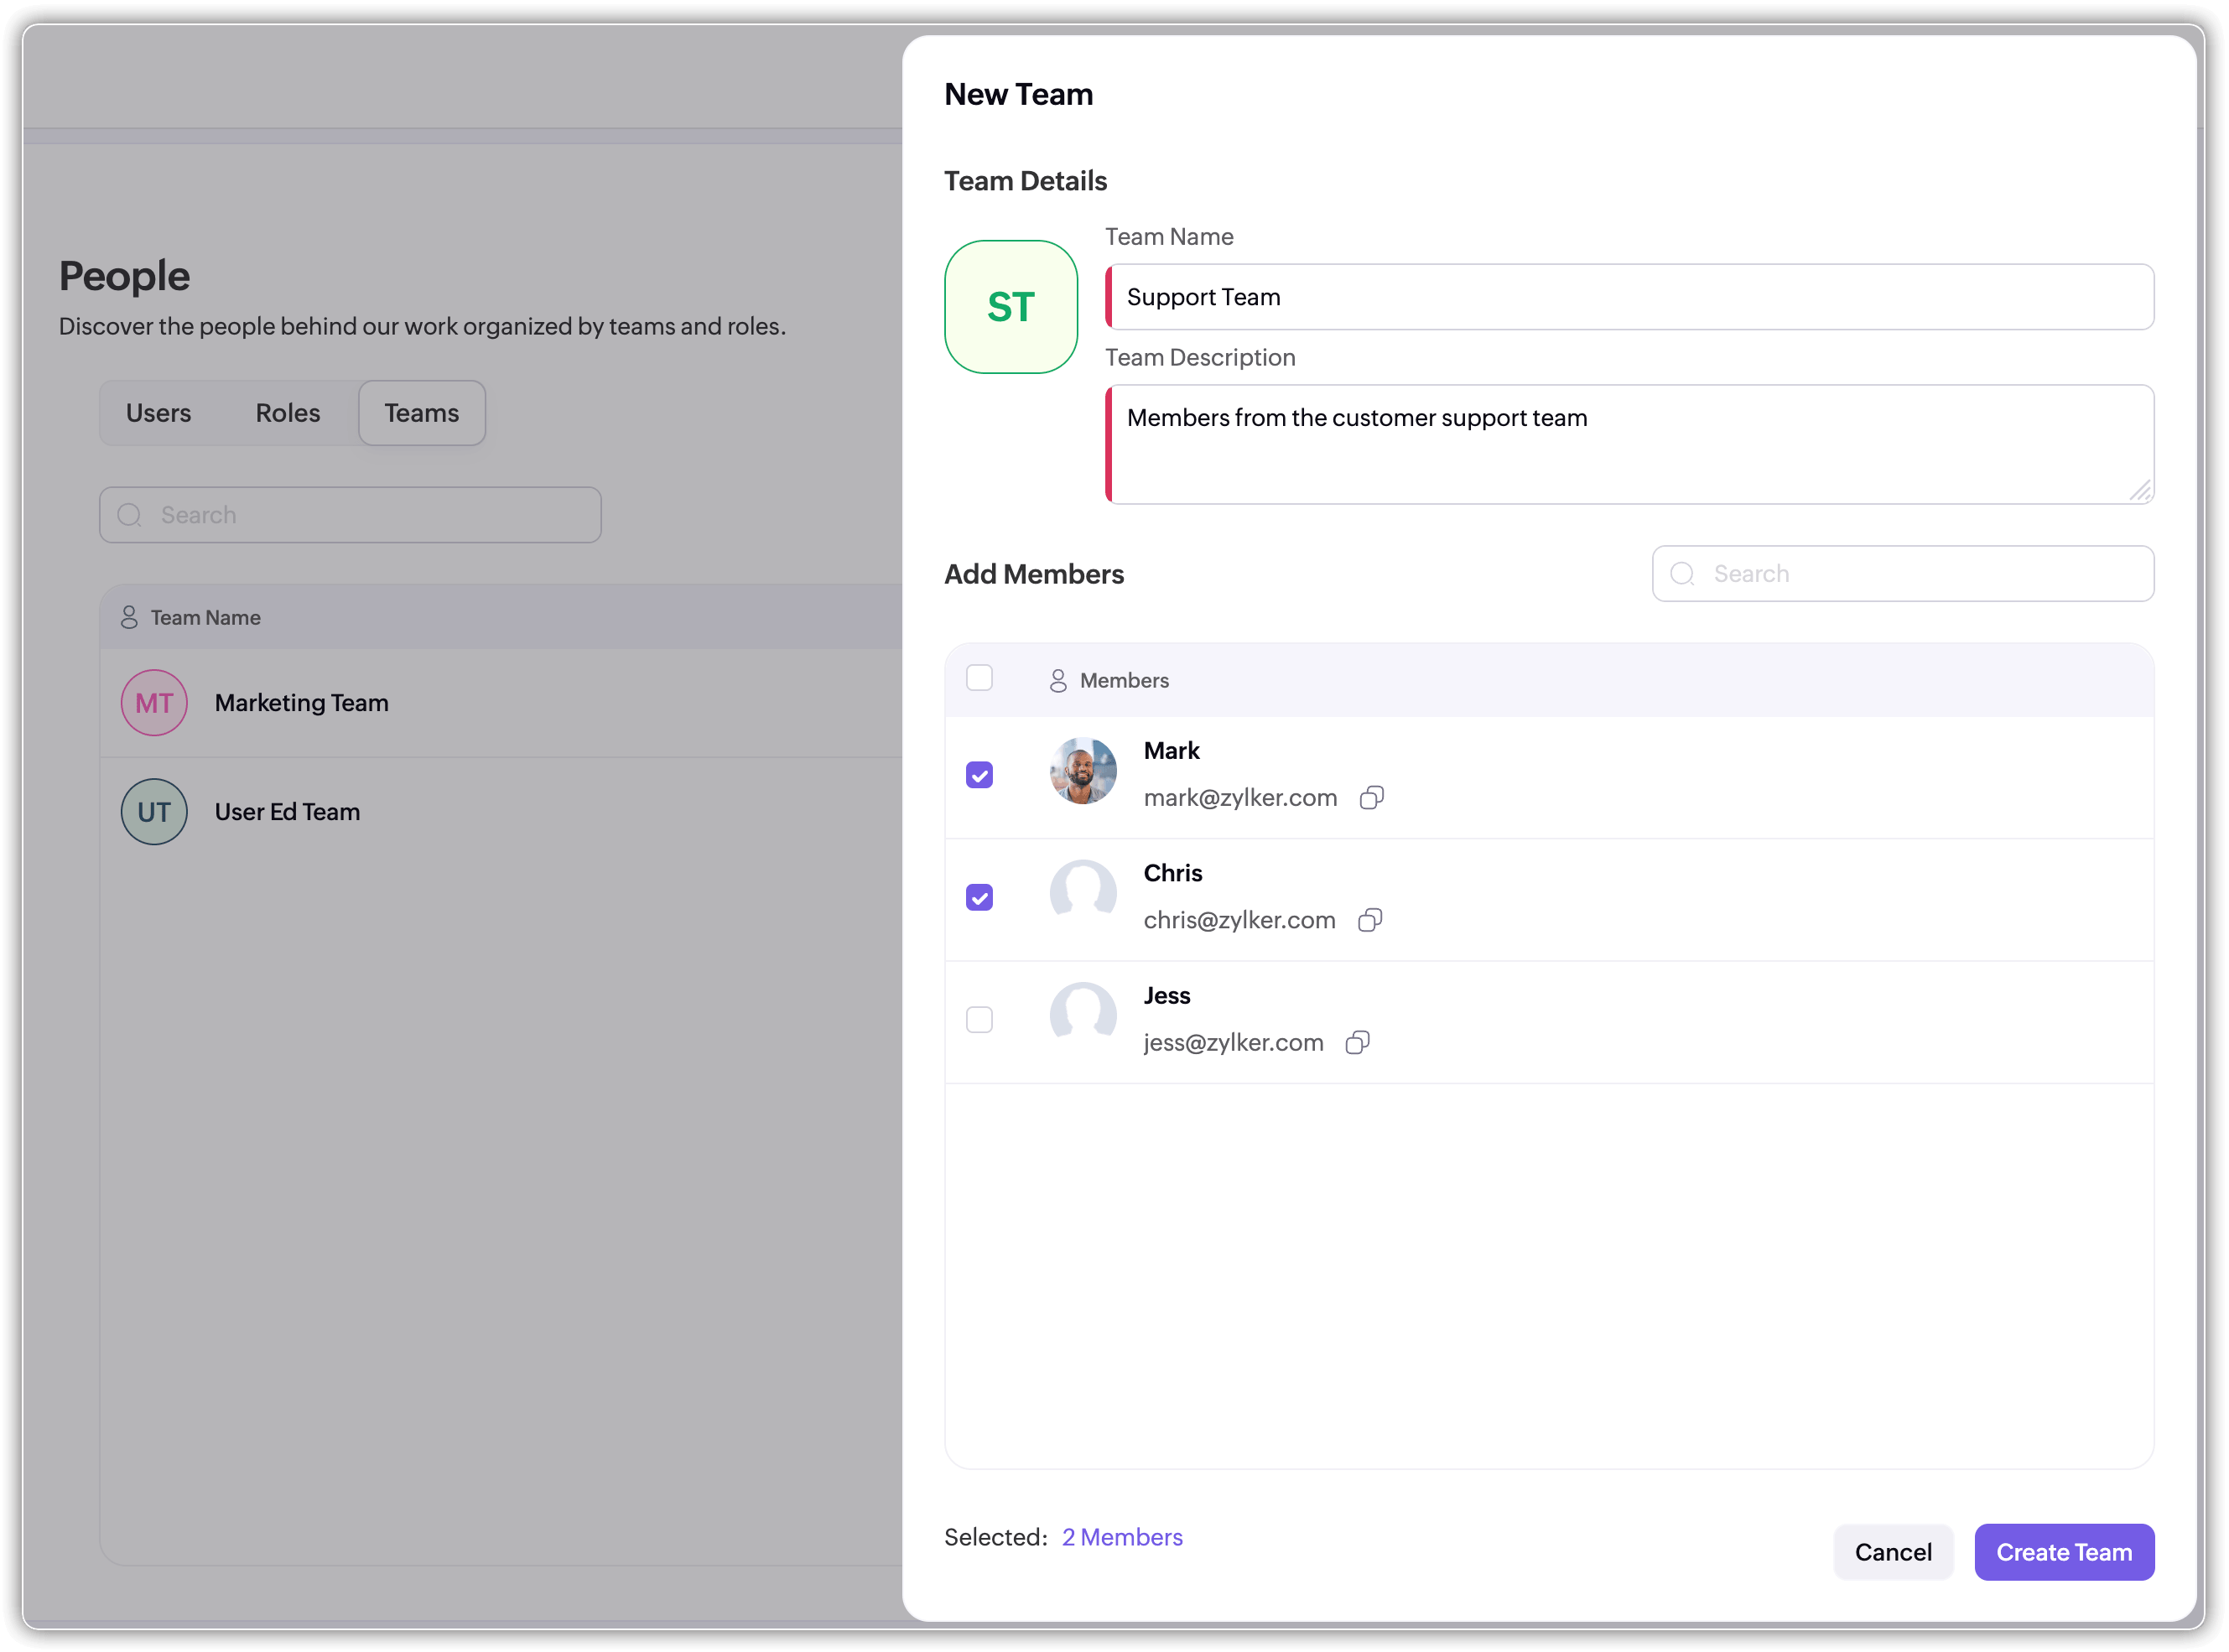
- Click Create Team.


You can also modify an existing team, change its name, add or remove users, as well as delete the team as required.
Plans & Billings
Under this section, you'll find the following options and details:
- Available and used AI credits, usage of credits and tokens in the past selected duration
- Buying credits for your account (Option available only for super-admins)
- Pricing details: ZKS (Zoho Key System) for the default LLMs; BYOK (Bring Your Own Key) for customer-billed LLMs
- Usage Breakdown: Consumption by model, and agent

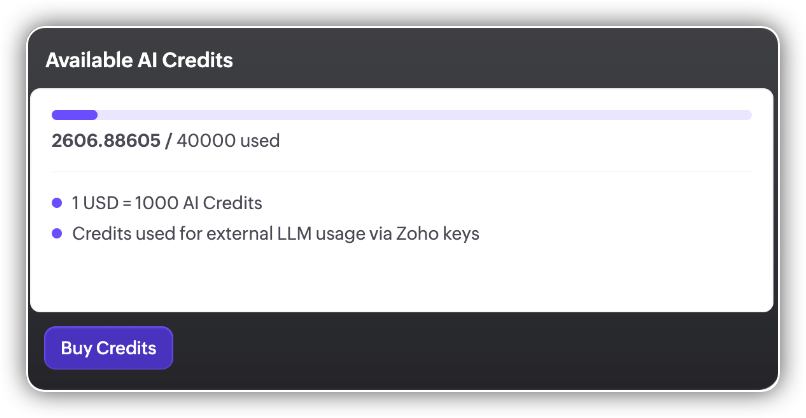
Credits
You can view how many credits have been used and how many remain. Using the filter on the right, you can select a specific period to see the credits consumed during that timeframe. You can also switch between currencies to view the equivalent costs.
Buy credits
To buy credits for your org,
- Under the Plans & Billings section, click on the Buy Credits button.
- You'll be redirected to the Zoho Store page.
- Select the mode of payment as USD or INR, and click Buy Add-on.
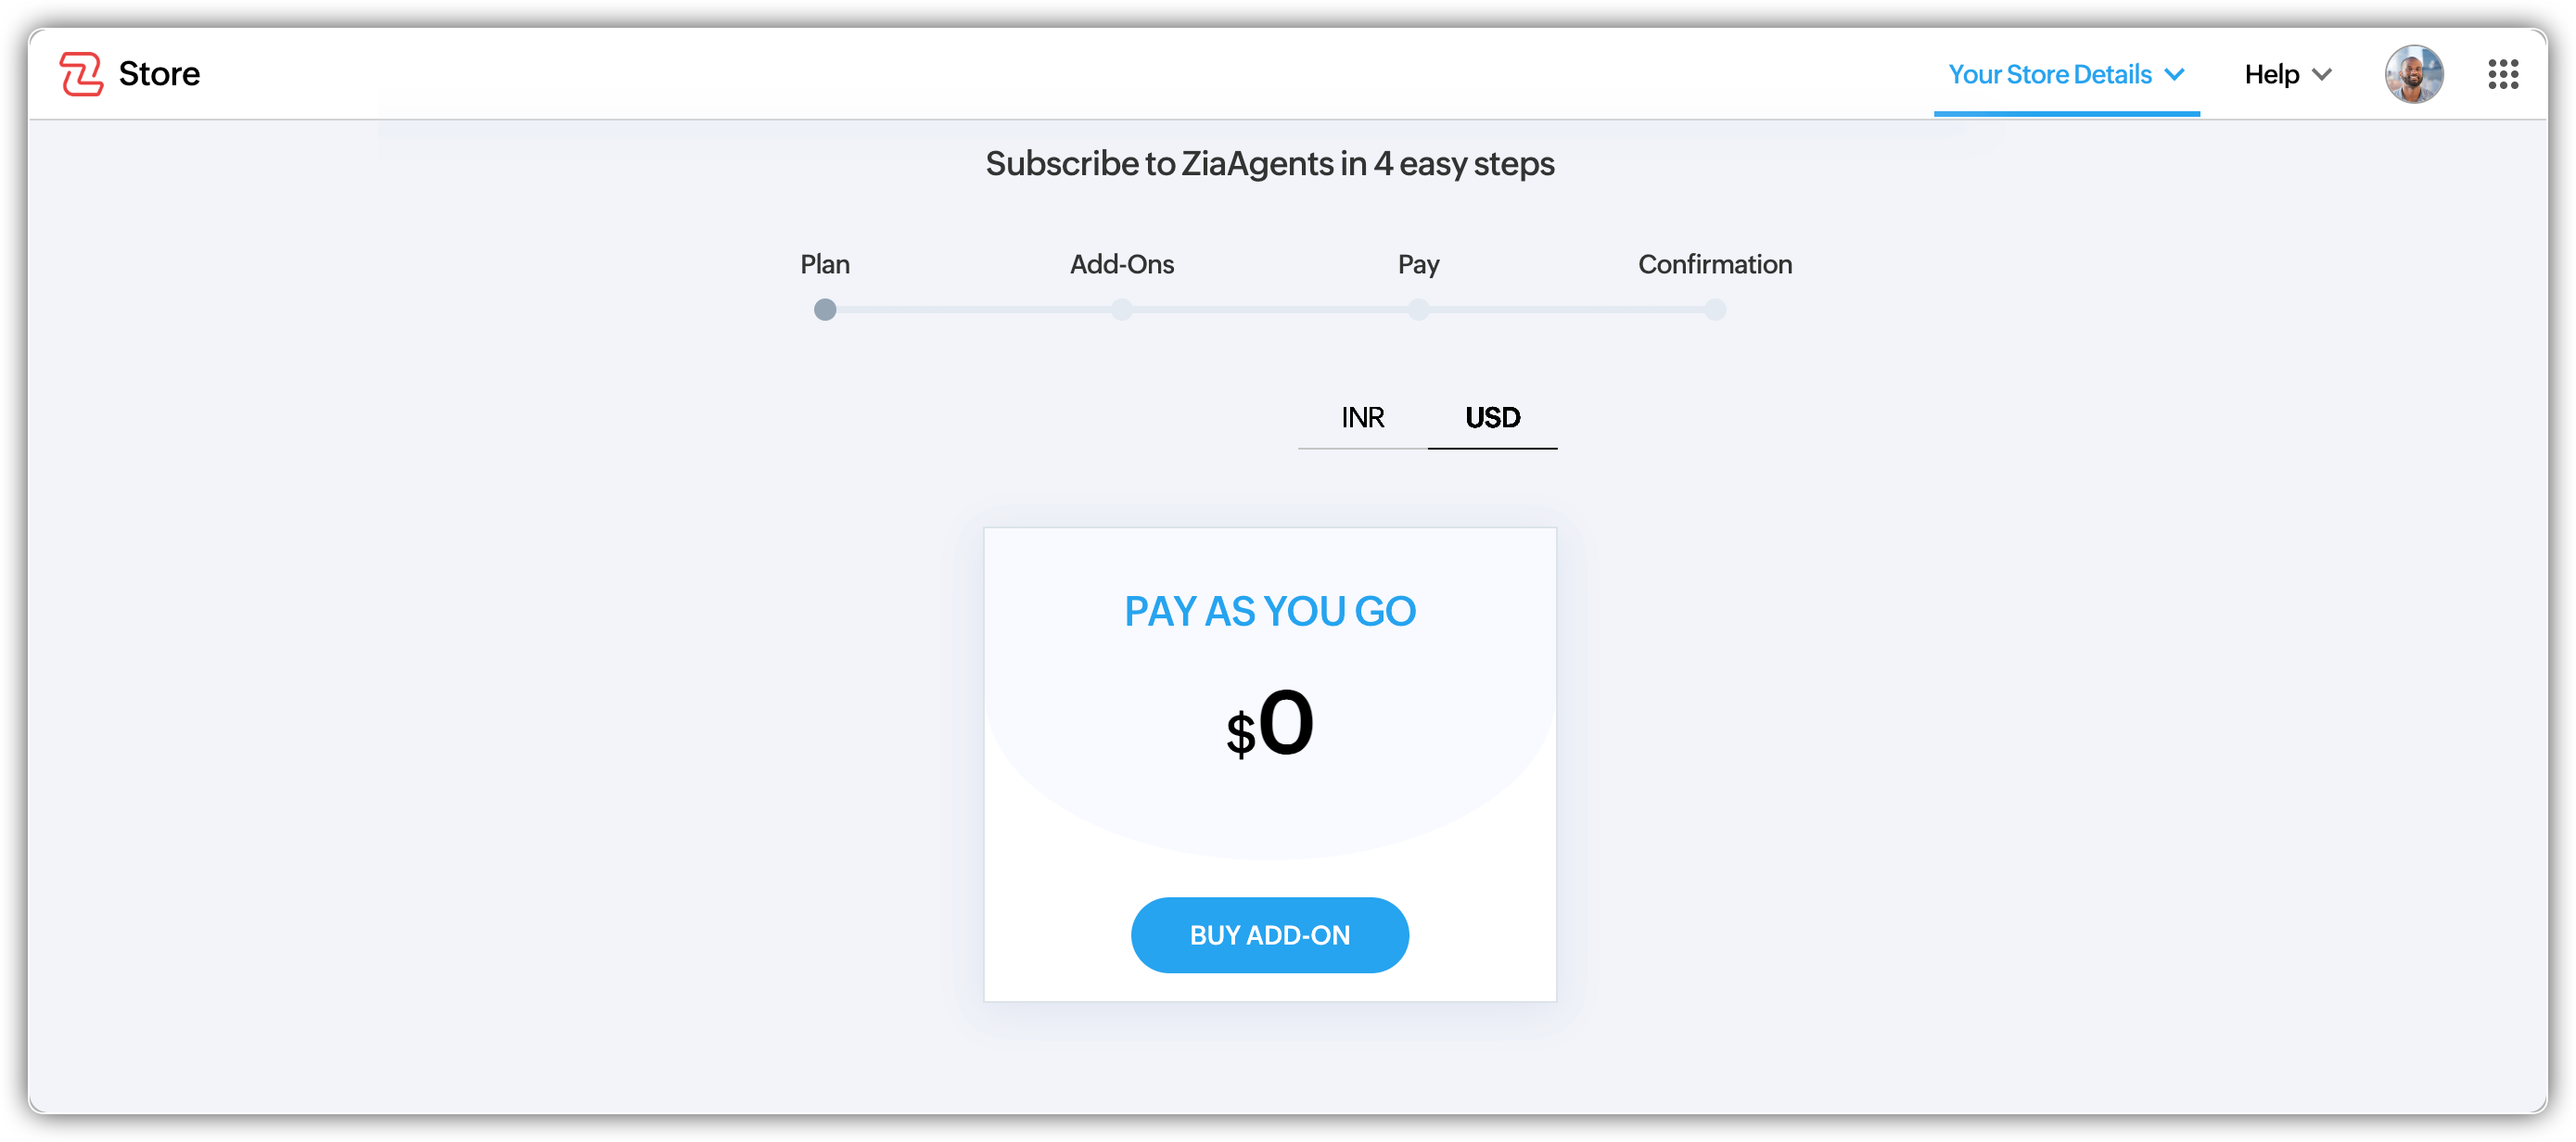
- Specify the number of credits and the summary will show the total amount. Click Proceed.
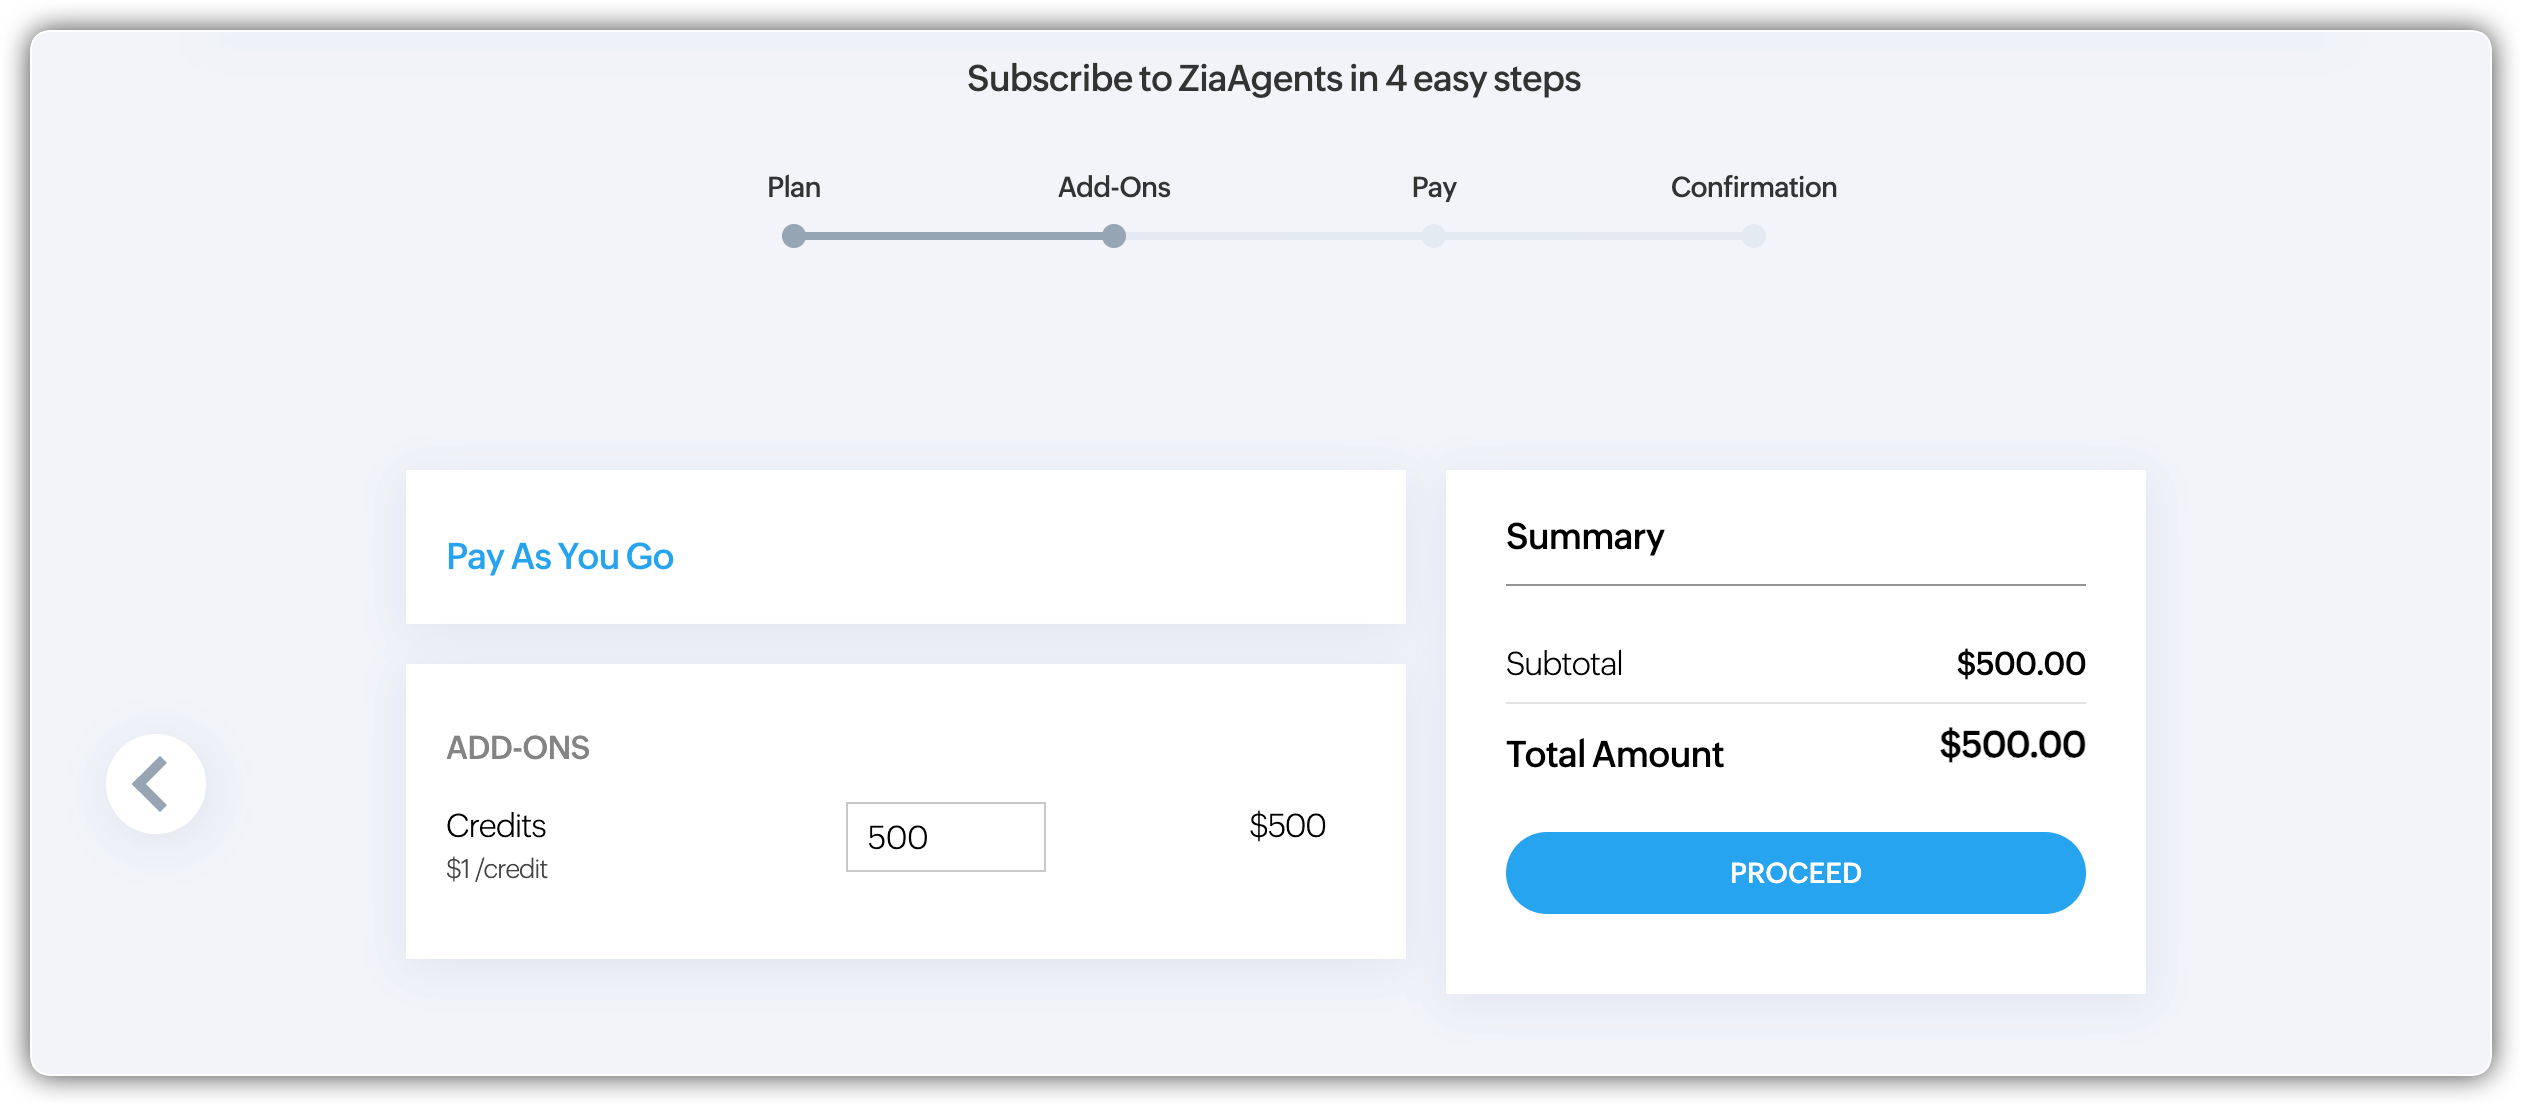
- Specify the address, choose the payment mode, and click Make Payment.


Note: Only super-admins can buy credits for the account
Info: For a detailed breakdown of model tiers, token allowances, and credit rates, see Platform Details.
Pricing Details
This section shows the different ways LLMs can be used and how they are billed. It includes free Zoho models, externally billed LLMs through Zoho keys, and bring-your-own-key providers where you pay the vendor directly.
ZKS (Zoho Key System)
ZKS lets you access the LLM powered by Zia. With ZKS enabled, Zoho handles the connection to supported LLM providers and manages the billing based on your usage. If you enable the ZKS option, you can use the default LLMs and choose between Zoho and OpenAI under Vendor Configuration while creating the agent.
Zoho Models
Zoho-hosted models come with a monthly free token allowance. Standard tier models (Qwen 14B, Qwen 30B MoE, GLM 4.7 Flash) get 30 million tokens per month. The Pro tier model (GLM 5) gets 20 million tokens per month. Usage within the allowance is free and doesn't consume AI credits. If you exceed the allowance, additional usage is billed through AI credits.

For the full tier breakdown, rates, and credit details, see Platform Details.
External LLMs (Zoho Keys)
You can also use external LLM, OpenAI, through Zoho-managed keys.
- Billed at the vendor’s exact rate
- No markup from Zoho
- Usage will consume your AI credits
- Ideal for more advanced capabilities or choosing specific models.

BYOK (Bring Your Own Key)
BYOK lets you use your own API key from an LLM provider. With BYOK, you add your provider API key and all usage is billed directly by the provider, so no AI credits are consumed on Zia Agents.
To enable the BYOK model,
- In the Plans & Billings tab, under BYOK Providers, click View BYOK. You will find a list of BYOK providers.

- Against the specific LLM vendor, click + Add Key.
- Provide a Name for the key.
- Paste the API key obtained from your vendor profile.

- Click Add.


After the key is added successfully, you can edit or delete it any time.

Usage Breakdown
The Consumption by Model section provides a breakdown of AI usage based on the individual models used during the selected period. This helps you understand which models are being used most and how many resources they consume. Use this section to quickly identify which models are consuming the most tokens or credits and monitor their cost impact.

The Consumption by Agent section shows AI usage grouped by individual agents. This helps you understand how much each agent is used and which models they rely on. This section helps you track usage and activity at the agent level, making it easier to understand which agents are most active and how they contribute to overall AI consumption.
Connections
This section mirrors the Connections page accessible from the left sidebar. You can create, review, and manage your service connections here.
Instant Messaging
This is where you connect messaging platforms to Zia Agents so your deployed agents can interact with customers through channels like WhatsApp. This is a one-time setup at the organization level.
To set up instant messaging:
- Navigate to Settings > Instant Messaging.
- Enable the integration.
- Click Link Account to connect your Meta Business account through Facebook Business Manager.
- Once linked, click Create Channel to configure your messaging channel.
After the channel is created, WhatsApp becomes available as an integration option on the Integrate tab of your deployed agents. See Integrating Agents for the agent-side setup.
Note: Instant Messaging is available for select users.