Time Logs:
- Methods to Log Time
- Cloning Time Logs
- Importing Time Logs
- Exporting Time Logs
- Viewing Time Logs
- Editing Time Logs
- Deleting Time Logs
Methods to Log Time
There are two ways in which Time can be logged.
Manual Method:
There are three ways of logging time manually.
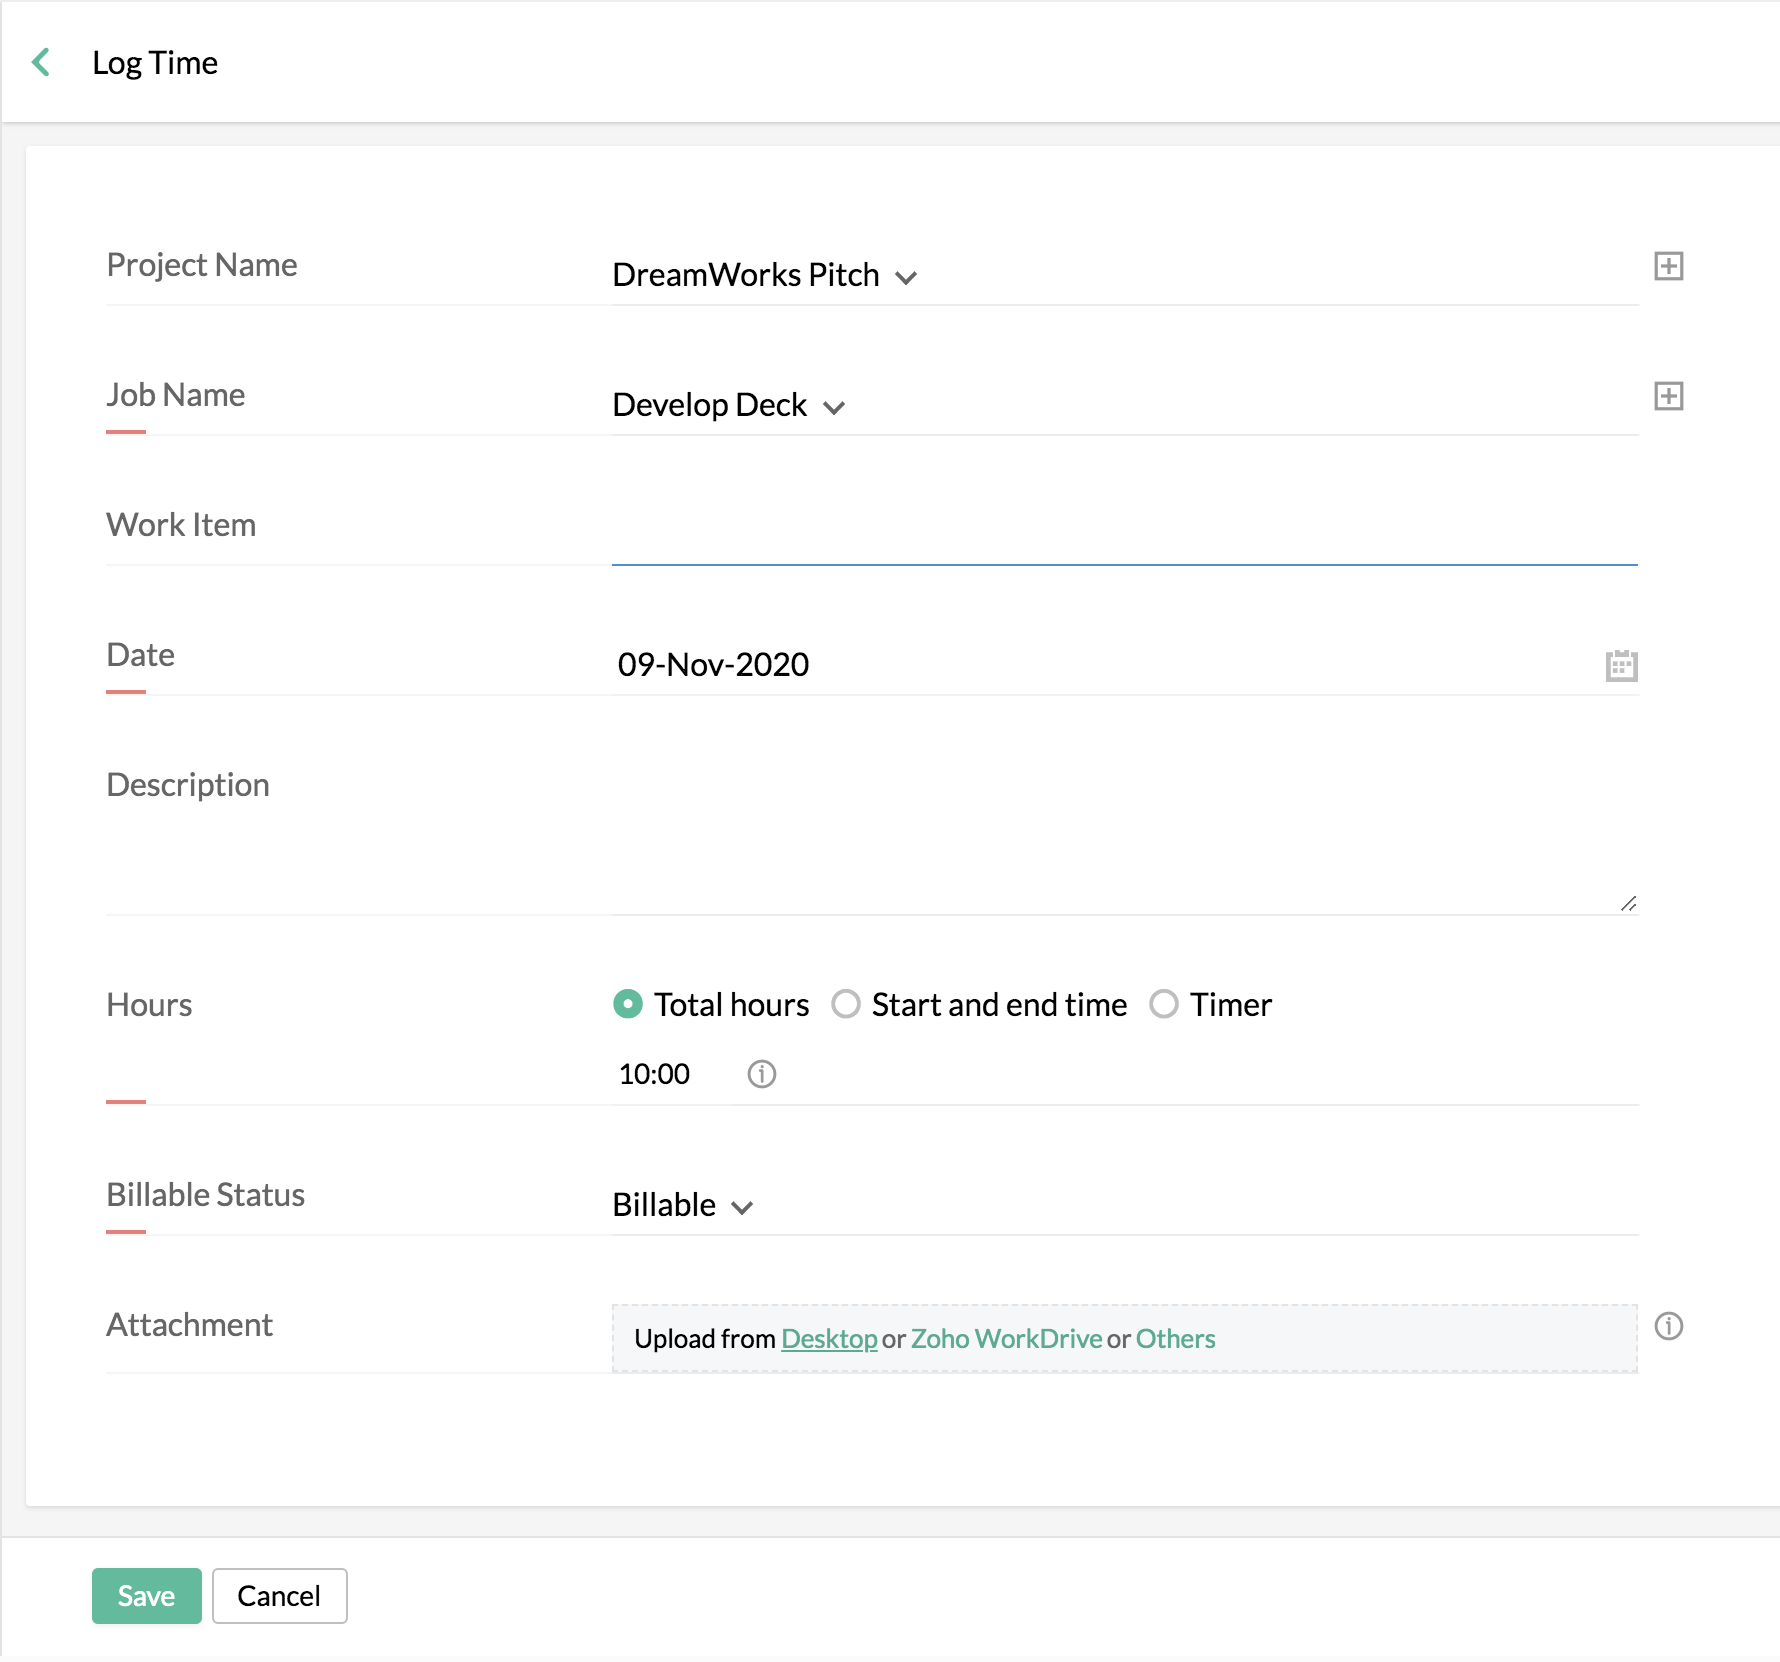
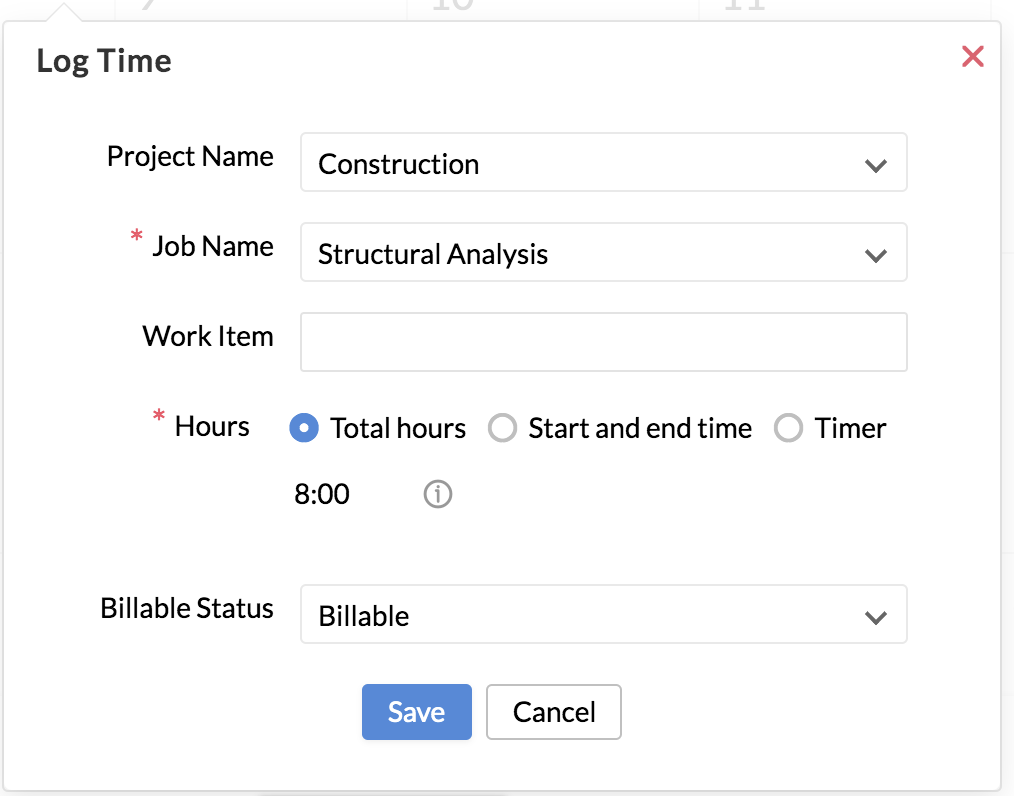
1. Using 'Log Time' option
- From your Home page, go to Time Logs > List View > Log Time.

- Select Job Name.
![]() You can also add a new job here by clicking Add Jobs.
You can also add a new job here by clicking Add Jobs.
- Select the date as required.
- Under Hours, you can either select Hours and enter the number of hours or select Start & End and enter the time there.
- Click Save.
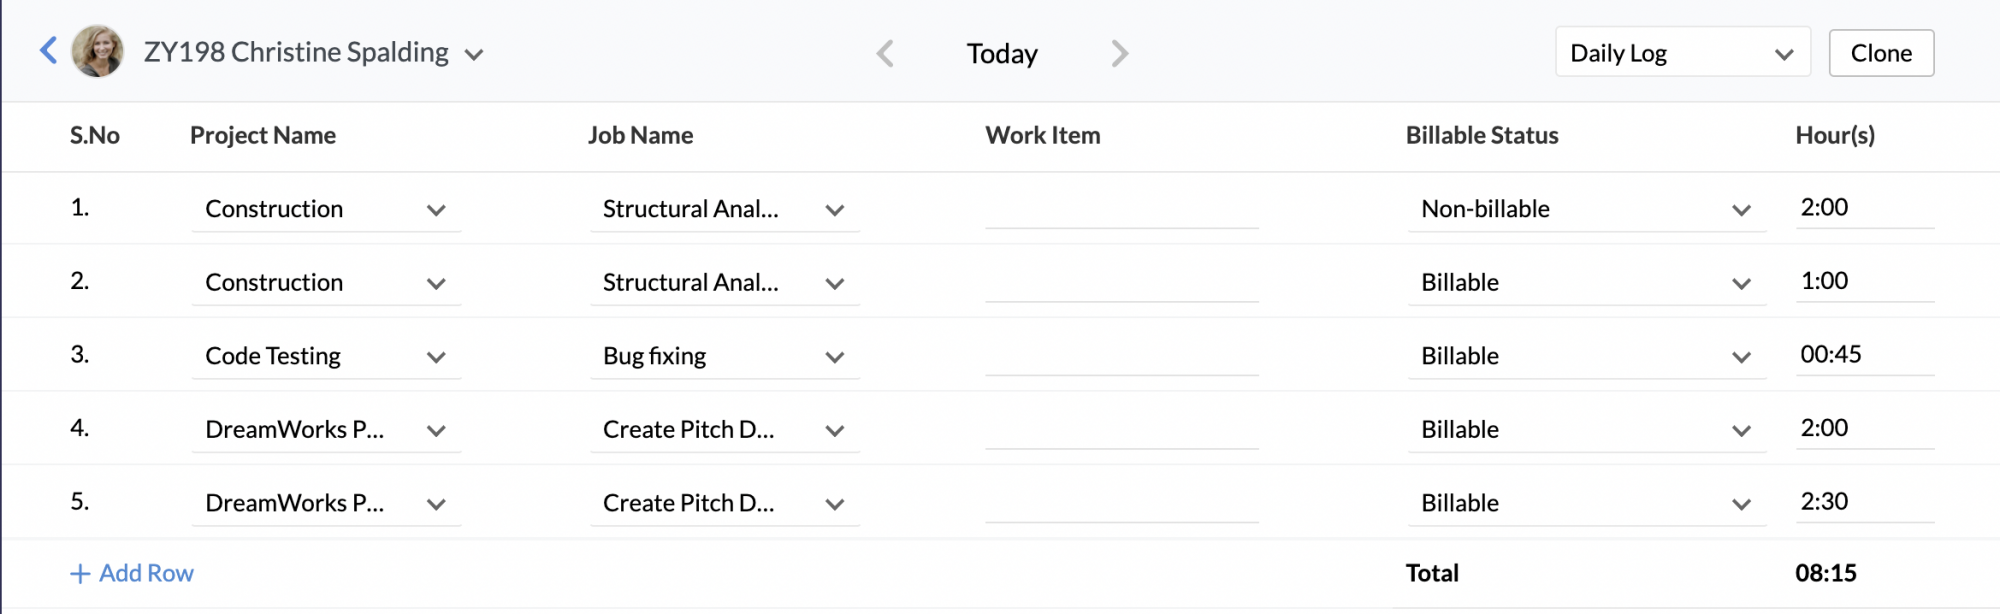
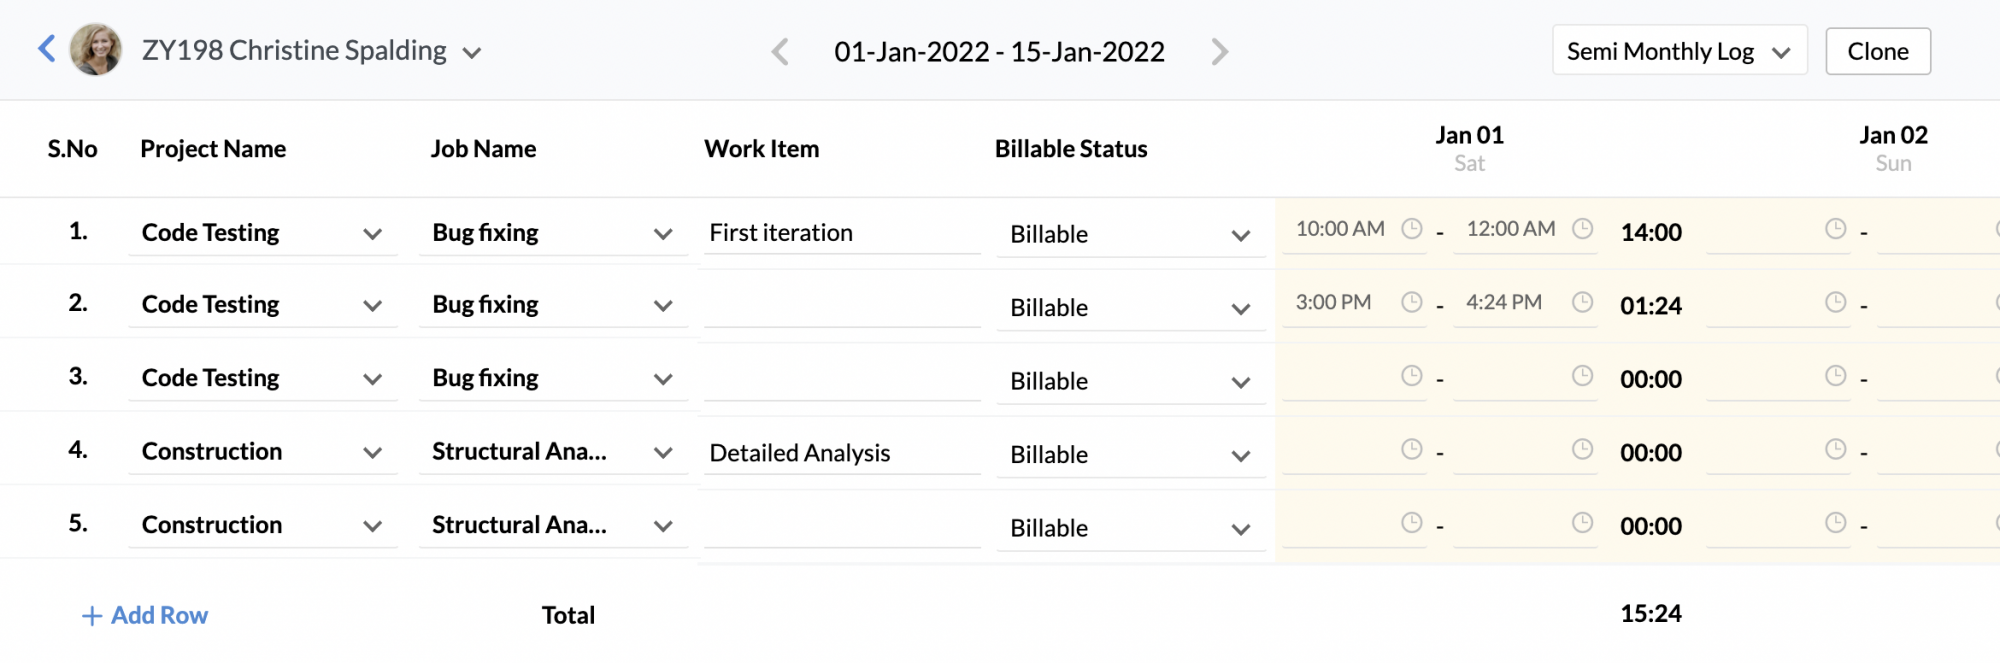
2. The next method of logging time manually is by entering time in the Daily, Weekly, Semi monthly, and Monthly time logs.
Using the daily/weekly/semi monthly/monthly log, you can log time manually. This helps in scenarios where you need to log more than one time log per day or when you want to log many time logs in a week.
- From your home page, go to Timesheet > Time Logs
- Click the Log time dropdown
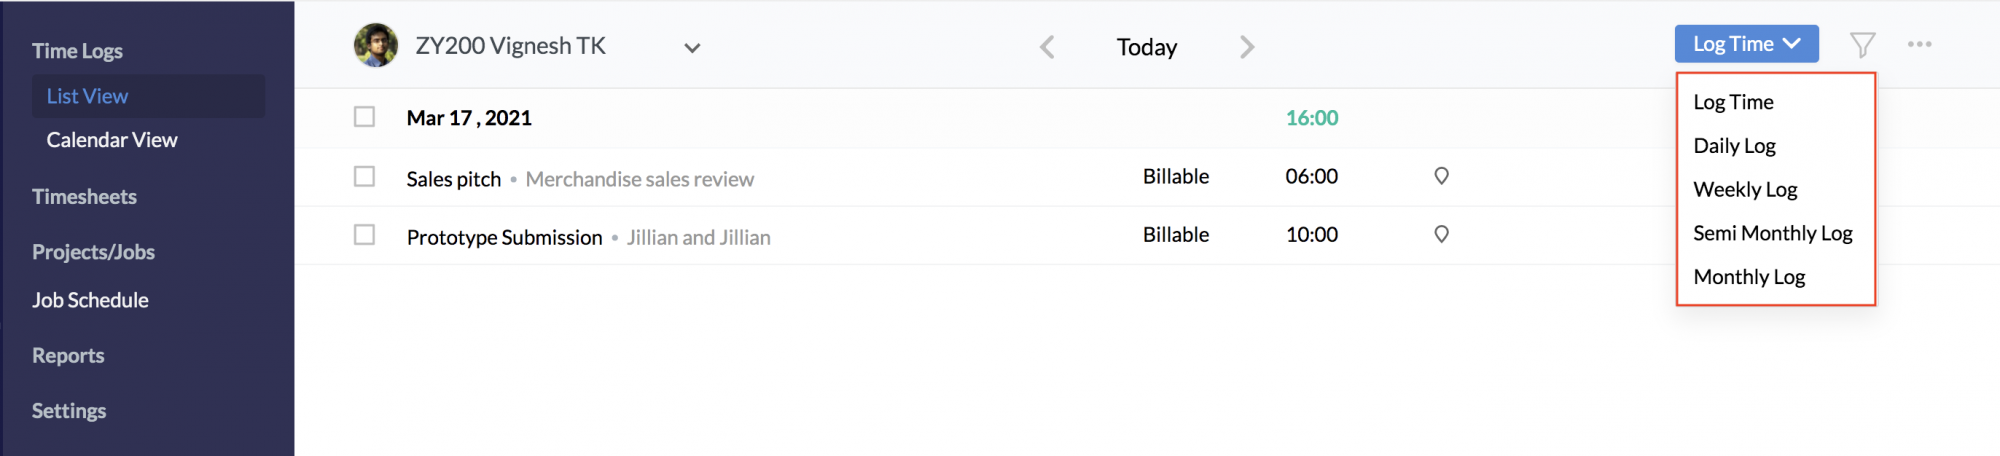
- Select daily/weekly/semi monthly /monthly log.
- Use the drop down to make your selection.
- Enter the number of hours and click Submit.
Depending on the selection made under general settings, bulk logging options available to the employee will vary. If both start and end time and total hours options are enabled, then when an employee tries to enter their time, a popup will appear prompting them to select the how they are going to log time and make their entry:
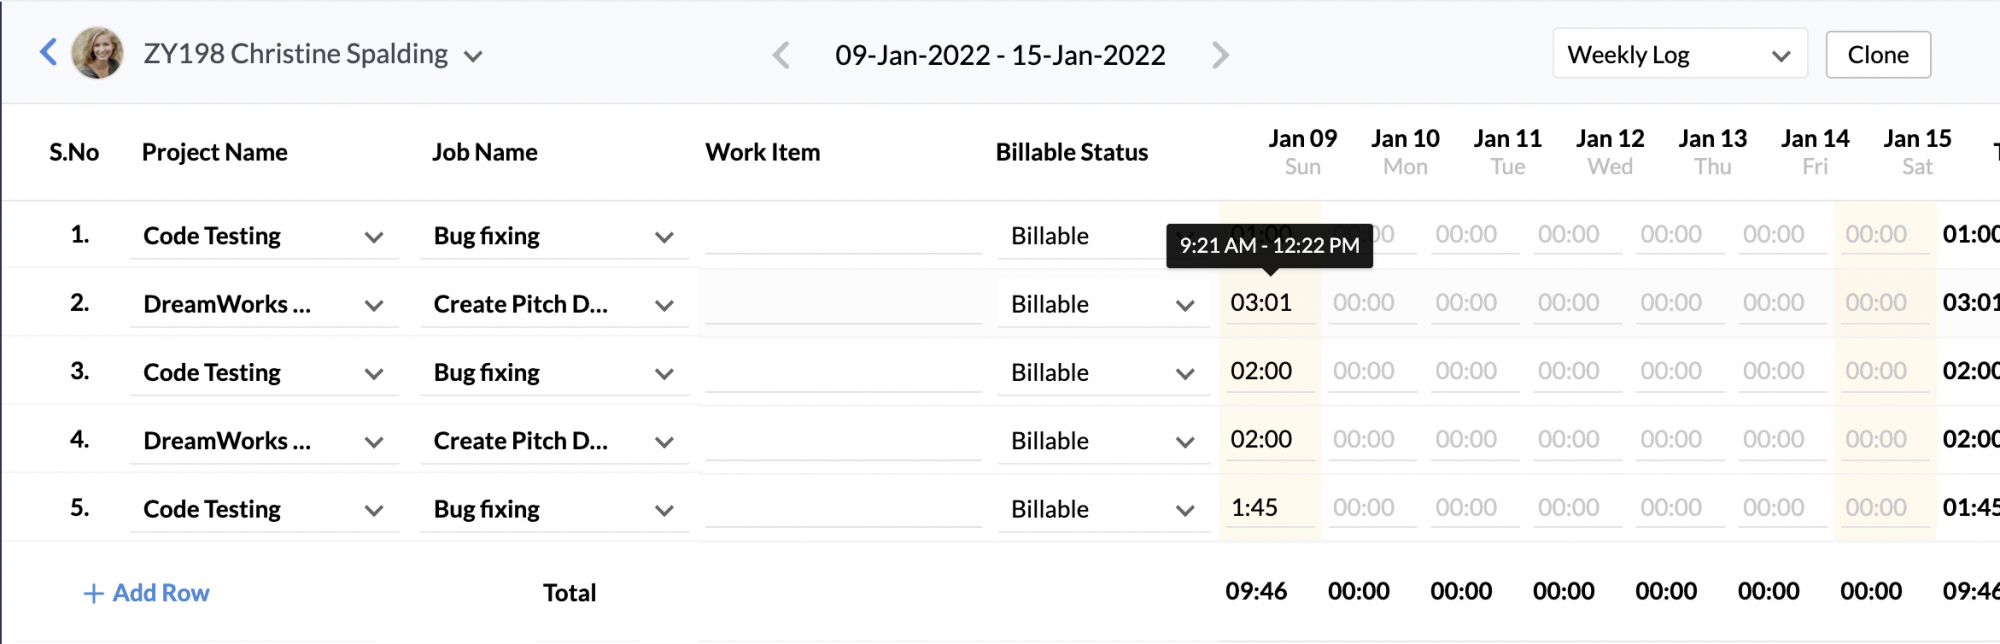
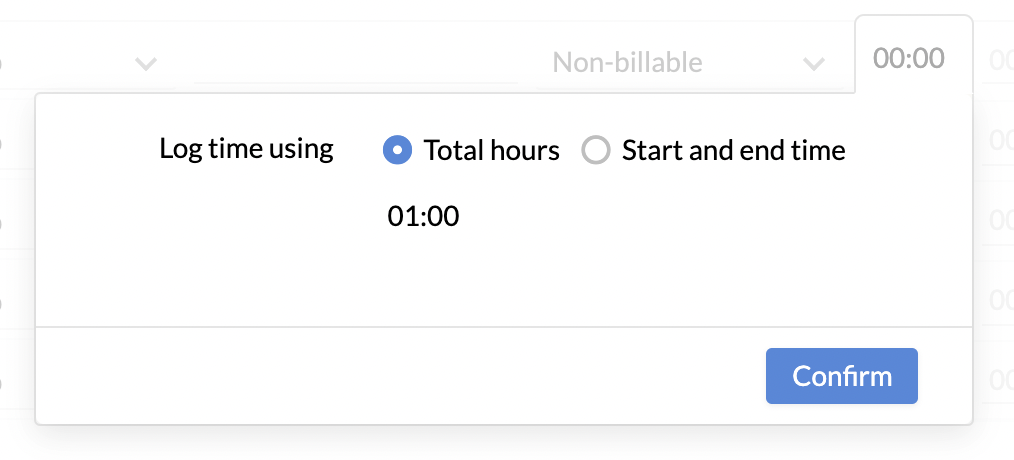
If only total hours is allowed then entries can be made directly.
If only start and end time is allowed then entries can be given directly.
Note:
- All logs will display the time logs (logged manually and through timer) that are billed, approved, rejected or pending for approval in the 'Read-only'mode.
- You can view/edit existing time logs or use the + icon to add new logs.
- You can navigate to previous or future day's log by using the left and right arrow in the daily log.
- In the weekly/monthly log, you can navigate to previous or future weeks' logs by using the left and right arrow keys.
- When work items are configured either in General settings or while adding/editing a job, they will be listed as dropdown options under Work Items for any job.
In the daily and the weekly log, you have the option to enable and disable fields based on your need. Learn more on how to customize the time log fields.
3. The third method of logging time manually is by Importing time logs.
![]() Tip: Click here to know how to import logs.
Tip: Click here to know how to import logs.
Automatic method Using Timer:
Timers can also be used to log time. You can use the Timer in two ways.
1. Given below are the steps for the first method.
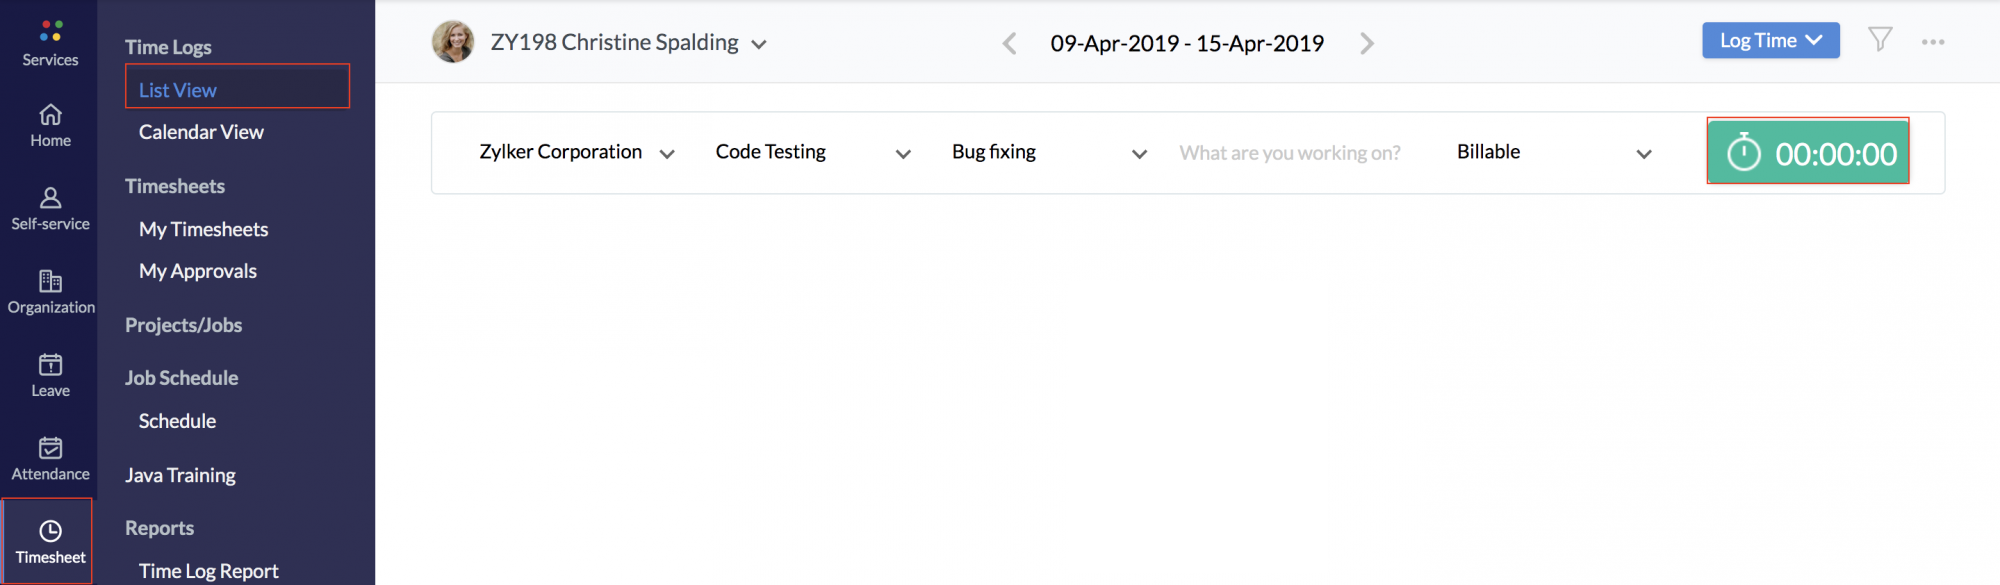
- From your home page, go to Timesheet > Time Logs.
- Select the Job for which you need to log time.
- Enter other details as required.
- Click on the Timer to start recording time.
- Click Save.
You can also pause the timer and resume it when you continue to work on the same job.
2. The second method of using Timers is explained below.
- From your home page, go to Timesheet > TIme Logs.
- Click Log Time.
- Select details as required.
- Click Start Timer.
- Click Save.
Time logging will get started for this job and you can see the Timer running in the List View.
Note for Timer:
- You can add notes while the Timer is running by clicking on the Notes icon. This cannot be done after the Timer is stopped.
- You can use the Timer only when you log time for the current date. Similarly, you can resume or pause the timer only for the current day.
Note for Time Logging:
- Though there are two methods to log time, the method of logging depends on the Settings configured under Timesheet > Settings > General Settings > Time Log Type. Time Logging can be done only based on the option chosen here.
- The Billing Status of the job depends on the status chosen under Timesheet > General Settings > Default Billing Status
You can also log time from Calendar View. Follow the steps given below:
- From your home page, go to Timesheet > Time Logs > Calendar View
- Hover your mouse over the date to see the + icon at the left corner
Note: Timer can be started only for the current date.
- Select the job and the time logging type (Hours/Start& End time/Timer).
- Select the Billable status of the job.
- Click Submit.
You can view the time logs for a particular day by clicking the ellipsis icon which is on the right bottom corner of the date.
Note:
- Time Logging depends on the Settings configured under Timesheet > Settings > General Settings > Time Log Type. Time Logging can be done only based on the option chosen here.
- The Billing Status of the job depends on the status chosen under Timesheet > General Settings > Default Billing Status
Cloning Time Logs
With the help of the 'Clone' option, you will be able to Clone the previous day's or previous week's or previous month's time logs.
Follow the steps given below to do this.
- From your home page, go to Timesheet > Time Logs > List View > Log Time drop down.
- Click on type of log and click Clone.
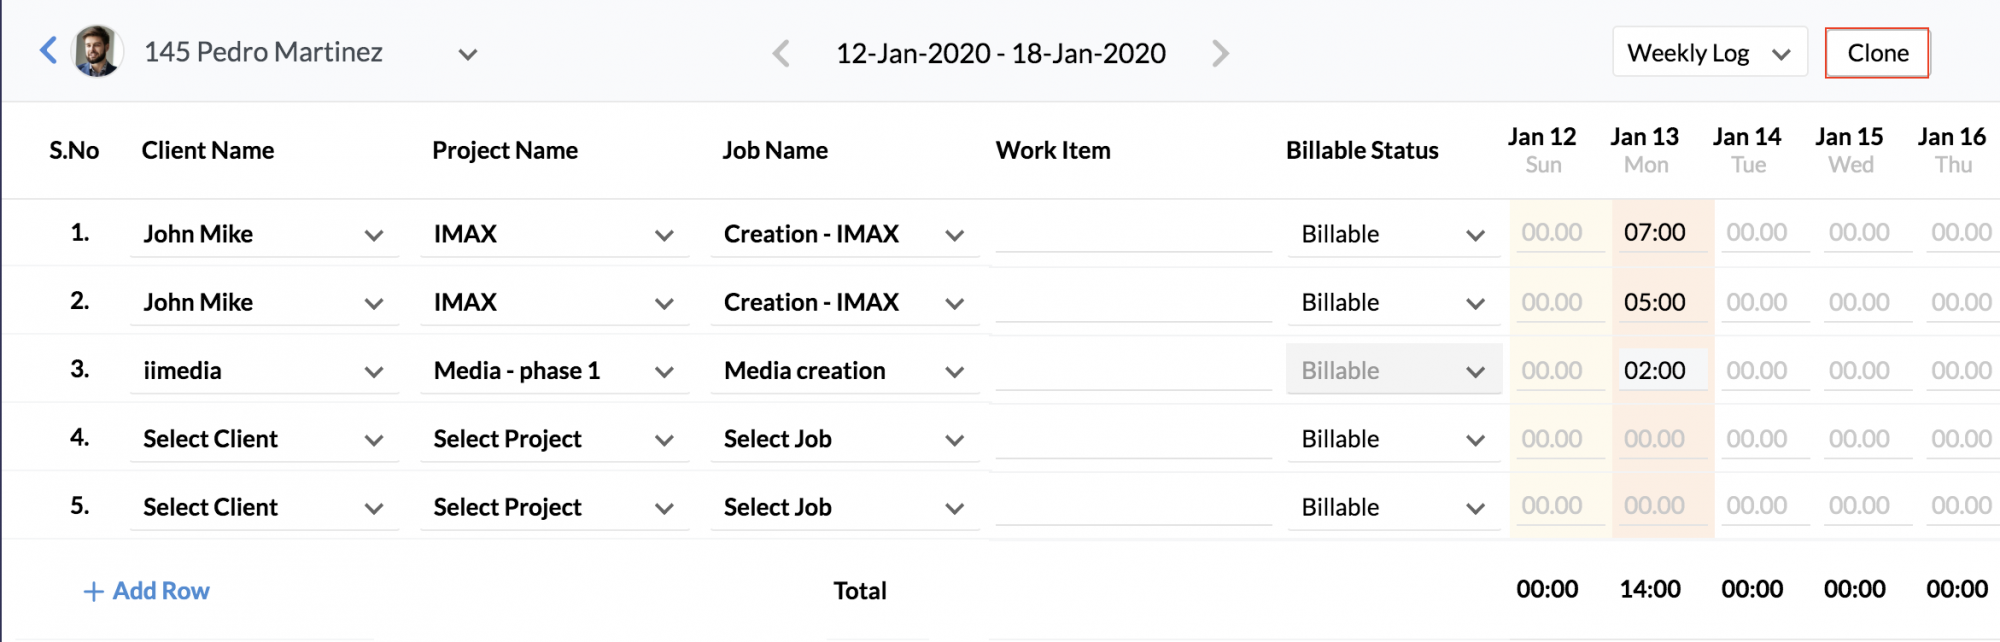
You will be able to see the time logs of the previous day,week or month replicated. You can add more time logs to this or edit the replicated time logs before submitting them.
The 'Reset' option helps you clear the time logs before they are submitted.
Note 1: The Settings that you have configured under Timesheet > Settings > General Settings > Time Logs Field Customization will be applicable for the cloned logs as well. For eg. If you had disabled the description, Work Item etc, then the Cloned time logs will not include this data.
Note 2: In case of Monthly logs, the 'Clone' option will replicate the dates according to the previous month. For example, if you Clone the time logs of May in the month of June, then the Cloned time logs will be for the period of 1-30 days only, though there might be time logs for 31 May as well.
Importing Time Logs
There are two ways in which you can add multiple time logs at a stretch
1. Importing Time Logs - Importing Time logs makes it easy for you to add time log for any date. Once the file is imported, the time log will be updated in the respective date. Follow the steps given below to import time logs.
- From your home page, go to Timesheet > Time Logs.
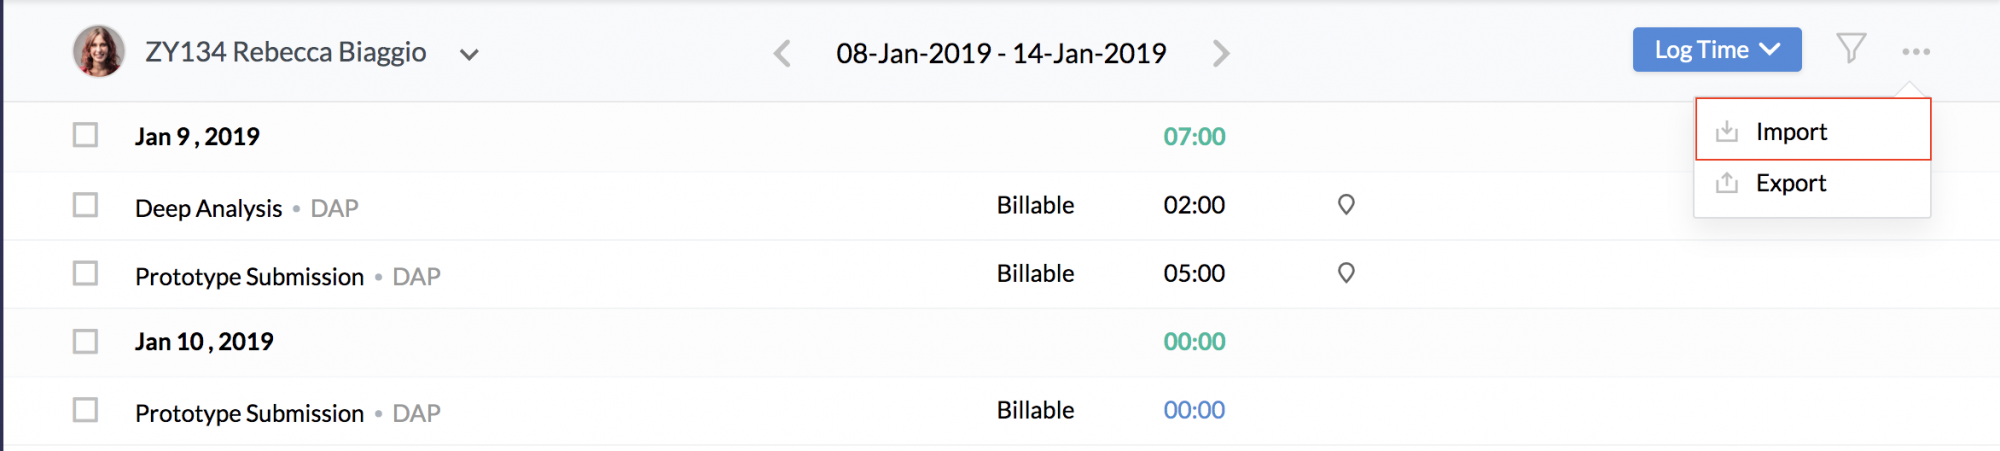
- Click on the ellipsis icon and select Import.
- Click Import File, browse the file from your system and upload it
Note: The file should be in .xls or .xlsx or .csv format.
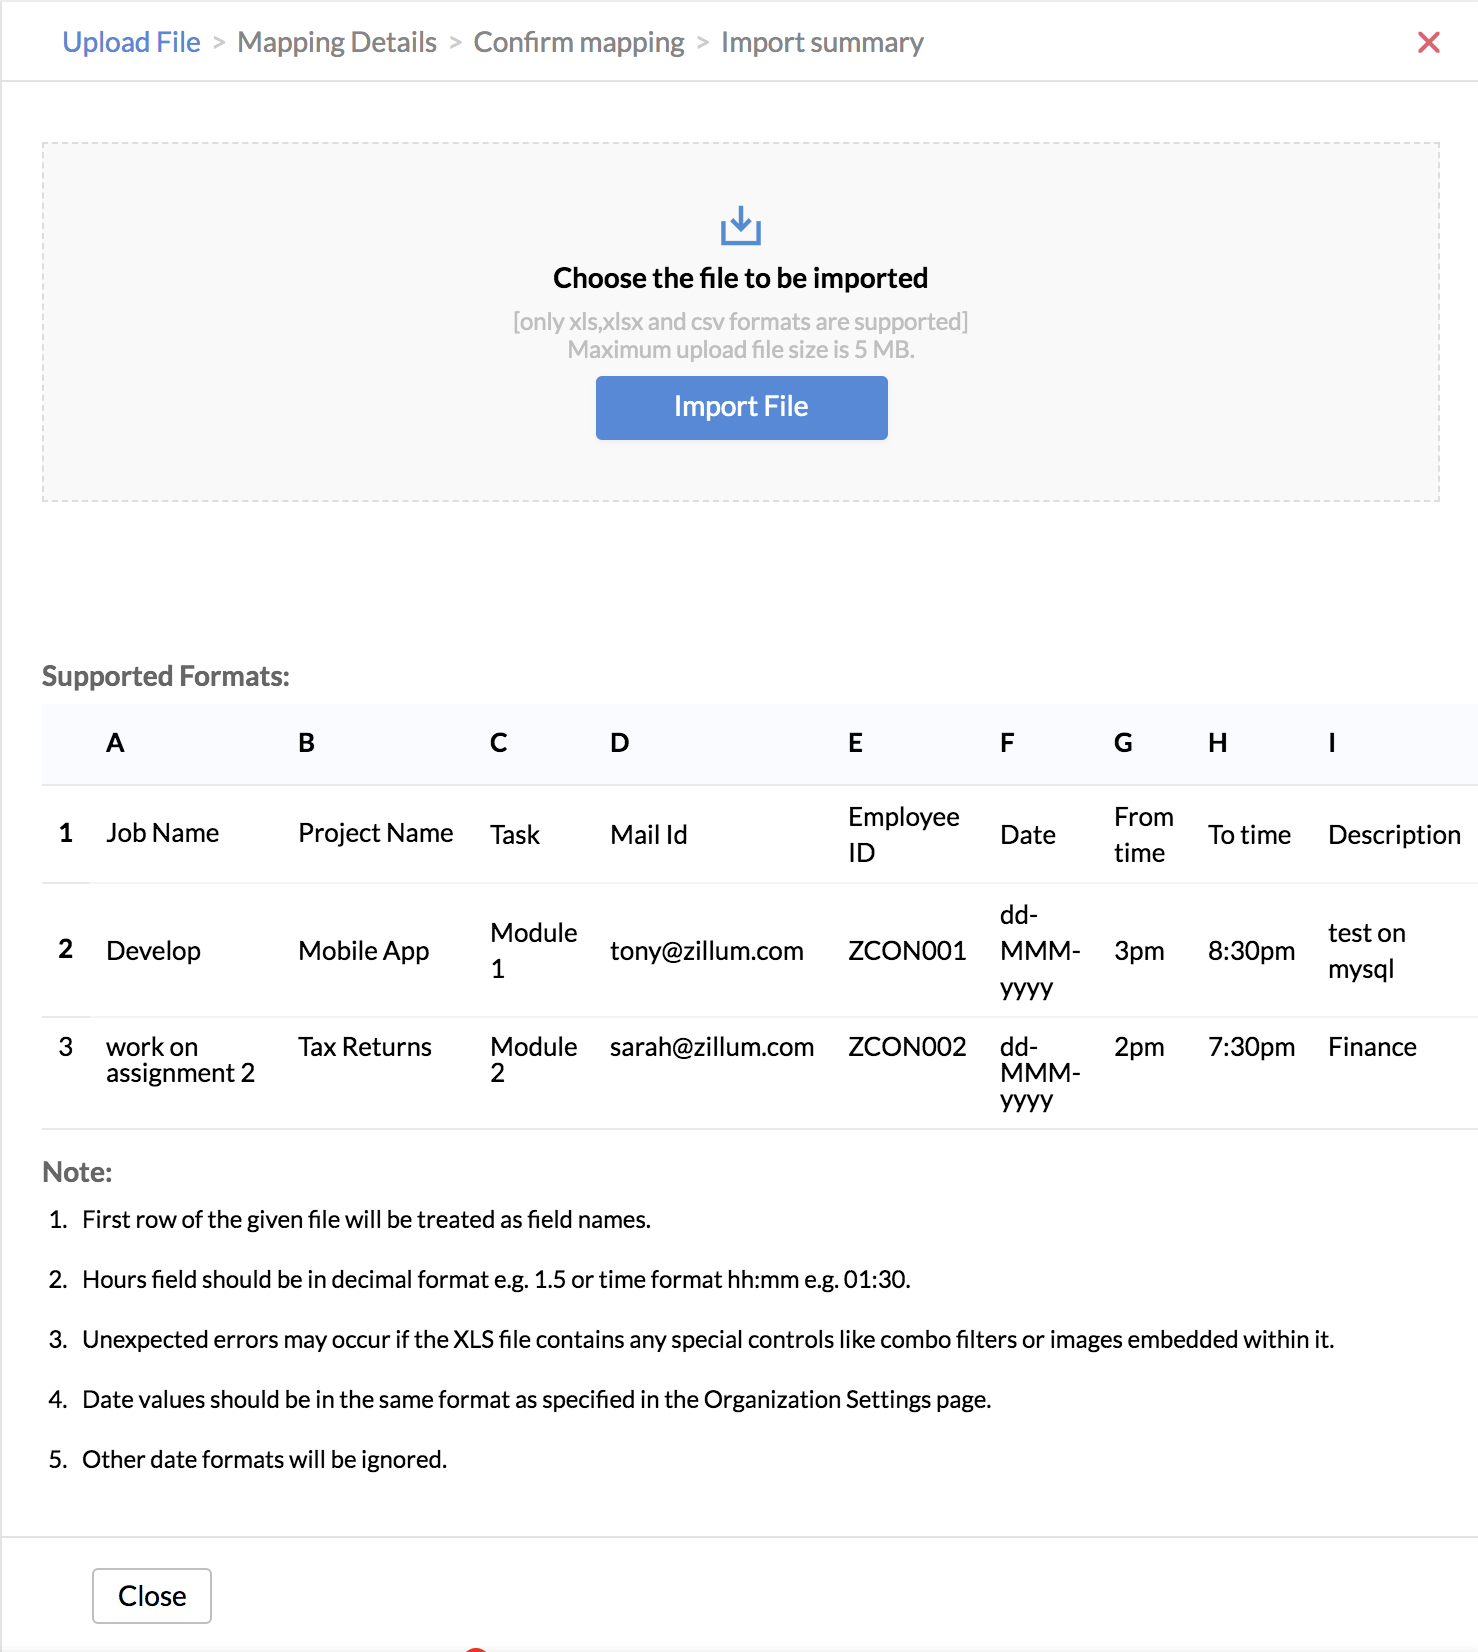
- Map the fields and click Next.
The imported time logs will now show when you go to Timesheet > Time Logs under the respective date of the log.
2. Daily, Weekly and Monthly Time Logs - You can add more than one time log at a time by making use of the Monthly, Weekly and Daily Logs. You will be able to add more than one log to a particular day and add multiple time logs to a week.
Exporting Time Logs
Once the time logs are created, they can be exported easily. Follow the steps given below.
- From your home page, go to Timesheet > Time Logs.
- Choose a user from the dropdown list to export their time log (you can also export for all users - refer step 6).
- Click the ellipsis icon at the top right corner.
- Select Export.
- Choose your preferred export format.
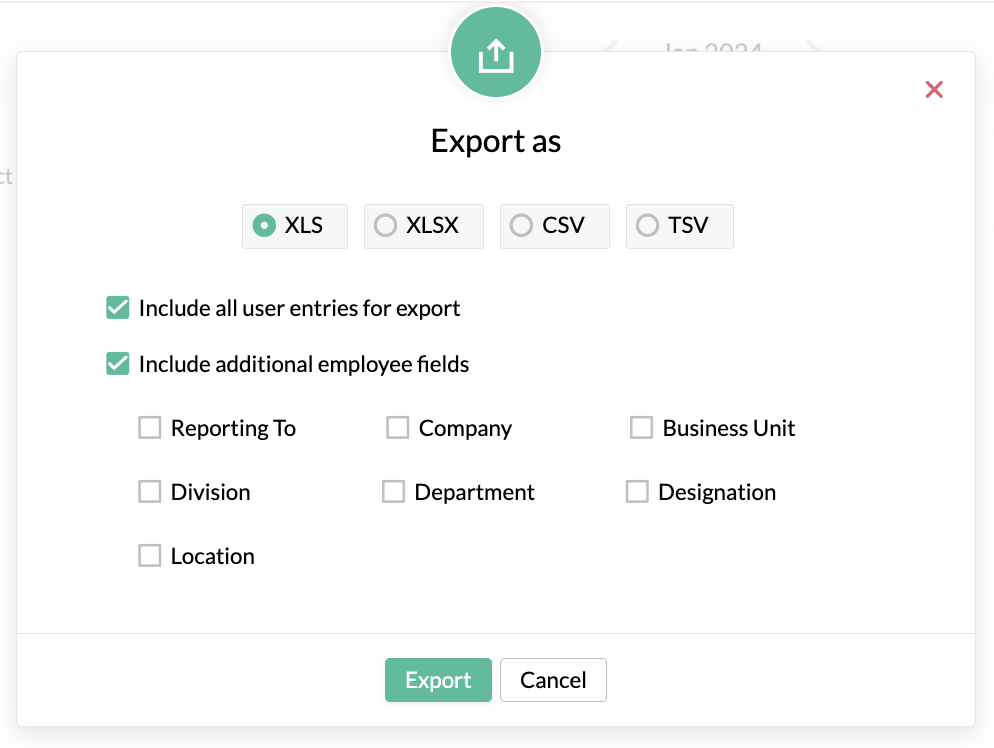
- Select Include all user entries for export check box if you want all users time logs to be exported.
- Select Include additional employee fields check box and select the required fields to be included in the export if necessary.
- Click Export.
Viewing Time Logs
You can view Time Logs of the past, of a period, of a particular status, or specific jobs, projects and clients using the filter option.
For instance, I would like to see the approved logs of last month for a particular employee, you can make use of the filter.
- From your home page, go to Timesheet > Time Logs.
- Search for the employee using the Search tab.
- Click the filter.
- Under Period, select Last month and under Approval Status, select Approved.
- Hit Search.
Note: You can also make use of the Filter option in the Calendar View to refine your search based on parameters like Clients, Projects etc
You can also view the time logs of your reportees.
To view the time logs of your reportees,
- From your home page, go to Timesheet > Time Logs.
- Search for the employee using the Search tab.
- Click the filter to see more options to filter the time logs.
- Hit Search.
Editing Time Logs
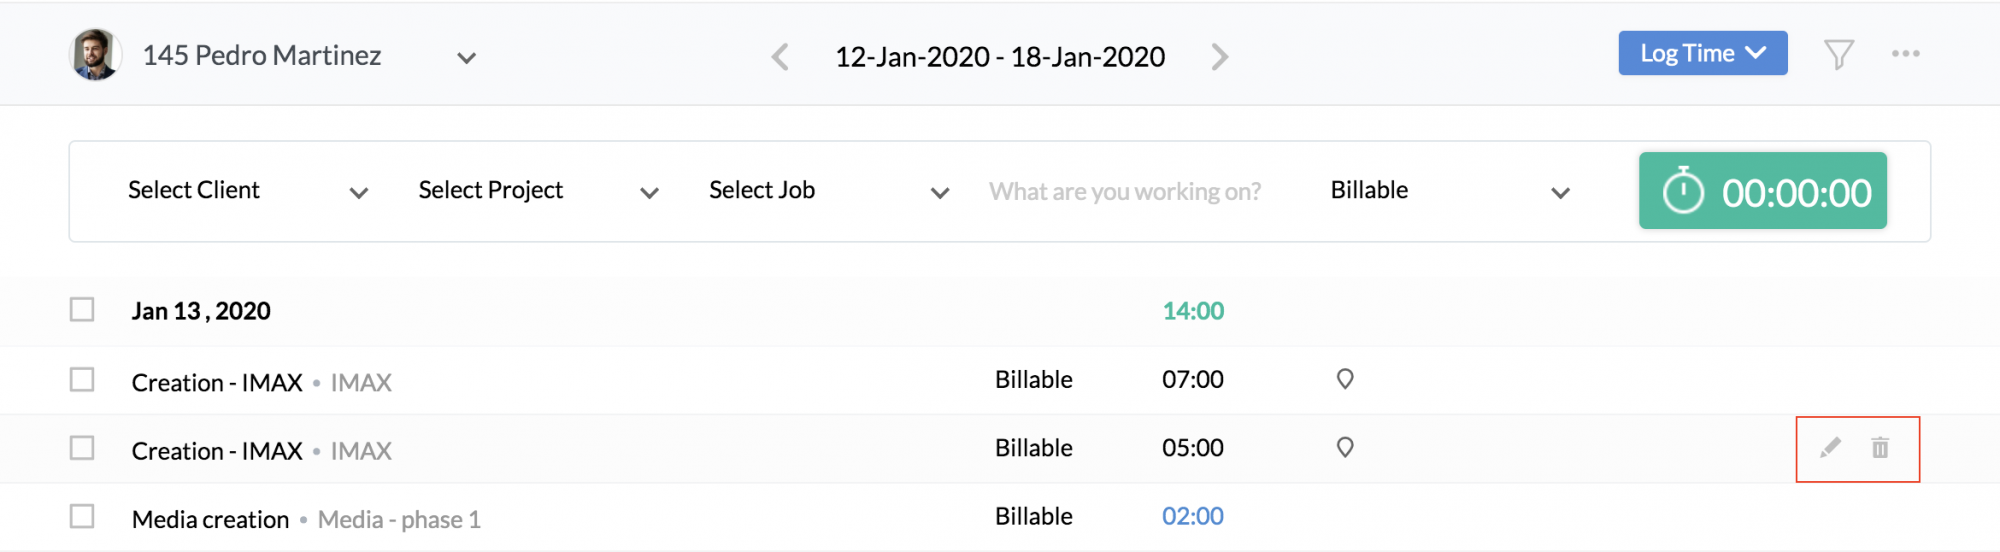
To edit a Time Log, just click on the pencil icon on the right, make the required changes and click 'Submit'.
However, to edit the hours captured by the Timer, follow the steps given below.
- From your home page, go to Time Tracker > Time Logs.
- Click the Hours.
- Click the edit icon (pencil icon) next to the Start and the end time.
- Edit the hours and click Save.
You will be able to see the hours edited. You can also delete an interval using the delete icon.
Also, Time logs which are already sent for approval and logs that are already billed cannot be edited or deleted.
Note: In order to edit the timer, permissions need to be set under Settings (Timesheet > Settings > General Settings > Timer Edit permission).
To edit a Time Log created from the Calendar View,
- From your home page, go to Timesheet > Time logs > Calendar View
- Click on the time log that needs to be edited
- Click on the Edit icon(pencil icon) to make changes
- Click Save
Note: Hours logged using timers cannot be edited.
Deleting Time Logs
To delete a Time Log, click on the delete icon at the right and click 'Confirm'.
To delete multiple Time Logs,
- From your home page, go to Timesheet > Time Logs.
- Select the Time logs that should be deleted and click Delete.
Note : Irrespective of the view selected under Settings (Timesheet > Settings > General Settings > Time Log View), you will be able to delete the logs of only one particular day at one go, using the multi-select option.