Adding Custom Related List
How Can I...
Each record in Zoho CRM has the option to associate other records to it. For example, a Contact has notes, activities, potentials, products, attachments, etc. associated to it. These are called Related Lists and are provided by default but you can also have custom related list added to a record. Custom Related Lists helps you view data collected from other sources.
Availability
![]() Permission Required: Users with the Administrator profile can configure this feature.
Permission Required: Users with the Administrator profile can configure this feature.
Adding a Related List
You can pull data from various sources to create related list with two options:
- Zoho Creator's Custom Apps - Add records from Zoho Creator Apps as Related Lists.
- Third-party APIs - Add Third-party API as Related Lists. You can either choose from pre-defined functions from the gallery or create your own functions.
Note:
- You can add custom related lists in the following modules: Leads, Accounts, Contacts, Potentials, Campaigns, Products, Vendors.
- When you initially click the Add Now button, you will be asked to specify a Username if you do not have an account in other Zoho services.
- Enterprise edition users can create a maximum of 5 custom related lists.
Use Custom Applications as Related List
You can extend your CRM platform with Zoho Creator custom applications . The forms and views can be used as custom tabs inside Zoho CRM. If you have the Zoho Creator Integration activated in your Zoho CRM organizational account, you can view the records of a Custom App's view using custom related list in your CRM modules.
To use custom app to create a related list
- Click a Module (tab) and select a record.
- In the Record Details page, click Add Related List.
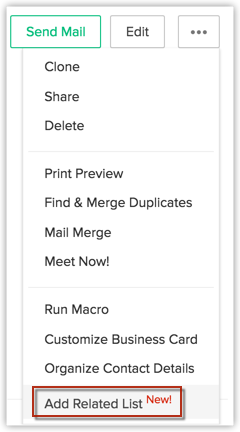
- In the Add Related List popup box, click Custom Apps.
All the Zoho Creator custom apps that are shared to your account will be listed. - From the list of custom apps, click Add Now for the corresponding app that you want to use.
- In the Add Related List page, do the following?
- Specify a name for the Related List.
- Choose a Form from the drop-down list.
Based on the form that you choose, the associated views will be available. - Choose a View from the drop-down list.
The selected View will be used as the related list for the module. - Specify a criteria for Fetch records for the related list only if [Zoho CRM field value] matches with [Custom Form field value].
- Select the check box of the fields that you want to view in the related list.
- Click Save.
The custom related list will be added.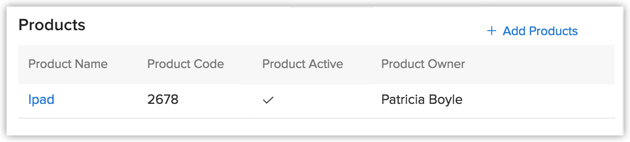
Third-Party API as Related Lists
Using API's, you can add third party services as related lists into Zoho CRM modules. You can either use the pre-defined third-party custom functions from the Gallery or create a custom function for the third-party service you wish to add in the Related List.
You need to call the API provided by the third-party vendor, and parse the response. The response has to be formatted to suit Zoho CRM. The sample code below explains that.
<row no="0">
<FL val="Name1">value1</FL>
<FL val="Name2">value2</FL>
<FL val="Name3">value3</FL>
<FL val="Name4">value4</FL>
<FL val="Name5">value5</FL>
</row>
<row no="1">
<FL val="Name1">value1</FL>
<FL val="Name2">value2</FL>
<FL val="Name3">value3</FL>
<FL val="Name4">value4</FL>
<FL val="Name5">value5</FL>
</row>
</record>
With the above code, the records will not be a hyperlink. If you need to create hyperlinks for the entries, add 2 attributes (url and link) in the <FL> tag. Following is a sample snippet. In this example, when you click on the Account Name, the web page (www.zillum.com) will open in a new tab.
<FL val="Account Name" link="true" url="http://zillum.com">Zillium</FL>
List of Predefined Gallery Functions
Zoho CRM provides the following third-party contextual integrations:
- Zoho Recruit
- Contactology
- Saasu
- FreshBooks
- Zoho People
Use Functions From Gallery
Zoho CRM offers some pre-defined functions that are ready to use. Browse through the gallery and select a function that suits your requirement. The selected function will be added to your list of custom functions. You can then use this function as a related list anytime.
To select a function from the gallery,
- Click on a Module (tab) and select a Record.
- In the Record Details page, click Add Related List.
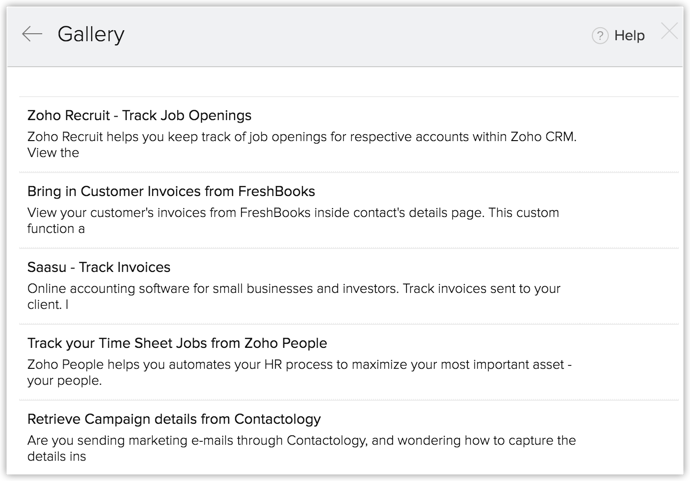
- In the Add Related List popup, click Custom Functions > Choose from Gallery. The pre-defined functions will be listed for you to choose.
- Click Install button of the function you want to use. The function will be added to the list of Custom Functions.
- In the Add Related List web page, specify the following:
- Specify a name for the Related List.
- Specify the Argument. Click on the Add Argument link to specify more.
- Save the changes.
Create Custom Functions
In addition to the pre-defined functions from the gallery, you can also write your own custom functions using DELUGE script. See Also Deluge Scripts - Reference Guide
Deluge Script
Deluge or Data Enriched Language for the Universal Grid Environment as we call it, is an online scripting language integrated with Zoho Creator. It enables users to add logic to the application, incrementally, making it more powerful and robust. The entire database layer is abstracted and you will only speak in terms of forms and fields, while scripting in Deluge. Read more
Custom Function
A function is a set of statements grouped together under a name and can be invoked from anywhere within a program. Deluge Scripting supports Functions, using which we can structure the deluge script, in a more modular way, accessing all the potential that structured programming can offer. Related functions can also be grouped under a common category based on their purpose, called names pace, which helps in easy maintenance. Functions can be invoked from form/field action scripts or on selected records in a view.
To create a custom function
- Click a Module (tab) and select a record.
- In the Record Details page, click Add Related List.
- In the Add Related List popup box, click Custom Functions > Create Custom Function.
- Click Create Custom Function.
- In the New Custom Function page, specify the following:
- Specify a name for the Function. Avoid using special characters and space.
- Click the Add Description link, if required.
- Enter the Argument. Click the Add Argument link to specify more.
- Click Next.
- What you see now is the DELUGE Script Editor. You can code your own logic here. Once done, click Save & Add. The function will be added to your list of Custom Functions.
- In the Add Related List page, do the following:
- Specify a name for the Related List.
- Specify the Argument. Click the Add Argument link to specify more.
- Click Save.
Edit a Custom Related List
To edit a related list
- Click a Module (tab) and select a record.
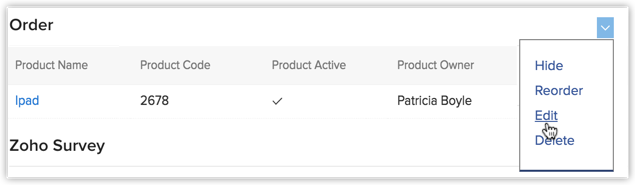
- In the Record Details page, move the mouse pointer to the related list that you want to edit.
- Click the arrow and then click Edit.
- In the Edit Custom Related List popupbox, you can do the following:
- Modify the name of the Related List.
- Click Edit [Function Name] to modify the function.
- Make changes to the Argument Values for the given Argument Name.
- Click Save.
Hide a Custom Related List
When you hide a custom related list, it will available under the Unselected Related Lists from where you can add it back whenever required.
To hide a related list
- Click a Module (tab) and select a record.
- In the Record Details page, move the mouse pointer to the related list that you want to hide.
- Click the arrow and then click Hide.
It will be available under Unselected Related List.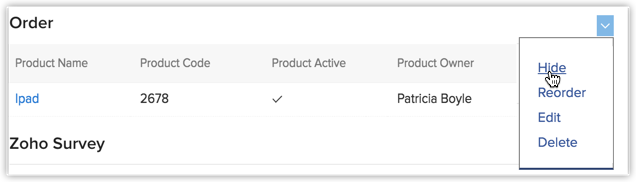
Delete a Custom Related List
To delete a related list
- Click a Module (tab) and select a record.
- In the Record Details page, move the mouse pointer to the related list that you want to delete.
- Click the arrow and then click Delete.
Real-Time Business Scenario
Associating Saasu Invoices With Zoho CRM Contacts
You can view the SaasU invoices sent to your CRM contacts, right in Zoho CRM. When you click on a contact, all the invoices sent to that contact via SaasU, will be listed along with the other contact details.
Here's How:
- Click the Contacts tab and select a record.
- In the Record Details page, click Add Related List.
- In the Add Related List popup, click Custom Functions.
- Click Create Custom Function.
- In the New Custom Function page, do the following:
- Specify a name for the function. Avoid using special characters and blank spaces.
- Click the Add Description link (optional).
- Enter the Argument. Click the Add Argument link to specify more.
- Click Next.
The DELUGE Script Editor will be available.
Here is where you need to call the API provided by SaasU, and convert the response to Zoho CRM format. - Add the code snippet.
Sample Codestring getMySaasuData(string email)
{
contactResp =
getUrl("https://secure.saasu.com/webservices/rest/r1/ContactList?wsaccesskey=
CA497&fileuid=37863&SearchFieldName=EmailAddress&searchfieldnamebeginswith="
+ input.email); contactStr = contactResp.executeXPath("/contactListResponse/contactList/contactListItem");
responseXML="";
lastModifiedTime='01-Jan-1901 00:00:00';
contactId="";
rowCount=1;
if((contactStr != null) && (contactStr != ""))
{
responseXML="";
contactList=contactStr.toList("-|-");
for each contact in contactList
{
time=(contact.executeXPath("/contactListItem/utcLastModified/text()")).replaceAll("T"," ");
dt=time.toTime("yyyy-MM-dd hh:mm:ss");
if(dt > lastModifiedTime)
{
lastModifiedTime=dt;
contactId = contact.executeXPath("/contactListItem/contactUid/text()");
}
}
resp =
getUrl("https://secure.saasu.com/webservices/rest/r1/invoicelist?wsaccesskey=CA497&fileuid=37863
&transactiontype=s&contactUid="
+ contactId);
invoicesList=resp.executeXPath("/invoiceListResponse/invoiceList/invoiceListItem").toList("-|-");
info "invoicesList ::: " + invoicesList;
for each invoice in invoicesList
{
invoiceUID = invoice.executeXPath("/invoiceListItem/invoiceUid/text()");
invoiceNumber = invoice.executeXPath("/invoiceListItem/invoiceNumber/text()");
invoiceDate = invoice.executeXPath("/invoiceListItem/invoiceDate/text()");
dueDate = invoice.executeXPath("/invoiceListItem/dueDate/text()");
totalAmount = invoice.executeXPath("/invoiceListItem/totalAmountInclTax/text()");
responseXML=responseXML + "";
responseXML=responseXML + "" + invoiceUID + "";
responseXML=responseXML + "" + invoiceNumber + "";
responseXML=responseXML + "" + invoiceDate + "";
responseXML=responseXML + "" + dueDate + "";
responseXML=responseXML + "" + totalAmount + "";
responseXML=responseXML + "";
rowCount=(rowCount + 1);
}
responseXML=responseXML + "
}
else
{
responseXML=responseXML + "";
responseXML=responseXML + "No Invoices found for this Contact";
responseXML=responseXML + "";
}
return responseXML; } - Click Save & Add. The function will be added to your list of Custom Functions.
- In the Add Related List page, do teh following:
- Specify a name for the Related List.
- Specify the Argument. Click the Add Argument link to specify more.
- Click Save.
Publish Gallery
If you have created a custom function to integrate a third-party application, and you'd like to share it with others, you could publish it. Published functions will have to be approved by us. Once approved, your function will be listed on the gallery for all users to install from.