How to Integrate WhatsApp with Zoho Voice?
Zoho Voice offers a robust WhatsApp integration, allowing businesses to create and manage WhatsApp Business accounts, send and receive messages, utilize message templates, and share media files.
Prerequisites
The following are the prerequisites for integrating WhatsApp with your Zoho Voice account:
A Facebook Business Manager account.
A verified business.
A WhatsApp Business Account(WABA).
A prepaid line of credit for your WhatsApp Business Account.
A valid business phone number capable of receiving or making calls and SMS to access the WhatsApp Business API.
Info
Numbers from countries that do not support WhatsApp within their geographical boundaries cannot be used to access the WhatsApp Business API.
Note
- After verifying your business, it will be reviewed for compliance with the WhatsApp Terms of Service and WhatsApp Commerce Policy.
- You cannot use WhatsApp phone numbers being used on other products. Only unused and registered phone numbers can be used for the integration.
- BSP Migration is now supported.
Steps to set-up a WhatsApp Channel on Zoho Voice
Log in to your Zoho Voice account with Superadmin or Admin privileges.
Select Integrations from the left menu bar.
Switch to Instant Messaging tab.
Navigate to WhatsApp and click on the Configure button.
To get started, Click on the Add Number button at the top right corner.
On clicking the Add Number button, Please ensure to agree to the WhatsApp Business Terms of Service pop-up prompt by selecting the Agree button to proceed with the onboarding process. If you choose not to agree, selecting the Cancel button will prevent access to WhatsApp via Zoho Voice.
Connect your Facebook Business Manager Account:
A Facebook authentication window powered by Zoho Social pops-up.
Info
Zoho Voice implements WhatsApp's embedded signup flow powered by Zoho Social, enabling seamless onboarding for businesses to the WhatsApp Business Platform Cloud API directly from Zoho Voice. This is the entry point that enables you to link your Facebook Business Manager account and WhatsApp Business Account with Zoho Voice to chat with WhatsApp users via WhatsApp Business API.
Login to Facebook using your personal Facebook account to access your Facebook Business Manager account.
Note
Your personal account involved in the signup flow must have admin privileges for your Facebook Business Manager account in order to set up and link your WhatsApp Business Accounts.
Warning
Do not keep the embedded Signup pop-up open for more than 1 hour, as the session will expire. Please ensure that you have all the above mentioned prerequisites ready before proceeding.
Enter your login credentials in the provided fields and click Continue to confirm your identity.
Once your identity is confirmed, Zoho Social will fetch and display your Facebook Business Manager accounts created using your personal Facebook account.
Note
Facebook allows only a maximum of two Business Manager accounts per Facebook account.
Select the Facebook business manager account of your choice and click Continue.
Link your WhatsApp Business Account:
On the following window, select the WhatsApp Business Account(WABA) within your Selected Facebook Business Manager account, then click Continue.
Create your WhatsApp Business Profile:
Create your WhatsApp Business profile by following the steps below:Create a new WhatsApp Business profile by adding the essential details of your business, like your WhatsApp Business Display Name that you will use to message your customers, and click Continue.
Note
Make sure the display name meets the guidelines mentioned here.
Next, select your Business Category from the dropdown menu.
Enter a brief Description of your business.
Note
The Category and business Description will both be visible to customers messaging your business.
Verify your WhatsApp Business Number:
Select an existing WhatsApp business number or enter a new number to register.
Note
You cannot register a number that is currently registered on either WhatsApp Messenger or the WhatsApp Business App.
Info
Here, you can enter an active virtual number of your choice that you have purchased from Zoho Voice or ported into Zoho Voice.
Select a verification method of your choice. You can choose between Text Message or Voice Call.
Click Send Code.
On the following window, enter the 6-digit verification code received on your WhatsApp business phone number.
Click Verify.
Once your WhatsApp Business phone number has been successfully verified, you will receive a prompt confirming the completion of the sign-up process.
You will be asked to provide your approval, indicating that you are ready to begin your WhatsApp trial through Zoho Voice. Click OK.
Configure your WhatsApp Channel:
Now you can get back on Instant Messaging → WhatsApp page, click on the Add Channel button on the top right corner.
Note
The Add Channel button appears only when you successfully link your Facebook Business Manager account and WhatsApp Business Account.
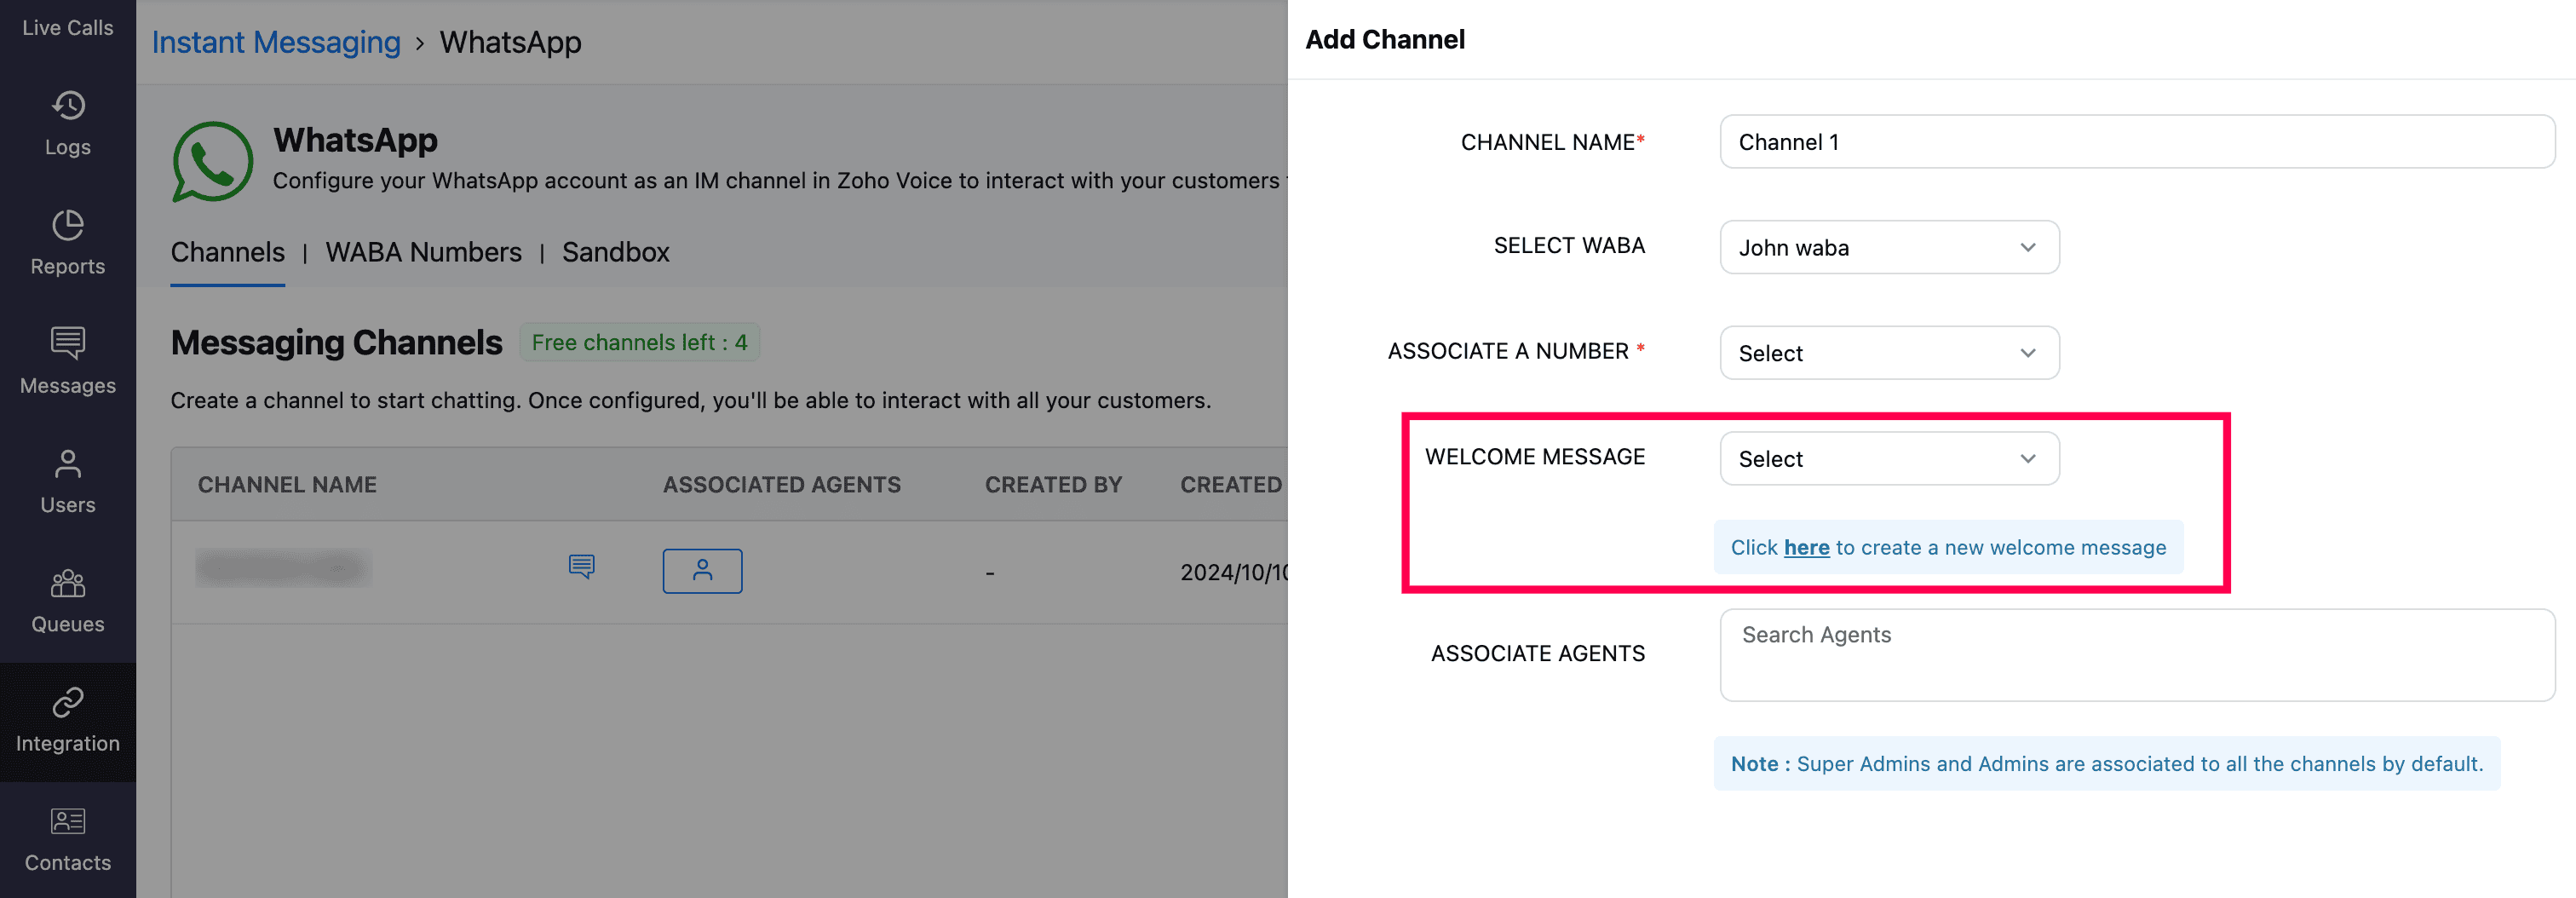
On the Add Channel window, Enter a name for the channel.
Navigate to the field WhatsApp Number and click on the View available numbers button right next to it.
Select the WhatsApp Business number added in the Step 9. from the list of available numbers.
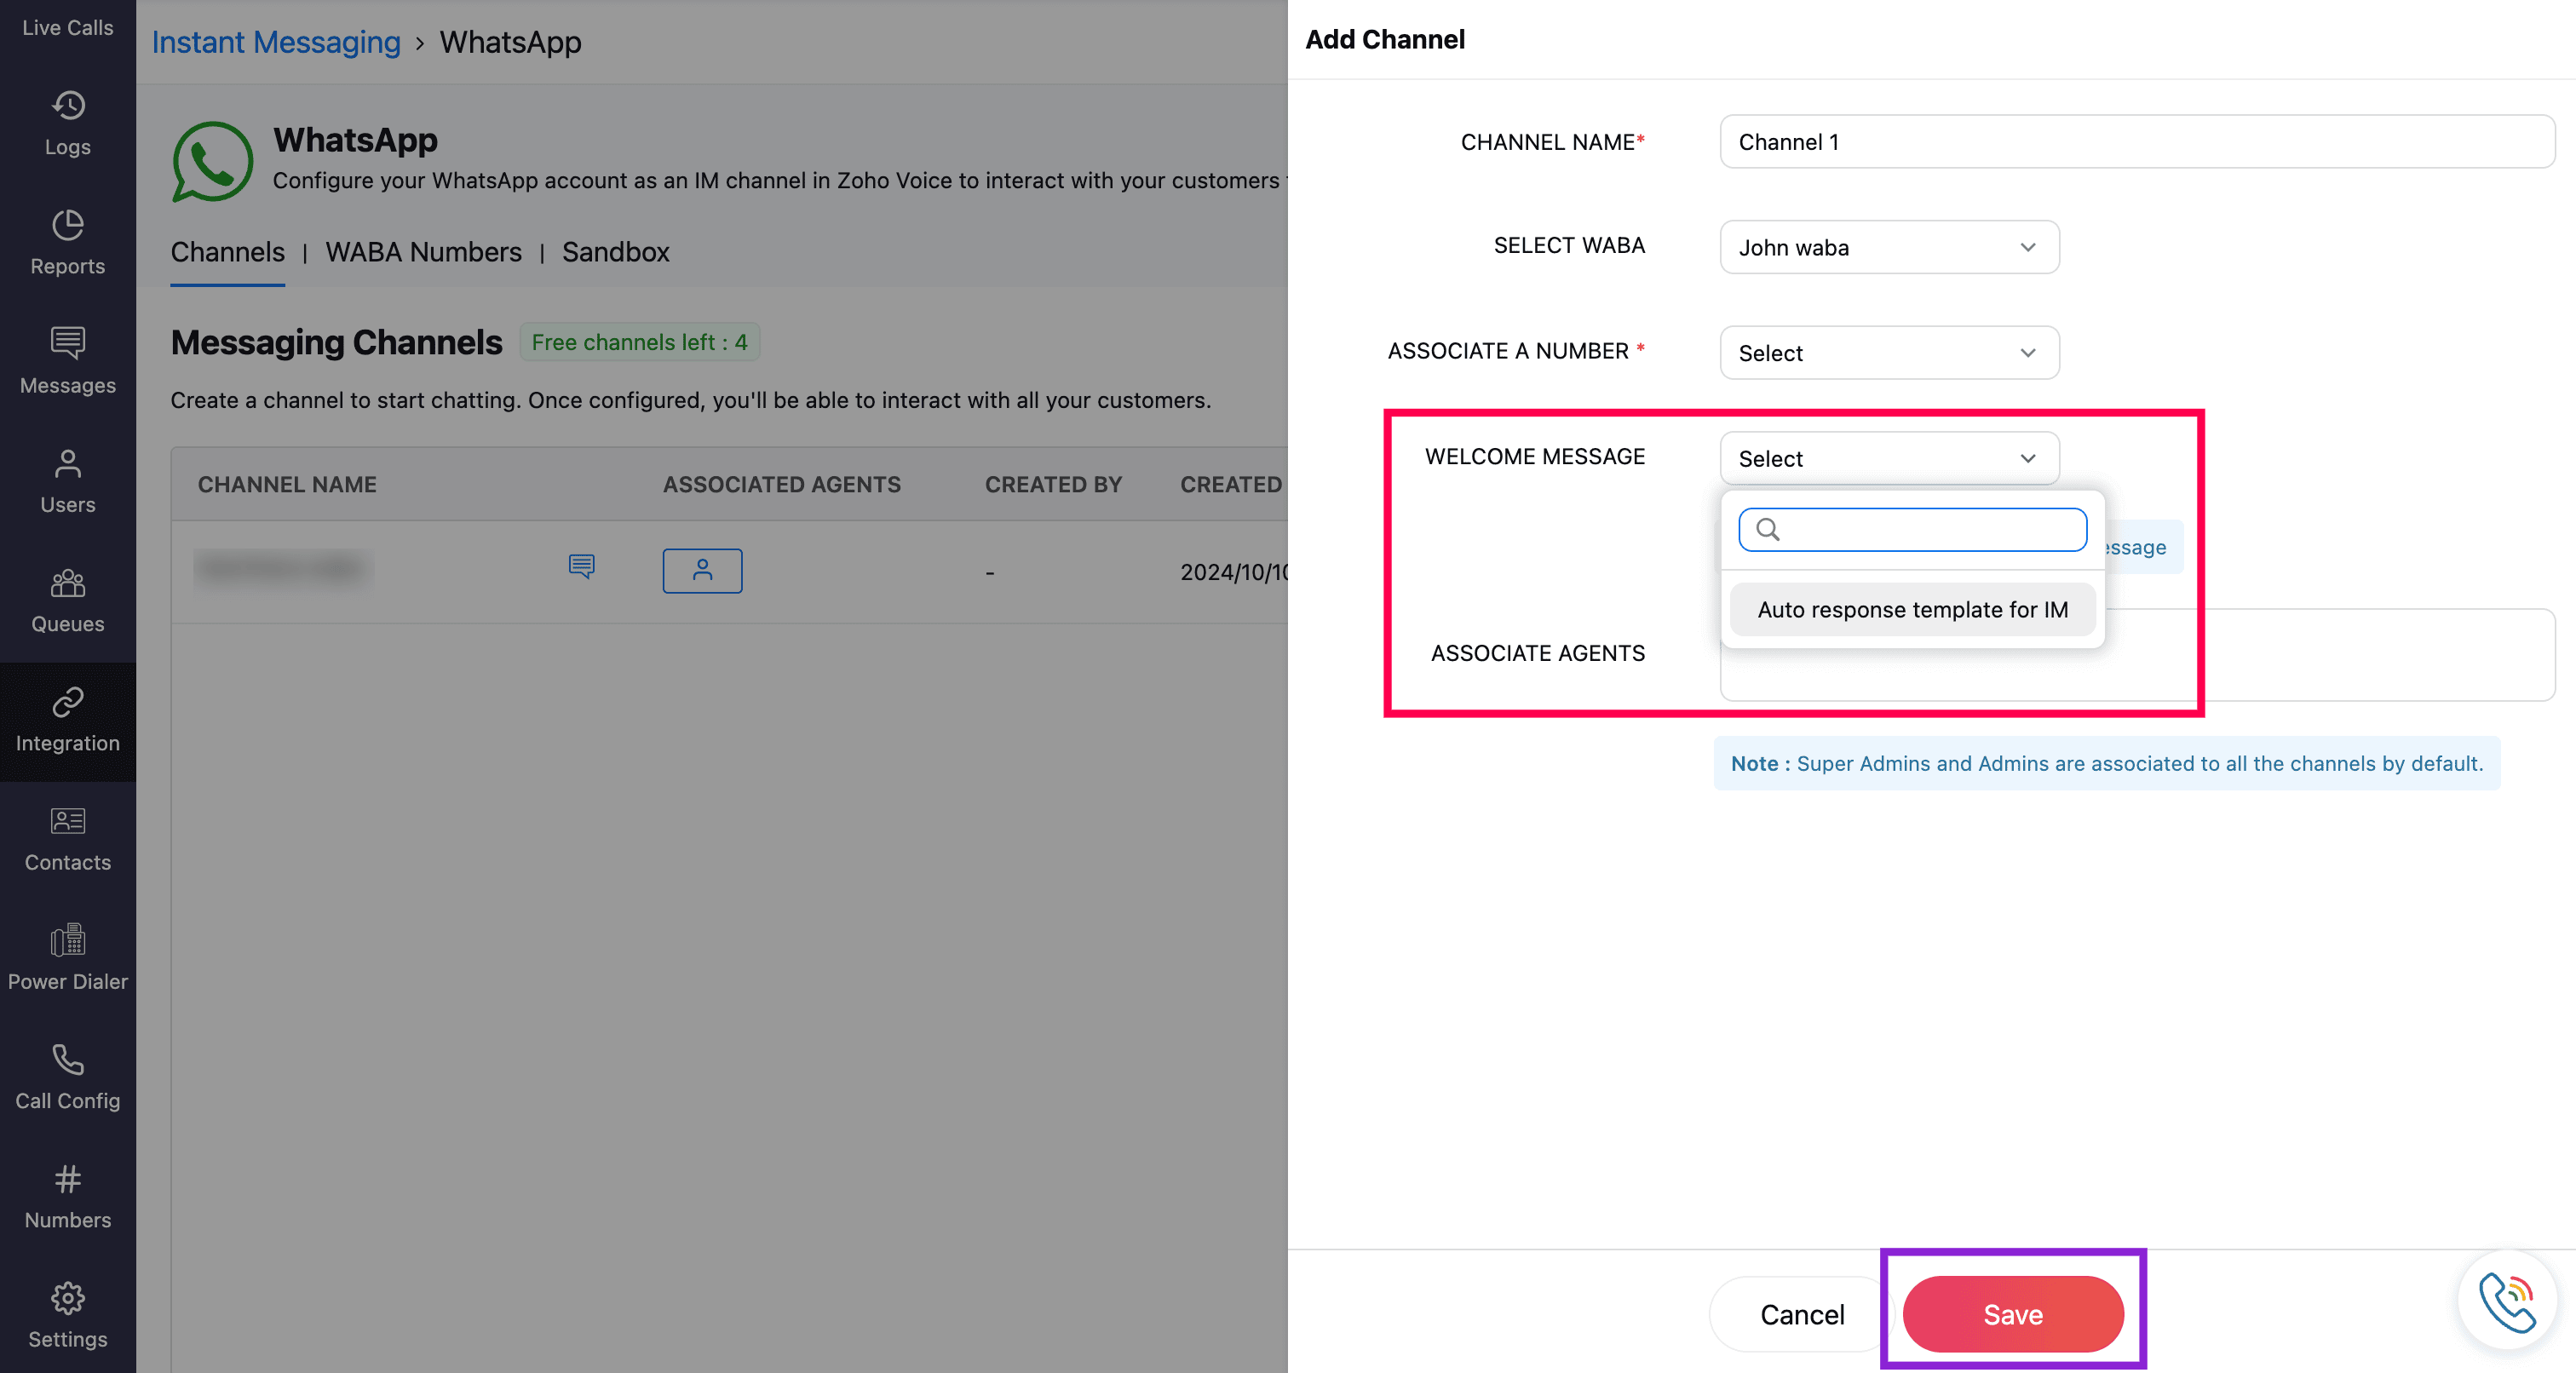
Configuring Welcome Message:
In the Welcome Message field, select your preferred template from the dropdown list of templates already configured in Messages → Templates (under the Auto Response category).
In case you haven't configured any Auto Response templates yet, click here to create a new welcome message. This will take you to Add Template page.
Under Category, select the Auto Response option.
Give a name for the new template in the Name Field.
Assign a suitable Tag for the new message.
Note
Tags act as keywords that help you categorize and easily retrieve templates when needed. Type the required tag and click Enter. You can assign multiple tags to a single message template to improve searchability and organization.
Enter the text content in the Message field and click Save.
Note
In message field, you can use placeholders to personalize messages with dynamic values that are automatically filled in when the message is sent.
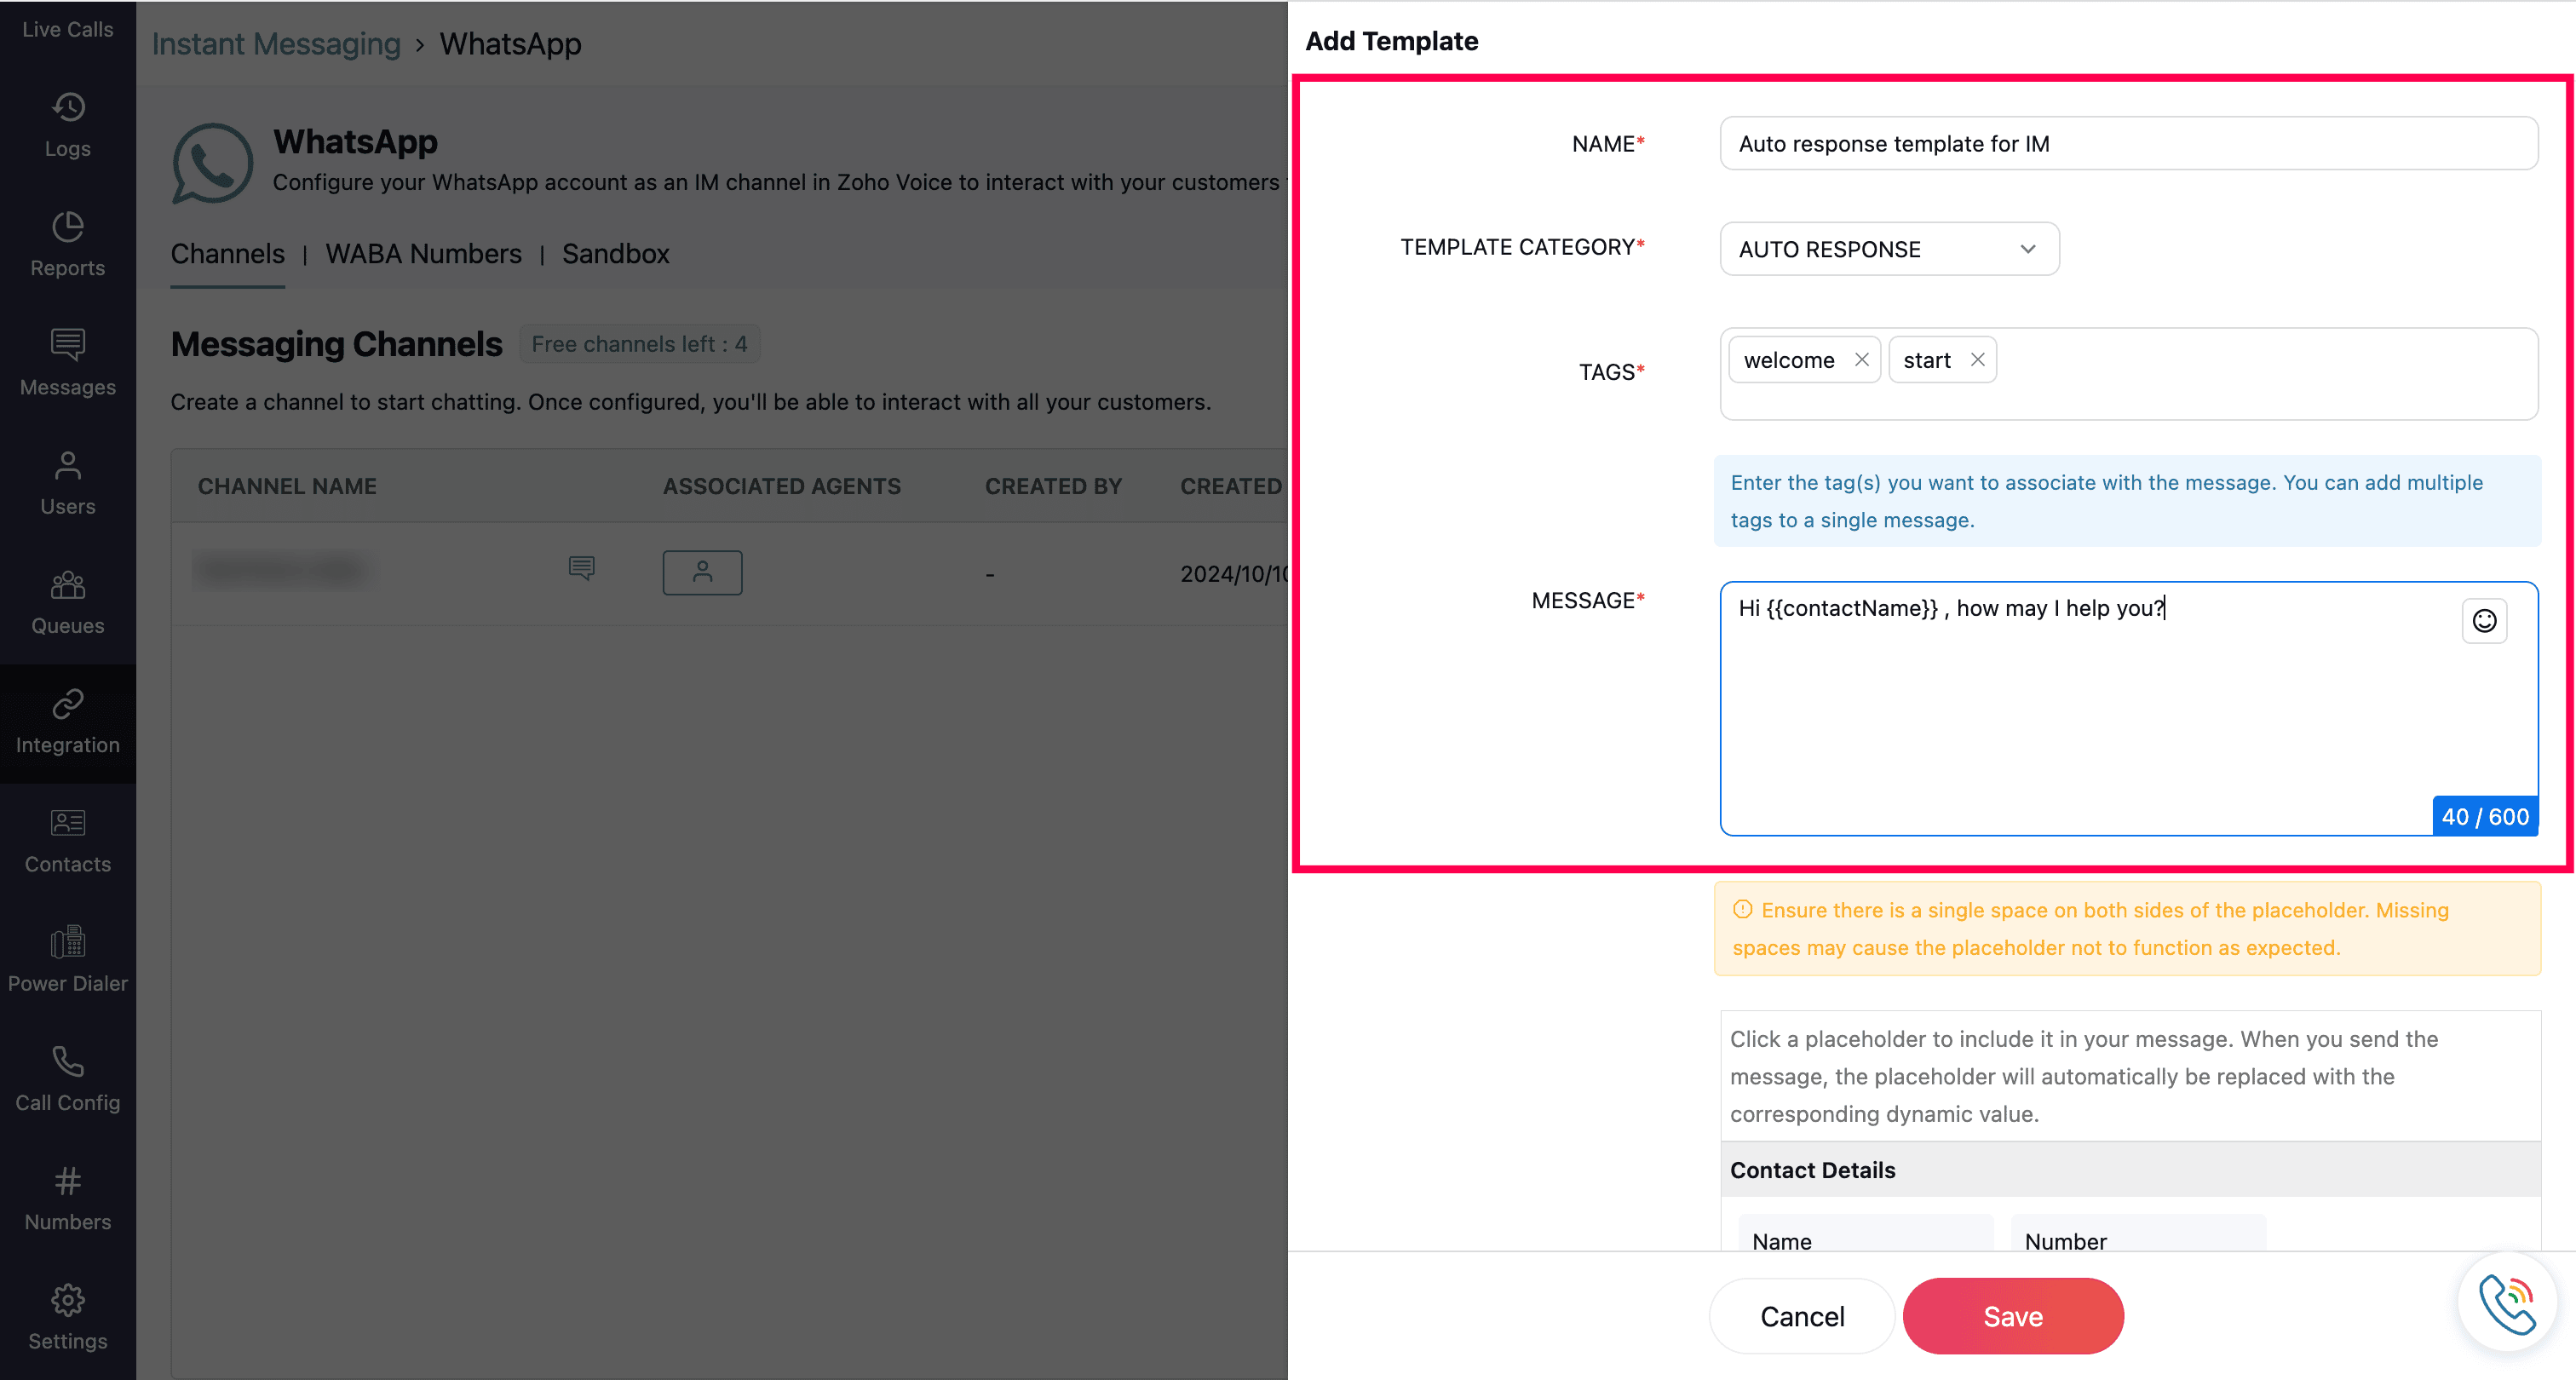
Once the template is saved, the new auto response(welcome message) can be searched and selected from the dropdown available near the Welcome Message field.
Specify the agents in the Associated Agents field who should have access to the newly created WhatsApp channel.
Click Save to create a new WhatsApp channel successfully.
Note
- Super Admins and Admins are automatically associated with all channels by default.
- Once the channel is created, all the agents associated with the channel will be notified of the association.


