
Sales Tax Automation - Operations
Configure Address Preferences
When Sales Tax Automation is enabled in Zoho Inventory, it calculates sales tax using the customer’s billing address by default. You can change this to use the shipping address instead. Here’s how:
- Go to Settings.
- Select Taxes under Taxes & Compliance.
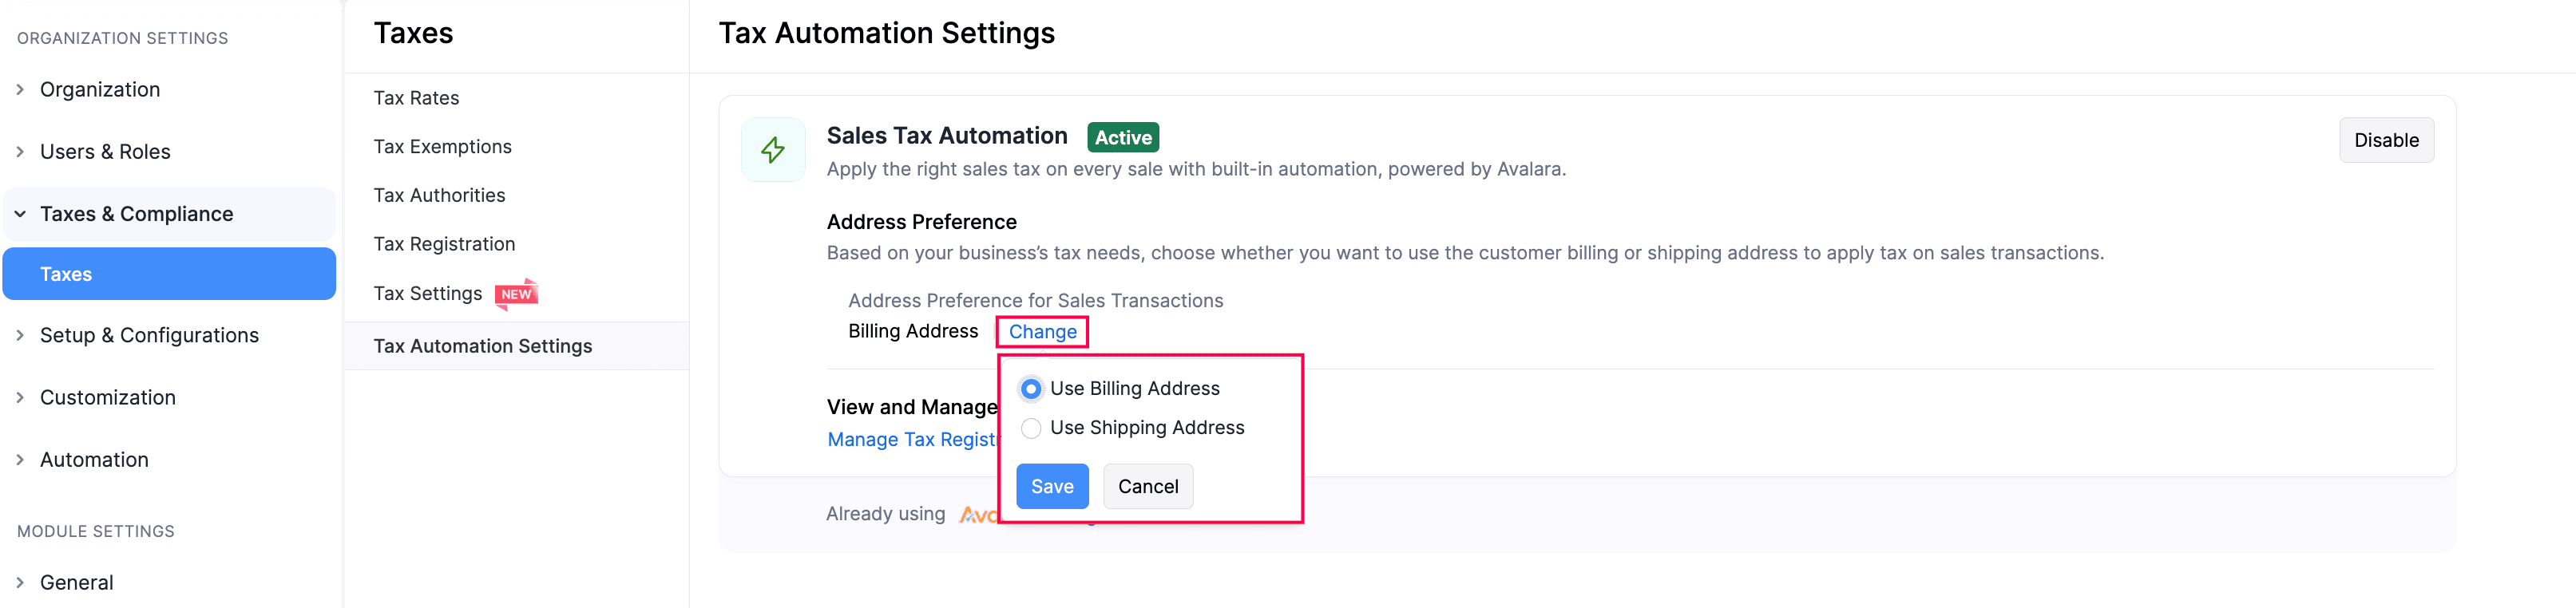
- In the next page, click Tax Automation Settings in the Taxes pane.
- In the next page, under Address Preference, click Change.
- In the pop-up, choose Billing Address or Shipping Address, based on your preferences.
- Click Save.
The address preference will now be applied automatically when calculating sales tax for all new transactions.
Configure Address Preferences for Recurring Transactions
Address verification for recurring transactions is optional by default. You can make it mandatory to ensure accurate tax calculations. When enabled, recurring transactions can be created only after the customer’s address is verified. If the address needs to be updated, the user may need permission to edit the customer’s address.
Note: If the user does not have permission to edit the customer’s address, they must request access or ask an authorized user to update the address before creating the recurring transaction.
To configure address preference for recurring invoices:
- Go to Settings.
- Select Taxes under Taxes & Compliance.
- Navigate to Tax Automation Settings in the Taxes pane.
- In the next page, under Address Verification Preference for Recurring Transactions, click Change.
- In the pop-up that appears, select whether you want the preference to be Mandatory or Optional, and click Save.
The selected address preference will now be applied automatically to recurring invoices when calculating sales tax.
Configure Fallback Tax Rates
You can configure fallback tax rates so that tax is automatically applied to recurring transactions when tax automation is unavailable, to ensure taxes are applied for states where you have tax registrations. To configure:
- Go to Settings.
- Select Taxes under Taxes & Compliance.
- Navigate to Tax Automation Settings and click Manage Fallback under Fallback Tax Rates.
- Click + Configure State.
- Select the State and Tax Name.
- Click + Configure State to add another state’s fallback rate.
- To remove a fallback rate, click the Remove icon next to it.
- Click Save.
Once configured, the fallback tax rates will be automatically applied to recurring transactions when tax automation is unavailable.
Configure Exemption Certificates
An exemption certificate is a document provided by a customer to show that they are not required to pay sales tax on certain purchases. Customers such as resellers, nonprofit organizations, or government agencies may qualify for this exemption under tax regulations. You can configure exemption certificates for customers so that eligible transactions can apply tax exemption based on jurisdiction rules.
To configure exemption certificates for a customer:
- Go to Sales on the left sidebar and select Customers.
- Select the customer for whom you want to configure the exemption certificate.
- On the customer’s details page, click the More icon and select Exemption Certificates.
- Click Add New in the top-right corner.
- In the Create Exemption Certificate page, the Customer will be selected automatically. Select the Exemption Category, State, Tax Authority, Tax Exemptions for the exemption certificate.
- Enter the other necessary details and click Save.
Once the certificate is saved, it will be validated and applied to transactions based on the jurisdiction rules.
Note: Tax may still be applied if the item’s Tax Category is not eligible for the exemption according to the jurisdiction rules.
Edit Tax Registration Details
To edit the tax registration details:
Go to Settings.
Select Taxes under Taxes & Compliance.
In the next page, select Tax Registration in the Taxes pane.
In the Tax Registration page, hover over the required tax, click the dropdown icon next to it, and select Edit.

In the Edit Tax Registration Settings page, make the required changes.
Click Save.
The tax registration details will be updated.
Deregister Taxes
If you no longer conduct business in a state, or if you’re no longer required to collect taxes there, and have deregistered taxes there, you can mark it in Zoho Inventory. This prevents sales tax from being automatically calculated for your transactions in that state and its local jurisdictions. Here’s how:
Go to Settings.
Select Taxes under Taxes & Compliance.
In the Taxes pane, click Tax Registration.
Hover over the required tax registration, click the dropdown icon next to it, and select Edit.
In the Edit Tax Registration Settings page, click Mark as Deregistered in the top right corner.

- If you’ve added multiple local taxes under a state, click Deregister All in the top right corner.
In the Tax Deregistration pop-up, enter the Tax Deregistration Date, and click Deregister.
The tax deregistration will be recorded, and it will no longer be applied to your transactions.
Note:
When you deregister taxes at the state-level, the local taxes that you’ve added for that state will also be deregistered.
To mark a specific local tax as deregistered:
In the Edit Tax Registration Settings page, hover over the required local tax, and click Deregister.

In the Tax Deregistration pop-up, enter the Tax Deregistration Date, and click Deregister. Sales tax will not be applied to transactions created after this date.
The tax deregistration will be recorded. However, the state-level tax will still be applied to your transactions.
Undo Tax Deregistration
If you resume your business in a state again, or if you’re required to collect your taxes there, you can undo the deregistration to ensure that sales tax is calculated correctly. To do this:
Go to Settings.
Select Taxes under Taxes & Compliance.
In the Taxes pane, click Tax Registration.
Hover over the required tax registration, click the dropdown icon next to it, and select Edit.
In the Edit Tax Registration Settings page, click Undo Deregistration in the top right corner.

If there are multiple local taxes under the state, click Undo All Deregistrations in the top right corner.
In the confirmation pop-up, click Undo Deregistration again.
The tax details will now be included in your transactions, and the sales tax will be calculated accordingly. Similary, you can also undo deregistration for a specific local tax.

Mark Tax Registrations as Inactive
If you want to temporarily prevent a specific tax registration from being applied to transactions, you can mark it as Inactive. Here’s how:
Go to Settings.
Select Taxes under Taxes & Compliance.
In the next page, select Tax Registration in the Taxes pane.
In the Tax Registrations page, hover over the required tax registration, click the dropdown icon next to it, and select Mark As Inactive.

In the confirmation pop-up, click Mark As Inactive again.
The tax registration will be marked as Inactive. To mark it active again:
- In the Tax Registrations page, hover over the inactive tax registration, click the dropdown icon next to it, and select Mark As Active.
- In the confirmation pop-up, click Mark As Active again.
The tax registration will be marked as Active.
Tax Exemptions
Tax exemptions apply when customers are not required to pay sales tax due to the nature of the item or their status, such as for resale, nonprofit organizations, or specific goods. These exemptions usually vary by state, and some counties or cities may have their own rules. To create a tax exemption:
- Go to Settings.
- Select Taxes under Taxes & Compliance.
- In the Taxes pane, select Tax Exemptions.
- Click + New Tax Exemption in the top right corner.
- In the New Tax Exemption pop-up, fill in the following fields:
- Exemption Reason: Enter the reason for the tax exemption.
- Description: Provide a description of the exemption.
- Type: Choose whether the exemption applies to a Customer or an Item.
- Click Save.
Tax Authority
Now that you’ve created the tax exemption, you can associate it with a customer or apply it to transactions for items.Tax Authority is a government agency that enforces tax laws and collects taxes from people and businesses in its area. In Zoho Inventory, associating a tax authority with a specific tax rate helps you track and apply the correct taxes while creating transactions for customers and vendors. To create a new tax authority:
- Go to Settings.
- Select Taxes under Taxes & Compliance.
- In the Taxes pane, click Tax Authorities.
- Click + New Tax Authority in the top right corner.
- In the New Tax Authority pop-up, fill in the following fields:
- Tax Authority: Enter a name of the tax authority.
- State: Select the state where the tax authority is located.
- Description: Add a description if needed.
- Click Save.
Now, after creating the tax authority, you can add it to a new tax rate when setting it up in Zoho Inventory.
Next >