
Sales Tax Automation
Sales tax is a consumption tax collected from customers at the point of sale and paid to state or local tax authorities. In the U.S., tax rates vary by state and jurisdiction. The tax you collect depends on where your business operates, where your customers are located, the goods or services you sell, your tax registrations, and any applicable customer exemptions (such as resellers, nonprofit organizations, or government entities).
Sales tax can be complex because rates differ across states, counties, cities, and special districts. Some goods and services are taxable, while others may be exempt or partially taxable. To simplify this, you can use Sales Tax Automation, which automatically determines and applies the correct tax to your transactions. When enabled in Zoho Books, Sales Tax Automation calculates the appropriate tax and applies valid exemptions, helping you stay compliant with tax regulations.
Note: If you already have an Avalara account, you can integrate it with Zoho Books and use it for automated tax calculations. Learn more about Avalara AvaTax Integration.
How Sales Tax Automation Works
Zoho Books calculates sales tax based on:
- Your business location and tax registrations
- Customer billing or shipping address
- Tax category of goods or services
- Applicable customer exemptions
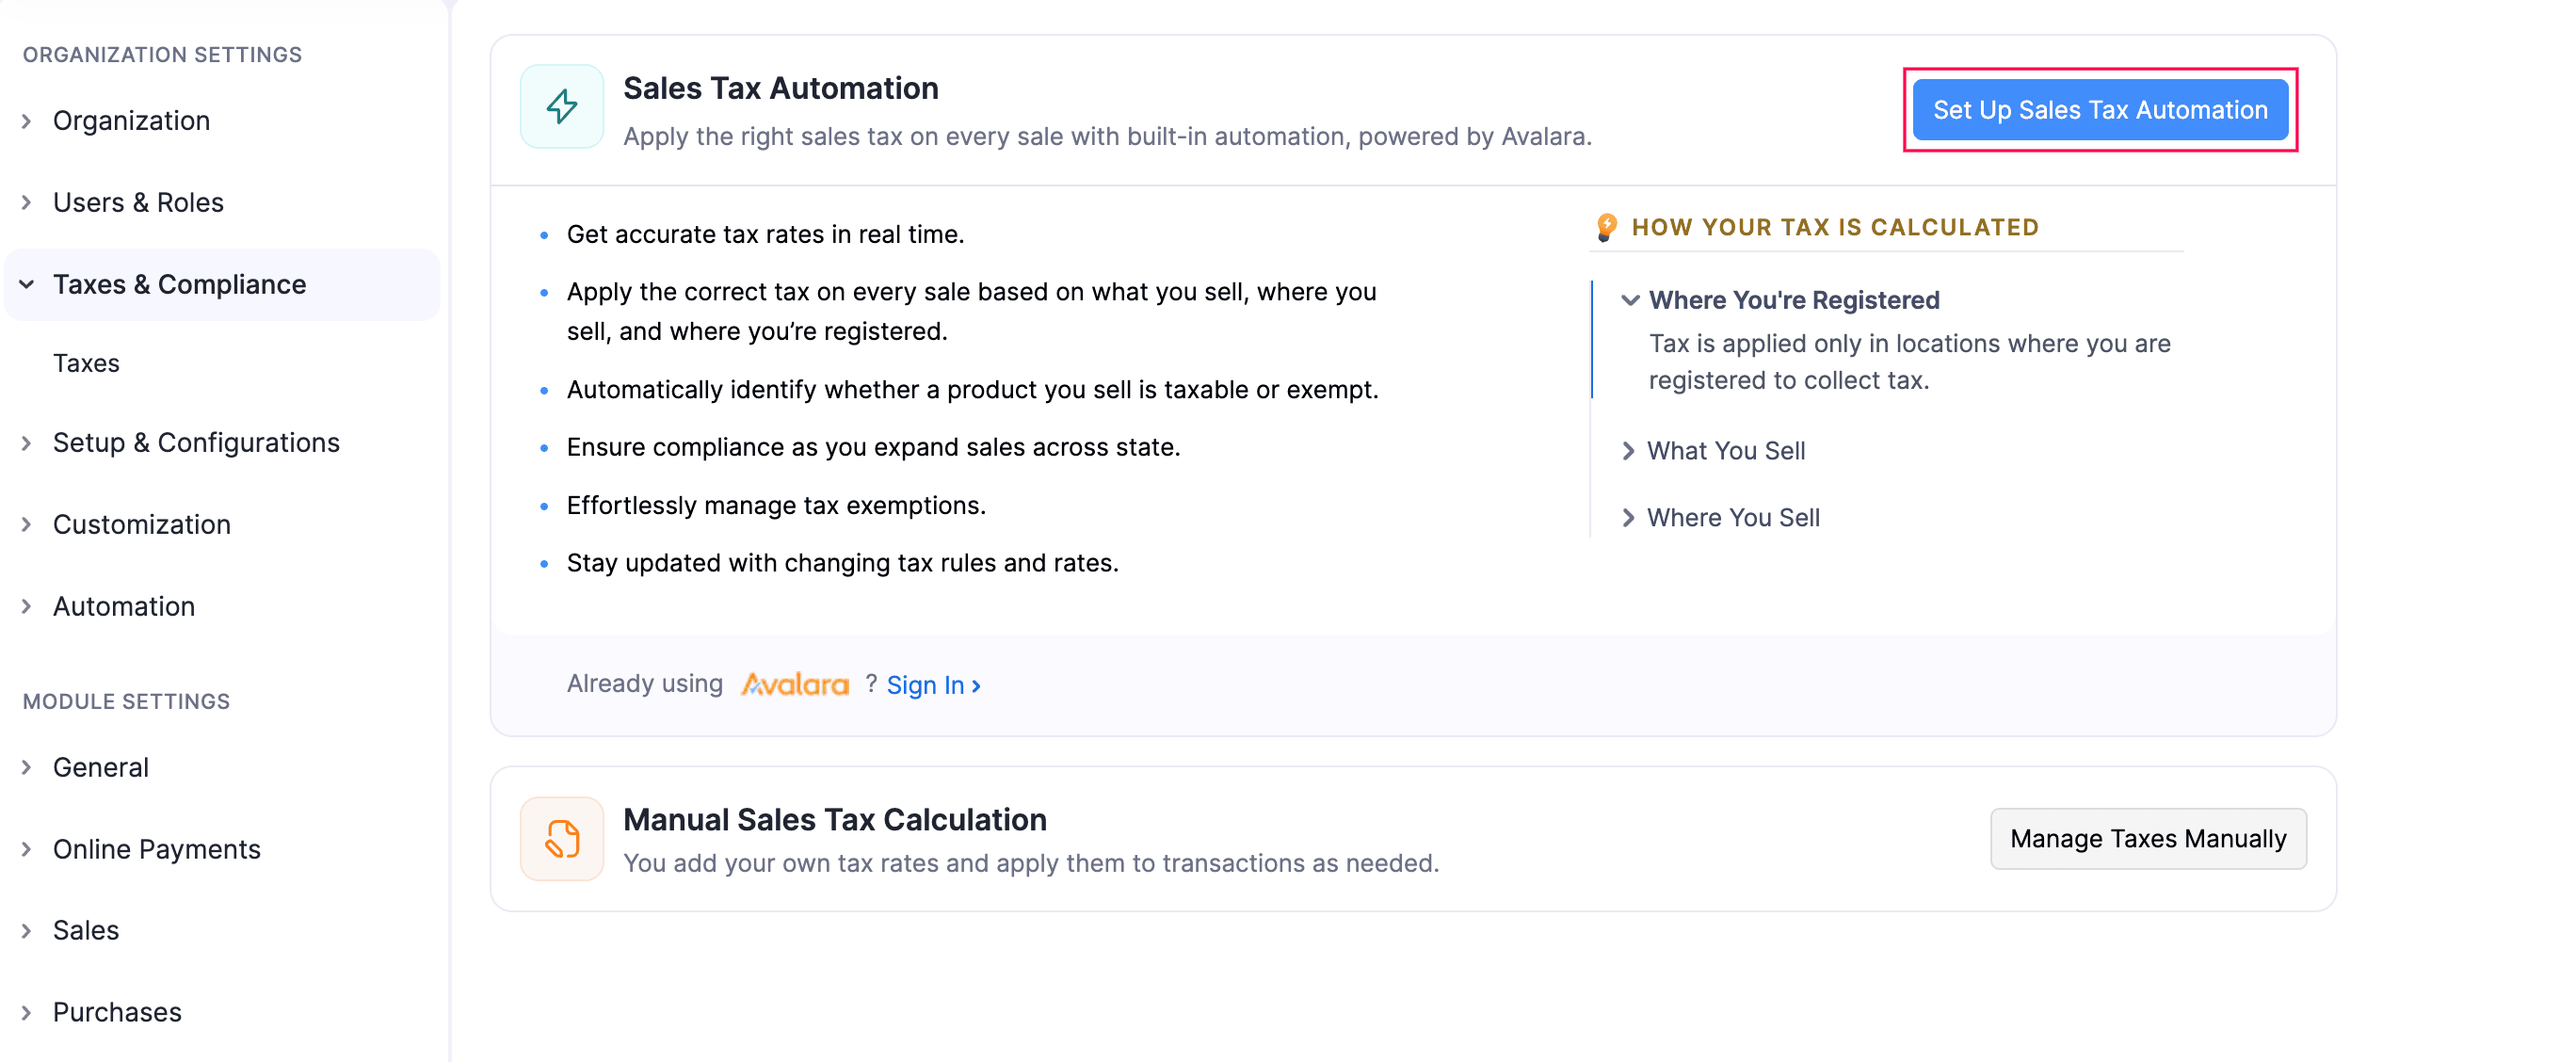
Choose the Right Sales Tax Approach
Choose how you want to handle sales tax for your transactions in Zoho Books. You can automate it or do it manually, based on your business requirements. To do this:
- Go to Settings.
- Select Taxes under Taxes & Compliance.
On the Taxes page, you can either set up Sales Tax Automation or calculate taxes manually.
Set Up Sales Tax Automation
If you want to automate tax calculation for every sale in Zoho Books instead of applying taxes manually, you can enable Sales Tax Automation. This works best if you sell in multiple jurisdictions where tax rates vary, offer goods or services with different tax treatments, want tax rates to update automatically when regulations change, or work with tax-exempt customers such as resellers, nonprofit organizations, or government entities. To enable Sales Tax Automation in Zoho Books:
- Go to Settings.
- Select Taxes under Taxes & Compliance.
- Click Set Up Sales Tax Automation.
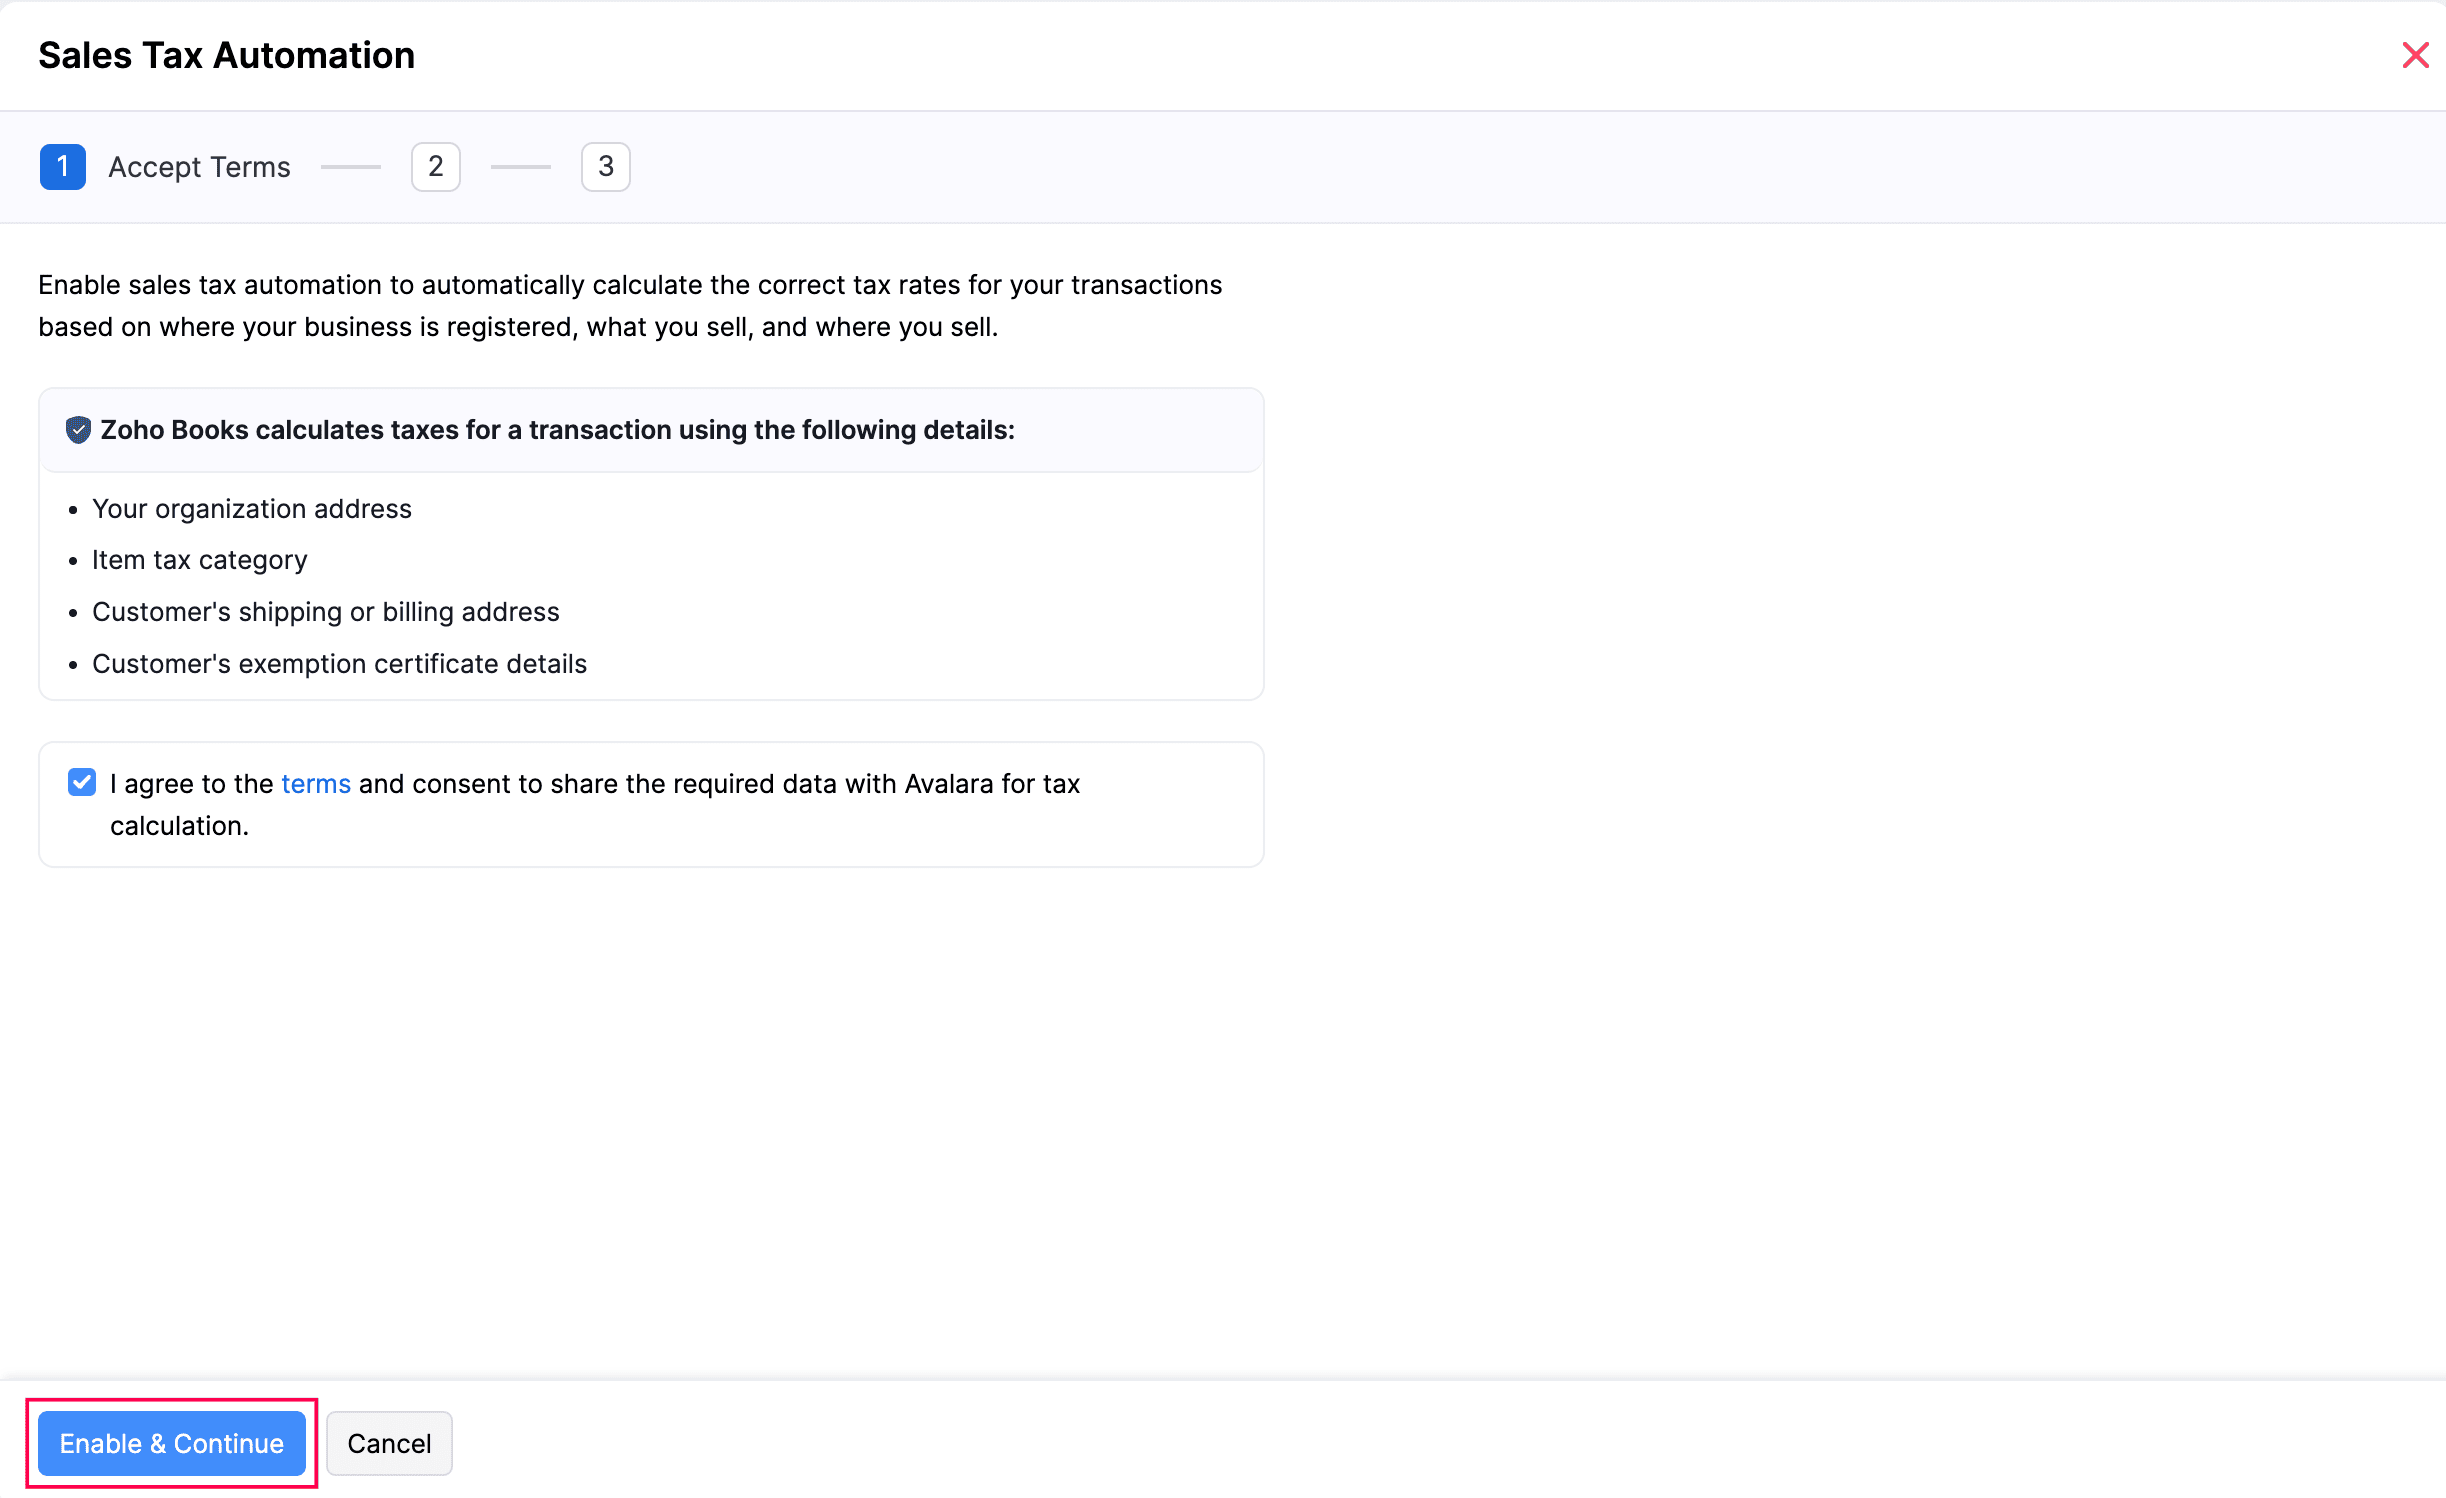
- In the next page, under Accept Terms, read the terms and check the option I agree to the terms and consent to share the required data with Avalara for tax calculation.
- Click Enable & Continue.
Sales Tax Automation will now be enabled in your Zoho Books organization.
- Under Verify Organization Address, check your Address. Ensure the details are correct, as Zoho Books uses your business address to determine the right sales tax. You can edit the fields directly.
- Once done, click Verify to validate the address for accurate tax calculation.
- If your organization address is invalid, edit the address and verify it again.
- Once verified, click Save & Continue.
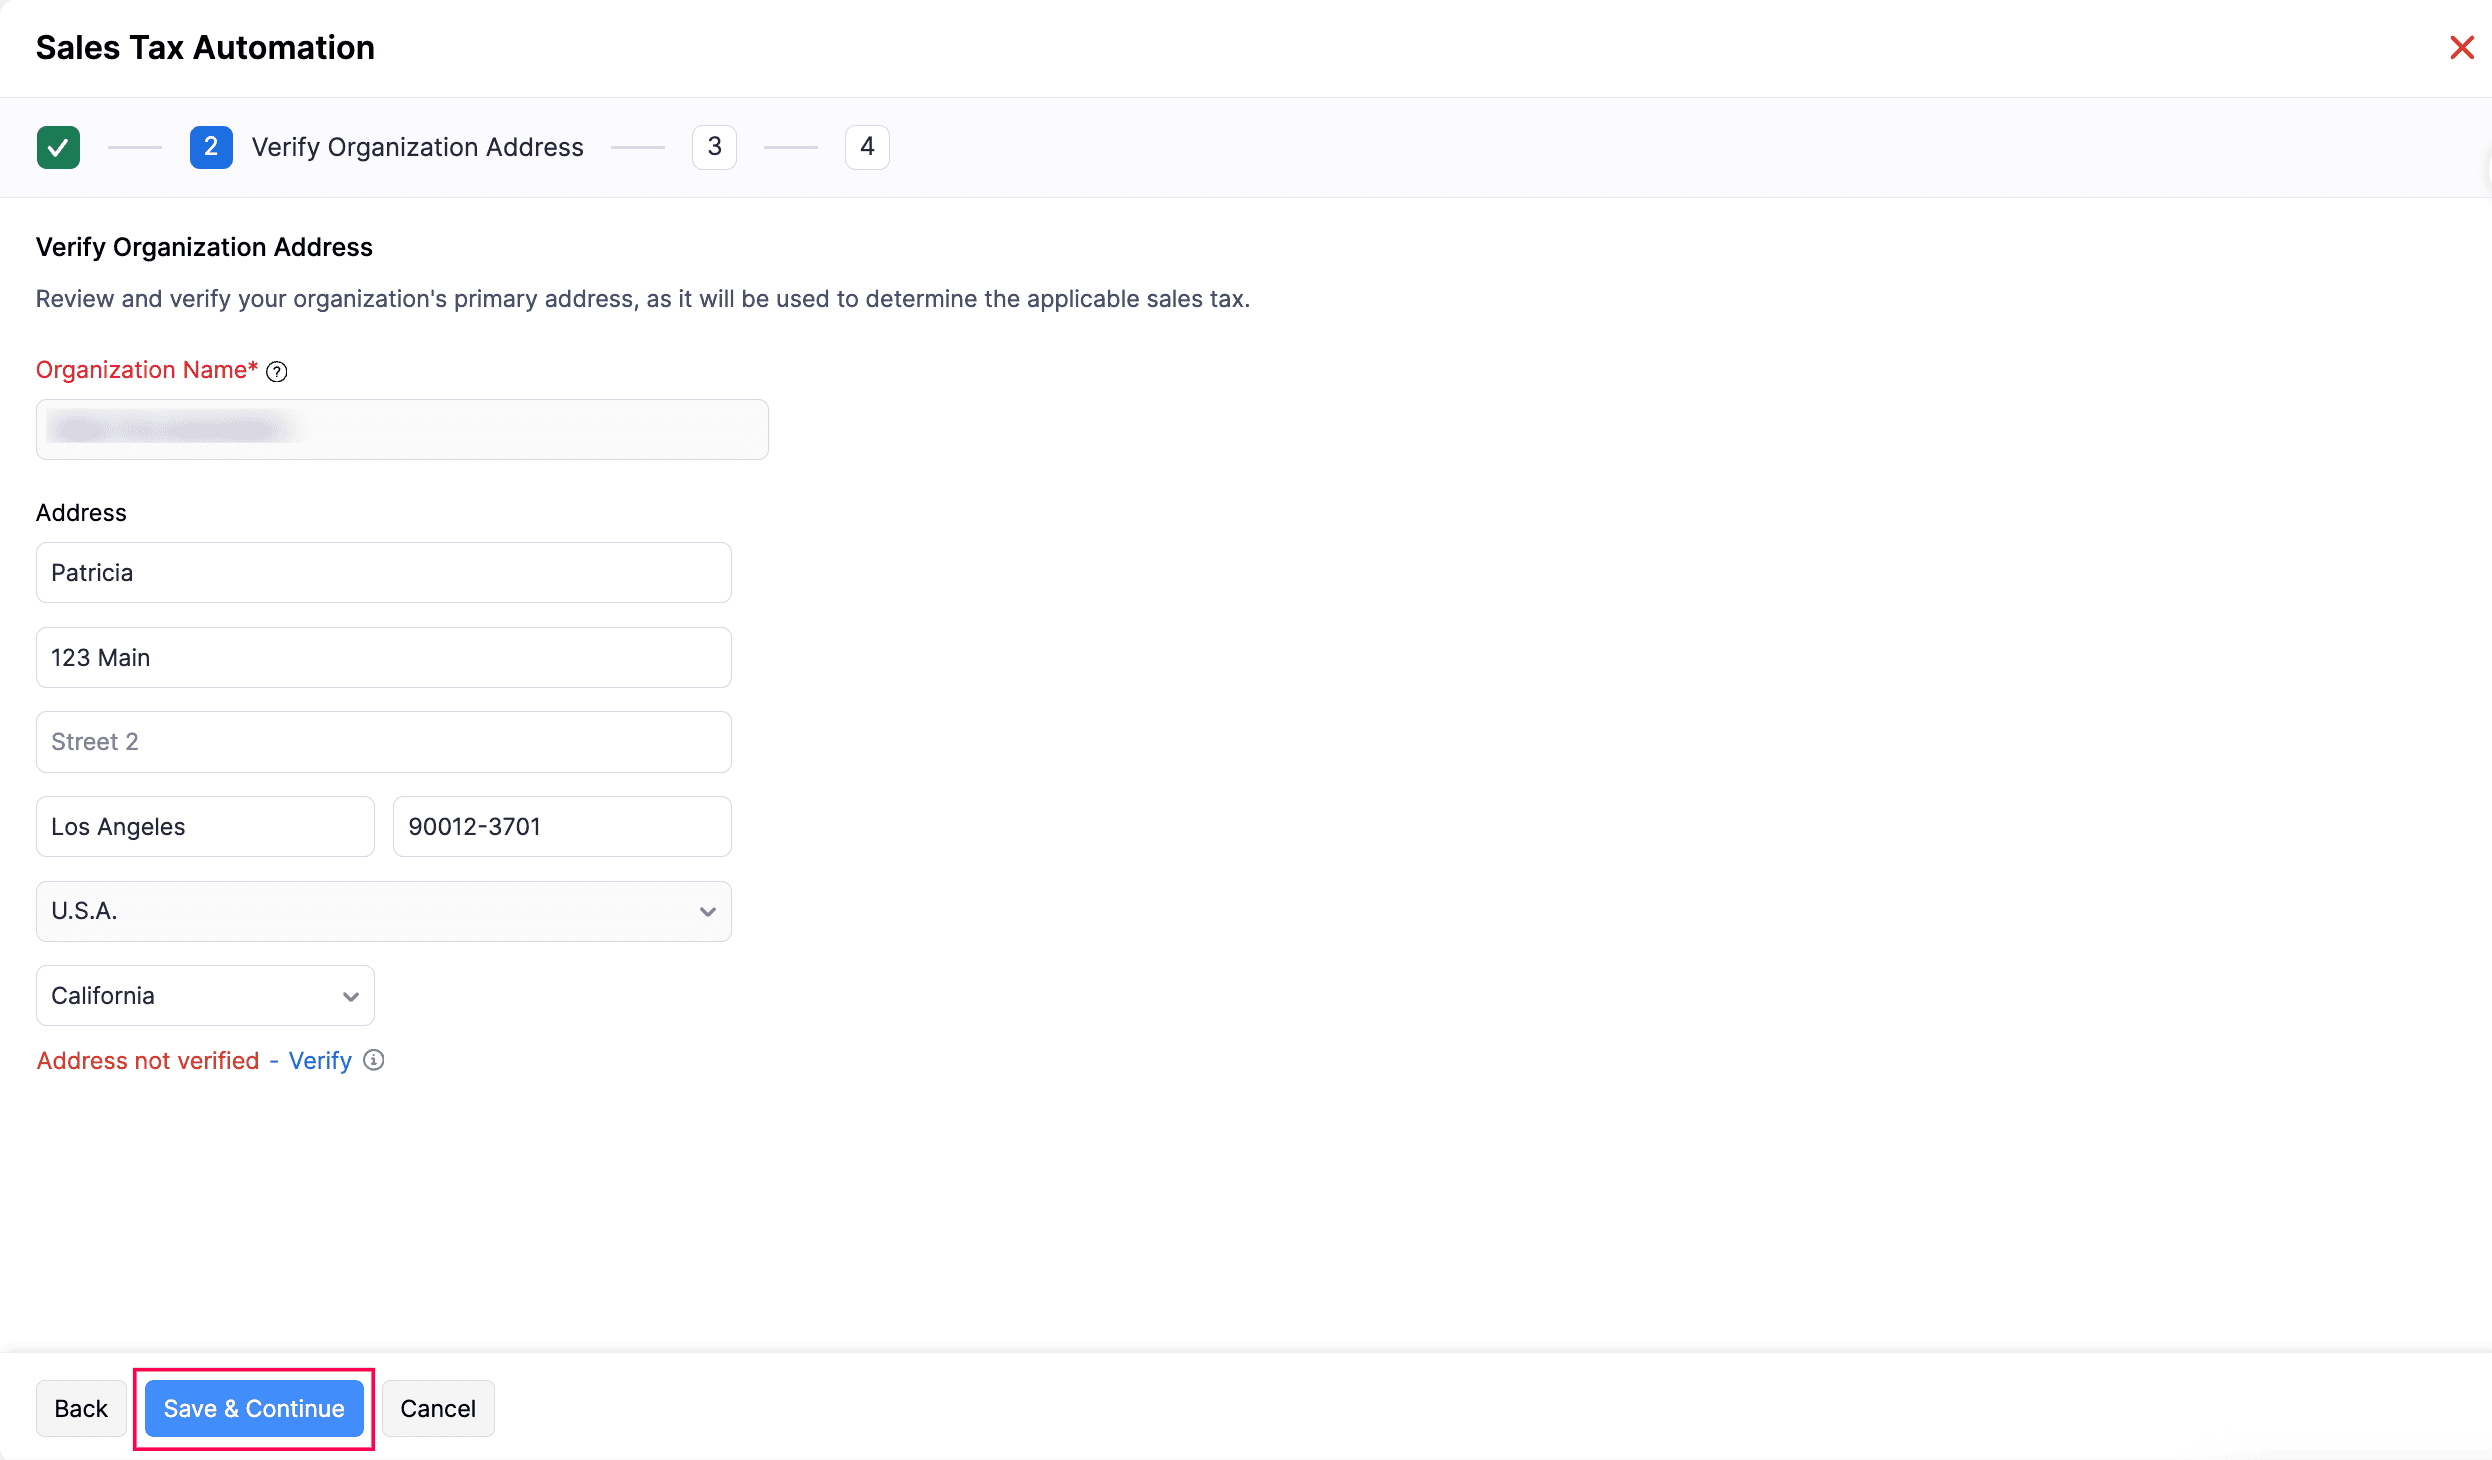
If you edit the address, choose whether you want to update it for new transactions or for all transactions in the Update Organization Address pop-up.
Under Tax Authority Mapping, map your Existing Tax Authorities to System-Recognized Tax Authorities and select their State. Each existing authority can be mapped to only one system-recognized authority. If a system-recognized authority is already mapped, select the appropriate state to group it correctly. Once mapped, the existing tax authorities will be updated and used for new transactions, while unmapped authorities will no longer be used after tax automation is enabled.
- Once you have completed the mapping, click Save & Continue.
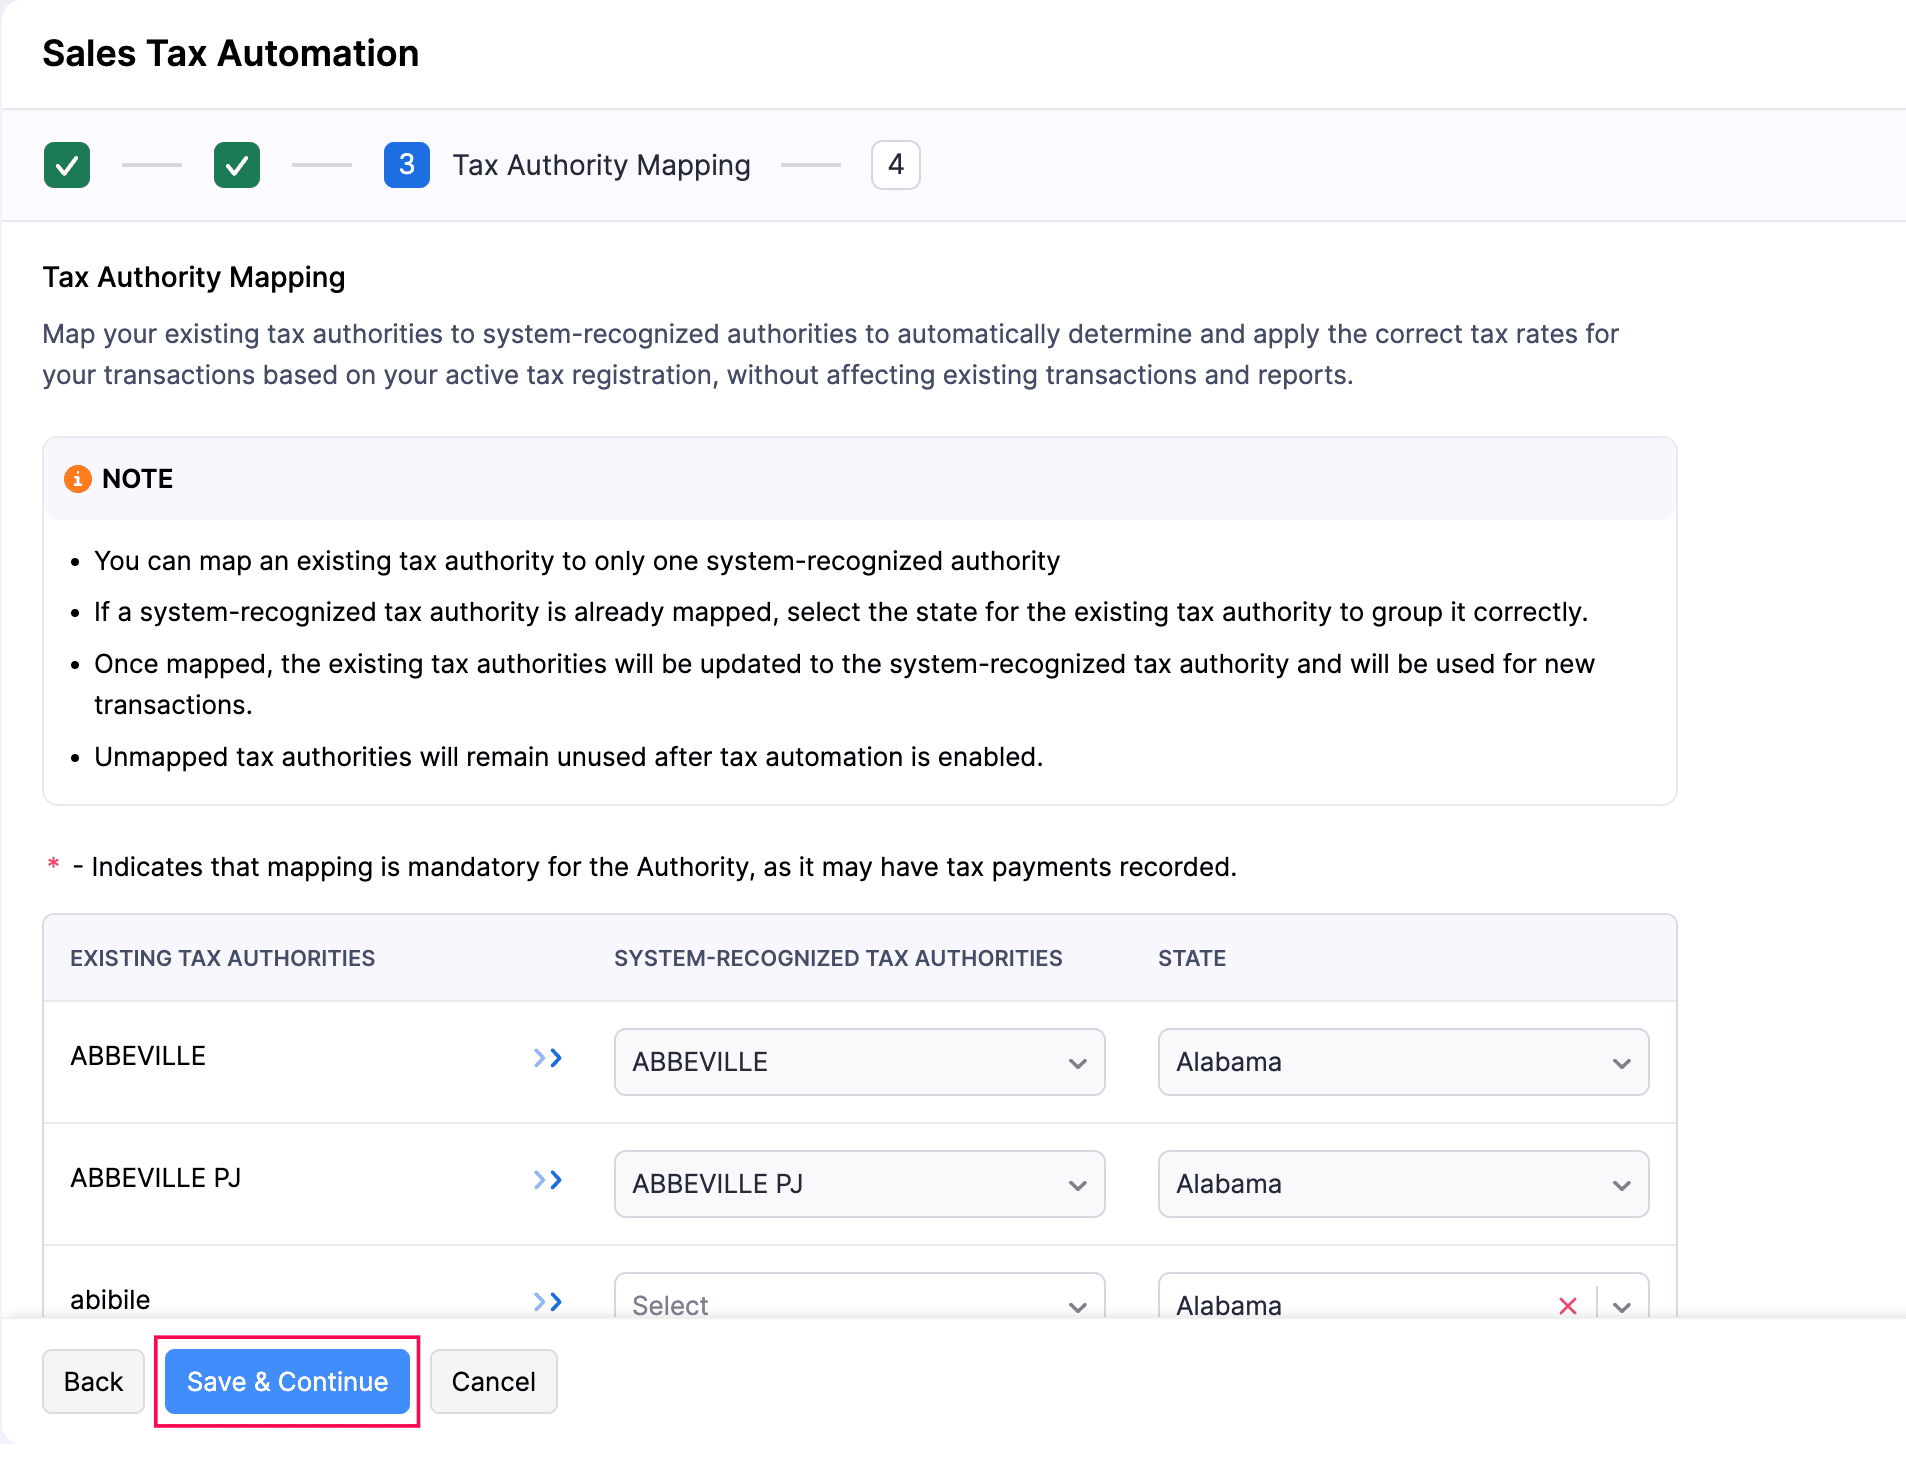
- Click Confirm in the confirmation pop-up that appears.
Note: Ensure you map the mandatory tax authorities, as they may have tax payments recorded.
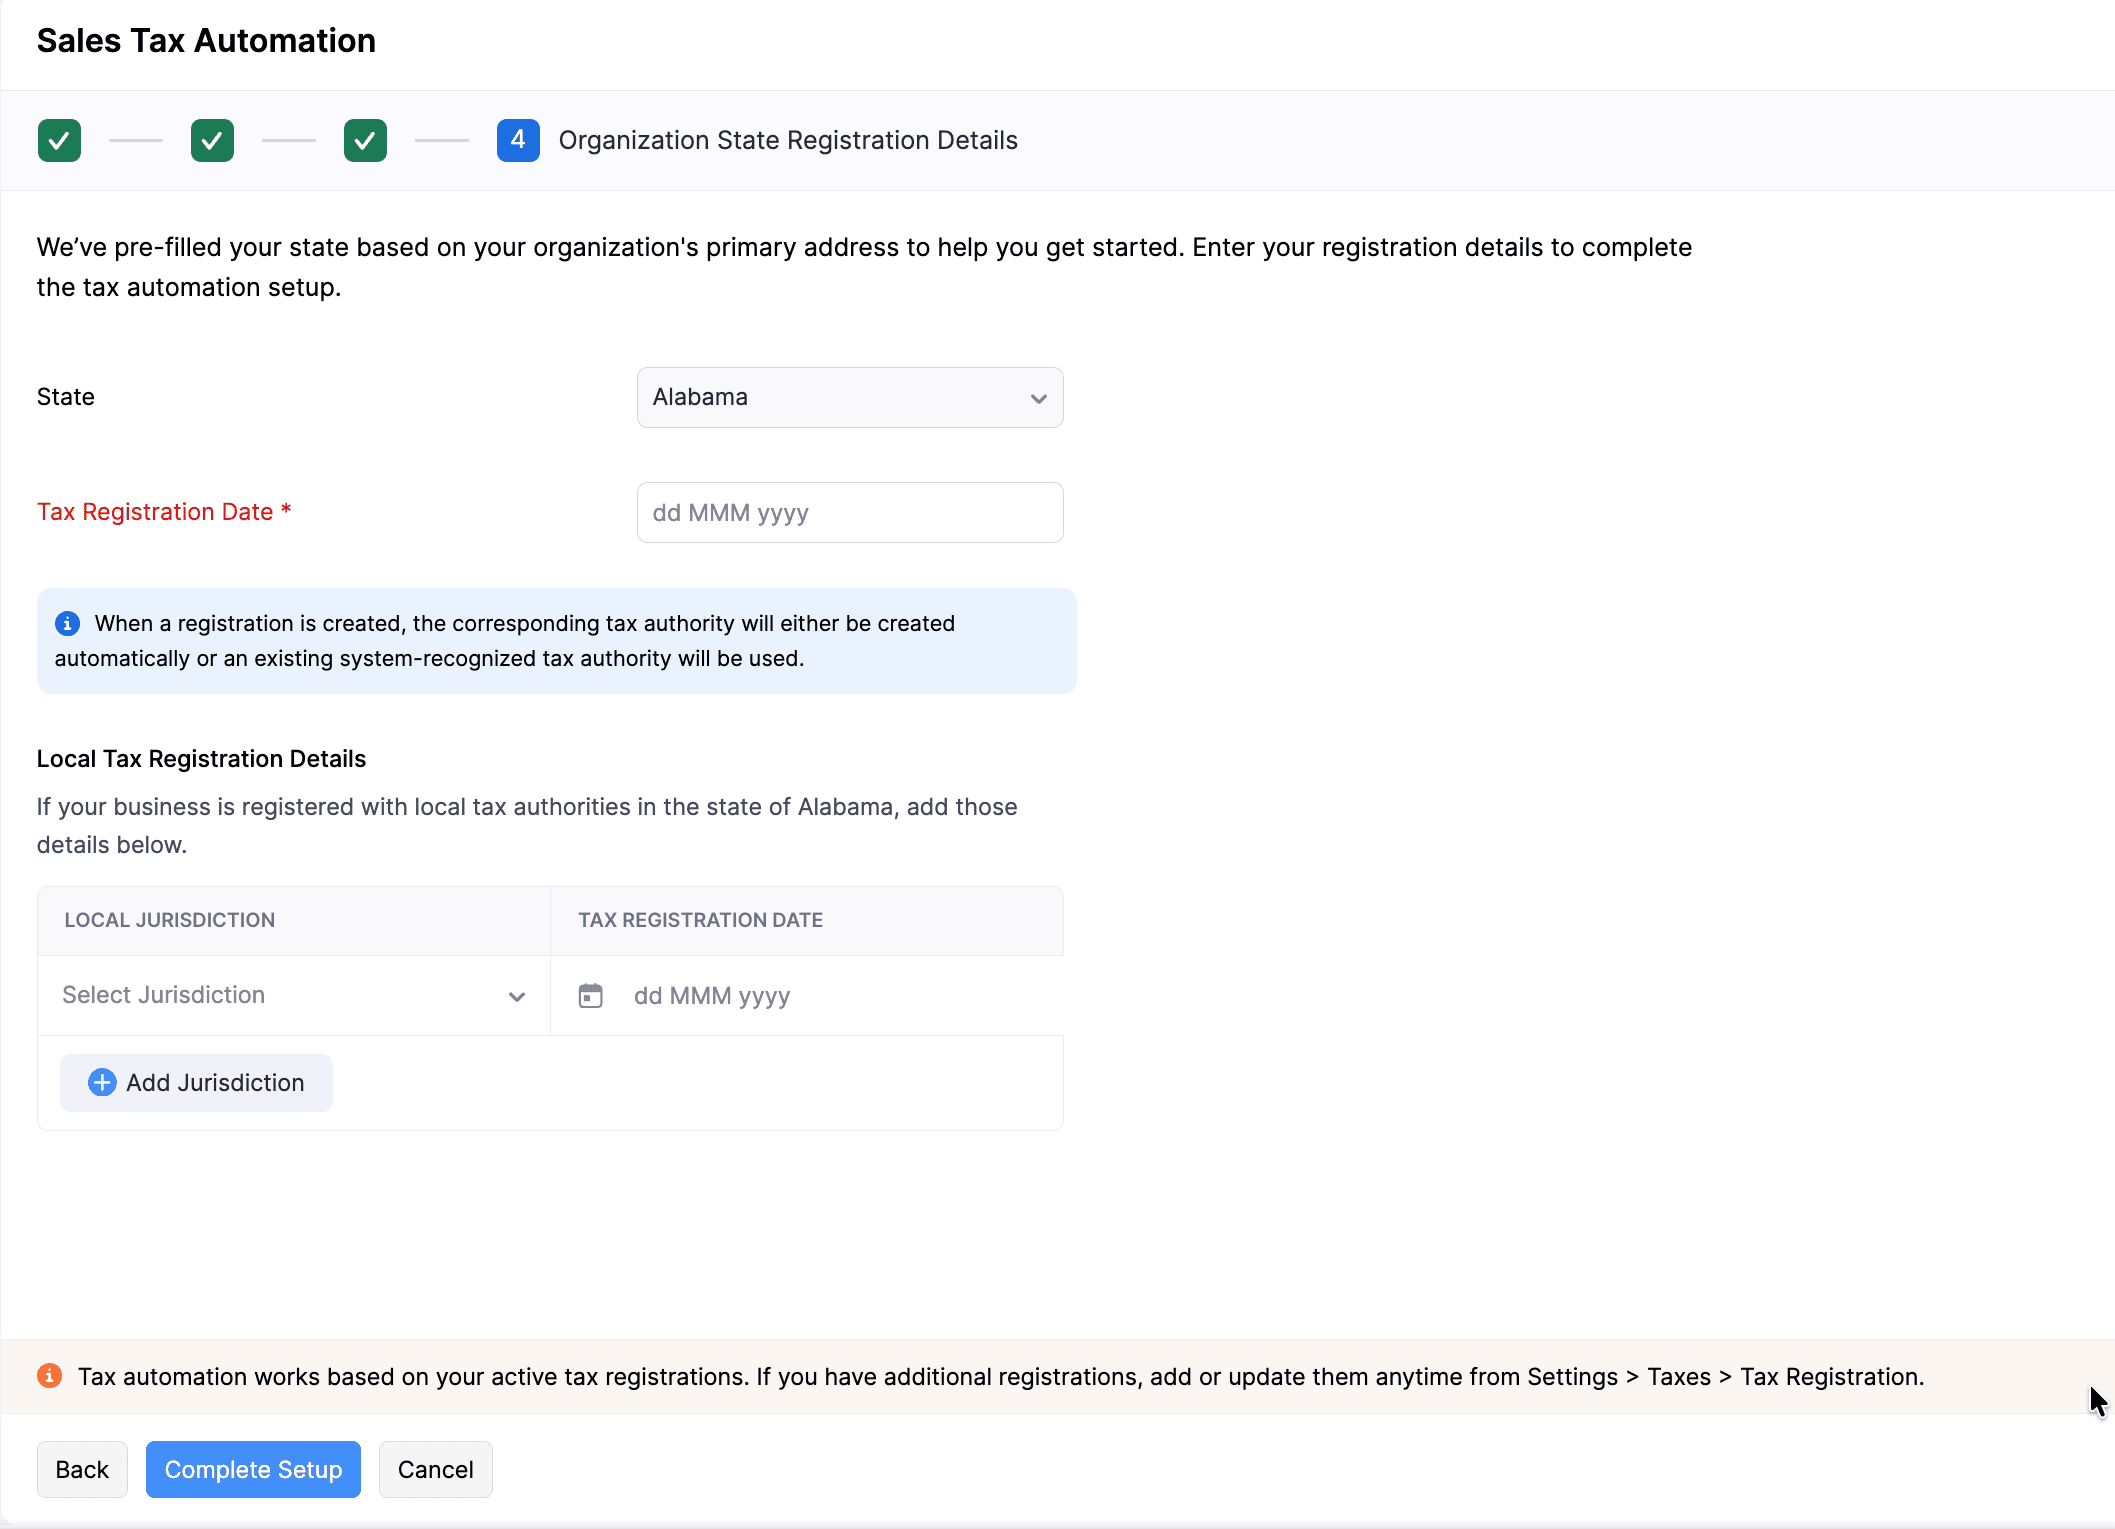
Under Organization State Registration Details, enter your business’s tax registration details. This lets Zoho Books apply sales tax for your transactions based on your tax registrations in the relevant states.
- State: The state where your business operates is auto-populated based on your organization address from the previous step.
- Tax Registration Date: Select the date on which your business is registered to collect sales tax in that state.
- Local Tax Registration Details: Apart from the state-level tax, if your business is also registered for taxes at the city, county, or other jurisdiction levels, including special taxes, include them for accurate tax calculation. To do this, click + Add Jurisdiction, select the required jurisdictions, and select the Tax Registration Date for each. You can also add this later by editing your tax registration details.
Click Complete Setup.
Sales Tax Automation will be set up for your organization.
Configure Address Preferences
When Sales Tax Automation is enabled in Zoho Books, it calculates sales tax using the customer’s billing address by default. You can change this to use the shipping address instead. Here’s how:
- Go to Settings.
- Select Taxes under Taxes & Compliance.
- Navigate to Tax Automation Settings under the Taxes pane.
- In the Tax Automation Settings page, click the Edit icon under Address Preference.
- In the Address Preference pop-up, choose either Use Billing Address or Use Shipping Address based on your preference.
- Click Save.
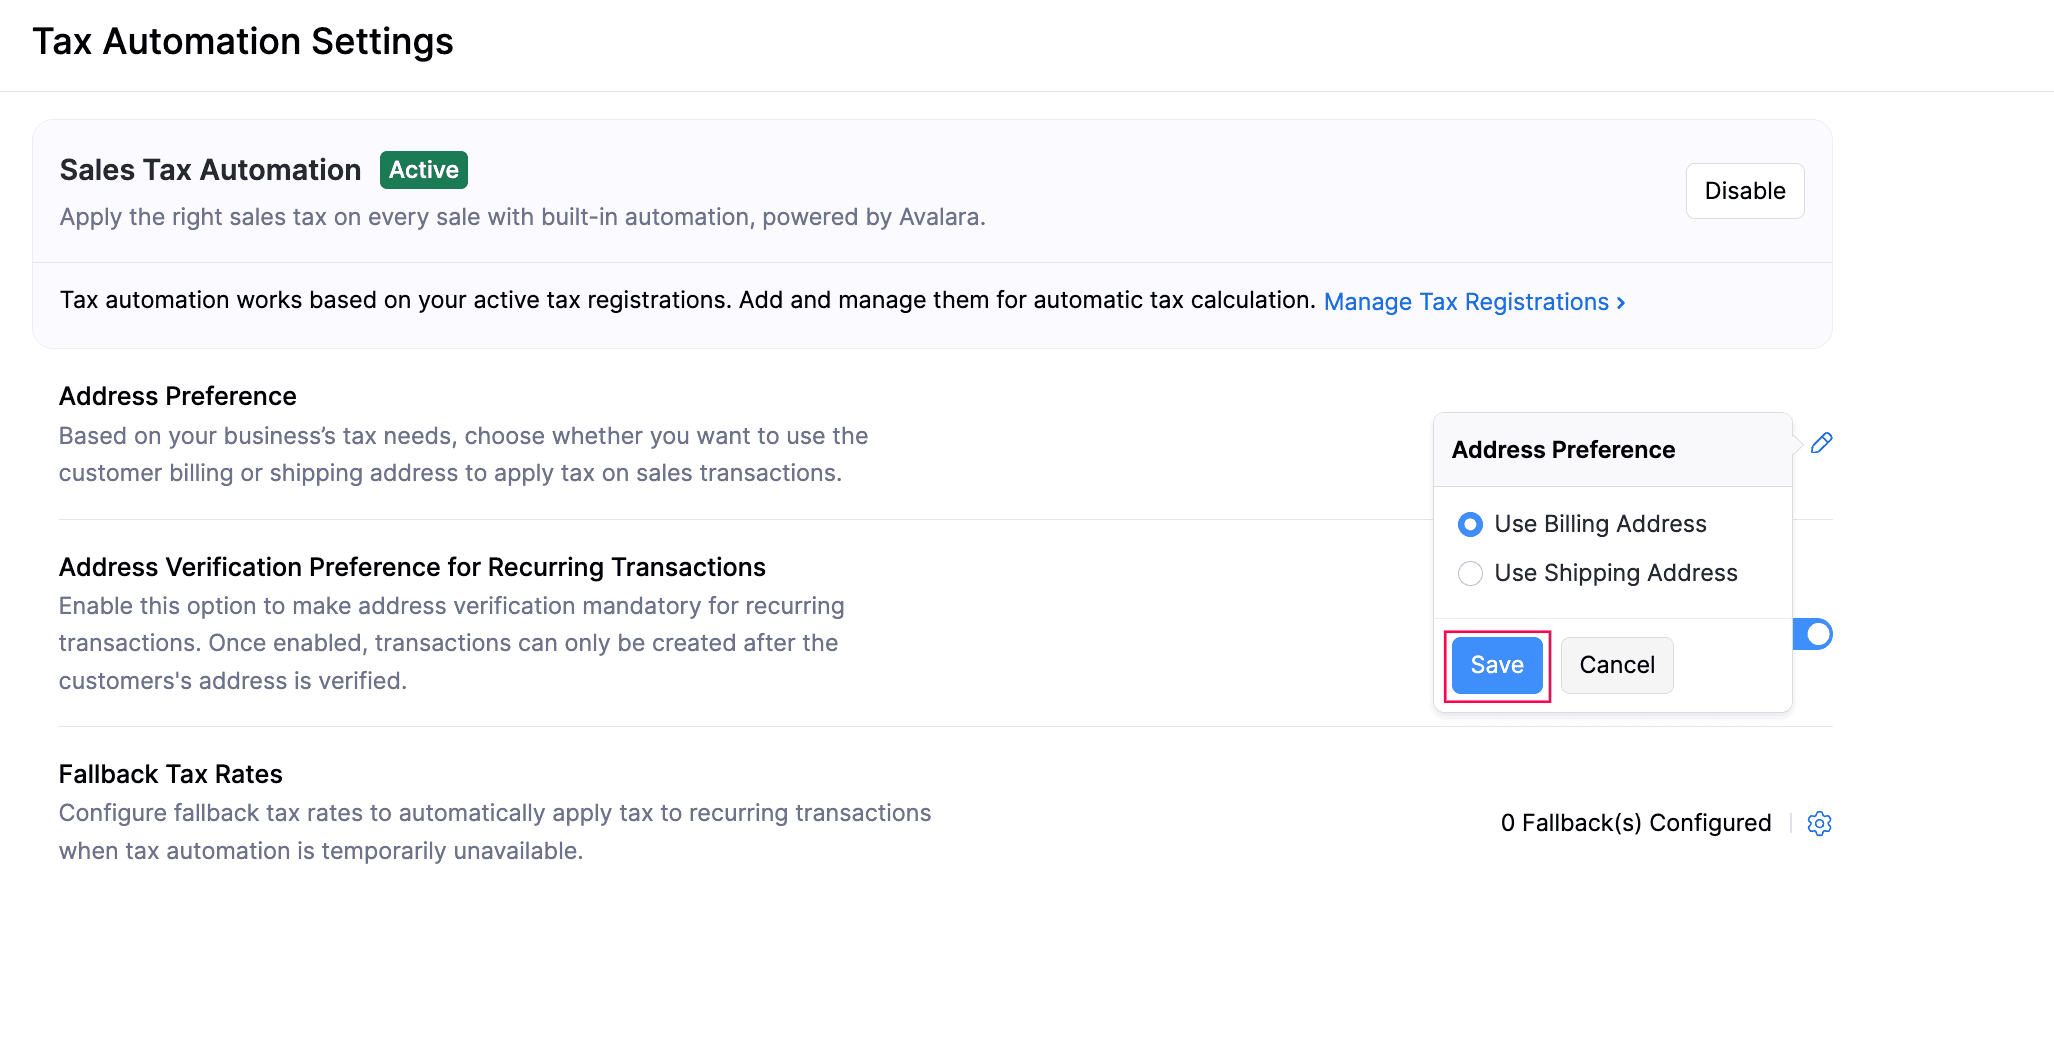
The address preference will now be applied automatically when calculating sales tax for all new transactions.
Configure Address Preferences for Recurring Transactions
Address verification for recurring transactions is optional by default, but you can make it mandatory to ensure accurate tax calculations. When enabled, recurring transactions can be created only after the customer’s address is verified, as the address determines the applicable tax. If the address needs to be updated, the user may require permission to edit the customer’s address. To configure address preference for recurring invoices:
- Go to Settings.
- Select Taxes under Taxes & Compliance.
- Navigate to Tax Automation Settings in the Taxes pane.
- On the Tax Automation Settings page, slide the toggle next to Address Verification Preference for Recurring Transactions.
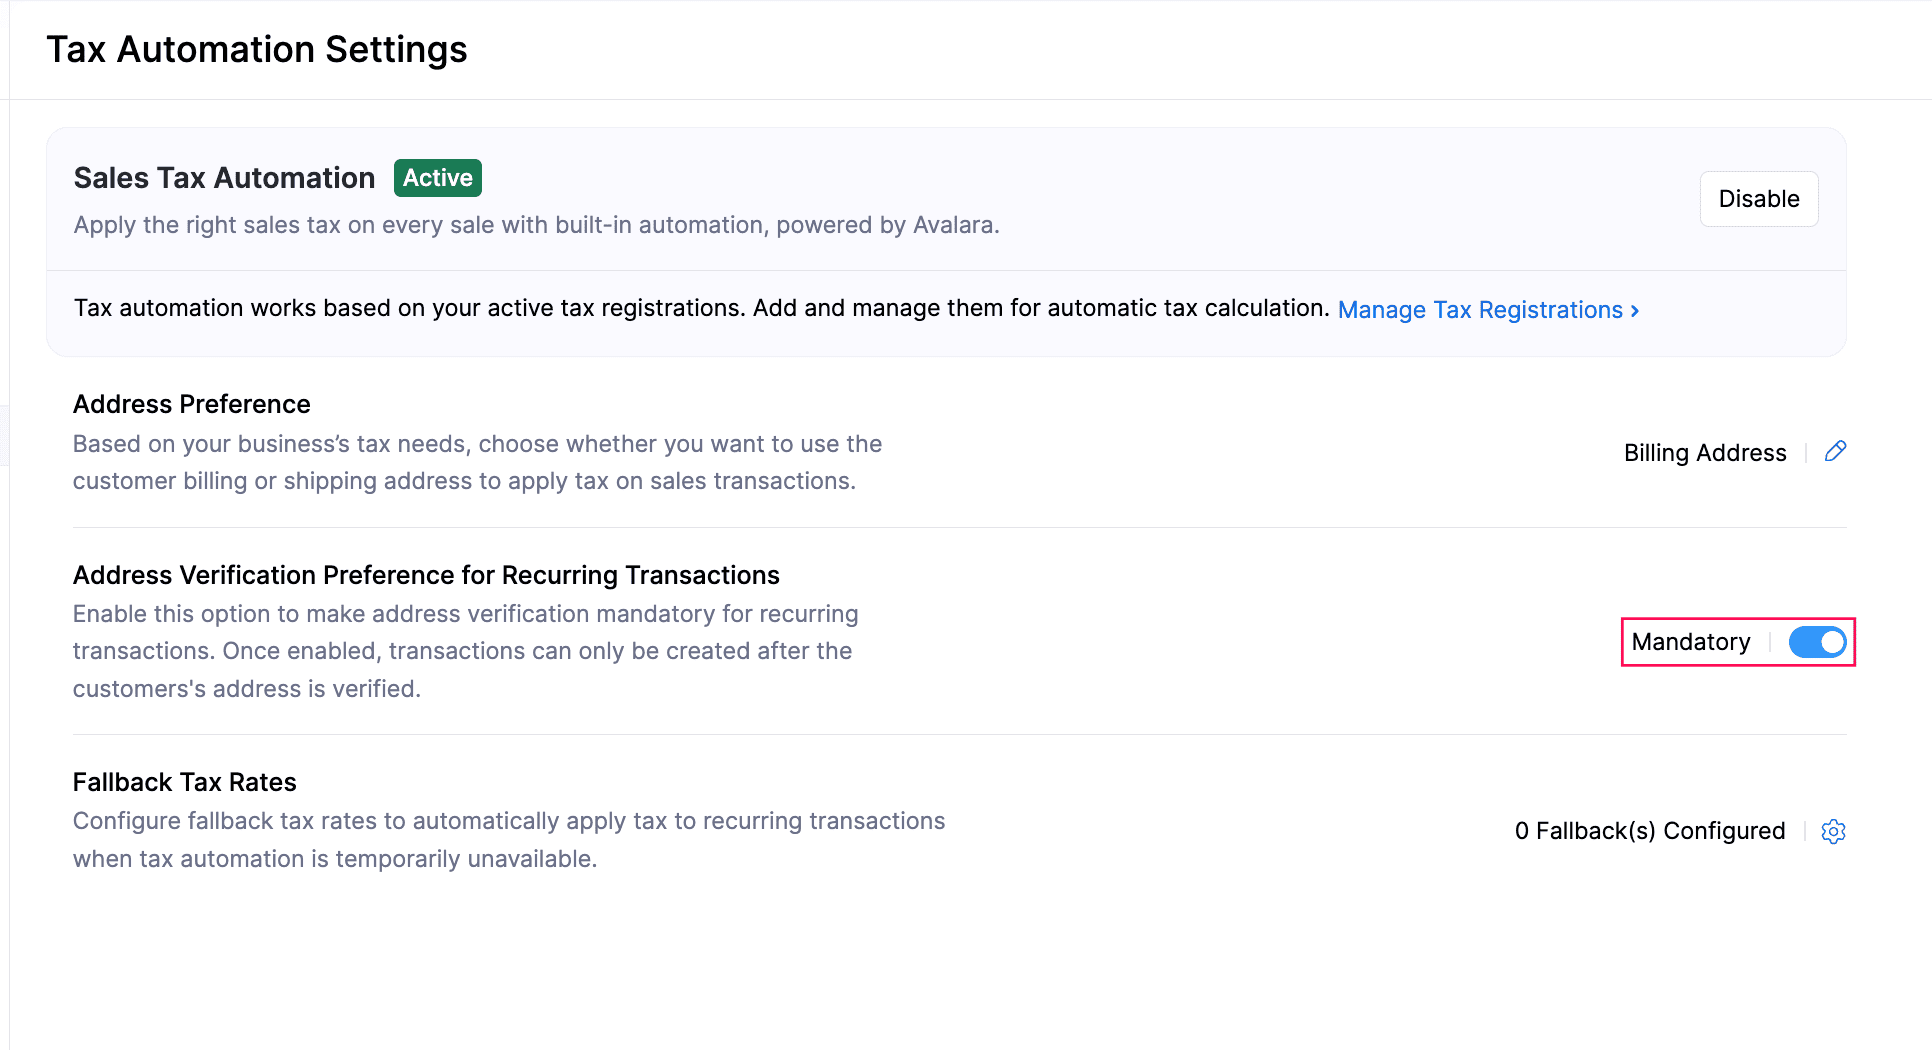
The address preference will now be applied automatically to recurring invoices when calculating sales tax.
Configure Fallback Tax Rates
You can configure fallback tax rates to ensure taxes are applied to transactions generated from recurring profiles when tax automation is unavailable, especially for states where you have tax registrations. To configure:
- Go to Settings.
- Select Taxes under Taxes & Compliance.
- Navigate to Tax Automation Settings in the Taxes pane.
- In the Tax Automation Settings page, click the Gear icon next to Fallback Tax Rates.
- In the Manage Fallback page, select the State and Tax Name for which you want to create a fallback tax rate.
- Click + Add Fallback Rate to add another state’s fallback rate.
- To remove a fallback rate, click the Delete icon next to it.
- Click Save.
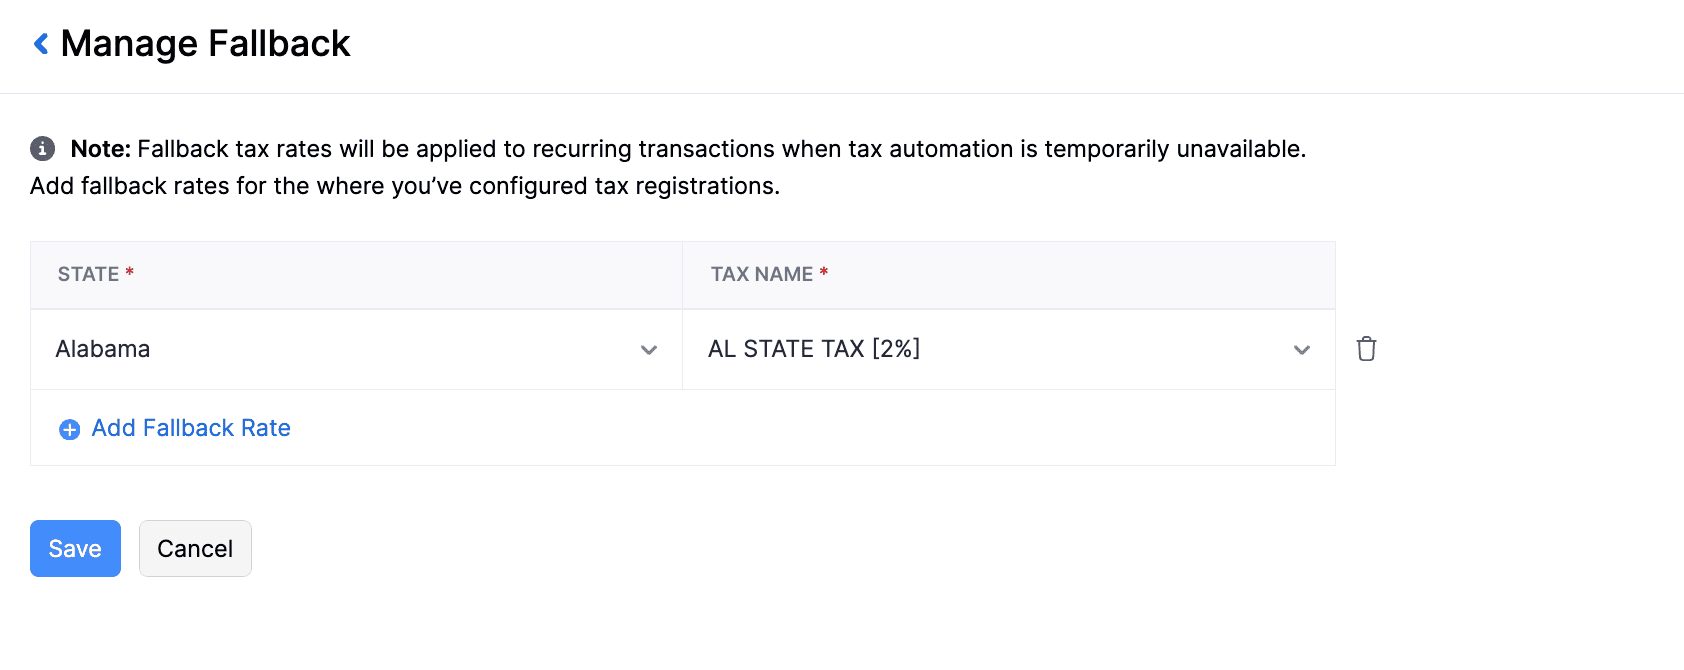
Once configured, the fallback tax rates will be automatically applied to recurring transactions when tax automation is unavailable.
Configure Exemption Certificates
An exemption certificate is a document provided by a customer to show that they are not required to pay sales tax on certain purchases. Customers such as resellers, non-profit organizations, or government agencies may qualify for this exemption under tax regulations. You can configure exemption certificates for customers so that eligible transactions can apply tax exemption based on jurisdiction rules.
To configure exemption certificates for a customer:
- Go to Sales on the left sidebar and select Customers.
- Select the customer for whom you want to configure the exemption certificate.
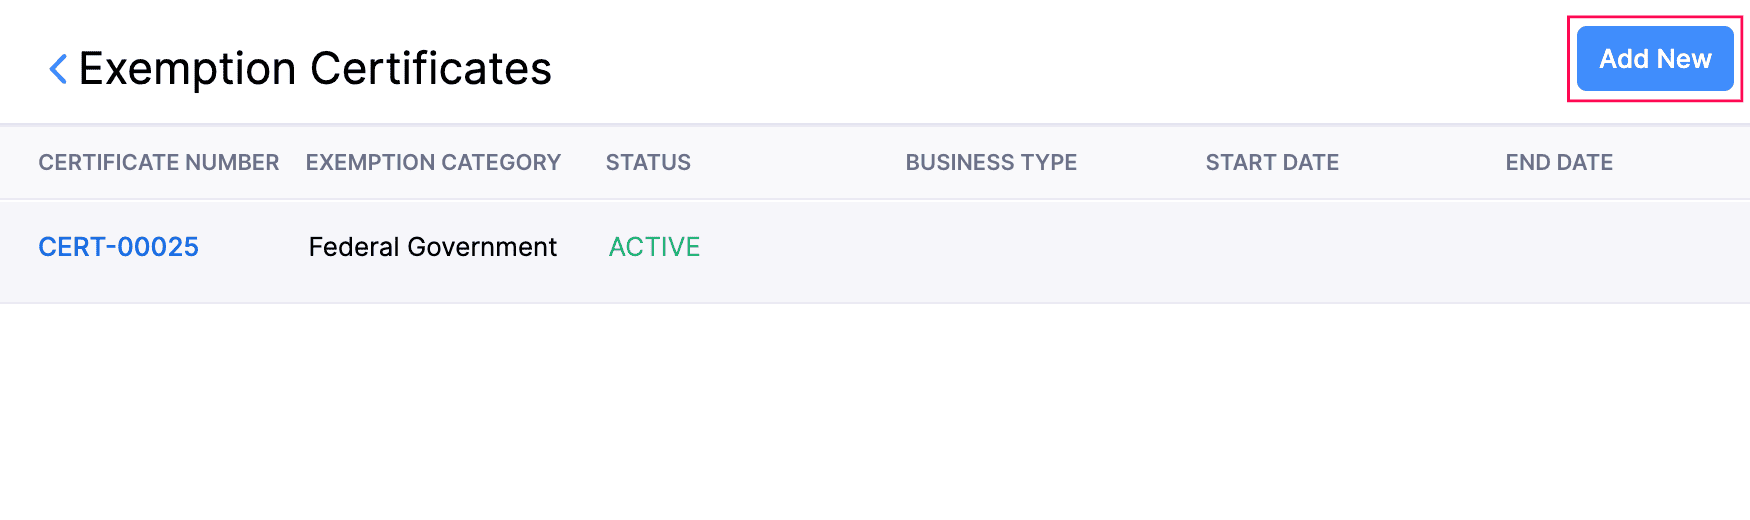
- On the customer’s details page, click the More icon and select Exemption Certificates.
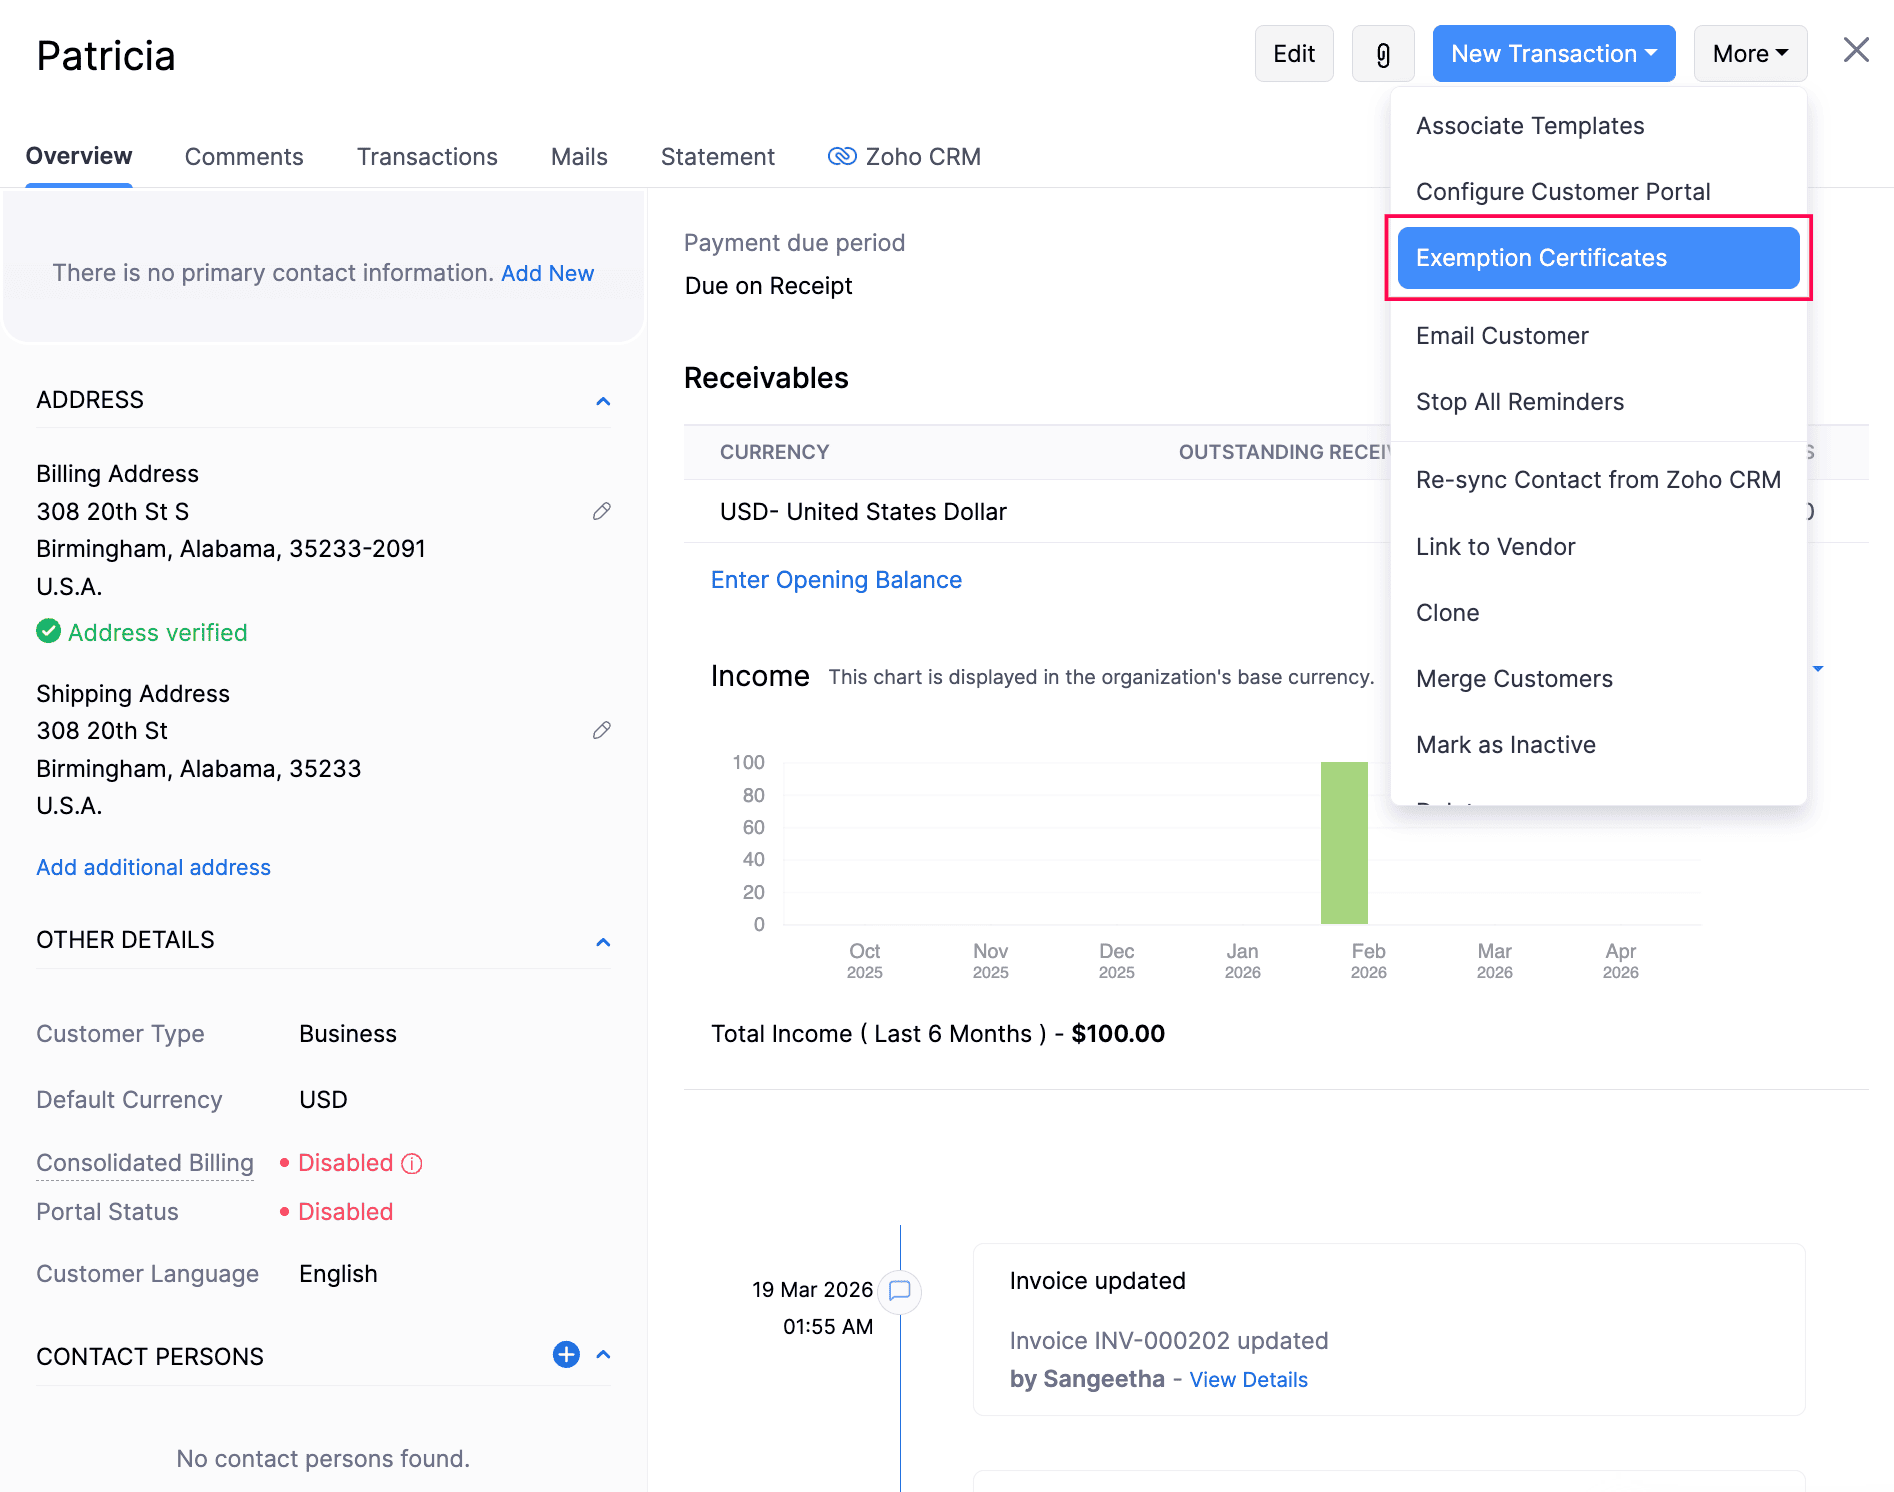
- Click Add New in the top-right corner.
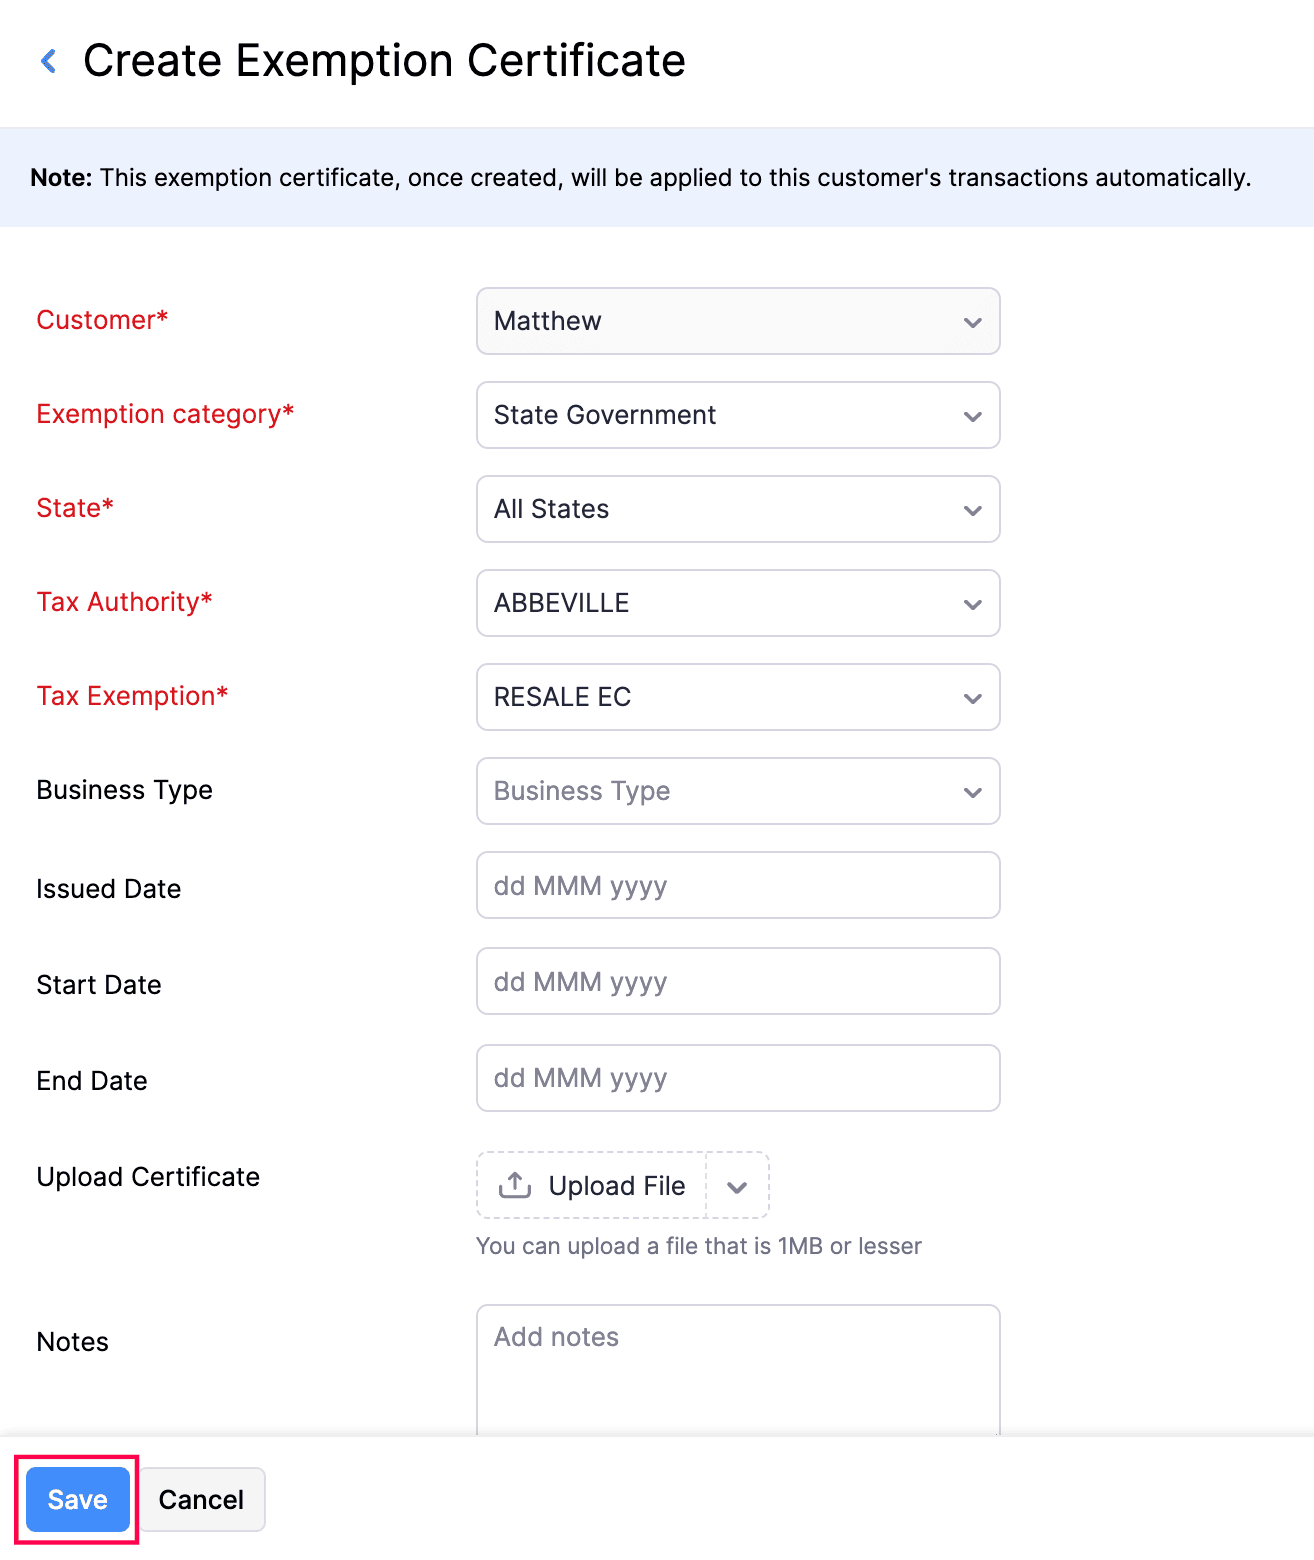
In the Create Exemption Certificate page, the Customer will be selected automatically. Fill in the following fields:
- Exemption Category: The reason the customer is exempt from tax.
- State: The state where the exemption certificate was issued.
- Tax Authority: The tax authority that issued this certificate.
- Tax Exemption: The specific tax exemption applicable to this customer.
Enter the other necessary details and click Save.
Once the certificate is saved, it will be validated and applied to transactions based on the jurisdiction rules.
Note: Tax may still be applied if the item’s Tax Category is not eligible for the exemption according to the jurisdiction rules.
Automate Sales Tax Calculation
Create Items
When you create an item, the Tax Category field lets you categorize goods and services that you sell. When you include an item in a transaction, the tax category associated with it determines the right sales tax based on your customer’s billing or shipping address and your tax registrations.
To add a tax category for an item:
- Go to Items on the left sidebar and select Items.
- Click + New in the top right corner.
- In the New Item page, enter the required details.
- Click the Search icon next to the Tax Category field.

- In the Search Tax Category pop-up, search and select the appropriate tax category based on the item type.
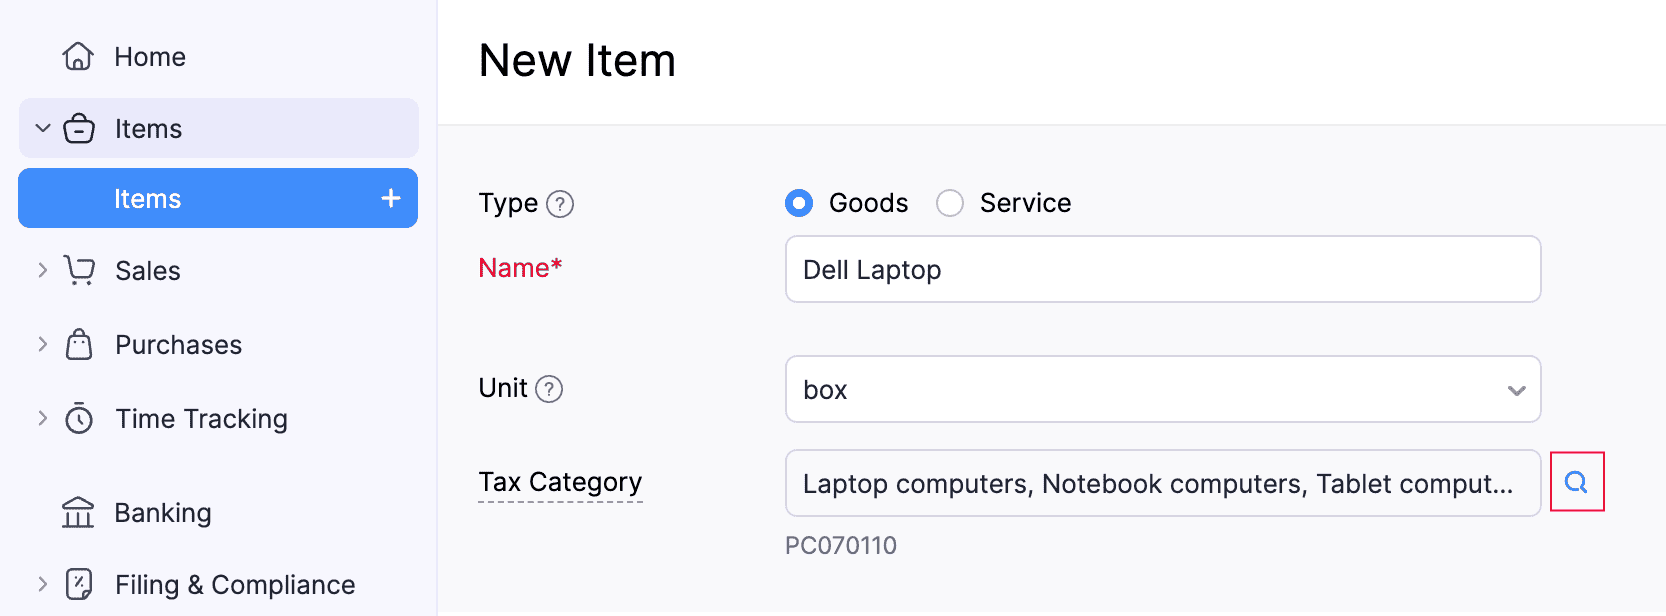
- Enter the other necessary details and click Save.
The item will be created, along with the tax category.
Record Transactions
When you create a sales transaction in Zoho Books, the sales tax is automatically calculated based on your business’s tax registration in the respective state, the customer’s billing or shipping address, and the tax category of the line items. Here’s how:
- Go to Sales on the left sidebar and select the transaction you want to create (for example, Invoices).
- Click + New in the top right corner.
- In the New Invoice page, select the required customer. Their billing or shipping address will be displayed. If you haven’t verified the address while creating the customer, click Verify Address.
- If the address is invalid, click the Edit icon and update the billing address. Once done, Verify Again.
- In the Tax Mode field, select whether you want to automate tax calculation or handle it manually.
- In the Item Table, select the items to include in the transaction. If a line item already has a tax category and Automated is selected in the Tax Mode field, the tax will be calculated automatically.
- If the selected item does not have a tax category, add one. You can also update the tax category of the line item, if required.
- Enter the other required details.
- Click Save and Send or Save as Draft and send it to your customer later.
The transaction will be created.
View Tax Calculation Details
When you create a transaction, sales tax is automatically calculated based on your business’s tax registration, the customer’s billing or shipping address, the tax category of each item, and whether the item is taxable. This ensures accurate tax calculation on every transaction.
To view this information:
- Go to Sales on the left sidebar to create a transaction (for example, Invoices).
- Click + New in the top right corner.
- In the New Invoice page, fill in the required details.
- In the Total section, click Tax Calculation Details.
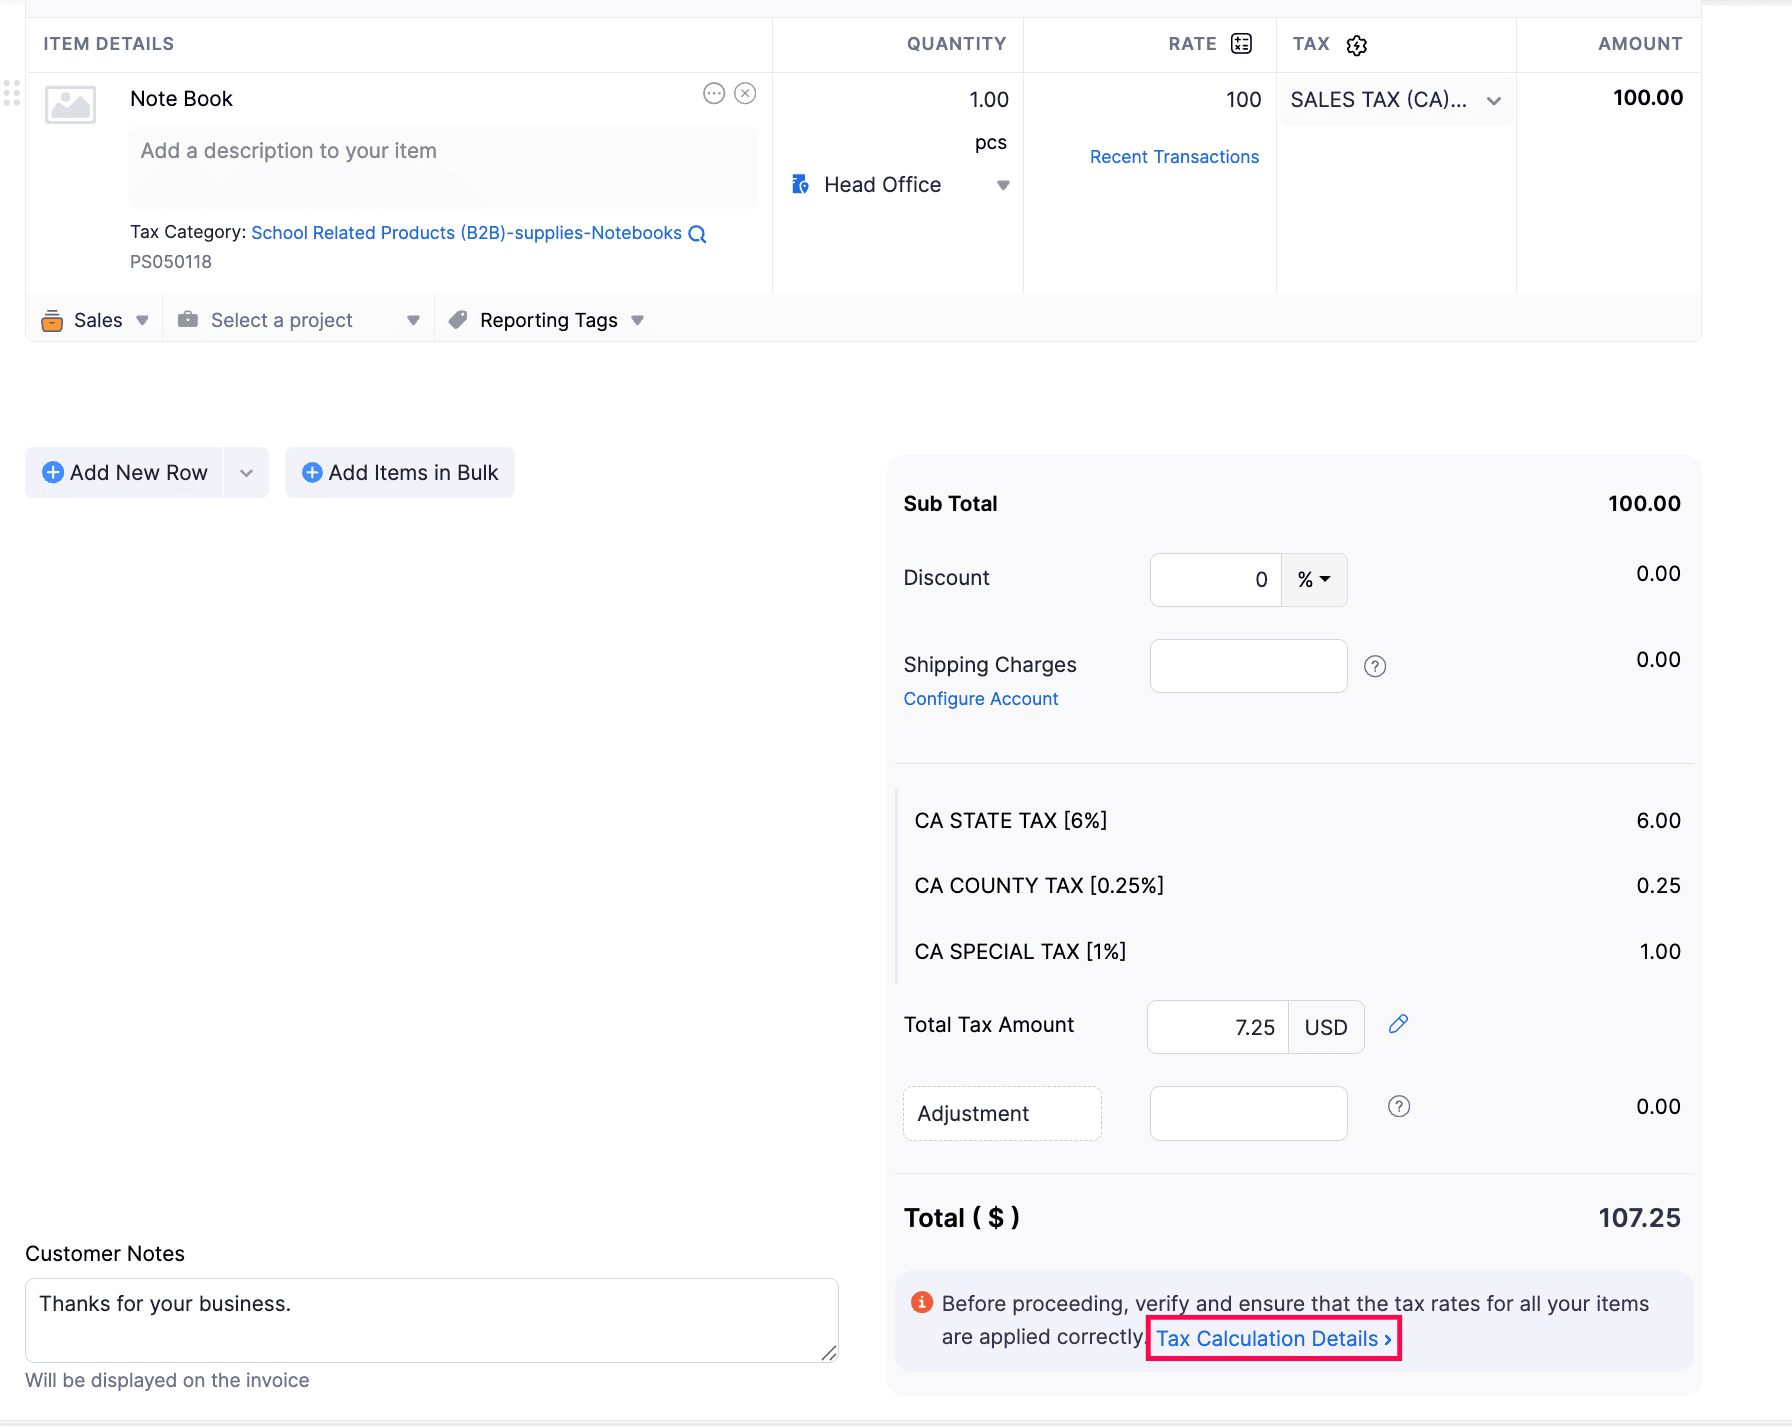
In the right pane that appears, you can view how taxes are calculated for the respective transaction.
Manage Tax Registrations
Add Tax Registration Details
Once sales tax is set up, taxes are applied automatically based on your active registrations. You can add any additional registrations as needed, and a tax authority will be created or an existing one will be used accordingly. To add tax registration details:
- Go to Settings.
- Select Taxes under Taxes & Compliance.
- In the Taxes pane, click Tax Registration.
- Click + New Tax Registration in the top right corner.
- In the New Tax Registration Settings pop-up, fill in the following fields:
- State: Select the state where you’re registered to collect sales tax.
- Tax Registration Date: Select the date on which your business is registered to collect sales tax in that state. Sales tax will be applied to transactions created on or after this date.
- Local Tax Registration Details: If your business is registered for taxes at the city, county, or other jurisdiction levels, including special taxes, include them for accurate tax calculations.
- Click Save.
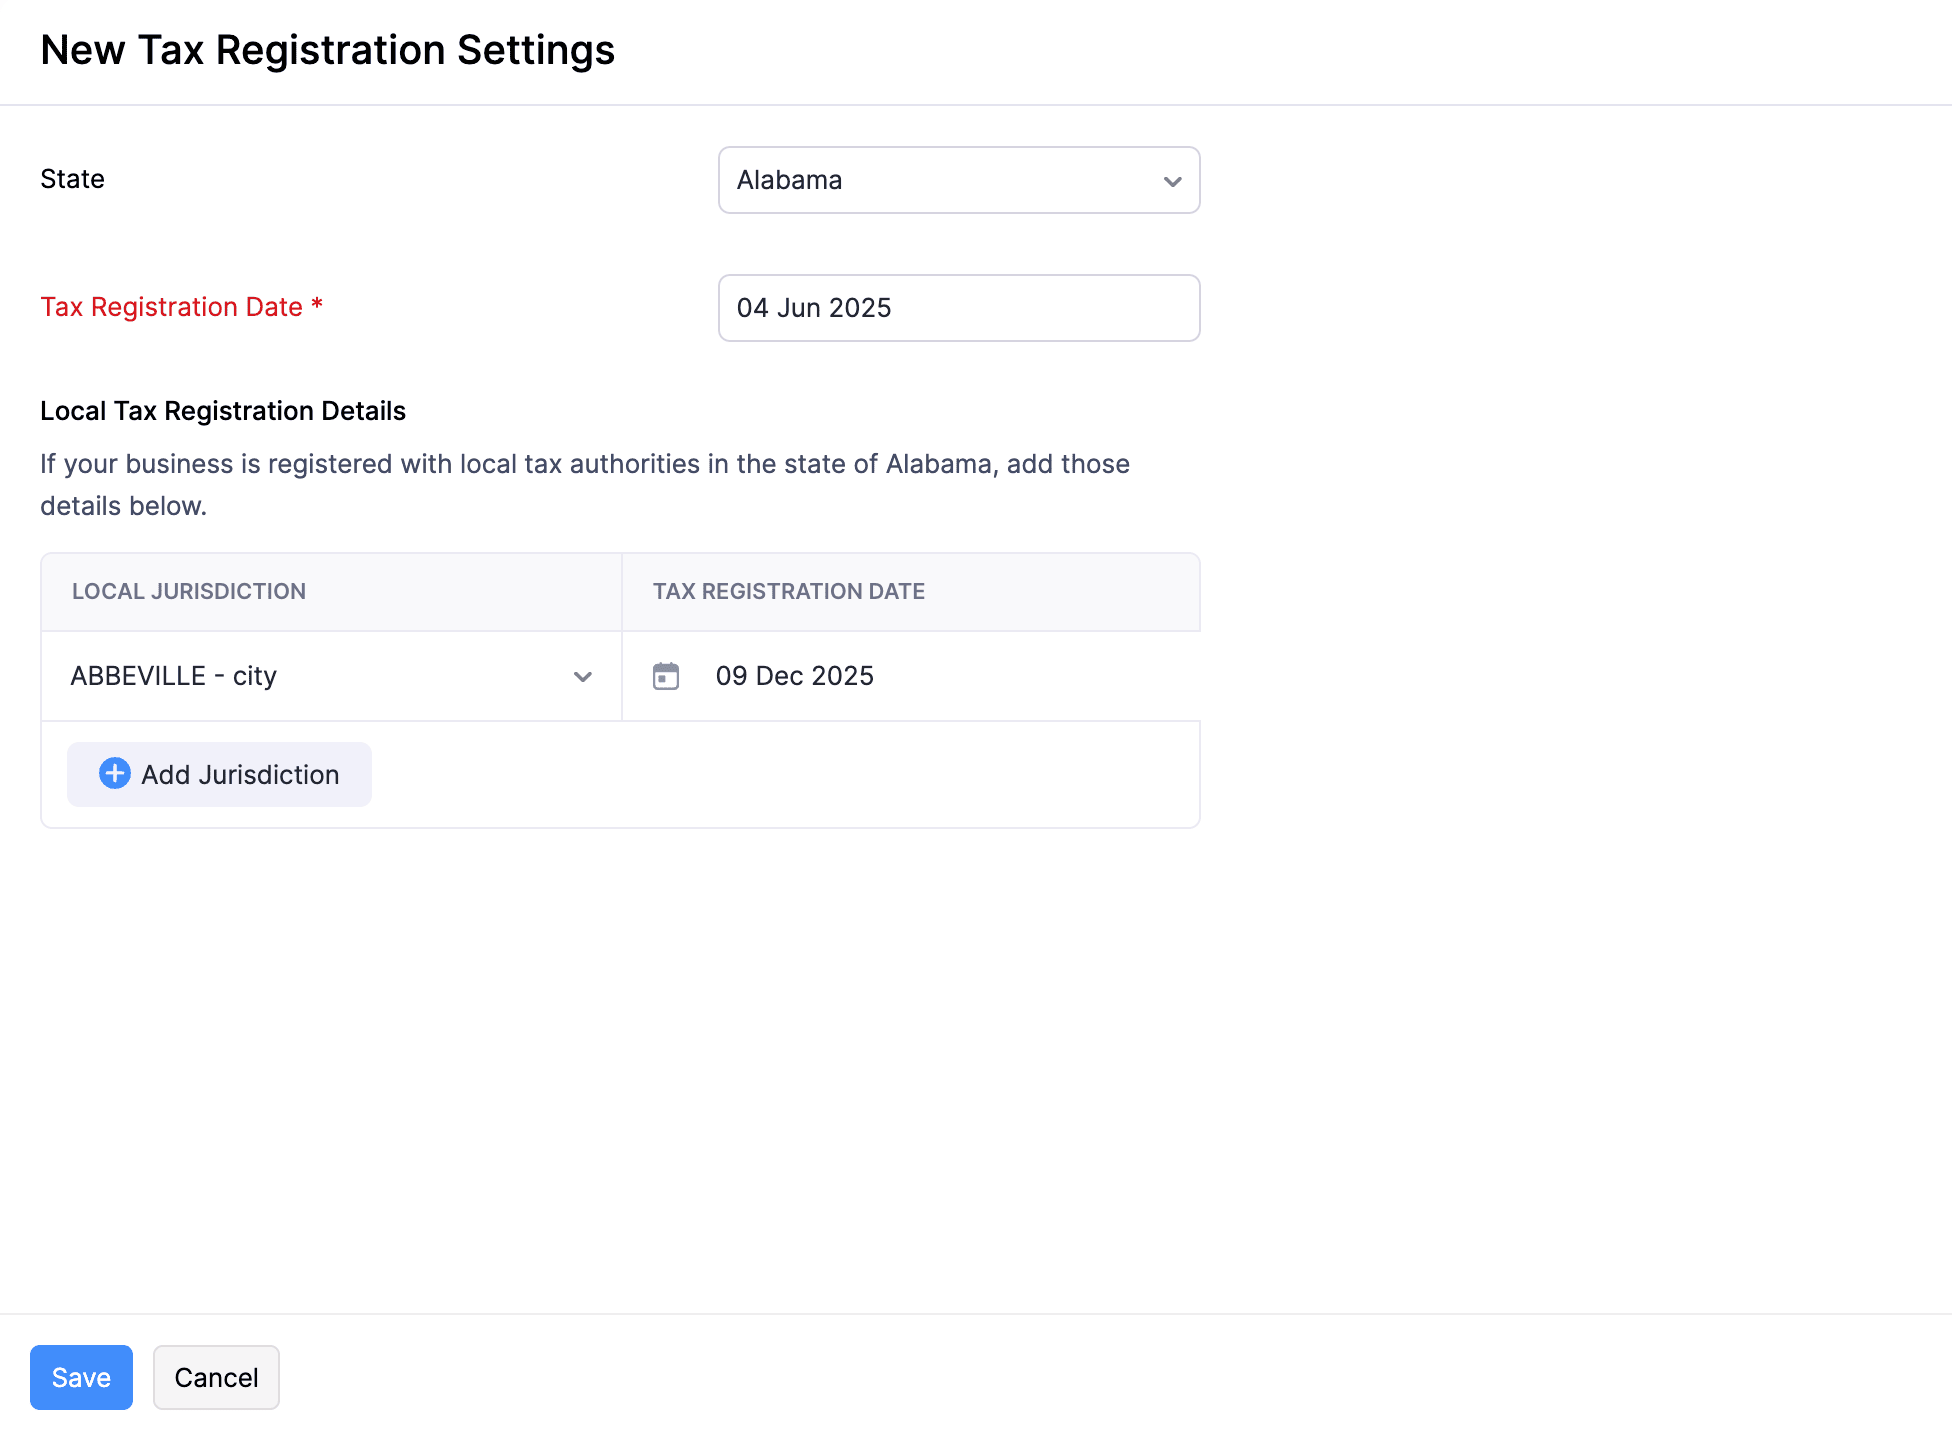
The tax registration details will be recorded.
Deregister Taxes
If you no longer conduct business in a state, or if you’re no longer required to collect taxes there, and have deregistered taxes there, you can mark it in Zoho Books. This prevents sales tax from being automatically calculated for your transactions in that state and its local jurisdictions. Here’s how:
- Go to Settings.
- Select Taxes under Taxes & Compliance.
- In the Taxes pane, click Tax Registration.
- Hover over the required tax registration, click the dropdown icon next to it, and select Edit.
- In the Edit Tax Registration Settings page, click Mark as Deregistered in the top right corner.
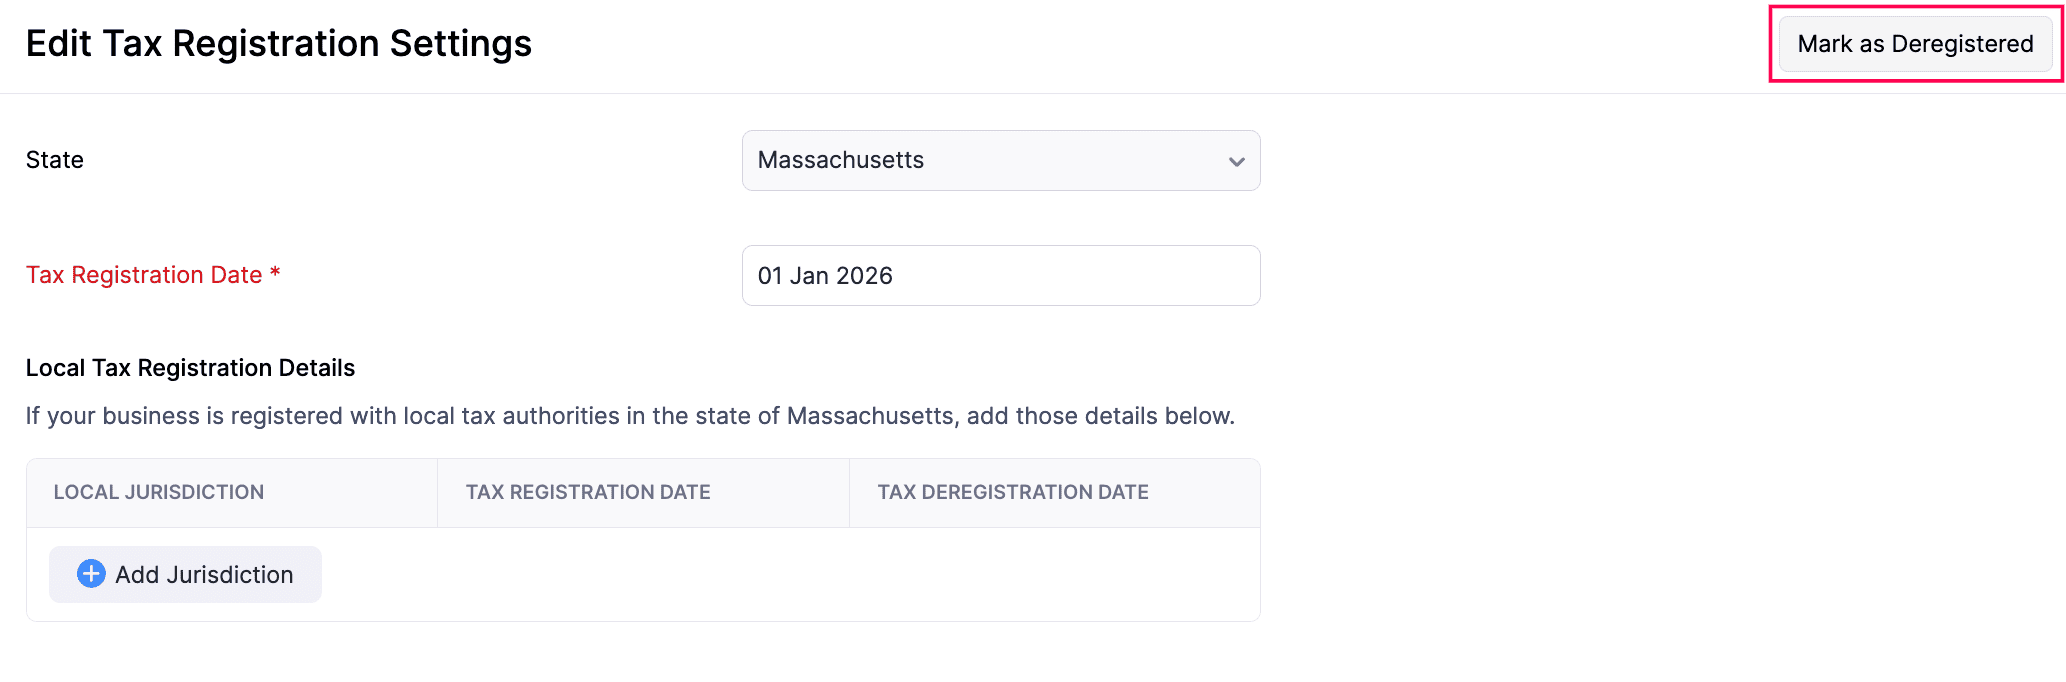
- If you’ve added multiple local taxes under a state, click Deregister All in the top right corner.
- In the Mark as Deregistered pop-up, enter the Tax Deregistration Date, and click Deregister.
The tax deregistration will be recorded, and it will no longer be applied to your transactions.
Note: When you deregister taxes at the state-level, the local taxes that you’ve added for that state will also be deregistered.
To mark a specific local tax as deregistered:
- In the Edit Tax Registration Settings page, hover over the required local tax, and click Deregister.
- In the Mark as Deregistered pop-up, enter the Tax Deregistration Date, and click Deregister.
The tax deregistration will be recorded. However, the state-level tax will still be applied to your transactions.
Undo Tax Deregistration
If you resume your business in a state again, or if you’re required to collect your taxes there, you can undo the deregistration to ensure that sales tax is calculated correctly. To do this:
- Go to Settings.
- Select Taxes under Taxes & Compliance.
- In the Taxes pane, click Tax Registration.
- Hover over the required tax registration, click the dropdown icon next to it, and select Edit.
- In the Edit Tax Registration Settings page, click Undo Deregistration in the top right corner.
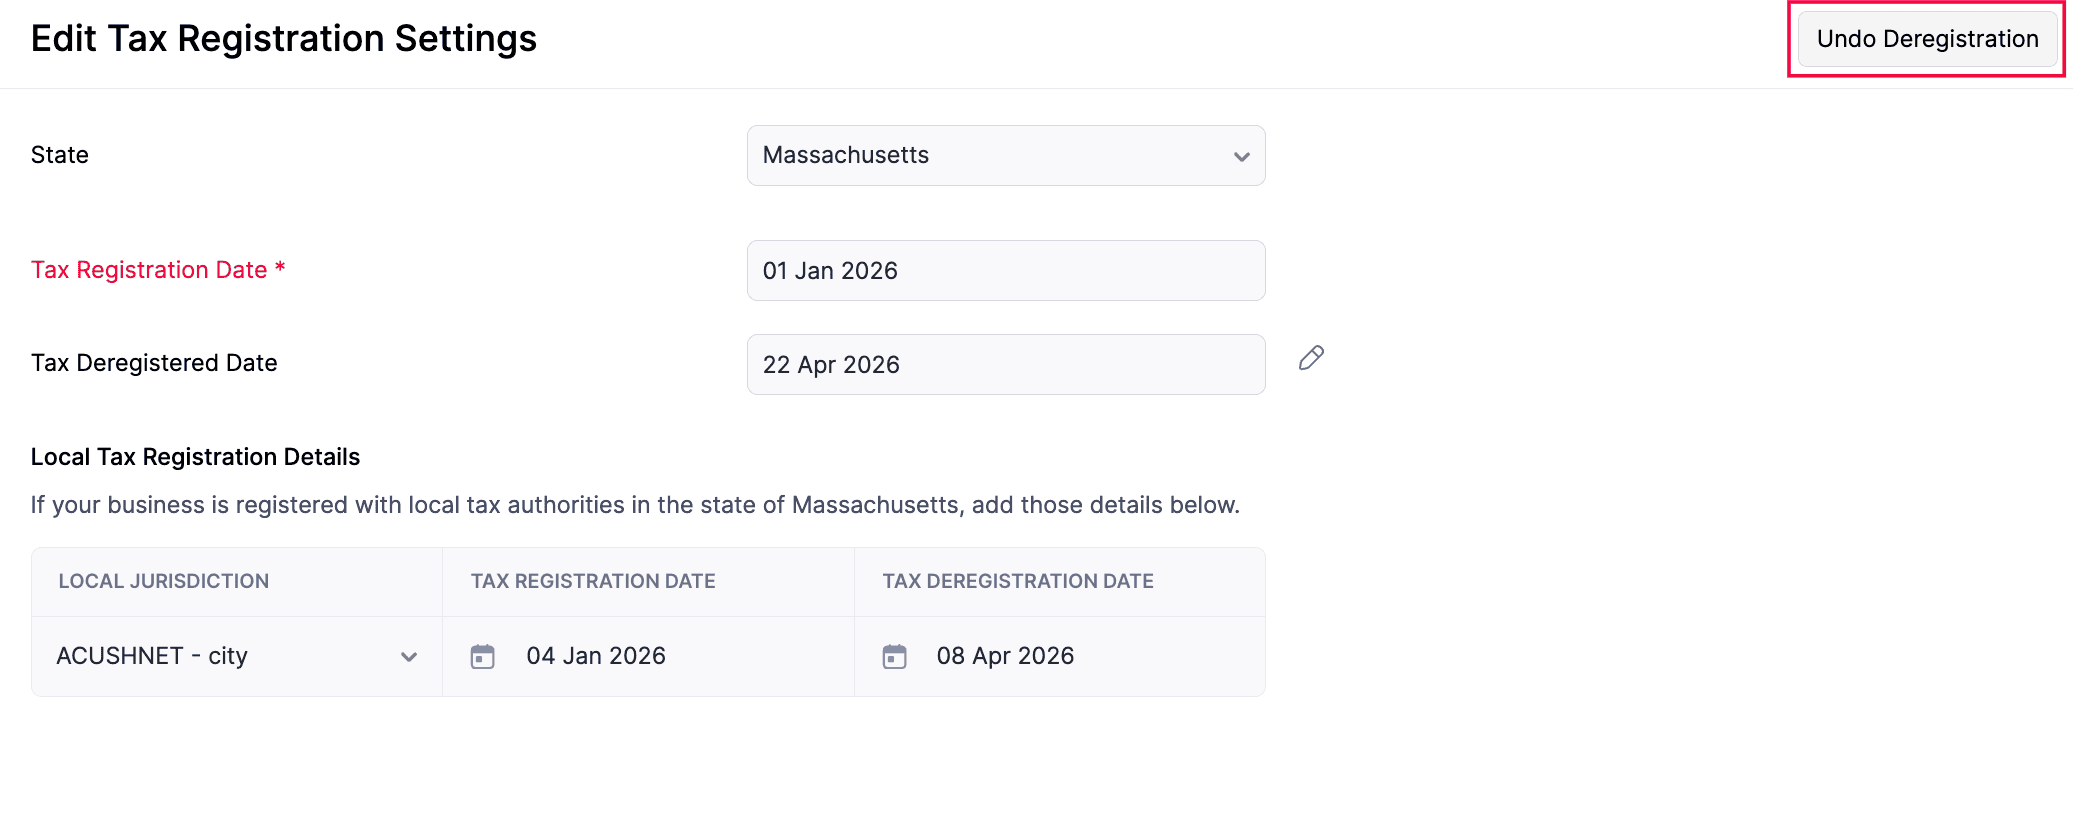
- If there are multiple local taxes under the state, click Undo All Deregistrations in the top right corner.
- In the confirmation pop-up, click Undo Deregistration.
The tax details will now be included in your transactions, and the sales tax will be calculated accordingly. Similarly, you can also undo deregistration for a specific local tax.
Mark Tax Registrations as Inactive
If you want to temporarily prevent a specific tax registration from being applied to transactions, you can mark it as Inactive. Here’s how:
- Go to Settings.
- Select Taxes under Taxes & Compliance.
- Navigate to Tax Registration in the Taxes pane.
- In the Tax Registrations page, hover over the required tax registration, click the dropdown icon next to it, and select Mark As Inactive.
- In the confirmation pop-up, click Mark As Inactive again.
The tax registration will be marked as Inactive. To mark it as active again:
- In the Tax Registrations page, hover over the inactive tax registration, click the dropdown icon next to it, and select Mark As Active.
- In the confirmation pop-up, click Mark As Active again.
The tax registration will be marked as Active.
Exception Report
Sales Tax Automation in Zoho Books calculates taxes using the available transaction details. When required information is missing or tax is applied manually, those transactions are flagged as exceptions and listed in the Exception Report for review, along with the reason.
The report includes:
- Transactions calculated with incomplete tax details.
- Transactions where tax was applied manually despite automation being enabled.
To view the report:
- Go to Reports on the left sidebar.
- Select Exception Report under Activity.
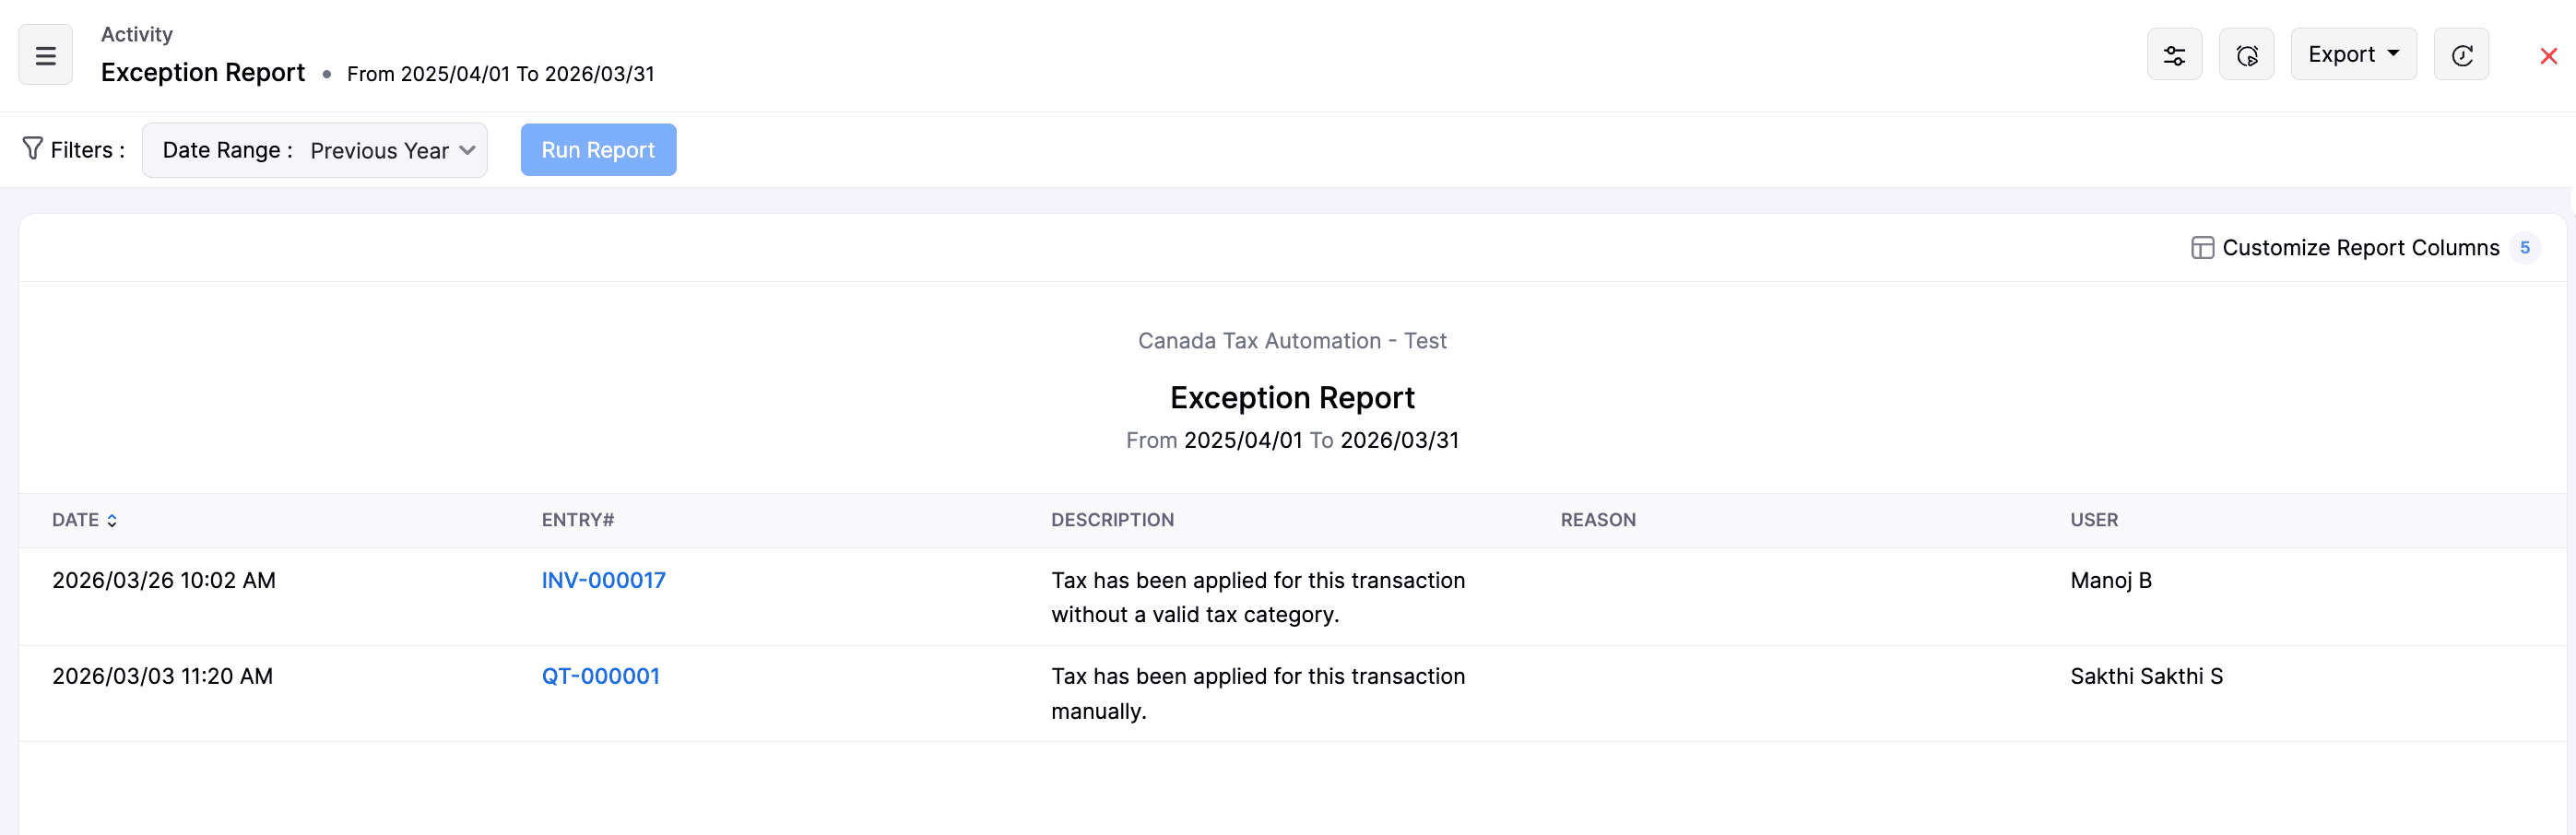
By reviewing the Exception Report regularly, you can identify transactions that require attention and ensure that sales tax calculations remain accurate and compliant.
Disable Sales Tax Automation
If you no longer want to use Sales Tax Automation, you can disable it and manage taxes manually. Next, create tax rates in the Taxes module and apply them to your transactions. Once disabled:
- You can still view your existing tax registrations, but they will not apply to new transactions.
- You must manually ensure that the correct taxes are applied to your transactions.
- For recurring transactions recorded before switching, ensure that correct sales tax is applied to any child invoices generated.
To disable Sales Tax Automation:
- Go to Settings.
- Select Taxes under Taxes & Compliance.
- Navigate to Tax Automation Settings in the Taxes pane.
- On the Tax Automation Settings page, click Disable next to Sales Tax Automation.
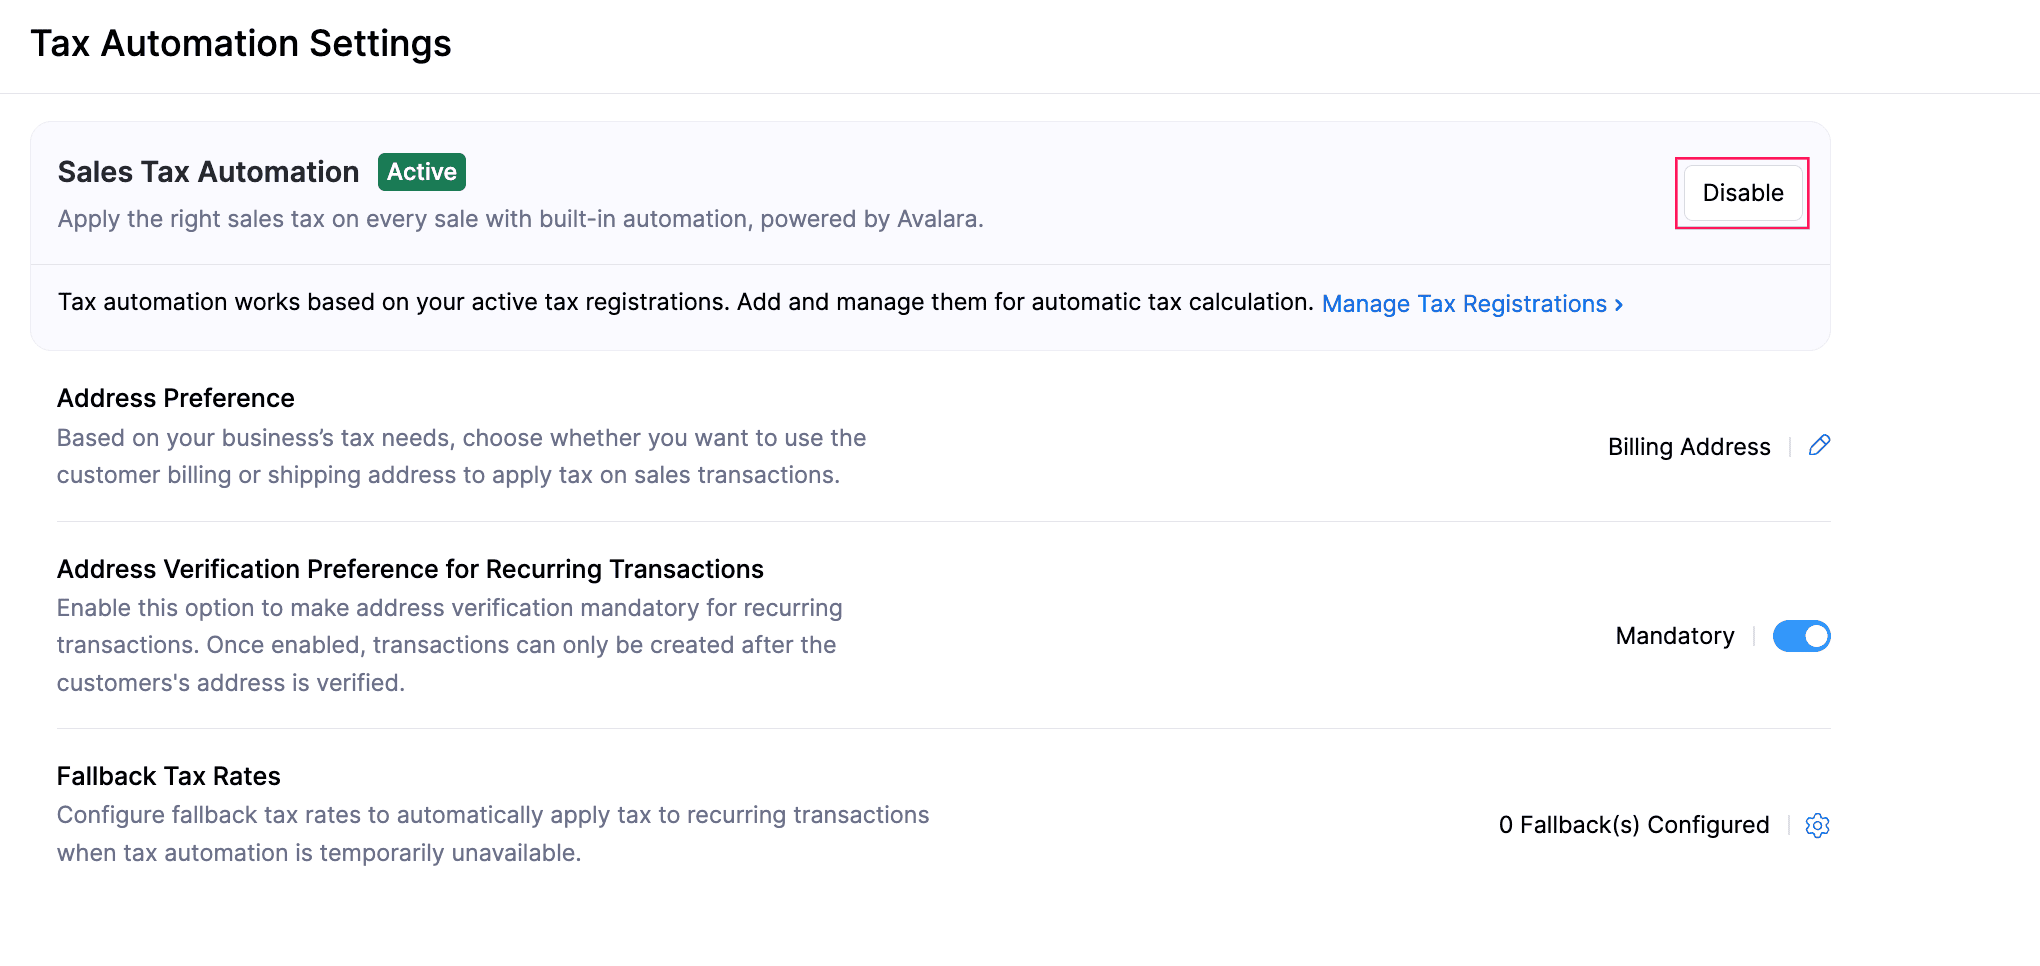
- In the confirmation pop-up, click Disable.
Sales Tax Automation will now be disabled in your Zoho Books organization.
Limitations
Sales Tax Automation handles most common tax scenarios automatically, but there are certain cases it does not support. Understanding these limitations helps you identify when to apply taxes manually.
- Partial exemption: Sales Tax Automation applies tax at the line-item level, treating each item as either fully taxable or fully exempt. It does not support partial taxation within a single line item. For example, under the Massachusetts clothing sales tax rule, if an item costs more than $175, sales tax applies only to the amount above $175, not the full price.
- Exemptions based on business type: Exemptions are not applied based on the customer’s business type. You should review exempt transactions manually before saving to ensure the correct exemption is applied. For example, when a textile manufacturer purchases cotton, it may be exempt since it is used to produce goods for resale. However, if the same manufacturer purchases CCTV equipment for its own use, the transaction is taxable, as the goods are consumed directly and not resold.
- Multi-country registrations in a single organization: Each Zoho Books organization is configured for a single country. If your business collects taxes in more than one country (for example, in both the United States and Canada), you cannot manage tax registrations for both countries within the same Zoho Books organization.
- Slab-based tax rates: Some jurisdictions apply different tax rates to different portions of the taxable amount. For example, the Tennessee Single Article Tax applies a standard rate to the first 1,600 of a single article’s price, a reduced rate to the next portion up to 3,200, and no tax beyond that. Sales Tax Automation calculates tax at a single rate per line item and cannot break a taxable amount into slabs to apply multiple rates.
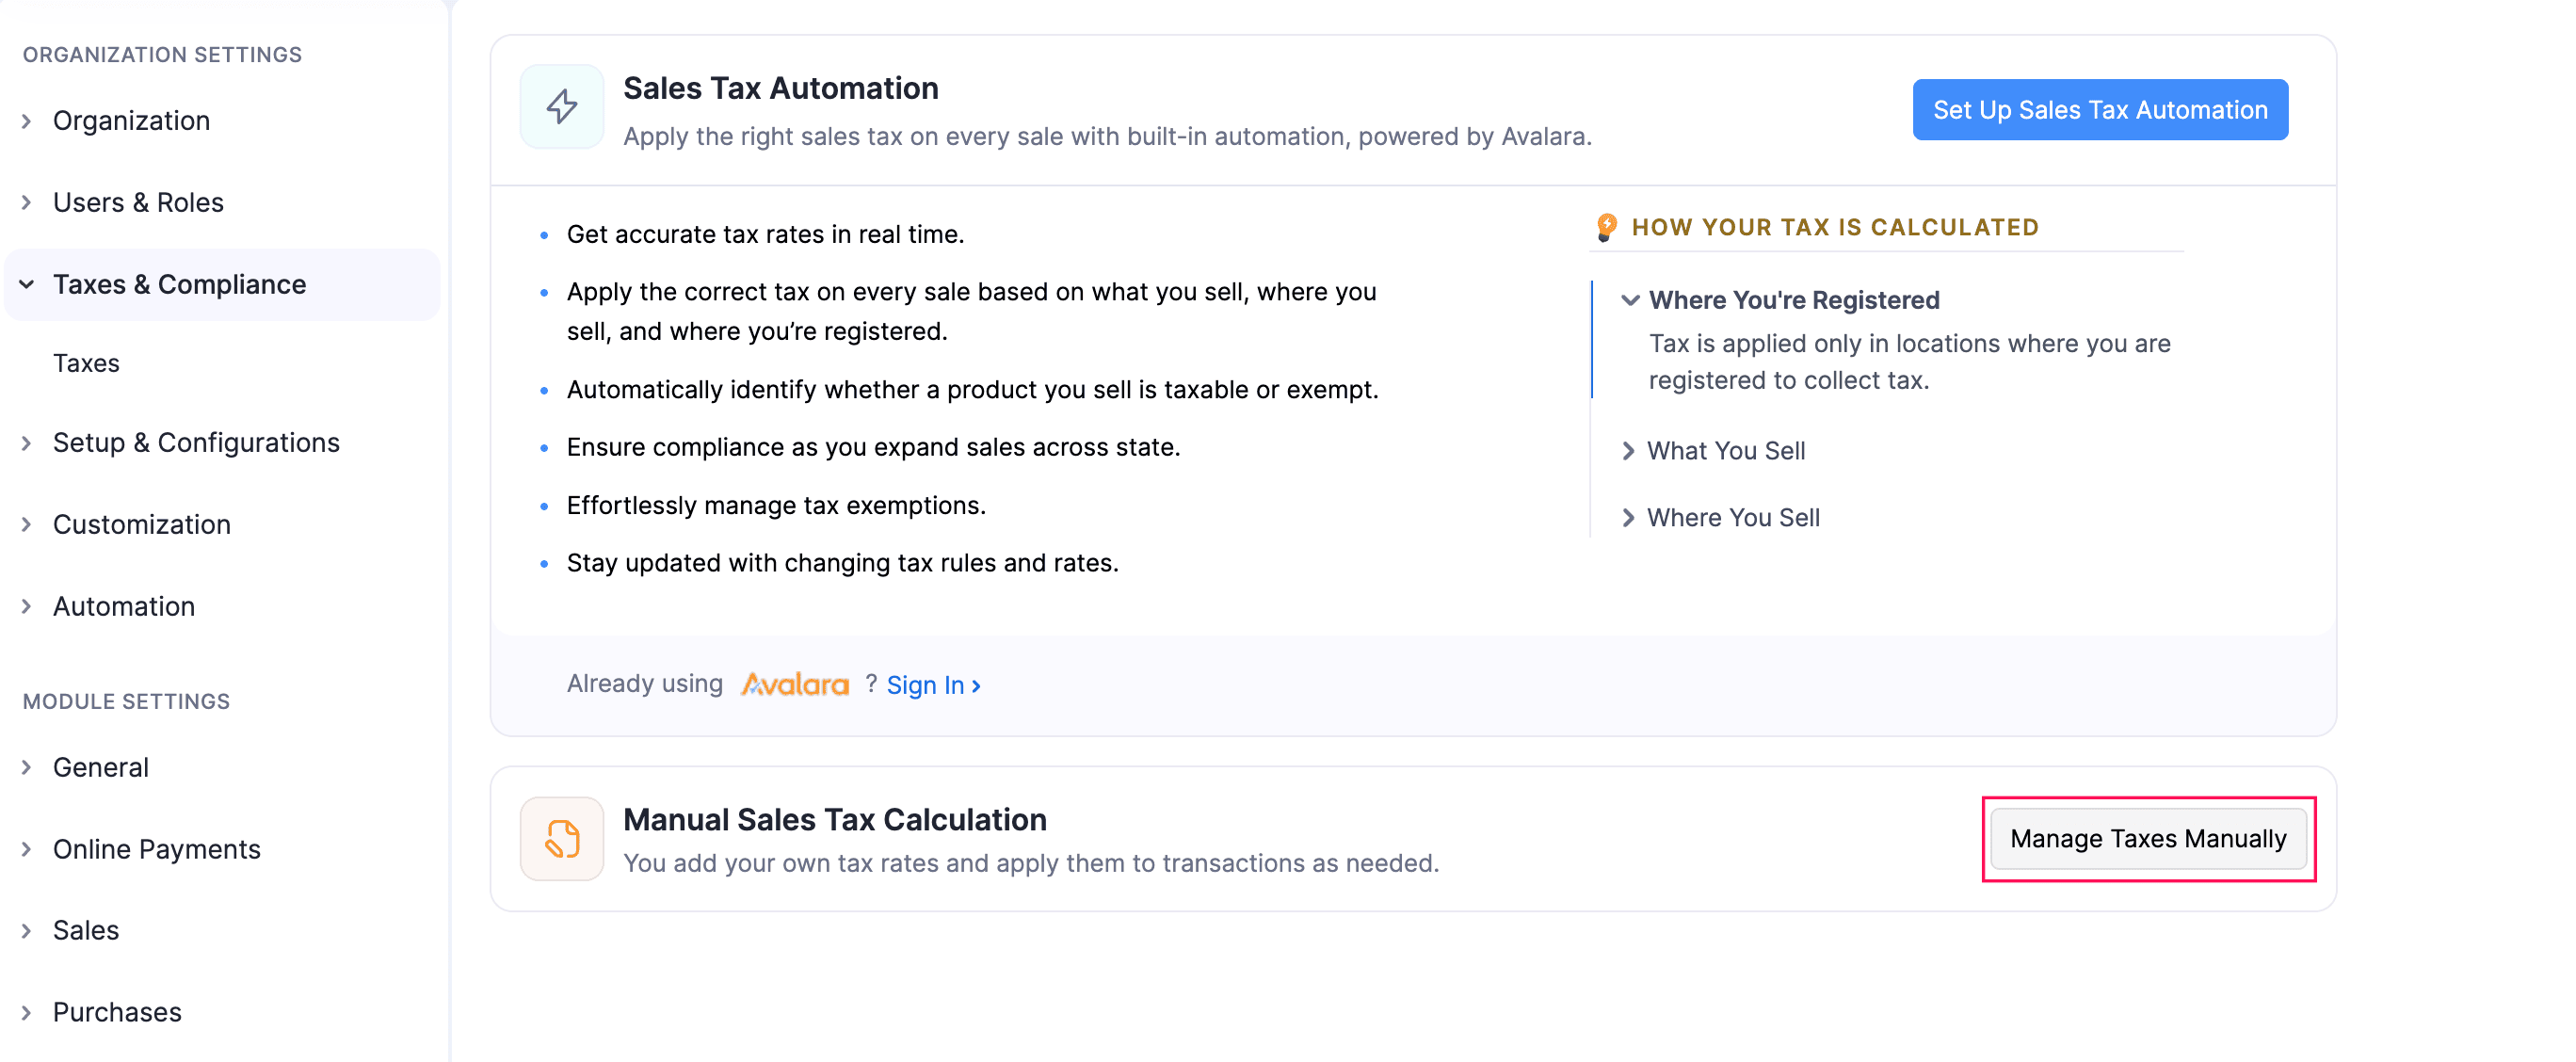
Calculate Tax Manually
If you know which tax is applied to every sales transaction, you can choose to apply taxes manually. To do this, you need to add the required tax rates in the Taxes module, and then apply them to your transactions. This works best when:
- You sell limited goods or services in a few jurisdictions where the tax rate is the same for all of them.
- You rarely handle tax-exempt customers.
- You prefer to update tax rates yourself whenever the law or regulations change.
If you choose to manage taxes yourself, click Manage Taxes Manually at the bottom of the Taxes page.
 Yes
No
Yes
No
Thank you for your feedback!