
Sales Channel Items
When you integrate Zoho Inventory with online sales channels such as Amazon, Etsy, eBay and so on, not only can you sell your Zoho Inventory items on those sales channels, but also fetch new items created in the sales channel. These items can either be linked to an existing Zoho Inventory item or added as a new item.
Confirming Items from Sales Channels
If the name or SKU of an items fetched from the sales channel is identical to any of those in Zoho Inventory, the app will link them automatically. Otherwise, they are categorized as Unconfirmed Items, which you can link manually or save as a new item.
Similarly, you can link multiple items from a single or multiple sales channels to the same item in Zoho Inventory. The stock residing in Zoho Inventory serves as the master stock and is updated across all sales channels.
Note: Unless you confirm these items in Zoho Inventory they cannot be added to any new transaction and their associated online orders will be frozen.
To confirm or link a sales channel item in Zoho Inventory:
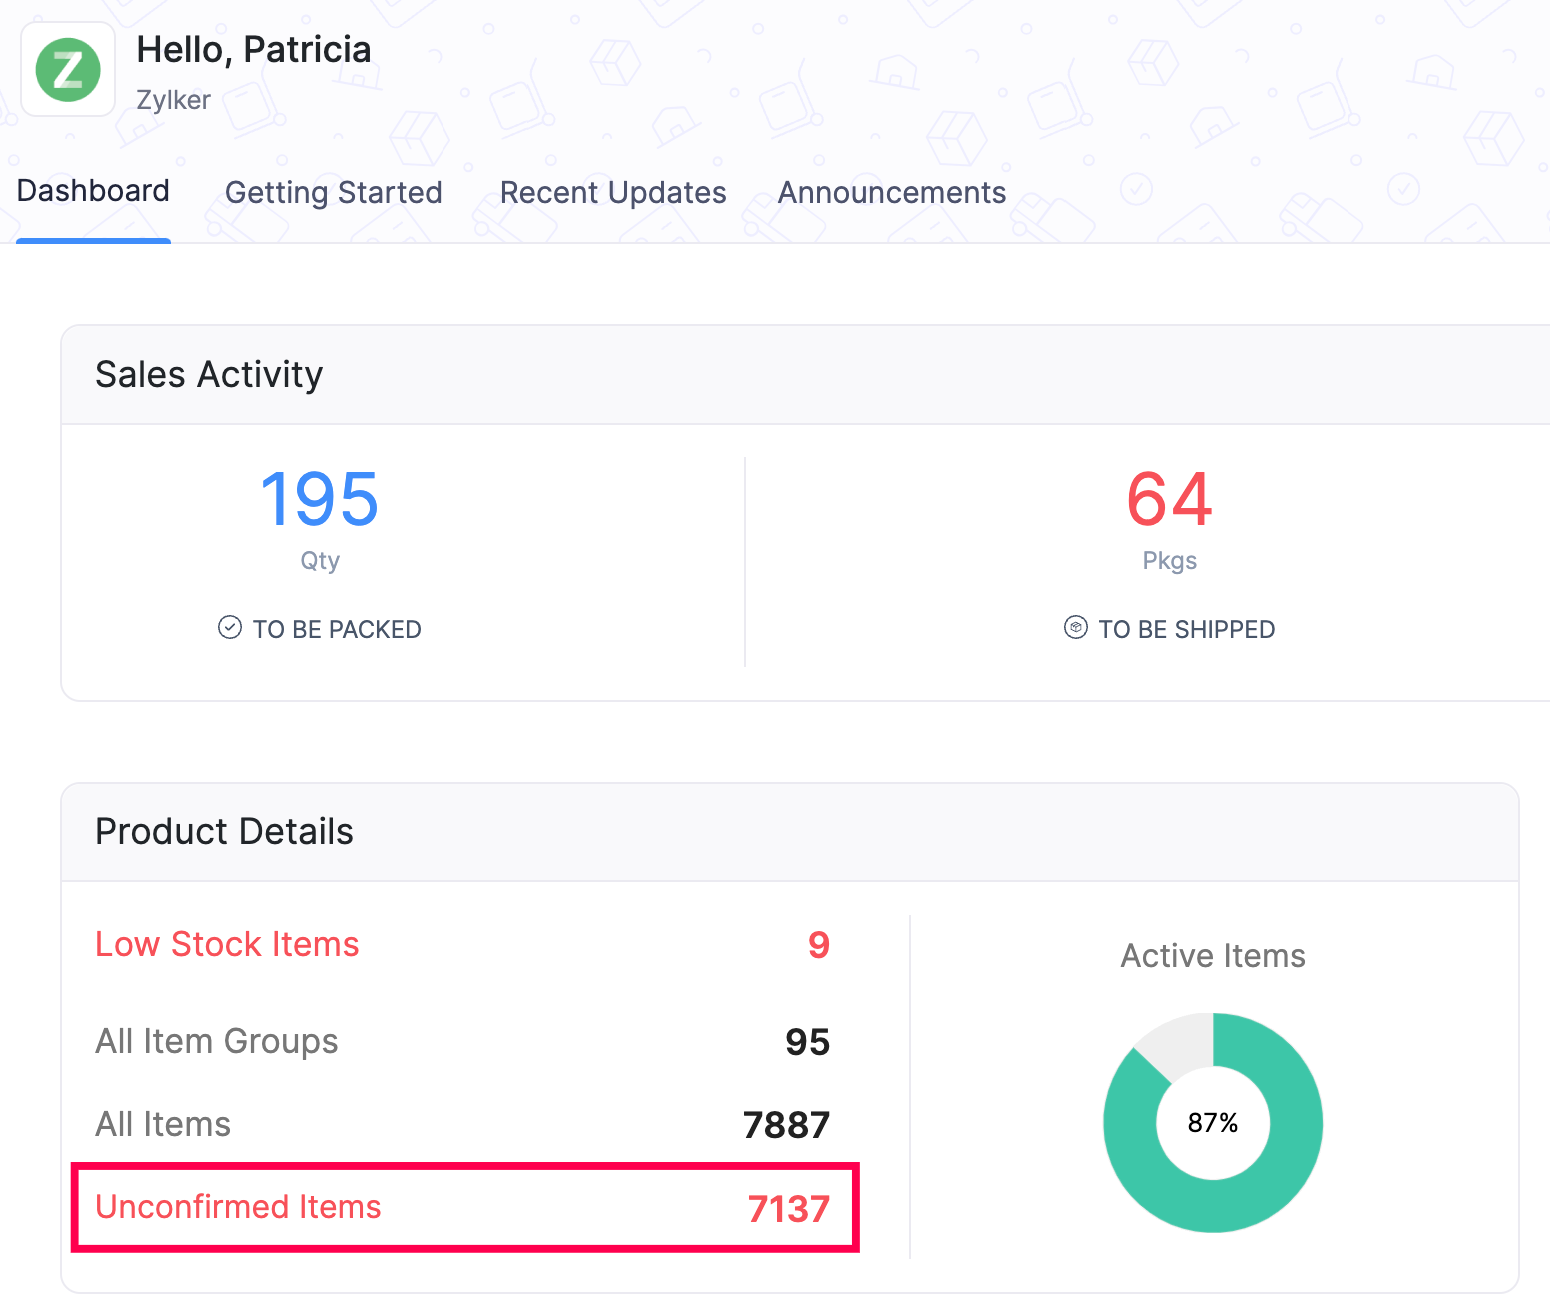
On the Dashboard page, click the value next to Unconfirmed Items under the Product Details section.
Select an item to confirm or link.
Under the confirmation banner in the Overview section, choose whether you want to confirm, update or link to an existing item.
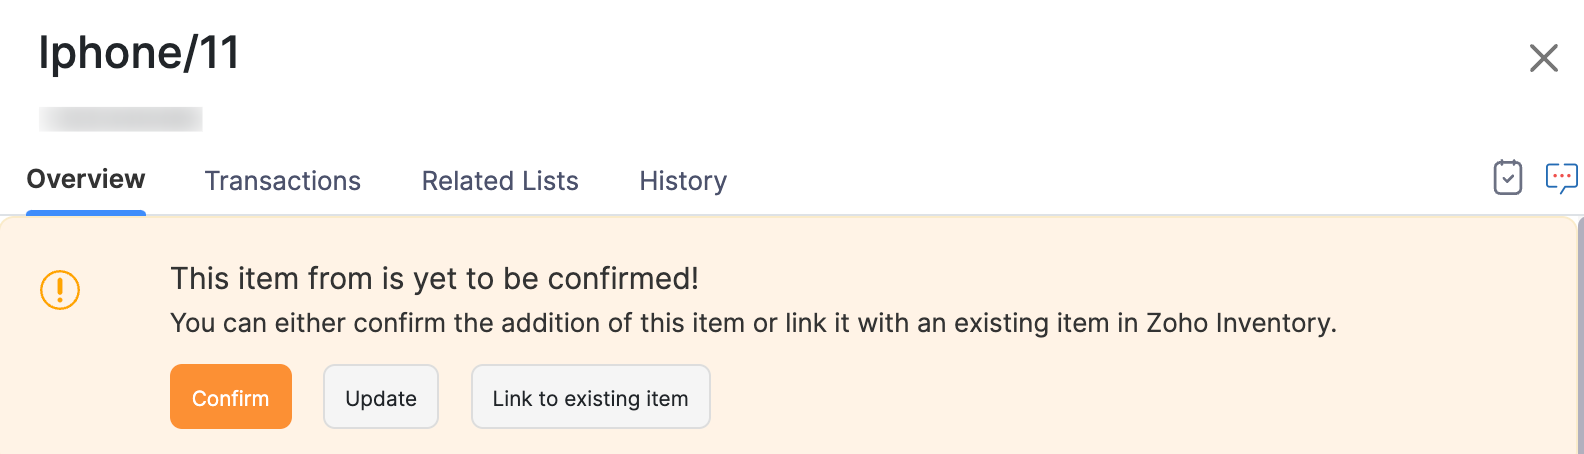
- Confirm Item: Click the Confirm button to add the item as a new record in Zoho Inventory with its current details.
- Update Item: Click the Update button to update the item details before adding it into Zoho Inventory.
- Link to Existing Item: Click this button to link the sales channel item with an exisitng item manually in Zoho Inventory. On doing so, its stock level in the sales channel gets updated with the stock level in Zoho Inventory.
Warning: Before confirming the items directly, please pay special attention the following fields - purchase price, selling price & opening stock value. Sales channel items do not have purchase information and hence the system will by default equate its selling price to its purchase price & opening stock value. Hence, it would be wise to update the actual values of your item purchase price & opening stock value during the update process.
Mapping Unconfirmed Items from Online Orders
Unconfirmed items cannot be associated to transactions and their associated online orders will be frozen until they have been mapped manually to Zoho Inventory.
Hence to unfreeze such online orders and to confirm your items,
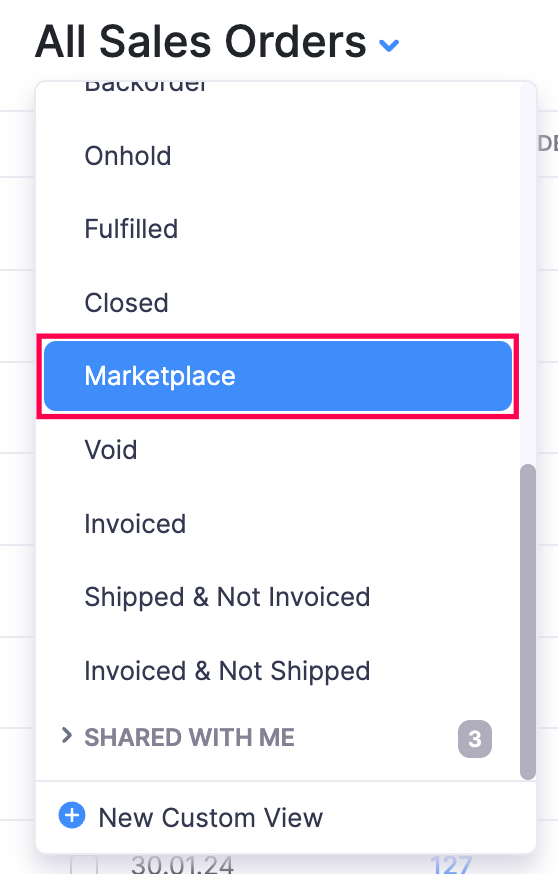
Go to the Sales Orders module under Sales from the left sidebar.
Apply the Marketplace filter for your sales orders.
Open an online order.
If the online sales order has one or more unconfirmed items, you will find a warning message indicating the presence of unconfirmed line items along with options : Confirm and Link to existing item.
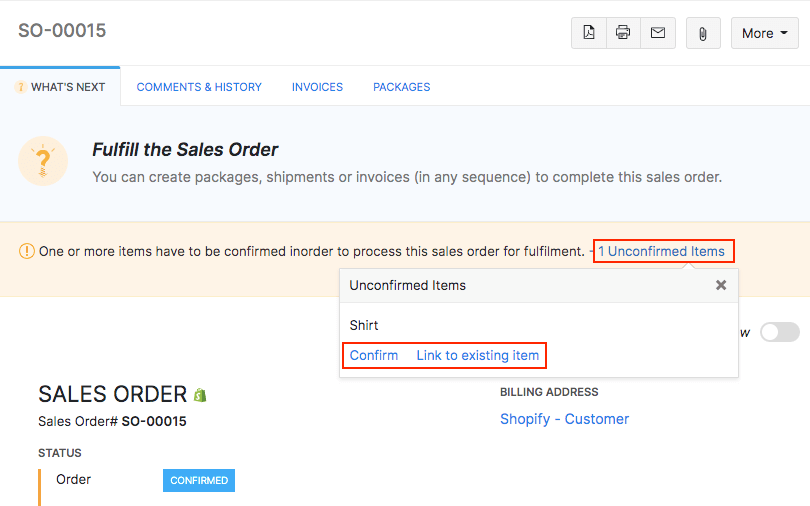
You can either select & confirm all the unconfirmed line items or link them to the existing inventory items one by one.
On confirming/mapping all the items on a particular online sales order, this order will be unfrozen and you can start processing the order by creating invoices, packages & shipments for it.
Unlinking an item from sales channels
If you no longer want to link a sales channel item to an Zoho Inventory item, you can unlink them. The following are the effects of unlinking an item from sales channels:
- Changes in stock level of the inventory item will no longer trigger a stock update to the sales channel item.
- The sales orders associated with the sales channel item will not be synced with Zoho Inventory.
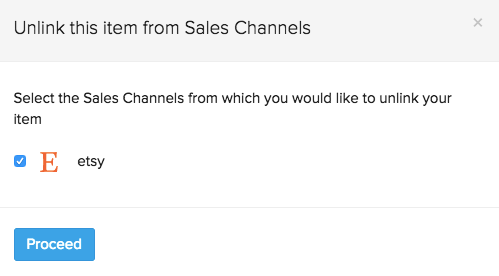
To unlink an inventory item from the sales channels:
Open an item that has been linked to sales channels.
Click Unlink this item option on the item details page.
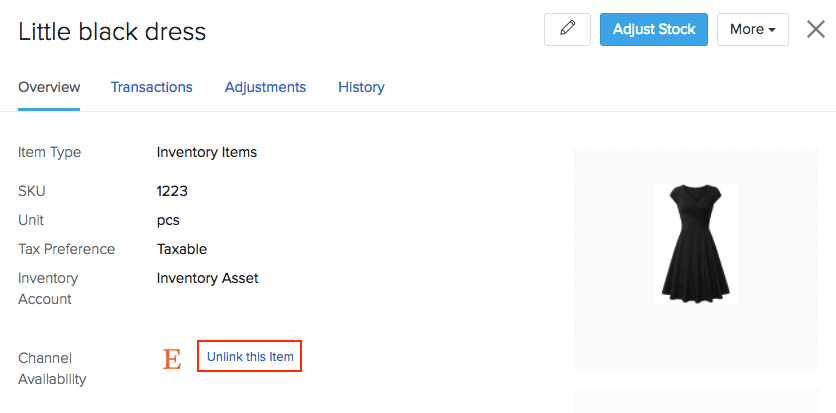
Select the sales channels from which you would like to unlink this item.
Click Proceed.
Pro Tip: This feature is useful if you have wrongly linked two items. You can unlink them, fetch the item again from the sales channel during the next sync, and link it to the appropriate item in Zoho Inventory.
Updating item stock levels to a sales channel
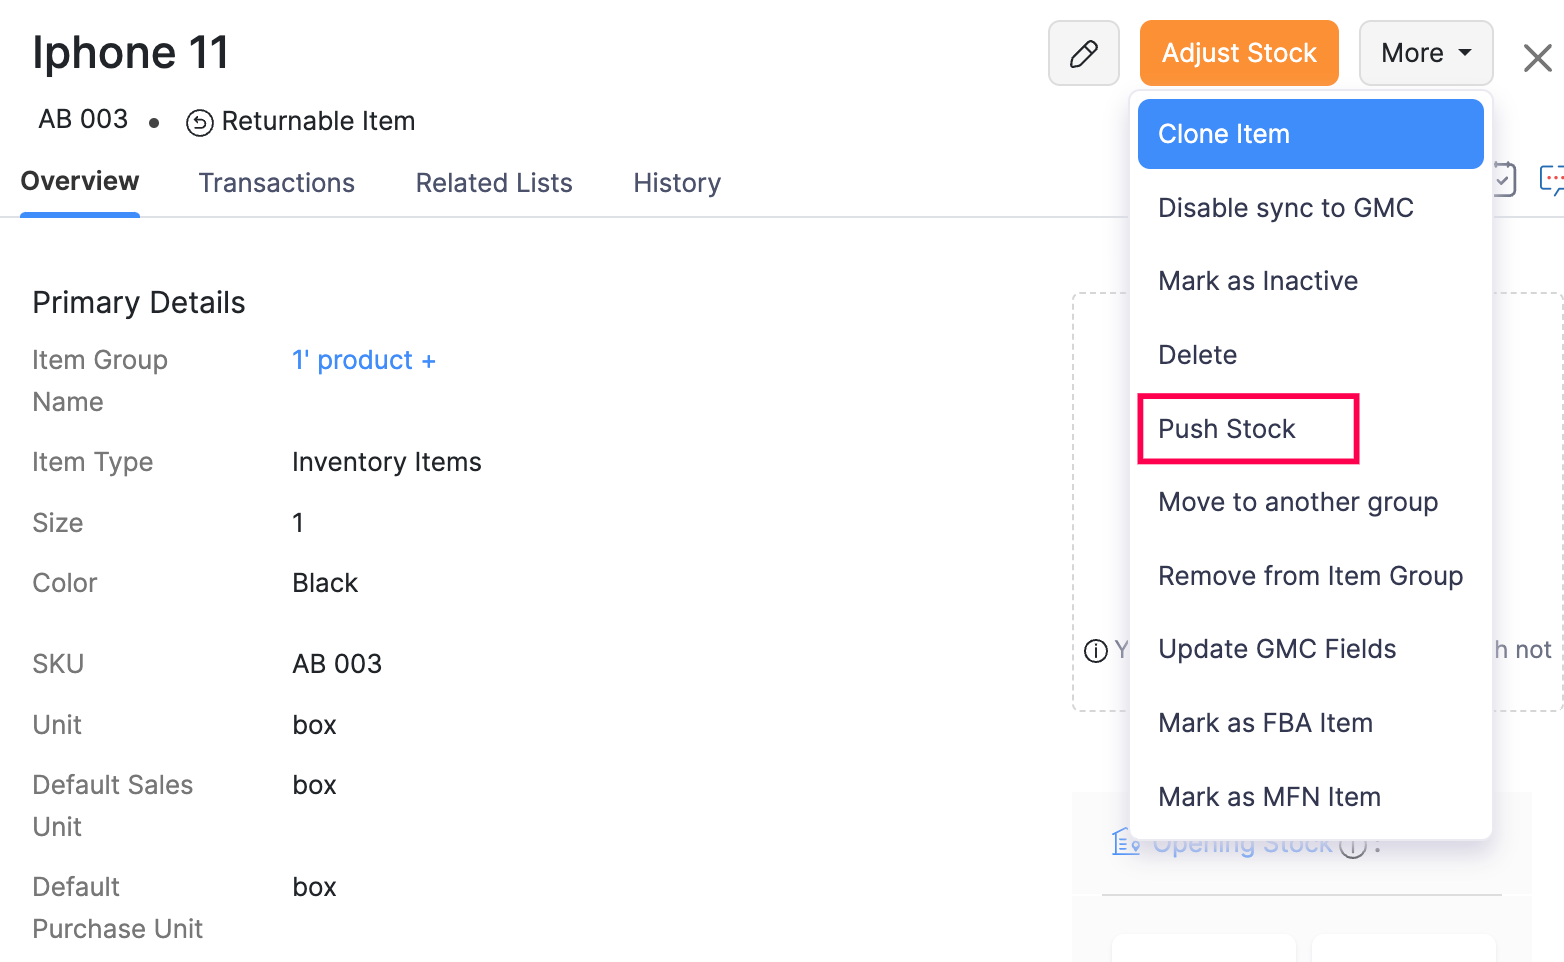
When you integrate Zoho Inventory with an online sales channel, the stock levels of the item in Zoho Inventory will be updated to the associated sales channels whenever there is a change in the stock level triggered by the creation of purchase receives, shipments, and invoices in Zoho Inventory. You can also trigger a manual stock update for an item to all the sales channels at any point of time. To do so:
Go to the Items module under Inventory from the left sidebar.
Open a sales channel item.
Click the More button on the top right corner.
Select Push Stock.
- During the sync, new online orders(if any) will be imported from the sales channel and the quantity required to fulfill these orders will be recorded as committed stock in Zoho Inventory. Now the stock update to sales channel will be something like : Available Quantity = Current Stock Available in Zoho Inventory - Committed Stock(for the online orders fetched during that sync).
Importing sales channel items
You can import items from your online sales channel into Zoho Inventory and not the other way around.
To import items from your sales channel,
- Integrate your Zoho Inventory with your online marketplace or shopping cart. Learn more about sales channel integrations.
- The initial item sync will be triggered after 30 minutes from the time of the integrating the two.
- On completion of the sync, you have the following outcomes inside the Sync History:
- Records Synced - Existing Zoho Inventory items and sales channel items that have the same SKU values will be mapped to each other by default. All the other sales channel items(both new and unmapped items) will be brought in as unconfirmed items which can be manually mapped by you.
- Failures - All the items that fail to sync from your sales channel to Zoho Inventory for one or more reasons will not be brought into Zoho Inventory.(you can obtain the cause of such failures from the Failures section of the Item Sync history) However, rectifying the failures and updating the sales channel item will allow the system to reimport it during the next sync.