
More Actions
Edit Invoice
To edit the details of an invoice:
Go to the Invoices module under Sales from the left sidebar.
Open the invoice you want to edit.
Click the Edit button on the menubar.
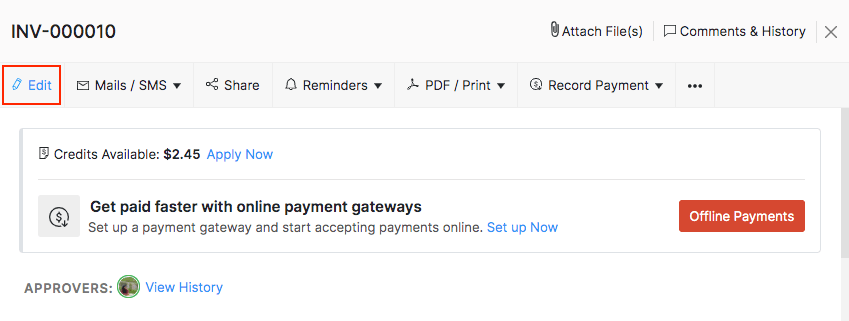
Update the necessary details.
Click Save.
If you have edited a digitally signed invoice, you will have to re-sign it before sending it to your customer.
Related: Learn how you can set up digital signatures in Zoho Inventory to authenticate your invoices.

Add Item Header
You can now easily categorize items in your invoices using the Item Headers feature. To add an item header:
Go to the Invoices module under Sales from the left sidebar.
Open the New Invoice page.
Add the necessary line items under Item Details.
Click the dropdown button next to Add Another Line and select Add Item Header.
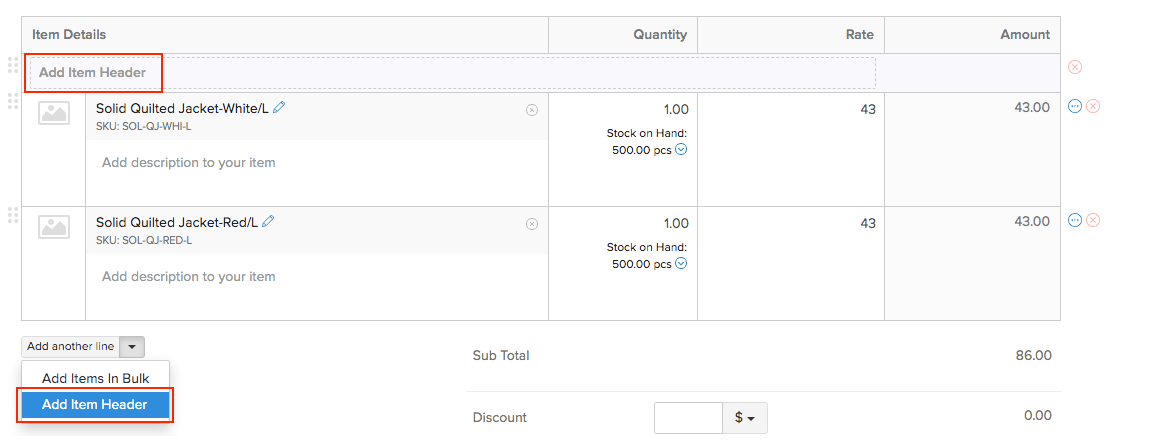
Enter the header name and press tab.
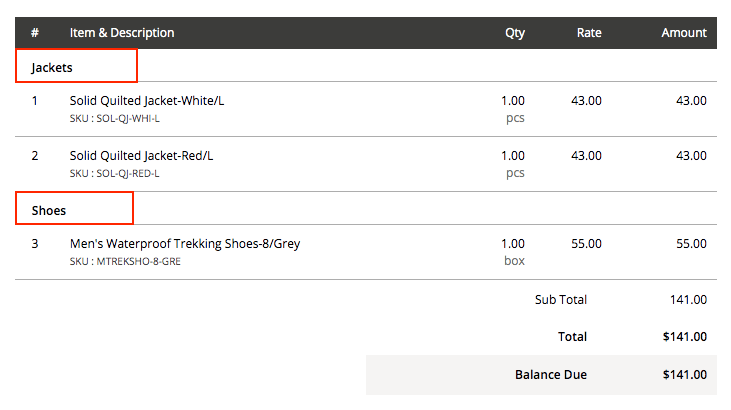
You can drag and reposition the item header by clickin and placed above any item.
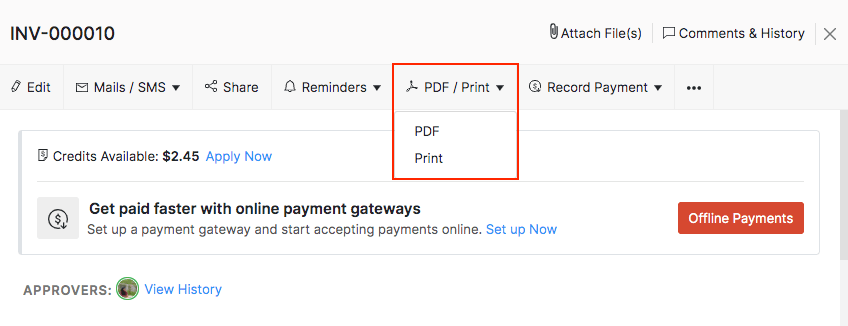
Download PDF or Print Invoice
To download or print your invoice:
Go to the Invoices module under Sales from the left sidebar.
Open the invoice you want to print/download.
Click the PDF/Print dropdown button on the menubar.
Select the PDF option to download a PDF copy of the invoice, or select the Print option to print the invoice.
Void Invoice
If there was an error in a customer invoice and if you do not want to delete it, you can simply void it. A void invoice will not be removed from the organization, hence it will not affect the invoice numbering sequence. Once you void an invoice, it will not reflect on any of your sales transactions or reports. Also, the customer cannot make payment for a void invoice. But you can mark it as Open anytime and then your customer can pay for the invoice.
To void an invoice:
Go to the Invoices module under Sales from the left sidebar.
Open the invoice you want to void. You cannot void paid invoices.
Click the ellipsis icon (***) on the menubar.
Select the Void option from the dropdown.
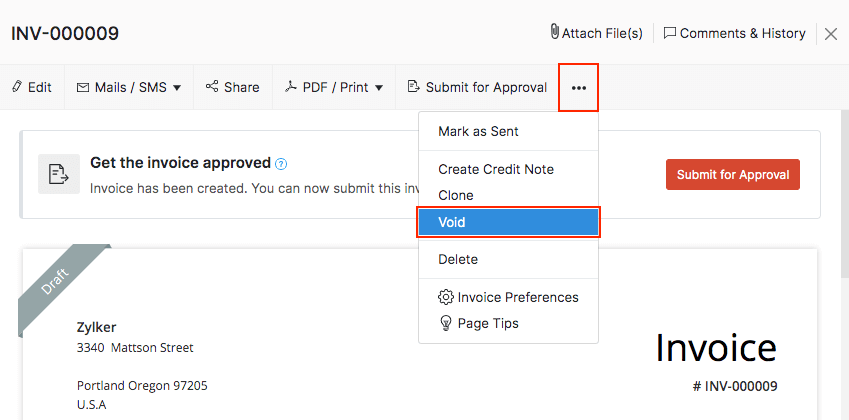
Enter the reason for voiding the invoice and click Void It.
To reopen a void invoice:
Go to the Invoices module under Sales from the left sidebar.
Click the void invoice you want to reopen.
Click the Convert to Draft option on the menubar.
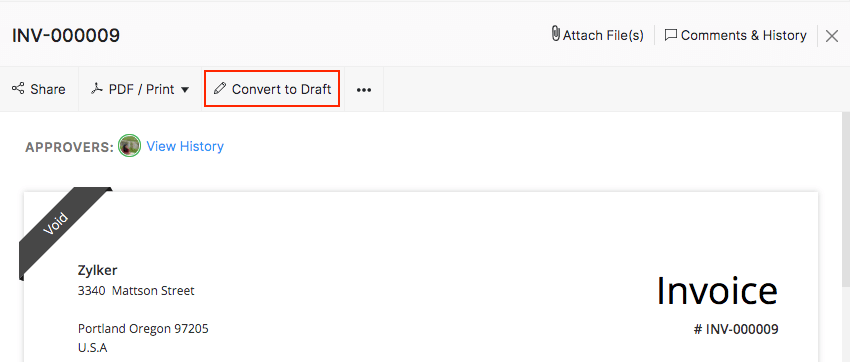
Enter the reason as to why you want to undo a void transaction.
Click Convert to Draft to successfully reopen the void invoice.
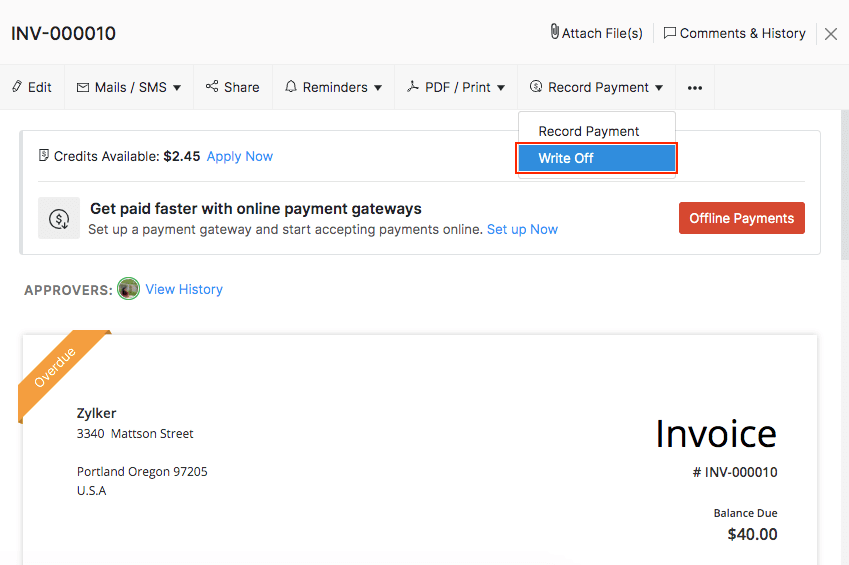
Write-off Invoice
Write Off is one way of dealing with bad debts. Bad debts usually means any specific invoice that becomes uncollectible. You can Write Off an invoice when you’re sure that the invoice amount is uncollectible. When you Write Off an invoice it will be marked as Paid.
To write-off an invoice amount:
Go to the Invoices module under Sales from the left sidebar.
Open the invoice you want to write-off.
Click the Record Payment drop-dropdown on the menubar.
Select the Write off option.
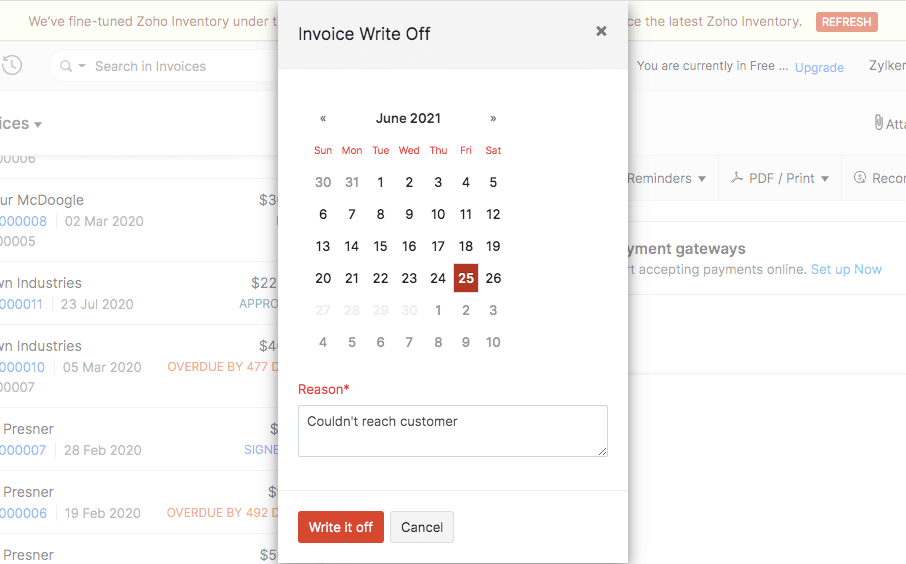
Select a write-off date on the calendar and enter the reason for the write-off.
Click Write it off to proceed.
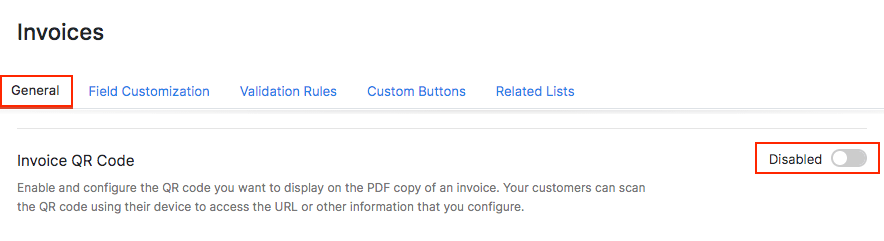
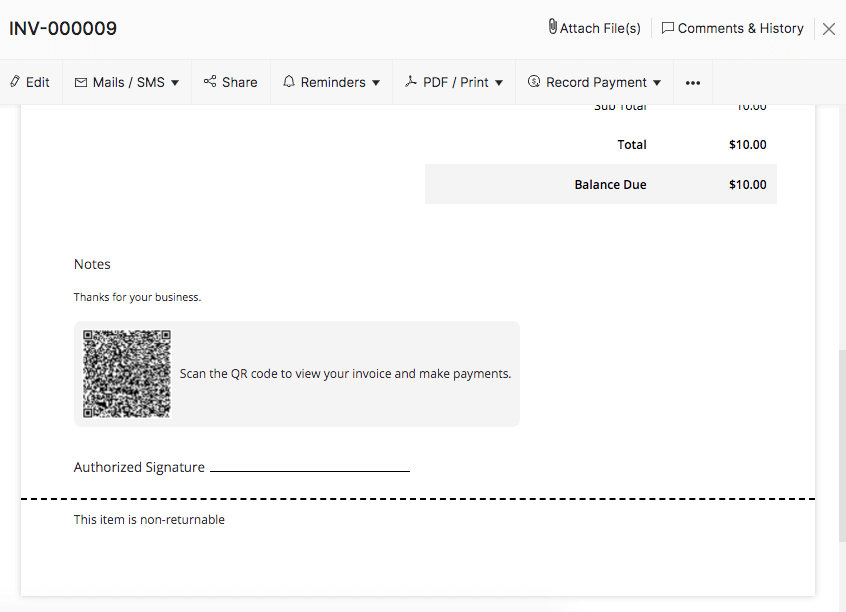
Display QR Code on Invoices
Generate QR codes for your invoice URL or other custom messages and embed them on your invoices in Zoho Inventory. When you send this invoice to your customer, they can scan the QR code to open the embedded link on their device.
To enable QR Codes in Zoho Inventory:
Go to Settings in the top right corner. Navigate to the Module Settings.
Click Invoices under Sales.
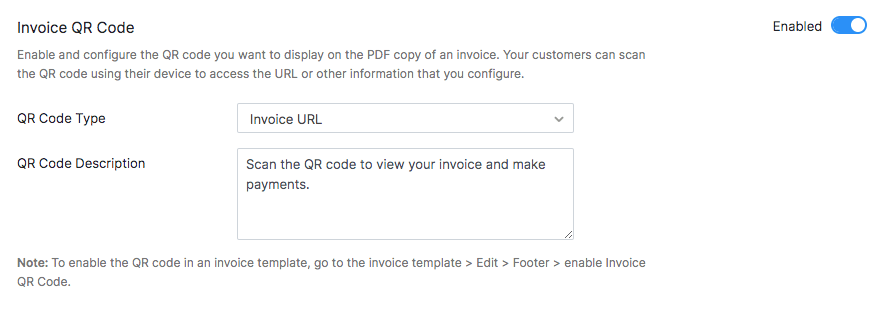
Enable Invoice QR Code option under the _General_tab.
Select the QR Code Type. This can either be Invoice URL or a Custom message.
If you have selected Invoice URL, a QR code will be generated for the invoice’s URL internally for every invoice that will be created in Zoho Inventory.
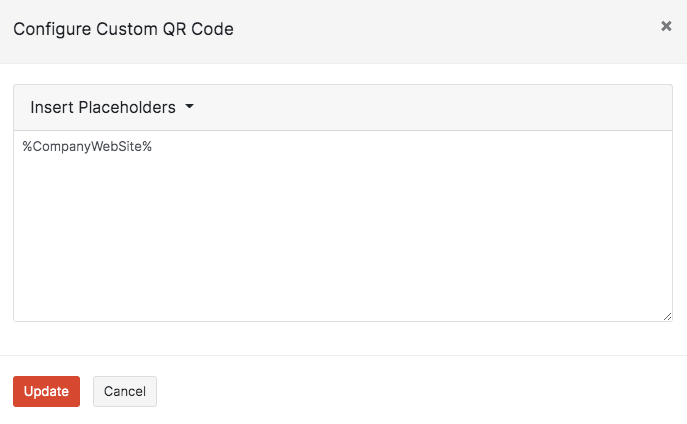
If you’ve selected Custom, click Configure.
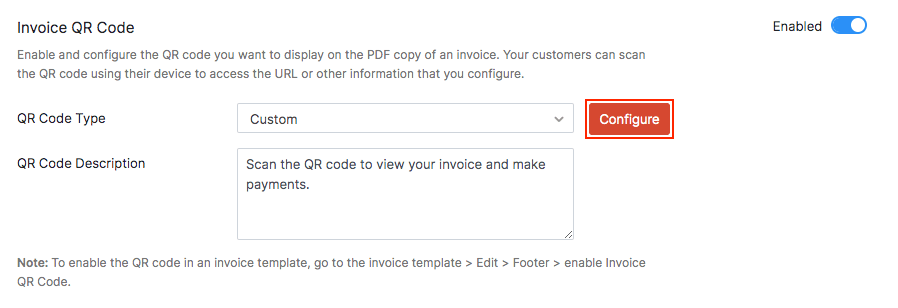
Enter the custom message (with 250 character limit) or insert placeholders and Update.
Enter a brief description about the QR code.
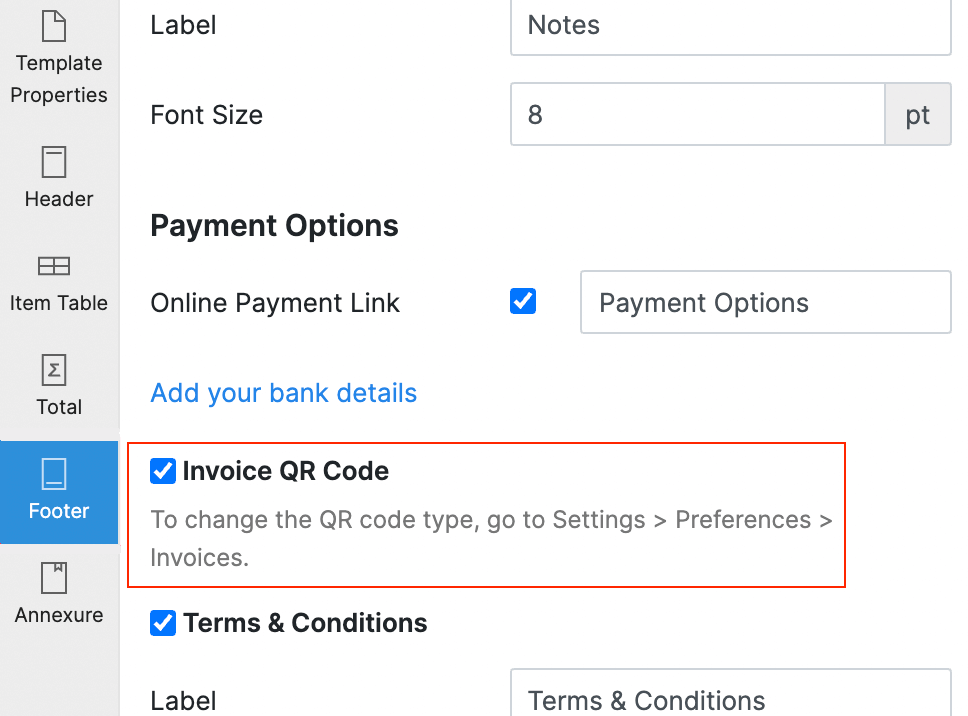
Click Save. Once the QR code has been enabled, all the custom templates created hereafter will have the QR code enabled in it.
If you wish to include QR codes in the existing templates:
Go to Settings in the top right corner. Navigate to the Module Settings.
Click Invoices under Sales.
Click the Edit button under the template you want to include the QR code.
Go to the Footer section of the template edit page.
Enable the Invoice QR Code option.
Click Save.
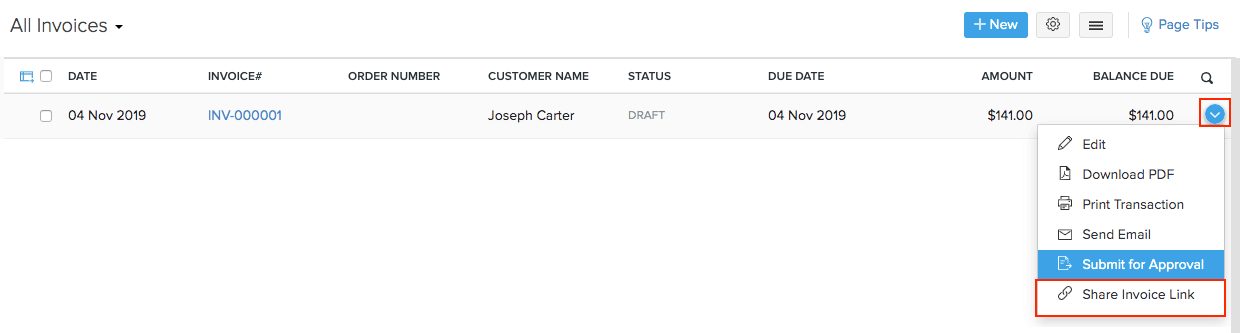
Share Invoice Link
Select the action that you want to perform on an invoice using the contextual menu on the invoice list page. You can also generate the invoice link and share it with your customer. On clicking the link, they will be able to open the invoice details on their browser and make the payment.
To share the invoice link with your customer:
Go to the Invoices module under Sales from the left sidebar.
Click the dropdown arrow at the end of the row and select the Share Invoice Link option.
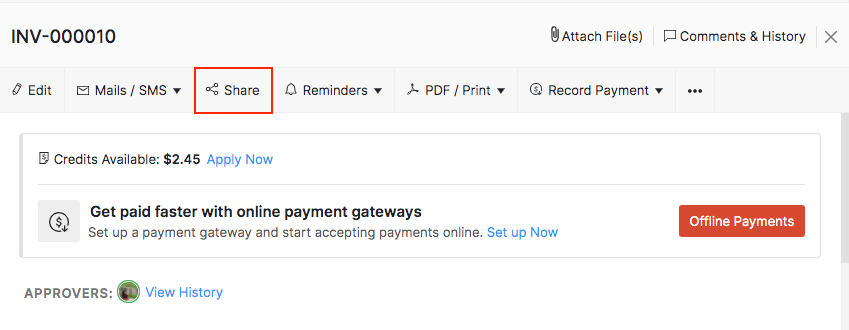
You can also open the particular invoice and click the Share button on the menubar.
Choose the access level under Visibility.
Set the link expiration date.
Click Generate Link.
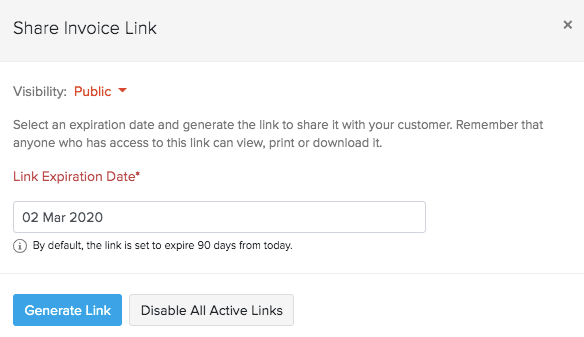
Click Copy Link and send it to your customer via instant messaging or any other medium.
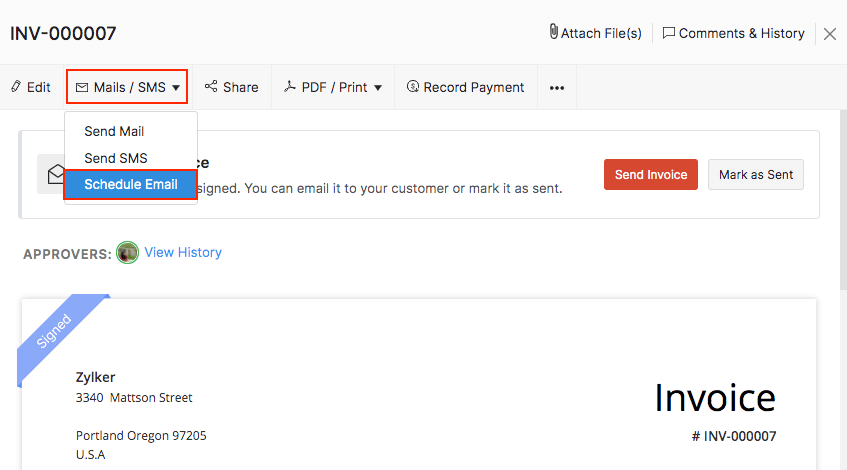
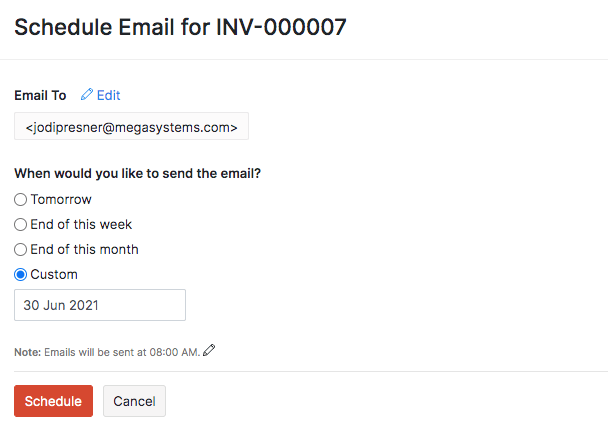
Schedule Invoice Email
You can schedule an invoice that has to be sent to your customer on a set date.
Prerequisite:
- If you have set up sales approval or integrated with Zoho Sign, then the invoice has to be in the Approved or Signed state respectively in order to be scheduled.
- If no workflow or integration has been set up, then the invoice can be scheduled when it’s in the Draft state.
To schedule an invoice email:
Go to the Invoices module and open an unsent invoice.
Click the Mails/SMS dropdown button on the menu bar.
Select the Schedule Email option.
Check the Email To list. Click the Edit option beside it to add or remove recipients.
Choose when you’d like the invoice to be emailed to your recipients.
Select the time by clicking the Pencil icon in the Notes.
Click Schedule. You can reschedule it anytime before the invoice is sent.
Delete Invoice
To delete an open invoice:
Go to the Invoices module under Sales from the left sidebar.
Open the invoice you want to delete.
Click the More dropdown on the menubar.
Choose the Delete option.
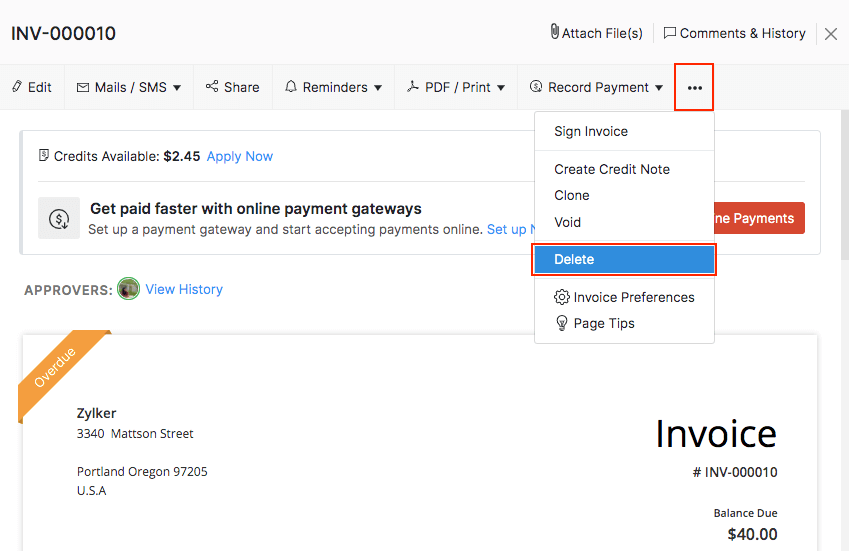
Confirm your action in the following pop-up.
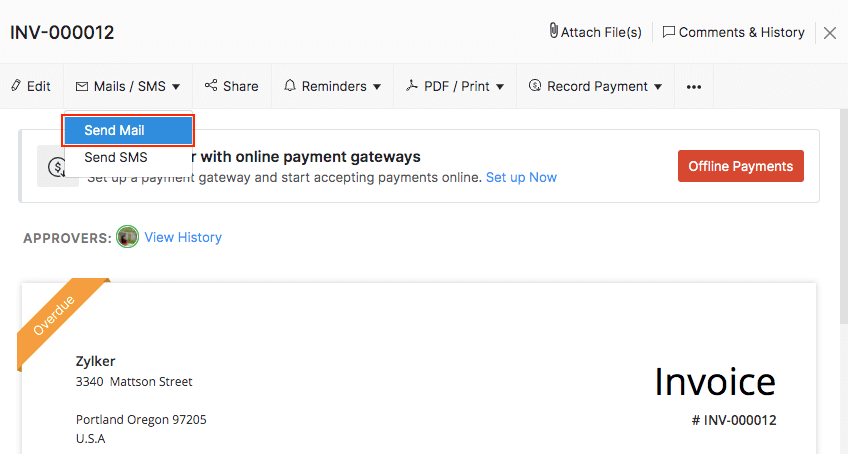
Email Invoices to Customers
To send invoices to your customers by email:
Go to the Invoices module under Sales from the left sidebar.
Open the invoice you want to email.
Click the Mail/SMS button on the menubar.
Select the Send Mail option from the dropdown.
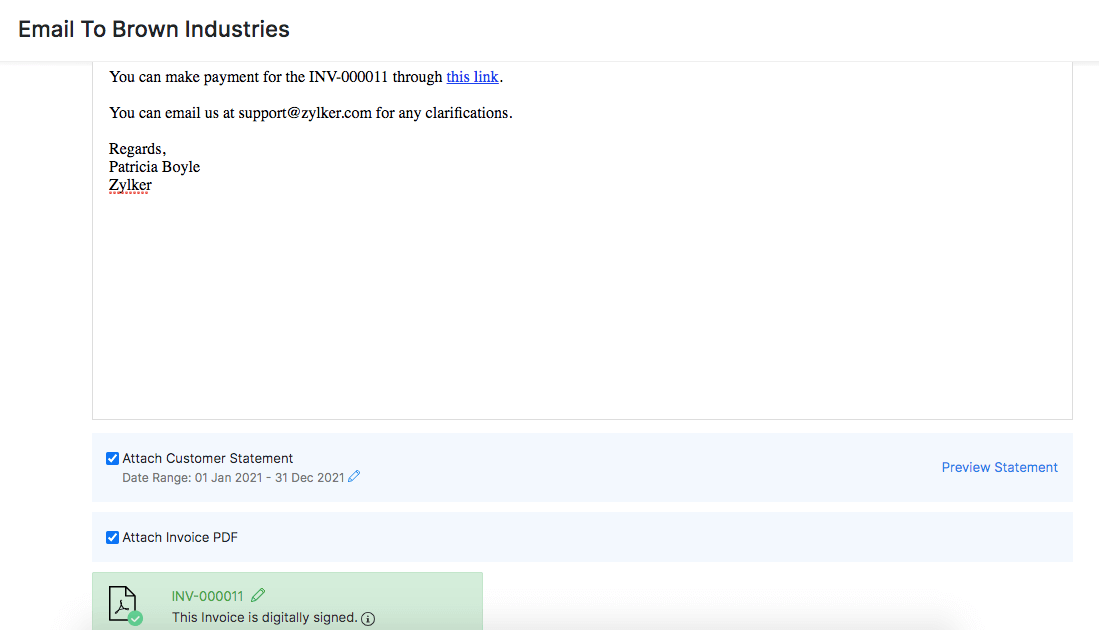
Select/add the contact persons to whom you want to send the email.
Edit the email content to your preference.
You can also attach Customer Statements and the Invoice PDF with this email.
Once your email is ready, click Send.
Note:
- The email addresses mentioned under CC will not be added as contact persons in Zoho Inventory.
- The email template can be edited by navigating to Settings > Emails.
Link Invoices with Sales Orders
You can associate invoices with sales orders that were created separately. There are two ways to do this in Zoho Inventory.
Before you proceed, please note the following prerequisites:
- The customer addressed to must be the same in both the invoice and the corresponding sales order.
- The sales order date cannot fall after the invoice date.
- The invoice must contain one or more of the items mentioned in the sales order. They cannot be linked in case of items mismatch.
- The sales order cannot be void, cancelled, closed, dropshipped or on hold.
Linking By Importing
You can link your invoices in to its corresponding sales orders in bulk while importing them. To do so,
Go to the Invoices module.
Click the Menu icon - Import Invoices.
Browse and upload the relevant file.
Check the option - Link Invoices to its corresponding Sales Orders.

Click Next.
Map the Sales Order Number field with the corresponding sales order number column from your import file. This step is mandatory to successfully link the invoices to its sales orders.
Click Next, preview your changes and click Import if everything is ready.
The selected invoices will be linked to their respective sales orders. The linked sales order will be marked as Confirmed if they were in draft.
Linking By Associating Order Numbers Manually
To link an invoice with a sales order manually in Zoho Inventory:
Go to the Invoices module.
Click an invoice to open it.
Click the Edit button at the top to edit the invoice details.
Enter the sales order number that you want to link it to in the Order Number field.
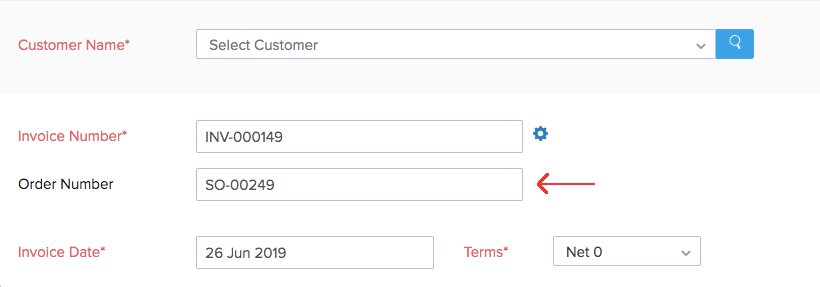
Click Save.
In the invoices list page, click the checkbox next to the invoice for which you’ve provided the sales order number. You can select more than one invoice.
Click the Link to existing sales order button at the top.
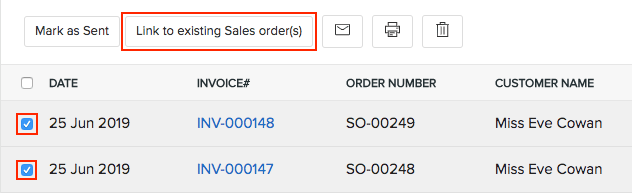
The selected invoices will be linked to their respective sales orders. The linked sales order will be marked as Confirmed if they were in draft.
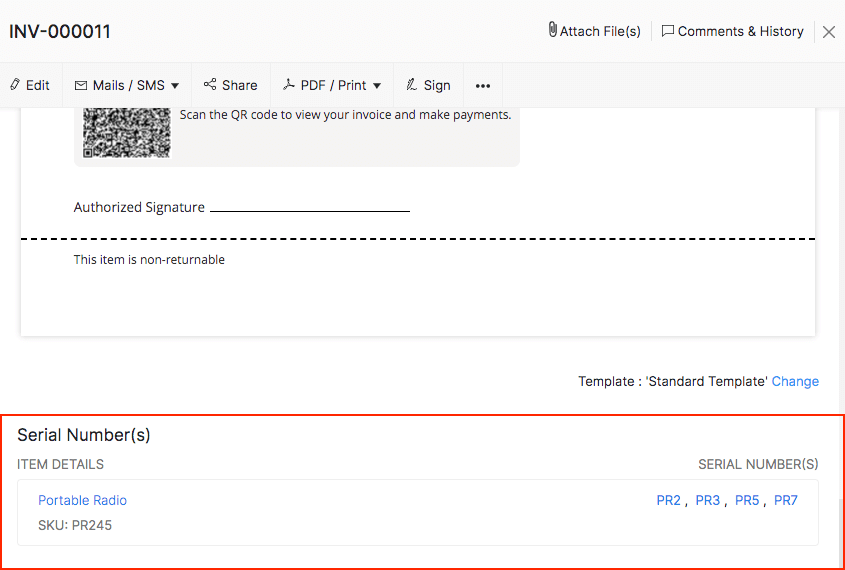
Adding Serial Numbers in Invoices
To add serial numbers for the serial-tracked items in an invoice:
Navigate to the Invoices module and open the New Invoice page.
Add items/composite items that are serial number tracked and specify the quantity.
Click the Select Serial Numbers option below the item quantity field.

Select the serial numbers you want to add from the dropdown or scan the serial number of the item using a barcode scanner for the specified quantity.You can add up to 1000 serial numbers in a transaction.
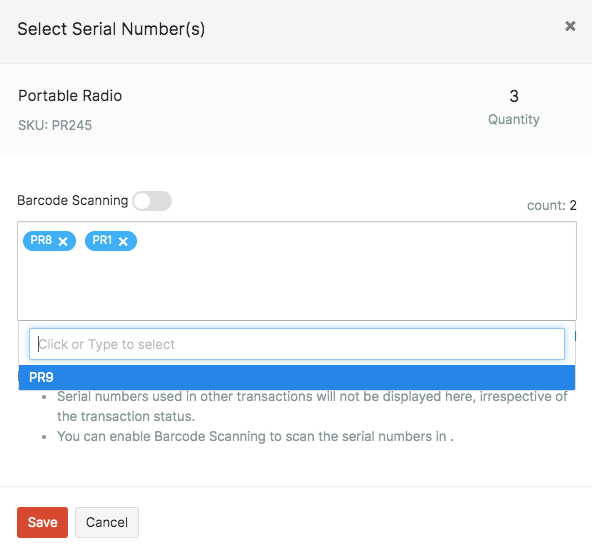
Save the invoice. You can view the serial numbers associated with it at the footer.
Insight: If you prefer to track serial/batch numbers in packages, purchase receives and sales return receipts, go to Settings > Preferences > Items. Under Advanced Inventory Tracking, choose Track in packages, purchase receives and return receipts option.
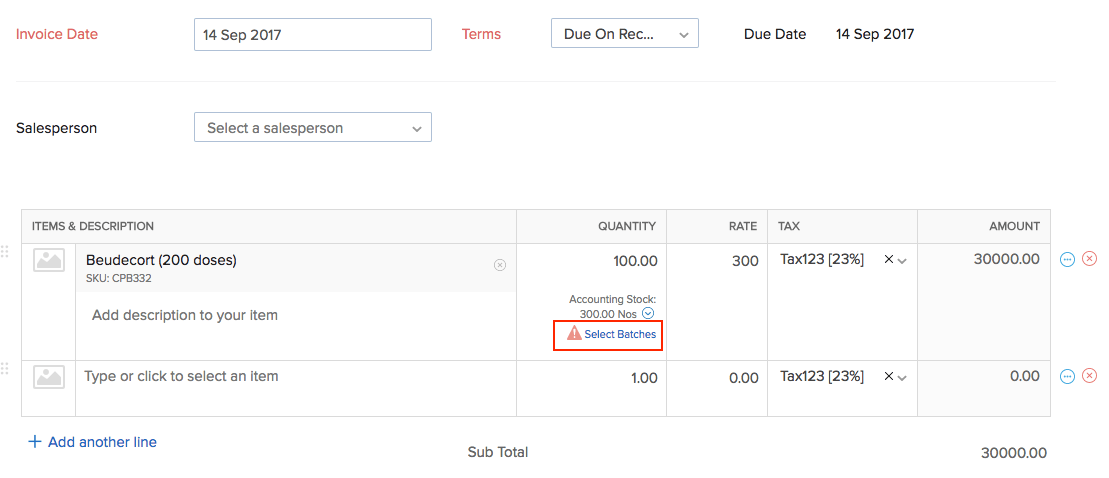
Adding Batch Numbers in Invoices
To add batch numbers for the batch-tracked items in an invoice:
Navigate to the Invoices module and open the New Invoice page.
Add items/composite items that are batch number tracked and specify the quantity.
Click the Select Batch Numbers option below the item quantity field.
Select the desired batch numbers and enter the quantity to dispatch from that batch. The aggregate of the quantity taken from each batch has to match the invoice quantity of that line item. You can select up to 100 batch numbers for each line item, and a total of 5000 batches per transaction.
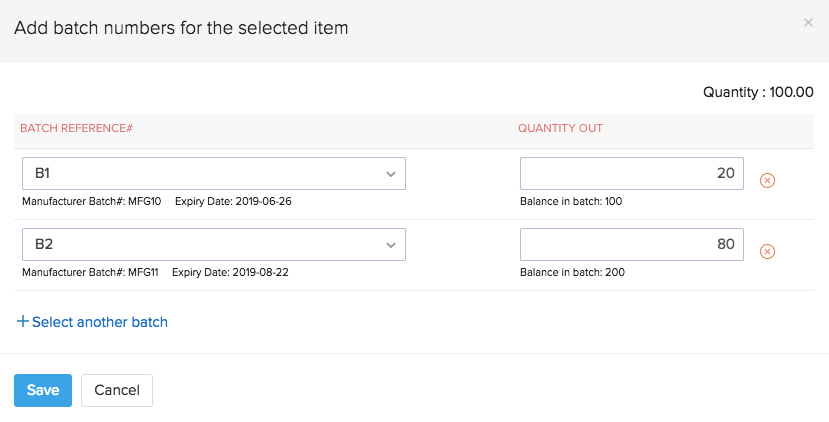
Save the invoice. You’ll be able to view the selected batches at the bottom of the invoice.

Insight: If you prefer to track serial/batch numbers in packages, purchase receives and sales return receipts, go to Settings > Preferences > Items. Under Advanced Inventory Tracking, choose Track in packages, purchase receives and return receipts option.
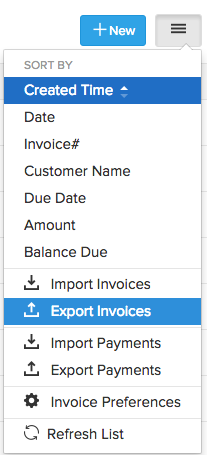
Export Invoices
To export invoices from your Zoho Inventory account:
Navigate to the Invoices module under Sales from the left sidebar.
Click the button with the More icon on the top right corner.
Select the Export Invoices option from the dropdown menu. The files will be saved to your default downloads folder.
Filter the transactions you wish to export by selecting one of the following options:
- All: Export all transactions of the selected module.
- Custom: Set a custom date range and export the transactions that falls within this date range.
Select a format in which you want to export the data: CSV (Comma Separated Value), XLS (Microsoft Excel 1997 - 2004) or XLSX (Microsoft Excel).
If required, you can add a password protection to your export files that contain sensitive data.
Click Export. The file will be saved to your default downloads folder.
Learn in detail the steps to export data from Zoho Inventory.