
Advanced Reporting Tags
As a growing business, you may have a rapidly expanding customer base spread across various domains and locations. When generating reports, it can become difficult to find details related to a specific domain or location.
Advanced Reporting Tags in Zoho Books allow you to filter and track transactions with precision by creating tags and options that can be applied at both the transaction and line item level. You can organize options in a parent-child hierarchy, control their visibility by mapping them with other tags or locations, and restrict user access to transactions based on associated tags and locations. These tags can be associated with items, customers, vendors, and transactions. By using reporting tags, you can filter and compare reports to gain detailed insights, track performance, and make more informed business decisions.
Note: This feature is available in early access only for certain plans of Zoho Books. Visit the pricing page to check if it’s available in your current plan.
Scenario: Mark runs a company with departments like Sales, Marketing, and Finance. To track departmental spending, he creates a reporting tag called Department with options for Sales, Marketing, and Finance, adding sub-options under Sales such as Sales Manager and Sales Executive. A client visits Mark’s company, and the Sales team incurs expenses for the meeting such as lunch or travel arrangements. Mark records this as an expense and tags it under Department > Sales. If the expense was specifically incurred by the Sales Manager, he selects the Sales Manager sub-option; if it was incurred by a Sales Executive, he selects Sales Executive. Later, he can filter reports by this tag and its options to get a clear breakdown of expenses across roles within the Sales team.
You can associate reporting tags with Customers, Vendors, Items, Quotes, Sales Orders, Invoices, Recurring Invoices, Credit Notes, Expenses, Recurring Expenses, Purchase Orders, Bills, Recurring Bills, Vendor Credits, Retainer Invoices, Customer Payments, Vendor Payments, Inventory Adjustments, Sales Receipts, Fixed Assets, Banking, and Journal Entries.
Enable Advanced Reporting Tags
To enable advanced reporting tags:
Note: Once you enable this feature, it cannot be disabled.
- Go to Settings.
- Navigate to Organisation Settings.
- Select Reporting Tags under Customisation.
- Click Enable Advanced Reporting Tags in the top right corner.
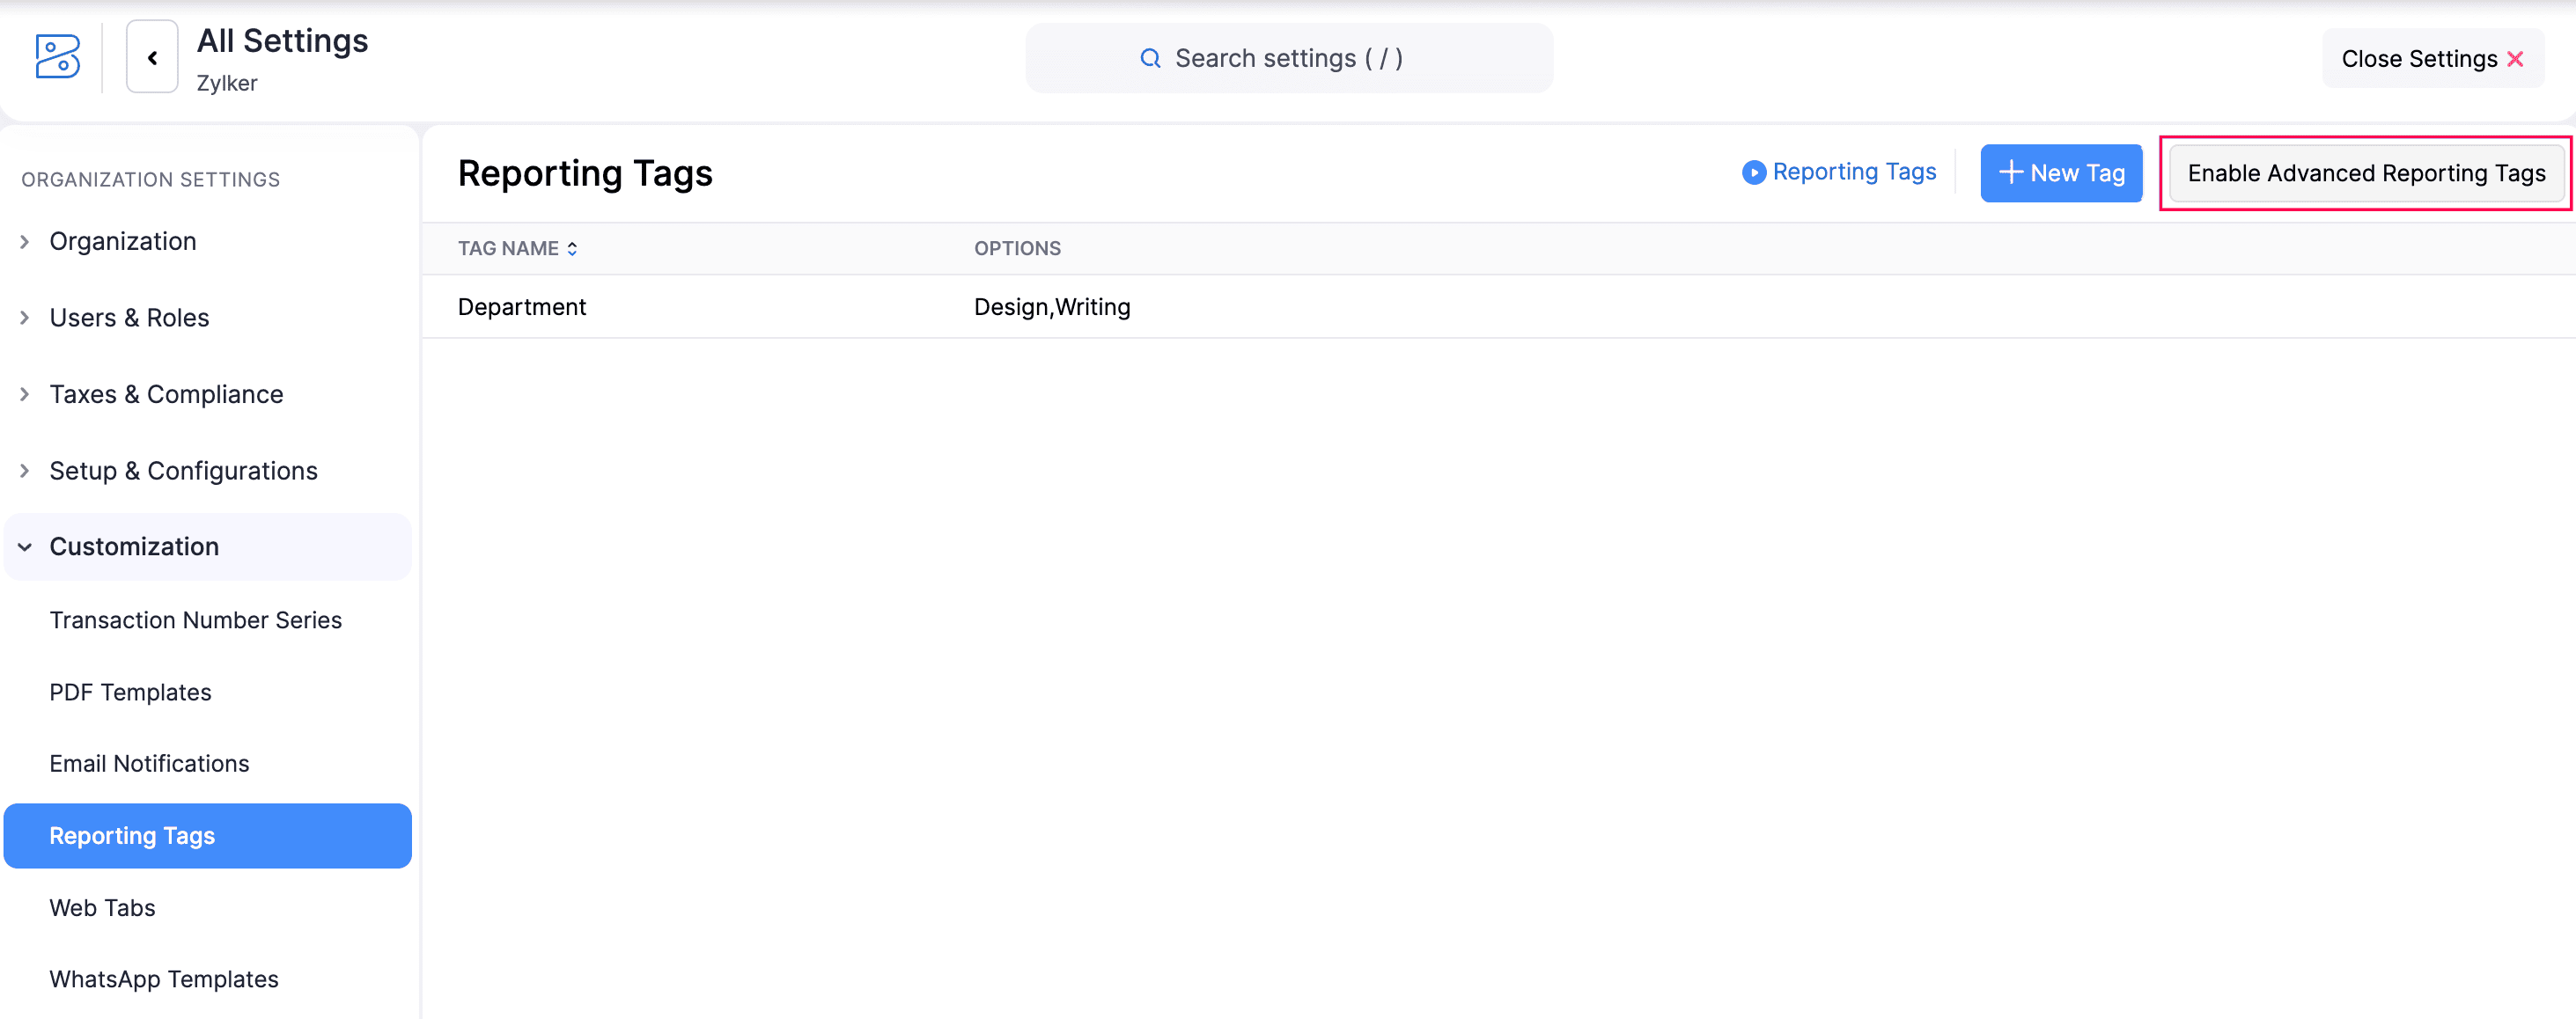
- Read the details about the feature, then click Enable in the Enable Advanced Reporting Tags pop-up.

Once you enable Advanced Reporting Tags, any reporting tags previously created in your organisation will be updated with the new features. You can then edit them to configure options, set visibility conditions and manage access control.
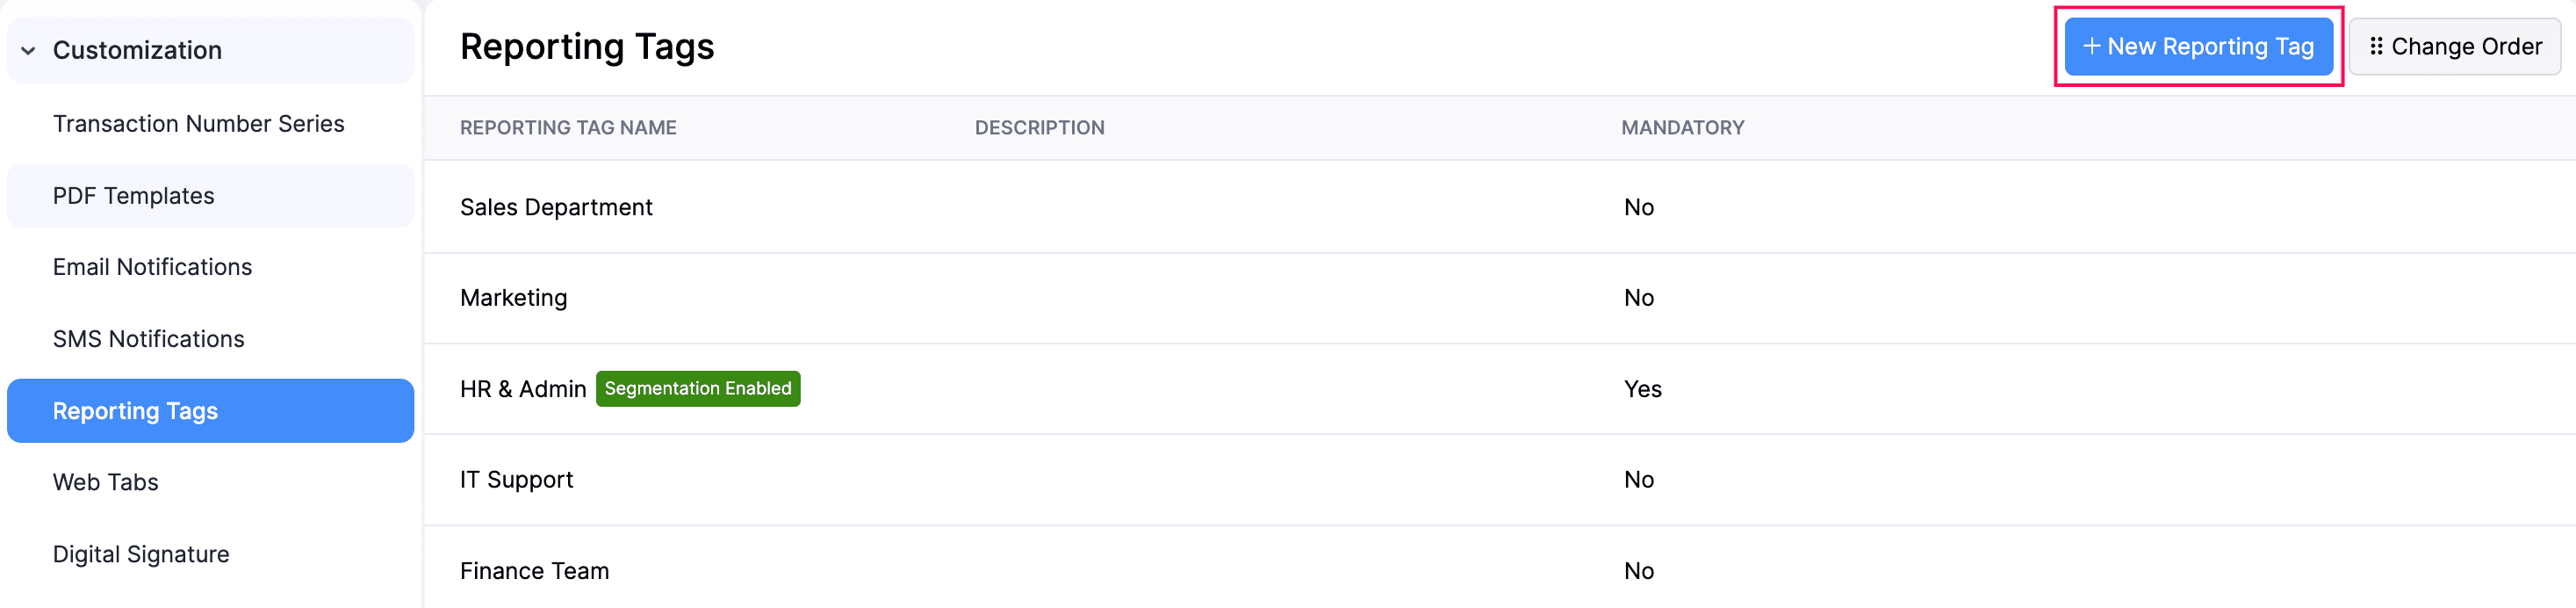
Create Reporting Tags
To create a reporting tag:
- Go to Settings in the top right corner.
- Navigate to Organisation Settings.
- Select Reporting Tags under Customisation.
- Click + New Reporting Tag.
You will then be directed to the reporting tags creation page.
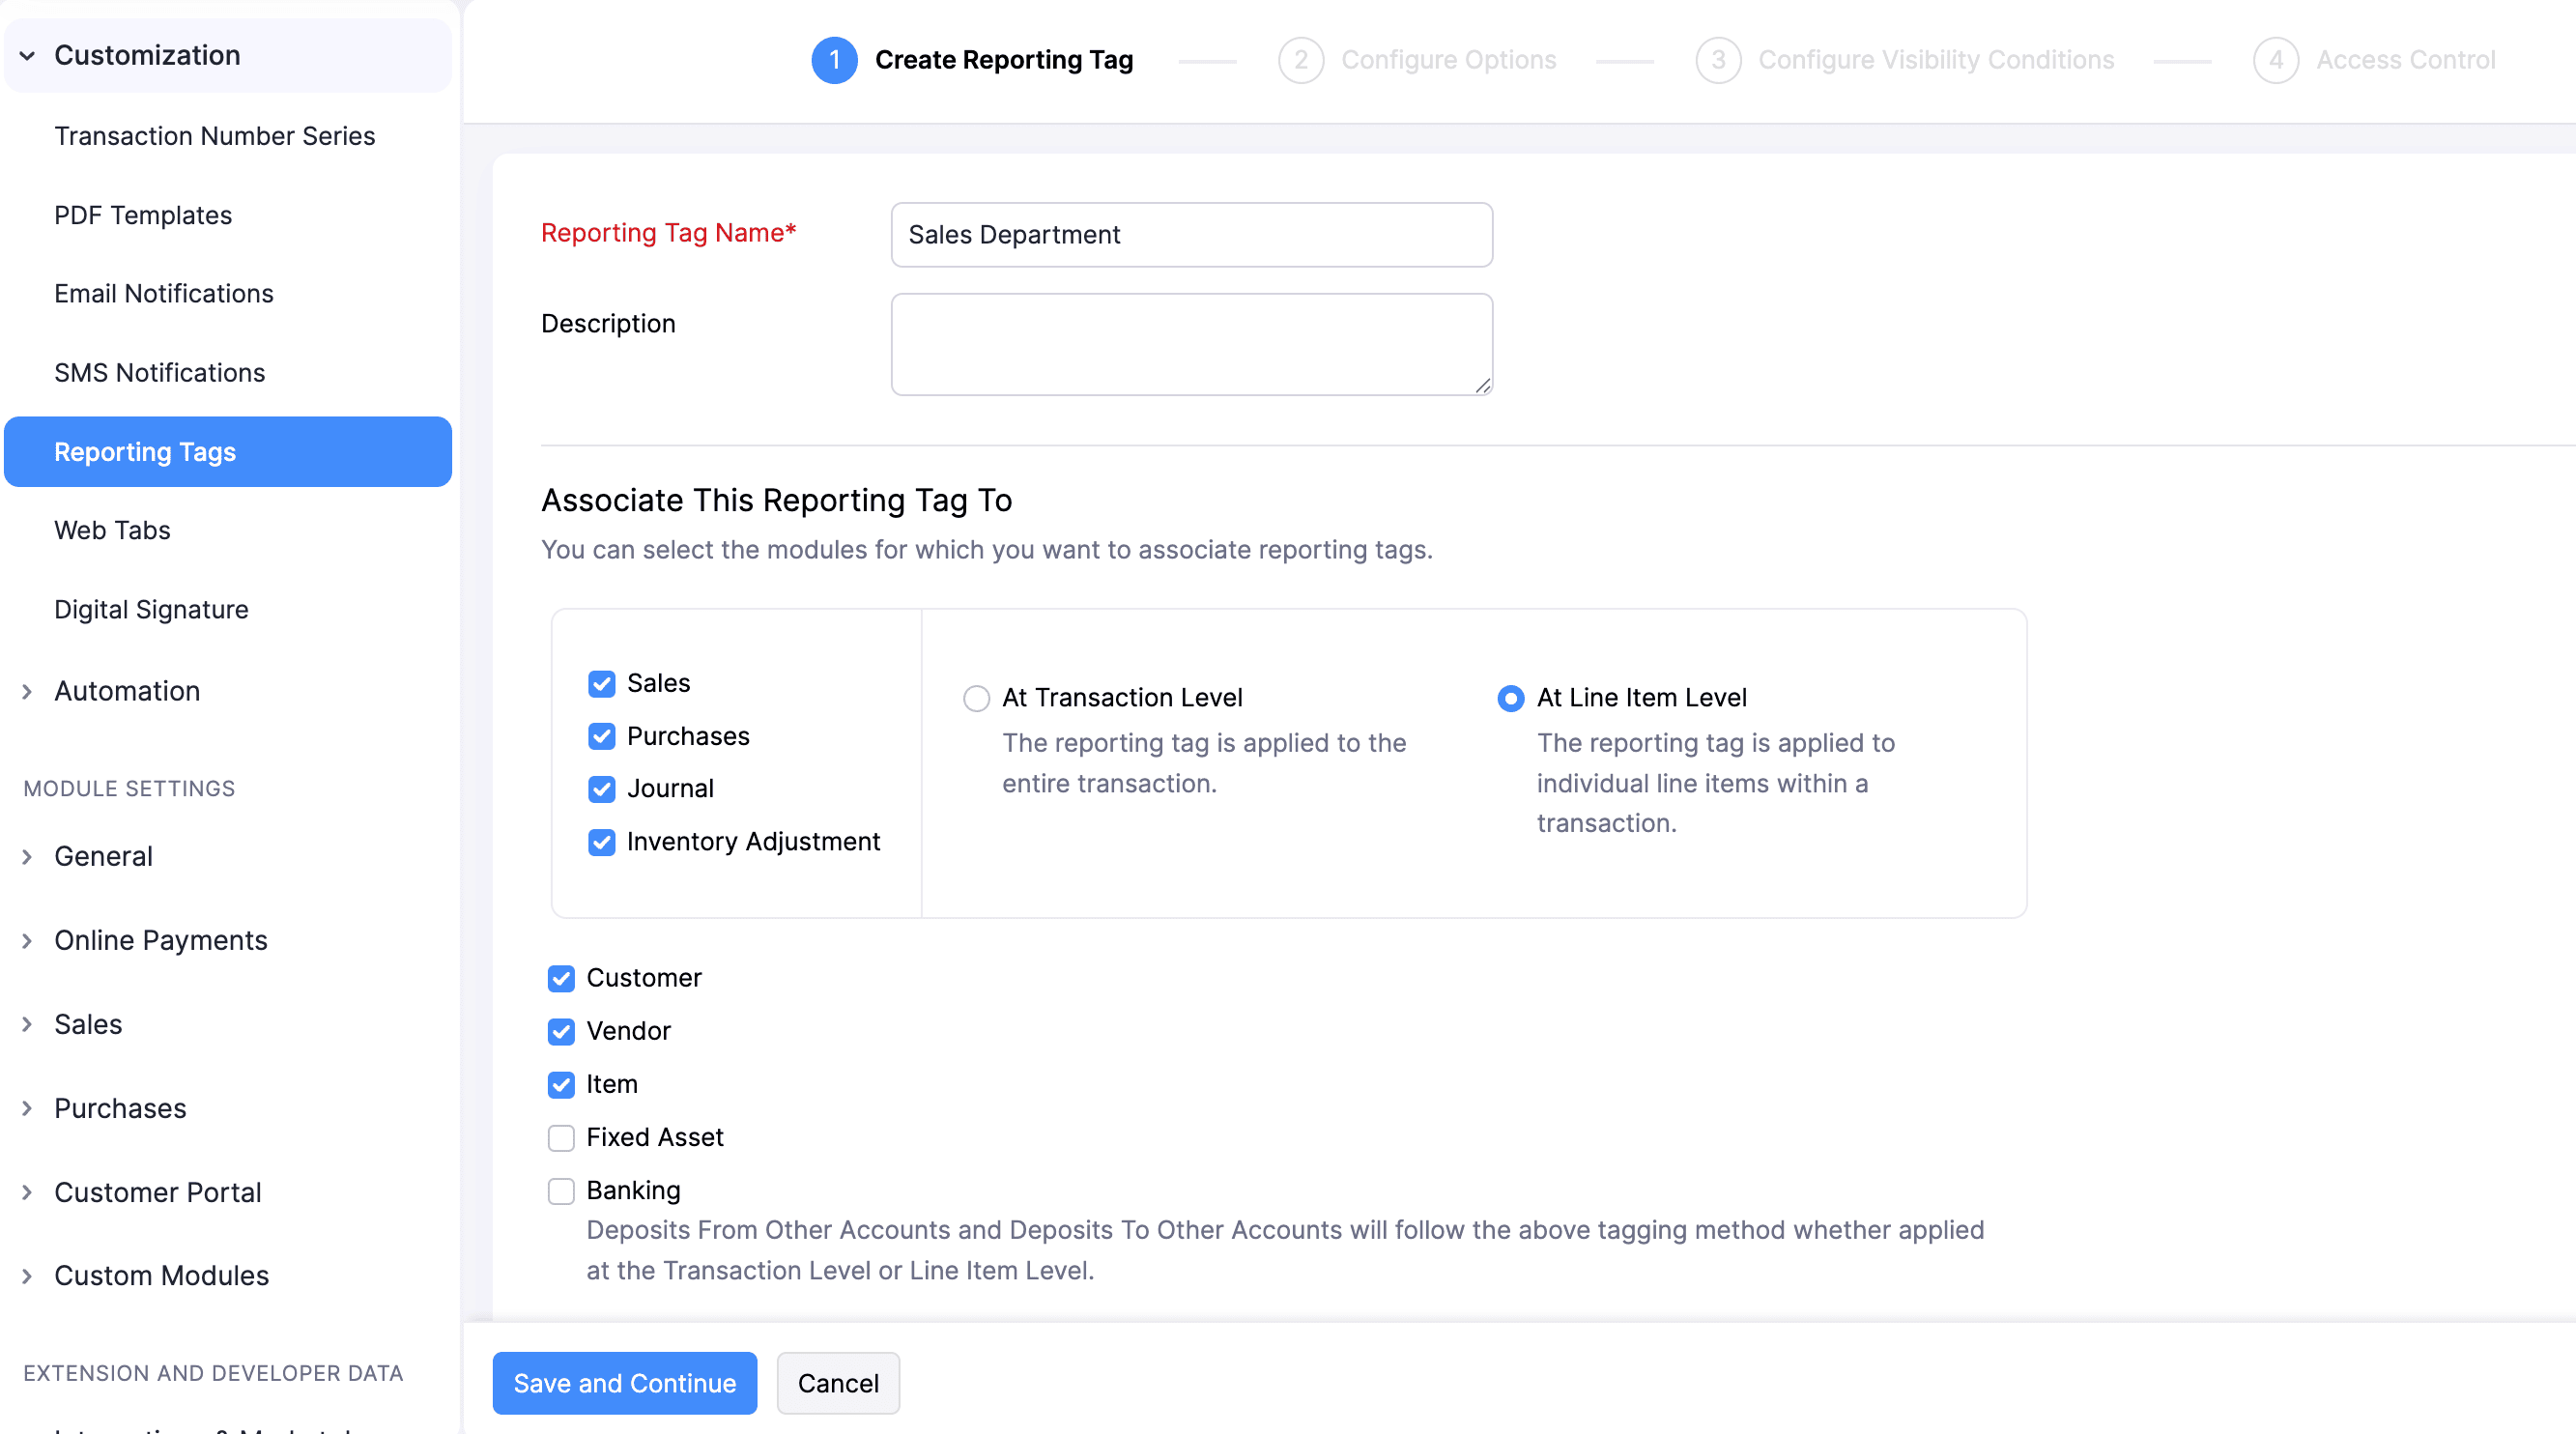
In the Create Reporting Tag tab, you can create and define reporting tags and choose the modules you want to associate them with. Here’s how:
- Enter a name for your reporting tag in the Reporting Tag Name field.
- Enter a Description if necessary.
- Under the Associate This Reporting Tag To section, select the modules you want to associate the reporting tag with. For certain modules such as Sales, Purchases, Journals, and Inventory Adjustments, you can choose to apply the reporting tag either At Transaction Level or At Line Item Level. Once you have associated the reporting tag with a module, it will appear on that module’s transaction creation or edit page, either at the line item level or the transaction level, based on the preference you’ve selected.
Note: You can associate a reporting tag with the Items module only if it is applied at the line item level in Sales, Purchases, Journals, or Inventory Adjustments. This is because the Items module tracks tags for individual items, and a tag applied at the transaction level cannot be assigned to specific items, so it won’t work for item-level reporting.
- Enable the Make This Reporting Tag Mandatory option to ensure it is applied to all relevant transactions. Please note that a mandatory reporting tag should have at least one active option.
- Once you’re done, click Save and Continue.
Note: Every reporting tag you create will be saved as Not Ready. To mark it as ready, go to Settings > Customisation > Reporting Tags > Click the More icon > select Mark as Ready from the dropdown. Please note that a reporting tag can be marked as ready only if it has at least one option.
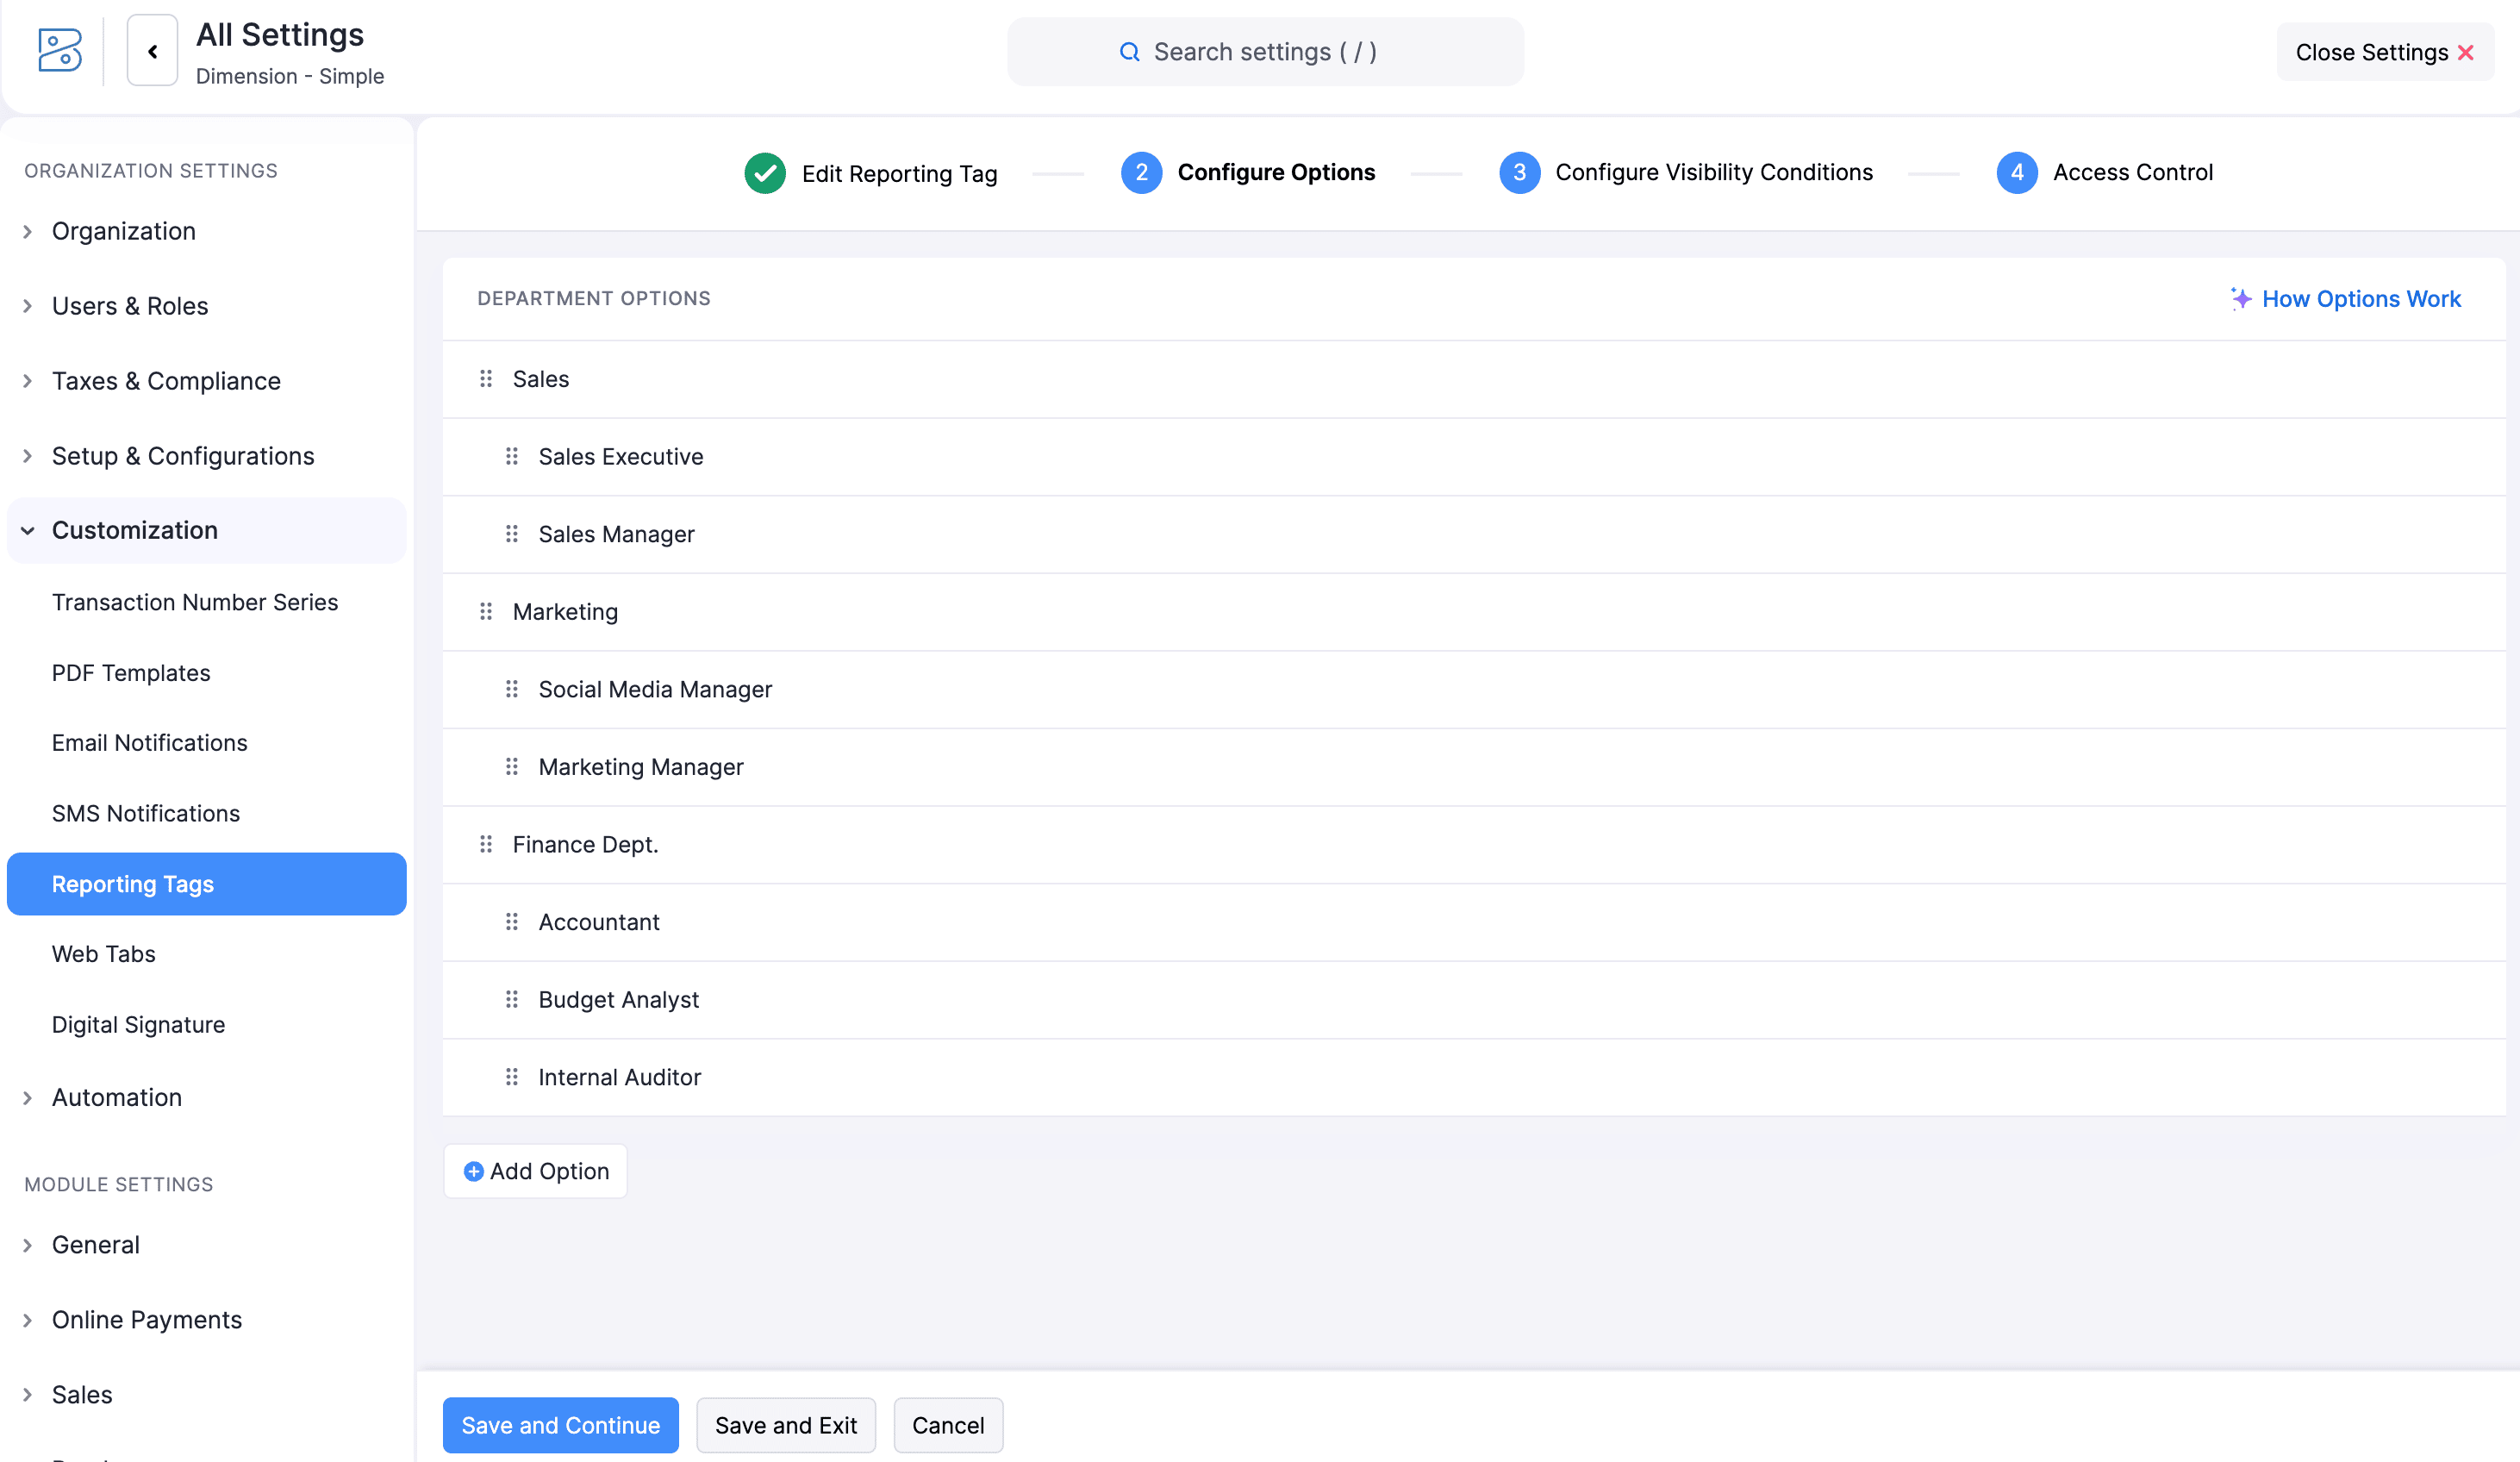
You will then be redirected to the Configure Options tab, where you can create options for your reporting tag.
Configure Options
In the Configure Options tab, you can create options for each reporting tag. These options act as the values you’ll select while recording transactions, helping you classify your sales, expenses, journals, and other entries, and making your reports easier to filter and analyze.
You can also arrange these options in a parent-child hierarchy. This means you can create a main option and add sub-options under it. You can create up to five levels in this hierarchy. Additionally, you can reorder the options if needed.
To configure options for your reporting tag:
Note: The number of options you can add to a reporting tag varies based on your plan. Visit the pricing page to check the limits for your current plan.
- Enter an option name in the Configure Options tab.
- Click + Add Option to add a new option (or)
- Hover over an option and click the + icon.
- Select Add Option Above from the dropdown to add an option above the parent option.
- Select Add Option Below from the dropdown to add an option below the parent option.
- Select Add a Child from the dropdown to add an option as a child of the parent option.
- Click the Delete icon to delete an option.
- Once you’re done, click Save and Continue to navigate to the Configure Visibility Conditions tab, where you can set filters for your reporting tag. If you prefer not to create filters, click Save and Exit to save your changes.
You will be directed to the Configure Visibility Conditions tab.
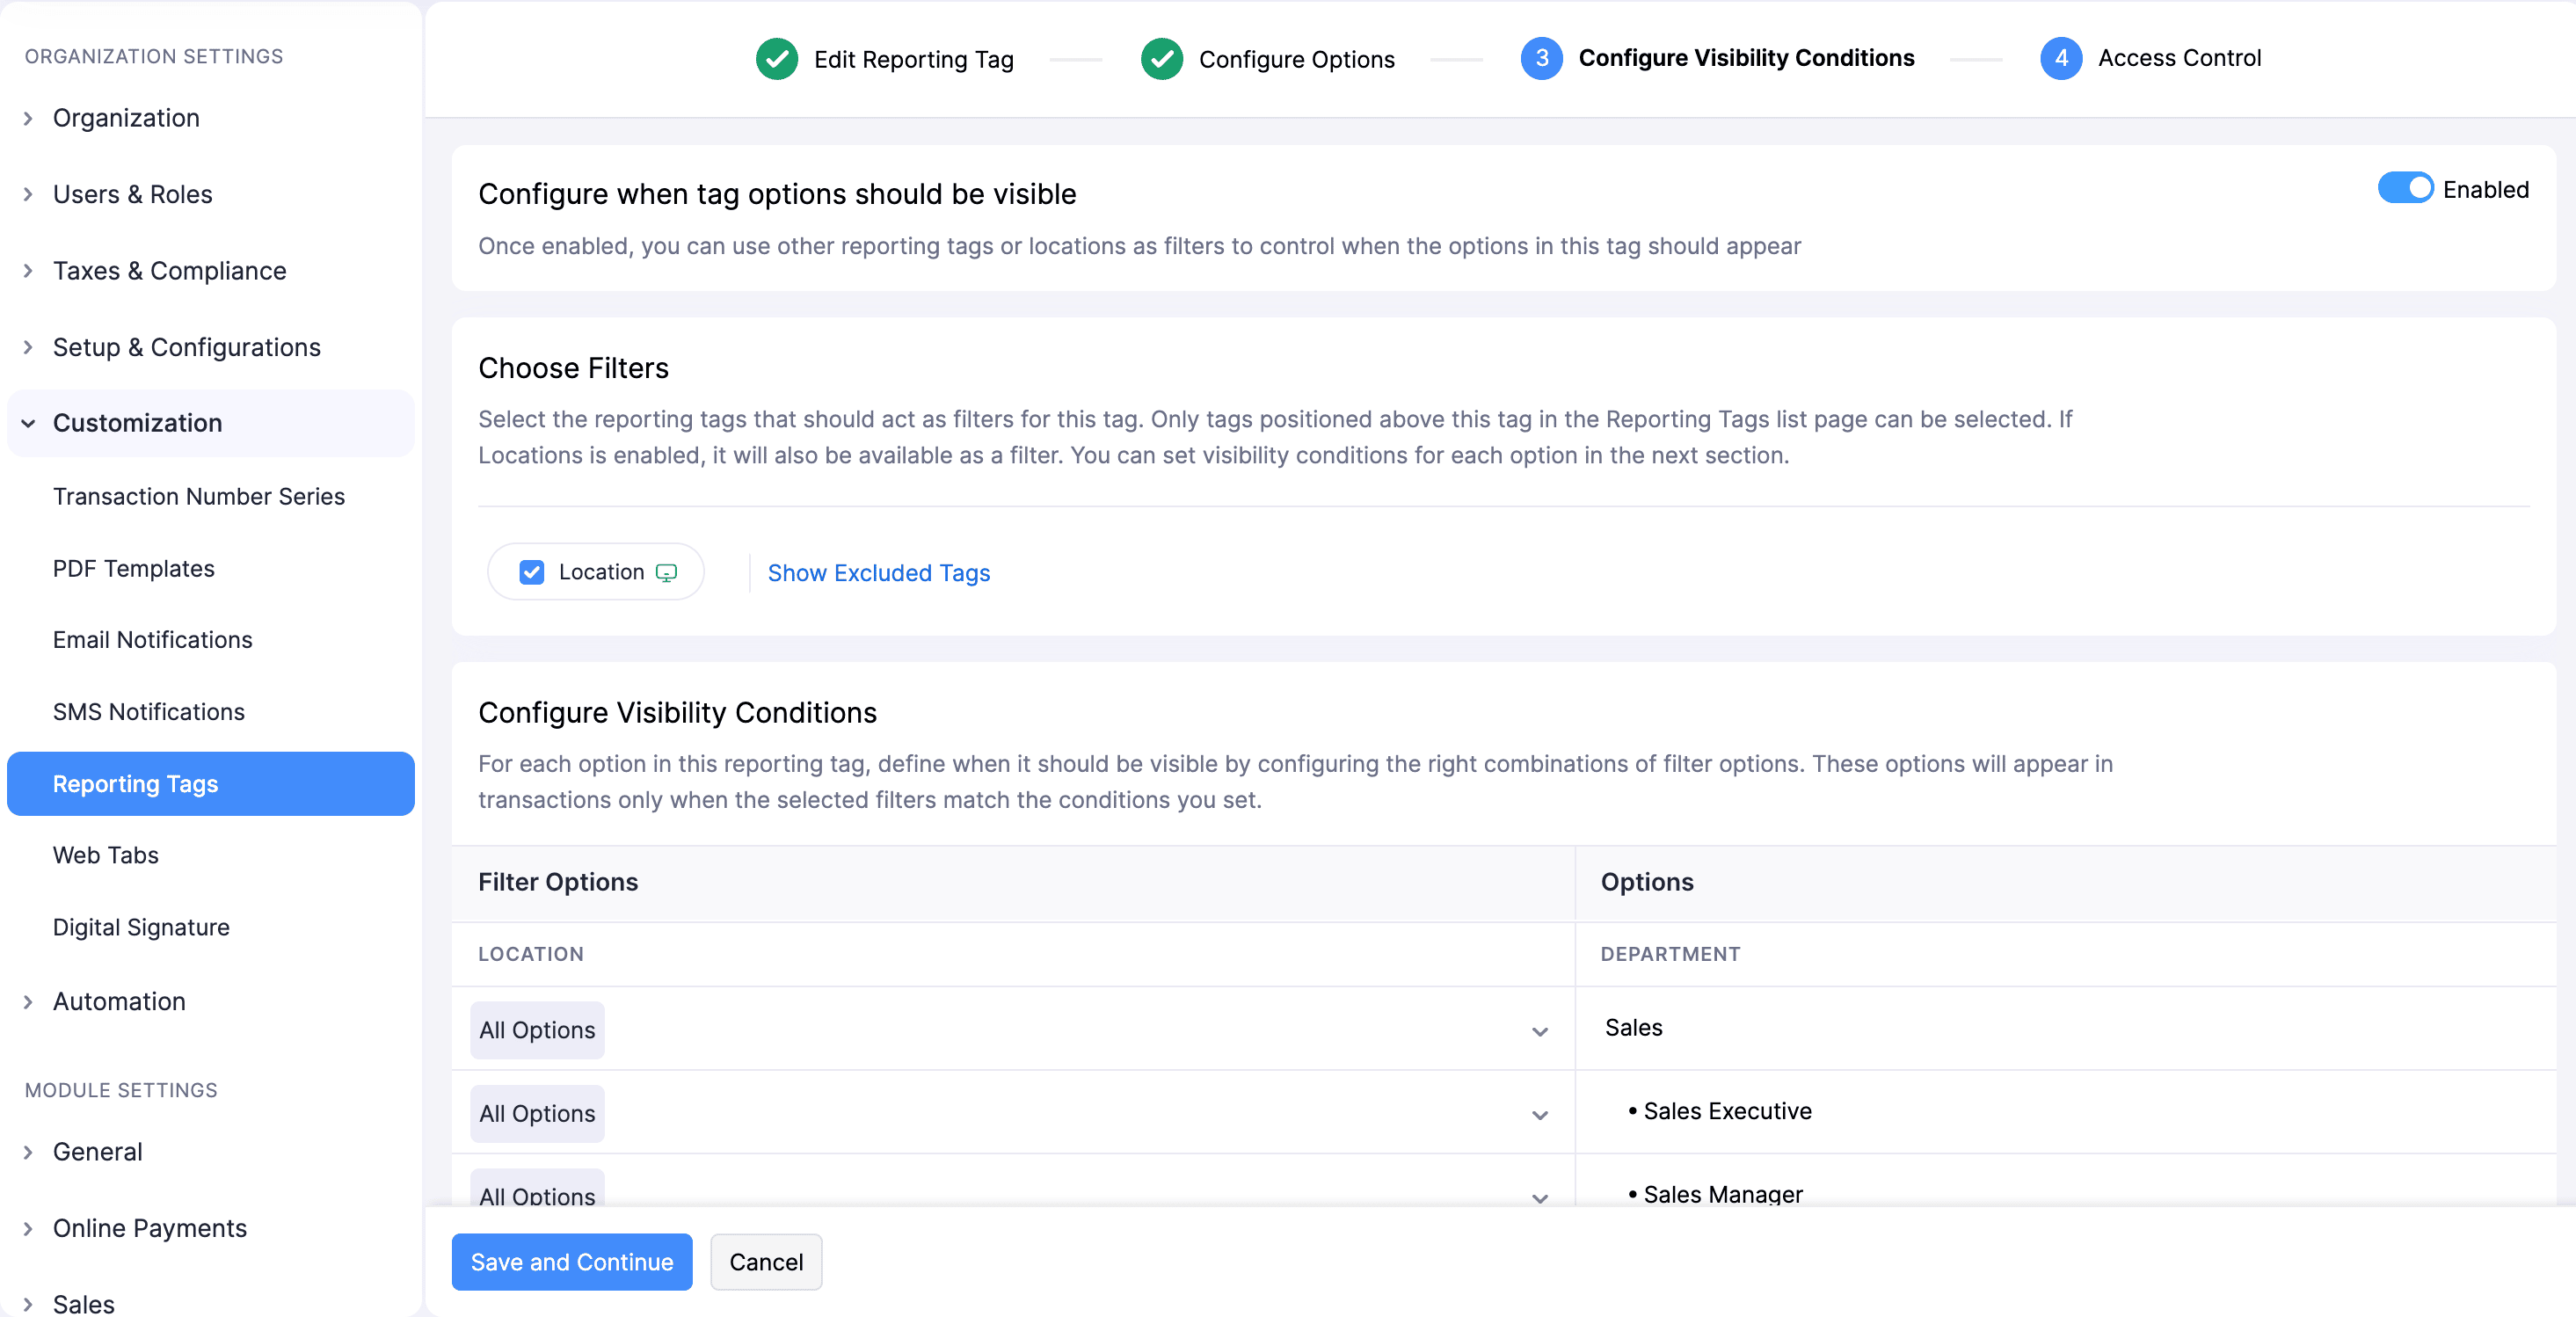
Configure Visibility Conditions
This feature is disabled by default. When you enable it, you can control when each option of a reporting tag appears in your transactions by mapping its options to the options of other reporting tags that act as filters. If Locations is enabled in your organisation, it will also be available as a filter.
Once enabled, Zoho Books will check the filter options selected in a transaction and show only the options that match the conditions you’ve set.
Scenario: Mark creates a reporting tag called Department, with options such as Sales, Marketing, and Finance and selects Location as a filter for this tag. He then sets visibility conditions by mapping each Department option to the relevant Location options. For example, he sets the Marketing option to appear only when the selected Location is New York. When Mark records a transaction, the Marketing option will appear under the Department tag will be shown only if the selected Location meets this condition.
To configure when each option of a reporting tag should appear in your transactions:
- Slide the Configure when tag options should be visible toggle.
- Select the reporting tags you want to use as filters for the current tag under the Choose Filters field. You can only apply tags that come before the current tag in the list page of reporting tags as filters.
Note: If a tag cannot be associated with a filter, it will be included under Show Excluded Tags. You can click Show Excluded Tags to see the why the tag was excluded.
- You can control when each option in the current tag appears by mapping it to specific options of the filter tags you selected under Choose filters. An option will be visible only when any one of the mapped filter options is selected for each filter tag or filter location. You can add five filters per tag and map up to 200 options to it.
- When mapping reporting tag options, you can either select specific options to use as filters or choose All from the dropdown to map a reporting tag’s option to all options of another reporting tag. If you want the reporting tag to display options even when no option is selected in the mapped tag, select Untagged.
- Once you’re done, click Save and Continue.
You will be redirected to the Access Control section.
Configure Access Control
Access Control in Zoho Books lets you manage and restrict what each user can view and access in a transaction based on reporting tags. When you enable access control, you can assign specific reporting tag options to a user. They will only be able to view transactions that include one of the tag options assigned to them. For example, if a user is assigned the Sales and Marketing options in a reporting tag, they will only see transactions tagged with Sales or Marketing, while all other transactions remain hidden.
Access control is configured at the role level, meaning all users within a role follow the same restrictions. You can also combine Locations with access control to limit users so they can access only the transactions associated with their assigned locations. Additionally, you can allow users to view transactions they normally wouldn’t have access to, or display transactions from modules don’t use reporting tags.
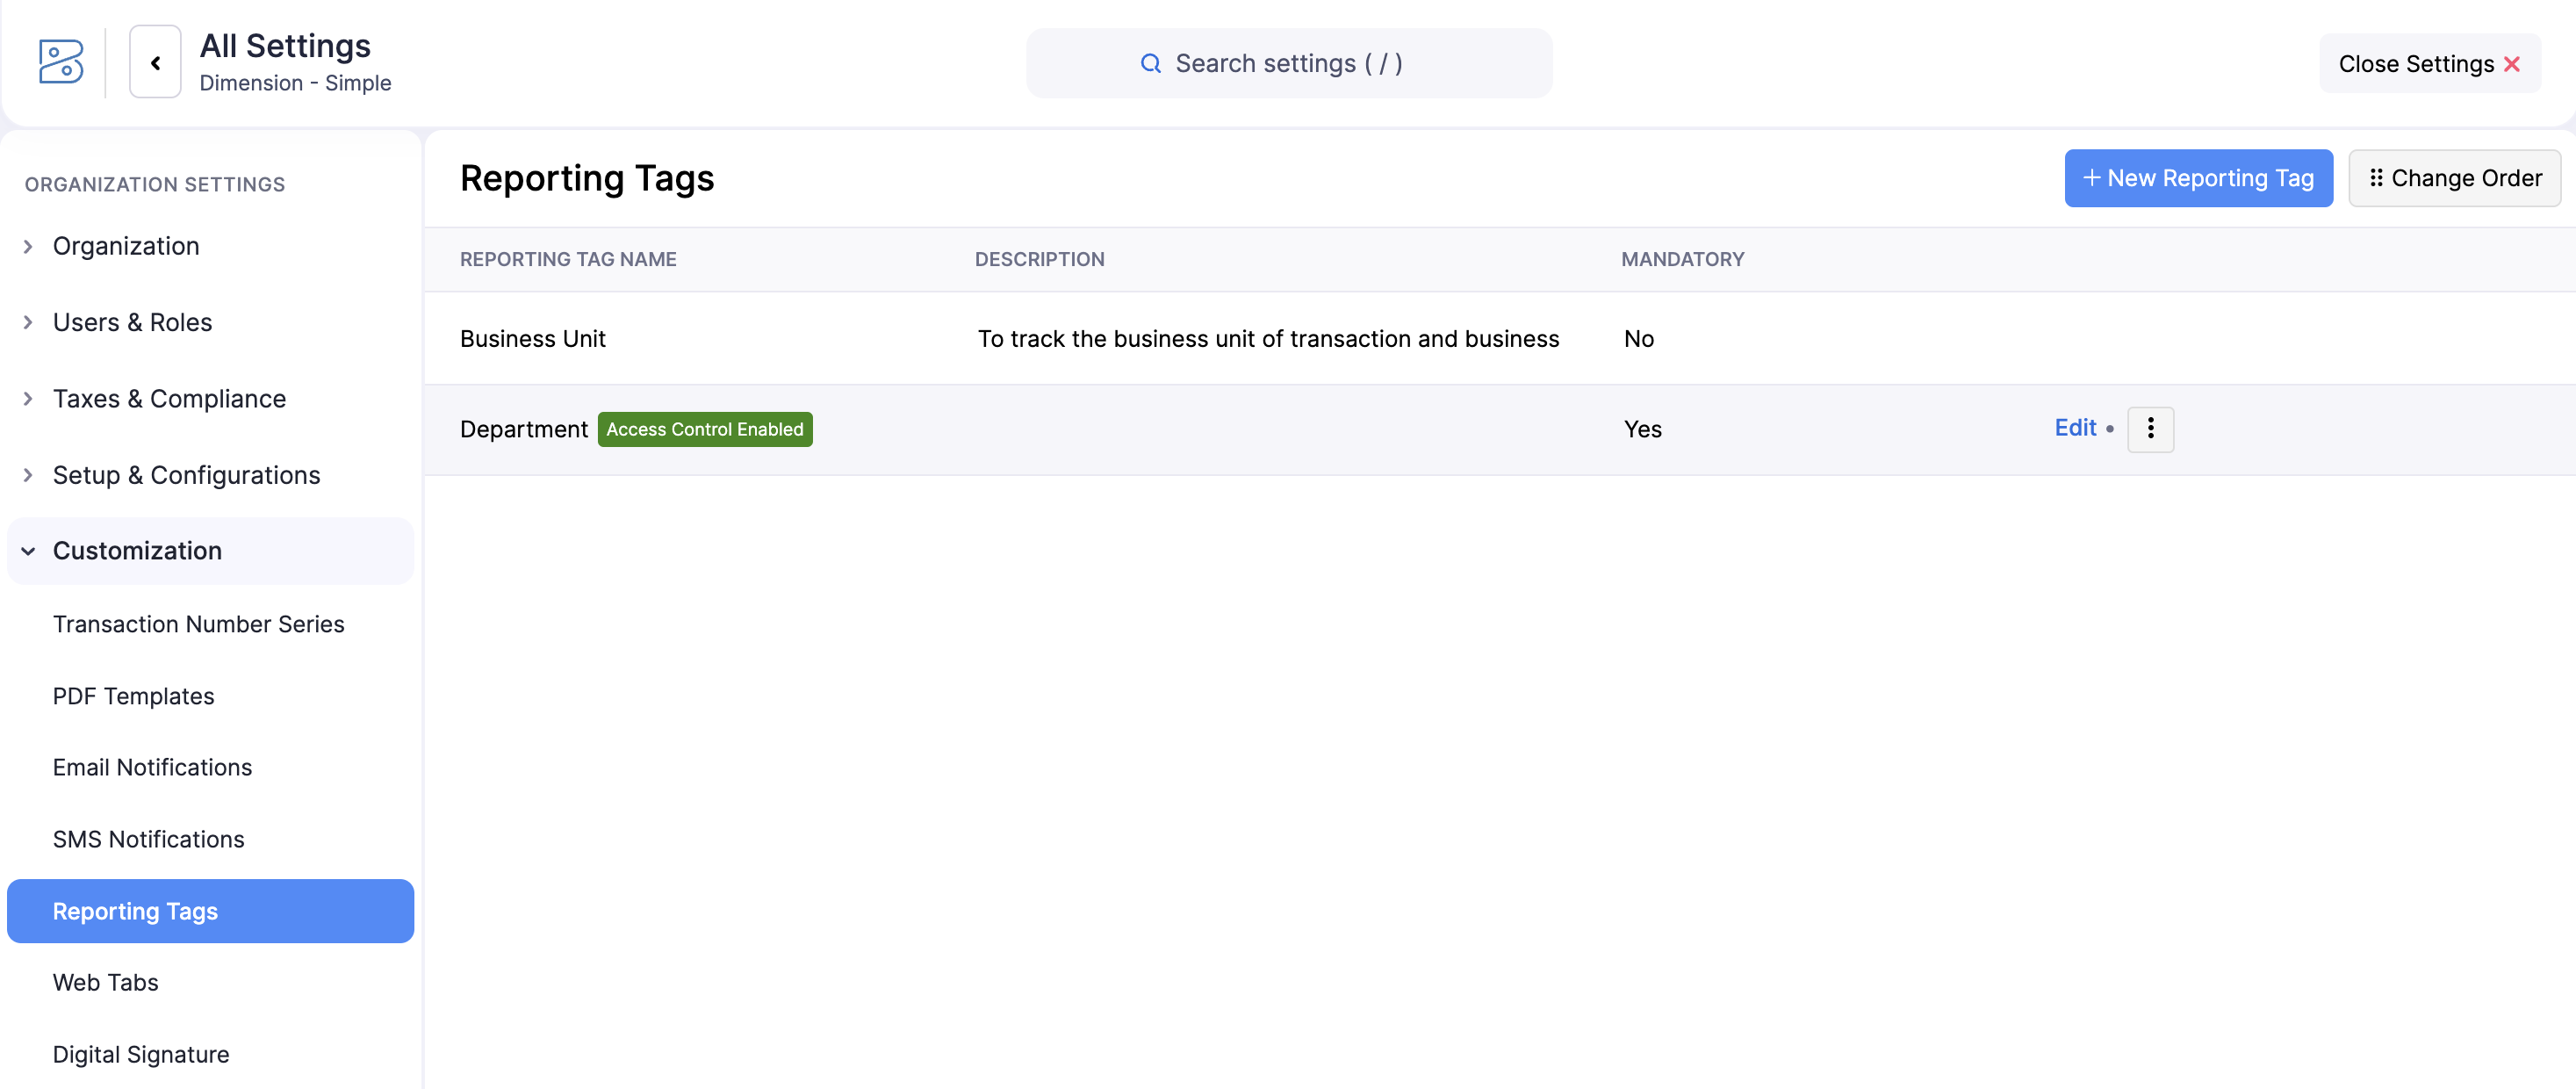
To enable access control for a reporting tag:
- Slide the Access Control toggle.
- Click Save.
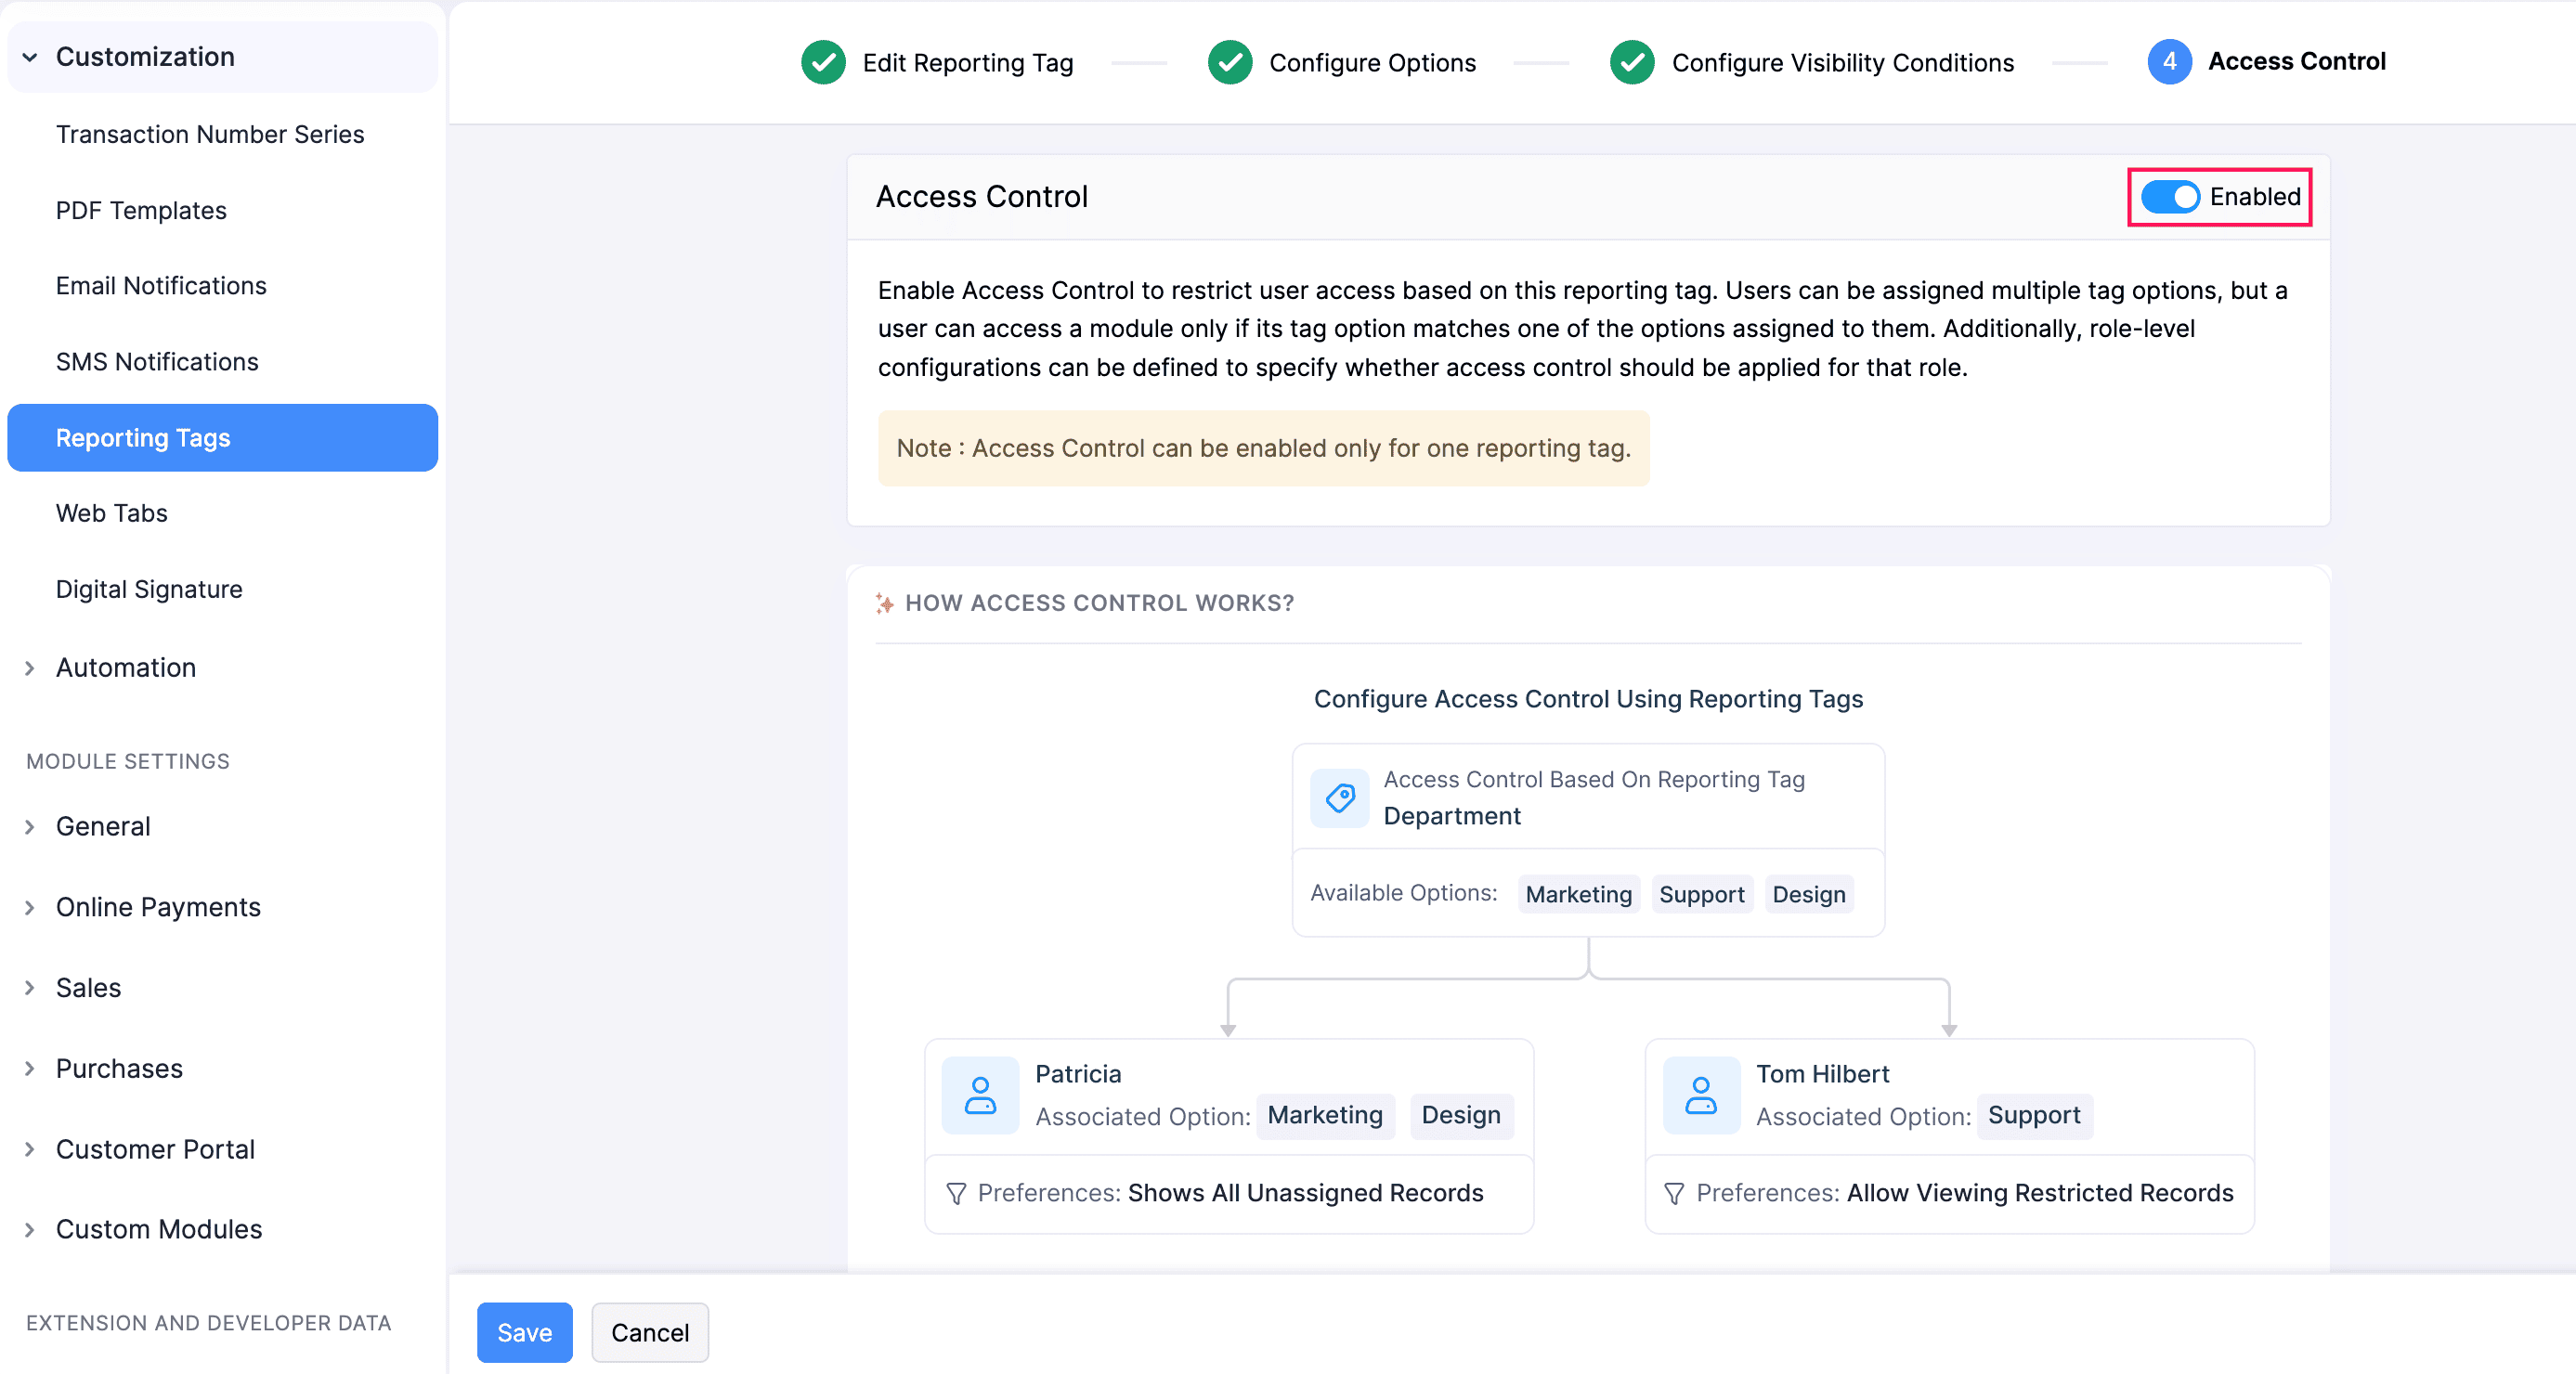
Please note that you can enable access control for only one reporting tag in your organisation.
To enable access control for a role in your organisation:
- Go to Settings.
- Navigate to Organisation Settings.
- Select Roles under Users and Roles.
- Create or edit a role.
- Navigate to the Segmented Access Control tab.
- In the Segmented Access Control tab, the Transactions option will be enabled by default for Locations and for the reporting tag for which you’ve enabled access control. This means that users with this role can access only the transactions that belong to the locations associated with them or the transaction that contain the reporting tag for which access control is enabled.
- If you want users with this role to view transactions that contain locations they don’t have access to, check the Allow Viewing Restricted Records option under Locations.
- If you want users with this role to access transactions that have no associated reporting tags, check the Allow Access to All Unassigned Records option.
- Click Save.

Once configured, the selected role will have controlled and secure access to transactions based on the locations and reporting tags you’ve assigned to the users with this role.
To enable access control for a user in your organisation:
- Go to Settings.
- Navigate to Organisation Settings.
- Select Users under Users and Roles.
- Invite or edit an user.
- Navigate to the Restrict Access To section.
- Select the locations you want the user to have access to under the Locations section. The user can access only the transactions that belong to these locations.
- Select the options you want to associate with the user for the reporting tag for which you’ve enabled access control in the next tab.
- Click Save.
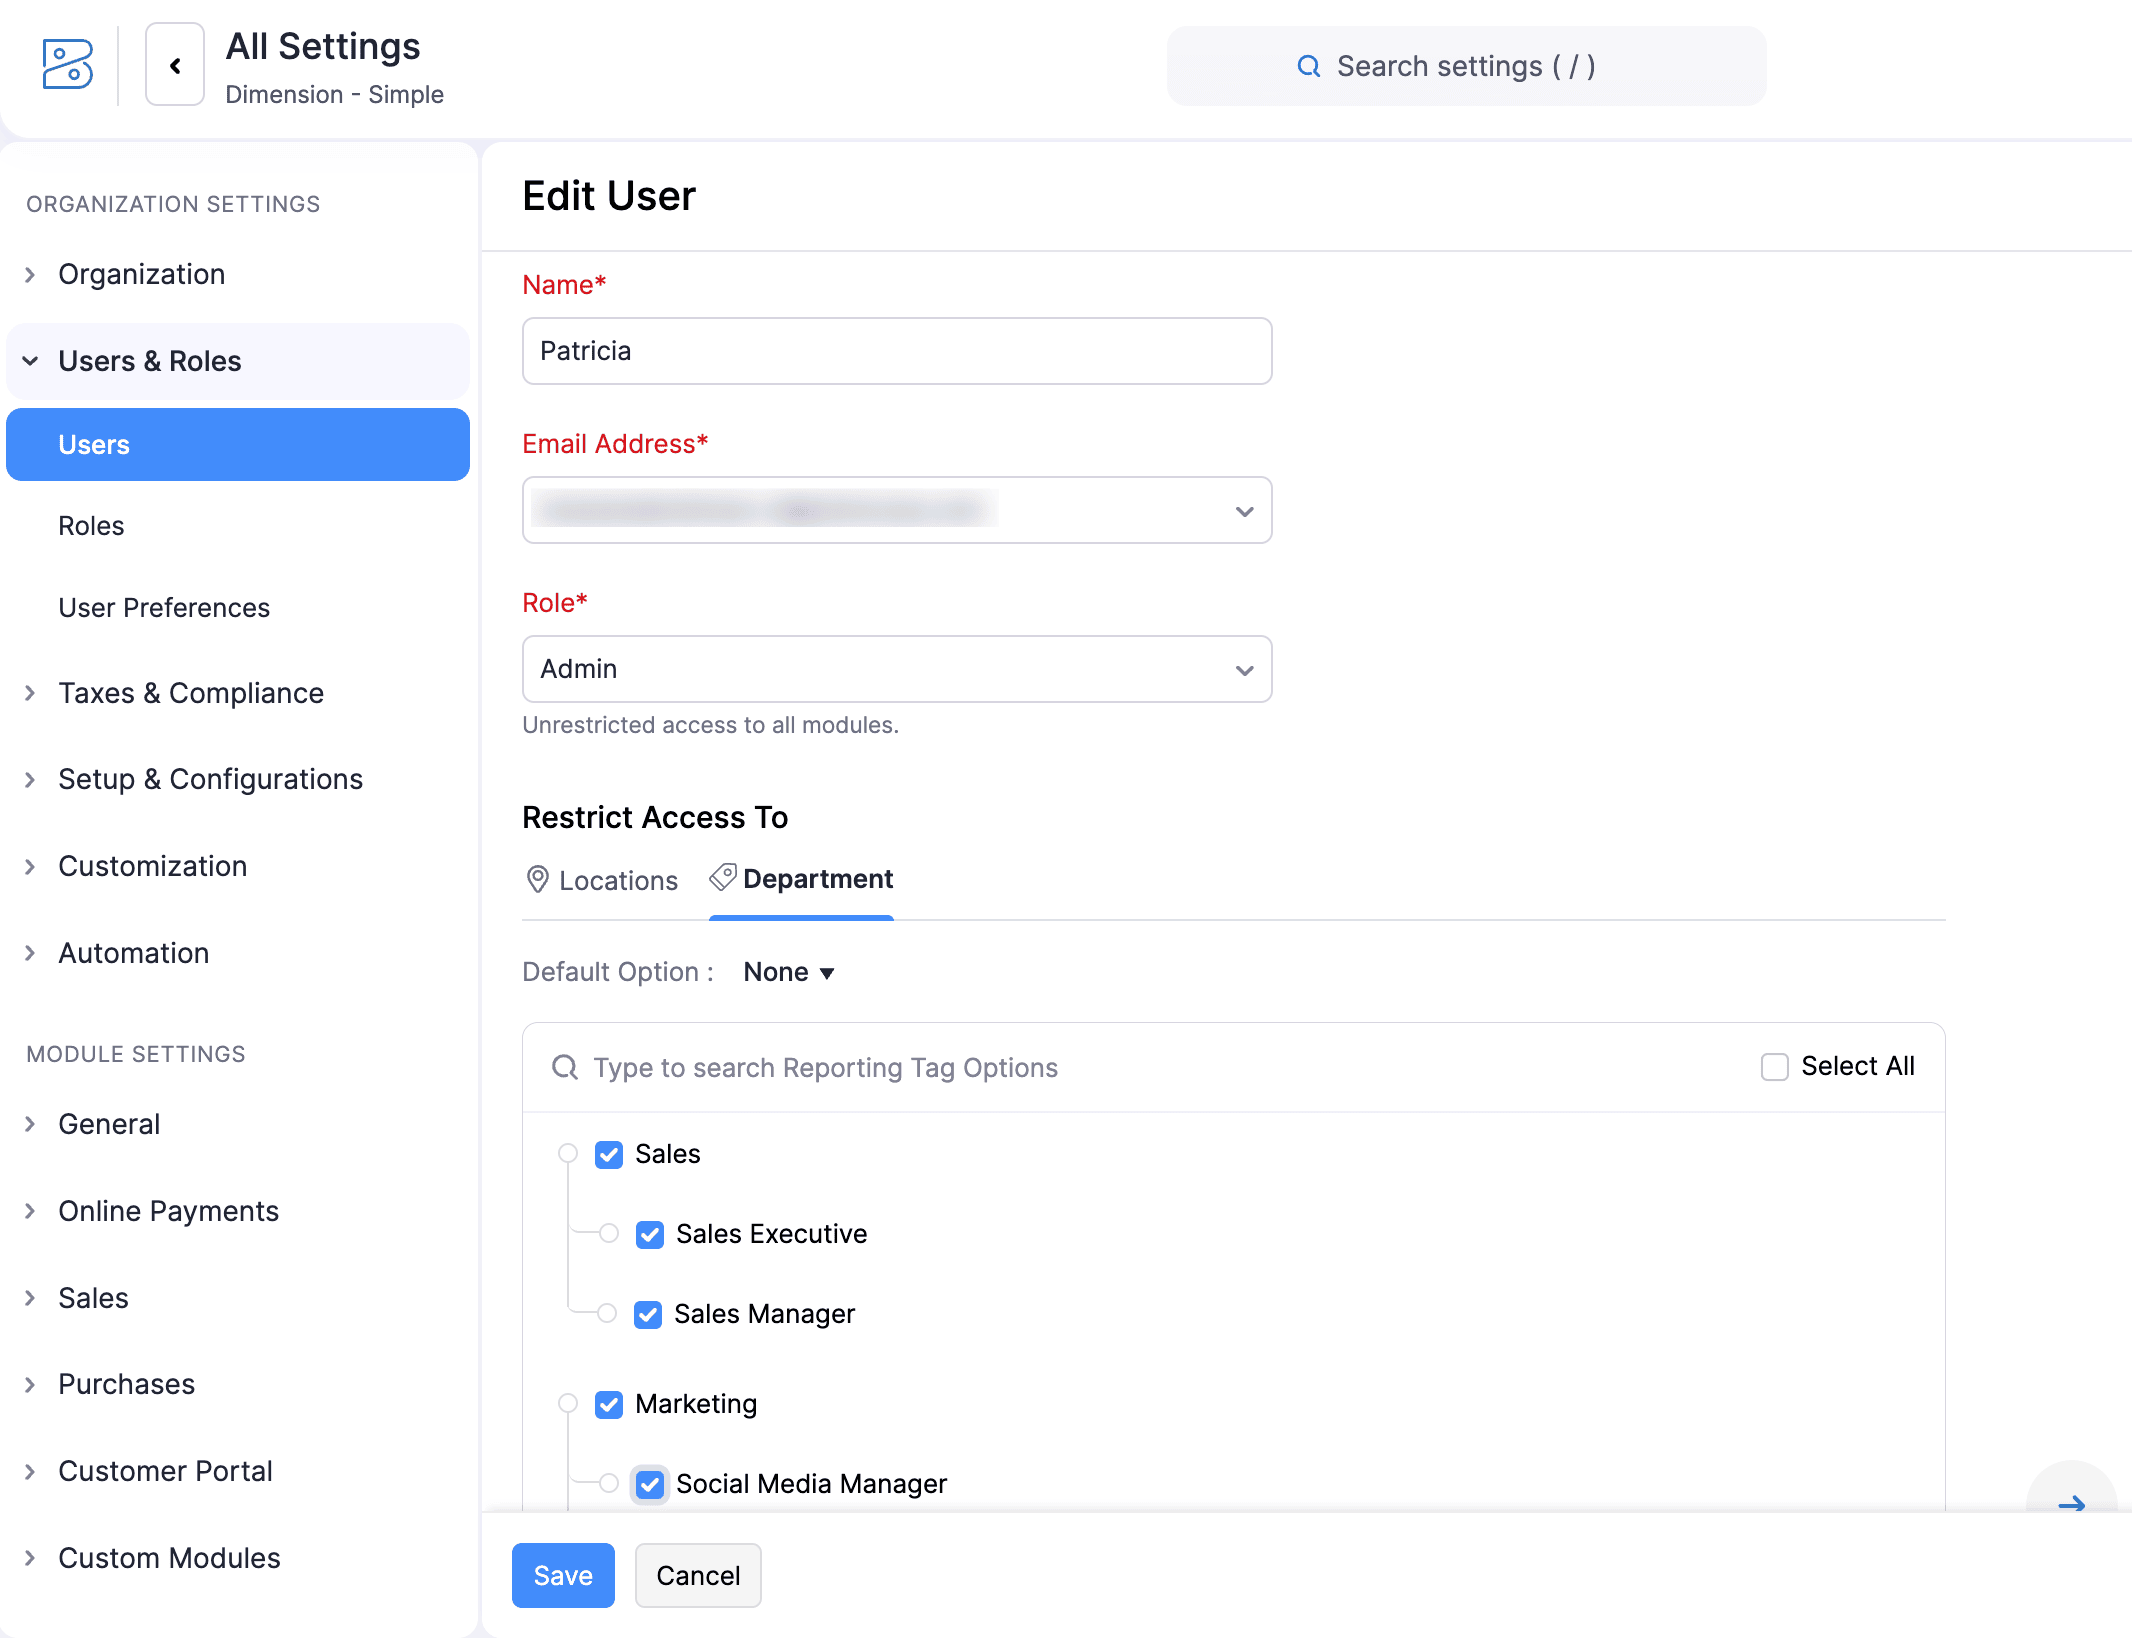
Each user can be associated with up to 500 reporting tag options.
Associate Reporting Tags
Once you create reporting tags, you can associate them with items, customers, vendors, and other transactions.
Associate Reporting Tags with Items
To associate reporting tags with items:
- Go to the Items on the left sidebar, and select Items.
- Edit or create a new item.
- Enter all the necessary details.
- Click the dropdown next to the reporting tag you want to associate with the item and select the required option from the dropdown.
- Click Save.
The reporting tag will be associated with the item. When you create a transaction and add this item as a line item, its associated reporting tag will be applied by default to track the item. You can also select a different tag if needed.
Associate Reporting Tags with Customers or Vendors
To associate reporting tags with customers or vendors:
- Go to Sales or Purchases on the left sidebar, and select Customers or Vendors.
- Click + New to create a customer or vendor or edit an existing one.
- Enter all the necessary details and navigate to the Reporting Tags tab at the bottom of the page.
- Cick the dropdown next to the reporting tag you want to associate with the customer or vendor and select the required option from the dropdown
- Click Save.
The reporting tag will be associated with the customer or vendor. When you create a transaction and select this customer or vendor, the associated reporting tag is applied by default to track and categorise transactions. The tag allows you to group, filter, and report transactions based on purpose, type, or other criteria, making analysis and tracking easier across multiple transactions.
Associate Reporting Tags with Sales or Purchases
- Go to Sales or Purchases on the left sidebar.
- Create or edit a transaction (For instance, a Quote).
- Enter all the necessary details.
- When creating the reporting tag that you want to associate with a sales or purchase transaction, you would have chosen to apply the reporting tag at either the line item level or the transaction level.
- If you have chosen to apply the reporting tag at the transaction level:
- Click the dropdown next to the reporting tag you want to associate with the sales or purchase transaction. Select the required option from the dropdown.
- If you have chosen to apply the reporting tag at the line item level:
- Navigate to the Item Table of the transaction.
- Click the Reporting Tags dropdown next to the line item you want to associate with the reporting tag.
- Then, click the dropdown under the reporting tag you want to associate and select the required option.
- Enter all the other necessary details.
- Click Save.
The reporting tag will be associated with the sales or purchase transaction at the line item or transaction level.
Edit Reporting Tags
To edit a reporting tag:
- Go to Settings in the top right corner.
- Navigate to Organisation Settings.
- Select Reporting Tags under Customisation.
- Hover over the reporting tag that you want to edit and click Edit.
- Make the necessary changes.
- Click Save.
Reorder Reporting Tags
To control which tags can be used as filters, you can reorder reporting tags. Here’s how:
- Go to Settings in the top right corner.
- Navigate to Organisation Settings.
- Select Reporting Tags under Customisation.
- Click Change Order.
- Drag the reporting tags to change the order.
- Click Save.

Please note that a tag that is used as a filter for another reporting tag cannot be moved above the tag it acts as a filter.
Mark an Option as Default
Marking an option as default for a reporting tag ensures that the selected option is automatically applied whenever the tag is used in a new transaction. To do this:
- Go to Settings in the top right corner.
- Navigate to Organisation Settings.
- Select Reporting Tags under Customisation.
- Select the reporting tag for which you want to mark an option as default.
- Hover over the option you want to set as default and click the More icon.
- Select Mark as Default from the dropdown.
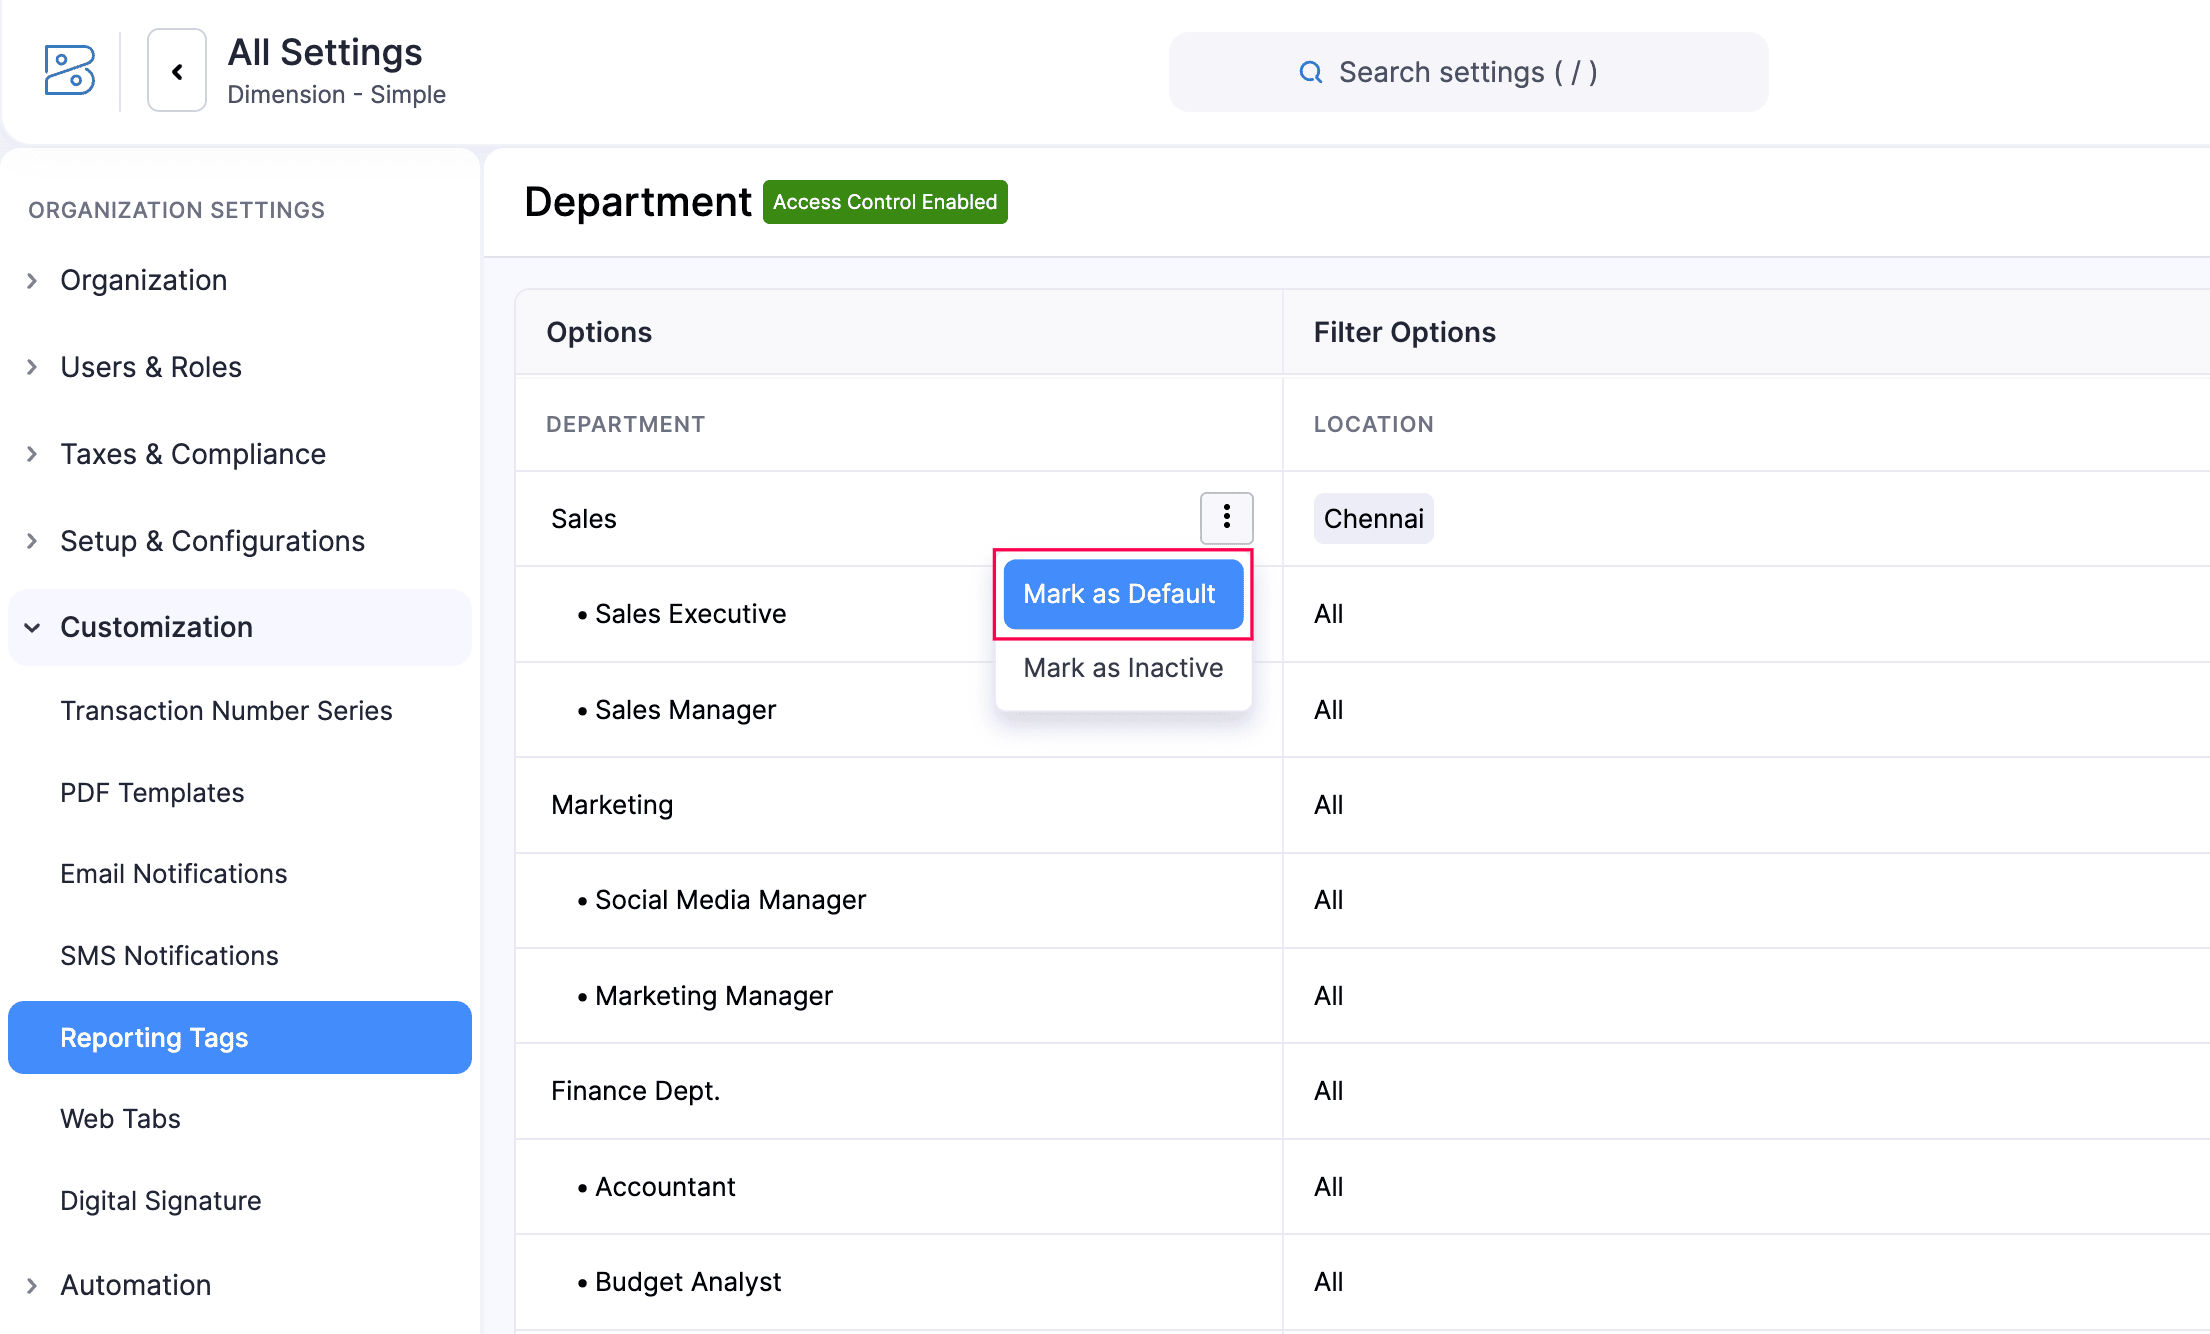
The option will be set as the default for the reporting tag.
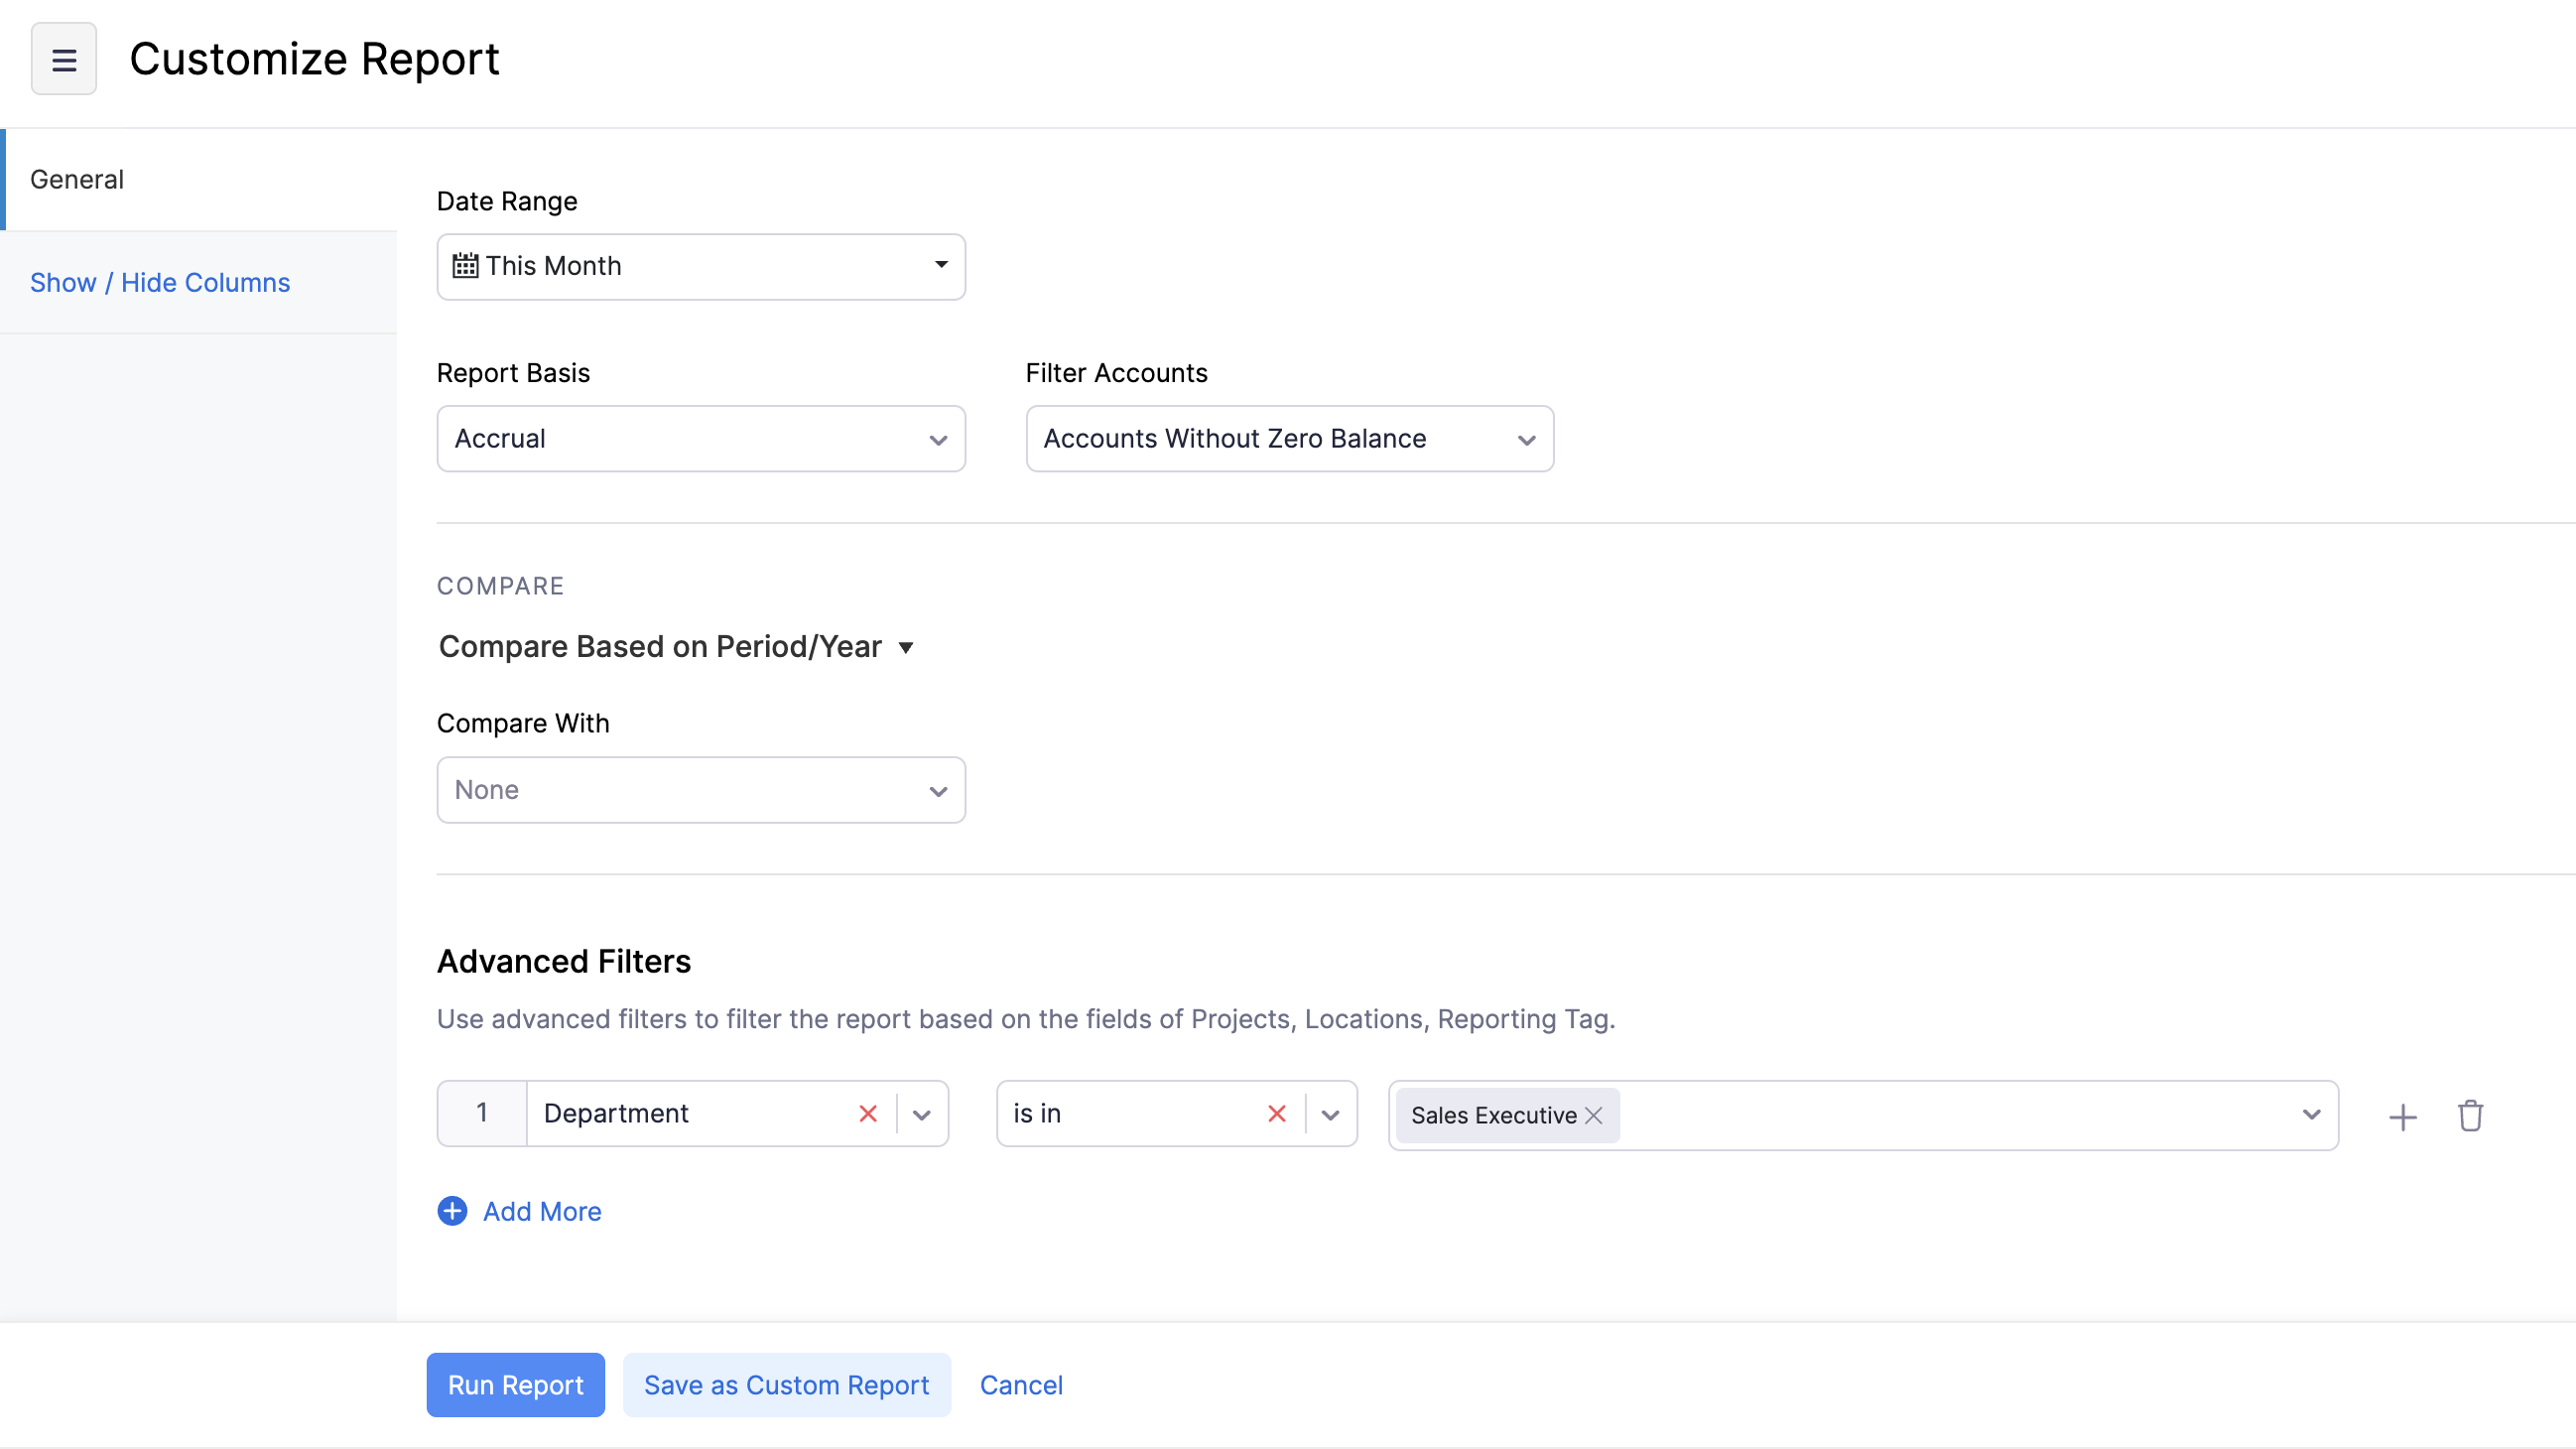
Generate Reports
Once you’ve created reporting tags and associated them with transactions, you can use these tags to generate reports, filter data, and make comparisons.
To filter reports using their associated reporting tags:
- Go to Reports on the left sidebar.
- Select a report under the Business Overview section (For example, Profit and Loss).
- Click the Customise icon.
- In the Customise Report page, navigate to the General section.
- Under Advanced Filters, select the reporting tag you want to filter the report by in the first dropdown, choose the comparator in the second dropdown, and select the option you want to filter the reporting tag with in the third dropdown.
- Click Run Report to generate the report based on your criteria. You can also click Save as Custom Report to save it for future use.
To compare reports using their associated reporting tags:
- Go to Reports on the left sidebar.
- Select a report under the Business Overview section (For example, Profit and Loss).
- Click Compare With and select the Compare Based on Period/Year dropdown in the Compare With pop-up. Then, select Compare Based on Reporting Tags.
- If you want to compare the reporting tag options hierarchically:
- Check the Organize the selected Reporting Tag by corresponding Parent-Child Hierarchy option.
- Select a Reporting Tag that you want to compare hierarchically.
- Click Apply.
- The reporting tags will be listed in the pop-up. Use the dropdown below each reporting tag to select the options you want to compare the report with. You can also click Select All next to a tag to compare the report using all the options available for that tag.
- Click Apply.
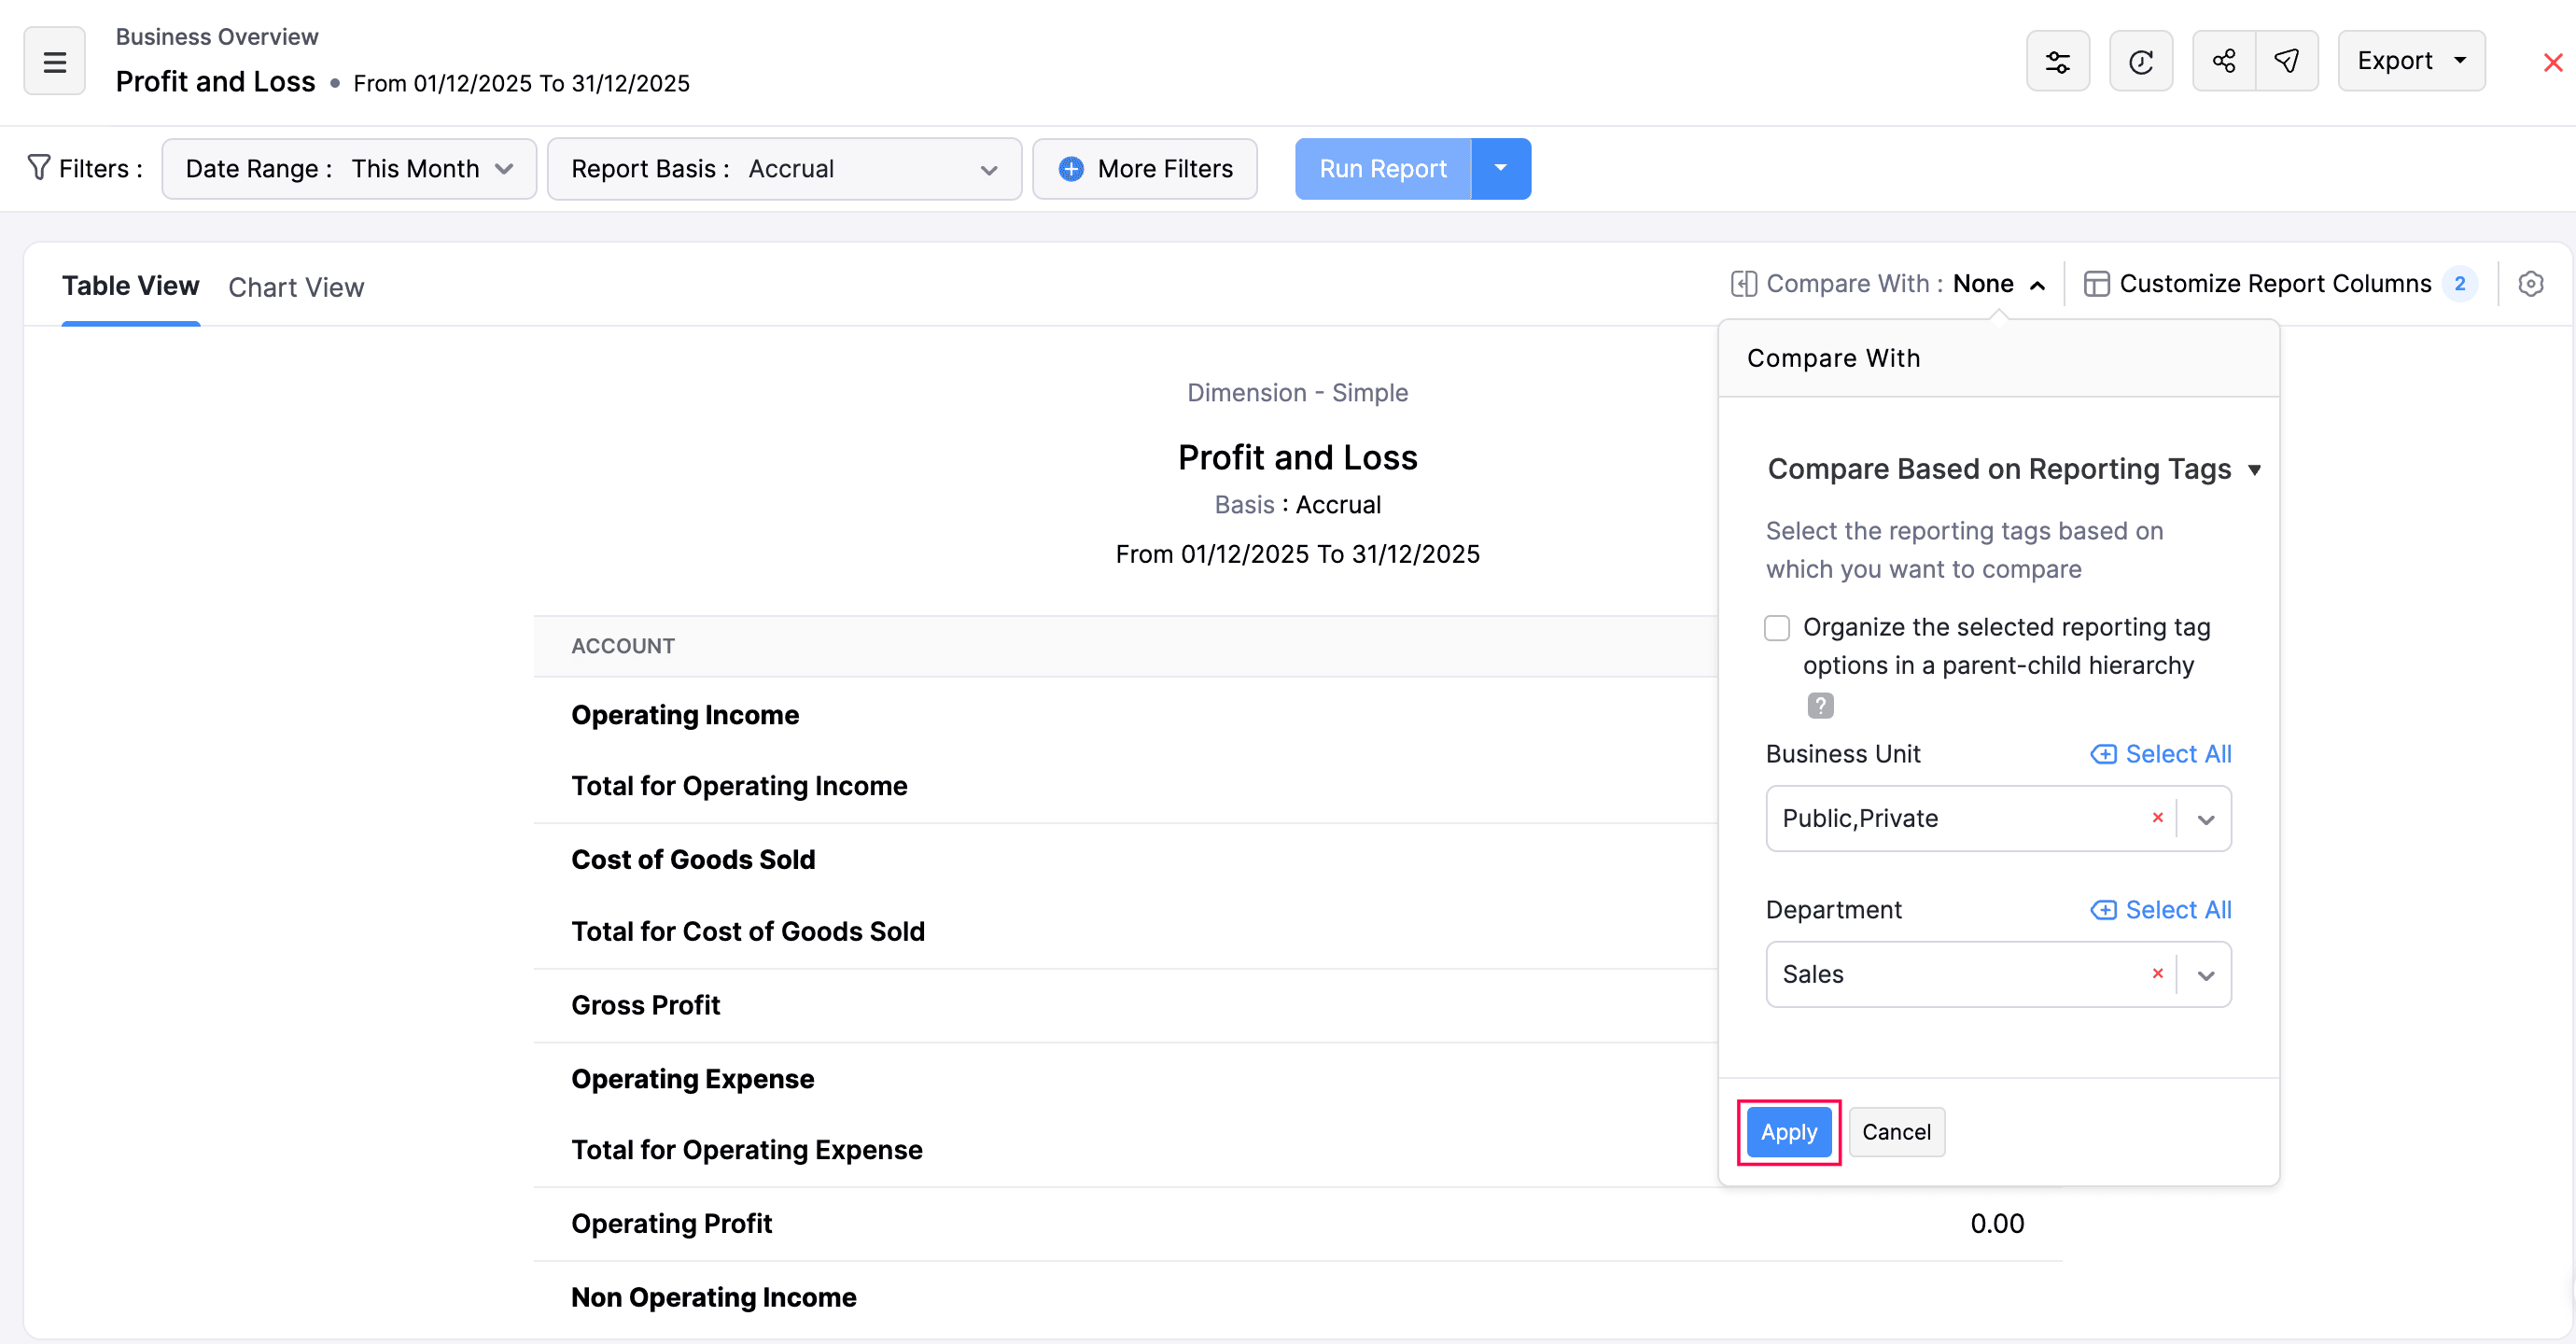
This way, you can filter and compare your reports using reporting tags.
 Yes
No
Yes
No
Thank you for your feedback!