

Add a Property

You can add your properties and associate sales and purchase transactions with each property to track property-specific income and expenses in Zoho Books.
To add a new property:
- Log in to your Zoho Books organisation.
- Navigate to Properties from the left sidebar.
- Click the + New Property button in the top-right corner.
- On the Add New Property page, enter the following details:
| Field | Description |
|---|---|
| Property Name | Enter a name for the property. |
| Location | Select a location from the dropdown to associate with this property. |
| Property Code | Enter a unique code to identify this property. |
| Property Number | A unique number assigned to this property. It will be used by default when creating property records. |
| Description | Add a brief description of the property (up to 500 characters). |
| Property Type | Select whether the property is a Building or Land. |
- Under Address Details, enter the property’s address.
- Click Save to record the property.
Once saved, the property will appear on the Properties list view page and will be available for association with your transactions.
Associate Transactions to a Property
Associate transactions with a property in Zoho Books to track its income and expenses separately. This helps you maintain accurate financial records for property Business and tax reporting.
You can associate the following transactions with a property:
Sales Transactions
Purchase Transactions
Associate Rental Income
Rental income represents the payments you receive for the use of your property. Recording rental income against a specific property helps you track how much each property earns and maintain accurate records for tax reporting.
To associate a rental income with a property:
- Log in to your Zoho Books organisation.
- Go to Properties from the left sidebar.
- Select the property for which you want to record the rental income.
- On the property’s details page, click + New Transaction and select Rental Income from the dropdown.
- In the pop-up that appears, enter the following details:
| Field | Description |
|---|---|
| Property | The property for which the rental income is being recorded. This will be auto-filled based on the property you selected. |
| To Account | Select the account into which the rental income is deposited. |
| Date | The date on which the rental income was received. |
| Reference# | Enter a reference number for the transaction to help identify the source of the payment or invoice number, to help identify who the payment was received from. |
| Description | Add a brief description for this rental income entry (up to 500 characters). |
- Under the Income Details section, add one or more rental income entries for this property:
| Column | Description |
|---|---|
| Income Account | Select the income account under which this rental income should be recorded (e.g., Lease Premium Income, Reverse Premium Income, Rental Income). |
| Received Via | Select the account through which the income was received (e.g., Cash, Bank Transfer, Cheque). |
| Amount | Enter the amount received for this income entry. |
- Click Reporting Tags to associate reporting tags with the line item, if required.
- Click + New Row to add additional rental income entries to this transaction.
- Under Attachments, click Upload File to attach supporting documents such as receipts or agreements.
- Click Save to record the rental income.
Once saved, the rental income will be associated with the selected property and reflected under the Transactions tab on the property’s details page.
Associate an Invoice
Associating an invoice with a property helps you track receivables and income at the property level for accurate financial reporting.
Scenario: Patricia Boyle owns a Property Business and manages three rental properties. In March, she rents out one of her flats to a new occupant, John, for a six-month term at £1,200 per month. To bill John for the first month’s rent, Patricia creates an invoice for this property in Zoho Books.
To create an invoice for a property:
- Log in to your Zoho Books organisation.
- Navigate to Properties from the left sidebar.
- Select the property for which you want to create the invoice.
- On the property’s details page, click + New Transaction and select Invoice from the dropdown.
- On the New Invoice page, fill in the following fields:
| Field | Description |
|---|---|
| Customer Name | Select the customer to whom this invoice will be sent for the use of this property. |
| Invoice# | The default transaction series will be used. Choose a different one from the dropdown, if needed. Click the Settings icon in the right of the field to enable or disable the option to auto-generate invoice numbers. |
| Order Number | Enter a reference number for the invoice, such as a rental agreement number or booking reference, if applicable. |
| Invoice Date | Choose the date on which the invoice is being raised for this property. |
| Terms | Choose the payment terms within which the invoice amount is due (e.g., Due on Receipt, Net 15, Net 30). |
| Due Date | Pick the date by which the payment for this property invoice should be received. |
| Salesperson | Select the person responsible for managing this property or handling the invoice, if applicable. |
| Property | The property for which this invoice is being raised. This will be auto-filled based on the property you selected. |
| Select Price List | Choose the price list to apply to the items on this invoice, such as a specific rate list configured for this property. |
- Under the Item Table, add items and fill in the following columns:
| Column | Description |
|---|---|
| Quantity | Enter the quantity for each item being billed against this property (e.g., number of months of rent, hours of service, or units of supply). |
| Rate | The rate will be auto-filled based on the item’s default rate. Modify it if needed to reflect the amount agreed for this property. Click Apply Price List under this field to apply a specific price list to the item. |
| Tax | Auto-filled based on the item or customer’s tax status. Applicable taxes will be calculated on the line item accordingly. |
| Discount | Enter a Percentage (%) or Amount if a discount applies to this line item (e.g., early payment discount or promotional offer for the occupant). |
| Bulk Actions | Click this option to perform bulk actions in the Item Table. Select Bulk Update Line Items to update the Project or Account of each item, or select Show Additional Information to display the project and account for each line item in the table. |
- Click + Add New Row to add additional rows for items.
- Click Add Items in Bulk to add multiple items at once.
- To insert a header row below a line item, click the More icon next to it, and select Insert New Header. You can also click the dropdown next to + New Row below the Item Table, and select New Header to add one.
- To insert a subtotal row below a line item, click the More icon next to it, and select Insert New Subtotal. You can also click the dropdown next to + New Row below the Item Table, and select New Subtotal to add one.
Fill in the remaining fields at the bottom of the page:
| Field | Description |
|---|---|
| Shipping Charges | Add shipping costs for your items. Click Apply Tax on Shipping Charge to select a tax on shipping. |
| Adjustment | Enter adjustments if needed. Use a Negative (-) sign to reduce the amount. |
| Customer Notes | Add notes to display them in the invoice. |
| Terms and Conditions | Add your business terms and conditions for the invoice. |
| Attach File(s) to Invoice | Click Upload File to attach a file to the invoice. |
| I have received the payment | Check this if you’ve received the payment when you’re creating this invoice. Then, select the Payment Method and Deposit Account from the table below. If the customer used multiple payment methods, click + Add Split Payment to split the payment. The invoice will be saved as Paid. |
Note: To use the I have received the payment option, you must disable Sales Approval in your organisation. Learn how to Disable Sales Approval.
- Click Save as Draft to save the invoice as a draft, or Save and Send to send it to the customer.
You can also schedule an invoice during the creation process. Here’s how:
- Click the dropdown next to Save and Send and select Save and Send Later.
- In the Schedule Mail page, select the schedule date under When would you like to send the email?.
- Verify other details and click Schedule.
If you haven’t recorded the payment directly, you can record it later for the created invoice once the customer pays the amount or create a Rental Income transaction.
Once saved, the invoice will be associated with the selected property and reflected in its financial activity under the Transactions tab.
Associate a Credit Note
A credit note is issued to a customer to reduce the amount they owe, typically due to returns, adjustments, or overcharges. Associating a credit note with a property helps you keep the property’s financial records accurate.
Scenario: Bailey Miles rents out one of her properties to an occupant at £1,200 per month. In April, she accidentally invoices the occupant £1,300 instead of £1,200. To correct the overcharge, Bailey issues a credit note of £100 against the invoice. To keep the adjustment linked to the specific property, she records the credit note for this property in Zoho Books.
To associate a credit note to a property:
- Log in to your Zoho Books organisation.
- Navigate to Properties from the left sidebar.
- Select the property for which you want to create the credit note.
- On the property’s details page, click + New Transaction and select Credit Note from the dropdown.
- On the New Credit Note page, fill in the following fields:
| Field | Description |
|---|---|
| Customer Name | Select the customer for the credit note. |
| Reason | Select the reason for issuing the credit note. |
| Credit Note# | The default transaction series will be used. Choose a different one from the dropdown, if needed. Click the Settings icon in the right of the field to enable or disable the option to auto-generate credit note numbers. |
| Reference# | Enter a reference number for this credit note, such as the related invoice number or rental agreement number, if applicable. |
| Credit Note Date | Choose the date on which the credit note is being issued for this property. |
| Salesperson | Select the person responsible for managing this property or handling the credit note, if applicable. |
| Property | The property will be auto-filled based on the property you selected. |
| Select Price List | Choose the price list for the items in the credit note. |
- Under the Item Table, Select an existing item, create a new one, or enter the item name without creating it while recording the credit note and fill in the following columns:
| Column | Description |
|---|---|
| Quantity | Enter the quantity for each item being credited against this property. |
| Rate | Auto-filled based on the item’s default rate. Modify it if needed. Click Apply Price List to apply a specific price list to the item. |
| Tax | Auto-filled based on the item or customer’s tax status. |
| Discount | Enter a Percentage (%) or Amount, if applicable. |
| Bulk Actions | Click to perform bulk actions in the Item Table, such as updating the Project or Account for multiple line items at once. |

- Click + Add New Row to add additional rows for items.
- Click Add Items in Bulk to add multiple items at once.
- To insert a header row below a line item, click the More icon next to it, and select Insert New Header.
- To insert a subtotal row below a line item, click the More icon next to it, and select Insert New Subtotal.
| Field | Description |
|---|---|
| Customer Notes | Add notes to display them on the credit note. |
| Terms and Conditions | Add your business terms and conditions for the credit note. |
- Click Save as Draft to save the credit note as a draft, or Save as Open to make it available for use.
Once saved, the credit note will be associated with the selected property and reflected in its financial activity under the Transactions tab.
Associate an Expense
An expense represents the money spent on running your property, such as maintenance, utilities, or repairs. Associating an expense with a property helps you track running costs at the property level for accurate financial tracking.
Scenario: Brandon Tyler hires a cleaning service to deep-clean one of his flats. He pays the vendor £120 on the spot. To record this expense against the property, Brandon associates an expense with the property in Zoho Books.
To associate an expense to a property:
- Log in to your Zoho Books organisation.
- Navigate to Properties from the left sidebar.
- Select the property for which you want to record the expense.
- On the property’s details page, click + New Transaction and select Expense from the dropdown.
- Enter the following details in the New Expense page:
| Field | Description |
|---|---|
| Date | Select the date on which the expense was incurred for this property. |
| Employee | Associate an employee with this expense, if applicable (e.g., a property manager who paid for the expense). Employees may or may not be users. To add an employee, click the Employee field, select Manage Employees, and click + Add New Employee. You can also delete employees by clicking the Delete icon next to them. |
| Expense Account | Select an account to track the type of expense being recorded for this property (e.g., Repairs & Maintenance, Utilities, Council Tax). |
| Itemize | Click Itemize to add multiple expense accounts if the payment covers different types of costs for this property. These accounts will be debited once the expense is recorded. After saving the expense, click Display Journal at the bottom of the page to view the corresponding journal. |
| Amount | Enter the amount spent on this property and the tax applicable on it, if any. |
| Paid Through | Choose the account used to pay for this expense, such as your business bank account, credit card, or petty cash. This account will be credited when the expense is recorded. |
| Vendor | Select the vendor (e.g., contractor, service provider, or supplier) to whom the payment was made for this property. |
| Property | The property against which this expense is being recorded. This will be auto-filled based on the property you selected. |
| Customer Name | Associate the expense with a customer, if the cost is to be recovered from an occupant. You can mark the expense as billable and later convert it into an invoice to collect payment. |
| Attach Receipt | Attach the receipt or proof of payment for this property expense from your Desktop, Cloud, or from your Documents in Zoho Books. You can also delete the receipt by clicking the Delete icon. |
| Projects | Choose the project(s) to associate with this expense, if applicable (e.g., a renovation or refurbishment project for this property). If a project is linked to a customer, you can bill it later. |
| Reporting Tags | Associate reporting tags for the expense. Learn more about Reporting Tags. |
To make the expense billable:
- Mark the Billable option next to the Customer Name.
- Select a Project to associate with the customer, if this is an expense incurred for the project.
- If you had configured a markup percentage for billable bills and expenses in Settings, the default percentage will be pre-filled. You can edit and change the markup percentage, if needed.
- Click Save.
When you’re creating an invoice for the associated customer, this expense will be shown as an unbilled item in the invoice to be included as a billable line item. You can select the expenses to be billed to the customer.
- After entering the details, click Save (or press alt/option + s) or Save & New (or press alt/option + s).
Once saved, the expense will be associated with the selected property and reflected in its financial activity under the Transactions tab.
Associate a Bill
A bill is a record of the amount you owe to a vendor for goods or services received. Associating a bill with a property helps you track property-specific payables and expenses for your property.
Scenario: Patricia Boyle owns a flat that she rents out. In April, a leaking pipe in the flat required urgent repairs. She hired a local plumber, who charged £450 for parts and labour. To record the payable and track the repair charge, Patricia records a bill for the property in Zoho Books.
To associate a bill to a property:
- Log in to your Zoho Books organisation.
- Navigate to Properties from the left sidebar.
- Select the property for which you want to record the bill.
- On the property’s details page, click + New Transaction and select Bill from the dropdown.
- Enter the following details in the New Bill page:
| Field | Description |
|---|---|
| Vendor Name | Select the vendor who provided goods or services for this property. |
| Bill# | Enter the unique bill number. |
| Order Number | Enter a reference number for the bill, such as a work order or service request number, if applicable. |
| Bill Date | Enter the date on which the vendor issued the bill for this property. |
| Due Date | Enter the date by which the payment for this bill must be made to the vendor. |
| Payment Terms | Select the time frame within which you need to pay the vendor. For example, Net 15 would mean you’ll have to pay the vendor within 15 days from the date when the bill is created. When you select a payment term, the due date will be adjusted accordingly. |
Under the Item Details section:
- Select an existing item, create a new one, or enter the item name without creating it while recording the bill. You can also add items in bulk by clicking the dropdown next to + Insert New Row and selecting + Add Items In Bulk.
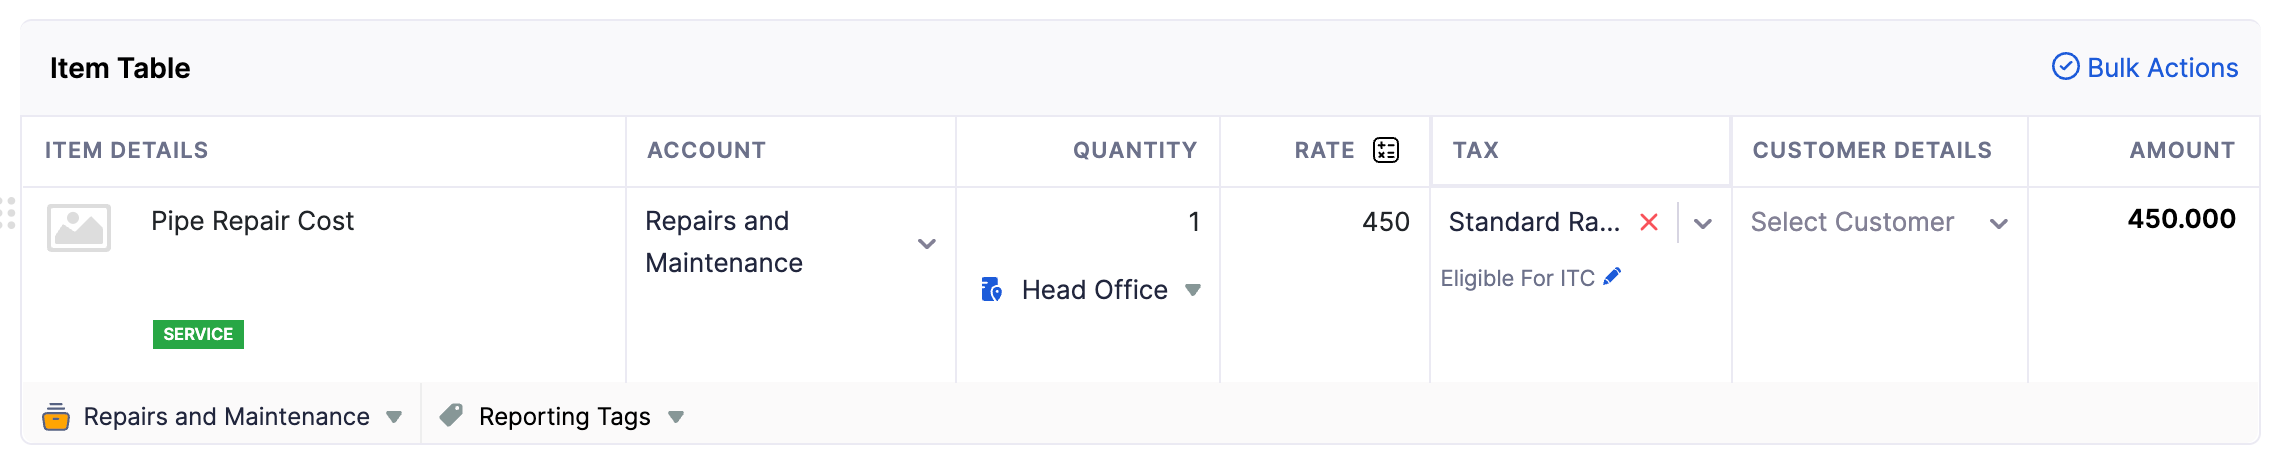
- To insert a header row below a line item, click the More icon next to it, and select Insert New Header. You can also click the dropdown next to + Insert New Row below the Item Table, and select New Header to add one.
- To insert a subtotal row below a line item, click the More icon next to it, and select Insert New Subtotal. You can also click the dropdown next to + Insert New Row below the Item Table, and select New Subtotal to add one.
Customer Details
Select the customer you want to associate to the line items in your bill. By default, the item will be Non-Billable to customer. If you make it Billable, then you can invoice the items and collect payments from them.
To make the item billable:
- Click the Edit icon and mark the Billable option.
- Select a Project to associate with the customer.
- If you had configured a default markup percentage for billable bills and expenses in Settings, the default percentage will be pre-filled. You can edit and change the markup percentage, if needed.
- Click Update.
Open Purchase Orders
If you have any open purchase orders for a particular vendor, you can choose to include them in the bill. Click the purchase order option below the Item Details, select the purchase order(s) to be included, and click Add.
- Add notes and attach files to the bill.
- Select a template for your bill.
- After entering the required details, click Save as Draft or Save as Open.
Once saved, the bill will be associated with the selected property and reflected in its financial activity under the Transactions tab.
 Yes
Yes