
Introduction to Hosted Payment Pages
Hosted payment pages allow you to collect card and personal information from your customers. If you own a website or an online service, you can set up a hosted payment page to act as your checkout page/signup page. Your customers can choose the product or service of their choice and pay for it through the hosted payment page.
Need for a hosted payment page
You might ask “Why do I need a hosted payment page? Can’t I set up a page myself and collect payments?” The answer is, setting up your own page and collecting payments requires your website to be PCI-compliant and the process can sometimes be long and tedious.
But, deploying a hosted payment page for your website can be done within minutes and you don’t have to worry about PCI-compliance since the hosted payment pages are by default PCI compliant, which means they are highly secure and comply with all security standards. Also, the hosted payment pages are mobile-friendly, which makes them easily accessible via mobile phones.
Set up Hosted Payment Pages
Zoho Billing allows you to create two types of Hosted Payment Pages:
Multi-Page (Recommended) - The signup process is divided into five simple steps across multiple pages. This step-by-step approach enhances clarity and improves the overall user experience. The multi-page hosted payment page template also supports user verification to avoid fraudulent emails.
Single Page - The entire signup process is presented on a single page, offering a quick and straightforward experience. This reduces friction and lowers the chances of customer abandonment.
Configure Hosted Payment Pages
To set up a Hosted Payment Page template:
- Navigate to Settings.
- Select Hosted Payment Pages under Customisation.
- Click + New Template.
- Click Use This under Single Page or Multi Page according to your needs.
- Enter a Template Name.
- Select the template’s Primary Language.
- Configure the General Preferences.
- Configure the Order Details tab.
- Configure Payment Information.
- Configure Messages & Notes.
- Configure your Thank You Page which will be displayed after your customer completes their payment.
- You can preview how your hosted page will look on the right side.
- Click the Checkout Page dropdown to select the page that you want to preview.
- Click Save.
Add Invoices and Customer Custom Fields
This feature is enabled by default for organizations created after July 1, 2026. For existing organizations, this feature is currently in early access. Reach out to our support at support@zohobilling.com to get it enabled for your organization.
You can now include customer and invoice custom fields in your Hosted Payment Pages. This allows you to capture additional details such as customer preferences, internal reference values, or invoice-specific information from your customers based on your business requirement.
You can do this from the relevant Order Details sections in your Hosted Payment Page template:
- To add customer custom fields, go to Account Information.
- To add invoice custom fields in the Multi-Page template, go to Final Summary.
- To add invoice custom fields in the Single-Page template, go to Additional Information.
Once custom fields are added to your template, you can also prefill their values using URL parameters if required. Learn more about Prefill Customer Custom Fields Using API Field Names.
General Preferences
To configure general preferences, navigate to the General Preferences tab in your hosted payment page template and configure the following sections.
Page Properties
In this section, you can customize the overall look of your hosted page.
Insight: You can choose a theme for your hosted payment page which you can customize further by clicking the color dropdown on the top right corner and selecting the desired theme. For organizations created after April 2026, these preferences also apply to the payment page displayed for payment links. For organizations created before April 2026, reach out to our support team at support@zohobilling.com to get it enabled.
| Field | Description |
|---|---|
| Favicon | Favicon is a small icon that is displayed on the browser tab. This typically enhances brand recognition. To select a favicon:
Note: The maximum file size for a favicon is 1 MB. |
| Browser Tab Name | This is the name of the hosted payment page that will be displayed on browser tabs. |
| Width | Select the width of the page in pixels. |
| Font | Select your desired font from the dropdown. |
| Font Style | Select the desired font style from the dropdown. Note: This option is available only in the Single-Page hosted payment page template. |
| Section Headers | Select the size of the section headers in pixels. You can also select the color of your section header by selecting the desired color from the color picker. Alternatively, you can also enter a hex code for the section header’s color. |
| Input Field | Select the size of the input fields in pixels. You can also select the color of your input fields’ placeholders by selecting the desired color from the color picker. Alternatively, you can also enter a hex code for the input field’s color. |
| Field Radius | Select the radius of the fields’ edges in pixels. Increasing the field radius allows you to give the fields a rounded look. |
| Order Summary Header | Select the background color and font color of the Order Summary by selecting a color from the respective color pickers or entering the hex codes in the respective fields. |
Header & Footer
In this section, you can customize the header and footer sections of your hosted page.
Note: If you embed the hosted payment pages in an iframe in your website, the header and footer sections will be hidden.
| Field | Description |
|---|---|
| Display Title Band | Enable this option if you want to display the title band in the header of your Hosted Payment Page. This is particularly helpful to add your company’s name, logo and description. Note: This option is available only in the Multi-Page hosted payment page template. |
| Title | Enter the title to be displayed in the header of your Hosted Payment Page. You can use the %CompanyName% placeholder to display your organization’s name by default. You can also enter the font size and font color from the respective fields. Note: This option is available only if you enable Display Title Band in the Multi-Page hosted payment page template. |
| Organization Logo | Check this option if you want to include your organization logo in the title band. Note: This option is available only if you enable Display Title Band in the Multi-Page hosted payment page template. |
| Description | Check this option if you want to include a description in the title band. Once enabled, enter the description and select the font size and font color from the respective fields. Note: This option is available only if you enable Display Title Band in the Multi-Page hosted payment page template. |
| Background Color | Enter the background color for the title band in the hosted payment page from the Background Color field. You can use a color’s hex code or use the color picker to select your desired color. |
| Customize Header Content | Enter the desired header content that you want to be displayed on the hosted payment pages. You can also customize this content with the text editor and insert placeholders according to your needs. You can also customize the content using HTML, allowing you to embed images as well. |
| Customize Footer Content | Enter the desired footer content that you want to be displayed on the hosted payment pages. You can also customize this content with the text editor and insert placeholders according to your needs. |
| Header & Footer Background Color | Select the background color of your header and footer content. |
| Display Contact Information | Enable this option to display your email address, mobile number, and website from your Organization Profile in the footer section of your hosted page. Select the font size of your contact information in pixels and select the font color using the color picker or enter the desired hex code. Note: This option is available only in the Single-Page hosted payment page template. |
| Enable Social Sharing | Allow your customers to share your hosted payment page through social media. Enter the message in the Label field that you want to be displayed in the hosted page’s footer section. Enter the Message To Be Shared - This message will be prefilled when your customers click the social media icons. |
Button Properties
In this section, you can customize how the button looks.
| Field | Description |
|---|---|
| Background Color | Select the background color of the button using the color picker or enter the hex code of your desired color. |
| Background Color on Hover | Select the background color of the button when the customer hovers over the button, using the color picker or enter the hex code of your desired color. |
| Label Color | Select the color of the text in the button by using the color picker or enter the hex code of your desired color. |
| Border Radius | Select the radius of the button’s edges in pixels. Increasing the border radius allows you to give the button a rounded look. |
| Label Size | Select the size of the text in the button in pixels. |
Background
In this section, you can customize the background of your hosted page.
| Field | Description |
|---|---|
| Color | Select the color of your hosted page’s background by selecting a color from the color picker or entering the hex code of the desired color. |
| Image | You can upload your own image to be displayed in the background of your hosted page. This allows you to add personalization to your hosted page. Note: The maximum file size is 1 MB. |
| Image Position | Select the position of your image from the drop-down. |
| Image Repetition | Select whether you want to repeat the background image in the hosted page from the dropdown. Note: Image repetition is based on the Image Position. |
| Scroll Behaviour | Select whether you want the image to be fixed or moving when the user scrolls through the hosted page. |
User Verification
Note: This feature is currently available only in the Multi-Page hosted payment page template.
In this section, you can configure the verification flow for customers before they proceed with checkout. Based on your selection, customers can proceed without verification, verify their identity using email, or sign in/sign up through the Customer Portal.
| Field | Description |
|---|---|
| Select Verification Mode | Select how customers are authenticated before checkout. The available options are: Proceed Without Verification - Customers are not required to verify their identity and can proceed directly to the next step. The details entered during checkout are used to create a new customer in Zoho Billing. Verify with Email - Customers receive a one-time code on their email to verify their identity before proceeding. After verification, the details entered during checkout are used to create a new customer in Zoho Billing. If an existing email address is used, a new customer will not be created. Sign In to Existing Account or Sign Up - Customers are prompted to sign in to their existing portal account or create a new one before they proceed to checkout. Signing up creates a new customer with portal access. |
| Allow customers to update their information | Enable this option to allow customers who have verified with their email, signed in or signed up using their email address to update their contact information and add new addresses directly from the Hosted Payment Pages. Note: The Allow customers to update their information option will not be available if Select Verification Mode is set to Proceed Without Verification. |
| Allow guest users | Enable this option to allow customers to proceed with checkout without signing in or signing up. A customer is still created in Zoho Billing based on the details entered during checkout. Note: The Allow guest users option is available only if Select Verification Mode is set to Sign In to Existing Account or Sign Up. |
Insight:
When Sign In to Existing Account or Sign Up is selected, the checkout behaviour depends on the customer type:
New customers - They sign up, which creates a new customer in Zoho Billing and grants Customer Portal access.
Existing customers - They sign in with existing portal credentials and continue checkout as an existing customer.
Guest users (when enabled) - Customers can skip sign in/sign up and continue checkout. A customer is still created based on the details entered during checkout, but portal access is not granted.
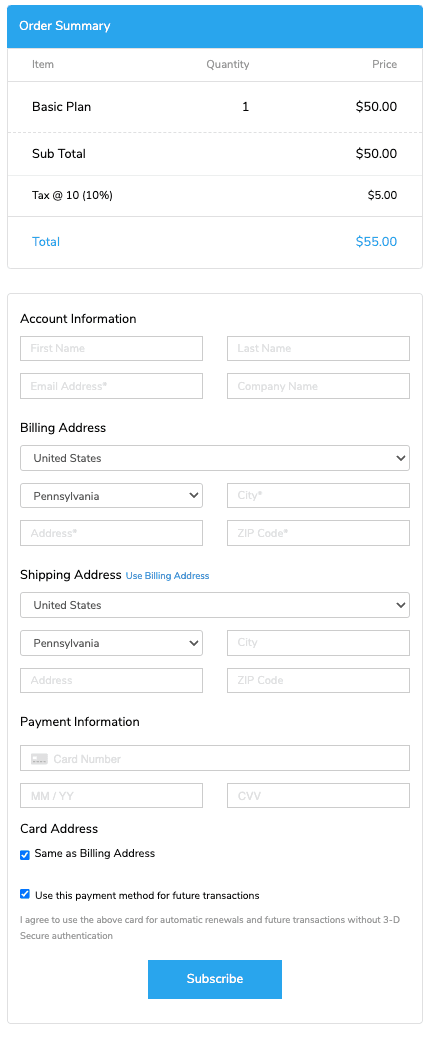
Order Details
To configure how the order section of your hosted payment page will look, navigate to the Order Details tab in your hosted payment page template and configure the following sections.
Note: You can change the order among account information, billing address, and shipping address by dragging the sections in the preview section for the single page template. However, this is not supported in the multi page template.
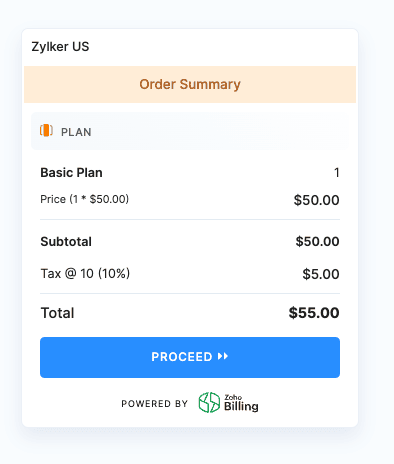
Order Summary
In this section, you can choose to display the order summary and customize what information to display, allow customers to edit quantities, and choose the field names in your hosted page template.
| Field | Description |
|---|---|
| Title | Edit the name that you want to be displayed as the Order Summary section header. |
| Plan | Enter the name that you want to be displayed as the plan section header. Note: Plans and Addons are available only in the Multi-page hosted payment pages. In Single-page hosted payment page templates, they are combined under Item section header. |
| Addon | Enter the name that you want to be displayed as the addon section header. |
| Quantity | Enter the name that you want to be displayed as the Quantity header. Note: You cannot edit the Quantity label in Multi-page hosted payment pages. Allow customers to edit quantities - Check this option if you want to allow your customers to choose the quantity of each item and addon. Allow customers to remove addons - Check this option if you want to allow your customers the flexibility to remove addons by editing the quantity as 0. This option is only available if you allow your customers to edit quantities. |
| Price Label | Enter the name that you want to be displayed as the Price header. |
| Setup Fee Label | Edit the name that you want to be displayed as the Setup Fee field. |
| Credits Applied Label | Edit the name that you want to be displayed as the Credits Applied field. |
| Subtotal Label | Edit the name that you want to be displayed as the Subtotal field. |
| Enable Coupons | Check this field if you want to allow your customers to apply coupons in the hosted payment pages. You can also edit the name that you want to be displayed as the placeholder text in the coupons field. |
| Total Label | Edit the name that you want to be displayed as the Total field. |
| Hide Zero-Value Line Items | Check this option if you want to hide the plans and addons that have their price as 0. This configuration will not apply if all the line-items are zero-value. |
| Make Setup Fee Taxable | Enable this option if you want to make the setup fee taxable, which will be calculated in the Total section. Note: This option is available only in specific editions, based on taxation policies of the region. |
| Show Billing Frequency | Enable this option to show the billing frequency of the subscription in the Hosted Payment Page. |
| Show Billing Cycle | Enable this option to show the number of billing cycles for the subscription. |
| Show Plan and Addon Descriptions | Enable this option if you want to display the description of plans and addons in the order summary table. |
| Button Label | Enter the text that you want to display on the button in the Order Summary page. Note: This option is available only in the Multi-Page hosted payment page template. |
Account Information
In this section, you can customize the account information section of your hosted payment page. You can set the order of the fields to be displayed in the Account Information fields by clicking the Reorder button next to Account Information Fields, set the order and click Save.
| Field | Description |
|---|---|
| Title | Edit the name that you want to be displayed as the Account Information section header. |
| Enable the portal for customers automatically | If you enable this option, an invitation email for the Customer Portal will be sent to new customers who sign up via the Hosted Payment Pages. |
| Account Information Fields | You can enable or disable the following fields, edit their names and set the field type for each of them:
|
| Customer Custom Fields | Add the customer custom fields that you want to display and collect during checkout in the Hosted Payment Page. |
| Communication Channels | Select SMS and/or WhatsApp as the communication channels, through which notifications related to subscriptions, payments, etc., will be sent to the customers who sign up through this hosted payment page. Note: These options will be visible only if you have integrated SMS and WhatsApp with your organization. |
| Button Label | Enter the text that you want to display on the button in the Account Information page. Note: This option is available only in the Multi-Page hosted payment page template. |
The Field Type dropdown lets you select the type of field in the Account Information section.
| Field Type | Description |
|---|---|
| Optional | Your customers can enter data in the field if they want to. |
| Mandatory | Your customers must enter data in the field in order to proceed. |
| Hidden | The field will not be displayed, however, data for this field can still be passed as parameters for the hosted payment pages. |
| Read Only | The field will not be editable, but can still be used to display prefilled data on the hosted payment pages. |
Address Information
In this section, you can customize the Billing Address and Shipping Address sections of the hosted payment pages. You can also reorder the address fields according to your needs.
Insight: You can reorder the account information fields according to your needs.
To customize the Billing Address or Shipping Address, navigate to the respective tab.
| Field | Description |
|---|---|
| Title | Edit the name that you want to be displayed as the Address Information page header. Note: This option is available only in the Multi-Page hosted payment page template. |
| Allow customers to choose between saved addresses | Enable this option to allow your existing customers to choose between their saved addresses. Note: This option is available only in Multi-Page hosted payment page template. |
| Enable Address Autocomplete | Customers can autocomplete their addresses in address line fields on the hosted payment page. Note: You must have the Address Typeahead extension installed for this to work. Also, secure the API key used in the extension by restricting it to your organization’s URL. |
| Show Billing / Shipping Address | Check this option to display the billing or shipping address respectively, in the hosted payment page. |
| Title | Enter the name that you want to be displayed as the billing address or shipping address header. |
| Address Fields | You can enable or disable the following fields, edit their names, and set the field type for each of them:
Insight: You can also reorder the address fields according to your needs. To reorder:
|
| Copy Billing Address Label | Note: This option is available only in the Shipping Address tab. This checkbox allows your customers to copy their billing address to their shipping address fields. You can also edit the name of the checkbox. |
| Button Label | Enter the text that you want to display on the button in the Address Information page. Insight: Clicking this button will take the customer to the Final Summary page. Note: This option is available only in the Multi-Page hosted payment page template. |
The Field Type dropdown lets you select the type of field in the Billing Address and Shipping Address sections.
| Field Type | Description |
|---|---|
| Optional | Your customers can enter data in the field if they want to. |
| Mandatory | Your customers must enter data in the field in order to proceed. |
| Hidden | The field will not be displayed, however, data for this field can still be passed as parameters for the hosted payment pages. |
| Read Only | The field will not be editable, but can still be used to display prefilled data on the hosted payment pages. |
Final Summary
Note:
This section is available only in the Multi-Page hosted payment page template.
In this section, you can customize the information that will be shown to your customers before they proceed to making their payment.
Insight: If you have selected Verify with Email for your customers, they will have to verify their email address from this page. You can also choose to disable the final summary section in the multi-page template.
| Field | Description |
|---|---|
| Show Final Summary | Enable this option to display the Final Summary section to your customers in the Hosted Payment Page. Note: If you disable this option, the Final Summary section will not be shown to your customers. |
| Next Renewal Date Label | Enter the text that you want to display to your customers to inform them about their next renewal date. Note: This option is only visible if you have enabled Show Final Summary. Insight: You can use the %NextInvoiceDate% placeholder to display the next renewal date. If left empty, the next renewal date will not be displayed. |
| Invoice Custom Fields | Add invoice custom fields that should appear in the Hosted Payment Page during checkout. You can configure its Field Type based on your business requirement. |
| Button Label | Enter the text that you want to be displayed on the button in the Final Summary page. Note: This option is only visible if you have enabled Show Final Summary. |
Additional Information
Note:
This section is available only in the Single-page hosted payment page template.
In this section, you can configure invoice-specific custom fields that appear during checkout.
| Field | Description |
|---|---|
| Invoice Custom Fields | Add invoice custom fields that should appear in the Hosted Payment Page during checkout. |
Field Type
The Field Type dropdown lets you select the type of field for your Invoice Custom Fields.
| Field Type | Description |
|---|---|
| Optional | Your customers can enter data in the field if they want to. |
| Mandatory | Your customers must enter data in the field in order to proceed. |
| Hidden | The field will not be displayed, however, data for this field can still be passed as parameters for the hosted payment pages. |
| Read Only | The field will not be editable, but can still be used to display prefilled data on the hosted payment pages. |
Payment Information
You can customize the Payment Information section of your Hosted Payment Page to configure how the payment details will be displayed to your customers from the Payment Information tab in your hosted payment page template. You can also add terms & conditions, privacy policy and legal agreement options in the following sections.
Payment Details
In this section, you can customize how the payment information section will look in the hosted payment page.
| Field | Description |
|---|---|
| Title | Enter the name that you want to be displayed as the payment information section header. |
| Skip this section for: | Check the respective options if you want the payment section to be skipped in the hosted payment page for:
Note: This will be applicable only for new subscriptions created from the hosted payment pages. |
| Cards/Bank Account | Customize the Bank Account or Cards fields in the respective tabs. |
| Label | Enter the name of the text that you want to be displayed on the checkout button. |
| Enable CAPTCHA | A CAPTCHA (Completely Automated Public Turing test to tell Computers and Humans Apart) is a security measure designed to distinguish between humans and automated bots. Enable this option to add an extra layer of security and prevent abuse on your website such as spam or automated account creation. |
| Zero-Value Checkout Label | Customize the text of the checkout button, when a customer is signing up to a plan, which requires no payment. |
| Trial Plan Checkout Label | If the plan has a trial plan, enter the name of the text that you want to be displayed on the checkout button. |
| Update Payment Information Label | If your customer is updating their payment information through the Hosted Payment Page, enter the name of the text that you want to be displayed on the checkout button. |
| Asynchronous Payment Gateway Label | If you have integrated to an asynchronous payment gateway, where your customers are redirected to another website to complete their payment and are redirected back to Zoho Billing, enter the name of the text that you want to be displayed on the checkout button. Note: You can use the %GatewayName% placeholder to display the selected payment gateway’s name on this button’s label. |
Legal
In this section, you can configure the legal terms such as Terms and Conditions for Cards and Bank Account.
| Field | Description |
|---|---|
| ACH Agreement | Note: This field is available only in the Bank Account tab. Enter the legal agreement of ACH in this field. Insight: You can use the %CompanyName% as the placeholder to display the company name. |
| Terms & Conditions Label | Enter the name of the Terms & Conditions label in the agreement statement above the button. |
| Privacy Policy Label | Enter the name of the Privacy Policy label in the agreement statement above the button. |
| Terms & Conditions URL | Enter the URL to your terms and conditions, to which your customers will be redirected when they click on the Terms & Conditions label. |
| Privacy Policy URL | Enter the URL to your privacy policy, to which your customers will be redirected to when they click on the Privacy Policy label. |
| Display Mandatory Legal Agreement Checkbox | Enable this option to allow users to check your terms & conditions and privacy policy when signing up to your plan. If you want the option to be checked by default when your customer is signing up, click Yes under Should be checked by default? |
| License Agreement | Enter the license agreement that you want to be displayed above the checkout button. Insight: You can use the %ButtonText%, %TermsURL% and %PrivacyURL% placeholders to display the payment button label, links to terms & conditions and privacy policy respectively. |
Messages & Notes
To customize how the error, success, and warning messages appear on your hosted payment page, navigate to the Messages & Notes tab in your hosted page template and configure the following sections.
Error Messages
Enter the message in the Error Messages field, which will be displayed when mandatory fields are empty or when invalid data is entered in certain fields.
Insight: The %Label% placeholder displays the specific field name for which an error is shown.
Success Messages & Notes
In this section, you can configure the messages that will be displayed on successful signing up to your product and other notes.
| Field | Description |
|---|---|
| Success Checkout Message | Enter the message that you want to be displayed when your customer successfully signs up to your product. |
| Trial Plan Note | Enter the message that you want to be displayed when your customer successfully signs up to your product’s trial plan. This is particularly helpful to inform the customer when their trial period ends and other related information. Insight: You can use the %TrialEndDate% placeholder to display the date when the customer’s trial ends. |
| Future subscription start date information | Enter the message that you want to be displayed to your customers about the date on which their future subscription will be activated. Insight: The %FutureDate% placeholder displays the billing date of the subscription here. |
Update Payment Page
In this section, you can update the warning and success messages shown to your customers when they update their payment.
| Field | Description |
|---|---|
| Warning Message | Enter the warning message that you want to display to your customers when they are signing up. This is particularly helpful to inform your customers that the new payment method will replace the existing payment method. Insight: You can use %LastFourDigits% as the placeholder to specify the last four digits of the existing card/bank account. |
| Success Message | Enter the message that you want to be displayed to your customers when they successfully update their payment method. |
Thank You Page
To customize the Thank You page of your hosted payment page, navigate to the Thank You Page tab in your hosted page template and configure the following fields:
| Field | Description |
|---|---|
| Browser Tab Name | Enter the name that you want to be displayed on the browser tab. |
| Image/GIF | Click Upload to upload an image or GIF that you want to be displayed above the Thank You message. Note: Maximum file size is 1 MB. Insight: If you don’t upload an image or GIF, the default tick GIF will be displayed in the Thank you page of the hosted payment page. |
| Title | Display the title of the Thank You message that you want to be displayed when your customer successfully signs up to your product. |
| Title Font Size | Enter the size of the Thank You message title in pixels. |
| Description | Enter the Thank you message that you want to be displayed below the Thank You title. You can click + Insert Placeholders to use placeholders and make the content dynamic. |
| Description Font Size | Enter the size of the description in pixels. |
| Footnote | Enter the desired footnote content that you want to be displayed in the Thank You page of the hosted payment pages. You can also customize this content with the text editor and insert placeholders according to your needs. |
Abandoned Cart Tracking
Abandoned Cart Tracking helps you identify potential customers who start the checkout process on your Hosted Payment Pages but do not complete their subscription or purchase. It allows you to send automated follow-up emails, recover lost sales opportunities, and improve conversion rates.
Enable Abandoned Cart Tracking
To enable Abandoned Cart Tracking:
- Go to Settings in the top right corner.
- Navigate to Customization and click Hosted Payment Pages.
- Click the More icon to the right of Abandoned Cart Tracking and click Enable Tracking.
- In the popup, click Enable Tracking again to confirm.
Now, when a visitor (email verified) exits the checkout without completing the payment, an automated reminder email will be sent. The email will have the link to resume the checkout process which will be valid for 5 days.
Edit Abandoned Cart Notifications
Once you have enabled Abandoned Cart Tracking, you can customize the email sent to visitors who abandon their cart. Here’s how:
- Go to Settings in the top right corner.
- Navigate to Customization and click Hosted Payment Pages.
- Click the More icon next to Abandoned Cart Tracking and click Edit Notifications.
- In the popup, you can customize your email templates for abandoned cart.
Disable Abandoned Cart Tracking
You can stop sending the abandoned cart emails to your customers by disabling it.
Here’s how:
- Go to Settings in the top right corner.
- Navigate to Customization and click Hosted Payment Pages.
- Click the More icon to the right of Abandoned Cart Tracking and click Disable Tracking.
- In the popup, click Disable Tracking to confirm.
UK specific notes
If trade outside EU is enabled for an organization, with respect to the billing country, the VAT Registration Number field will be displayed in the Order Summary section and accordingly VAT will be collected for all the items.
Note:
- If it is UK, accordingly VAT will be collected for all the items.
- If it is a Non EU country, then no VAT will be applied.
- If it is an EU country and if the VAT registration number is entered in the field provided, i.e. EU VAT registered, then Zero VAT(0%) will be applied.
- If it is an EU country and if the VAT registration number is not entered in the field provided, i.e. EU Non VAT registered, then accordingly VAT will be collected for all the items.
- Even if it is EU Non VAT registered, VAT will not be collected for digital services.
Payment Preferences
You can change the order in which the different online payment methods appear in your hosted payment pages.
- Go to Settings > Preferences > Payments Received.
- Drag & drop the payment mode to change its order.
- Enter a label name for each payment mode if needed.
Integrate the following online payment gateways in order to enable different payment modes:
| Payment Mode | Payment Gateway to be Integrated |
|---|---|
| Express Checkout | Payflow Pro, Payments Pro |
| Bank Account | Forte, GoCardless, Authorize.Net |
| Credit Card | All payment gateways except 2Checkout and Paypal |
Visitor Tracking in Hosted Payment Pages
You can use Google Analytics or Meta Pixel (previously Facebook Pixel) to track your visitors’ behavior in your Hosted Payment Pages. This is particularly helpful to figure out the percentage of visitors who sign up for your products compared to the total number of visitors in your Hosted Payment Pages.
You can track the following metrics for each hosted payment page using Google Analytics:
- Page visits by country
- Number of page visits in the last 30 minutes
- Number of total visits and total users
- Number of successful signups and number of users
- Number of failed signup attempts and number of users
You can track the following metrics for each hosted payment page using Meta Pixel:
- Visitors who initiated a checkout
- Visitors who subscribed to a plan without trial days
- Visitors who subscribed to a plan with trial days
- New customer registration
- Visitors who clicked Contact Us on the Thank You page.
Set up Visitor Tracking in Hosted Payment Pages
To set up visitor tracking using Google Analytics or Meta Pixel in Hosted Payment Pages:
Navigate to Settings.
Select Hosted Payment Pages under Customisation.
Select a template for which you want to set up visitor tracking.
Click the Tracking Tool dropdown under the Visitor Tracking section.
Select Google Analytics or Meta Pixel.
Note: Meta Pixel is supported only for multi-page Hosted Payment Pages.
Enter the Tracking ID.
Insight: If you have selected Google Analytics as the Tracking Tool, the Tracking ID will be the Tracking Code provided by Google Analytics. If you have selected Meta Pixel as the Tracking Tool, the Tracking ID will be the Pixel ID provided by Meta Pixel.
Make other necessary changes.
Click Save.
How to fetch Pixel ID from Meta Pixel
You need to fetch the Pixel ID from Meta Pixel to track visitor behavior in your Hosted Payment Pages.
Note: These steps are subject to change based on changes by Meta Pixel.
To fetch the Pixel ID:
- Log in to your Meta Business Manager account.
- Navigate to Events Manager from the left sidebar.
- Go to the Overview page.
The Overview page shows a list of all your Pixels. You can get your Pixel ID under the Pixel name.
View Visitor Behavior in Google Analytics
Note: These steps are subject to change based on changes by Google Analytics.
To track visitor behavior in Google Analytics:
- Log in to your Google Analytics account.
- Navigate to Reports and select Events under Engagement on the left sidebar.
- Select your desired event from the list of events.
You can now view a list of the metrics for your visitors’ behavior in your Hosted Payment Pages.
View Visitor Behavior in Meta Pixel
Note: These steps are subject to change based on changes by Meta Pixel.
To track visitor behavior in Meta Pixel:
- Log in to your Meta Business Manager account.
- Navigate to Events Manager from the left sidebar.
- Click Data Sources.
- Select the pixel you configured.
You can view a list of all the supported metrics for your visitors’ behavior in your Hosted Payment Pages.
Troubleshooting
Your customers might receive these errors when they try to subscribe to one of your plans using hosted payment pages:
| Error Code | What went wrong? | What can you do? |
|---|---|---|
| CP1003 | Your hosted payment page might be associated with a deleted customer. | Verify that the associated customer still exists. |
| CP1004 | Your hosted payment page might be associated with a deleted subscription. | Verify that the associated subscription still exists. |
| CP1005 | Your hosted payment page might be associated with an inactive plan. | Verify that the associated plan is active. |
| CP1006 | Your hosted payment page might be associated with an inactive add-on. | Verify that the associated add-on is active. |
| CP1007 | Your hosted payment page might be associated with a deleted plan or the URL might contain an invalid plan code. | Fix the URL by entering the correct plan code |
| CP1008 | Your hosted payment page might be associated with a deleted add-on or the URL might contain an invalid add-on code. | Fix the URL by entering the correct add-on code |
| CP1009 | The add-on quantity given for the associated add-on is invalid. | Enter a valid add-on quantity. |
| CP1011 | ACH/direct debit payments have not been enabled for your customer. | Enable ACH/direct debit payments by going to Customers > Select customer > Mark the Enable ACH/direct debit payments for this customer box. |
| CP1012 | A one-time add-on was associated with a trial subscription while signing up. | Remove the one-time add-on and try again, or associate the one-time add-on with a non-trial subscription. |
| CP2001 | You have not set up default taxes for your organization. | Go to Settings > Taxes & Compliance > Taxes and create a default tax. |
| CP2011 | Digital service plans/add-ons cannot be included in the invoice along with goods or other services. | Create separate hosted payment pages for digital services. |
| CP2012 | Customer’s billing country does not match the EU tax member state that you’ve associated with the plan or add-on (digital service). You’ll get this error only when you’ve enabled VAT MOSS for your organization. | Make sure that the customer belongs to your organization’s tax registered member state. |
| CP2013 | You have not entered the product type for the plan or add-on for which your customer is trying to subscribe. | Edit the plan/add-on and specify whether the product is a good, service or digital service. |
| CP3001 | You have not enabled reference transactions in your merchant account. | Enable reference transactions in your merchant account. |
| CP3002 | You have configured the payment gateway with invalid credentials or have made recent changes to your merchant account. | Re-enter the correct credentials by going to Settings > Integrations. |
| CP3003 | The payment has been declined due to the fraud detection filters that you’ve set up in your merchant account. | Verify if the transaction was fraudulent or not. Moderate your fraud filters, if necessary. |
| CP3004 | The transaction has been declined as the payment gateway couldn’t verify the address of your customer. | Enable the address fields for your hosted payment pages from Settings > Customization > Hosted Payment Pages. |
| CP3005 | A transaction with the same amount and card details was made within a few minutes of the previous transaction. | Ask your customers to try again after a few minutes. |
| CP4001 | The transaction amount is less than the minimum amount allowed by the payment gateway. This may be due to the discounts or credits applied. | Make sure that the transaction amount is greater than the minimum transaction amount. |
| CP4002 | Payment gateway that you’ve configured doesn’t support recurring payments. | Configure a payment gateway which supports recurring payments. |
| CP4003 | The payment gateways that you’ve configured don’t support the transaction currency. | Configure a payment gateway which supports the transaction currency. |
 Yes
No
Yes
No
Thank you for your feedback!