Important update: Our previous package "react-native-zohosalesiq-mobilisten" is no longer maintained. The replacement requires a core package and a UI package. To upgrade, follow these steps:
- Install the new packages by running npm i @react-native-zohosalesiq/mobilisten-core @react-native-zohosalesiq/mobilisten.
- Replace all imports from the old package with '@react-native-zohosalesiq/mobilisten'.
Overview
React Native is a framework that allows you to build native mobile apps using JavaScript. Usually, you need to program your mobile app using Java/Kotlin for Android and Swift/Obj-C for iOS. React Native helps you remove that requirement, leading to fully functional apps on both platforms in much less time and using just one coding language.
Installation steps
- Requirements
- Installing Zoho SalesIQ Mobilisten for React Native
- Dependencies installation
- New architecture(Turbo Module) support
- Platform configuration (mandatory)
- Generate App and Access keys
- Initialize Mobilisten SDK
- Platform configuration (optional)
Zoho SalesIQ Mobile SDK will let you embed the tracking and live chat widget code in your existing react-native project. Using this, you can track and converse with visitors to your website right away from your mobile application. Click on the button below to get a sample app.
Note: Zoho SalesIQ is GDPR Compliant. The configurations for the website and Mobile SDK remain the same; if you have already configured on your site, it will be automatically reflected in Mobile SDK. If not, then learn how to configure now.
Requirements
iOS:
- Minimum Android Version: iOS 13 and above
- Xcode: 16.0+ (latest recommended)
Android:
- Minimum Android Version: Android 6.0 (Lollipop) (API Level 23)
- Compile SDK Version: 35(Android 15)
Installing Zoho SalesIQ Mobilisten for React Native
Package installation
- To add ZohoSalesIQ SDK to your project, install the packages using the commands given.
- Open your react-native project in the terminal. Then, run the commands below to install the packages.
Copied
npm install @react-native-zohosalesiq/mobilisten-core @react-native-zohosalesiq/mobilisten
Run this optional command to integrate Mobilisten calls along with Mobilisten.
Copied
npm install @react-native-zohosalesiq/mobilisten-core @react-native-zohosalesiq/mobilisten @react-native-zohosalesiq/mobilisten-calls
For React-Native versions below 0.59 [Auto linking]
Copied
react-native link @react-native-zohosalesiq/mobilisten-core @react-native-zohosalesiq/mobilisten - This package is to install our SDK (command 1) and then link them to your React - Native project (command 2).
- Run this optional command to integrate Mobilisten calls along with Mobilisten.
Copied
react-native link @react-native-zohosalesiq/mobilisten-calls
For React-Native versions below 0.59 [Manual linking]
- Add the below code to the android/settings.gradle
Copied
include ':react-native-zohosalesiq_mobilisten-core'
project(':react-native-zohosalesiq_mobilisten-core').projectDir = new File(rootProject.projectDir, '../node_modules/react-native-zohosalesiq_mobilisten-core/android')
include ':react-native-zohosalesiq_mobilisten'
project(':react-native-zohosalesiq_mobilisten').projectDir = new File(rootProject.projectDir, '../node_modules/react-native-zohosalesiq_mobilisten/android') - Run this optional command to integrate Mobilisten calls along with Mobilisten.
Copied
include ':react-native-zohosalesiq_mobilisten-calls'
project(':react-native-zohosalesiq_mobilisten-calls').projectDir = new File(rootProject.projectDir, '../node_modules/react-native-zohosalesiq_mobilisten-calls/android') - Implement the dependency in the android/app/build.gradle file inside dependencies
Copied
implementation project(':react-native-zohosalesiq_mobilisten')
Note: The mobilisten-core must be linked mandatorily.
Dependencies installation
iOS
- Navigate to the iOS folder in your project directory.
- Install CocoaPods dependencies by running the command below.
Copied
pod install
Android
- Open the Android folder of your react-native project in Android Studio or any other platform for Android development.
- Add the following maven repository in the project root settings.gradle(project/android/settings.gradle) or build.gradle file(project/android/build.gradle).
For Gradle version 6.7 and below
Copied// Add the following to your project's root build.gradle file.

allprojects {
   repositories {
      google()
      mavenCentral()
      // ...
      maven { url 'https://maven.zohodl.com' }
   }
}
For Gradle version 6.8 and above
Copied// Add the following to your settings.gradle file.

dependencyResolutionManagement {
    repositoriesMode.set(RepositoriesMode.FAIL_ON_PROJECT_REPOS)
    repositories {
        google()
        mavenCentral()
        // Add the Zoho Maven URL here
        maven { url = uri("https://maven.zohodl.com") }
    }
}Copied// Add the following to your settings.gradle file.
dependencyResolutionManagement {
repositoriesMode.set(RepositoriesMode.FAIL_ON_PROJECT_REPOS)
repositories {
google()
mavenCentral()
// Add the Zoho Maven URL here
maven { url 'https://maven.zohodl.com' }
}
}New architecture(Turbo Module) support
The new architecture is supported only for React native >= 0.73 and library version >= 11.0.0. To enable it, follow the instructions below.
iOS
- Open the "ios/Podfile" file.
- Add the below line in the main scope of your Podfile.
Copied
ENV['RCT_NEW_ARCH_ENABLED'] = '1'
- Navigate to the "ios" folder under the project directory.
- Run the following command in the project.
Copied
pod install
Android
- Open the "android/gradle.properties" file.
- Toggle the "newArchEnabled" flag from "false" to "true".
Copied
newArchEnabled=true

Note: When switching between the old and new architecture, delete the node_modules folder and rebuild your project to avoid issues.
Platform configuration (mandatory)
iOS
1. Update your Info.plist
Add the required keys and descriptions for your application in the Info.plist file. These are necessary for the SDK to work correctly and comply with iOS requirements.
- Open Xcode workspace
Copied
open ios/YourProject.xcworkspace- In Xcode, find Info.plist under your app folder.
- Add only the usage description keys you need, then save and rebuild the app.

2. Configure background mode capability for CallKit
When integrating @react-native-zohosalesiq/mobilisten-calls, enable the appropriate Background Modes in Xcode so CallKit can properly show incoming and ongoing calls, even when your app runs in the background.
This setup ensures your app can display CallKit’s call UI and handle calls seamlessly in the background.
Enable background modes for CallKit
- Open Xcode and select your app target.
- Navigate to the Signing & Capabilities tab.
- Click + Capability and add Background Modes.
- Under Background Modes options, check:
- Background fetch
- Audio, AirPlay, and Picture in Picture
- Background fetch

Android
1. Lifecycle Callback
- Add the android:name property to the <application> tag in your AndroidManifest.xml:
Copied
<application
    android:label="@string/app_name"
    android:icon="@drawable/ic_launcher"
android:name="<package_name>.MainApplication"> Copiedimport com.zohosalesiq.reactlibrary.RNZohoSalesIQ;
// OPTIONAL - Only If Calls feature is required.
import com.zoho.salesiq.calls.reactlibrary.RNZohoSalesIQCalls
public class MainApplication extends Application implements ReactApplication {
//...
@Override
public void onCreate() {
RNZohoSalesIQ.registerCallbacks(this);
// OPTIONAL - Only If Calls feature is required.
RNZohoSalesIQCalls.registerCallbacks(this)
super.onCreate();
}
} - This is essential as it enables Mobilisten to track activity's lifecycles and other listener callbacks on the app's startup to show the launcher and other important user behaviors.
Note: If you already have a custom Application class, ensure to "import com.zoho.livechat.android.MobilistenActivityLifecycleCallbacks;" and call "MobilistenActivityLifecycleCallbacks.register(this);" before invoking "super.onCreate()".
2. Permissions
Mobilisten
- android.permission.INTERNET: Required for network-related operations (mandatory)
- android.permission.SCHEDULE_EXACT_ALARM: If you want your chatbot to be proactively triggered for your mobile app users after a specified duration (more than a second), add SCHEDULE_EXACT_ALARM permission in your AndroidManifest.xml. This ensures scheduling the bot trigger after the designated time. Even if your app is inactive, SalesIQ will post the trigger message as a notification for your app users.
Note: To use the bot triggers in Android 12 & above, the SCHEDULE_EXACT_ALARM permission is mandatory.
Mobilisten calls
- android.permission.INTERNET (Required for network operations)
- android.permission.POST_NOTIFICATIONS
- android.permission.FOREGROUND_SERVICE_SPECIAL_USE
- android.permission.FOREGROUND_SERVICE_PHONE_CALL
- android.permission.FOREGROUND_SERVICE_MICROPHONE
- android.permission.MANAGE_OWN_CALLS
- android.hardware.sensor.proximity
- android.permission.BLUETOOTH_CONNECT
- android.permission.USE_FULL_SCREEN_INTENT
- android.permission.MODIFY_AUDIO_SETTINGS
- android.permission.SYSTEM_ALERT_WINDOW
- android.permission.RECORD_AUDIO
- android.permission.VIBRATE
Generate App and Access keys
Once the SDK is integrated and the necessary permissions are configured, generate the App Key and Access Key for the required platform(s) to initialise Mobilisten.
Note: A separate app and access key are required for iOS and Android.
iOS
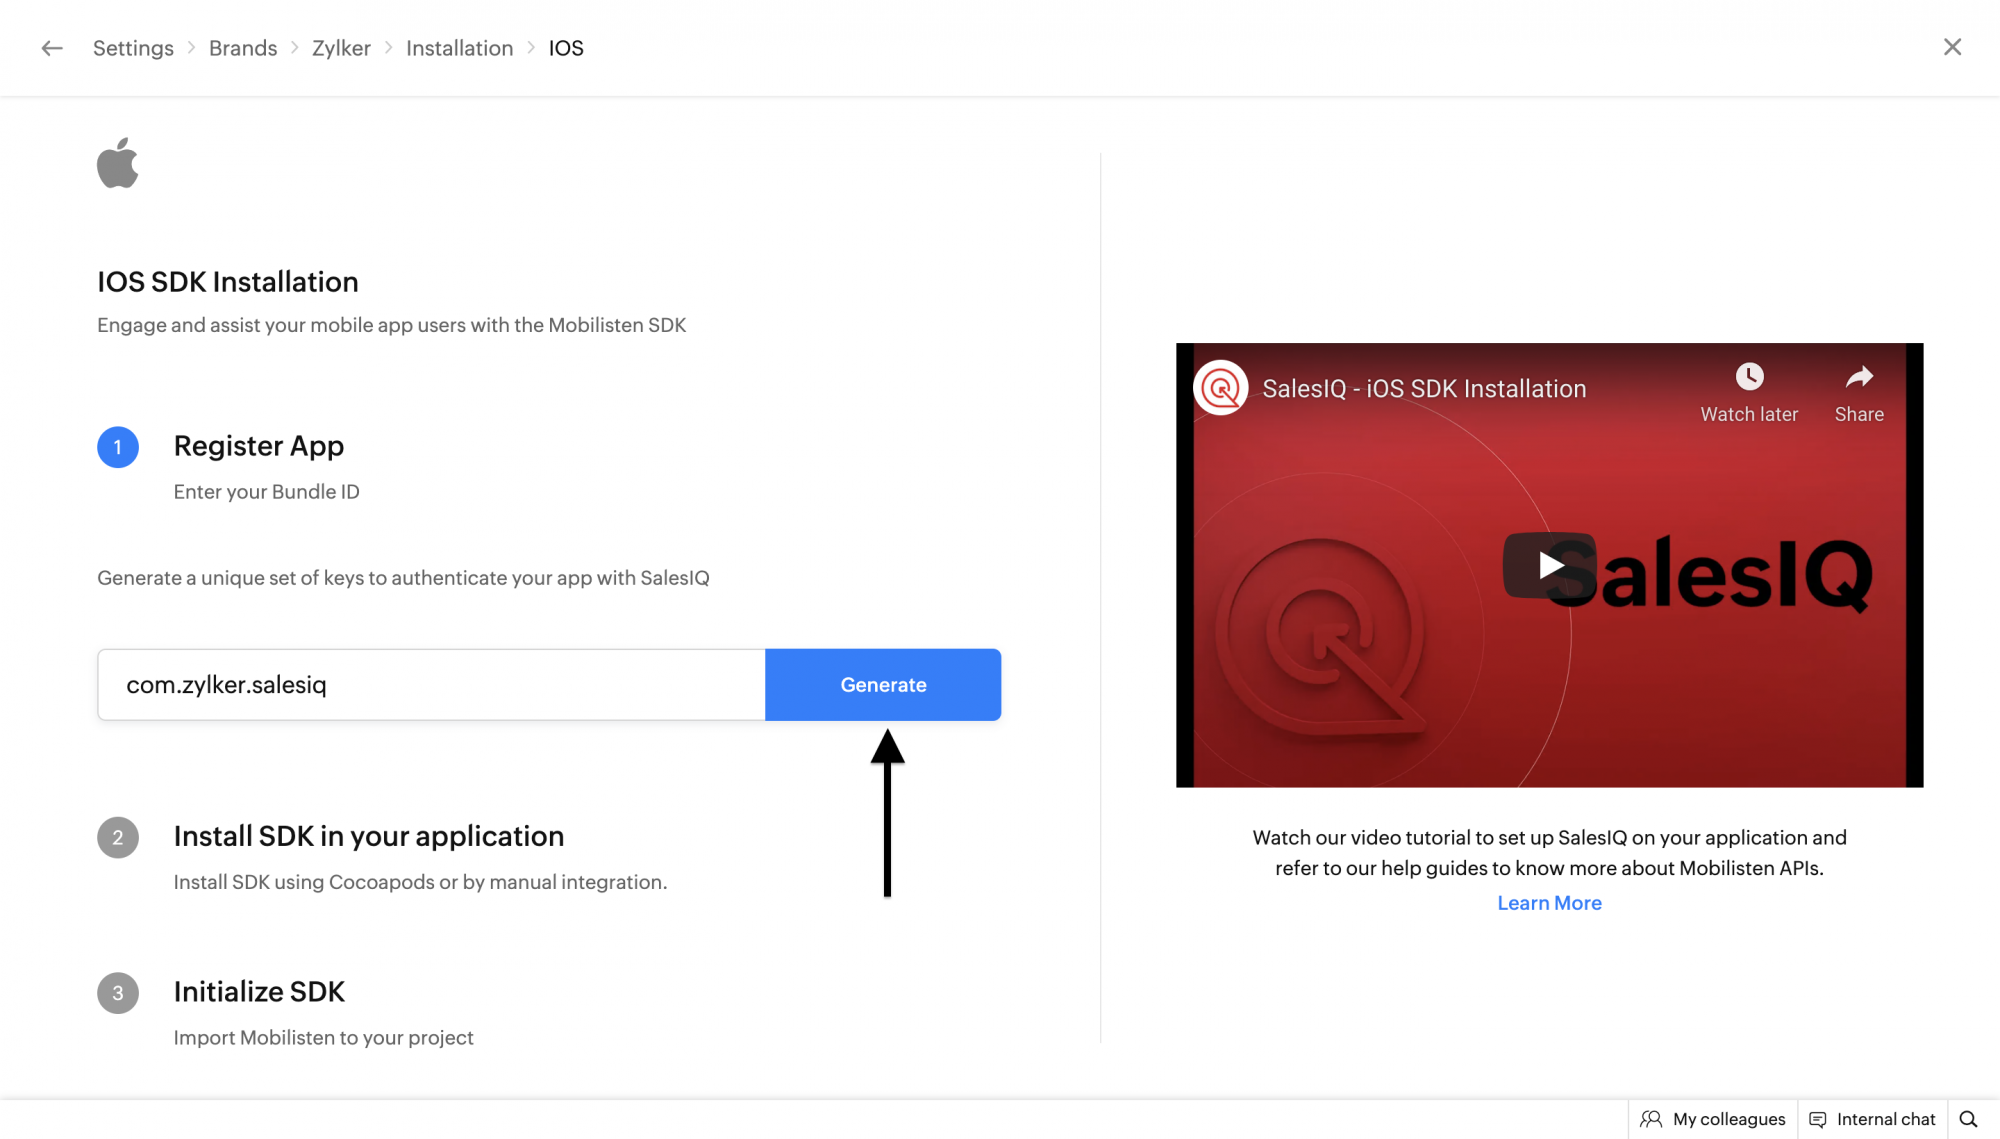
- In the Zoho SalesIQ console, navigate to Settings > Brands > choose the brand > Installation, and choose iOS.
- Enter your application's bundle ID, which must match Xcode > Runner target > Bundle Identifier.

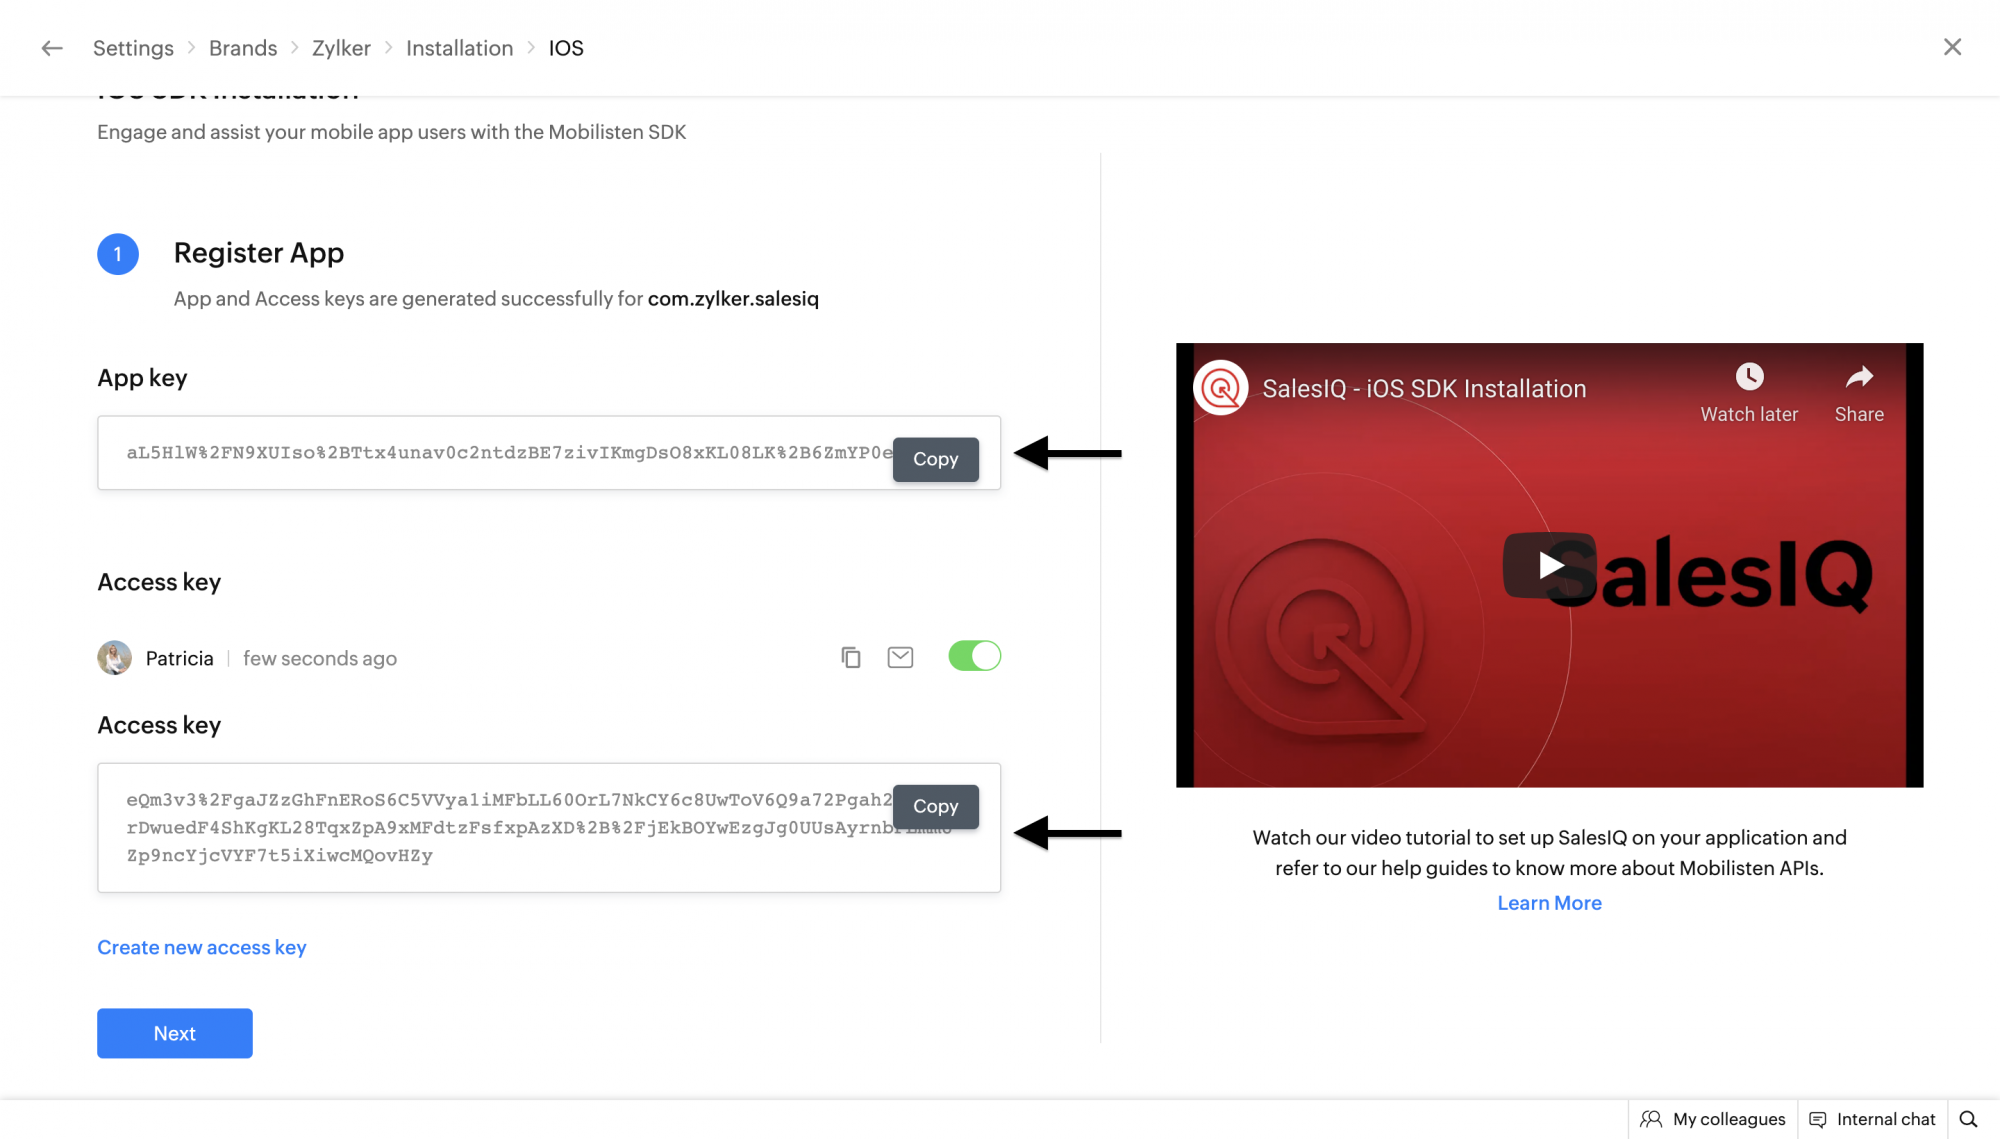
- Click on Generate Token. Copy the App key and Access key. You can also generate the new keys by clicking on the Generate button again.

Android
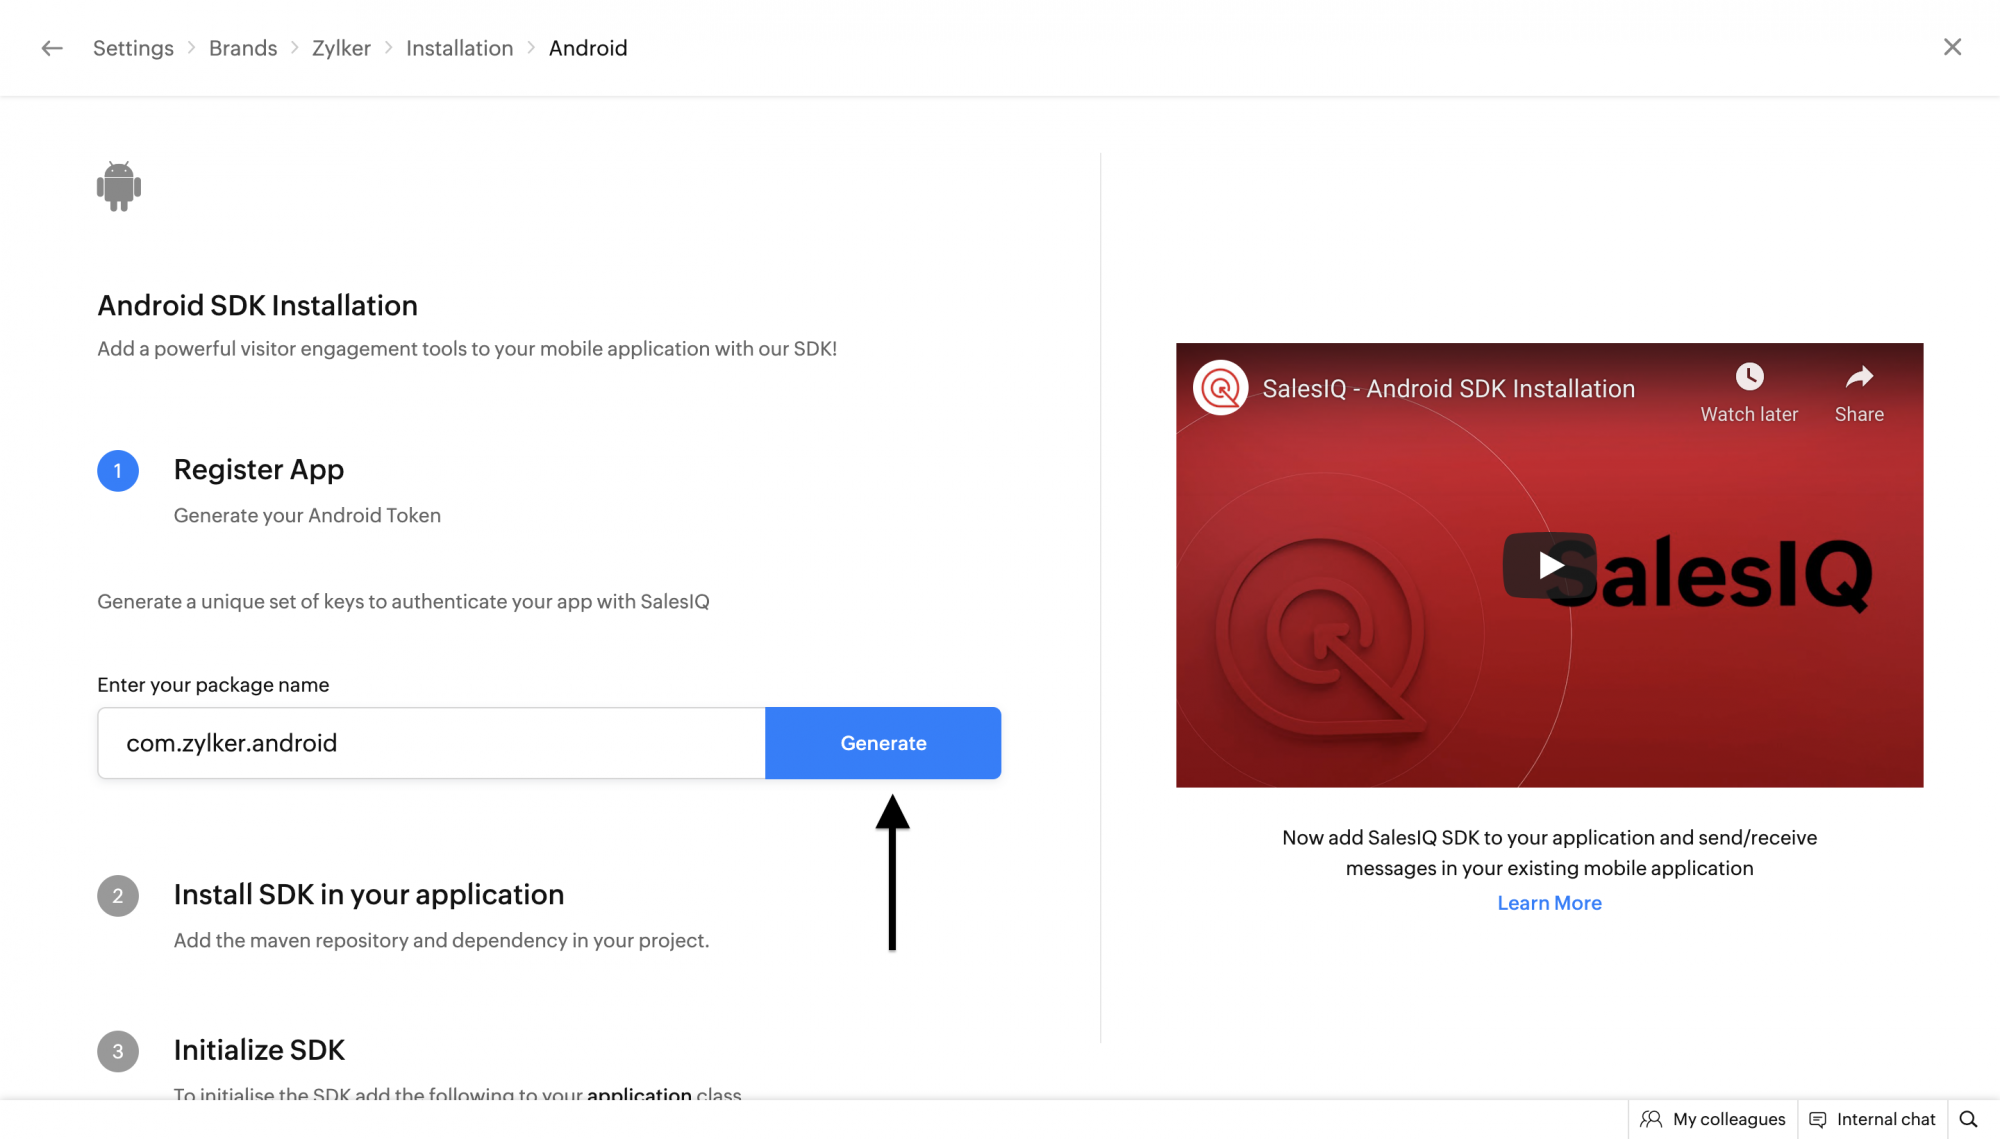
- In the Zoho SalesIQ console, go to Settings > Brands > Installation, and choose Android.
- Enter your application's bundle ID (applicationId in android/app/build.gradle).

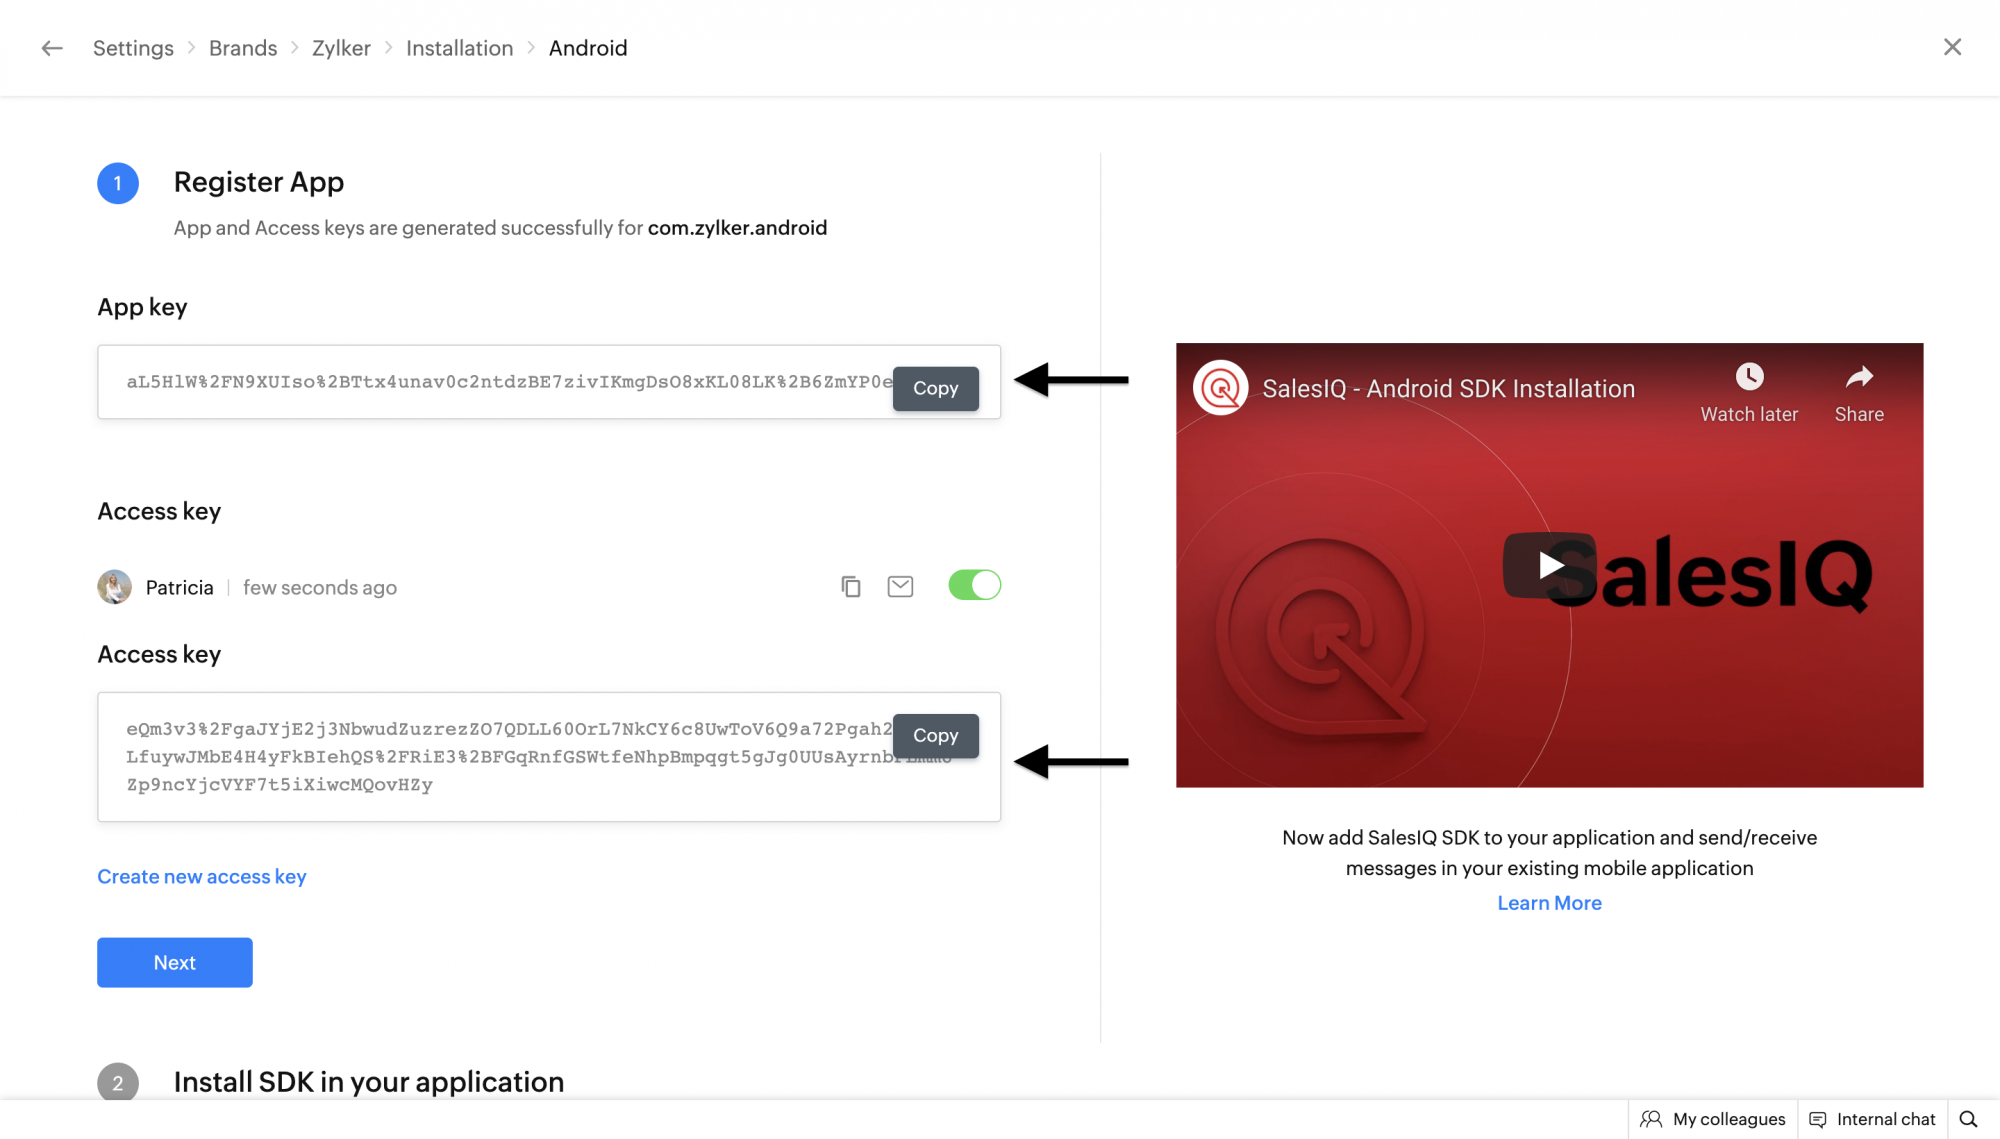
- Click on Generate. Copy the App key and Access key. You can also generate the new keys by clicking on the Generate button again.

Initialize Mobilisten SDK
After completing all the above steps, initialize the SDK by adding the following snippet in your App.tsx file with your app key and access key.
Copiedimport { ZohoSalesIQ } from '@react-native-zohosalesiq/mobilisten';

// OPTIONAL - Only If Calls feature is required.
import { ZohoSalesIQCalls } from '@react-native-zohosalesiq/mobilisten-calls';

let APP_KEY;
let ACCESS_KEY;
if (Platform.OS === 'ios'){
    APP_KEY = "ios_app_key";
    ACCESS_KEY = "ios_access_key";
} else {
    APP_KEY = "android_app_key";
    ACCESS_KEY = "android_access_key";
}

// OPTIONAL - Only If Calls feature is required.
ZohoSalesIQCalls.initialiseForiOS();

ZohoSalesIQ.initialize({ appKey: APP_KEY, accessKey: ACCESS_KEY }).then(() => {
  ZohoSalesIQ.Launcher.show(ZohoSalesIQ.Launcher.VisibilityMode.ALWAYS); // Show the chat launcher
  // Your logic after initialization
}).catch((error) => {
  // Handle initialization error
});
Platform configuration (optional)
Android
Proguard Configuration (Minifying App)
In some versions of the Android Gradle plugin, the R8 compiler exhibits aggressive behavior that removes some essential classes necessary for the SDK to function as expected. To handle this, we have added specific pro-guard rules within our Mobilisten SDK to preserve these crucial classes during the build process. If you have enabled ProGuard(minifyEnabled) R8, then please add the following rules in your proguard-rules.pro file in your project/android folder.
Copied
-dontwarn kotlinx.parcelize.Parcelize
If you encounter any instances where these pro-guard rules do not suffice, kindly reach us at (support@zohosalesiq.com).
Backup Codes
If your app has enabled backup and you have your own backup rules or some of your other dependencies have them, then all these steps below are mandatory for App data backup to Google. Since Android doesn’t support manifest merging, all backup rules must be combined into a single file, which you’ll need to reference in your app’s AndroidManifest.xml.
To complete this setup,
- Create XML files called merged_backup_rules.xml and merged_data_extraction_rules.xml in the res/xml/ directory. Example: android/app/src/main/res/xml.
- Add your rules with our Mobilisten rules to your app and verify that everything is functioning as expected.
Copied<?xml version="1.0" encoding="utf-8"?>
<full-backup-content>
    <!-- Your own/other library's rules -->
    <exclude domain="sharedpref" path="sample-data"/>
    <exclude domain="database" path="sample.db"/>

    <!-- Mobilisten rules -->
    <exclude
        domain="sharedpref"
        path="siq_encrypted_shared_preference_entries.xml" />
    <exclude
        domain="sharedpref"
        path="siq_session.xml" />
    <exclude
        domain="sharedpref"
        path="siq_permission.xml" />
    <exclude
        domain="database"
        path="siq_mobilisten.db" />
     <exclude
        domain="database"
        path="mobilisten_zoho_salesiq.db" />
</full-backup-content>
merged_data_extraction_rules.xml
Copied<?xml version="1.0" encoding="utf-8"?>
<data-extraction-rules>

    <cloud-backup>
        <!-- Your own/other library's rules -->
        <exclude domain="sharedpref" path="sample-data"/>
        <exclude domain="database" path="sample.db"/>

        <!-- Mobilisten rules -->
        <exclude
            domain="sharedpref"
            path="siq_encrypted_shared_preference_entries.xml" />
        <exclude
            domain="sharedpref"
            path="siq_session.xml" />
        <exclude
            domain="sharedpref"
            path="siq_permission.xml" />
        <exclude
            domain="database"
            path="siq_mobilisten.db" />
        <exclude
            domain="database"
            path="mobilisten_zoho_salesiq.db" />
    </cloud-backup>

    <device-transfer>
        <!-- Your own/other library's rules -->
        <exclude domain="sharedpref" path="sample-data"/>
        <exclude domain="database" path="sample.db"/>
    </device-transfer>
</data-extraction-rules>
Also, ensure to map it in your AndroidManifest.xml.
Copiedandroid:dataExtractionRules="@xml/merged_data_extraction_rules"
android:fullBackupContent="@xml/merged_backup_rules"'
tools:replace="android:fullBackupContent,android:dataExtractionRules,android:allowBackup"