Overview
Zoho SalesIQ Mobile SDK (Mobilisten) allows you to extend the functionality of your application. With Mobilisten, you can view all your live app users in the SalesIQ dashboard, connect with your users via real-time chat, provide self-help tools, and much more. Click on the below button to get a sample app.
Note:
Zoho SalesIQ is GDPR Compliant! The configurations for the website and Mobile SDK remain the same. If you have already configured them for your brand, it will also be automatically reflected in Mobile SDK. If not, then learn how to configure it now.
Installing live chat on your Android mobile application
Requirements
Ensure that your project meets the following requirements:
- Minimum Android Version: Android 5.0 (Lollipop) (API Level 21)
- Compile SDK Version: 34 (Android 14)
app/build.gradle
Copiedandroid {
        compileSdk 34     // Please replace the latest version of compileSdk here

        //...
}
Mobilisten Calls
Ensure that your project meets the following requirements to support calls:
- Minimum Android Version: Android 5.0 (Lollipop) (API Level 21)
- Compile SDK Version: 34 (Android 14)
- Gradle wrapper version: Above 8
- AGP version: 8.0.2
- Kotlin: 1.9.10
Required Permissions for Calls:
- android.permission.INTERNET (Required for network operations)
- android.permission.POST_NOTIFICATIONS
- android.permission.FOREGROUND_SERVICE_SPECIAL_USE
- android.permission.FOREGROUND_SERVICE_PHONE_CALL
- android.permission.FOREGROUND_SERVICE_MICROPHONE
- android.permission.MANAGE_OWN_CALLS
- android.hardware.sensor.proximity
- android.permission.BLUETOOTH_CONNECT
- android.permission.USE_FULL_SCREEN_INTENT
- android.permission.MODIFY_AUDIO_SETTINGS
- android.permission.SYSTEM_ALERT_WINDOW
- android.permission.RECORD_AUDIO
- android.permission.VIBRATE
Installing Zoho SalesIQ SDK
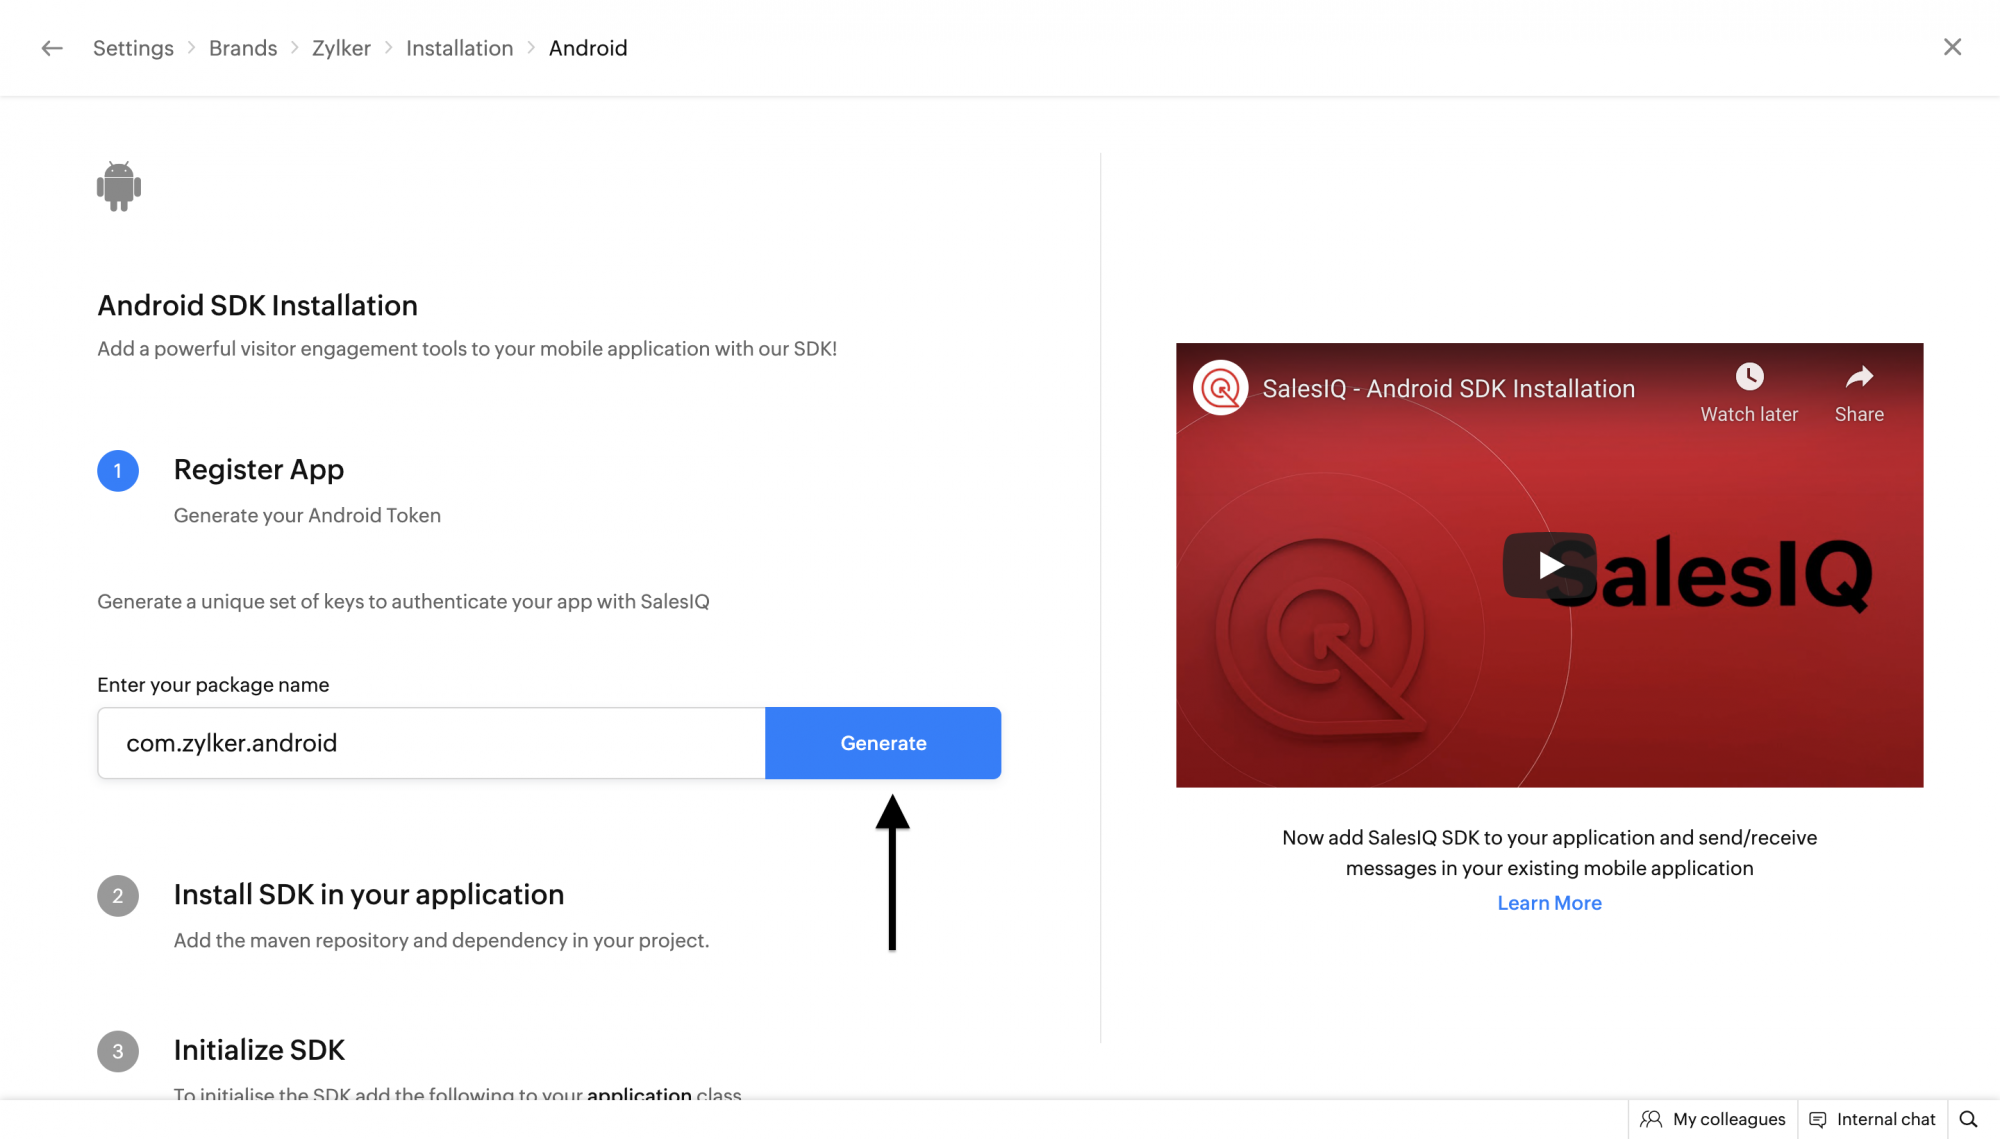
Step 1: In the Zoho SalesIQ console, go to Settings > Brands > Brand name > Installation, and choose Android from the menu.
Step 2: Then, enter your application ID and click Generate.
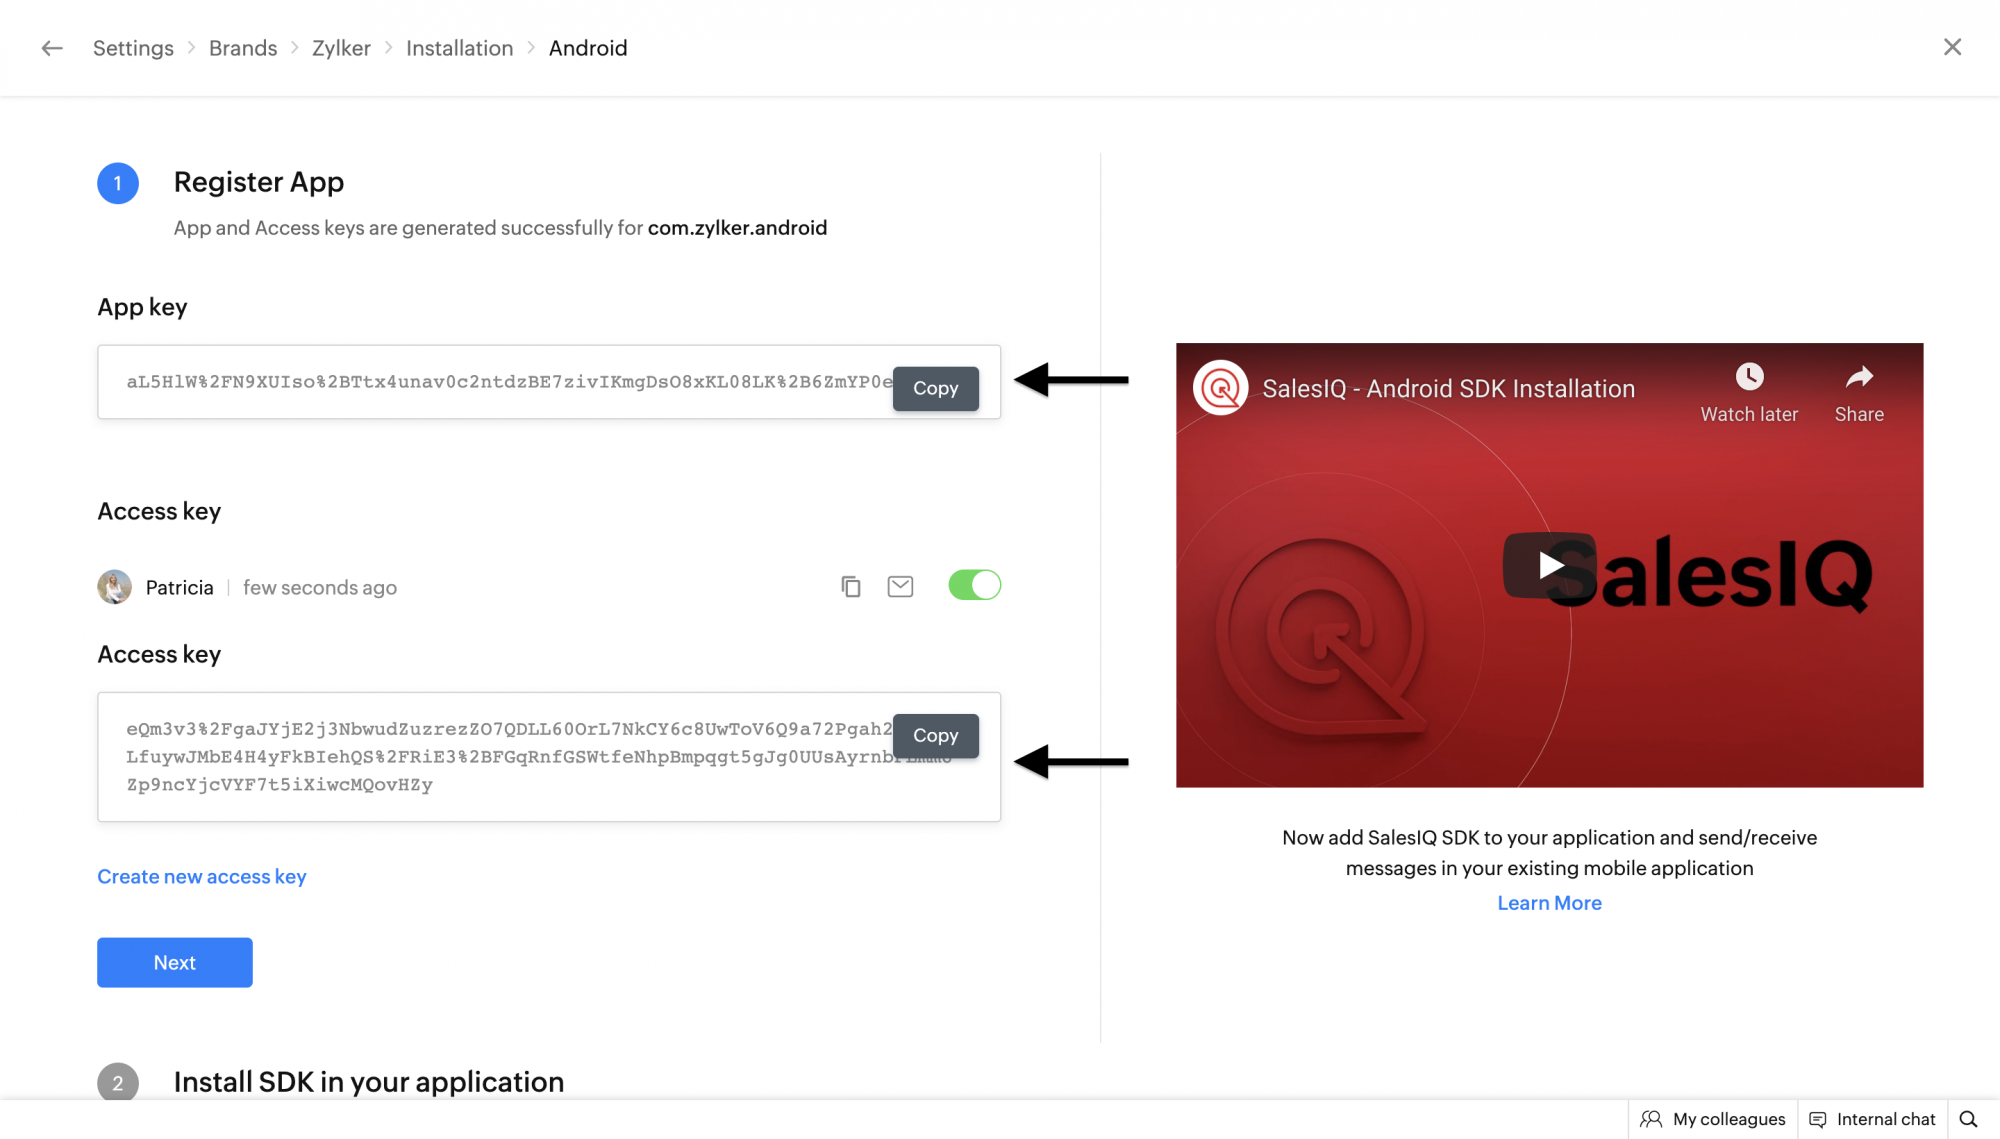
Step 3: Once the token is generated, you will find the unique app key and the access key provided for your application, which helps to authenticate your app with SalesIQ. Each app can have one app key and three active access key.
App Key
The App key is unique to each app, this key can't be regenerated.
Access Key
This key is the token to access the SalesIQ SDK on your application. Each application can have only three active access keys. When you generate the fourth access key, you will be prompted to delete an existing access key, or the fourth key will replace the oldest access key of the application.
You can associate the access key in each version of your application. If you wish to release a new application version, you can create a new access key and associate it with the application. The old version will also be accessible until you delete or disable the access key.
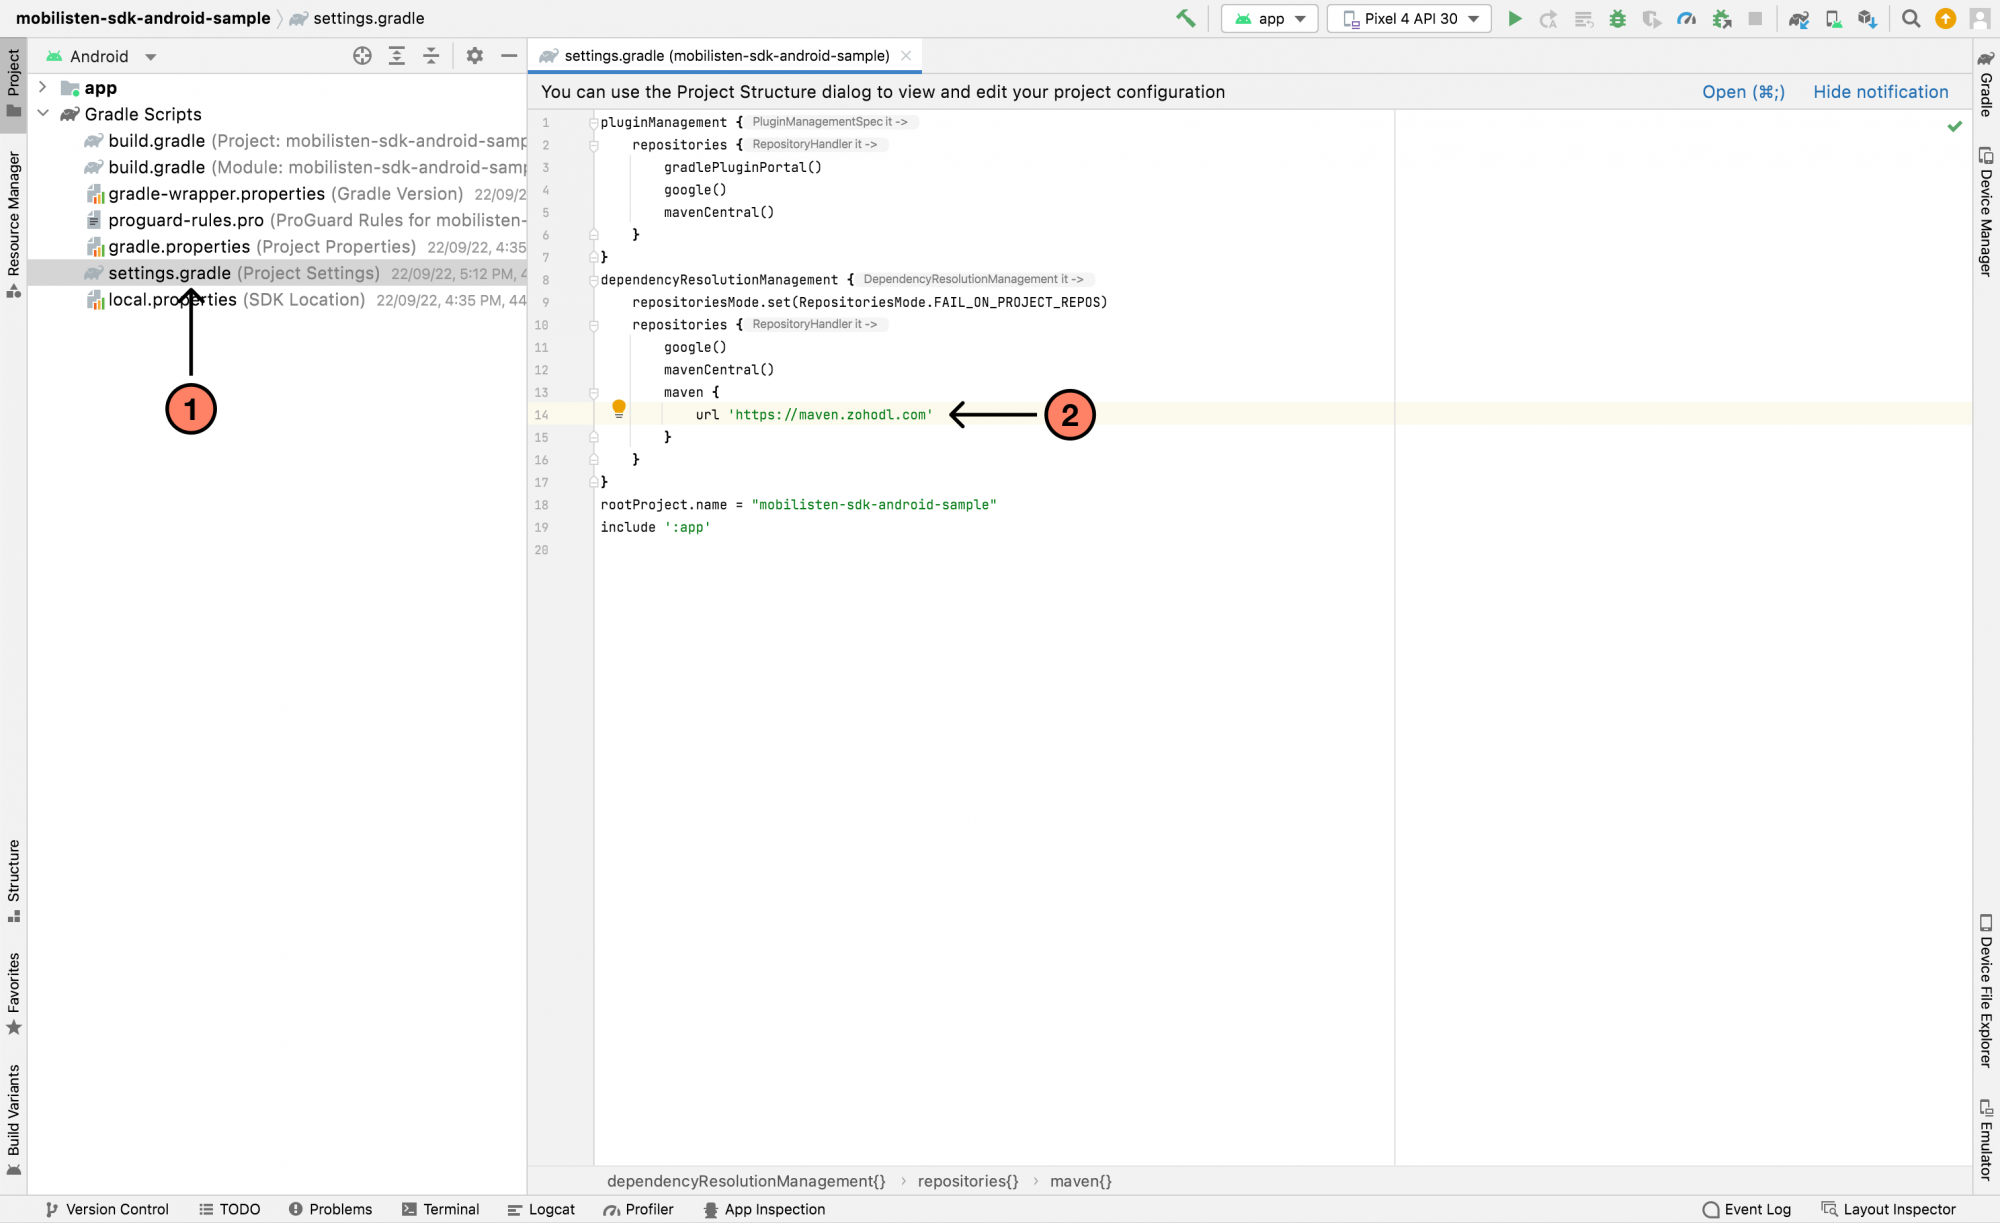
Step 4: Add the following maven repository in the project root settings.gradle or build.gradle file (/build.gradle).
For Gradle version 6.7 and below
Copied// Add the following to your project's root build.gradle file.

allprojects {
   repositories {
      google()
      mavenCentral()
      // ...
      maven { url 'https://maven.zohodl.com' }
   }
}
For Gradle version 6.8 and above
Copied// Add the following to your settings.gradle file.

dependencyResolutionManagement {
    repositoriesMode.set(RepositoriesMode.FAIL_ON_PROJECT_REPOS)
    repositories {
        google()
        mavenCentral()
        // Add the Zoho Maven URL here
        maven { url = uri("https://maven.zohodl.com") }
    }
}Copied// Add the following to your settings.gradle file.
dependencyResolutionManagement {
repositoriesMode.set(RepositoriesMode.FAIL_ON_PROJECT_REPOS)
repositories {
google()
mavenCentral()
// Add the Zoho Maven URL here
maven { url 'https://maven.zohodl.com' }
}
}
Step 5: Add the following dependency in the app's build.gradle file (app/build.gradle).
app/build.gradle
Copiedimplementation("com.zoho.salesiq:mobilisten:8.1.0-beta01")
implementation("com.zoho.salesiq:mobilisten-calls:0.0.1-beta01") // Add include this to support calls in mobilistenCopiedimplementation "com.zoho.salesiq:mobilisten:8.1.0-beta01"
implementation "com.zoho.salesiq:mobilisten-calls:0.0.1-beta01" // Add include this to support calls in mobilisten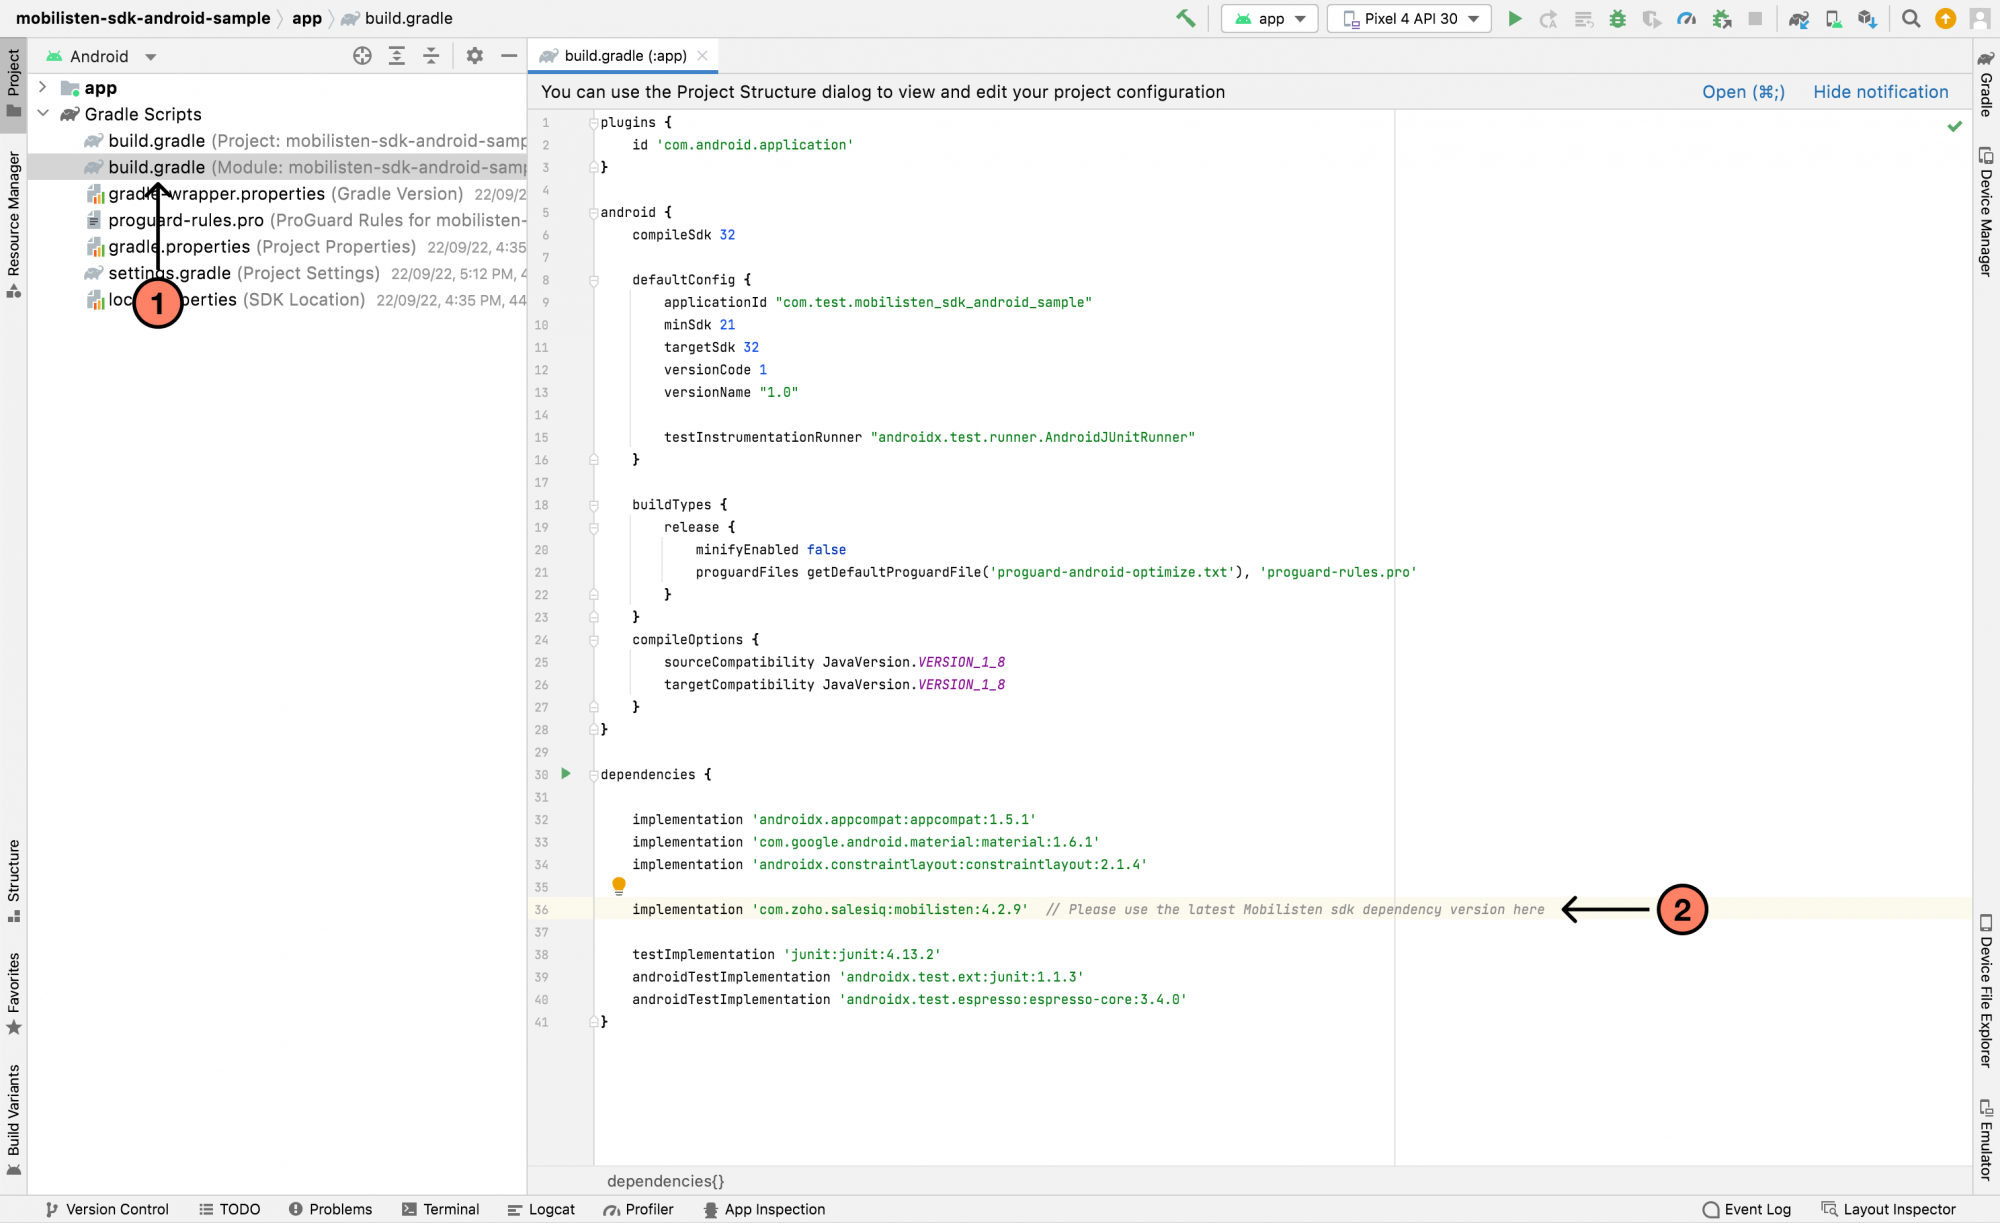
Step 6: Then press Sync Now in the bar that appears in the IDE.

Step 7: Now, initialize the SDK by adding the following line in the onCreate() method of your application class. You will have to insert the app key and access key as mentioned below:
- If you don't override the Application class, you need to override it as follows.
Alert: This is an essential step to handle cases of preference/master key corruption.
For SDK versions 8.1.0-beta01 and above
Copiedimport android.app.Application
import android.util.Log
import com.zoho.commons.Fonts
import com.zoho.livechat.android.MobilistenActivityLifecycleCallbacks
import com.zoho.salesiqembed.ZohoSalesIQ
import com.zoho.salesiqembed.models.SalesIQConfiguration

class MyApplication : Application() {

    override fun onCreate() {
        MobilistenActivityLifecycleCallbacks.register(this)
        super.onCreate()

        ZohoSalesIQ.setListener(object :SalesIQListener {
            // Other method implementations

            override fun onVisitorRegistrationFailed(salesIQError: SalesIQError): SalesIQAuth? {
                return if (isLoggedInUser) {
                    SalesIQUser("user_id") // Same ID used in ZohoSalesIQ.registerVisitor()
                } else {
                    SalesIQGuestUser()
                }
            }
        })

        val configuration = SalesIQConfiguration.Builder("yourAppKey", "yourAccessKey")
            // Optional methods
            .setFont(Fonts.REGULAR, "fonts/Roboto-Regular.ttf")
            .setFont(Fonts.MEDIUM, "fonts/Roboto-Medium.ttf")
            .build()

        FirebaseMessaging.getInstance().token.addOnSuccessListener {
            ZohoLiveChat.Notification.enablePush(it, true)
        }

        ZohoSalesIQ.initialize(this, configuration) { result ->
            if (result.isSuccess) {
                // SalesIQ SDK initialized successfully
            } else {
                Log.d("Mobilisten", "Initialization failed: code: ${result.error?.code} , message:  ${result.error?.message}")
            }
        }
    }
}Copiedimport android.app.Application;
import android.util.Log;
import com.zoho.commons.Fonts;
import com.zoho.livechat.android.MobilistenActivityLifecycleCallbacks;
import com.zoho.livechat.android.modules.common.ui.result.entities.SalesIQError;
import com.zoho.salesiqembed.ZohoSalesIQ;
import com.zoho.salesiqembed.models.SalesIQConfiguration;
public class MyApplication extends Application {
@Override
public void onCreate() {
MobilistenActivityLifecycleCallbacks.register(this);
super.onCreate();
ZohoSalesIQ.setListener(new SalesIQListener() {
// Other method implementations
@Nullable
@Override
public SalesIQAuth onVisitorRegistrationFailed(@NonNull SalesIQError salesIQError) {
SalesIQAuth salesIQAuth;
if (isLoggedInUser) {
salesIQAuth = new SalesIQUser("user_id"); // Same ID used in ZohoSalesIQ.registerVisitor()
} else {
salesIQAuth = new SalesIQGuestUser();
}
return salesIQAuth;
}
});
SalesIQConfiguration configuration = new SalesIQConfiguration.Builder("yourAppKey", "yourAccessKey")
// Optional methods
// .setFont(Fonts.REGULAR, "fonts/Roboto-Regular.ttf")
// .setFont(Fonts.MEDIUM, "fonts/Roboto-Medium.ttf")
.build();
FirebaseMessaging.getInstance().getToken().addOnSuccessListener(new OnSuccessListener<String>() {
@Override
public void onSuccess(String token) {
ZohoSalesIQ.Notification.enablePush(token, true);
}
});
ZohoSalesIQ.initialize(this, configuration, result -> {
if (result.isSuccess()) {
// SalesIQ SDK initialized successfully
} else {
SalesIQError error = result.getError();
if (error != null) {
Log.d("Mobilisten", "Initialization failed: code: " + error.getCode() + " , message: " + error.getMessage());
}
}
});
}
}For SDK versions 8.1.0-beta01 and below
Copiedimport android.app.Application
import com.zoho.commons.Fonts
import com.zoho.commons.InitConfig
import com.zoho.livechat.android.MobilistenActivityLifecycleCallbacks
import com.zoho.livechat.android.listeners.InitListener
import com.zoho.salesiqembed.ZohoSalesIQ

class MyApplication : Application() {

    override fun onCreate() {
        MobilistenActivityLifecycleCallbacks.register(this)
        super.onCreate()

        val initConfig = InitConfig().apply {
            // (Optional) To set custom fonts for the SDK
            setFont(Fonts.REGULAR, "fonts/Roboto-Regular.ttf")
            setFont(Fonts.MEDIUM, "fonts/Roboto-Medium.ttf")
        }

        ZohoSalesIQ.init(this, "appKey", "accessKey", initConfig, object : InitListener {
            override fun onInitSuccess() {
                // SalesIQ SDK is initialized successfully
                ZohoSalesIQ.Launcher.show(ZohoSalesIQ.Launcher.VisibilityMode.ALWAYS)
            }

            override fun onInitError(errorCode: Int, errorMessage: String) {
                // your code
            }
        })
    }

}Copiedpublic class MyApplication extends Application {
@Override
public void onCreate() {
MobilistenActivityLifecycleCallbacks.register(this);
super.onCreate();
InitConfig initConfig = new InitConfig();
initConfig.setFont(Fonts.REGULAR, );
ZohoSalesIQ.init(this, "appKey", "accessKey", initConfig, new InitListener() {
@Override
public void onInitSuccess() {
ZohoSalesIQ.Launcher.show(ZohoSalesIQ.Launcher.VisibilityMode.ALWAYS);
}
@Override
public void onInitError(int errorCode, String errorMessage) {
//your code
}
});
}
}Note: Please use other APIs only after a successful callback from the init() method.
- Also, in the AndroidManifest.xml file, add the application class name in the <application> tag.
Copied
android:name=".MyApplication"Step 8: Permissions:
- android.permission.INTERNET: Required for network-related operations (mandatory)
- android.permission.SCHEDULE_EXACT_ALARM: If you want your chatbot to be proactively triggered for your mobile app users after a specified duration (more than a second), add SCHEDULE_EXACT_ALARM permission in your AndroidManifest.xml. This ensures scheduling the bot trigger after the designated time. Even if your app is inactive, SalesIQ will post the trigger message as a notification for your app users.
Note:
To use the bot triggers in Android 12 & above, the SCHEDULE_EXACT_ALARM permission is mandatory.
Step 9: Proguard Configuration (Minifying App)
In some versions of the Android Gradle plugin, the R8 compiler exhibits aggressive behavior that removes some essential classes necessary for the SDK to function as expected. To handle this, we have added specific pro-guard rules within our Mobilisten SDK to preserve these crucial classes during the build process. If you have enabled ProGuard(minifyEnabled) R8, then please add the following rules in your proguard-rules.pro file in your project/android folder.
Copied
-dontwarn kotlinx.parcelize.Parcelize
If you encounter any instances where these pro-guard rules do not suffice, kindly reach us at (support@zohosalesiq.com).
Note:
The pro-guard rules are available from version 6.0.1 and above.
Step 10: By default, if you wish to display the FAB/launcher on the application, use the ZohoSalesIQ.Launcher.show(VisibilityMode.ALWAYS) API. You can also blend SalesIQ Mobilisten SDK with your application by creating a Custom UI and using ZohoSalesIQ.Chat.show() API.
Step 11: Backup Codes
If your app has enabled backup and you have your own backup rules or some of your other dependencies have them, then all these steps below are mandatory for App data backup to Google. Since Android doesn’t support manifest merging, all backup rules must be combined into a single file, which you’ll need to reference in your app’s AndroidManifest.xml.
To complete this setup,
- Create XML files called merged_backup_rules.xml and merged_data_extraction_rules.xml in the res/xml/ directory. Example: app/src/main/res/xml.
- Add your rules with our Mobilisten rules to your app and verify that everything is functioning as expected.
Copied<?xml version="1.0" encoding="utf-8"?>
<full-backup-content>
    <!-- Your own/other library's rules -->
    <exclude domain="sharedpref" path="sample-data"/>
    <exclude domain="database" path="sample.db"/>

    <!-- Mobilisten rules -->
    <exclude
        domain="sharedpref"
        path="siq_encrypted_shared_preference_entries.xml" />
    <exclude
        domain="sharedpref"
        path="siq_session.xml" />
    <exclude
        domain="sharedpref"
        path="siq_permission.xml" />
    <exclude
        domain="database"
        path="siq_mobilisten.db" />
     <exclude
        domain="database"
        path="mobilisten_zoho_salesiq.db" />
</full-backup-content>
merged_data_extraction_rules.xml
Copied<?xml version="1.0" encoding="utf-8"?>
<data-extraction-rules>

    <cloud-backup>
        <!-- Your own/other library's rules -->
        <exclude domain="sharedpref" path="sample-data"/>
        <exclude domain="database" path="sample.db"/>

        <!-- Mobilisten rules -->
        <exclude
            domain="sharedpref"
            path="siq_encrypted_shared_preference_entries.xml" />
        <exclude
            domain="sharedpref"
            path="siq_session.xml" />
        <exclude
            domain="sharedpref"
            path="siq_permission.xml" />
        <exclude
            domain="database"
            path="siq_mobilisten.db" />
        <exclude
            domain="database"
            path="mobilisten_zoho_salesiq.db" />
    </cloud-backup>

    <device-transfer>
        <!-- Your own/other library's rules -->
        <exclude domain="sharedpref" path="sample-data"/>
        <exclude domain="database" path="sample.db"/>
    </device-transfer>
</data-extraction-rules>
Also, ensure to map it in your AndroidManifest.xml.
Copiedandroid:dataExtractionRules="@xml/merged_data_extraction_rules"
android:fullBackupContent="@xml/merged_backup_rules"'
tools:replace="android:fullBackupContent,android:dataExtractionRules,android:allowBackup"