

PDF Templates
PDF templates are customizable designs used to generate transactional documents in PDF format. This allows you to create professional-looking documents that align with your brand identity.
In Zoho Invoice, you can use templates to create standardised documents like invoices, quotes, credit notes, and other documents as PDF. By setting up PDF templates, you ensure that all your documents maintain a consistent and professional appearance and include essential information related to your transactions using one of the existing templates or creating a new one.
Scenario: Larissa, a freelance designer, wants to create customised invoices that reflect her brand. She wants to include her logo, brand colours, payment details, and project-specific details. She uses PDF templates to customise her transactional documents to include these while automating fields like customer name and invoice date. This ensures her invoices are clear, professional, and aligned with her branding, improving customer communication and speeding up payments.
Customize PDF Templates
Here’s how you can customise PDF templates:
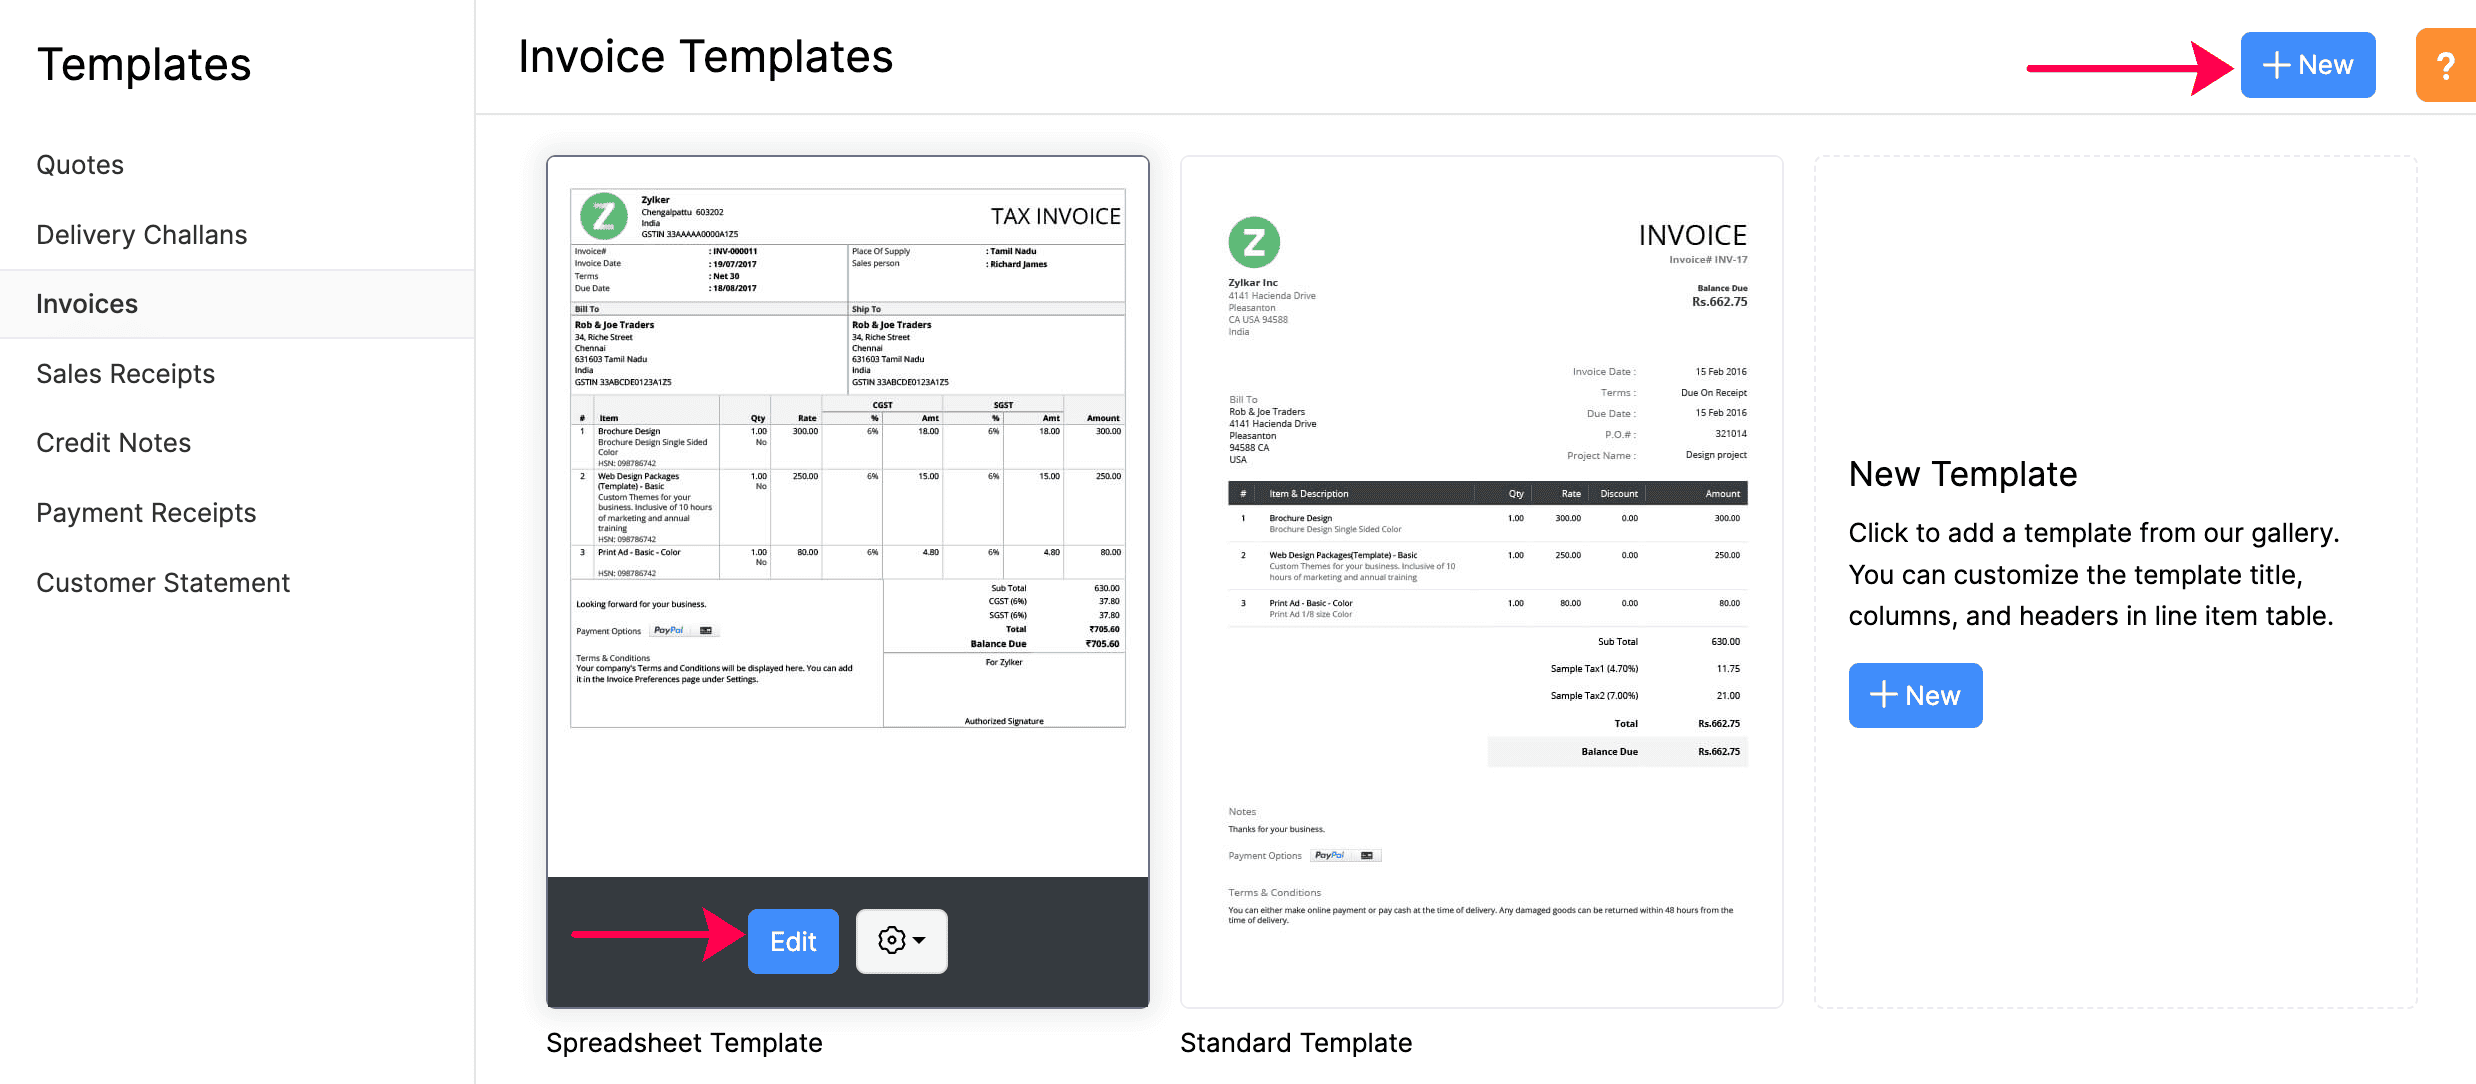
- Go to Settings in the top-right corner.
- Select PDF Templates.
- Select the module that you want to customise from the left sidebar under Templates.
- Click + New in the top-right corner to create a new template, or hover over an existing template.
- Click Edit to customise the template.
General
In the General tab, you can change the name, orientation, font, and background of the PDF template.
Template Properties
Here’s how to change the template properties:
- Go to the General tab under Edit Template.
- Select Template Properties.
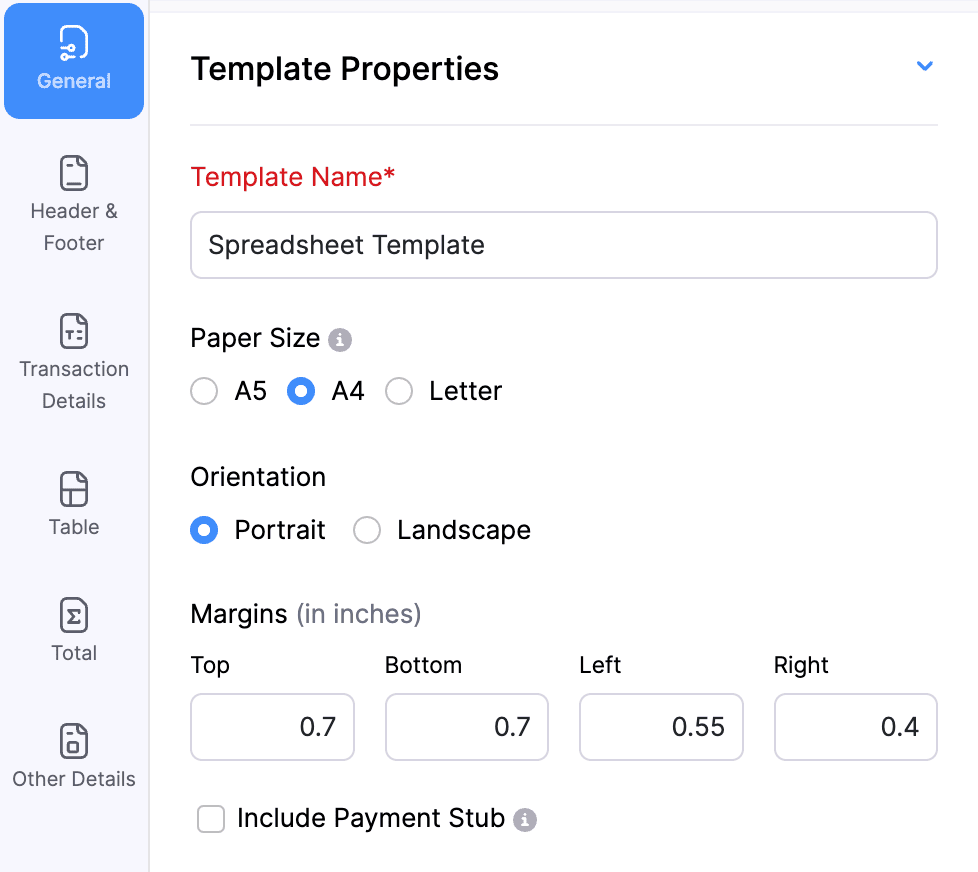
| Field | Description |
|---|---|
| Template Name | Enter a name for your template. |
| Paper Size | Select A5, A4 or Letter sizes as paper size of your invoices based on your preference. |
| Orientation | Select either Portrait or Landscape as the orientation of your invoices. |
| Margins (in inches) | The margins of the template determine the distance between the content of the template and its edges. |
| Include Payment Stub | Payment Stub is a detachable section that is added to an invoice to collect cash payments, especially when you send invoices via postal services. This option is available only for Invoices. |
Font
Here’s how to edit the font of the template:
- Go to the General tab under Edit Template.
- Select Font.
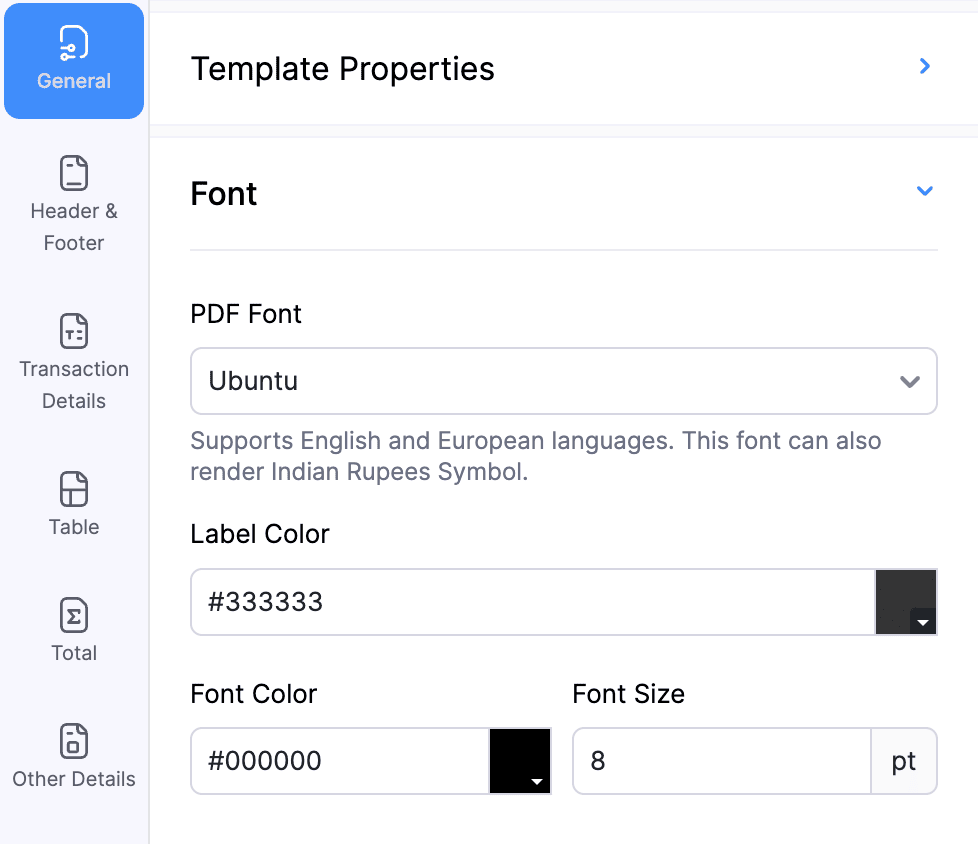
| Field | Description |
|---|---|
| PDF Font | Select the font that should be used to display the contents of the template. |
| Label Colour | Select the colour of the labels in the document. |
| Font Colour | Select the colour of the text in the document. |
| Font Size | Specify the font size for the displayed invoice. |
Background
Here’s how to edit the background of the template:
- Go to the General tab under Edit Template.
- Select Background.
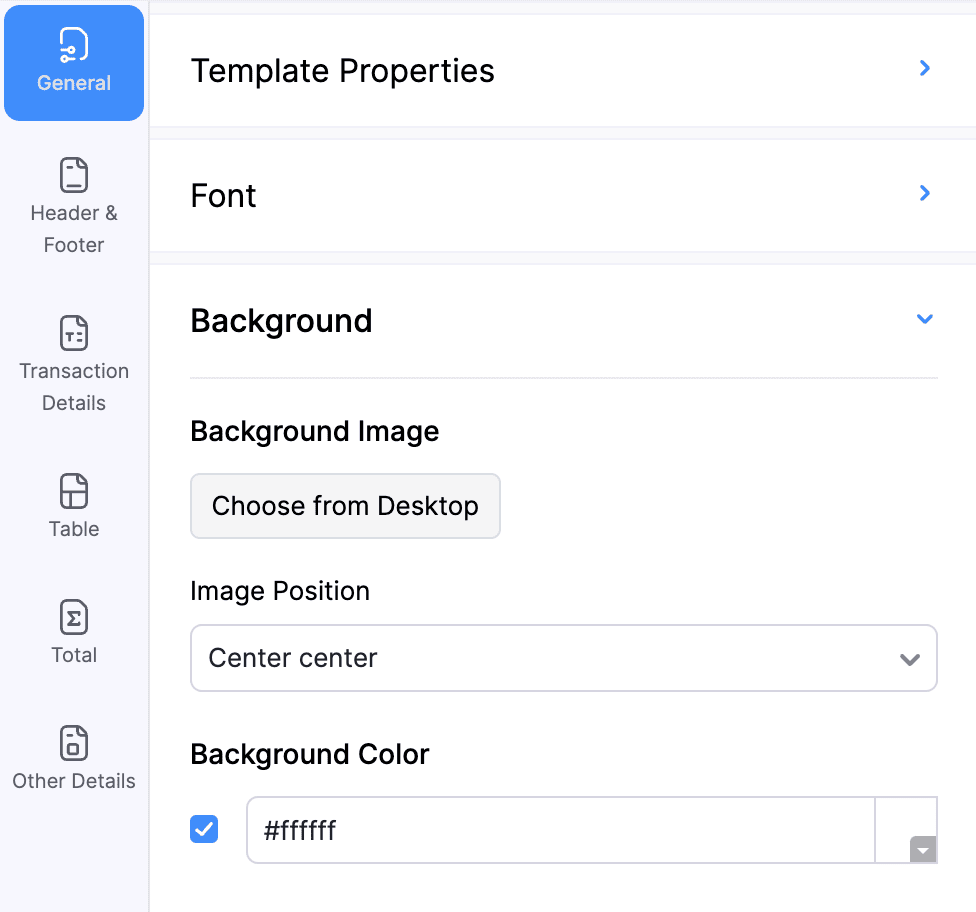
| Field | Description |
|---|---|
| Background Image | A background image can be added to fill the background of the template. |
| Image Position | The position of this image can be adjusted using the Image Position dropdown. |
| Background Colour | You can change the colour of the template’s background. Notes: You can only change either the background image or the background colour at a time. |
Header and Footer
You can edit the header and footer of the PDF template. In Zoho Invoice, the Payment Receipts module has separate tabs for Header and Footer.
Header
Here’s how to edit the header of the template:
- Go to the Header & Footer tab under Edit Template.
- Select Header.
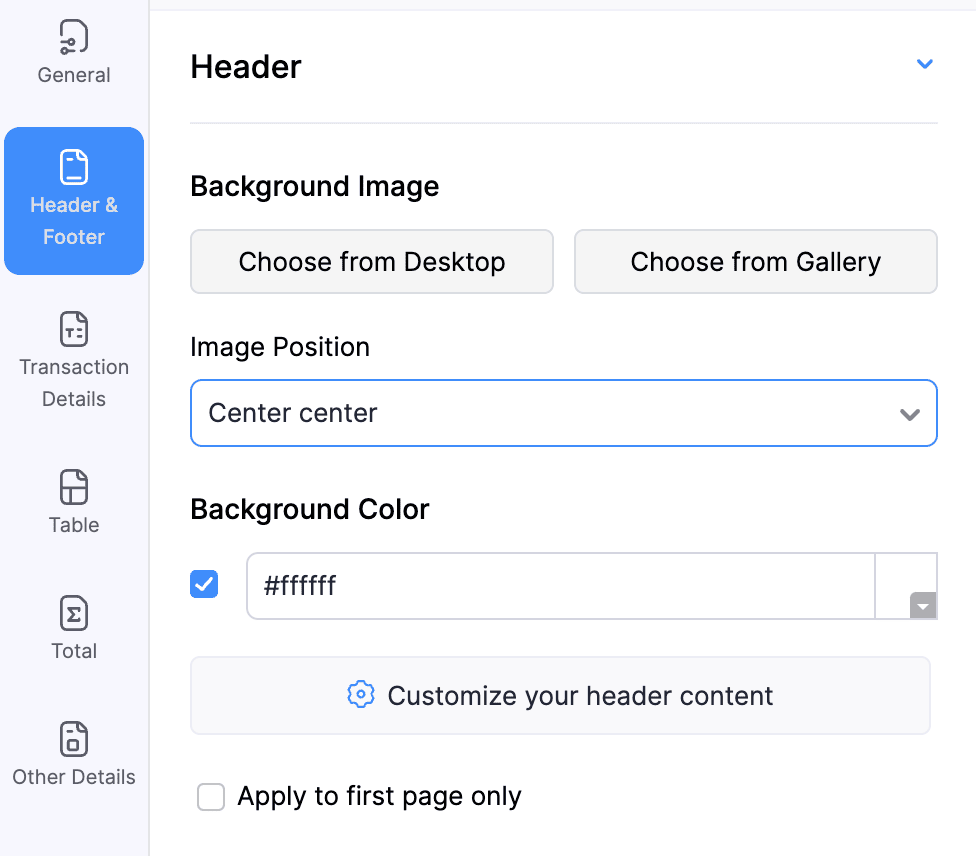
| Field | Description |
|---|---|
| Background Image | You can add a background image to fill the header section of the template. Notes: The size of the background image cannot exceed 1 MB. |
| Background colour | You can change the background colour of the header section either by entering a hex colour code or clicking the coloured square to open the colour picker. |
| Customise your header content | Customise the header content of your template with placeholder and font options. |
| Apply to first page only | Enable this option to customise the header section differently for the first page. You can also provide separate header content for the other pages. |
Footer
Here’s how to edit the footer of the template:
- Go to the Header & Footer tab under Edit Template.
- Select Footer.
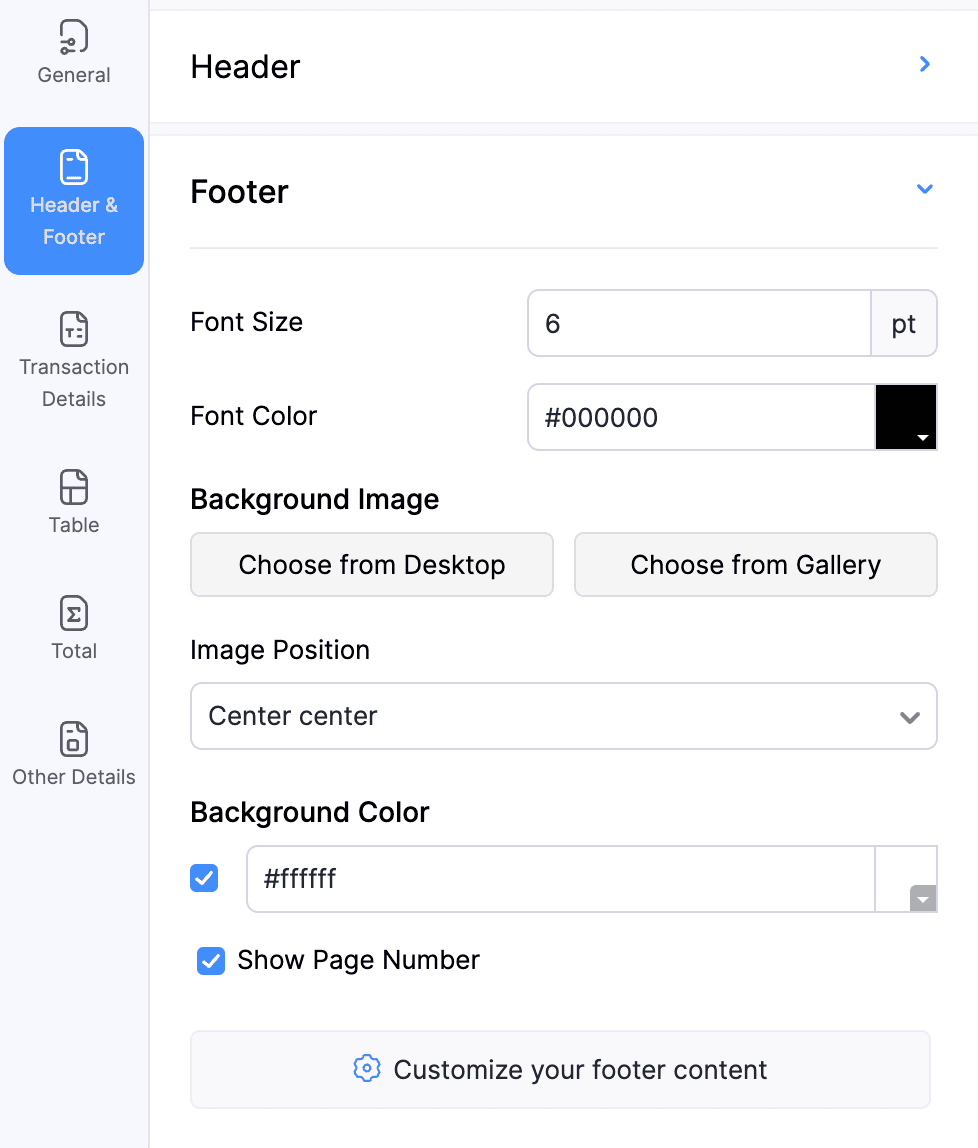
| Field | Description |
|---|---|
| Font Size | Adjust the font size of the footer of the document. |
| Font colour | Select the text colour of the footer. |
| Background Image | A background image can be added to fill the footer section of the template by clicking Choose from Desktop or Choose from Gallery. |
| Image Position | The position of this image can be adjusted using the Image Position dropdown. |
| Show Page Number | Mark this box to include page numbers in the document. |
| Customise your footer content | You can add information to be displayed on the lower portion of the document. This content can be completely customised with placeholders, tables, font options, and links to suit your needs. |
Transaction Details
You can edit organisation details, customer details, and document details of the PDF template.
Organization Details
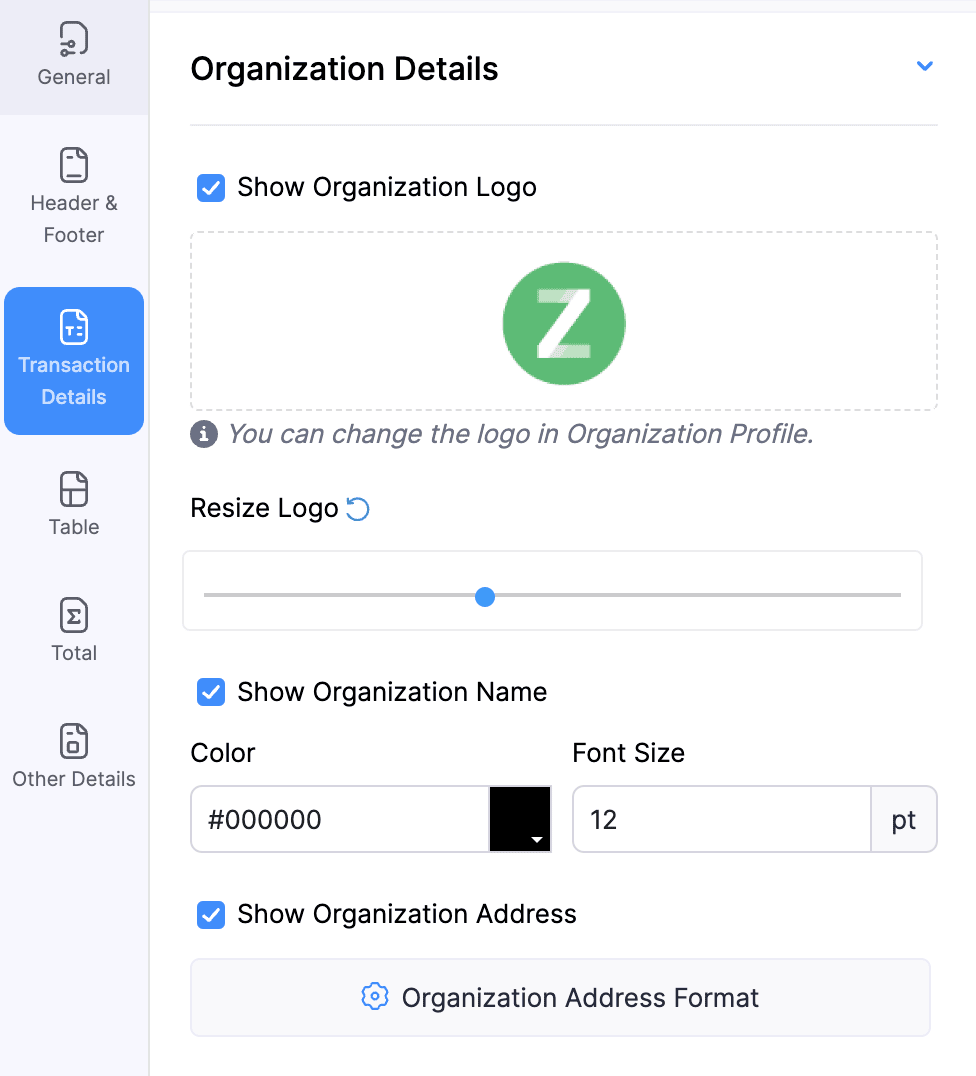
Here’s how to edit the organisation details of the template:
- Go to the Transactional Details tab under Edit Template.
- Select Organisation Details.
| Field | Description |
|---|---|
| Show Organisation Logo | You can upload your business logo here to display on the document. |
| Resize Logo | Your organisation’s logo can be resized to fit the template by dragging the slider to the left or right. Pro Tip: Click the Reset icon to switch to the image’s default size. |
| Show Organisation Name | Enable this option to show your organisation’s name in the template. |
| Show Organisation Address | Select if you wish to show your organisation’s address on the template. |
| Organisation Address Format | You can change your organisation’s address format. You can also add or remove placeholders to customise it further. |
Customer Details
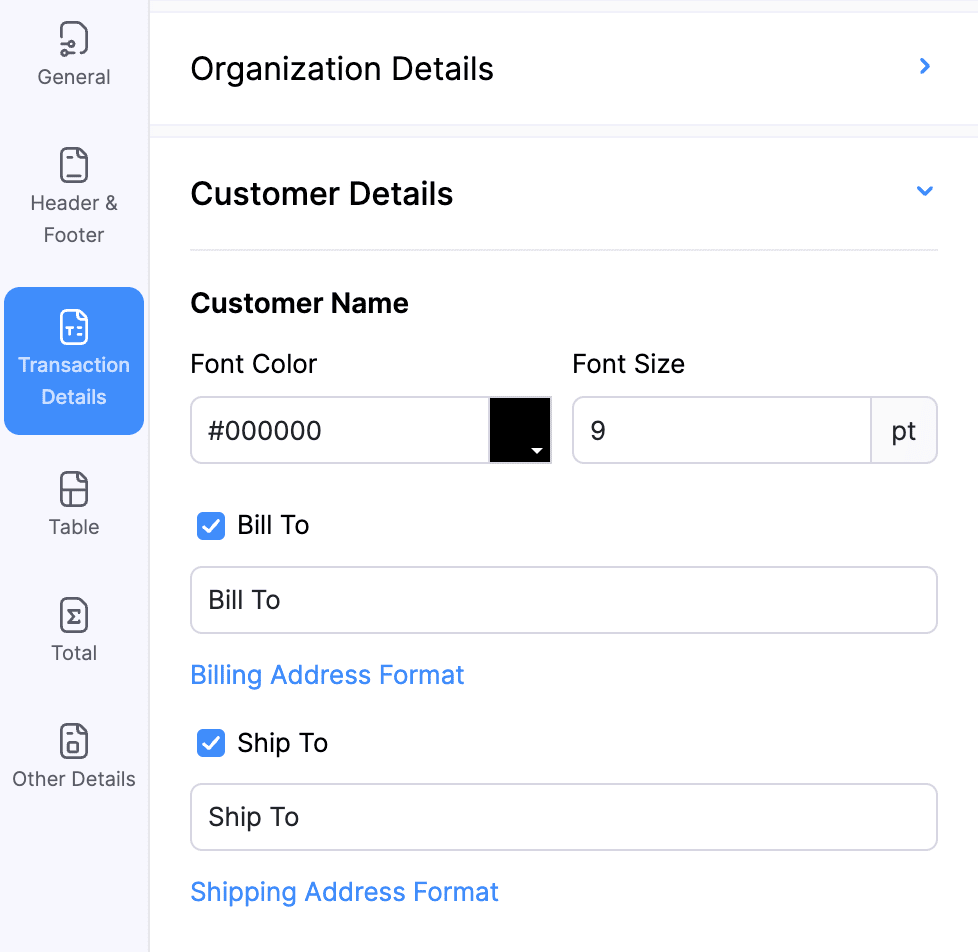
Here’s how to edit the customer details of the template:
- Go to the Transactional Details tab under Edit Template.
- Select Customer Details.
| Field | Description |
|---|---|
| Font Colour | Choose the Font Colour for the customer’s name. |
| Font Size | Adjust the font size for the customer’s name. |
| Bill To | Mark this option to include the billing address in the template. You can also change the field name in the textbox below. |
| Billing Address Format | Click this option to customise the format of the billing address by adding the required placeholders. |
| Ship To | Mark this option to include the shipping address in the template. You can also change the field name in the textbox below. |
| Shipping Address Format | Select this option to customise the format of the shipping address by adding the required placeholders. |
Document Details
Here’s how to edit the document details of the template:
- Go to the Transactional Details tab under Edit Template.
- Select Document Details.
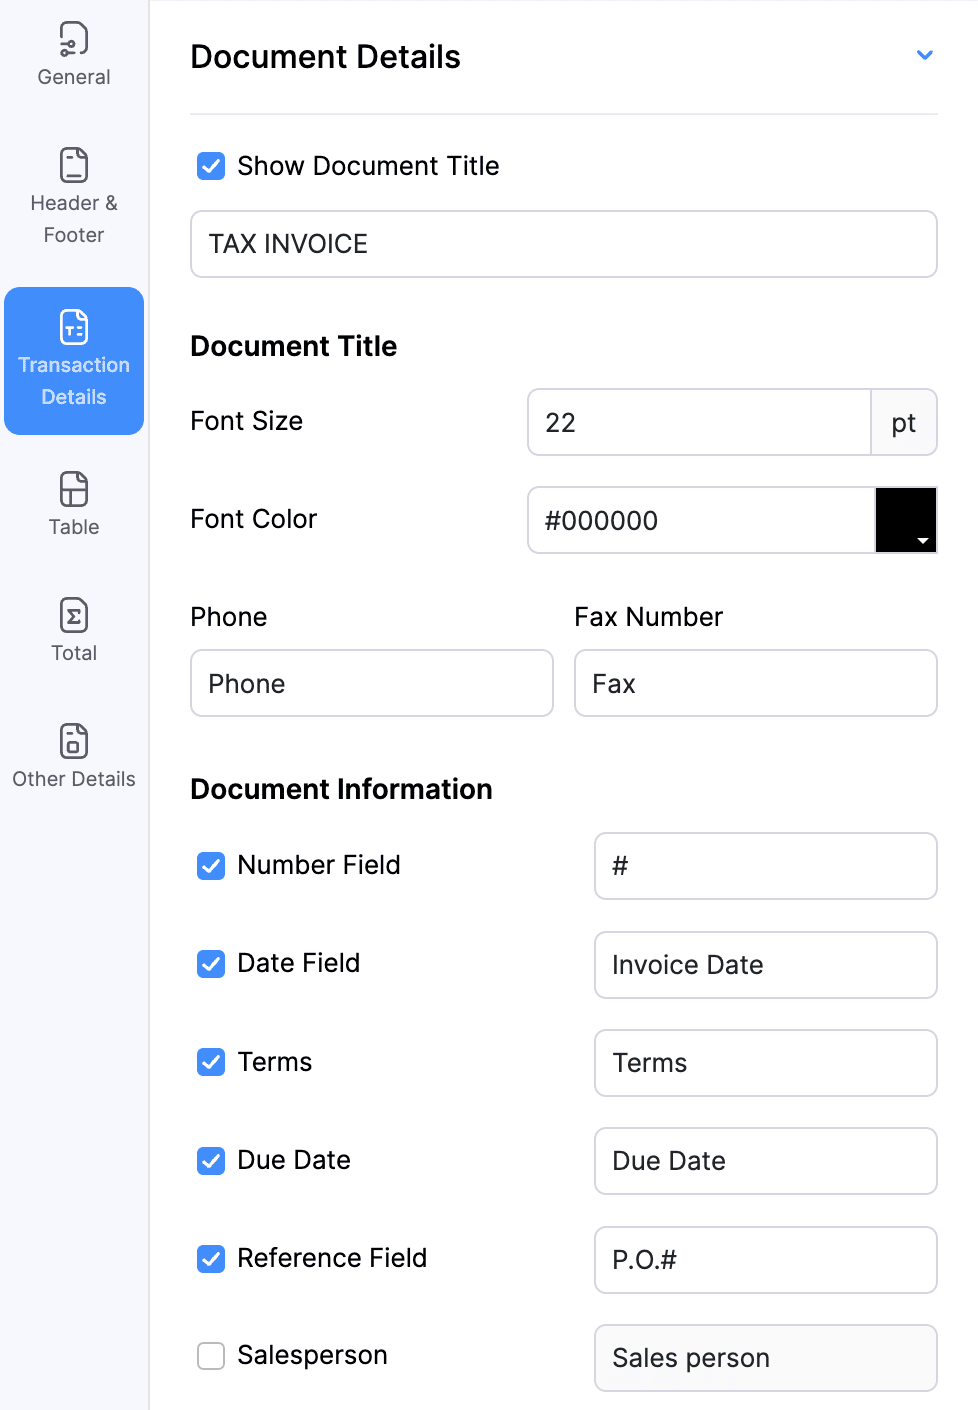
| Field | Description |
|---|---|
| Show Document Title | Enable this option to display the document’s title in the template. |
| Font Size and Colour | Set the Font Size and Font Colour for the title of the document. |
| Document Information | Mark the checkboxes to display or hide the listed fields. The listed fields include Number Field, Date Field, Terms, Due Date, Reference Field, Salesperson, Project, e-Way Bill Number, Place Of Supply, and Subject. You can also edit the label names in the adjacent text boxes. |
Table
You can edit the labels and layout of the table of the PDF template.
Labels
Here’s how to edit the labels of the template:
- Go to the Table tab under Edit Template.
- Select Labels.
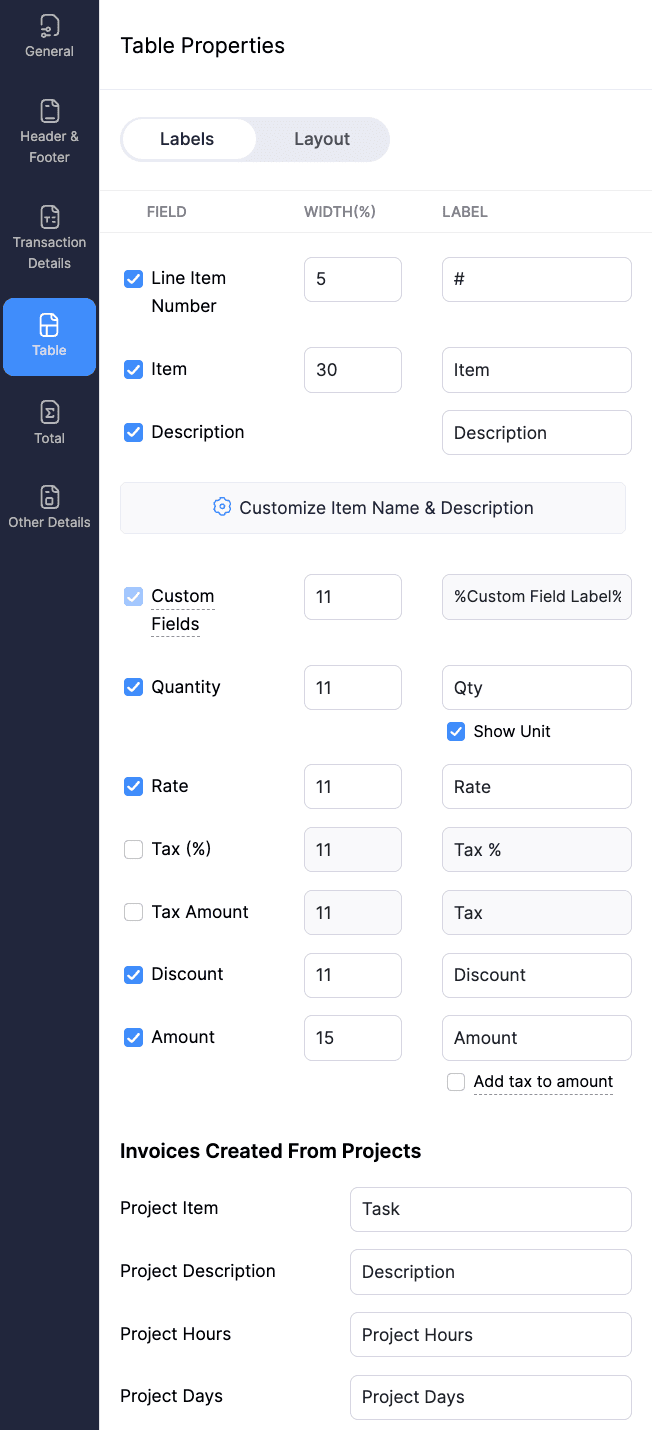
| Field | Description | Supported Modules |
|---|---|---|
| Label Fields | Enable/Disable the fields like Quantity, Tax, Tax Amount, HSN Code, Rate, Line Item Number, Discount, Amount to add/hide them in transaction documents like invoices, noting that label fields vary across templates based on document purpose. You can customise the name of these fields in the text box next to it. | All Modules |
| Customise Item Name & Description | Customise the item name and description format in PDFs by inserting placeholders and adding custom content. | All Modules |
| Invoice Created From Projects | You can apply these labels to adjust the project details in the template. | Invoices |
| Customise table cell width | You can adjust the column width of your table. | All Modules |
Layout
Here’s how to edit the layout of the template:
- Go to the Table tab under Edit Template.
- Select Layout.

| Field | Description |
|---|---|
| Table Header, Item Row, and Item Description | Adjust the Font Size, Background colour, and Font colour settings in these fields in the pdf template. |
Total Tab
You can edit the labels and layout of the table of the PDF template.
Total Section
Here’s how to edit the Total Section of the template:
- Go to the Total tab under Edit Template.
- Select Total Section.
Labels
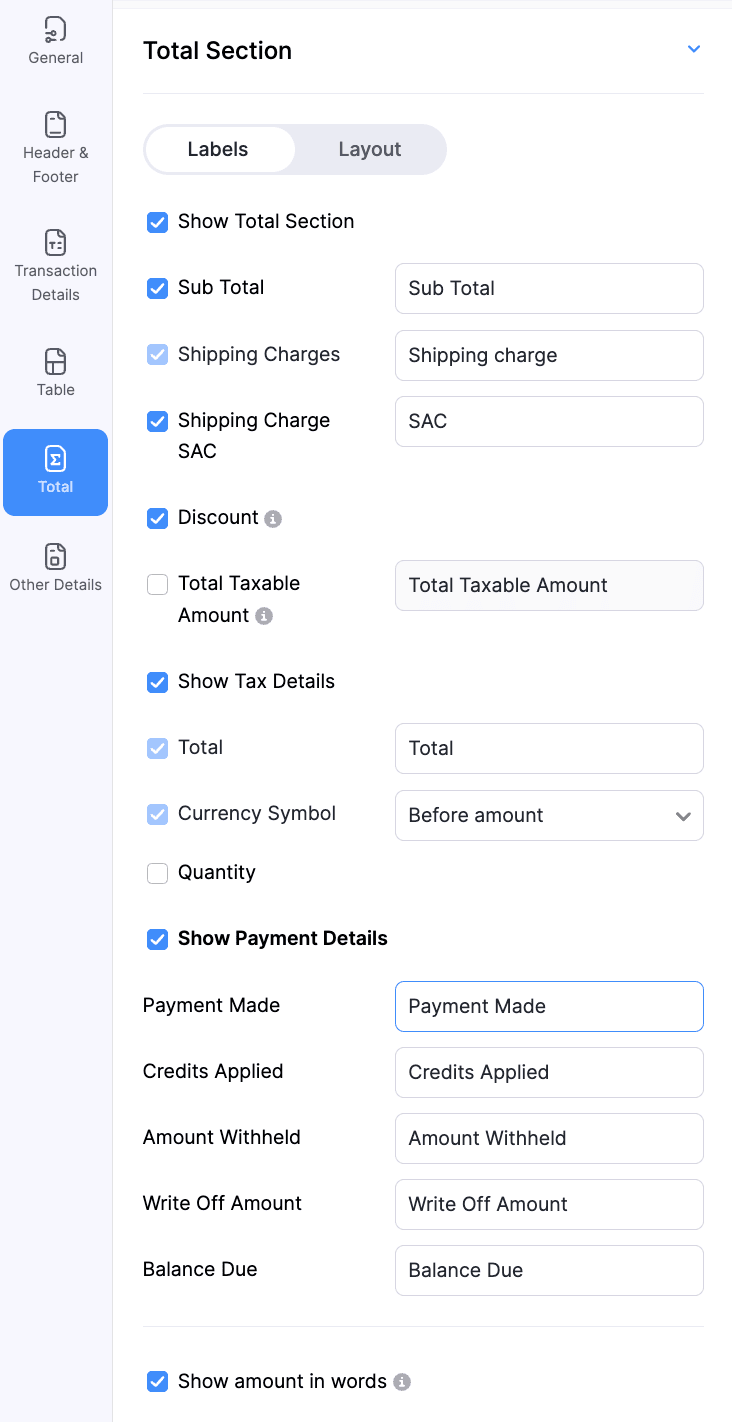
| Field | Description | Supported Modules |
|---|---|---|
| Show Total Section | Mark/Unmark this option to add/hide fields like Sub Total, Shipping Charges, Discount, and Total Taxable Amount, Tax Details, Total, Currency Symbol, and Quantity in the template. | Quotes, Invoices, Credit Notes. |
| Show Payment Details | Mark/Unmark this option to add/hide fields such as Payments Made, Credits Applied, Amount Withheld, Write Off Amount, and Balance Due to the template. | Quotes, Invoices, Credit Notes. |
| Show Amount in Words | Mark this option to display the amount in words on the template. | Quotes, Invoices, Credit Notes. |
Layout
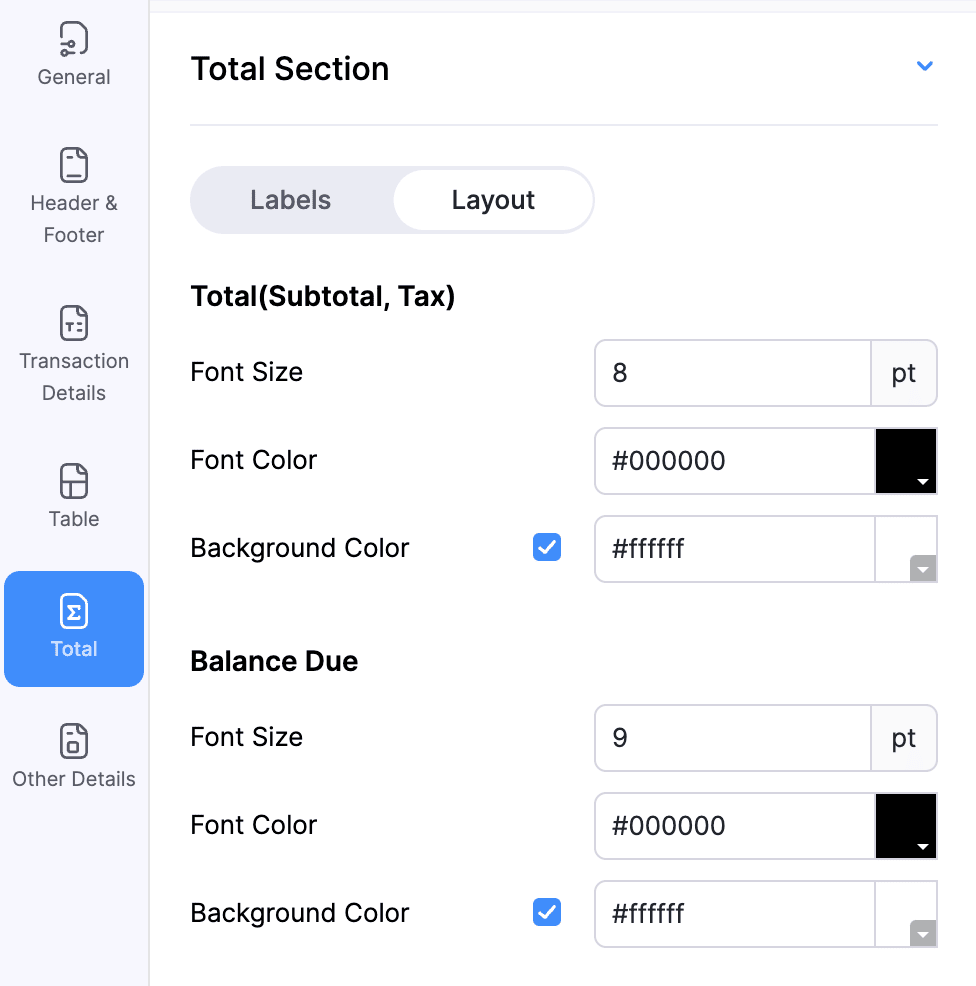
| Field | Description |
|---|---|
| Total(Subtotal, Tax) | Adjust the Font Size, Font colour, and Background colour of these fields based on your preferences |
| Balance Due | Adjust the Font Size, Font colour and Background colour of these fields based on your preference. |
Other Details
You can edit the notes, payment options, bank details, and terms & conditions of the PDF template.
Document Summary
Here’s how to edit the Document Summary of the template:
- Go to the Other Details tab under Edit Template.
- Select Document Summary.
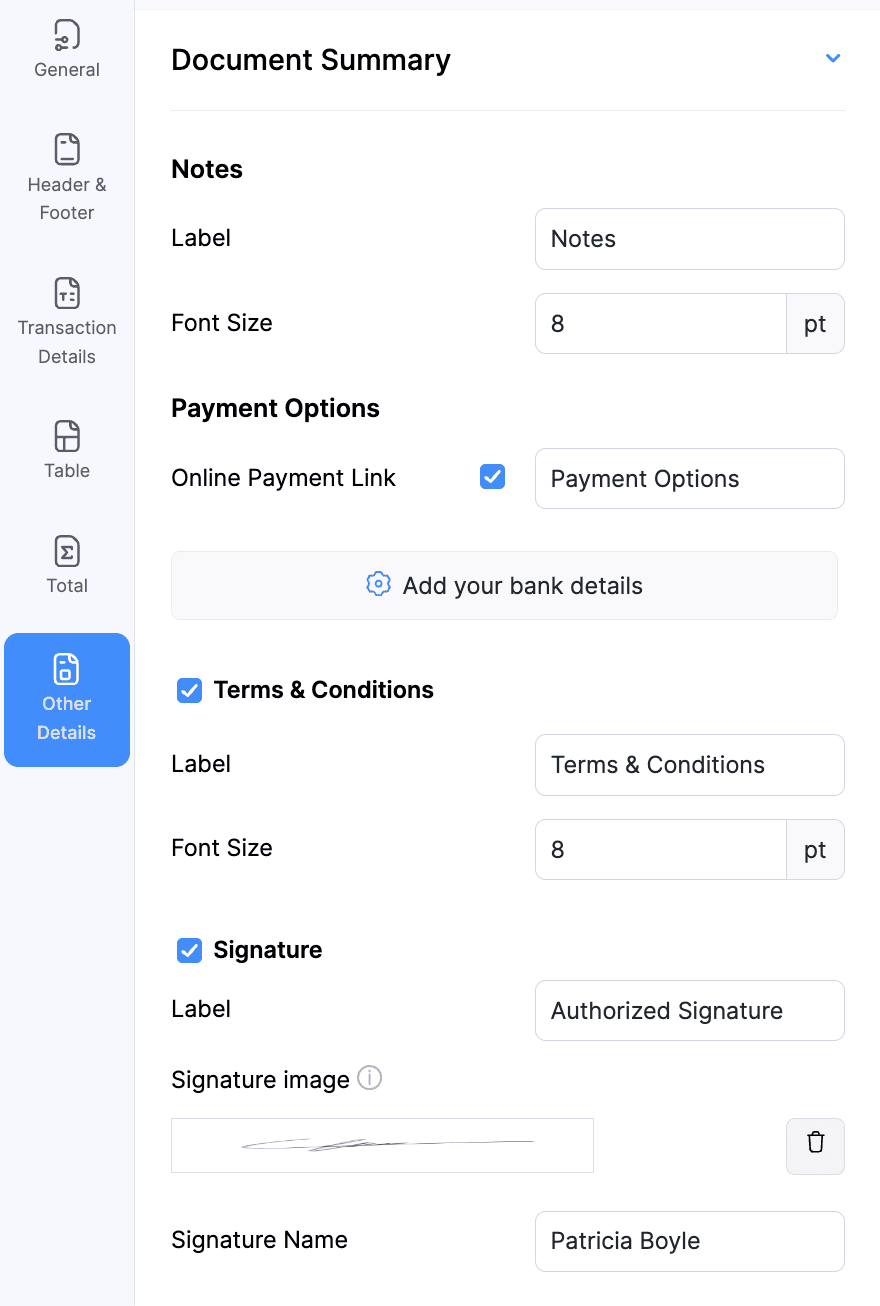
| Field | Description | Supported Modules |
|---|---|---|
| Notes | Adjust the Label and Font Size for notes. | Invoices, Quotes, Credit Notes. |
| Payment Options | Enable this option to include available online payment methods in the template. | Invoices, Quotes, Credit Notes. |
| Add your bank details | Select this option to include your bank account details in the template so that your customers can initiate payments towards this bank account. | Invoices, Quotes, Credit Notes. |
| Show Invoice QR Code | Select this option to view the invoice by scanning the QR Code. | Invoices |
| Terms and Conditions | Check this option if you want to add terms and conditions to your template. Also customise the Label and Font Size of this field. | All Modules |
| Signature | Enable this option if you want to add a signature to your template. You can upload an image of your signature and add a name for it. | All Modules |
Annexure
Here’s how to edit the Annexure of the template:
- Go to the Other Details tab under Edit Template.
- Select Annexure.
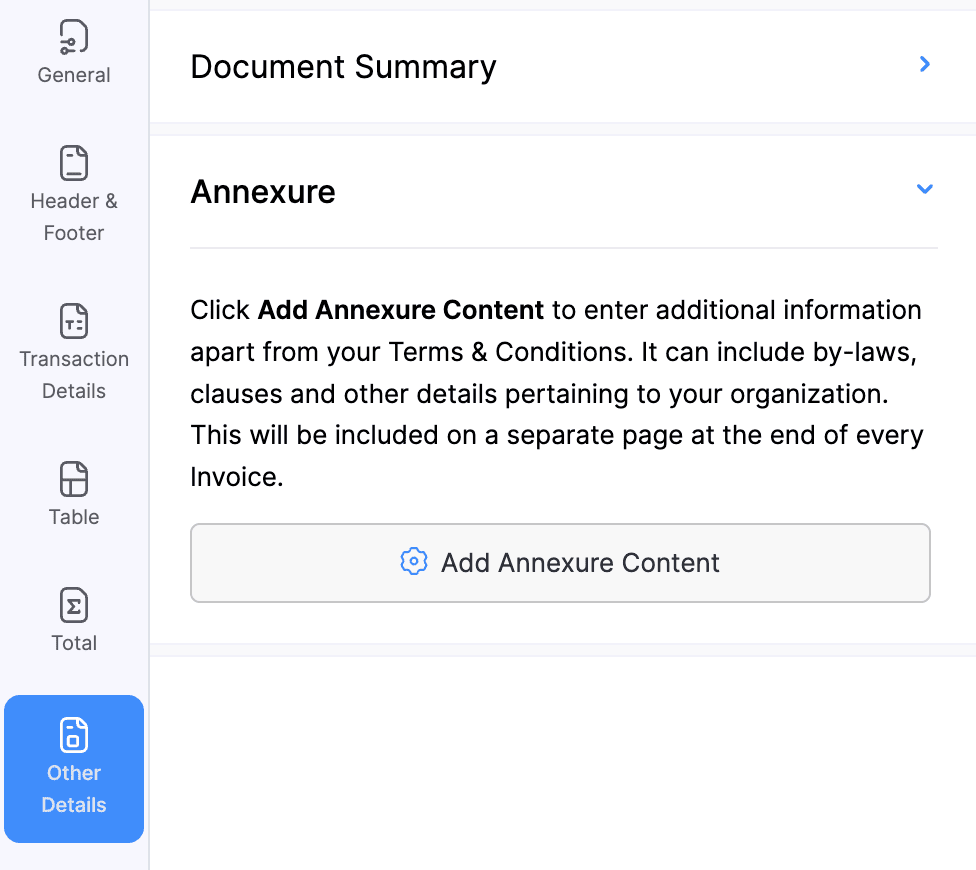
| Field | Description | Supported Modules |
|---|---|---|
| Add Annexure Content | Check this option if you want to display tax information. | Invoices, Quotes, Credit Notes |
| Show Retainer Tax Summary | Click Add Annexure Content to enter additional information apart from your Terms and Conditions. It can include by-laws, clauses, and other details about your organisation. This will be included at the end of every invoice. | All Modules |
Other Actions in Templates
Apart from the customizations that you can do in each tab, there are other actions that you can perform in the PDF Templates module in Zoho Invoice.
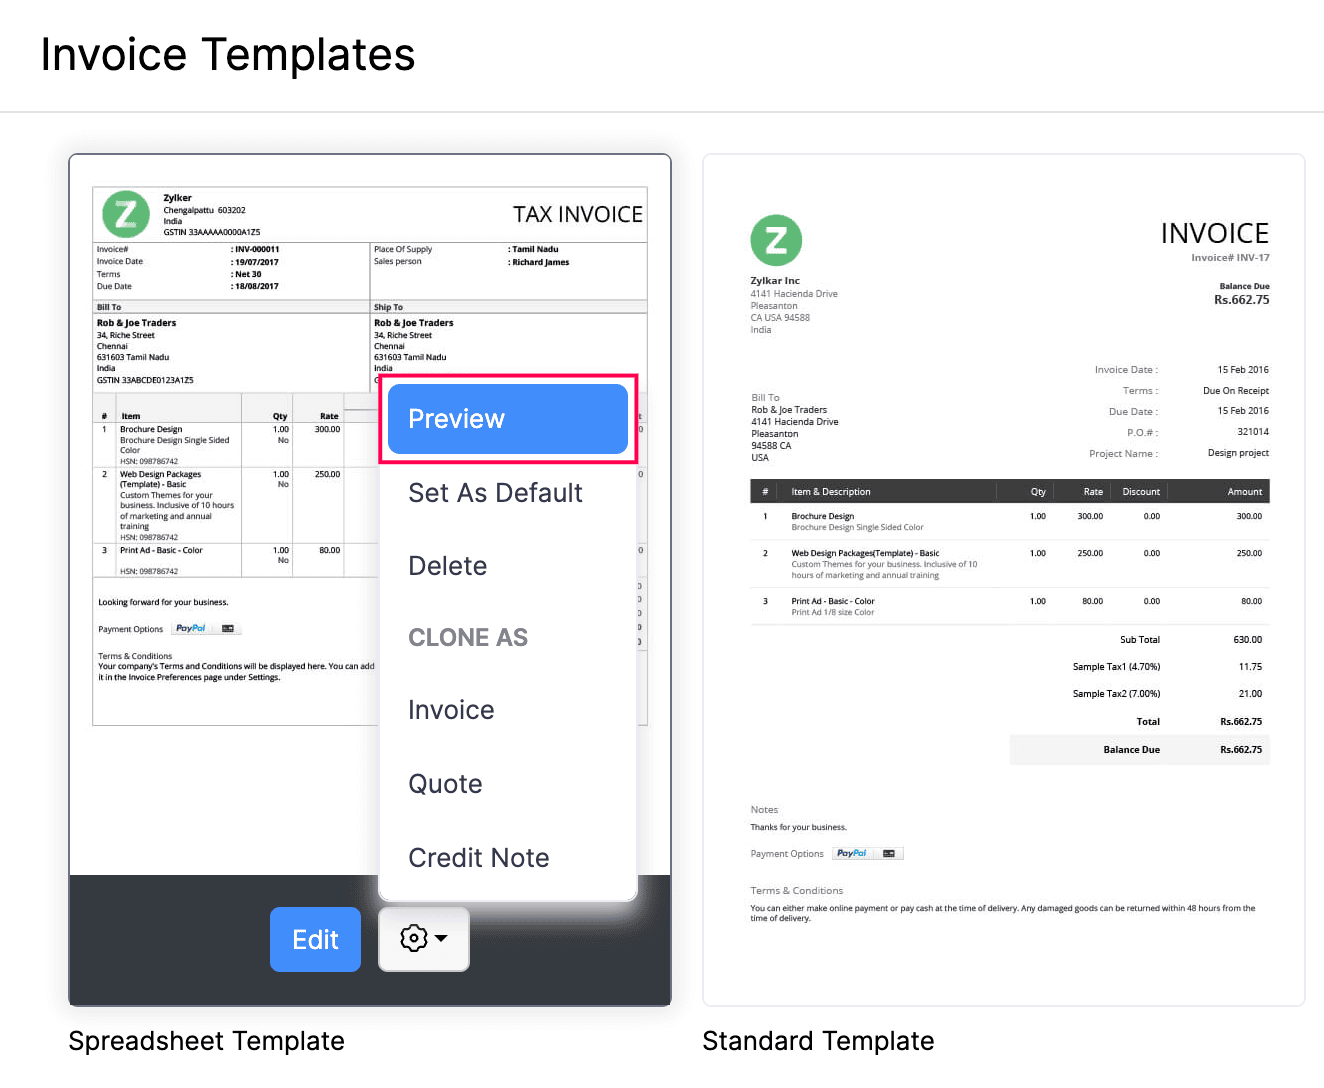
Preview Templates
The Preview Templates option in Zoho Invoice allows you to view how your templates (such as invoices, quotes, etc.) will appear before sending them. Here’s how to preview templates:
- Go to Settings in the top-right corner.
- Click PDF Templates.
- Select the module in the Templates pane to preview the template you want.
- Hover over a template in the module, and click the Settings icon to see more options.
- Click Preview.
Change Default Template
By default, each module has a default template. If you’ve customised and created a new template, you can set that as the default template for that module’s PDFs. Here’s how to change the default template:
- Go to Settings in the top-right corner.
- Select PDF Templates.
- In the Templates pane, select the module you want to customise.
- Hover over the existing templates and click the Settings icon dropdown.
- Click Set as Default.
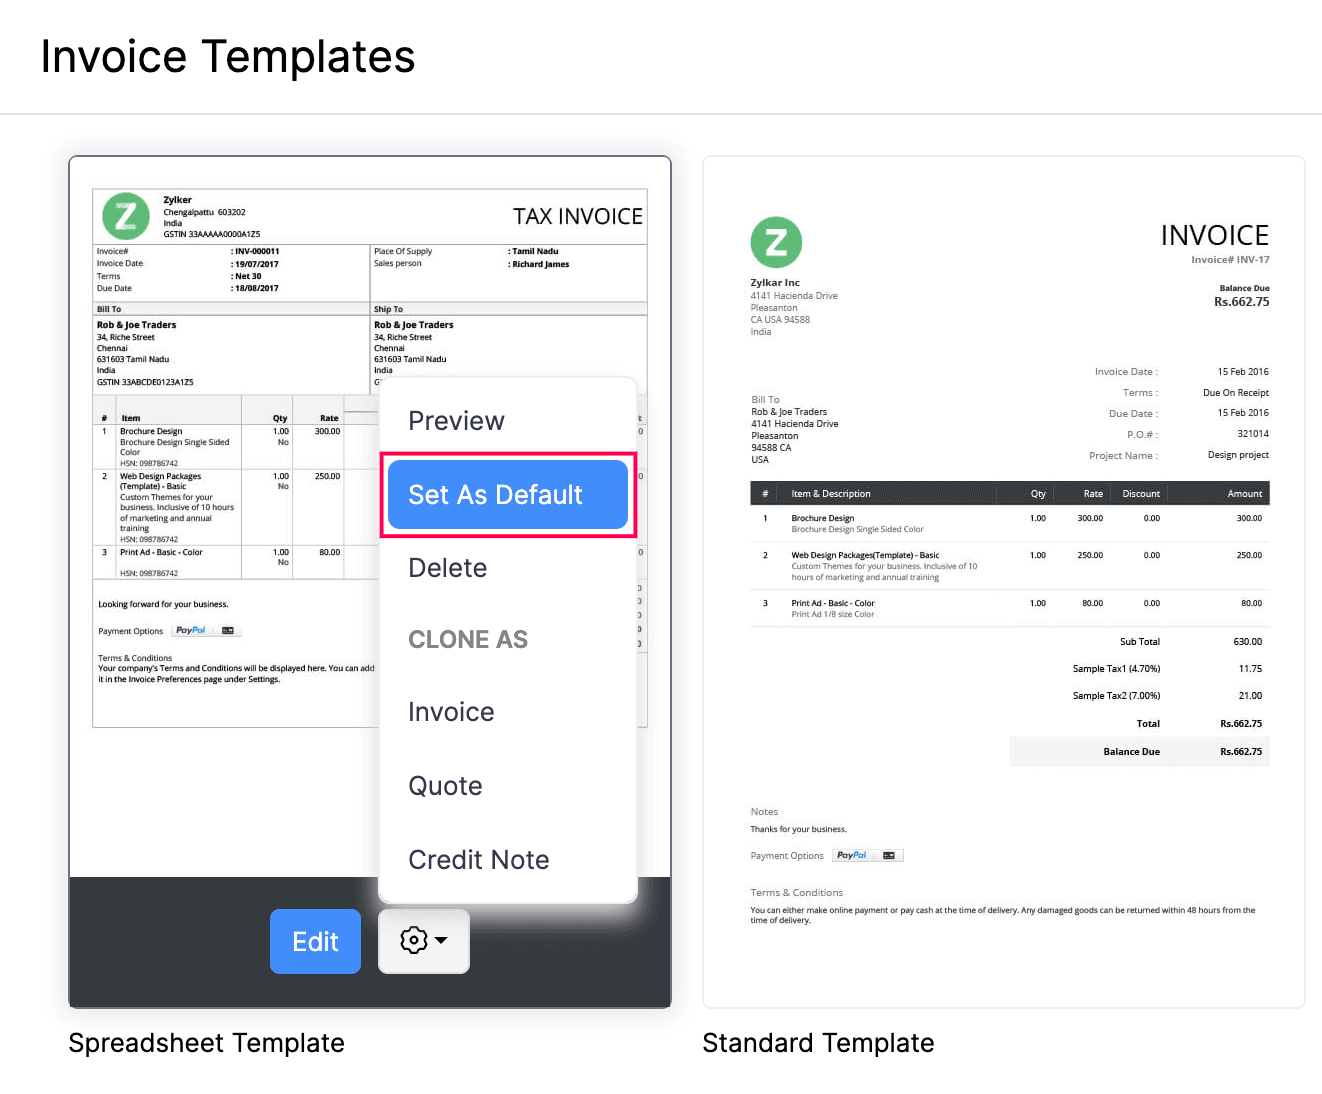
Now, the default template will be automatically applied to all transactions, ensuring a consistent format.
Pro Tip: You can also set a default template for each customer in Zoho Invoice. Learn how to associate templates with customers.
Clone Templates
Cloning templates simplifies the process of creating a new template, making it quicker and ensuring that all the basic customizations are present in the template.
In Zoho Invoice, if you’ve customised a template for one module, you can clone that template for use in another module. Here’s how to clone a template:
- Go to Settings in the top-right corner.
- Select PDF Templates.
- In the Templates pane, select the module you want to customise.
- Hover over the existing template and click the Settings icon dropdown.
- In the drop-down, under Clone As, select the module you want to clone the template into.
- In the next page, make the necessary changes and click Save.
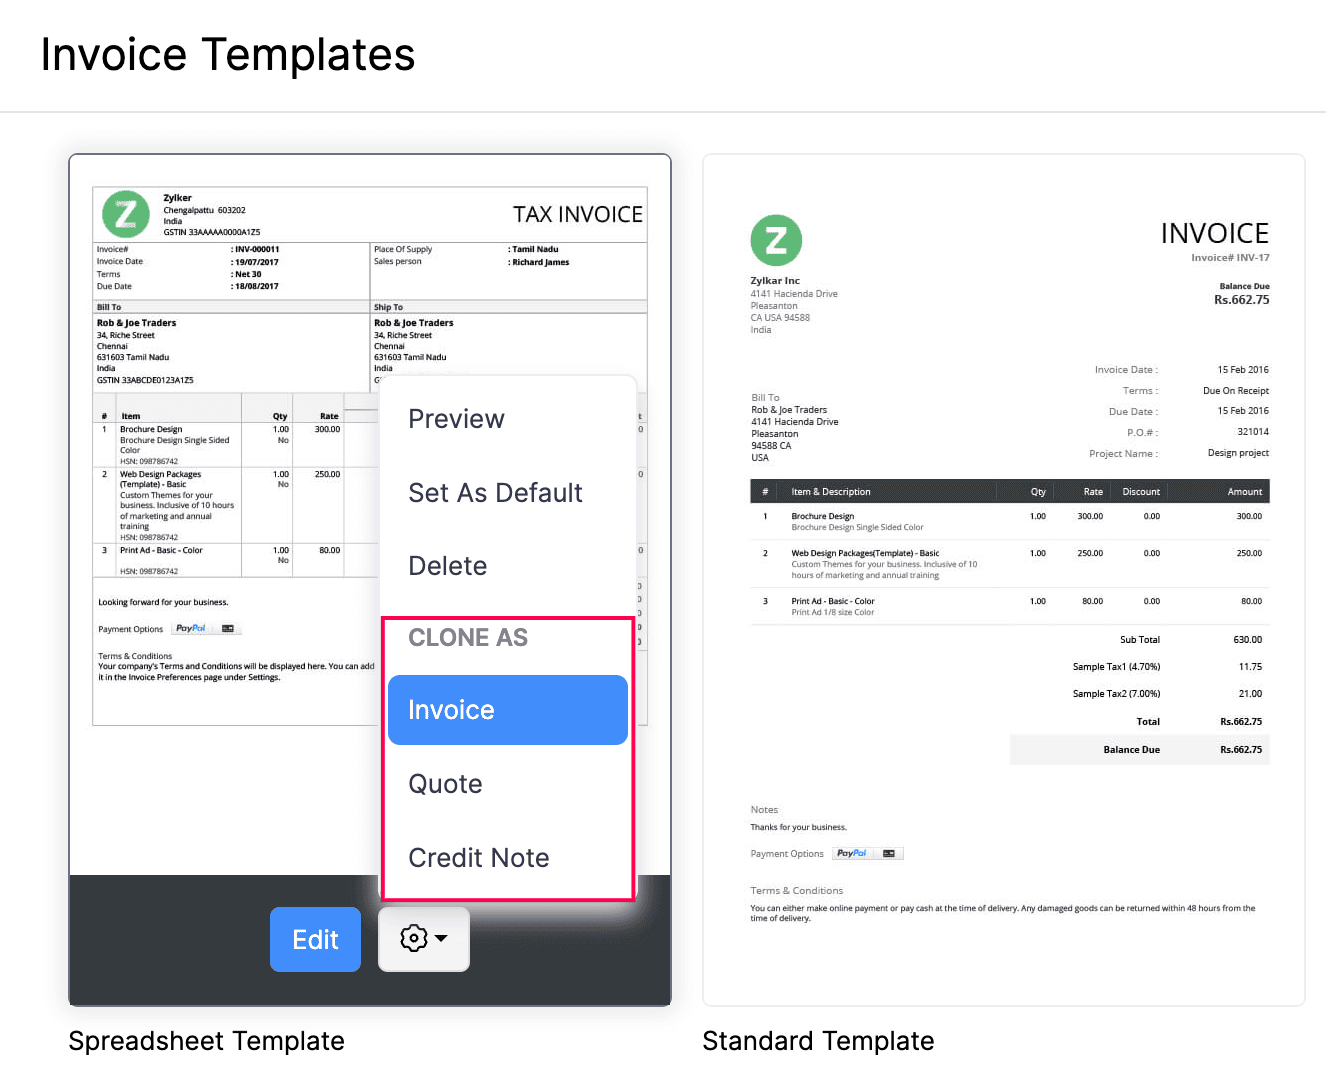
Now, by cloning, you can use different templates with the same properties for various modules.
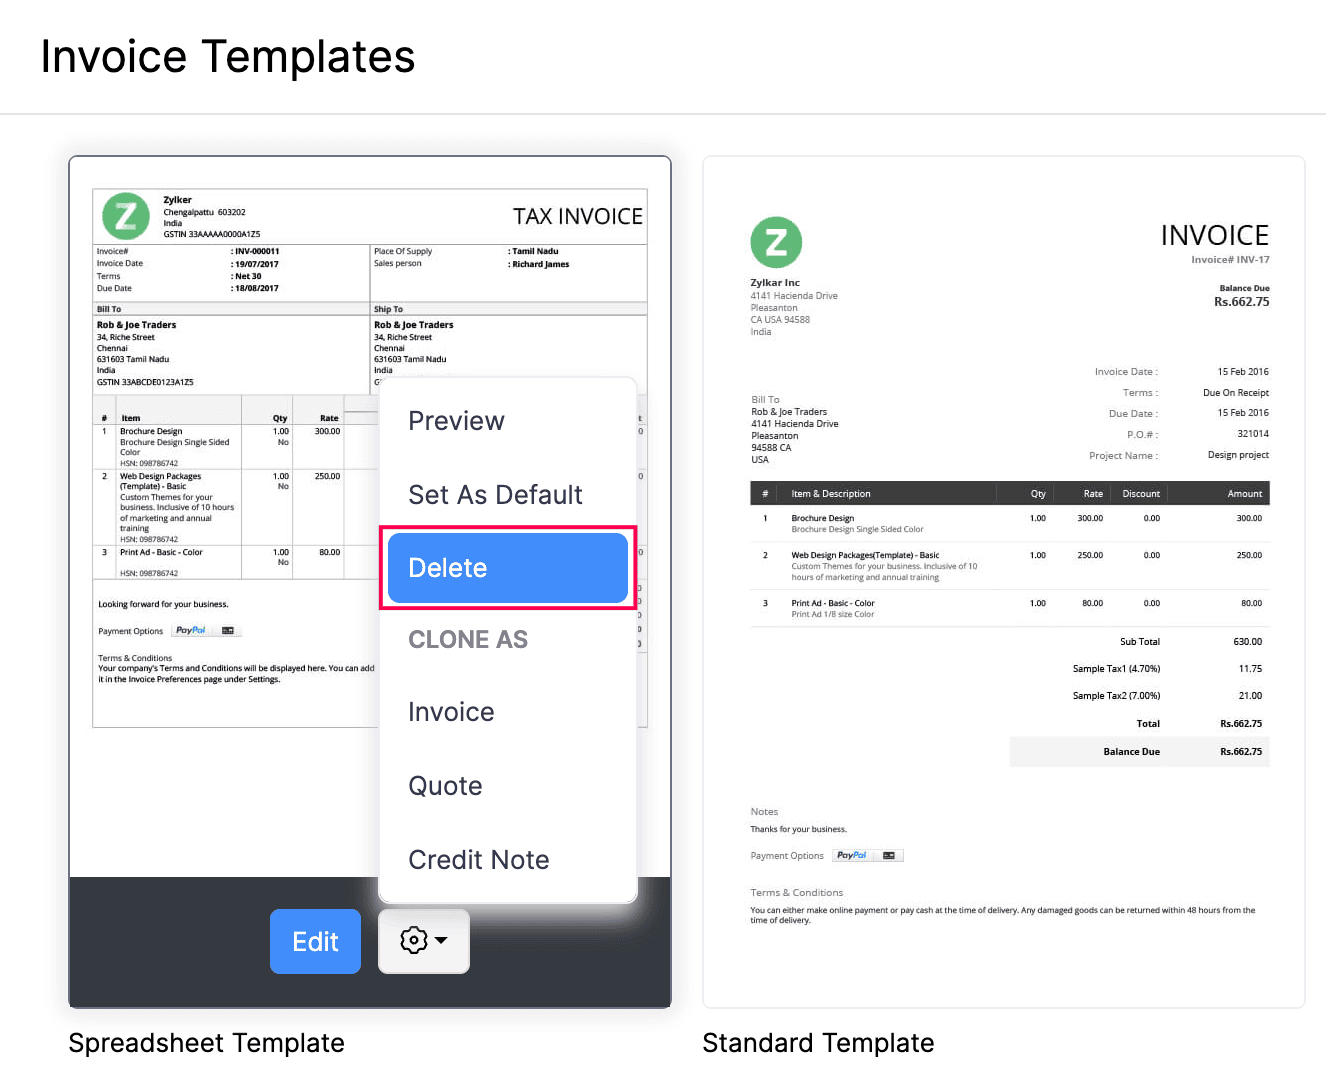
Delete Templates
Prerequisite:
- Make sure the template is not set as default or associated with any customer.
- If the template is associated with a customer, associate another template before deleting it.
Here’s how to delete a template:
- Go to Settings in the top-right corner.
- Select PDF Templates.
- In the Templates pane, select the module you want to customise.
- Hover over the existing template and click the Settings icon dropdown.
- Click Delete in the dropdown,.
- Click OK to confirm the deletion in the pop-up that appears.
 Yes
No
Yes
No
Thank you for your feedback!