Creating and Editing Forms
- Creating a Form
- Form Link Name
- Customizing a Form
- Form Fields
- Field limits of a Form
- Renaming & Hiding Form Buttons
- Form Field-Lookup
- Lookup-Filters
- Usecase-Creating Filters for a Travel Form
- Show/Hide Form Fields Based on Rules & Conditions
- Form Field-Formula
- Adding and Editing a Formula Field
- Usecases-Formula Field
- Adding Drop-down Options in a Bulk
- Editing a Form Name
- Marking a Field Mandatory
- Making a Field Unique
- Enabling Encryption for Fields
- Audit History of a Field
- Marking a field as Personal Data
- Marking a field as ePHI Data
- Disabling/Deleting Form Fields
- Imposing Restrictions on values entered - Custom Validation
- Creating Sections in a Form
- Cloning a Form
- Auto Numbering in Forms
- Reset Auto Numbering in Forms
- Capturing location in forms
Creating a Form
- From your home page, go to Settings (gear icon) > Customization > Forms
- Click Add New Form
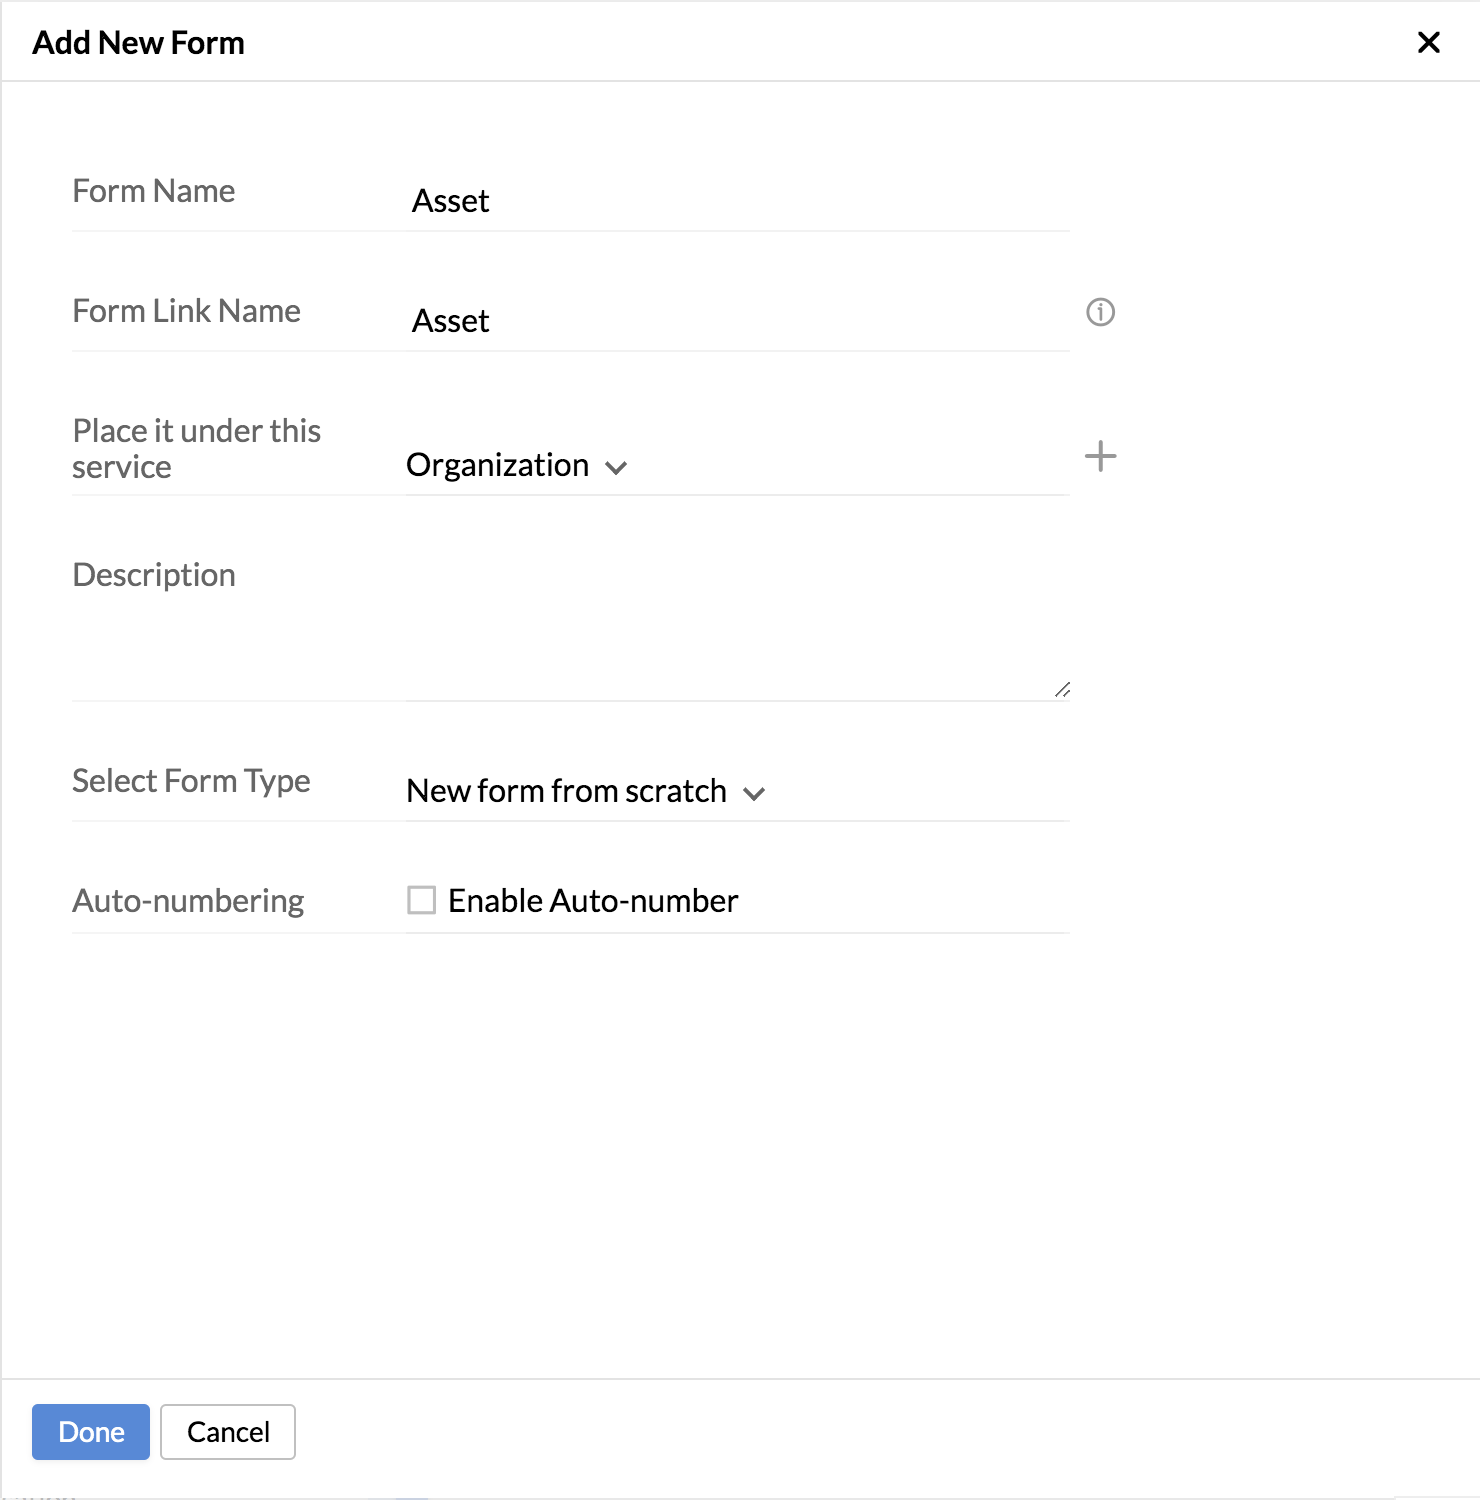
- Give a name for the form and a form link name
- Select which service to place it under
- Give a description if needed.
- Select Form Type - New form from scratch, Clone Form.
- Check the box Enable Auto-number if you would like your form to be auto-numbered
- Click Done
Note: Auto Numbering of forms helps you to automatically assign a unique sequential number, whenever a new record is added in the form. You just have to enable the auto numbering for a form which will create an auto number field and will populate a form number when a new record is added. For example, this functionality can be used for forms like training, travel, reimbursement forms, etc.,
Form Link Name
The Form Link name is a unique name associated with each form that helps during integration. While integrating with third-party applications, you may have more than one form with the same name. In this case, the system will take the Form Link Name to sync with third-party applications.
Customizing a Form
You can customize a form based on your needs using dragging and dropping required fields. Follow the steps given below to customize a form.
- From your home page, go to Settings (gear icon) > Customization > Forms. You will be able to see all the Forms listed here.
- Click on the respective form which needs to be customized
- Drag and drop the fields as per your need
Changes made in the form will get saved automatically.
Form Fields
- Single Line: It is a one-line input field where the user can enter the text. It can contain any letters, numbers, or symbols. Click Form Properties to make the required changes. Example: Employee's name, Nickname, etc.,
- Multi-Line: It is a multi-line input field where the user can provide multiple texts. Ex: Address, Comments, etc., You can add a maximum of 25 multi-line fields in one form and each tabular section can contain up to 25 multi-line fields.
- Email: To provide the email address. Ex: Employee's personal email ID, official email ID.
- URL: To provide any web URLs. Ex: Company's website URL, Blog URL, etc.,
- Number: It is used to hold numerical values. Ex: Age, Bank account number, etc.
- Decimal: It is used to hold the decimal data. Ex: Salary details like Basic pay, HRA, etc.,
- Currency: Currency fields are used to hold decimal values with the currency notation(like USD, INR, etc). This currency type can be selected during the customization of forms.
- Drop-down: It is used to hold a set of user-defined options, out of which an option can be selected and assigned as a value to the field. Ex. Employee Grade.
- Radio: Radio field is exactly the same as the drop-down field. The only difference is the display type. Drop-down list fields, as the name indicates will be displayed as a list. Radio fields will be displayed as options in the form.
- Date: It can be used to hold date values. The date picker can be used to populate the date fields while adding a record. Ex. Date of Birth, Date of Joining, etc.,
- Date-Time: It can be used to hold the time stamp value. The date-time picker can be used to populate the timestamp values for the fields while adding a record. Ex. In-Time, Out-Time, etc.,
- File Upload: It can be used to allow the users to attach a file during form submission. The file size limit can be set by the administrator (up to 5 MB).
Note 1: In Date & Date-time fields, the following validations are supported
- Allow past dates
- Allow future dates
- Allow dates before
- Allow dates after
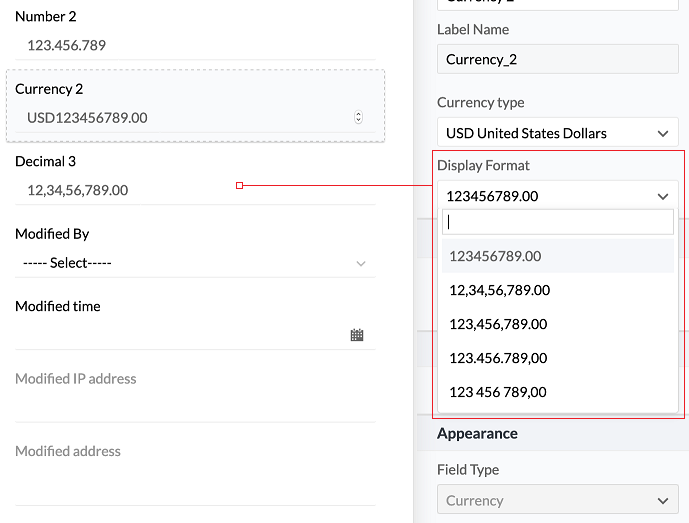
Note 2: For Number, Currency & Decimal fields, the display format can be customized as per user preference, the screenshot below shows the available display format options:
Note 3: The list of supported services is given below.
- Zoho Docs
- GDrive
- Dropbox
- One Drive
- Box
- Evernote
- Decision box: It can be used to hold Boolean values - True or false.,
- Add Notes: It is used for holding a descriptive help text that can be useful for the users while adding a record.
- Country: It can be used to store country information. Ex. Citizenship
- Blood group: It can be used to store blood group information.
- Gender: It can be used to store gender information.
- Phone: It can be used to hold phone numbers. Ex. Mobile number, emergency contact number, etc.,
- Formula: It can be used to perform some basic calculations with the fields available in the form.
- Lookup fields: A lookup field is used to create a relationship between two different forms. The lookup field will look up the ID of the record in the source form. It displays a drop-down menu containing items from the source form. For Example, Employee ID lookup in other forms like Salary, Performance Appraisal, etc.
There are four different ways to make use of these lookup fields. They are the Drop-down list (Single-select), Radio Button (Single-select), Check Boxes (Multi-select), and Multiple Select List (Multi-select).
Drop-down list (Single-select) and Radio Button (Single-select)lookup fields: Using a single-select lookup field, you can select a single field from the drop-down list. For example, typically an employee will be assigned to only one department and hence a relationship between the Employee and Department form is created using a single-select lookup field. The employee can view/edit the records if permission is given.
Check Boxes (Multi-select) and Multiple Select List (Multi-select): Using multi-select, you can select multiple fields from the list. For example, many employees may be traveling abroad for conferences. The travel desk person can create a form using a multi-select lookup field and be able to select multiple employees in a single shot. The selected people in the list will be able to view/edit the records if given permission.
Checkbox list: Using this list, you will be able to able to select more than one option in a list of checkboxes displayed.
Multiple select list: Under Multiple select lists, you can select more than one option from a list.
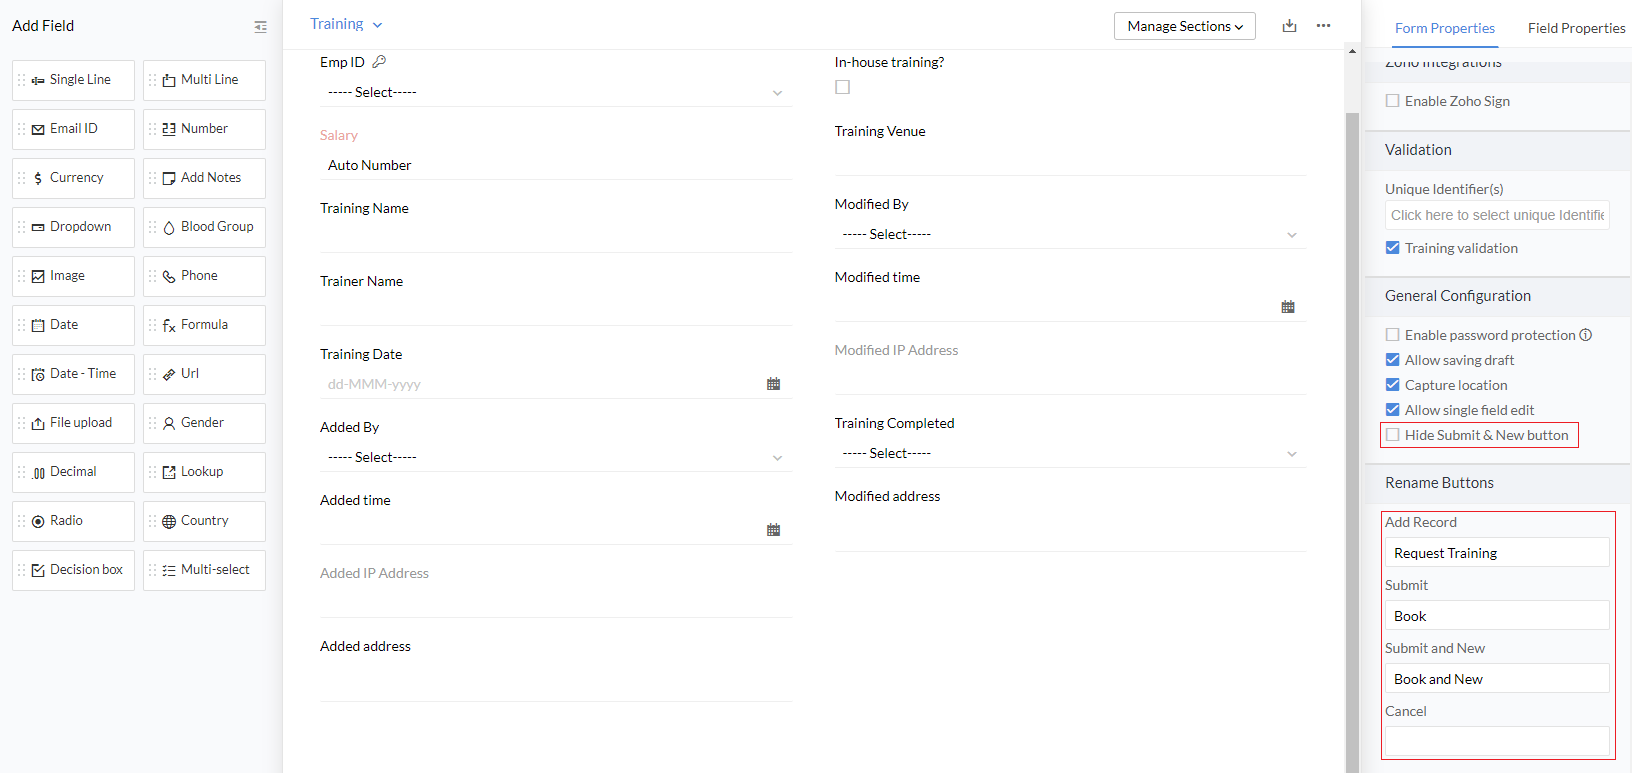
Renaming & Hiding Form Buttons
Along with other extensive form customizations, it is also possible to rename form buttons to the user's preference. The Submit and New buttons can also be hidden. These options are available only on custom forms.
To view these options, navigate to any custom form and use the Rename Buttons space available under the Form Properties tab. Enable Hide Submit & New button if you wish to hide the button in your form.
Field limits of a Form
The number of fields that you can add to a form is pre-determined. Please note the combined and individual limits for each type. If you exceed the limit, then you will get the message that you need to contact support@zohopeople.com
- The maximum limit of fields in a linear section is 200 per form.
- The maximum limit for tabular sections is 5 per form with a maximum of 25 fields per section.
The limit for forms is given below. The count given represents the combined total allowed in each category.
- Single line, Email, Image, Country, Gender, File upload, Blood Group, Phone, Formula - 70
- Date - 20
- Number, Lookup, Picklist, Date time, Formula- 50
- Currency, Decimal, Formula -25
- Multi-line, URL - 25
- Decision box, Formula - 15
- Notes - No limit
Form Field-Lookup
A lookup field is used to create a relationship between two different forms. When there are fields that will be repeatedly used in more than one form, the need to replicate all these fields can be eliminated by adding a lookup field. For eg. If you have a leave form where you will need the details of employees that are listed in the Employee form already, you can create a lookup in the leave form and connect it to the Employee form. By doing this, you can enable users to pick the fields of the Employee form that they will need in the leave form.
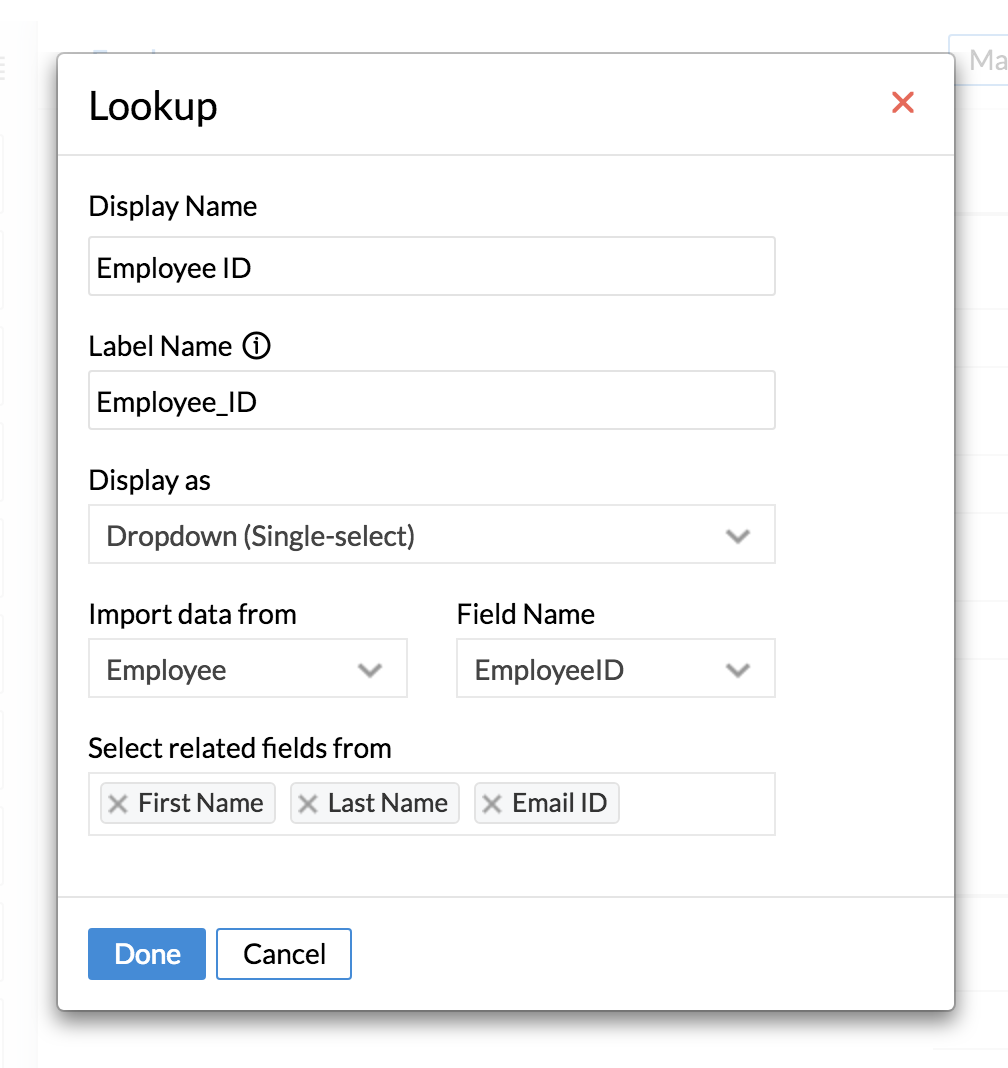
To create a lookup field
- From your home page, go to Customization > Forms and go to the form for which you need to add a lookup field.
- Drag and drop the lookup field from the left side menu.
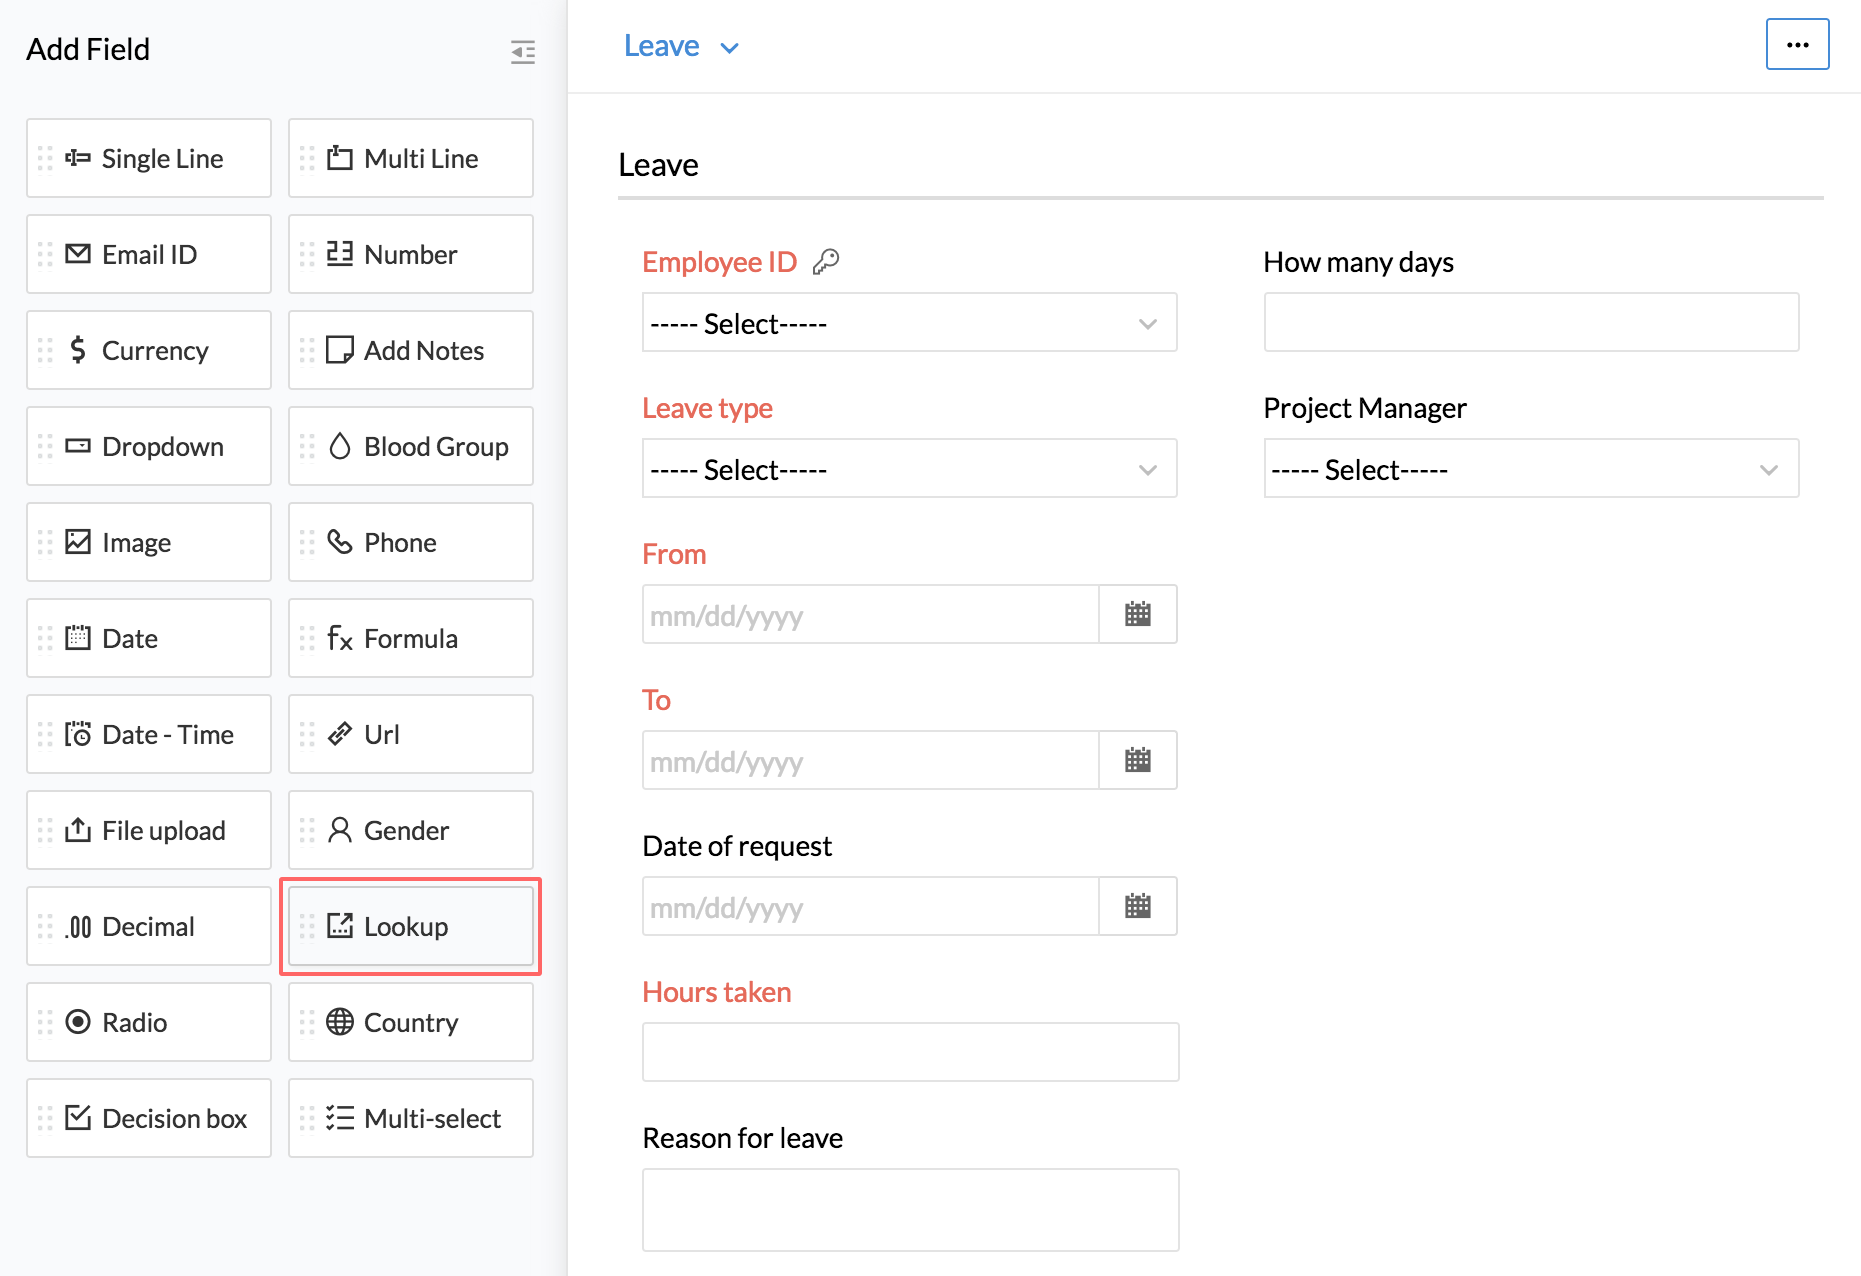
- Enter details like Display Name etc.
- Under Display, select the option as required.
- Under Import data, select the form from which the fields need to be picked.
- Under Field Name, select the Field name based on which the mapping has to be done - for example, if you would like to have the mapping done based on the Employee ID in the Employee Form, you need to select Employee Id under the Field name.
- Under Select related fields, select the other Fields that you would like to be displayed.
- Check the box if your lookup is a primary lookup.

- Click Done
Note: You can have more related fields added to the lookup even after creating the lookup field.
Select the lookup field, go to Field Properties, and under Select Related fields, you can add more related fields to your lookup field.
Primary Lookup:
When there are more than one similar lookup fields in a form, (for eg. in a training form, Employee ID, and Trainer name are two different fields but with the same lookup reference - i.e Employee ID from Employee form), the primary lookup option allows the administrator to choose one of the two lookup fields as the base field for setting up permissions for the form. You can have more than one lookup field in your form. However, the Primary lookup field is the one that will decide the owner of the record. A Primary lookup is done only for the Employee form.
Let us take this scenario to understand Primary lookup better. Assume that in your leave form, you have the Employee name field in which you have Primary lookup enabled. This will be linked to the Employee form. Let us assume that you have another lookup field added in your form (which also links to the Employee form), in which you want to be able to choose a person in charge in the absence of the Employee.
If a manager adds a leave record on behalf of employee X, then the Employee for whom the leave is added will be the record owner and the leave balance of the particular employee will get reduced.
However, in the other lookup field, 'person in-charge (linked to Employee form) you can choose another employee who will be in charge in the absence of Employee X. This is a lookup field too but this lookup is only for providing information.
Lookup Filters
Look up - filters:
When you are creating a field with the Look-up option, you can also add a filter to this field.
For eg - If an Employee wants to submit a request for Travel Expenses of the previous month, then filters can be created in the respective lookup field to filter out the requests of the previous month alone.
To set a filter for the lookup field, follow the steps given below.
- From your home page, go to Settings (Gear icon) > Customization > Forms > Travel Expense
- Drag the Lookup field from the left-hand side and drop it in your form
- Enter the details like Name etc - You can give the name as Travel Month here
- Under Import Data From, give Travel Request and under Field Name, select Travel ID

- Click Done
- On the right-hand side, under Field Properties, Check Set Filter
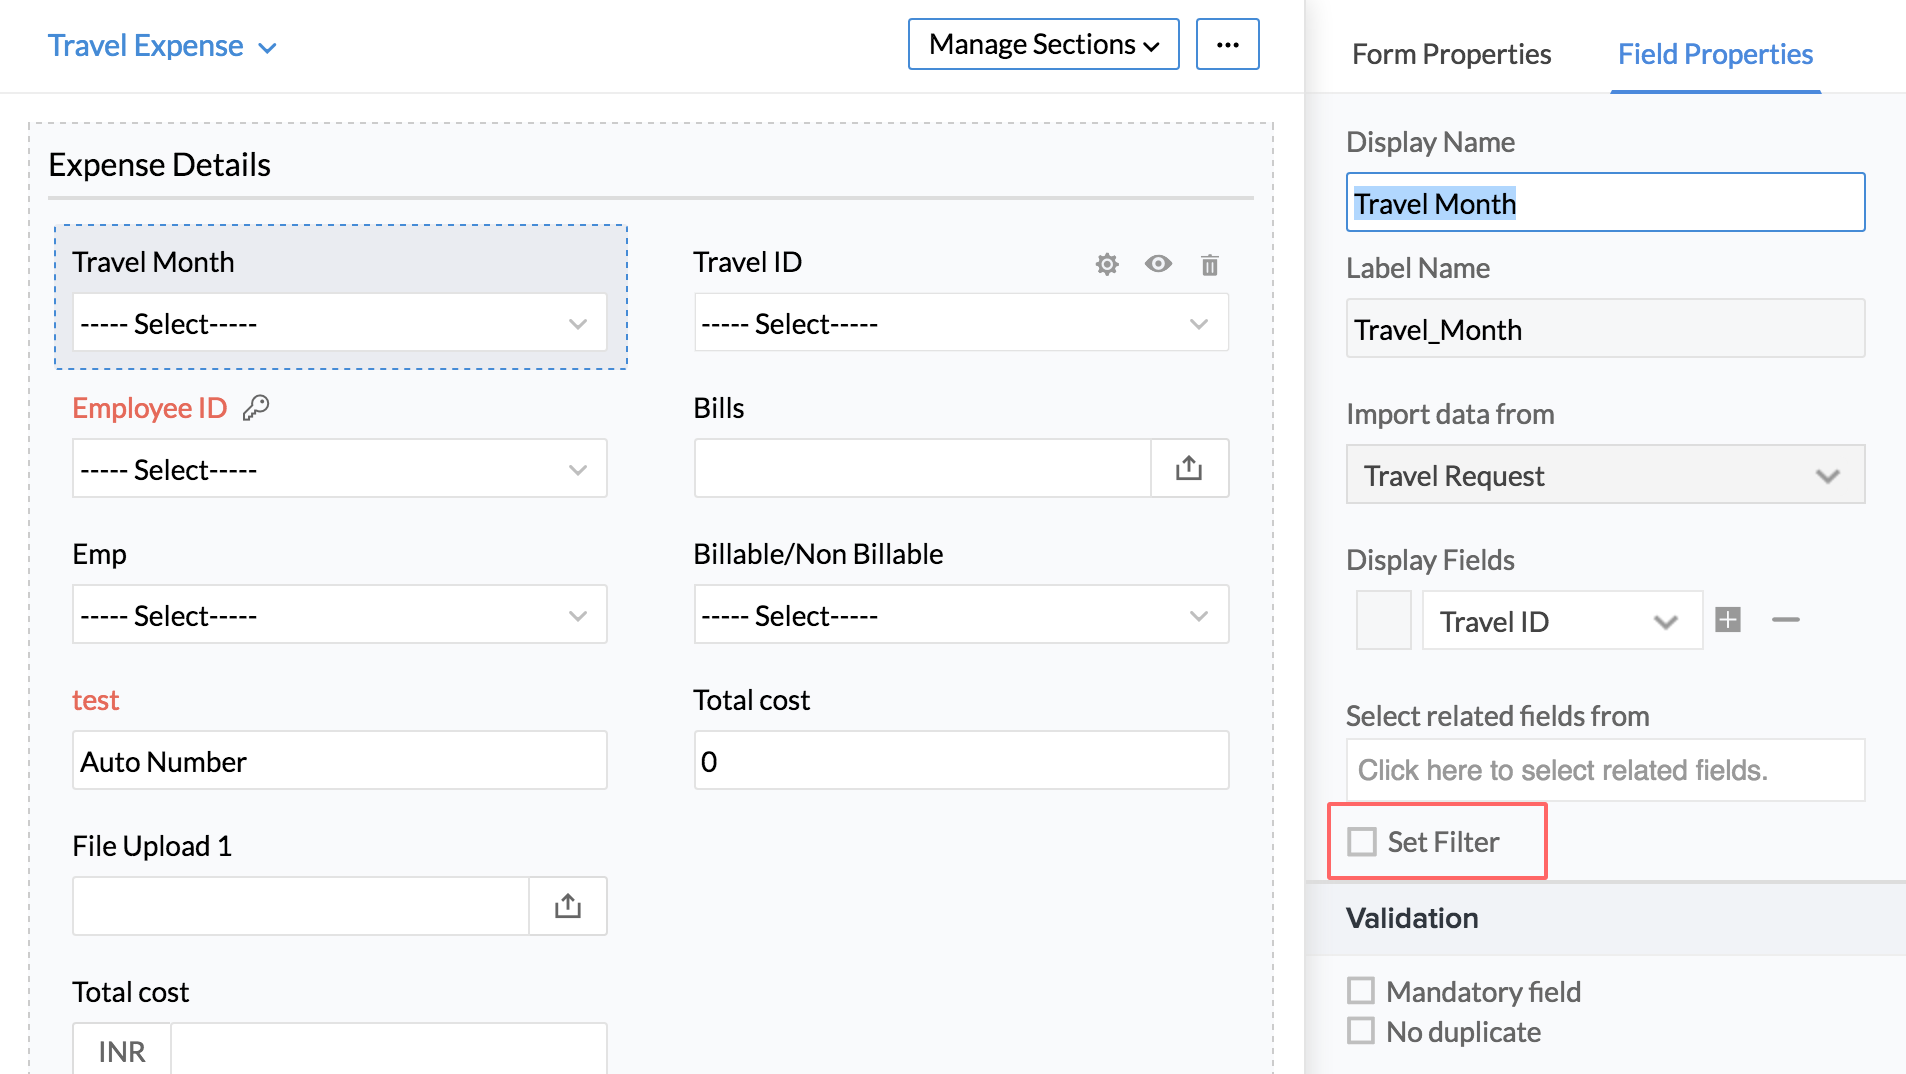
- Under Field Name, select Expected Date of Departure
- Under Condition select Last Month
- Click Done
Now, when a record is added in the Travel Expense form, under Month of Travel, the Travel details of the previous month alone will get displayed.
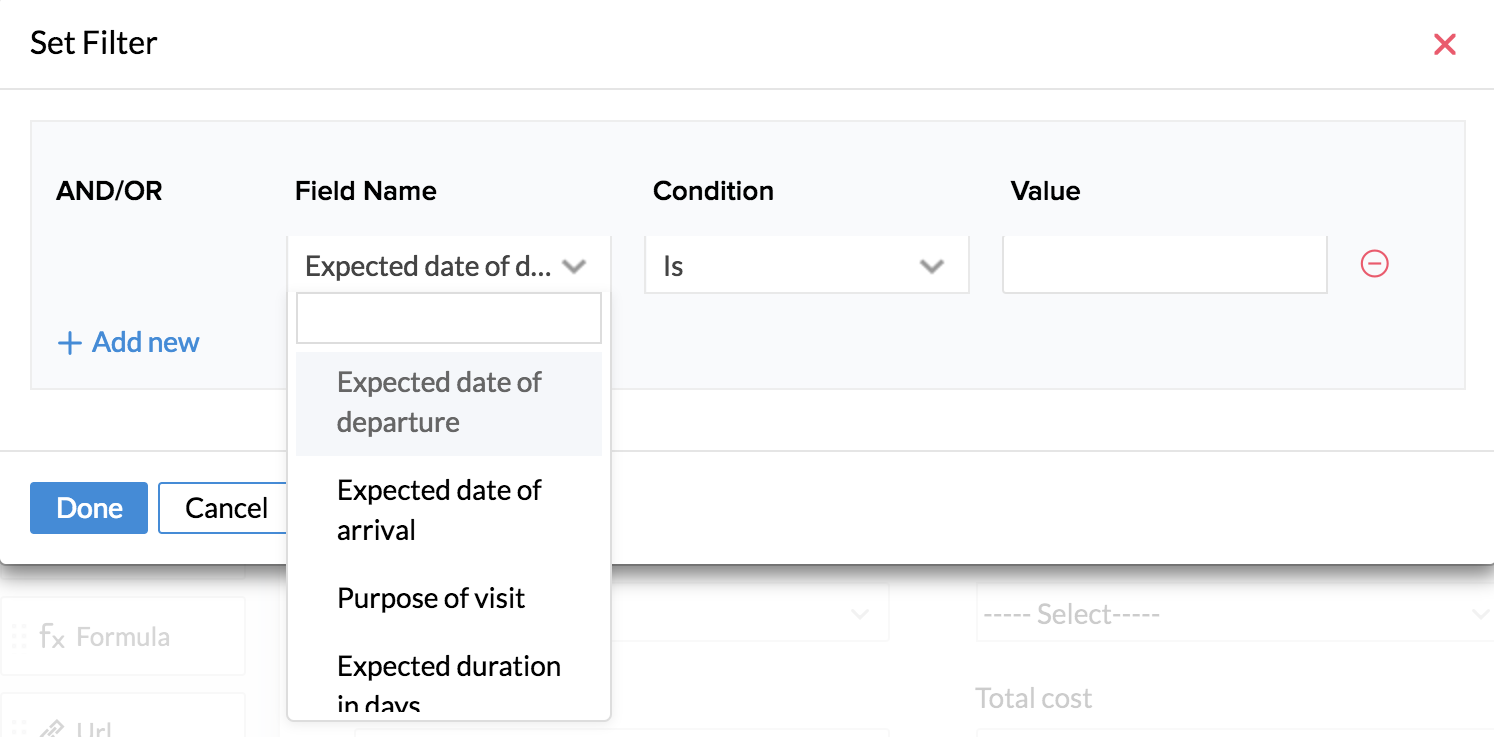
Let us look at another example of a Training Form where filters can be used. Let us assume that, you need only the training of the following month to be displayed when employees register for training. In this case, you can use a Filter.
First, a Training Registration form needs to be added and then a lookup field needs to be created to link this form to the Training form in order to extract details like Date of Training etc.
Follow the steps given below to set the filter.
- From your home page, go to Settings(gear icon) > Customization > Forms > Add Form
- Enter the details and click Save
- Drag and drop the required fields from the left-hand side for Field names like Training Name, Trainer Name, etc
- Drag a lookup field, drop it and name it as Training Date
- Under Import Data from, select Training form, and under Field name, select Training ID
- Under Select related fields, select Start Date, and Description
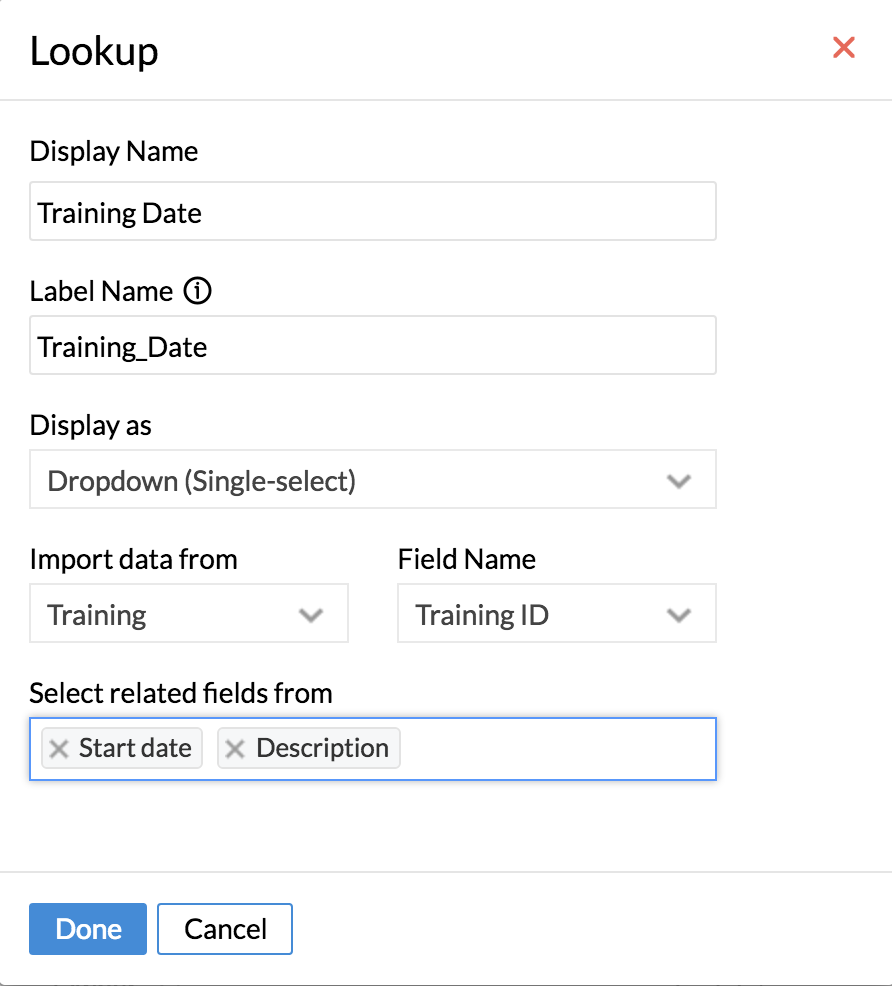
- Click Done
- On the right-hand side, click on Field properties and check the box Set Filters
- Under Field Name, select Start Date and Under Condition, select Next Month
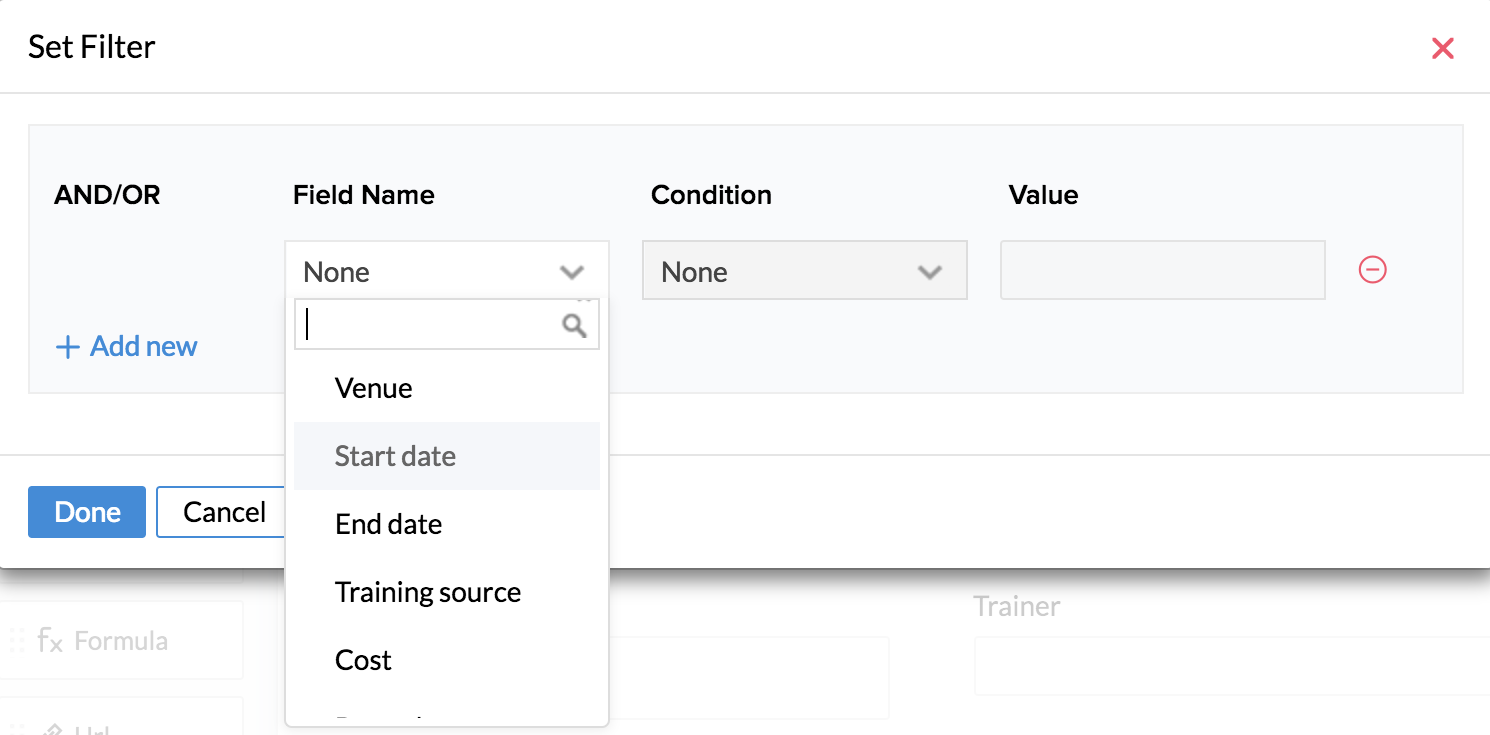
- Click Done
Once this is done, when an employee registers for Training, then he/she will be able to see only the Training that are happening in the next month.
Usecase-Creating Filters for a Travel Form
Setting filters lets you have control over the data that is shown in a field. Along with this, filters can also help decide field values based on a selection that is made. In this scenario of a Travel form, there are various options that are possible using filters. The following forms will be used in this scenario.
- Travel Claims Form
- Travel Request Form
- Employee form
The Travel Request form should have the Travel ID along with the other details. It should also have a lookup field linking it to the Employee form.
- Drag and drop a lookup field
- Give the name as Employee ID
- Under Import data from, select Employee, and under Field Name, select Employee ID
- Click Done
Using this look-up, you will be able to select the employee ID. You can also select related fields like First Name, Last Name, etc if you want them displayed while choosing the employee id.
After adding the lookup field, you can add other fields like 'Date of Departure' ' Date of Arrival', 'Mode of Transport' etc to the form.
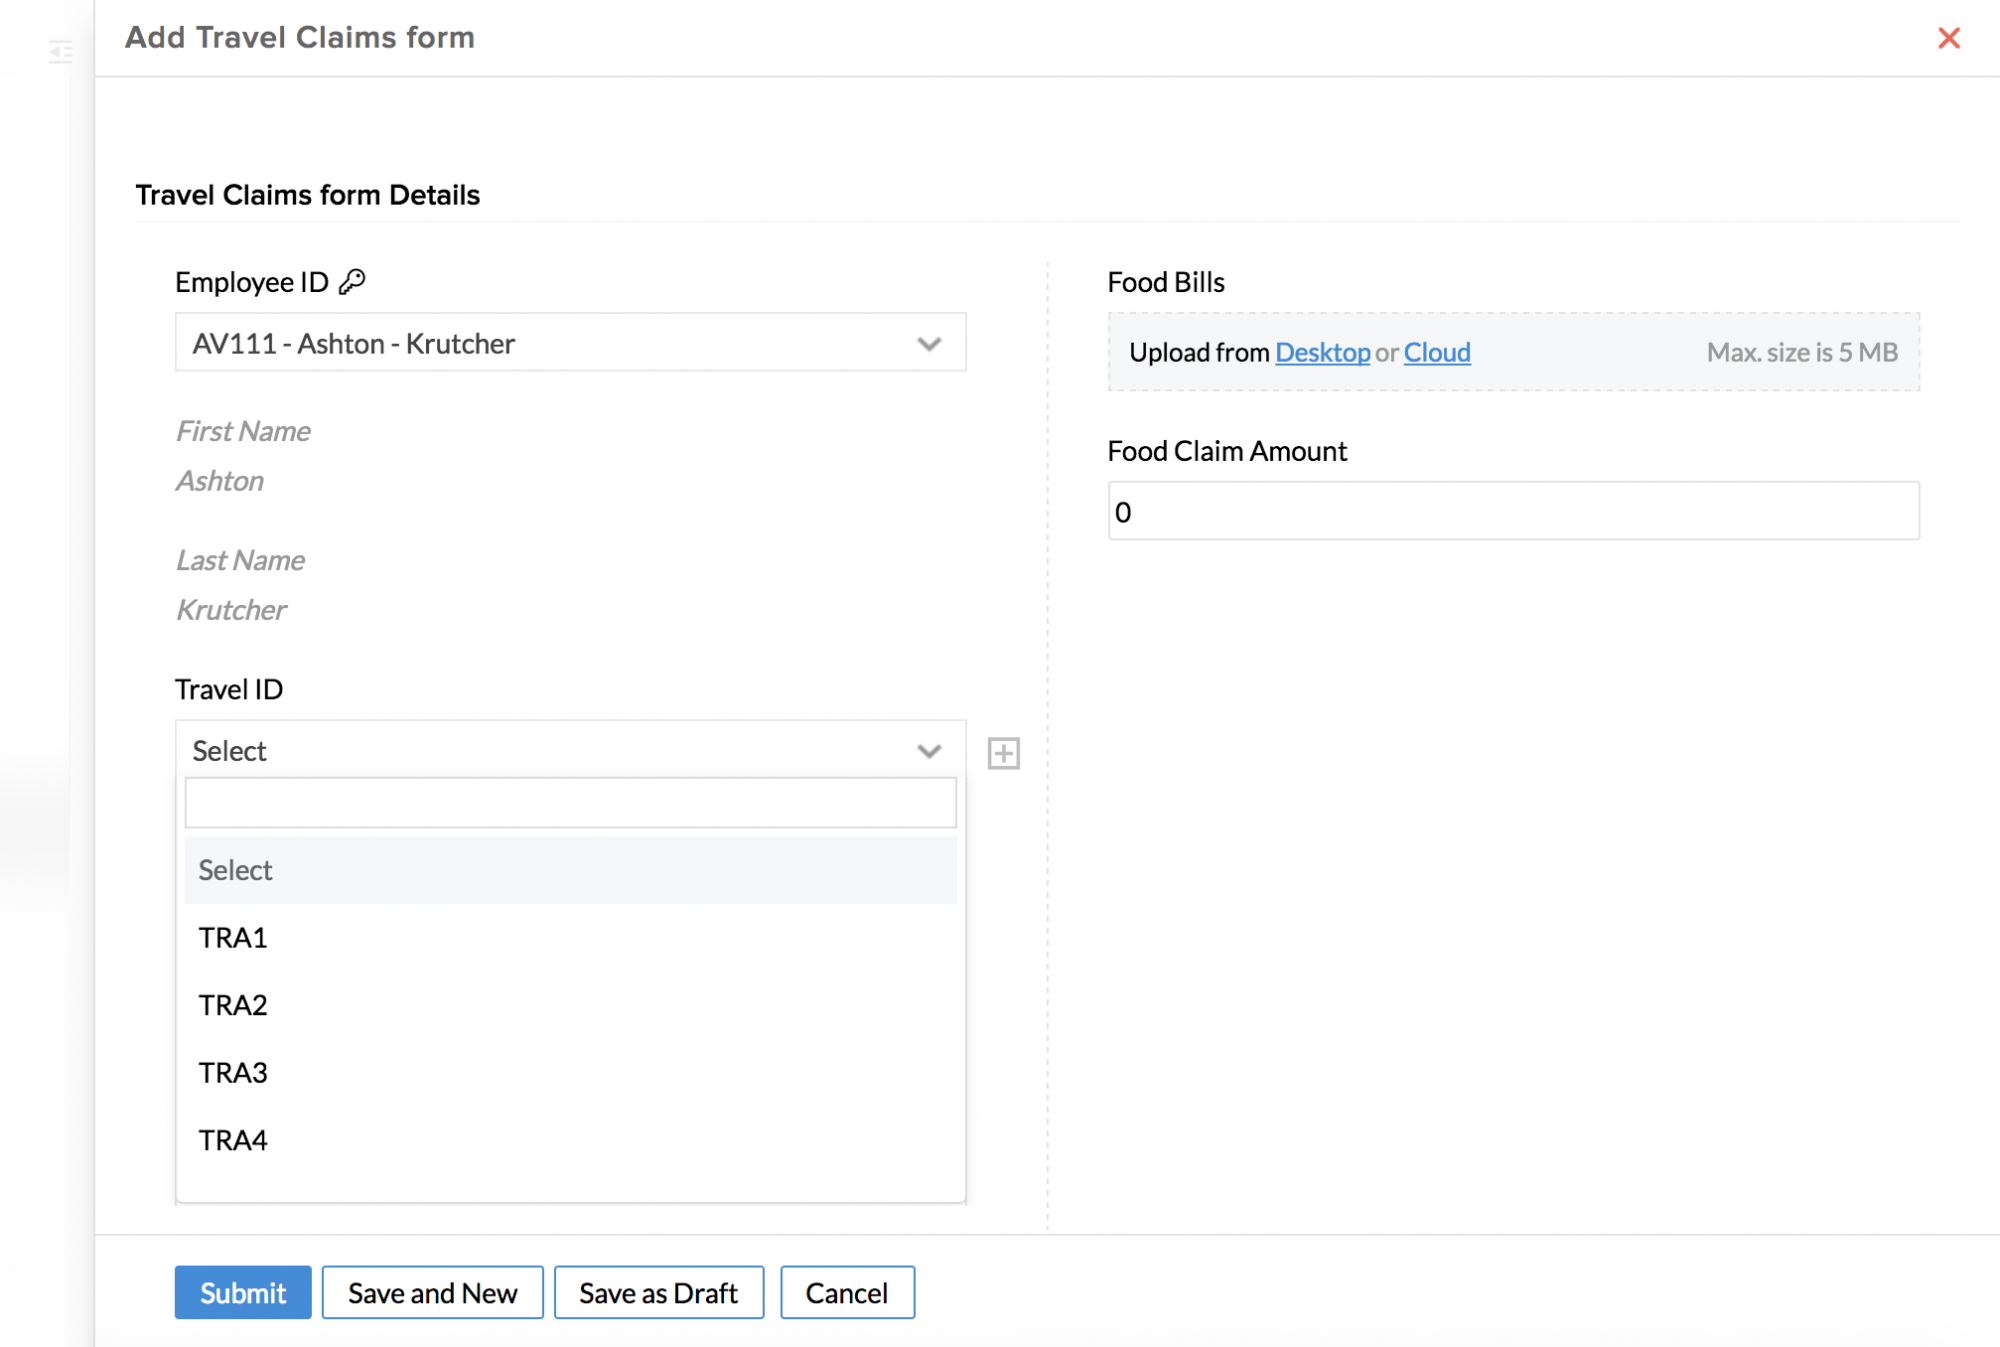
Next, you can proceed to the Travel Claims form. In this form, you need to have two look-up fields. One is the Employee ID look-up from the Employee form and the other one is the Travel ID look-up from the Travel Request form.
As the next step, you need to set a filter. Using the filter you can address three scenarios as given below.
1. If you have a particular user (like a Travel Desk agent) who does the Travel Claims of everyone, then you can set the filter according to explained below.
- Click on Set Filter
- Under Field Name, select Employee ID under User Defined Fields, under Condition select, Is, under Value, select the list icon and select the User
- Click Done
- Add other fields to the Travel Claim form, like the Conveyance Bills, Food Bills etc
- Drag and drop a formula field to calculate the total claim amount
Now, when the particular agent goes to Travel > Travel Claims, he/she can create claims by clicking on the 'Add Record' icon. Under the Travel ID, all the travel requests that have made under his/her name will be listed. The claims can be submitted one by one.
Note: In this case, when other employees submit their travel request, they should select the Travel Desk agent's name under Employee ID. Only then, the requests will get listed for the agent when he/she wants to do claims for these requests.
2. If you want the travel claims done by the employees/users themselves, then you can make use of this option in the filter
- Click on Set Filter
- Under Field Name, select Employee ID under User Defined Fields, under Condition select Logged In User
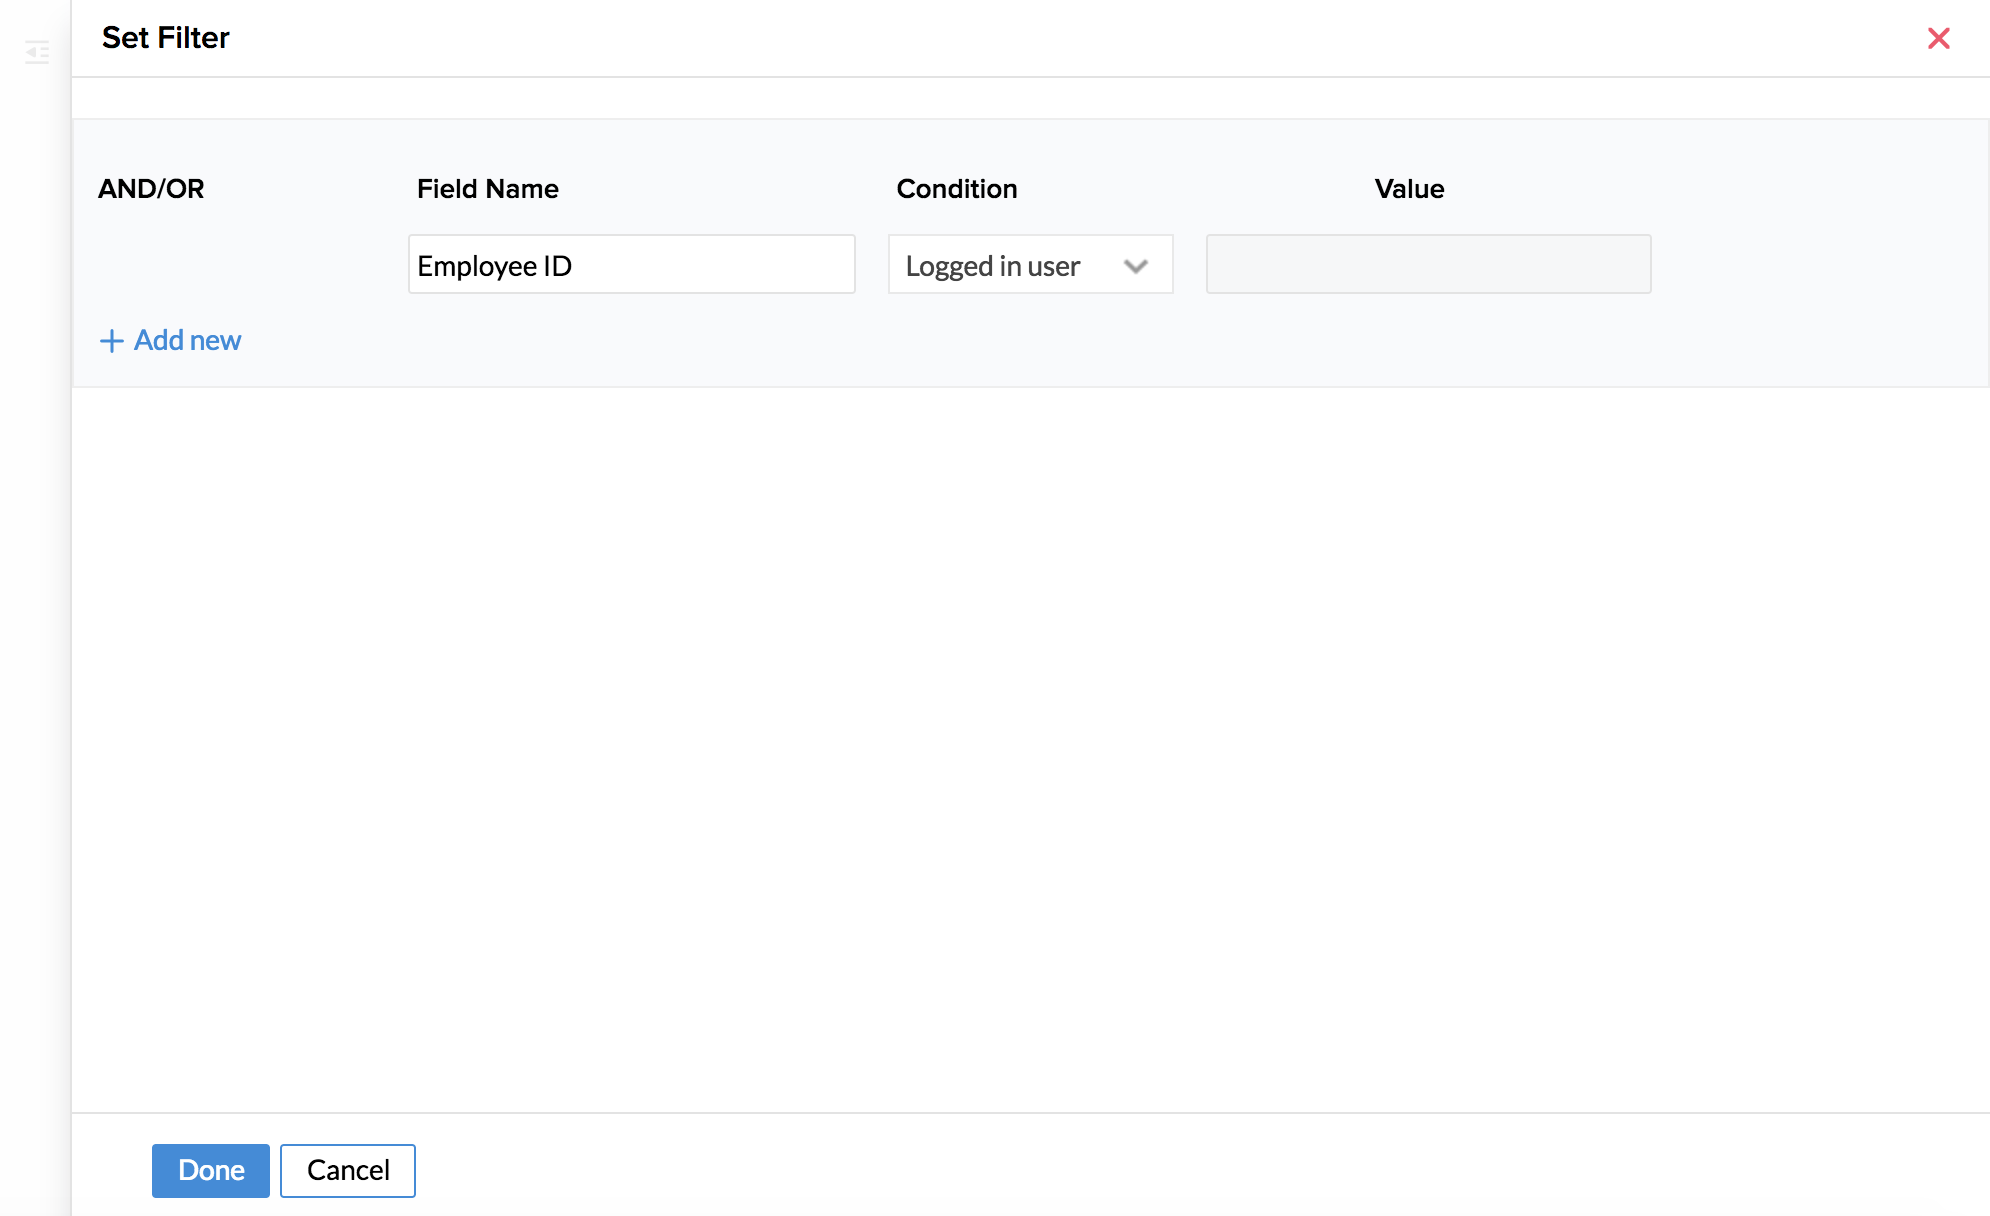
- Click Done
Once this is done, when an employee goes to Travel > Travel Claims form and clicks on 'Add Record', he/she will be able to see all the travel requests that he/she has made and the claims can be done for these.
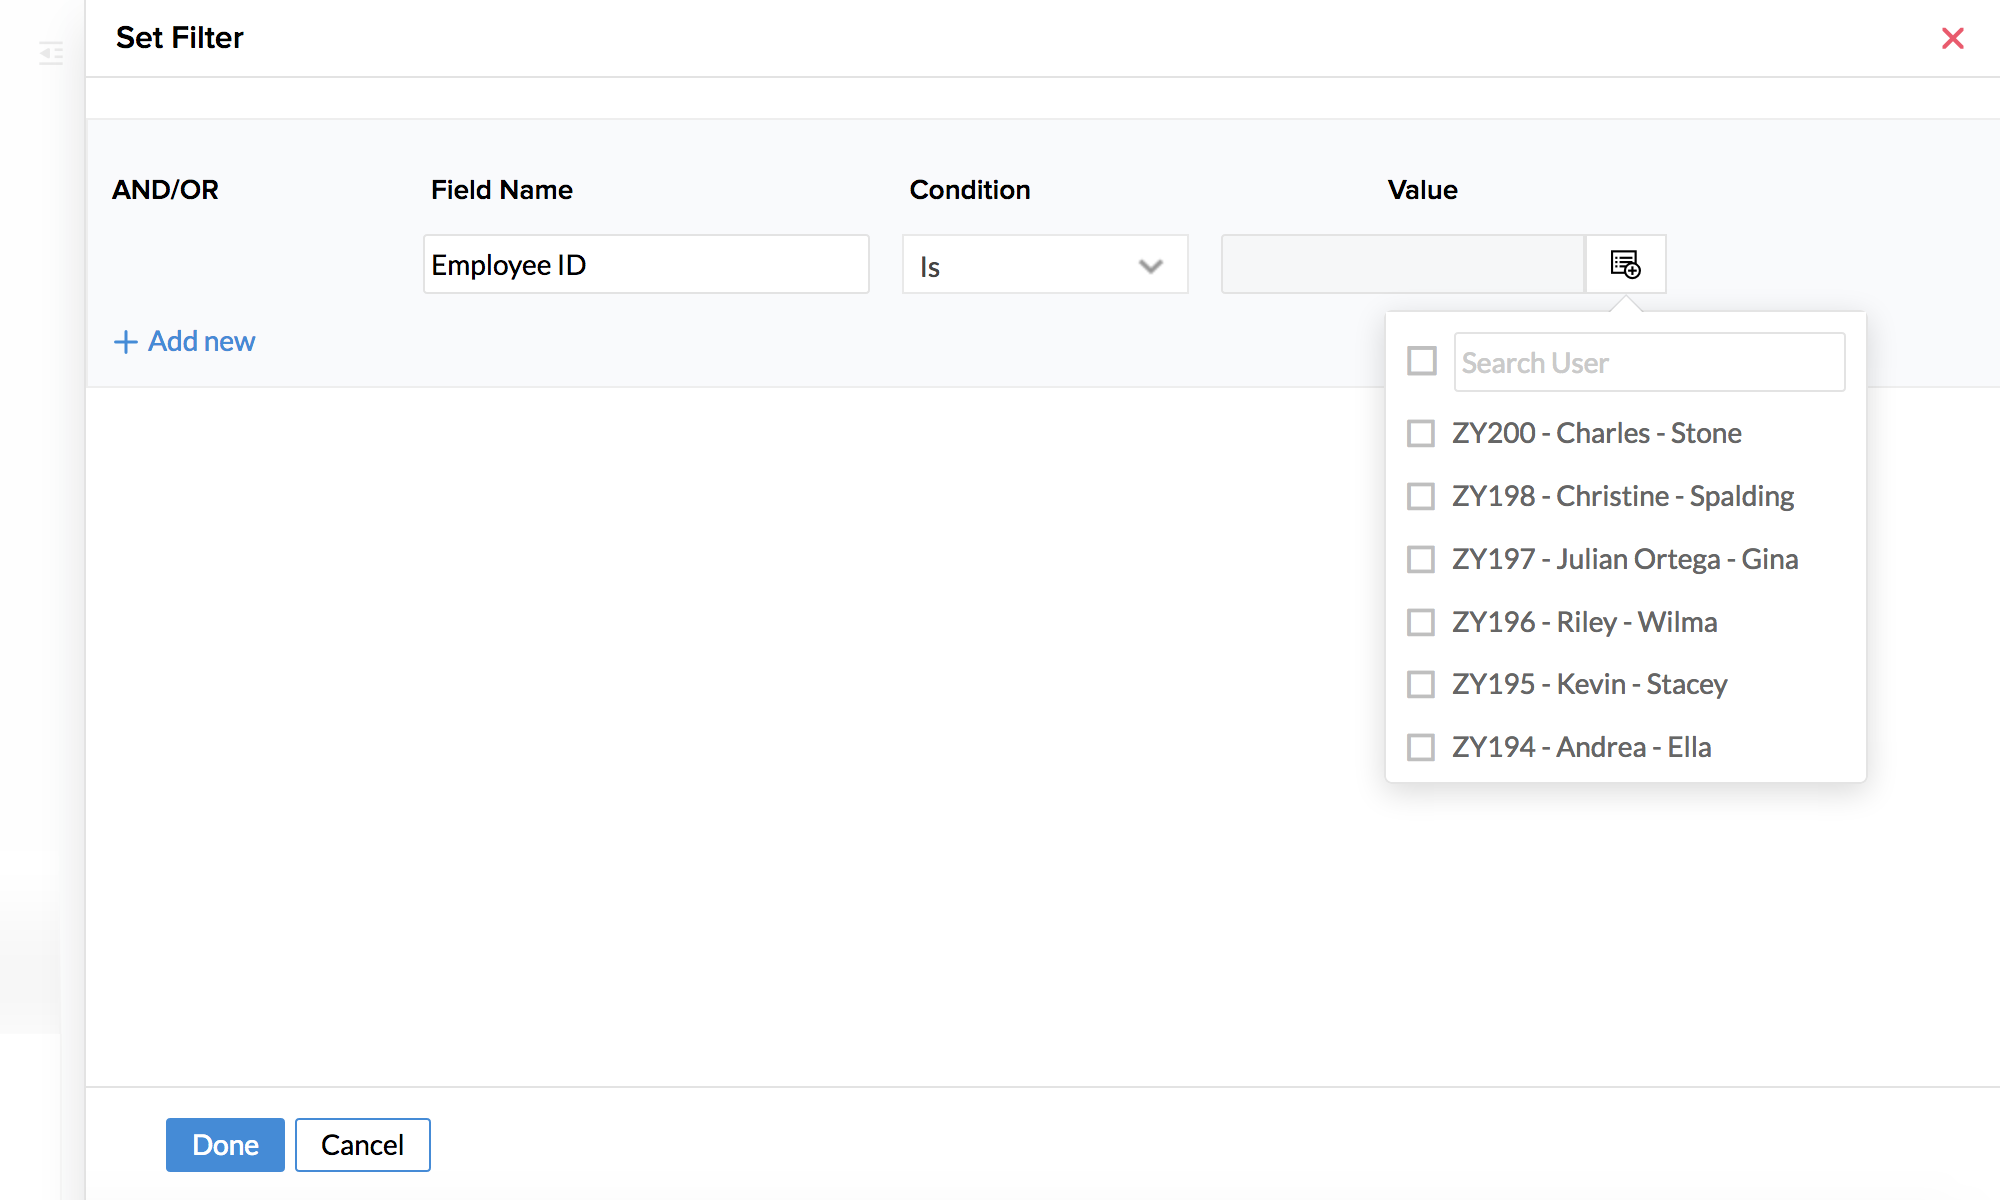
3. If you want the travel claims submitted by someone (the admin or travel desk agent) for requests that are created by other user/employees in their corresponding names, then you can make use of this option in the filter.
- Click on Set Filter
- Under Field Name, select Employee ID under User Defined Fields, select Is under Condition and under Value, click on Select Value and select Employee ID
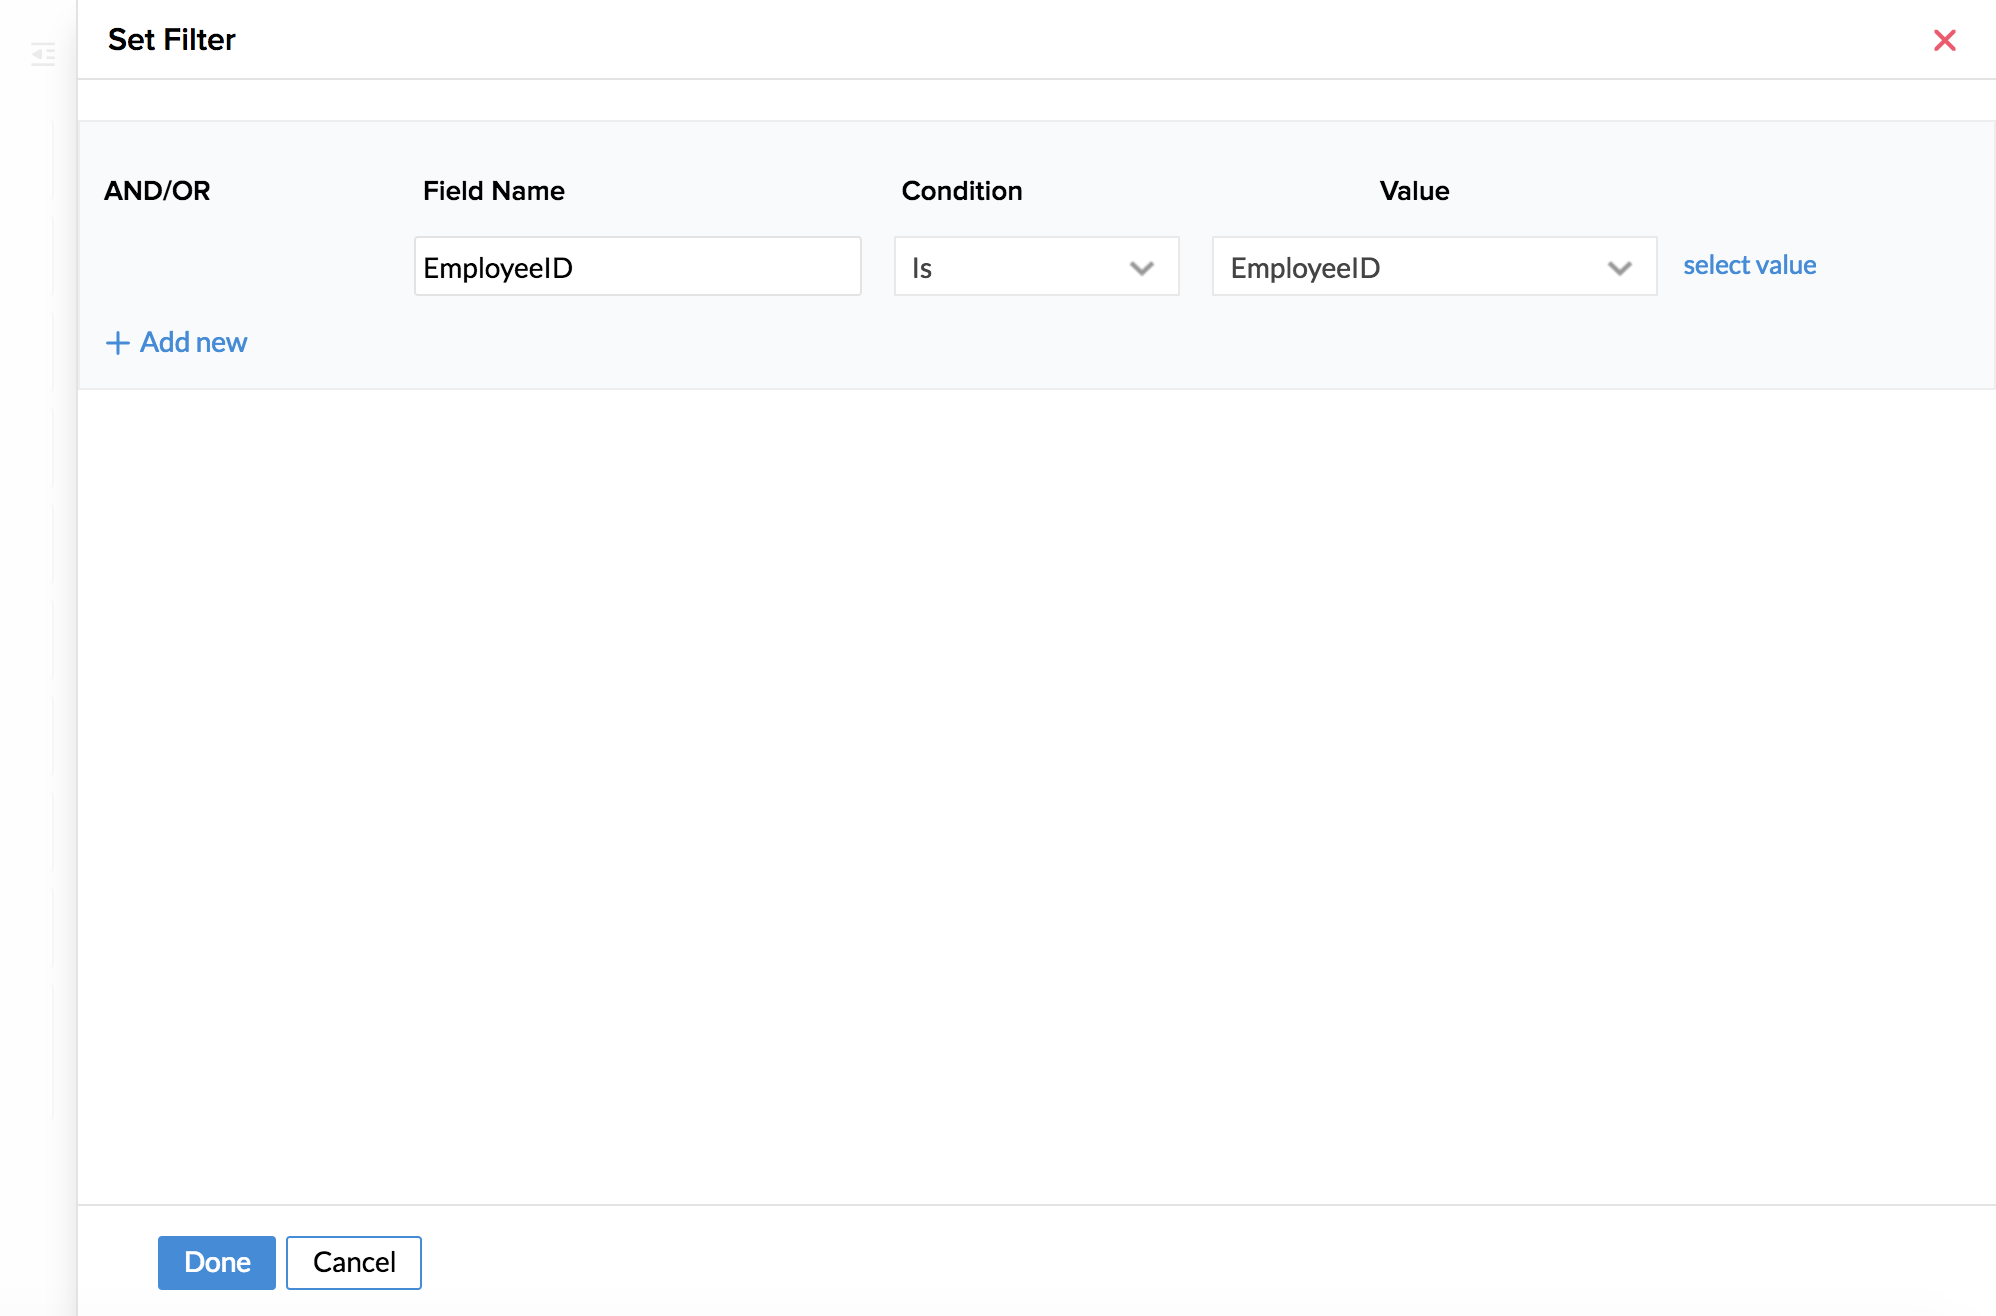
- Click Done
Once this is done, when a travel agent/administrator goes to Travel > Travel Claims form and clicks on 'Add Record', he/she will be able to see all the travel requests of the particular employee whom they select in the Employee ID field of the Claims form. They can select a request from the list and do the claims for that request.
Show/Hide Form Fields Based on Rules & Conditions
In Zoho People, you can customize fields by adjusting their visibility (show or hide) based on conditions or rules. For example, If the location is selected as India, we may want to add a field for Aadhaar or PAN card number. Or if USA is the selected location, we can show a field for the user to input the social security number, etc.
Steps to show/hide a form field:
- Navigate to Settings > Forms (Under Customization) > Select a particular form (For Example: Employee Form). If you already know which field is to be hidden, you can directly click Configure that appears when hovering a particular form name.

- Now add any field to the Employee Form, lets add a Single Line field and call it "PF Number" for this example, and click Done to confirm.
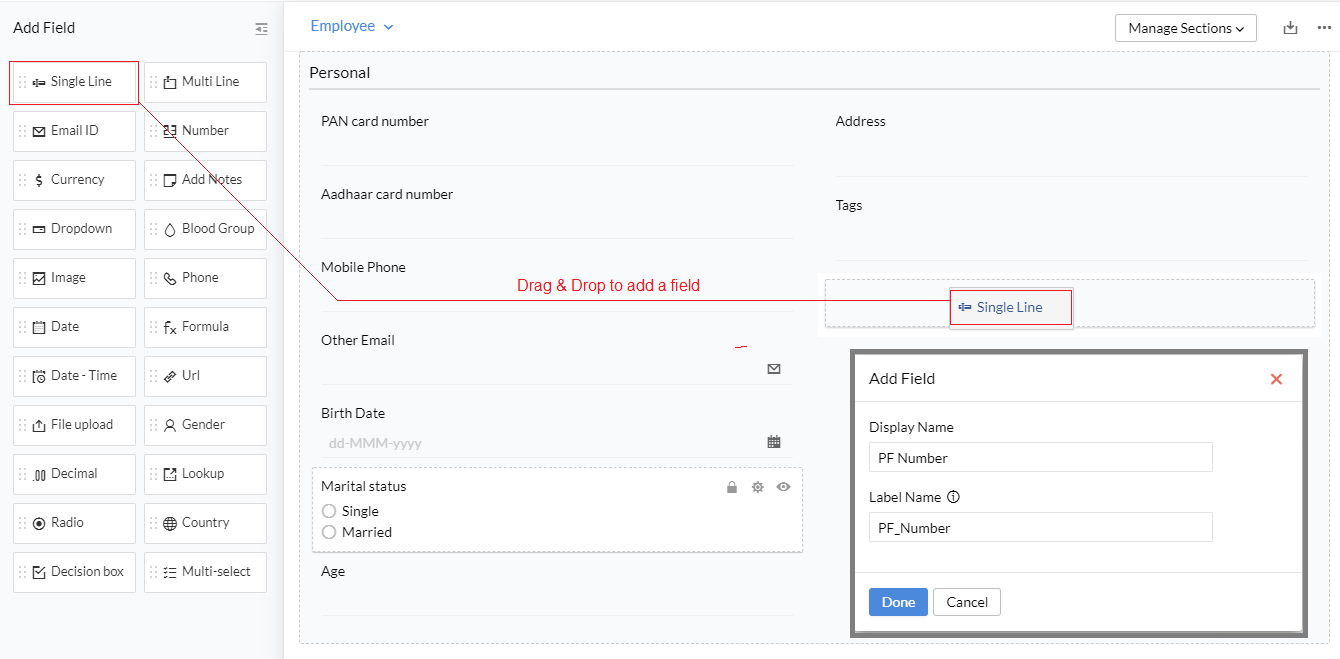
- Now click the three-dot ellipsis icon > Configure Rule. In the pop-up page, The required condition to show/hide a field can be configured. In the below example, a field called PF Number is to be shown only when the Employee Type is selected as Permanent. For all other type of employees, such as contract employees, the PF field will not be displayed. Multiple Rules can be added by clicking on the Add Rule button.
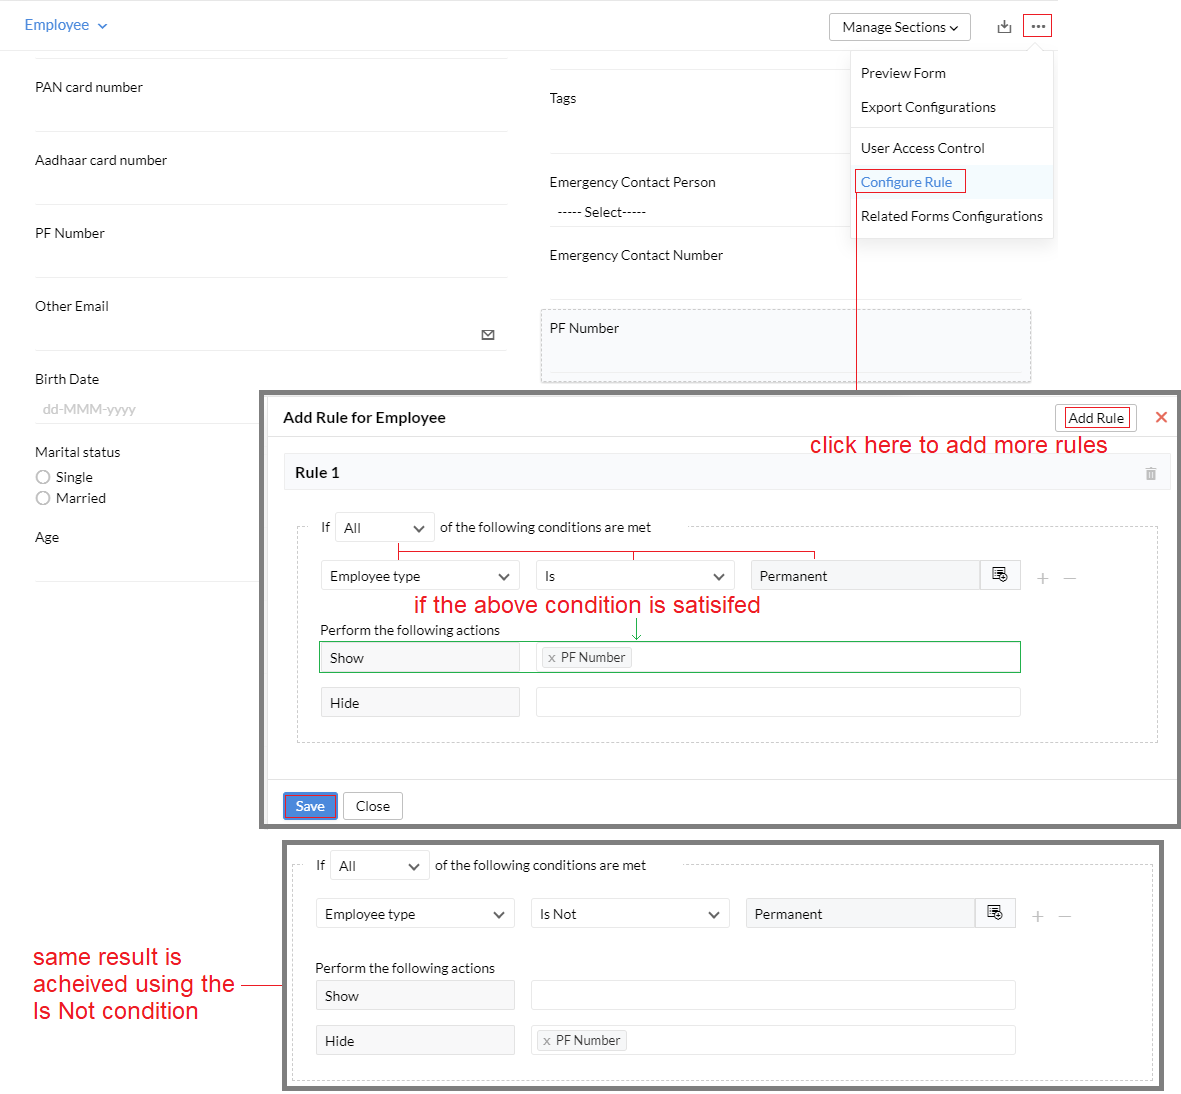
Now that a rule is set, the PF Number field will only be shown when Employee Type is selected as permanent.
Form Field- Formula
Formula fields are used for Formula calculations.
Zoho People's formula fields are like any other advanced custom fields. Using our function type, field type, and an operator type, you can build a formula as per your requirement. You also have the option to view all of the function's description, usage and examples for the complete understanding and moreover to make use of these in a right scenario. The administrators can create and make use of these formula expressions for multiple use cases like updating salary details, calculating reimbursements, work experience, etc.,
Operators supported in Formula Field
Listed below are supported field types for formula calculation:
List of operators
Given below is the list of all the supported operators.
- +Add
- -Subtract
- *Multiply
- /Divide
- %Remainder
- ()Parentheses
- !=Not equal
- ==Equals
- >Greater than
- >=Greater than or equal
Built-in functions
There are four types of built-in functions: Numeric functions, Date and Time Functions, String Functions and Boolean Functions.
Numeric functions: These are used primarily for numeric calculations.
Date and Time Functions: These functions are used for date and time manipulations.
String Functions: These functions are used for string manipulations.
Boolean Functions: This function describes how to determine a Boolean value output based on some logical calculation from Boolean inputs.
Adding and Editing a Formula Field
To add a formula field:
- From your home page, go to Settings (gear icon) > Customization > Forms
- Add new form or select an existing form from the forms list
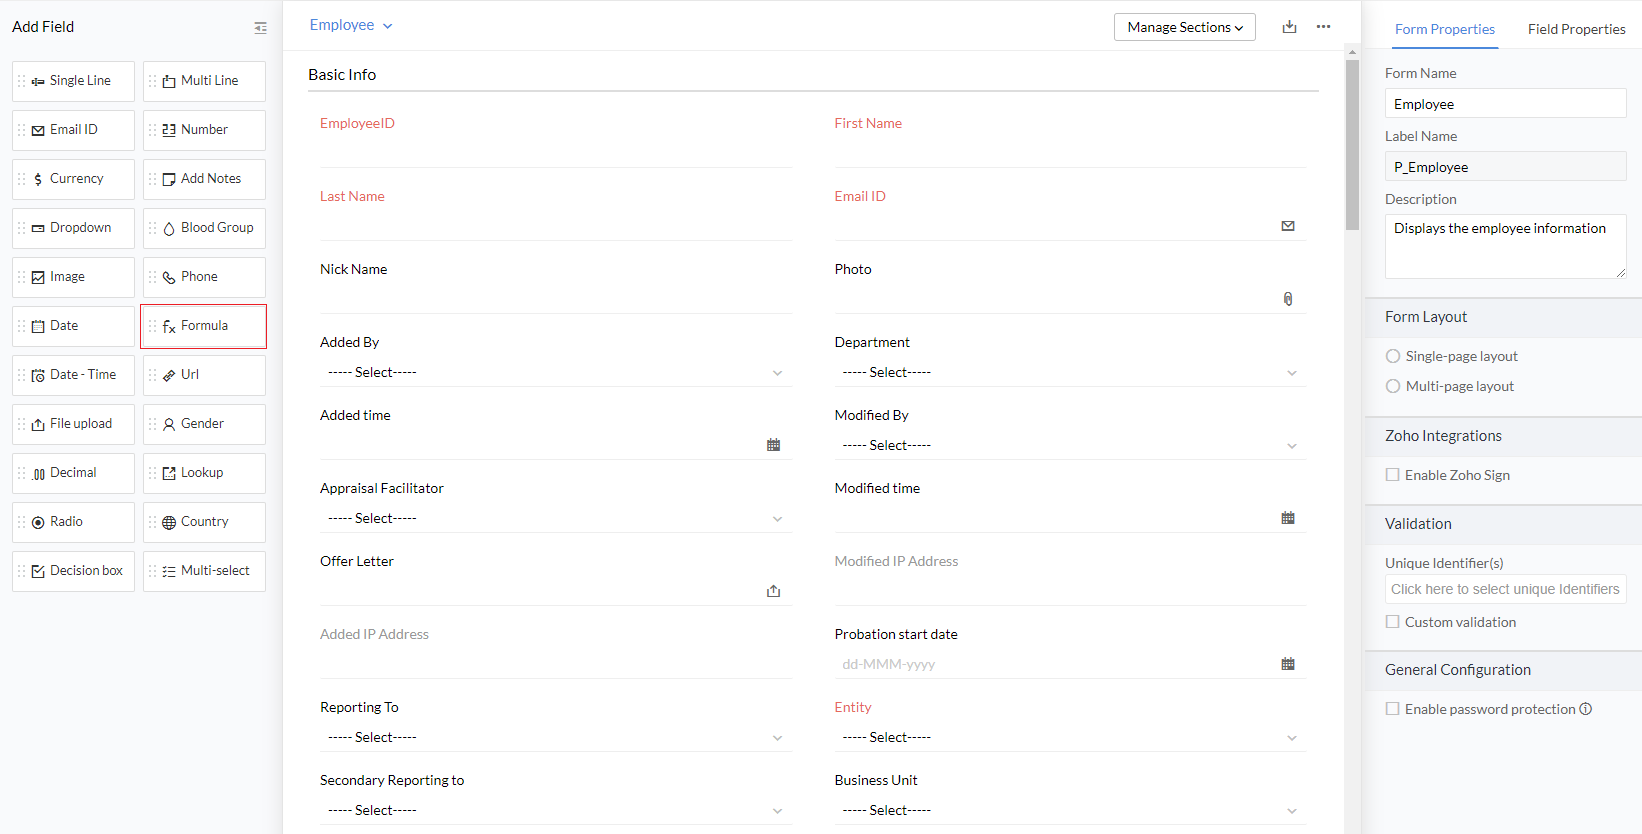
- Drag and drop the Formula field into the section
- Provide Display Name and Label Name
- Click Select Function drop-down list and select the respective type of function according to your need and click Insert
- Click the required field in Select Field and click Insert
- Click respective operator in Select Operator and click Insert
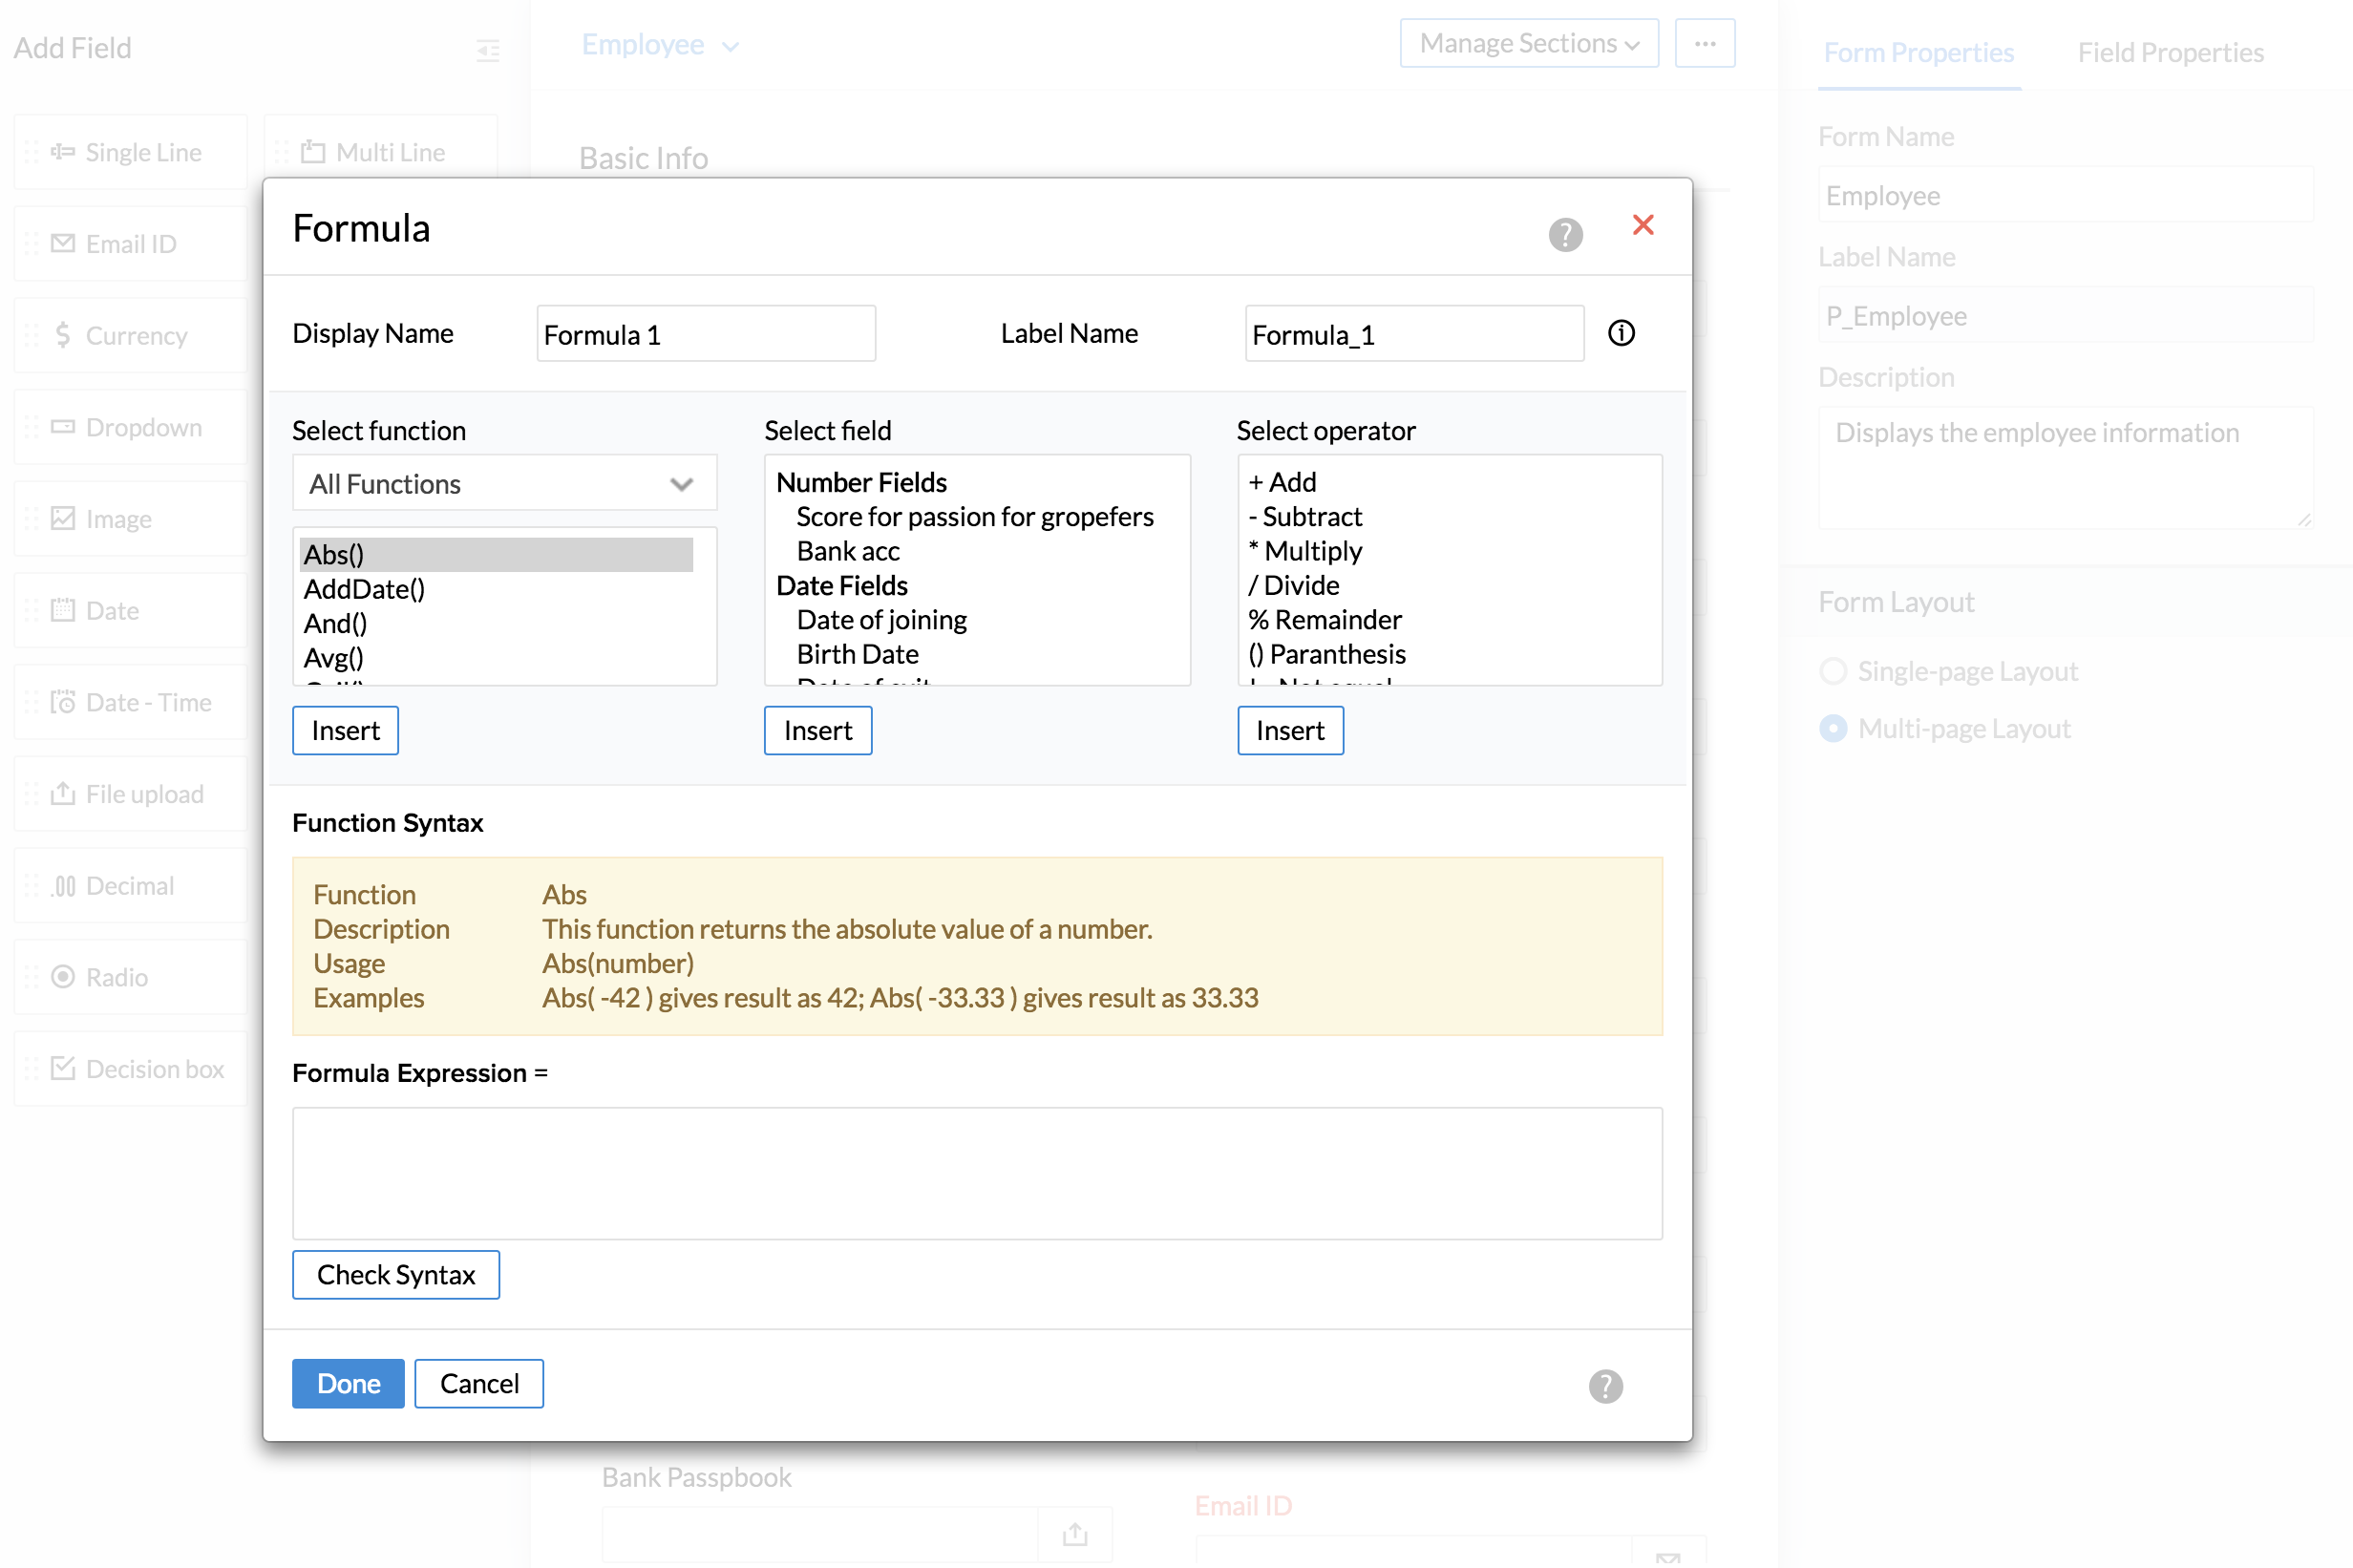
- Click Check Syntax > Done. The formula will get calculated automatically based on the inserted functions, fields, and operators
To edit formula fields:
- From Home, go to Settings (gear icon) > Customization > Forms
- Select an existing form from the list
- Hover your mouse over the specific formula field
- On the right section, you will see that you will be able to edit the field properties
Usecases-Formula Field
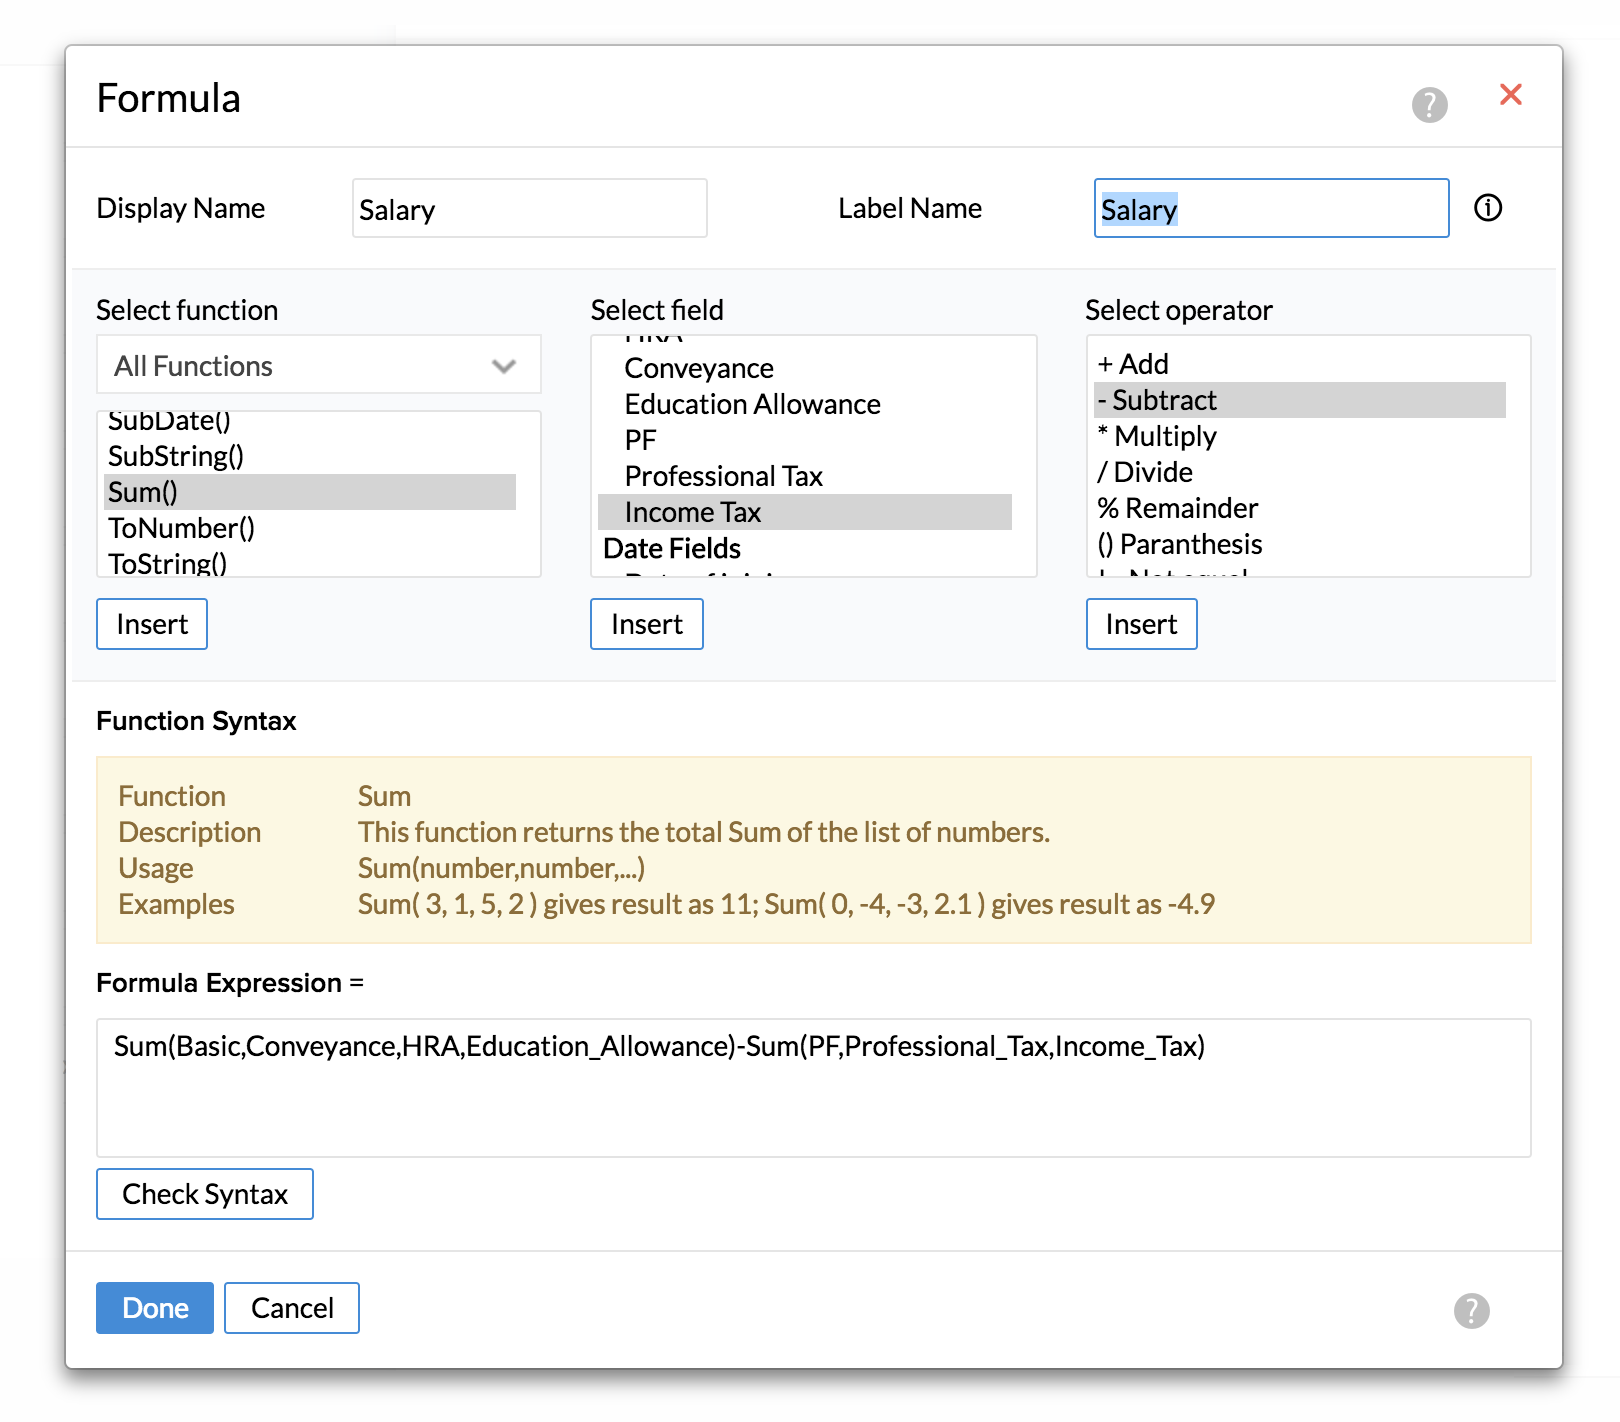
To calculate employee's pay:
Using formula fields, you can easily calculate your employee's pay automatically without doing any manual calculations, using the below formula expression.
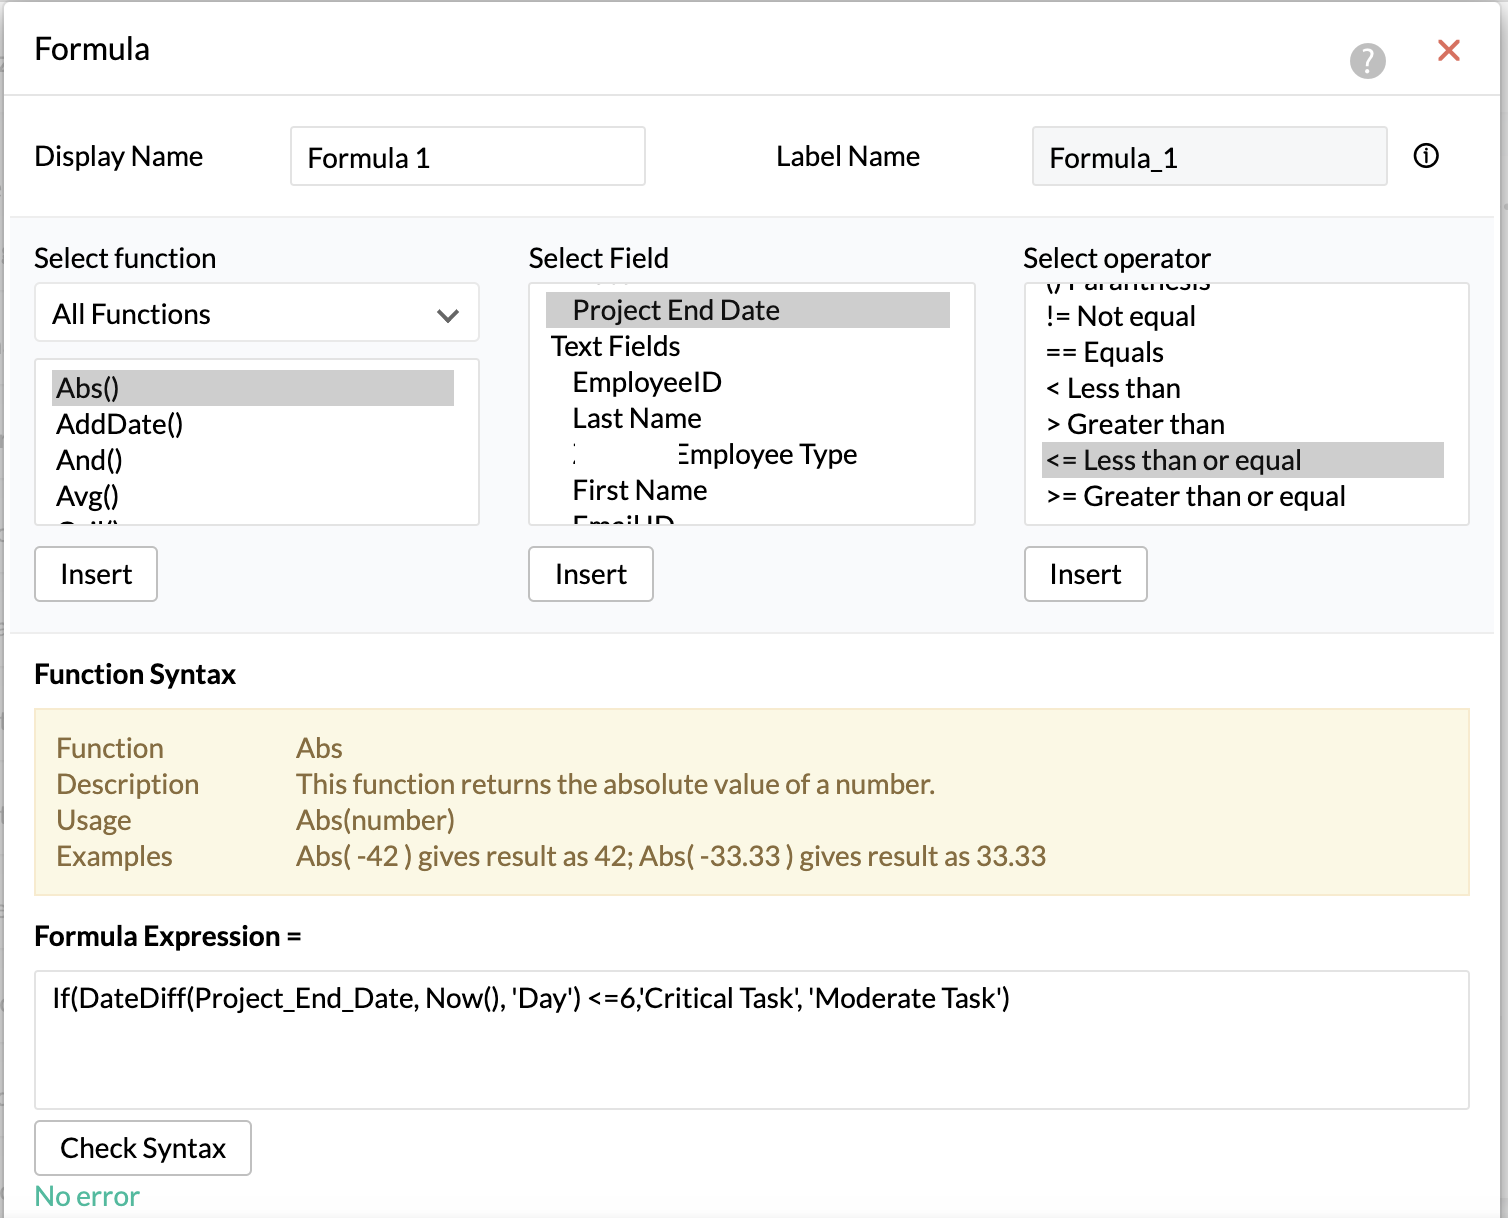
To calculate employee's project deadline:
You can send reminders when the employees' project deadline is near the end date of the Project. You can make employees aware of the deadline automatically using this following formula expression.
Apart from this, there are two system fields, 'Age' and 'Experience', which have the age and the experience of the employee automatically calculated with the help of the fields like 'Date of Birth' and 'Date of Joining'. There is no need for the formula field to be added separately for calculating these two.
Adding Drop-down Options in a Bulk
Yes, it is possible to add multiple drop downs with multiple options in each drop-down.
- From your home page, go to Settings (Gear icon) > Customization > Forms.
- Click Add New form.
- Enter the name of the form and other details.
- Click Save.

- Drag and drop a drop down field.
- Under Field Properties, go to 'Choices' and enter the options that you would like to be added in the drop down.
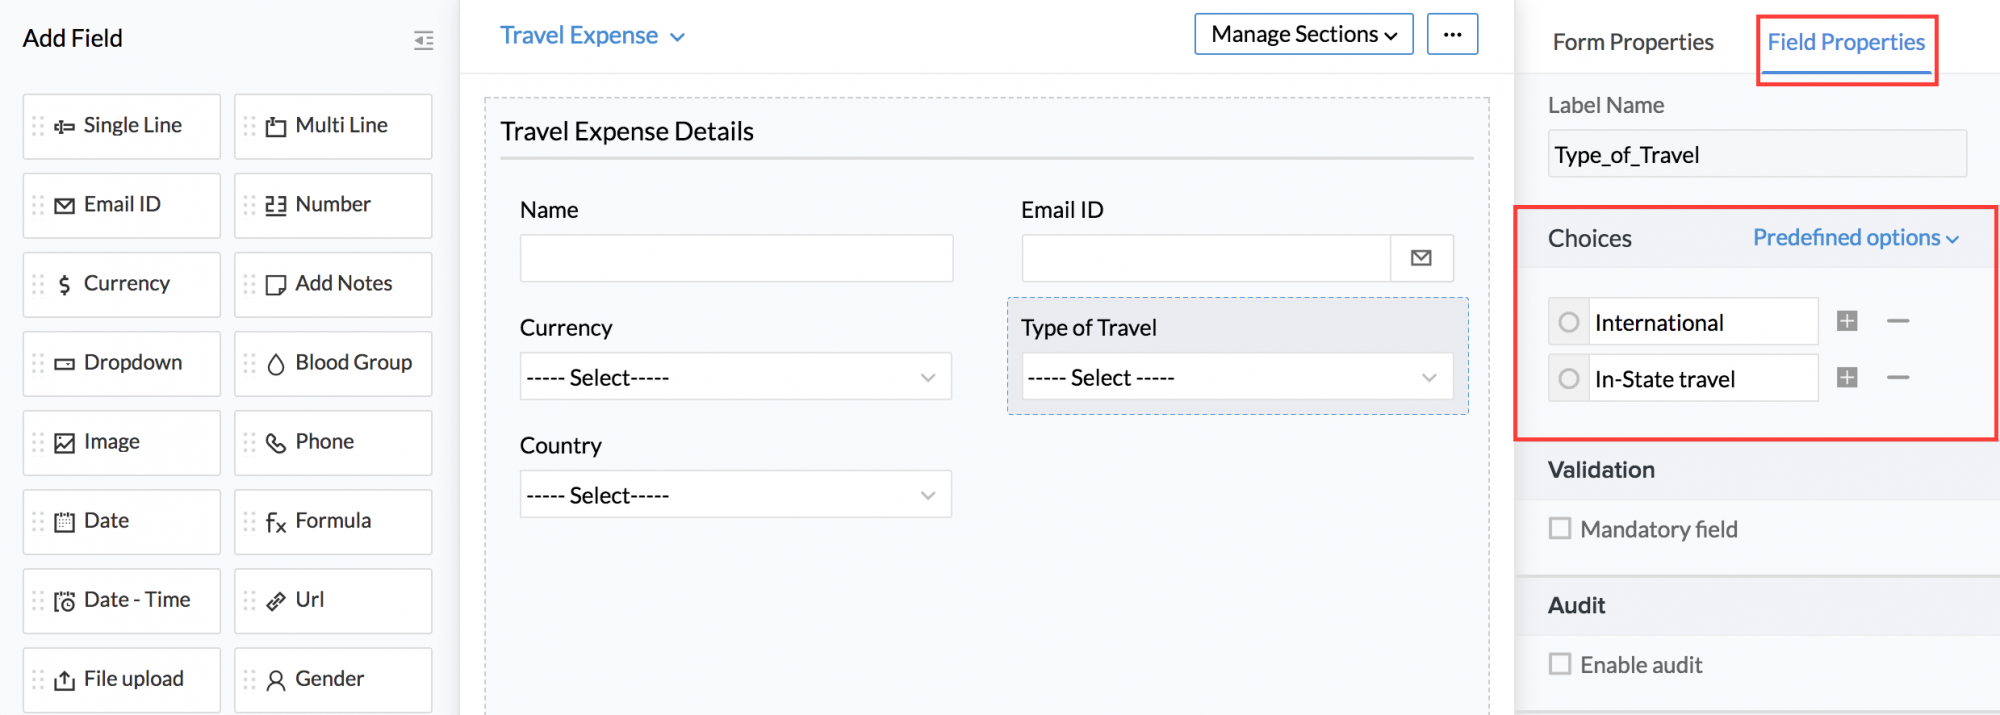
- Use the + icon to keep adding to the list of options.
You can also have pre-defined options populated in the drop-down. Follow the steps given below to do this.
- Drag and drop a drop down a field from the editor.
- Give a name.
- Under 'Field Properties', click on 'Pre-defined options'.
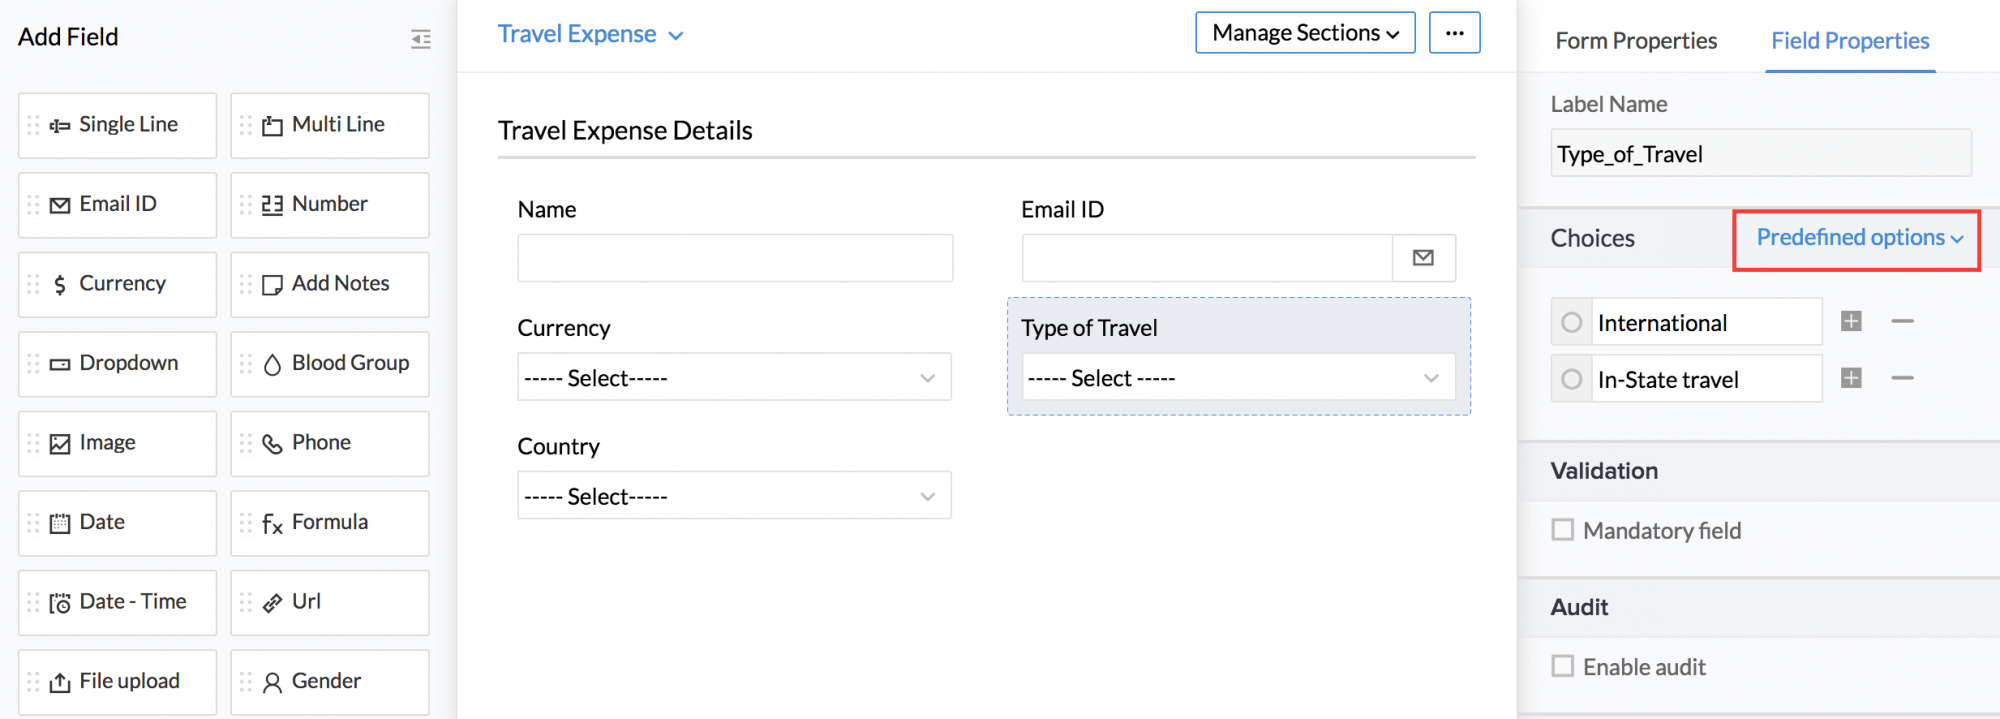

You will be able to see pre-defined options under different sections like Age, Education, etc. Apart from the available options, you can also Add a new option by clicking on 'Add Options'
- Click on 'Add options'
- Enter the options one below the other and click 'Import' to have the options populated as part of the drop down
Note: If you have the list of options saved, you can simply copy and paste it here.
- Click on 'Save Template' and give a name for the template if you wish to use this template again later
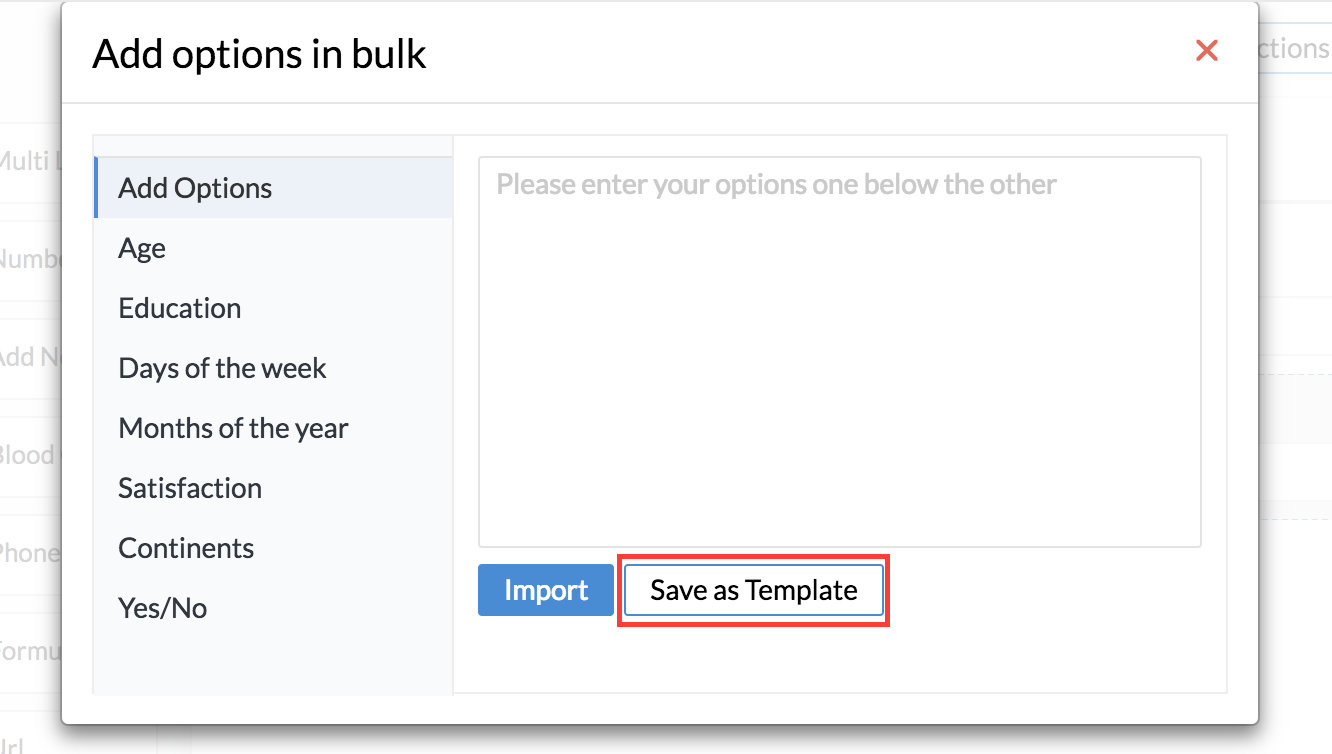
Once this is done, you will be able to use the pre-defined options as part of the drop down.
Editing a Form Name
- From your home page, go to Settings (gear icon) > Customization > Forms to go to the form whose name needs to be edited and click on the form name
- On the right-hand side section, you will see the tab called Form properties
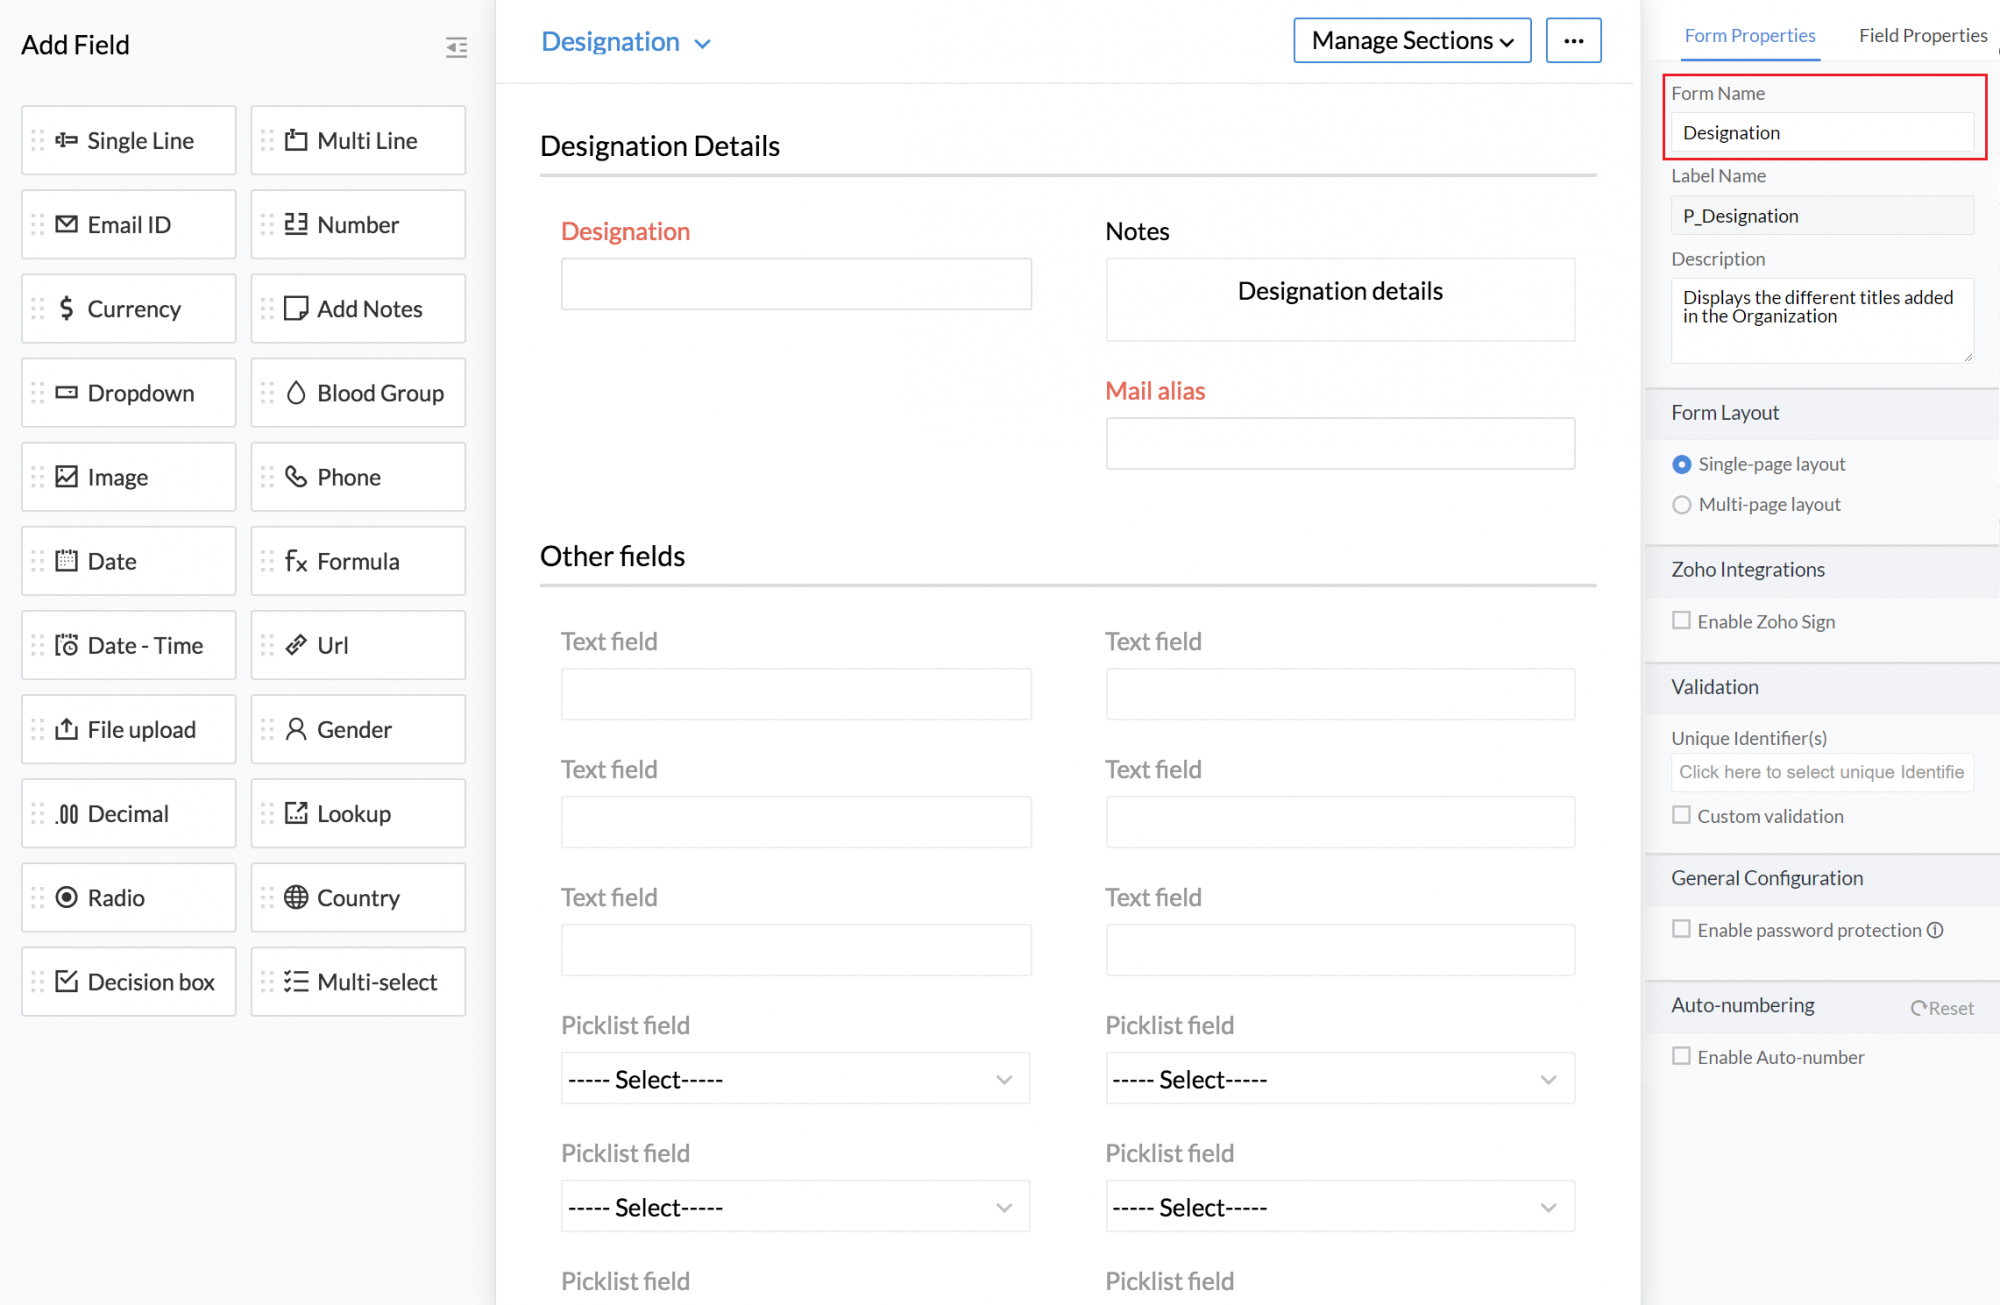
- Change the Form name
Marking a Field Mandatory
- From your home page go to Settings (Gear icon) > Customization > Forms and click on the form in which you want to mark a field as mandatory
- Click on the Field that needs to be marked on the form
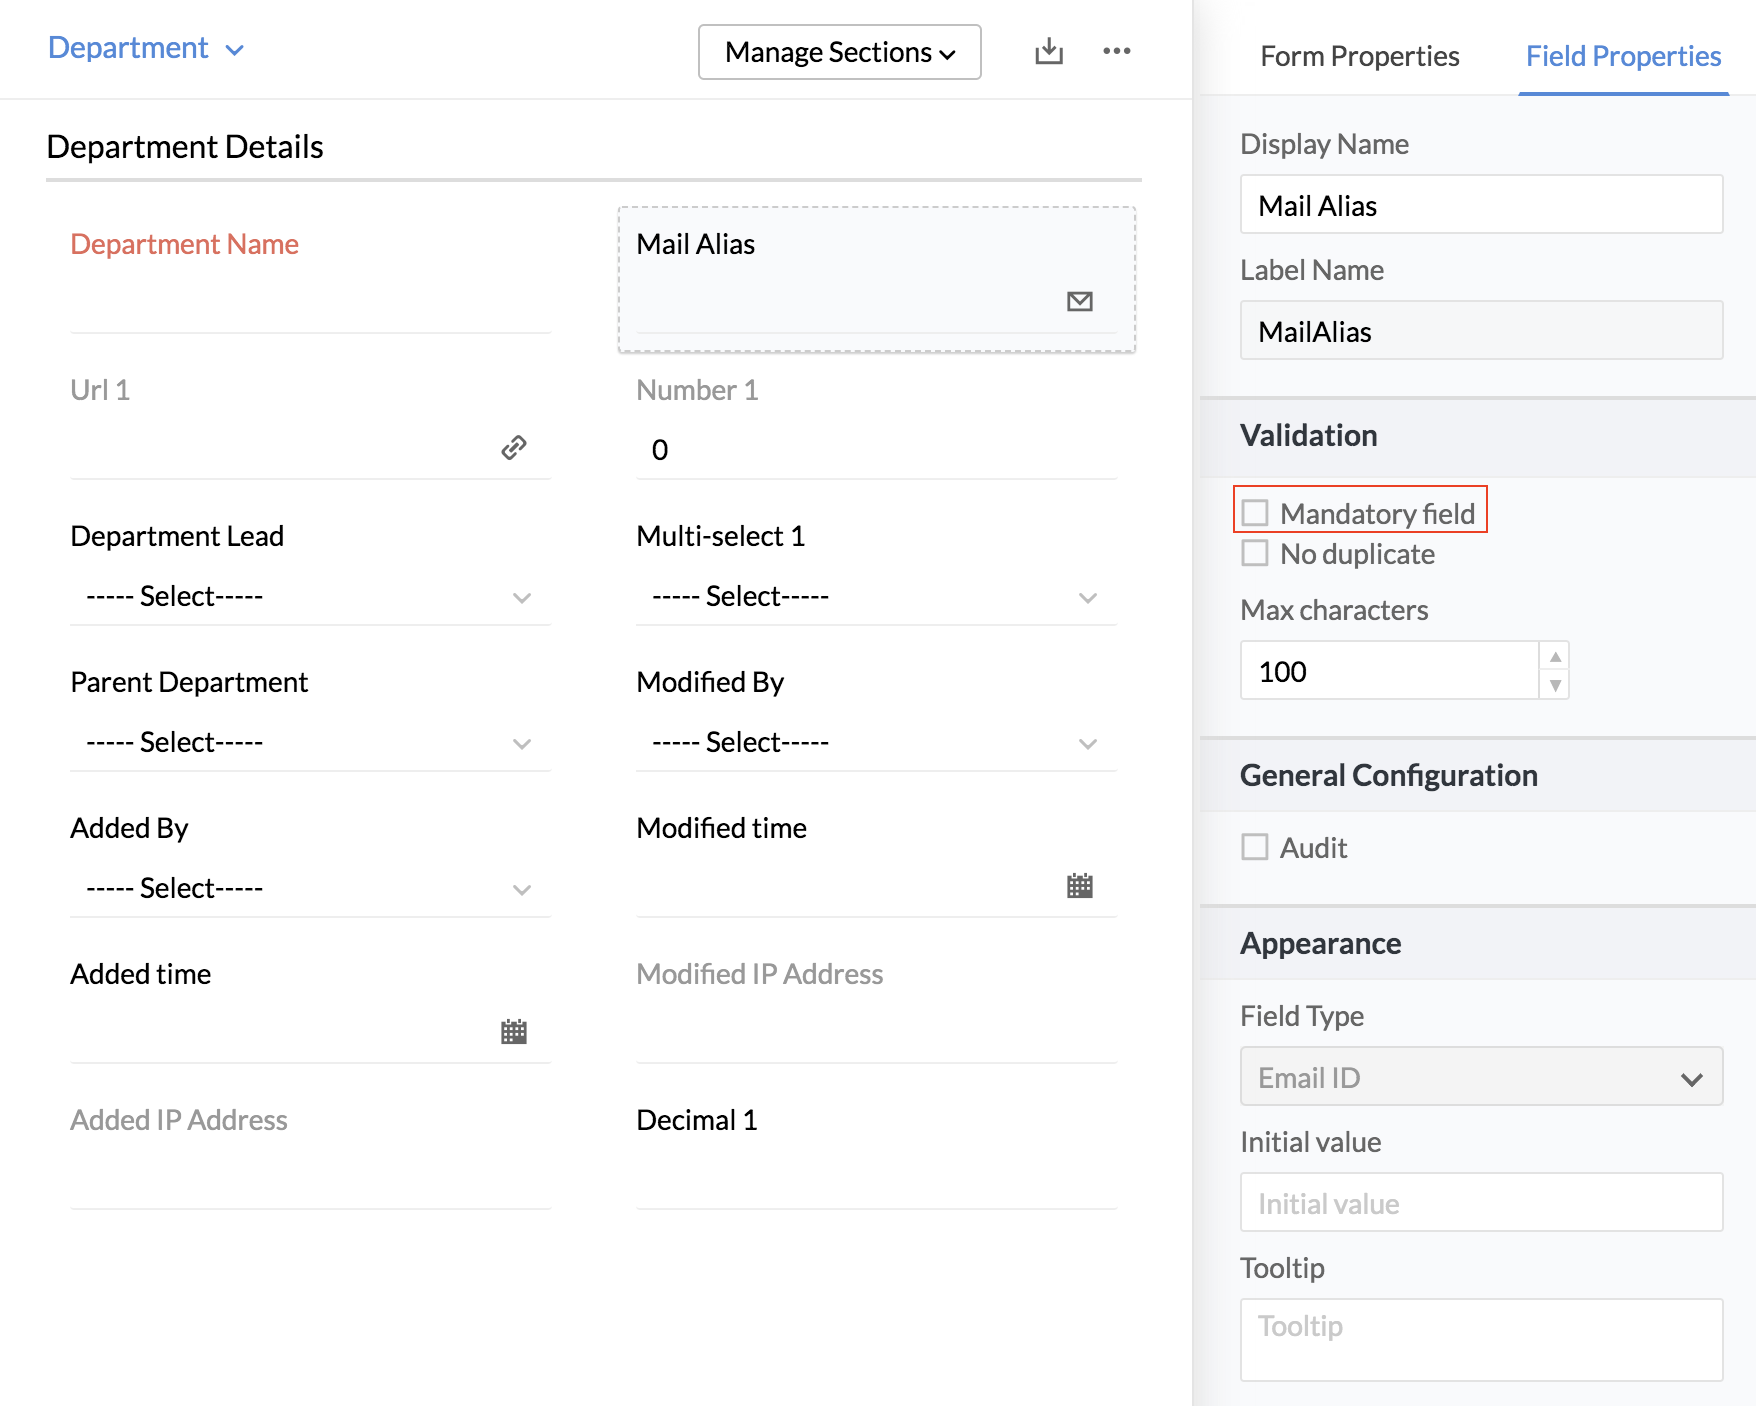
- Under Field properties, go to Validation and check the box 'Mandatory Field'
By doing so, that particular field becomes a mandatory field.
You can make a field as mandatory field while creating a form by following the same steps.
Making a Field Unique
Once you have added a field, you can enable the option 'No duplicate' for the field if you would like to retain the field as the unique field. Let us take an example. Let us consider that, you would like to restrict the number of travel requests logged for a particular event to 1 for an organization. In this case, you can create a field called 'Event name' and define this field as the unique field as a result of which, there can be only one travel request raised for this event in the organization.
To make a field as unique id,
- From your home page, go to Settings (Gear icon) > Customization > Forms
- Go to the respective form
- Select the field that should be made unique and under 'Field Properties', check the 'No Duplicate' option
The selected field becomes the unique field.
Enabling Encryption for Fields
Certain information of employees like SSN, UAN, Aadhar number, bank account number etc are of sensitive terms, which need to stay private. You can encrypt fields containing such sensitive data and keep them secure. Encryption ensures that the secured data is unreadable in case of an data hack.
For example, if you consider the bank account number of your employees to be sensitive, you can secure it. You can encrypt the particular field containing the bank account number in the respective form. Similarly, you can encrypt fields in cases of Aadhar number, SSN number, salary data etc.
To encrypt fields in a form,
- From your home page, go to Settings (gear icon) > Customization > Forms
- Select the respective form, in this case, the Employee form
- Click on the field that you would like to encrypt, in this case, the Bank account number
Note:
- Encryption is available only for custom fields. system fields cannot be encrypted.
- Encryption can only be enabled for single line, multi-line, date fields and number fields
- Click on Field Properties (right top corner)
- Under General Configuration, enable Encryption
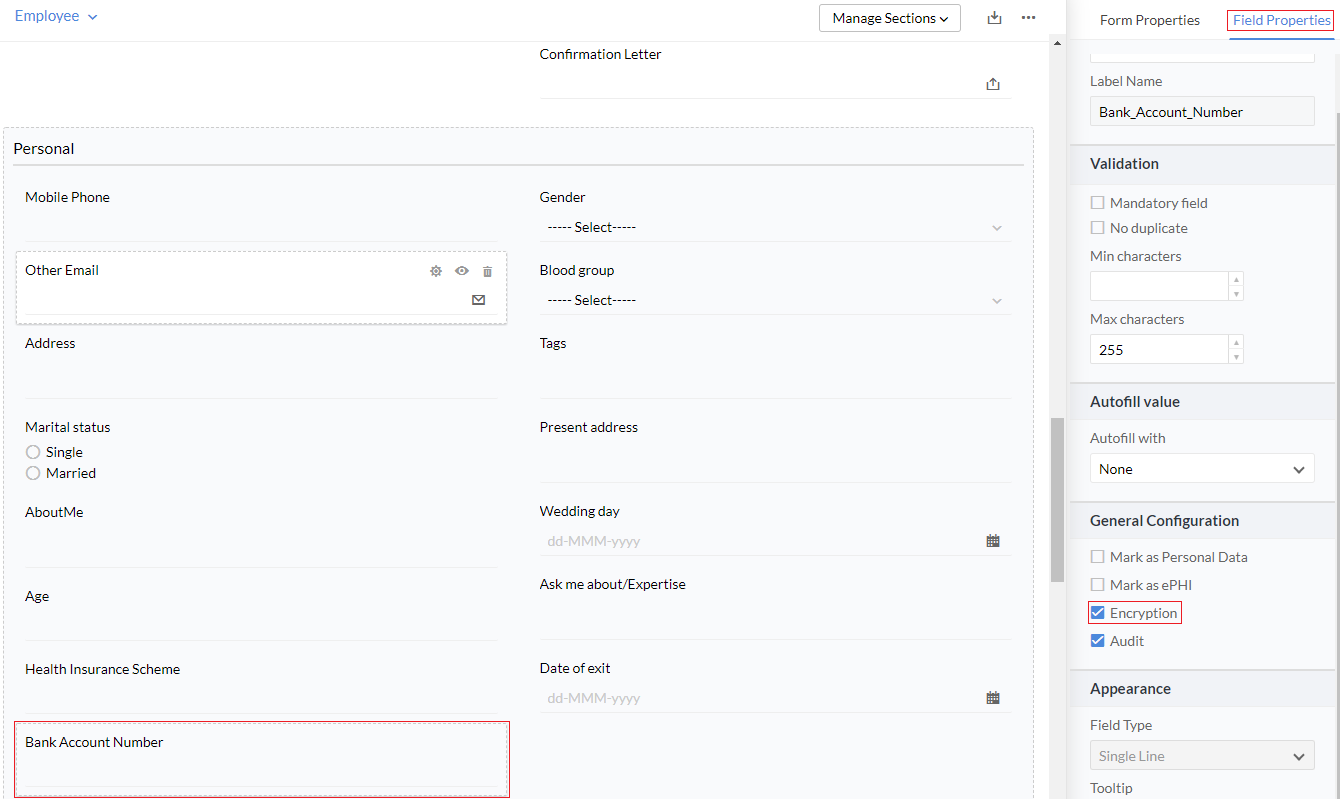
Now the field will remain encrypted in all records and workflows.
Note:
- You can encrypt a maximum of 5 fields for linear sections in a form.
- In case of Tabular sections, you can encrypt 5 fields per tabular section.
- The Employee Form can have a maximum of 10 fields to be encrypted.
- In 'List View' search, the operations allowed are 'Equal', 'Not Equal', 'Empty' and 'Not Empty'.
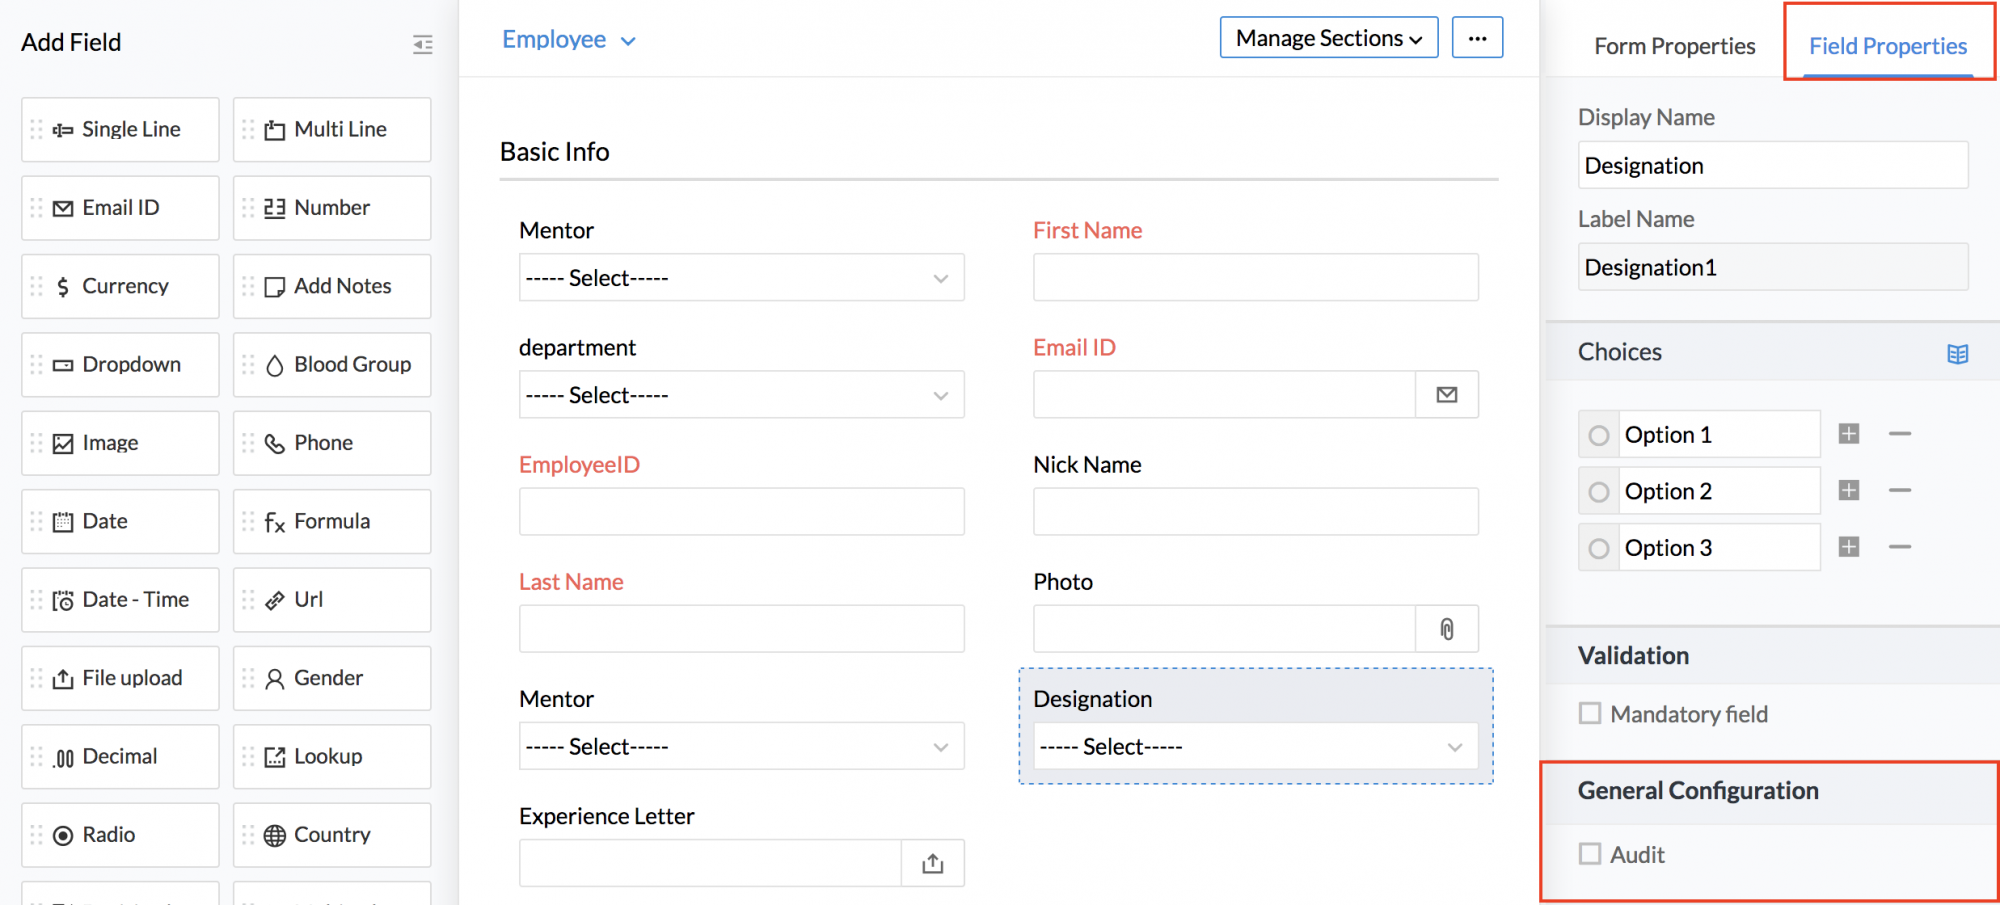
Audit History of a Field
Enable audit helps you see the history of the field. When there are changes made to the particular field, it can be easily tracked using this option.
Consider this use case. Let's suppose you would like to view your employees' designation changes over a period of time. You can easily access such information using audit history.
To enable audit history:
- From your home page, go to Settings(gear icon) > Customization > Forms
- Go to the respective form's field for which you would like to enable Audit History, in this case, the Employee Form
- Click on the respective field for which you would like to enable Audit History, here the Designation field
- Under Field Properties > General Configuration, enable Audit
To view audit history:
You can view the audit history of the fields in any record of the respective form.
- From your homepage, click on Organization > Employee
- Click on any employee record
- Click on the clock icon
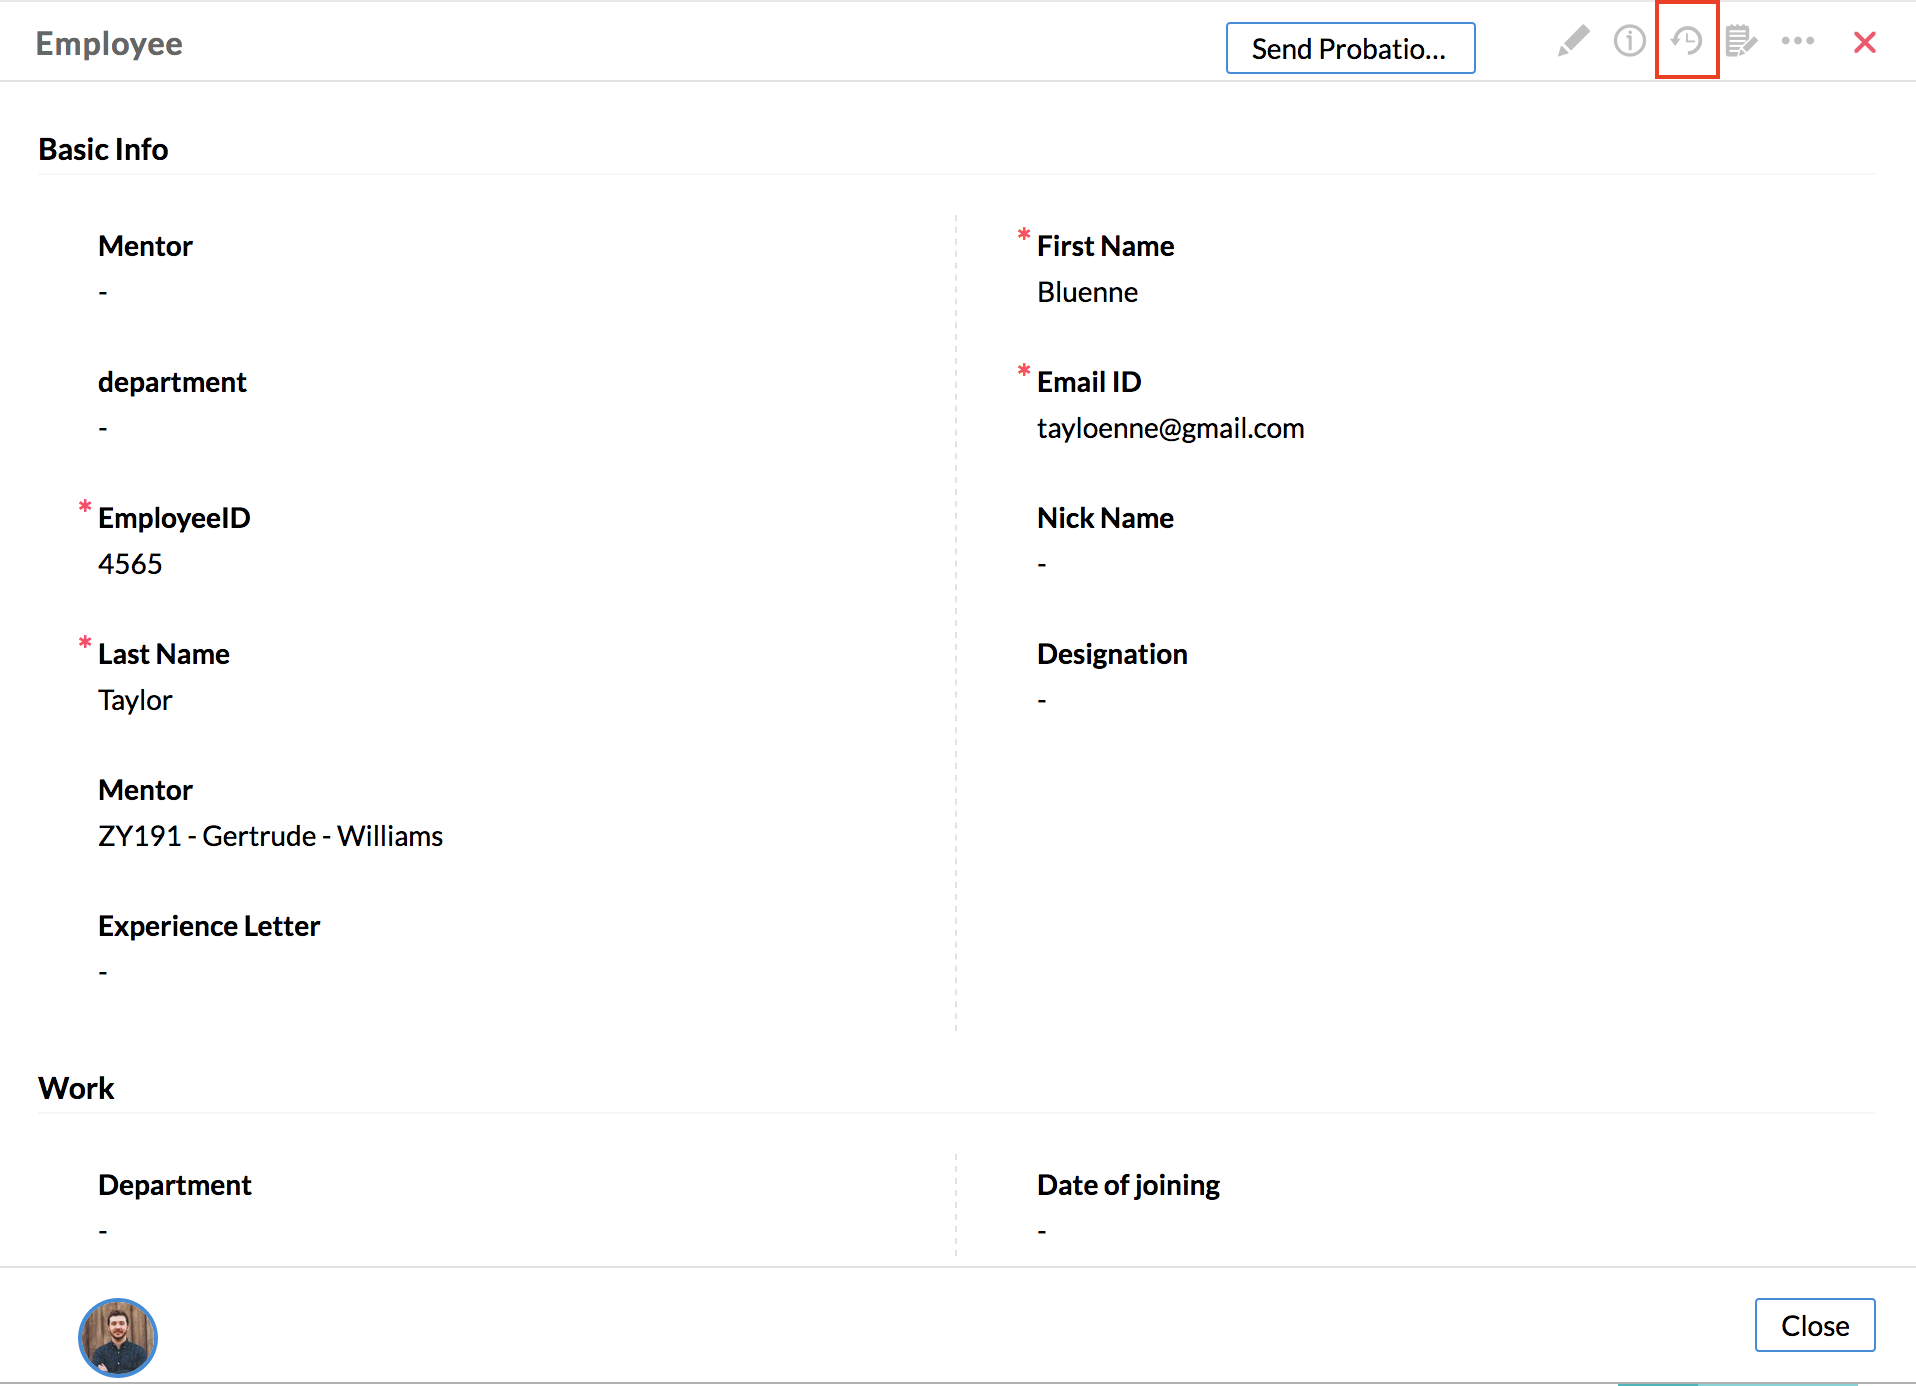
You can view the changes made to all audit history enabled fields in the form. Now to view the audit history of specific fields,
- Select the specific field from the drop down
- You can now view the audit history of the selected field(s)
Yes. It is possible to export history of audit enabled fields in records.
From your home page, go to the respective List View. For eg, if you have enabled audit history for a field in the employee form, then go to Employee List View from your Home page > Organization > Employee
Click on ellipsis icon in the list view
Click History Export
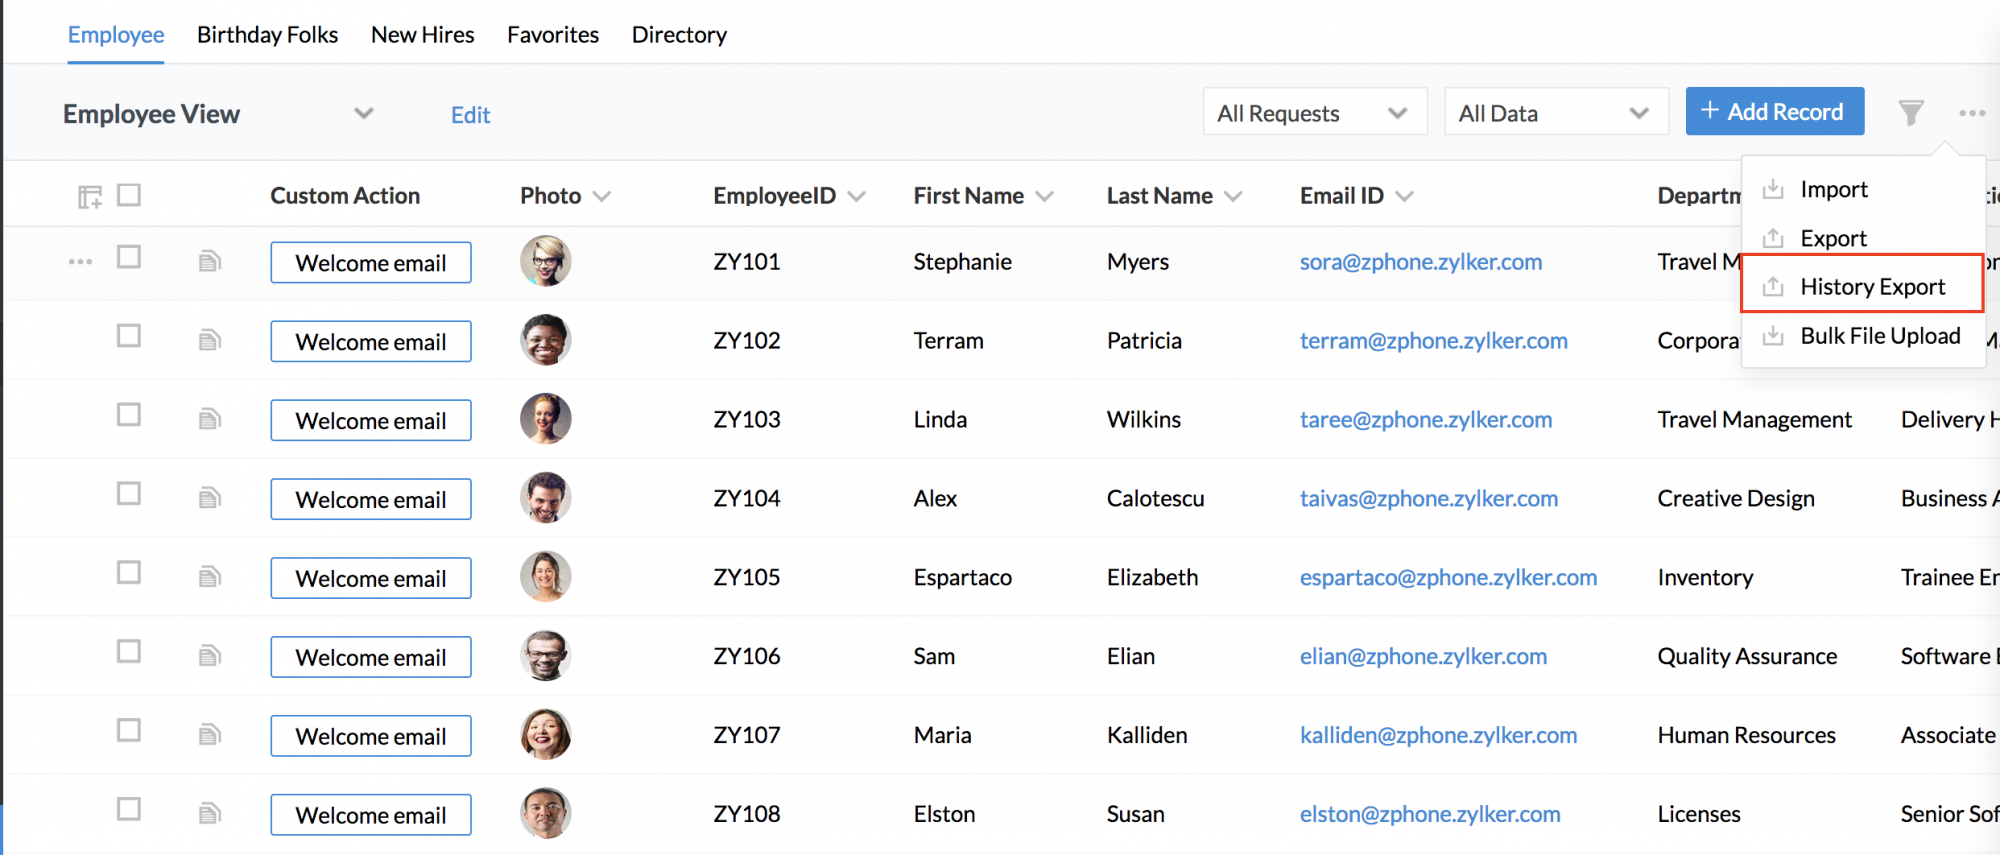
- Select your desired file format and a time frame as necessary
You have now exported the history of all changes made to the audited fields.
Note: The field export depends on the view that you have chosen while exporting. History of only the fields present in the particular view would be exported.
![]() Tip: If you would like to export the audit history of specific records alone, you can create a particular view and export history of fields in that particular view alone.
Tip: If you would like to export the audit history of specific records alone, you can create a particular view and export history of fields in that particular view alone.
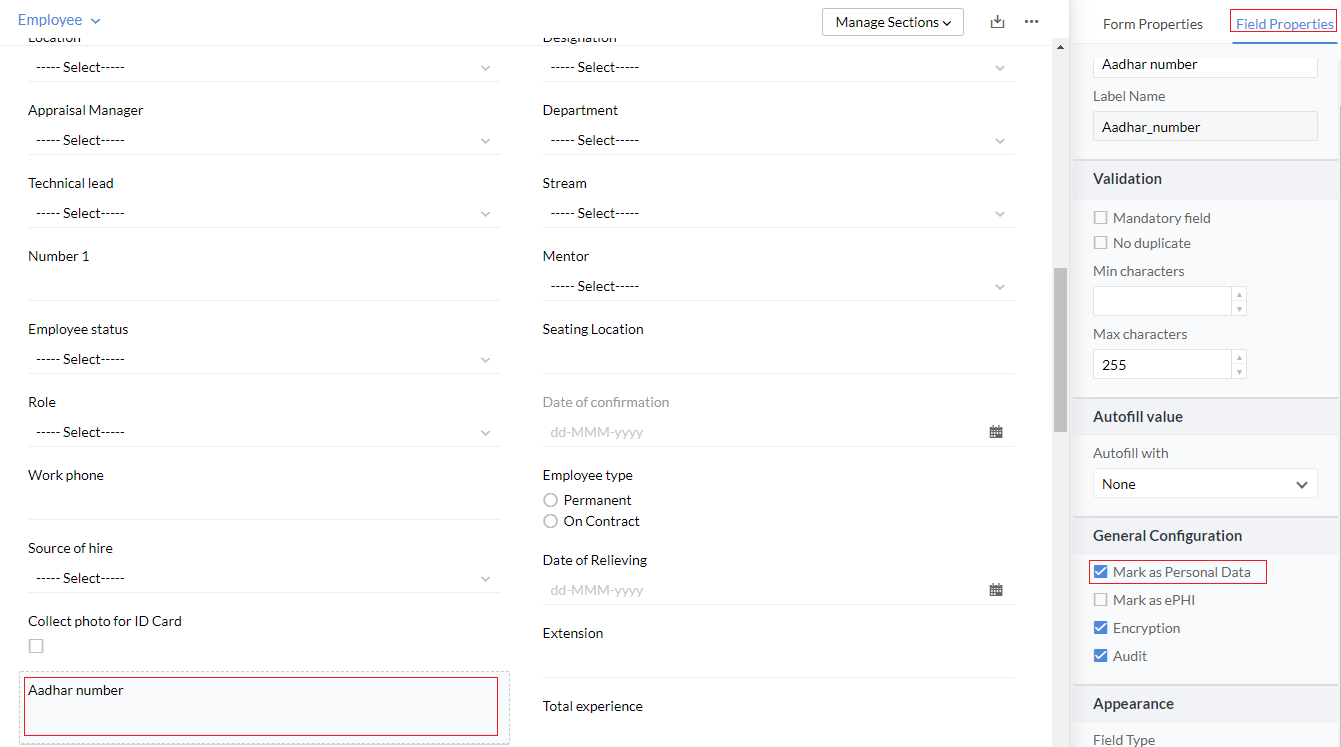
Marking a field as Personal Data
Fields that hold personal and sensitive data can be marked and identified as Personal Data. This ensures that the data is encrypted and there by secure. Encryption ensures that personal data will be rendered unreadable in case of a data hack. SSN, UAN, Aadhaar number, PAN, bank account number are some of the examples of fields that can be marked as personal data.
This is one of the feature that ensures Zoho People is GDPR compliant.
Note 1: Only Single Line, Multi Line, Number fields can be marked as personal data
Note 2: A field can be either marked as Personal Data or as ePHI data
Note 3: Encryption and audit will be auto-enabled when a field is marked as personal data
Note 3: System fields cannot be marked as personal data
To mark a field as personal data:
- Go to Settings > Forms and open any existing form.
- Select a field that you would like to identify as personal data.
- Head over to the Field Properties tab. Enable Mark as Personal Data.
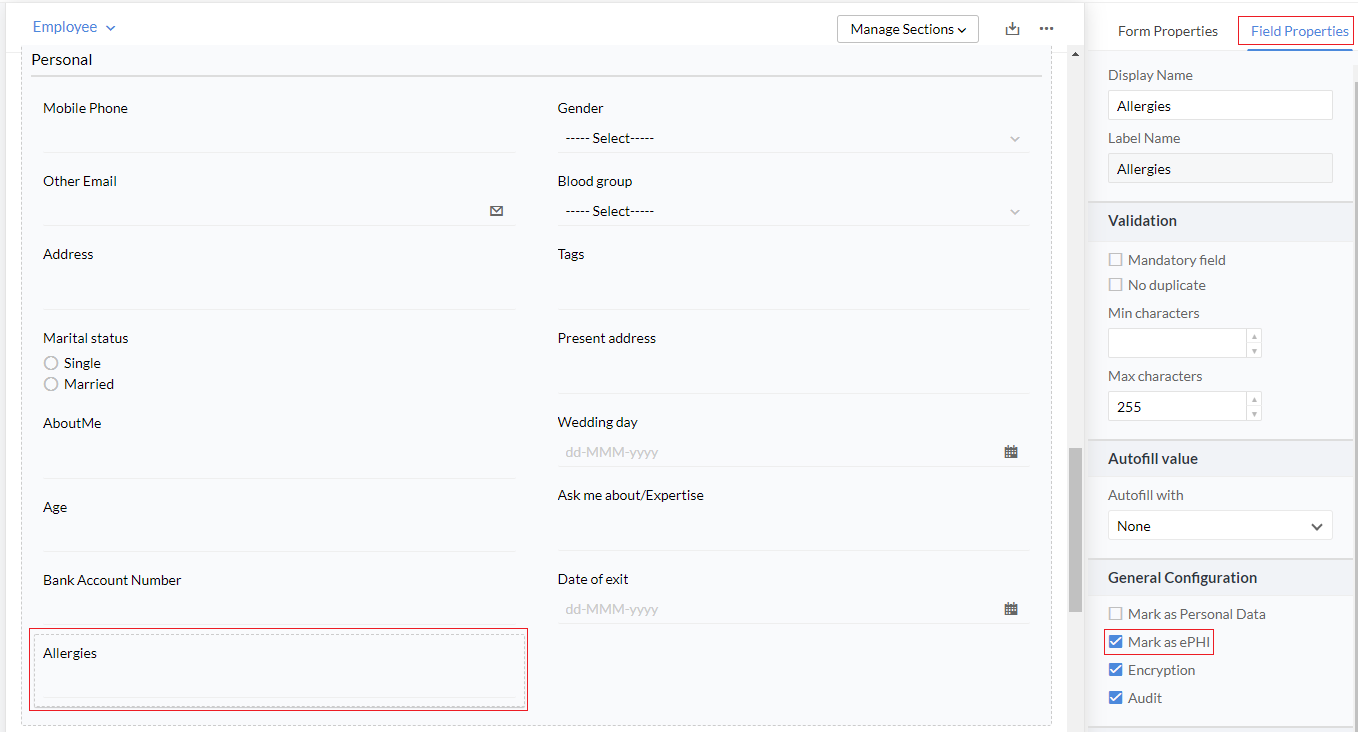
Marking a field as ePHI data
Fields that contain personal medical related data can be marked and identified as ePHI data. When a field is marked as ePHI data it ensures that the data is encrypted and there by secure. Encryption ensures that ePHI data will be rendered unreadable in case of a data hack. Blood group, allergies, drug allergies, disabilities are some of the examples of fields that can be marked as ePHI data.
This is one of the feature that ensures Zoho People is compliant with HIPAA standards..
Note 1: Only Single Line, Multi Line, Number fields can be marked as ePHI data
Note 2: A field can be either marked as ePHI data or as personal data
Note 3: Encryption and audit will be auto-enabled when a field is marked as\ ePHI data
Note 3: System fields cannot be marked as ePHI data
To mark a field as personal data:
- Go to Settings > Forms and open any existing form.
- Select a field that you would like to identify as personal data.
- Head over to the Field Properties tab. Enable Mark as ePHI data.
Disabling/Deleting Form Fields
While you have the option to delete custom forms (the ones that you have created), you will not be able to delete system forms. You can disable them if you do not want to use them. Under Customization > Forms, you will see all the forms listed. You can enable or disable the forms using the icon next to the form name.
Imposing Restrictions on values entered - Custom Validation
You can create a validation for one or more fields of a form, set rules and have a script written for the conditions to be satisfied.
This helps in scenarios where you would like to have control over the values entered by employees.
Scenario 1 - For example, in a travel form, you can allow the Admin/HR alone to raise a request on an employee's behalf and also restrict the members of that designation from claiming more than a fixed amount. This means that an employee cannot raise the request and, any amount more than what is set, cannot be entered by Admin/HR.
As the first step, you need to set the maximum claim amount against each designation in the Designation form.
Note: Your Designation form should have a number field named 'Allowed Amount' to enter the allowed claim amount for each designation
Follow the steps given below to fix amount for each designation.
- From your home page, go to Self-Service > Organization > Designation > Add Record
- Enter the allowed amount against each Designation
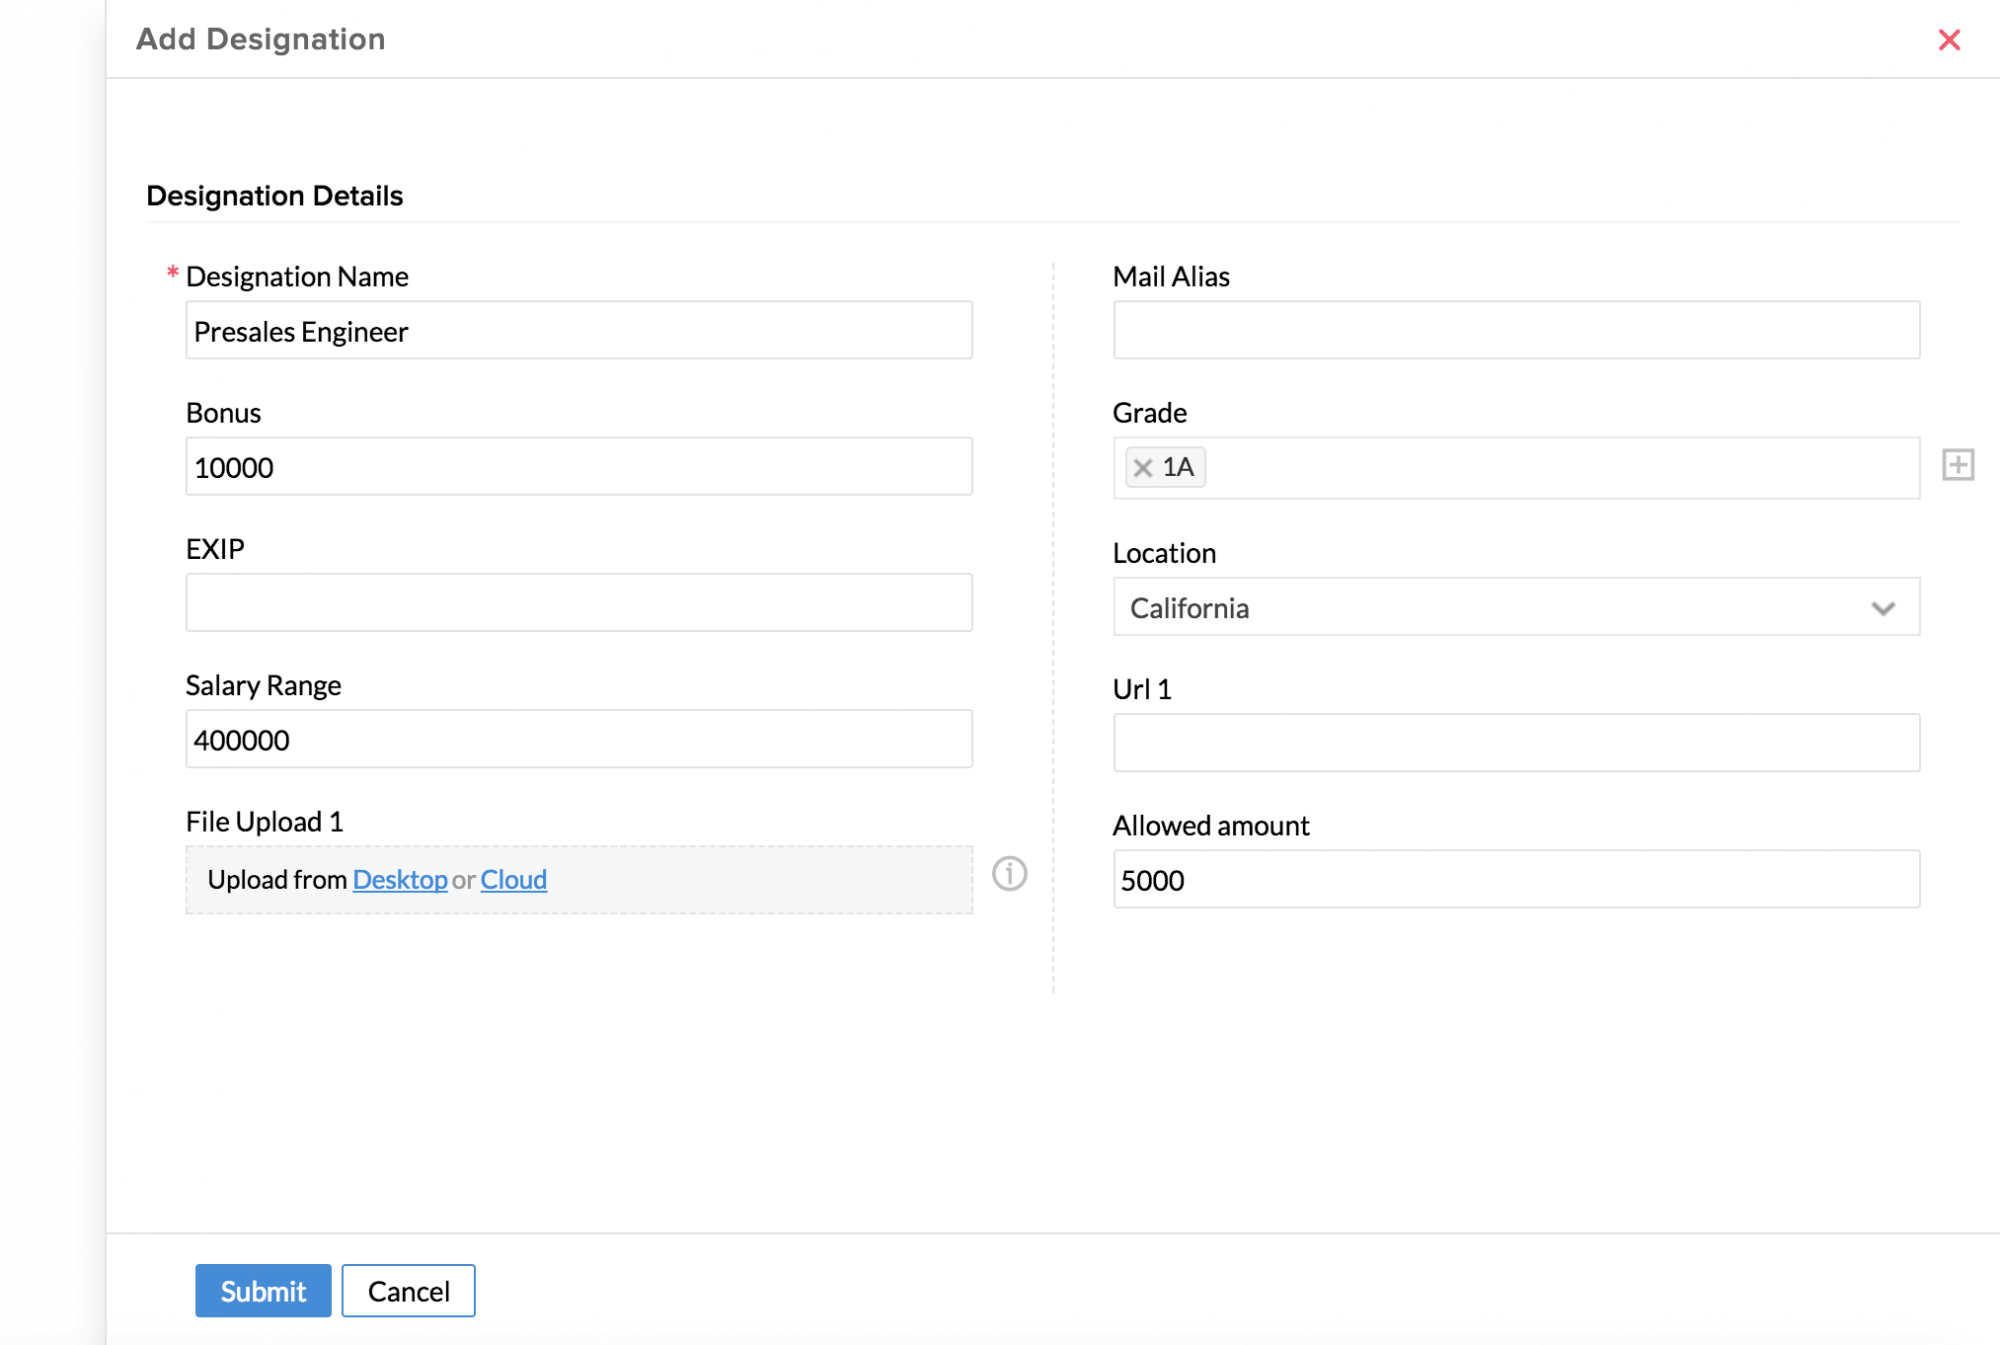
- Click Submit
Once this is done, you can do a validation for the Travel Expense form. Follow the steps given below to do this.
- From your home page, go to Settings > Customization > Forms
- Go to the Travel Form
- Check the 'Custom Validation' box under Form Properties
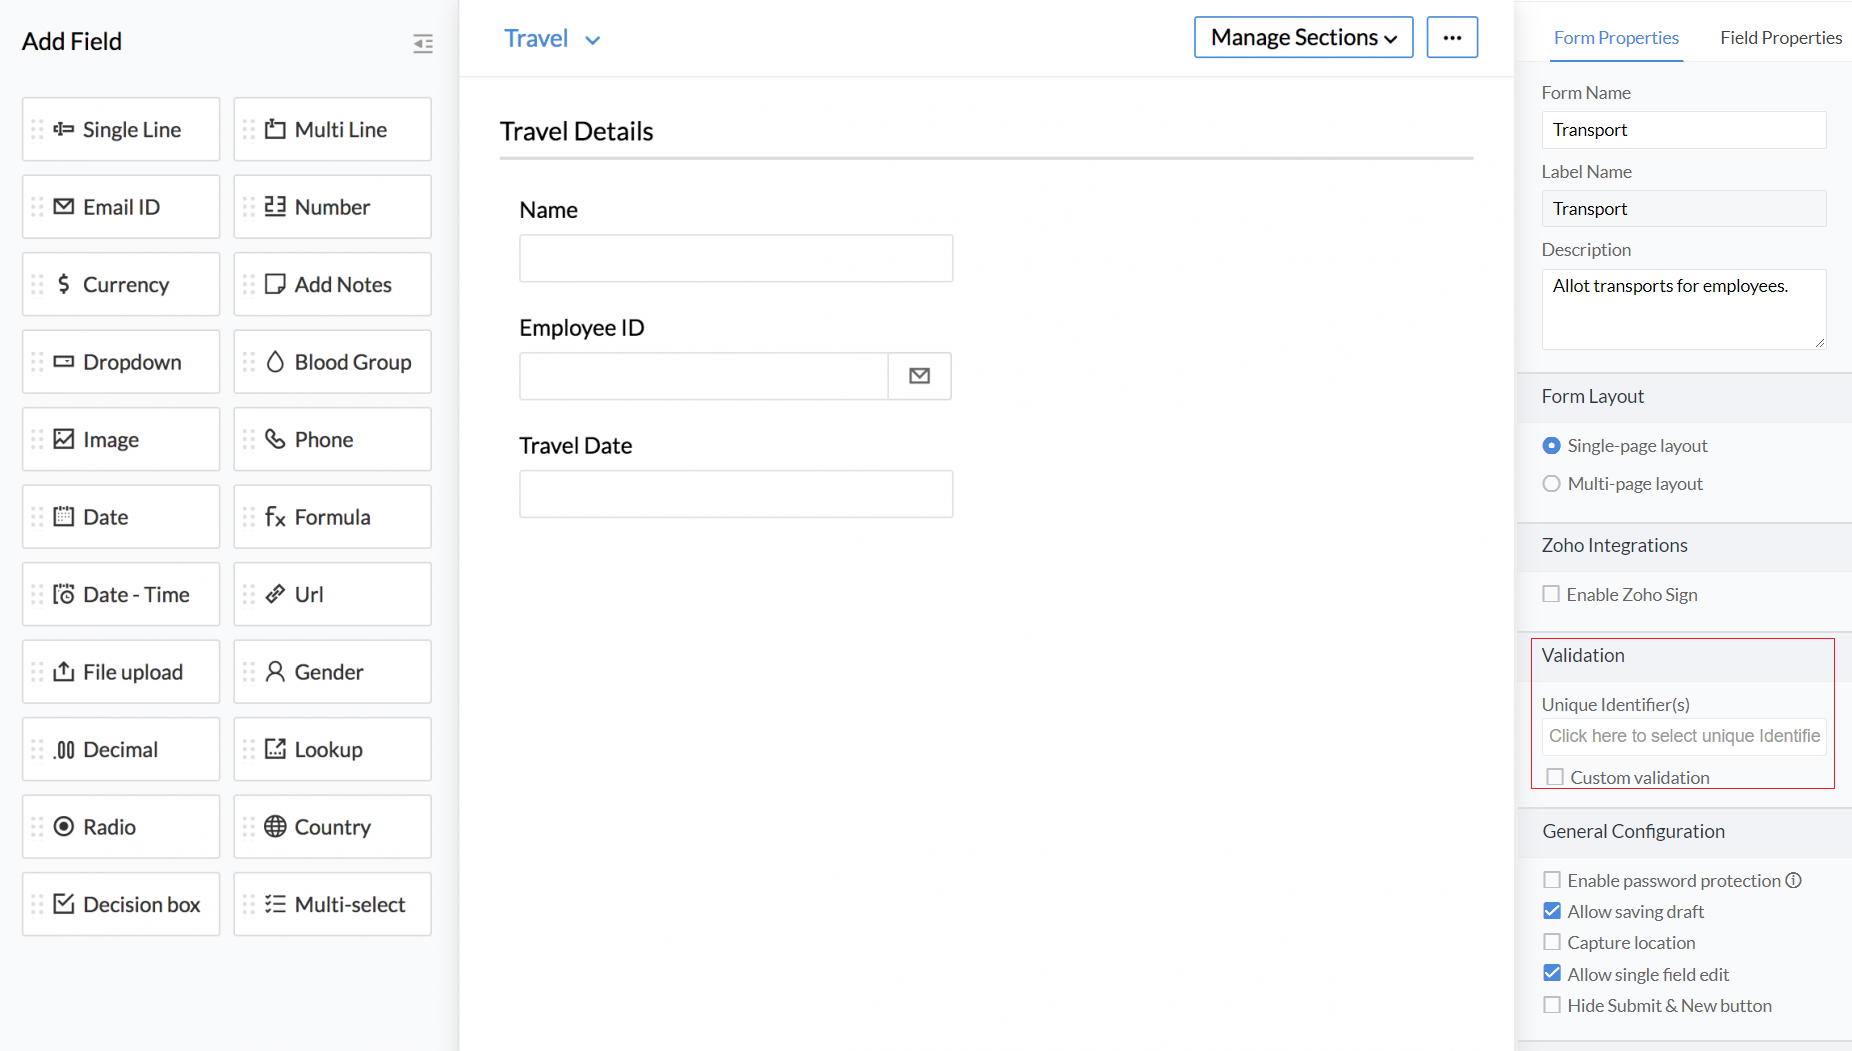
- Enter the function name and enter the script given below in the box provided
Result = Collection();
additionalDetails = recordDetails.get("additionalDetails");
roleid = additionalDetails.get("roleid");
if(roleid == "430765000000035631")
{
formDetails = Map();
formDetails = recordDetails;
DesignationId = formDetails.get("Designation.ID");
travelamount = formDetails.get("Travel_Amount");
DesignationformDetails = Map();
DesignationformDetails = zoho.people.getRecordByID("designation",DesignationId);
DesignationName = DesignationformDetails.get("Designation");
Allowed_Amount = DesignationformDetails.get("Allowed_Amount");
if(!DesignationName.equalsIgnoreCase("") && travelamount.toLong() > Allowed_Amount.toLong())
{
Result.insert("Travel_Amount":DesignationName + " travel amount should not be higher than " + Allowed_Amount + roleid);
}
}
else
{
Result.insert("EmployeeID":"Only HR is allowed to add record in this form");
}
error = Collection();
error.insert("errors":Result);
return error;
Additional Points to note:
System Parameters in script
Recorddetail field is provided which will contain all the details of the record.
The following details (of the person performing this action) are given under additional details:
- empid - employee record id details of the employee
- depid - department details of the employee
- locationid - location details of the employee
- desid - designation details of the employee
- roleid - role details of the employee
- IsAdd - output is true if the record is being added; output is false if record is being edited.
Error Messages
Step 1: Result.insert("EmployeeID":"Only HR is allowed to add record in this form");
Mention all the errors under the corresponding field name
Step 2 :error = Collection();
Create the new collection
error.insert("errors":Result);
Insert the error collection created in step 2
Step 3: return error;
We have returned the collection here
Note: During the process of custom validation no interim changes are to be made to any record.
![]() Tip: Label names can be obtained from Settings > Integration > Zoho People API > API reference
Tip: Label names can be obtained from Settings > Integration > Zoho People API > API reference
Scenario 2: Let us assume another scenario where a travel claim must be made within 10 days from the date of arrival.
To do this
- From your home page, go to Settings > Customization > Forms
- Go to the Travel Expense form
- Check the 'Custom Validation' under 'Form Properties'
- Enter the function name and paste the script given below
Script:
total_errors = Collection();
Date_of_Claim = recordDetails.get("Date_of_Claim");
Travel_End_Date = recordDetails.get("Travel_End_Date");
if(Date_of_Claim.toDate() > Travel_End_Date.toDate().addDay(10))
{
total_errors.insert("Global":"Claim has to be made within 10 days from Date of
Arrival");
}
message_errors = Collection();
message_errors.insert("errors":total_errors);
return message_errors;
- Click Save
The output format will be a collection and it should in the format of Key value pair as label name, error message.
![]() Tip : Label names can be obtained from Settings > Integration > Zoho People API > API reference
Tip : Label names can be obtained from Settings > Integration > Zoho People API > API reference
Creating Sections in a Form
Yes. You can add more than one section in a form depending on the length of your form.
- From your home page, go to Settings (gear icon) > Customization > Forms for which you need to add more sections
- Under Manage Sections, select Linear if you want a Linear section and select Tabular if you would like to select a Tabular section
- For Linear section, give section name and Description (if needed) and click Done
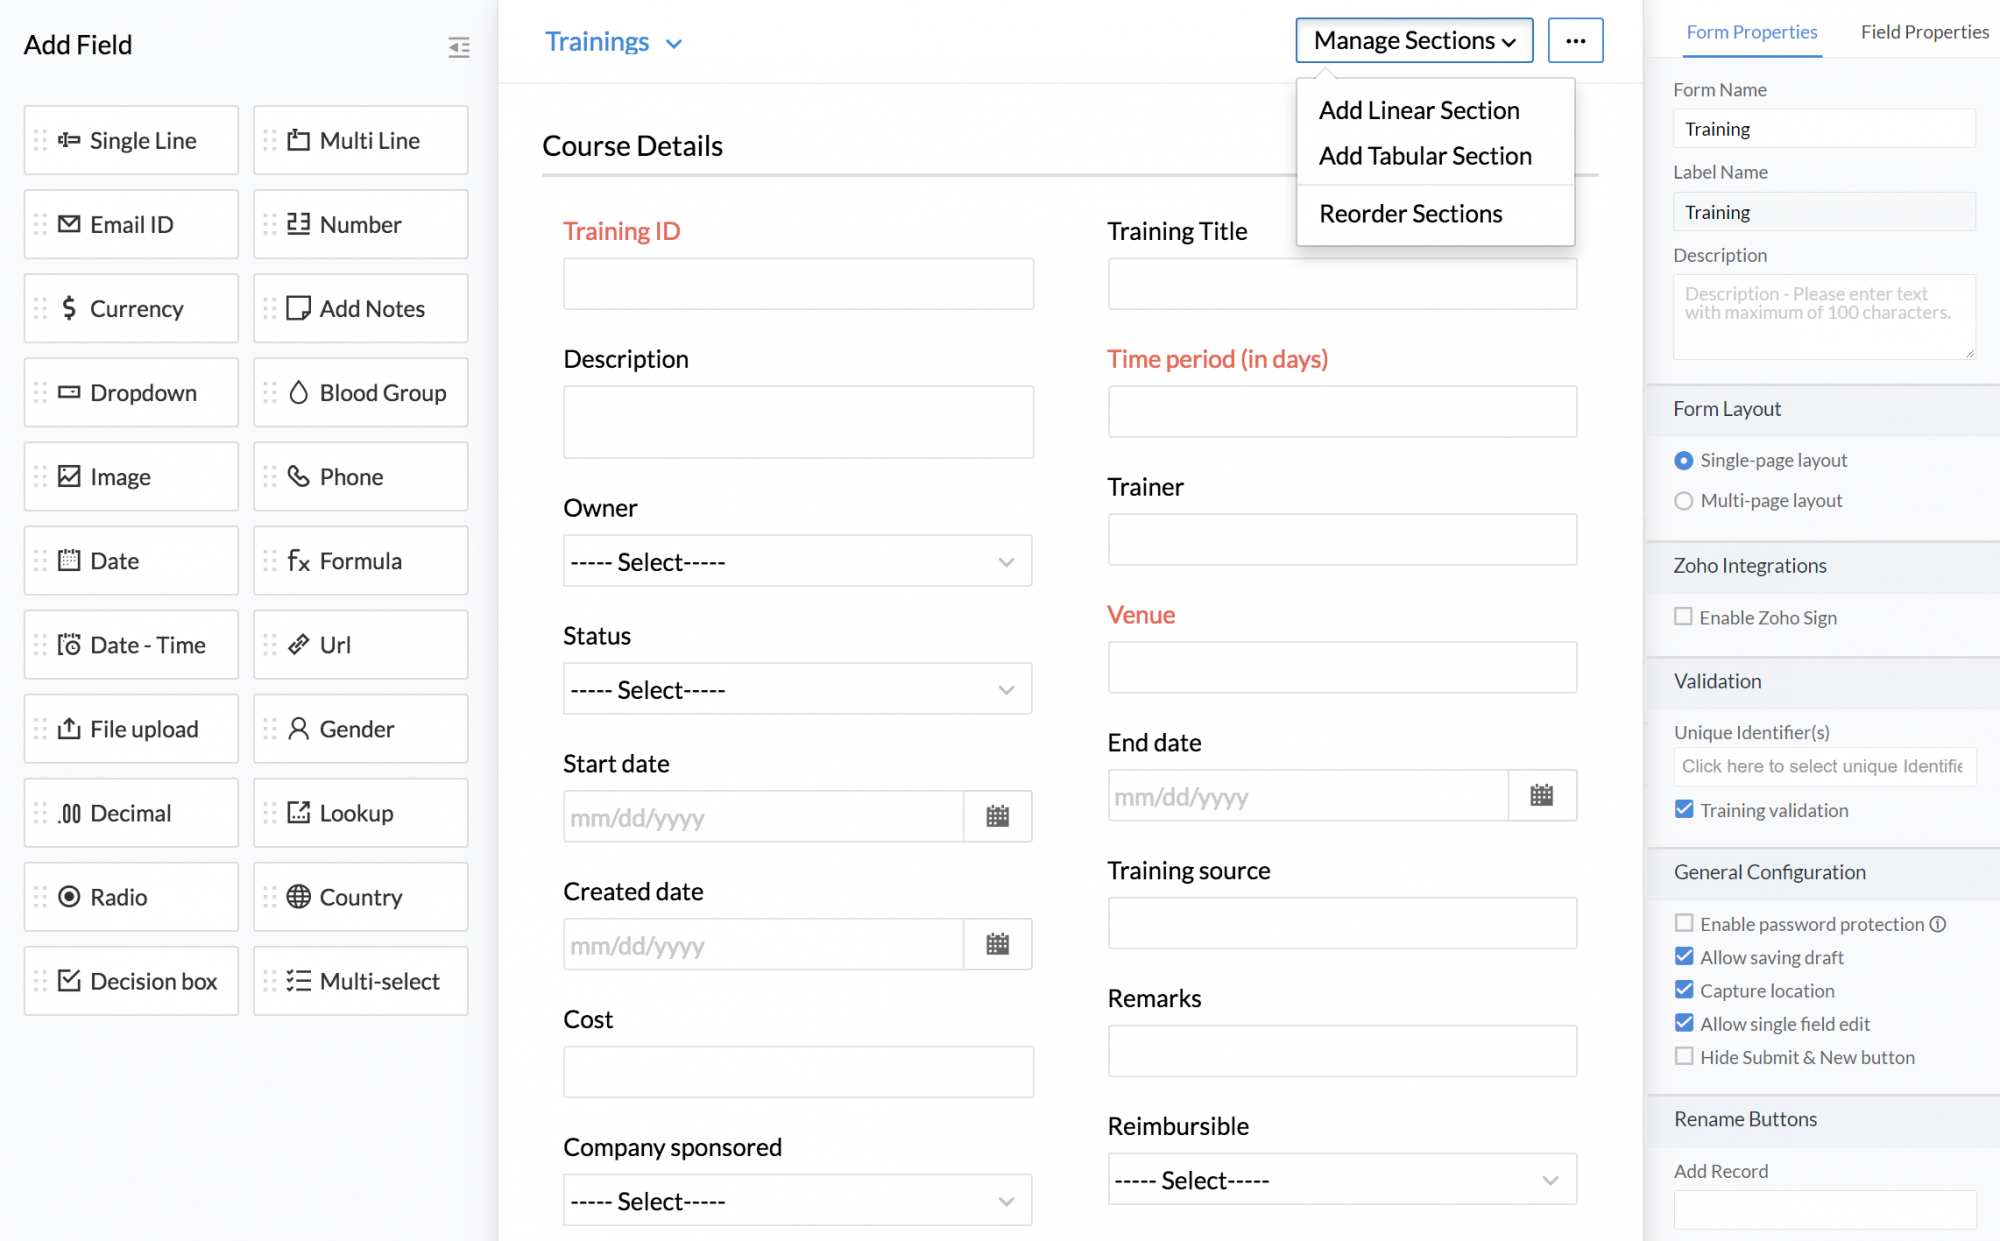
- For Tabular section, give the section name, select Grid or Inline, give a description if needed and click Done.
However, there is a limitation on the number of fields that can be added to a Tabular section. You can add only up to 5 file upload or image fields and a total of 25 fields in the tabular section.
Once you have added a grid tabular section, hover the mouse over the tabular section. You will see a plus icon, clicking which you can add fields in the tabular section. When you click on the plus icon, you will see a drop-down from which you can select the fields. Fields other than the ones listed in this drop down cannot be added in a tabular section.
The fields that can be added in a Tabular section are listed below.
Text Fields:
- Single Line
- Multi Line
- Email ID
- Phone
- URL
Number Fields:
- Number
- Decimal
- Currency
Choices:
- Dropdown
Other Fields:
- Date
- Date-TIme
- Lookup
- Formula
- Gender
- Blood Group
- Country
- File upload
- Image
Cloning a Form
Sometimes, in a new form, you may need to use many of the fields of an existing form. In this case, instead of creating all the fields again, you can clone an existing form.
- From your home page, go to Settings (Gear icon) > Customization > Add Form
- Enter the details and check the Clone Form option
You can select which form you would like to clone.
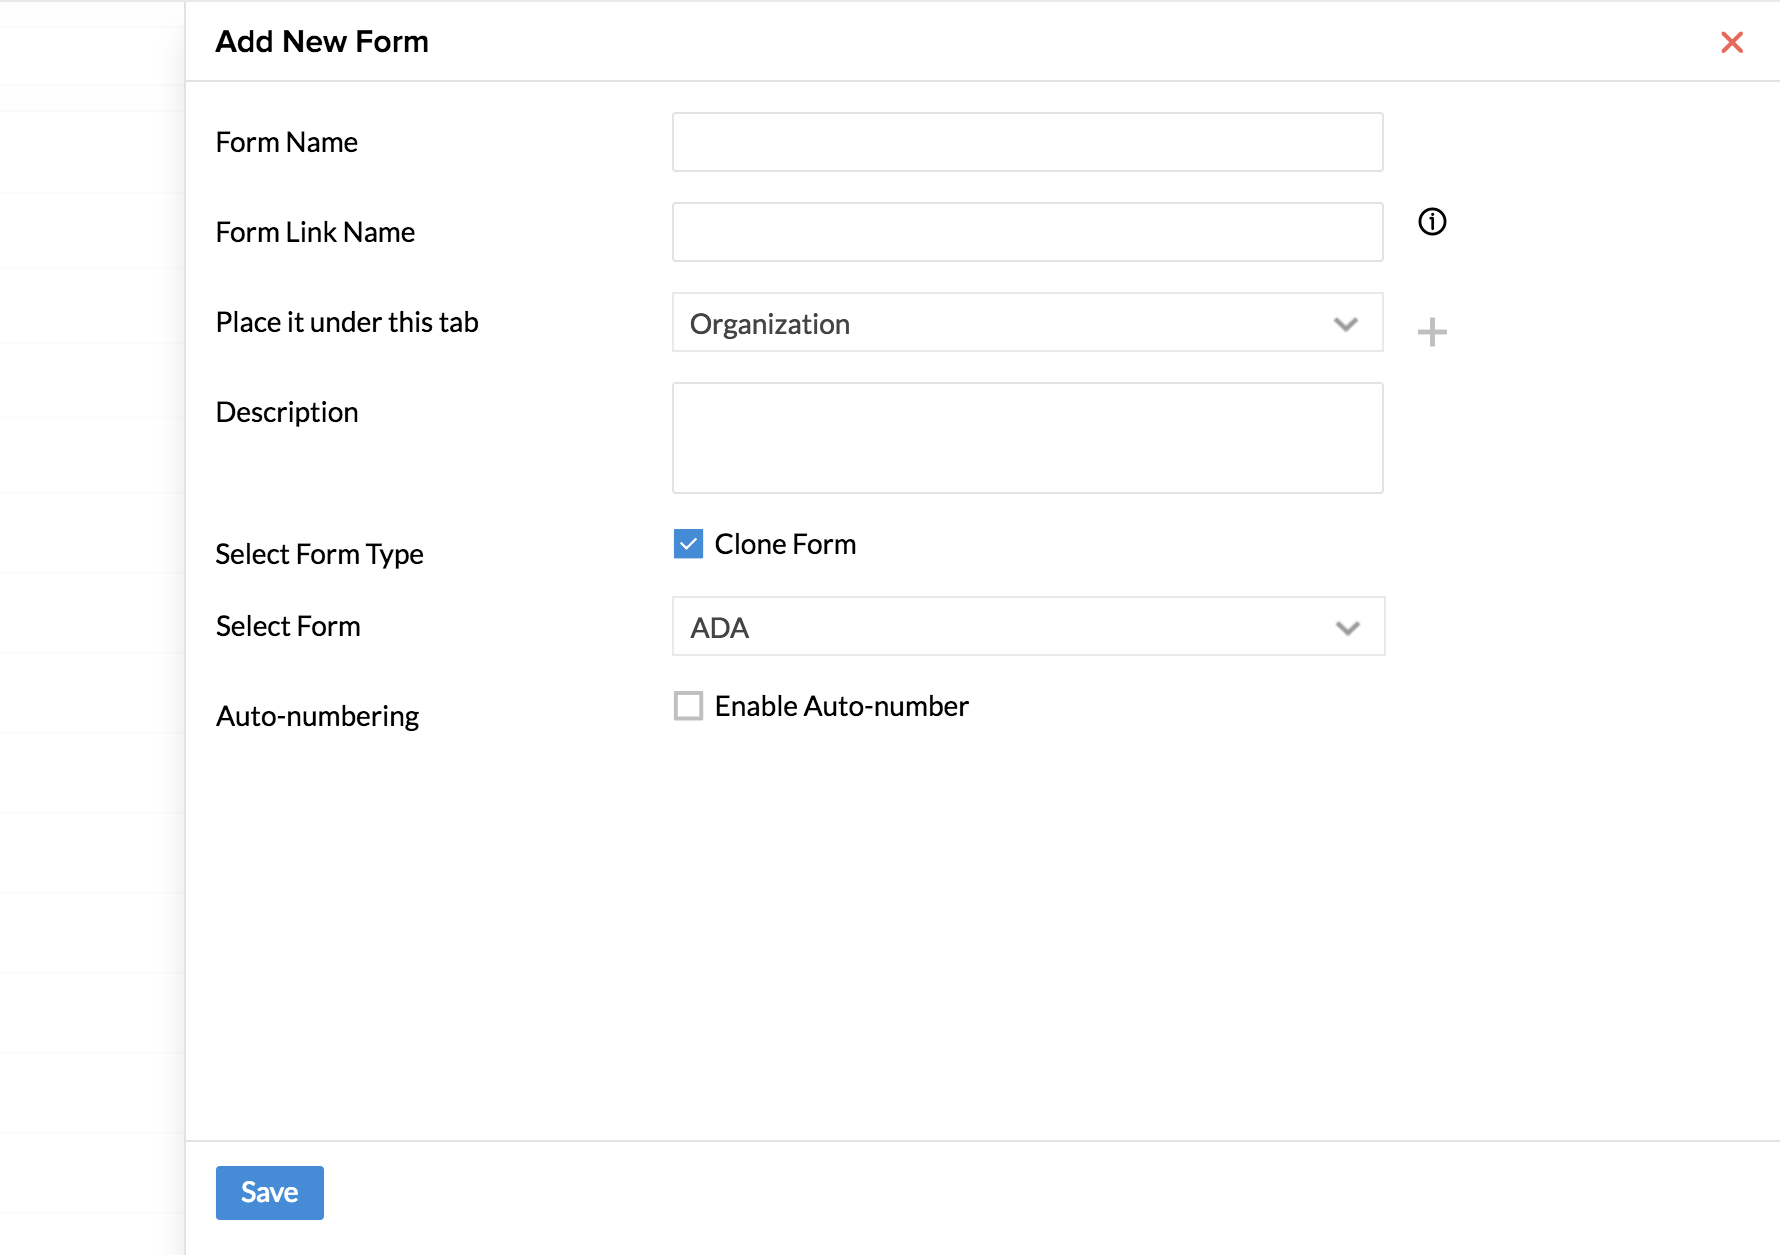
- Click Save
Auto Numbering in Forms
Auto Numbering of forms helps you to automatically assign a unique sequential number, whenever a new record is added in the form. Enabling the auto numbering for a form will create an auto number field and will populate a form number when a new record is added. This functionality can be used for forms like training, travel, reimbursement forms etc.
To auto number a form:
- From your home page, go to Settings (gear icon) > Customization > Forms >Add New form
- Enter details like Name of the form, Placed it under etc
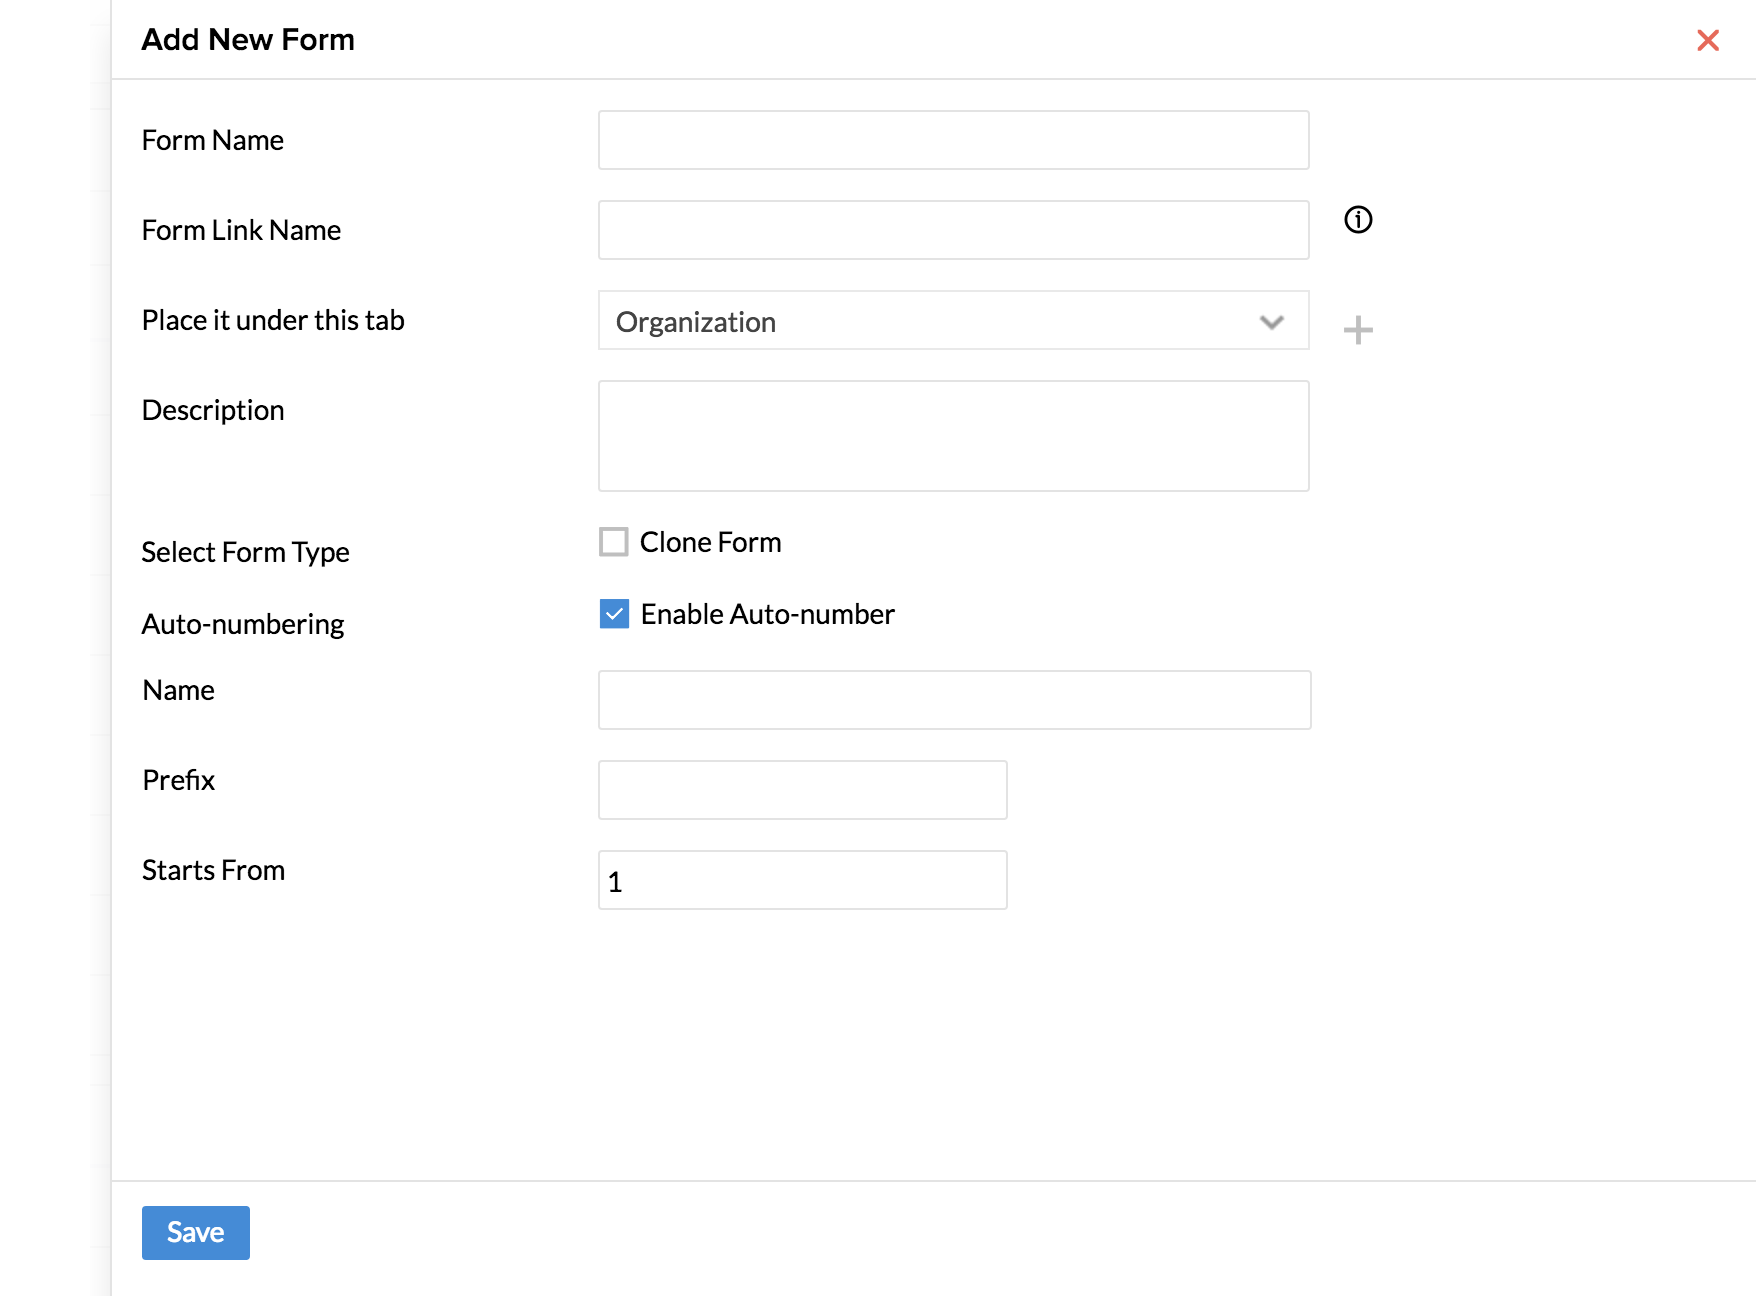
- Check the Enable auto-number under Auto-numbering
- Give a name, prefix and Starts from and click Save
Reset Auto Numbering in Forms
Assume you are adding a set of records in a form with auto number enabled. As you add records, they will be auto-numbered in a sequence. However, if you would like to edit the series with a different auto-numbering, then you can make use of the 'Reset' option.
This option, lets you give a different Name and prefix to ensure that the auto-numbering is carried out right for the ensuing records.
To enable the reset option:
- Go to Settings > Customization > Forms and go to the respective form.
- Under Auto-numbering click on Reset.
- Delete all previous records if any.
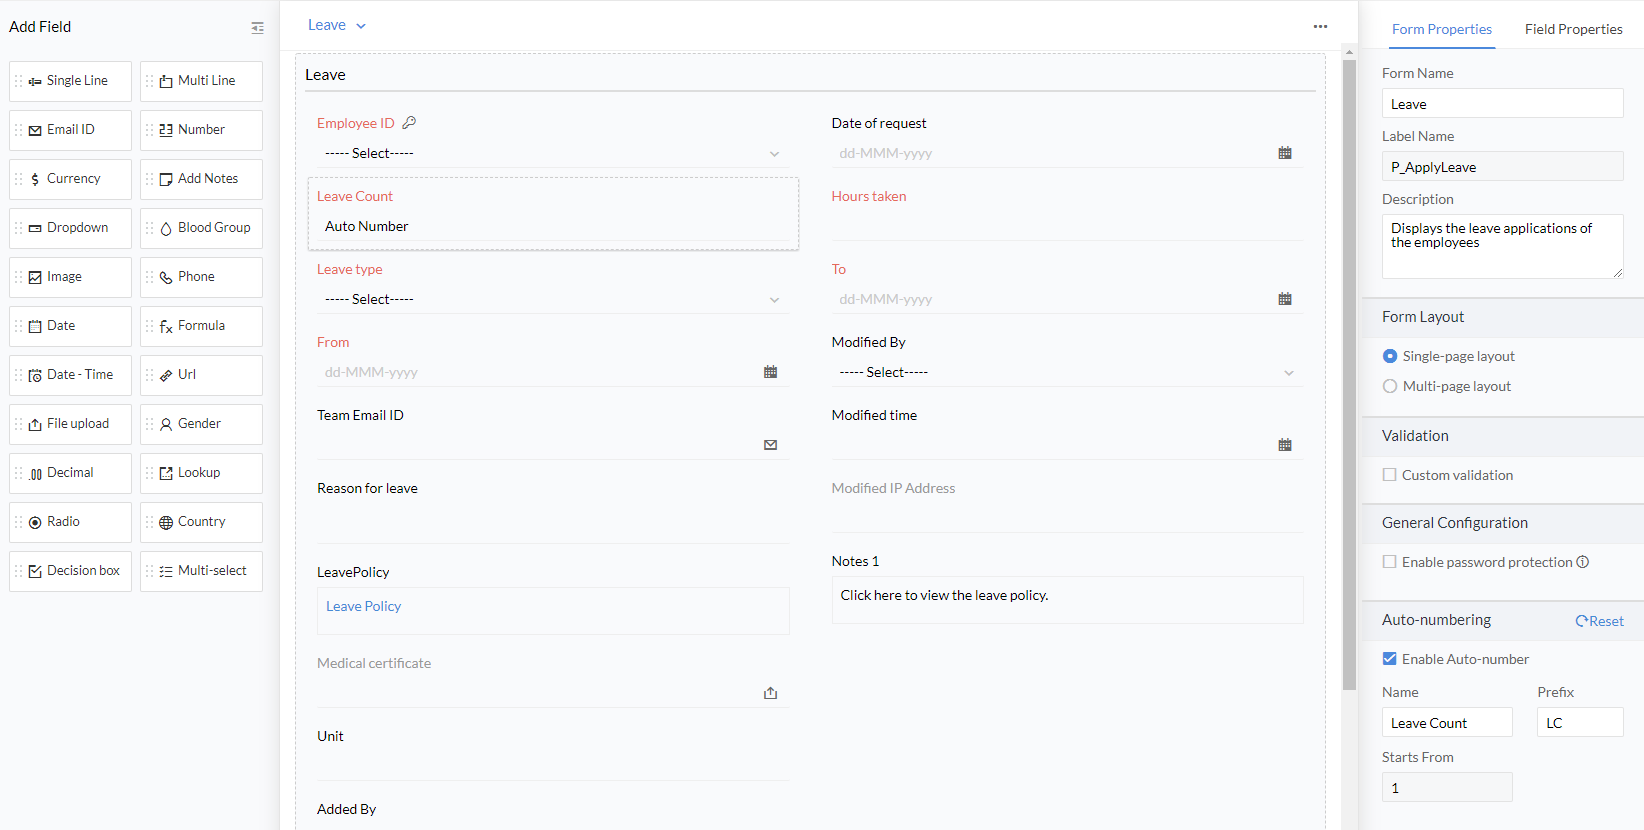
- Under Name and Prefix, enter the value that you need.
Note: Deleting all previous records of the form ensures that you start with a clean slate when you add the next set of records after the auto-numbering is reset.
Once this is done, when you go to the respective form and click on'Add Record', you will be able to see that the auto-numbering is done as per what you have edited during the reset
Capturing location in forms
The location of a user who is filling a form can be captured and stored using Capture Location.
The location of a user is considered sensitive and personal data. It's imperative that a user fully understands that their personal information is being accessed.
To enable Capture location:
- Navigate to Settings > Customization > Forms > Form Properties > General Configuration.
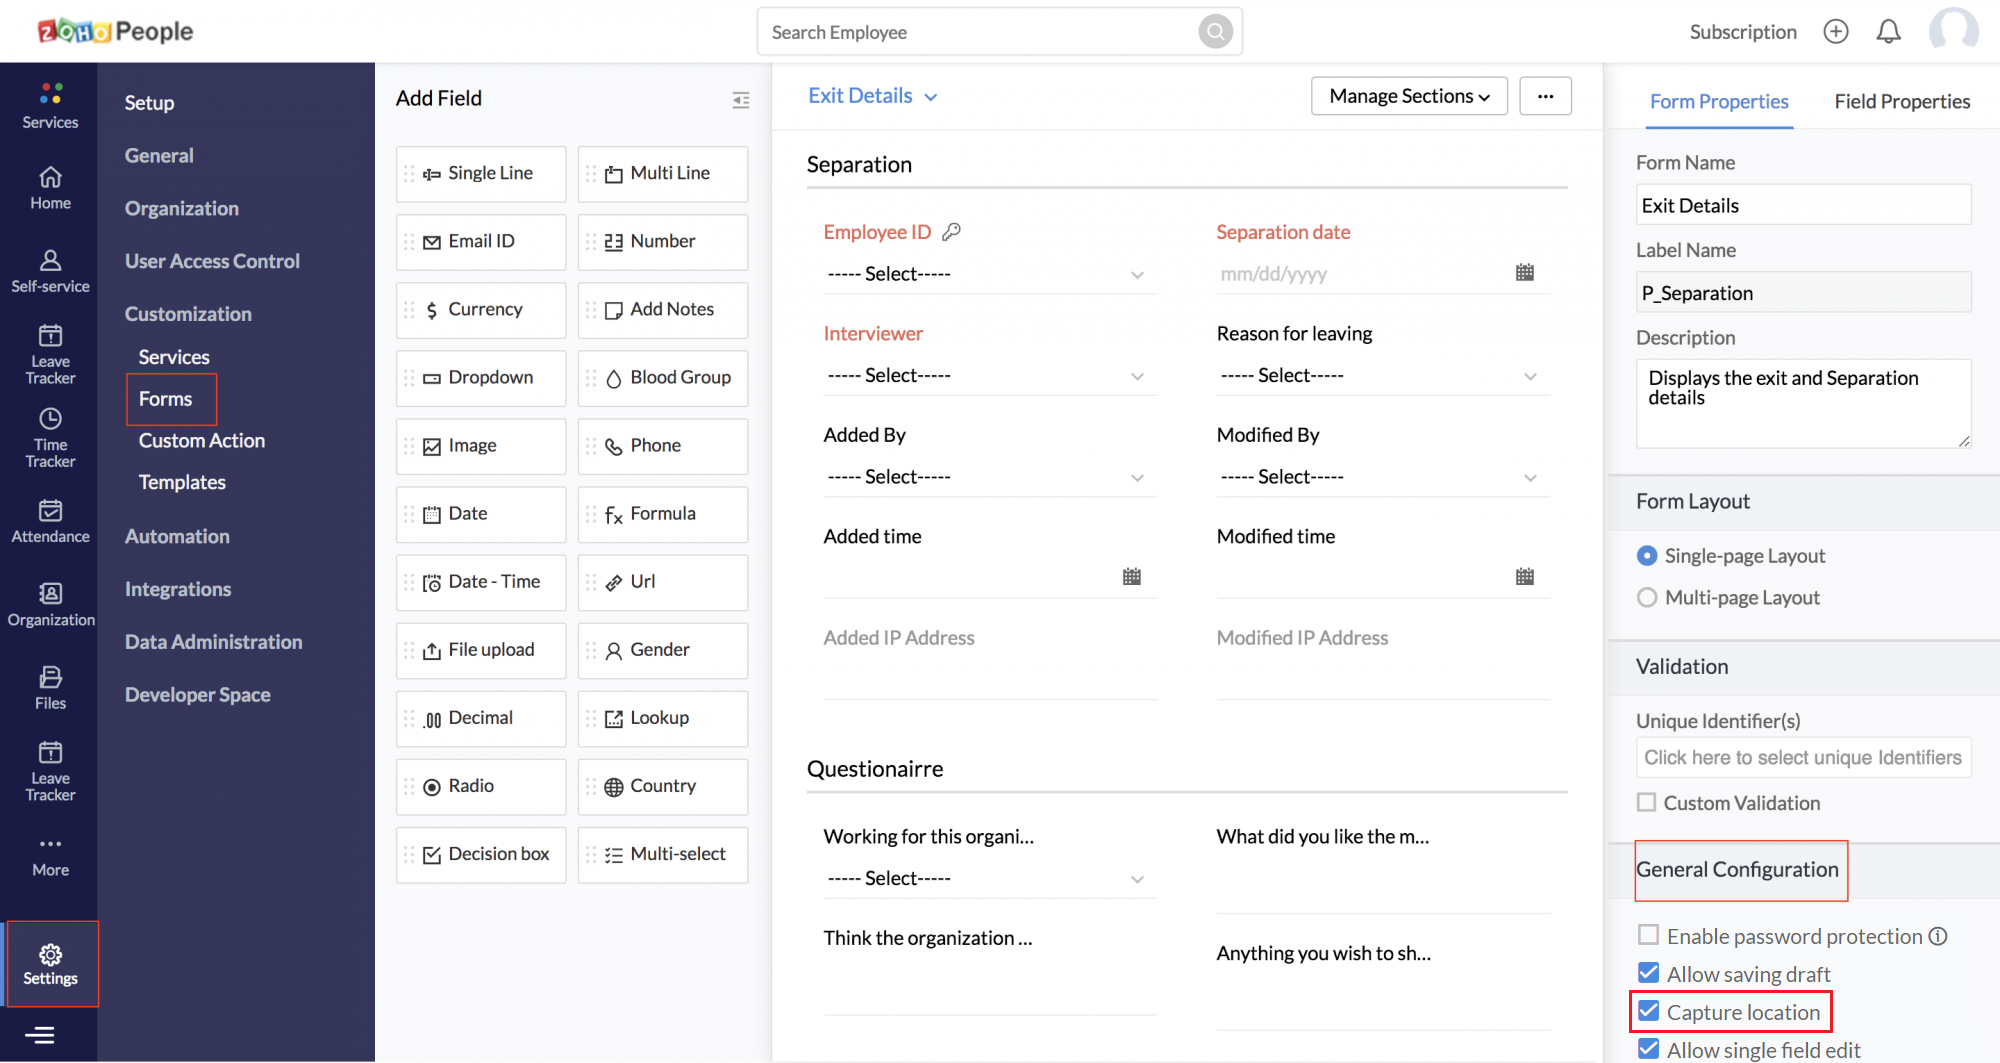
- Check Capture location.
- Select I Agree.
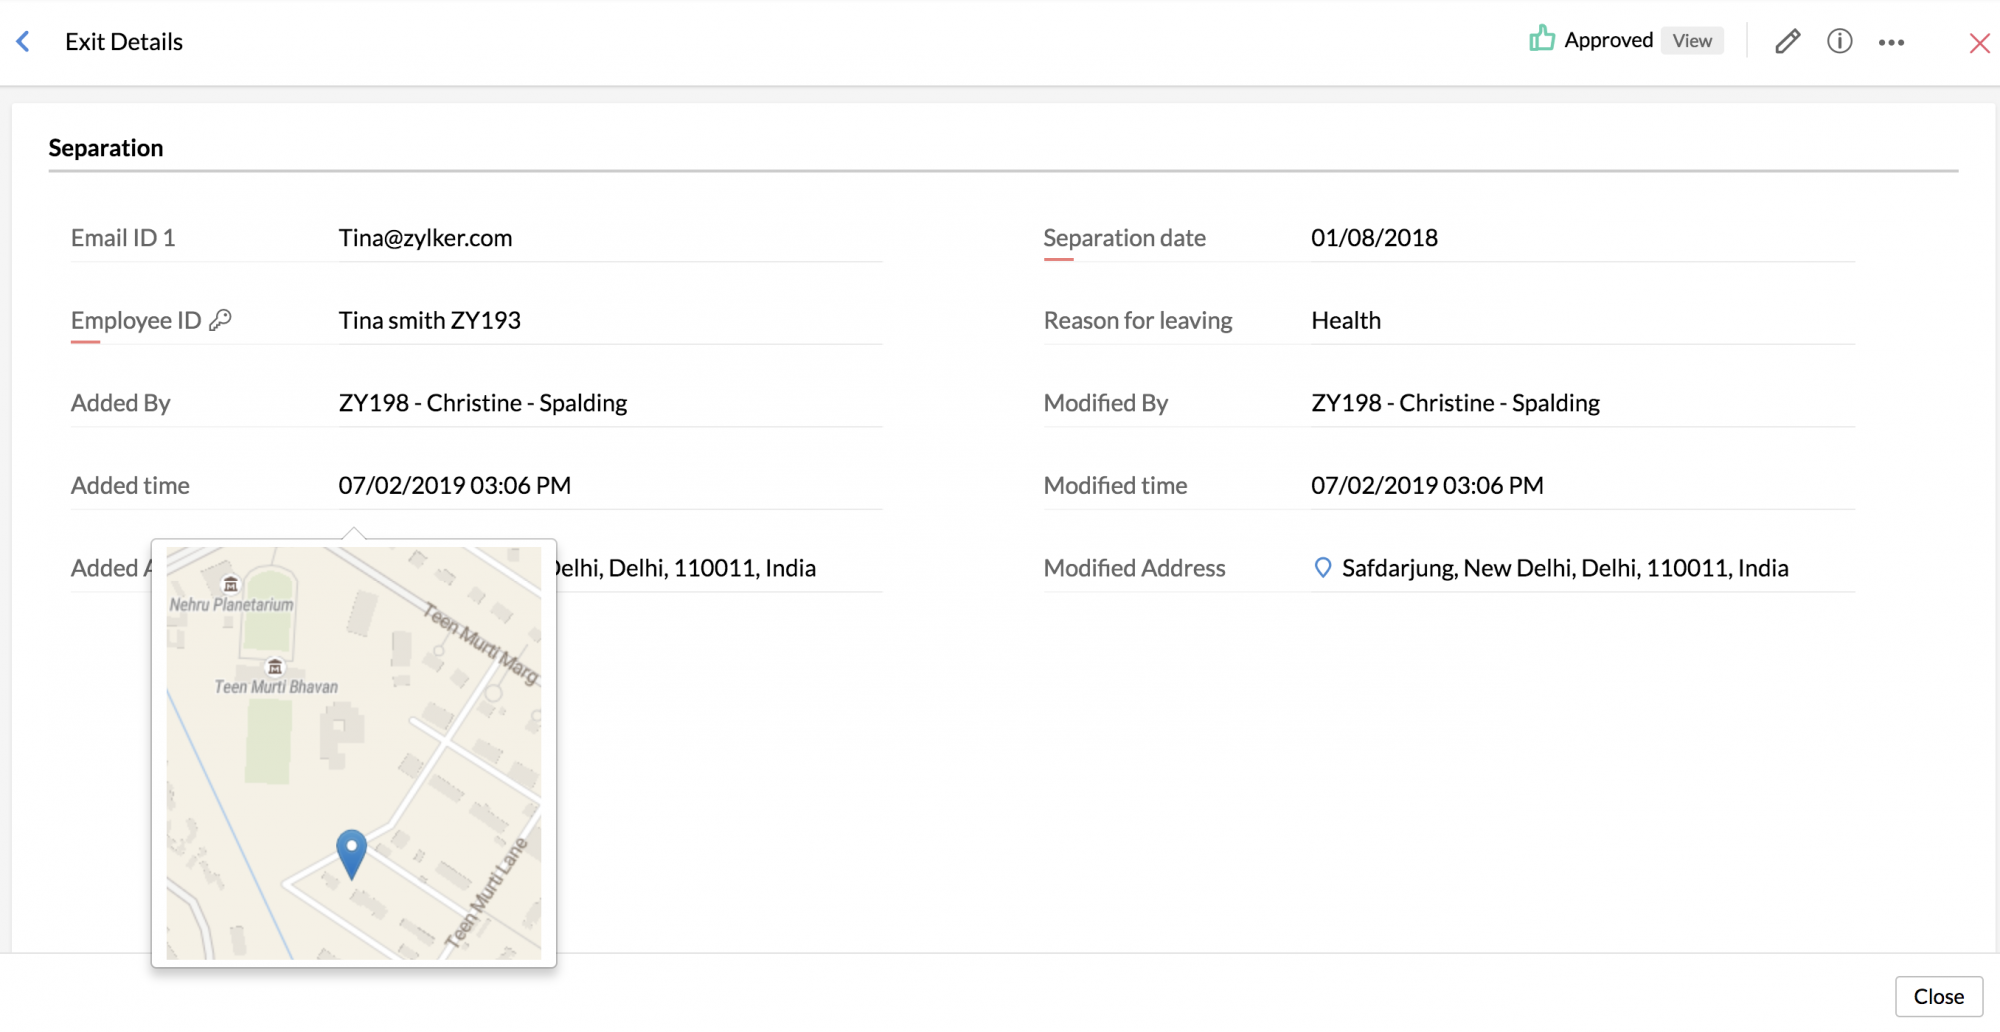
Once Capture location is enabled, the user will be asked to allow or deny tracking their location.
Once the user allows the location to be shared, they will be able to add or edit a record in that form.
Once they add or edit a record in the form, the location address will be stored along with a view of the location's map.
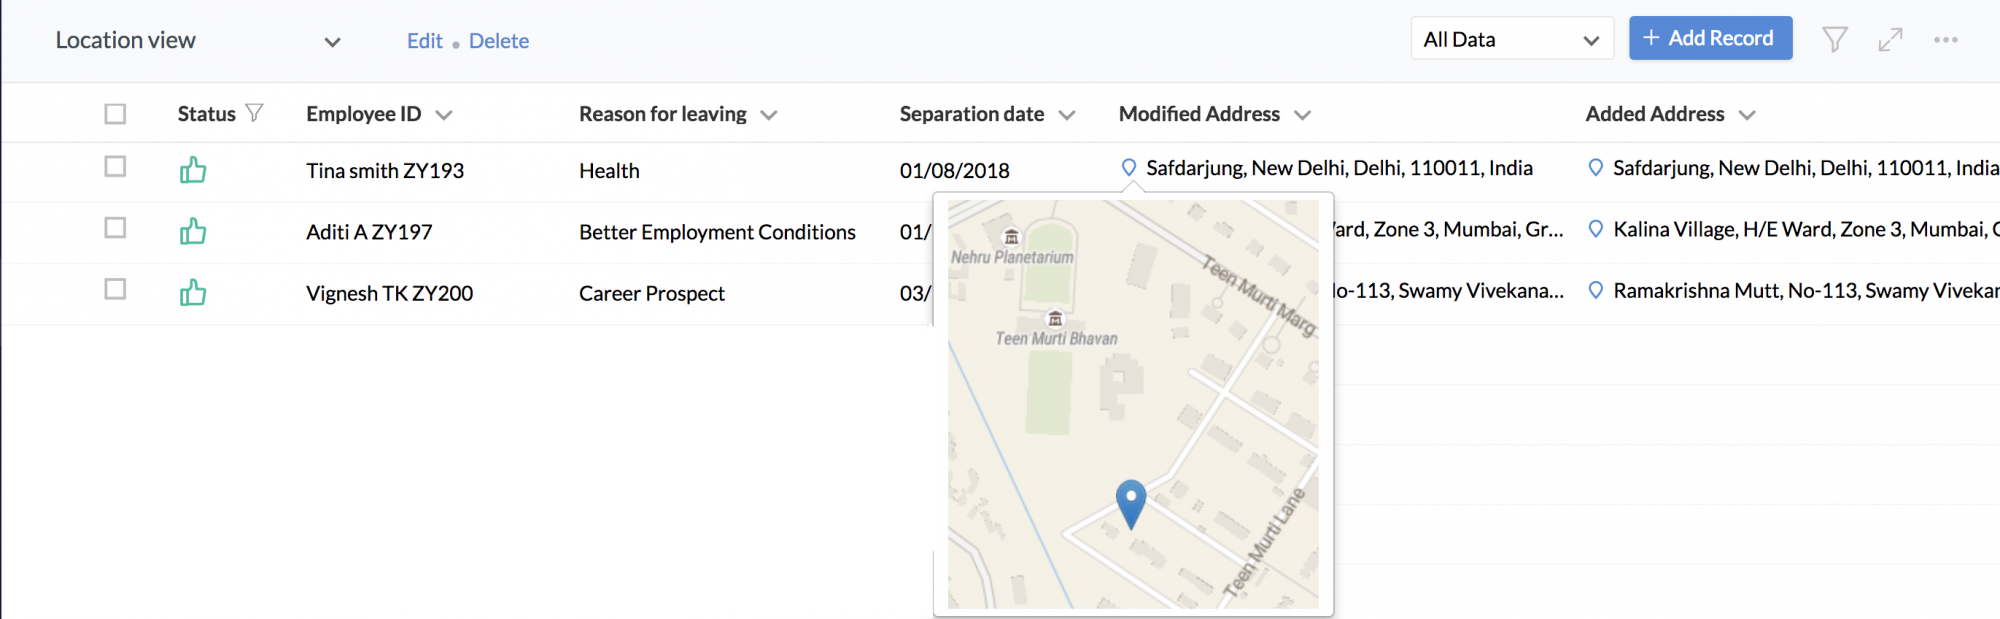
The location map can also be viewed in the list view of the form.
To disable Capture Location, use the same steps and uncheck Capture Location.
Note: Once Capture location is disabled, all stored location data for the form will be deleted.
If Capture Location is enabled and a user is unable to add a record, it could be because the user chose to block tracking their location. In such a case, the following screen will appear:
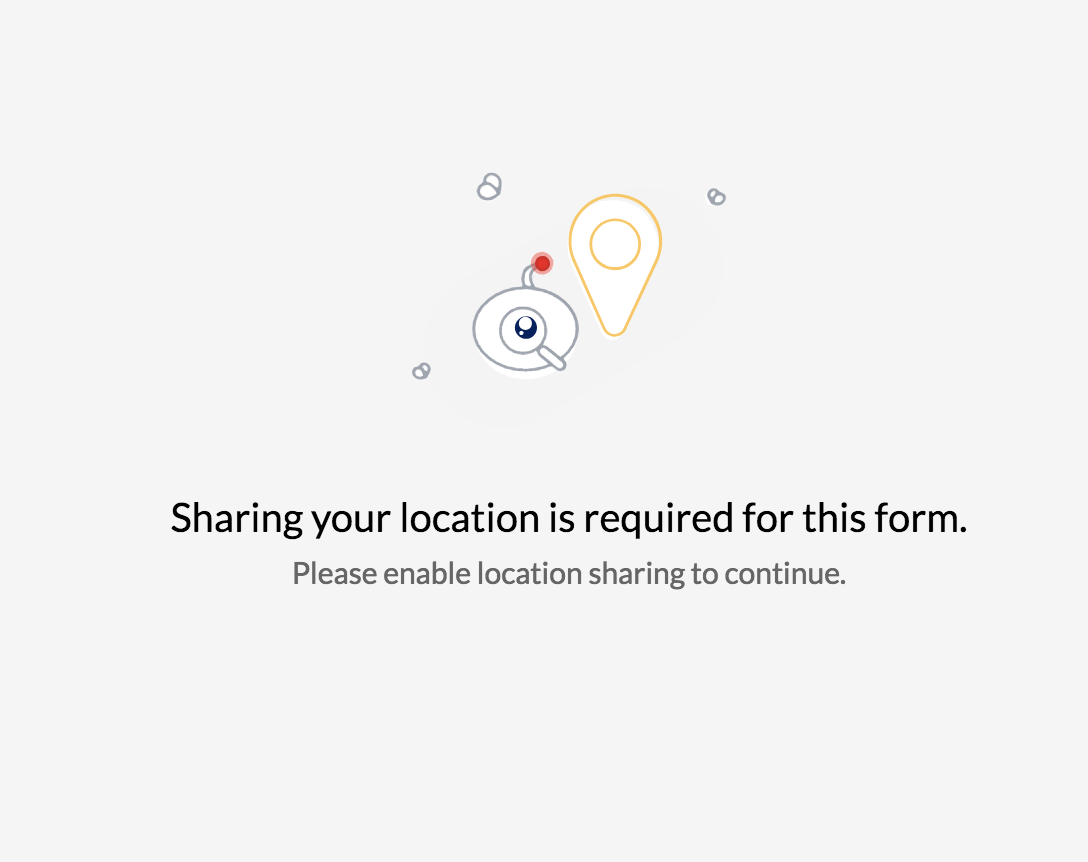
Once the user allows sharing their location, they will be able to add a record.
To understand and learn more about permissions related to forms, go to Form Permissions.