Job Scheduling
Job Scheduling is used for managing jobs and assigning them to employees in the form of schedules, to ensure that a job is done on a specific day(s) and within a specific period. For any given day, you can add multiple schedules and also ensure that the schedules do not clash with each other.
There can be repeated schedules so that job can be done as a series, continuously in regular intervals. Further, when you log time for the jobs within the scheduled time, you can get an exact record of the worked hours against each scheduled Job.
When you define that a job should be completed within the set time, you have more accountability and a much easier way to track if employees were able to complete the job within the slot.
Employees can also have a consolidated view of their schedule for the entire day or week which in turn helps them to gain more clarity and focus on their schedule.
- Pre-requisite settings
- Adding a Schedule
- Editing a Schedule
- Editing a Series
- Deleting a Series
- Cloning a Schedule
- Schedule Views
- Hide Job Schedule View
- Exclude from Repeat Series
- Notifications
- Importing and Exporting job schedules
Pre-requisite settings
Job Scheduling can be accessed by all users of your organization. You can restrict access according to your organizational needs. If you want only the Reporting managers to use Job Scheduling for your organization, this can be defined in Settings.
To define settings:
- Go to Timesheet > Settings > General Settings > Job Schedule Settings
- In Job Schedule View Permission, select Users/Administrator/Reporting Manager as required
- In Job Schedule Edit Permission, select Users/Administrator/Reporting Manager as required
Note: To set Edit Permission, View Permission should be given in the first place for the Users/Administrator/Reporting Manager.
Here, if you select Administrator, then, the administrator of the account, location-based administrator for the account if any (configured under User Access Control > Roles ), and location-administrator for Timesheets module if any (Configured under User Access Control > Permissions > Admin Operations) will have access to view/edit the job schedules specific to those settings. I.e - if a User/Employee is set as the location admin for India, then this User will be able to view the job schedules that are created for Users in the location.
- Enable email notifications for published job schedules if required.
- Enable Feeds notifications for published job schedules if required.
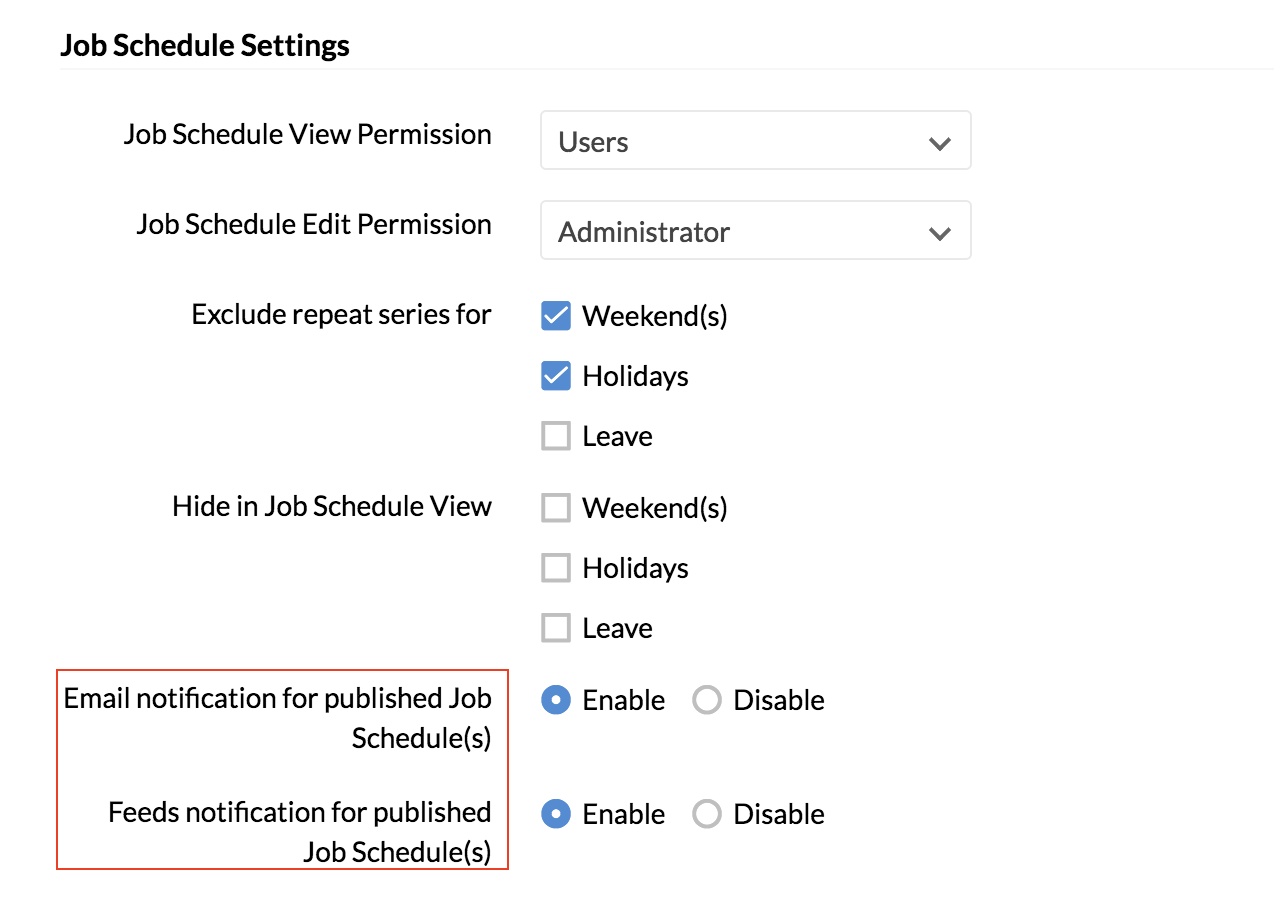
- Click Submit.
Note: If you enable notifications, then the Users for whom the job schedule is created will be notified as soon as the schedule is published. If there are multiple schedules unpublished, then when the 'Publish' action is done, an email or feeds notification will be sent (based on the Settings configured) for all the Job Schedules in one shot.
Adding a Schedule
- Go to Timesheet > Job Schedule
- Go to the date column of the user for whom you would like to add the schedule and click to add a schedule
- Select the Project and the Job Name
- Enter other details like Date, Time, Description
- Enable the Repeat box to repeat this schedule. Select Daily or Weekly or Monthly, and enter the interval and until date.
For eg., if you would like the job schedule to be followed once in two weeks, then you can give 2 in the number of days, select 'Weeks' once and select the date until which the schedule should be repeated. Any schedule that is repeated, becomes a Series.
- Select the Billable Status if applicable and Work Item if any.
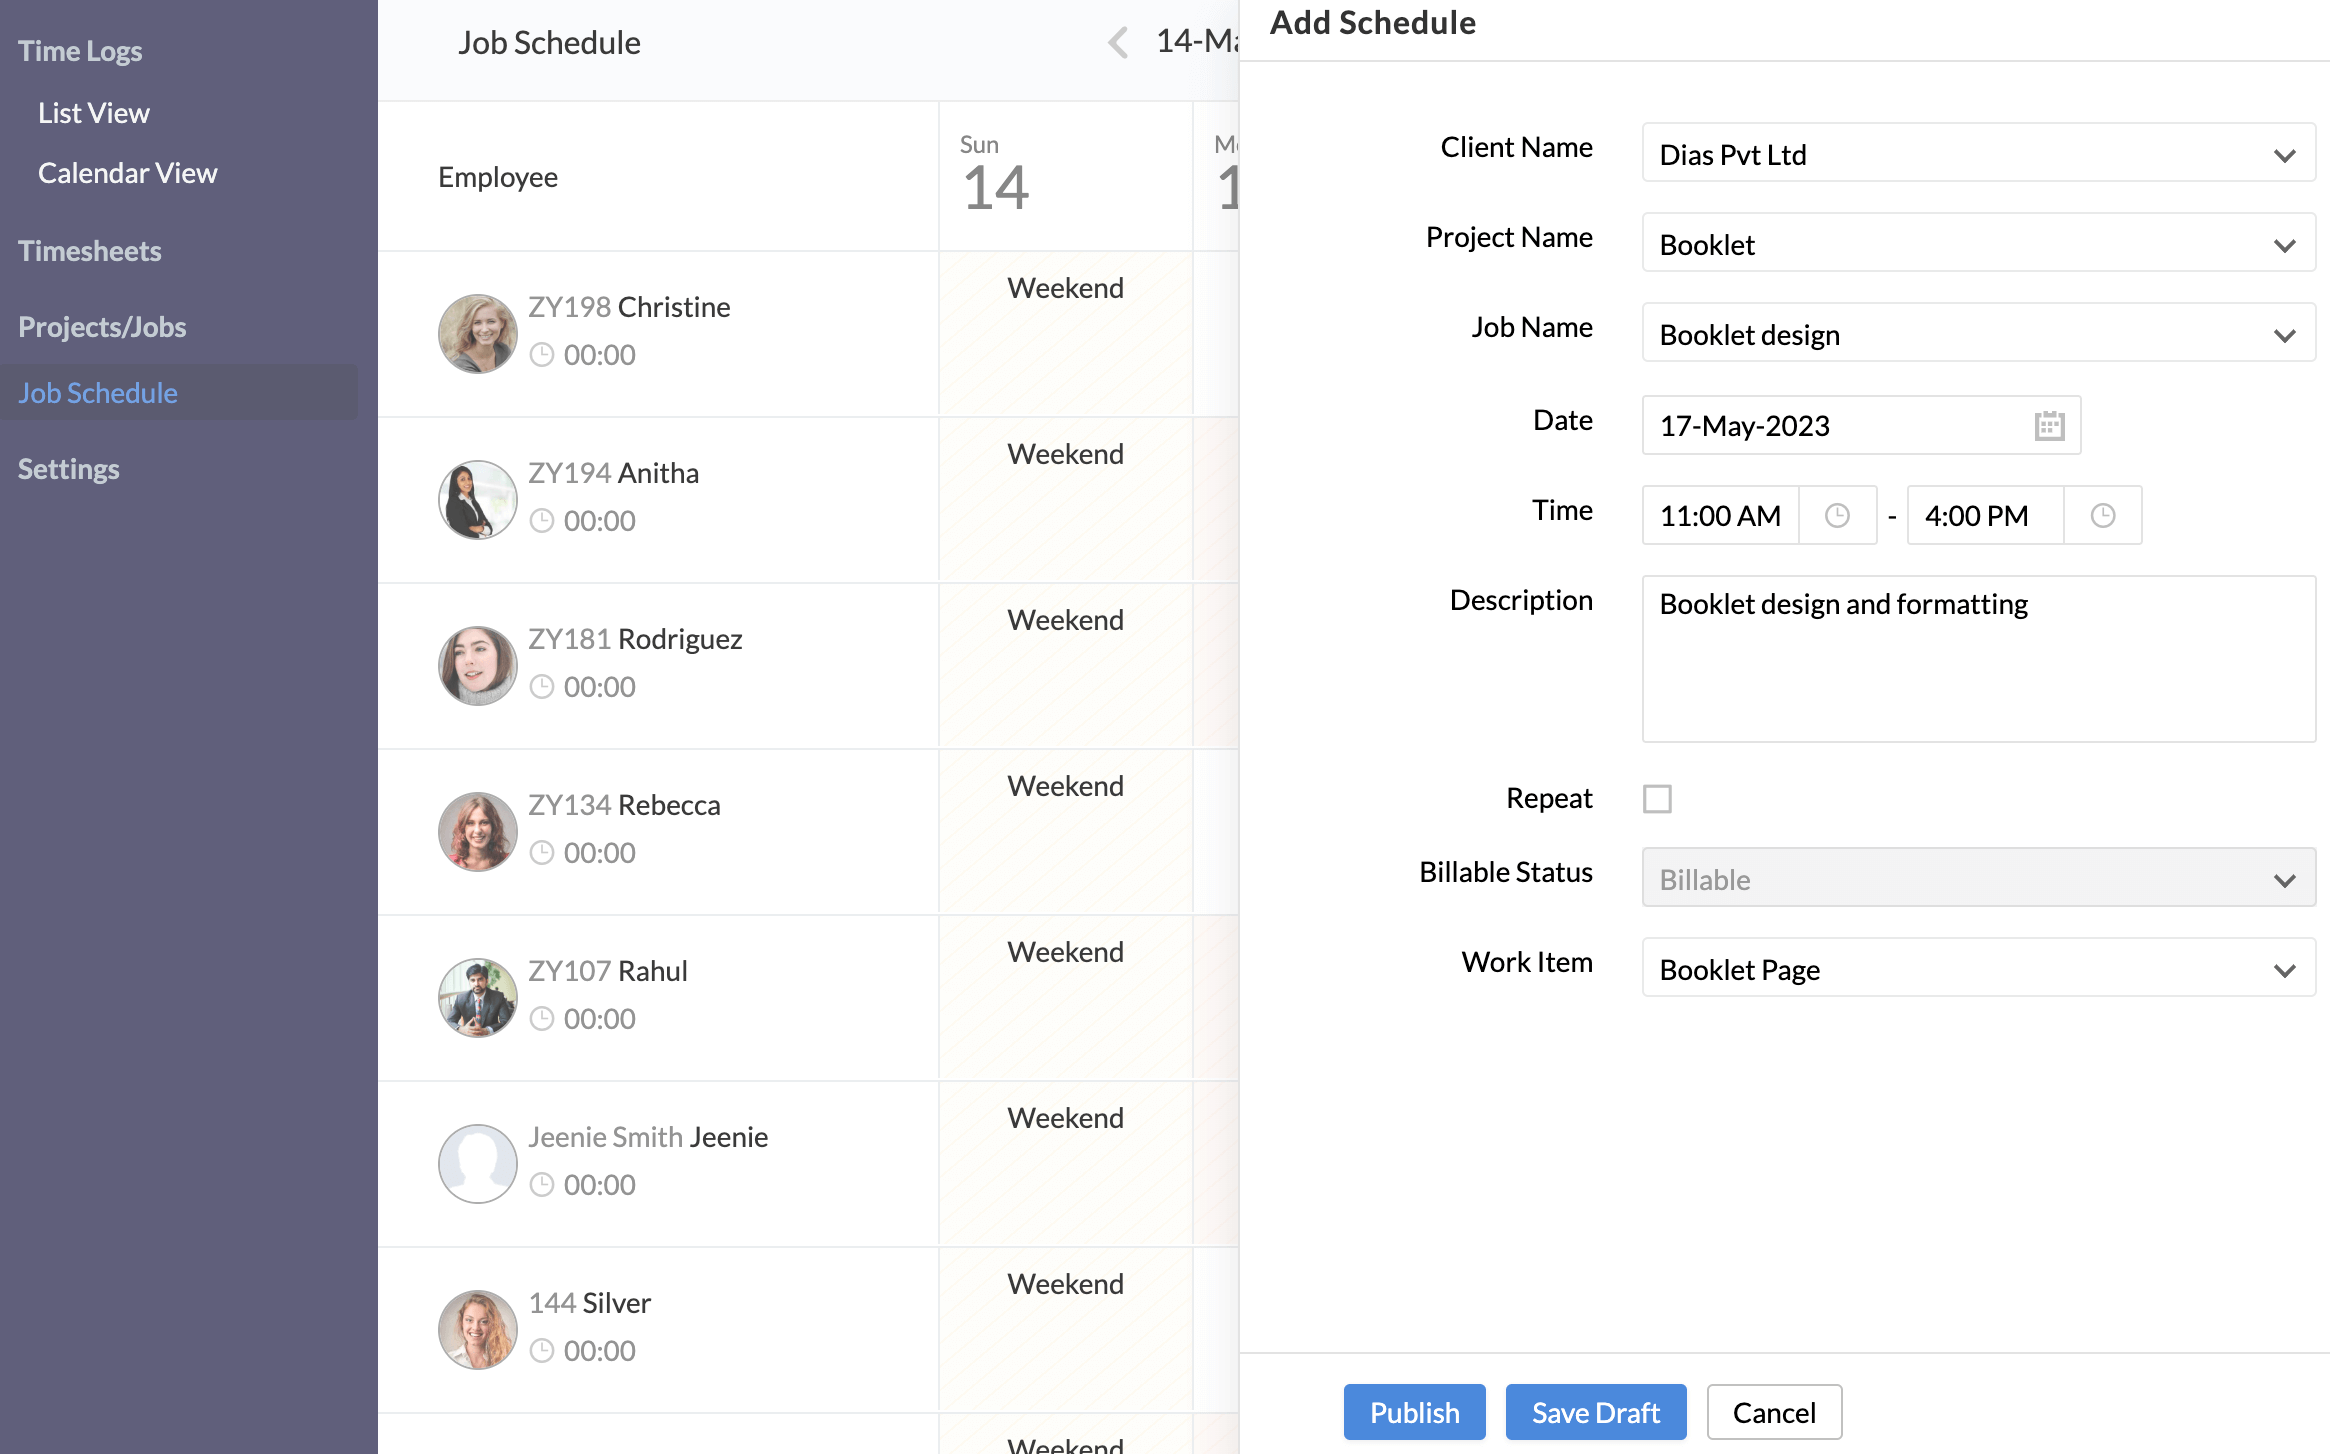
- Click Save Draft if you do not want to publish the schedule.
Note: The schedules that are saved as 'draft' will be visible only to the owner of the schedule.
- Click Publish to Publish the schedule.
Note: Users for whom the schedule is added will be able to see all the published schedules. To publish a collection of job schedules at one go, you can save them as draft and publish them later.
Editing a Schedule
- Navigate to Timesheet > Job Schedule.
- Click on the schedule on the day or week view.
- Make the required changes.
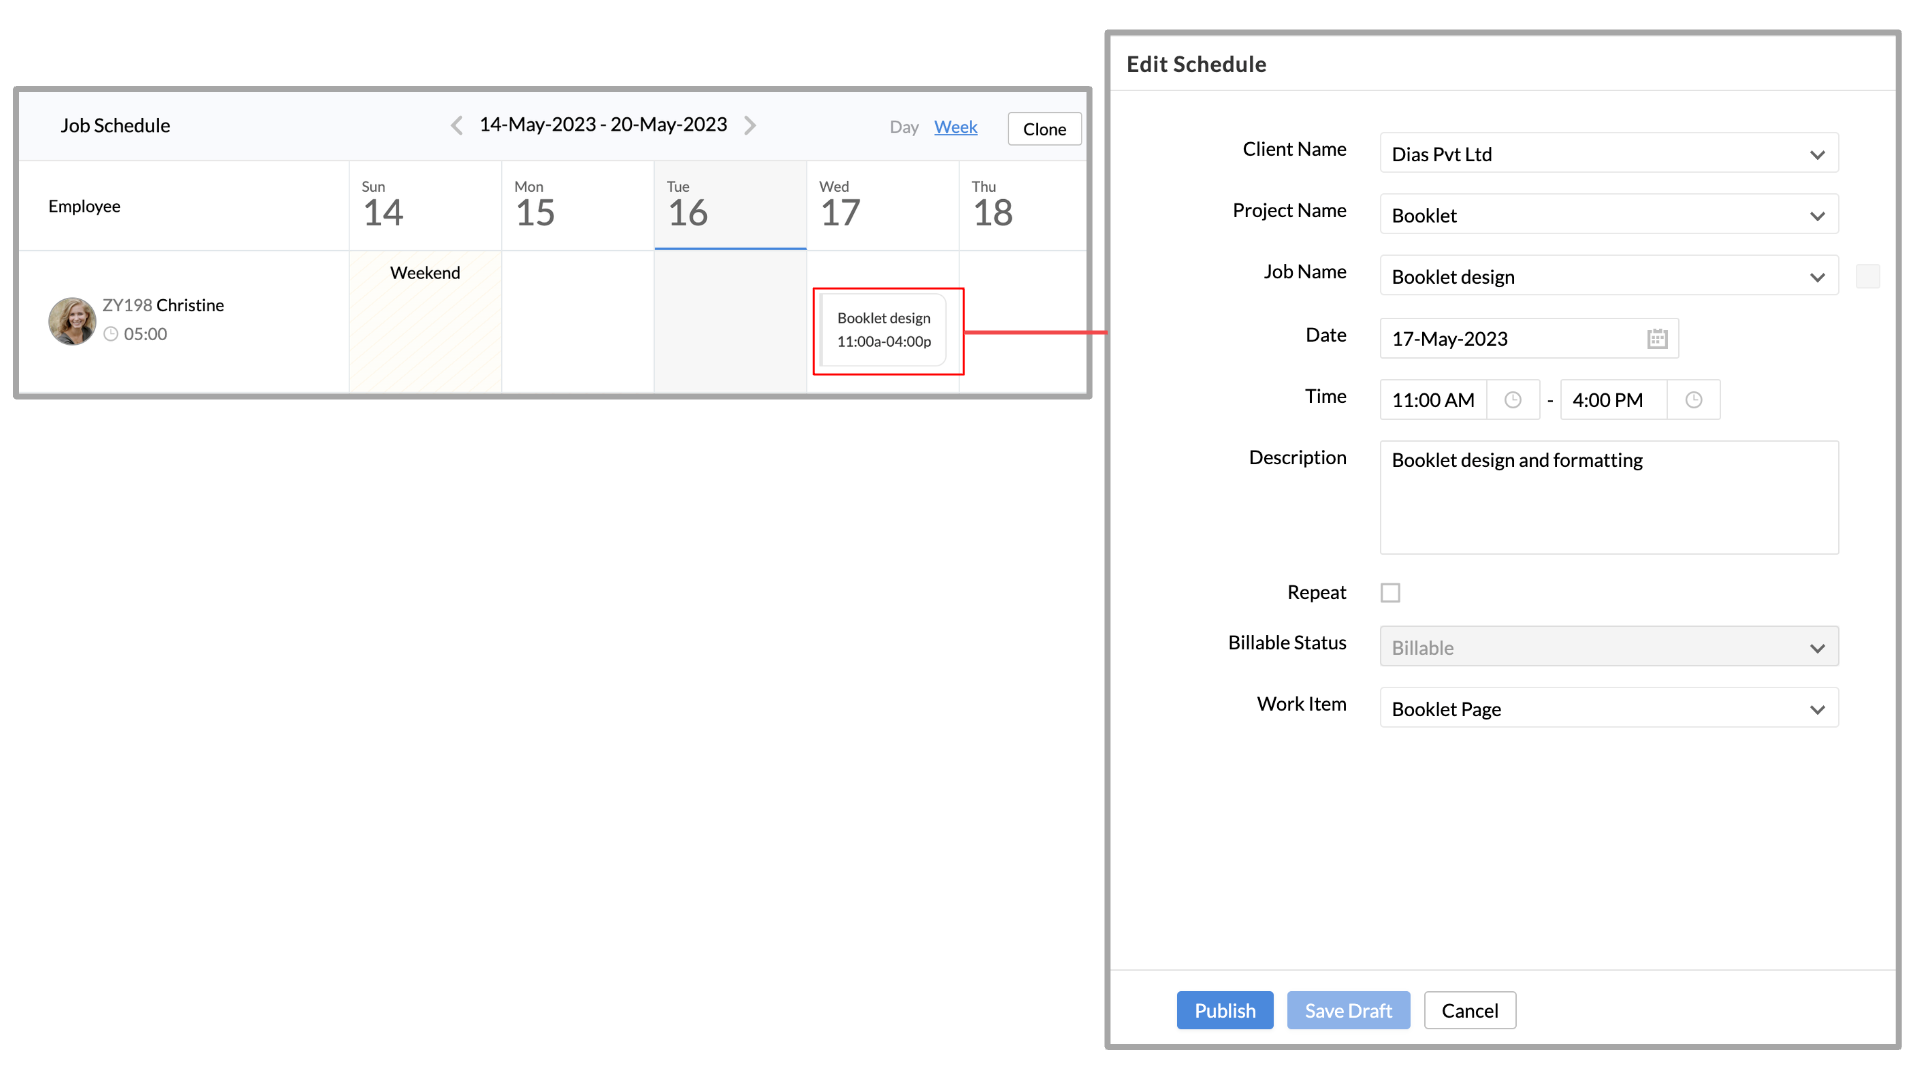
- Click Publish or Save Draft.
Note: Schedules of the past cannot be added or edited by anyone other than the administrator.
To delete a schedule, click on the schedule in the day or week view and click the delete icon.
Editing a Series
- Click on the schedule.
- Click on Edit within the Repeat option.
- Make the required changes.
- Click Save Draft.
- You will get a pop-up where you can select that the edits done should be applicable to one of the following:
- Only this schedule - Changes will be made only to the current schedule
- This and the following schedule in this series - Changes will be made to the current schedule and to the upcoming schedules of the series
- Entire series - Changes will be made to the entire series (including previous dates)
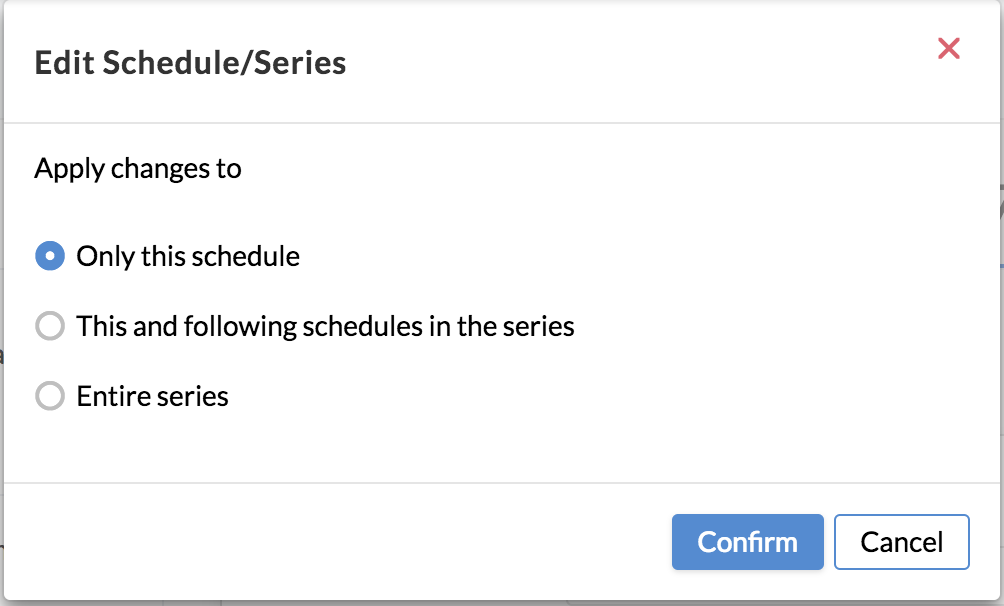
- Click Publish to get the changed schedule published.
Deleting a Series
- Click on the schedule you wish to delete
- Click on the delete icon
- You will get a pop-up where you can select that the deletion should be applicable to one of the following:
- Only this schedule - Only the current schedule will be deleted
- This and the following schedule in this series - The current schedule and the upcoming schedules of the series will be deleted
- Entire series - The entire series (including previous dates) will be deleted
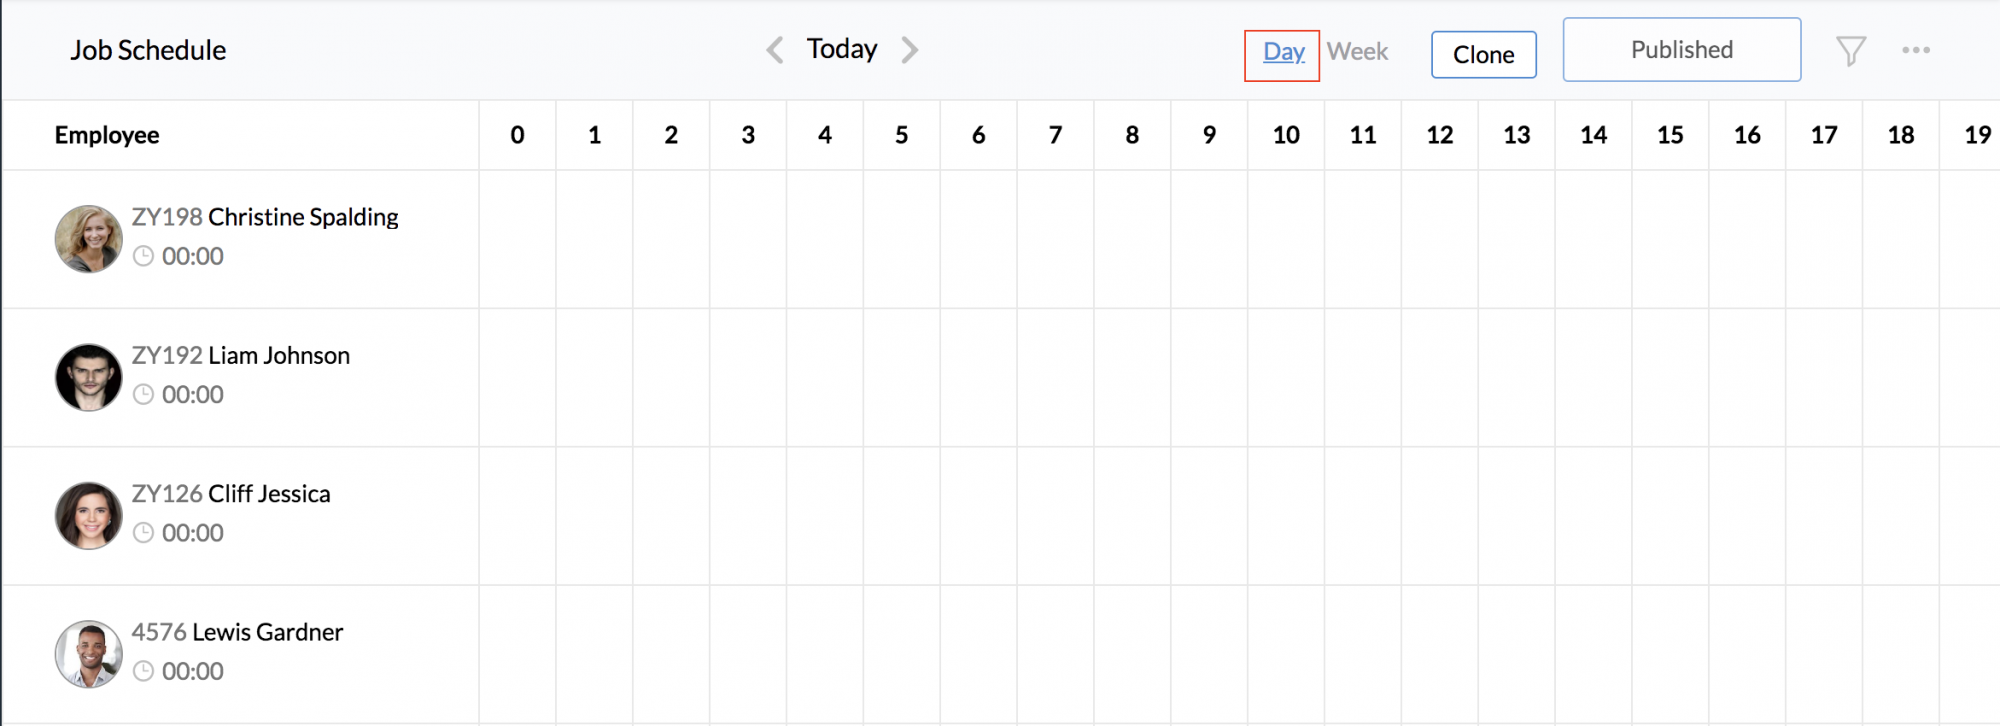
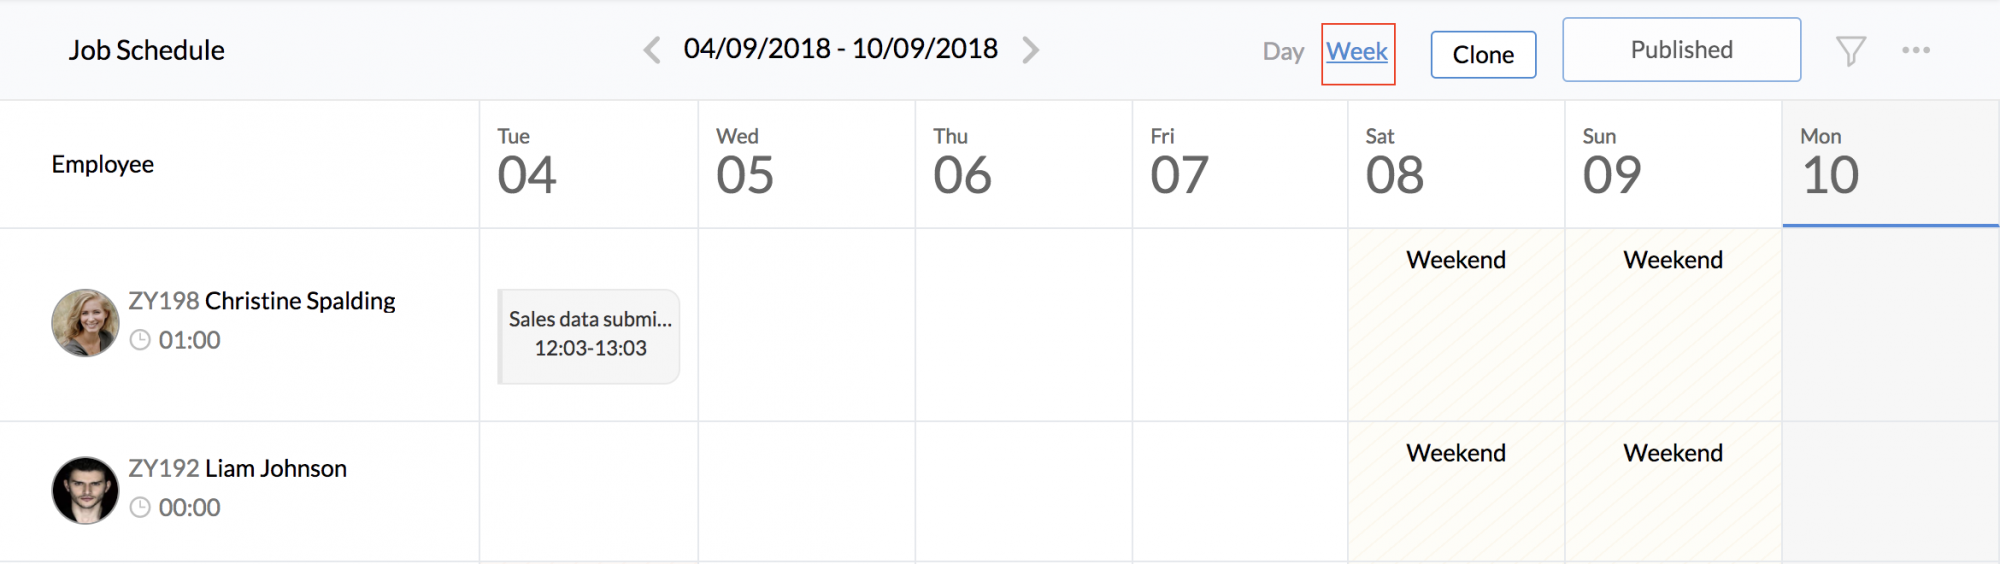
Cloning a Schedule
The Clone option helps you copy the schedules of the past day/week to the following day/week. If you have selected the Day view while using the Clone option, then the schedules of the day will get copied to the following day. If you have selected Week while using the Clone option, then the schedules of the entire week will be cloned to the following week.
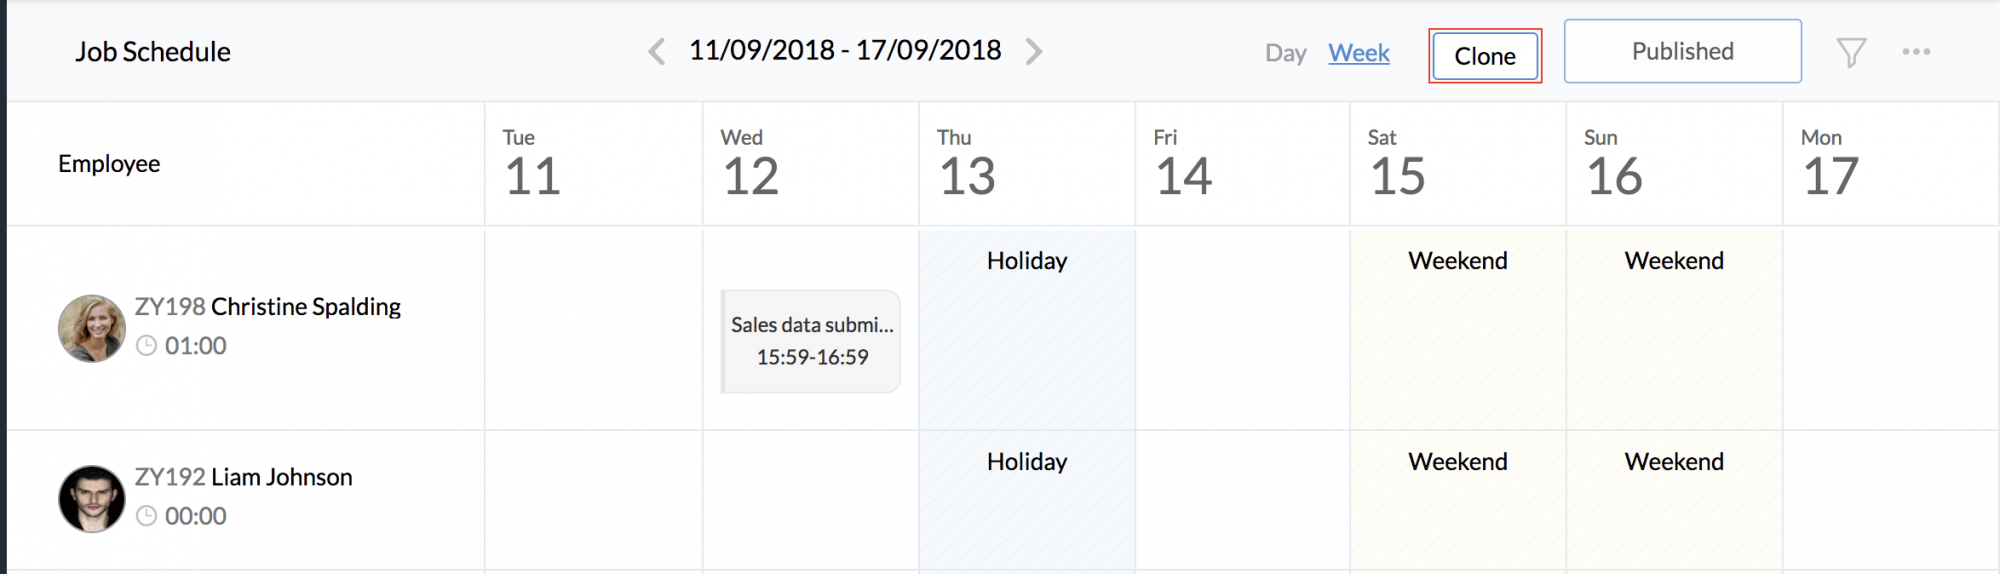
Note: If there are filters used, then the cloning done will be based on that. For eg., if you have selected a particular User in the filter and then proceed to use the Clone option, then the specific User's job schedule alone will get cloned for the following day/week.
Schedule Views
There are two views on the job schedules that are created.
The Day view gives the details of all the schedules for the entire day. You will be able to see the schedules displayed horizontally, with the option to drag and extend the scheduled hours. While doing this, if there is another schedule during the same slot, you will not be able to add a new schedule. You can also click on the schedule in the day view to edit it.
The Week view gives the details of all the job schedules for a user across the week that is chosen.
To view Job Schedules of specific locations or departments:
- Click on the filter icon.
- Make the selection from the drop-downs as required.
- Click Search.
Hide in Job Schedule View:
In case you do not want the weekends, holidays, and leave to be highlighted in the job schedule view, you can disable it. Follow the steps given below.
- Navigate to Timesheet > General Settings > Job Schedule Settings.
- In 'Hide in Job Schedule View', select Weekend(s)/Holidays/Leave or all based on your need.
- Click Submit.
Exclude from Repeat Series
If you would like to exclude either weekends, holidays or leave from the repeat series,
- Go to Timesheet > General Settings > Job Schedule Settings.
- Select the options that you would like to exclude.
- Click Submit.
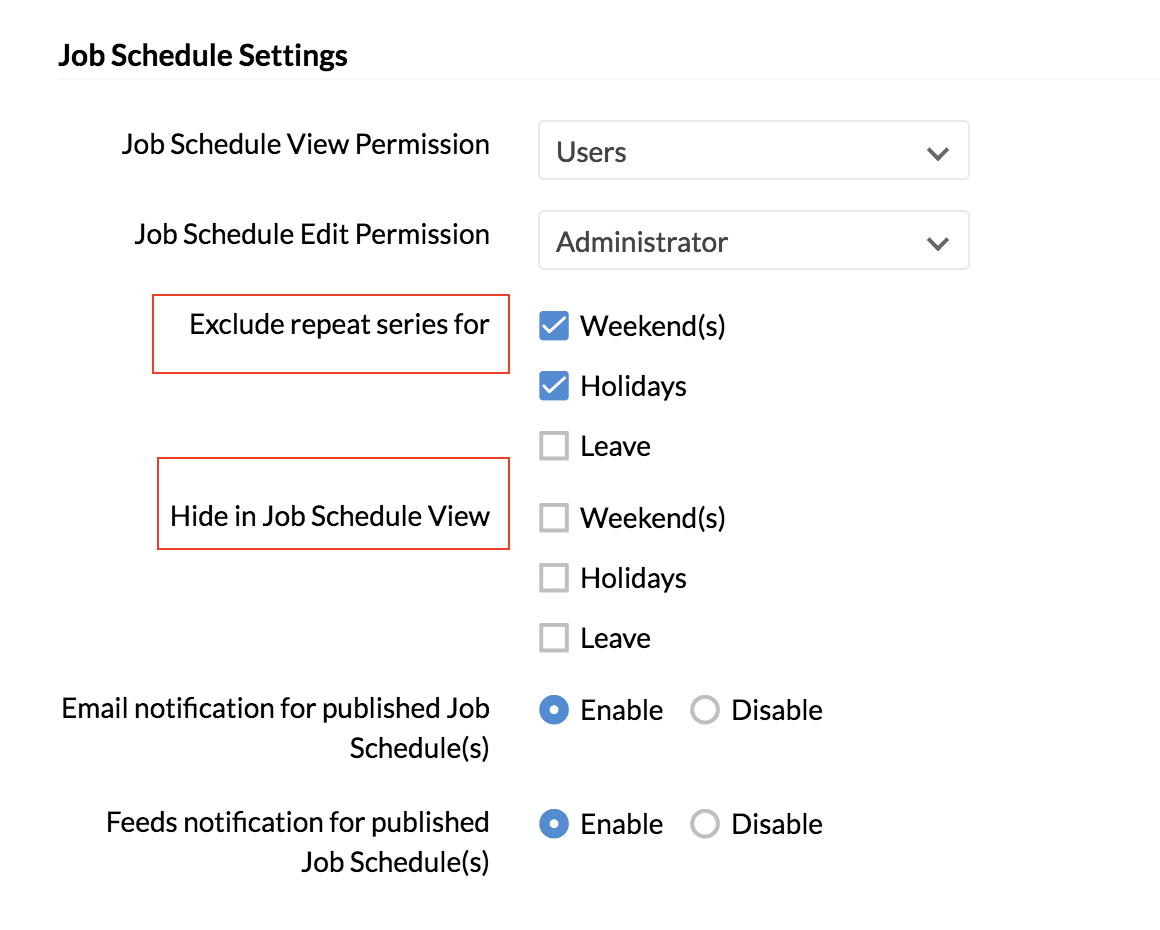
Notifications:
For each published Job Schedule, email and feeds notifications can be enabled or disabled.
- Navigate to Timesheet > General Settings > Job Schedule Settings.
- Under Email and Feeds notifications for publishing Job Schedule(s), check the enable/disable option.
- Click Submit.
Importing and Exporting job schedules
When there are a large number of job schedules you can use the Import option to bulk add many job schedules.

Click Import under the ellipsis icon. Ensure to follow the guidelines mentioned in the notes to be able to import successfully.
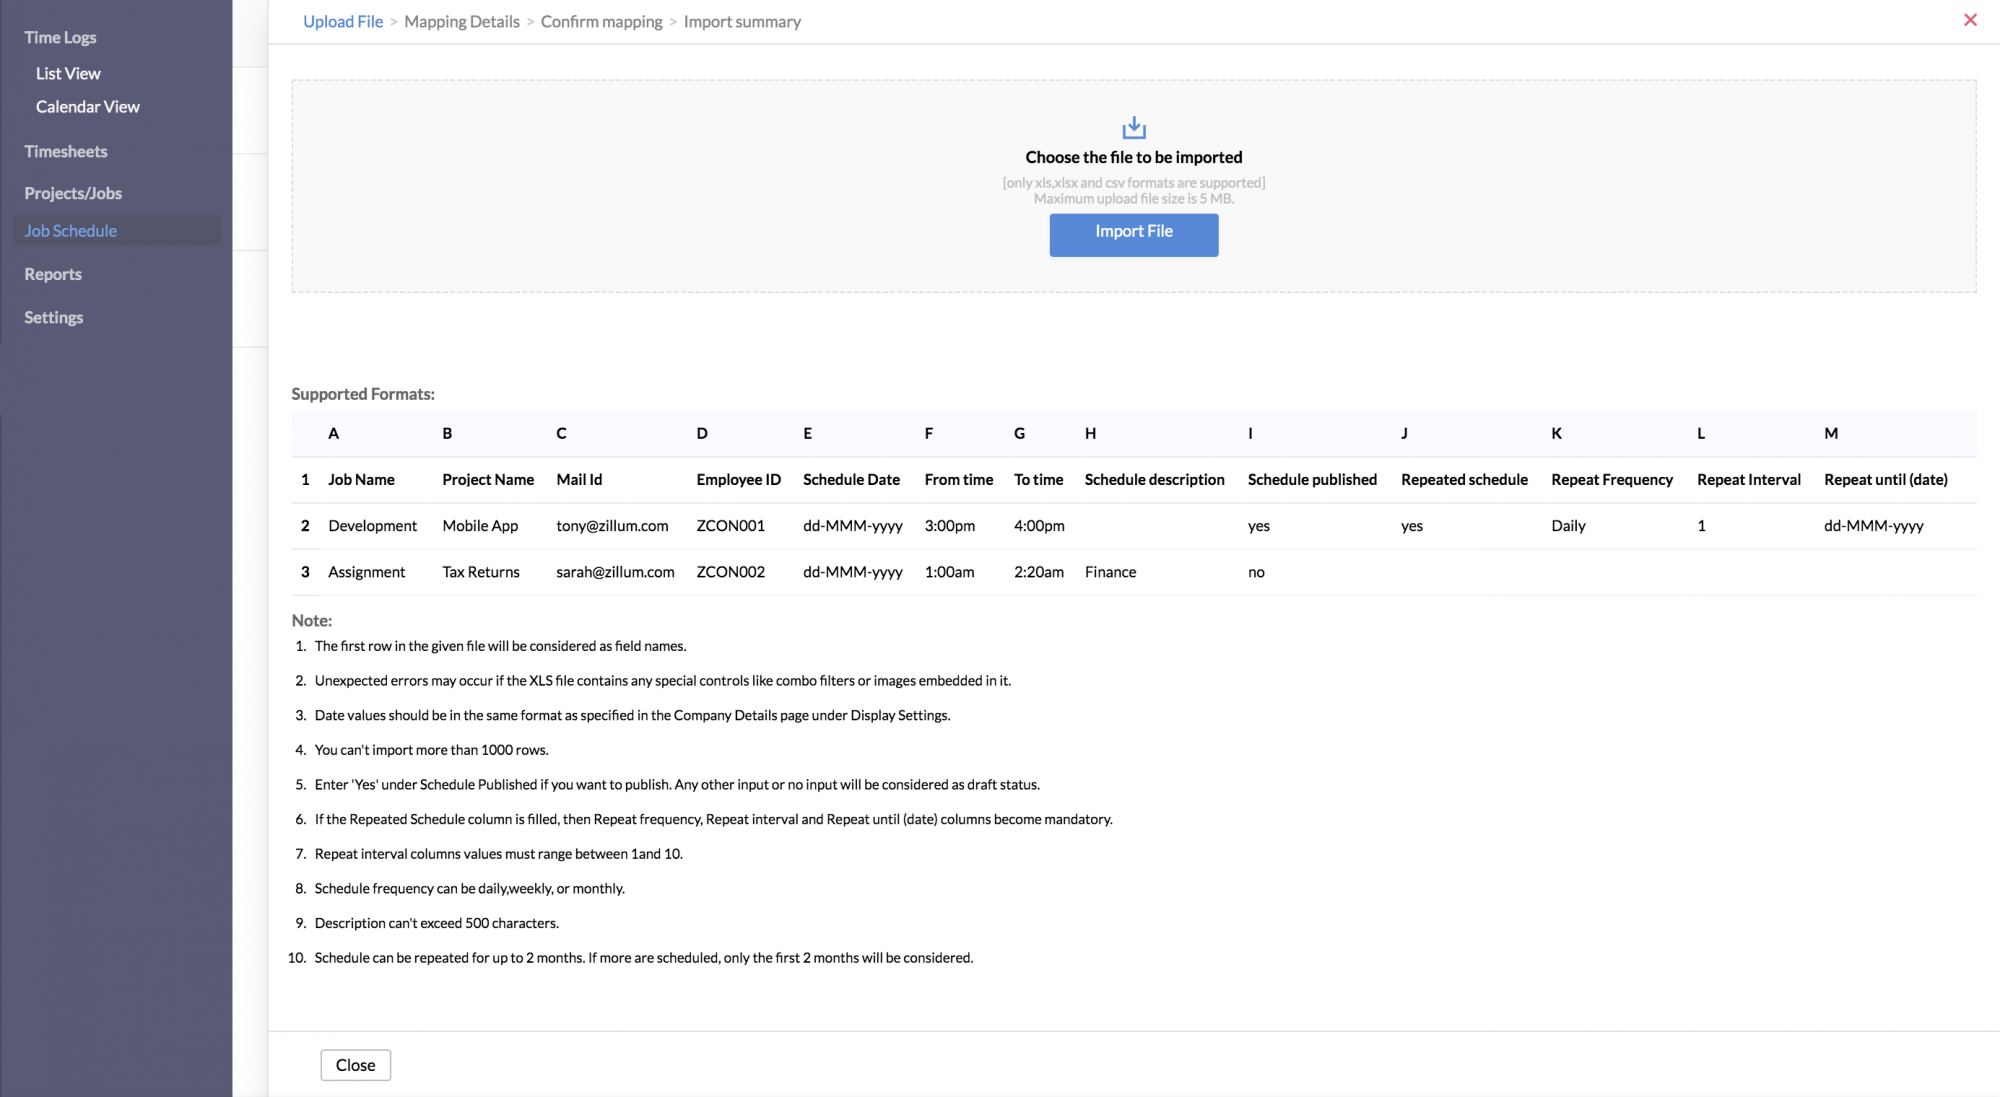
After adding the file, map the corresponding details to complete import.
Job schedule data can also be exported using the Export option under the ellipsis icon. Once you click Export, you will see this popup:
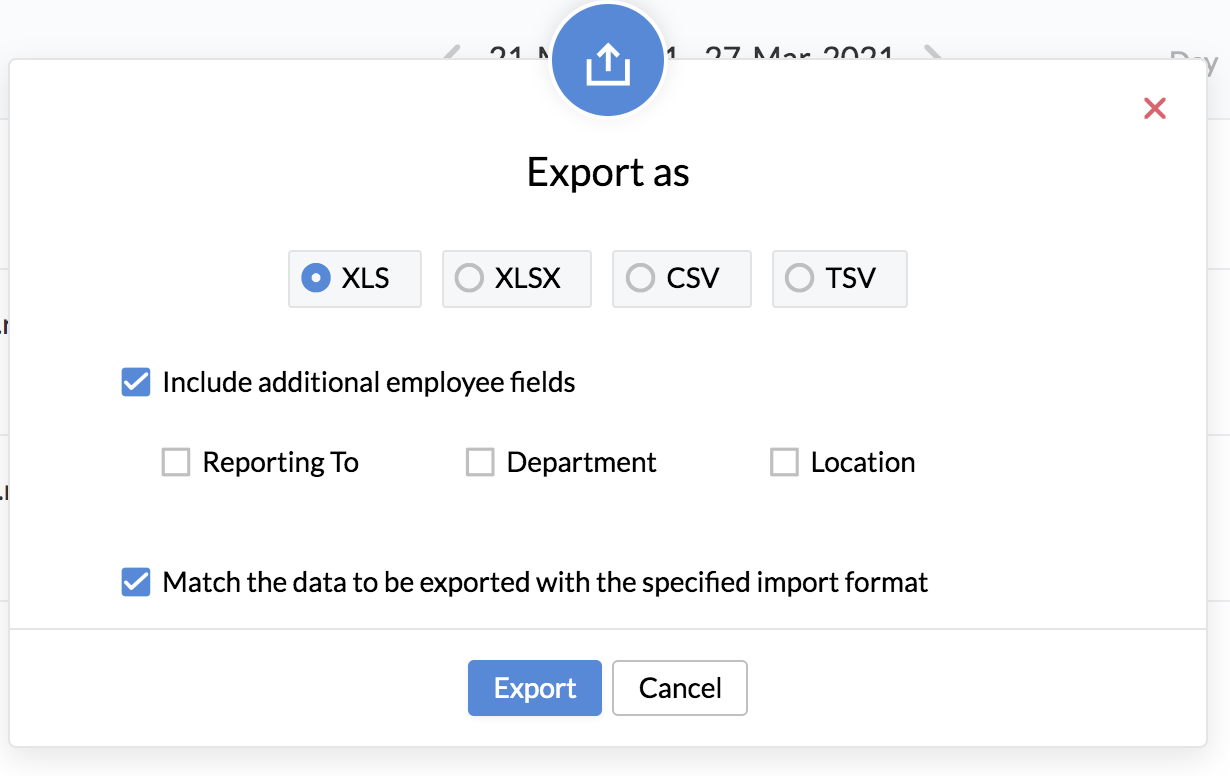
- Select the first option if you want to include additional fields in your import, and choose the fields listed below.
- By default, the exported data will be in the calendar format, same as your current view. Select the second option if you want to match the import file format so that this exported file can be reused for future import purposes easily.