Cases in Zoho People
..
What is Cases?
Cases in Zoho People is an online help desk that employees can use to get their queries resolved.
..
Why is it useful?
Cases helps employees post their questions under appropriate categories and gets them answered by agents who are assigned experts in that category. The query, is therefore resolved in a systematic manner.
- Adding a Category- Agents, Subcategories, References and FAQs
- Adding Cases Admin
- Adding Category Admin
- Views
- Frequently Asked Questions ( FAQs)
- Feedback settings
- Raising a query and resolving a query
- Cases Customization
- Cases Restrictions
- Notifications in Cases
- Steps involved in creating a Workflow for Cases
Glossary
Categories: Categories are the divisions under which you can raise queries. The 'General Queries' category is available by default. You can also add more categories based on your organizational needs.
Cases Admin: An administrator for the cases module who has access to all the settings and data of cases in Zoho People. A case admin can select and assign another employee as a case admin.
Category Admin: A Category Admin can edit or add any information within their assigned category. They can also assign and unassign agents for all cases raised in their category.
Location: This denotes the locations out of which your organization operates.
Query: Query refers to the question you raise to the HR. Once raised, a query becomes a 'Request' and can be tracked.
Subcategory: Divisions within each category. For example, under the 'Travel' category, 'Domestic' and 'International' are the subcategories.
Tasks: For each query, Tasks can be added and assigned to themselves or their subordinates
Agent: An agent can refer to an individual, group, or a department
Requestor: One who has raised a query
Case Agent: One who handles the query
![]() A Group consists of a set of users from the same or different teams.
A Group consists of a set of users from the same or different teams.
FAQ: Before raising a query, you can look at the frequently asked questions in the category.
References: This refers to content related to a category such as URLs and documents which are related to a category.
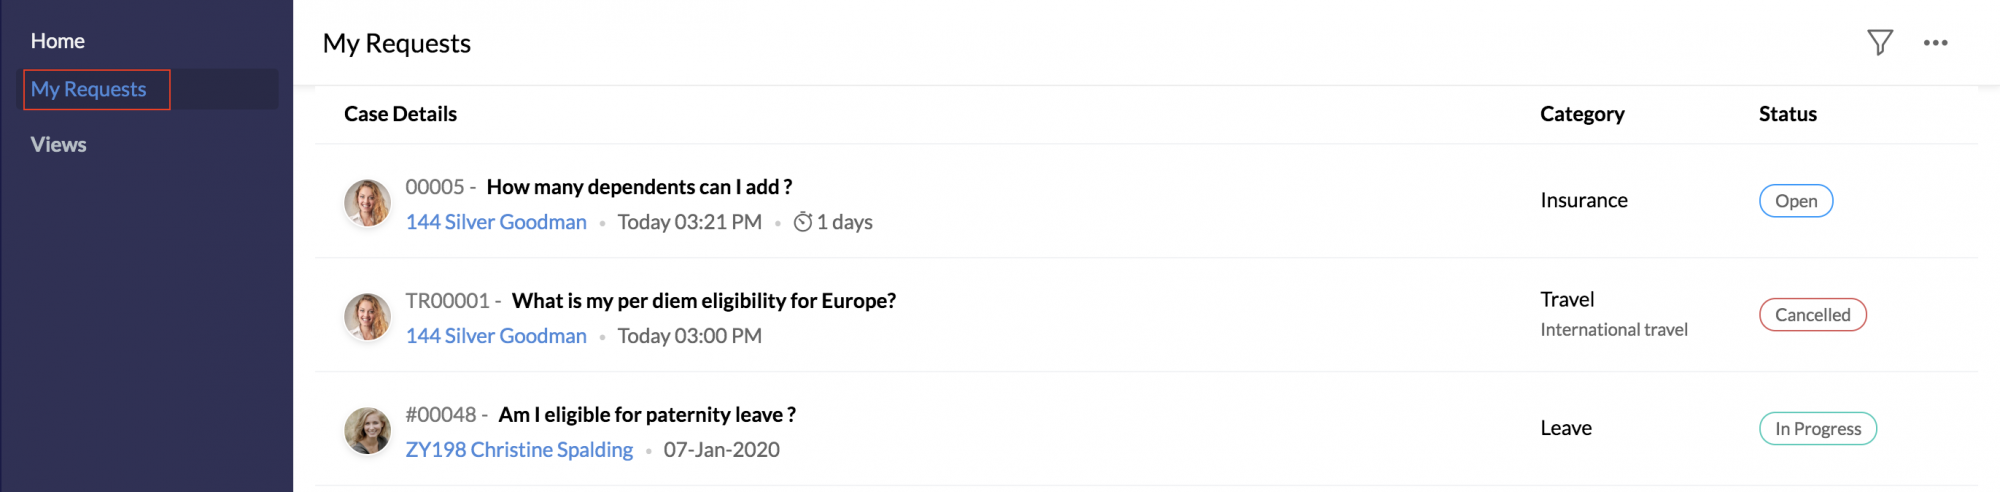
Status: This denotes the status of the query raised. There are six statuses:
- Open: When a requester submits a query, and a case is created.
- Closed : When the query is resolved.
- On Hold : When the process of resolving the case is paused.
- In Progress : When the agent has begun working on the case.
- Canceled : When the case requester removes their request, and it can no longer be worked on by the agents or admins.
- Pending: When some input is needed from the case requester to work further on the case.
General flow of activities in Cases
- A case or query is raised by someone in the organization
- An individual users/group/department under the category picks up the case and work on it as 'Agents'
- The Agent starts work on the case if it is assigned to an individual user. If it's assigned to a group or a department, the group/department head can assign the case to a user who belongs to the group/department or the user can pick up a case assigned to their group or department
- The agent can add comments to discuss the case
- Agents can add and assign tasks to themselves or their reportees. Admin can assign tasks to any user in the organization.
- Once the case is completed, the status is changed
Adding a Category - Agents, Subcategories, References and FAQs
- From your home page, go to Cases > Settings > Categories > Add Category.
- Give a name and choose an icon to match the category.
- Give a short description.
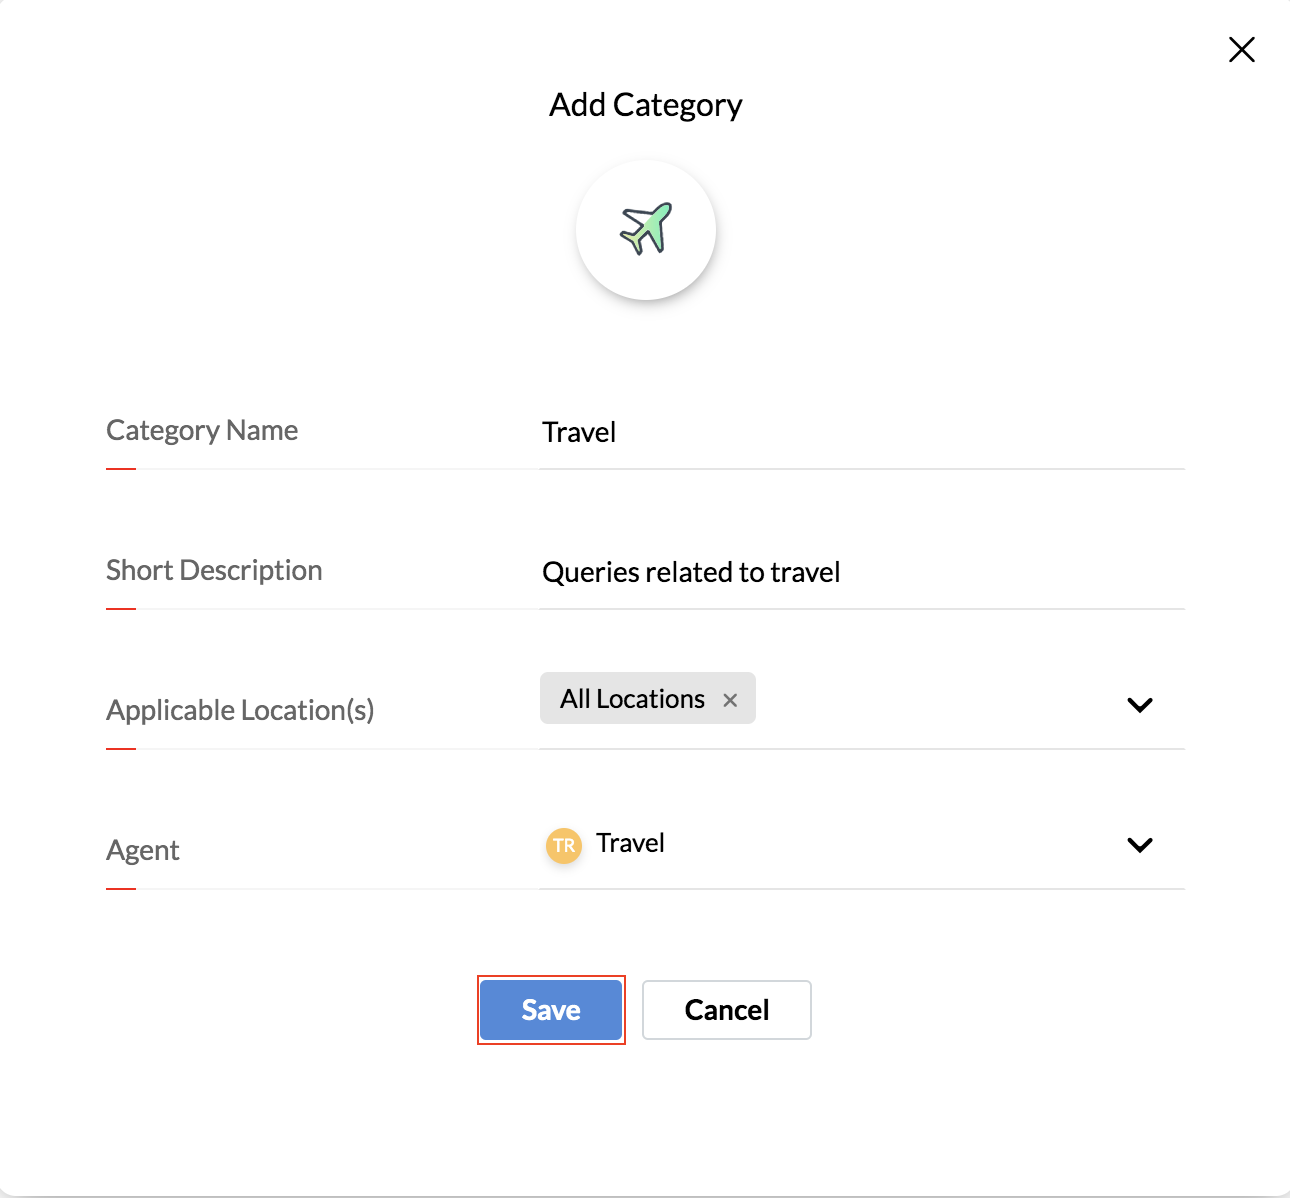
- Select the locations under Applicable Locations.
- Select the agent for this category.
- Click Save.
The new category is now in a draft mode.

Before publishing the category, the following actions can be done:
Add Agents
Tag more agents to specific locations.

Add Subcategories
Add subcategories and tag agents to each of them.
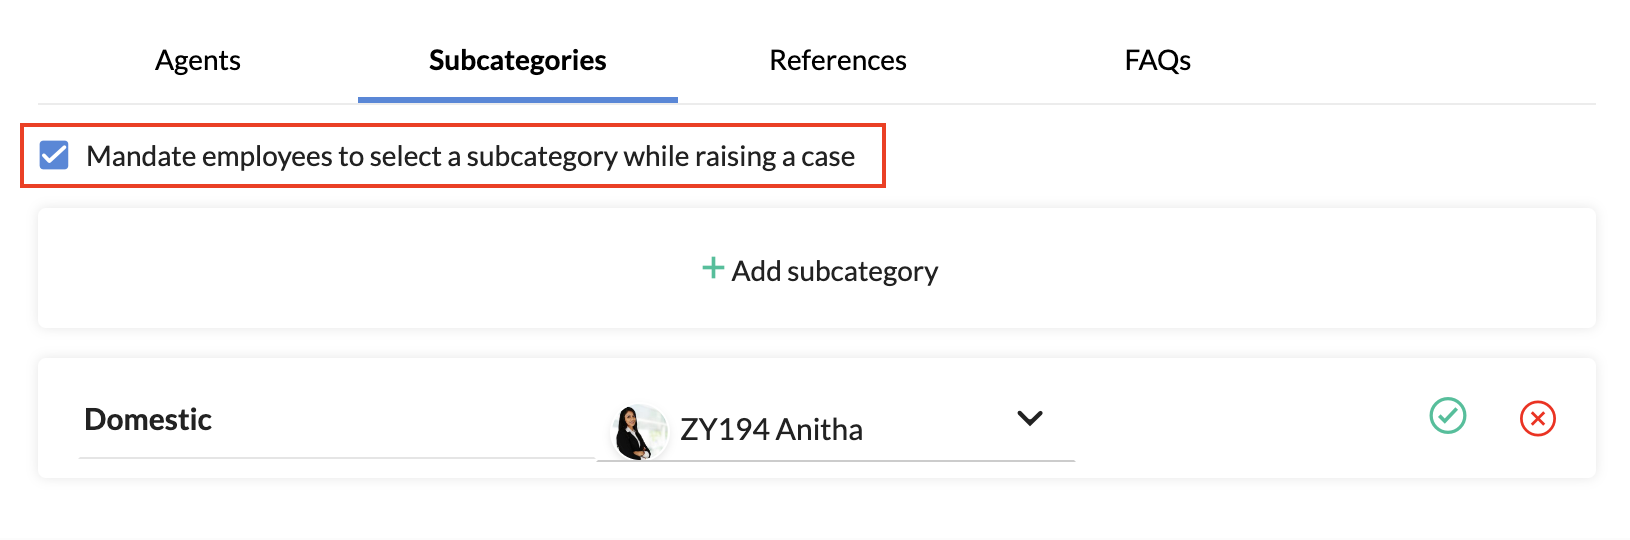
If you want employees to compulsorily select a subcategory for their case, check Mandate employees to select a subcategory while raising a case.
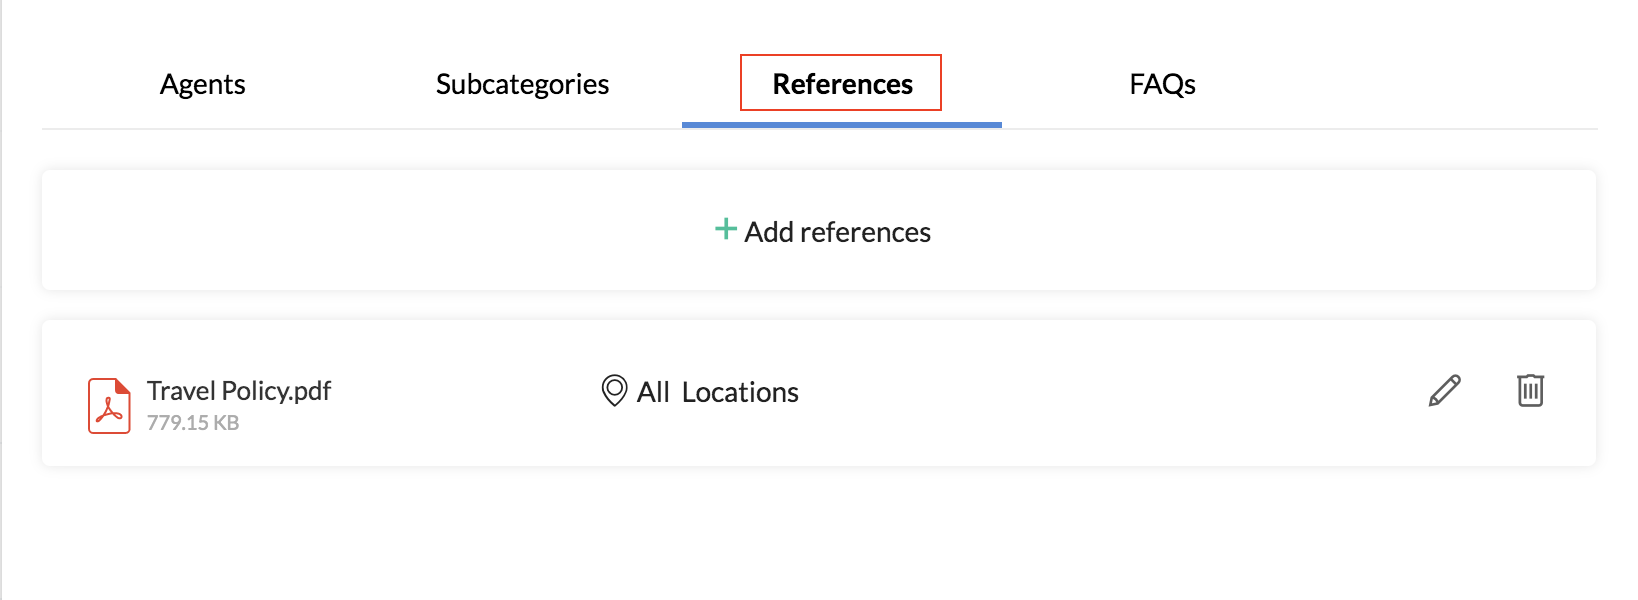
Add References
Add references such as documents or URLs for this category.
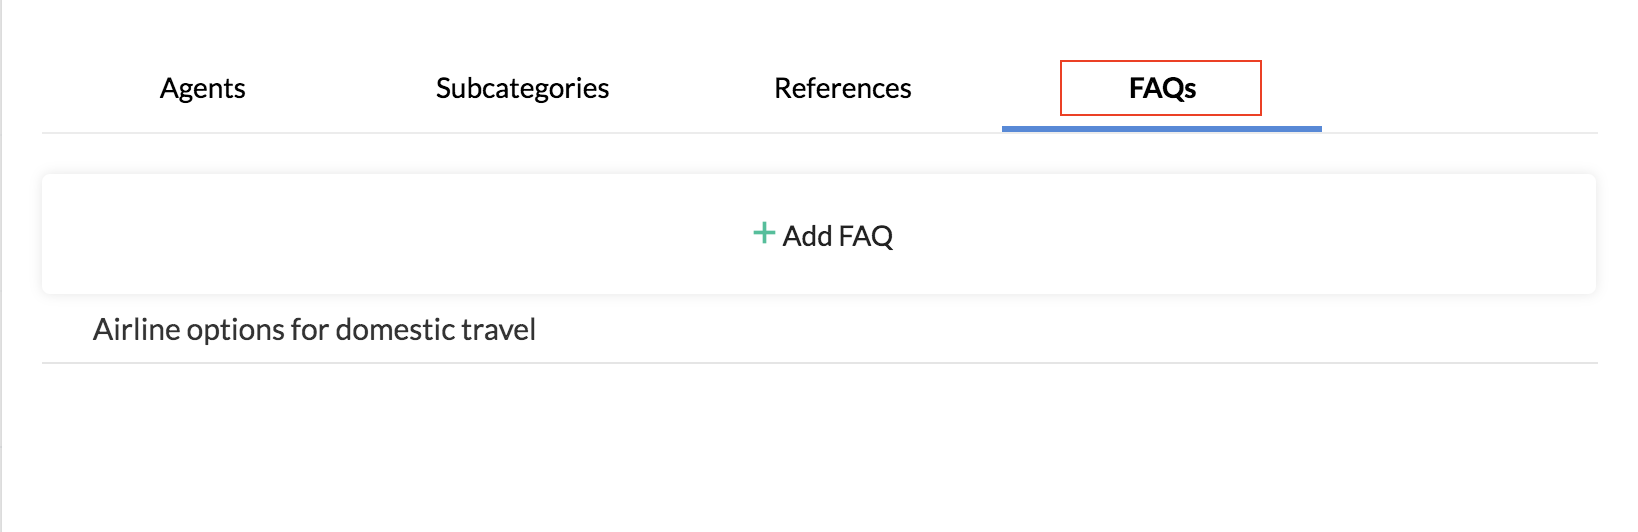
Add FAQs
Add frequently asked questions that are related to this category.
Once the configuration is complete, click Publish on the top right to make this category viewable to the user and allow them to raise queries.
The category, along with agents, subcategories, references, and FAQs can be edited using the edit(pencil) icon. While editing the category, a prefix can also be given. This will be displayed alongside the category name and beside any case numbers raised in that category. For example, if TR is given as a prefix for the travel category, the case number will be displayed as TR003.
Adding Cases Admin
The Super Administrator can assign an employee as a Case Admin, A Case Admin will be able to access the settings and data of Cases. Additionally, Case Admins can assign another employee as a Case Admin.
To add a Cases Admin,
- Go to Cases > Settings > Permissions.

- Click Add Cases Admin.
- Select the Admin whom you want to assign as Cases Admin.
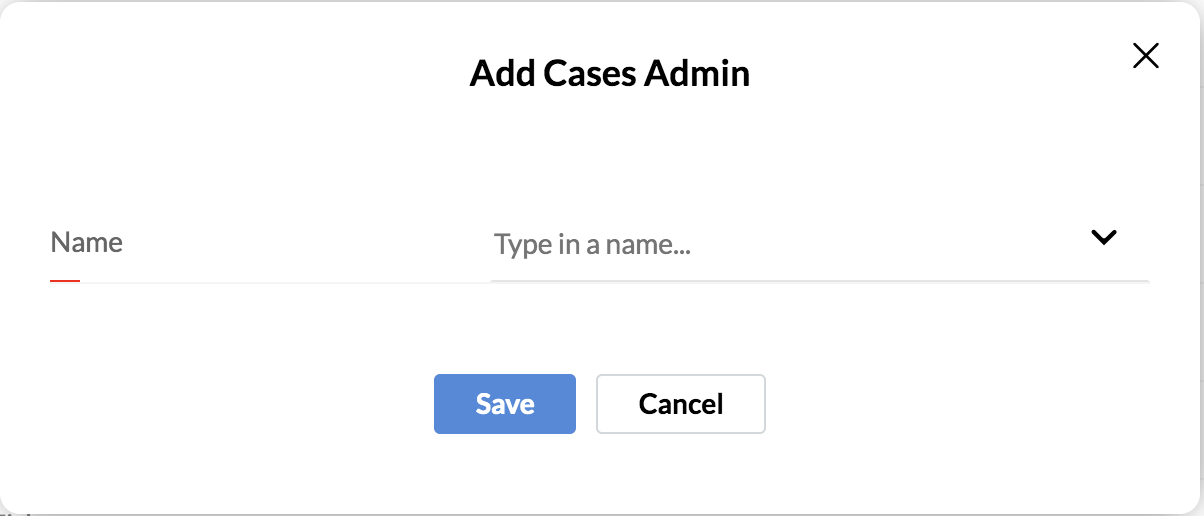
- Click Save.
You can only assign existing Admins as Cases Admins. You can assign more than one Cases Admin by following these same steps given above.
To remove a Cases Admin, click the Delete icon beside the Cases Admin you want to delete and click Remove.
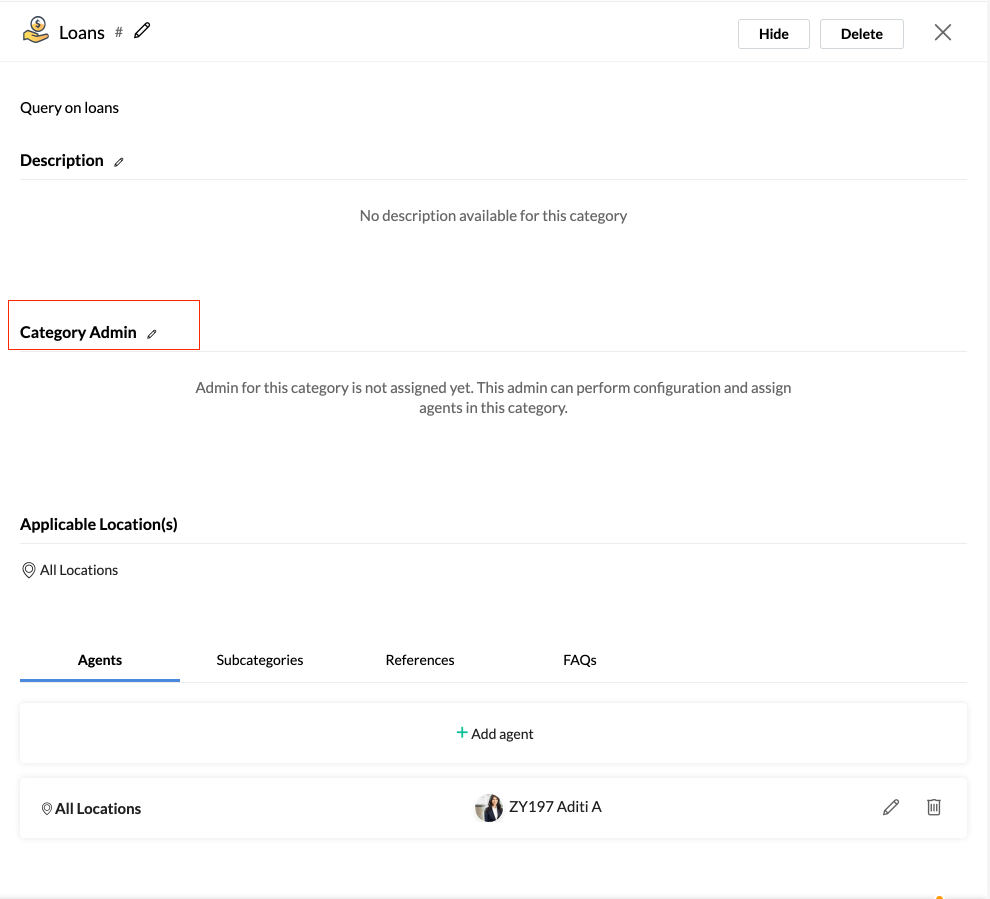
Adding Category Admin
Once a new category is created, you can assign the category admin in the following way:
- Click on the edit icon in the Category Admin section and select a user,department or group from the drop-down.
- Select the checkbox to stop auto assigning cases. The category admin will have to review all new cases and assign them manually.
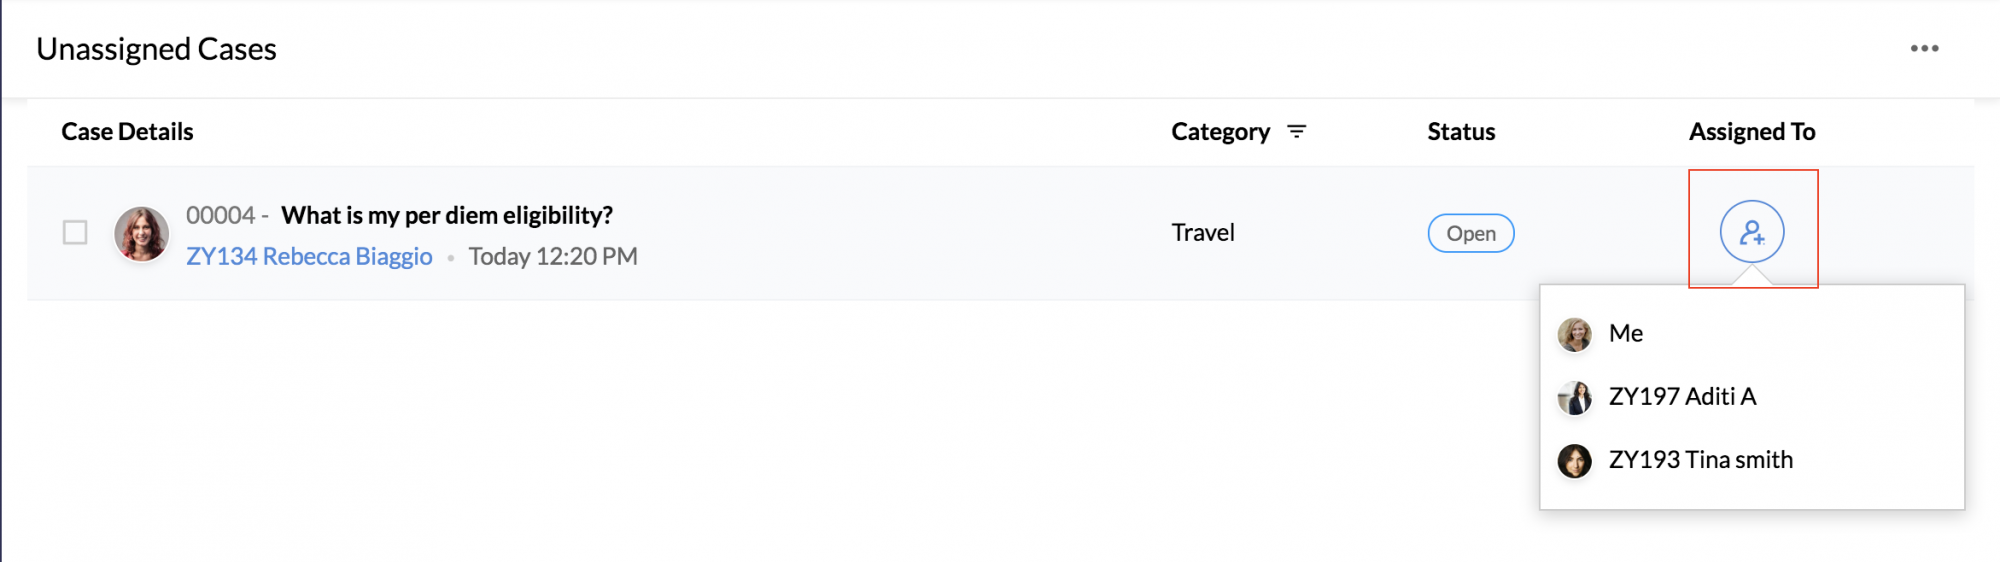
Case assignment by category admin
A category admin can assign or unassign an agent from any case raised in their category. Here's how:
To assign an agent to a case:
- From the home page, go to Cases > Views > Unmanaged.
- Click on the case you want to assign an agent to.
- Click on the agent drop-down and tag the agent you want to assign.
To unassign an agent to a case:
- From the home page, go to Cases > Views > All Cases.
- Click on the case you want to unassign the agent from.
- Click on the ellipsis icon in the top-right corner.
- Select Unassign. The agent will no longer be associated with the case.
Views
The Views tab under Cases provides different views by categorizing the cases into subsets.
1. My cases: All the cases for which the user is assigned as the agent will be shown.
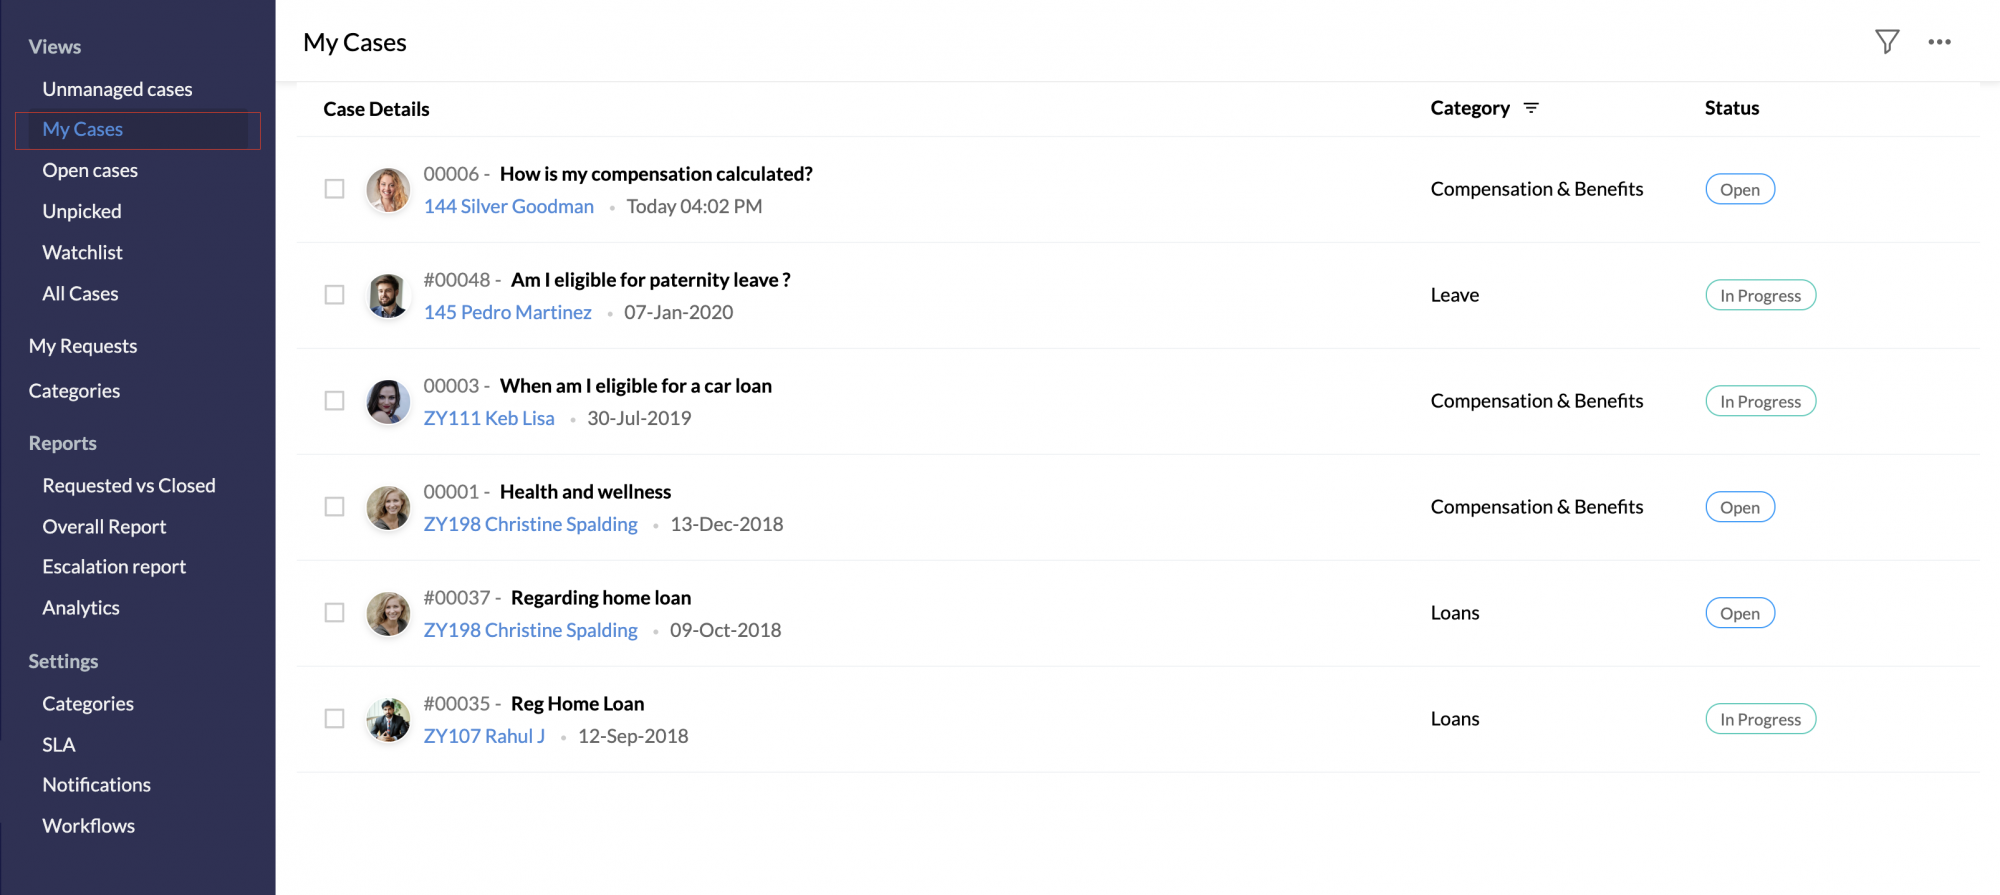
2. Open cases: All cases with an Open or In-Progress status will be shown
3. Watchlist: All cases in which the user has been @mentioned will be shown.
4. Unmanaged: All cases that are yet to be assigned to an agent by the category admin will be shown.
5. Unpicked: All cases which are assigned to a department or group but not to an agent yet will be shown.
6. All cases: The admin will be able to view all the cases listed.
Frequently Asked Questions (FAQs)
An employee can refer to FAQs to find existing answers to their questions. Both Admin and Agents can view, create, edit and delete FAQs, however Agents are limited to only the FAQs of their category.
![]()
Creating an FAQ
To create an FAQ,
1. Navigate to Cases > Categories
- Agents will need to hover over the Agent to edit and add FAQs.
- Admins can navigate to Cases > Settings > Categories and modify all settings.
2. Click Add next to FAQ.
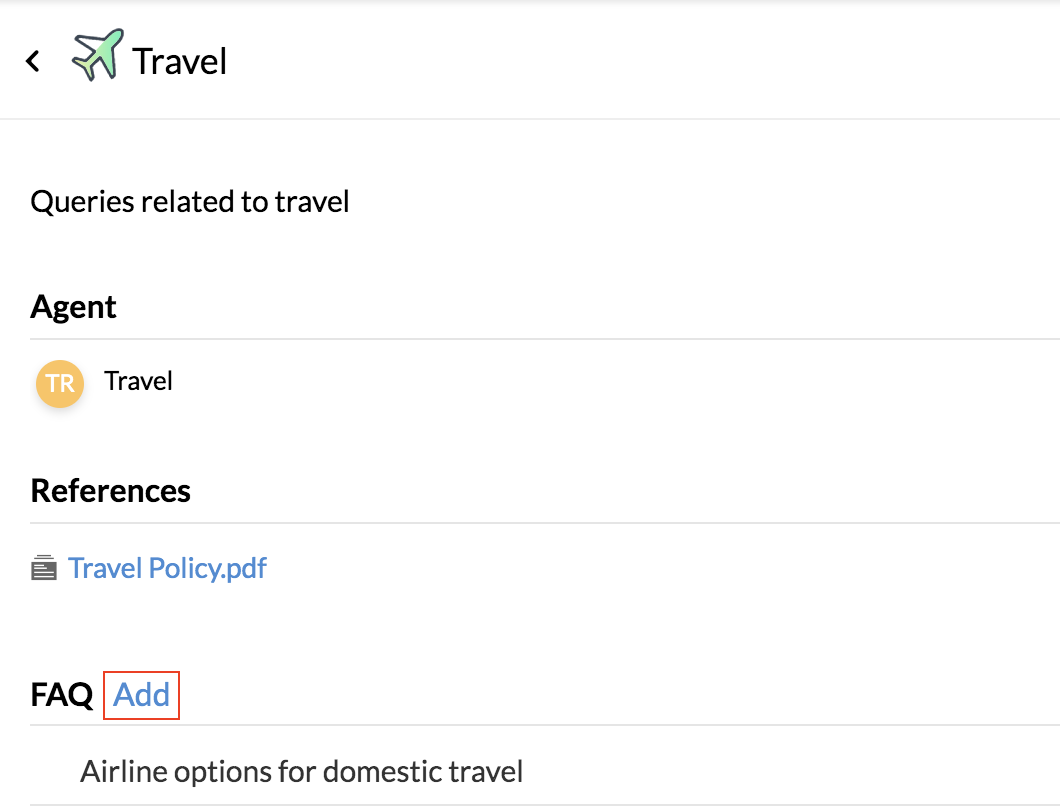
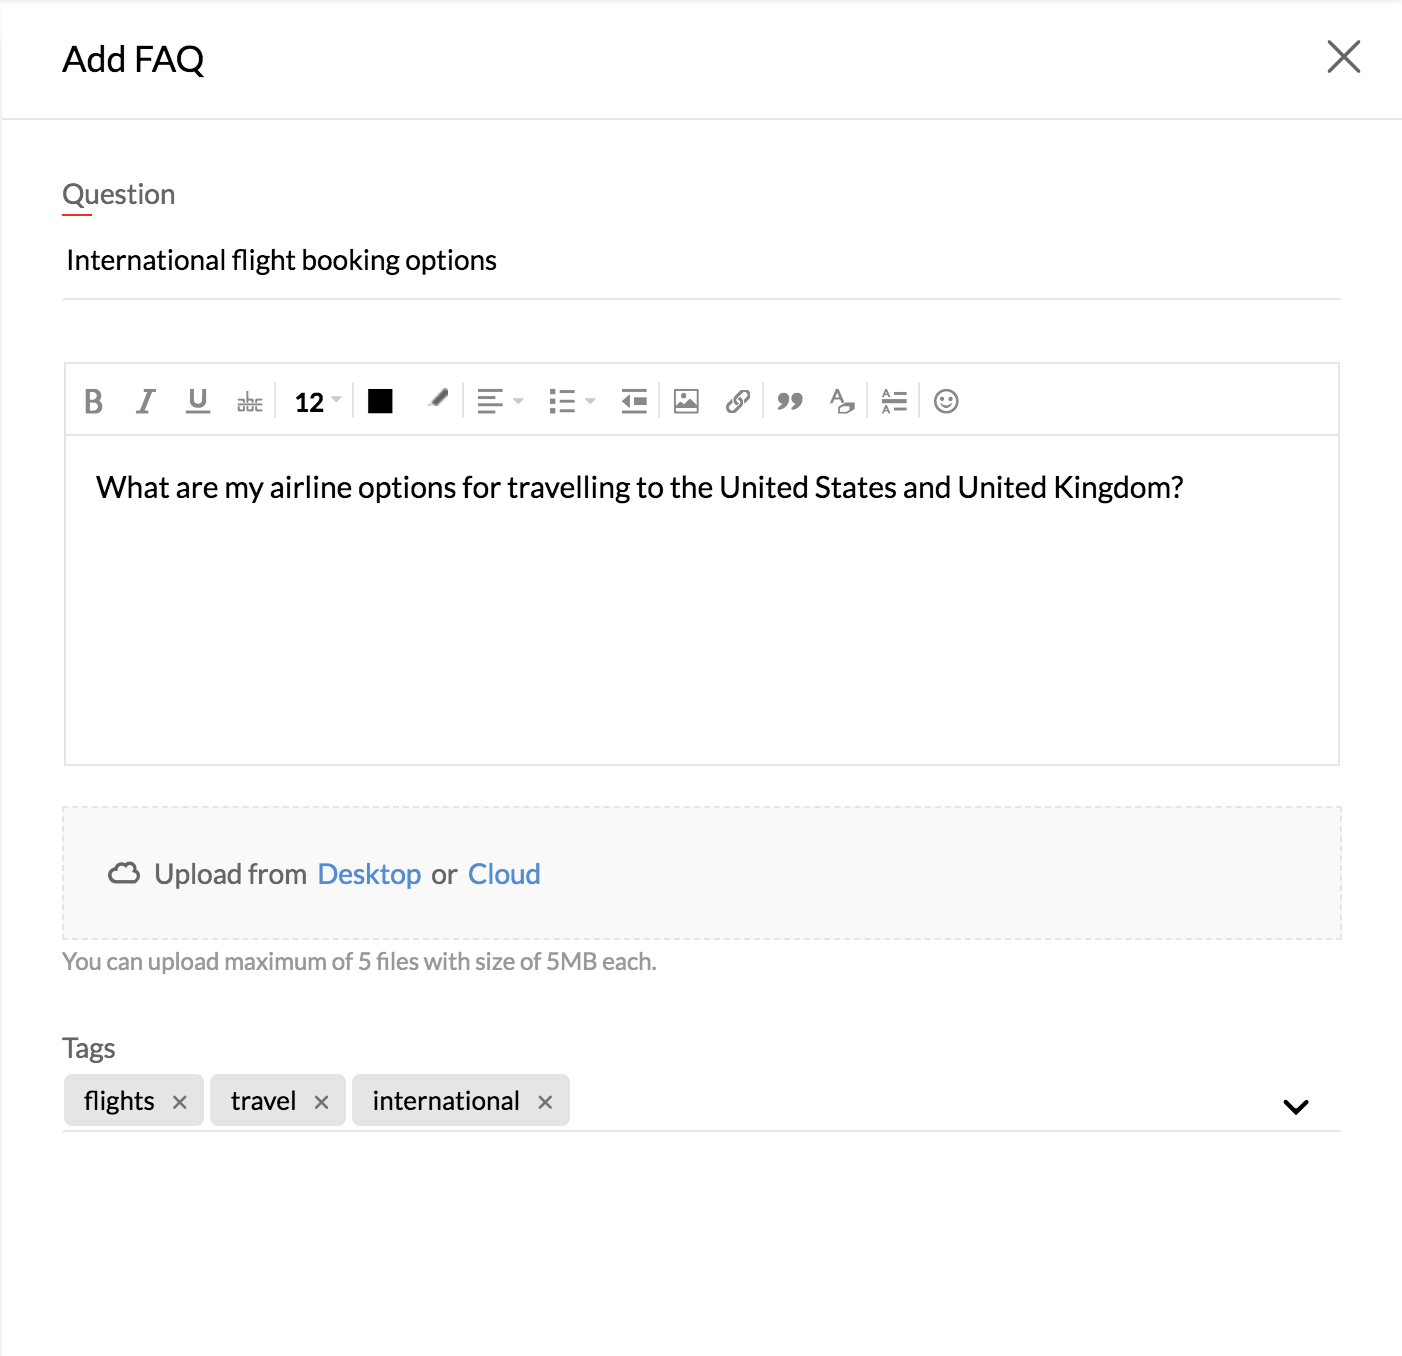
3. Fill in the question and the response.
4. Click Save.
Editing and Deleting FAQs
To edit an FAQ,
- Click on the pencil icon on the right of the FAQ
- Make the necessary edits
- Click Update

To delete an FAQ,
- Click on the delete icon at the right of the FAQ
- Click Confirm

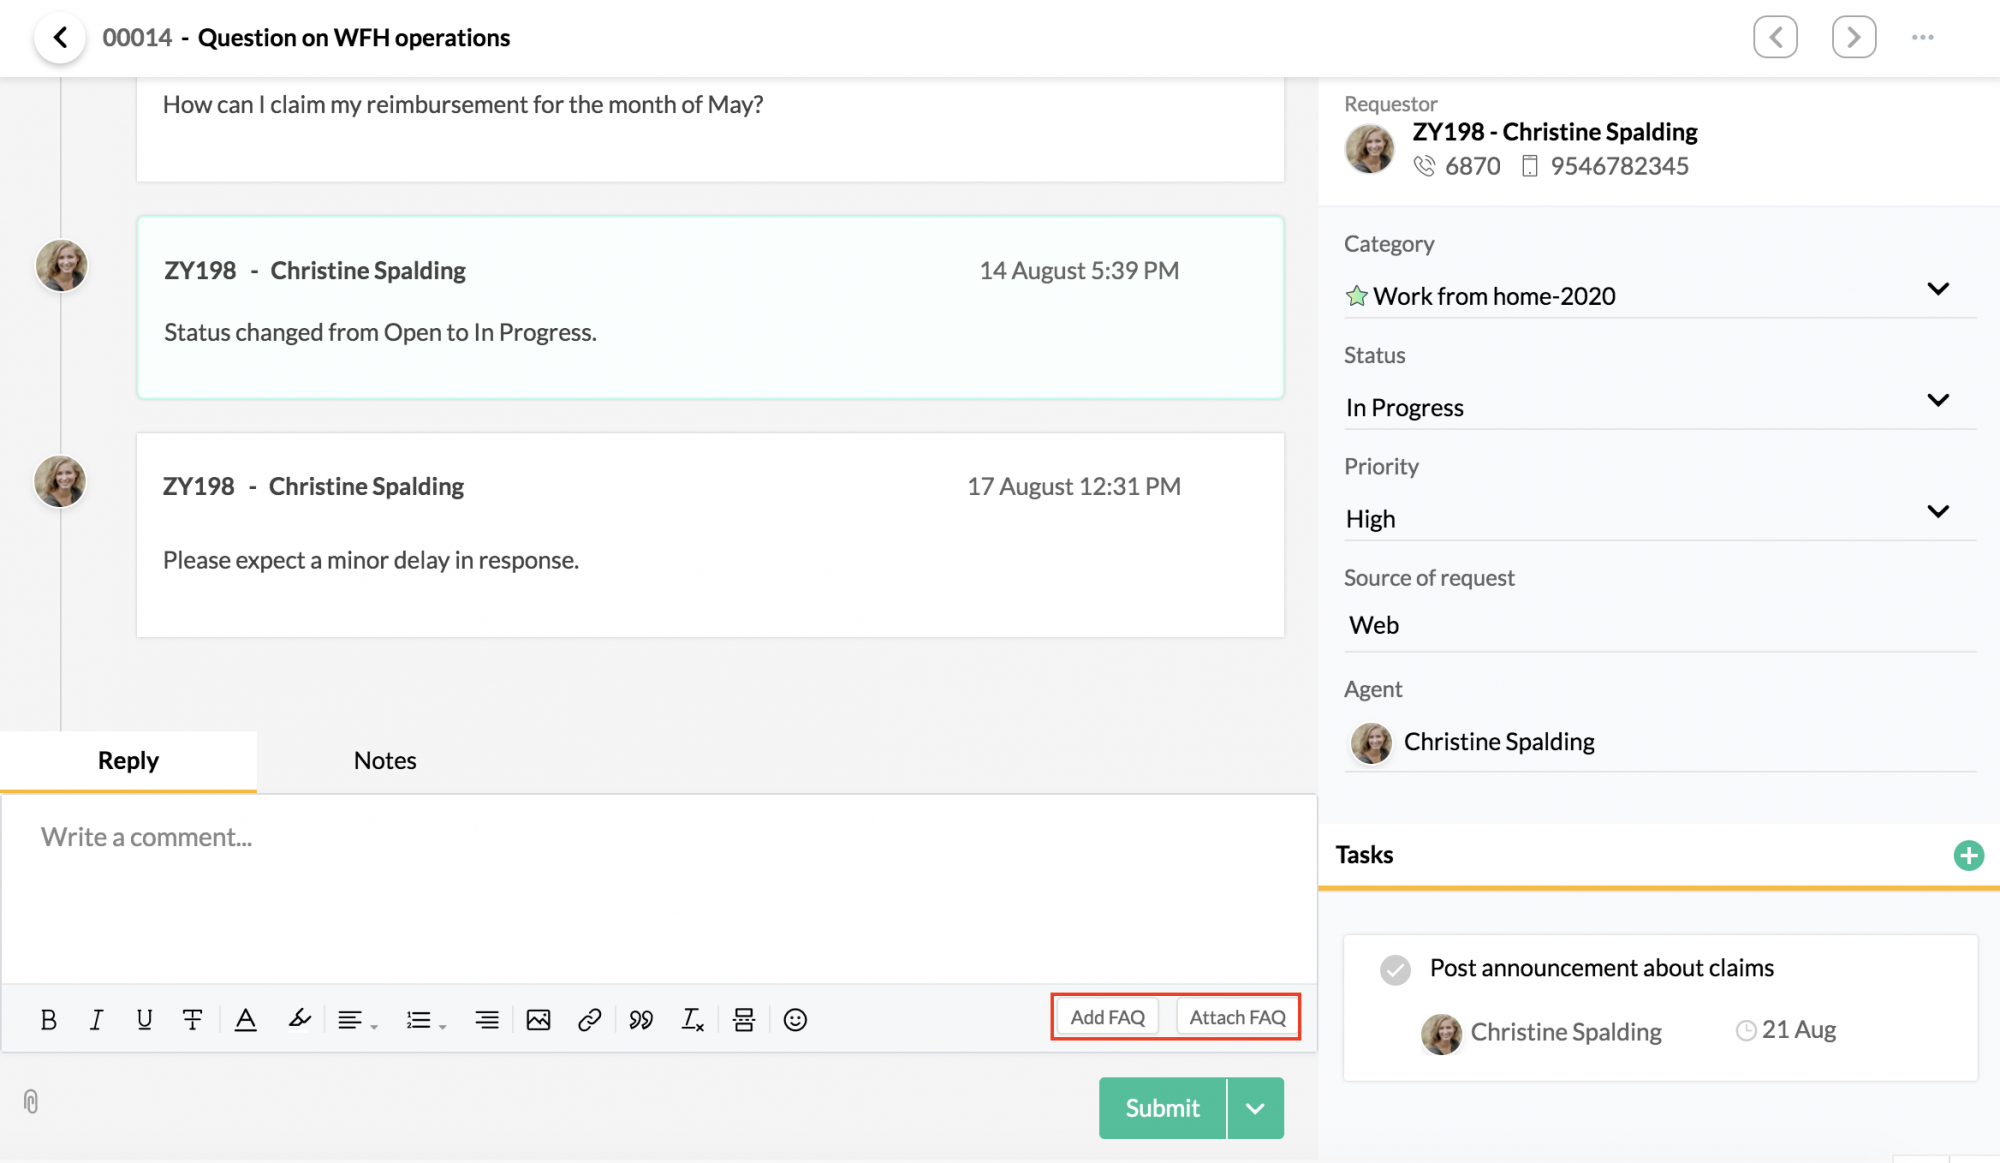
Attach and Add FAQs
When responding to a question, the Agent or the Admin can use existing FAQs, or create new ones to supplement their response.
To attach an existing FAQ to your response,
- Navigate to Cases
- Select the case that you are handling under All Requests, My Requests or Unassigned
- In the comments space, click Attach FAQ.
4. Enter the keywords you're are searching for.
5.Select the relevant FAQ and click Attach FAQ.
The FAQ will be attached as a link in the comments space.
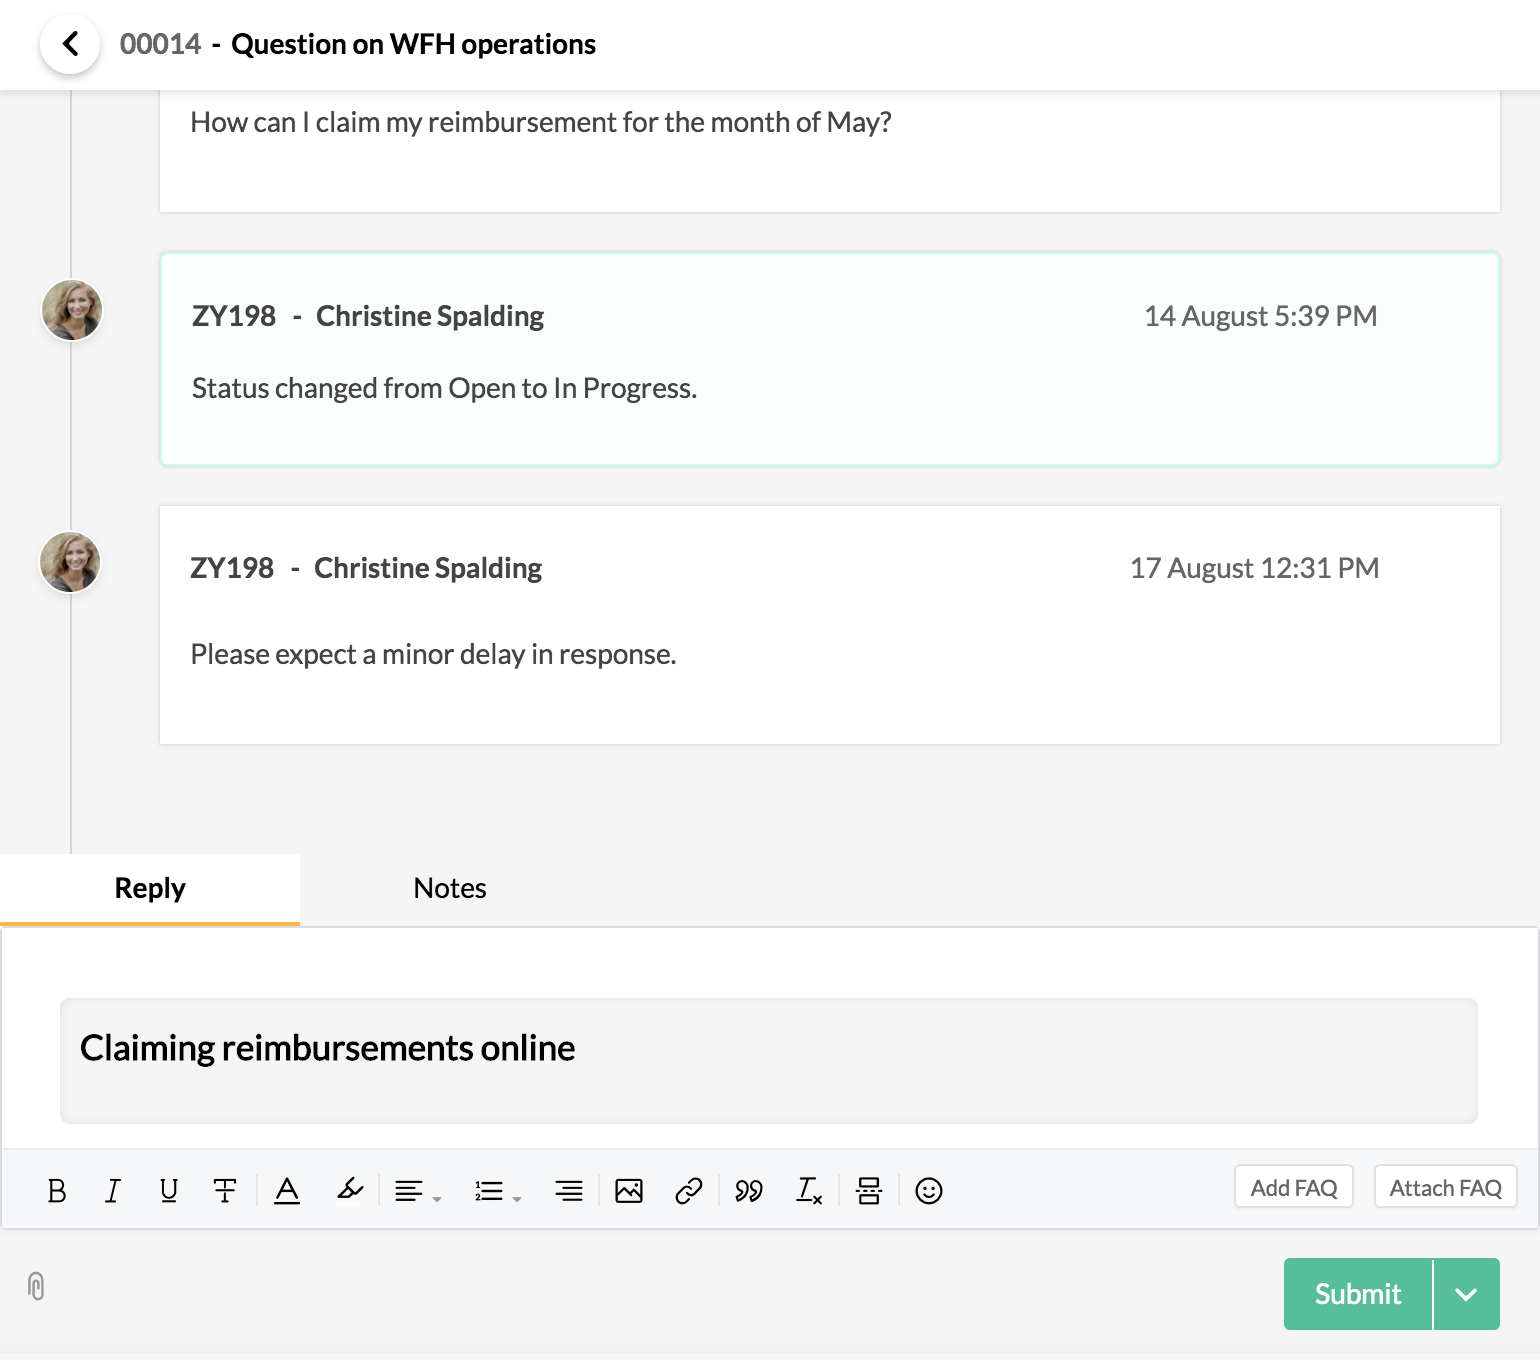
The requester can view the details by clicking on the link.
FAQs can also be created by the Agent or Admin directly from the comments space while responding to a query by using Add FAQ.
The Save and Attach option enables you to save the FAQ and also attach it as a link for the requester to click and view.
Feedback settings
These settings let you define if you want the feedback mechanism to be part of cases and configure some additional settings.
Enable Feedback: If this setting is enabled, an employee will be able to give a rating for how their case was handled. This information will also be available in the feedback report.
When you enable this option, this pop-up will appear.
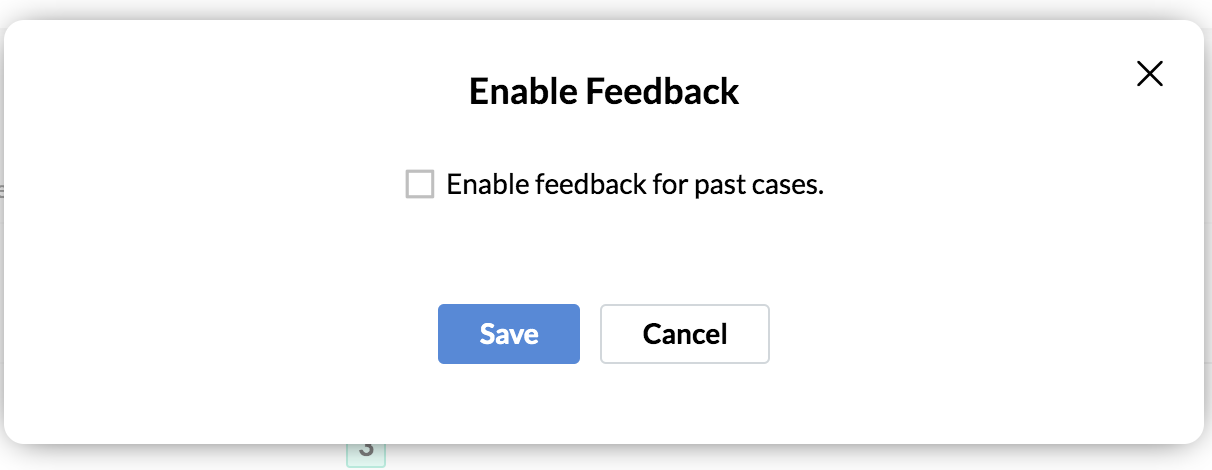
If you want to enable feedback for past cases as well, check Enable feedback for past cases.
Feedback message: Configure the feedback message that will be displayed to the requester.
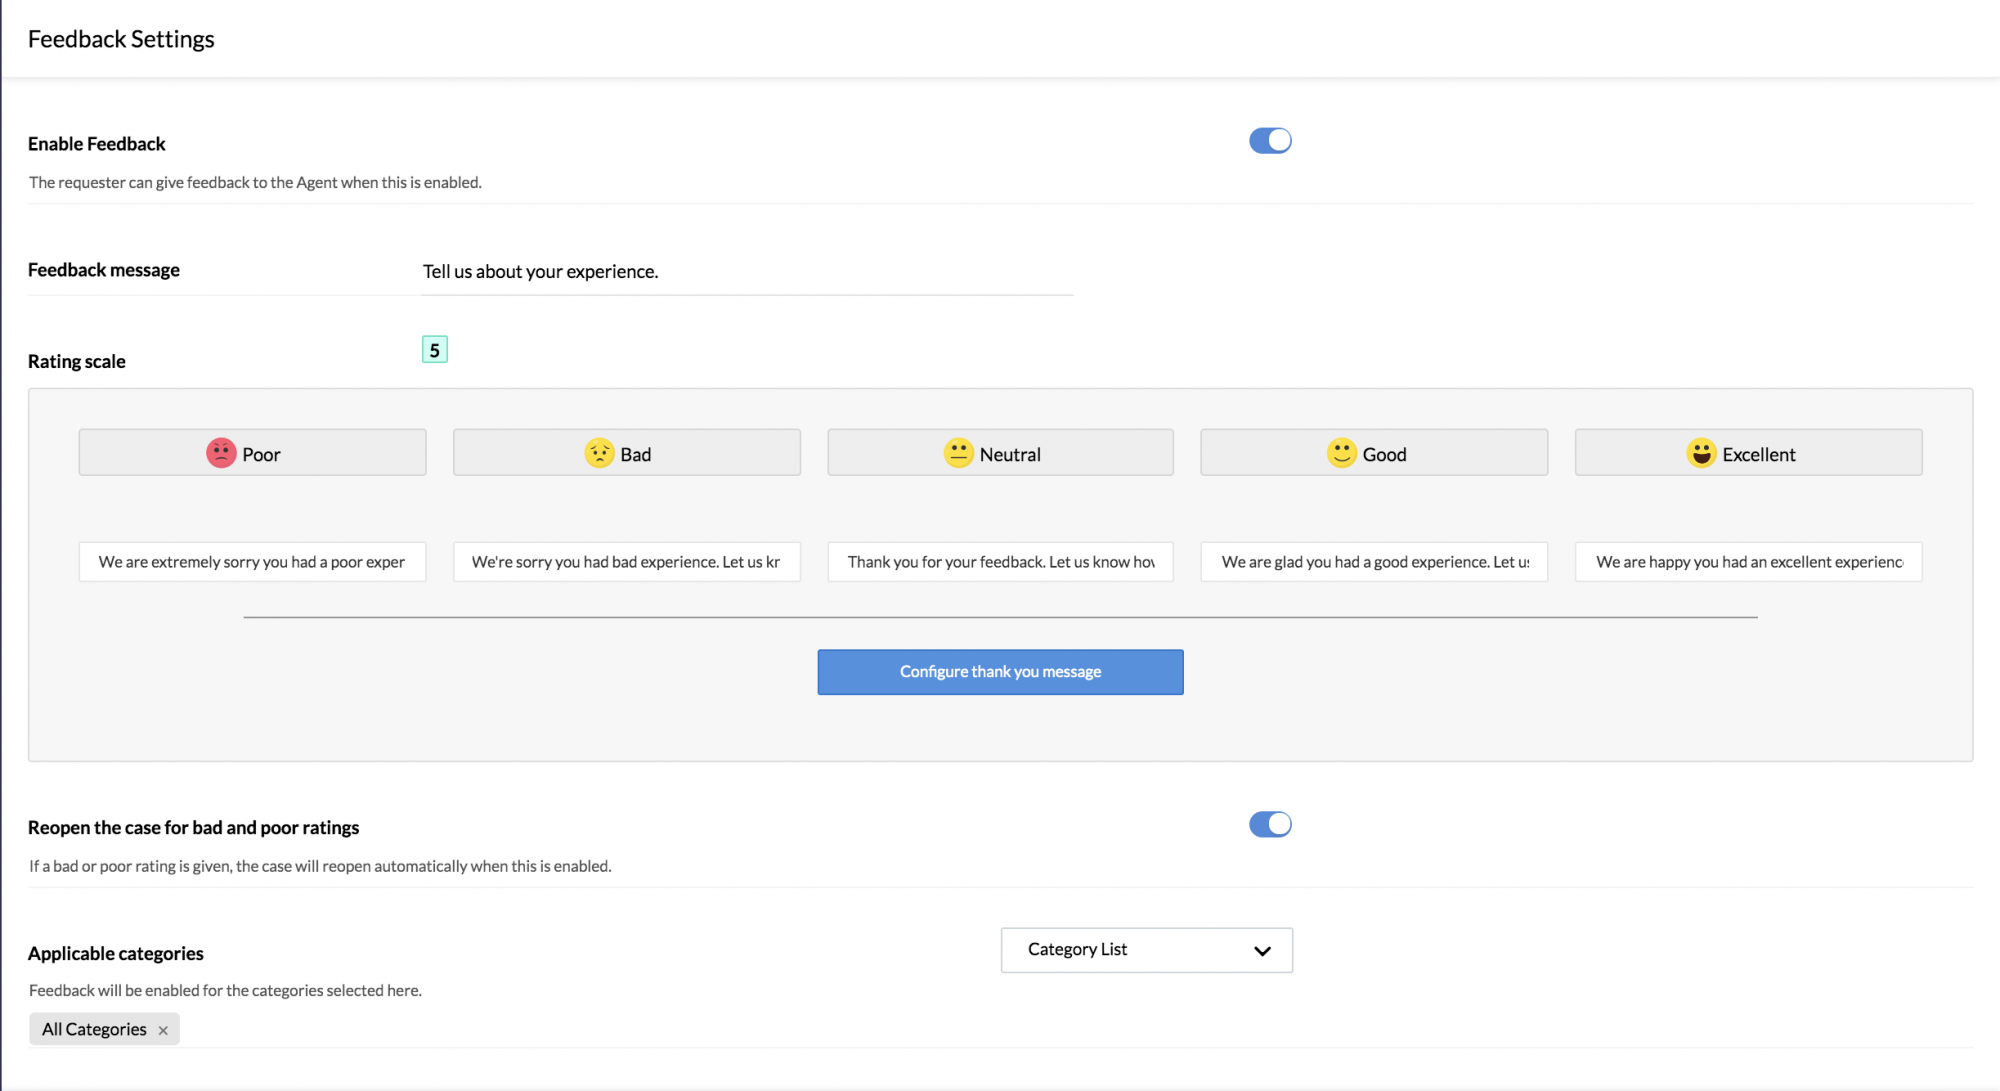
Rating Scale: Select if you want to provide a rating scale out of 3 or 5 for providing feedback. You can edit and customize the rating name, description, and thank you message.
Reopen the case for bad and poor ratings: If you want the case to reopen automatically when a poor or bad rating is given, enable this option. This helps you quickly act on the employee's feedback and work on creating a better experience.
Applicable categories: Select the categories you want to enable this option for.
How is feedback received from the requester?
- When a case is closed, an employee will receive an email with a link to provide feedback.
- When they click the link, a pop-up will appear.
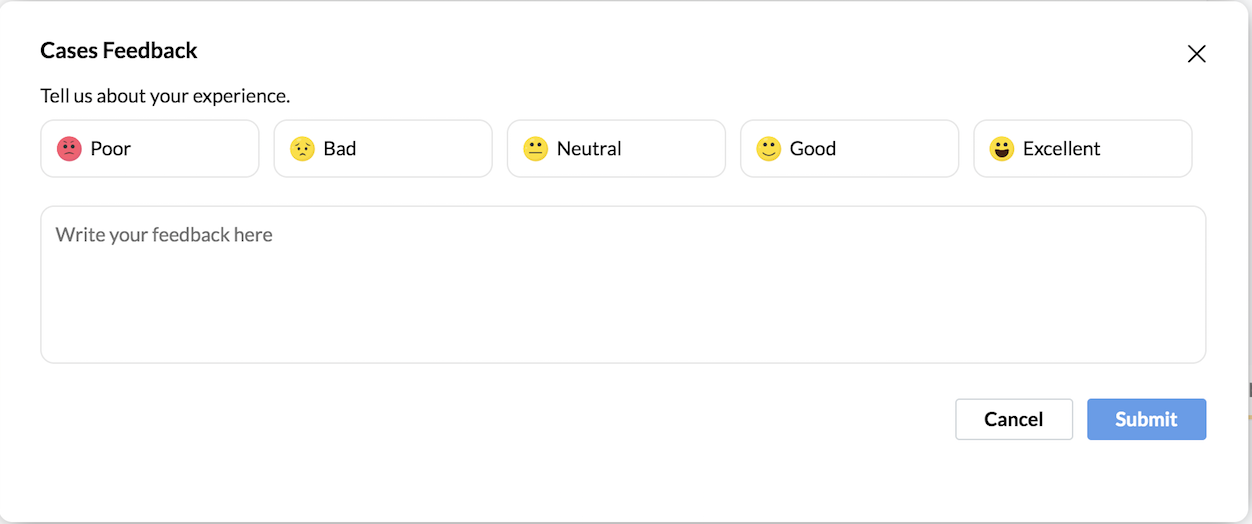
- They employee can then fill their feedback and click Submit.
- The feedback will be added to the Feedback Report.
Alternatively, an employee can give feedback by going to Cases and then My Requests and clicking on the specific case.
Raising a query and resolving a query
When an employee has a query and would like to use Cases to raise, these are steps they should follow:
- From their home page, go to Cases > Home.
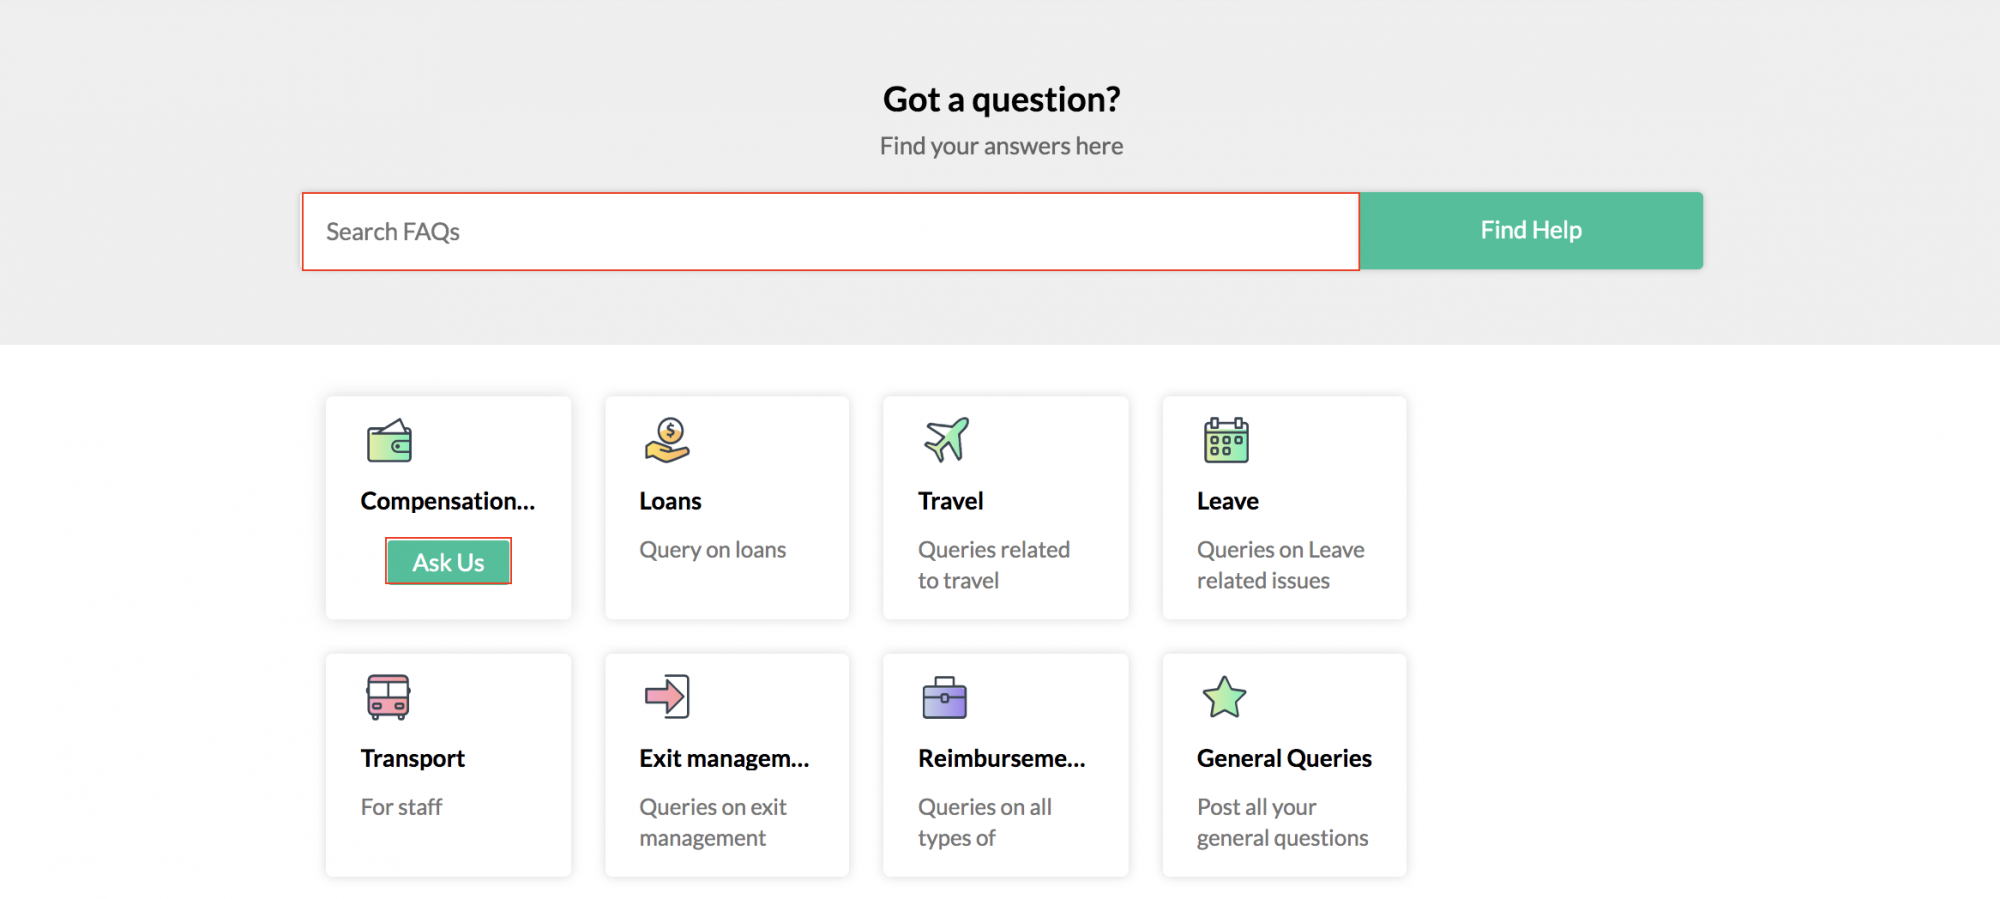
- Type in your question in the search bar to see if any FAQs match your query.
- If no FAQs match, click on the relevant category and click Ask Us.
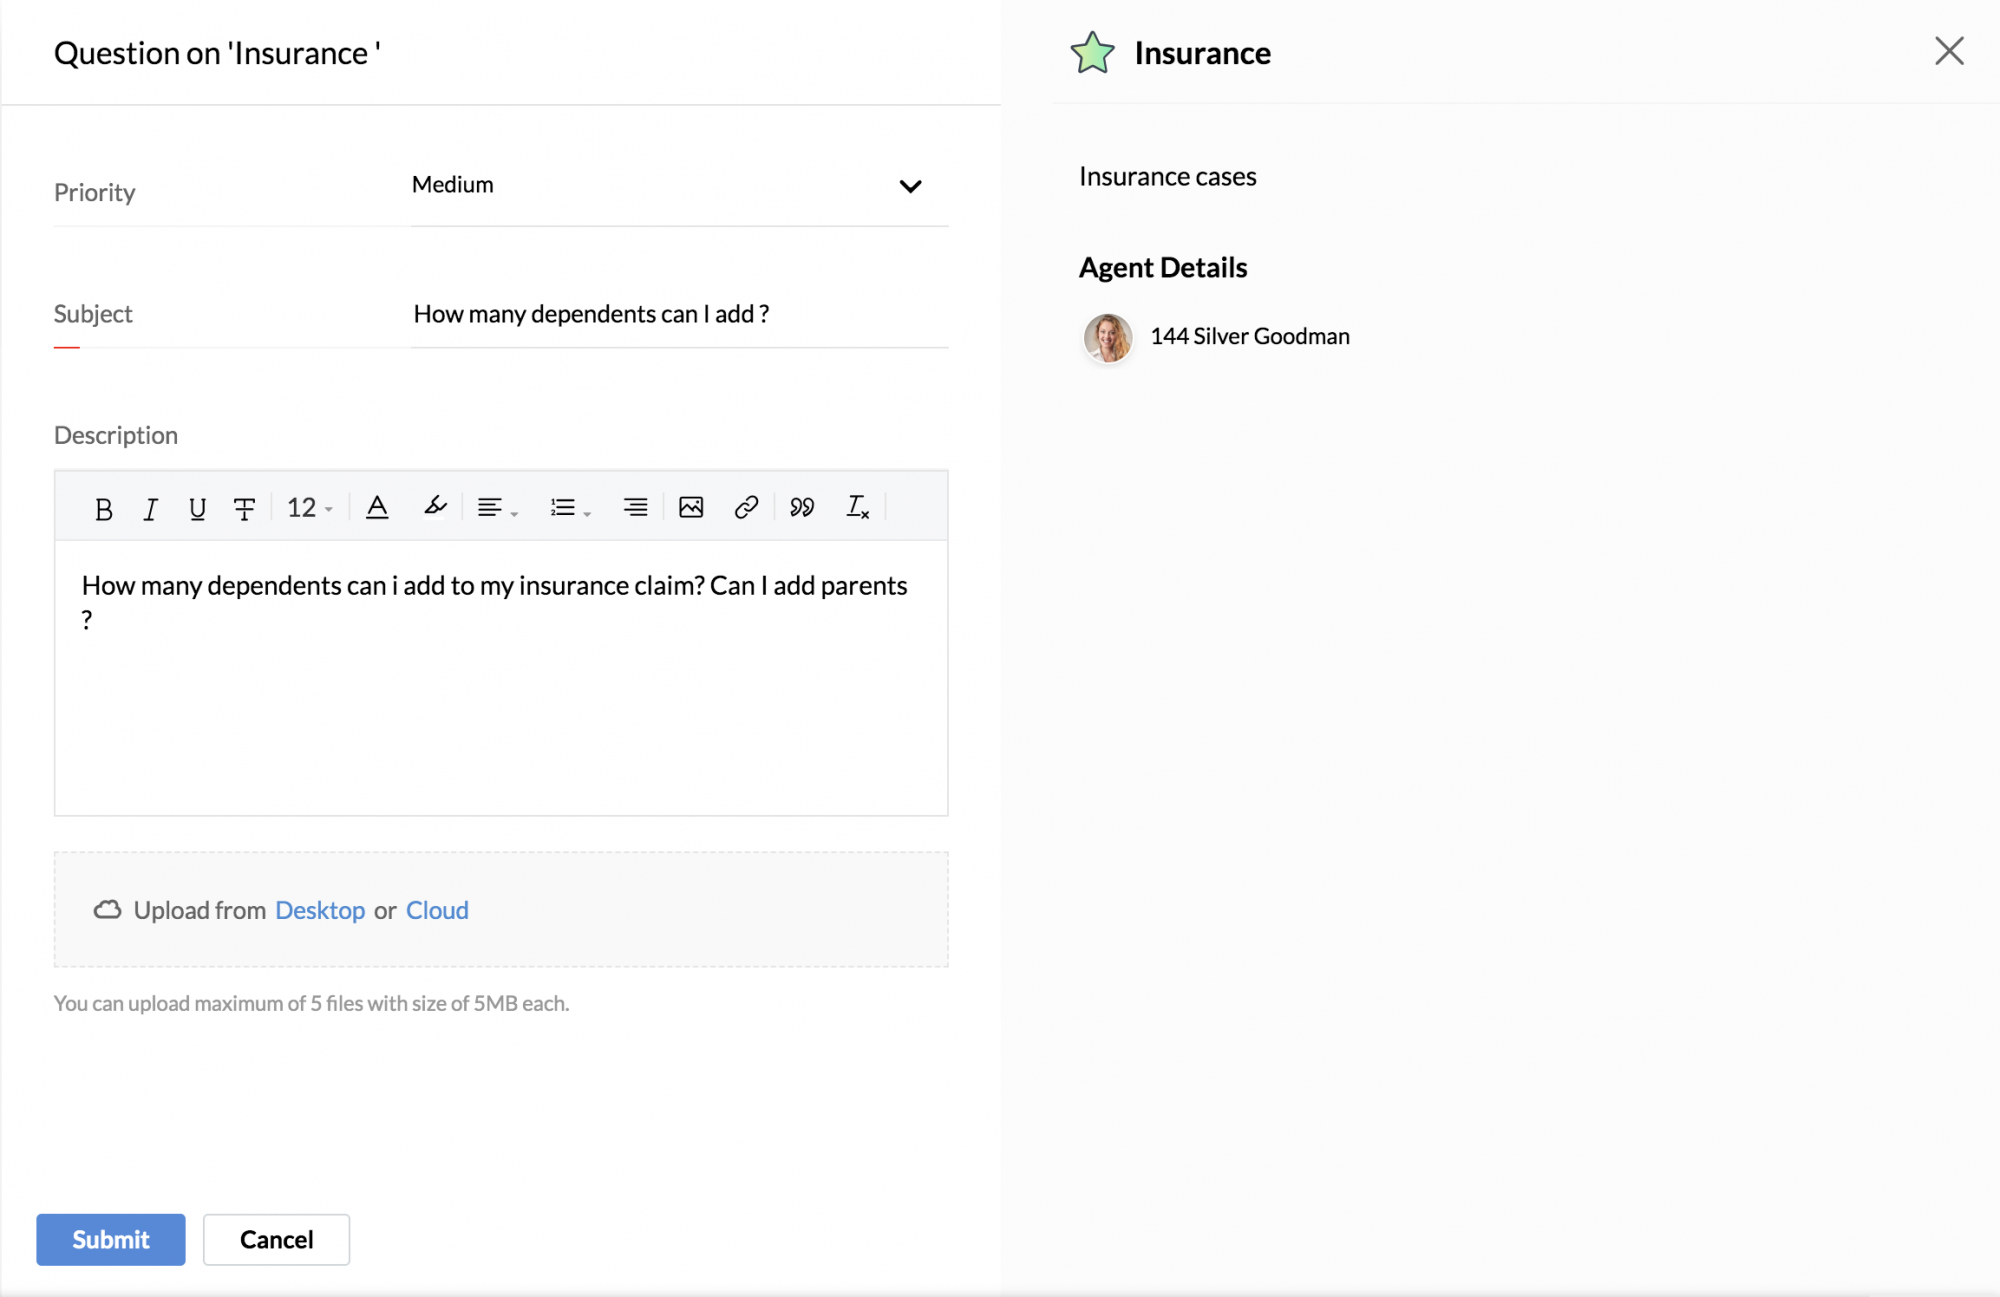
- Type in the query Subject and Description.
- Upload attachments if any.
- Click Submit.
- The raised query and its status can be viewed under Cases > My requests.
- The assigned agent will pick up the query (under My Cases). If the case isn't assigned, they can go to Cases > View > Unassigned and pick the case.
- The agent can respond and chat with the requestor via comments.
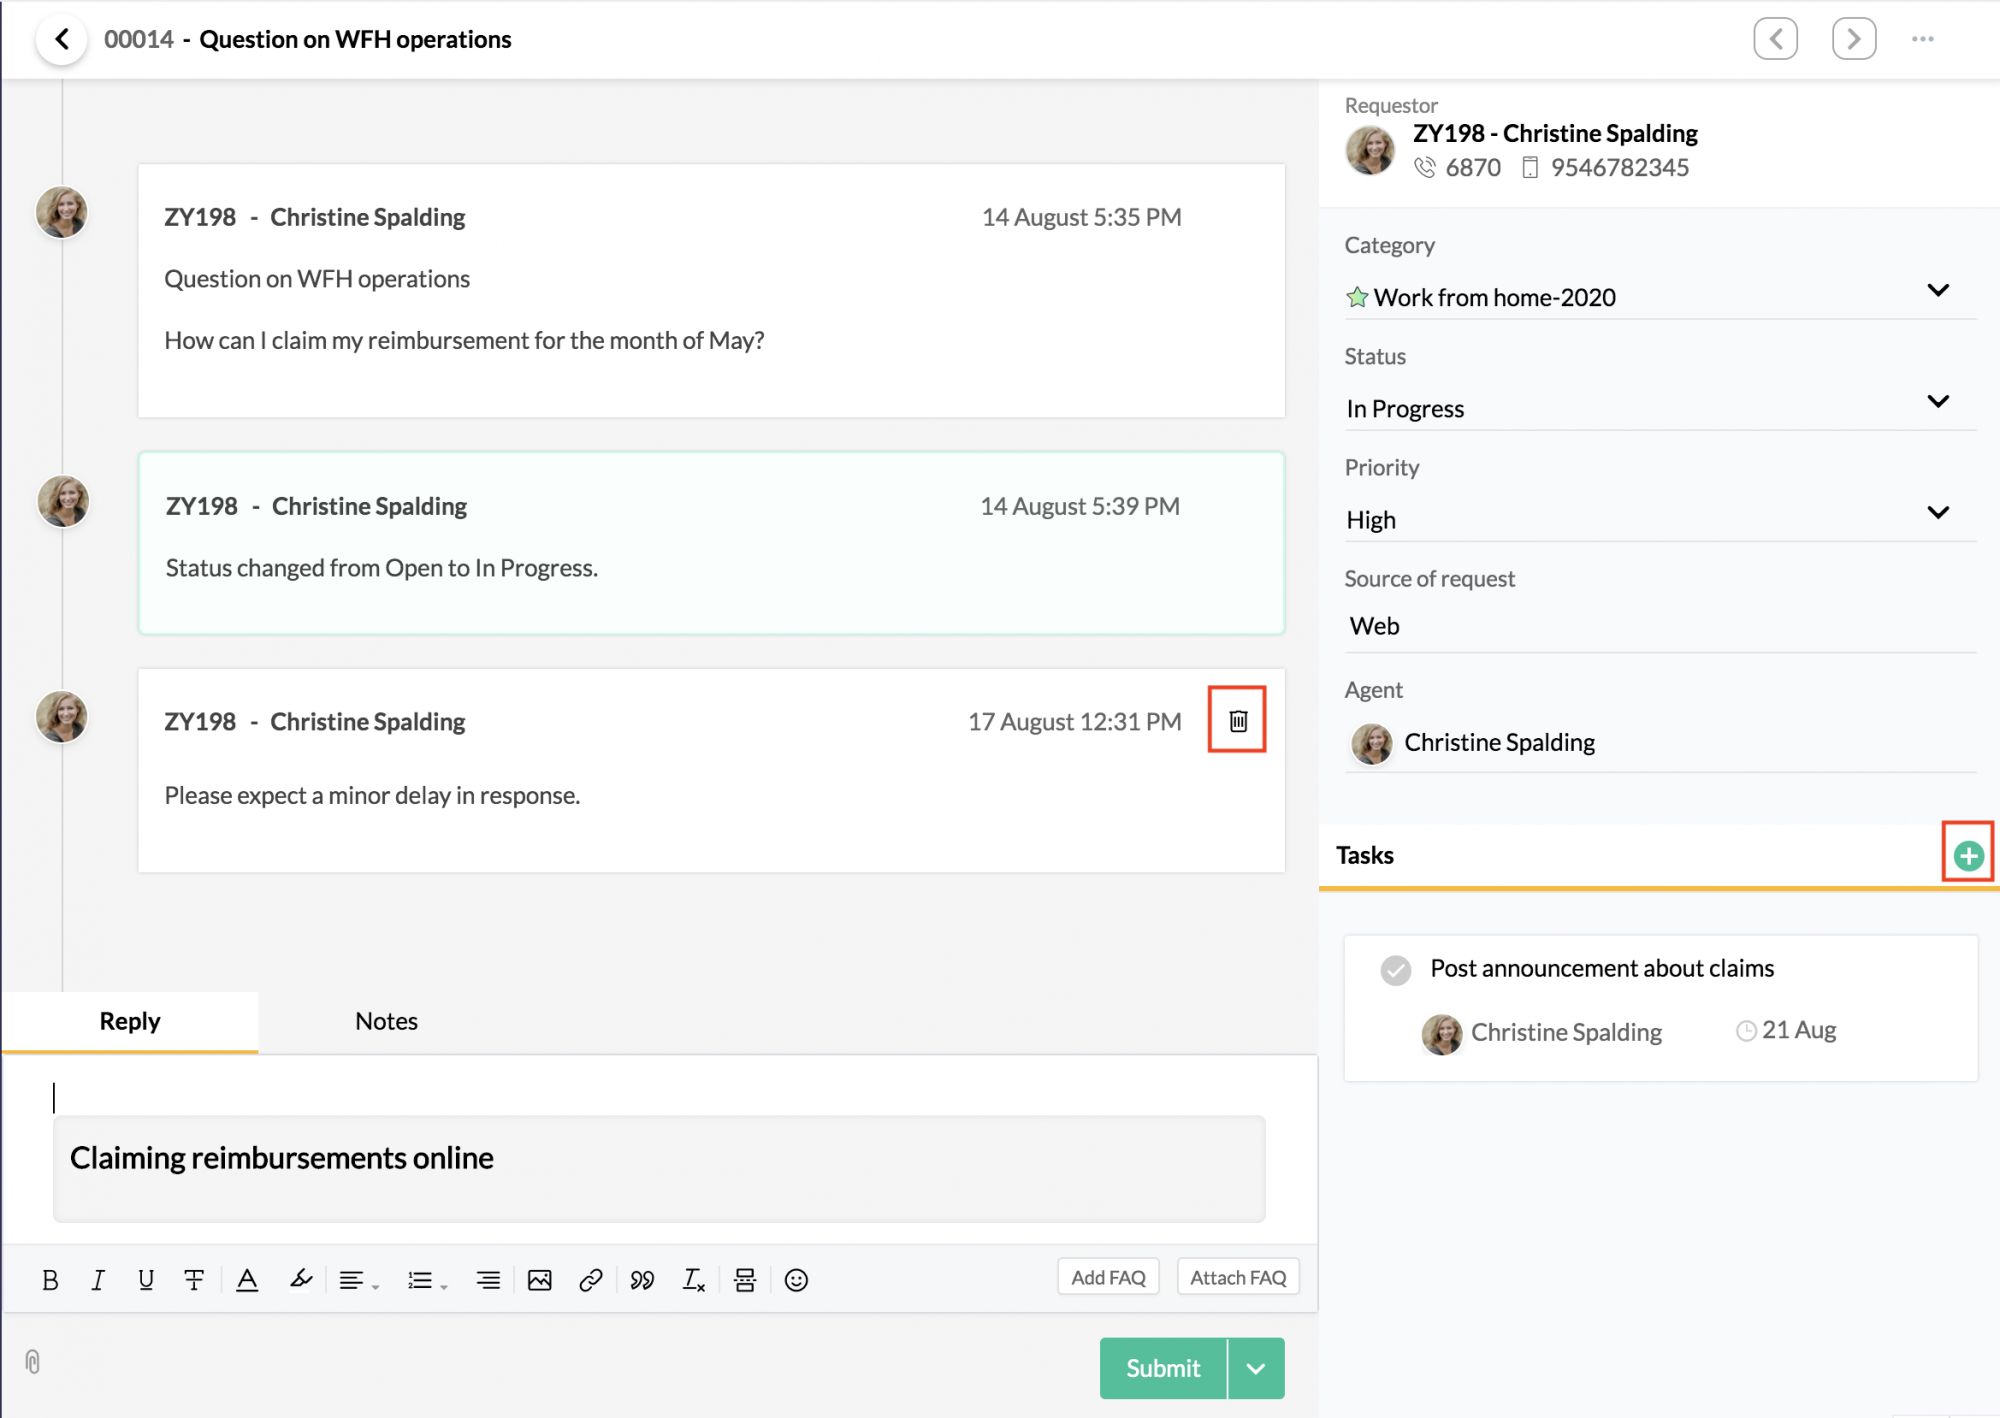
- Comments can be deleted by the person who made them, by clicking on the delete icon beside it.
- Tasks can also be assigned when necessary by clicking Add Task
- When the query has been responded to, click Submit
Unassigning yourself from a case
If you (Agents or Admins) are mistakenly assigned to a case or need to leave it for whatever reason, you can unassign yourself from it.
- From your home page, go to Cases > Views > All Cases
- Click on the respective case
- Click on the ellipsis icon in the right top corner
- Select Unassigned. You will no longer be associated with the case
Canceling a request
To cancel unwanted case requests or requests raised by mistake, follow these steps.
- From your home page, go to Cases > My Requests
- Click on the respective case
- Click on the ellipsis icon in the top right corner
- Click Cancel Request. The case is now canceled.
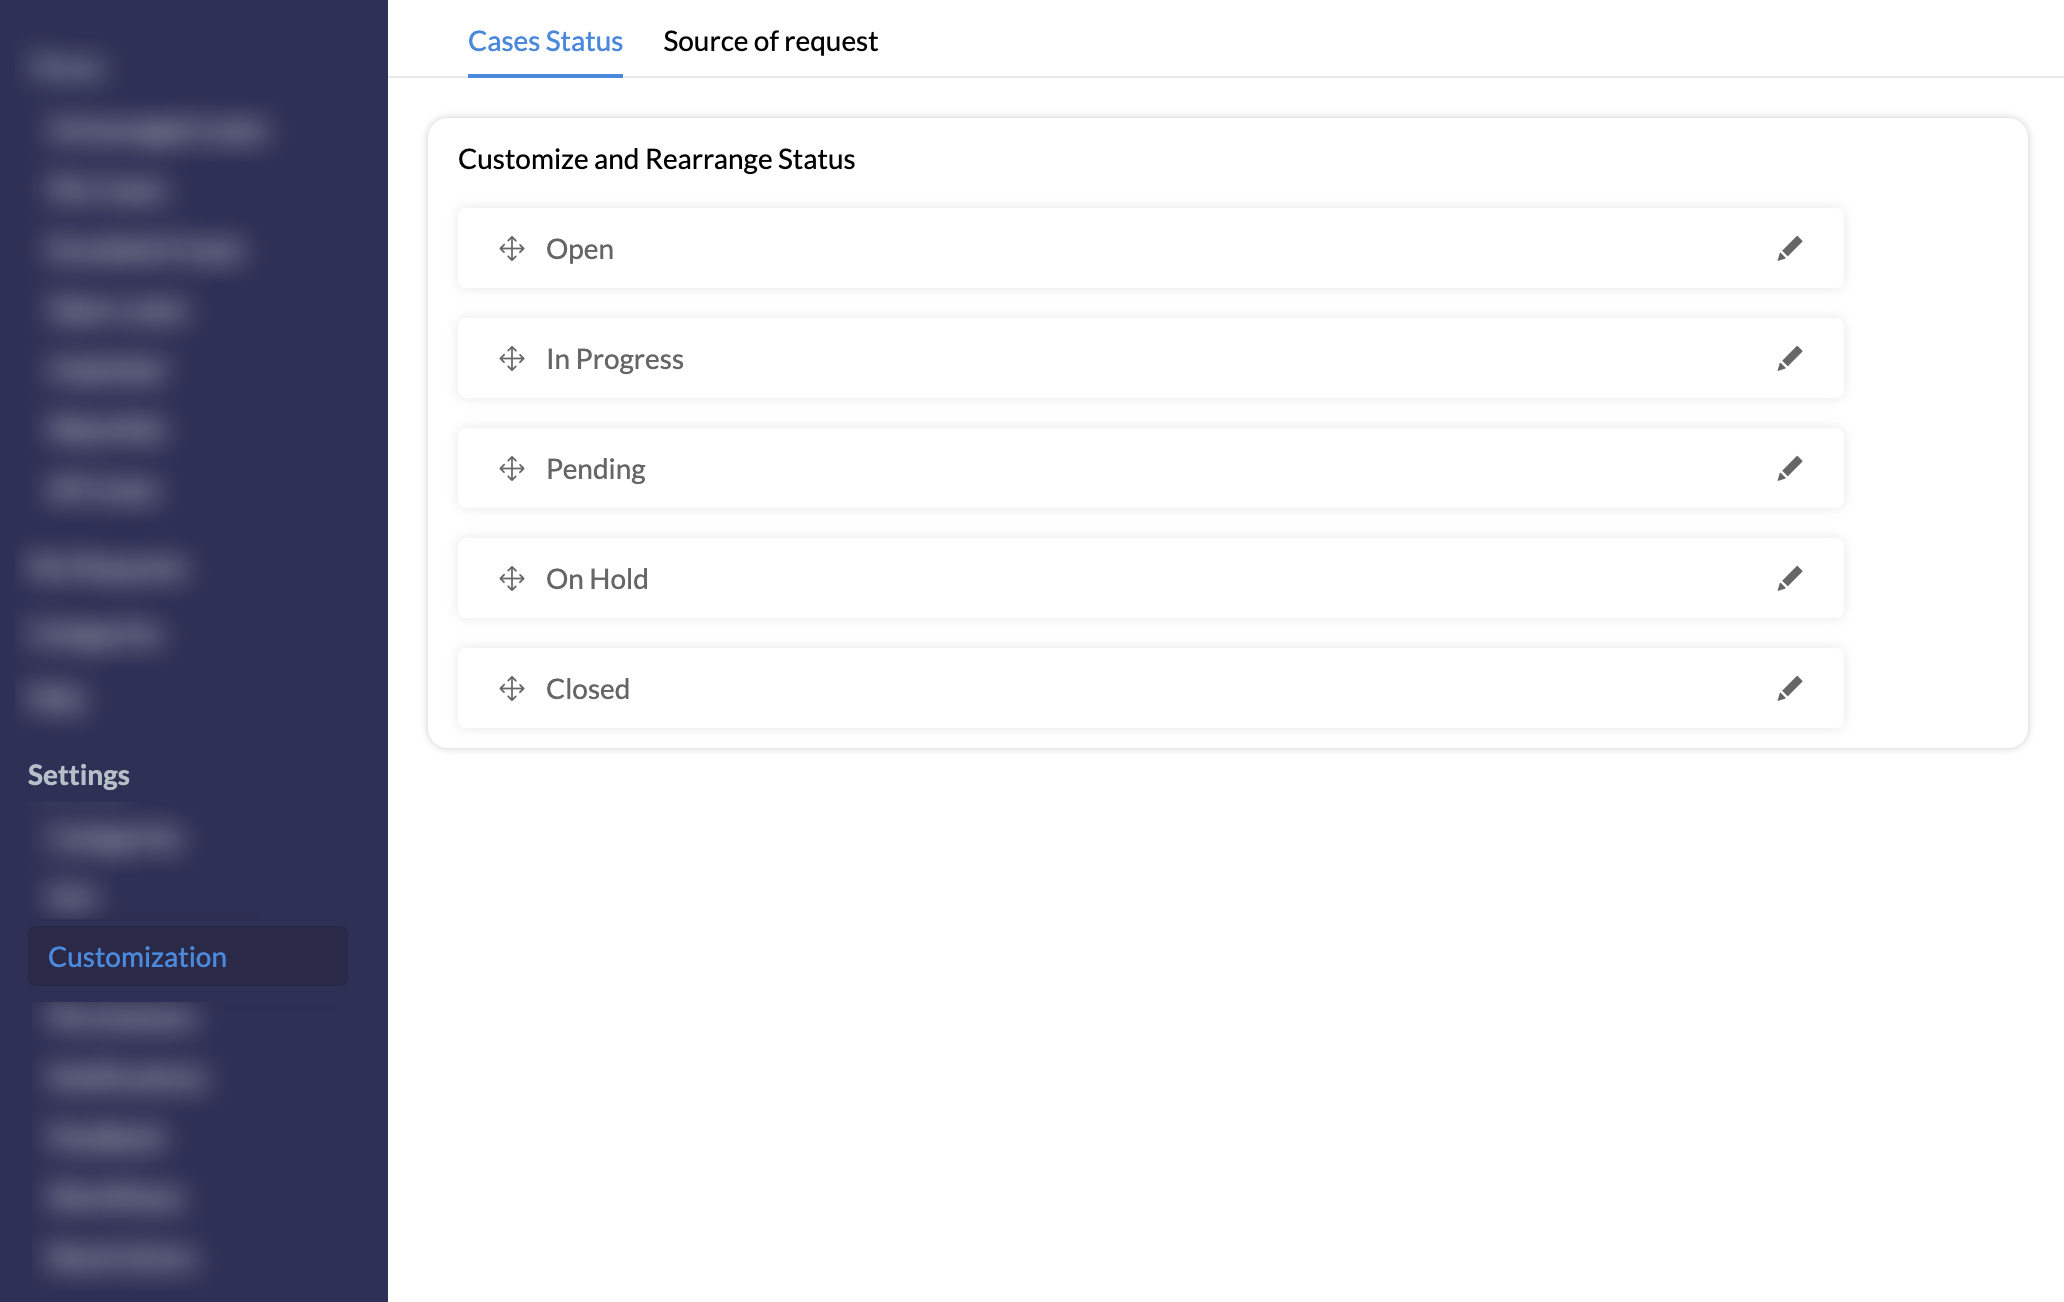
Cases Customization
There are two customizations options available within the cases feature, they are:
- Cases Status Customization
- Source of Request Customization
Navigate to Cases > Settings > Customization
Select Cases Status tab or Source of Request tab to customize as required
There are a total of 5 case statuses, and 5 sources predefined. The status and sources texts can be edited and rearranged as per requirement.
To edit a status text or source text, simply hover your pointer over the text you would like to edit, click on the pencil edit icon to the right to edit status. To rearrange use the drag and drop icon.
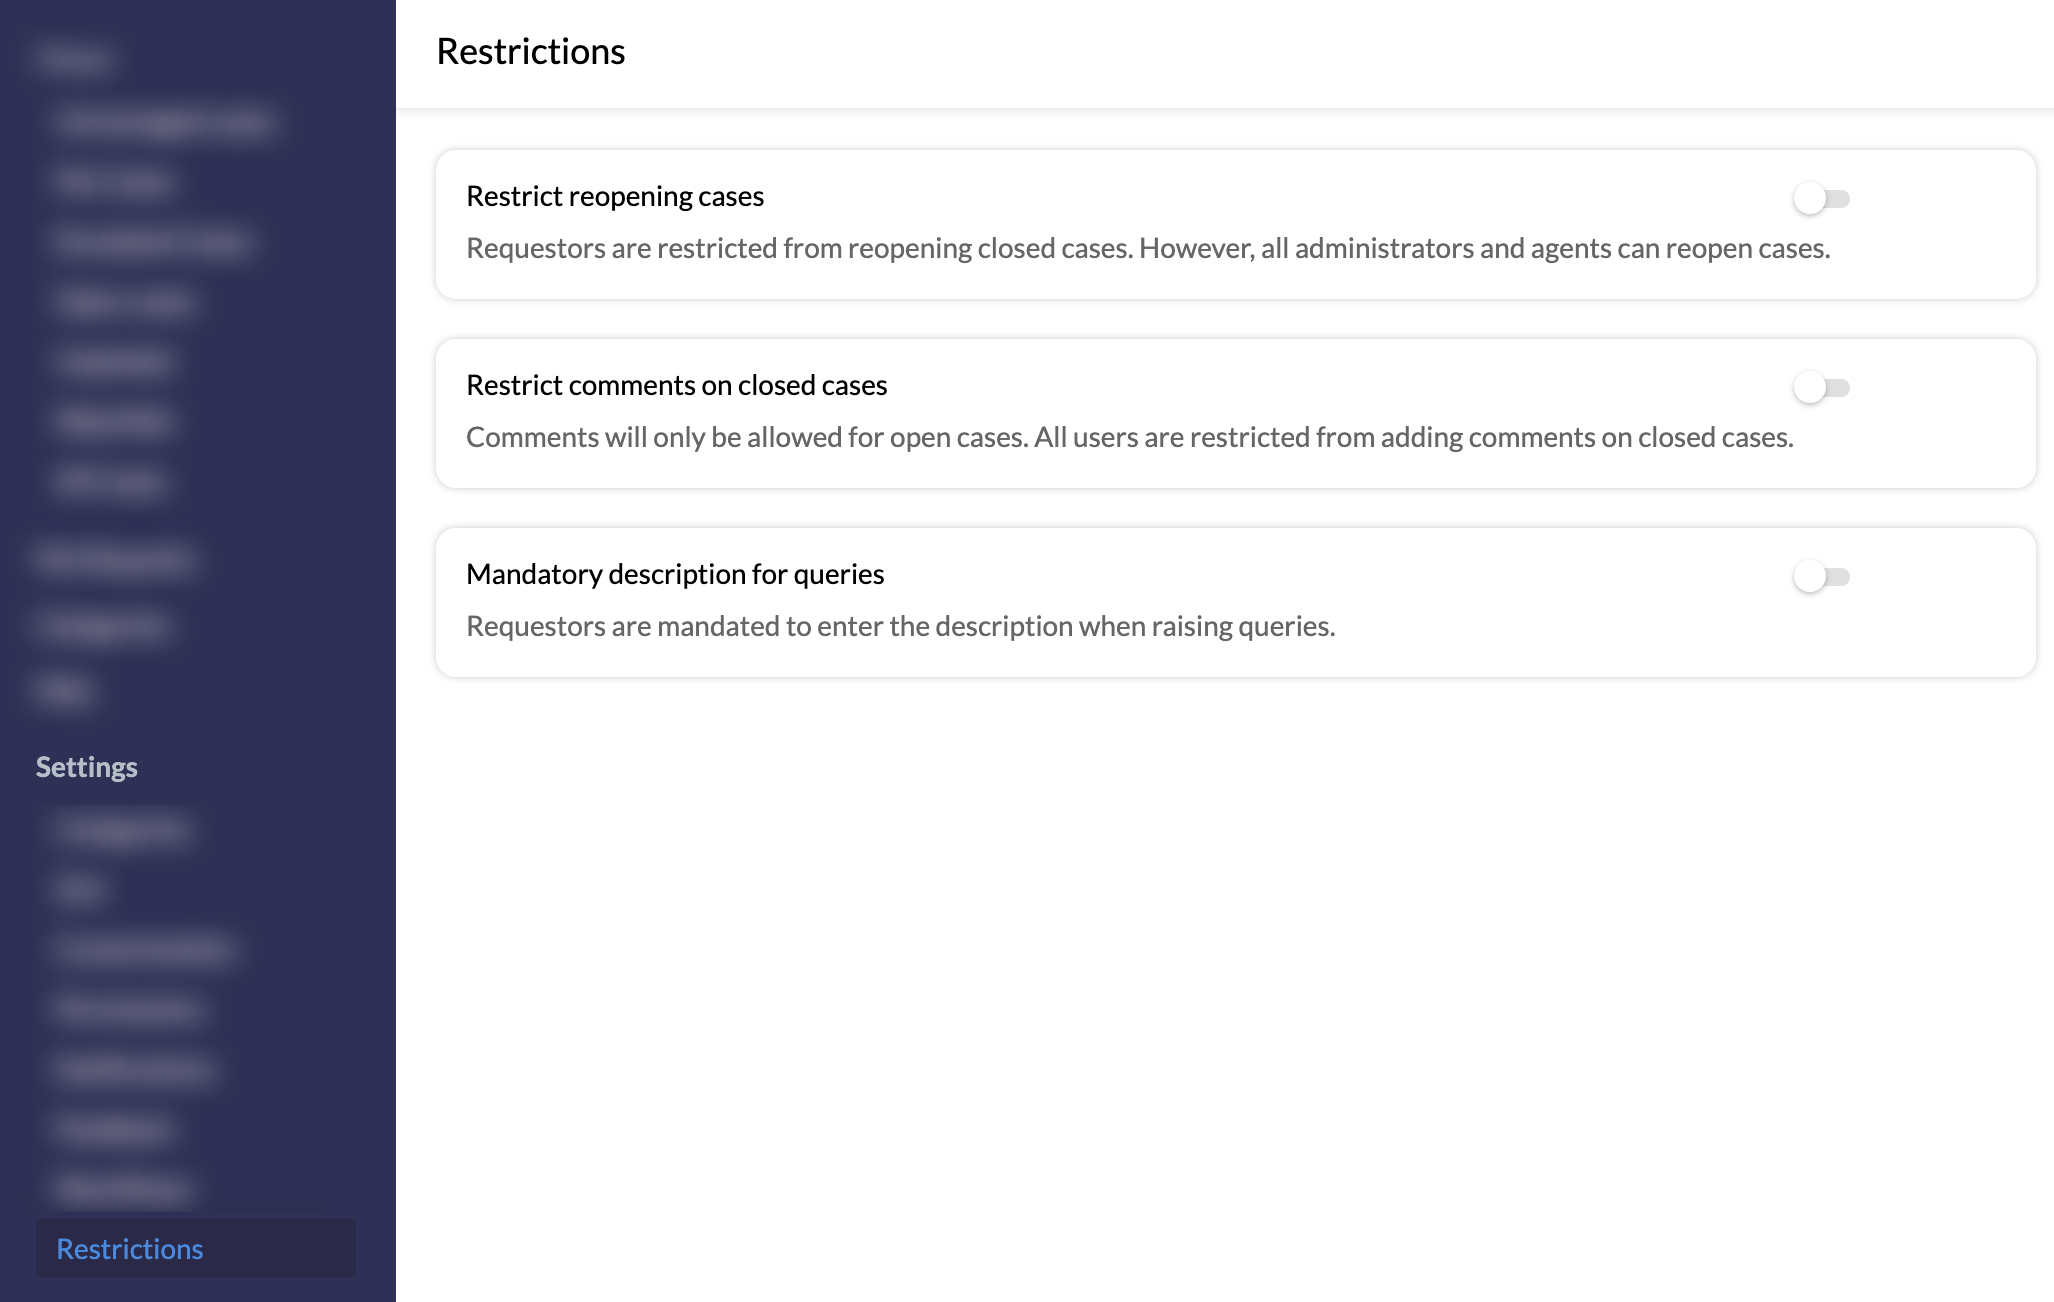
Cases Restrictions
The options listed in Settings > Restrictions can be used to disallow requestors from reopening closed cases, and to also restrict comments on closed cases. Additionally, descriptions can be made mandatory for query submissions.
Notifications in Cases
These notifications can be sent out as Mail Alerts in Cases to inform, intimate or remind agents or requesters of a case.
Go to Cases > Settings > Notifications to enable or disable these notifications as per your requirement.
There are two types of notifications available:
Agent notifications
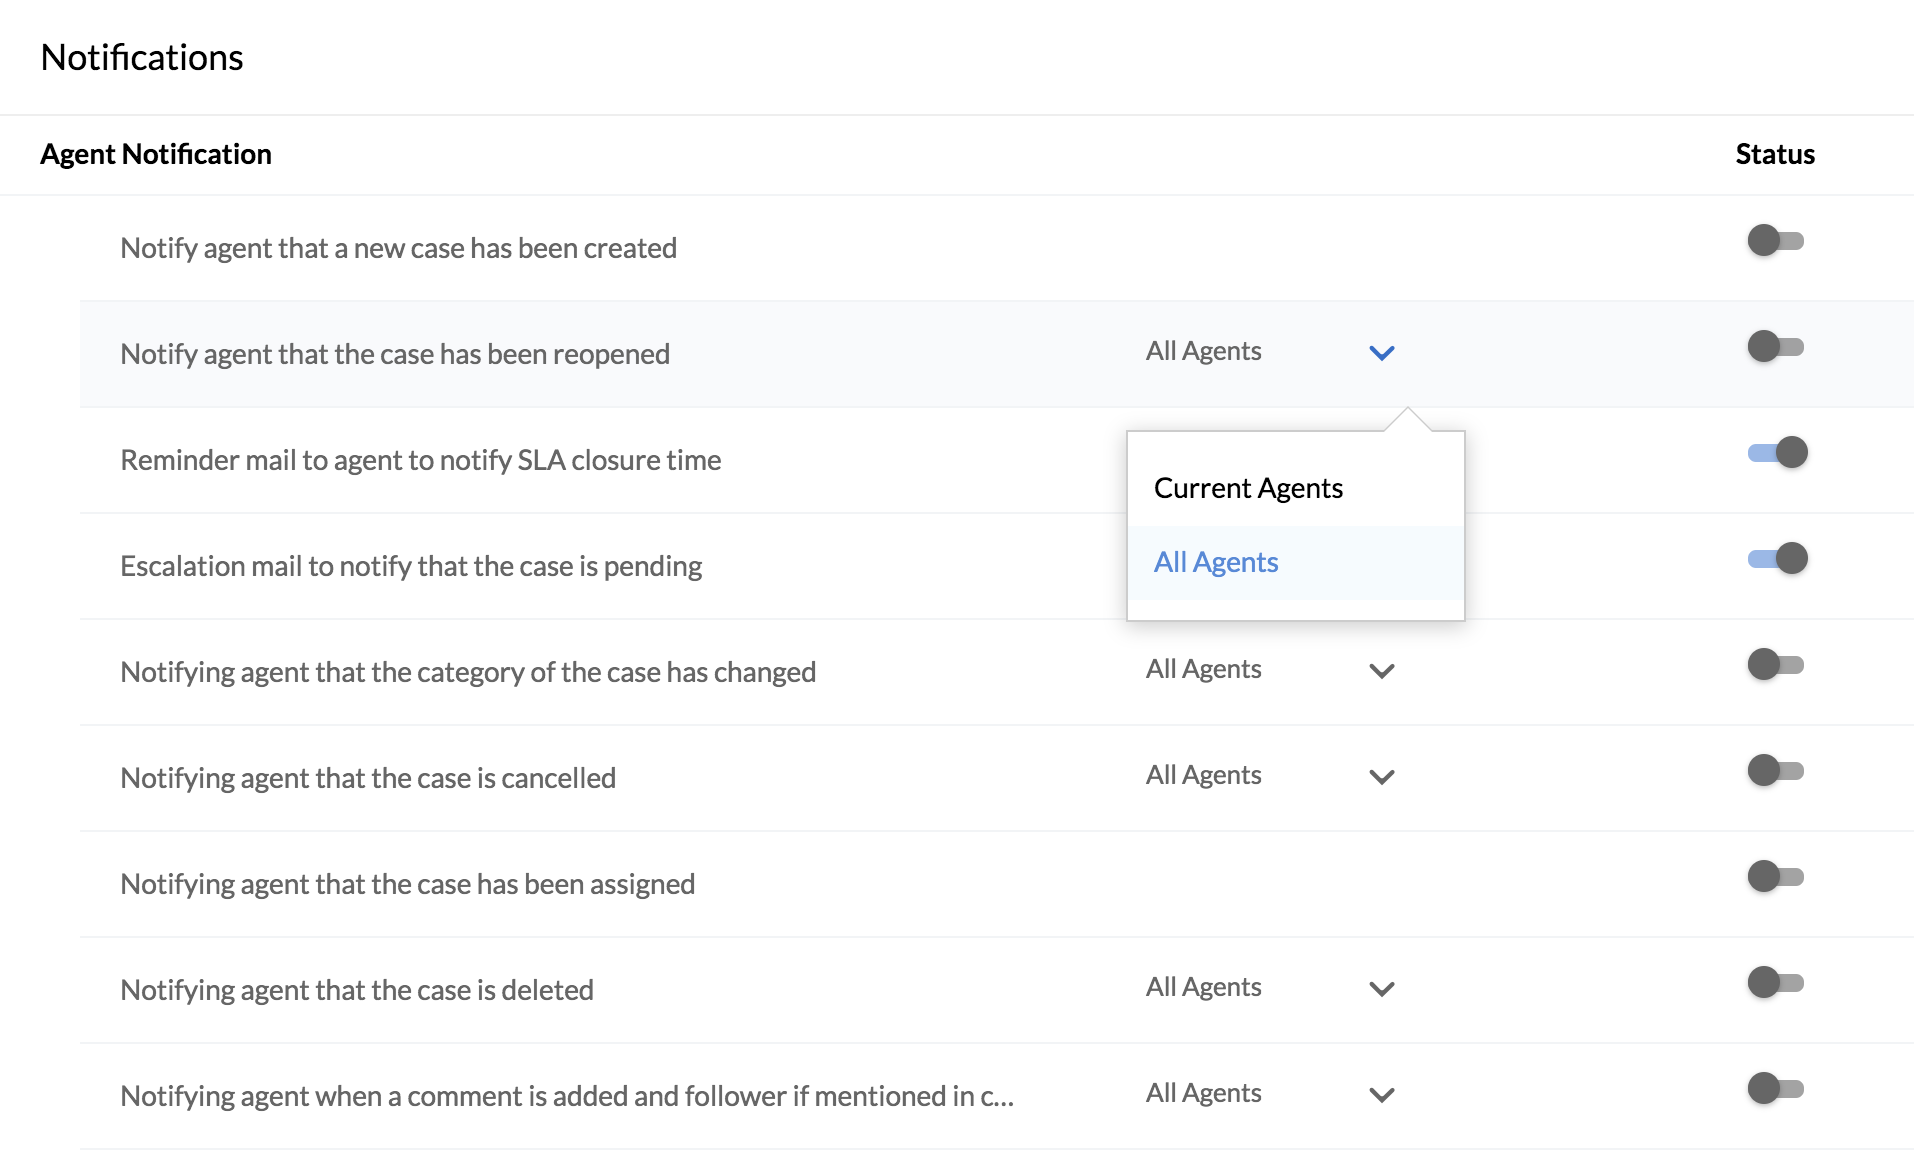
Under agent notifications, you can select if the notification should go to the current agent or all agents (of a group or department).
User notifications

To edit a notification, click on it and make the changes.
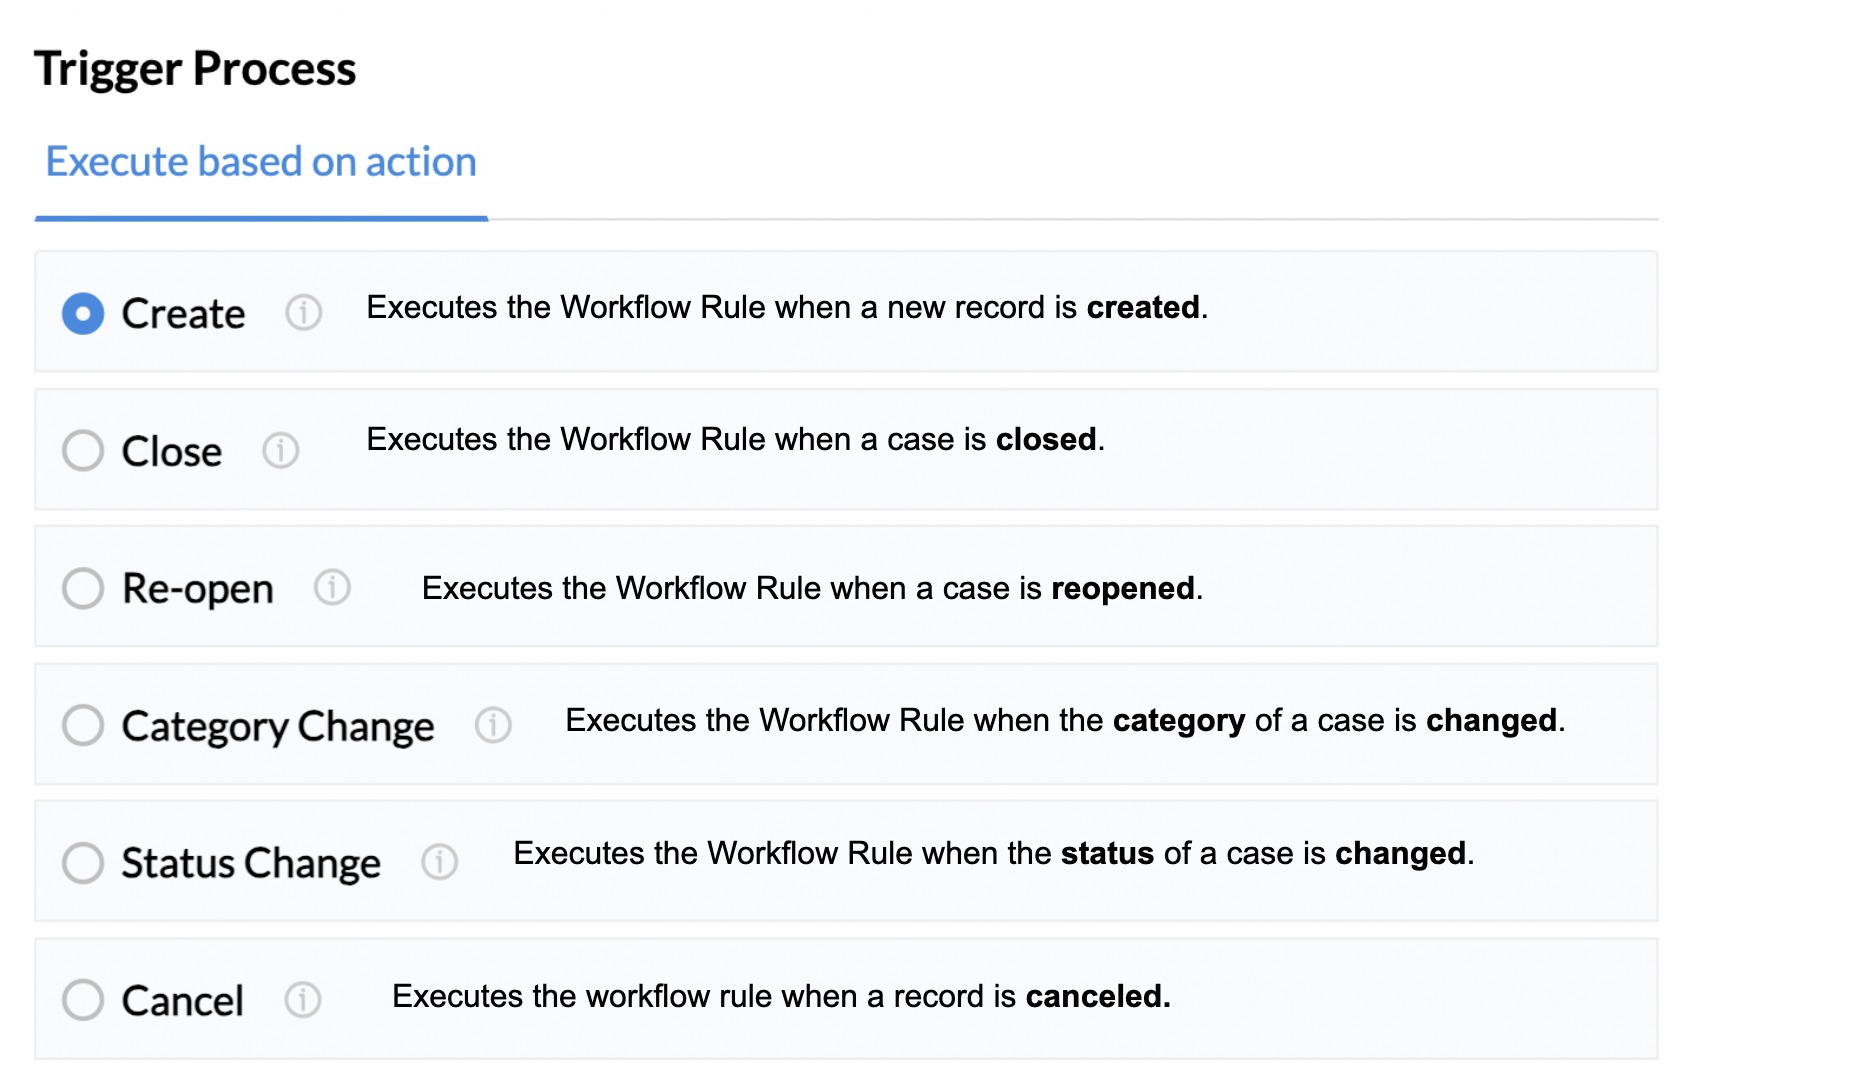
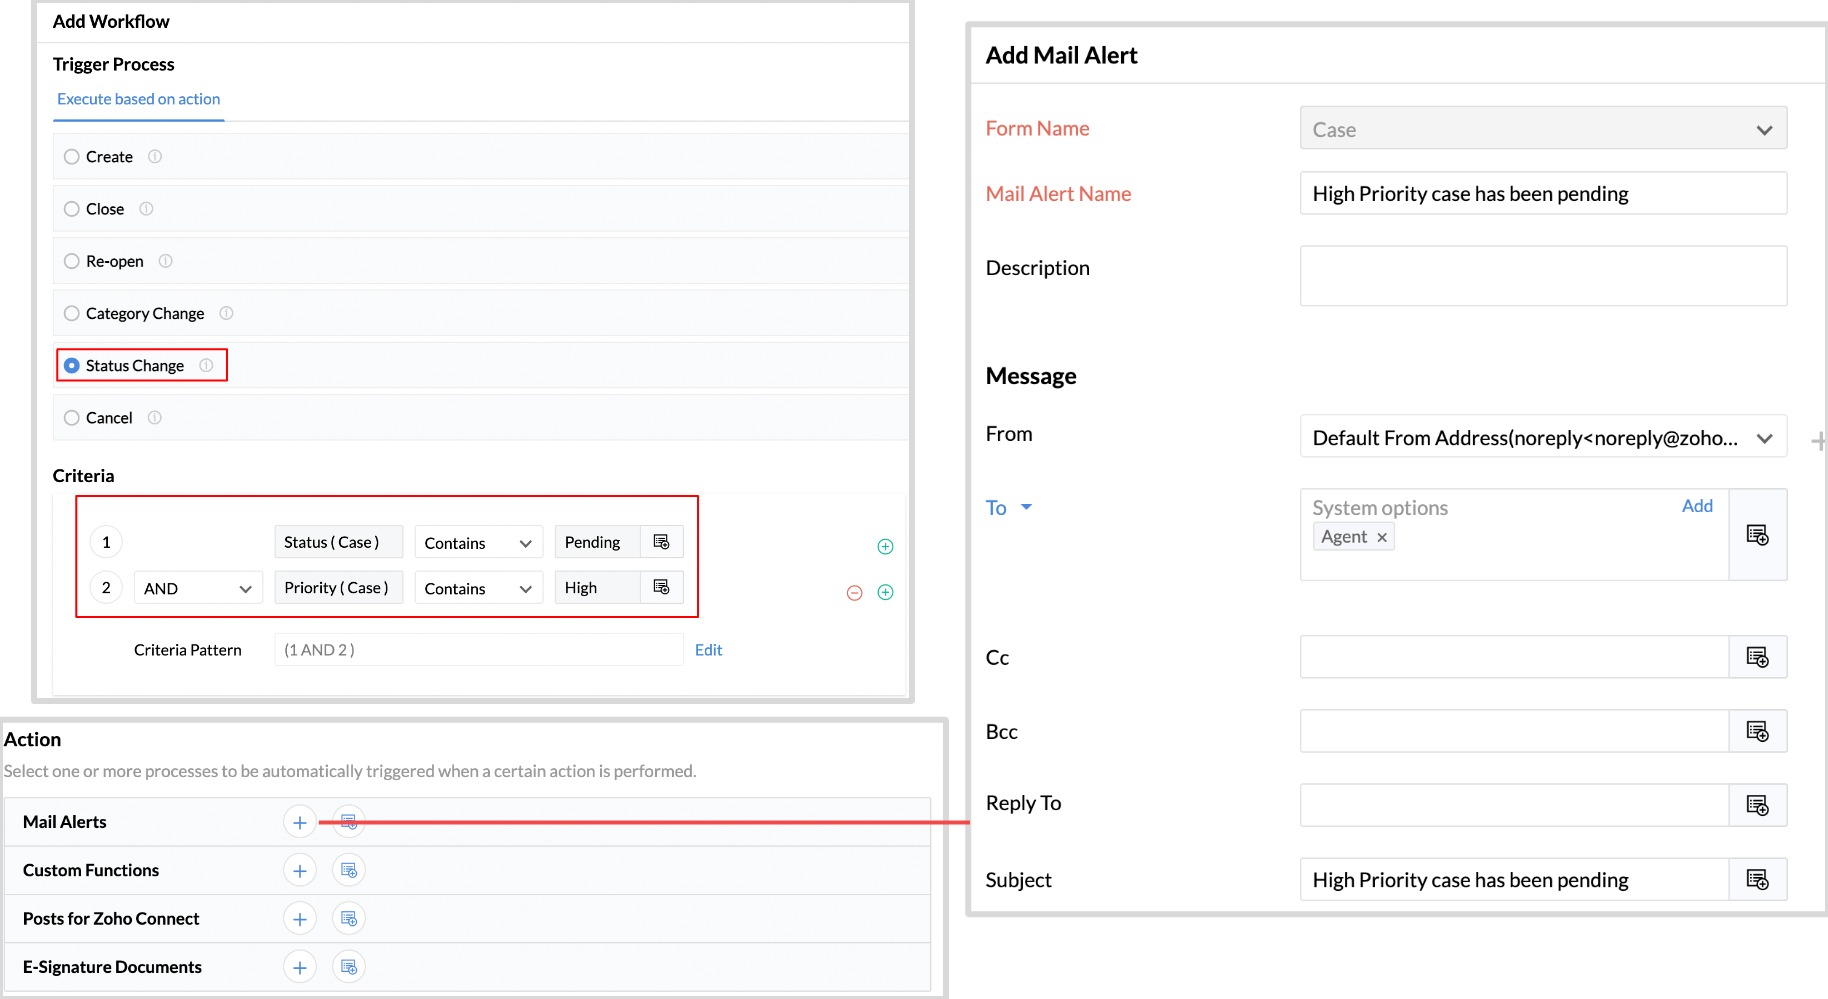
Steps involved in creating a Workflow for Cases
To set up a workflow for Cases, Navigate to Cases > Settings > Workflows > Add Workflow
- Fill in the basic information, such as the name, description, and set status.
Configure the trigger process. (For example, you can trigger a workflow when a case is re-opened, or the status is changed to either pending, in progress, on hold, etc)
Configure the criteria as required. For example, you can configure the workflow criteria as pending case status.
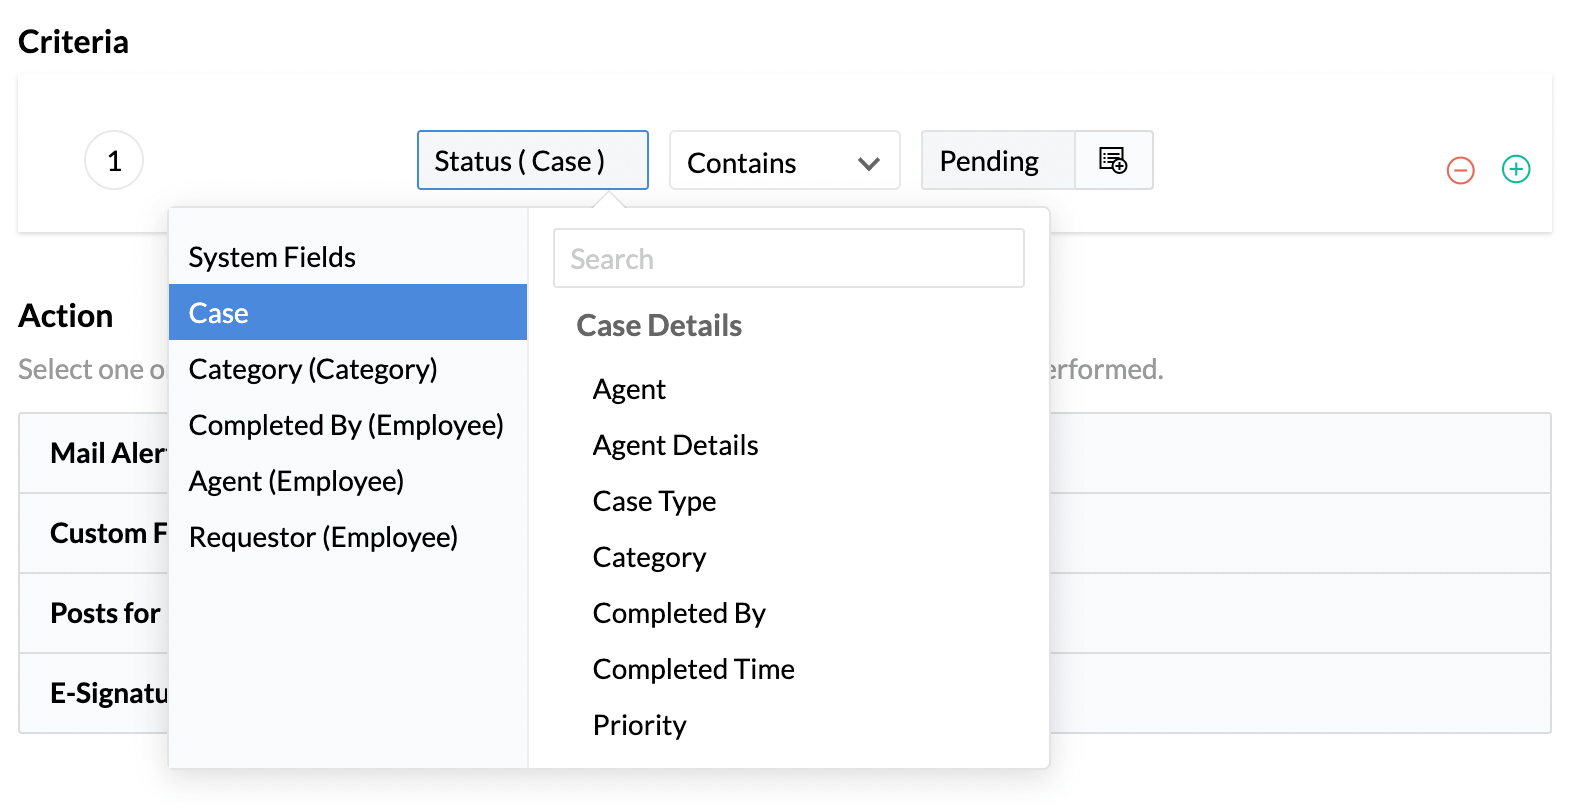
Finally configure the action. For example, you can configure a mail alert that will be sent automatically when the criteria are met. The screenshot below shows a workflow where the agent is notified via email when a high-priority case status has been changed to pending. This will ensure that the agent takes swift action.


Click this link to learn more about: Workflows.