

Creating an Invoice
You can create invoices in Zoho Invoice either by importing them from other systems or by creating them manually.
Create from the Invoice Module
Go to Invoices in the left sidebar or press shift + i to open the Invoices module.
Click the + New button or press c + i to create a new invoice.
Select a customer from the Customer Name dropdown menu. If this customer is not listed, you can add them to your contacts by clicking + New Customer and filling in the details.
Check the auto-generated Invoice# or enter an invoice number manually, Click the Gear icon to change the prefix of the auto-generated invoice number or the change the setting to manually enter the invoice number each time.
Enter an Order Number for the invoice.
Select the date on which you’re raising the invoice.
Select the Terms of payment for the invoice from the Due on Receipt dropdown menu. You’ll find the following options:
- Net 15, 30, 45, 60: means that the outstanding amount of the invoice must be paid by the customer within 15, 30, 45 or 60 days.
- Due end of the month: means that the outstanding amount of the invoice must be paid by the customer by the end of the current month.
- Due end of next month: means that the outstanding amount of the invoice must be paid by the customer by the end of next month.
- Due on receipt: means that the outstanding amount on the invoice must be paid on the same day.
- Custom: Choose this option and select a date, if you want to set a custom due date.
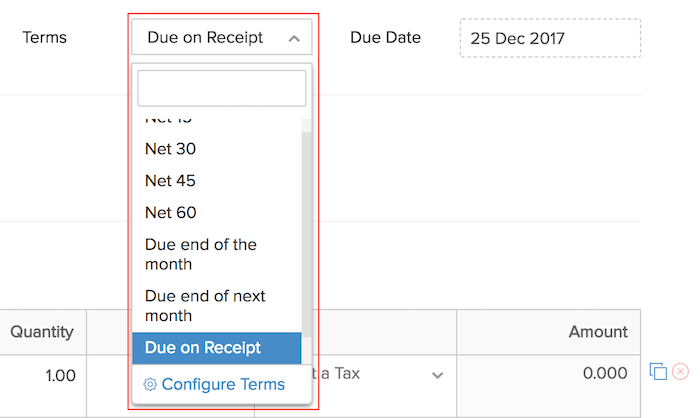
Pro Tip: You can configure the options available in the dropdown and add other options to the payment terms. Click Configure Terms and configure the pre-configured terms.
- Click the Salesperson dropdown to associate this invoice to a salesperson from your organization who would have handled this sale. Click Manage Salespersons in the dropdown menu to add salespersons to the list.
- Type or select an item in the Item Details table from the list of items in the dropdown menu. If this items has not been added to Zoho Invoice before, click + Add New Item in the dropdown menu and add it.
Insight: Adding items to Zoho Invoice and including them in the invoice allows you to track and view the item information in reports.
- Enter the quantity of items that you’re selling.
- Select a tax, if applicable.
- Enter the Discount amount or percentage depending on your choice.
- Enter any amount that you want to adjust from the total in the Adjustment field. You can use this field to round-off the total amount or make any needed change in the total amount. You can edit and change the field name too to suit your need.

Pro Tip: If you’ve created Billable Expenses and Projects for a customer, you can include them in the invoice while invoicing them. This enables you to consolidate all the items that you need to charge your customer into a single invoice instead of sending multiple invoices.
- Enter any specific notes that you’d like to share with your customer.
- Enter the Terms & Conditions related to the sale of goods or services.
- (Optional) Click the Upload File dropdown to attach files to the invoice.
- Select Attach from Desktop to upload a file from your device.
- Select Attach from Cloud to upload a file from online drives.
- Select an online payment option from the available of payment gateways.
- Mark Allow customer to make partial payments for this invoice if you want to enable partial payments.
- Mark I have received the payment if you’ve received the payment when you’re creating this invoice. Then, select the Payment Mode and enter the amount in the table that appears. If the customer used multiple payment methods, click + Add Split Payment to split the payment. The invoice will be saved as Paid.
Note: Split Payment feature is available only in India, United States, United Kingdom, Canada, Australia, Kenya, Germany, Mexico, South Africa editions of Zoho Invoice.
- If you want to convert this invoice to a recurring invoice, click Make Recurring at the bottom right of the creation page.
- Click Save and Send to send the invoice to your customer as an email immediately.
- Click Save as Draft to save the invoice as a draft. This allows you to edit and send it later.
- Or, click the Save and Send dropup menu and select Save and Share or Save and Print or Save and Send later to schedule and send it.
Now, you would have created an invoice. As soon as you send the invoice, a corresponding email will be sent and the invoice will be available in the customer’s customer portal.
Create from a Quote
If you have created a quote for a customer, you can convert the quote to an invoice and send the invoice to your customer. This means that you don’t have to create invoice separately. Instead, you can convert the already issued quote to an invoice. Learn more about creating an invoice from a quote.
Create from a Customer
Alternatively, you can create an invoice directly for a customer from the Customers module.
To create an invoice for a customer:
- Go to Customers in the left sidebar.
- Select a customer for whom you want to create an invoice.
- Click the New Transaction dropdown menu and select Invoice.
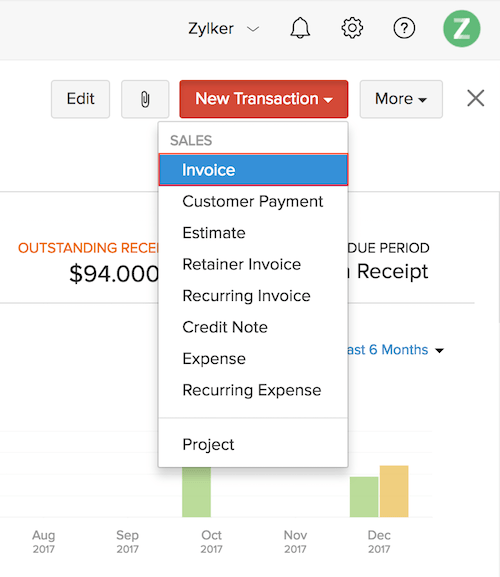
- Enter the relevant information and click Save and Send to send it to your customer.
Create from a Project
If you charge your customers based on the time spent on a work, you can track their time by creating a project in the Timesheets module. You can create an invoice from within a project and include the tasks from the project to the invoice. Learn more.
Importing Invoices
If you have invoices in your previous invoicing system, you can import them into Zoho Invoice instead of creating them manually.
To import invoices:
- Go to Invoices in the left sidebar or press shift + i to instantly navigate to the Invoices module.
- Click the More icon and select Import Invoices or simply press alt + i to import invoices.
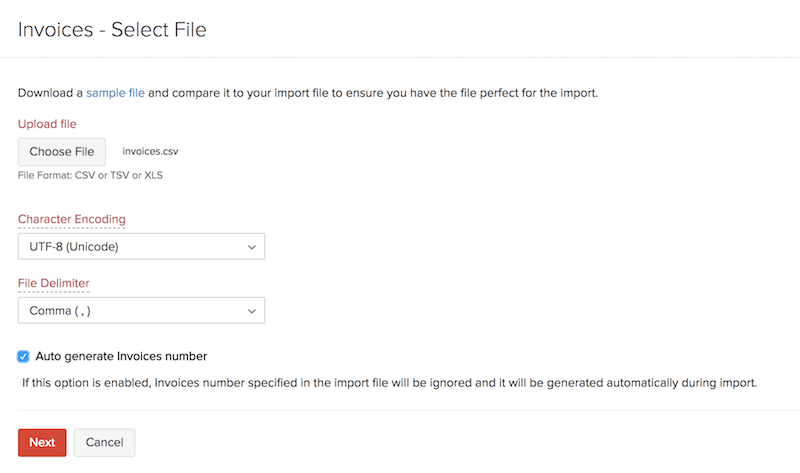
- Download the sample file and compare it with your file. Make sure that the format in your file is similar to the sample file.
- Click the Choose File button and select the import file from your device.
- Choose whether to skip or overwrite duplicate invoices. Duplicate invoices will be identified based on the invoice number.
- Select the Character Encoding based on your import file. By default, UTF-8 (Unicode) is selected.
- Choose the appropriate File Delimiter.
- Check the Auto Generate Invoice Number option to generate new invoice numbers for the imported invoices.
Insight: File Delimiter refers to the character that is used to separate the values in the import file.
- Click Next.
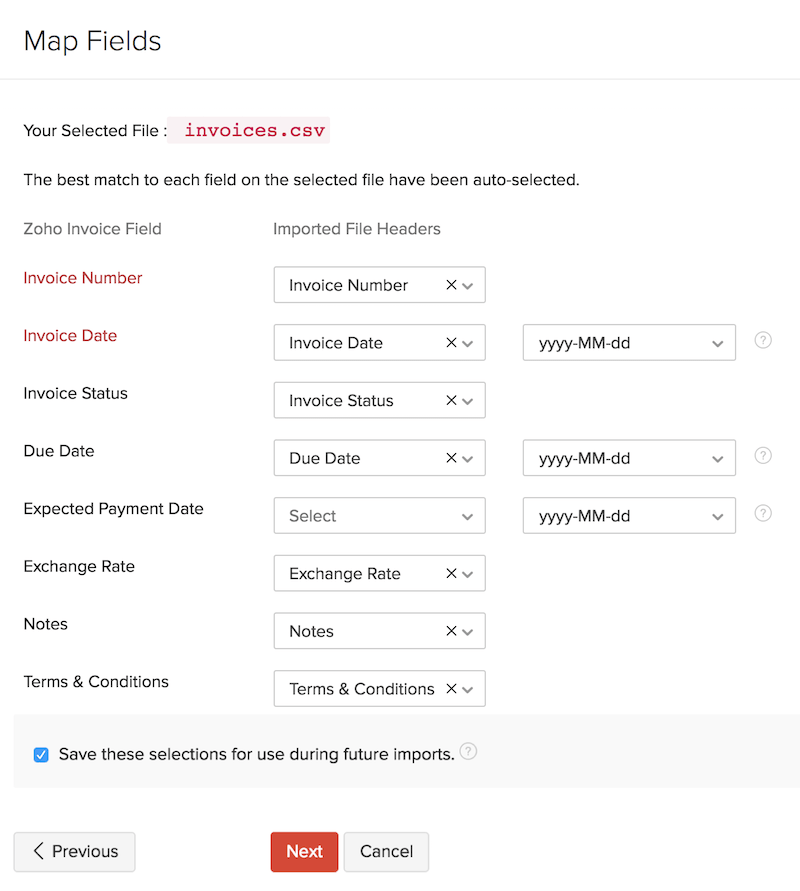
- The field names of Zoho Invoice are listed on the left side and the field names in the import file are listed on the right side.
- Match the field names appropriately.
- Check the Save these selections for use during future imports. option if you wish to use the same mapping of fields in future imports.
- Click Next.
- You can see the status of all the Invoices that are ready to be imported, skipped and the Unmapped Fields. If there are invoices that are being skipped, edit the import file and repeat the steps above.
- Click Import.
Now, the invoices in the import file will be imported into the Invoices module of Zoho Invoice.
Customizing Invoices
All the invoices that are created use a template to display its information. You can customize the way invoice information is displayed by customizing the templates.
To customize the invoice template directly from the Invoices module:
- Go to Invoices in the left sidebar.
- Select the invoice you want to customize.
- Hover your mouse cursor over the invoice and click the Customize dropdown menu in the top-right corner of the invoice.
- Select Change Template to select another template from the existing gallery of invoice templates. By default, Standard template is used for all the invoices you create. Zoho Invoice provides a collection of templates from which you can select one that suits your business needs. Also, you can associate a specific template to a customer and it will be used every time you send an invoice. Learn more about associating a template to a customer.
- Select Edit Template and click Continue to customize the current template. The customizations you make will be reflected in all the invoices that use this template. Learn more about editing templates.
- Select Update Logo & Address, upload the logo and enter your organization address. Click Save in the pop-up to quickly update them in the invoice.
- Select Manage Custom Fields to add or edit invoice custom fields. Selecting this option will redirect you to the invoice custom fields page. Learn more about Custom Fields.
Editing an Invoice
To edit an invoice:
- Go to Invoices in the left sidebar.
- Select the invoice you want to edit.
- Click the Edit icon at the top.
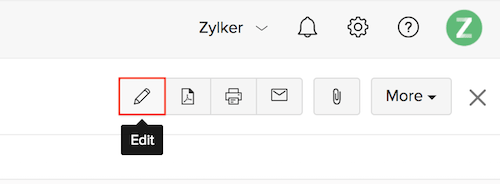
- Edit the invoice and click Save or Save and Send to send a copy of the edited invoice to the customer.
Insight: If you edit an already sent invoice, make sure to send the edited invoice again to your customer to reflect the changes.
 Yes
No
Yes
No
Thank you for your feedback!
You might also find these helpful
Send Invoice to Customer
Share the created invoices with your customers to request payment and maintain clear financial records.
Online Payments - Overview
Receive payments from customers quickly and securely by integrating with popular payment gateways.
Reminders
Set manual and automatic payment reminders to notify customers of upcoming or overdue invoices and ensure timely payments.